Használati útmutató Atdec TH-CM-SH-2
Atdec
Lapos panel támogatás
TH-CM-SH-2
Olvassa el alább 📖 a magyar nyelvű használati útmutatót Atdec TH-CM-SH-2 (2 oldal) a Lapos panel támogatás kategóriában. Ezt az útmutatót 4 ember találta hasznosnak és 2 felhasználó értékelte átlagosan 4.5 csillagra
Oldal 1/2
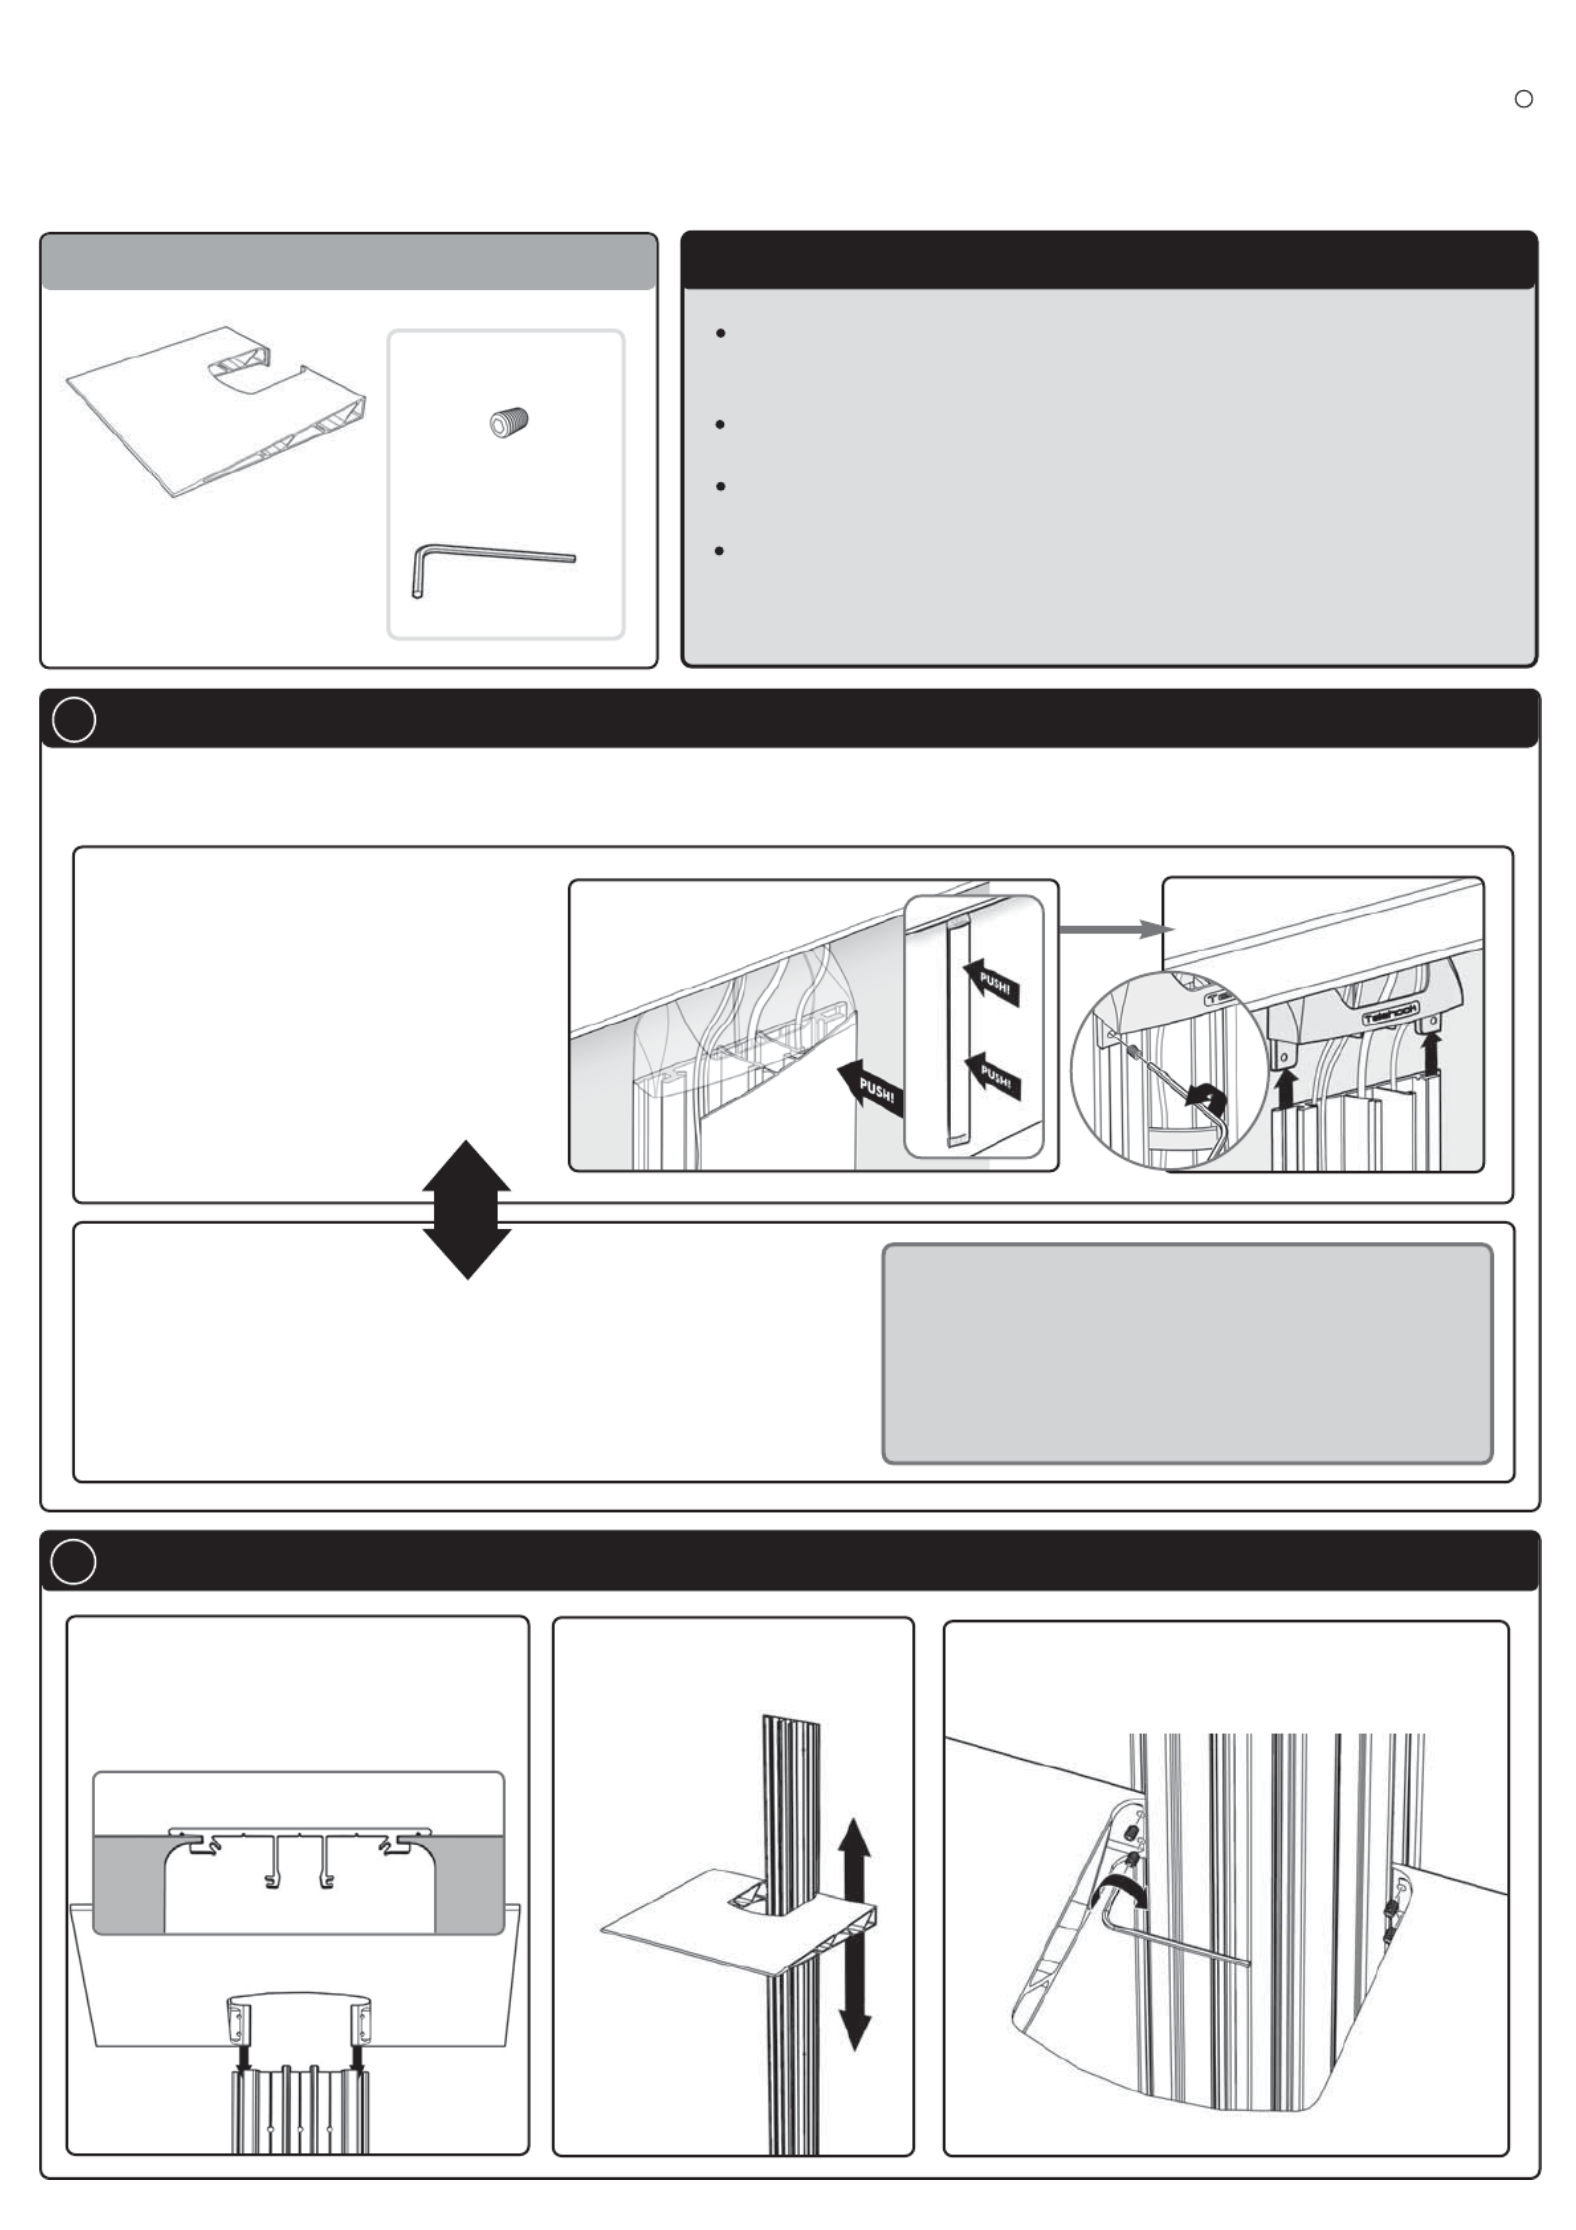
Shelf (x2)
TM
Component Checklist
Installation Instructions
TELEHOOK
Cable Manager Shelf System
Bits Bag
A Installation Options
M4 x 5mm Grub
Screw (x8)
2mm Allen Key
Check you have received
all parts against the
Component Checklist
If you already have the
Telehook Cable Manager
installed.
Begin by removing the Front Fascia and
the End Caps as shown. Once
complete, continue to step B below.
Option 1
If you are installing both
the Telehook Cable Manager and Telehook Cable
Manager Shelf System at the same time.
Begin by mounting the Wall Plate as shown in step A on the
Telehook Cable Manager Installation Instructions. Once complete,
continue to step B below.
Option 2
If your display is already wall mounted, depending on its position, it may be best to remove the display,
as it may interfere with the installation of the Telehook Cable Manager and Cable Manager Shelf System.
B Installing Telehook Cable Manager Shelves
Push one edge of the
Front Fascia until it
pops open
B.1.
Slide the Cable Manager Shelf
onto the Cable Manager Wall
Mount
Adjust the Cable Manager
Shelf to the
desired height
B.2.
Secure in place using the M4 Grub Screws and
the 2mm Allen Key supplied
B.3.
Remove End
Caps
Note:
If the mounted height of the display is
less than the length of the Telehook
Cable Manager, you may need to reduce
the length by cutting it to size.
(Consult a professional at this stage)
TOP VIEW
The Telehook Cable Manager Shelf System MUST be used in
conjunction with the Telehook Cable Manager.
Each Telehook Cable Manager is limited to a maximum of 4 Shelves.
Each Shelf supports a maximum weight of 20kgs (44lbs).
If you wish to paint your Cable Manager Shelves, please consult your
paint specialist for advice.
IMPORTANT NOTES
OR
Due to continuing product development, the manufacturer reserves the right to alter specifications without notice. Published: 24.09.07©
C Install your Equipment
Install or reinstall your display
Place your Audio/Video equipment on the Telehook Cable Manager Shelves
Connect all required cables to Audio/Video equipment
D Installing Cables
Display on
wall mount
bracket
Wall Plate
Install the display’s cables into the left,
right and centre cable bays as shown
E Insert Cable Clips
Cable
Tab
F Attach End Caps
TOP VIEW
Attach an End Cap onto
both ends of the Wall
Plate and secure in place
using the M4 Grub
Screws as shown.
NOTE:
If possible, separate the display’s
power cable from the data cables
(i.e. hi-fi & speaker cables) by
installing them into separate cable
bays. This will reduce the chance of
electromagnetic interference. The
diagram to the right shows an
example installation setup.
Left cable bay
Centre cable bay
(best for display power cable)
Right cable bay
Data cables
(can also be installed
into the same bay)
TOP VIEW
Using two hands,
flex the End Cap
around the
display’s cables
and manoeuvre
them into their
corresponding End
Cap Cable Bay
End Cap Cable Bay
E.2.
Twist the Cable
Tabs into the small
slots in the Wall
Plate
Display Power
cable
2mm
Allen
Key
M4
Grub
Screw
WARNING: DO
NOT OVER TIGHTEN
G Insert Front Fascia
G.2.
Partially insert the front
fascia as shown above
TOP VIEW
G.3.
Push the edge of the
Front Fascia until it
snaps into place
G.4.
Repeat G.3.
down the
length of the
Front Fascia
until it is firmly
secured onto
the Wall Plate
A
B
Installation Complete
Shelf
G.1.
Slide the Front
Fascia through the
cut outs in the
Shelves
Insert the Cable Tabs into
the Wall Plate to Secure
Cables in place.
If required, cables can exit
from the side of the Cable
Manager. In this case, use
the left or right cable bays
only.
Cables exiting from the side
E.1.
Using your
thumb and
index finger,
flex the Cable
Tab into a
concave shape
Termékspecifikációk
| Márka: | Atdec |
| Kategória: | Lapos panel támogatás |
| Modell: | TH-CM-SH-2 |
Szüksége van segítségre?
Ha segítségre van szüksége Atdec TH-CM-SH-2, tegyen fel kérdést alább, és más felhasználók válaszolnak Önnek
Útmutatók Lapos panel támogatás Atdec

7 December 2024
7 December 2024
7 December 2024
19 Augusztus 2024
19 Augusztus 2024
19 Augusztus 2024
18 Augusztus 2024
18 Augusztus 2024
18 Augusztus 2024
18 Augusztus 2024
Útmutatók Lapos panel támogatás
- Lapos panel támogatás Samsung
- Lapos panel támogatás Marantz
- Lapos panel támogatás Pioneer
- Lapos panel támogatás StarTech.com
- Lapos panel támogatás Sven
- Lapos panel támogatás HP
- Lapos panel támogatás BenQ
- Lapos panel támogatás HQ
- Lapos panel támogatás Fellowes
- Lapos panel támogatás Digitus
- Lapos panel támogatás My Wall
- Lapos panel támogatás Insignia
- Lapos panel támogatás Crimson
- Lapos panel támogatás V7
- Lapos panel támogatás GPX
- Lapos panel támogatás Proaim
- Lapos panel támogatás Hitachi
- Lapos panel támogatás Kanto
- Lapos panel támogatás Ewent
- Lapos panel támogatás Konig & Meyer
- Lapos panel támogatás Mount-It!
- Lapos panel támogatás Sanus
- Lapos panel támogatás Atlantic
- Lapos panel támogatás Manhattan
- Lapos panel támogatás Kogan
- Lapos panel támogatás Ultimate
- Lapos panel támogatás One For All
- Lapos panel támogatás Peerless-AV
- Lapos panel támogatás Abus
- Lapos panel támogatás Iiyama
- Lapos panel támogatás Chief
- Lapos panel támogatás AKAI
- Lapos panel támogatás Konig
- Lapos panel támogatás 3M
- Lapos panel támogatás Pyle
- Lapos panel támogatás NEC
- Lapos panel támogatás Siig
- Lapos panel támogatás Panduit
- Lapos panel támogatás Equip
- Lapos panel támogatás Luxor
- Lapos panel támogatás Valueline
- Lapos panel támogatás Gabor
- Lapos panel támogatás Anthro
- Lapos panel támogatás Schwaiger
- Lapos panel támogatás Multibrackets
- Lapos panel támogatás Planar
- Lapos panel támogatás Speaka
- Lapos panel támogatás Newstar
- Lapos panel támogatás Vogel's
- Lapos panel támogatás Heckler
- Lapos panel támogatás Acco
- Lapos panel támogatás Reflecta
- Lapos panel támogatás Icy Box
- Lapos panel támogatás SilverStone
- Lapos panel támogatás Vision
- Lapos panel támogatás Kensington
- Lapos panel támogatás Nabo
- Lapos panel támogatás Techly
- Lapos panel támogatás BlueBuilt
- Lapos panel támogatás Da-Lite
- Lapos panel támogatás Steren
- Lapos panel támogatás Barkan
- Lapos panel támogatás InFocus
- Lapos panel támogatás Metronic
- Lapos panel támogatás Ematic
- Lapos panel támogatás Apart
- Lapos panel támogatás BakkerElkhuizen
- Lapos panel támogatás Wentronic
- Lapos panel támogatás Peerless
- Lapos panel támogatás SMS Smart Media Solutions
- Lapos panel támogatás Monoprice
- Lapos panel támogatás Erard
- Lapos panel támogatás Ergotron
- Lapos panel támogatás Premier
- Lapos panel támogatás Bell'O
- Lapos panel támogatás B-tech
- Lapos panel támogatás Premier Mounts
- Lapos panel támogatás Cabstone
- Lapos panel támogatás Elite Screens
- Lapos panel támogatás Kondator
- Lapos panel támogatás Bretford
- Lapos panel támogatás SmartMetals
- Lapos panel támogatás Unicol
- Lapos panel támogatás Zaor
- Lapos panel támogatás Dataflex
- Lapos panel támogatás CTA Digital
- Lapos panel támogatás Amer
- Lapos panel támogatás Avteq
- Lapos panel támogatás Walker Edison
- Lapos panel támogatás LTN Technologies
- Lapos panel támogatás Helder
- Lapos panel támogatás NeoMounts
- Lapos panel támogatás ViewZ
Legújabb útmutatók Lapos panel támogatás
8 Április 2025
3 Április 2025
3 Április 2025
3 Április 2025
3 Április 2025
3 Április 2025
3 Április 2025
3 Április 2025
3 Április 2025