Használati útmutató MakerBot Method X
MakerBot
3D nyomtató
Method X
Olvassa el alább 📖 a magyar nyelvű használati útmutatót MakerBot Method X (28 oldal) a 3D nyomtató kategóriában. Ezt az útmutatót 10 ember találta hasznosnak és 2 felhasználó értékelte átlagosan 4.5 csillagra
Oldal 1/28

USER MANUAL FOR
METHOD AND METHOD X

MA KE RB O T MET HO D M AN UAL PAG E 2
CHAPTER 1
WELCOME
Welcome to the User Manual for the MakerBot® Method™ Series 3D Printers.

MA KE RB O T MET HO D M AN UAL PAG E 3
LEGAL NOTICES
LIMITED WARRANTY
The MakerBot Limited Warranty (available at makerbot.com/legal) applies to the MakerBot
Method 3D Printer.
OVERALL PROVISIONS
All information in this user manual (“ ”) is subject to change at any time without notice Manual
and is provided for convenience purposes only. MakerBot Industries, LLC and our respective
aliates and suppliers (“MakerBot”) reserves the right to modify or revise this Manual in its sole
discretion and at any time and makes no commitment to provide any such changes, updates,
enhancements, or other additions to this Manual in a timely manner or at all. Contact the
MakerBot Support Team for up-to-date information. In order to protect MakerBot proprietary
and confidential information and/or trade secrets, this manual may describe some aspects of
MakerBot technology in generalized terms.
DISCLAIMERS
MakerBot does not warrant the accuracy or completeness of the information, products, or
services provided by or through this Manual and assumes no responsibility for any typographical,
technical, or other inaccuracies in this Manual, which is provided “as is” and without any
express or implied warranties of any kind, including warranties of merchantability, fitness for a
particular purpose, or non-infringement of intellectual property. In connection with your use of
this Manual, MakerBot shall not be liable to you for any damages whatsoever, be they direct,
economic, commercial, special, consequential, incidental, exemplary, or indirect damages, even if
MakerBot has been advised of the possibility of such damages, including without limitation, loss
of business revenue or earnings, lost data, or lost profits. MakerBot assumes no responsibility,
nor will be liable, for any damages to, or any viruses or malware that may infect, your computer,
telecommunication equipment, or other property caused by or arising from your downloading
of any information or materials related to this Manual. The foregoing exclusions do not apply to
the extent prohibited by law; please refer to your local laws for any such prohibitions. MakerBot
makes no warranties to those defined as “consumers” in the Magnuson-Moss Warranty-Federal
Trade Commission Improvement Act.
INTELLECTUAL PROPERTY
Certain trademarks, trade names, service marks, and logos (the “Marks”) used in this Manual
are registered and unregistered trademarks, trade names, and service marks of MakerBot and
its aliates. Nothing contained in this Manual grants or should be construed as granting, by
implication, estoppel, or otherwise, any license or right to use any Marks without the written
permission of MakerBot. Any unauthorized use of any information, materials, or Marks may
violate copyright laws, trademark laws, laws of privacy and publicity, and/or other laws and
regulations. Other company and/or product names mentioned herein may be trademarks of their
respective companies.
© 2009-2019 MakerBot Industries, LLC. All rights reserved.

MA KE RB O T MET HO D M AN UAL PAG E 4
SAFETY AND COMPLIANCE
MANUFACTURER:
MakerBot Industries, LLC
One MetroTech Center, 21st Floor
Brooklyn, NY 11201
347.334.6800
Regulatorycompliance@makerbot.com
CMIIT ID: 2019AJ2744
MakerBot declares that the radio equipment type 802.11
a/b/g/n dual band complies with Directive 2014/53/EU.
PRODUCT: 3D Desktop Printer
MODEL: METHOD
MAKERBOT METHOD CAT NO.: PACT56
RATINGS: 100-240VAC~ 50/60 Hz, 3.9 - 1.6 A
MAKERBOT METHOD X CAT NO.: PADJ56
RATINGS: 100-240VAC~ 50/60 Hz, 8.1 - 3.4 A
應避免影響附近雷達系統之操作。The use of equipment near radar systems should be avoided.
第十二條
經型式認證合格之低功率射頻電機,非經許可,公司、商號或使用者均不得擅自變更頻
率、加大功率或變更原設計之特性及功能。
第十四條
低功率射頻電機之使用不得影響飛航安全及干擾合法通信;經發現有干擾現象時,應立即
停用,並改善至無干擾時方得繼續使用。
前項合法通信,指依電信法規定作業之無線電通信。
低功率射頻電機須忍受合法通信或工業、科學及醫療用電波輻射性電機設備之干擾。
China WLAN RF Range is 2412-2483.5 MHz, 5150-5250MHz, 5250-5350MHz, 5725-5825 MHz.
The module supports router channels 1-14. Not all RF channels are available in all countries.
Taiwan:
a. 低功率電波輻射性電機管理辦法
第十二條經型式認證合格之低功率射頻電機,非經許可,公司、商號或使用者均不得擅自變更頻率、加大功率或變
更原設計之特性及功能。
第十四條低功率射頻電機之使用不得影響飛航安全及干擾合法通信;經發現有干擾現象時,應立即停用,並改善
至無干擾時方得繼續使用。
前項合法通信,指依電信規定作業之無線電信。低功率射頻電機須忍受合法通信或工業、科學及醫療用電波輻射
性電機設備之干擾。
b. 電磁波曝露量MPE 標準値1mW/cm2,送測產品實測值為: 0.0411。
c. 應避免影響附近雷達系統之操作。
Japan:
この装置は、クラスA機器です。この装置を住宅環境で使用すると電波妨害を引き起こすことがあります。この場合に
は使用者が適切な対策を講ずるよう要求されることがあります。VCCI - A
Thailand:
“เครื่องโทรคมนาคมและอุปกรณ์นี้ มีความสอดคล้องตามข้อกาาหนดของ กสทช.”
(This telecommunication equipment is in compliance with NBTC requirements)

MA KE RB O T MET HO D M AN UAL PAG E 5
51-68785 מספר אישור אלחוטי של משרד התקשורת הוא
אסור להחליף את האנטנה המקורית של המכשיר ולא
לעשות בו כל שינוי טכני אחר
Connection and use of this communications equipment is permitted
by the Nigerian Communication Commission.
NIGERIA
ISRAEL

MA KE RB O T MET HO D M AN UAL PAG E 6
SOUTH AMERICA: RADIO FREQUENCY SPECIFICATIONS
KOREA: WIRELESS SPECIFICATIONS
WLAN 802.11b/g/n
IEEE 802.11 a/b/g/n
WLAN 802.11a/n20/
n40
WLAN 802.11a/n20/
n40
RFID
WLAN 802.11a/n20/
n40
RFID
±20.0ppm
±20.0ppm
±20.0ppm
±20.0ppm
±20.0ppm
2400 - 2483.5 MHz
2.412 ~ 2.472GHz
5.180 ~ 5.825GHz
5150 - 5350 MHz
5470 - 5725 MHz
13.5605 MHz
5725 - 5850 MHz
13.5 MHz
-42.48 dBm / -47.20
dBm
2.4GHz:
10mW/MHz(20MHz BW) 5mW/MHz(40MHz BW)
5GHz :
10mW/MHz, 2.5 mW/MHz (20MHz BW)
10mW/MHz, 5mW/MHz, 2.5 mW/MHz (40MHz BW)
-32.67 dBm / -37.44
dBm
-36.88 dBm / -40.86
dBm
47.544mV/m@10m
-45.89 dBm / -47.61
dBm
< 16.97 dB(μ A/m)
20M4G1D
2.4GHZ, 3.2dBi
5GHz, 4.2dBi
20M4G1D
20M4G1D
N/A
20M4G1D
14KOG1D
17.85 dBm
15.16 dBm
13.99 dBm
18.67 dBm
-21.2 dB(μ A/m)
OPERATING
FREQUENCY BAND
FREQUENCY
RANGE
FREQUENCY
STABILITY
WIRELESS TRANSMISSION OUTPUT
SPURIOUS
EMISSIONS
RF TRANSMIT
POWER
TECHNOLOGY
PROTOCOL
EMISSION TYPE
ANTENNA
SPECIFICATION
The module supports router channels 1-14.
Contiene Módules
Model 840-0010A CNC ID: H-23699 Y
Model WL18MODGI CNC ID: C-23700
WIRELESS SPECIFICATIONS
FREQUENCY
2.4 GHz / 5GHz 2.412 - 2.484 GHz /
4.91 - 5.825 GHz 802.11
PulseLarsen Antennas,
Part #W3006
2.5 DBI IN THE 2.4
FX831.07.0100C
GHZ BANDS
3.2 dBi in the 2.4 GHz
band /
4.2 dBi in the 5 GHz
band
WLAN RF
FREQUENCY RANGE PROTOCOL ANTENNA TYPE ANTENNA
SPECIFICATIONS

MA KE RB O T MET HO D M AN UAL PAG E 8
Safety alert symbols precede each safety message in this
manual. These symbols indicate potential safety hazards that
could harm you or others or cause product or property damage.
Warning: The MakerBot Method includes moving parts that may cause injury. Never reach inside the
MakerBot Method while it is in operation.
Warning: The MakerBot Method generates high temperatures. Always allow the MakerBot Method
Performance Extruders to cool down before you reach inside.
Warning: There is a risk of shock. The electronics of the MakerBot Method are not user serviceable.
Caution: The socket outlet must be located near the printer and must be easily accessible.
Caution: In case of emergency, disconnect the MakerBot Method from the socket outlet.
Caution: The MakerBot Method melts plastic during printing. Plastic odors and particles may be
emitted during this operation. Make sure to set up the MakerBot Method in a well-ventilated area.
Caution: Always allow the Performance Extruders to cool to 50°C before reaching inside the
MakerBot Method or removing the Performance Extruders.
Caution: Children under 12 should be supervised by an adult.
Caution: Dust generation and accumulation should be minimized. Some dust and dry powders can
build static electricity charges when subjected to friction and create an ignition hazard.
Note: For users in Japan, the power cord is only for use with this printer model, the MakerBot Method
Performance 3D Printer.

MA KE RB O T MET HO D M AN UAL PAG E 9
ABOUT THE MAKERBOT METHOD
SPECIFICATIONS
Fused deposition modeling (FDM)
19 L x 19 W x 19.6 H cm / 7.5 x 7.5 x 7.75 in single extrusion
15.2 L x 19 W x 19.6 H cm / 6.0 x 7.5 x 7.75 in dual extrusion
MakerBot Print, MakerBot Mobile
MakerBot (.makerbot), STL (.stl), SolidWorks (.sldprt, .sldasm), InventorOBJ (.ipt,
.iam), IGES (.iges, .igs), STEP AP203/214 (.step, .stp), CATIA (.CATPart, .CATProduct),
Wavefront Object (.obj), Unigraphics/NX (.prt), Solid Edge (.par, .asm), ProE/Creo
(.prt, .asm), VRML (.wrl), Parasolid (.x_t, .x_b)
76.5 H x 50.0 W x 55.5 D centimeters [30.1 H x 19.7 W x 21.9 D inches]
64.9 H x 41.3 W x 43.7 D centimeters [25.6 H x 16.3 W x 17.2 D inches]
65 lbs
0 - 38º C / 32 - 100º F
100 - 240 VAC, 50/ 60 HZ, 400 W MAX 3.9A -1.6A
100 - 240 VAC, 50/ 60 HZ, 800 W MAX 8.1A- 3.4A
USB 2.0, Unshielded Ethernet: 10/100Base -T, WiFi 802.11 a/b/g/n 2.5GHz, 5GHz
640 by 480 pixels
81.7 lbs
15 - 26º C / 59 - 78º F, 10 - 70% RH non-condensing
.makerbot
20 – 400 microns
0.4 mm
Print Technology
Build Volume
Soware Bundle
Supported File Types
Shipping Box
Printer Weight
Storage Temperature
POWER REQUIREMENTS :
MAKERBOT METHOD (PACT56)
MAKERBOT METHOD X (PADJ56)
Connectivity
Camera Resolution
Shipping Weight
Ambient Operating
Temperature
Printer
Print File Type
Maximum Layer Resolution
Nozzle Diameter
PRINTING
SOF TWARE
PHYSICAL DIMENSIONS
TEMPERATURE
ELECTRICAL
CAMERA
HOW THE MAKERBOT METHOD WORKS
The MakerBot Method makes three-dimensional objects out of dierent types of melted materials. First,
download a model from the internet or design a part, then use MakerBot Print to translate 3D design files into
a .makerbot file, which creates instructions for the MakerBot printer. Then, transfer the .makerbot file to the
MakerBot printer via your local network, USB drive, or USB cable.
The MakerBot Method will melt materials and extrude it out onto the build plate in thin lines to build your
object layer by layer. The heated build chamber allows the extruded material to cool slowly, minimizing
warping and curling. This 3D printing technology is called fused deposition modeling (FDM).

MA KE RB O T MET HO D M AN UAL PAG E 10
MAKERBOT METHOD DIAGRAM
POWER BUTTON
PRINTER LID
TOUCHSCREEN
HEATED BUILD CHAMBER
SPRING STEEL BUILD PLATE
MATERIAL DRAWER BAY 1
MATERIAL DRAWER BAY 2
USB KEY PORT
MODEL
PERFORMANCE EXTRUDER
SUPPORT
PERFORMANCE EXTRUDER

CHAPTER 2
GETTING STARTED
When you set up your MakerBot® Method™ Performance 3D Printer,
remember that it was built and packaged very carefully. We hope you will
take your time and be just as careful unpacking it and getting it set up.
MA KE RB O T MET HO D M AN UAL PAG E 12
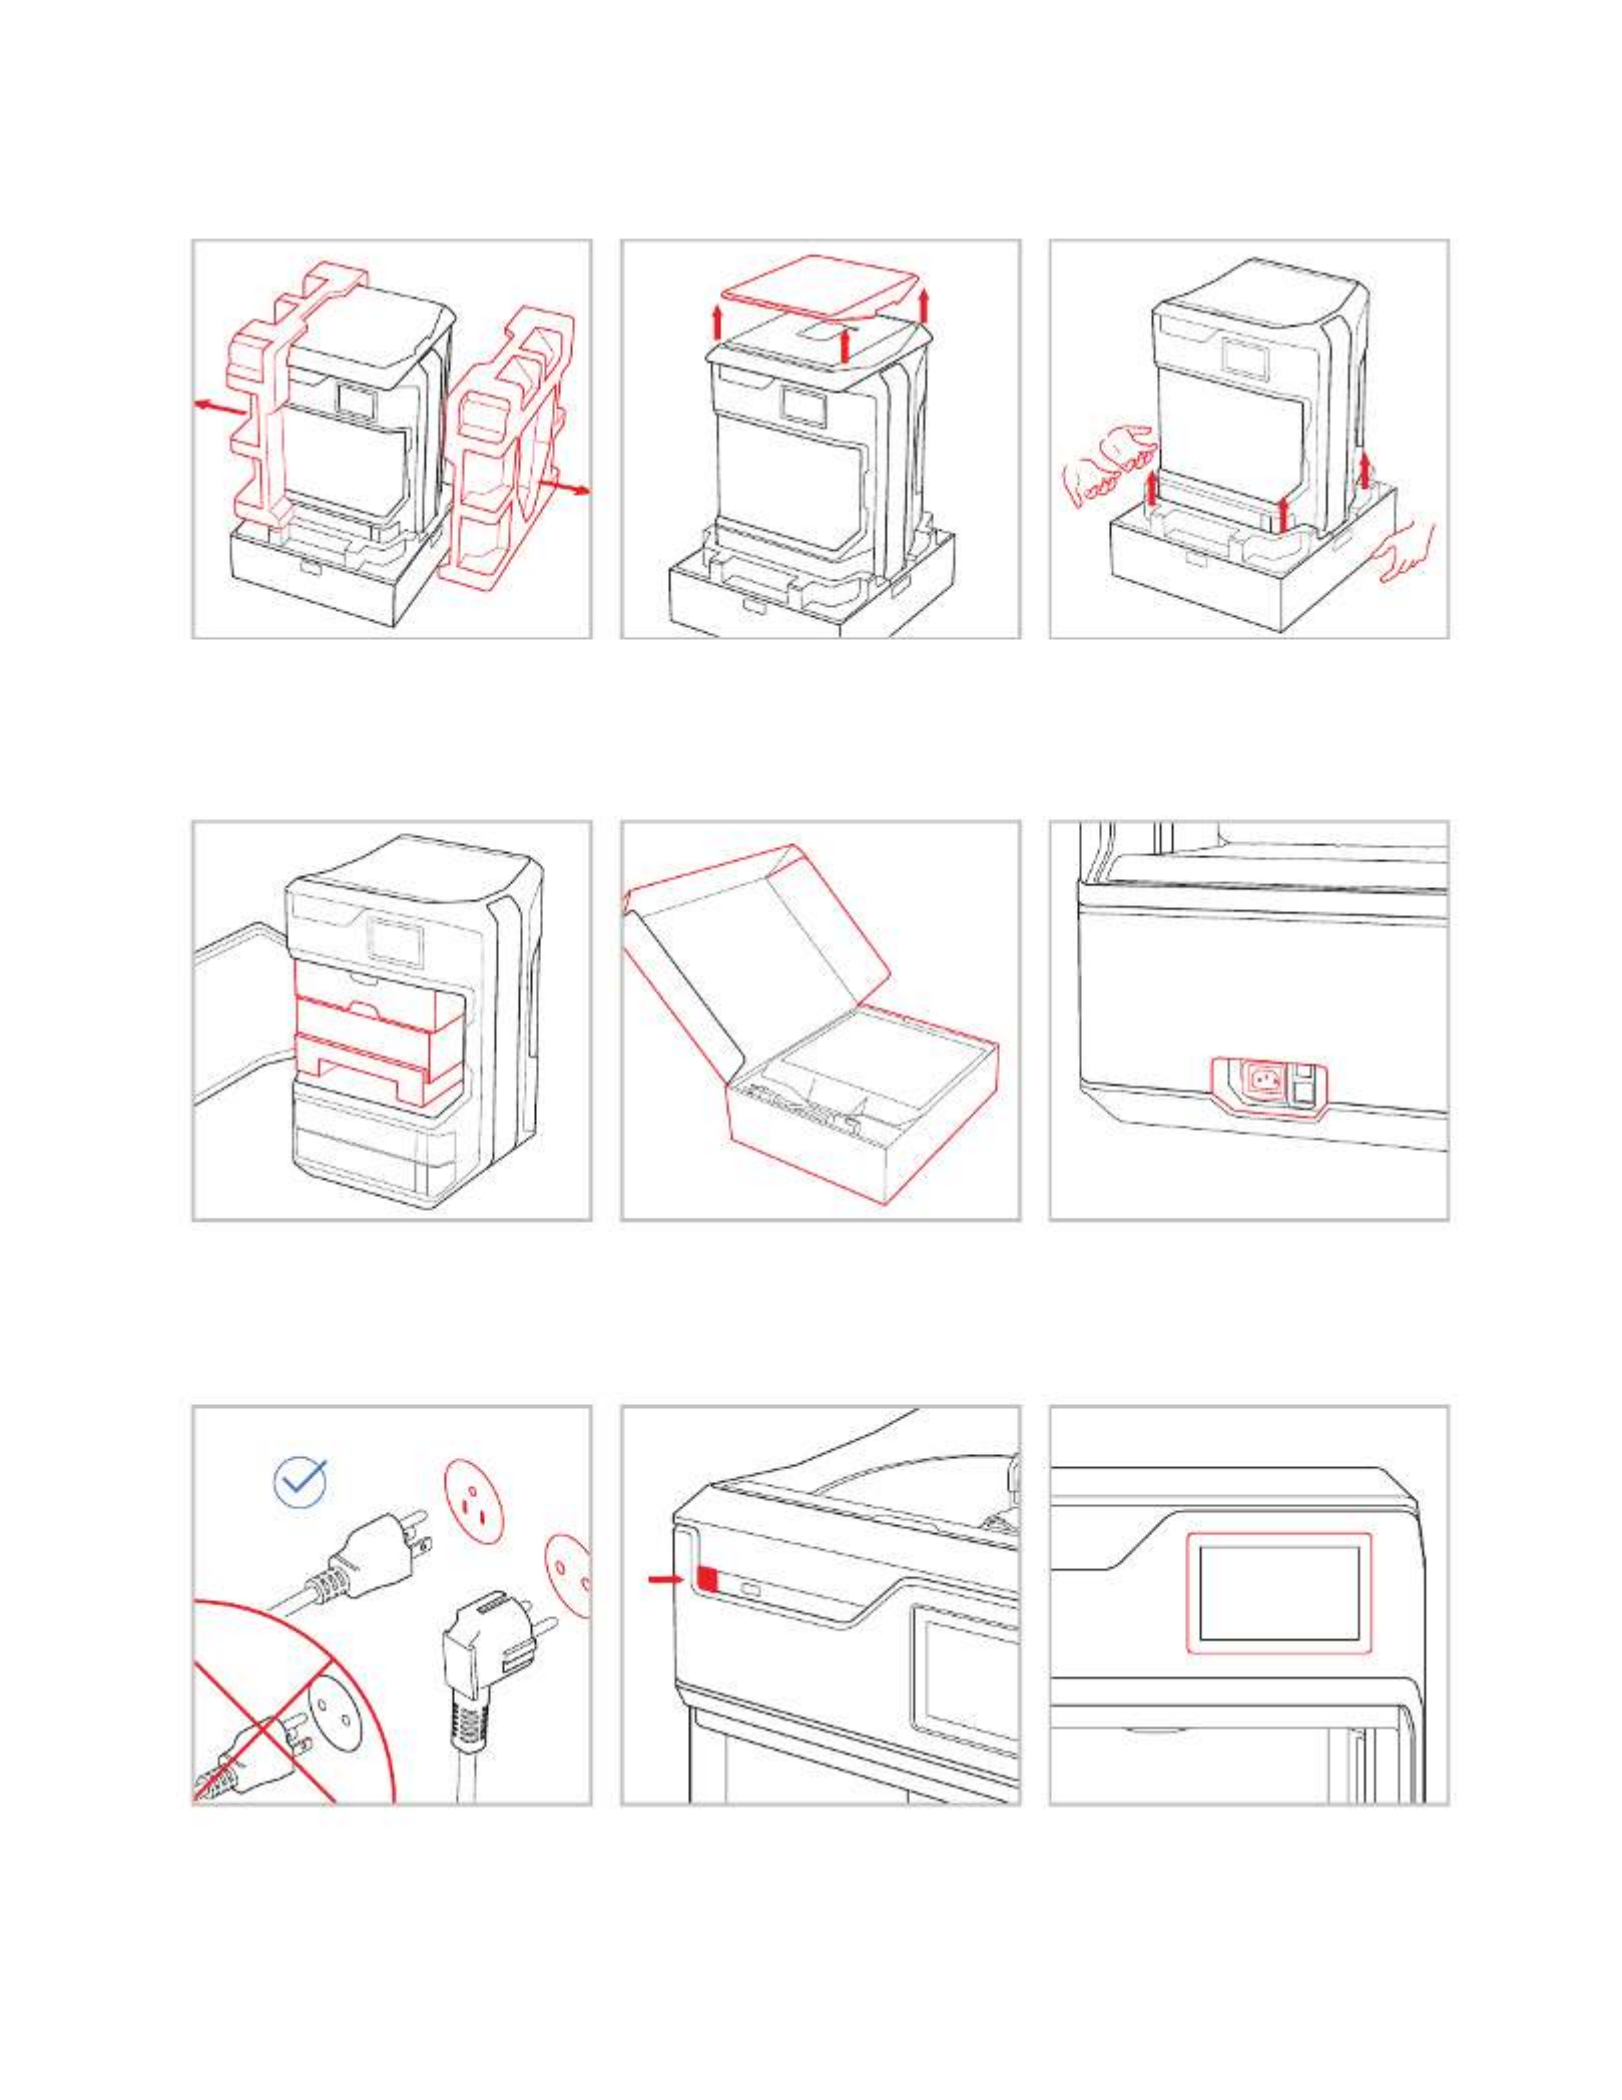
Carefully remove the foam from
the sides of the printer.
Remove the bag, remaining
packaging tape, and open the
door to remove the starter kit.
Use the correct power cord
to connect the printer to an
accessible outlet.
Li the lid o and store nearby.
Open the starter kit on a flat
surface.
Press the power button on the
front of the printer.
With two people li from the side
handles of the printer and put it
on a stable flat surface.
Locate the power input on the
lower back of the printer.
Aer the printer powers on,
follow the on screen instructions
to finish setting up your printer.
UNPACKING THE METHOD
1 2 3
4 5 6
7 8 9
MA KE RB O T MET HO D M AN UAL PAG E 13
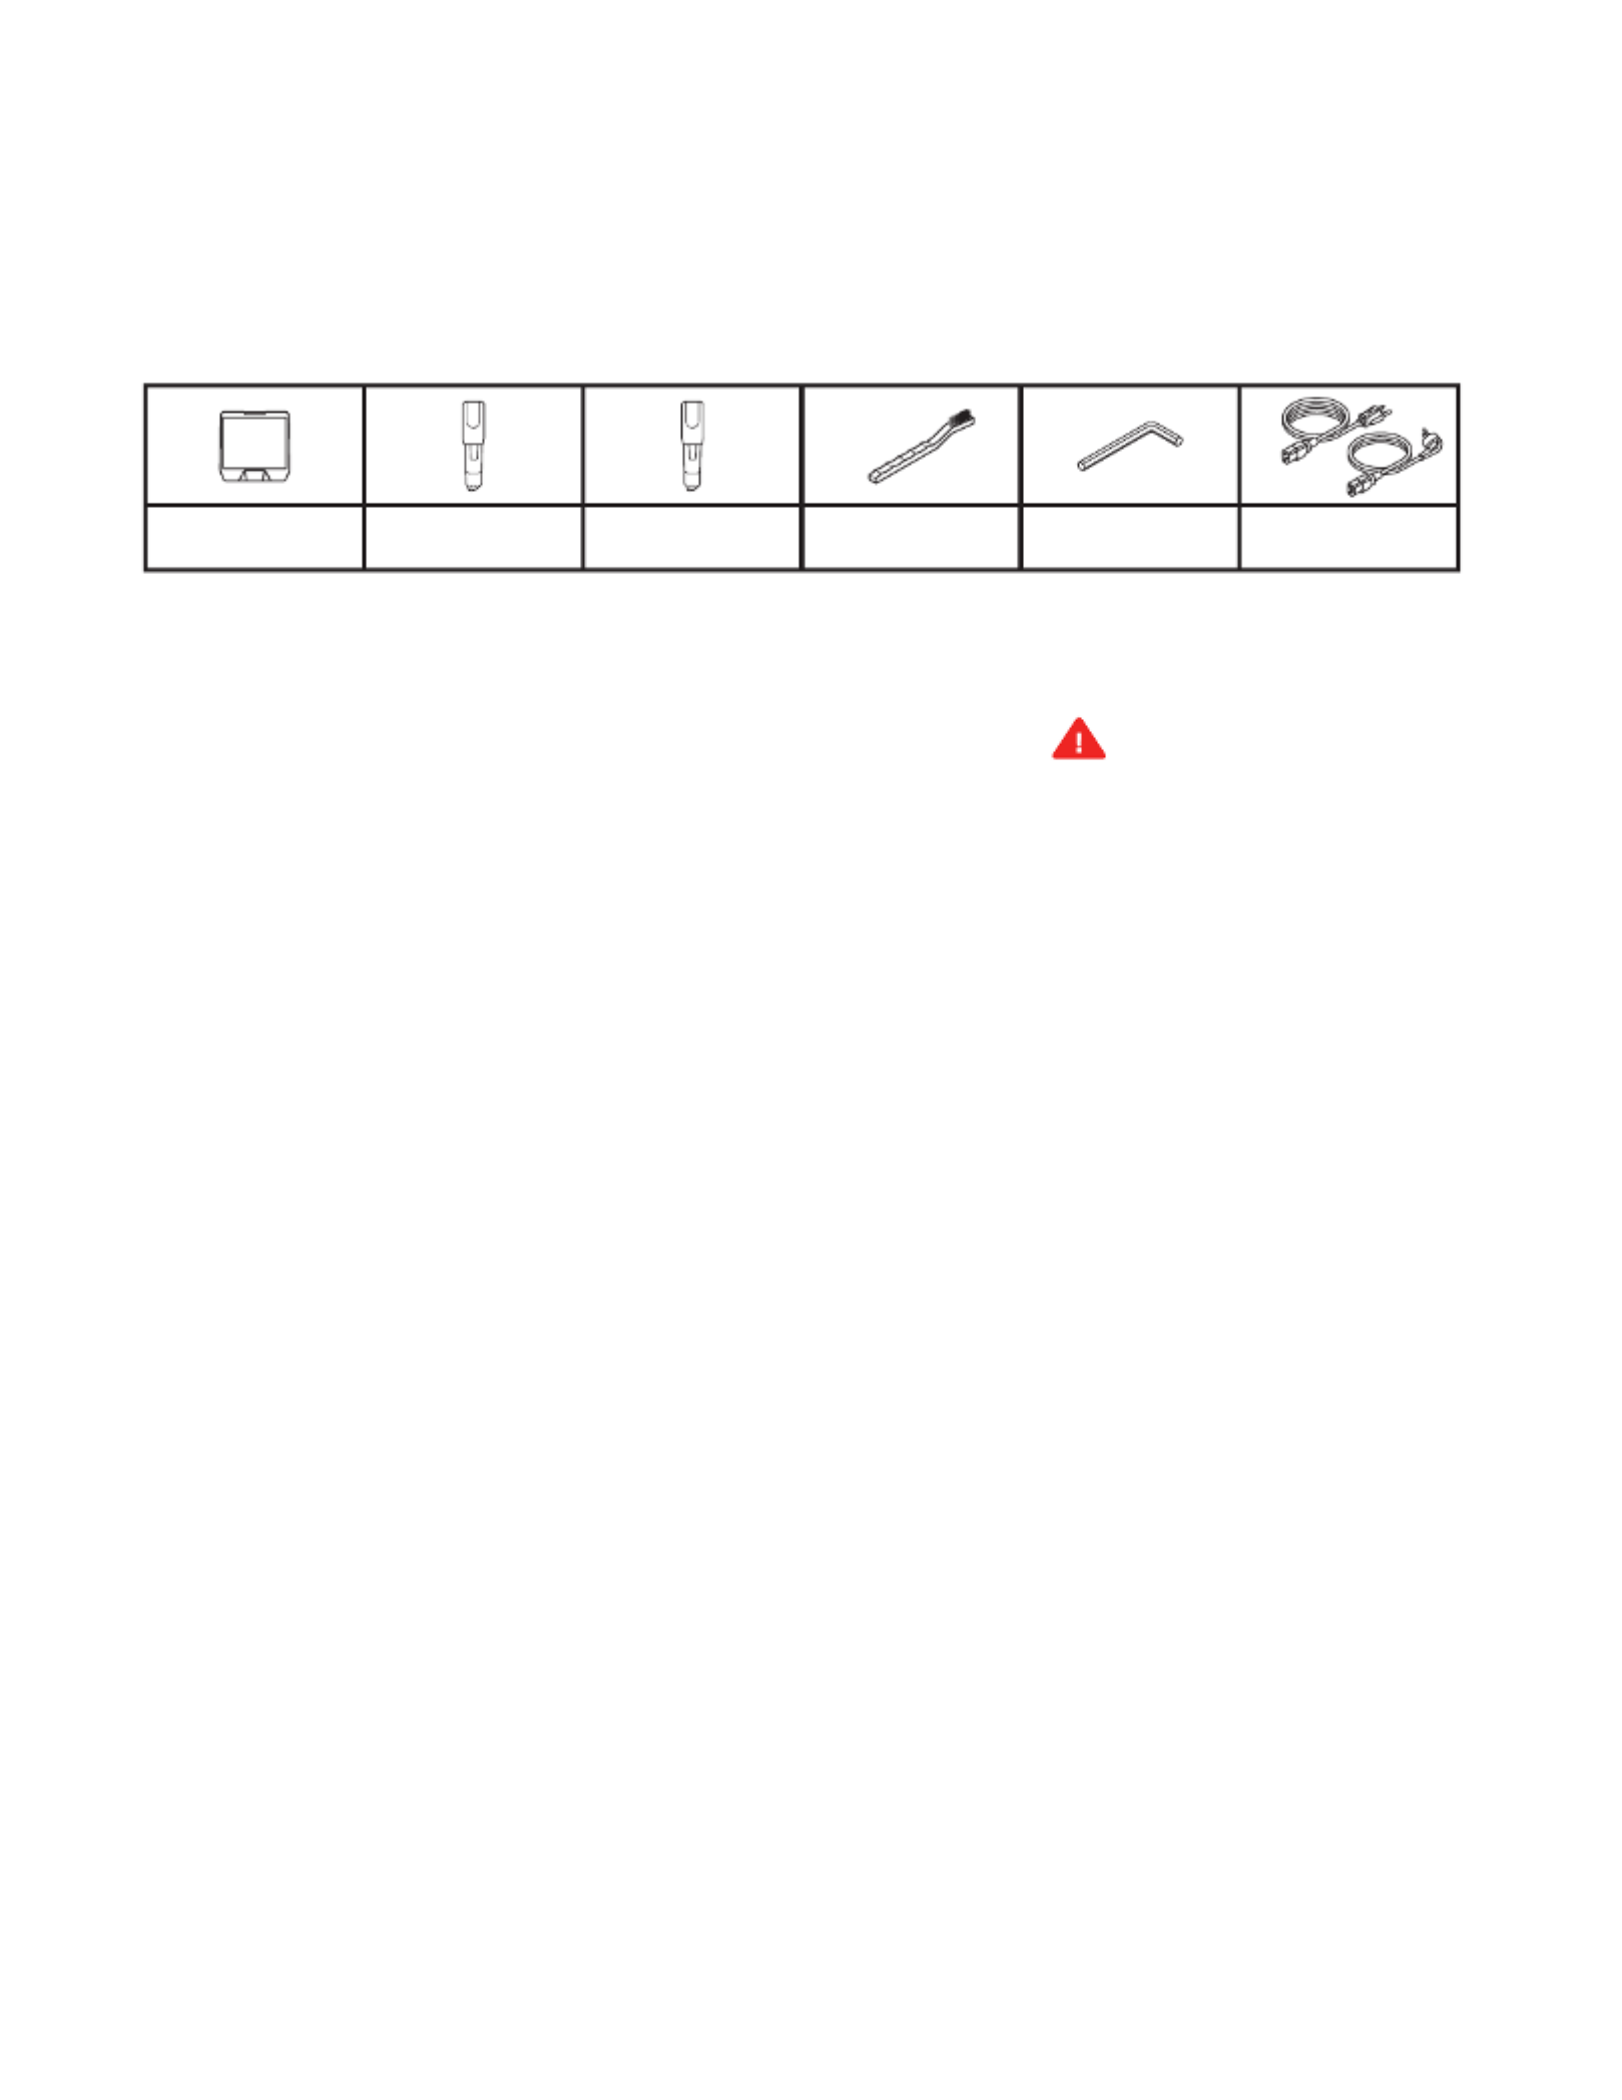
STARTER KIT
SETTING UP THE METHOD
In case of conflicting information between this Manual and the on-screen
instructions, FOLLOW THE ON-SCREEN information, since it is updated more
frequently.
TURN ON YOUR MAKERBOT METHOD
The power button for the MakerBot Method is located on the top front panel, to the le of the USB port. Push this
button to turn on your MakerBot Method.
To reset your MakerBot Method, depress the power button for at least 8 seconds. To turn o your MakerBot
Method, go to Settings --> Shutdown on the touch screen.
THE GUIDED SETUP
The first time you turn on your MakerBot Method, you will be guided through the initial setup process using the
MakerBot Method user interface. This Guided Setup will walk you through connecting the printer to an internet
connection, authorizing your printer, attaching Performance extruders, running calibration, loading material, and
running your test print.
Please see Chapter 3: Guided Setup for more information.
Prepare Your Model to Print
The 3D model must be formatted, or “sliced” for the MakerBot Method using the MakerBot Print soware.
MakerBot Print can import an STL or other supported 3D file type, and export a MakerBot (.makerbot) file type.
Please see Chapter 5: MakerBot Print for more information about MakerBot Print.
SUPPORTED FILE TYPES:
Mac: MakerBot (.makerbot), STL (.stl)
Windows: MakerBot (.makerbot), STL (.stl), SolidWorks (.sldprt, .sldasm), InventorOBJ (.ipt, .iam), IGES (.iges,
.igs), STEP AP203/214 (.step, .stp), CATIA (.CATPart, .CATProduct), Wavefront Object(.obj), Unigraphics/NX
(.prt), Solid Edge (.par, .asm), ProE/Creo (.prt, .prt., .asm, .asm.), VRML(.wrl), Parasolid (.x_t, .x_b)
Caution: Never remove a Performance
Extruder from your MakerBot Method
3D printer during or immediately aer
printing. Always allow a Performance
Extruder to cool below 50°C.
Inside the box of your MakerBot Method, you will find almost everything you need to get started, including both a Model Performance
Extruder and Support Performance Extruder, a spring steel build plate, a leveling hex key, a nozzle cleaning brush, and two power cords
(North America and EU). To order material, visit store.makerbot.com.
SPRING STEEL
BUILD PLATE
MODEL
PERFORMANCE
EXTRUDER
SUPPORT
PERFORMANCE
EXTRUDER
CLEANING
BRUSH
LEVELING
HEX KEY
NORTH AMERICA AND
EU POWER CORD

MA KE RB O T MET HO D M AN UAL PAG E 14
MA KE RB O T MET HO D M AN UAL PAG E 14
CHAPTER 3
GUIDED SETUP
The first time you turn on your MakerBot® Method™ Performance 3D
Printer, you will be guided through the setup process via the onboard
touchscreen. From there, you will learn everything you need to know to
start your first 3D print.

MA KE RB O T MET HO D M AN UAL PAG E 15
THE MAKERBOT METHOD TOUCHSCREEN
The touchscreen located at the upper right of the machine operates the MakerBot Method.
See Chapter 4 The User Interface for more related information.
THE GUIDED SETUP
The first time you turn on your MakerBot Method, you will be guided through the initial setup process using the
MakerBot Method user interface. This Guided Setup will walk you through connecting the printer to an internet
connection, authorizing your printer, attaching Performance extruders, running calibration, loading material, and
running your test print.
RE-RUN THE GUIDED SETUP
To re-run the Guided Setup, select SETTINGS > RESET TO FACTORY.
Restoring factory settings will allow you to rerun the Guided Setup.
NEW FIRMWARE UPDATE REQUIRED
Having up to date firmware is one of the most important factors in getting the most out of your MakerBot
Method. The first step in the setup process will make sure that your MakerBot Method is running the most up
to date firmware. You will not be able to proceed without updating firmware. Use the touch screen on your
MakerBot Method to select the option that works best for you. Once selected your MakerBot Method will walk
you through the firmware update process via on screen prompts.
UPDATING VIA ETHERNET
Please make sure your MakerBot Method is plugged into your local network via the Ethernet port in the back of
the printer. Once your MakerBot Method has established an Ethernet Connection, it will download the latest
firmware. Once the firmware has been downloaded and installed, press “Continue Setup”.
UPDATING VIA WI-FI
Once you select “Update via Wi-FI” from the startup screen, your MakerBot Method 3D Printer will automatically
scan for nearby Wi-Fi networks. Select your preferred wireless network from the available list. You will then
be prompted for the password for this network, please enter it using the touch screen. Once complete your
MakerBot Method will connect to the network and automatically download the newest firmware version.
Once you have successfully entered the password for the selected Wi-Fi network, your MakerBot Method will
automatically connect and begin searching for the latest firmware version. Once the latest firmware has been
found, it will automatically begin downloading and installing. Once all three steps have been completed, your
MakerBot Method will restart running the latest firmware version. Once the firmware has been downloaded and
installed, press “Continue Setup”.
UPDATING VIA USB STICK
For the MakerBot Method, visit MakerBot.com/MethodFW to download the latest firmware.
For the MakerBot Method X, visit MakerBot.com/MethodXFW to download the latest firmware.
Once you have downloaded the newest firmware version, transfer it to a USB drive. Please ensure that the
firmware file is not embedded inside another folder on your USB stick, or else the Method printer will not be able
POWER BUTTON
PRINTER LID
TOUCHSCREEN
USB KEY PORT

MA KE RB O T MET HO D M AN UAL PAG E 17
If you are using material you had previously printed with, it is important that you remove any material that may have already
been routed from the drawer to the extruder.
If the material feels brittle or breaks easily do not load this into the printer. Remove at least 2 feet of the material and continue
with loading.
As the filament travels from the bay up to the extruders it must pass through a Y splitter at the top le of the gantry.
Occasionally the material can get caught on the lip of the guide tube leading to the extruder.
You can reseat the guide tube by removing the panel on the top le outside of the printer, pinching the small metal clasp to
release the tube, and reseat into the splitter making sure it is firmly in place.
To determine if your Material has become brittle, you’ll want to bend a piece of it back onto itself a few times. If you can bend it
at least 3 times before breaking it is not brittle.
PVA SUPPORT MATERIAL BEST PRACTICES
Once the PVA Support Material is loaded, you’ll want to leave the material in the drawer for as long as possible unless the
printer is not going to be used for an extended amount of time. When not in use always store the support material in the sealed
metalized polyester bag to avoid moisture uptake and environmental damage
If you notice excessive stringiness during a print this is oen caused by moisture uptake of the material. At this point, we
recommend using a new unopened spool. You can always salvage your PVA spool by putting it in a bag with 20 grams of
desiccant and sealing it up to absorb moisture.
TEST PRINT
Once you have loaded material into both of your Performance Extruders, it is time to run a test print to ensure your MakerBot
Method. The purpose of the test print is to ensure that your MakerBot Method is setup to provide the best dimensional
accuracy.
Note: If you have already performed the guided setup and would like to print the calibration test again, you can access it from
MakerBot Print. Simply navigate to File > Insert Example Print > Method > Calibration Check Print
START TEST PRINT
You will need both the model and support material for the test print. Once you have ensured they are both loaded, click “Start
Test Print” to start the print. The extruders will then begin heating up for the test print.
Once the Performance Extruders have heated, the test print will begin. It is recommended that you watch at least the first few
layers to ensure the print is adhering to the build surface.
The test print will take around 30 minutes. The display screen will show a progress bar.
WHAT IS THE PURGE TOWER?
The MakerBot Method utilizes a “Purge Tower” to periodically remove material residue from the nozzles of each extruder and to
make sure the quality of the material is uniform across each layer line.
When first setting up your MakerBot Method, you may notice that the “Calibration Test Print” has a second small model next to
it. What you are seeing is a small version of a Purge Tower.
During the course of a print, you will notice the extruders will move back and forth from your model to the Purge Tower, in order
to purge material. When the print is complete, you can remove the purge tower along with your model.
The purge tower is necessary for ideal print quality, and removing it may reduce print quality or cause print failures. We
recommend printing with the purge tower to achieve optimal print quality. See Chapter 5 to learn how to interact with the
purge tower in MakerBot Print.
MA KE RB O T MET HO D M AN UAL PAG E 19
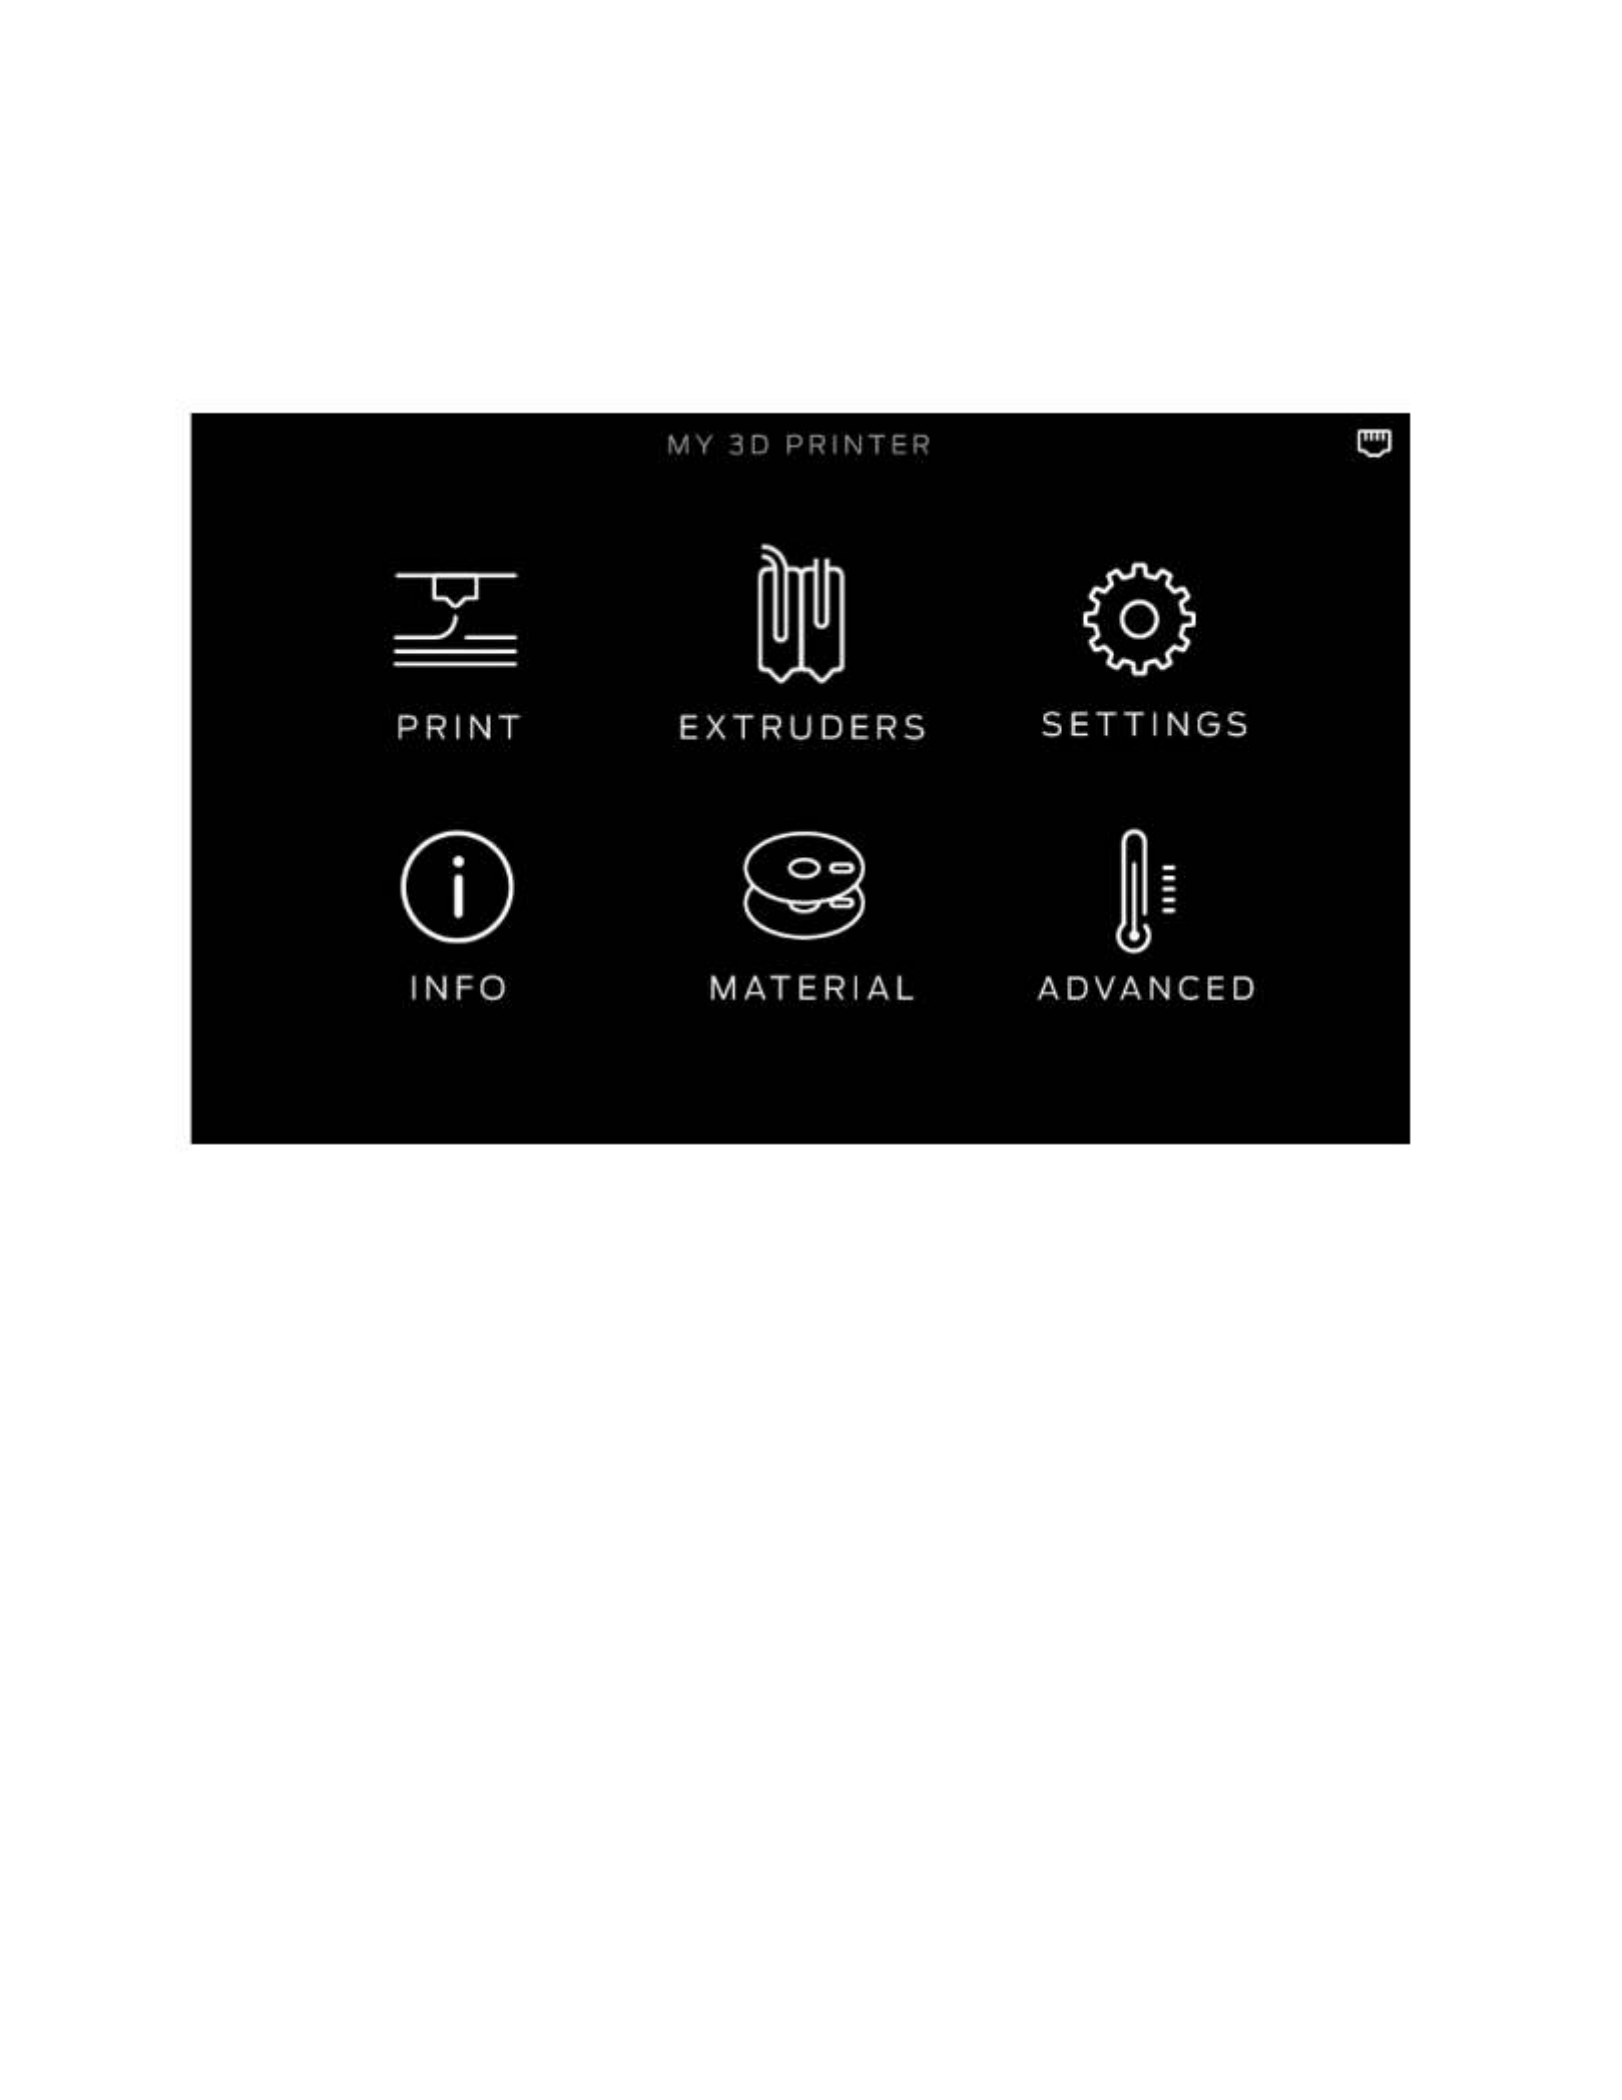
HOME SCREEN
The touchscreen gives you six options for managing your printer and the printing process:
› PRINT › EXTRUDERS › SETTINGS
› INFO › MATERIAL › ADVANCED

MA KE RB O T MET HO D M AN UAL PAG E 20
23
START PRINT PRINTING
Choose a .MakerBot file that has been exported from MakerBot
Print to begin printing. Note that the file needs to be formatted
from within MakerBot Print for MakerBot Method before being
exported.
Select [START PRINT] to begin printing the file.
During the printing process you will be able to view print progress
information and other printer details.
1. Percentage of the print completed.
2. Time elapsed and estimated time remaining in the print. While the
Heated Chamber and Performance Extruders are heating, the screen
will display the current and target temperatures.
3. While actively printing, swipe the touch screen between the following
screens:
• Print progress
• Rendering of your model or layout
• File information
• Print options information
• Extruder temperatures
4. The Print menu contains the following options:
• PAUSE - Press the pause button on the screen to temporarily
pause your print.
• CHANGE MATERIAL - Select this option to load or unload material.
• CANCEL - Select this option to cancel your print.
START A PRINT
1
Use the touchscreen to scroll through the list of available files
and press it again to select the file you would like to print.
SELECT A FILE
Select on the touchscreen to initiate a print stored on a [PRINT]
USB flash drive.
Push the icon to select the location of the file you want to print.
Select [USB STORAGE] to print a file stored on a USB drive
inserted into the USB port.
Termékspecifikációk
| Márka: | MakerBot |
| Kategória: | 3D nyomtató |
| Modell: | Method X |
Szüksége van segítségre?
Ha segítségre van szüksége MakerBot Method X, tegyen fel kérdést alább, és más felhasználók válaszolnak Önnek
Útmutatók 3D nyomtató MakerBot

1 Szeptember 2024
1 Szeptember 2024
30 Augusztus 2024
30 Augusztus 2024
30 Augusztus 2024
30 Augusztus 2024
30 Augusztus 2024
12 Augusztus 2024
7 Május 2024
Útmutatók 3D nyomtató
- 3D nyomtató Polaroid
- 3D nyomtató Renkforce
- 3D nyomtató Kodak
- 3D nyomtató Gembird
- 3D nyomtató Weller
- 3D nyomtató Velleman
- 3D nyomtató Flashforge
- 3D nyomtató Anker
- 3D nyomtató Exibel
- 3D nyomtató BQ
- 3D nyomtató Monoprice
- 3D nyomtató XYZprinting
- 3D nyomtató Weistek
- 3D nyomtató Leap Frog
- 3D nyomtató Snapmaker
- 3D nyomtató Dimension
- 3D nyomtató Anycubic
- 3D nyomtató German RepRap
- 3D nyomtató Creality3D
- 3D nyomtató Wanhao
- 3D nyomtató Artillery
- 3D nyomtató GooVer
- 3D nyomtató Easy Threed
- 3D nyomtató Zortrax
- 3D nyomtató LulzBot
- 3D nyomtató SINDOH
- 3D nyomtató PP3DP
- 3D nyomtató Wasp
- 3D nyomtató 3D Systems
- 3D nyomtató Creality
- 3D nyomtató Raise3D
- 3D nyomtató Craftbot
Legújabb útmutatók 3D nyomtató
31 December 2025
27 December 2024
27 December 2024
27 December 2024
27 December 2024
12 December 2024
27 Szeptember 2024
14 Szeptember 2024
3 Szeptember 2024
3 Szeptember 2024