Használati útmutató ZyXEL NBG6817 - ARMOR Z2
Olvassa el alább 📖 a magyar nyelvű használati útmutatót ZyXEL NBG6817 - ARMOR Z2 (206 oldal) a router kategóriában. Ezt az útmutatót 7 ember találta hasznosnak és 2 felhasználó értékelte átlagosan 4.5 csillagra
Oldal 1/206

Default Login Details
User’s Guide
ARMOR Z2
AC2600 MU-MIMO Wireless Gigabit Router
Model: NBG6817
Copyright © 2018 Zyxel Communications Corporation
LAN IP Address http://192.168.1.1 (Router
Mode)
http://192.168.1.2 (Access
Point Mode)
Password 1234
Version 1.00 Edition 1, 05/2018

NBG6817 User’s Guide
2
IMPORTANT!
READ CAREFULLY BEFORE USE.
KEEP THIS GUIDE FOR FUTURE REFERENCE.
Screenshots and graphics in this book may differ slightly from your product due to differences in your
product firmware or your computer operating system. Every effort has been made to ensure that the
information in this manual is accurate.
Related Documentation
•Quick Start Guide
The Quick Start Guide shows how to connect the NBG6817 and access the Web Configurator wizards.
It contains information on setting up your network and configuring for Internet access.
•More Information
Go to support.zyxel.com to find other information on the NBG6817.

Contents Overview
NBG6817 User’s Guide
3
Contents Overview
User’s Guide ........................................................................................................................................9
Introduction ........................................................................................................................................... 10
Introducing the Web Configurator ..................................................................................................... 15
eaZy 123 Wizard .................................................................................................................................... 18
NBG6817 Modes ................................................................................................................................... 27
Easy Mode ............................................................................................................................................. 28
Router Mode ......................................................................................................................................... 36
Access Point Mode .............................................................................................................................. 42
Tutorials .................................................................................................................................................. 49
Technical Reference ........................................................................................................................59
Status ...................................................................................................................................................... 60
WAN ....................................................................................................................................................... 73
Wireless LAN .......................................................................................................................................... 94
LAN ....................................................................................................................................................... 113
Applications ........................................................................................................................................ 118
Security ................................................................................................................................................ 141
Maintenance ...................................................................................................................................... 147
Troubleshooting .................................................................................................................................. 160

Table of Contents
NBG6817 User’s Guide
4
Table of Contents
Contents Overview .............................................................................................................................3
Table of Contents.................................................................................................................................4
Part I: User’s Guide............................................................................................9
Chapter 1
Introduction ........................................................................................................................................10
1.1 Overview ......................................................................................................................................... 10
1.2 Applications .................................................................................................................................... 10
1.3 Ways to Manage the NBG6817 .................................................................................................... 10
1.4 Good Habits for Managing the NBG6817 ................................................................................... 11
1.5 Resetting the NBG6817 .................................................................................................................. 11
1.5.1 How to Use the RESET Button ................................................................................................ 11
1.6 The WPS Button ............................................................................................................................... 11
1.7 LEDs .................................................................................................................................................. 12
Chapter 2
Introducing the Web Configurator ...................................................................................................15
2.1 Overview ......................................................................................................................................... 15
2.2 Accessing the Web Configurator ................................................................................................. 15
2.2.1 Login Screen .......................................................................................................................... 16
2.2.2 Change Default Password Screen ...................................................................................... 16
Chapter 3
eaZy 123 Wizard.................................................................................................................................18
3.1 Overview ......................................................................................................................................... 18
3.2 Accessing the eaZy 123 Wizard .................................................................................................... 18
3.3 Internet Type ................................................................................................................................... 20
3.3.1 WAN Selection Type: Automatic - DHCP ........................................................................... 21
3.3.2 WAN Selection Type: PPPoE ................................................................................................. 21
3.3.3 WAN Selection Type: Static .................................................................................................. 22
3.4 Wireless Network ............................................................................................................................. 23
Chapter 4
NBG6817 Modes.................................................................................................................................27
4.1 Overview ......................................................................................................................................... 27
4.1.1 Web Configurator Modes .................................................................................................... 27

Table of Contents
NBG6817 User’s Guide
5
4.1.2 Device Modes ....................................................................................................................... 27
Chapter 5
Easy Mode..........................................................................................................................................28
5.1 Overview ......................................................................................................................................... 28
5.2 What You Can Do .......................................................................................................................... 28
5.3 What You Need to Know ............................................................................................................... 29
5.4 Navigation Panel ............................................................................................................................ 29
5.5 Network Map .................................................................................................................................. 30
5.6 Control Panel .................................................................................................................................. 31
5.6.1 Wi-Fi ......................................................................................................................................... 32
5.6.2 Guest Wi-Fi ............................................................................................................................. 33
5.6.3 Parental Control .................................................................................................................... 34
5.6.4 Notification ............................................................................................................................ 35
5.6.5 LED .......................................................................................................................................... 35
Chapter 6
Router Mode.......................................................................................................................................36
6.1 Overview ......................................................................................................................................... 36
6.2 Router Mode Status Screen ........................................................................................................... 36
6.2.1 Navigation Panel .................................................................................................................. 39
Chapter 7
Access Point Mode............................................................................................................................42
7.1 Overview ......................................................................................................................................... 42
7.2 What You Can Do .......................................................................................................................... 42
7.3 What You Need to Know ............................................................................................................... 42
7.3.1 Setting your NBG6817 to AP Mode ..................................................................................... 42
7.3.2 Accessing the Web Configurator in Access Point Mode ................................................. 43
7.3.3 Configuring your WLAN and Maintenance Settings ......................................................... 44
7.4 AP Mode Status Screen ................................................................................................................. 44
7.4.1 Navigation Panel .................................................................................................................. 46
7.5 LAN Screen ...................................................................................................................................... 46
Chapter 8
Tutorials...............................................................................................................................................49
8.1 Overview ......................................................................................................................................... 49
8.2 Set Up a Wireless Network Using WPS ........................................................................................... 49
8.2.1 Push Button Configuration (PBC) ........................................................................................ 49
8.2.2 PIN Configuration .................................................................................................................. 50
8.3 Connect to NBG6817 Wireless Network without WPS ................................................................. 51
8.3.1 Configure Your Notebook .................................................................................................... 53
8.4 Using Guest SSIDs on the NBG6817 ............................................................................................... 55

Table of Contents
NBG6817 User’s Guide
6
8.4.1 Configuring Security Settings of Guest SSIDs ...................................................................... 56
Part II: Technical Reference...........................................................................59
Chapter 9
Status...................................................................................................................................................60
9.1 Overview ......................................................................................................................................... 60
9.1.1 What You Can Do ................................................................................................................. 60
9.2 Live Network Monitor Screen ........................................................................................................ 60
9.3 Usage Monitor Screens .................................................................................................................. 63
9.3.1 Internet Data Usage Monitor ............................................................................................... 63
9.3.2 Bandwidth History ................................................................................................................. 64
9.3.3 Time Tracker ........................................................................................................................... 66
9.3.4 Data Usage Alert ................................................................................................................... 66
9.4 Common Usage Screen ............................................................................................................. 69
9.5 Download Traffic Statistics Screen ................................................................................................ 70
9.6 Client Tables Screen ....................................................................................................................... 71
Chapter 10
WAN ....................................................................................................................................................73
10.1 Overview ....................................................................................................................................... 73
10.2 What You Can Do ........................................................................................................................ 73
10.3 What You Need To Know ............................................................................................................ 73
10.3.1 Configuring Your Internet Connection ............................................................................. 74
10.4 Internet Connection Screen ........................................................................................................ 76
10.4.1 IPoE Encapsulation .............................................................................................................. 76
10.4.2 PPPoE Encapsulation .......................................................................................................... 81
10.4.3 PPTP Encapsulation ............................................................................................................. 85
10.5 NAT ................................................................................................................................................. 88
10.5.1 General Screen ................................................................................................................... 88
10.5.2 Port Trigger Screen .............................................................................................................. 90
10.5.3 Passthrough Screen ............................................................................................................ 90
10.6 Dynamic DNS Screen ................................................................................................................... 92
Chapter 11
Wireless LAN .......................................................................................................................................94
11.1 Overview ....................................................................................................................................... 94
11.1.1 What You Can Do ............................................................................................................... 95
11.1.2 What You Should Know ...................................................................................................... 95
11.2 Wireless Screen ............................................................................................................................ 98
11.3 Wireless Security .......................................................................................................................... 101

Table of Contents
NBG6817 User’s Guide
7
11.3.1 No Security ......................................................................................................................... 101
11.3.2 WPA-PSK/WPA2-PSK .......................................................................................................... 102
11.3.3 WPA/WPA2 ........................................................................................................................ 103
11.4 Guest Wireless Screen ................................................................................................................ 105
11.4.1 Guest Wireless Edit ............................................................................................................ 106
11.5 MAC Filter Screen ...................................................................................................................... 107
11.6 Advanced Screen ...................................................................................................................... 108
11.7 WPS Screen ................................................................................................................................. 110
11.8 Scheduling Screen ..................................................................................................................... 111
Chapter 12
LAN....................................................................................................................................................113
12.1 Overview ..................................................................................................................................... 113
12.2 What You Can Do ...................................................................................................................... 113
12.3 What You Need To Know .......................................................................................................... 113
12.4 LAN IP Screen .............................................................................................................................. 114
12.5 Static DHCP Screen .................................................................................................................... 115
12.6 IPv6 LAN Screen .......................................................................................................................... 116
Chapter 13
Applications .....................................................................................................................................118
13.1 Overview ..................................................................................................................................... 118
13.1.1 What You Can Do ............................................................................................................. 118
13.1.2 What You Need To Know ................................................................................................. 118
13.1.3 Before You Begin ............................................................................................................... 119
13.2 Parental Control ......................................................................................................................... 120
13.2.1 General Screen ................................................................................................................. 120
13.2.2 Notification Screen ........................................................................................................... 123
13.3 Bandwidth Management .......................................................................................................... 126
13.3.1 Bandwidth Screen ............................................................................................................. 126
13.3.2 Priorities Screen .................................................................................................................. 127
13.4 USB Media Sharing Screen ........................................................................................................ 128
13.5 UPnP Screen ................................................................................................................................ 130
13.6 File Sharing ................................................................................................................................... 131
13.6.1 SAMBA Server Screen ....................................................................................................... 131
13.6.2 FTP Server Screen .............................................................................................................. 133
13.6.3 Example of Accessing Your Shared Files From a Computer ........................................ 134
13.7 ONE Connect Screen ................................................................................................................. 138
13.8 Technical Reference .................................................................................................................. 139
Chapter 14
Security .............................................................................................................................................141
14.1 Overview ................................................................................................................................... 141

Table of Contents
NBG6817 User’s Guide
8
14.1.1 What You Can Do ............................................................................................................. 141
14.1.2 What You Need To Know ................................................................................................. 141
14.2 IPv4 Firewall Screen ................................................................................................................... 142
14.3 IPv6 Firewall Screen .................................................................................................................... 144
Chapter 15
Maintenance....................................................................................................................................147
15.1 Overview ..................................................................................................................................... 147
15.2 What You Can Do ...................................................................................................................... 147
15.3 General Screen ........................................................................................................................... 147
15.4 Password Screen ......................................................................................................................... 148
15.5 Time Screen ................................................................................................................................. 148
15.6 Firmware Upgrade Screen ........................................................................................................ 150
15.7 Backup/Restore Screen ............................................................................................................. 151
15.8 Restart Screen ............................................................................................................................. 153
15.9 Language Screen ....................................................................................................................... 153
15.10 Remote Management Screen ................................................................................................ 153
15.10.1 Remote Access ............................................................................................................... 153
15.10.2 Wake On LAN .................................................................................................................. 155
15.11 Log Screen ................................................................................................................................ 156
15.12 System Operation Mode Overview ........................................................................................ 157
15.13 Operation Mode Screen ......................................................................................................... 158
Chapter 16
Troubleshooting................................................................................................................................160
16.1 Overview ..................................................................................................................................... 160
16.2 Power, Hardware Connections, and LEDs ............................................................................... 160
16.3 NBG6817 Access and Login ...................................................................................................... 161
16.4 Internet Access ........................................................................................................................... 162
16.5 Resetting the NBG6817 to Its Factory Defaults ........................................................................ 164
16.6 Wireless Connections ................................................................................................................. 164
16.7 USB Device Problems ................................................................................................................. 166
Appendix A Customer Support ..................................................................................................... 167
Appendix B Setting Up Your Computer’s IP Address................................................................... 173
Appendix C Common Services .....................................................................................................193
Appendix D Legal Information ...................................................................................................... 196
Index.................................................................................................................................................203

9
PART I
User’s Guide

NBG6817 User’s Guide
10
CHAPTER 1
Introduction
1.1 Overview
This chapter introduces the main features and applications of the NBG6817.
The NBG6817 extends the range of your existing wired network without additional wiring, providing easy
network access to mobile users. You can set up a wireless network with other IEEE 802.11a/b/g/n/ac
compatible devices. The NBG6817 is able to function both 2.4GHz and 5GHz networks at the same time.
A range of services such as a firewall and content filtering are also available for secure Internet
computing.
There are two USB ports on the side panel of your NBG6817. One is USB 2.0, and the other is USB 3.0. You
can connect USB memory sticks, USB hard drives, or USB devices for file sharing. The NBG6817
automatically detects the USB devices.
1.2 Applications
Your can have the following networks with the NBG6817:
•Wired. You can connect network devices via the Ethernet ports of the NBG6817 so that they can
communicate with each other and access the Internet.
•Wireless. Wireless clients can connect to the NBG6817 to access network resources. You can use WPS
(Wi-Fi Protected Setup) to create an instant network connection with another WPS-compatible
device.
•WAN. Connect to a broadband modem/router for Internet access.
1.3 Ways to Manage the NBG6817
Use any of the following methods to manage the NBG6817.
• WPS (Wi-Fi Protected Setup). You can use the WPS button or the WPS section of the Web Configurator
to set up a wireless network with your NBG6817.
• Web Configurator. This is recommended for everyday management of the NBG6817 using a
(supported) web browser.

NBG6817 User’s Guide
15
CHAPTER 2
Introducing the Web
Configurator
2.1 Overview
This chapter describes how to access the NBG6817 Web Configurator and provides an overview of its
screens.
The Web Configurator is an HTML-based management interface that allows easy setup and
management of the NBG6817 via Internet browser. Use a browser that supports HTML5, such as Internet
Explorer 9.0 and later versions, Mozilla Firefox 21 and later versions, Safari 6.0 and later versions or Google
Chrome 26.0 and later versions. The recommended screen resolution is 1024 by 768 pixels.
In order to use the Web Configurator you need to allow:
• Web browser pop-up windows from your device. Web pop-up blocking is enabled by default in
Windows 7.
• JavaScript (enabled by default).
• Java permissions (enabled by default).
Refer to the Troubleshooting chapter (Chapter 16 on page 160) to see how to make sure these functions
are allowed in Internet Explorer.
2.2 Accessing the Web Configurator
1Make sure your NBG6817 hardware is properly connected and prepare your computer or computer
network to connect to the NBG6817 (refer to the Quick Start Guide).
2Launch your web browser.
3The NBG6817 is in router mode by default. Type "http://192.168.1.1 or http://myrouter" as the website
address. If the NBG6817 obtains a WAN IP address or a DNS server IP address in the same subnet as the
LAN IP address 192.168.1.1, the default LAN IP address will be changed to 10.0.0.1 automatically. See
Auto-IP Change on page 75 for more information.
If the NBG6817 is in access point, the IP address is 192.168.1.2. See Chapter 4 on page 27 for more
information about the modes of the NBG6817.
Your computer must be in the same subnet in order to access this website address.

Chapter 2 Introducing the Web Configurator
NBG6817 User’s Guide
16
2.2.1 Login Screen
Note: If this is the first time you are accessing the Web Configurator, you may be redirected to
the eaZy123 wizard. Refer to Chapter 3 on page 18 for the eaZy123 setup screens.
The Web Configurator initially displays the following login screen.
Figure 4 Login screen
The following table describes the labels in this screen.
2.2.2 Change Default Password Screen
You should see a screen asking you to change your password (highly recommended) as shown next.
Table 2 Login screen
LABEL DESCRIPTION
Password Type "1234" (default) as the password. Click Login.

Chapter 2 Introducing the Web Configurator
NBG6817 User’s Guide
17
Figure 5 Change Default Password Screen
The following table describes the labels in this screen.
Note: The management session automatically times out when the time period set in the
Administrator Inactivity Timer field expires (default five minutes; go to Chapter 15 on
page 147 to change this). Simply log back into the NBG6817 if this happens.
Table 3 Change Default Password Screen
LABEL DESCRIPTION
Enter your new
password here
Type a new password.
Confirm password Retype the password for confirmation.
Skip Click Skip if you do not want to change the password this time.
Change Click Change to save your changes back to the NBG6817.

NBG6817 User’s Guide
18
CHAPTER 3
eaZy 123 Wizard
3.1 Overview
This chapter provides information on the eaZy 123 setup screens in the Web Configurator.
The Web Configurator’s eaZy 123 setup wizard helps you configure your device to access the Internet.
Refer to your ISP for your Internet account information. Leave a field blank if you don’t have that
information.
3.2 Accessing the eaZy 123 Wizard
Launch your web browser and type "http://192.168.1.1 or http://myrouter" as the website address. Type
"1234" (default) as the password and click Login.
Note: The eaZy 123 wizard appears automatically when the NBG6817 is accessed for the first
time or when you reset the NBG6817 to its default factory settings. If you didn’t
configure the wizard screens, you will be redirected to the login page when you
connect to the Internet.
If you have already configured the wizard screens and want to open it again, click on the upper
right corner of any Web Configurator screen. The eaZy 123 wizard attempts to detect which WAN
connection type you are using.
If the eaZy 123 wizard does not detect a connection type, you must select one from the drop-down list
box. Check with your ISP to make sure you use the correct type.
If you do not have the Internet connection, the following screen opens.

Chapter 3 eaZy 123 Wizard
NBG6817 User’s Guide
19
Figure 6 Unable to continue: WAN
If you do not press the Wi-Fi button located on the NBG6817’s back panel, the following screen opens.
Figure 7 Unable to continue: Wi-Fi
Note: If you get an error message, check your hardware connections. Make sure your Internet
connection is up and running.
The wizard screen opens.

Chapter 3 eaZy 123 Wizard
NBG6817 User’s Guide
20
Figure 8 Detecting your Internet Connection Type
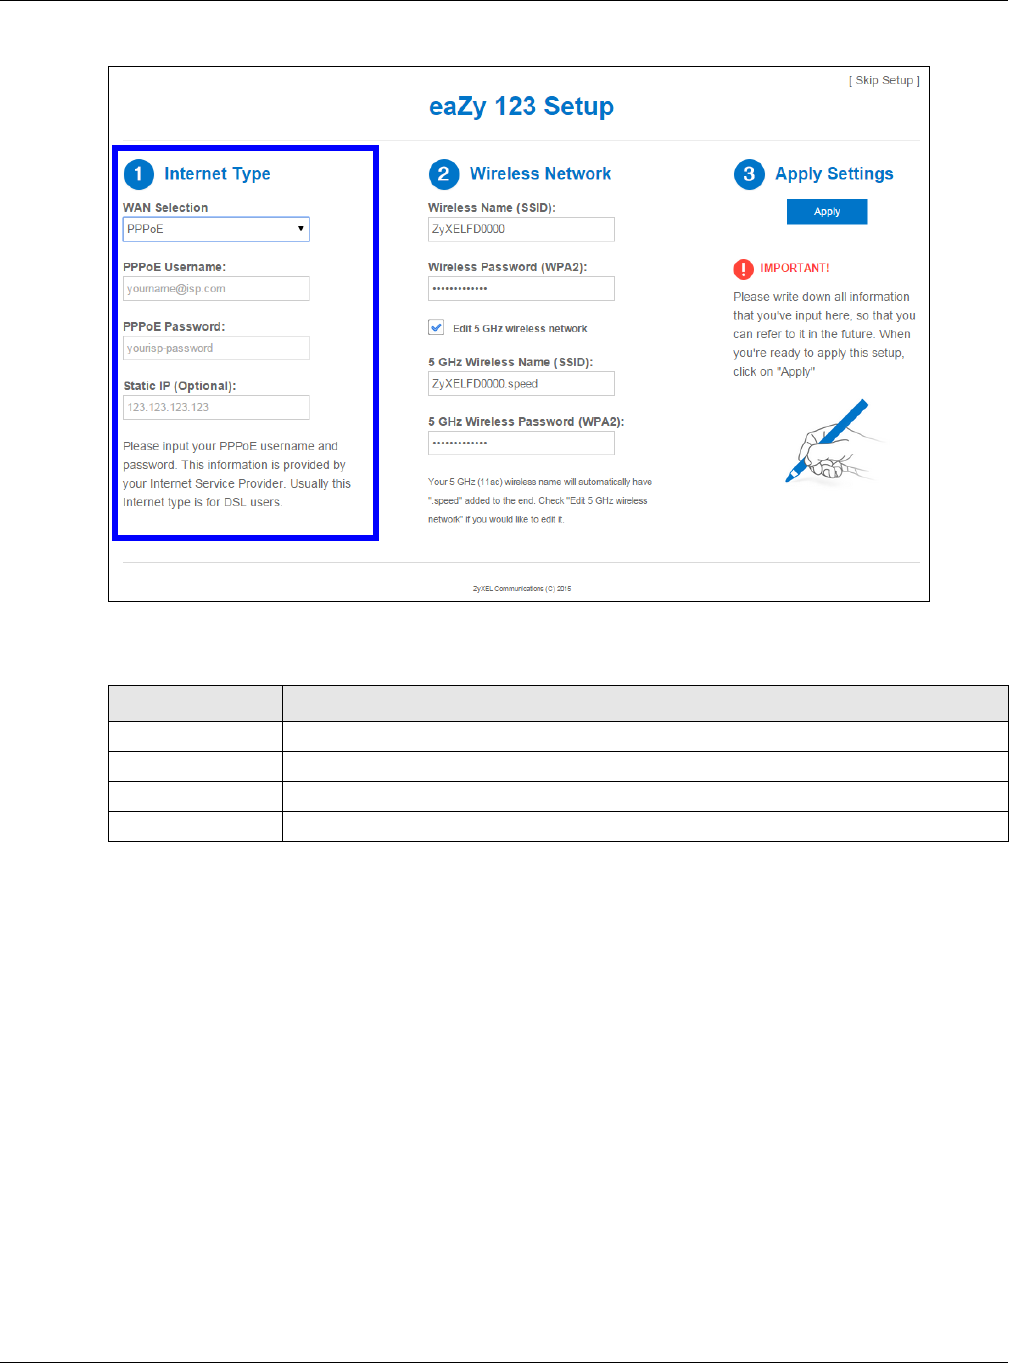
Figure 9 eaZy 123 Setup
3.3 Internet Type
The NBG6817 offers three WAN selection types. They are Automatic - DHCP, PPPoE or Static. Configure
the Internet type settings on your NBG6817 in the first part. The following screen depends on your Internet
connection type. Enter the details provided by your Internet Service Provider (ISP) in the fields (if any).
Check with your ISP to make sure you use the correct type. This wizard screen varies according to the
connection type that you select.

Chapter 3 eaZy 123 Wizard
NBG6817 User’s Guide
21
3.3.1 WAN Selection Type: Automatic - DHCP
Select the Automatic - DHCP option if your ISP did not assign you a fixed IP address.
Figure 10 WAN Selection Type: Automatic - DHCP
3.3.2 WAN Selection Type: PPPoE
Point-to-Point Protocol over Ethernet (PPPoE) functions as a dial-up connection. PPPoE is an IETF (Internet
Engineering Task Force) standard specifying how a host personal computer interacts with a broadband
modem (for example DSL, cable, wireless, etc.) to achieve access to high-speed data networks.
For the service provider, PPPoE offers an access and authentication method that works with existing
access control systems (for instance, RADIUS).
One of the benefits of PPPoE is the ability to let end users access one of multiple network services, a
function known as dynamic service selection. This enables the service provider to easily create and offer
new IP services for specific users.
Operationally, PPPoE saves significant effort for both the subscriber and the ISP/carrier, as it requires no
specific configuration of the broadband modem at the subscriber's site.
By implementing PPPoE directly on the NBG6817 (rather than individual computers), the computers on
the LAN do not need PPPoE software installed, since the NBG6817 does that part of the task.
Furthermore, with NAT, all of the LAN's computers will have Internet access.
Chapter 3 eaZy 123 Wizard
NBG6817 User’s Guide
22
Figure 11 WAN Selection Type: PPPoE
The following table describes the labels in this screen.
Note: If you get an error message, make sure you have entered the correct information
provided by your ISP.
3.3.3 WAN Selection Type: Static
Choose Static as the WAN Selection Type when the WAN port is used as a regular Ethernet. Click Next.
Table 4 WAN Selection Type: PPPoE
LABEL DESCRIPTION
WAN Selection Select the PPPoE (Point-to-Point Protocol over Ethernet) option for a dial-up connection.
PPPoE Username Type the user name given to you by your ISP.
PPPoE Password Type the password associated with the user name above.
Static IP (Optional) Enter the WAN IP address assigned by your ISP.

Chapter 3 eaZy 123 Wizard
NBG6817 User’s Guide
23
Figure 12 WAN Selection Type: Static
The following table describes the labels in this screen.
Note: If you get an error screen, make sure your Internet connection is working and select the
right WAN Selection Type. Contact your ISP if you are not sure of your Internet
Connection type.
3.4 Wireless Network
Configure the wireless network settings on your NBG6817 in the second part. The default wireless security
setting is WPA2-PSK.
Table 5 WAN Selection Type: Static
LABEL DESCRIPTION
WAN Selection Select the Static option when the WAN port is using a fixed IP address.
IP Address Enter the IP address provided by your ISP.
Subnet Mask Enter the IP subnet mask in this field.
Gateway IP Address
(Optional)
Enter the gateway IP address in this field.
DNS Server Enter the DNS server IP address in this field.

Chapter 3 eaZy 123 Wizard
NBG6817 User’s Guide
24
Figure 13 Wireless Network
The following table describes the labels in this screen.
Click the Apply button in the third part to save your settings.
Table 6 Wireless Network
LABEL DESCRIPTION
Wireless Name
(SSID)
Enter a descriptive name for the wireless LAN.
Note: The setting here applies to 2.4 GHz wireless radios.
If you change this field on the NBG6817, make sure all wireless stations use the same SSID in order
to access the network.
Wireless
Password
(WPA2)
Type from 8 to 63 case-sensitive ASCII characters. You can set up the most secure wireless
connection by configuring WPA in the wireless LAN screens.
Edit 5 GHz
wireless network
Select this check box to configure different SSID and wireless security settings for the NBG6817’s 5
GHz wireless network.
If you do not select this option, the NBG6817 uses the same SSID and Wi-Fi key (you configured
above) for the 5 GHZ wireless network.
5GHz Wireless
Name (SSID)
Enter a descriptive name for the wireless LAN.
If you change this field on the NBG6817, make sure all wireless stations use the same SSID in order
to access the network.
5GHz Wireless
Password
(WPA2)
Type from 8 to 63 case-sensitive ASCII characters. You can set up the most secure wireless
connection by configuring WPA in the wireless LAN screens.

Chapter 3 eaZy 123 Wizard
NBG6817 User’s Guide
25
Figure 14 Apply your Wi-Fi settings
Congratulations! Open a web browser, such as Internet Explorer, to visit your favorite website.
Note: If you cannot access the Internet when your computer is connected to one of the
NBG6817’s LAN ports, check your connections. Then turn the NBG6817 off, wait for a
few seconds then turn it back on. If that does not work, log in to the web configurator
again and check you have typed all information correctly. See the User’s Guide for
more suggestions.
Figure 15 Congratulations
You can click the myZyXELcloud button to go to https://mycloud.zyxel.com, where you can create an
account and register your NBG6817. At the time of writing, you can have free DDNS service to get a

Chapter 3 eaZy 123 Wizard
NBG6817 User’s Guide
26
domain name mapped to the NBG6817’s dynamic IP address. With DDNS, you can use the domain
name to remotely access the NBG6817’s Web Configurator through the Internet.
You have successfully set up your NBG6817 to operate on your network and access the Internet.

NBG6817 User’s Guide
27
CHAPTER 4
NBG6817 Modes
4.1 Overview
This chapter introduces the different modes available on your NBG6817. First, the term “mode” refers to
two things in this User’s Guide.
•Web Configurator mode. This refers to the Web Configurator interface you want to use for editing
NBG6817 features.
•Device mode. This is the operating mode of your NBG6817, or simply how the NBG6817 is being used
in the network.
4.1.1 Web Configurator Modes
This refers to the configuration interface of the Web Configurator, which has two modes:
•Easy: The Web Configurator shows this mode by default. Refer to Chapter 5 on page 28 for more
information on the screens in this mode. This interface may be sufficient for users who just want to use
the device.
•Expert: Advanced users can change to this mode to customize all the functions of the NBG6817. Click
> Expert Mode after logging into the Web Configurator. The User’s Guide Chapter 9 on page 60
through Chapter 15 on page 158 discusses the screens in this mode.
4.1.2 Device Modes
This refers to the operating mode of the NBG6817, which can act as a:
•Router: This is the default device mode of the NBG6817. Use this mode to connect the local network
to another network, like the Internet. Go to Section 6.2 on page 36 to view the Status screen in this
mode.
•Access Point: Use this mode if you want to extend your network by allowing network devices to
connect to the NBG6817 wirelessly. Go to Section 7.4 on page 44 to view the Status screen in this
mode.
For more information on these modes and to change the mode of your NBG6817, refer to Chapter 15 on
page 158.
The menu for changing device modes is available in Expert Mode only.
Note: Choose your device mode carefully to avoid having to change it later.
When changing to another mode, the IP address of the NBG6817 changes. The running applications
and services of the network devices connected to the NBG6817 can be interrupted.

NBG6817 User’s Guide
28
CHAPTER 5
Easy Mode
5.1 Overview
The Web Configurator is set to Easy Mode by default. You can configure several key features of the
NBG6817 in this mode. This mode is useful to users who are not fully familiar with some features that are
usually intended for network administrators.
When you log in to the Web Configurator, the following screen opens.
Figure 16 Easy Mode
5.2 What You Can Do
You can do the following in this mode:
• Use this Navigation Panel to open the eaZy123 wizard or log out the NBG6817 (Section 5.4 on page
29).
• Use the Network Map screen to check if your NBG6817 is connected to the Internet (Section 5.5 on
page 30).
Network Map
Navigation Panel
Control Panel
Go to
Status
Screen
(Expert
Mode)
Chapter 5 Easy Mode
NBG6817 User’s Guide
29
• Use the Control Panel to configure and enable NBG6817 features, including guest Wi-Fi, wireless
security, parental control and so on (Section 5.6 on page 31).
5.3 What You Need to Know
Between the different device modes, the Control Panel (Section 5.6 on page 31) changes depending
on which features are applicable to the mode:
•Router Mode: All Control Panel features are available.
•Access Point Mode: Parental Control and Notification are not available.
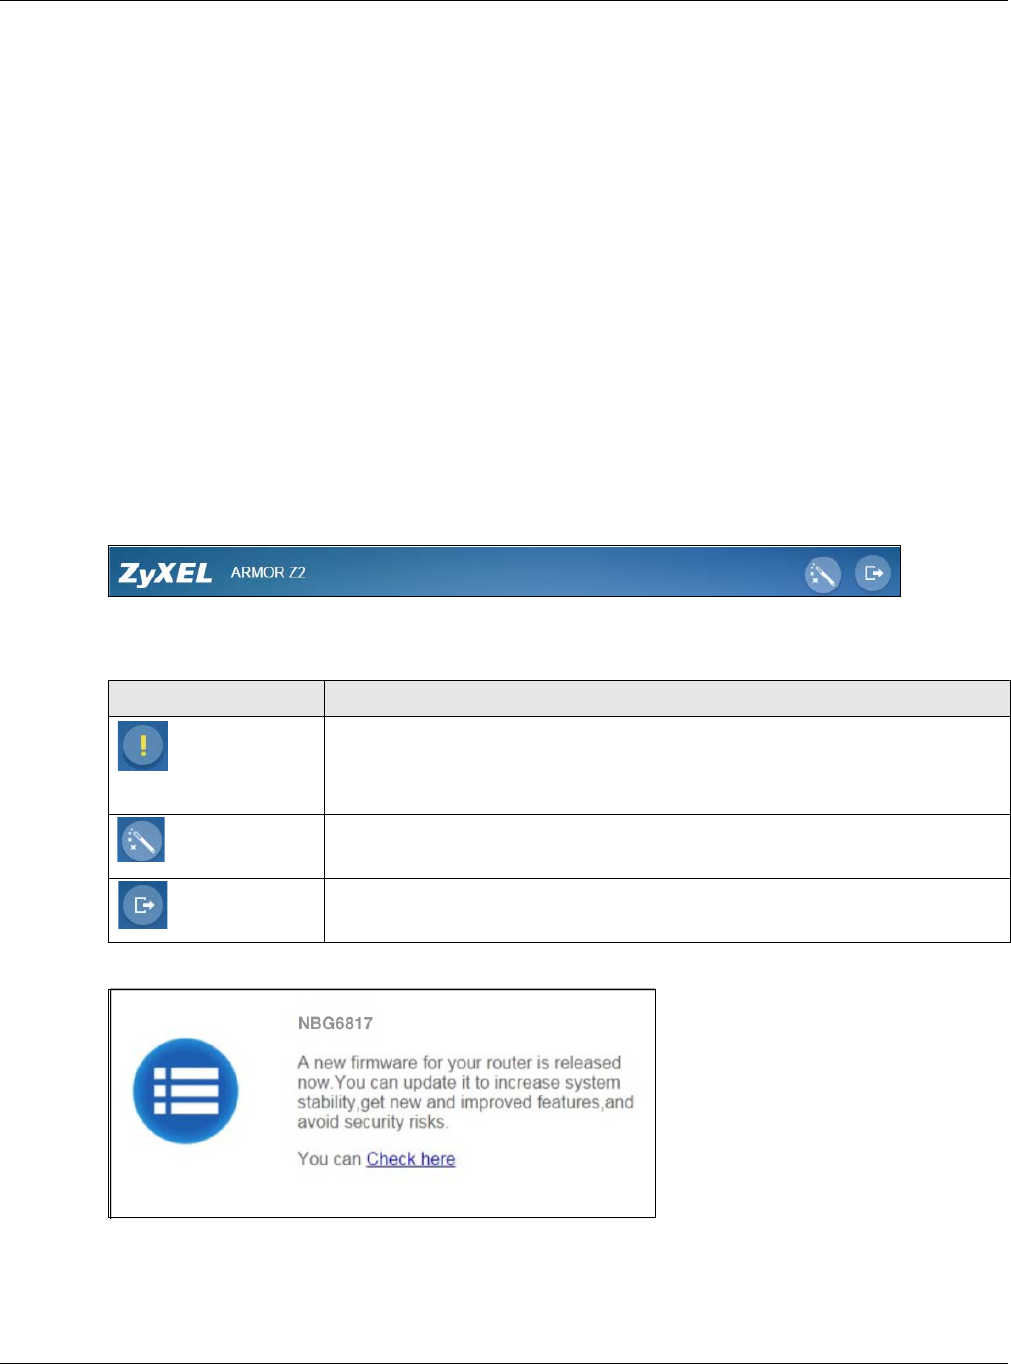
5.4 Navigation Panel
Use this navigation panel to opt out of the Easy mode.
Figure 17 Easy Mode: Navigation Panel
The following table describes the labels in this screen.
Figure 18 Easy Mode: Navigation Panel: Firmware Notification
Table 7 Easy Mode: Navigation Panel
ITEM DESCRIPTION
Firmware Notification
Click this icon to open a screen where you can click Check here to redirect your
screen to the firmware upgrade page.
This icon only displays when new firmware is released.
Wizard Click this icon to open the eaZy123 wizard for the NBG6817.
Logout Click this to end the Web Configurator session.

Chapter 5 Easy Mode
NBG6817 User’s Guide
30
5.5 Network Map
When you log into the Web Configurator, the Network Map is shown as follows.
Figure 19 Easy Mode: Network Map
This screen displays whether the NBG6817 connects to the Internet. It also shows the devices connected
to the NBG6817, including those connecting wirelessly. Click the Refresh button to refresh the network
map.
The following table describes the icons in this screen.
Table 8 Easy Mode: Network Map
ITEM DESCRIPTION
This icon shows the NBG6817’s connection status.
This icon is grayed out if the user is unable to access the Internet.
Click this button to refresh the NBG6817’s connection status and the network map.
Info Click this to view the device’s information that is currently connected to the NBG6817.
Block Click this to block the device from accessing the Internet through the NBG6817.
Rename / Icon Click this to rename the device or change the device’s icon.

Chapter 5 Easy Mode
NBG6817 User’s Guide
31
Figure 20 Easy Mode: Network Map: Info
Figure 21 Easy Mode: Network Map: Rename / Icon
Click Apply to save your changes back to the NBG6817. Click Cancel to reload the previous
configuration for this screen.
5.6 Control Panel
The features configurable in Easy Mode are shown in the Control Panel.
Figure 22 Easy Mode: Control Panel
Switch ON to enable the feature. Otherwise, switch OFF. If the feature is turned on, the green light
flashes. If it is turned off, the blue light flashes.
Additionally, click the feature to open a screen where you can edit its settings.

Chapter 5 Easy Mode
NBG6817 User’s Guide
32
The following table describes the labels in this screen.
5.6.1 Wi-Fi
Use this screen to configure security for the NBG6817's default wireless LAN. You can enter the SSID and
select the wireless security mode in the following screen. See Chapter 14 on page 141 for how to
configure wireless network.
Note: You can enable the wireless function of your NBG6817 by first turning on the WIFI switch
in the rear panel.
Figure 23 Easy Mode: Wi-Fi
Table 9 Easy Mode: Control Panel
ITEM DESCRIPTION
Wi-Fi Click this to configure wireless radio, SSID, security mode and wireless password for the
NBG6817's default Wi-Fi network.
Refer to Section 5.6.1 on page 32 to see this screen.
Guest Wi-Fi Click this to configure wireless and wireless security settings for the guest Wi-Fi network.
Parental Control Switch ON to enable parental control, and click this to view the parental control rules.
Otherwise, switch OFF.
Refer to Section 5.6.3 on page 34 to see this screen.
Notification Switch ON to have the NBG6817 send e-mail notifications when the user(s) is
connected to the NBG6817 for Internet access during the specified time periods.
Otherwise, switch OFF.
Refer to Section 5.6.4 on page 35 to see this screen.
LED Switch ON to have the NBG6817's LEDs (lights) stay lit/blinking. Otherwise, switch OFF.

Chapter 5 Easy Mode
NBG6817 User’s Guide
33
The following table describes the labels in this screen.
5.6.2 Guest Wi-Fi
This screen allows you to configure guest wireless network settings on the NBG6817. Users connected to
the guest wireless network can access the Internet via the NBG6817, but not other networks connected
to the NBG6817. See Chapter 11 on page 94 for how to enable and set up the guest wireless network.
Figure 24 Easy Mode: Guest Wi-Fi
Table 10 Easy Mode: Wi-Fi
LABEL DESCRIPTION
Wireless Radio Choose whether you want to apply the wireless security to 2.4G Hz, 5G Hz or Both wireless
radios.
Network Name
(SSID)
(Service Set IDentity) The SSID identifies the Service Set with which a wireless station is
associated. Wireless stations associating to the access point (AP) must have the same
SSID. Enter a descriptive name (up to 32 keyboard characters) for the wireless LAN.
Security Mode Select WPA2-PSK to enable data encryption. Or Select No Security to allow wireless clients to
communicate with the access points without any data encryption.
Password This field appears when you choose wither WPA2-PSK as the security mode.
Type a pre-shared key from 8 to 63 case-sensitive keyboard characters.
Verify Password Type the password again to confirm.
Cancel Click Cancel to reload the previous configuration for this screen.
Apply Click Apply to save your changes back to the NBG6817.

Chapter 5 Easy Mode
NBG6817 User’s Guide
34
The following table describes the labels in this screen.
5.6.3 Parental Control
Use this screen to view the parental control rules configured on the NBG6817. See Section 13.2 on page
120 for how to enable and configure parental control rules.
Figure 25 Easy Mode: Parental Control
The following table describes the labels in this screen.
Table 11 Easy Mode: Guest Wi-Fi
LABEL DESCRIPTION
Wireless Radio Choose whether you want to apply the wireless settings to the 2.4G Hz or 5G Hz wireless
radio.
Network Name
(SSID)
The SSID (Service Set IDentity) identifies the Service Set with which a wireless client is
associated. Enter a descriptive name (up to 32 printable characters found on a typical
English language keyboard) for the guest wireless network.
Security Mode Select WPA2-PSK to enable data encryption. Or select No Security to allow wireless clients to
communicate with the NBG6817 without any data encryption.
Password This field appears when you choose WPA2-PSK as the security mode.
Type a pre-shared key from 8 to 63 case-sensitive keyboard characters.
Verify Password Type the password again to confirm.
Cancel Click Cancel to reload the previous configuration for this screen.
Apply Click Apply to save your changes back to the NBG6817.
Table 12 Easy Mode: Parental Control
LABEL DESCRIPTION
Status This indicates whether the rule is active or not.
A yellow bulb signifies that this rule is active. A gray bulb signifies that this rule is not active.
User Name This shows the name of the user to which this rule applies.
Schedule This shows whether the user is allowed to access the Internet (Allow) or not (Block).
Bonus If the user is currently not permitted to access the Internet, you can click the Bonus to allow
access for a specified period of time. A screen then displays allowing you to set how long (in
minutes) the user is allowed to access the Internet.
This button is grayed out if the user is now able to access the Internet.
Remaining time This field displays the amount of Internet access time that remains for each user before the
NBG6817 blocks the user from accessing the Internet.
None means there is no extra Internet access time.

Chapter 5 Easy Mode
NBG6817 User’s Guide
35
5.6.4 Notification
Use this screen to view the e-mail notification rules configured on the NBG6817. See Section 13.2.2 on
page 123 for how to configure e-mail notification rules and e-mail settings.
Figure 26 Easy Mode: Notification
The following table describes the labels in this screen.
5.6.5 LED
Switch ON to turn on the LEDs (lights) on the NBG6817. Otherwise, switch OFF.
Table 13 Easy Mode: Notification
LABEL DESCRIPTION
Notification
Status This indicates whether the rule is active or not.
A yellow bulb signifies that this rule is active. A gray bulb signifies that this rule is not active.
User Name This shows the name of the user to which this rule applies.
Notification This shows the e-mail address to which the notification is sent.

NBG6817 User’s Guide
36
CHAPTER 6
Router Mode
6.1 Overview
The NBG6817 is set to router mode by default. Routers are used to connect the local network to another
network (for example, the Internet). In the figure below, the NBG6817 connects the local network (LAN1
~ LAN4) to the Internet.
Figure 27 NBG6817 Network
Note: After clicking Login, the Easy Mode appears. Refer to Chapter 5 on page 28 for the
Easy Mode screens. Change to Expert Mode to see the screens described in the
sections following this.
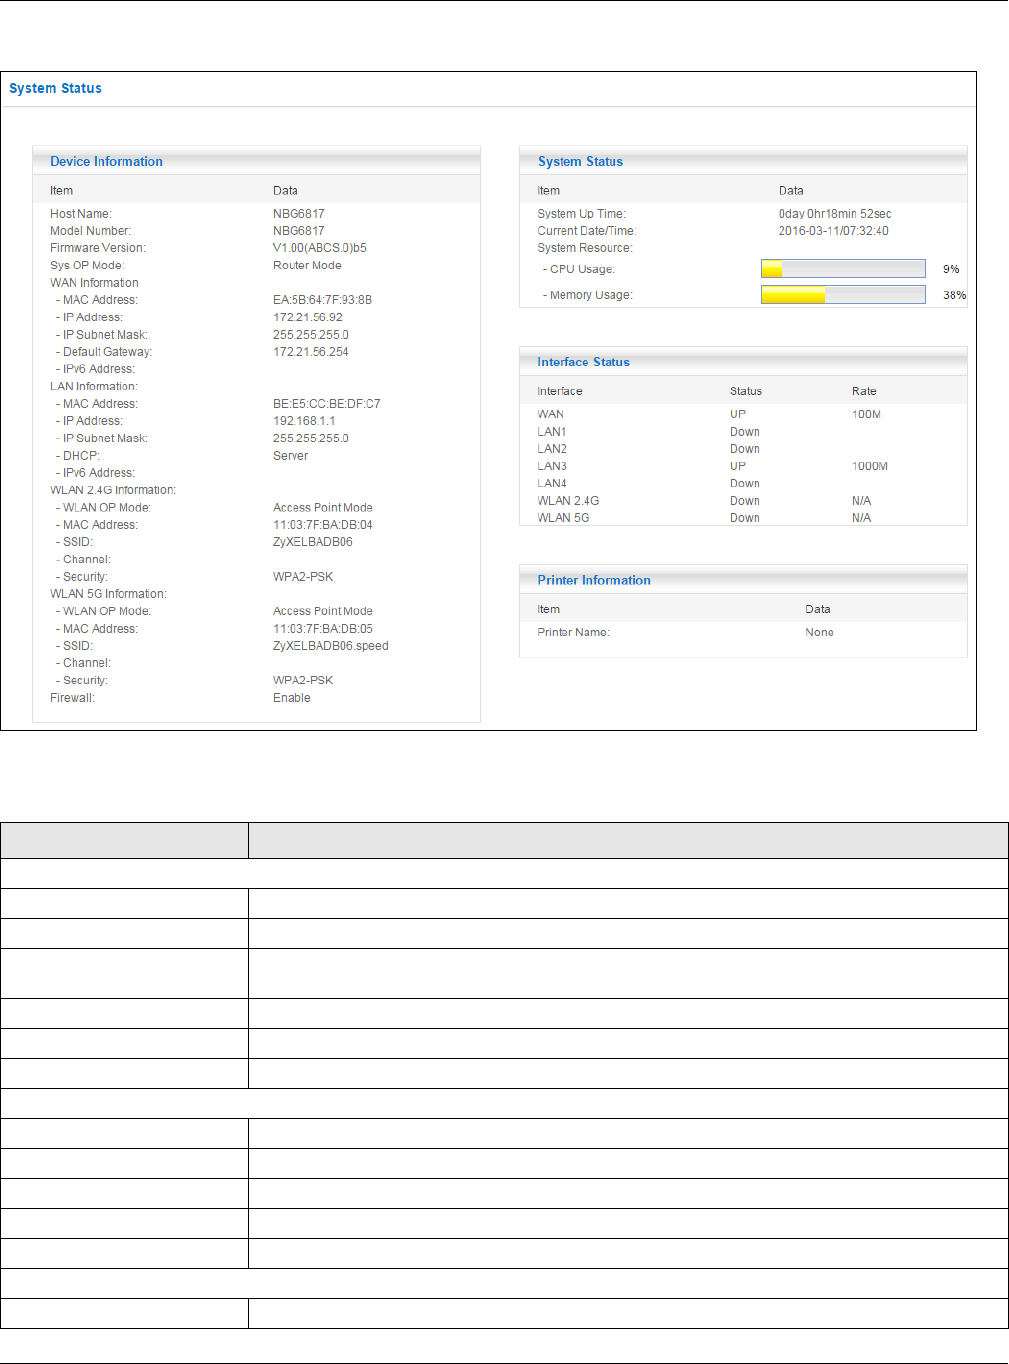
6.2 Router Mode Status Screen
Click Expert Mode > Status > System Status to open the status screen.
Modem
Chapter 6 Router Mode
NBG6817 User’s Guide
37
Figure 28 Expert Mode: Status > System Status: Router Mode
The following table describes the labels shown in the Status screen.
Table 14 Expert Mode: Status > System Status: Router Mode
LABEL DESCRIPTION
Device Information
Item This column shows the type of data the NBG6817 is recording.
Data This column shows the actual data recorded by the NBG6817.
Host Name This is the System Name you enter in the Maintenance > General screen. It is for identification
purposes.
Model Number This is the model name of your device.
Firmware Version This is the firmware version.
Sys OP Mode This is the device mode (Section 4.1.2 on page 27) to which the NBG6817 is set - Router Mode.
WAN Information
MAC Address This shows the WAN Ethernet adapter MAC Address of your device.
IP Address This shows the WAN port’s IP address.
IP Subnet Mask This shows the WAN port’s subnet mask.
Default Gateway This shows the WAN port’s gateway IP address.
IPv6 Address This shows the IPv6 address of the NBG6817 on the WAN.
LAN Information
MAC Address This shows the LAN Ethernet adapter MAC Address of your device.

Chapter 6 Router Mode
NBG6817 User’s Guide
38
IP Address This shows the LAN port’s IP address.
IP Subnet Mask This shows the LAN port’s subnet mask.
DHCP This shows the LAN port’s DHCP role - Server or Disable.
IPv6 Address This shows the IPv6 address of the NBG6817 on the LAN.
WLAN 2.4G Information
WLAN OP Mode This is the device mode (Section 4.1.2 on page 27) to which the NBG6817’s wireless LAN is set -
Access Point Mode.
MAC Address This shows the 2.4GHz wireless adapter MAC Address of your device.
SSID This shows a descriptive name used to identify the NBG6817 in the 2.4GHz wireless LAN.
Channel This shows the channel number which you select manually.
Security This shows the level of wireless security the NBG6817 is using.
WLAN 5G Information
WLAN OP Mode This is the device mode (Section 4.1.2 on page 27) to which the NBG6817’s wireless LAN is set -
Access Point Mode.
MAC Address This shows the 5GHz wireless adapter MAC Address of your device.
SSID This shows a descriptive name used to identify the NBG6817 in the 5GHz wireless LAN.
Channel This shows the channel number which you select manually.
Security This shows the level of wireless security the NBG6817 is using.
Firewall This shows whether the firewall is enabled or not.
System Status
System Up Time This is the total time the NBG6817 has been on.
Current Date/Time This field displays your NBG6817’s present date and time.
System Resource
- CPU Usage This displays what percentage of the NBG6817’s processing ability is currently used. When this
percentage is close to 100%, the NBG6817 is running at full load, and the throughput is not going
to improve anymore. If you want some applications to have more throughput, you should turn
off other applications (for example, using bandwidth management.)
- Memory Usage This shows what percentage of the heap memory the NBG6817 is using.
Interface Status
Interface This displays the NBG6817 port types. The port types are: WAN, LAN and WLAN.
Status For the LAN and WAN ports, this field displays Down (line is down) or Up (line is up or connected).
For the 2.4GHz/5GHz WLAN, it displays Up when the 2.4GHz/5GHz WLAN is enabled or Down
when the 2.4G/5G WLAN is disabled.
Rate For the LAN ports, this displays the port speed and duplex setting or is left blank when the line is
disconnected.
For the WAN port, it displays the port speed and duplex setting if you’re using Ethernet
encapsulation. This field displays N/A when the line is disconnected.
For the 2.4GHz/5GHz WLAN, it displays the maximum transmission rate when the 2.4GHz/5GHz
WLAN is enabled and N/A when the WLAN is disabled.
Printer Information
Printer Name The NBG6817 can act as a print server and allows you to share a USB printer on your LAN. This
displays the name of the printer connected to the NBG6817's USB port.
Note: You need to manually install the printer driver in your computer and add the
printer to your printer list.
Table 14 Expert Mode: Status > System Status: Router Mode (continued)
LABEL DESCRIPTION
Termékspecifikációk
| Márka: | ZyXEL |
| Kategória: | router |
| Modell: | NBG6817 - ARMOR Z2 |
Szüksége van segítségre?
Ha segítségre van szüksége ZyXEL NBG6817 - ARMOR Z2, tegyen fel kérdést alább, és más felhasználók válaszolnak Önnek
Útmutatók router ZyXEL

23 Március 2025
11 Október 2024
18 Szeptember 2024
17 Szeptember 2024
20 Augusztus 2024
19 Augusztus 2024
19 Augusztus 2024
15 Augusztus 2024
8 Augusztus 2024
8 Augusztus 2024
Útmutatók router
- router Samsung
- router Acer
- router Milwaukee
- router Bosch
- router AEG
- router StarTech.com
- router Einhell
- router Nokia
- router HP
- router Makita
- router BenQ
- router Apple
- router Ubiquiti Networks
- router Siemens
- router TP-Link
- router Medion
- router Motorola
- router Vimar
- router LogiLink
- router Alcatel
- router Roland
- router TCL
- router Digitus
- router Zebra
- router Xiaomi
- router TRENDnet
- router Mercusys
- router AVM
- router EZVIZ
- router Dell
- router Lancom
- router Strong
- router Gigabyte
- router Conceptronic
- router Thomson
- router Juniper
- router Kyocera
- router Hikvision
- router Keewifi
- router Vivanco
- router Netgear
- router Huawei
- router Asus
- router Vtech
- router Hama
- router Zoom
- router Renkforce
- router Synology
- router Draytek
- router Iogear
- router Güde
- router Hitachi
- router Mikrotik
- router Toolcraft
- router SPL
- router Dahua Technology
- router Smart-AVI
- router Black & Decker
- router Devolo
- router Planet
- router Tenda
- router BT
- router Black Box
- router MSI
- router Gembird
- router Cisco
- router PowerPlus
- router ATen
- router Google
- router Metabo
- router Bea-fon
- router ZTE
- router Edimax
- router Vodafone
- router ModeCom
- router HiKOKI
- router Foscam
- router Milan
- router Manhattan
- router Kogan
- router Festool
- router EnGenius
- router Sigma
- router Western Digital
- router D-Link
- router Media-Tech
- router Blustream
- router Milesight
- router Moxa
- router Sagem
- router Razer
- router Trust
- router Porter-Cable
- router Konig
- router Alfa
- router MuxLab
- router DeWalt
- router AVMATRIX
- router IFM
- router A-NeuVideo
- router Atlona
- router Schneider
- router AJA
- router Lindy
- router Cudy
- router Barco
- router QNAP
- router NEC
- router Silverline
- router Cotech
- router Siig
- router Gefen
- router Kathrein
- router Avenview
- router Lantronix
- router Technicolor
- router FSR
- router Topcom
- router Holzmann
- router Arris
- router Anker
- router I-TEC
- router Keenetic
- router Linksys
- router Teltonika
- router Sitecom
- router Intelix
- router Comprehensive
- router Ocean Matrix
- router Digitalinx
- router Alfatron
- router Belkin
- router RGBlink
- router Kopul
- router KanexPro
- router Key Digital
- router Kramer
- router BZBGear
- router UPC
- router Allnet
- router Allied Telesis
- router Airlive
- router Proximus
- router Skil
- router Eminent
- router Nilox
- router Sonos
- router Patton
- router Techly
- router Totolink
- router KPN
- router Netis
- router Envivo
- router Buffalo
- router Nest
- router LevelOne
- router ICIDU
- router Clas Ohlson
- router AT&T
- router Sweex
- router Aruba
- router Phicomm
- router Kasda
- router Jung
- router Digi
- router Verizon
- router Billion
- router T-Mobile
- router RAVPower
- router Hawking Technologies
- router Nexxt
- router Beafon
- router Kraun
- router LTS
- router Zolid
- router Sagemcom
- router Telstra
- router Eero
- router Advantech
- router Mercku
- router Hercules
- router Xantech
- router Intellinet
- router Arcadyan
- router Digiconnect
- router Ubee
- router SMC
- router Tele 2
- router Peak
- router CradlePoint
- router Davolink
- router Sixnet
- router 7inova
- router AVPro Edge
- router F-Secure
- router Rosewill
- router Digicom
- router Sabrent
- router On Networks
- router PENTAGRAM
- router Leoxsys
- router Readynet
- router OneAccess
- router Accelerated
- router Nexaira
- router Hamlet
- router Approx
- router T-com
- router Amped Wireless
- router Cambium Networks
- router 3Com
- router WyreStorm
- router Ruckus Wireless
- router Dovado
- router Mach Power
- router EXSYS
- router NetComm
- router Comtrend
- router Premiertek
- router GL.iNet
- router Shinybow
- router Edgewater
- router Atlantis Land
- router Lumantek
- router Starlink
- router PulseAudio
- router Predator
- router Evolution
- router Luxul
- router StarIink
- router Silentwind
- router Keezel
- router United Telecom
- router Wisetiger
Legújabb útmutatók router

9 Április 2025
9 Április 2025
9 Április 2025

31 Március 2025
30 Március 2025
30 Március 2025
30 Március 2025
30 Március 2025
30 Március 2025
15 Január 2025