Használati útmutató Verbatim PowerBay
Verbatim
külső merevlemez
PowerBay
Olvassa el alább 📖 a magyar nyelvű használati útmutatót Verbatim PowerBay (5 oldal) a külső merevlemez kategóriában. Ezt az útmutatót 7 ember találta hasznosnak és 2 felhasználó értékelte átlagosan 4.5 csillagra
Oldal 1/5
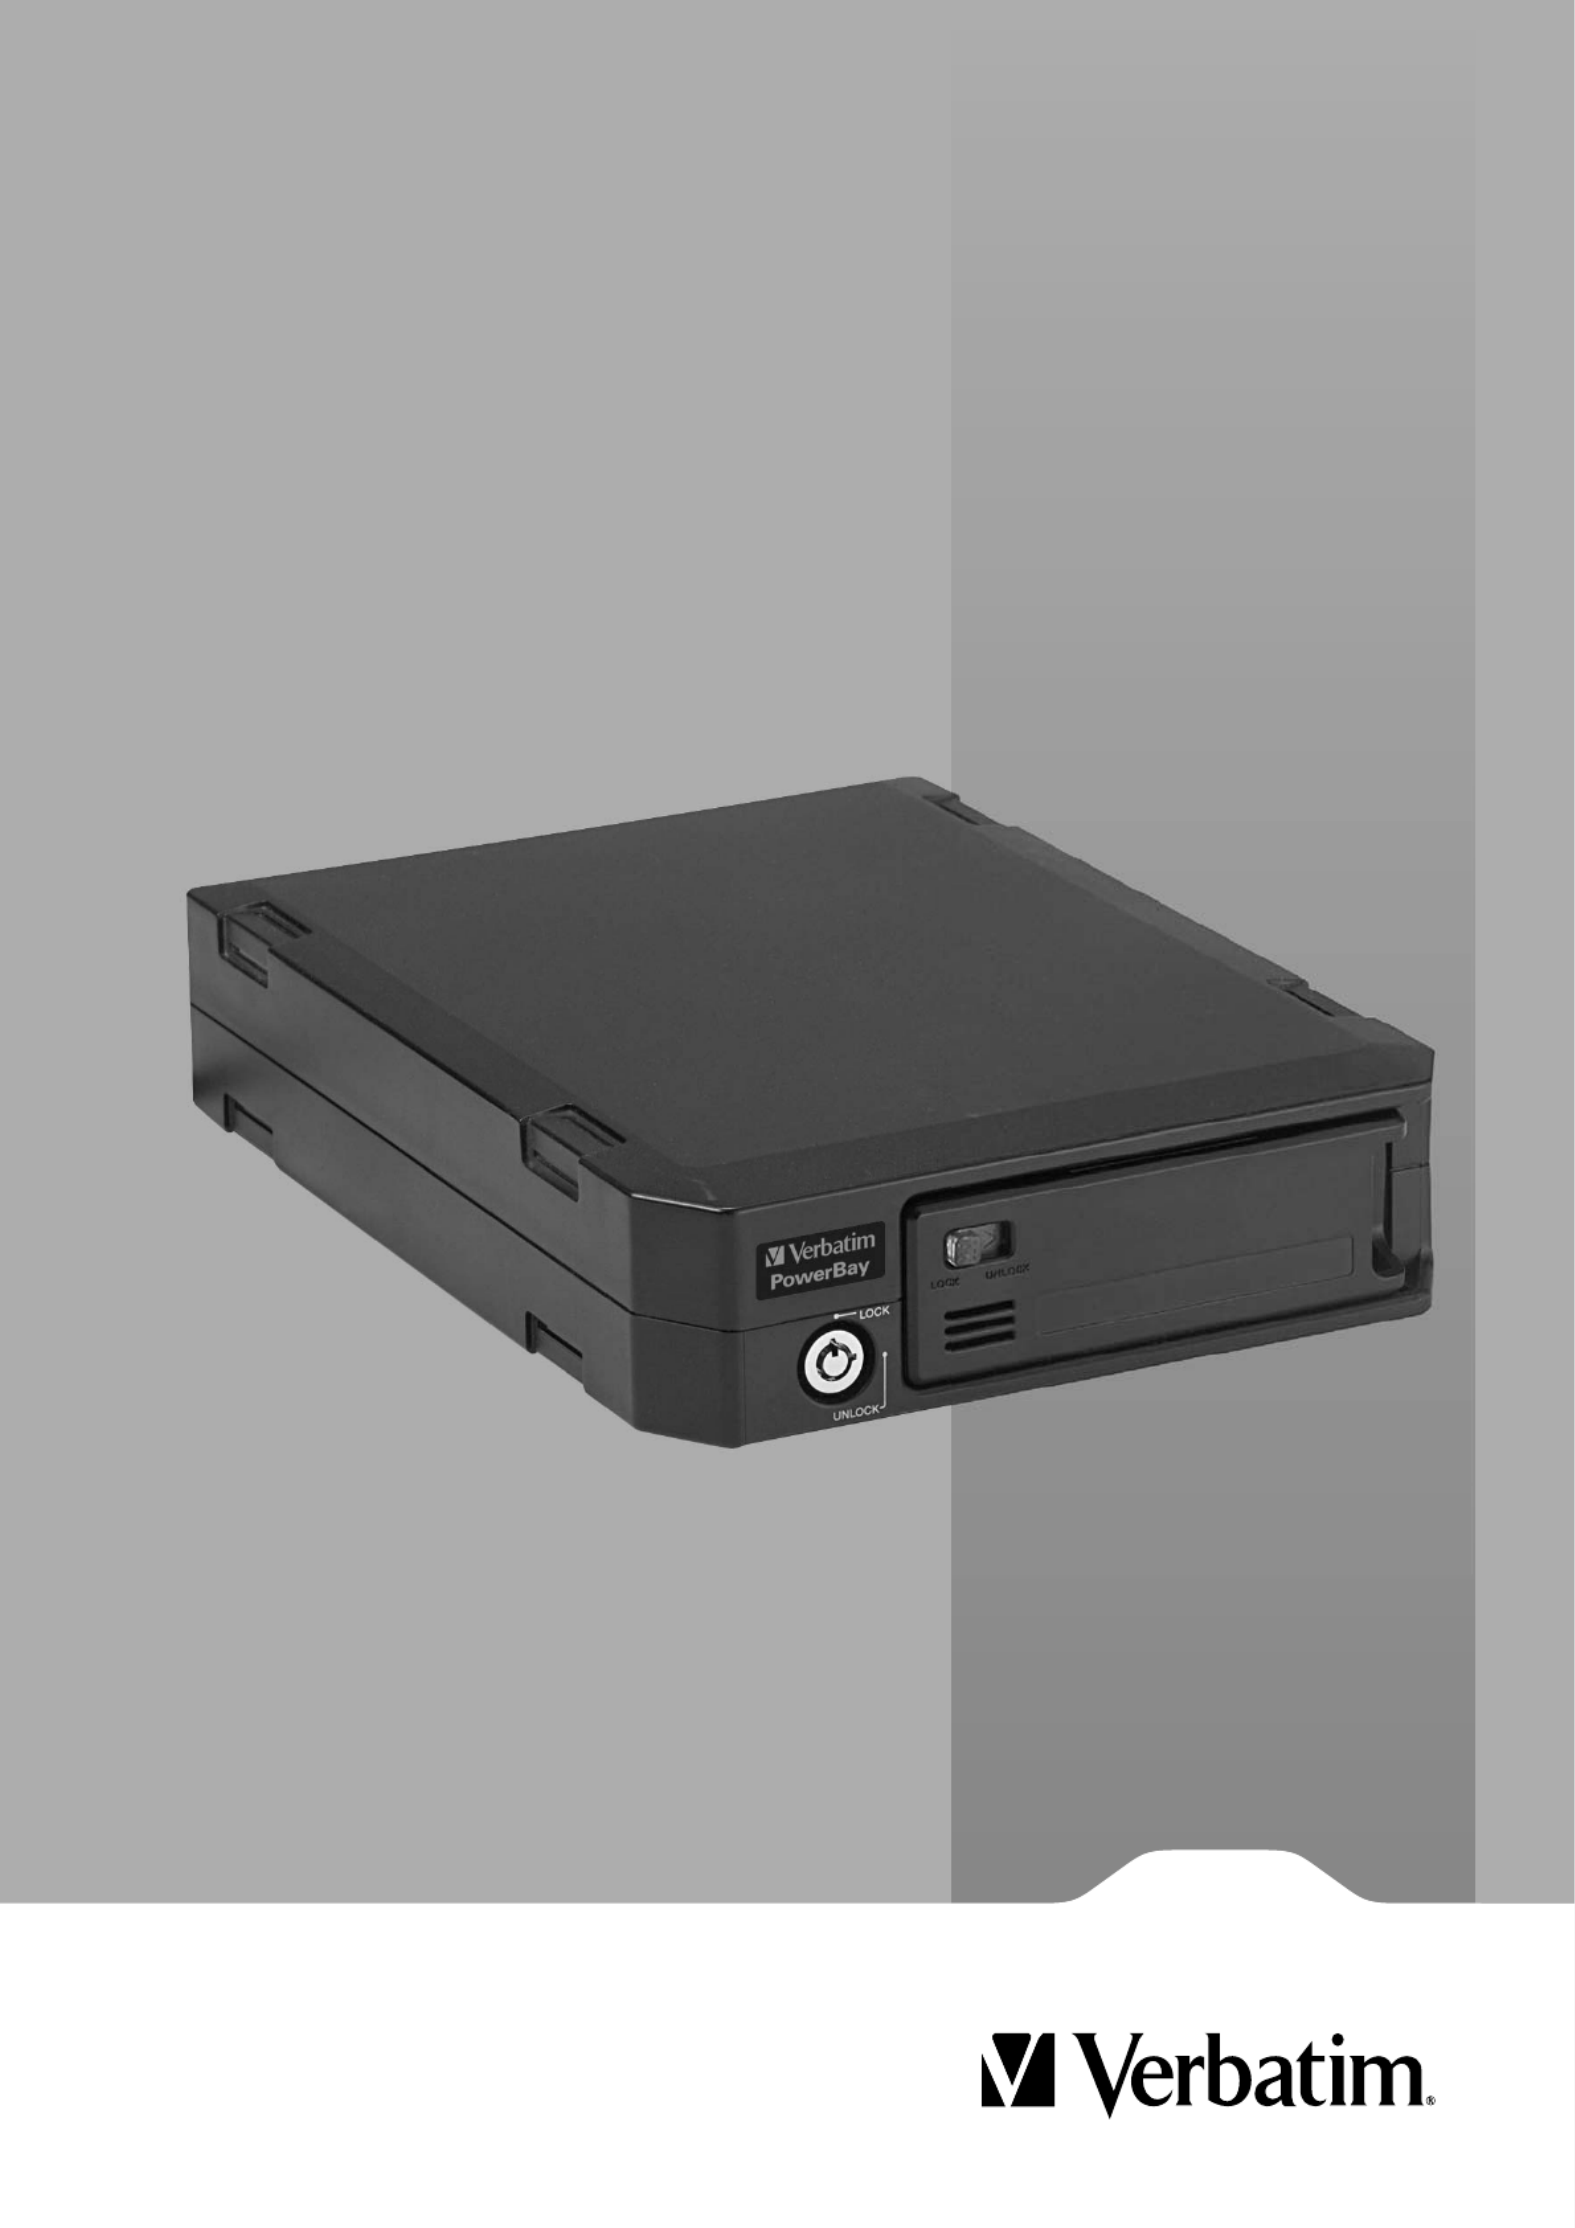
PowerBay™
Removable Hard Drive System
USB / eSATA
User Guide
English

2
I
ntr
o
du
c
ti
on
Thank you
f
or purchasing this Verbatim PowerBay Removable Hard Drive System. Be
f
ore you begin to use the drive there are a
f
ew important
t
hings to learn about your new product.
P
ac
k
C
ontent
s
• PowerBa
y
sin
gl
e
b
a
y
h
ar
d
d
riv
e
• Front Pane
l
Loc
k
Key (2 eac
h)
• AC Power A
d
apter wit
h
power cor
d
• USB 2.0 Ca
ble
• eSATA Ca
bl
es
(
one 30cm ca
bl
e an
d
one 100cm ca
bl
e
)
• CD-ROM containin
g
softwar
e
• User Gui
de
• Foot
p
a
d
s (4 eac
h)
Controls
,
Connectors and Indicators
F
irst
f
amiliarize yoursel
f
with the
f
eatures o
f
the unit.
1
. Hard Disk Cartridge. The hard disk cartridge is designed to be easily removed
f
rom the enclosure
f
or storage or replacement. To remove
t
he cartrid
g
e, slide the lock button to the ri
g
ht and then slide the cartrid
g
e out of the enclosure.
2
. Cartrid
g
e Slide Lock and LED. After insertin
g
the cartrid
g
e into the enclosure, slide the lock button to the left to lock the cartrid
g
e in
p
lace. The lock button also shows the activit
y
LED. The LED will come on blue to indicate the
p
ower-on state. The LED will fl ash
p
ur
p
le
d
uring data access.
3
. Key Lock. Use the included key to lock the cartridge in the enclosure in order to sa
f
eguard
f
rom unauthorized removal
.
4
. Kensin
g
ton S
l
ot. Use t
h
is s
l
ot wit
h
a com
p
ati
bl
e Kensin
g
ton
l
oc
k
.
5. Auto Power Switch. This
p
roduct su
pp
orts an Auto Power feature that allows the drive to
p
ower on and
p
ower off automaticall
y
d
e
p
endin
g
on the
p
ower condition of the attached host com
p
uter. To enable the Auto Power feature, move this switch to the “Auto”
position. To disable the Auto Power
f
eature, move this switch to the “ON” position
.
6
. eSATA Connector. Use t
h
is connector to attac
h
t
h
e
d
rive to your computer via eSATA
.
7
. USB Connector. Use t
h
is connector to attac
h
t
h
e
d
rive to
y
our com
p
uter via USB
.
8. DC In
p
ut Connector. Use this connector to attach the DC
p
lu
g
of
y
our included AC Power Ada
p
ter (10)
.
9
. Power Switch. Once the AC Power Ada
p
ter (10) has been
p
ro
p
erl
y
connected to the drive and an AC outlet,
y
ou can
p
ress the Power
S
witch to the ON position to power on the drive
.
Ab
out t
h
e Har
d
Drive
The hard drive comes
p
re-formatted in FAT32 format. This format allows for o
p
eration with either Windows or Mac OS.
Note: Capacity dependent on model. 1 MB = 1,000,000 bytes/1 GB = 1,000,000,000 bytes/1 TB = 1,000,000,000,000 bytes. Some capacity used
f
or pre-loaded so
f
tware,
f
ormatting
and other
f
unctions, and thus is not available
f
or data storage. As a result, and due to di
ff
ering calculation methods, your operating systems may report as
f
ewer megabytes/gigabytes/
tera
b
ytes
.

3
L
ocating the Drive on Your Desk
P
lace the drive on a sturdy desk or table that is
f
ree
f
rom clutter that could block air
fl
ow around the unit. The drive can be used in either the
horizontal or vertical position. Please install the attachable rubber
f
eet as shown below depending on which orientation you pre
f
er. In either
orientation ta
k
e care not to
bl
oc
k
any air vents
.
B
undled
S
oftwar
e
The included CD-ROM contains co
p
ies of the User Guide, as well as bundled o
p
tional software utilities as follows
:
• Acronis True Image backup so
f
tware
To install this application on your Windows computer, open the Acronis
f
older on the CD and then double click the setup
fi
l
e
t
o
s
t
a
rt in
s
t
a
ll
a
ti
o
n.
The Acronis installation window will a
pp
ear. Follow the setu
p
wizard to install the software. User documentation can also
b
e found on the CD.
• MachUSB to enhance data trans
f
er speeds via USB 2.
0
To install this application on your Windows computer, open the MacUSB
f
older on the CD and then double click the MachUSB.exe
fi
le to
s
t
a
rt in
s
t
alla
ti
o
n
.
The handler will remain active in the back
g
round and will accelerate USB data transfers whenever
y
our PowerBa
y
sin
g
le ba
y
drive is
attac
h
e
d.
C
onnecting To Your Computer
This Verbatim external hard drive provides both USB 2.0 and eSATA connections. You can connect your drive to a computer with either USB or
eSATA, but not both at the same time
.
Connecting your drive to a computer is extremely simple. Follow the steps below.
1
. Connect t
h
e inc
l
u
d
e
d
AC A
d
apter to t
h
e
d
rive, an
d
t
h
en to a wa
ll
out
l
et.
2
. Next
p
ress t
h
e Power Switc
h
to t
h
e ON
p
osition
.
3
. Finall
y
, connect the data cable. For USB, connect the included USB cable from the USB
p
ort on the drive to an available USB
p
ort on
y
our
c
om
p
uter. For eSATA, connect the included eSATA cable from the eSATA
p
ort on the drive to an available eSATA
p
ort on
y
our com
p
uter.
4
. The hard drive will mount automatically, and a new icon will appear in My Compute
r
(
Windows) or a new icon will appear on the desktop (Mac).
D
epending on your computer’s operating system and the inter
f
ace type you are using, the
f
ollowing special notes may apply
:
Note 1: USB under Windows. If
y
ou are usin
g
a USB 1.1
p
ort on
y
our Windows com
p
uter, the followin
g
cautionar
y
note ma
y
a
pp
ear on
y
our dis
p
la
y
: Hi-S
p
eed USB Device
p
lu
gg
ed into
n
on-Hi-S
p
eed USB hub. This does not indicate a
p
roblem because the drive is com
p
atible with both USB 1.1 and USB 2.0
p
orts. Sim
p
l
y
close the messa
g
e and
p
roceed. However, in
this case the drive will o
p
erate onl
y
at USB 1.1 s
p
eeds
.
Note 2: USB or eSATA under Mac OS X 10.2. Mac OS X version 10.2 will not mount an
y
sin
g
le FAT32-formatted (MS-DOS)
p
artition
g
reater than 128GB. To work around this OS limitation,
y
ou ma
y
p
artition the drive into smaller FAT32
p
artitions, or
y
ou ma
y
reformat the drive to HFS+ format.
Note 3: eSATA. Thou
g
h the eSATA interface standard
p
rovides for “hot-
p
lu
gg
in
g
” of the drive, some com
p
uters ma
y
not follow the standard
p
recisel
y
. If
y
ou fi nd that
y
our drive does not
m
ount after attachin
g
to a com
p
uter that is
p
owered on, then shut down the com
p
uter, attach and
p
ower on the drive, and then boot u
p
y
our com
p
uter.
Termékspecifikációk
| Márka: | Verbatim |
| Kategória: | külső merevlemez |
| Modell: | PowerBay |
Szüksége van segítségre?
Ha segítségre van szüksége Verbatim PowerBay, tegyen fel kérdést alább, és más felhasználók válaszolnak Önnek
Útmutatók külső merevlemez Verbatim

19 Augusztus 2024
19 Augusztus 2024
18 Augusztus 2024
17 Augusztus 2024
17 Augusztus 2024
16 Augusztus 2024
16 Augusztus 2024
16 Augusztus 2024
16 Augusztus 2024
14 Augusztus 2024
Útmutatók külső merevlemez
- külső merevlemez Samsung
- külső merevlemez Sony
- külső merevlemez Nedis
- külső merevlemez Philips
- külső merevlemez SilverCrest
- külső merevlemez StarTech.com
- külső merevlemez Lenovo
- külső merevlemez Toshiba
- külső merevlemez Sandisk
- külső merevlemez Medion
- külső merevlemez Rocstor
- külső merevlemez Digitus
- külső merevlemez LC-Power
- külső merevlemez Conceptronic
- külső merevlemez Asus
- külső merevlemez Hitachi
- külső merevlemez Kodak
- külső merevlemez Aluratek
- külső merevlemez Akasa
- külső merevlemez ADATA
- külső merevlemez Manhattan
- külső merevlemez Intenso
- külső merevlemez Western Digital
- külső merevlemez HGST
- külső merevlemez D-Link
- külső merevlemez Oyen Digital
- külső merevlemez Apricorn
- külső merevlemez Be Quiet!
- külső merevlemez Konig
- külső merevlemez Maxell
- külső merevlemez Corsair
- külső merevlemez Lindy
- külső merevlemez Inter-Tech
- külső merevlemez Inateck
- külső merevlemez Edge
- külső merevlemez Kathrein
- külső merevlemez I-TEC
- külső merevlemez Chieftec
- külső merevlemez Act
- külső merevlemez Icy Box
- külső merevlemez SilverStone
- külső merevlemez Trekstor
- külső merevlemez IStorage
- külső merevlemez Buffalo
- külső merevlemez Transcend
- külső merevlemez LaCie
- külső merevlemez Goodram
- külső merevlemez Fantec
- külső merevlemez Freecom
- külső merevlemez Seagate
- külső merevlemez Iomega
- külső merevlemez IoSafe
- külső merevlemez Emtec
- külső merevlemez Memup
- külső merevlemez Cavalry
- külső merevlemez Tandberg Data
- külső merevlemez Sonnet
- külső merevlemez Vantec
- külső merevlemez Dane Elec
- külső merevlemez Storex
- külső merevlemez PNY
- külső merevlemez Xigmatek
- külső merevlemez Highpoint
- külső merevlemez Silicon Power
- külső merevlemez Sabrent
- külső merevlemez Hamlet
- külső merevlemez OWC
- külső merevlemez Lexar
- külső merevlemez G-Technology
- külső merevlemez Glyph
- külső merevlemez Axagon
- külső merevlemez IODD
- külső merevlemez SecureData
- külső merevlemez Origin Storage
Legújabb útmutatók külső merevlemez
30 Március 2025
4 Január 2025
3 Január 2025
3 Január 2025

1 Január 2025
1 Január 2025
1 Január 2025
1 Január 2025
31 December 2025
31 December 2025