Használati útmutató SilverCrest SKGL 2000 A1
SilverCrest
Grill tányér
SKGL 2000 A1
Olvassa el alább 📖 a magyar nyelvű használati útmutatót SilverCrest SKGL 2000 A1 (213 oldal) a Grill tányér kategóriában. Ezt az útmutatót 4 ember találta hasznosnak és 2 felhasználó értékelte átlagosan 4.5 csillagra
Oldal 1/213

IAN 290943
KontaKtGrill
ContaCt Grill
Gril multi-usaGe sKGl 2000 a1
Gril multi-usaGe
Mode d’emploi
KontaKtGrill
Bedienungsanleitung
ContaCt Grill
Operating instructions
Grill de ContaCto
Instrucciones de uso
Grelhador eléCtriCo
Manual de instruções
ContaCtGrill
Gebruiksaanwijzing
KontaKtní Gril
Návod k obsluze

DE / AT / CH Bedienungsanleitung Seite 1
GB/IE Operating instructions Page 31
FR / BE Mode d’emploi Page 61
NL / BE Gebruiksaanwijzing Pagina 91
CZ Návod k obsluze Strana 121
ES Instrucciones de uso Página 151
PT Manual de instruções Página 181
Klappen Sie vor dem Lesen die Seite mit den Abbildungen aus und machen Sie sich anschließend mit allen
Funktionen des Gerätes vertraut.
Before reading, unfold the page containing the illustrations and familiarise yourself with all functions of
the device.
Avant de lire le mode d‘emploi, ouvrez la page contenant les illustrations et familiarisez-vous ensuite avec
toutes les fonctions de l‘appareil.
Vouw vóór het lezen de pagina met de afbeeldingen open en maak u vertrouwd met alle functies van het
apparaat.
Před čtením si otevřete stranu s obrázky a potom se seznamte se všemi funkcemi přístroje.
Antes de empezar a leer abra la página que contiene las imágenes y, en seguida, familiarícese con todas
las funciones del dispositivo.
Antes de começar a ler abra na página com as imagens e, de seguida, familiarize-se com todas as
funções do aparelho.

a
b

SKGL 2000 A1 DE│AT│CH │ 1 ■
Inhaltsverzeichnis
Einführung ................................................2
Informationen zu dieser Bedienungsanleitung . . . . . . . . . . . . . . . . . . . . . . . . . . . . . . 2
Urheberrecht. . . . . . . . . . . . . . . . . . . . . . . . . . . . . . . . . . . . . . . . . . . . . . . . . . . . . . . .2
Bestimmungsgemäße Verwendung ......................................2
Warnhinweise .......................................................2
Sicherheit ................................................4
Grundlegende Sicherheitshinweise ......................................4
Bedienelemente ...........................................8
Auspacken und Anschließen .................................8
Sicherheitshinweise ...................................................8
Lieferumfang und Transportinspektion . . . . . . . . . . . . . . . . . . . . . . . . . . . . . . . . . . . .9
Auspacken .........................................................9
Entsorgung der Verpackung ............................................9
Bedienung und Betrieb ....................................10
Vor dem ersten Gebrauch ............................................10
Bedienfeld ........................................................11
Bedienen .........................................................12
Temperatureinstellungen ..............................................13
Position „Kontaktgrill“ ................................................14
Position „Paninigrill“ .................................................15
Position „Tischgrill“ ..................................................16
Tipps und Tricks ..........................................17
Reinigen und Pflegen ......................................18
Sicherheitshinweise ..................................................18
Aufbewahren ............................................19
Fehlerbehebung ..........................................20
Entsorgung ..............................................20
Anhang .................................................21
Technische Daten ...................................................21
Garantie der Kompernaß Handels GmbH . . . . . . . . . . . . . . . . . . . . .21
Service ...........................................................22
Importeur .........................................................23
Rezepte .................................................23
Position „Kontaktgrill“ ................................................23
Position „Paninigrill“ .................................................25
Position „Tischgrill“ ..................................................27

SKGL 2000 A1
■ 2 │ DE│AT│CH
Einführung
Informationen zu dieser Bedienungsanleitung
Herzlichen Glückwunsch zum Kauf Ihres neuen Gerätes.
Sie haben sich damit für ein hochwertiges Produkt entschieden. Die Bedienungsan-
leitung ist Bestandteil dieses Produkts. Sie enthält wichtige Hinweise für Sicherheit,
Gebrauch und Entsorgung. Machen Sie sich vor der Benutzung des Produkts mit
allen Bedien- und Sicherheitshinweisen vertraut. Benutzen Sie das Produkt nur wie
beschrieben und für die angegebenen Einsatzbereiche. Händigen Sie alle Unter-
lagen bei Weitergabe des Produkts an Dritte mit aus.
Urheberrecht
Diese Dokumentation ist urheberrechtlich geschützt.
Jede Vervielfältigung bzw. jeder Nachdruck, auch auszugsweise, sowie die
Wiedergabe der Abbildungen, auch im veränderten Zustand ist nur mit schriftlicher
Zustimmung des Herstellers gestattet.
Bestimmungsgemäße Verwendung
Dieses Gerät dient ausschließlich dem Grillen von Lebensmitteln im Innenbreich.
Eine andere oder darüber hinausgehende Benutzung gilt als nicht bestimmungs-
gemäß. Das Gerät ist nicht zur Verwendung in gewerblichen oder industriellen
Bereichen vorgesehen.
Ansprüche jeglicher Art wegen Schäden aus nicht bestimmungsgemäßer Verwen-
dung, unsachgemäßen Reparaturen, unerlaubt vorgenommener Veränderungen
oder Verwendung nicht zugelassener Ersatzteile sind ausgeschlossen. Das Risiko
trägt allein der Betreiber.
Warnhinweise
In der vorliegenden Bedienungsanleitung werden folgende Warnhinweise verwendet:
GEFAHR
Ein Warnhinweis dieser Gefahrenstufe kennzeichnet eine
drohende gefährliche Situation.
Falls die gefährliche Situation nicht vermieden wird, kann dies zum Tod oder
zu schweren Verletzungen führen.
► Die Anweisungen in diesem Warnhinweis befolgen, um die Gefahr des
Todes oder schwerer Verletzungen von Personen zu vermeiden.

SKGL 2000 A1 DE│AT│CH │ 3 ■
WARNUNG
Ein Warnhinweis dieser Gefahrenstufe kennzeichnet eine
mögliche gefährliche Situation.
Falls die gefährliche Situation nicht vermieden wird, kann dies zu Verletzungen
führen.
► Die Anweisungen in diesem Warnhinweis befolgen, um Verletzungen von
Personen zu vermeiden.
ACHTUNG
Ein Warnhinweis dieser Gefahrenstufe kennzeichnet einen
möglichen Sachschaden.
Falls die Situation nicht vermieden wird, kann dies zu Sachschäden führen.
► Die Anweisungen in diesem Warnhinweis befolgen, um Sachschäden zu
vermeiden.
HINWEIS
► Ein Hinweis kennzeichnet zusätzliche Informationen, die den Umgang mit
dem Gerät erleichtern.

SKGL 2000 A1
■ 4 │ DE│AT│CH
Sicherheit
In diesem Kapitel erhalten Sie wichtige Sicherheitshinweise im
Umgang mit dem Gerät.
Dieses Gerät entspricht den vorgeschriebenen Sicherheitsbestim-
mungen. Ein unsachgemäßer Gebrauch kann zu Personen- und
Sachschäden führen.
Grundlegende Sicherheitshinweise
Beachten Sie für einen sicheren Umgang mit dem Gerät die
folgenden Sicherheitshinweise:
■ Kontrollieren Sie das Gerät vor der Verwendung auf äußere,
sichtbare Schäden. Nehmen Sie ein beschädigtes oder herun-
tergefallenes Gerät nicht in Betrieb.
■ Lassen Sie beschädigte Netzstecker oder Netzkabel sofort
von autorisiertem Fachpersonal oder dem Kundenservice aus-
tauschen, um Gefährdungen zu vermeiden.
■ Dieses Gerät kann von Kindern ab 8 Jahren sowie von Personen
mit reduzierten physischen, sensorischen oder mentalen
Fähigkeiten oder Mangel an Erfahrung und/oder Wissen
benutzt werden, wenn sie beaufsichtigt oder bezüglich des
sicheren Gebrauchs des Gerätes unterwiesen wurden und
die daraus resultierenden Gefahren verstanden haben.
■ Kinder dürfen nicht mit dem Gerät spielen.
■ Reinigung und Benutzer-Wartung dürfen nicht durch Kinder
durchgeführt werden, es sei denn, sie sind älter als 8 Jahre und
beaufsichtigt.
■ Kinder jünger als 8 Jahre sind vom Gerät und der Anschluss-
leitung fernzuhalten.

SKGL 2000 A1 DE│AT│CH │ 5 ■
■ Lassen Sie Reparaturen am Gerät nur von autorisierten Fach-
betrieben oder dem Kundenservice durchführen. Durch unsach-
gemäße Reparaturen können Gefahren für den Benutzer
entstehen. Zudem erlischt der Garantieanspruch.
■ Eine Reparatur des Gerätes während der Garantiezeit darf
nur von einem vom Hersteller autorisierten Kundendienst vor-
genommen werden, sonst besteht bei nachfolgenden Schäden
kein Garantieanspruch mehr.
■ Defekte Bauteile dürfen nur gegen Original-Ersatzteile ausge-
tauscht werden. Nur bei diesen Teilen ist gewährleistet, dass
sie die Sicherheitsanforderungen erfüllen werden.
■ Schützen Sie die Netzleitung vor Berührungen mit heißen Ge-
räteteilen. Benutzen Sie das Gerät niemals in der Nähe einer
offenen Flamme, einer Heizplatte oder eines beheizten Ofens.
■ Lassen Sie das Gerät nach dem Gebrauch abkühlen, bevor
Sie es reinigen! Verbrennungsgefahr!
■ Wickeln Sie das Netzkabel immer komplett von der Kabelauf-
wicklung, wenn Sie das Gerät verwenden!
■ Stellen Sie das Gerät möglichst in der Nähe einer Steckdose auf.
Sorgen Sie dafür, dass der Netzstecker bei Gefahr schnell erreich-
bar ist und die Netzleitung nicht zur Stolperfalle werden kann.
■ Sorgen Sie für einen sicheren Stand des Gerätes.

SKGL 2000 A1
■ 6 │ DE│AT│CH
GEFAHR DURCH ELEKTRISCHEN SCHLAG!
► Schließen Sie das Gerät nur an eine vorschriftsmäßig instal-
lierte und geerdete Netzsteckdose an. Die Netzspannung
muss mit den Angaben auf dem Typenschild des Gerätes
übereinstimmen.
► Lassen Sie Anschlussleitungen bzw. Geräte, die nicht ein-
wandfrei funktionieren oder beschädigt wurden, sofort vom
Kundendienst reparieren oder austauschen.
► Setzen Sie das Gerät nicht dem Regen aus und benutzen Sie
es auch niemals in feuchter oder nasser Umgebung.
► Achten Sie darauf, dass das Netzkabel während des Betriebs
niemals nass oder feucht wird.
► Tauchen Sie das Gerät niemals in Wasser oder andere Flüs-
sigkeiten! Hier kann Lebensgefahr durch elektrischen Schlag
entstehen, wenn im Betrieb Flüssigkeitsreste auf spannungs-
führende Teile gelangen.
► Fassen Sie das Netzkabel immer am Stecker an. Ziehen Sie
nicht am Kabel selbst und fassen Sie das Netzkabel niemals
mit nassen Händen an, da dies einen Kurzschluss oder elekt-
rischen Schlag verursachen kann.
► Stellen Sie weder das Gerät noch Möbelstücke o. Ä. auf das
Netzkabel und achten Sie darauf, dass es nicht eingeklemmt
wird.
► Sie dürfen das Gerätegehäuse nicht öffnen, das Gerät nicht
reparieren oder modifizieren. Bei geöffnetem Gehäuse oder
eigenmächtigen Umbauten besteht Lebensgefahr durch elek-
trischen Schlag und die Gewährleistung erlischt.

SKGL 2000 A1
■ 8 │ DE│AT│CH
Bedienelemente
Abbildung A:
Stützfüße
Sicherheitsverschluss
Entriegelungstaste 180°
Fettauslauf
Kabelaufwicklung
Leuchtelement
grüne Kontrollleuchte „Ready“
Bedienfeld
Taste RELEASE (untere Heizplatte)
Fettauffangschale
- Heizplatten
3 Taste RELEASE (obere Heizplatte)
Abbildung B:
! Reinigungsschaber
Auspacken und Anschließen
Sicherheitshinweise
WARNUNG
Bei der Inbetriebnahme des Gerätes können
Personen- und Sachschäden auftreten!
Beachten Sie die folgenden Sicherheitshinweise, um die Gefahren
zu vermeiden:
► Verpackungsmaterialien dürfen nicht zum Spielen verwendet
werden. Es besteht Erstickungsgefahr.
► Beachten Sie die Hinweise zum elektrischen Anschluss des
Gerätes, um Sachschäden zu vermeiden.

SKGL 2000 A1
■ 10 │ DE│AT│CH
Bedienung und Betrieb
In diesem Kapitel erhalten Sie wichtige Hinweise zur Bedienung und Betrieb des
Gerätes.
Vor dem ersten Gebrauch
1) Reinigen Sie sämtliche Zubehörteile wie im Kapitel „Reinigen und Pflegen“
beschrieben, um mögliche Rückstände aus der Produktion zu entfernen.
2) Lesen Sie diese Bedienungsanleitung aufmerksam durch.
3) Stellen Sie das Gerät gemäß den Sicherheitshinweisen auf.
4) Entriegeln Sie das Gerät, indem Sie den Sicherheitsverschluss in die
Position stellen.
5) Öffnen Sie das Gerät.
6) Wischen Sie die Heizplatten - mit einem feuchten Tuch ab.
7) Schließen Sie das Gerät.
8) Stecken Sie den Stecker des Netzkabels in eine ordnungsgemäß ange-
schlossene und geerdete Netzsteckdose, die die im Kapitel „Technische
Daten“ genannte Spannung liefert. Lassen Sie das Gerät für ca. 5 Minuten
auf maximaler Temperatureinstellung aufheizen, indem Sie die entsprechen-
den Einstellungen mit Hilfe des Bedienfeldesvornehmen.
HINWEIS
► Beim erstmaligen Aufheizen des Gerätes kann es durch fertigungsbedingte
Rückstände zu leichter Rauch- und Geruchsentwicklung kommen. Das ist
normal und völlig ungefährlich. Sorgen Sie für ausreichende Belüftung, öffnen
Sie zum Beispiel ein Fenster.
9) Ziehen Sie den Netzstecker nach dem Aufheizen aus der Netzsteckdose
und lassen Sie das Gerät abkühlen.
10) Reinigen Sie das Gerät noch einmal mit einem feuchten Tuch.

SKGL 2000 A1 DE│AT│CH │ 11 ■
Bedienfeld
Mit Hilfe des Bedienfeldes nehmen Sie Temperatur- und Zeiteinstellungen vor.
Taste „+“: Temperatur oder Heizdauer erhöhen
Taste Ein/Aus : Gerät ein- und ausschalten
Taste T/MIN: Temperatur oder Heizdauer auswählen
Display: LCD-Display
Taste „-“: Temperatur oder Heizdauer verringern
HINWEIS
► Die grüne Kontrollleuchte „Ready“ leuchtet auf, sobald die eingestellte
Temperatur erreicht ist. Sie kann sich zwischendurch wieder abschalten. Das
bedeutet, dass die eingestellte Temperatur unterschritten wurde und das
Gerät wieder aufheizt!
► Beachten Sie, dass bei jeder Eingabe ein Signalton ertönt.

SKGL 2000 A1 DE│AT│CH │ 13 ■
8) Reinigen Sie das Gerät wie unter „Reinigen und Pflegen“ beschrieben.
ACHTUNG
► Ziehen Sie immer den Netzstecker aus der Netzsteckdose, wenn Sie das
Gerät nicht verwenden. Es genügt nicht, das Gerät mit der Taste
Ein/Aus abzuschalten!
HINWEIS
► Die grüne Kontrollleuchte „Ready“ leuchtet auf, sobald die eingestellte
Temperatur erreicht ist. Sie kann sich zwischendurch wieder abschalten. Das
bedeutet, dass die eingestellte Temperatur unterschritten wurde und das
Gerät wieder aufheizt!
► Beachten Sie, dass bei jeder Eingabe ein Signalton ertönt.
HINWEIS
Sie können diesen Grill in 3 verschiedenen Arten nutzen:
–komplett aufgeklappt, so dass beide Heizplatten - als Tischgrill
genutzt werden können.
–mit beweglicher oberer Heizplatte als Kontaktgrill, so dass z. B. -
Fleisch von beiden Seiten gegrillt wird.
–mit festgestellter oberer Heizplatte - als Panini-Grill, so dass z. B.
Baguettes überbacken werden können.
Temperatureinstellungen
Stellen Sie die Temperatur, abhängig vom Grillgut, unterschiedlich ein. Als Orientierung
können Ihnen folgende Angaben dienen:
90 °C: Warmhaltemodus
150 - 175 °C: niedrige Temperatur, z. B. für Gemüse oder Panini
175 - 200 °C: mittlere Temperatur, z. B. für Fisch
200 - 230 °C: hohe Temperatur, z. B. für Fleisch
HINWEIS
► Die angegebenen Temperatureinstellungen sind lediglich Empfehlungen.
Sie können je nach Beschaffenheit der Zutaten variieren!

SKGL 2000 A1
■ 14 │ DE│AT│CH
Position „Kontaktgrill“
1) Stecken Sie den Netzstecker in die Netzsteckdose und schalten Sie das Gerät
mit der Taste Ein/Aus ein.
2) Stellen Sie die gewünschte Temperatur und ggf. Heizdauer, wie im Kapitel
„Bedienen“ beschrieben, ein und warten Sie, bis die eingestellte Temperatur
erreicht ist.
3) Öffnen Sie den Gerätedeckel und legen Sie die zu grillenden Lebensmittel
auf die untere Heizplatte .-
4) Schließen Sie den Gerätedeckel am Griff.
5) Durch die beweglich gelagerte obere Heizplatte liegt diese auch bei -
dickerem Grillgut immer parallel zur unteren Heizplatte -. So wird ein
optimales Grillergebnis erreicht.
6) Kontrollieren Sie nach einiger Zeit die Bräunung des Grillgutes. Öffnen Sie
hierzu den Gerätedeckel am Griff.
HINWEIS
Fangen Sie mit kurzen Grillzeiten an und steigern Sie sie, bis Sie die richtige
Dauer gefunden haben.
7) Wenn Sie mit der Bräunung zufrieden sind, entnehmen Sie das Grillgut.
ACHTUNG
Beschädigung des Gerätes!
► Verwenden Sie keine spitzen oder scharfen Gegenstände, um das Grillgut
zu entnehmen. Diese könnten die Oberflächen der Heizplatten - beschä-
digen!
8) Schalten Sie das Gerät mit der Taste Ein/Aus aus und ziehen Sie den
Netzstecker aus der Netzsteckdose.
ACHTUNG
► Ziehen Sie immer den Netzstecker aus der Netzsteckdose, wenn Sie das
Gerät nicht verwenden. Es genügt nicht, das Gerät mit der Taste Ein/Aus
abzuschalten!

SKGL 2000 A1 DE│AT│CH │ 15 ■
Position „Paninigrill“
1) Stecken Sie den Netzstecker in die Netzsteckdose und schalten Sie das Gerät
mit der Taste Ein/Aus ein.
2) Stellen Sie die gewünschte Temperatur und ggf. Heizdauer, wie im Kapitel
„Bedienen“ beschrieben, ein und warten Sie, bis die eingestellte Temperatur
erreicht ist.
3) Öffnen Sie den Gerätedeckel und legen Sie die zu grillenden Lebensmittel
auf die untere Heizplatte .-
4) Schließen Sie die obere Heizplatte - und fixieren Sie diese in der
gewünschten Höhe, indem Sie den Sicherheitsverschluss nach hinten
drücken (Position MIN, II, III, IV, V). Je weiter der Sicherheitsverschluss
nach hinten gedrückt wird, umso größer ist der Abstand zwischen den
Heizplatten .-
5) Kontrollieren Sie nach einiger Zeit die Bräunung des Grillgutes. Öffnen Sie
hierzu den Gerätedeckel am Griff.
HINWEIS
Fangen Sie mit kurzen Grillzeiten an und steigern Sie sie, bis Sie die richtige
Dauer gefunden haben.
6) Wenn Sie mit der Bräunung zufrieden sind, entnehmen Sie das Grillgut.
ACHTUNG
Beschädigung des Gerätes!
► Verwenden Sie keine spitzen oder scharfen Gegenstände, um das Grillgut
zu entnehmen. Diese könnten die Oberflächen der Heizplatten - beschä-
digen!
7) Schalten Sie das Gerät mit der Taste Ein/Aus aus und ziehen Sie den
Netzstecker aus der Netzsteckdose.
ACHTUNG
► Ziehen Sie immer den Netzstecker aus der Netzsteckdose, wenn Sie das
Gerät nicht verwenden. Es genügt nicht, das Gerät mit der Taste
Ein/Aus abzuschalten!

SKGL 2000 A1
■ 16 │ DE│AT│CH
Position „Tischgrill“
1) Stecken Sie den Netzstecker in die Netzsteckdose und schalten Sie das Gerät
mit der Taste Ein/Aus ein.
2) Stellen Sie die gewünschte Temperatur und ggf. Heizdauer, wie im Kapitel
„Bedienen“ beschrieben, ein und warten Sie, bis die eingestellte Temperatur
erreicht ist.
3) Klappen Sie die beiden Stützfüße aus (Abb.1).
4) Drücken Sie die Entriegelungstaste 180° (Abb.1) und öffnen Sie den
Gerätedeckel so weit, dass beide Heizplatten - als Tischgrill benutzt
werden können.
Abb.1
5) Die Heizplatten - liegen nun nebeneinander und können als Tischgrill
genutzt werden (Abb. 2).

SKGL 2000 A1
■ 18 │ DE│AT│CH
Reinigen und Pflegen
Sicherheitshinweise
WARNUNG!
LEBENSGEFAHR DURCH ELEKTRISCHEN SCHLAG!
Bei der Reinigung des Gerätes können
Personenschäden auftreten!
Beachten Sie die folgenden Sicherheitshinweise, um die Gefahren zu
vermeiden:
► Ziehen Sie vor der Reinigung den Netzstecker und warten Sie, bis
das Gerät vollständig abgekühlt ist. Verletzungsgefahr!
► Reinigen Sie das Gerät nie unter fließendem Wasser und tauchen
Sie es nie in Wasser ein. Das Gerät kann irreparabel beschädigt
werden!
ACHTUNG
Beschädigung des Gerätes!
► Stellen Sie sicher, dass bei der Reinigung keine Feuchtigkeit in das Gerät
eindringt, um eine irreparable Beschädigung des Gerätes zu vermeiden.
► Benutzen Sie zur Reinigung der Oberflächen weder scharfe Scheuer- oder
chemische Reinigungsmittel, noch spitze oder kratzende Gegenstände.
■ Ziehen Sie den Reinigungsschaber ! -, nachdem sich die Heizplatten
abgekühlt haben, über die Heizplatten -, so dass Fett und Rückstände
zusammengeschoben werden und schieben Sie diese in die Fettauffangschale .
■ Entleeren und reinigen Sie die Fettauffangschale in warmem Wasser mit
etwas Spülmittel.
■ Wischen Sie die Heizplatten -mit einem feuchten Tuch ab. Benutzen Sie
zur Reinigung keine scharfen Putzmittel, raue Schwämme oder spitze Gegen-
stände, um die Antihaftbeschichtung nicht zu zerstören.
Bei hartnäckigeren Verschmutzungen oder festgebackenen Rückständen
nehmen Sie die Heizplatten ab:-
–Öffnen Sie das Gerät.
–Halten Sie die obere Heizplatte fest damit diese nicht herunter fällt -
und drücken Sie die Taste RELEASE . Die obere Heizplatte löst sich 3 -
aus dem Gerät.
–Drücken Sie die Taste RELEASE und heben Sie gleichzeitig die untere
Heizplatte ab.-

SKGL 2000 A1 DE│AT│CH │ 19 ■
Reinigen Sie die abgenommenen Heizplatten - in warmem Wasser mit etwas
Spülmittel. Bei starken Verkrustungen lassen Sie die Heizplatten - ein wenig in dem
Spülwasser einweichen. Spülen Sie die Heizplatten - nach der Reinigung mit klarem
Wasser ab, um Spülmittelrückstände zu beseitigen. Trocknen Sie alles gut ab. Die
Heizplatten - müssen trocken sein, bevor Sie diese wieder in das Gerät einbauen!
Um die Heizplatten - wieder einzubauen, stecken Sie die Heizplatten so auf die -
Basis, dass die beiden Aussparungen neben dem Fettauslauf in die Haken an der
Basis greifen. Drücken Sie dann den vorderen Teil der Heizplatte - nach unten, dass
diese hörbar einrastet.
Verfahren Sie mit der zweiten Heizplatte - genauso.
■ Reinigen Sie die Außenflächen des Gerätes mit einem feuchten Tuch. Bei hartnä-
ckigeren Verschmutzungen geben Sie ein mildes Spülmittel auf das Tuch.
■ Wischen Sie den Reinigungsschaber ! mit einem feuchten Tuch ab. Bei hartnä-
ckigeren Verschmutzungen geben Sie ein mildes Spülmittel auf das Tuch oder
spülen Sie ihn in warmem Wasser und Spülmittel.
■ Achten Sie darauf, dass vor der erneuten Verwendung des Gerätes alle Teile
vollständig trocken sind.
HINWEIS
► Die Heizplatten -, die Fettauffangschale und der Reinigungsschaber !
sind für die Reinigung in der Spülmaschine geeignet. Zur Schonung des
Materials empfehlen wir jedoch, diese wie oben beschrieben zu reinigen.
Aufbewahren
Verriegeln Sie das Gerät, indem Sie den Sicherheitsverschluss auf Position
schieben. Wickeln Sie das Netzkabel im Uhrzeigersinn um die Kabelaufwicklung
unter dem Geräteboden und befestigen Sie das Kabel mit dem Kabelclip:
Abb. 3
Bewahren Sie das gereinigte Gerät an einem trockenen Ort auf.

SKGL 2000 A1
■ 20 │ DE│AT│CH
Fehlerbehebung
In diesem Kapitel erhalten Sie wichtige Hinweise zur Störungslokalisierung und
Störungsbehebung. Die nachfolgende Tabelle hilft bei der Lokalisierung und
Behebung kleinerer Störungen.
HINWEIS
► Liegt eine Störung des Gerätes vor, wird der entsprechende Fehlercode
im Display angezeigt. Es ertönen Signaltöne und sämtliche Tasten sind ge-
sperrt, es ist keine Eingabe über das Bedienfeld möglich. Bitte befolgen
Sie die nachstehenden Anweisungen.
Fehler Mögliche Ursache Behebung
Das Gerät lässt sich
nicht einschalten.
Der Netzstecker ist nicht
angeschlossen.
Schließen Sie den Netzadapter richtig
am Gerät an.
Die Steckdose liefert
keine Spannung. Überprüfen Sie die Haussicherungen.
Das Gerät ist beschädigt. Wenden Sie sich an den Kundenser-
vice.
Im Display wird ER1
angezeigt.
Es liegt ein Kurzschluss
im System vor.
Ziehen Sie den Netzstecker aus der
Netzsteckdose und wenden Sie sich
an den Kundenservice.
Im Display wird ER2
angezeigt.
Die untere Heizplatte -
ist nicht korrekt eingesetzt.
Stellen Sie sicher, dass
die untere Heizplatte - korrekt
eingesetzt ist.
Im Display wird ER3
angezeigt.
Die Temperatur der
Heizplatten liegt über -
320 °C, das Gerät ist
überhitzt.
Ziehen Sie den Netzstecker aus der
Netzsteckdose. Warten Sie, bis das
Gerät vollständig abgekühlt ist und
schließen Sie das Gerät wieder an
eine Netzsteckdose an.
HINWEIS
► Wenn Sie mit den vorstehend genannten Schritten das Problem nicht lösen
können, wenden Sie sich bitte an den Kundenservice.
Entsorgung
Werfen Sie das Gerät keinesfalls in den normalen Hausmüll.
Dieses Produkt unterliegt der europäischen Richtlinie 2012/19/EU-
WEEE (Waste Electrical and Electronic Equipment).
Entsorgen Sie das Gerät über einen zugelassenen Entsorgungsbetrieb oder über
Ihre kommunale Entsorgungseinrichtung. Beachten Sie die aktuell geltenden Vorschrif-
ten. Setzen Sie sich im Zweifelsfall mit Ihrer Entsorgungseinrichtung in Verbindung.

SKGL 2000 A1 DE│AT│CH │ 21 ■
Anhang
Technische Daten
Spannungsversorgung 220 – 240 V ~ | 50/60 Hz
Leistungsaufnahme 2000 W
Alle Teile dieses Gerätes, welche mit
Lebensmitteln in Berührung kommen, sind
lebensmittelecht.
Schutzklasse I ( Schutzerde)
Garantie der Kompernaß Handels GmbH
Sehr geehrte Kundin, sehr geehrter Kunde,
Sie erhalten auf dieses Gerät 3 Jahre Garantie ab Kaufdatum. Im Falle von
Mängeln dieses Produkts stehen Ihnen gegen den Verkäufer des Produkts gesetz-
liche Rechte zu. Diese gesetzlichen Rechte werden durch unsere im Folgenden
dargestellte Garantie nicht eingeschränkt.
Garantiebedingungen
Die Garantiefrist beginnt mit dem Kaufdatum. Bitte bewahren Sie den Original–
Kassenbon gut auf. Diese Unterlage wird als Nachweis für den Kauf benötigt.
Tritt innerhalb von drei Jahren ab dem Kaufdatum dieses Produkts ein Material-
oder Fabrikationsfehler auf, wird das Produkt von uns – nach unserer Wahl – für
Sie kostenlos repariert oder ersetzt. Diese Garantieleistung setzt voraus, dass
innerhalb der Drei-Jahres-Frist das defekte Gerät und der Kaufbeleg (Kassenbon)
vorgelegt und schriftlich kurz beschrieben wird, worin der Mangel besteht und
wann er aufgetreten ist.
Wenn der Defekt von unserer Garantie gedeckt ist, erhalten Sie das reparierte
oder ein neues Produkt zurück. Mit Reparatur oder Austausch des Produkts
beginnt kein neuer Garantiezeitraum.
Garantiezeit und gesetzliche Mängelansprüche
Die Garantiezeit wird durch die Gewährleistung nicht verlängert. Dies gilt auch
für ersetzte und reparierte Teile. Eventuell schon beim Kauf vorhandene Schäden
und Mängel müssen sofort nach dem Auspacken gemeldet werden. Nach Ablauf
der Garantiezeit anfallende Reparaturen sind kostenpflichtig.
Garantieumfang
Das Gerät wurde nach strengen Qualitätsrichtlinien sorgfältig produziert und vor
Auslieferung gewissenhaft geprüft.
Die Garantieleistung gilt für Material- oder Fabrikationsfehler. Diese Garantie
erstreckt sich nicht auf Produktteile, die normaler Abnutzung ausgesetzt sind und
daher als Verschleißteile angesehen werden können oder für Beschädigungen
an zerbrechlichen Teilen, z. B. Schalter, Akkus, Backformen oder Teile die aus
Glas gefertigt sind.

SKGL 2000 A1
■ 22 │ DE│AT│CH
Diese Garantie verfällt, wenn das Produkt beschädigt, nicht sachgemäß benutzt
oder gewartet wurde. Für eine sachgemäße Benutzung des Produkts sind alle
in der Bedienungsanleitung aufgeführten Anweisungen genau einzuhalten.
Verwendungszwecke und Handlungen, von denen in der Bedienungsanleitung
abgeraten oder vor denen gewarnt wird, sind unbedingt zu vermeiden.
Das Produkt ist nur für den privaten und nicht für den gewerblichen Gebrauch
bestimmt. Bei missbräuchlicher und unsachgemäßer Behandlung, Gewaltanwen-
dung und bei Eingriffen, die nicht von unserer autorisierten Service-Niederlassung
vorgenommen wurden, erlischt die Garantie.
Abwicklung im Garantiefall
Um eine schnelle Bearbeitung Ihres Anliegens zu gewährleisten, folgen Sie bitte
den folgenden Hinweisen:
■ Bitte halten Sie für alle Anfragen den Kassenbon und die Artikelnummer (z. B.
IAN 12345) als Nachweis für den Kauf bereit.
■ Die Artikelnummer entnehmen Sie bitte dem Typenschild, einer Gravur, auf
dem Titelblatt Ihrer Anleitung (unten links) oder als Aufkleber auf der Rück-
oder Unterseite.
■ Sollten Funktionsfehler oder sonstige Mängel auftreten, kontaktieren Sie zunächst
die nachfolgend benannte Serviceabteilung oder per telefonisch E-Mail.
■ Ein als defekt erfasstes Produkt können Sie dann unter Beifügung des Kauf-
belegs (Kassenbon) und der Angabe, worin der Mangel besteht und wann
er aufgetreten ist, für Sie portofrei an die Ihnen mitgeteilte Service-Anschrift
übersenden.
Auf www.lidl-service.com können Sie diese und viele weitere Handbücher,
Produktvideos und Software herunterladen.
Service
Service Deutschland
Tel.: 0800 5435 111 (Kostenfrei aus dem dt. Festnetz/Mobilfunknetz)
E-Mail: kompernass@lidl.de
Service Österreich
Tel.: 0820 201 222 (0,15 EUR/Min.)
E-Mail: kompernass@lidl.at
Service Schweiz
Tel.: 0842 665566 (0,08 CHF/Min., Mobilfunk max. 0,40 CHF/Min.)
E-Mail: kompernass@lidl.ch
IAN 290943

SKGL 2000 A1 DE│AT│CH │ 23 ■
Importeur
Bitte beachten Sie, dass die folgende Anschrift keine Serviceanschrift ist.
Kontaktieren Sie zunächst die benannte Servicestelle.
KOMPERNASS HANDELS GMBH
BURGSTRASSE 21
DE - 44867 BOCHUM
DEUTSCHLAND
www.kompernass.com
Rezepte
HINWEIS
► Die in den Rezepten angegebenen Temperatureinstellungen und Zeitanga-
ben sind lediglich Empfehlungen. Sie können je nach Beschaffenheit der
Zutaten variieren!
Position „Kontaktgrill“
Mex-Tex-Burger
900 g Rinderhackfleisch
6 EL Barbecuesauce
6 EL fein gehackte Zwiebeln
3 EL frische oder fertige Salsa
1/2 TL Chilipulver
4 große Hamburgerbrötchen
1) Vermischen Sie das Hackfleisch, die Zwiebeln, die Salsa, das Chilipulver
und die Barbecuesauce in einer großen Schüssel.
2) Formen Sie die Hackfleischmasse zu vier gleich großen, knapp 2 cm dicken
Hamburgerscheiben.
3) Heizen Sie das Gerät auf (200 - 230 °C).
4) Die Hamburger 8 - 10 Min. auf dem vorgeheizten Gerät in Kontaktposition
grillen. Anschließend die Hamburger zusammen mit Zutaten und Gewürzen
Ihrer Wahl in den Hamburgerbrötchen servieren.

SKGL 2000 A1
■ 24 │ DE│AT│CH
Rumpsteak mit Frühlingszwiebeln-Kräuter-Sauce
500 g mageres Rumpsteak (je 125 g)
120 g Margarine
1 TL Worcestershiresauce
1 fein gehackte Knoblauchzehe
4 EL fein gehackte Petersilie
4 fein gehackte Frühlingszwiebeln
1) Vermischen Sie die Margarine und die Worcestershiresauce in einer kleinen
Schüssel und mischen Sie den Knoblauch, die Petersilie und die Frühlings-
zwiebeln unter.
2) Heizen Sie das Gerät auf Maximaltemperatur auf (230 °C).
3) Grillen Sie das Steak ca. 3 Min.
4) Bestreichen Sie das Steak mit der Frühlingszwiebel-Kräuter-Sauce und garen
Sie es weitere 4 Min. bei ca. 200 °C.
HINWEIS
► Die sich in der Fettauffangschale sammelnde Kräutersoße können Sie zum
Servieren über das Steak gießen!
Thunfisch mit Orangenscheiben
(4 Personen)
4 frische Thunfischsteaks (je 170 g)
1 Orange
1 EL fein gehackte Petersilie
Salz
Pfeffer
1) Schälen Sie die Orange und schneiden Sie sie in etwa 5 mm dicke Scheiben.
2) Heizen Sie das Gerät vor (ca. 200 °C).
3) Legen Sie die Thunfischsteaks auf den vorgeheizten Grill, streuen Sie die
Petersilie darüber und würzen Sie sie mit Salz und Pfeffer.
4) Legen Sie die Orangenscheiben auf die Thunfischsteaks und grillen Sie alles
ca. 6 - 8 Min.
5) Entfernen Sie vor dem Servieren die gegrillten Orangenscheiben.

SKGL 2000 A1 DE│AT│CH │ 25 ■
Position „Paninigrill“
Spinat-Käse-Panini
250 g Blattspinat
1 Zwiebel
1 Knoblauchzehe
1 EL Öl
2 TL Zitronensaft
1 Prise Salz (und Pfeffer)
4 Scheiben Toast/Weißbrot
40 g Kräuterbutter
75 g Mozzarella
20 g Pinienkerne
1) Verlesen und waschen Sie den Blattspinat.
2) Zwiebel und Knoblauchzehe schälen und fein hacken, in heißem Öl glasig
dünsten. Den Spinat zufügen. Mit Zitronensaft, Salz und Pfeffer würzen.
3) Bestreichen Sie den Toast mit Kräuterbutter.
4) Schneiden Sie den Mozzarella in Scheiben.
5) Verteilen Sie den Mozzarella und den abgetropften Spinat auf 2 Toastschei-
ben und betreuen Sie sie mit Pinienkernen.
6) Die Panini mit einer zweiten Scheibe Toast bedecken.
7) Heizen Sie das Gerät vor (ca.175 °C).
8) Die Panini vorsichtig auf den vorgeheizten Grill legen.
9) Mit dem Sicherheitsverschluss den gewünschten Abstand der oberen
Heizplatte - einstellen und den Deckel schließen.
10) Die Panini sollten gold-braun geröstet sein.

SKGL 2000 A1
■ 26 │ DE│AT│CH
Hähnchenbrust-Panini
400 g Hähnchenbrustfilet
20 g Butter
Pfeffer, Salz, Paprikapulver
120 g Bacon, in Streifen
6 Scheiben Weißbrot/Toast
3 EL Salatdressing (Joghurt)
30 g Eisbergsalat
2 Tomaten
1 Avocado
1 TL Limonensaft
50 g Salatgurke
1) Hähnchenbrustfilet unter fließendem Wasser kurz abspülen und mit Küchen-
papier trockentupfen.
2) Das Gerät auf Maximaltemperatur vorheizen (230 °C) und das Hähnchen-
brustfilet kurz in der Kontaktposition anbraten.
3) Die Hähnchenbrustfilets bei ca. 175 °C etwa 10 Minuten fertig braten.
Nach dem Braten mit Salz, Pfeffer und Paprika würzen und beiseitelegen.
4) In einer Pfanne die Bacon-Streifen knusprig braten.
5) Auf 3 Toast-/Weißbrotscheiben Joghurt-Dressing verteilen, Eisbergsalat
darauflegen, Tomaten in Scheiben schneiden, würzen und drauflegen.
6) Hähnchenbrustfilets der Länge nach aufschneiden und auf die Tomaten legen.
7) Bacon-Streifen auf die Hähnchenbrustfilets legen.
8) Avocado der Länge nach rundum aufschneiden und durch eine Drehbewe-
gung vom Kern lösen. Schale abziehen und Avocado in Scheiben schneiden.
Avocado mit dem Limonensaft beträufeln, damit sie nicht braun anläuft. Die
Scheiben auf die Panini legen.
9) Salatgurke in Scheiben schneiden und auf die Avocado legen.
10) Die Panini mit einer zweiten Scheibe Toast bedecken.
11) Die Panini auf die Heizplatte legen.-
12) Mit dem Sicherheitsverschluss den gewünschten Abstand der oberen
Heizplatte - einstellen und den Deckel schließen.
13) Die Panini sollten gold-braun geröstet sein.

SKGL 2000 A1 DE│AT│CH │ 27 ■
Senf-Baguette
1 Baguette
1 Zehe Knoblauch
50 g Senfgurken
40 g Pecorino
1 EL scharfer Senf
2 EL süßer Senf
50 g Butter
2 EL Schnittlauchröllchen
Salz, Pfeffer
1) Das Baguette in ca. 2 - 3 Zentimeter großen Abständen quer ein-, aber nicht
durchschneiden.
2) Knoblauch abziehen und zerdrücken, Senfgurken sehr fein würfeln und
Pecorino raspeln.
3) Scharfen und süßen Senf mit der weichen Butter, Knoblauch, Gurken, Pecorino
und Schnittlauch verrühren und mit Salz und Pfeffer abschmecken.
4) Senfbutter in die Baguetteeinschnitte füllen und die Baguettes in Alufolie
einwickeln.
5) Heizen Sie das Gerät vor (175 - 200 °C).
6) Die Baguettes auf die Heizplatte - legen.
7) Mit dem Sicherheitsverschluss den gewünschten Abstand der oberen
Heizplatte - einstellen und den Deckel schließen.
8) Das Baguette sollte gold-braun sein.
Position „Tischgrill“
Hühner-/Putenbrust
200 g Hühner-/Putenbrust
etwas Mehl
1) Ein wenig zum Braten geeignetes Öl auf die Heizplatten geben und das -
Gerät auf Maximaltemperatur (230 °C) aufheizen.
2) Die 200 g Hühner-/Putenbrust in Scheiben schneiden und leicht bemehlen.
3) Ca. 4 Minuten von der einen Seite braten, dann wenden, leicht salzen und
die zweite Seite ca. 4 Minuten braten.

SKGL 2000 A1 DE│AT│CH │ 29 ■
5) Verteilen Sie die Garnelen und das Gemüse gleichmäßig auf 4 Stücke Alu-
folie. Die Alufolie muss so groß sein, dass man die Zutaten darin einwickeln
kann, wie ein Päckchen. Träufeln Sie die Curry-Kokos-Sauce darüber und
würzen Sie alles mit Salz und Pfeffer.
6) Verschließen Sie die Päckchen gut, so dass keine Flüssigkeit austreten kann.
7) Heizen Sie das Gerät vor (150 - 175 °C).
8) Legen Sie die gefüllten Päckchen auf die vorgeheizte Heizplatten - und
garen Sie alles von beiden Seiten jeweils ca. 15 Minuten.
Gegrillte Maiskolben
2 Zucker-Maiskolben
100 g Kräuterbutter
Knoblauchsalz
Salz
Pfeffer
Alufolie
1) Bestreichen Sie ein Stück Alufolie mit der Kräuterbutter.
2) Salzen Sie den Maiskolben und wickeln diesen in die Alufolie.
3) Heizen Sie das Gerät vor (150 - 175 °C).
4) Legen Sie das Päckchen auf die Heizplatten -.
5) Wenden Sie es nach 15 Minuten und garen Sie die Maiskolben weitere 15
Minuten.
6) Würzen Sie den Maiskolben mit Knoblauchsalz und Pfeffer.

SKGL 2000 A1
■ 30 │ DE│AT│CH

SKGL 2000 A1 GB│IE │ 31 ■
Contents
Introduction .............................................32
Information about these operating instructions . . . . . . . . . . . . . . . . . . . . . . . . . . . . .32
Copyright .........................................................32
Intended use .......................................................32
Warnings .........................................................32
Safety ..................................................34
Basic safety instructions ..............................................34
Operating components ....................................38
Unpacking and installation .................................38
Safety information ..................................................38
Package contents and transport inspection . . . . . . . . . . . . . . . . . . . . . . . . . . . . . . .39
Unpacking ........................................................39
Disposal of the packaging ............................................39
Handling and use .........................................40
Before first use .....................................................40
Control panel ......................................................41
Operation .........................................................42
Temperature settings .................................................43
“Contact grill” position ...............................................44
“Panini grill” position ................................................45
“Table grill” position .................................................46
Tips and tricks ............................................47
Cleaning and care ........................................48
Safety instructions ...................................................48
Storage .................................................49
Troubleshooting ..........................................50
Disposal .................................................50
Attachment ..............................................51
Technical data .....................................................51
Kompernass Handels GmbH warranty . . . . . . . . . . . . . . . . . . . . . . .51
Service ...........................................................52
Importer ..........................................................53
Recipes .................................................53
“Contact grill” position ...............................................53
“Panini grill” position ................................................55
“Table grill” position .................................................57

SKGL 2000 A1
■ 32 │ GB│IE
Introduction
Information about these operating instructions
Congratulations on the purchase of your new appliance.
You have selected a high-quality product. The operating instructions are part of
this product. They contain important information about safety, usage and disposal.
Before using the product, please familiarise yourself with all operating and safety
instructions. Use the product only as described and for the range of applications
specified. Please also pass these operating instructions on to any future owner.
Copyright
This documentation is protected by copyright.
Any copying or reproduction, including in the form of extracts, or any reproduction
of images (even in a modified state), is permitted only with the written authorisa-
tion of the manufacturer.
Intended use
This appliance is intended exclusively for grilling food indoors. It is not intended
for any other use or use beyond that specified. The appliance is not intended for
use in commercial or industrial environments.
The manufacturer accepts no responsibility for damage caused by failure to
observe these instructions, improper use or repairs, unauthorised modifications or
the use of unapproved replacement parts. The operator bears sole liability.
Warnings
The following types of warning are used in these operating instructions:
DANGER
A warning notice at this hazard level indicates an imminently
hazardous situation.
If the hazardous situation is not avoided, it could result in death or serious
physical injury.
► Follow the instructions in this warning to prevent a fatality or serious personal
injury.

SKGL 2000 A1 GB│IE │ 33 ■
WARNING
A warning at this hazard level indicates a potentially hazardous
situation.
Failure to avoid this hazardous situation could result in injury.
► Follow the instructions in this warning notice to prevent injury.
CAUTION
A warning notice of this hazard level indicates a risk of property
damage.
Failure to avoid this situation could result in property damage.
► Follow the instructions in this warning to prevent material damage.
NOTE
► A note provides additional information that makes handling the appliance
easier for you.

SKGL 2000 A1
■ 34 │ GB│IE
Safety
This section contains important safety instructions for handling
the appliance.
This appliance complies with statutory safety regulations.
Improper use may result in personal injury and property damage.
Basic safety instructions
To ensure safe operation of the appliance, follow the safety
guidelines set out below:
■ Prior to use, check the appliance for visible external damage.
Do not use an appliance that has been damaged or dropped.
■ Arrange for defective power plugs and/or cables to be re-
placed as soon as possible by a qualified technician or by our
Customer Service Department to avoid the risk of injury.
■ This appliance may be used by children over the age of 8 and
by persons with reduced physical, sensory or mental abilities
or by those without experience and/or knowledge, if they are
supervised or have been instructed in the safe use of the appli-
ance and have understood the potential risks.
■ Children must not play with the appliance.
■ Cleaning and user maintenance must not be performed by
children unless they are older than 8 years of age and are
supervised.
■ Children younger than 8 years of age must be kept away from
the appliance and the mains cable.

SKGL 2000 A1 GB│IE │ 35 ■
■ All repairs must be carried out by authorised specialist companies
or by the Customer Service department. Improper repairs may
put the user at risk. They will also invalidate any warranty claims.
■ Repairs to the appliance during the warranty period may only
be carried out by a customer service department authorised
by the manufacturer. Otherwise, no warranty claims will be
held for any subsequent damages.
■ Defective components must always be replaced with original
replacement parts. Compliance with safety requirements can
only be guaranteed if original replacement parts are used.
■ Protect the mains cable from contact with hot appliance parts.
NEVER use the appliance adjacent to open flames, a hotplate
or a heated oven.
■ After use, allow the appliance to cool down completely before
cleaning it! Risk of burns!
■ Unwind all of the mains cable from the cable retainer when you
use the appliance!
■ Install the appliance as close as possible to an electrical power
socket. Ensure that the power plug is quickly reachable in case
of danger, and that the cable poses no risk of tripping.
■ Provide a stable location for the appliance.

SKGL 2000 A1
■ 36 │ GB│IE
RISK OF ELECTRICAL SHOCK!
► The appliance should only be connected to correctly installed
and earthed mains power sockets. Ensure that the rating for
your local power supply corresponds with the details on the
rating plate of the appliance.
► Arrange for Customer Services to repair or replace connecting
cables and/or appliances that are not functioning properly
or have been damaged.
► Do not expose the appliance to rain, and never use it in a
humid or wet environment.
► Take steps to ensure the mains cable never becomes wet or
moist during use.
► Never immerse the appliance in water or other liquids! There
is a risk of a potentially fatal electric shock if residual moisture
comes into contact with live components during operation.
► Always take hold of the plug when handling the mains cable.
Do not pull on the cable itself and never touch the mains
cable with wet hands. This could result in either a short circuit
or an electric shock.
► Do not place the appliance itself, furniture items or similar
objects on the mains cable and take steps to ensure it cannot
become jammed or trapped in any way.
► Do not open the appliance housing or attempt to repair or
modify the appliance. If the housing is opened or improper
modications are made, you run the risk of receiving a po-
tentially fatal electric shock and the warranty will be void.

SKGL 2000 A1 GB│IE
│ 37 ■
RISK OF ELECTRICAL SHOCK!
► Protect the appliance from water droplets or spray. Do not
place any vessels containing liquid (e.g. ower vases) on or
near the appliance.
► Always pull the plug out of the power socket during each
break in use, as well as after use and before any cleaning.
RISK OF BURNS!
Caution! Hot surface!
► The surface of the appliance can become extremely hot
during use. Touch the appliance using only the handle.
CAUTION! PROPERTY DAMAGE!
► Do not use an external timer switch or a separate remote
control system to operate the appliance.
► Never leave the appliance unattended during operation.
► Ensure that the appliance, the mains cable and the plug do
not come into contact with heat sources such as hotplates or
naked ames.
► Do not use charcoal or similar fuels to operate the appliance!
► To protect the non-stick coating, do not use metallic tools such
as knives, forks, etc. If the non-stick coating is damaged, stop
using the appliance.
► Operate the appliance only with the original accessories
supplied.

SKGL 2000 A1
■ 38 │ GB│IE
Operating components
Figure A:
Support feet
Safety catch
Unlocking button 180°
Fat outlet
Cable retainer
Light element
Green “Ready” control lamp
Control panel
RELEASE button (lower hotplate)
Fat drip tray
- Hotplates
3 RELEASE button (upper hotplate)
Figure B:
! Cleaning scraper
Unpacking and installation
Safety information
WARNING
While using the appliance, there is a risk of injury
and/or damage to property!
To avoid risks, observe the following safety instructions:
► Do not allow children to play with packaging materials.
Risk of suffocation.
► Please follow the instructions regarding the electrical connec-
tion of the appliance to avoid damage to property.

SKGL 2000 A1 GB│IE │ 39 ■
Package contents and transport inspection
This appliance is supplied with the following components as standard
(see fold-out page):
● Contact Grill
● Fat drip tray
● Cleaning scraper
● Operating instructions
NOTE
► Check the package for completeness and signs of visible damage.
► If the delivery is incomplete or damage has occurred as a result of defective
packaging or during transport, contact the Service hotline (see section Service).
Unpacking
♦ Remove all parts of the appliance and the operating instructions from the box.
♦ Remove all packaging materials and any lms and labels.
Disposal of the packaging
The packaging protects the appliance from damage during transport. The packaging
materials have been selected for their environmental friendliness and ease of
disposal, and are therefore recyclable.
Returning the packaging to the material cycle conserves raw materials and
reduces the amount of waste that is generated. Dispose of packaging materials
that are no longer needed in accordance with applicable local regulations.
NOTE
► If possible, keep the original packaging during the warranty period so
that the appliance can be properly packed for returning in the event of
a warranty claim.

SKGL 2000 A1
■ 40 │ GB│IE
Handling and use
This section provides you with important information on handling and using the
appliance.
Before rst use
1) Clean all accessories as described in the section “Cleaning and care” to
remove any production residues.
2) Read these operating instructions carefully.
3) Set up the appliance in accordance with the safety instructions.
4) Unlock the appliance by moving the safety catch to the position .
5) Open the appliance.
6) Wipe the hotplates - with a damp cloth.
7) Close the appliance.
8) Insert the mains cable plug into a properly connected and earthed mains
power socket which supplies the voltage stated in the “Technical data”
section. Allow the appliance to heat up for about 5 minutes to maximum
temperature by making the appropriate settings on the control panel .
NOTE
► The rst time the appliance heats up, a small amount of smoke and odour
may result from production-related residues. This is normal and is completely
harmless. Ensure sufficient ventilation; for example, by opening a window.
9) After heating, pull the plug from the mains socket and allow the appliance
to cool down completely.
10) Clean the appliance again with a damp cloth.

SKGL 2000 A1
■ 42 │ GB│IE
Operation
RISK OF BURNS!
Caution! Hot surface!
► The surface of the appliance can become extremely hot during
use. Touch the appliance using only the handle.
NOTE
► Unwind all of the mains cable from the cable retainer when you use the
appliance.
1) Close the appliance lid using the handle.
2) Slide the fat drip tray into the appliance.
3) Insert the plug into the mains power socket. You will hear a beep and
“OFF” will appear on the display . The display lights up blue and goes
out automatically after 1 minute if no further entries are made.
4) Switch on the appliance using the On/Off button . The display
lights up blue, there will be a beep and the appliance starts to heat up to
the preset temperature of 90°C (keep-warm mode). Once the temperature
has been reached, you will hear three beeps and the green “Ready” control
lamp lights up. The light element lights up blue during operation.
5) Press T/MIN button and set the desired temperature (90–230°C) by
pressing the “+” and “-” buttons. If the set temperature has not yet
been reached, the green “Ready” control lamp goes out and the appli-
ance heats up. If the appliance has already reached the set temperature,
you will hear two beeps and the green “Ready” control lamp will light
up.
6) If required, press the T/MIN button again to adjust the heating duration
(1–90 min.) using the “+” and “-” buttons. The green “Ready”
control lamp lights up again as soon as the set heating level is reached
and the temperature is maintained. As soon as the heating period is over,
you will hear two beeps and the appliance will switch back into keep warm
mode (90°C). The appliance switches off automatically after 1 hour if no
entries are made.
7) Switch the appliance off by pressing the On/Off button and pull the
mains power plug from the wall socket.

SKGL 2000 A1 GB│IE │ 43 ■
8) Clean the appliance again as described in “Cleaning and care”.
CAUTION
► Always remove the plug from the mains power socket when the appliance
is not in use. It is not sufficient to switch off the appliance using the On/Off
button !
NOTE
► The green "Ready" control lamp lights up as soon as the set temperature
is reached. It may switch off again in the interim. This indicates that the
temperature has briey fallen under the set temperature and the appliance
is heating itself back up.
► Please note that there will be a beep every time you make an entry.
NOTE
You can use this grill in 3 different ways:
– fully open so that both hotplates - can be used as a table grill.
– with movable upper hotplate - as a contact grill so that meat, for
instance, is grilled from both sides.
– with xed upper hotplate - as a panini grill, for instance, for cooking
cheese-topped baguettes.
Temperature settings
Set the temperature level to an appropriate setting for the food. Use the following
information as a guideline:
90°C: Keep warm mode
150–175°C: Low temperature, e.g. for vegetables or panini
175–200°C: Medium temperature, e.g. for sh
200–230°C: High temperature, e.g. for meat
NOTE
► The temperature settings provided are merely recommendations. They can
vary depending on the characteristics of the ingredients!

SKGL 2000 A1
■ 44 │ GB│IE
“Contact grill” position
1) Insert the plug into a mains power socket and switch on the appliance using
the On/Off button .
2) Set the desired temperature and heating duration, if necessary, as described
in the section “Operation” and wait until the set temperature has been
reached.
3) Open the appliance lid and place the food to be grilled on the lower
hotplate -.
4) Close the appliance lid using the handle.
5) The upper hotplate always lies parallel to the lower hotplate - - on
account of its movable hinges, even when cooking large quantities of food.
This guarantees an optimal grilling result.
6) Check the browning of the food after a while. To do this, open the appliance
lid using the handle.
NOTE
Start with short grilling times and increase these until you have found the correct
duration.
7) When you are satised with the level of browning, remove the food.
CAUTION
Damage to the appliance!
► Do not use pointed or sharp objects to remove the food. These could damage
the surfaces of the hotplates -!
8) Use the On/Off button to switch the appliance off and pull the mains
power plug from the wall socket.
CAUTION
► Always remove the plug from the mains power socket when the appliance
is not in use. It is not sufficient to switch off the appliance using the On/Off
button !

SKGL 2000 A1 GB│IE │ 45 ■
“Panini grill” position
1) Insert the plug into a mains power socket and switch on the appliance using
the On/Off button .
2) Set the desired temperature and heating duration, if necessary, as described
in the section “Operation” and wait until the set temperature has been
reached.
3) Open the appliance lid and place the food to be grilled on the lower
hotplate -.
4) Close the upper hotplate - and lock it at the desired height by pushing the
safety catch backwards (position MIN, II, III, IV, V). The further back you
press the safety catch -, the greater the distance between the hotplates .
5) Check the browning of the food after a while. To do this, open the appliance
lid using the handle.
NOTE
Start with short grilling times and increase these until you have found the correct
duration.
6) When you are satised with the level of browning, remove the food.
CAUTION
Damage to the appliance!
► Do not use pointed or sharp objects to remove the food. These could dam-
age the surfaces of the hotplates -!
7) Use the On/Off button to switch the appliance off and pull the mains
power plug from the wall socket.
CAUTION
► Always remove the plug from the mains power socket when the appliance
is not in use. It is not sufficient to switch off the appliance using the On/Off
button !

SKGL 2000 A1
■ 46 │ GB│IE
“Table grill” position
1) Insert the plug into a mains power socket and switch on the appliance using
the On/Off button .
2) Set the desired temperature and heating duration, if necessary, as described
in the section “Operation” and wait until the set temperature has been
reached.
3) Fold out both support feet (g.1).
4) Press the unlocking button 180° (g.1) and open the appliance lid until
both hotplates - can be used as a table grill.
Fig. 1
5) The hotplates - are now positioned next to each other and can be used as
a table grill (Fig. 2).

SKGL 2000 A1 GB│IE │ 47 ■
Fig. 2
6) Place the food to be grilled onto the hotplates .-
7) Turn the food being grilled from time to time and remove it from the hotplates -
once it is cooked.
CAUTION
Damage to the appliance!
► Do not use pointed or sharp objects to turn or remove the grilled food.
These could damage the surfaces of the hotplates -!
8) Use the On/Off button to switch the appliance off and pull the mains
power plug from the wall socket.
CAUTION
► Always remove the plug from the mains power socket when the appliance
is not in use. It is not sufficient to switch off the appliance using the On/Off
button !
Tips and tricks
■ To make meat more tender and speed up the grilling process, you can
marinate it beforehand. An ideal basis for this can be sour cream, red wine,
vinegar, buttermilk or fresh papaya or pineapple juice, for example. Add
herbs and spices according to taste. Do not add salt as this can draw water
out of the meat and make it dry. Place the meat in the marinade so that it is
completely covered and close the container. Ideally, leave it overnight.
■ The hotplates - have a non-stick coating, making extra fat unnecessary.
If you still wish to use fat, please ensure that the fat/oil is suitable for
grill-roasting, e.g. rapeseed oil.
■ To ensure that the food is evenly cooked, make sure that it has a uniform
thickness.
■ If you are not sure whether the food is cooked all the way through, you can
use a commercially available meat thermometer.

SKGL 2000 A1
■ 48 │ GB│IE
Cleaning and care
Safety instructions
WARNING!
RISK OF FATAL ELECTRIC SHOCK!
Risk of bodily injury when cleaning the appliance!
To avoid risks, observe the following safety instructions:
► Before cleaning, pull out the plug and wait until the appliance has
completely cooled down. Risk of injury!
► Never clean the appliance under running water and never immerse
it in water. The appliance could be irreparably damaged!
CAUTION
Damage to the appliance!
► To avoid irreparable damage to the appliance, ensure that no moisture can
penetrate the appliance during cleaning.
► When cleaning the surfaces use neither abrasive or chemical cleaners, nor
sharp or scratchy objects.
■ Draw the cleaning scraper ! over the hotplates after the hotplates - -
have cooled down so that fat and residues are aggregated, then slide them
into the fat drip tray .
■ Empty and clean the fat drip tray in warm water with a little detergent.
■ Wipe the hotplates - with a damp cloth. Do not use any harsh cleaning
agents, rough sponges or sharp objects for cleaning as these could damage
the non-stick coating.
For more stubborn soiling or hardened residue, remove the hotplates :-
– Open the appliance.
– Hold the upper hotplate - in place to prevent it from falling and press
the RELEASE button 3. The upper hotplate - is released from the
appliance.
– Press the RELEASE button and at the same time, remove the lower
hotplate -.

SKGL 2000 A1 GB│IE │ 49 ■
Clean the hotplates - which have been removed in warm water with a little
detergent in it. For severe incrustations, leave the hotplates - to soak for a while
in the water. After washing, rinse the hotplates - with clean water to remove all
detergent residues. Dry everything properly. The hotplates - must be dry before
you put them back in the appliance!
To refit the hotplates , place the hotplates - - onto the base so that the two
notches next to the fat outlet grip onto the hooks on the base. Then, press
down the front part of the hotplate - until you hear it engage.
Proceed in the same way with the second hotplate -.
■ Clean the surfaces of the appliance with a damp cloth. For stubborn soiling,
use a mild detergent on the cloth.
■ Wipe the cleaning scraper ! with a damp cloth. For more stubborn soiling,
add some mild detergent to the cloth or rinse it in warm water and detergent.
■ Ensure that all parts are completely dry before reusing the appliance.
NOTE
► The hotplates - !, the fat drip tray and the cleaning scraper are all
dishwasher safe. To protect the material, however, we recommend cleaning
it as described above.
Storage
Lock the appliance by pushing the safety catch to the position . Wind the
mains cable clockwise around the cable retainer on the underside of the
appliance and fasten it in place with the cable clip:
Fig. 3
Store the cleaned appliance in a dry location.

SKGL 2000 A1 GB│IE │ 51 ■
Attachment
Technical data
Power supply 220–240 V ~ | 50/60 Hz
Power consumption 2000 W
All of the parts of this appliance that come
into contact with food are food-safe.
Protection class I ( protective earth)
Kompernass Handels GmbH warranty
Dear Customer,
This appliance has a 3-year warranty valid from the date of purchase. If this product
has any faults, you, the buyer, have certain statutory rights. Your statutory rights
are not restricted in any way by the warranty described below.
Warranty conditions
The validity period of the warranty starts from the date of purchase. Please keep
your original receipt in a safe place. This document will be required as proof of
purchase.
If any material or production fault occurs within three years of the date of purchase
of the product, we will either repair or replace the product for you at our discretion.
This warranty service is dependent on you presenting the defective appliance
and the proof of purchase (receipt) and a short written description of the fault
and its time of occurrence.
If the defect is covered by the warranty, your product will either be repaired or
replaced by us. The repair or replacement of a product does not signify the begin-
ning of a new warranty period.
Warranty period and statutory claims for defects
The warranty period is not prolonged by repairs effected under the warranty.
This also applies to replaced and repaired components. Any damage and defects
present at the time of purchase must be reported immediately after unpacking.
Repairs carried out after expiry of the warranty period shall be subject to a fee.
Scope of the warranty
This appliance has been manufactured in accordance with strict quality guidelines
and inspected meticulously prior to delivery.
The warranty covers material faults or production faults. The warranty does not
extend to product parts subject to normal wear and tear or fragile parts such as
switches, batteries, baking moulds or parts made of glass.

SKGL 2000 A1
■ 52 │ GB│IE
The warranty does not apply if the product has been damaged, improperly used
or improperly maintained. The directions in the operating instructions for the product
regarding proper use of the product are to be strictly followed. Uses and actions
that are discouraged in the operating instructions or which are warned against
must be avoided.
This product is intended solely for private use and not for commercial purposes.
The warranty shall be deemed void in cases of misuse or improper handling, use
of force and modications / repairs which have not been carried out by one of
our authorised Service centres.
Warranty claim procedure
To ensure quick processing of your case, please observe the following instructions:
■ Please have the till receipt and the item number (e.g. IAN 12345) available
as proof of purchase.
■ You will nd the item number on the type plate, an engraving on the front
page of the instructions (bottom left), or as a sticker on the rear or bottom of
the appliance.
■ If functional or other defects occur, please contact the service department
listed either by or by .telephone e-mail
■ You can return a defective product to us free of charge to the service address
that will be provided to you. Ensure that you enclose the proof of purchase
(till receipt) and information about what the defect is and when it occurred.
You can download these instructions along with many other manuals,
product videos and software on www.lidl-service.com.
Service
Service Great Britain
Tel.: 0871 5000 720 (£ 0.10/Min.)
E-Mail: kompernass@lidl.co.uk
Service Ireland
Tel.: 1890 930 034
(0,08 EUR/Min., (peak))
(0,06 EUR/Min., (off peak))
E-Mail: kompernass@lidl.ie
IAN 290943

SKGL 2000 A1 GB│IE │ 53 ■
Importer
Please note that the following address is not the service address. Please use the
service address provided in the operating instructions.
KOMPERNASS HANDELS GMBH
BURGSTRASSE 21
DE - 44867 BOCHUM
GERMANY
www.kompernass.com
Recipes
NOTE
► The cooking times and temperature settings given in the recipes are recom-
mendations only. They can vary depending on the characteristics of the
ingredients!
“Contact grill” position
Tex-Mex burger
900 g minced beef
6 tbsp. BBQ sauce
6 tbsp. nely chopped onions
3 tbsp. fresh or ready-made salsa
1/2 tsp chilli powder
4 large hamburger buns
1) Mix the minced meat, onions, salsa, chilli powder and BBQ sauce in a
large bowl.
2) Shape the minced meat into four evenly sized hamburgers that are
approx. 2 cm thick.
3) Heat up the appliance (200–230°C).
4) Grill the hamburgers for 8–10 minutes on the preheated appliance, having
set this to the contact position. Then serve the hamburgers in the hamburger
buns together with the ingredients and herbs of your choice.

SKGL 2000 A1
■ 54 │ GB│IE
Rump steak with spring onion & herb sauce
500 g lean rump steaks (125 g each)
120 g margarine
1 tsp. Worcestershire sauce
1 nely chopped garlic clove
4 tbsp. nely chopped parsley
4 nely chopped spring onions
1) Mix the margarine and Worcestershire sauce in a small bowl and mix in the
garlic, parsley and spring onions.
2) Heat up the appliance to the maximum temperature (230°C).
3) Grill the steak for around 3 min.
4) Brush the spring onion and herb sauce onto the steak and cook it for
another 4 minutes at around 200°C.
NOTE
► The herb sauce collecting in the fat drip tray can be poured over the steak
before serving.
Tuna with slices of orange
(4 people)
4 fresh tuna steaks (170 g each)
1 orange
1 tbsp. nely chopped parsley
Salt
Pepper
1) Peel the oranges and cut them into slices approx. 5 mm thick.
2) Preheat the appliance (approx. 200°C).
3) Place the tuna steaks onto the preheated grill, scatter the parsley on top and
season with salt and pepper.
4) Place the slices of orange onto the tuna steaks and grill everything for
approx. 6–8 minutes.
5) Remove the grilled orange slices before serving.

SKGL 2000 A1 GB│IE │ 55 ■
“Panini grill” position
Spinach and cheese panini
250 g spinach leaves
1 onion
1 clove of garlic
1 tbsp. cooking oil
2 tsp. lemon juice
1 pinch of salt (and pepper)
4 slices of toasting bread/white bread
40 g herb butter
75 g mozzarella
20 g pine nuts
1) Sort and wash the spinach leaves.
2) Peel and nely chop the onion and garlic, stew in hot oil. Add the spinach.
Season with lemon juice, salt and pepper.
3) Spread the herb butter onto the toast.
4) Cut the mozzarella into slices.
5) Divide the mozzarella and drained spinach onto 2 slices of toast and scatter
the pine nuts on top.
6) Top the panini with a second slice of bread.
7) Preheat the appliance (approx. 175°C).
8) Carefully place the panini onto the preheated grill.
9) Using the safety catch -, set the desired gap to the upper hotplate and
close the lid.
10) The panini should be roasted to a golden brown.

SKGL 2000 A1
■ 56 │ GB│IE
Chicken breast panini
400 g chicken breast
20 g butter
Pepper, salt, paprika powder
120 g bacon, in strips
6 slices of toasting bread
3 tbsp. salad dressing yoghurt
30 g of iceberg lettuce
2 tomatoes
1 avocado
1 tsp. lime juice
50 g cucumber
1) Rinse the chicken breast under running tap water and pat dry with kitchen
paper.
2) Preheat the appliance to the maximum temperature (230°C) and cook the
breast fillet for a short while in the contact position.
3) Roast at approx. 175°C for around 10 minutes. After grill-roasting, season
with salt, pepper and paprika and set aside.
4) Fry the strips of bacon in a pan until crispy.
5) Spread the yoghurt dressing onto 3 slices of toasting bread or white bread,
add the iceberg lettuce, cut the tomatoes into slices, season them and arrange
them on top.
6) Cut the chicken breasts along their length and lay them on top of the
tomatoes.
7) Lay the strips of bacon on the chicken breasts.
8) Cut open the avocados vertically and use a turning movement to remove the
halves from the stone. Peel and cut the avocado into slices. Drizzle the lime
juice onto the avocado to prevent from going brown. Lay the slices onto the
panini.
9) Cut the cucumber into slices and place them on the avocado.
10) Top the panini with a second slice of bread.
11) Carefully place the panini onto the hotplate .-
12) Using the safety catch -, set the desired gap to the upper hotplate and
close the lid.
13) The panini should be roasted to a golden brown.

SKGL 2000 A1 GB│IE │ 57 ■
Mustard baguette
1 baguette
1 garlic clove
50 g mustard-pickled gherkins
40 g pecorino
1 tbsp. hot mustard
2 tbsp. sweet mustard
50 g butter
2 tbsp. chopped chives
Salt, pepper
1) Cut into the baguette at 2–3 centimetre intervals but do not cut all the way
through.
2) Peel and crush the garlic, dice the gherkins and grate the pecorino cheese.
3) Mix the hot and sweet mustards with the soft butter, garlic, gherkins, Pecorino
cheese and chives, and season with salt and pepper.Fill the mustard butter
into the slits in the baguette and wrap the baguettes in aluminium foil.
4) Preheat the appliance (175–200°C).
5) Lay the baguettes onto the hotplate .-
6) Using the safety catch -, set the desired gap to the upper hotplate and
close the lid.
7) The baguette should be golden-brown.
“Table grill” position
Chicken/turkey breast
200 g chicken/turkey breast
A little flour
1) Coat the hotplates - with a little oil that is suitable for grill-roasting and
heat the appliance to maximum temperature (230°C).
2) Cut the 200 g of chicken/turkey breast into slices and lightly dust with flour.
3) Grill-roast on one side for around 4 minutes, then turn, sprinkle with a little
salt and grill the other side for about 4 minutes.

SKGL 2000 A1
■ 58 │ GB│IE
Grilled vegetables
2 peppers
1 courgette
1 aubergine
Olive oil
Salt
Pepper
Herbs de Provence (seasoning mix)
1) Wash the vegetables thoroughly. Cut the peppers in half, remove the seeds
and cut them into strips. Cut the aubergine and courgette in half along their
length and then into pieces measuring around 0.5 cm.
2) Brush the vegetables with a little olive oil.
3) Preheat the appliance (150–175°C).
4) Place the vegetables onto the preheated hotplate - and grill them on
both sides, allowing around 8–10 minutes for each side, until they are light
brown in colour.
5) Season the vegetables with salt, pepper and herbs de Provence according
to taste.
Coconut curry prawns
100 g red curry paste
50 ml coconut milk
400 g prawns (alternatively crab or shrimps)
200 g sugar snaps
2 peppers
2 onions
2 garlic cloves
Salt and pepper
Aluminium foil
1) Mix the curry paste and the coconut milk.
2) Wash the prawns, the sugar snaps and the peppers.
3) Peel the onions and garlic cloves.
4) Chop the onions, the garlic cloves and peppers into small pieces.

SKGL 2000 A1 GB│IE │ 59 ■
5) Spread the prawns and the vegetables evenly over four pieces of aluminium
foil. The aluminium foil must be big enough so that it is possible to wrap up
the ingredients in little packages. Drip the coconut curry sauce over the food
and season everything with salt and pepper.
6) Seal the packages well so that no liquid can escape.
7) Preheat the appliance (150–175°C).
8) Place the filled packages onto the preheated hotplates - and cook from
both sides, allowing around 15 minutes per side.
Grilled corn on the cob
2 sweet corn cobs
100 g herb butter
Garlic salt
Salt
Pepper
Aluminium foil
1) Brush a piece of aluminium foil with the herb butter.
2) Salt the corn cobs and wrap them in the aluminium foil.
3) Preheat the appliance (150–175°C).
4) Place the package onto the hotplates -.
5) Turn the package after 15 minutes and cook the cobs for another
15 minutes.
6) Season the corn cobs with garlic salt and pepper.

SKGL 2000 A1 FR│BE │ 61 ■
Table des matières
Introduction .............................................62
Informations relatives à ce mode d'emploi . . . . . . . . . . . . . . . . . . . . . . . . . . . . . . . .62
Droits d'auteur .....................................................62
Usage conforme ....................................................62
Avertissements .....................................................62
Sécurité .................................................64
Consignes de sécurité fondamentales . . . . . . . . . . . . . . . . . . . . . . . . . . . . . . . . . . .64
Éléments de commande ....................................68
Déballage et raccordement .................................68
Consignes de sécurité. . . . . . . . . . . . . . . . . . . . . . . . . . . . . . . . . . . . . . . . . . . . . . . .68
Matériel livré et inspection après transport . . . . . . . . . . . . . . . . . . . . . . . . . . . . . . .69
Déballage. . . . . . . . . . . . . . . . . . . . . . . . . . . . . . . . . . . . . . . . . . . . . . . . . . . . . . . . .69
Mise au rebut de l'emballage. . . . . . . . . . . . . . . . . . . . . . . . . . . . . . . . . . . . . . . . . .69
Utilisation et fonctionnement . . . . . . . . . . . . . . . . . . . . . . . . . . . . . . .70
Avant la première utilisation ...........................................70
Bandeau de commande ..............................................71
Utilisation .........................................................72
Réglages de température .............................................73
Position "Gril de contact" .............................................74
Position "Gril à paninis" ..............................................75
Position "Gril de table" ...............................................76
Conseils et astuces ........................................77
Nettoyage et entretien ....................................78
Consignes de sécurité. . . . . . . . . . . . . . . . . . . . . . . . . . . . . . . . . . . . . . . . . . . . . . . .78
Rangement ..............................................79
Dépannage ..............................................80
Mise au rebut ............................................80
Annexe .................................................81
Caractéristiques techniques ...........................................81
Garantie de Kompernass Handels GmbH . . . . . . . . . . . . . . . . . . . . .81
Service après-vente. . . . . . . . . . . . . . . . . . . . . . . . . . . . . . . . . . . . . . . . . . . . . . . . . .82
Importateur ........................................................83
Recettes .................................................83
Position "Gril de contact" .............................................83
Position "Gril à paninis" ..............................................85
Position "Gril de table" ...............................................87

SKGL 2000 A1 FR│BE │ 63 ■
AVERTISSEMENT
Un avertissement à ce niveau de danger signale une situation
potentiellement dangereuse.
Si la situation dangereuse ne peut être écartée, elle peut entraîner des
blessures.
► Les consignes de cet avertissement doivent être suivies pour éviter de
blesser des personnes.
ATTENTION
Un avertissement à ce niveau de danger signale un risque
éventuel de dégâts matériels.
Si la situation n'est pas évitée, elle risque d'entraîner des dégâts matériels.
► Les instructions stipulées dans cet avertissement doivent être suivies pour
éviter tout dégât matériel.
REMARQUE
► Une remarque contient des informations supplémentaires facilitant le
maniement de l'appareil.

SKGL 2000 A1
■ 64 │ FR
│BE
Sécurité
Ce chapitre contient des consignes de sécurité importantes
visant le maniement de l'appareil.
Cet appareil est conforme aux consignes de sécurité prescrites.
Tout usage non conforme peut entraîner des dommages corporels
et des dégâts matériels.
Consignes de sécurité fondamentales
Veuillez vous conformer aux consignes de sécurité ci-dessous
an de garantir une utilisation en toute sécurité de l'appareil:
■ Avant d'utiliser l'appareil, vériez que celui-ci ne présente
aucun dégât extérieur visible. Ne mettez pas en service un
appareil endommagé ou qui a chuté.
■ Faites immédiatement remplacer la che secteur ou le cordon
d'alimentation endommagé par des techniciens spécialisés
agréés ou par le service après-vente pour éviter tout risque.
■ Cet appareil peut être utilisé par des enfants à partir de 8ans
et par des personnes ayant des capacités physiques, sensorielles
ou mentales réduites ou un manque d'expérience et/ou de
connaissances à condition qu'ils soient supervisés ou qu'ils
aient reçu des instructions concernant l'utilisation de l'appareil
en toute sécurité et qu'ils aient compris les dangers en résultant.
■ Les enfants ne doivent pas jouer avec l'appareil.
■ Le nettoyage et la maintenance utilisateur ne doivent pas être
effectués par des enfants à moins qu'ils aient plus de 8 ans et
soient sous surveillance.
■ Maintenir l'appareil et son cordon hors de portée des enfants
de moins de 8 ans.

SKGL 2000 A1 FR
│BE │ 65 ■
■ Conez les réparations de l'appareil exclusivement à des
entreprises agréées ou au service après-vente. Toute répara-
tion non conforme peut entraîner des risques pour l'utilisateur.
À cela s'ajoute l'annulation de la garantie.
■ Toute réparation de l'appareil pendant la période de garantie
doit être conée exclusivement à un service clientèle agréé
par le fabricant, sinon les dommages consécutifs ne seront
pas couverts par la garantie.
■ Les pièces défectueuses doivent être remplacées impérative-
ment par des pièces de rechange d'origine. Seules ces pièces
garantissent la satisfaction des critères de sécurité requis.
■ Évitez tout contact du cordon d'alimentation avec des objets
brûlants. N'utilisez jamais l'appareil à proximité d'une amme
nue, d'une plaque chauffante ou d'un four chauffé.
■ Après utilisation, laissez l'appareil refroidir avant de le nettoyer!
Risque de brûlure!
■ Déroulez toujours le cordon d'alimentation intégralement
lorsque vous utilisez l'appareil!
■ Dans la mesure du possible, placez l'appareil à proximité
immédiate d'une prise secteur. Veillez à ce que la che secteur
soit rapidement accessible en cas de danger et à ce que le
cordon d'alimentation ne fasse trébucher personne.
■ Veillez à ce que l'appareil soit posé sur une surface stable.

SKGL 2000 A1 FR
│BE │ 67 ■
RISQUE D'ÉLECTROCUTION!
► Protégez l'appareil contre les gouttes d'eau et éclaboussures.
Ne posez de ce fait pas d'objets contenant du liquide (par
exemple des vases) sur ou à côté de l'appareil.
► Après chaque interruption, en n d'utilisation ou avant
chaque nettoyage, retirez la che secteur de la prise secteur.
RISQUE DE BRÛLURE!
Attention! Surface brûlante!
► La surface de l'appareil devient brûlante en cours d'utilisation.
Ne touchez l'appareil qu'au niveau de la poignée.
ATTENTION! RISQUE DE DÉGÂTS MATÉRIELS!
► N'utilisez pas de minuterie externe ni de dispositif de com-
mande à distance séparé pour utiliser l'appareil.
► Ne laissez jamais l'appareil sans surveillance lorsque vous
l'utilisez.
► Assurez-vous que l'appareil, le cordon d'alimentation ou la
che secteur n'entrent pas en contact avec des sources de
chaleur telles que des plaques de cuisson ou des ammes nues.
► N'utilisez pas de charbon ou de combustibles similaires pour
faire fonctionner l'appareil!
► Protégez le revêtement anti-adhésif en évitant d'utiliser des
outils métalliques tels que des couteaux, des fourchettes, etc.
Si le revêtement anti-adhésif est endommagé, cessez d'utiliser
l'appareil.
► Utilisez l'appareil uniquement avec les accessoires d'origine
fournis.

SKGL 2000 A1
■ 68 │ FR
│BE
Éléments de commande
Figure A:
Pieds
Fermeture de sécurité
Touche de déverrouillage 180°
Sortie de la graisse
Enroulement du cordon
Bandeau lumineux
Voyant de contrôle vert "Ready"
Bandeau de commande
Touche RELEASE (plaque chauffante inférieure)
Bac collecteur de graisses
- Plaques chauffantes
3 Touche RELEASE (plaque chauffante supérieure)
Figure B:
! Racloir de nettoyage
Déballage et raccordement
Consignes de sécurité
AVERTISSEMENT
Toute mise en service de l'appareil peut entraîner
des dommages corporels et des dégâts matériels!
Veuillez respecter les consignes de sécurité suivantes pour
éviter les risques:
► Les matériaux d'emballage ne doivent pas être utilisés
comme des jouets. Il y a un risque d'étouffement.
► Tenez compte des remarques relatives au branchement
électriques de l'appareil an d'éviter tous dégâts matériels.

SKGL 2000 A1
■ 70 │ FR│BE
Utilisation et fonctionnement
Ce chapitre contient des remarques importantes sur l'utilisation et le fonctionne-
ment de l'appareil.
Avant la première utilisation
1) Nettoyez tous les accessoires comme décrit au chapitre "Nettoyage et
entretien" afin de retirer d'éventuels résidus issus de la production.
2) Veuillez lire le présent mode d'emploi attentivement et dans son intégralité.
3) Installez l'appareil conformément aux consignes de sécurité.
4) Déverrouillez l'appareil en plaçant la fermeture de sécurité en position .
5) Ouvrez l'appareil.
6) Essuyez les plaques chauffantes avec une lavette humide.-
7) Refermez l'appareil.
8) Branchez la fiche du cordon d'alimentation dans une prise secteur raccordée
en bonne et due forme et mise à la terre conformément à la réglementation,
et fournissant la tension indiquée au chapitre "Caractéristiques techniques".
Faites chauffer l'appareil à température maximale pendant env. 5 minutes
en procédant aux réglages correspondants à l'aide du bandeau de com-
mande .
REMARQUE
► Lorsque vous faites chauffer l'appareil pour la première fois, les résidus
de fabrication peuvent entraîner un léger dégagement de fumée ou une
légère odeur. Ce phénomène est tout à fait normal et sans risque. Assurez
une aération suffisante, en ouvrant une fenêtre par exemple.
9) Après le chauffage, retirez la fiche secteur de la prise secteur et laissez
l'appareil refroidir.
10) Nettoyez à nouveau l'appareil avec une lavette humide.

SKGL 2000 A1 FR│BE │ 71 ■
Bandeau de commande
Procédez aux réglages de température et de temps à l'aide du bandeau de
commande .
Touche "+": Augmenter la température ou la durée de
chauffage
Touche Marche/Arrêt : Allumer et éteindre l'appareil
Touche T/MIN : Sélectionner la température ou la durée
de chauffage
Écran: Écran LCD
Touche "-": Réduire la température ou la durée de
chauffage
REMARQUE
► Dès que la température réglée est atteinte, le voyant de contrôle vert "Ready"
s'allume. Il peut s'éteindre à nouveau entremis. Cela signifie que la tempéra-
ture est redescendue en-dessous de celle réglée et que l'appareil se remet
à chauffer.
► Notez qu'un signal sonore se fait entendre lors de chaque saisie.

SKGL 2000 A1
■ 72 │ FR
│BE
Utilisation
RISQUE DE BRÛLURE!
Attention! Surface brûlante!
► La surface de l'appareil devient brûlante en cours d'utilisation.
Ne touchez l'appareil qu'au niveau de la poignée.
REMARQUE
► Déroulez toujours l'ensemble du cordon d'alimentation de l'enroulement du
cordon lorsque vous utilisez l'appareil!
1) Fermez le couvercle de l'appareil à l'aide de la poignée.
2) Introduisez le bac collecteur de graisses dans l'appareil.
3) Branchez la che secteur dans la prise secteur. Un signal sonore retentit
et l'écran affiche le message "OFF". L'écran s'allume en bleu et s'éteint
automatiquement au bout d'une minute si aucune saisie n'est effectuée.
4) Allumez l'appareil avec la touche Marche/Arrêt . L'écran s'allume
en bleu, un signal sonore retentit et l'appareil se met à chauffer à la
température préréglée de 90°C (mode de maintien au chaud). Une fois
la température atteinte, trois signaux sonores retentissent et le voyant de
contrôle "Ready" s'allume. Le bandeau lumineux s'allume en bleu
pendant l'utilisation.
5) Appuyez sur la touche T/MIN et réglez la température souhaitée (90 -
230°C) en appuyant (longuement) sur les touches "+" . Tant et "-"
que la température souhaitée n'est pas atteinte, le voyant de contrôle vert
"Ready" reste éteint et l'appareil commence à chauffer. Une fois que
l'appareil a atteint la température réglée, deux signaux sonores retentissent
et le voyant de contrôle vert "Ready" s'allume.
6) Si nécessaire il est possible, en appuyant à nouveau sur la touche T/MIN ,
de régler la durée de chauffage (1 - 90 min.) à l'aide des touches "+" et
"-" . Dès que la température réglée est atteinte, le voyant de contrôle vert
"Ready" s'allume à nouveau, la température réglée est maintenue.
Dès que la durée de chauffage réglée est écoulée, deux signaux sonores
retentissent et l'appareil passe à nouveau en mode de maintien au chaud
(90°C). L'appareil s'éteint automatiquement au bout d'une heure si aucune
saisie n'est effectuée.
7) Éteignez l'appareil en appuyant sur la touche Marche/Arrêt et
débranchez la che secteur de la prise secteur.

SKGL 2000 A1 FR│BE │ 73 ■
8) Nettoyez l'appareil comme indiqué au chapitre "Nettoyage et entretien".
ATTENTION
► Débranchez toujours la fiche secteur de la prise secteur lorsque vous cessez
d'utiliser l'appareil. Il ne suffit pas d'éteindre l'appareil avec la touche
Marche/Arrêt !
REMARQUE
► Le voyant de contrôle vert "Ready" s'allume dès que la température
réglée est atteinte. Il peut s'éteindre à nouveau entremis. Cela signifie que
la température est redescendue en-dessous de celle réglée et que l'appa-
reil se remet à chauffer.
► Notez qu'un signal sonore se fait entendre lors de chaque saisie.
REMARQUE
Vous pouvez choisir d'utiliser ce gril de 3 manières différentes:
–grand ouvert, pour que les deux plaques chauffantes - puissent
être utilisées comme gril de table.
–avec la plaque chauffante supérieure mobile comme gril de -
contact, pour griller la viande des deux côtés.
–avec la plaque chauffante supérieure fixe comme gril à paninis, -
pour pouvoir gratiner des baguettes par ex.
Réglages de température
Réglez la température différemment, en fonction des aliments à griller. Les indica-
tions suivantes peuvent servir d'orientation :
90 °C : mode de maintien au chaud
150 - 175 °C : température basse, par ex. pour les légumes ou paninis
175 - 200 °C: température moyenne, par ex. pour le poisson
200 - 230 °C: température élevée, par ex. pour la viande
REMARQUE
► Les réglages de température indiqués sont de simples recommandations.
Ils peuvent varier en fonction de la nature des ingrédients!

SKGL 2000 A1 FR│BE │ 75 ■
Position "Gril à paninis"
1) Branchez la fiche secteur dans une prise secteur et allumez l'appareil avec
la touche Marche/Arrêt .
2) Réglez la température souhaitée et si nécessaire la durée de chauffage,
comme décrit au chapitre "Utilisation", et patientez jusqu'à ce que la
température réglée soit atteinte.
3) Ouvrez le couvercle de l'appareil et placez les aliments à griller sur la
plaque chauffante inférieure .-
4) Fermez la plaque chauffante supérieure - et immobilisez-la à la hauteur
souhaitée en poussant la fermeture de sécurité en arrière (position
MIN, II, III, IV, V). Plus la fermeture de sécurité est poussée vers l'arrière,
plus l'écart entre les plaques chauffantes - est important.
5) Au bout d'un certain temps, contrôlez le brunissement des aliments. Ouvrez
à cet effet le couvercle de l'appareil à l'aide de la poignée.
REMARQUE
Commencez par des temps de cuisson courts et allongez-les jusqu'à ce que
vous ayez trouvé la durée adaptée.
6) Si vous êtes satisfait du degré de brunissement atteint, retirez la préparation.
ATTENTION
Endommagement de l'appareil!
► N'utilisez aucun objet pointu ou tranchant pour retirer la préparation
grillée. L'objet est susceptible d'endommager les surfaces des plaques
chauffantes -!
7) Éteignez l'appareil en appuyant sur la touche Marche/Arrêt et
débranchez la fiche secteur de la prise secteur.
ATTENTION
► Débranchez toujours la fiche secteur de la prise secteur lorsque vous cessez
d'utiliser l'appareil. Il ne suffit pas d'éteindre l'appareil avec la touche
Marche/Arrêt !

SKGL 2000 A1
■ 76 │ FR│BE
Position "Gril de table"
1) Branchez la fiche secteur dans une prise secteur et allumez l'appareil avec
la touche Marche/Arrêt .
2) Réglez la température souhaitée et si nécessaire la durée de chauffage,
comme décrit au chapitre "Utilisation", et patientez jusqu'à ce que la
température réglée soit atteinte.
3) Dépliez les deux pieds (fig.1).
4) Appuyez sur la touche de déverrouillage 180° (fig.1) et ouvrez le couvercle
de l'appareil de manière à ce que les deux plaques chauffantes - puissent
être utilisées comme gril de table.
Fig. 1
5) Les plaques chauffantes - sont maintenant l'une à côté de l'autre et
peuvent être utilisées comme gril de table (fig. 2).

SKGL 2000 A1 FR│BE │ 77 ■
Fig. 2
6) Placez les aliments à griller sur les plaques chauffantes -.
7) Retournez les aliments à griller de temps en temps et retirez-les des plaques
chauffantes - une fois cuits.
ATTENTION
Endommagement de l'appareil!
► N'utilisez aucun objet pointu ou tranchant pour retourner/retirer les
aliments grillés. L'objet est susceptible d'endommager les surfaces des
plaques chauffantes -!
8) Éteignez l'appareil en appuyant sur la touche Marche/Arrêt et
débranchez la fiche secteur de la prise secteur.
ATTENTION
► Débranchez toujours la fiche secteur de la prise secteur lorsque vous cessez
d'utiliser l'appareil. Il ne suffit pas d'éteindre l'appareil avec la touche
Marche/Arrêt !
Conseils et astuces
■ Pour attendrir la viande et accélérer le processus de grillade, vous pouvez la faire
mariner au préalable. Vous pouvez la mariner par exemple dans de la crème
fraîche, du vin rouge, du vinaigre, du babeurre ou encore dans du jus de papaye
ou d'ananas frais. Rajoutez des herbes et des épices selon vos préférences. Ne
salez pas la viande pour éviter de la déshydrater et de la rendre dure. Déposez la
viande dans la marinade (cette dernière doit entièrement la recouvrir) ; refermez
ensuite le récipient. Laissez mariner de préférence une nuit entière.
■ Les plaques chauffantes - sont dotées d'un revêtement anti-adhésif, il n'y a
donc pas besoin de matière grasse supplémentaire. Si vous souhaitez quand
même en utiliser, veillez à choisir de la graisse/huile adaptée à la cuisson
comme par exemple de l'huile de colza.
■ Veillez à ce que les aliments à griller aient la même épaisseur pour qu'ils
soient cuits de manière uniforme.
■ Pour être sûr que l'intérieur des aliments à griller est cuit, utilisez un thermo-
mètre à viande disponible dans le commerce.

SKGL 2000 A1
■ 78 │ FR│BE
Nettoyage et entretien
Consignes de sécurité
AVERTISSEMENT!
DANGER DE MORT PAR CHOC ÉLECTRIQUE!
Risque de dommages corporels pendant le nettoyage
de l'appareil!
Veuillez respecter les consignes de sécurité suivantes pour éviter les
risques:
► Avant le nettoyage, retirez la fiche secteur et attendez que l'appa-
reil ait entièrement refroidi. Risque de blessures!
► Ne nettoyez jamais l'appareil sous l'eau du robinet et ne le plongez
jamais dans l'eau. L'appareil risque alors d'être endommagé de
manière irréparable!
ATTENTION
Endommagement de l'appareil!
► Lors du nettoyage de l'appareil, veillez à ce qu'aucune humidité ne pénètre
dans ce dernier afin d'éviter tous dégâts irréparables.
► Pour nettoyer les surfaces, n'utilisez aucun produit nettoyant agressif,
abrasif ou chimique, et aucun objet pointu ou qui risque de rayer.
■ Passez le racloir de nettoyage une fois les ! - sur les plaques chauffantes
plaques chauffantes - refroidies, de manière à rassembler la graisse et les
restes, et poussez-les ensuite dans le bac collecteur de graisses .
■ Videz et nettoyez le bac collecteur de graisses à l'eau chaude avec un
peu de liquide vaisselle.
■ Essuyez les plaques chauffantes - avec une lavette humide. Pour le nettoyage,
n'utilisez pas de produit nettoyant agressif, d'éponges à dos récurant ou
d'objets pointus car ils risqueraient de détruire le revêtement anti-adhésif.
En cas de salissures tenaces ou de résidus incrustés, retirez les plaques
chauffantes -:
–Ouvrez l'appareil.
–Tenez bien la plaque chauffante supérieure - pour qu'elle ne tombe
pas par terre et appuyez sur la touche RELEASE . La plaque chauf-3
fante supérieure se détache de l'appareil.-
–Appuyez sur la touche RELEASE et soulevez simultanément la plaque
chauffante inférieure -.
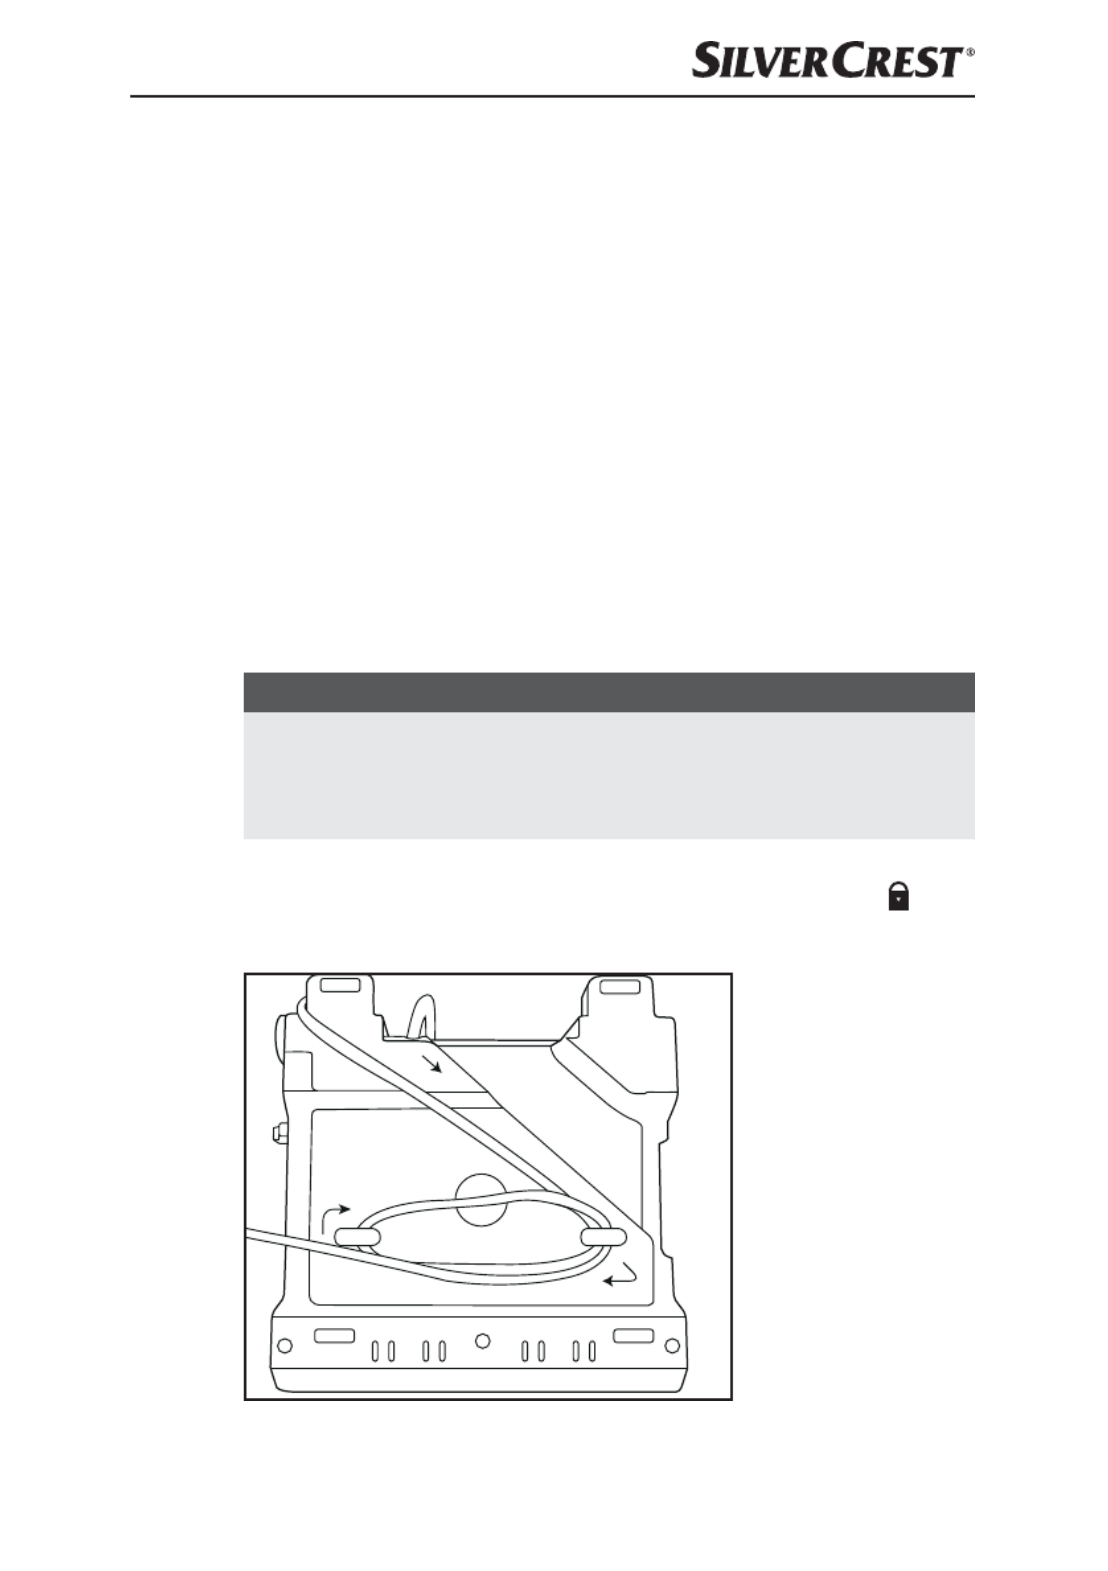
SKGL 2000 A1 FR│BE │ 79 ■
Nettoyez les plaques chauffantes retirées à l'eau chaude avec un peu de liquide -
vaisselle. En cas d'incrustations tenaces, faites tremper un peu les plaques chauf-
fantes - dans l'eau de vaisselle. Après le lavage, rincez les plaques chauffantes -
à l'eau claire afin d'éliminer les restes de liquide vaisselle. Séchez bien le tout. Les
plaques chauffantes doivent être sèches avant de les remonter dans l'appareil!-
Pour remonter les plaques chauffantes -, placez à nouveau les plaques
chauffantes - sur la base de manière à ce que les deux évidements à côté de
la sortie de la graisse encrantent dans les crochets sur la base. Appuyez
ensuite sur la partie avant de la plaque chauffante - de manière à ce qu'elle
s'enclenche de manière audible.
Répétez l'opération avec la deuxième plaque chauffante .-
■ Nettoyez les surfaces extérieures de l'appareil à l'aide d'une lavette humide.
En présence de taches tenaces, appliquez un peu de liquide vaisselle doux
sur la lavette.
■ Essuyez le racloir de nettoyage ! avec une lavette humide. En cas de salissures
plus tenaces, mettez un liquide vaisselle doux sur la lavette ou rincez-la à
l'eau chaude avec du liquide vaisselle.
■ Avant de réutiliser l'appareil, vérifiez bien que toutes les pièces soient totale-
ment sèches.
REMARQUE
► Les plaques chauffantes -, le bac collecteur de graisses et le racloir
de nettoyage !conviennent également au nettoyage au lave-vaisselle.
Pour ménager le matériau, nous recommandons cependant de le nettoyer
comme décrit ci-dessus.
Rangement
Verrouillez l'appareil en plaçant la fermeture de sécurité en position .
Enroulez le cordon d'alimentation dans le sens horaire autour de l'enroulement du
cordon sous le fond de l'appareil et fixez le cordon avec le clip à cet effet:
Fig. 3
Conservez l'appareil nettoyé dans un endroit sec.

SKGL 2000 A1 FR│BE │ 81 ■
Annexe
Caractéristiques techniques
Alimentation électrique 220 – 240V ~ | 50/60Hz
Puissance absorbée 2000W
Tous les éléments de cet appareil en
contact avec les aliments conviennent aux
produits alimentaires.
Classe de protection I ( Prise de terre)
Garantie de Kompernass Handels GmbH
Chère cliente, cher client,
Cet appareil est garanti 3 ans à partir de la date d’achat. Si ce produit venait à
présenter des vices, vous disposez de droits légaux face au vendeur de ce produit.
Vos droits légaux ne sont pas restreints par notre garantie présentée ci-dessous.
Conditions de garantie
La période de garantie débute à la date de l’achat. Veuillez bien conserver le
ticket de caisse d’origine. Ce document servira de preuve d’achat.
Si dans un délai de trois ans suivant la date d’achat de ce produit, un vice de
matériel ou de fabrication venait à apparaître, le produit sera réparé ou remplacé
gratuitement par nos soins, selon notre choix. Cette prestation de garantie néces-
site dans un délai de trois ans la présentation de l’appareil défectueux et du
justificatif d’achat (ticket de caisse) ainsi que la description brève du vice et du
moment de son apparition.
Si le vice est couvert par notre garantie, vous recevrez le produit réparé ou un
nouveau produit en retour. Aucune nouvelle période de garantie ne débute avec
la réparation ou l’échange du produit.
Période de garantie et réclamation légale pour vices cachés
L’exercice de la garantie ne prolonge pas la période de garantie. Cette disposition
s’applique également aux pièces remplacées ou réparées. Les dommages et
vices éventuellement déjà présents à l’achat doivent être signalés immédiatement
après le déballage. Toute réparation survenant après la période sous garantie
fera l’objet d’une facturation.
Étendue de la garantie
L’appareil a été fabriqué avec soin conformément à des directives de qualité
strictes et consciencieusement contrôlé avant sa livraison.
La prestation de garantie est valable pour des vices de matériel et de fabrication.
Cette garantie ne s’étend pas aux pièces du produit qui sont exposées à une usure
normale et peuvent de ce fait être considérées comme pièces d’usure, ni aux dété-
riorations de pièces fragiles, par ex. connecteur, accu, moules ou pièces en verre.

SKGL 2000 A1
■ 82 │ FR│BE
Cette garantie devient caduque si le produit est détérioré, utilisé ou entretenu de
manière non conforme. Toutes les instructions listées dans le manuel d’utilisation
doivent être exactement respectées pour une utilisation conforme du produit. Des
buts d’utilisation et actions qui sont déconseillés dans le manuel d’utilisation, ou
dont vous êtes avertis doivent également être évités.
Le produit est uniquement destiné à un usage privé et ne convient pas à un usage
professionnel. La garantie est annulée en cas d’entretien incorrect et inapproprié,
d’usage de la force et en cas d’intervention non réalisée par notre centre de
service après-vente agréé.
Procédure en cas de garantie
Afin de garantir un traitement rapide de votre demande, veuillez suivre les indica-
tions suivantes :
■ Veuillez avoir à portée de main pour toutes questions le ticket de caisse et la
référence article (par ex. IAN 12345) en tant que justificatif de votre achat.
■ Vous trouverez la référence sur la plaque signalétique, une gravure, sur la
page de garde de votre manuel d’utilisation (en bas à gauche) ou sous
forme d’autocollant au dos ou sur le dessous.
■ Si des erreurs de fonctionnement ou d’autres vices venaient à apparaître,
veuillez d’abord contacter le département service clientèle cité ci-dessous
par ou par .téléphone e-mail
■ Vous pouvez ensuite retourner un produit enregistré comme étant défectueux
en joignant le ticket de caisse et en indiquant en quoi consiste le vice et
quand il est survenu, sans devoir l’affranchir à l’adresse de service après-
vente communiquée.
Sur www.lidl-service.com, vous pouvez télécharger ce manuel ainsi que
beaucoup d’autres, des vidéos produit et logiciels.
Service après-vente
Service France
Tel.: 0800 919270
E-Mail: kompernass@lidl.fr
Service Belgique
Tel.: 070 270 171 (0,15 EUR/Min.)
E-Mail: kompernass@lidl.be
IAN 290943

SKGL 2000 A1 FR│BE │ 85 ■
Position "Gril à paninis"
Paninis épinards et fromage
250g d'épinards en branches
1 oignon
1 gousse d'ail
1 c. à soupe d'huile
2 cc de jus de citron
1 pincée de sel (et de poivre)
4 tranches de pain de mie/ pain blanc
40g de beurre aux fines herbes
75g de mozzarella
20g de pignons de pin
1) Équeutez les épinards et lavez-les.
2) Pelez l'oignon et la gousse d'ail, hachez-les finement puis faites-les blondir
dans de l'huile bien chaude. Rajoutez les épinards. Assaisonnez avec le jus
de citron, le sel et le poivre.
3) Badigeonnez le pain de mie de beurre aux fines herbes.
4) Coupez la mozzarella en tranches.
5) Répartissez la mozzarella et les épinards égouttés sur 2 tranches de pain
de mie et parsemez de pignons de pin.
6) Recouvrez les paninis d'une deuxième tranche de pain de mie.
7) Préchauffez l'appareil (env. 175°C).
8) Placez les paninis avec précaution sur le gril préchauffé.
9) Avec la fermeture de sécurité , réglez l'écartement souhaité de la plaque
chauffante supérieure - et fermez le couvercle.
10) Les paninis doivent être dorés/brunis.

SKGL 2000 A1
■ 86 │ FR│BE
Paninis au blanc de poulet
400g de blanc de poulet
20g de beurre
Poivre, sel, paprika en poudre
120g de bacon en lanières
6 tranches de pain blanc / de pain de mie
3 c. à soupe d'assaisonnement (au yaourt)
30g de salade iceberg
2 tomates
1 avocat
1 cc de jus de citron vert
50g de concombre
1) Rincez brièvement les blancs de poulet sous l'eau du robinet puis tampon-
nez-les avec de l'essuie-tout pour les sécher.
2) Préchauffez l'appareil à température maximale (230°C) et grillez le blanc
de poulet rapidement en position de contact.
3) Faites cuire les blancs de poulet environ 10 minutes à 175°C. Après la
cuisson, salez, poivrez et saupoudrez de paprika, retirez les blancs de la
poêle puis mettez-les de côté.
4) Faites revenir les lanières de bacon à la poêle jusqu'à ce qu'elles soient
croustillantes.
5) Sur 3 tranches de pain de mie/ de pain blanc, étalez l'assaisonnement au
yaourt, garnissez avec la salade iceberg, découpez les tomates en tranche,
assaisonnez-les puis posez-les dessus.
6) Découpez les filets dans le sens de la longueur puis déposez-les sur les tomates.
7) Posez les lanières de bacon sur les blancs de poulet.
8) Coupez l'avocat en deux dans le sens de la longueur puis imprimez une
rotation aux deux moitiés pour détacher le noyau. Retirez la peau puis
découpez la chair d'avocat en tranches. Versez quelques gouttes du jus de
citron vert dessus afin qu'elle ne brunisse pas. Déposez les tranches sur les
paninis.
9) Découpez le concombre en tranches et déposez-les sur l'avocat.
10) Recouvrez les paninis d'une deuxième tranche de pain de mie.
11) Posez les paninis sur la plaque chauffante .-
12) Avec la fermeture de sécurité , réglez l'écartement souhaité de la plaque
chauffante supérieure - et fermez le couvercle.
13) Les paninis doivent être dorés/brunis.

SKGL 2000 A1 FR│BE │ 87 ■
Baguette à la moutarde
1 baguette
1 gousse d'ail
50g de cornichons
40g de pecorino
1 c. à soupe de moutarde forte
2 c. à soupe de moutarde douce
50g de beurre
2 c. à soupe de ciboulette coupée en petits morceaux
Sel, poivre
1) Tous les 2 à 3 centimètres, pratiquez une incision dans la baguette en
veillant à ne pas la trancher.
2) Pelez et écrasez l'ail, découpez les cornichons en tous petits dés puis râpez
le pecorino.
3) Mélangez les moutardes forte et douce, le beurre ramolli, l'ail, les dés de
cornichons, le pecorino et la ciboulette puis assaisonnez de sel et de poivre.
4) Garnissez les incisions avec le beurre à la moutarde puis enveloppez les
baguettes dans une feuille d'aluminium.
5) Préchauffez l'appareil (175 - 200°C).
6) Posez les baguettes sur la plaque chauffante .-
7) Avec la fermeture de sécurité , réglez l'écartement souhaité de la plaque
chauffante supérieure - et fermez le couvercle.
8) Attendez que les baguettes aient doré / bruni.
Position "Gril de table"
Blanc de volaille (poulet/dinde)
200g de blanc de volaille
un peu de farine
1) Versez un peu d'huile adaptée à la cuisson sur les plaques chauffantes -
et préchauffez l'appareil à température maximale (230°C).
2) Coupez les 200g de blanc de volaille en tranches et farinez-les légèrement.
3) Faites cuire pendant env. 4 minutes d'un côté, puis retournez, salez légère-
ment et faites cuire l'autre côté env. 4 minutes.

SKGL 2000 A1
■ 88 │ FR
│BE
Légumes grillés
2 poivrons
1 courgette
1 aubergine
Huile d'olive
Sel
Poivre
Herbes de Provence (mélange d'épices)
1) Lavez soigneusement les légumes. Coupez le poivron en deux, épépinez-le et
coupez-le en tranches. Coupez l'aubergine et la courgette en deux moitiés
dans le sens de la longueur, puis en morceaux de respectivement 0,5cm.
2) Badigeonnez les légumes d'huile d'olive.
3) Préchauffez l'appareil (150 - 175°C).
4) Posez les légumes sur la plaque chauffante - préchauffée et faites griller
les légumes des deux côtés pendant env. 8 à 10 minutes jusqu'à atteindre
une couleur brun clair.
5) Assaisonnez les légumes de sel, de poivre et selon vos goûts d'herbes de
Provence.
Gambas au curry et au lait de coco
100g de pâte de curry rouge
50ml de lait de noix de coco
400g de gambas (ou du crabe ou des crevettes)
200g de pois mange-tout
2 poivrons
2 oignons
2 gousses d'ail
Sel et poivre
Feuille d'aluminium
1) Mélangez la pâte de curry et le lait de coco.
2) Lavez les gambas, les pois mange-tout et le poivron.
3) Épluchez les oignons et les gousses d'ail.
4) Découpez les oignons, les gousses d'ail et le poivron en petits dés.

SKGL 2000 A1 FR│BE │ 89 ■
5) Répartissez les gambas et les légumes uniformément sur 4 feuilles d'aluminium.
La taille de la feuille d'aluminium doit être telle que l'on puisse y emballer
les ingrédients, comme un petit paquet. Répartissez la sauce curry-coco et
assaisonnez le tout avec du sel et du poivre.
6) Refermez bien les paquets de sorte qu'aucun liquide ne puisse s'en échap-
per.
7) Préchauffez l'appareil (150 - 175°C).
8) Posez les paquets garnis sur les plaques chauffantes préchauffées et -
faites cuire des deux côtés pendant env. 15 minutes respectivement.
Épis de maïs grillés
2 épis de maïs sucré
100g de beurre aux fines herbes
Sel aromatisé à l'ail
Sel
Poivre
Feuille d'aluminium
1) Badigeonnez un morceau de feuille d'aluminium de beurre aux fines herbes.
2) Salez chaque épi de maïs et enroulez-le dans la feuille d'aluminium.
3) Préchauffez l'appareil (150 - 175°C).
4) Placez les petits paquets sur les plaques chauffantes -.
5) Retournez-les au bout de 15 minutes et faites cuire les épis de maïs
15 minutes de plus.
6) Assaisonnez les épis de maïs de sel aromatisé à l'ail et de poivre.

SKGL 2000 A1
■ 90 │ FR│BE

SKGL 2000 A1 NL
│BE │ 95 ■
■ Laat reparaties aan het apparaat alleen uitvoeren door geauto-
riseerde vakbedrijven of door de klantendienst. Ondeskundige
reparaties kunnen de gebruiker in gevaar brengen. Bovendien
vervalt dan de garantie.
■ Een reparatie van het apparaat tijdens de garantieperiode
mag alleen worden uitgevoerd door een klantendienst die
door de fabrikant is geautoriseerd, anders vervalt de garantie
bij volgende schadegevallen.
■ Defecte onderdelen mogen alleen worden vervangen door
originele reserveonderdelen. Alleen bij deze onderdelen is
gewaarborgd dat ze voldoen aan de veiligheidseisen.
■ Zorg ervoor dat het snoer geen hete delen van het apparaat
kan aanraken. Gebruik het apparaat nooit in de buurt van
open vuur, een kookplaat of een ingeschakelde oven.
■ Laat het apparaat na gebruik afkoelen alvorens het te reinigen!
Verbrandingsgevaar!
■ Rol het snoer altijd helemaal van de kabelspoel af wanneer u
het apparaat gebruikt!
■ Plaats het apparaat bij voorkeur dicht bij een stopcontact.
Zorg ervoor dat de stekker bij gevaar goed bereikbaar is en
dat u niet kunt struikelen over het snoer.
■ Zorg ervoor dat het apparaat op een veilige manier opgesteld
staat.

SKGL 2000 A1
■ 96 │ NL
│BE
GEVAAR VOOR EEN ELEKTRISCHE SCHOK!
► Sluit het apparaat uitsluitend aan op een volgens de voor-
schriften geïnstalleerd en geaard stopcontact. De netspanning
moet overeenstemmen met de gegevens op het typeplaatje
van het apparaat.
► Laat aansluitleidingen resp. apparaten die niet naar behoren
werken of beschadigd zijn, meteen repareren of vervangen
door de klantendienst.
► Stel het apparaat niet bloot aan regen en gebruik het ook
nooit in een vochtige of natte omgeving.
► Zorg ervoor dat het snoer nooit nat of vochtig wordt terwijl
het apparaat is ingeschakeld.
► Dompel het apparaat nooit onder in water of in andere
vloeistoffen! Er kan levensgevaar ontstaan door een elektri-
sche schok, wanneer bij gebruik vloeistofresten in aanraking
komen met geleidende delen.
► Pak het snoer altijd bij de stekker vast. Trek niet aan het snoer
zelf en pak het snoer nooit vast met natte handen, omdat dit
kortsluiting of een elektrische schok kan veroorzaken.
► Zet noch het apparaat, noch meubelstukken of andere voor-
werpen op het snoer en let erop dat het niet geklemd raakt.
► U mag de behuizing niet openen en het apparaat niet re-
pareren of modiceren. Wanneer u de behuizing opent of
modicaties aanbrengt zonder toestemming, bestaat er
levensgevaar door een elektrische schok en vervalt de
garantie.

SKGL 2000 A1
■ 98 │ NL
│BE
Bedieningselementen
Afbeelding A:
Steunvoetjes
Veiligheidssluiting
Ontgrendelknop 180°
Vetuitloop
Kabelspoel
Lichtelement
Groen indicatielampje “Ready”
Bedieningspaneel
Knop RELEASE (onderste grillplaat)
Vetopvangbak
- Grillplaten
3 Knop RELEASE (bovenste grillplaat)
Afbeelding B:
! Reinigingsschraper
Uitpakken en aansluiten
Veiligheidsvoorschriften
WAARSCHUWING
Bij de ingebruikname van het apparaat kan
persoonlijk letsel en materiële schade ontstaan!
Neem de volgende veiligheidsvoorschriften in acht om de
gevaren te vermijden:
► Verpakkingsmateriaal mag niet als speelgoed worden
gebruikt. Er bestaat gevaar voor verstikking.
► Let altijd op de aanwijzingen voor de elektrische aansluiting
van het apparaat, om materiële schade te voorkomen.
Termékspecifikációk
| Márka: | SilverCrest |
| Kategória: | Grill tányér |
| Modell: | SKGL 2000 A1 |
Szüksége van segítségre?
Ha segítségre van szüksége SilverCrest SKGL 2000 A1, tegyen fel kérdést alább, és más felhasználók válaszolnak Önnek
Útmutatók Grill tányér SilverCrest

9 Október 2024
28 Július 2024
27 Július 2024
21 Július 2024
17 Július 2024
16 Július 2024
16 Július 2024
15 Július 2024
13 Július 2024
13 Július 2024
Útmutatók Grill tányér
- Grill tányér Mestic
- Grill tányér Braun
- Grill tányér Beko
- Grill tányér Moulinex
- Grill tányér Whirlpool
- Grill tányér Nedis
- Grill tányér Grundig
- Grill tányér Gorenje
- Grill tányér Adler
- Grill tányér Princess
- Grill tányér Bosch
- Grill tányér Indesit
- Grill tányér MPM
- Grill tányér AEG
- Grill tányér Emerio
- Grill tányér Bartscher
- Grill tányér Scarlett
- Grill tányér Tefal
- Grill tányér Siemens
- Grill tányér Exquisit
- Grill tányér Miele
- Grill tányér Camry
- Grill tányér DeLonghi
- Grill tányér Krups
- Grill tányér Heinner
- Grill tányér Sunbeam
- Grill tányér Ariete
- Grill tányér Wilfa
- Grill tányér Klarstein
- Grill tányér VOX
- Grill tányér Gourmetmaxx
- Grill tányér Vivax
- Grill tányér Smeg
- Grill tányér Fagor
- Grill tányér Unold
- Grill tányér Sage
- Grill tányér Brentwood
- Grill tányér Bifinett
- Grill tányér Ardes
- Grill tányér Cuisinart
- Grill tányér Rommelsbacher
- Grill tányér Kenwood
- Grill tányér Jocel
- Grill tányér Etna
- Grill tányér Solis
- Grill tányér Clatronic
- Grill tányér Bomann
- Grill tányér Ambiano
- Grill tányér Ninja
- Grill tányér Cecotec
- Grill tányér Dacor
- Grill tányér Sencor
- Grill tányér Pelgrim
- Grill tányér Küppersbusch
- Grill tányér Innoliving
- Grill tányér Bose
- Grill tányér Rowenta
- Grill tányér TurboTronic
- Grill tányér Thomas
- Grill tányér Inventum
- Grill tányér Lagrange
- Grill tányér Continental Edison
- Grill tányér Eta
- Grill tányér Atag
- Grill tányér Telefunken
- Grill tányér Nevir
- Grill tányér Domo
- Grill tányér Russell Hobbs
- Grill tányér Caso
- Grill tányér Coyote
- Grill tányér Black & Decker
- Grill tányér G3 Ferrari
- Grill tányér Hamilton Beach
- Grill tányér Severin
- Grill tányér Fieldmann
- Grill tányér Orbegozo
- Grill tányér Livoo
- Grill tányér Viking
- Grill tányér Dash
- Grill tányér OK
- Grill tányér Guzzanti
- Grill tányér Concept
- Grill tányér DCS
- Grill tányér JL Audio
- Grill tányér OBH Nordica
- Grill tányér TriStar
- Grill tányér Biltema
- Grill tányér Zelmer
- Grill tányér Suntec
- Grill tányér Steba
- Grill tányér Trisa
- Grill tányér Kogan
- Grill tányér Yato
- Grill tányér Furrion
- Grill tányér Gardenline
- Grill tányér ProfiCook
- Grill tányér Fisher & Paykel
- Grill tányér DCG
- Grill tányér Hestan
- Grill tányér Melissa
- Grill tányér Efbe-Schott
- Grill tányér Bourgini
- Grill tányér Blaupunkt
- Grill tányér Chefman
- Grill tányér Witt
- Grill tányér Korona
- Grill tányér Bertazzoni
- Grill tányér Taurus
- Grill tányér Hendi
- Grill tányér BEEM
- Grill tányér H.Koenig
- Grill tányér Kalorik
- Grill tányér CRUX
- Grill tányér Alpina
- Grill tányér Gastroback
- Grill tányér ECG
- Grill tányér Gaggenau
- Grill tányér Rotel
- Grill tányér Hertz
- Grill tányér Ufesa
- Grill tányér Atlas Sound
- Grill tányér Proctor Silex
- Grill tányér Ernesto
- Grill tányér Trebs
- Grill tányér WMF
- Grill tányér Wolf
- Grill tányér Arendo
- Grill tányér Capital
- Grill tányér Beper
- Grill tányér Bestron
- Grill tányér Imperial
- Grill tányér Kicker
- Grill tányér Becken
- Grill tányér OneConcept
- Grill tányér Char-Griller
- Grill tányér Comelec
- Grill tányér Maxxmee
- Grill tányér Lund
- Grill tányér Magic Chef
- Grill tányér Sogo
- Grill tányér George Foreman
- Grill tányér Tepro
- Grill tányér Char-Broil
- Grill tányér Flama
- Grill tányér Vortex
- Grill tányér Quigg
- Grill tányér Aroma
- Grill tányér Salton
- Grill tányér Waring Commercial
- Grill tányér Tomado
- Grill tányér Kernau
- Grill tányér Thermador
- Grill tányér Oster
- Grill tányér Sinbo
- Grill tányér Jata
- Grill tányér Fritel
- Grill tányér Landmann
- Grill tányér Mellerware
- Grill tányér Bella
- Grill tányér Eldom
- Grill tányér First Austria
- Grill tányér Elba
- Grill tányér Proline
- Grill tányér Bull
- Grill tányér Champion
- Grill tányér Buffalo
- Grill tányér Presto
- Grill tányér Imetec
- Grill tányér Arzum
- Grill tányér Sunwind
- Grill tányér Primo
- Grill tányér Saro
- Grill tányér EVO
- Grill tányér Hema
- Grill tányér Vakoss
- Grill tányér Napoleon
- Grill tányér Team
- Grill tányér Blumfeldt
- Grill tányér CaterChef
- Grill tányér Zephir
- Grill tányér Kuvings
- Grill tányér Kunft
- Grill tányér Fusion
- Grill tányér Grunkel
- Grill tányér Bazooka
- Grill tányér Nesco
- Grill tányér Coline
- Grill tányér Lynx
- Grill tányér Micromaxx
- Grill tányér Eurochef
- Grill tányér Weasy
- Grill tányér Gutfels
- Grill tányér Globe
- Grill tányér Krampouz
- Grill tányér Riviera And Bar
- Grill tányér Wet Sounds
- Grill tányér CombiSteel
- Grill tányér Walco
- Grill tányér Black Decker
- Grill tányér Wells
- Grill tányér Avantco
- Grill tányér Cecilware
- Grill tányér Vulcan
- Grill tányér Traeger
- Grill tányér Dyna-Glo
- Grill tányér Proluxe
- Grill tányér Riviera Bar
- Grill tányér APW Wyott
- Grill tányér Ursus Trotter
- Grill tányér DoughXpress
- Grill tányér Pit Boss
- Grill tányér Espressions
- Grill tányér Hatco
- Grill tányér GreenPan
- Grill tányér Zeegma
- Grill tányér WestBend
- Grill tányér MilanToast
- Grill tányér DistinQ
- Grill tányér Dash Go
- Grill tányér Maximex
- Grill tányér Estella
- Grill tányér Simeo
- Grill tányér Firefriend
- Grill tányér Bliss Outdoors
- Grill tányér Monzana
- Grill tányér Stilevs
- Grill tányér Casselin
- Grill tányér Girmi
- Grill tányér Le Marquier
- Grill tányér BBQ Premium
- Grill tányér Kleva
- Grill tányér Cosmo
- Grill tányér Forge Adour
- Grill tányér Stöckli
- Grill tányér Champion Tuff Grills
- Grill tányér Blackstone
- Grill tányér Beautiful
- Grill tányér Roller Grill
- Grill tányér Starfrit
- Grill tányér Backyard Pro
- Grill tányér Chef's Choice
- Grill tányér Royal Catering
- Grill tányér SpidoCook
- Grill tányér Atosa
- Grill tányér Imarflex
- Grill tányér Taco Tuesday
- Grill tányér Yamazen
Legújabb útmutatók Grill tányér

31 Március 2025

27 Március 2025
22 Március 2025
16 Január 2025
14 Január 2025
14 Január 2025
14 Január 2025
14 Január 2025
14 Január 2025
12 Január 2025