Használati útmutató Scansonic DA310
Scansonic
Audio rendszer
DA310
Olvassa el alább 📖 a magyar nyelvű használati útmutatót Scansonic DA310 (172 oldal) a Audio rendszer kategóriában. Ezt az útmutatót 10 ember találta hasznosnak és 2 felhasználó értékelte átlagosan 4.5 csillagra
Oldal 1/172

1
DA 310
Micro System with
CD/MP3 player
UK User Manual
DK Brugervejledning
DE Bedienungsanleitung
NL Gebruikershandleiding
IT Manuale di istruzioni
FR Guide d'instructions
E Manual de instrucciones
DA 310
2
Safety warnings
• Read all the instructions carefully before using the unit and keep them
for future reference.
• Retain the manual. If you pass the unit onto a third party make sure to
include this manual.
• Check that the voltage marked on the rating label matches your mains
voltage.
Damage
• Please inspect the unit for damage after unpacking.
• Do not continue to operate the unit if you are in any doubt about it
working normally, or if it is damaged in any way – switch off, unplug from
the mains socket and consult your dealer.
Location of Unit
• The unit must be on a at stable surface and should not be subjected to
vibrations.
• Do not place the unit on sloped or unstable surfaces as the unit may fall
off or tip over.
• The mains socket must be located near the unit and should be easily
accessible.
• This unit is designed for indoor use only.
Temperature
• Avoid extreme degrees of temperature, either hot or cold. Place the unit
well away from heat sources such as radiators or gas/elctric res.
• Avoid exposure to direct sunlight and other sources of heat.
Naked Flames
• Never place any type of candle or naked ame on the top or near the
unit.
Moisture
• To reduce the risk of re, electric shock or product damage, do not
expose this unit to rain, moisture, dripping or splashing. No objects lled
with liquids, such as vases, should be placed on the unit.
• If you spill any liquid into the unit, it can cause serious damage. Switch it
off at the mains immediately. Withdraw the mains plug and consult your
dealer.
Ventilation
• To prevent the risk of electric shock or re hazard due to overheating,
3
ensure that curtains and other materials do not obstruct the ventilation
vents.
• Do not install or place this unit in a bookcase, built-in cabinet or in
another conned space. Ensure the unit is well ventilated.
Safety
• Always disconnect the unit from the mains supply before connection/
disconnecting other devices or moving the unit.
• Unplug the unit from the mains socket before a lightning storm.
• In the interests of safety and to avoid unnecessary energy consumption,
never leave the unit switched on while unattended for long periods of
time, e.g. overnight, while on holiday or while out of the house. Switch it
off and disconnect the mains plug from the mains socket.
Mains cable
• Make sure the unit or the unit stand is not resting on top of the mains
cable, as the weight of the unit may damage the cable and create a
safety hazard.
Interference
• Do not place the unit on or near appliances which may cause
electromagnetic interference. If you do, it may adversely affect the
operating performance of the unit, and cause distorted sound.
Batteries
• Batteries used in the remote control for this unit are easily swallowed by
young children and this is dangerous.
• Keep loose batteries away from young children and make sure that the
battery holder tray is secure in the remote control. Seek medical advice
if you believe a cell has been swallowed.
• Please dispose of batteries correctly by following the guidance in this
manual.
• Do not expose the battery to direct sunlight of sources of excessive
heat.
Supervision
• Children should be supervised to ensure that they do not play with the
unit and the remote control.
• Never let anyone especially children push anything into the holes, slots
or any other openings in the case – this could result in a fatal electric
shock.
5
1. Disk tray
2. Display
3. Remote Control Sensor
Receive signal from the remote
control.
4. USB … 5V 1A Charging Port
• For charging external devices.
• For MP3 playback.
5. STANDBY Button
Switch the unit between the ON
and STANDBY modes.
6. MODE Button
Switch between DAB, FM,
CD, USB, AUX and Bluetooth
modes.
7. AUDIO IN Socket
Connects to an external audio
device.
8. VOLUME +/– Dial
Increase or decrease the
volume.
9. SCAN/►/II Button
Play/pause/resume playback.
Auto-scan in DAB/FM mode.
10. SKIP/TUNE SEARCH
7
12. USB Button
switch to USB operating mode.
13. BLUETOOTH Button
switch to Bluetooth operating mode.
14. I◄◄ Button
Skip backwards to the beginning of the track or to the previous
track in bluetooth mode.
15. Display Button
Display track information in CD or USB mode.
16. SCAN Button
Auto-scan in DAB mode.
17. OPEN/CLOSE Buttons
open and close disc compartment.
18. MEMORY Button
Press to show preset stations in DAB or FM mode.
Press to programme preset station in DAB or FM mode.
19. CLOCK Button
Press to show the clock.
Press and hold to enter clock setup in Standby mode.
20. TIMER Button
Setup an alarm timer.
21. INTRO Button
Play soundtrack for 10 seconds.
22. RANDOM Button
Set to random playback.
23. MUTE Button
Silence the unit or restore the sound.
24. SLEEP Button
Select a sleep timer.
25. I►► Button
skip forwards to the next track.
Allow fast forwarding of the current track.
Search for a radio station going forwards through accessible radio
frequecides.
26. VOLUME + Buttons
Increase the volume.
27. ENTER Button
conrmselection.
28. FOLDER + Button
SelectoderupinCDorUSBmode.
29. AUDIO IN Button
switch to AUDIO IN operating mode.
Button
Skip backwards to the beginning
of the track or to the previous
track.
Allow fast reversing of the
current track.
Search for a radio station going
backwards through accessible
radio frequencies.
11. SKIP/TUNE SEARCH
7
12. USB Button
switch to USB operating mode.
13. BLUETOOTH Button
switch to Bluetooth operating mode.
14. I◄◄ Button
Skip backwards to the beginning of the track or to the previous
track in bluetooth mode.
15. Display Button
Display track information in CD or USB mode.
16. SCAN Button
Auto-scan in DAB mode.
17. OPEN/CLOSE Buttons
open and close disc compartment.
18. MEMORY Button
Press to show preset stations in DAB or FM mode.
Press to programme preset station in DAB or FM mode.
19. CLOCK Button
Press to show the clock.
Press and hold to enter clock setup in Standby mode.
20. TIMER Button
Setup an alarm timer.
21. INTRO Button
Play soundtrack for 10 seconds.
22. RANDOM Button
Set to random playback.
23. MUTE Button
Silence the unit or restore the sound.
24. SLEEP Button
Select a sleep timer.
25. I►► Button
skip forwards to the next track.
Allow fast forwarding of the current track.
Search for a radio station going forwards through accessible radio
frequecides.
26. VOLUME + Buttons
Increase the volume.
27. ENTER Button
conrmselection.
28. FOLDER + Button
SelectoderupinCDorUSBmode.
29. AUDIO IN Button
switch to AUDIO IN operating mode.
Button
Skip forwards to the next track.
Allow fast forwarding of the
current track.
Search for a radio station going
forwards through accessible
radio frequencies.
12. ENTER Button
Stop playback
13. ▲ open/close disk Button
3
4 5 6 7 8 9 1110
21
12
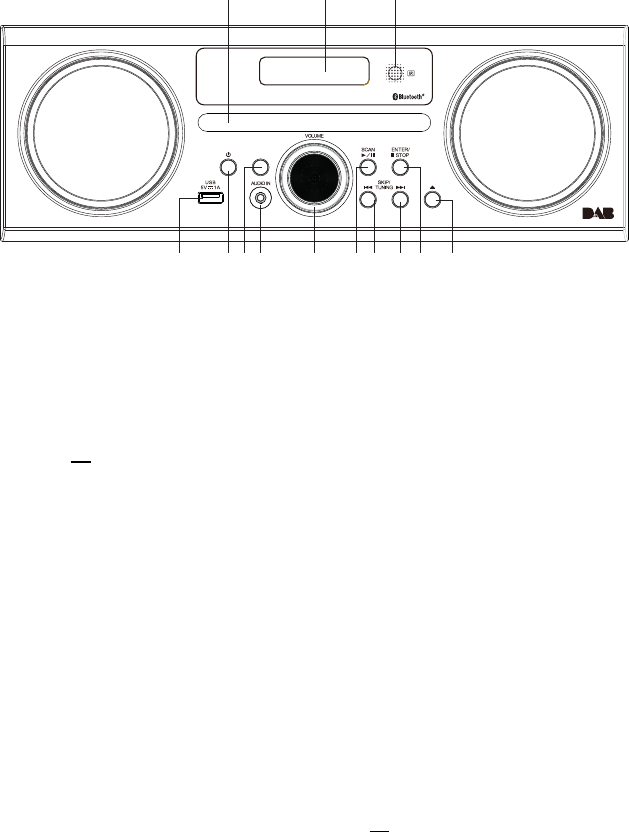
product overview
front view
1. Disk tray
2. Display
3. Remote Control Sensor
Receive signal from the remote control.
4. USB 5V 1A Charging Port
t'PSDIBSHJOHFYUFSOBMEFWJDFT
t'PS.1QMBZCBDL
5. STANDBY Button
4XJUDIUIFVOJUCFUXFFOUIF0/BOE
45"/%#:NPEFT
6. MODE Button
4XJUDICFUXFFO%"#'.$%64#"69BOE
Bluetooth modes.
7. AUDIO IN Socket
$POOFDUTUPBOFYUFSOBMBVEJPEFWJDF
8. VOLUME +/– Dial
Increase or decrease the volume.
9. SCAN/ Button
t1MBZQBVTFSFTVNFQMBZCBDL
t"VUPTDBOJO%"#'.NPEF
10. SKIP/TUNE SEARCH Button
t4LJQCBDLXBSETUPUIFCFHJOOJOHPGUIF
track or to the previous track.
t"MMPXGBTUSFWFSTJOHPGUIFDVSSFOUUSBDL
t4FBSDIGPSBSBEJPTUBUJPOHPJOHCBDLXBSET
UISPVHIBDDFTTJCMFSBEJPGSFRVFODJFT
11. SKIP/TUNE SEARCH Button
t4LJQGPSXBSETUPUIFOFYUUSBDL
t"MMPXGBTUGPSXBSEJOHPGUIFDVSSFOUUSBDL
t4FBSDIGPSBSBEJPTUBUJPOHPJOHGPSXBSET
UISPVHIBDDFTTJCMFSBEJPGSFRVFODJFT
12. ENTER Button
StopQMBZCBDL
PQFODMPTFEJTL#VUUPO
8
MODE
13
Product overview
Front view

6
rear view
12
1. Mains Cable 2. FM Aerial
9
remote control
1. STANDBY Button
Switch the unit between the ON and
STANDBY modes.
2. Number buttons
3. REPEAT Button
Set repeat function.
4. EQ Button
Select the EQ (Equaliser) mode.
5. SELECT/MONO/ST. Button
Switch between mono or stereo in FM mode.
6. Button
t4LJQCBDLXBSETUPUIFCFHJOOJOHPGUIF
USBDLPSUPUIFQSFWJPVTUSBDL
t"MMPXGBTUSFWFSTJOHPGUIFDVSSFOUUSBDL
t4FBSDIGPSBSBEJPTUBUJPOHPJOHCBDLXBSET
UISPVHIBDDFTTJCMFSBEJPGSFRVFODJFT
7. PRESET Button
t4FMFDUBQSFTFUTUBUJPOVQJO%"#PS
FM mode.
8. VOLUME – Buttons
Decrease volum
9. PRESET Button
t4FMFDUBQSFTFUTUBUJPOEPXOJO%"#PS
FM mode.
10. FOLDER - Button
Select oder down in CD or USB mode.
B LU E TOOTH
ME NU
4
6
7
8
9
5
1
2
3
13
15
17
19
20
21
22
23
24
25
26
27
28
29
30
31
32
33
34
35
36
37
38
16
18
11
10
12
14
rear view
12
1. Mains Cable 2. FM Aerial
9
remote control
1. STANDBY Button
Switch the unit between the ON and
STANDBY modes.
2. Number buttons
3. REPEAT Button
Set repeat function.
4. EQ Button
Select the EQ (Equaliser) mode.
5. SELECT/MONO/ST. Button
Switch between mono or stereo in FM mode.
6. Button
t4LJQCBDLXBSETUPUIFCFHJOOJOHPGUIF
USBDLPSUPUIFQSFWJPVTUSBDL
t"MMPXGBTUSFWFSTJOHPGUIFDVSSFOUUSBDL
t4FBSDIGPSBSBEJPTUBUJPOHPJOHCBDLXBSET
UISPVHIBDDFTTJCMFSBEJPGSFRVFODJFT
7. PRESET Button
t4FMFDUBQSFTFUTUBUJPOVQJO%"#PS
FM mode.
8. VOLUME – Buttons
Decrease volum
9. PRESET Button
t4FMFDUBQSFTFUTUBUJPOEPXOJO%"#PS
FM mode.
10. FOLDER - Button
Select oder down in CD or USB mode.
B LU E TOOTH
ME N U
4
6
7
8
9
5
1
2
3
13
15
17
19
20
21
22
23
24
25
26
27
28
29
30
31
32
33
34
35
36
37
38
16
18
11
10
12
14
Remote control
1. STANDBY Button
Switch the unit between the ON
and STANDBY modes.
2. Number buttons
3. REPEAT Button
Set repeat function.
4. EQ Button
Select the EQ (Equaliser) mode.
5. SELECT/MONO/ST. Button
Switch between mono or stereo
in FM mode.
6.
7
12. USB Button
switch to USB operating mode.
13. BLUETOOTH Button
switch to Bluetooth operating mode.
14. I◄◄ Button
Skip backwards to the beginning of the track or to the previous
track in bluetooth mode.
15. Display Button
Display track information in CD or USB mode.
16. SCAN Button
Auto-scan in DAB mode.
17. OPEN/CLOSE Buttons
open and close disc compartment.
18. MEMORY Button
Press to show preset stations in DAB or FM mode.
Press to programme preset station in DAB or FM mode.
19. CLOCK Button
Press to show the clock.
Press and hold to enter clock setup in Standby mode.
20. TIMER Button
Setup an alarm timer.
21. INTRO Button
Play soundtrack for 10 seconds.
22. RANDOM Button
Set to random playback.
23. MUTE Button
Silence the unit or restore the sound.
24. SLEEP Button
Select a sleep timer.
25. I►► Button
skip forwards to the next track.
Allow fast forwarding of the current track.
Search for a radio station going forwards through accessible radio
frequecides.
26. VOLUME + Buttons
Increase the volume.
27. ENTER Button
conrmselection.
28. FOLDER + Button
SelectoderupinCDorUSBmode.
29. AUDIO IN Button
switch to AUDIO IN operating mode.
Button
7. PRESET
6
Remote control
1. STANDBY Button
Switch the unit between the
ON and STANDBY modes.
2. Number buttons
3. REPEAT Button
Set repeat function.
4. EQ Button
Select the EQ (Equaliser) mode.
5. SELECT/MONO/ST. Button
Switch between mono or
stereo in FM mode.
6. I◄◄ Button
7 PRESET Button
SelectoderdowninCD
or USB mode.
8. VOLUME Buttons
Decrease volum
9. PRESET Button
Select a preset station down
in DAM or FM mode.
10. FOLDER Button
SelectoderdowninCD
or USB mode.
11. CD Button
switch to CD operating mode.
rear view
12
1. Mains Cable 2. FM Aerial
9
remote control
1. STANDBY Button
Switch the unit between the ON and
STANDBY modes.
2. Number buttons
3. REPEAT Button
Set repeat function.
4. EQ Button
Select the EQ (Equaliser) mode.
5. SELECT/MONO/ST. Button
Switch between mono or stereo in FM mode.
6. Button
t4LJQCBDLXBSETUPUIFCFHJOOJOHPGUIF
USBDLPSUPUIFQSFWJPVTUSBDL
t"MMPXGBTUSFWFSTJOHPGUIFDVSSFOUUSBDL
t4FBSDIGPSBSBEJPTUBUJPOHPJOHCBDLXBSET
UISPVHIBDDFTTJCMFSBEJPGSFRVFODJFT
7. PRESET Button
t4FMFDUBQSFTFUTUBUJPOVQJO%"#PS
FM mode.
8. VOLUME – Buttons
Decrease volum
9. PRESET Button
t4FMFDUBQSFTFUTUBUJPOEPXOJO%"#PS
FM mode.
10. FOLDER - Button
Select oder down in CD or USB mode.
B LUE TOOTH
ME N U
4
6
7
8
9
5
1
2
3
13
15
17
19
20
21
22
23
24
25
26
27
28
29
30
31
32
33
34
35
36
37
38
16
18
11
10
12
14
rear view
12
1. Mains Cable 2. FM Aerial
9
remote control
1. STANDBY Button
Switch the unit between the ON and
STANDBY modes.
2. Number buttons
3. REPEAT Button
Set repeat function.
4. EQ Button
Select the EQ (Equaliser) mode.
5. SELECT/MONO/ST. Button
Switch between mono or stereo in FM mode.
6. Button
t4LJQCBDLXBSETUPUIFCFHJOOJOHPGUIF
USBDLPSUPUIFQSFWJPVTUSBDL
t"MMPXGBTUSFWFSTJOHPGUIFDVSSFOUUSBDL
t4FBSDIGPSBSBEJPTUBUJPOHPJOHCBDLXBSET
UISPVHIBDDFTTJCMFSBEJPGSFRVFODJFT
7. PRESET Button
t4FMFDUBQSFTFUTUBUJPOVQJO%"#PS
FM mode.
8. VOLUME – Buttons
Decrease volum
9. PRESET Button
t4FMFDUBQSFTFUTUBUJPOEPXOJO%"#PS
FM mode.
10. FOLDER - Button
Select oder down in CD or USB mode.
B LUE TOOTH
ME NU
4
6
7
8
9
5
1
2
3
13
15
17
19
20
21
22
23
24
25
26
27
28
29
30
31
32
33
34
35
36
37
38
16
18
11
10
12
14
Button
Select a preset station up in DAB
or FM mode.
8. VOLUME - Buttons
Decrease volume
9. PRESET
6
Remote control
1. STANDBY Button
Switch the unit between the
ON and STANDBY modes.
2. Number buttons
3. REPEAT Button
Set repeat function.
4. EQ Button
Select the EQ (Equaliser) mode.
5. SELECT/MONO/ST. Button
Switch between mono or
stereo in FM mode.
6. I◄◄ Button
7 PRESET Button
SelectoderdowninCD
or USB mode.
8. VOLUME Buttons
Decrease volum
9. PRESET Button
Select a preset station down
in DAM or FM mode.
10. FOLDER Button
SelectoderdowninCD
or USB mode.
11. CD Button
switch to CD operating mode.
rear view
12
1. Mains Cable 2. FM Aerial
9
remote control
1. STANDBY Button
Switch the unit between the ON and
STANDBY modes.
2. Number buttons
3. REPEAT Button
Set repeat function.
4. EQ Button
Select the EQ (Equaliser) mode.
5. SELECT/MONO/ST. Button
Switch between mono or stereo in FM mode.
6. Button
t4LJQCBDLXBSETUPUIFCFHJOOJOHPGUIF
USBDLPSUPUIFQSFWJPVTUSBDL
t"MMPXGBTUSFWFSTJOHPGUIFDVSSFOUUSBDL
t4FBSDIGPSBSBEJPTUBUJPOHPJOHCBDLXBSET
UISPVHIBDDFTTJCMFSBEJPGSFRVFODJFT
7. PRESET Button
t4FMFDUBQSFTFUTUBUJPOVQJO%"#PS
FM mode.
8. VOLUME – Buttons
Decrease volum
9. PRESET Button
t4FMFDUBQSFTFUTUBUJPOEPXOJO%"#PS
FM mode.
10. FOLDER - Button
Select oder down in CD or USB mode.
B LUE TOOTH
ME N U
4
6
7
8
9
5
1
2
3
13
15
17
19
20
21
22
23
24
25
26
27
28
29
30
31
32
33
34
35
36
37
38
16
18
11
10
12
14
rear view
12
1. Mains Cable 2. FM Aerial
9
remote control
1. STANDBY Button
Switch the unit between the ON and
STANDBY modes.
2. Number buttons
3. REPEAT Button
Set repeat function.
4. EQ Button
Select the EQ (Equaliser) mode.
5. SELECT/MONO/ST. Button
Switch between mono or stereo in FM mode.
6. Button
t4LJQCBDLXBSETUPUIFCFHJOOJOHPGUIF
USBDLPSUPUIFQSFWJPVTUSBDL
t"MMPXGBTUSFWFSTJOHPGUIFDVSSFOUUSBDL
t4FBSDIGPSBSBEJPTUBUJPOHPJOHCBDLXBSET
UISPVHIBDDFTTJCMFSBEJPGSFRVFODJFT
7. PRESET Button
t4FMFDUBQSFTFUTUBUJPOVQJO%"#PS
FM mode.
8. VOLUME – Buttons
Decrease volum
9. PRESET Button
t4FMFDUBQSFTFUTUBUJPOEPXOJO%"#PS
FM mode.
10. FOLDER - Button
Select oder down in CD or USB mode.
B LU E TOOTH
ME NU
4
6
7
8
9
5
1
2
3
13
15
17
19
20
21
22
23
24
25
26
27
28
29
30
31
32
33
34
35
36
37
38
16
18
11
10
12
14
Button
Select a preset station down in
DAB or FM mode.
10. FOLDER - Button
Select folder down in CD or USB
mode.
11. CD Button
switch to CD operating mode.
1. Mains Cable 2. FM Aerial
7
12. USB Button
switch to USB operating mode.
13. BLUETOOTH Button
switch to Bluetooth operating mode.
14.
7
12. USB Button
switch to USB operating mode.
13. BLUETOOTH Button
switch to Bluetooth operating mode.
14. I◄◄ Button
Skip backwards to the beginning of the track or to the previous
track in bluetooth mode.
15. Display Button
Display track information in CD or USB mode.
16. SCAN Button
Auto-scan in DAB mode.
17. OPEN/CLOSE Buttons
open and close disc compartment.
18. MEMORY Button
Press to show preset stations in DAB or FM mode.
Press to programme preset station in DAB or FM mode.
19. CLOCK Button
Press to show the clock.
Press and hold to enter clock setup in Standby mode.
20. TIMER Button
Setup an alarm timer.
21. INTRO Button
Play soundtrack for 10 seconds.
22. RANDOM Button
Set to random playback.
23. MUTE Button
Silence the unit or restore the sound.
24. SLEEP Button
Select a sleep timer.
25. I►► Button
skip forwards to the next track.
Allow fast forwarding of the current track.
Search for a radio station going forwards through accessible radio
frequecides.
26. VOLUME + Buttons
Increase the volume.
27. ENTER Button
conrmselection.
28. FOLDER + Button
SelectoderupinCDorUSBmode.
29. AUDIO IN Button
switch to AUDIO IN operating mode.
Button
Skip backwards to the beginning of the track or to the previous track in
bluetooth mode.
15. Display Button
Display track information in CD or USB mode.
16. SCAN Button
Auto-scan in DAB mode.
17. OPEN/CLOSE Buttons
open and close disc compartment.
18. MEMORY Button
Press to show preset stations in DAB or FM mode.
Press to programme preset station in DAB or FM mode.
19. CLOCK Button
Press to show the clock.
Press and hold to enter clock setup in Standby mode.
20. TIMER Button
Setup an alarm timer.
21. INTRO Button
Play soundtrack for 10 seconds.
22. RANDOM Button
Set to random playback.
23. MUTE Button
Silence the unit or restore the sound.
24. SLEEP Button
Select a sleep timer.
25.
7
12. USB Button
switch to USB operating mode.
13. BLUETOOTH Button
switch to Bluetooth operating mode.
14. I◄◄ Button
Skip backwards to the beginning of the track or to the previous
track in bluetooth mode.
15. Display Button
Display track information in CD or USB mode.
16. SCAN Button
Auto-scan in DAB mode.
17. OPEN/CLOSE Buttons
open and close disc compartment.
18. MEMORY Button
Press to show preset stations in DAB or FM mode.
Press to programme preset station in DAB or FM mode.
19. CLOCK Button
Press to show the clock.
Press and hold to enter clock setup in Standby mode.
20. TIMER Button
Setup an alarm timer.
21. INTRO Button
Play soundtrack for 10 seconds.
22. RANDOM Button
Set to random playback.
23. MUTE Button
Silence the unit or restore the sound.
24. SLEEP Button
Select a sleep timer.
25. I►► Button
skip forwards to the next track.
Allow fast forwarding of the current track.
Search for a radio station going forwards through accessible radio
frequecides.
26. VOLUME + Buttons
Increase the volume.
27. ENTER Button
conrmselection.
28. FOLDER + Button
SelectoderupinCDorUSBmode.
29. AUDIO IN Button
switch to AUDIO IN operating mode.
Button
skip forwards to the next track.
Allow fast forwarding of the current track.
Search for a radio station going forwards through accessible radio
frequencies.
26. VOLUME + Buttons
Increase the volume.
27. ENTER Button
conrm selection.
28. FOLDER + Button
Select folder up in CD or USB mode.
29. AUDIO IN Button
switch to AUDIO IN operating mode.

8
30. TUNER/DAB Button
switch to TUNER or DAB operating mode.
31. ►/II Button
Start and pause playback in bluetooth mode.
32.
7
12. USB Button
switch to USB operating mode.
13. BLUETOOTH Button
switch to Bluetooth operating mode.
14. I◄◄ Button
Skip backwards to the beginning of the track or to the previous
track in bluetooth mode.
15. Display Button
Display track information in CD or USB mode.
16. SCAN Button
Auto-scan in DAB mode.
17. OPEN/CLOSE Buttons
open and close disc compartment.
18. MEMORY Button
Press to show preset stations in DAB or FM mode.
Press to programme preset station in DAB or FM mode.
19. CLOCK Button
Press to show the clock.
Press and hold to enter clock setup in Standby mode.
20. TIMER Button
Setup an alarm timer.
21. INTRO Button
Play soundtrack for 10 seconds.
22. RANDOM Button
Set to random playback.
23. MUTE Button
Silence the unit or restore the sound.
24. SLEEP Button
Select a sleep timer.
25. I►► Button
skip forwards to the next track.
Allow fast forwarding of the current track.
Search for a radio station going forwards through accessible radio
frequecides.
26. VOLUME + Buttons
Increase the volume.
27. ENTER Button
conrmselection.
28. FOLDER + Button
SelectoderupinCDorUSBmode.
29. AUDIO IN Button
switch to AUDIO IN operating mode.
Button
Skip forwards to the next track in bluetooth mode.
33. ►/II Button
Start and pause playback in CD or USB mode.
34. Stop Button
Stop playback in CD or USB mode.
35. Display Buttons
Display information in DAB mode.
36. MENU Buttons
MENU in DAB mode.
37. Display Button
switch between station names, program type, radio text and frequency
in FM mode.
38. SCAN Button
Auto-scan in FM mode.
Battery replacement for the remote control
The remote control requires a LR6 1.5V AA/AM3 battery.
1. Open the battery cover.
2. Insert the supplied battery according to the direction indicated in the
battery compartment. When inserting or removing the battery, push it
towards the (–) battery terminals.
3. Close the cover.
battery replacement for the remote control
The remote control requires a LR6 1.5V AA/AM3 battery.
1. Open the battery cover.
2. Insert the supplied battery according to the direction indicated in the battery compartment.
When inserting or removing the battery, push it towards the (–) battery terminals.
3. Close the cover.
Handling the Battery
t Improper or incorrect use of batteries may cause corrosion or battery leakage, which could
t Install the battery correctly in the battery compartment. Normally the battery’s positive
polarity (+) will face up.
t Use only the battery type indicated in this manual.
t Do not dispose of the used battery as domestic waste. Dispose of it in accordance with
local regulations.
t Small button cell batteries such as the one used in the remote control are easily swallowed
by young children and this is dangerous. Keep loose button cells away from young children
and make sure that the battery is secure in the remote control. Seek medical advice if you
believe a battery cell has been swallowed.
11

9
battery replacement for the remote control
The remote control requires a LR6 1.5V AA/AM3 battery.
1. Open the battery cover.
2. Insert the supplied battery according to the direction indicated in the battery compartment.
When inserting or removing the battery, push it towards the (–) battery terminals.
3. Close the cover.
Handling the Battery
t Improper or incorrect use of batteries may cause corrosion or battery leakage, which could
t Install the battery correctly in the battery compartment. Normally the battery’s positive
polarity (+) will face up.
t Use only the battery type indicated in this manual.
t Do not dispose of the used battery as domestic waste. Dispose of it in accordance with
local regulations.
t Small button cell batteries such as the one used in the remote control are easily swallowed
by young children and this is dangerous. Keep loose button cells away from young children
and make sure that the battery is secure in the remote control. Seek medical advice if you
believe a battery cell has been swallowed.
11
Handling the Battery
• Improper or incorrect use of batteries may cause corrosion or battery
leakage, which could cause re, personal injury or damage to
property.
• Install the battery correctly in the battery compartment. Normally the
battery’s positive polarity (+) will face up.
• Use only the battery type indicated in this manual.
• Do not dispose of the used battery as domestic waste. Dispose of it in
accordance with local regulations.
• Keep loose button cells away from young children and make sure that
the battery is secure in the remote control.
Handling the Remote Control
• Take care of your ngernails when you slide and pull the battery
release tab.
• Do not drop the remote control.
• Do not allow anything to impact the remote control.
• Do not spill water or liquid on the remote control.
• Do not place the remote control on a wet object.
• Do not place the remote control under direct sunlight or near sources
of excessive heat.
• Remove the battery from the remote control when not in use for a long
period of time, as corrosion or battery leakage may occur and result in
physical injury, and/or property damage, and/or re.
• When the battery is exhausted, the remote control will not function.
10
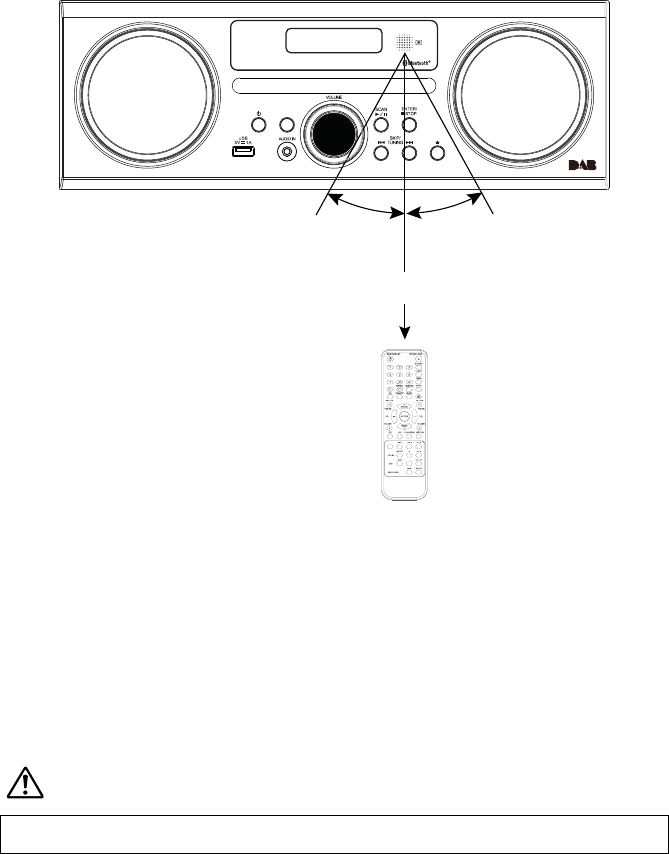
Remote control operation range
• The remote control sensor on the front unit is sensitive to the remote
control’s commands up to a maximum of 4 metres away and within a
maximum of 60° arc.
• Please note that the operating distance may vary depending on the
brightness of the room.
remote control operation range
t The remote control sensor on the front unit is sensitive to the remote control’s commands up
to a maximum of 4 metres away and within a maximum of 60° arc.
t Please note that the operating distance may vary depending on the brightness of the room.
30° 30°
Max. 4 m
Handling the Remote Control
t
t Do not drop the remote control.
t Do not allow anything to impact the remote control.
t Do not spill water or liquid on the remote control.
t Do not place the remote control on a wet object.
t Do not place the remote control under direct sunlight or near sources of excessive heat.
t Remove the battery from the remote control when not in use for a long period of time,
as corrosion or battery leakage may occur and result in physical injury, and/or property
t When the battery is exhausted, the remote control will not function.
12
BLUETOOTH
MENU
MODE
Max. 4m
Connecting to the mains supply
• This unit is designed to operate with an AC power supply.
• Connecting the unit to any other power source may cause damage to
the unit. Unwind the mains cable to its full length. Connect the mains
plug to a mains socket. Make sure the mains plug is fully inserted into
the mains socket. The unit is now connected and ready to use.
• To switch the unit off completely, unplug the mains plug from the mains
socket.
battery replacement for the remote control
The remote control requires a LR6 1.5V AA/AM3 battery.
1. Open the battery cover.
2. Insert the supplied battery according to the direction indicated in the battery compartment.
When inserting or removing the battery, push it towards the (–) battery terminals.
3. Close the cover.
Handling the Battery
t Improper or incorrect use of batteries may cause corrosion or battery leakage, which could
t Install the battery correctly in the battery compartment. Normally the battery’s positive
polarity (+) will face up.
t Use only the battery type indicated in this manual.
t Do not dispose of the used battery as domestic waste. Dispose of it in accordance with
local regulations.
t Small button cell batteries such as the one used in the remote control are easily swallowed
by young children and this is dangerous. Keep loose button cells away from young children
and make sure that the battery is secure in the remote control. Seek medical advice if you
believe a battery cell has been swallowed.
11
Ensure all connections are connected to the mains power socket.

14
Once the scan has nished the unit will select the rst alphanumerically
found station. to explore the found stations, press
7
12. USB Button
switch to USB operating mode.
13. BLUETOOTH Button
switch to Bluetooth operating mode.
14. I◄◄ Button
Skip backwards to the beginning of the track or to the previous
track in bluetooth mode.
15. Display Button
Display track information in CD or USB mode.
16. SCAN Button
Auto-scan in DAB mode.
17. OPEN/CLOSE Buttons
open and close disc compartment.
18. MEMORY Button
Press to show preset stations in DAB or FM mode.
Press to programme preset station in DAB or FM mode.
19. CLOCK Button
Press to show the clock.
Press and hold to enter clock setup in Standby mode.
20. TIMER Button
Setup an alarm timer.
21. INTRO Button
Play soundtrack for 10 seconds.
22. RANDOM Button
Set to random playback.
23. MUTE Button
Silence the unit or restore the sound.
24. SLEEP Button
Select a sleep timer.
25. I►► Button
skip forwards to the next track.
Allow fast forwarding of the current track.
Search for a radio station going forwards through accessible radio
frequecides.
26. VOLUME + Buttons
Increase the volume.
27. ENTER Button
conrmselection.
28. FOLDER + Button
SelectoderupinCDorUSBmode.
29. AUDIO IN Button
switch to AUDIO IN operating mode.
.
Full scan
The full scan will search for the entire DAB Band III channels. After
the scan has nished, the rst alphanumerically found station will be
automatically selected.
1. To activate auto scan, press SCAN/►/II and the display will show
“Scanning …” and a progressing slide bar.
2. All the stations that have been found will be
stored automatically. To explore and listen to
the found stations, press
7
12. USB Button
switch to USB operating mode.
13. BLUETOOTH Button
switch to Bluetooth operating mode.
14. I◄◄ Button
Skip backwards to the beginning of the track or to the previous
track in bluetooth mode.
15. Display Button
Display track information in CD or USB mode.
16. SCAN Button
Auto-scan in DAB mode.
17. OPEN/CLOSE Buttons
open and close disc compartment.
18. MEMORY Button
Press to show preset stations in DAB or FM mode.
Press to programme preset station in DAB or FM mode.
19. CLOCK Button
Press to show the clock.
Press and hold to enter clock setup in Standby mode.
20. TIMER Button
Setup an alarm timer.
21. INTRO Button
Play soundtrack for 10 seconds.
22. RANDOM Button
Set to random playback.
23. MUTE Button
Silence the unit or restore the sound.
24. SLEEP Button
Select a sleep timer.
25. I►► Button
skip forwards to the next track.
Allow fast forwarding of the current track.
Search for a radio station going forwards through accessible radio
frequecides.
26. VOLUME + Buttons
Increase the volume.
27. ENTER Button
conrmselection.
28. FOLDER + Button
SelectoderupinCDorUSBmode.
29. AUDIO IN Button
switch to AUDIO IN operating mode.
to select.
Then press ENTER conrm into stations.
DAB operation
time, the unit will automatically enter into the DAB mode and perform auto scan function.
During the scan the display will show “Scanning… ” together with a slide bar that
indicates the progress of the scan and the amount of stations that have been found so far.
explore the found stations, press .
full scan
1. To activate auto scan, press /SCAN and the display will
show “Scanning … ” and a progressing slide bar.
2. All the stations that have been found will be stored
automatically. To explore and listen to the found stations,
press to select.Then press ENTER conrm into stations.
manual tuning
As well as the auto tune function, you can manually tune the receiver. This can help you
when aligning your aerial or when adding stations that were missed while auto tuning.
1. Press MENU to display the menu.
2. Press to cycle through the DAB channels, which are
numbered from 5A to 13F.
3. After your desired channel number is selected, press
ENTER to conrm. The display will show the multiplex.
4. Press MENU again to add selected channel to station list.
secondary services
You may see a “>” symbol after the name of the station, this indicates that there are
secondary services available to that station. These secondary services contain extra
services that are related to the primary station. e.g. a sports station may want to add extra
commentaries. The secondary services are inserted directly after the primary station in the
station list.
To select the secondary station, press MENU when the “>” appears in the display before
the station name. When the secondary service ends, the unit will automatically switch
back to the primary station.
18
DAB
< Manual tune >
Manual tune
< 5A 174 928MHz >
MENU on the remote
Press ENTER to select Manual tune.
Manual tuning
As well as the auto tune function, you can manually tune the receiver. This
can help you when aligning your aerial or when adding stations that were
missed while auto tuning.
1. Press ENTER to select Manual tune.
2. Press
7
12. USB Button
switch to USB operating mode.
13. BLUETOOTH Button
switch to Bluetooth operating mode.
14. I◄◄ Button
Skip backwards to the beginning of the track or to the previous
track in bluetooth mode.
15. Display Button
Display track information in CD or USB mode.
16. SCAN Button
Auto-scan in DAB mode.
17. OPEN/CLOSE Buttons
open and close disc compartment.
18. MEMORY Button
Press to show preset stations in DAB or FM mode.
Press to programme preset station in DAB or FM mode.
19. CLOCK Button
Press to show the clock.
Press and hold to enter clock setup in Standby mode.
20. TIMER Button
Setup an alarm timer.
21. INTRO Button
Play soundtrack for 10 seconds.
22. RANDOM Button
Set to random playback.
23. MUTE Button
Silence the unit or restore the sound.
24. SLEEP Button
Select a sleep timer.
25. I►► Button
skip forwards to the next track.
Allow fast forwarding of the current track.
Search for a radio station going forwards through accessible radio
frequecides.
26. VOLUME + Buttons
Increase the volume.
27. ENTER Button
conrmselection.
28. FOLDER + Button
SelectoderupinCDorUSBmode.
29. AUDIO IN Button
switch to AUDIO IN operating mode.
to cycle through the DAB
channels, which are numbered from 5A to
13F.
3. After your desired channel number is
selected, press ENTER to conrm. The
display will show the multiplex.
DAB operation
time, the unit will automatically enter into the DAB mode and perform auto scan function.
During the scan the display will show “Scanning… ” together with a slide bar that
indicates the progress of the scan and the amount of stations that have been found so far.
explore the found stations, press .
full scan
1. To activate auto scan, press /SCAN and the display will
show “Scanning … ” and a progressing slide bar.
2. All the stations that have been found will be stored
automatically. To explore and listen to the found stations,
press to select.Then press ENTER conrm into stations.
manual tuning
As well as the auto tune function, you can manually tune the receiver. This can help you
when aligning your aerial or when adding stations that were missed while auto tuning.
1. Press MENU to display the menu.
2. Press to cycle through the DAB channels, which are
numbered from 5A to 13F.
3. After your desired channel number is selected, press
ENTER to conrm. The display will show the multiplex.
4. Press MENU again to add selected channel to station list.
secondary services
You may see a “>” symbol after the name of the station, this indicates that there are
secondary services available to that station. These secondary services contain extra
services that are related to the primary station. e.g. a sports station may want to add extra
commentaries. The secondary services are inserted directly after the primary station in the
station list.
To select the secondary station, press MENU when the “>” appears in the display before
the station name. When the secondary service ends, the unit will automatically switch
back to the primary station.
18
DAB
< Manual tune >
Manual tune
< 5A 174 928MHz >
MENU on the remote
Press ENTER to select Manual tune.
4. Press MENU again to add selected channel to station list.
Secondary services
You may see a “>” symbol after the name of the station, this indicates that
there are secondary services available to that station. These secondary
services contain extra services that are related to the primary station. e.g.
a sports station may want to add extra commentaries. The secondary
services are inserted directly after the primary station in the station list.
To select the secondary station, press MENU when the “>” appears in the
display before the station name. When the secondary service ends, the unit
will automatically switch back to the primary station.
Preset stations
You can store up to 30 of your favourite stations to the memory. This will
enable you to access your favourite stations quickly and easily.
1. To store a preset, you must rst go back listening to the station that you
would like to save, press and hold MEMORY. The display will show
“Preset Store <#: (Empty)>”.

16
DLS (Dynamic Label Segment)
Dynamic label segment is a scrolling message that the broadcaster may
include with their transmissions. The message usually includes information,
such as programme details etc.
Programme Type
This describes the “style” or “genre” of the programme that is being
broadcast.
Audio Bit Rate
The display will show the digital audio bit rate being received.
Frequency
This displays the frequency of the present station, such as “11C
220.352MHz”.
FM operation
Switching from DAB to FM mode
To switch the unit to FM mode, press MODE repeatedly to select FM mode.
The display will show the frequency.
Auto scan
Press SCAN/►/II until the tuner starts searching for a station. To scan
down the frequency band, press and hold SCAN/►/II. Once a station has
been found, the scanning will stop automatically.
general operation
powering ON/OFF
Scan Time
00:00:00” and synchronize to the current local time if you can receive a DAB signal in your
location. After approximate one minute, it will switch to STANDBY mode.
tPress on the unit or press ON/STAND-BY on the remote control to switch the unit to
ON mode.
t Press to switch the unit back to STANDBY mode.
t
completely.
t When the unit is idle for approximately 15 minutes, it will automatically switch to standby.
t
selecting modes
Press MODE repeatedly to switch between DAB, FM, CD, USB, AUX and Bluetooth modes.
adjusting the volume
t Turn the VOLUME +/– dial on the unit or press VOLUME +/– on the remote control to
adjust the volume.
t MUTE on the remote control. Press MUTE again
or press VOLUME +/– on the remote control or turn VOLUME +/– to resume normal
listening.
auto setting the clock
The clock can be updated automatically if you can receive a DAB signal in your location.
In order to synchronise to the current local time you must leave it on the DAB station for a
short period of time.
manually setting the time
1. During Standby mode, press and hold CLOCK on the remote control. The hour digits
2. Press to adjust the hour digits, and then press CLOCK
3. Press to adjust the minute digits, and then press CLOCK
4. The time is now set.
15
MODE repeatedly on the unit or press
CD, USB, TUNER/DAB, AUDIO IN,
BLUETOOTH on the remote
The search may not stop at a station with a very weak signal.
Manual scan
To search for FM stations manually, press
7
12. USB Button
switch to USB operating mode.
13. BLUETOOTH Button
switch to Bluetooth operating mode.
14. I◄◄ Button
Skip backwards to the beginning of the track or to the previous
track in bluetooth mode.
15. Display Button
Display track information in CD or USB mode.
16. SCAN Button
Auto-scan in DAB mode.
17. OPEN/CLOSE Buttons
open and close disc compartment.
18. MEMORY Button
Press to show preset stations in DAB or FM mode.
Press to programme preset station in DAB or FM mode.
19. CLOCK Button
Press to show the clock.
Press and hold to enter clock setup in Standby mode.
20. TIMER Button
Setup an alarm timer.
21. INTRO Button
Play soundtrack for 10 seconds.
22. RANDOM Button
Set to random playback.
23. MUTE Button
Silence the unit or restore the sound.
24. SLEEP Button
Select a sleep timer.
25. I►► Button
skip forwards to the next track.
Allow fast forwarding of the current track.
Search for a radio station going forwards through accessible radio
frequecides.
26. VOLUME + Buttons
Increase the volume.
27. ENTER Button
conrmselection.
28. FOLDER + Button
SelectoderupinCDorUSBmode.
29. AUDIO IN Button
switch to AUDIO IN operating mode.
repeatedly until your
desired frequency is reached.
general operation
powering ON/OFF
Scan Time
00:00:00” and synchronize to the current local time if you can receive a DAB signal in your
location. After approximate one minute, it will switch to STANDBY mode.
tPress on the unit or press ON/STAND-BY on the remote control to switch the unit to
ON mode.
t Press to switch the unit back to STANDBY mode.
t
completely.
t When the unit is idle for approximately 15 minutes, it will automatically switch to standby.
t
selecting modes
Press MODE repeatedly to switch between DAB, FM, CD, USB, AUX and Bluetooth modes.
adjusting the volume
t Turn the VOLUME +/– dial on the unit or press VOLUME +/– on the remote control to
adjust the volume.
t MUTE on the remote control. Press MUTE again
or press VOLUME +/– on the remote control or turn VOLUME +/– to resume normal
listening.
auto setting the clock
The clock can be updated automatically if you can receive a DAB signal in your location.
In order to synchronise to the current local time you must leave it on the DAB station for a
short period of time.
manually setting the time
1. During Standby mode, press and hold CLOCK on the remote control. The hour digits
2. Press to adjust the hour digits, and then press CLOCK
3. Press to adjust the minute digits, and then press CLOCK
4. The time is now set.
15
MODE repeatedly on the unit or press
CD, USB, TUNER/DAB, AUDIO IN,
BLUETOOTH on the remote
With FM radio it may be necessary to ne tune each station by
pressing
7
12. USB Button
switch to USB operating mode.
13. BLUETOOTH Button
switch to Bluetooth operating mode.
14. I◄◄ Button
Skip backwards to the beginning of the track or to the previous
track in bluetooth mode.
15. Display Button
Display track information in CD or USB mode.
16. SCAN Button
Auto-scan in DAB mode.
17. OPEN/CLOSE Buttons
open and close disc compartment.
18. MEMORY Button
Press to show preset stations in DAB or FM mode.
Press to programme preset station in DAB or FM mode.
19. CLOCK Button
Press to show the clock.
Press and hold to enter clock setup in Standby mode.
20. TIMER Button
Setup an alarm timer.
21. INTRO Button
Play soundtrack for 10 seconds.
22. RANDOM Button
Set to random playback.
23. MUTE Button
Silence the unit or restore the sound.
24. SLEEP Button
Select a sleep timer.
25. I►► Button
skip forwards to the next track.
Allow fast forwarding of the current track.
Search for a radio station going forwards through accessible radio
frequecides.
26. VOLUME + Buttons
Increase the volume.
27. ENTER Button
conrmselection.
28. FOLDER + Button
SelectoderupinCDorUSBmode.
29. AUDIO IN Button
switch to AUDIO IN operating mode.
repeatedly. Each press/tap will adjust the
frequency by 0.05 MHz. If reception is still poor adjust the position
of the aerial or try moving the radio to another location.
Audio mode
Press SELECT/MONO/ST. on the remote control to toggle between the
Stereo or Mono selection.
18
Station Name
This displays the station name.
Audio Type
This displays if the station being received is in mono or stereo.
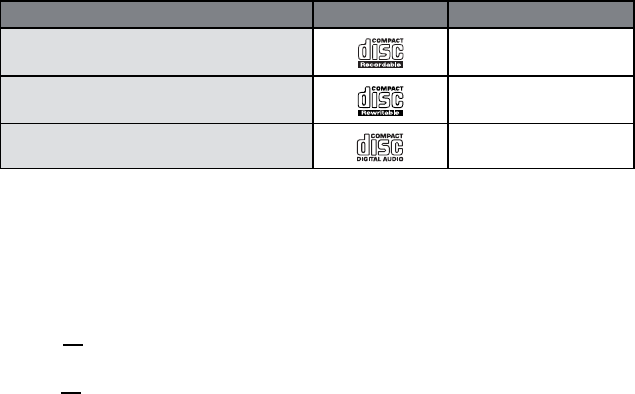
Compatible disc types
Disc Types Disc Logo Recorded Content
CD-R (CD Recordable)
compatible disc types
Disc Types Disc Logo Recorded Content
CD-R (CD Recordable) AUDIO
CD-RW (CD-Rewritable) AUDIO
AUDIO-CD (Compact Disc Digital Audio) AUDIO
CD operation
Press MODE repeatedly to select CD mode.
playback
1. Press “ open/close ” to open the disc tray.
PUSH OPEN/CLOSE
2. Place the CD with the label side up into the CD compartment, and then press
“ open/close ” to close the disc tray.
3. If there is no disc or the disc can’t be read, “NO DISC” or “Unknown Disc” will show on
the display.
4. The total number of tracks will display on the display, then press SCAN/ to play the
t This unit can play CD, CD-R, CD-RW disc, 8cm.
to pause playback
1. Press SCAN/ to pause the playback.
2. To resume playback, press SCAN/ again.
to stop playback
Press to stop playback.
skipping to another track
t Press to skip backwards to the beginning of the track or previous track or skip
forwards to the next track.
t Press and hold to perform fast forward/reverse playback.
23
MODE repeatedly on the unit
or press CD on the remote
AUDIO
CD-RW (CD-Rewritable)
compatible disc types
Disc Types Disc Logo Recorded Content
CD-R (CD Recordable) AUDIO
CD-RW (CD-Rewritable) AUDIO
AUDIO-CD (Compact Disc Digital Audio) AUDIO
CD operation
Press MODE repeatedly to select CD mode.
playback
1. Press “ open/close ” to open the disc tray.
PUSH OPEN/CLOSE
2. Place the CD with the label side up into the CD compartment, and then press
“ open/close ” to close the disc tray.
3. If there is no disc or the disc can’t be read, “NO DISC” or “Unknown Disc” will show on
the display.
4. The total number of tracks will display on the display, then press SCAN/ to play the
t This unit can play CD, CD-R, CD-RW disc, 8cm.
to pause playback
1. Press SCAN/ to pause the playback.
2. To resume playback, press SCAN/ again.
to stop playback
Press to stop playback.
skipping to another track
t Press to skip backwards to the beginning of the track or previous track or skip
forwards to the next track.
t Press and hold to perform fast forward/reverse playback.
23
MODE repeatedly on the unit
or press CD on the remote
AUDIO
AUDIO-CD (Compact Disc Digital Audio)
compatible disc types
Disc Types Disc Logo Recorded Content
CD-R (CD Recordable) AUDIO
CD-RW (CD-Rewritable) AUDIO
AUDIO-CD (Compact Disc Digital Audio) AUDIO
CD operation
Press MODE repeatedly to select CD mode.
playback
1. Press “ open/close ” to open the disc tray.
PUSH OPEN/CLOSE
2. Place the CD with the label side up into the CD compartment, and then press
“ open/close ” to close the disc tray.
3. If there is no disc or the disc can’t be read, “NO DISC” or “Unknown Disc” will show on
the display.
4. The total number of tracks will display on the display, then press SCAN/ to play the
t This unit can play CD, CD-R, CD-RW disc, 8cm.
to pause playback
1. Press SCAN/ to pause the playback.
2. To resume playback, press SCAN/ again.
to stop playback
Press to stop playback.
skipping to another track
t Press to skip backwards to the beginning of the track or previous track or skip
forwards to the next track.
t Press and hold to perform fast forward/reverse playback.
23
MODE repeatedly on the unit
or press CD on the remote
AUDIO
CD operation
Press MODE repeatedly on the unit or press CD on the remote to select
CD mode.
Playback
1. Press “▲ open/close” to open the disc tray.
2. Place the CD with the label side up into the CD compartment, and then
press “▲ open/close” to close the disc tray.
3. If there is no disc or the disc can’t be read, “NO DISC” or “Unknown
Disc” will show on the display.
4. The total number of tracks will display on the display, then press
SCAN/►/II to play the rst track of the CD/MP3 disc automatically.
• This unit can play CD, CD-R, CD-RW disc, 8cm.
To pause playback
1. Press SCAN/►/II to pause the playback.
2. To resume playback, press SCAN/►/II again.
To stop playback
Press to stop playback.
Skipping to another track
• Press
7
12. USB Button
switch to USB operating mode.
13. BLUETOOTH Button
switch to Bluetooth operating mode.
14. I◄◄ Button
Skip backwards to the beginning of the track or to the previous
track in bluetooth mode.
15. Display Button
Display track information in CD or USB mode.
16. SCAN Button
Auto-scan in DAB mode.
17. OPEN/CLOSE Buttons
open and close disc compartment.
18. MEMORY Button
Press to show preset stations in DAB or FM mode.
Press to programme preset station in DAB or FM mode.
19. CLOCK Button
Press to show the clock.
Press and hold to enter clock setup in Standby mode.
20. TIMER Button
Setup an alarm timer.
21. INTRO Button
Play soundtrack for 10 seconds.
22. RANDOM Button
Set to random playback.
23. MUTE Button
Silence the unit or restore the sound.
24. SLEEP Button
Select a sleep timer.
25. I►► Button
skip forwards to the next track.
Allow fast forwarding of the current track.
Search for a radio station going forwards through accessible radio
frequecides.
26. VOLUME + Buttons
Increase the volume.
27. ENTER Button
conrmselection.
28. FOLDER + Button
SelectoderupinCDorUSBmode.
29. AUDIO IN Button
switch to AUDIO IN operating mode.
to skip backwards to the beginning of the track or
previous track or skip forwards to the next track.
• Press and hold
7
12. USB Button
switch to USB operating mode.
13. BLUETOOTH Button
switch to Bluetooth operating mode.
14. I◄◄ Button
Skip backwards to the beginning of the track or to the previous
track in bluetooth mode.
15. Display Button
Display track information in CD or USB mode.
16. SCAN Button
Auto-scan in DAB mode.
17. OPEN/CLOSE Buttons
open and close disc compartment.
18. MEMORY Button
Press to show preset stations in DAB or FM mode.
Press to programme preset station in DAB or FM mode.
19. CLOCK Button
Press to show the clock.
Press and hold to enter clock setup in Standby mode.
20. TIMER Button
Setup an alarm timer.
21. INTRO Button
Play soundtrack for 10 seconds.
22. RANDOM Button
Set to random playback.
23. MUTE Button
Silence the unit or restore the sound.
24. SLEEP Button
Select a sleep timer.
25. I►► Button
skip forwards to the next track.
Allow fast forwarding of the current track.
Search for a radio station going forwards through accessible radio
frequecides.
26. VOLUME + Buttons
Increase the volume.
27. ENTER Button
conrmselection.
28. FOLDER + Button
SelectoderupinCDorUSBmode.
29. AUDIO IN Button
switch to AUDIO IN operating mode.
to perform fast forward/reverse playback.

21
• Press REPEAT once, “REP_ONE” will show on the display, It will play
the current track repeatedly.
• Press REPEAT twice, “REP_ALBUM” will show on the display. It will
play the current folder repeatedly.
• Press REPEAT three times, “REP_ALL” will show on the display. It will
play all les repeatedly.
• Press REPEAT once more again, the repeat function will turn off.
AUX operation
1. There is a AUDIO IN socket located at the front of the unit. Analogue
audio sound signals from other sources can be input to the unit through
this socket.
2. Connect the input to another audio device via an AUX cable (not
included) with AUDIO IN socket.
3. Press MODE repeatedly on the unit or press AUDIO IN on the remote
to select AUX mode.
4. Turn VOLUME on the unit or press VOL +/– on the remote control to
adjust the volume control for your desired sound output level.
5. In AUX mode, operate your audio device directly for playback features.
general operation
powering ON/OFF
Scan Time
00:00:00” and synchronize to the current local time if you can receive a DAB signal in your
location. After approximate one minute, it will switch to STANDBY mode.
tPress on the unit or press ON/STAND-BY on the remote control to switch the unit to
ON mode.
t Press to switch the unit back to STANDBY mode.
t
completely.
t When the unit is idle for approximately 15 minutes, it will automatically switch to standby.
t
selecting modes
Press MODE repeatedly to switch between DAB, FM, CD, USB, AUX and Bluetooth modes.
adjusting the volume
t Turn the VOLUME +/– dial on the unit or press VOLUME +/– on the remote control to
adjust the volume.
t MUTE on the remote control. Press MUTE again
or press VOLUME +/– on the remote control or turn VOLUME +/– to resume normal
listening.
auto setting the clock
The clock can be updated automatically if you can receive a DAB signal in your location.
In order to synchronise to the current local time you must leave it on the DAB station for a
short period of time.
manually setting the time
1. During Standby mode, press and hold CLOCK on the remote control. The hour digits
2. Press to adjust the hour digits, and then press CLOCK
3. Press to adjust the minute digits, and then press CLOCK
4. The time is now set.
15
MODE repeatedly on the unit or press
CD, USB, TUNER/DAB, AUDIO IN,
BLUETOOTH on the remote
• When connecting the external audio device, refer to the owner’s
manual of the external device, as well as the manual.
• Examples of External Audio Device that can be connected to
the unit are: Portable MP3 Players, Cassette Players, Mini Disc
Players, DVD Players, etc.
battery replacement for the remote control
The remote control requires a LR6 1.5V AA/AM3 battery.
1. Open the battery cover.
2. Insert the supplied battery according to the direction indicated in the battery compartment.
When inserting or removing the battery, push it towards the (–) battery terminals.
3. Close the cover.
Handling the Battery
t Improper or incorrect use of batteries may cause corrosion or battery leakage, which could
t Install the battery correctly in the battery compartment. Normally the battery’s positive
polarity (+) will face up.
t Use only the battery type indicated in this manual.
t Do not dispose of the used battery as domestic waste. Dispose of it in accordance with
local regulations.
t Small button cell batteries such as the one used in the remote control are easily swallowed
by young children and this is dangerous. Keep loose button cells away from young children
and make sure that the battery is secure in the remote control. Seek medical advice if you
believe a battery cell has been swallowed.
11
4-hours playback:
1. If the unit is in AUX mode more than 4 hours, it will automatically
switch to standby mode.
2. 10 minutes before entering standby, “AUTO-OFF” will ash on the
display.
3. Press INTRO to continue cancel auto off function.
Maintenance
Cleaning the unit
battery replacement for the remote control
The remote control requires a LR6 1.5V AA/AM3 battery.
1. Open the battery cover.
2. Insert the supplied battery according to the direction indicated in the battery compartment.
When inserting or removing the battery, push it towards the (–) battery terminals.
3. Close the cover.
Handling the Battery
t Improper or incorrect use of batteries may cause corrosion or battery leakage, which could
t Install the battery correctly in the battery compartment. Normally the battery’s positive
polarity (+) will face up.
t Use only the battery type indicated in this manual.
t Do not dispose of the used battery as domestic waste. Dispose of it in accordance with
local regulations.
t Small button cell batteries such as the one used in the remote control are easily swallowed
by young children and this is dangerous. Keep loose button cells away from young children
and make sure that the battery is secure in the remote control. Seek medical advice if you
believe a battery cell has been swallowed.
11
Ensure the unit is fully unplugged from the mains socket before cleaning.

23
Hints and tips
If a problem occurs, it may often be due to something very minor. The
following table contains various tips:
Problem Solution
No power Ensure the mains cable is connected securely at both ends.
Make sure that the ON mode is selected.
The remote
control does
not function
Use the remote control near the unit.
Point the remote control at the remote sensor on the unit.
Replace the battery in the remote control with a new one.
Remove any obstacles between the remote control and the unit.
The unit does
not respond
when pressing
any buttons
The unit may freeze up during use. Switch the unit off and then on again
at he mains socket to reset the unit.
CD
The disc does
not play
There is no disc inside the unit (“No Disc” appears on the display).
Insert the disc correctly with the label side facing up.
Clean the disc.
PAUSE mode may be activated, deactivate it.
A non-valid disc has been inserted.
Condensation may have formed inside the unit due to a sudden change
in temperature. Wait about an hour for it to clear and try again.
Disc skips Make sure the unit is on a secure spot. Vibrations or jarring can cause
the disc to skip.
Radio
Desired station
not found
Weak signal. Use the Manual Tune function.
No DAB coverage in your area or poor reception.
Adjust the position of the aerial.
USB
USB port not
charging
Not all device are compatible with USB charging.
Bluetooth
I cannot nd
“BT speaker N”
my Bluetooth
device
Ensure the Bluetooth function is activated on your Bluetooth device.
general operation
powering ON/OFF
Scan Time
00:00:00” and synchronize to the current local time if you can receive a DAB signal in your
location. After approximate one minute, it will switch to STANDBY mode.
tPress on the unit or press ON/STAND-BY on the remote control to switch the unit to
ON mode.
t Press to switch the unit back to STANDBY mode.
t
completely.
t When the unit is idle for approximately 15 minutes, it will automatically switch to standby.
t
selecting modes
Press MODE repeatedly to switch between DAB, FM, CD, USB, AUX and Bluetooth modes.
adjusting the volume
t Turn the VOLUME +/– dial on the unit or press VOLUME +/– on the remote control to
adjust the volume.
t MUTE on the remote control. Press MUTE again
or press VOLUME +/– on the remote control or turn VOLUME +/– to resume normal
listening.
auto setting the clock
The clock can be updated automatically if you can receive a DAB signal in your location.
In order to synchronise to the current local time you must leave it on the DAB station for a
short period of time.
manually setting the time
1. During Standby mode, press and hold CLOCK on the remote control. The hour digits
2. Press to adjust the hour digits, and then press CLOCK
3. Press to adjust the minute digits, and then press CLOCK
4. The time is now set.
15
MODE repeatedly on the unit or press
CD, USB, TUNER/DAB, AUDIO IN,
BLUETOOTH on the remote
If any functional abnormality is encountered, unplug the unit from
the mains socket and reconnect it again.

1
DA 310
Mikrosystem med CD/MP3-afspiller
DK Brugervejledning
DA 310
4
Supervision
t ChildrFOTIPVMECFTVQFrWJTFEtPFOTVrF
thaUUIFZEPOPUQMaZXJUIUIFVOJUBOEUIF
rFNPtFcPntrPl.
t NevFSMFUBnZPOFFTQFDJBMMZDIJMErFOQVTI
anZUIJOHJntPUIFIPMFTTMPUTPSBnZPUIFS
PQFOJOHTJOUIFDBTFUIJTcPVMErFTVMUJOB
faUBMFMFctrJDTIPDk.
CAUTION
RISK OF ELECTRIC SHOCK
DO NOT OPEN
TZNCPlXJUIJOBOFRVJMaterBMUrJBOHMeJT
intFOEFEtPBMFrUUIFVTFStPUIFQrFTFOcF
PGVOJOTVMated“EBOHFrPVTvPMUBHe”XJUIJO
UIFVOJt’TFODMPTVrFUIaUNaZCFPG
electrJDTIPDk.
TIFexclamaUJPOQPJnUXJUIJOBO
FRVJMaterBMUrJBOHMFJTJntFOEFEtPBMFrUUIF
VTFStPUIFQrFTFOcFPGJNQPrtanU
PQFraUJOHBOENBJntenancFTFrWJDJOH
JOTUSVcUJPOTJOUIFNBOVBMBccPNQBnZJOH
UIFVOJt.
Service
t TPrFEVcFUIFrJTLPGFMFctrJDTIPDkEPOPU
remPvFTDreXT.TIFVOJUEPFTOPUcPnUBJO
anZVTFrTFrvicFBCMFQBrtTPMFBTFMFavFBMM
t
eYQPTFEBOHFrPVTvPMUBHFT.
Maintenance
t &OTVrFUIFVOJUJTGVMMZVOQMVHHFEGrPNUIF
QPXFSTVQQMZCFfPrFDMFBOJOH.
t DPOPUVTFBnZtZQFPGBCrBTJvFQBEPS
BCrBTJvFDMFBOJOHTPMVUJPOTBTUIFTFNaZ
EBNBHFUIFVOJt’TTVrface.
t DPOPUVTFMJRVJETtPDMFBOUIFVOJt.
6
RISIKO FOR ELEKTRISK STØD
MÅ IKKE ÅBNES
FORSIGTIG
Supervision
t ChildrFOTIPVMECFTVQFrWJTFEtPFOTVrF
thaUUIFZEPOPUQMaZXJUIUIFVOJUBOEUIF
rFNPtFcPntrPl.
t NevFSMFUBnZPOFFTQFDJBMMZDIJMErFOQVTI
anZUIJOHJntPUIFIPMFTTMPUTPSBnZPUIFS
PQFOJOHTJOUIFDBTFUIJTcPVMErFTVMUJOB
faUBMFMFctrJDTIPDk.
CAUTION
RISK OF ELECTRIC SHOCK
DO NOT OPEN
TZNCPlXJUIJOBOFRVJMaterBMUrJBOHMeJT
intFOEFEtPBMFrUUIFVTFStPUIFQrFTFOcF
PGVOJOTVMated“EBOHFrPVTvPMUBHe”XJUIJO
UIFVOJt’TFODMPTVrFUIaUNaZCFPG
electrJDTIPDk.
TIFexclamaUJPOQPJnUXJUIJOBO
FRVJMaterBMUrJBOHMFJTJntFOEFEtPBMFrUUIF
VTFStPUIFQrFTFOcFPGJNQPrtanU
PQFraUJOHBOENBJntenancFTFrWJDJOH
JOTUSVcUJPOTJOUIFNBOVBMBccPNQBnZJOH
UIFVOJt.
Service
t TPrFEVcFUIFrJTLPGFMFctrJDTIPDkEPOPU
remPvFTDreXT.TIFVOJUEPFTOPUcPnUBJO
anZVTFrTFrvicFBCMFQBrtTPMFBTFMFavFBMM
t
eYQPTFEBOHFrPVTvPMUBHFT.
Maintenance
t &OTVrFUIFVOJUJTGVMMZVOQMVHHFEGrPNUIF
QPXFSTVQQMZCFfPrFDMFBOJOH.
t DPOPUVTFBnZtZQFPGBCrBTJvFQBEPS
BCrBTJvFDMFBOJOHTPMVUJPOTBTUIFTFNaZ
EBNBHFUIFVOJt’TTVrface.
t DPOPUVTFMJRVJETtPDMFBOUIFVOJt.
6
Det trekantede symbol med lynet er beregnet på at gøre bruger
opmærksom på, at apparatets indre indeholder strømførende
dele, der ikke er isolerede, og hvis strømstyrke er tilstrækkelig til at
udgøre en fare for skade på personer ved elektriske stød.
Supervision
t ChildrFOTIPVMECFTVQFrWJTFEtPFOTVrF
thaUUIFZEPOPUQMaZXJUIUIFVOJUBOEUIF
rFNPtFcPntrPl.
t NevFSMFUBnZPOFFTQFDJBMMZDIJMErFOQVTI
anZUIJOHJntPUIFIPMFTTMPUTPSBnZPUIFS
PQFOJOHTJOUIFDBTFUIJTcPVMErFTVMUJOB
faUBMFMFctrJDTIPDk.
CAUTION
RISK OF ELECTRIC SHOCK
DO NOT OPEN
TZNCPlXJUIJOBOFRVJMaterBMUrJBOHMeJT
intFOEFEtPBMFrUUIFVTFStPUIFQrFTFOcF
PGVOJOTVMated“EBOHFrPVTvPMUBHe”XJUIJO
UIFVOJt’TFODMPTVrFUIaUNaZCFPG
electrJDTIPDk.
TIFexclamaUJPOQPJnUXJUIJOBO
FRVJMaterBMUrJBOHMFJTJntFOEFEtPBMFrUUIF
VTFStPUIFQrFTFOcFPGJNQPrtanU
PQFraUJOHBOENBJntenancFTFrWJDJOH
JOTUSVcUJPOTJOUIFNBOVBMBccPNQBnZJOH
UIFVOJt.
Service
t TPrFEVcFUIFrJTLPGFMFctrJDTIPDkEPOPU
remPvFTDreXT.TIFVOJUEPFTOPUcPnUBJO
anZVTFrTFrvicFBCMFQBrtTPMFBTFMFavFBMM
t
eYQPTFEBOHFrPVTvPMUBHFT.
Maintenance
t &OTVrFUIFVOJUJTGVMMZVOQMVHHFEGrPNUIF
QPXFSTVQQMZCFfPrFDMFBOJOH.
t DPOPUVTFBnZtZQFPGBCrBTJvFQBEPS
BCrBTJvFDMFBOJOHTPMVUJPOTBTUIFTFNaZ
EBNBHFUIFVOJt’TTVrface.
t DPOPUVTFMJRVJETtPDMFBOUIFVOJt.
6
Udråbstegnet i den ligebenede trekant er beregnet til at gøre
bruger opmærksom på vigtige oplysninger i den medfølgende
brugsvejledning vedrørende betjening og vedligeholdelse af
apparatet.
Service
• For at reducere risikoen for elektrisk stød, må ingen af skruerne på
enheden fjernes. Enheden indeholder ingen dele, der kan efterses af
brugeren selv. Reparationer må kun udføres af kvaliceret personale.
• Åbn ikke fastspændte dæksler, da dette kan udsætte dig for farlige
spændinger.
Vedligeholdelse
• Sørg for at tage stikket ud af stikkontakten, inden du rengør afspilleren.
• Brug ikke skuresvampe eller skrappe rengøringsmidler, der kan
beskadige enhedens overade.
• Brug ikke væsker til rengøring af enheden.
Termékspecifikációk
| Márka: | Scansonic |
| Kategória: | Audio rendszer |
| Modell: | DA310 |
Szüksége van segítségre?
Ha segítségre van szüksége Scansonic DA310, tegyen fel kérdést alább, és más felhasználók válaszolnak Önnek
Útmutatók Audio rendszer Scansonic

21 Augusztus 2024
19 Augusztus 2024
13 Augusztus 2024
10 Augusztus 2024
8 Augusztus 2024
5 Augusztus 2024
1 Augusztus 2024
30 Július 2024
Útmutatók Audio rendszer
- Audio rendszer Samsung
- Audio rendszer Sony
- Audio rendszer Yamaha
- Audio rendszer Nedis
- Audio rendszer Grundig
- Audio rendszer Philips
- Audio rendszer Pioneer
- Audio rendszer JVC
- Audio rendszer AEG
- Audio rendszer Harman Kardon
- Audio rendszer Toshiba
- Audio rendszer Medion
- Audio rendszer Onkyo
- Audio rendszer Technics
- Audio rendszer Aiwa
- Audio rendszer Kenwood
- Audio rendszer PEAQ
- Audio rendszer Zoom
- Audio rendszer Bose
- Audio rendszer Telefunken
- Audio rendszer Tangent
- Audio rendszer Roadstar
- Audio rendszer Omnitronic
- Audio rendszer Nextbase
- Audio rendszer Sonoro
- Audio rendszer Naim
- Audio rendszer Power Dynamics
- Audio rendszer Elta
- Audio rendszer Muse
- Audio rendszer Auna
- Audio rendszer Teac
- Audio rendszer Scott
- Audio rendszer ION
- Audio rendszer NAD
- Audio rendszer Samson
- Audio rendszer Vonyx
- Audio rendszer AKAI
- Audio rendszer TechniSat
- Audio rendszer Fenton
- Audio rendszer Telestar
- Audio rendszer Lenco
- Audio rendszer Soundmaster
- Audio rendszer Dual
- Audio rendszer HQ Power
- Audio rendszer Sangean
- Audio rendszer OneConcept
- Audio rendszer Tascam
- Audio rendszer Arcam
- Audio rendszer Sitecom
- Audio rendszer Reflexion
- Audio rendszer Teufel
- Audio rendszer Argon
- Audio rendszer Tevion
- Audio rendszer GPO
- Audio rendszer Sonos
- Audio rendszer Marquant
- Audio rendszer Polk
- Audio rendszer Proline
- Audio rendszer Pure
- Audio rendszer Terris
- Audio rendszer Tokai
- Audio rendszer Ricatech
- Audio rendszer Boston Acoustics
- Audio rendszer Sweex
- Audio rendszer Pure Acoustics
- Audio rendszer Pinnacle
- Audio rendszer Dnt
- Audio rendszer Quantis
- Audio rendszer Bluesound
- Audio rendszer Karcher Audio
- Audio rendszer Revox
- Audio rendszer Fusion
- Audio rendszer Skytec
- Audio rendszer Numan
- Audio rendszer Iluv
- Audio rendszer Odys
- Audio rendszer Lynx
- Audio rendszer Xoro
- Audio rendszer Hiteker
- Audio rendszer Tamashi
- Audio rendszer Quadral
- Audio rendszer JGC
- Audio rendszer Devialet
- Audio rendszer Moneual
- Audio rendszer Roku
- Audio rendszer Visual Land
- Audio rendszer Tivoli
- Audio rendszer Axxion
- Audio rendszer Ebench
- Audio rendszer Bang Olufsen
- Audio rendszer KRK Systems
- Audio rendszer Jarre
- Audio rendszer Belson
- Audio rendszer S-Digital
- Audio rendszer Monitor
Legújabb útmutatók Audio rendszer
16 Január 2025
15 Január 2025

15 Január 2025
14 Január 2025
14 Január 2025
14 Január 2025
12 Január 2025
5 Október 2024
26 Szeptember 2024
24 Szeptember 2024