Használati útmutató Sanyo Xacti VPC-CG9EX
Sanyo
videókamera
Xacti VPC-CG9EX
Olvassa el alább 📖 a magyar nyelvű használati útmutatót Sanyo Xacti VPC-CG9EX (220 oldal) a videókamera kategóriában. Ezt az útmutatót 2 ember találta hasznosnak és 2 felhasználó értékelte átlagosan 4.5 csillagra
Oldal 1/220

VPC-CG9EX
VPC-CG9
VPC-CG9GX
INSTRUCTION MANUAL
Digital Movie Camera
Please read these instructions carefully before using the camera.
Make sure to read and understand the separate booklet “SAFETY MANUAL”.
Keep this manual in a safe place for later reference.
Important note
This manual explains how to safely operate the VPC-CG9EX, VPC-CG9 and
VPC-CG9GX.
Any information regarding only one of these products will be labeled as such.

iEnglish
Symbols used in this manual
HINT Points giving some extended instructions or special points to pay
attention to.
CAUTION Points that require special attention.
(page xx) Refer to the page indicated for detailed information.
You may find the answers to questions or problems concerning camera
operation in the sections “COMMONLY ASKED QUESTIONS” (page 180)
and “TROUBLESHOOTING” (page 187).
English ii
SHOOT, PLAY BACK AND SAVE
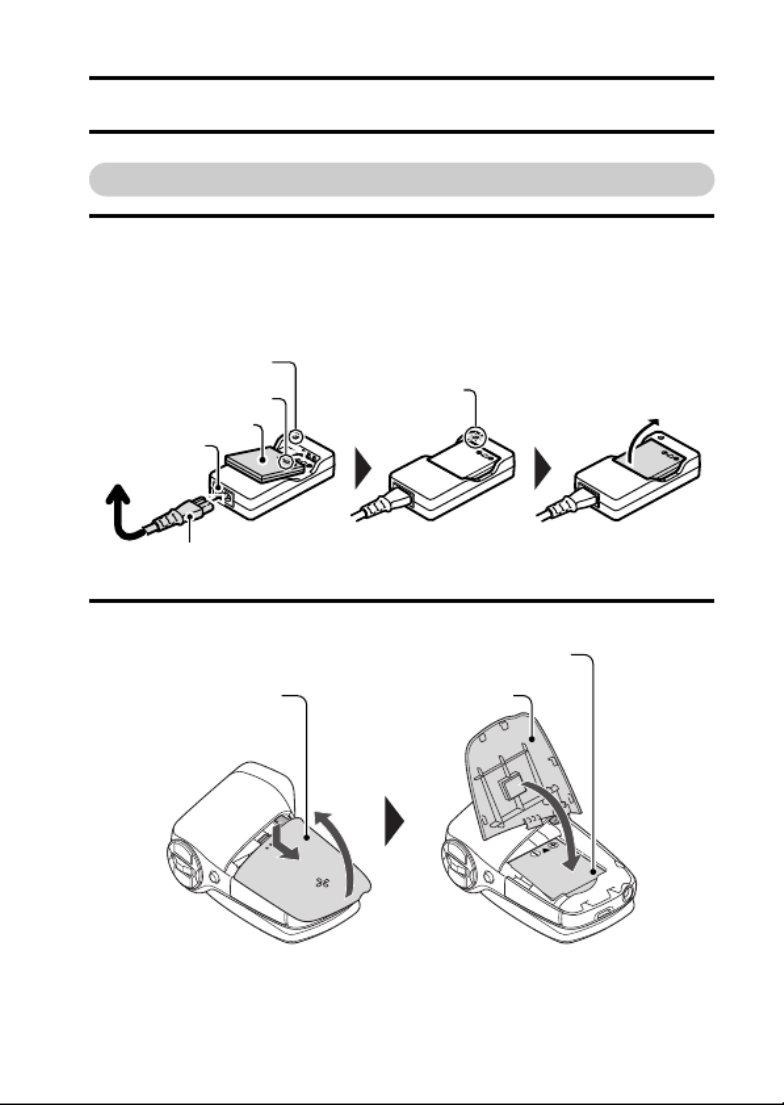
Prepare the battery pack
1 Charge the battery pack.
The CHARGE indicator shows the battery pack charge status.
hLights red during recharging.
hTurns off when battery pack is fully charged.
hThe charging time is approx. 90 minutes.
2 Insert the battery pack.
CHARGE indicator
[o] mark
Battery pack
Socket
Power cord
CHARGE indicator
1Open
2Insert the battery pack
3Close
iii English
SHOOT, PLAY BACK AND SAVE
Before capturing those important shots, be sure to first take a
test shot to confirm that your camera is set up and ready to go
i
Sanyo declines any claim for compensation for recorded contents etc. in case
of photographing or recording failure due to a chance camera or card flaw.
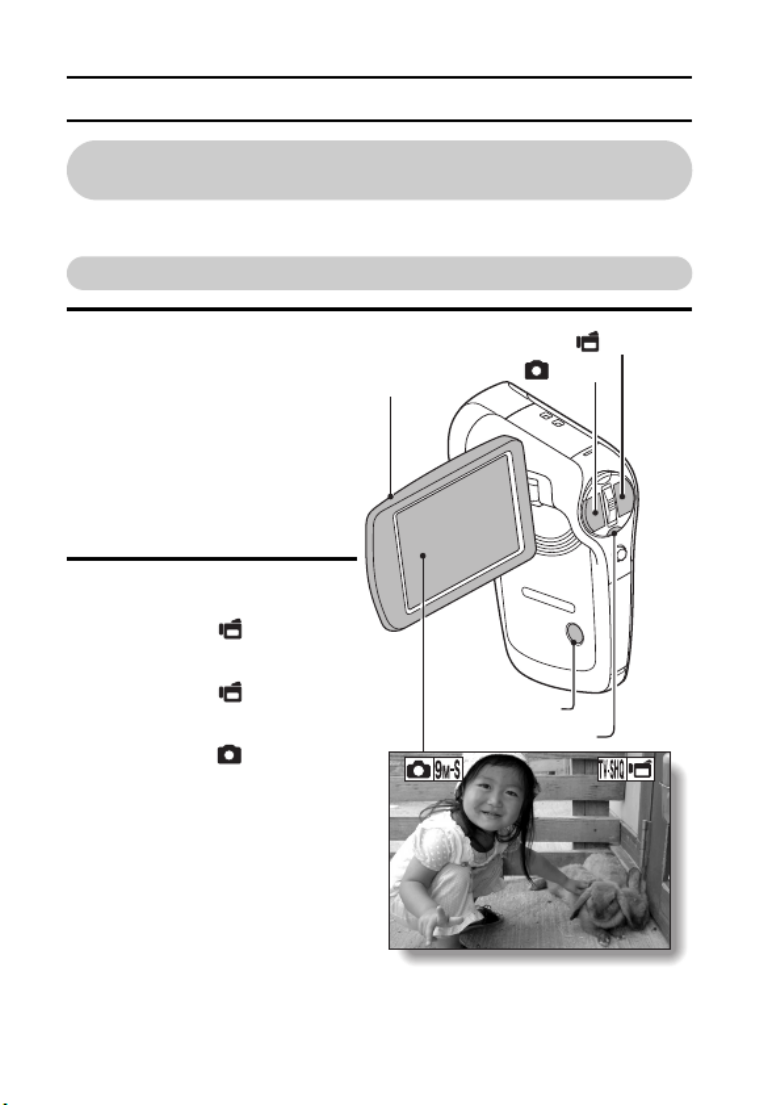
Shooting
1 Open the monitor unit, and
press the ON/OFF button
for at least 1 second to turn
the camera on.
h
If the screen to set the date
and time appears, press
the MENU button 2 times
to cancel it.
For how to set the date
and time, see page 32.
2 Record.
To record a video clip:
h
Press the [ ] button to
begin recording a video
clip.
h
Press the [ ] button
again to end the recording.
To take a photo:
h
Press the [ ] button.
h
A still image is captured.
668
668
668
668
668
01:17:32
01:17:32
01:17:32
01:17:32
01:17:32
668 01:17:32
ON/OFF button
[ ] button
[ ] button
Monitor unit
MENU button
<Shooting Mode Screen>
English iv
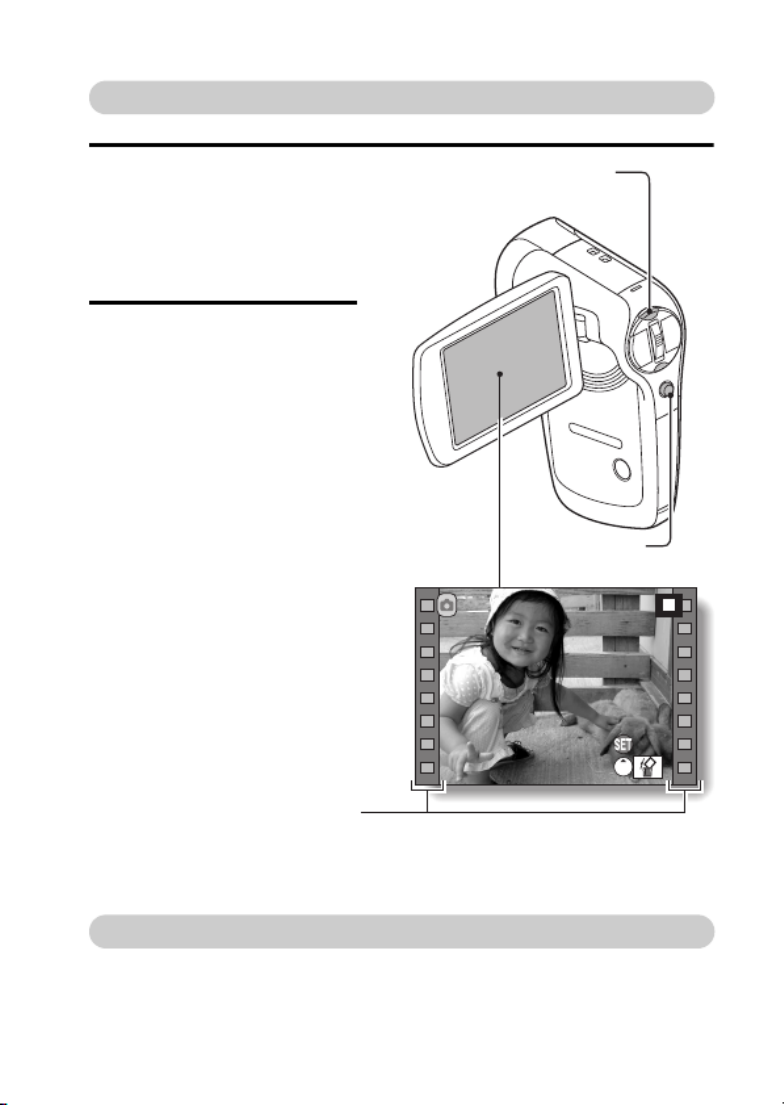
Playback
When you are finished using the camera...
Press the ON/OFF button for at least 1 second to turn the camera off.
1 Press the REC/PLAY
button.
hThe display changes to
the Playback Screen and
the image that was just
captured is shown.
2 Toggle the SET button to
the left or right to display
the image you wish to see.
<Video clip playback>
hVideo clips are indicated
by a video clip pattern
along the left and right
sides of the screen.
hPress the SET button to
start video clip playback.
<To return to the shooting
mode>
hPress the REC/PLAY
button.
PLAY
PLAY
PLAY
PLAY
PLAY
SAVE
SAVE
SAVE
SAVE
SAVE
PLAY
SAVE
SET button
<Example: After recording a
video clip>
Video clip pattern
REC/PLAY button
vEnglish
SHOOT, PLAY BACK AND SAVE
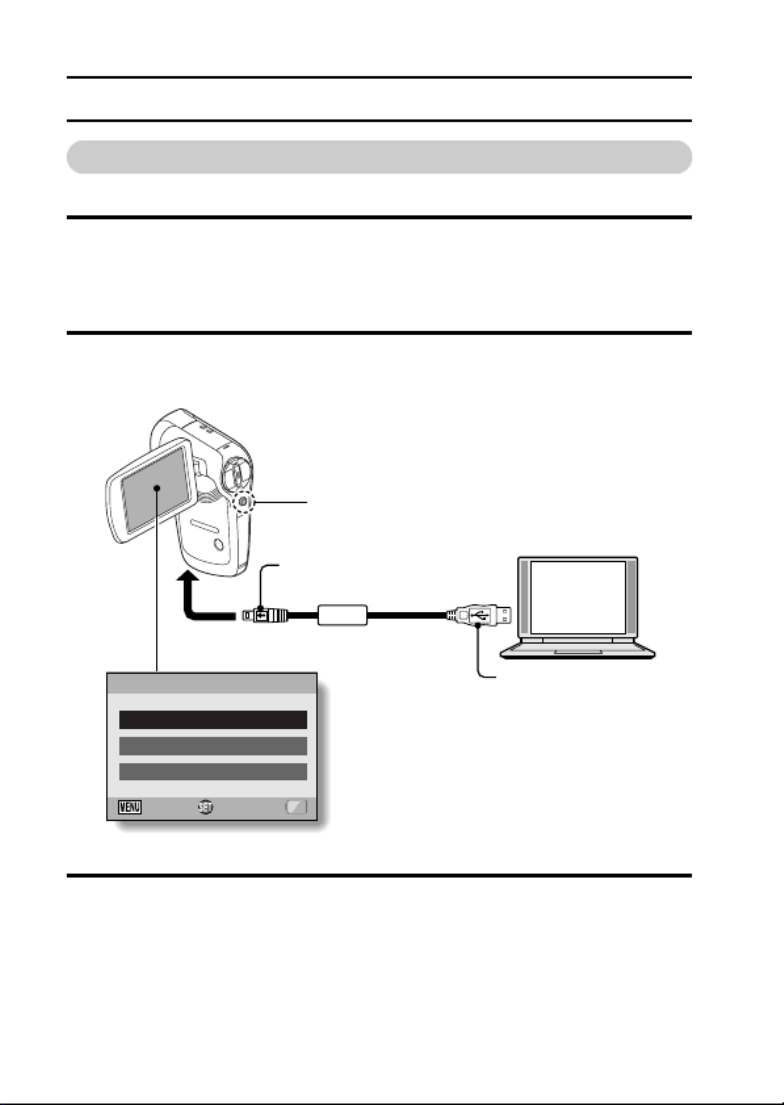
Copy files to the computer (Windows XP)
Connect your camera to a computer, and copy files to the computer.
1 Turn on the computer, and use the supplied dedicated USB interface
cable to connect your camera to the computer.
hConnect the cable between the camera’s USB/AV terminal and the
computer’s USB connector.
2 Turn on the camera (page 29).
hThe USB Connection Screen appears on the camera’s monitor.
3 Select “COMPUTER”, and press the SET button.
hThe screen to select the computer connection mode appears.
OK
CANCEL
USB CONNECTION
CANCEL
PRINTER
COMPUTER
To USB/AV terminal
on the camera
To USB connector
on the computer
Supplied dedicated
USB interface cable
SET button

English vi
4 Select “CARD READER”, and press the SET button.
hThe message [Found New Hardware] appears in the task tray,
showing that the camera is recognized as a drive.
hThe card is recognized (mounted) as a disk, and the [XACTI_INT (E:)]
icon appears in the [My Computer] window.
* The drive name (E:) may be different on your computer.
<If the access menu (page 168) appears>
hClick on [Exit] to cancel the access menu.
5 Select an action.
hIf the [XACTI_INT (E:)] window appears automatically, select the
desired procedure from the window.
Dismounting the camera
CAUTION
iTo disconnect your camera, be sure to follow the procedure below. Failure
to follow this procedure may cause faulty operation of your computer or
corrupt the files in your camera.
1 Left-click on the icon for safely removing hardware in the task tray.
hA list appears showing the devices connected to the computer’s USB
connector.
<Windows Vista>
hClose the window.
2 Left-click on the camera drive (E:).
hThe camera can now be disconnected.
* The drive name (E:) may be different on your computer.
No software is included with this camera. Instructions for obtaining
the software can be found on page 167.

1English
CONTENTS
CONTENTS ........................................................................................... 1
QUICK SEARCH BY OPERATION ............ ..................... ....................... 7
CHECKING THE INCLUDED ACCESSORIES .................................... 13
Media cards that can be used with this camera ............................ 17
What “card” means in this manual ................................................ 17
GETTING THE MOST OUT OF YOUR CAMERA ............................... 18
SIMPLE mode for quick-and-easy operation ................................ 18
Movie image stabilizer for sharp pictures ..................................... 19
Sharp face shots ........................................................................... 19
SYSTEM MAP ..................................................................................... 20
SETUP
PARTS NAMES ................................................................................... 21
CHARGING .......................................................................................... 23
INSTALL THE CARD ........................................................................... 24
INSTALLING THE BATTERY PACK .................................................... 26
Installing the DC adaptor (sold separately) ................................... 27
Warning concerning battery pack temperature ............................. 28
TURNING THE CAMERA ON AND OFF ............................................. 29
Turning on the camera .................................................................. 29
Turning on the camera when the power save (sleep) mode is
active ........................................................................................ 30
Turning off the camera .................................................................. 30
DATE AND TIME SETTING ................................................................. 32
SWITCHING BETWEEN THE SHOOTING MODE AND
PLAYBACK MODE .......................................................................... 35
SWITCHING THE OPERATING MODE .............................................. 36
Switching between the SIMPLE and NORMAL modes ................ 36
Accessing/exiting the SIMPLE/NORMAL Mode Menu Screen ..... 37
Overview of the SIMPLE Mode Setting Screen ............................ 41
Overview of the NORMAL Mode Setting Screen .......................... 45

English 2
SIMPLE
SHOOTING
BEFORE TAKING PICTURES .............................................................53
For best results ..............................................................................53
Using the autofocus .......................................................................54
Select the recording size ...............................................................56
Select the focus setting .................................................................57
Switching the display mode ...........................................................58
Hints for taking pictures .................................................................59
VIDEO CLIP RECORDING ...................................................................60
SHOOTING SINGLE SHOTS ...............................................................61
Using the flash ...............................................................................63
SHOOT A STILL IMAGE WHILE RECORDING A VIDEO CLIP ..........65
MACRO-PHOTOGRAPHY (ZOOM) .....................................................67
PLAYBACK
PLAYING BACK VIDEO CLIPS AND STILL IMAGES ..........................68
How to save one frame from a video clip as a still image .............70
SLIDESHOW PLAYBACK ....................................................................71
PLAYBACK VOLUME ...........................................................................72
DELETING FILES .................................................................................73
PLAYBACK MODES .............................................................................75
Multi-image display ........................................................................75
Selecting the playback folder ........................................................76
Magnifying (zooming in) the image ...............................................77

English 4
PRINTING INSTRUCTIONS ............. ........... ..................... .......... ........120
Display the Printing Instructions Screen ......................................120
Specifying date imprinting and print quantities ............................122
Index print ....................................................................................124
Clearing all the printing instructions ............................................125
COPY FILES .......................................................................................126
DISPLAYING FILE PROPERTIES (INFORMATION SCREEN) .........128
OPTION SETTINGS
DISPLAY THE OPTION SETTING MENU .........................................129
SCREEN DISPLAY .............................................................................130
SELECT THE STARTUP DISPLAY ....................................................131
OPERATION SOUNDS ............ ........... ..................... .......... ................132
POST-VIEW DISPLAY SETTING .......................................................134
ASSIGN SET BUTTON FUNCTIONS ................................................135
NOISE-REDUCTION FUNCTION ................... ..................... ..............137
ADJUST THE IMAGE QUALITY .........................................................138
FLICKER-REDUCTION ......................................................................139
MONITOR BRIGHTNESS ..................................................................140
SCREEN LANGUAGE ........................................................................141
TV SYSTEM SETTING .......................................................................142
POWER SAVE FUNCTION ................ .......... ..................... ........... ......143
FILE NO. MEMORY ............................................................................145
FORMATTING A CARD .....................................................................148
RESETTING THE CAMERA SETTINGS ............................................150
CHECKING THE REMAINING CARD MEMORY ...............................151
Checking the remaining number of images and
video recording time ................................................................151
For audio recordings ...................................................................151
CHECKING THE REMAINING BATTERY PACK CHARGE ..............153

5English
CONTENTS
OTHER DEVICES AND CONNECTIONS
CONNECTING TO A TV
CONNECTING TO A TV .................................................................... 155
PLAYING BACK ON A TV ................................................................. 156
CONNECTING TO A COMPUTER
OPERATING ENVIRONMENT .......................................................... 157
When using as a card reader ...................................................... 157
To access the files in the internal memory ................................. 157
SETTING THE CONNECTION MODE .............................................. 158
USING AS A CARD READER ........................................................... 160
For Windows Vista/XP users ......................................................160
For Windows 2000 users ............................................................161
For Mac OS X users ................................................................... 162
ABOUT THE CONTENTS OF THE CARD ........................................ 163
Configuration of directories in the card ....................................... 163
File formats ................................................................................. 163
Cautions when using as a card reader ....................................... 164
USING AS A PC CAMERA ................................................................ 165
For Windows XP ......................................................................... 165
Using as a PC camera ................................................................ 165
USING THE SOFTWARE .................................................................. 166
Operating environment ............................................................... 166
Obtaining the software ................................................................ 167
SAVE AN IMAGE OF YOUR COMPUTER SCREEN ........................ 170
Install Screen Capture ................................................................ 170
How to use Screen Capture ........................................................ 171
CONNECTING TO A PRINTER
PictBridge MODE ............................................................................... 172
Print preparations ....................................................................... 172
PRINTING .......................................................................................... 174
Printing selected images ............................................................. 174
Printing all images ......................................................................175
Making an index print .................................................................. 176
Printing images according to printing instructions
(requested images) ................................................................ 177
Changing the printer settings ......................................................178

English 6
APPENDICES
COMMONLY ASKED QUESTIONS ...................................................180
TROUBLESHOOTING ........................................................................187
Camera ........................................................................................187
Notes regarding the Scene Select feature and filters ..................197
SPECIFICATIONS ..............................................................................199
Camera ........................................................................................199
Camera connectors .....................................................................203
Battery life ...................................................................................203
Possible No. of Images/Possible Shooting Time/
Possible Recording Time ........................................................204
Concerning the multi-indicator .....................................................205
Supplied battery pack charger .....................................................206
Supplied Li-ion battery pack ........................................................206
Others ..........................................................................................207
Before capturing those important shots, be sure to first take
a test shot to confirm that your camera is set up and ready
to go ........................................................................................208
HINTS FOR TAKING PICTURES .......................................................209

7English
QUICK SEARCH BY OPERATION
Your camera has an abundance of convenient features and functions. From
creating precisely the photo you want, to viewing images using various
techniques, you can locate the exact operation for your purposes in the
following table.
Shooting/recording
Basic operation Convenient functions Additional functions
Getting started
shooting/recording
• “VIDEO CLIP
RECORDING” on
page 60
• “SHOOTING SINGLE
SHOTS” on page 61
• “Sequential shots” on
page 80
• “Audio recording” on
page 81
Log the date and time
of your photos
• “DATE AND TIME
SETTING” on page 32
Zoom in on the
subject
• “MACRO-
PHOTOGRAPHY
(ZOOM)” on page 67
Close-up
photography
• “Select the focus setting”
(super macro mode) on
page 57
• “FOCUS RANGE” (super
macro mode) on page 93
For more accurate
focus
• “How to use the manual
focus” (manual focus) on
page 94
Set the focus to a
narrow range
• “FOCUS MODE” on
page 95
Reduce noise when
recording
• “NOISE-REDUCTION
FUNCTION” on page 137
Optimize the photo
quality
• “Select the recording
size” on page 56
• “RECORDING SIZE” on
page 78
Reduce video clip flicker
• “FLICKER-REDUCTION” on page 139
Set the camera’s color/contrast
characteristics
• “ADJUST THE IMAGE QUALITY” on page 138

English 8
Capture fast-moving subjects
• “SCENE SELECT” (sports mode) on page 84
Suppress camera shake effect
• “Compensate for camera shake during video clip recording” on page 90
• “Compensate for camera shake during still image shooting” on page 90
Shoot in dark conditions
• “EXPOSURE COMPENSATION” on page 104
• “Using the flash” on page 63
• “FLASH OPERATION” on page 87
• “SCENE SELECT” (night view portrait mode/fireworks mode/lamp mode) on page 84
Increase the camera’s sensitivity
• “ISO SENSITIVITY” on page 97
• “HIGH SENSITIVITY MODE” on page 101
Photographing people
• “SCENE SELECT” (portrait mode/night view portrait mode) on page 84
• “FILTERS” (cosmetic filter) on page 86
Sharp face shots
• “FACE CHASER” on page 100
Simplified operation for shooting/playback
• “Switching between the SIMPLE and NORMAL modes” on page 36
Shooting/recording
Basic operation Convenient functions Additional functions

9English
QUICK SEARCH BY OPERATION
Photographing landscapes
• “SCENE SELECT” (landscape mode) on page 84
Take a self-photo
• “SELF-TIMER” on page 88
Make images lighter
or darker
• “EXPOSURE
COMPENSATION” on
page 104
• “HIGH SENSITIVITY
MODE” on page 101
Measure the
brightness of a
specific area
• “LIGHT-MEASURING
MODE SETTING” on
page 96
Adjust the camera’s
sensitivity
• “ISO SENSITIVITY” on
page 97
Change the color of
the images
• “FILTERS” (monochrome
filter/sepia filter) on
page 86
Make white appear
natural
• “WHITE BALANCE” on
page 99
Shooting/recording
Basic operation Convenient functions Additional functions

English 10
Playback
Basic operation Convenient functions Additional functions
Getting started
viewing images
• “PLAYING BACK VIDEO
CLIPS AND STILL
IMAGES” on page 68
Adjust the speaker
volume
• “PLAYBACK VOLUME”
on page 72
Search for image/
audio files
• “Multi-image display” on
page 75
• “Selecting the playback
folder” on page 76
Magnify an image
• “Magnifying (zooming in)
the image” on page 77
Change the angle of
view
• “ROTATE STILL IMAGE”
on page 108
• “Audio playback” on
page 82
Adjust the speaker volume
• “PLAYBACK VOLUME” on page 72
Continuous playback
• “SLIDESHOW PLAYBACK” on page 71 and 105
Adjust the monitor brightness
• “MONITOR BRIGHTNESS” on page 140
Playback on a TV
• “PLAYING BACK ON A TV” on page 156
Set the TV system
• “CONNECTING TO A TV” on page 155 and “PLAYING BACK ON A TV” on page 156

11 English
QUICK SEARCH BY OPERATION
File managing/processing
Basic operation Convenient functions Additional functions
Search for image/audio files
• “Multi-image display” on page 75
• “Selecting the playback folder” on page 76
Delete files
• “DELETING FILES” on
page 73
Protect files from accidental erasure
• “FILE PROTECT” on page 107
Format a card
• “FORMATTING A CARD” on page 148
Delete a part of a video clip and join video clips
• “EDITING VIDEO CLIPS” on page 112
Specify the number of prints, index print, and date imprint
• “PRINTING INSTRUCTIONS” on page 120
Repair the “red-eye” caused by the flash, or enhance the contrast
• “CORRECTING THE RED-EYE EFFECT AND IMAGE BLUR” on page 110
View the settings that were in effect when the image/audio files were
recorded
• “DISPLAYING FILE PROPERTIES (INFORMATION SCREEN)” on page 128

English 12
Using with a computer
Basic operation Convenient functions Additional functions
Use the camera as a card reader
• “USING AS A CARD READER” on page 160
Use your computer to organize/edit files that were recorded with your
camera
• “USING THE SOFTWARE” on page 166
Copy data from your
camera to a computer
• “Copy files to the
computer (Windows XP)”
on page v
• “OPERATING
ENVIRONMENT” on
page 157
• “SETTING THE
CONNECTION MODE”
on page 158
Using with Windows Vista
• “SETTING THE CONNECTION MODE” on page 158
Playback
• “About video clip files recorded with this camera” on page 164
Using as a webcam
• “USING AS A PC CAMERA” on page 165
Record an image of the computer screen
• “SAVE AN IMAGE OF YOUR COMPUTER SCREEN” on page 170

13 English
CHECKING THE INCLUDED
ACCESSORIES
i
i
i
ii Li-ion battery pack (pages 23
and 26): 1
i
i
i
ii Lithium-ion battery pack
charger and power cord
(page 23): 1
i
i
i
ii Dedicated USB interface cable
(pages 158 and 172): 1
i
i
i
ii Dedicated AV interface cable
(page 155): 1
i
i
i
ii i
i
i
iiLens cap (page 15): 1 “SAFETY MANUAL”
(safety precautions booklet)
Please read this booklet
carefully before using the
camera.

English 14
i
i
i
ii Quick Guide i
i
i
ii Obtaining the PDF instruction
manual and cautions

15 English
CHECKING THE INCLUDED ACCESSORIES
k
k
k
kk How to attach the lens cap

English 16
<When used with a commercially available handstrap>

17 English
CHECKING THE INCLUDED ACCESSORIES
Media cards that can be used with this camera
The type of card that can be inserted into and used with this camera is:
iSD Memory Card
iSDHC Memory Card
What “card” means in this manual
iIn this manual, SD Memory Cards and SDHC Memory Cards that can be
used in this digital camera are referred to as “card”.

English 18
GETTING THE MOST OUT OF YOUR
CAMERA
As well as photographing still images and recording video clips, your digital
movie camera can even capture still images while you’re recording a video
clip. In one compact body you get sophisticated but easy-to-use features such
as the “SIMPLE mode” that gives you beautiful images with a minimum of
setup, an image stabilizer that suppresses the effects of camera shake during
shooting, “face chaser” for perfectly focused faces, and more.
SIMPLE mode for quick-and-easy operation
(page 36)
Select from two operating modes: the “SIMPLE mode” for users new to the
camera, and the “NORMAL mode” for full use of all the camera’s many
features and functions.
S
S
S
SSS
N
OK
Select movie and
photo size
3
2
2
3
1
1
S
S
S
SSS
N
RECORDING MENU
MOVIE
PHOTO
SCENE SELECT
FILTER
FLASH
SELF-TIMER
OKEXIT
1
<SIMPLE Mode Shooting Menu> <NORMAL Mode Shooting Menu>

19 English
GETTING THE MOST OUT OF YOUR CAMERA
Movie image stabilizer for sharp pictures
(page 90)
Your camera can compensate for the camera shake that results in blurry
images when you try to capture a fast-moving subject or zoom in on a
subject.
Sharp face shots (page 100)
Your camera is equipped with a face recognition feature which detects the
subject’s face even when slightly lit from behind or in dim surroundings and
automatically adjusts the focus and brightness to compensate. Now those
otherwise perfect photos that are marred by shadowed faces can be
minimized.

English 20
SYSTEM MAP
You can connect the camera to various devices to expand its capabilities.
Dedicated USB
interface cable
Dedicated AV
interface cable
Computer
Printer
TV
DC adaptor
(Optional)
Commercially available
SD Memory Card
Internet
AC adaptor
(Optional)
iCard reader
iDPOF-compatible
printer
iPhoto shop

21 English
SETUP
SETUP
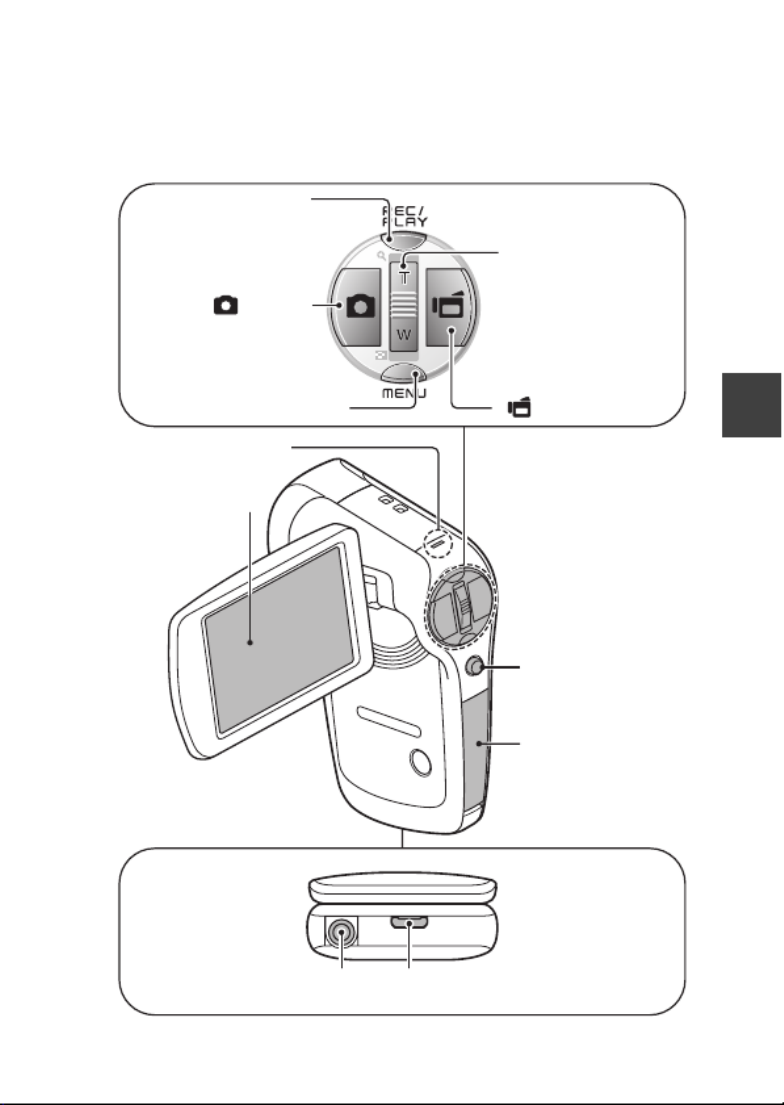
PARTS NAMES
Front
To open
Lens
Flash
Stereo microphone
Strap holder
ON/OFF button
Monitor unit
Speaker
English 22
SETUP
Rear
[ ] button
[ ] button
REC/PLAY button
Monitor
SET button
Tripod stand hole
Zoom switch
[T]/[]]
[W]/[P]
MENU button
Card slot cover
USB/AV terminal
Bottom
Multi-indicator
23 English
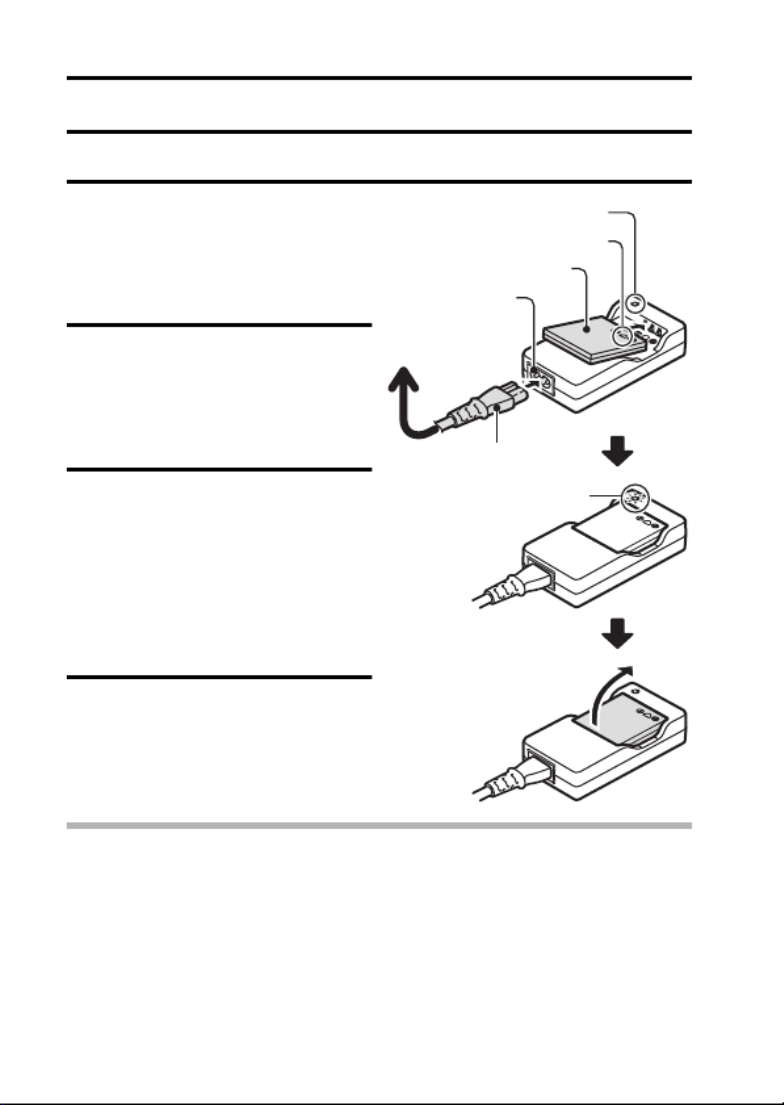
CHARGING
Please charge the supplied battery pack before using it.
1 Insert the battery pack in the
battery charger.
hInsert it in the direction
indicated by the [o] mark
on the battery pack.
2 Connect the supplied power
cord to the socket on the
battery pack charger.
hInsert the connector straight
and securely.
3 Plug the power plug into a
power outlet (AC 100 V to
240 V).
hCharging begins.
hDuring charging, the
CHARGE indicator is lit red.
hThe charging time is approx.
90 minutes.
4 When the CHARGE indicator
turns off, unplug the power
cord from the power outlet,
and remove the battery pack
from the charger.
CAUTION
Do not charge the battery pack immediately after the camera has been
in continuous use for a long time
iThe battery pack becomes hot when the camera is used continuously for a
long time. If you attempt to charge the battery pack in this state, the
CHARGE indicator may flash red and it may not be possible to charge the
battery pack. Wait until the battery pack has cooled down before
attempting to charge it.
Battery pack
[o] mark
To power outlet
CHARGE indicator
Socket
Power cord
CHARGE indicator
25 English
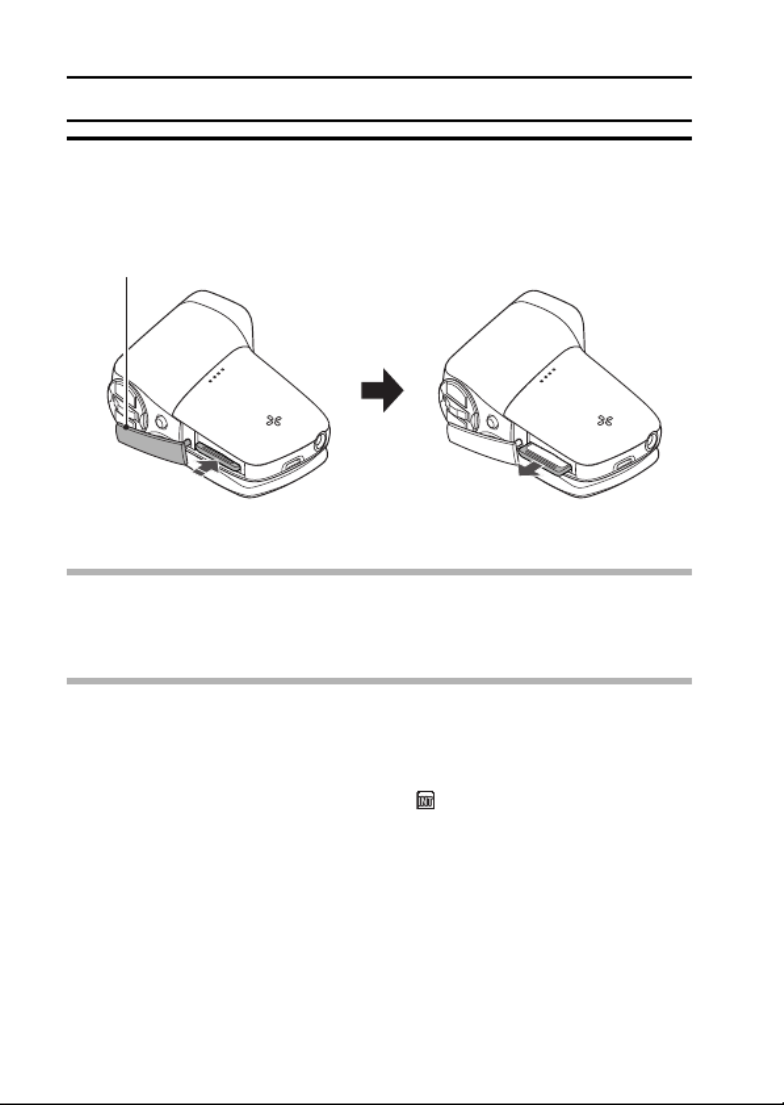
INSTALL THE CARD
3 Close the card slot cover.
<When removing the card...>
hTo remove the card, press it down, and then release. The card will
protrude slightly, and you can then pull it out.
CAUTION
Do not attempt to forcibly remove the card
iNever remove the card when the multi-indicator is flashing red. In doing so,
you risk losing the data stored in the card.
HINT
Shooting without a card installed
iWhen a card is installed, images are recorded to and played back from the
card. When no card is installed, images are recorded to and played back
from the camera’s internal memory. When the camera is turned on with no
card installed, the internal memory icon is shown on the monitor to let
you know that the images you capture will be saved to the camera’s
internal memory.
1Open
2 3Push Pull out

English 26
SETUP
INSTALLING THE BATTERY PACK
Please charge the supplied battery pack before using it.
1 Open the battery cover.
2 Insert the battery pack.
hTake care that it is positioned correctly.
Battery cover
2Open
1Push down and slide
out.
Battery pack
1Align
2Insert

27 English
INSTALLING THE BATTERY PACK
3 Replace the battery cover.
Installing the DC adaptor (sold separately:
VAR-A2U/A2EX)
Push
<To remove the battery pack...>
iRaise the edge of the battery
pack to remove it.
3 Set in groove
4 Close
AC adaptor
(sold separately: VAR-G8U/G8EX)
1 Insert
2 Open

English 28
SETUP
CAUTION
Does the battery pack appear swollen?
iThe lithium-ion battery used in this camera may expand slightly when
stored in a hot environment or repeatedly used, but this is not a safety
hazard.
HINT
About the internal backup battery
iThis camera’s internal battery serves to maintain the date and time
settings, as well as the shooting settings. The backup battery will be fully
charged when the battery pack is kept in the camera continuously for about
2 days. In the fully charged state, the backup battery will maintain the
camera settings for about 7 days.
When not using the camera for a long time, remove the battery pack
iA small amount of power is still used even if the camera is turned off, and it
is therefore recommended that the battery pack be removed from the
camera if it is not going to be used for a long time. Note that when the
battery pack is removed for a long period, the time and date settings may
be cleared. Before using your camera again, be sure to confirm that the
camera settings are correct.
To prolong the life of the battery pack
iAlthough the battery pack is an expendable item, you can maximize the life
of the battery by heeding the following suggestions.
hDo not leave the battery under the hot summer sun or exposed to other
high-temperature environments.
hDo not continually recharge the battery when it is already fully charged.
After fully charging it once, for example, use it for a while to partially
discharge it before recharging it again.
hWhen the battery is not to be used for a long time, if possible store the
partially charged (not fully charged) battery in a cool environment.
Warning concerning battery pack temperature
iIf the battery pack in the camera becomes too hot, a blinking temperature
warning icon \ will appear on the monitor. If the blinking icon does
appear, the camera should be turned off as soon as possible and the
battery pack allowed to cool before the camera is turned on again.
iNote that the camera will turn off automatically if it continues to be used
with the battery pack temperature elevated.
iIf you attempt to turn on the camera when the battery pack temperature is
too high, the temperature warning icon will blink and the camera will not
turn on.

29 English
TURNING THE CAMERA ON AND
OFF
Turning on the camera
1 Open the monitor unit, and press
the ON/OFF button for at least 1
second.
hThe camera turns on.
hIf the date and time have not
been set, the screen to set the
date and time is shown on the
monitor (page 32).
In the playback mode
1 Press the REC/PLAY button for at
least one second.
hThe Playback Screen appears on
the monitor (page 68).
hPressing the REC/PLAY button
again will change the display to
the shooting screen.
Monitor unit
ON/OFF button
REC/PLAY button

English 30
SETUP
Turning on the camera when the power save
(sleep) mode is active
In order to preserve battery pack power, the power save (sleep) function
will automatically turn off the camera after 1 minute of no use during
shooting, or 5 minutes of no use during playback (factory-preset
setting).
i When the power save mode is active, you can restore the power by any of
the following methods:
h
h
h
hh Press the REC/PLAY button.
h
h
h
hh Press the ON/OFF button.
h
h
h
hh Press the [ ] or [ ] button.
h
h
h
hh Press the SET or MENU button.
h
h
h
hh Push the zoom switch.
* When the MENU button is used to turn on the camera, the screen to set
the operation sounds (page 132) appears.
i After the power save mode has been active for about 1 hour, the camera
will switch to the standby mode. In this case, you can restore the power by
pressing the ON/OFF button, or by closing and then opening the monitor
unit.
i The user can specify the time elapsed before the power save mode is
activated (page 143).
i When the camera is connected to a computer or printer, the power save
mode becomes active after about 12 hours.
Turning off the camera
1 Press the ON/OFF button for at least 1 second.
h The camera turns off.

31 English
TURNING THE CAMERA ON AND OFF
HINT
To immediately activate the power save mode
i Press the ON/OFF button briefly to activate the power save function.
About the standby mode
i To turn off the camera only briefly, you can close the monitor unit to put the
camera in the standby mode. The standby mode uses almost no power.
When the monitor unit is opened again, the camera turns on immediately
and you are ready to shoot or view images without any delay.
If the date and time setting has been completed (page 32)
i The current time is shown on the monitor when the camera is turned on.
CAUTION
If the K icon appears...
i When a picture is taken, the date and time it was captured are recorded
with it. If the date and time settings have not been completed (page 32),
the date and time cannot be recorded with the captured images. For this
reason, immediately after the camera is turned on, the “Set date and time”
reminder briefly appears, after which the K icon is shown on the
Shooting Screen. To have the date and time recorded with the images,
please complete this setting before capturing images.

English 32
SETUP
DATE AND TIME SETTING
The camera will record the date and time an image or audio recording is
taken so that you can display them during playback. Therefore, before
capturing images, make sure the correct date and time are set.
* To correct the date and time setting, please see under HINT on page 34.
Example: To set the clock to 7:30 p.m. on December 24, 2008
1 Turn on the camera (page 29), and
press the SET button.
h The Clock Set Screen appears.
h Follow the procedures below to
enable or disable the date display
during playback, to set the display
format for the date, and to set the
date and time.
h To display the Recording or
Playback Screen, press the
MENU button 2 times.
CLOCK SET
DATE
TIME
DISP
OK
2008/04/01
00:00
Y / M / D
SET button
MENU button

33 English
DATE AND TIME SETTING
2 Set the date.
1 Select “DATE”.
2 Press the SET button.
h The Set Date Screen
appears.
3 Set the date to “2008/12/24”.
h The date is set in the
following order: Set the year
→ → Set the month Set the
day.
h Toggle the SET button left or
right to select year, month or
day. Toggle the SET button up
or down to increase or
decrease the number.
4 Press the SET button.
3 Set the clock.
1 Select “TIME”.
2 Press the SET button.
h The Set Time Screen
appears.
3 Set the time to “19:30”.
h The time is set in the
following order: Set the hour
→ Set the minute.
h A 24-hour clock is used for
the time display.
4 Press the SET button.
CLOCK SET
DATE
2008/12/24
OK
19:30
TIME
CLOCK SET
OK

English 34
SETUP
4 Set the order in which the date is
displayed during playback.
1 Select “DISP”.
2 Press the SET button.
h The Set Date Format Screen
appears.
3 Toggle the SET button up or
down.
h Toggle the SET button up to
change the displayed date
order as follows:
Toggle the SET button down to change it in the reverse order.
4 Press the SET button.
5 Press the MENU button.
h The date and time setting is completed.
h To display the Recording or Playback Screen, press the MENU button.
HINT
About the settings backup
i Under normal conditions, while the battery pack is being replaced, an
internal battery will maintain the date and time settings. However, there is a
small chance the settings may be lost (the backup will last for about
7 days). It is recommended to check that the date and time settings are still
correct after replacing the battery pack and before shooting or recording of
any type (follow step 1).
To correct the date and time settings
1 Turn on the camera.
2 Display the Option Setting Menu [E1] (page 129).
3 Select “CLOCK SET” and press the SET button.
h The screen to set the date and time appears.
h The current date and time settings are shown.
4 Select the line you wish to change, and make the correction.
CLOCK SET
OK
DISP Y / M / D
Y / M / D → M / D / Y → D / M / Y

35 English
SWITCHING BETWEEN THE SHOOTING
MODE AND PLAYBACK MODE
Switch between the shooting mode (for recording) and the playback mode (for
viewing your recorded images).
1 Turn on the camera (page 29).
PLAY
PLAY
PLAY
PLAY
PLAY
SAVE
SAVE
SAVE
SAVE
SAVE
PLAY
SAVE
668
668
668
668
668
01:17:32
01:17:32
01:17:32
01:17:32
01:17:32
668 01:17:32
2 Press the REC/PLAY button.
h The mode changes.
h The mode changes each time
the REC/PLAY button is
pressed.
REC/PLAY button
<Example of the shooting
mode>
<Example of the playback
mode>
English 36
SETUP
SWITCHING THE OPERATING MODE
The “SIMPLE mode” comprises only those functions that are most often used
and necessary to operate the camera, while the “NORMAL mode” enables
full use of all the camera’s many functions. Select the mode that is suitable for
your purposes.
Switching between the SIMPLE and NORMAL
modes
1 Turn on the camera (page 29).
h The previous mode is active.
2 Press the MENU button.
h The Menu Screen for the active mode appears.
3 Select the operating mode icon
, and press the SET button.
h Switch from the SIMPLE mode
to the NORMAL mode, or from
the NORMAL mode to the
SIMPLE mode.
h Press the MENU button to
cancel the Menu Screen.
S
S
S
SSS
N
N
N
NNN
3
2
2
3
1
1
S
S
S
SSS
N
N
N
NNN
OK
OKEXIT
Switch to
simple menu
Switch to detailed
normal menu
<SIMPLE Mode Menu Screen>
<NORMAL Mode Menu Screen>
Operating mode icon
Operating mode icon

37 English
SWITCHING THE OPERATING MODE
Accessing/exiting the SIMPLE/NORMAL Mode
Menu Screen
1 Set the camera to the shooting or playback mode (page 35).
2 Select the desired operating mode (page 36).
3 If the Menu Screen is not displayed, press the MENU button.
h The Menu Screen appears.
h To cancel the Menu Screen, press the MENU button.
3
2
2
3
1
1
S
S
S
SSS
N
N
N
NNN
S
S
S
SSS
N
N
N
NNN
OK
Switch to detailed
normal menu
OKEXIT
Switch to
simple menu
MENU button
<Example: SIMPLE Mode
Shooting Menu>
<Example: NORMAL Mode
Shooting Menu>

English 38
SETUP
Using the SIMPLE Mode Menu
4 Toggle the SET button up or down to select the item you wish to
change, and press the SET button.
h The Setting Screen for the selected item appears.
S
S
S
SSS
N
OK
OK
Select movie and
photo size
To watch on TV
TV size
9M [4:3]
Select an item to change
Description of selected
item
<Setting Screen>

39 English
SWITCHING THE OPERATING MODE
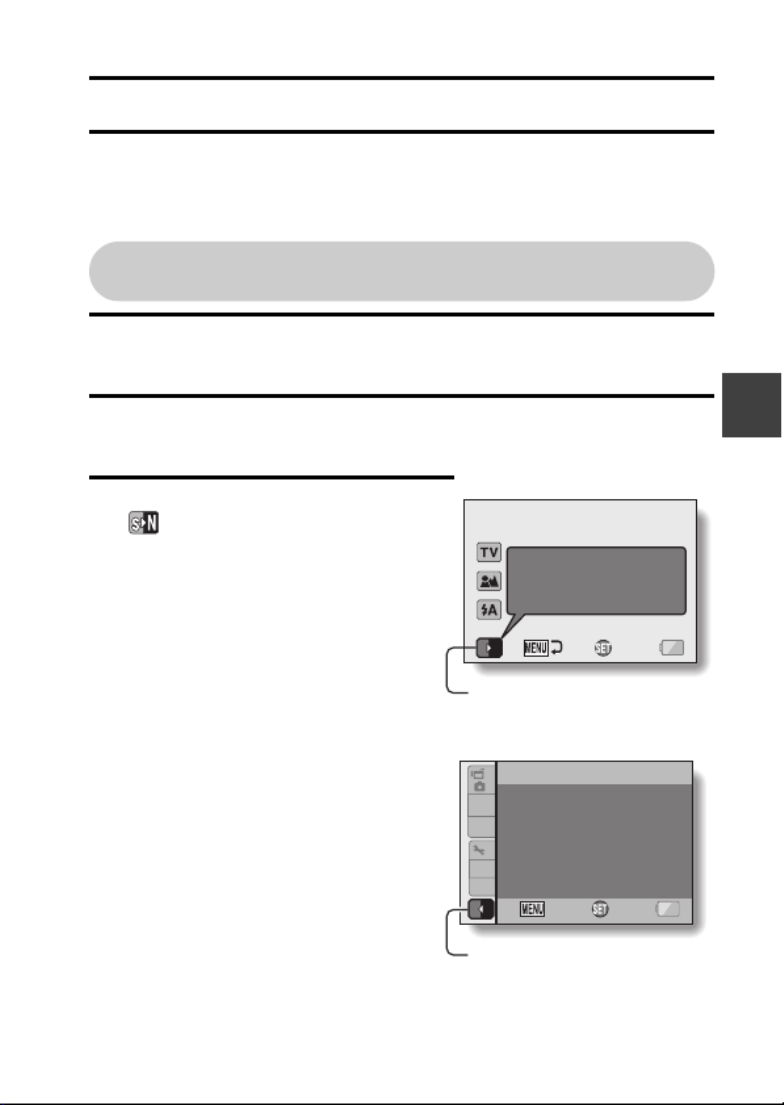
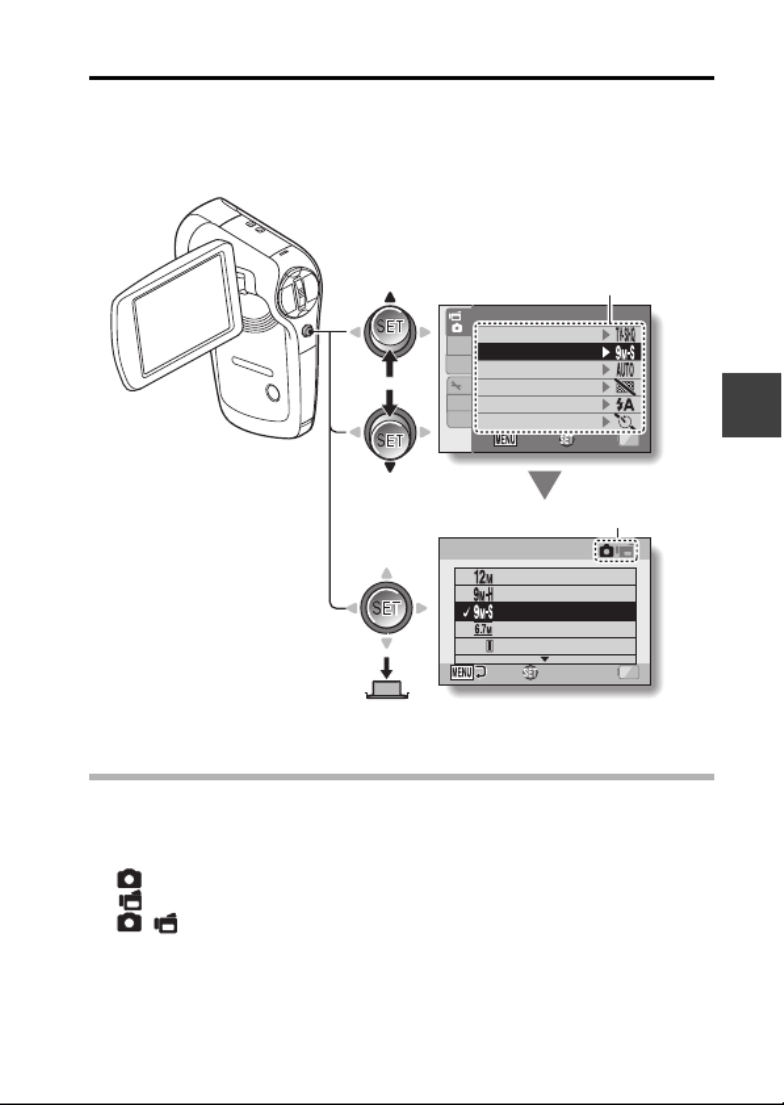
Using the NORMAL Mode Menu
4 Toggle the SET button up or down to select a tab.
h The Menu Screen for the selected tab appears.
5 Toggle the SET button to the right.
3
2
2
3
1
1
S
S
S
SSS
N
OKEXIT
RECORDING MENU
MOVIE
PHOTO
SCENE SELECT
FILTER
FLASH
SELF-TIMER
1
Tab
3
2
2
3
1
1
OKEXIT
RECORDING MENU
MOVIE
PHOTO
SCENE SELECT
FILTER
FLASH
SELF-TIMER
1
English 40
SETUP
6 Toggle the SET button up or down to select the item you wish to
change, and press the SET button.
h The Setting Screen for the selected item appears.
h To return to the Menu Screen, press the MENU button.
HINT
About the applicable mode indicator
i This indicator shows the shooting mode(s) for which the selected setting is
effective.
: This setting is effective during still image shooting.
: This setting is effective during video clip recording.
: This setting is effective during still image shooting and video clip
recording.
3
2
2
1
1
5
M
3
OKEXIT
RECORDING MENU
MOVIE
PHOTO
SCENE SELECT
FILTER
FLASH
SELF-TIMER
OK
PHOTO
4000×3000
3456×2592
3456×2592
3456×1944
1944×2592
1
[16:9 ]
Select an item to change
Applicable mode
<Setting Screen>
43 English
SWITCHING THE OPERATING MODE
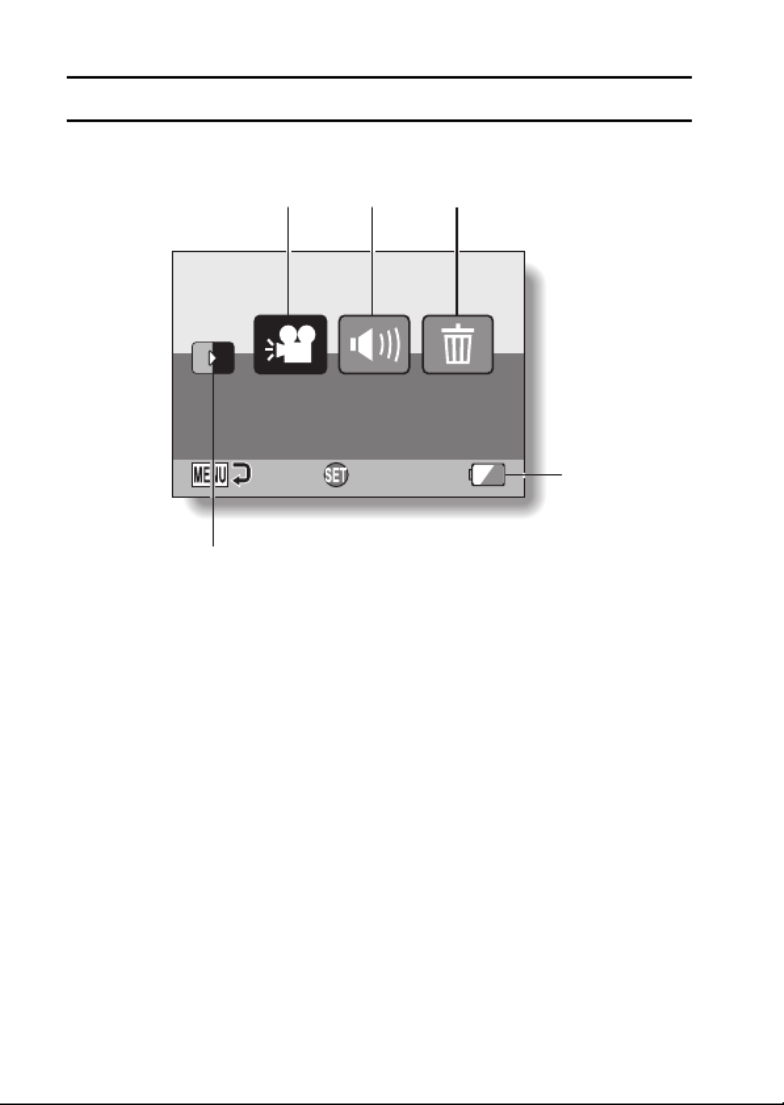
SIMPLE Mode Playback Menu
S
S
S
SSS
N
3
5
21
Start slideshow
OK
4

45 English
SWITCHING THE OPERATING MODE
Overview of the NORMAL Mode Setting Screen
NORMAL Mode Shooting Menu
<Tab 1>
3
2
2
3
1
1
7
6
5
4
3
2
1
1
RECORDING MENU
MOVIE
PHOTO
SCENE SELECT
FILTER
FLASH
SELF-TIMER
OKEXIT

English 46
SETUP
1 Video clip settings (page 78)
2 Still image settings (page 79)
3 Scene select (page 84)
4 Filter (page 86)
5 Flash (page 87)
6 Self-timer (page 88)
7 Remaining battery power
(page 153)
(: Record at 640 × 480 pixels,
60 frames per second.
): Record at 640 × 480 pixels,
30 frames per second (high
bit rate).
B: Record at 640 × 480 pixels,
30 frames per second
(standard bit rate).
l: Record at 320 × 240 pixels,
30 frames per second.
d: Record at 320 × 240 pixels,
15 frames per second.
<: Make an audio recording.
I: Image size is 4000 × 3000
pixels.
J: Image size is 3456 × 2592
pixels (low compression).
K: Image size is 3456 × 2592
pixels (normal
compression).
Q: Image size is 3456 × 1944
pixels (16:9 aspect ratio).
L: Image size is 1944 × 2592
pixels (portrait orientation).
G: Image size is 1600 × 1200
pixels.
[: Image size is 640 × 480
pixels.
R: 3264 × 2448-pixel
sequential shots.
t: 1600 × 1200-pixel
sequential shots.
=: Full auto setting
a: Sports mode
>: Portrait mode
+: Landscape mode
/: Night view portrait mode
k: Snow & beach mode
+: Fireworks mode
Q: Lamp mode
&: No filter
%: Cosmetic filter
W: Monochrome filter
,: Sepia filter
k: The camera will detect the
subject brightness and use
the flash only when
necessary.
m: The flash will operate with
every image captured
regardless of the
conditions.
l: The flash will not operate
even in dark situations.
N: Self-timer is off.
y: Shooting begins 2 seconds
after the [ ] or [ ]
button is pressed.
x: Shooting begins
10 seconds after the [ ]
or [ ] button is pressed.

47 English
SWITCHING THE OPERATING MODE
<Tab 2>
2
2
3
1
1
3
7
6
5
4
3
2
1
2RECORDING MENU
MOVIE STABILIZER
FOCUS
PHOTO STABILIZER
FOCUS MODE
EXP MEASURE
ISO
OKEXIT

English 48
SETUP
1Movie stabilizer (page 90)
hCompensate for camera shake
during video clip recording.
2Photo stabilizer (page 90)
hCompensate for camera shake
during still image shooting.
3Focus range (page 93)
hSelect the focus range that
corresponds to the distance to
the subject.
4Focus mode (page 95)
5Light-measuring mode
(page 96)
6ISO sensitivity (page 97)
* The indicated ISO value is the
standard output sensitivity.
7Remaining battery power
(page 153)
p: Shoot using the video clip
field of view display.
q: Shoot using the still image
field of view display.
]: Image stabilizer function
off.
\: Shoot with image stabilizer
on.
]: Shoot without image
stabilizer.
-: The camera automatically
focuses on the subject
within a range of 10 cm
(3.94 in.) to infinity (total
range).
*: The camera automatically
focuses on the subject
within a range of 80 cm
(31.50 in.) to infinity
(normal).
-: Set the focus distance
manually (manual).
+: The camera focuses on the
subject within a range of
1 cm (0.39 in.) to 80 cm
(31.50 in.) (super macro).
B: 9-point range finder focus
C: Spot focus
X: Multi-section light
measuring
W: Center-weighted light
measuring
Y: Spot light-measuring
=: Sensitivity is set
automatically
*: Sets sensitivity to ISO 50
u: Sets sensitivity to ISO 100
v: Sets sensitivity to ISO 200
w: Sets sensitivity to ISO 400
6: Sets sensitivity to ISO 800
-: Sets sensitivity to ISO 1600

English 50
SETUP
1 White balance (page 99)
2 Face chaser (page 100)
3 High sensitivity mode
(page 101)
4 Digital zoom (page 102)
5 Recording folder (page 103)
h Create or select a folder in
which to store recorded files.
6 Remaining battery power
indication (page 153)
>: White balance is
automatically adjusted
depending on the ambient
lighting (auto).
r : For shooting in sunny
conditions (fair)
o: For shooting in overcast
conditions (cloudy)
p: For shooting under
fluorescent lighting
(fluorescent)
q: For shooting under
incandescent lighting
(incandescent)
^: For setting the most
accurate white balance
(one push)
-: Enable face chaser.
.: Disable face chaser.
1: Increased sensitivity
2: Normal sensitivity
Q: Enable the digital zoom.
B: Disable the digital zoom.

53 English
SIMPLE
SHOOTING
SIMPLE/SHOOTING
BEFORE TAKING PICTURES
For best results
Hold the camera securely, keeping your elbows close to your body and
making sure the camera is stable.
Make sure that the lens and flash are not blocked by your fingers or the
handstrap.
Correct hold Incorrect hold
A finger is blocking the
lens or flash.
<Holding the camera>
Example 1:
Grip the camera by wrapping
the fingers of the right hand,
from the little finger to the
middle finger, around the
camera, and hook the index
finger above the camera.
Example 2:
Grip the camera by wrapping
the fingers of the right hand,
from the little finger to the
index finger, around the
camera.

English 54
SIMPLE/SHOOTING
Using the autofocus
The autofocus will work in almost all situations; however, there are
certain conditions that may cause the autofocus function to not work
properly. If the autofocus function is not working properly, set the focus
range to capture images (page 57).
k
k
k
kk Conditions that may cause incorrect focus
The following examples are some of the situations where the autofocus
function may not work.
i
i
i
ii Subjects with low contrast, very
bright subjects at the center of the
image or dark subjects or locations
Use the focus-lock function to lock the
focus on an object with contrast at the
same distance as the desired subject.
i
i
i
ii Subjects without vertical lines
Use the focus-lock function to lock the
focus while framing the subject
vertically, then re-orient the camera to
compose a horizontally framed image.

55 English
BEFORE TAKING PICTURES
The following examples are some of the situations where the autofocus
function may work, but not as desired.
i
i
i
ii When both near and far objects are
present
Use the focus-lock function to lock the
focus on an object at the same distance
as the desired subject, then reposition
the camera to compose the picture.
i
i
i
ii Fast-moving subjects
Use the focus-lock function to lock the
focus on an object at the same distance
as the desired subject, then reposition
the camera to compose the picture.
HINT
i Images captured in the still image shooting mode can be rotated when
they are played back (page 108).
i When the [ ] button is pressed halfway, the image in the monitor may
waver vertically. This is the result of internal image processing and is not a
malfunction. This wavering is not recorded and will not affect your images
in any way.
i When the optical zoom is used or when the autofocus is operating, the
image may appear to waver, but this is not a malfunction.

57 English
BEFORE TAKING PICTURES
Select the focus setting
Select the focus range corresponding to the distance between the camera
and the subject.
1 Display the SIMPLE Mode Shooting Menu (page 37), select the focus
setting, and press the SET button.
2 Select the desired focus range, and press the SET button.
h This completes the focus range setting.
7: The camera automatically focuses on the subject within a range of
10 cm (3.94 in.) to infinity (normal).
8: The camera focuses on a subject within a range of 1 cm (0.39 in.) to
80 cm (31.50 in.) (super macro).
OK
Automatic focus
(people, landscape, etc.)
All ranges

English 58
SIMPLE/SHOOTING
Switching the display mode
In the shooting mode, you can select the either the “settings display mode”
which allows you to confirm the shooting settings on the monitor while you
shoot, or the “normal display mode” in which the setting indications are turned
off, providing a full view of the subject.
1 Set the camera to the shooting
mode (page 36).
2 Press the SET button.
h Each time the SET button is
pressed, the camera switches
between the settings display
mode and the normal display
mode.
668
668
668
668
668
01:17:32
01:17:32
01:17:32
01:17:32
01:17:32
668 01:17:32
SET button
<Settings display mode>
<Normal display mode>

59 English
BEFORE TAKING PICTURES
Hints for taking pictures
Muting the operation sounds
i The audio guidance that sounds when you operate the camera can be
muted (page 132).
Where are the image and audio files saved?
i All the image and sound files are recorded on the card installed in the
camera or in the camera’s internal memory.
Taking pictures in backlight conditions...
i When taking pictures with the light coming from behind the subject, due to
the characteristics of the lens, ghost patterns (flare phenomenon) may
appear in the captured image. In this situation, it is recommended that you
avoid taking pictures with the subject lit from behind.
While the image files are being recorded...
i While the multi-indicator is flashing red, the image files are being written to
the memory, during which time it is not possible to capture another image.
Another image can be captured after the flashing red indicator turns off.
However, even when the multi-indicator is flashing red, depending on the
camera’s internal memory remaining capacity, in some cases the next
image can be captured about 2 seconds after shooting.

English 60
SIMPLE/SHOOTING
VIDEO CLIP RECORDING
1 Turn on the camera
(page 29), and set it to the
shooting mode (page 35).
2 Press the [ ] button.
h Recording begins.
h It is not necessary to
keep the [ ] button
pressed while shooting.
h When the remaining
recording time available
for the currently recording
clip becomes little, a
countdown of the
remaining recording time
appears on the display.
3 End the recording.
h Press the [ ] button
again to stop recording.
5
5
5
55
REC 00:00:09
REC 00:00:09
REC 00:00:09
REC 00:00:09
REC 00:00:09
REC 00:00:09 5
Available recording time
remaining
[ ] button
Recording time

English 62
SIMPLE/SHOOTING
HINT
Adjusting the monitor brightness
i While the Shooting Screen is active, you can quickly access the screen for
adjusting the brightness of the monitor (page 140) by pressing the MENU
button for at least 1 second.
What is the camera focusing on?
i A target mark & on the monitor
shows the area the camera is
focusing on.
i The camera automatically
determines the correct focus by
measuring from 9 different focus
points within the shooting area. If the
target mark is at a position that is
different from the point you wish to
focus on, you can refocus, for
example, by changing the shooting
angle.
i The large target mark appears when
the camera focuses on a wide area
in the center of the screen.
The focus can be locked
i By assigning an operation shortcut to the SET button (page 135), you can
set the autofocus or the aperture to a fixed setting. When the aperture
setting is fixed, the P icon appears on the monitor; when the autofocus
setting is fixed, the p icon appears on the monitor.
i When the focus range (page 57) setting is changed, the focus lock is
released.
The shutter speed and aperture are displayed
i In the NORMAL mode, the shutter speed and aperture settings are shown
on the Shooting Screen. You can use them as a reference when shooting.
If the camera shake icon > appears...
i During still image shooting, if the shutter speed is slow and the possibility
that the image may be blurred due to camera shake becomes high, the
camera shake icon may appear on the monitor. In this case, use a tripod to
stabilize the camera when shooting, or set the flash operation mode to
automatic (page 63).
i When shooting with the scene select function set to the fireworks +
mode, the camera shake icon always appears, but this is normal.
F3.5
1/7
Shutter speed
Aperture
Target mark
Camera shake icon

63 English
SHOOTING SINGLE SHOTS
Using the flash
The flash is not only used for photographing under dark conditions, but is also
convenient for example when the subject is in shadow or lit from behind. The
flash is available only when shooting single-shot still images.
1 Display the SIMPLE Mode Shooting Menu (page 37), select the flash
setting, and press the SET button.
h The screen to select the flash operation appears.
2 Select the desired flash operation, and press the SET button.
h This completes the flash operation setting.
3 Press the [ ] button to take the picture.
9: The camera detects the subject brightness and uses the flash only
when necessary.
:: The flash operates with every image captured regardless of the
conditions.
;: The flash does not operate even in dark situations.
OK
Auto
Flash automatically

65 English
SHOOT A STILL IMAGE WHILE
RECORDING A VIDEO CLIP
You can capture a still image (a single-shot) while recording a video clip.
1 Turn on the camera
(page 29), and set it to the
shooting mode (page 35).
2 Press the [ ] button.
3 When you see a scene
you’d like to capture as a
still image. press the
[ ] button.
4 Press the [ ] button to
end the video clip
recording.
REC 00:00:09
REC 00:00:09
REC 00:00:09
REC 00:00:09
REC 00:00:09
REC 00:00:09
[ ] button
[ ] button
Termékspecifikációk
| Márka: | Sanyo |
| Kategória: | videókamera |
| Modell: | Xacti VPC-CG9EX |
Szüksége van segítségre?
Ha segítségre van szüksége Sanyo Xacti VPC-CG9EX, tegyen fel kérdést alább, és más felhasználók válaszolnak Önnek
Útmutatók videókamera Sanyo

7 Október 2024
17 Augusztus 2024
17 Augusztus 2024
17 Augusztus 2024
12 Augusztus 2024
9 Augusztus 2024
8 Augusztus 2024
6 Augusztus 2024
6 Augusztus 2024
2 Augusztus 2024
Útmutatók videókamera
- videókamera Samsung
- videókamera Sony
- videókamera Braun
- videókamera Nedis
- videókamera Milwaukee
- videókamera Philips
- videókamera Olympus
- videókamera Oregon Scientific
- videókamera SilverCrest
- videókamera Garmin
- videókamera Panasonic
- videókamera Canon
- videókamera JVC
- videókamera Sharp
- videókamera Toshiba
- videókamera HP
- videókamera Hyundai
- videókamera BenQ
- videókamera Voltcraft
- videókamera Medion
- videókamera Vimar
- videókamera SBS
- videókamera Insignia
- videókamera Fujifilm
- videókamera Polaroid
- videókamera Kyocera
- videókamera GoPro
- videókamera Speco Technologies
- videókamera Blackmagic Design
- videókamera Ricoh
- videókamera Kenwood
- videókamera Rollei
- videókamera Hama
- videókamera Zoom
- videókamera Renkforce
- videókamera Agfa
- videókamera Midland
- videókamera Lamax
- videókamera Sencor
- videókamera Hitachi
- videókamera Xblitz
- videókamera Kodak
- videókamera Nikon
- videókamera Logitech
- videókamera Bresser
- videókamera Klein Tools
- videókamera Viewsonic
- videókamera Cobra
- videókamera Denver
- videókamera Minox
- videókamera Trevi
- videókamera DJI
- videókamera Extech
- videókamera Gembird
- videókamera Cisco
- videókamera Energy Sistem
- videókamera OK
- videókamera Konica Minolta
- videókamera Mamiya
- videókamera Overmax
- videókamera Kogan
- videókamera SJCAM
- videókamera Intenso
- videókamera AgfaPhoto
- videókamera Marshall
- videókamera Trotec
- videókamera ION
- videókamera Mio
- videókamera DOD
- videókamera Samson
- videókamera TomTom
- videókamera Jay-Tech
- videókamera Trust
- videókamera Konig
- videókamera ARRI
- videókamera Pyle
- videókamera Salora
- videókamera DataVideo
- videókamera Lenco
- videókamera Uniden
- videókamera Best Buy
- videókamera Leica
- videókamera Thinkware
- videókamera Soundmaster
- videókamera Steinberg
- videókamera GoClever
- videókamera RCA
- videókamera Insta360
- videókamera Genius
- videókamera Swann
- videókamera Elmo
- videókamera Vitek
- videókamera Laserliner
- videókamera Hazet
- videókamera Vivitar
- videókamera Aiptek
- videókamera AEE
- videókamera Airis
- videókamera ATN
- videókamera Activeon
- videókamera Lexibook
- videókamera Bushnell
- videókamera Easypix
- videókamera Nilox
- videókamera Maginon
- videókamera Magellan
- videókamera Flir
- videókamera Coby
- videókamera Envivo
- videókamera TacTic
- videókamera Macally
- videókamera Transcend
- videókamera Bauer
- videókamera Naxa
- videókamera Ricatech
- videókamera Tronje
- videókamera Mpman
- videókamera Nikkei
- videókamera T'nB
- videókamera Ematic
- videókamera Tracer
- videókamera Minolta
- videókamera Zagg
- videókamera Veho
- videókamera Dnt
- videókamera Zorki
- videókamera Contour
- videókamera RunCam
- videókamera Drift
- videókamera SeaLife
- videókamera Sakar
- videókamera Jobo
- videókamera Dragon Touch
- videókamera Mediacom
- videókamera Kreator
- videókamera Contax
- videókamera EE
- videókamera Traveler
- videókamera Contour Design
- videókamera Kaiser Baas
- videókamera Bluetech
- videókamera Braun Phototechnik
- videókamera Spypoint
- videókamera Kitvision
- videókamera Praktica
- videókamera MMTC
- videókamera Flip
- videókamera Brinno
- videókamera BlackVue
- videókamera Storex
- videókamera DXG
- videókamera MD 80
- videókamera Berger & Schröter
- videókamera Vupoint Solutions
- videókamera Whistler
- videókamera Curve
- videókamera PCE Instruments
- videókamera CamOne
- videókamera Mobius
- videókamera ISAW
- videókamera Beaulieu
- videókamera Revier Manager
- videókamera Kobian
- videókamera FHD 1080P
- videókamera RSC
- videókamera Stealth Cam
- videókamera Aqua-Vu
- videókamera Hamlet
- videókamera Qoltec
- videókamera Leotec
- videókamera Replay
- videókamera Akaso
- videókamera Hamilton Buhl
- videókamera Aida
- videókamera Rexing
- videókamera IOPLEE
- videókamera Moultrie
- videókamera Bolex
- videókamera Teslong
- videókamera Izzo
Legújabb útmutatók videókamera

30 Március 2025
30 Március 2025
30 Március 2025
30 Március 2025
28 Március 2025
28 Március 2025
28 Március 2025
28 Március 2025

16 Január 2025
16 Január 2025