Használati útmutató Sanyo Xacti VPC-CA9EX
Sanyo
videókamera
Xacti VPC-CA9EX
Olvassa el alább 📖 a magyar nyelvű használati útmutatót Sanyo Xacti VPC-CA9EX (197 oldal) a videókamera kategóriában. Ezt az útmutatót 8 ember találta hasznosnak és 2 felhasználó értékelte átlagosan 4.5 csillagra
Oldal 1/197

VPC-CA9EX
VPC-CA9
VPC-CA9GX
INSTRUCTION MANUAL
Dual Camera
Please read these instructions carefully before using the camera.
Make sure to read and understand the separate booklet “SAFETY MANUAL”.
Keep this manual in a safe place for later reference.
Important note
This manual explains how to safely operate the VPC-CA9EX, VPC-CA9 and
VPC-CA9GX.
Any information regarding only one of these products will be labeled as such.

i English
Warning
TO PREVENT THE RISK OF FIRE OR ELECTRIC SHOCK, DO NOT
EXPOSE THIS APPLIANCE TO RAIN OR MOISTURE.
FOR AMERICAN USERS
The following advisory is included in accordance with the laws of the State of
California (USA):
WARNING:
This product contains chemicals, including lead, known to the State of
California to cause cancer, birth defects or other reproductive harm. Wash
hands after handling.
i This equipment has been tested and found to comply with the limits for a
Class B digital device, pursuant to Part 15 of the FCC Rules. These limits
are designed to provide reasonable protection against harmful interference
in a residential installation. This equipment generates, uses and can
radiate radio frequency energy and, if not installed and used in accordance
with the instructions, may cause harmful interference to radio
communications. However, there is no guarantee that interference will not
occur in a particular installation. If this equipment does cause harmful
interference to radio or television reception, which can be determined by
turning the equipment off and on, the user is encouraged to try to correct
the interference by one or more of the following measures:
h Reorient or relocate the receiving antenna.
h Increase the separation between the equipment and receiver.
h Connect the equipment into an outlet on a circuit different from that to
which the receiver is connected.
h Consult the dealer or an experienced radio/TV technician for help.
i Changes or modifications not expressly approved by the party responsible
for compliance could void the user’s authority to operate the equipment.
Declaration of Conformity
Model number: VPC-CA9
Trade Name: SANYO
Responsible party: SANYO FISHER COMPANY
Address: 21605 Plummer Street, Chatsworth, California 91311
Telephone No.: (818) 998-7322
This device complies with Part 15 of the FCC Rules. Operation is subject
to the following two conditions:
(1) this device may not cause harmful interference, and
(2) this device must accept any interference received, including
interference that may cause undesired operation.

English ii
FOR CANADIAN USERS
i This Class B digital apparatus complies with Canadian ICES-003.
FOR EU USERS
The symbol mark and recycling systems described below apply to EU
countries and do not apply to countries in other areas of the world.
Your SANYO product is designed and manufactured with high quality
materials and components which can be recycled and/or reused.
The symbol mark means that electrical and electronic equipment, batteries
and accumulators, at their end-of-life, should be disposed of separately from
your household waste.
Note:
If a chemical symbol is printed beneath the symbol mark, this chemical
symbol means that the battery or accumulator contains a heavy metal at a
certain concentration. This will be indicated as follows: Hg: mercury, Cd:
cadmium, Pb: lead
In the European Union there are separate collection systems for used
electrical and electronic equipment, batteries and accumulators.
Please, dispose of them correctly at your local community waste collection/
recycling centre.
Please, help us to conserve the environment we live in!
FOR RUSSIAN USERS
This product is certified by an official certification company
which is authorized by the Russian Federation.
SANYO FISHER Sales (Europe) GmbH
Stahlgruberring 4, D-81829 München, Germany
SANYO Electric Co., Ltd.
1-1, Sanyo-cho, Daito City, Osaka 574-8534, Japan

iii English
HOW TO READ THIS MANUAL
For first-time users
Please read the sections on “SETUP” and “SIMPLE” in this manual,
as well as the included “QUICK GUIDE” to familiarize yourself with
your camera’s operation.
↓
To use the various camera features
Please read the sections on “NORMAL” and “OPTION SETTINGS” in
this manual. To view on a TV, please read the section on “OTHER
DEVICES AND CONNECTIONS” in this manual. To connect to a
computer, please see the “Xacti Software CD INSTRUCTION
MANUAL”.
↓
To use additional features
To use a computer to edit the recorded data or to save data to a DVD,
please read the “Xacti Software CD INSTRUCTION MANUAL”.
You may find the answers to questions or problems concerning camera
operation in the sections “COMMONLY ASKED QUESTIONS” (page 143)
and “TROUBLESHOOTING” (page 150).
Symbols used in this manual
HINT Points giving some extended instructions or special points to pay
attention to.
CAUTION Points that require special attention.
(page xx) Refer to the page indicated for detailed information.
English iv
SHOOT, PLAY BACK AND SAVE
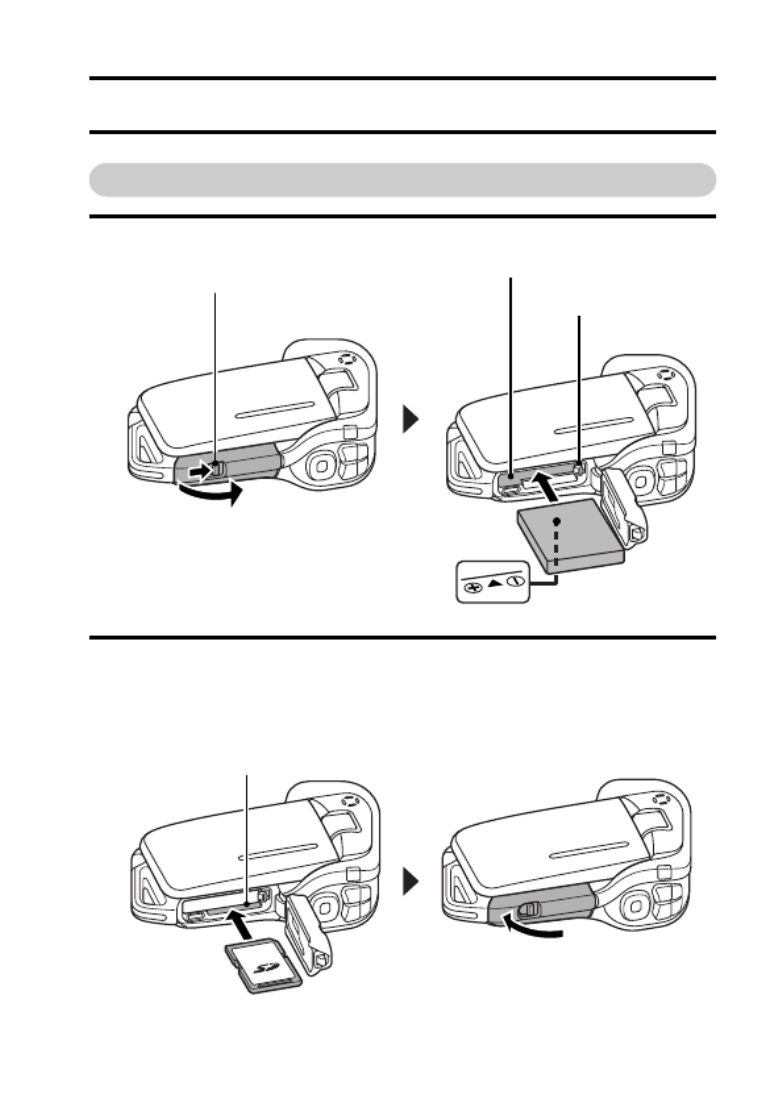
Install the battery pack and card
1 Insert the battery pack.
2 Insert the SD Memory Card.
h An SD Memory Card is not included with your camera. Please
purchase a commercially sold card.
h In this manual, the SD Memory Card is referred to as the “card”.
Lever
1 Press the latch
Battery pack slot
2 Insert
1 Push
2 Open
Bottom side
Card slot
2 Insert
1 Open
v English
SHOOT, PLAY BACK AND SAVE
Shooting
k
k
k
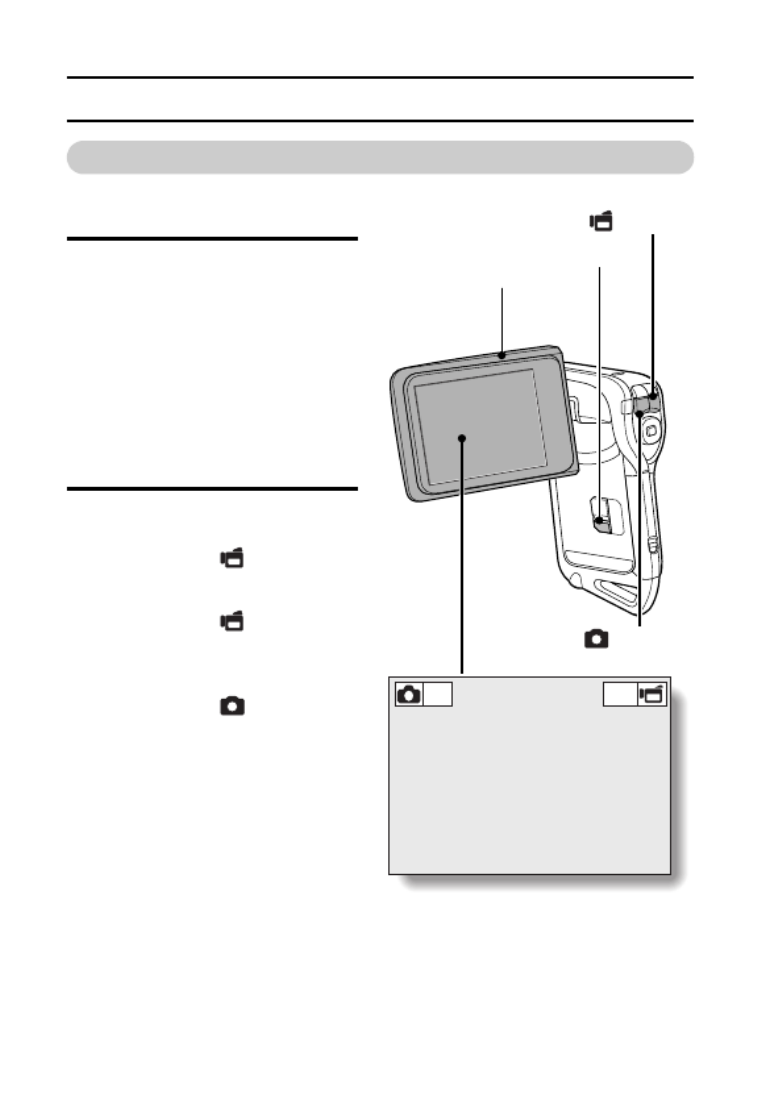
kkVideo clip recording
1 Open the monitor unit, and
press the ON/OFF button
for at least 1 second.
h The camera turns on.
h
If the screen to set the date
and time appears, press
the MENU button 2 times
to cancel it.
For how to set the date
and time, see page 32.
2 Record.
To record a video clip:
hPress the [ ] button to
begin recording a video
clip.
hPress the [ ] button
again to end the
recording.
To take a photo:
hPress the [ ] button.
h A still image is captured.
1031 00:55:58
9
M
-
S
HD-SHQ
Monitor unit
[ ] button
[ ] button
ON/OFF button
English vi
Before capturing those important shots, be sure to first take a
test shot to confirm that your camera is set up and ready to go
i Sanyo declines any claim for compensation for recorded contents etc. in
case of photographing or recording failure due to a chance camera or card
flaw.
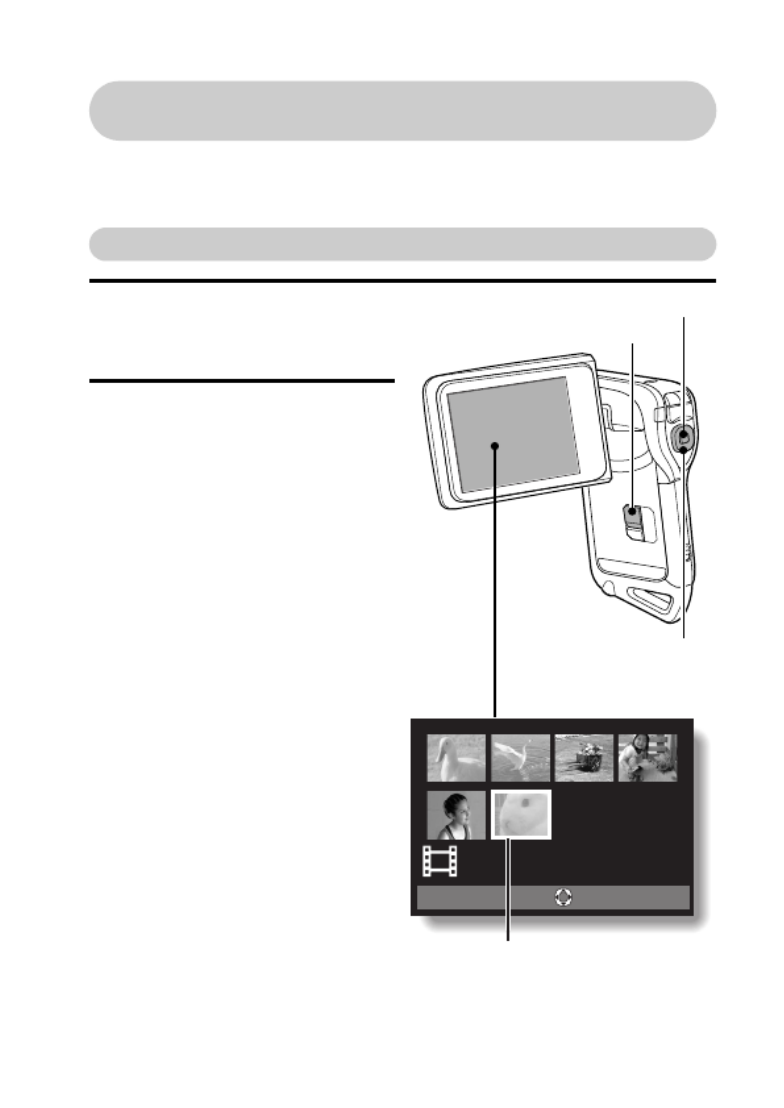
Playback
1
Press the REC/PLAY button.
h
The display changes to
the Playback Screen.
2 Select the image to play
back.
h Press the [G H] or [ ]
button to move the
orange frame to the
image you wish to play
back.
h The image information for
the framed image is
shown at the bottom of
the screen.
100-0006
10.2MB 00:00:08
HD-SHQ
OK
SET button
REC/PLAY button
Arrow buttons
Orange frame

vii English
SHOOT, PLAY BACK AND SAVE
3 Press the SET button.
<Video clip playback>
h Playback begins.
<To return to the recording mode>
h Press the REC/PLAY button.
When you are finished using the camera...
Press the ON/OFF button for at least 1 second to turn the camera off.
To continue to the next operation...
Please confirm that your computer is connected to the Internet.

English viii
Burn your recorded video clips onto a DVD
(Windows Vista)
Using the supplied CD-ROM (Xacti Software CD), you can store your
captured images on a DVD. Detailed information about the Xacti
Software CD can be found on page 4 in the Xacti Software CD
INSTRUCTION MANUAL.
Install application program
1 Set the supplied CD-ROM in your computer’s DVD drive.
h The installation window opens.
2 Click on [TotalMedia Extreme for SANYO].
h After clicking on the application program, follow the instructions shown
on the monitor to install the program.
h When the window appears requesting to restart your computer, click
the [Finish] button to reboot.
3 Remove the CD-ROM from the computer’s DVD drive.
<About the Kodak online service>
h When the installation window closes, a dialog box to connect to the
website introducing Kodak’s online service appears. Check the [No
thanks !] option button, and then click on the [OK] button.
ix English
SHOOT, PLAY BACK AND SAVE
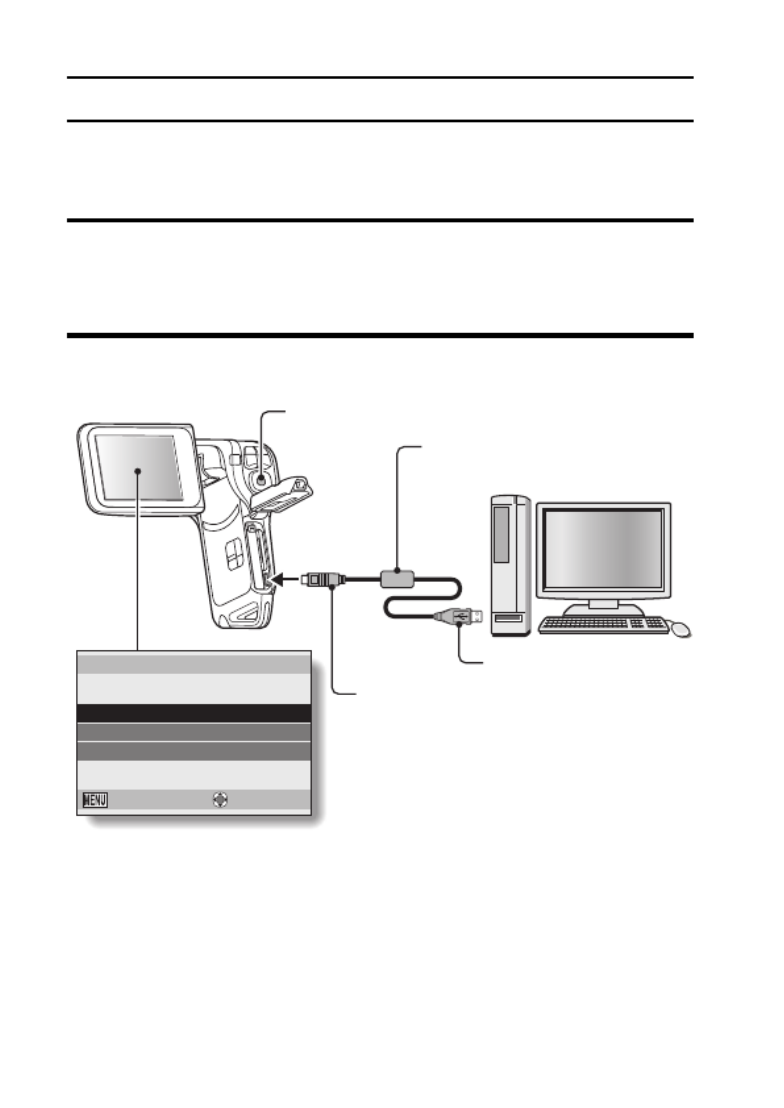
Copy data from your camera to the computer
Connect your camera to a computer, and copy the desired data to the
computer.
1 Turn on the computer, and use the supplied dedicated USB interface
cable to connect your camera to the computer.
h Connect the cable between the camera’s USB/AV terminal and the
computer’s USB connector.
2 Turn on the camera (page 30).
h The USB Connection Screen appears on the camera’s monitor.
USB CONNECTION
COMPUTER
PRINTER
CANCEL
CANCEL OK
To USB/AV terminal
on the camera
To USB connector
on the computer
Supplied dedicated
USB interface cable
SET button

English x
3 Select “COMPUTER”, and press the SET button.
h The screen to select the computer
connection mode appears.
4 Select “CARD READER”, and press the SET button.
5 Copy data from your camera to a computer.
USB CONNECTION
MTP
CARD READER
SCREEN CAPTURE
PC CAMERA
CANCEL
OK

xi English
SHOOT, PLAY BACK AND SAVE
Burn video clips onto a DVD (For Windows Vista
users)
Here’s how to write your recorded data onto a DVD in the mpeg2 format. For
information on other operations, please see the Help file for TotalMedia
Extreme. To access the TotalMedia Extreme Help file, click the [?] Help button
on the TotalMedia Extreme start screen.
1 Insert a blank DVD in your computer’s DVD drive.
2 Double-click the [TotalMedia Extreme] icon on your desktop.
h The TotalMedia Extreme application starts, and the startup page
appears.
[Create video] icon

English xii
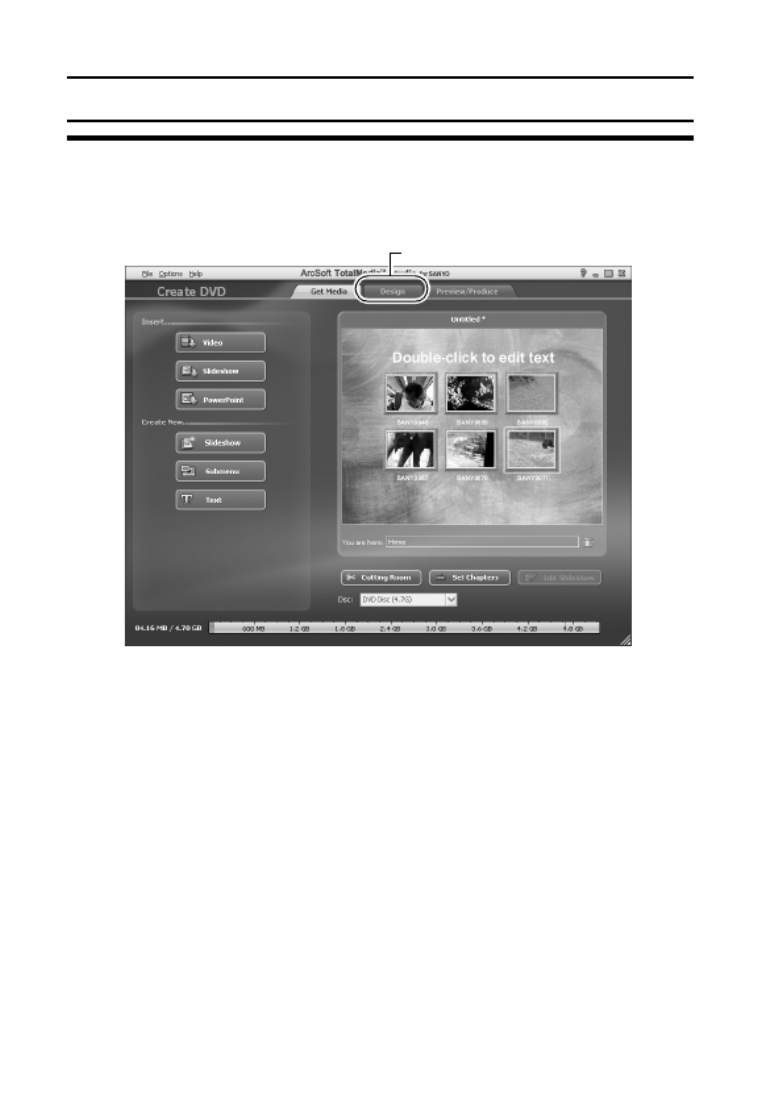
3 Click the [Create video] icon.
h The “Create DVD” window appears.
4 Click the [Video] button in the “Insert” field.
h The screen to select the video clip file to write to a DVD appears.
h Click the file you wish to write to a DVD.
h To select multiple files, keep the [Ctrl] key pressed while selecting
files.
[Video] button
xiii English
SHOOT, PLAY BACK AND SAVE
5 Click on the [Open] button.
h The file(s) selected in step 4 and the DVD file capacity appear in the
“Create DVD” window.
[Design] tab

English xiv
6 Click the [Design] tab.
h The window appears to design the title menu for when the DVD is
played back.
h Select the desired design.
[Preview/Produce] tab

xv English
SHOOT, PLAY BACK AND SAVE
7 Click the [Preview/Produce] tab.
h A warning regarding the image quality of the preview image appears.
8 Click the [OK] button.
h The screen to begin burning to disk appears.
9 Double-click the [Burn] button.
h The “save project” confirmation window appears.
[Burn] button

English xvi
10 Click the [Yes] button.
h Enter a name for the project file.
11 Click the [Save] button.
h The “Burn disk” window appears.
12 Click the [OK] button.
h Burning begins.
h Depending on your computer’s capacity, it may take some time to burn
a large file.
h When burning is completed, the DVD is ejected from the DVD drive.
[OK] button

xvii English
SHOOT, PLAY BACK AND SAVE
13 Click the [OK] button.
14 Click the [×] button to close the “Create DVD” window.
h The TotalMedia Extreme top page appears.
15 Click the [×] button to close the startup page.
h TotalMedia Extreme is exited.

Englishxviii
CAUTION
Does the window requesting confirmation to enable the MPEG-2 Codec
appear?
When using TotalMedia Extreme for the first time, a window requesting you to
confirm activation of the MPEG-2 Codec appears during the procedure. The
MPEG-2 Codec must be activated in order to burn files to a DVD. Complete
the following procedure to activate the MPEG-2 Codec.
i Note that your computer must be connected to the Internet in order to
complete this procedure. Please confirm that your computer is connected
to the Internet.
1 When the window requesting confirmation to activate the MPEG-2
Codec appears, click the [Yes] button.
h The ArcSoft website appears.
2 Click on [Special downloads].
h The window appears for you to enter your email address, name, license
ID, etc.
h Enter the correct information.
3 Click the [Submit] button.
h Soon thereafter, the URL for the download to activate the MPEG-2
Codec will be sent to the email address you entered in step 2.
4 Click the download URL link.
h The program will be downloaded to your computer.
5 Double-click the icon for the downloaded program.
h Follow the instructions to activate the MPEG-2 Codec.
h DVD burning via the TotalMedia Extreme program is now enabled.
h When the procedure above has been completed, continue to the
procedure to burn to DVD.
United States/Canada
Tel: +1-510-979-5599
Web: http://www.arcsoft.com/support/
E-mail Support: http://www.arcsoft.com/public/
content_page.asp?pageID=83
Hours: M-F from 9:00am - 5:00pm
(Pacific Standard Time, excluding holidays observed by ArcSoft)
Language: English

xix English
SHOOT, PLAY BACK AND SAVE
Europe
Tel: +353 (0) 61-702087
Web: http://www.arcsoft.com/en/support
Email Support: eurosupport@arcsoft.com
Hours: M-Th from 8:30am - 5:30pm GMT
(excluding holidays observed by ArcSofts Affilitate)
F from 8:30am - 5:00pm GMT
(excluding holidays observed by ArcSoft’s Affilitate)
(Adjusted for daylight savings time when applicable)
Language: English, French, Italian, German, Spanish and Dutch
China
Tel: +86 (0) 571-88210575
Web: http://www.arcsoft.com.cn/support
E-Mail Support: support@arcsoft.com.cn
Hours: M-F 8:30am-5:30pm
(Beijing local time) (excluding holidays observed by ArcSoft)
Language: Chinese

English xx
How was that? The convenient accessories not only let you immediately view
images captured with the camera, but you can also upload images to your
computer and create your original DVDs. Read the following explanations to
find out how you can fully enjoy your camera’s digital video feature.

xxi English
This camera complies with JIS IPX8 (formerly JIS protection grade 8)
waterproof standard and can be used in water. Note, however, that
failing to heed the following precautions may result in damage or injury
that is not covered by the warranty. Please take the time to carefully
read and heed the following cautions.
NOTE
k
k
k
kk Before using the camera
i
When closing the battery/card compartment cover,
make sure that no foreign object such as sand, hair,
dust, etc. is caught in the seal.
i
Make sure that the battery/card compartment cover is
completely and securely closed to prevent water from
getting inside the camera and damaging it.
i
Please note that the camera accessories are not
waterproof.
k
k
k
kk Cautions concerning use in water
i
The waterproof properties of the camera apply to fresh
water and saltwater only; they do not apply to cleaning
substances, chemicals or water from spas, etc. In
case of a splash, immediately wipe off any moisture.
i
Do not immerse in water at a depth greater than 1.5 m
(4.92 ft.).
i
Do not subject the camera to high-pressure water.
i
Do not immerse in water for longer than 60 minutes.
After 60 minutes of use in water, allow it to dry for at
least 10 minutes.
i
Do not immerse in water that is warmer than 40
°
C
(104
°
F).
i
Do not open and close the battery/card compartment
cover when the camera is wet or while it is immersed
in water.
i
Do not open and close the battery/card compartment cover with wet hands.
i
Do not open the battery/card compartment cover on the beach or at the
poolside.
i
Do not jolt the camera while it is immersed in water. Doing so may cause the
battery/card compartment cover to open.
Important! Concerning your camera’s
waterproof feature

English xxii
NOTE
k
k
k
kk Storing and maintaining your camera
i Do not leave the camera unwashed after it has been
immersed in salt water or if salt water is adhering to
it. Doing so may cause corrosion and discoloration of
the plating, as well as deterioration of the camera’s
waterproof capability.
i After the camera has been used in water, use fresh
water to wash it. Never use soap or detergent to
clean the camera, as doing so will cause deterioration
of the camera’s waterproof capability.
i After washing the camera, take care to completely
drain it, and use a dry cloth to wipe off any drops of
water adhering to it (page 67).
i Do not leave the camera in an environment colder than
0 °C (32°F) or warmer than 40 °C (104°F), as doing so
may cause deterioration of the camera’s waterproof
capability.
i Waterproof seals are used in this camera. It is
recommended that the waterproof seals be replaced
every year with new ones. For replacing the seals,
please consult your dealer.
* Please note that there is a fee for replacing the
waterproof seal.
k
k
k
kk Other cautions
i Do not subject the camera to severe jolts, as doing so may deform the
battery/card compartment cover or camera body, thus compromising its
waterproof capability. If the camera has been subjected to a strong jolt,
please consult with your dealer.
HINT
What is “JIS IPX8” (formerly “JIS protection grade 8”)?
i “JIS IPX8” specifies that a device is protected against the effects of
continuous immersion in water.

1 English
CONTENTS
QUICK SEARCH BY OPERATION ........................................................ 6
CHECKING THE INCLUDED ACCESSORIES .................................... 11
How to use the accessories .......................................................... 13
Media cards that can be used with this camera ............................ 15
What “card” means in this manual ................................................ 15
SPECIAL FEATURES .......................................................................... 16
Waterproof capability .................................................................... 16
Movable monitor for any shooting angle ....................................... 17
Capture still shots while recording a video clip ............................. 18
Lots of accessories for optimal use of your captured images ....... 19
SYSTEM MAP ..................................................................................... 20
SETUP
PARTS NAMES ................................................................................... 21
CHARGING THE BATTERY PACK ..................................................... 23
Recharging the battery pack ......................................................... 24
INSTALLING THE BATTERY PACK AND CARD ................................ 25
Install the battery pack .................................................................. 25
Installing the DC adaptor (sold separately: VAR-A2U/A2EX) ....... 26
Install the card .............................................................................. 28
About the temperature alert icon \ .......................................... 29
TURNING THE CAMERA ON AND OFF ............................................. 30
Turning on the camera .................................................................. 30
Turning on the camera when the power save (sleep) function is
active ........................................................................................ 30
Turning off the camera .................................................................. 31
DATE AND TIME SETTING ................................................................. 32
SWITCHING BETWEEN THE RECORDING MODE AND
PLAYBACK MODE .......................................................................... 35
SWITCHING THE OPERATING MODE .............................................. 36
Switching between the SIMPLE and NORMAL modes ................ 36
Accessing/exiting the SIMPLE/NORMAL Mode Menu Screen ..... 37
Overview of the SIMPLE Mode Setting Screen ............................ 41
Overview of the NORMAL Mode Setting Screen .......................... 45

English 2
SIMPLE
SHOOTING
BEFORE TAKING PICTURES .............................................................53
For best results ..............................................................................53
Using the autofocus .......................................................................54
Select the recording size ...............................................................56
Select the focus setting .................................................................57
Hints for taking pictures .................................................................58
VIDEO CLIP RECORDING ...................................................................59
SHOOTING SINGLE SHOTS ...............................................................60
Using the flash ...............................................................................62
SHOOT A STILL IMAGE WHILE RECORDING A VIDEO CLIP ..........64
MACRO-PHOTOGRAPHY (ZOOM) .....................................................66
AFTER USING THE CAMERA IN WATER ..........................................67
PLAYBACK
PLAYING BACK VIDEO CLIPS AND STILL IMAGES ..........................69
How to save one frame from a video clip as a still image .............71
SLIDESHOW PLAYBACK ....................................................................72
PLAYBACK VOLUME ...........................................................................73
DELETING FILES .................................................................................74
Delete single/delete all ..................................................................74
Delete selected ..............................................................................75
PLAYBACK MODES .............................................................................77
Multi-image display ........................................................................77
Selecting the playback folder ........................................................78
Magnifying (zooming in) the image ...............................................79

English 4
OPTION SETTINGS
DISPLAY THE OPTION SETTING MENU .........................................116
INTRODUCTION TO THE OPTION SETTING MENU .......................117
Setting up the shortcuts ...............................................................123
TV output setting .........................................................................125
File No. continued setting ............................................................129
Formatting (initializing) ................................................................131
CHECKING THE REMAINING CARD MEMORY ...............................132
Checking the remaining number of images and
video recording time ................................................................132
For audio recordings ...................................................................133
CHECKING THE REMAINING BATTERY PACK CHARGE ..............134
OTHER DEVICES AND CONNECTIONS
CONNECTING TO A TV
CONNECTING TO A TV .....................................................................136
Connecting to a standard video input terminal ............................137
Connect to the 480p/720p terminal .............................................138
PLAYING BACK ON A TV ..................................................................139
CONNECTING TO A PRINTER
PRINTING ...........................................................................................140
Print preparations ........................................................................140

5 English
CONTENTS
APPENDICES
COMMONLY ASKED QUESTIONS ................................................... 143
TROUBLESHOOTING ....................................................................... 150
Camera ....................................................................................... 150
Notes regarding the Scene Select feature and filters ................. 158
SPECIFICATIONS ............................................................................. 160
Camera ....................................................................................... 160
Camera connectors .................................................................... 164
Battery life ................................................................................... 164
Possible No. of Images/Possible Shooting Time/
Possible Recording Time ....................................................... 165
Concerning the multi-indicator .................................................... 166
Supplied battery pack charger .................................................... 167
Supplied Li-ion battery pack ....................................................... 167
Others ......................................................................................... 168
Before capturing those important shots, be sure to first
take a test shot to confirm that your camera is set up and
ready to go ............................................................................. 169
HINTS FOR TAKING PICTURES ...................................................... 170

English 6
QUICK SEARCH BY OPERATION
Your camera has an abundance of convenient features and functions. From
creating precisely the photo you want, to viewing images using various
techniques, you can locate the exact operation for your purposes in the
following table.
Shooting/recording
Basic operation Convenient functions Additional functions
Getting started
shooting/recording
• “VIDEO CLIP
RECORDING” on
page 59
• “SHOOTING SINGLE
SHOTS” on page 60
• “Sequential shots” on
page 83
• “Audio recording” on
page 80
Log the date and time
of your photos
• “DATE AND TIME
SETTING” on page 32
Zoom in on the
subject
• “MACRO-
PHOTOGRAPHY
(ZOOM)” on page 66
Close-up
photography
• “Focus range” (super
macro mode) on
pages 42 and 48
• “Select the focus setting”
(super macro mode) on
page 57
For more accurate
focus
• “How to use the manual
focus” (manual focus) on
page 87
Set the focus to a
narrow range
• “Focus mode setting” on
page 88
Reduce noise when
recording
• “NOISE REDUCTION
setting” on page 120
Optimize the photo
quality
• “Select the recording
size” on pages 42 and
56.
• “Video setting” on
pages 46 and 80
• “Still image setting” on
pages 46 and 83
Set the camera’s color/contrast
characteristics
• “Image quality setting” on page 120
Capture fast-moving subjects
• “Scene select” (sports mode) on page 46
Suppress camera shake effect
• “Video stabilizer setting” on pages 48 and 86

7 English
QUICK SEARCH BY OPERATION
Shoot in dark conditions
• “Exposure compensation” on page 94
• “Using the flash” on pages 42, 46 and 62
• “Scene select setting” (night view portrait mode/fireworks mode/lamp mode) on pages 46
and 84
Increase the camera’s sensitivity
• “ISO sensitivity setting” on pages 48 and 89
• “High sensitivity mode setting” on pages 50 and 93
Photographing people
• “Scene select setting” (portrait mode/night view portrait mode) on pages 46 and 84
• “Filter setting” (cosmetic filter) on pages 46 and 84
Sharp face shots
• “Face chaser setting” on pages 50 and 92
Simplified operation for shooting/playback
• “SWITCHING BETWEEN THE RECORDING MODE AND PLAYBACK MODE” on page 35
Photographing landscapes
• “Scene select” (landscape mode) on page 46
Take a self-photo
• “Self-timer setting” on pages 46 and 85
Make images lighter
or darker
• “Exposure compensation”
on page 94
• “High sensitivity mode
setting” pages 50 and 93
Measure the
brightness of a
specific area
• “Light-measuring mode
setting” on pages 48 and
88
Adjust the camera’s
sensitivity
• “ISO sensitivity setting”
pages 48 and 89
For a more precise
exposure setting
• “Exposure setting”
(manual exposure control)
on pages 50 and 91
Change the color of
the images
• “Filter setting”
(monochrome filter/sepia
filter) on pages 46 and 84
Make white appear
natural
• “White balance setting” on
pages 50 and 90
Shooting/recording
Basic operation Convenient functions Additional functions

English 8
Playback
Basic operation Convenient functions Additional functions
Getting started
viewing images
• “PLAYING BACK VIDEO
CLIPS AND STILL
IMAGES” on page 69
Adjust the speaker
volume
• “PLAYBACK VOLUME”
pages 44 and 73
Search for image/
audio files
• “Multi-image display” on
page 77
• “Selecting the playback
folder” on pages 52 and
78
Magnify an image
• “Magnifying (zooming in)
the image” on page 79
Change the angle of
view
• “Rotate” on pages 51 and
99
Reduce the photo
size
• “Resize” on pages 51
and 99
• “Audio playback” on
page 82
Adjust the speaker volume
• “PLAYBACK VOLUME” on pages 44 and 73
Continuous playback
• “SLIDESHOW PLAYBACK” on pages 44, 72 and 96
Adjust the monitor brightness
• “BRIGHTNESS setting” on page 120
Playback on a TV
• “PLAYING BACK ON A TV” on page 139
Set the TV system
• “TV output setting” on pages 120 and 125

9 English
QUICK SEARCH BY OPERATION
File managing/processing
Basic operation Convenient functions Additional functions
Search for image/audio files
• “Multi-image display” on page 77
• “Selecting the playback folder” on pages 52 and 78
Delete files
• “DELETING FILES” on
pages 44 and 74
Protect files from accidental erasure
• “File protect setting” on pages 51 and 97
Format a card
• “Formatting (initializing)” on pages 122 and 131
Delete a part of a video clip and join video clips
• “Editing video clips” on pages 52 and 101
Specify the number of prints, index print, and date imprint
• “Printing instructions” on pages 52 and 112
View the settings that were in effect when the image/audio files were
recorded
• “FILE INFO DISPLAY” on page 115

English 10
Using with a computer
Basic operation Convenient functions Additional functions
Use the camera as a card reader
• “SETTING THE CONNECTION MODE” on page 9 in the Xacti Software CD
INSTRUCTION MANUAL
• “USING AS A CARD READER” on page 11 in the Xacti Software CD INSTRUCTION
MANUAL
Use your computer to organize/edit files that were recorded with your
camera
• "The software" on page 4 in the Xacti Software CD INSTRUCTION MANUAL
Copy data from your
camera to a computer
• "Copy data from your
camera to the computer"
on page ix
• "Operating environment"
on page 6 in the Xacti
Software CD
INSTRUCTION MANUAL
• “SETTING THE
CONNECTION MODE”
on page 9 in the Xacti
Software CD
INSTRUCTION MANUAL
Using with Windows Vista
• “SETTING THE CONNECTION MODE” on page 9 in
the Xacti Software CD INSTRUCTION MANUAL
Playback
• “About video clip files recorded with this camera” on page 8 in the Xacti Software CD
INSTRUCTION MANUAL
Using as a webcam
• “USING AS A PC CAMERA” on page 14 in the Xacti Software CD INSTRUCTION
MANUAL
Record an image of the computer screen
• "INSTALLING THE APPLICATION SOFTWARE" on page 15 in the Xacti Software CD
INSTRUCTION MANUAL
• "SCREEN CAPTURE" on page 16 in the Xacti Software CD INSTRUCTION MANUAL

11 English
CHECKING THE INCLUDED
ACCESSORIES
i
i
i
ii Handstrap and soft case
(pages 13 and 14): 1 set
i
i
i
ii Xacti Software CD (CD-ROM)
(page 4 in the Xacti Software
CD INSTRUCTION MANUAL):
1
i
i
i
ii Li-ion battery pack (pages 23
and 25): 1
i
i
i
ii Lithium-ion battery pack
charger (page 23): 1
i
i
i
ii
Dedicated
USB interface cable
(page 140, page 9 in the Xacti
Software CD INSTRUCTION
MANUAL): 1
i
i
i
ii Dedicated AV interface cable
(page 136): 1

English 12
i
i
i
ii i
i
i
iiQUICK GUIDE SAFETY MANUAL
(safety precautions booklet)
Please read this booklet
carefully before using the
camera.

13 English
CHECKING THE INCLUDED ACCESSORIES
How to use the accessories
k
k
k
kk Handstrap

English 14
k
k
k
kk Soft case

15 English
CHECKING THE INCLUDED ACCESSORIES
Media cards that can be used with this camera
The types of card that can be inserted into and used with this camera are:
i SD Memory Card
i SDHC Memory Card
What “card” means in this manual
i In this manual, SD Memory Cards and SDHC Memory Cards that can be
used in this digital camera are referred to as “card”.

English 16
SPECIAL FEATURES
Your dual camera can not only record video clips, you can also take still
photos and make audio recordings. For example, you can snap a still image
while recording a video clip, or make just an audio recording.
Waterproof capability
The camera is equipped to safely be used in water at a temperature of less
than 40 °C (104°F), at a depth of less than 1.5 m (59 in.), for up to
approximately 60 minutes. You can enjoy taking pictures at the beach or by
the pool.

17 English
SPECIAL FEATURES
Movable monitor for any shooting angle
The movable monitor lets you shoot from any angle. Hold the camera high to
get a great view of a parade, or swivel the monitor around to snap a photo of
yourself.
If you swivel the
monitor unit to its
farthest position, the
image on the monitor
will be inverted.

English 18
Capture still shots while recording a video clip
(page 64)
Suppose that while you’re recording a video clip, there’s a scene you’d like to
keep as a still photo. Your camera makes it possible to record the still photo
without interrupting the video clip recording.
1031 00:55:58
9
M
-
S
HD-SHQ

19 English
SPECIAL FEATURES
Lots of accessories for optimal use of your
captured images (page 20)
Use the accessory cables to view images on a TV or computer. Or connect
the camera directly to a printer to make prints of your photos. And with the
software in the supplied CD-ROM (Xacti Software CD), you can create your
original DVDs and CDs.

English 20
SYSTEM MAP
You can connect the camera to various devices to expand its capabilities.
Dedicated USB
interface cable
Dedicated AV
interface cable
Computer
Printer
TV
DC adaptor
(Optional)
Commercially available
SD Memory Card
Internet
AC adaptor
(Optional)
i Card reader
i DPOF-compatible
printer
i Photo shop
21 English
SETUP
SETUP
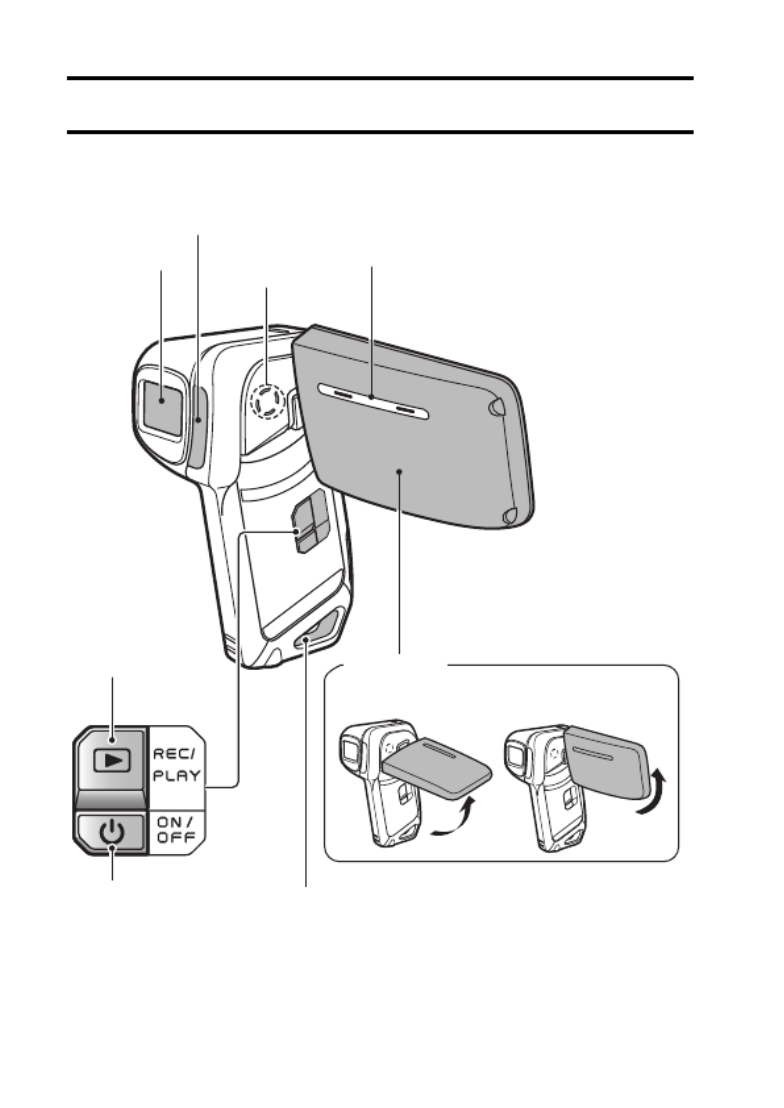
PARTS NAMES
Front
There are places in the camera where water might accumulate, but this will
not affect its waterproof properties.
Concerning the drainage holes, see page 67.
To open
Lens
Flash
Stereo microphone
Speaker
Strap holder
ON/OFF button
REC/PLAY button Monitor unit

English 22
SETUP
Rear
Multi-indicator
[ ] button [ ] button
MENU button
Monitor
SET button
Battery/card
compartment
cover
Tripod stand hole
[W/P] button
[G] button
[T/]] button
[H] button
i When the camera is set to the
HD mode, black bars appear
along the top and bottom borders
of the monitor, and the screen
display changes to the 16:9
aspect ratio. In the Instruction
Manual, however, these black
bars are not shown in the
illustration of the screen.

English 24
SETUP
Recharging the battery pack
Be sure to fully charge the supplied or separately sold battery pack before
using it in your camera. For charging the battery pack, use the supplied
charger.
Charge the battery pack if it is being used for the first time, and recharge it
whenever the remaining charge is low (see “CHECKING THE REMAINING
BATTERY PACK CHARGE” on page 134).
If there is interference to your TV or radio during recharging...
i Move the battery pack and charger further away from the TV or radio.
Ambient temperature during recharging
i During recharging, the charger and battery pack will be warm. This is
normal and does not indicate a malfunction.
i It is recommended that the ambient temperature during recharging be
between about 0 °C and 40 °C (32°F and 104°F). Due to the
characteristics of the battery pack, at temperatures below 0 °C (32°F), it
may not be possible to sufficiently recharge it.
i When the battery pack temperature is high, it may take longer to recharge
it.
Recharge a battery pack in the following cases
i A battery pack which has not been used for a long time
i Newly purchased battery pack

25 English
INSTALLING THE BATTERY PACK
AND CARD
Make sure that the battery pack and the card orientation are correct.
Install the battery pack
1 Open the battery/card compartment
cover.
h While gently pressing the lever,
open the battery/card compartment
cover.
2 Insert the battery pack.
h Press the latch, insert the battery
pack, and firmly push it all the way
in.
1 Push
Lever
2 Open
2 Insert
Battery pack slot
1 Press the latch
Bottom side

English 26
SETUP
<To remove the battery pack...>
h Press the latch securing the battery
pack, and remove the battery pack.
3 Close the battery/card compartment
cover.
h Press the PUSH LOCK part to
close the cover securely.
h At the time of purchase the battery
pack is not charged. Be sure to fully
charge the battery pack (page 23).
Installing the DC adaptor (sold separately:
VAR-A2U/A2EX)
1 Press the latch
2 Pull out
Press the PUSH LOCK part
to securely close the cover.
1 Insert
2 Connect the
AC adaptor
To power outlet

27 English
INSTALLING THE BATTERY PACK AND CARD
CAUTION
Close the battery/card compartment cover securely
i If the battery/card compartment cover is not closed or is not closed
completely, the camera will no longer be waterproof. When closing the
battery/card compartment cover, make sure that no foreign object such as
sand, hair, dust, etc. is caught in the seal.
Do not charge the battery pack immediately after the camera has been
in continuous use for a long time
i The battery pack becomes hot when the camera is used continuously for a
long time. If you attempt to charge the battery pack in this state, the charge
indicator may flash red and it may not be possible to charge the battery
pack. Wait until the battery pack has cooled down before attempting to
charge it.
Does the battery pack appear swollen?
i The lithium-ion battery used in this camera may expand slightly when
stored in a hot environment or repeatedly used, but this is not a safety
hazard.
HINT
About the internal backup battery
i This camera’s internal battery serves to maintain the date and time
settings, as well as the shooting settings. The backup battery will be fully
charged when the battery pack is kept in the camera continuously for about
2 days. In the fully charged state, the backup battery will maintain the
camera settings for about 7 days.
When not using the camera for a long time, remove the battery pack
i A small amount of power is still used even if the camera is turned off, and it
is therefore recommended that the battery pack be removed from the
camera if it is not going to be used for a long time. Note that when the
battery pack is removed for a long period, the time and date settings may
be cleared. Before using your camera again, be sure to confirm that the
camera settings are correct.
To prolong the life of the battery pack
i Although the battery pack is an expendable item, you can maximize the life
of the battery by heeding the following suggestions.
h Do not leave the battery under the hot summer sun or exposed to other
high-temperature environments.
h Do not continually recharge the battery when it is already fully charged.
After fully charging it once, for example, use it for a while to partially
discharge it before recharging it again.
h When the battery is not to be used for a long time, if possible store the
partially charged (not fully charged) battery in a cool environment.

English 28
SETUP
Install the card
The card can be used after it has been formatted with the camera
(page 131).
1 Open the battery/card
compartment cover.
2 Insert the card.
h Firmly insert the card until it
clicks into place.
3 Close the battery/card compartment cover.
<When removing the card...>
h To remove the card, press it
down, and then release. The
card will protrude slightly, and
you can then pull it out.
1 Open
Card slot
2 Insert
1 Open
2 Push
3 Pull out

29 English
INSTALLING THE BATTERY PACK AND CARD
CAUTION
Do not attempt to forcibly remove the card
i Never remove the card when the multi-indicator is flashing red. In doing so,
you risk losing the data stored in the card.
HINT
Shooting without a card installed
i When a card is installed, images are recorded to and played back from the
card. When no card is installed, images are recorded to and played back
from the camera’s internal memory. When the camera is turned on with no
card installed, the internal memory icon is shown on the monitor to let
you know that the images you capture will be saved to the camera’s
internal memory.
About the temperature alert icon
\
During camera use, if the temperature of the battery or inside the camera
(excluding the battery) rises, a temperature alert icon \ will appear as
described below.
k
k
k
kk When the battery or internal camera (excluding battery) temperature
rises during use
h During camera use, if the temperature of the battery or inside the
camera (excluding the battery) rises, a \ icon lights on the monitor. It
is still possible to record and play back even when the \ icon is lit;
however it is advised that you discontinue use as soon as possible and
turn the camera off.
h If the temperature rises further, the \ icon will start to flash, and the
camera will turn off automatically.
The camera cannot be turned on until the temperature has dropped (or
as long as the \ icon remains flashing). Please wait until the
temperature has dropped before resuming use.
hDuring video recording, a countdown indicator will show the time
starting about 15 seconds before shutdown. When the indicator shows
0 seconds, recording stops.
hIf the camera is turned off while the temperature is high (that is, while
the \ icon is flashing), it cannot be turned on again until the
temperature has dropped (or as long as the \ icon remains flashing).

English 30
SETUP
TURNING THE CAMERA ON AND OFF
Turning on the camera
1 Open the monitor unit, and press the
ON/OFF button for at least 1 second.
h If you press the REC/PLAY button for
at least 1 second, the camera turns
on in the playback mode.
h If you press the ON/OFF button once,
the camera will switch to the power
save mode.
Turning on the camera when the power save
(sleep) function is active
In order to preserve battery pack power, the power save (sleep) function will
automatically turn off the camera after about 1 minute of no use during
shooting, or about 5 minutes of no use during playback (factory-preset
setting).
i When the power save function is active, you can restore the power by any
of the following methods:
h
h
h
hh Press the ON/OFF button.
h
h
h
hh Press the [ ] or [ ] button.
h
h
h
hh Open the monitor unit.
h
h
h
hh Press the SET button.
i The camera will switch to the standby mode after the power save function
has been active for about 1 hour, or when you close the monitor unit.
i The power save mode will not be activated while you are recording.
i The user can specify the time elapsed before the power save function is
activated (page 122).
i When the camera is connected to a computer or printer using the
dedicated USB interface cable, the power save function is disabled, and
the camera turns off after about 12 hours.
Monitor unit
ON/OFF button

English 32
SETUP
DATE AND TIME SETTING
The camera will record the date and time an image or audio recording is
taken so that you can display them during playback. Therefore, before
capturing images, make sure the correct date and time are set.
* To correct the date and time setting, please see under HINT on page 34.
Example: To set the clock to 7:30 p.m. on December 24, 2009
1 Turn on the camera (page 30), and
press the SET button.
h The Clock Set Screen appears.
h Follow the procedures below to
enable or disable the date display
during playback, to set the display
format for the date, and to set the
date and time.
h To display the Recording or
Playback Screen, press the
MENU button 2 times.
SET
2009/02/01
00:00
CLOCK SET
TIME
DATE
DISP
OK
Y / M / D
SET button
MENU button

English 34
SETUP
4 Set the order in which the date is
displayed during playback.
1 Select “DISP”.
2 Press the SET button.
h The Set Date Format Screen
appears.
3 Press the [T/] P] or [W/ ]
button.
h Press the [T/]] button to
change the displayed date
order as follows:
Press the [W/P] button to change it in the reverse order.
4 Press the SET button.
5 Press the MENU button.
h The date and time setting is completed.
h To display the Recording or Playback Screen, press the MENU button.
HINT
About the settings backup
i Under normal conditions, while the battery pack is being replaced, an
internal battery will maintain the date and time settings. However, there is a
small chance the settings may be lost (the backup will last for about
7 days). It is recommended to check that the date and time settings are still
correct after replacing the battery pack and before shooting or recording of
any type (follow step 1).
To correct the date and time settings
1 Turn on the camera.
2Display the Option Menu [E1] (page 116).
3 Select “CLOCK SET” and press the SET button.
h The screen to set the date and time appears.
h The current date and time settings are shown.
4 Select the line you wish to change, and make the correction.
CLOCK SET
DISP Y / M / D
OK
Y / M / D
→
M / D / Y →
D / M / Y

English 36
SETUP
SWITCHING THE OPERATING MODE
The “SIMPLE mode” comprises only those functions that are most often used
and necessary to operate the camera, while the “NORMAL mode” enables
full use of all the camera’s many functions. Select the mode that is suitable for
your purposes.
Switching between the SIMPLE and NORMAL
modes
1 Turn on the camera (page 30).
h The previous mode is active.
2 Press the MENU button.
h The Menu Screen for the active mode appears.
3 Select the operating mode icon,
and press the SET button.
h Switch from the SIMPLE mode
to the NORMAL mode, or from
the NORMAL mode to the
SIMPLE mode.
h Press the MENU button to
cancel the Menu Screen.
S
N
Switch to detailed
normal menu
EXIT OK
3
2
1
2
3
1
S
S
S
SSS N
N
N
NNN
Press SET button
to switch to
simple Menu
EXIT OK
<SIMPLE Mode Menu Screen>
<NORMAL Mode Menu Screen>
Operating mode icon
Operating mode icon

37 English
SWITCHING THE OPERATING MODE
Accessing/exiting the SIMPLE/NORMAL Mode
Menu Screen
1 Set the camera to the recording or playback mode (page 35).
2 Select the desired operating mode (page 36).
3 If the Menu Screen is not displayed, press the MENU button.
h The Menu Screen appears.
h To cancel the Menu Screen, press the MENU button.
3
2
1
2
3
1
S
S
S
SSS N
N
N
NNN
S
N
Switch to detailed
normal menu
EXIT OK
Press SET button
to switch to
simple Menu
EXIT OK
MENU button
<Example: SIMPLE Mode
Recording Menu>
<Example: NORMAL Mode
Recording Menu>

English 38
SETUP
Using the SIMPLE Mode Menu
4 Press the [T/]] or [W/P] button to select the item you wish to
change, and press the SET button.
h The Setting Screen for the selected item appears.
S
N
9
HD
2
Select video
and photo size
E X I T O K
To keep in HDTV size
HDTV size
9M [4:3]
EXIT OK
Select an item to change
Description of
selected item
<Setting Screen>
Press
Press
Press

39 English
SWITCHING THE OPERATING MODE
Using the NORMAL Mode Menu
4 Press the [T/]] or [W/P] button to select a tab.
h The Menu Screen for the selected tab appears.
5 Press the [H] button.
3
2
1
2
3
1
HD-SHQ
9
M
-
S
S
S
S
SSS N
N
N
NNN
RECORDING MENU1
VIDEO
PHOTO
SCENE SELECT
FILTER
FLASH
SELF-TIMER
E X I T O K
Tab
Press
Press
3
2
1
2
3
1
HD-SHQ
9
M
-
S
RECORDING MENU1
VIDEO
PHOTO
SCENE SELECT
FILTER
FLASH
SELF-TIMER
E X I T O K
Press

English 40
SETUP
6 Press the [T/]] or [W/P] button to select the item you wish to
change, and press the SET button.
h The Setting Screen for the selected item appears.
h To return to the Menu Screen, press the MENU button.
HINT
About the applicable mode indicator
i This indicator shows the shooting mode(s) for which the selected setting is
effective.
: This setting is effective during still image shooting.
: This setting is effective during video clip recording.
: This setting is effective during still image shooting and video clip
recording.
4000x3000
3456x2592
3456x2592
3456x1944 [16:9]
1600x1200
1280x720 [16:9]
2
M
0.9
M
12
M
9
M
-H
9
M
-S
6.7
M
3
2
1
2
3
1
HD-SHQ
9
M
-
S
RECORDING MENU1
VIDEO
PHOTO
SCENE SELECT
FILTER
FLASH
SELF-TIMER
E X I T O K
O K
PHOTO
Select an item
to change
Applicable mode
<Setting Screen>
Press
Press
Press

41 English
SWITCHING THE OPERATING MODE
Overview of the SIMPLE Mode Setting Screen
SIMPLE Mode Recording Menu
S
N
1
5
2
3
4
Select video
and photo size
EXIT OK

43 English
SWITCHING THE OPERATING MODE
SIMPLE Mode Playback Menu
3
5
21
4
Start slideshow
OK

45 English
SWITCHING THE OPERATING MODE
Overview of the NORMAL Mode Setting Screen
NORMAL Mode Recording Menu
<Tab 1>
3
2
1
2
3
1
HD-SHQ
9
M
-S
7
6
5
4
3
2
1
RECORDING MENU1
VIDEO
PHOTO
SCENE SELECT
FILTER
FLASH
SELF-TIMER
EXIT OK

English 46
SETUP
1Video clip settings (page 80)
<HD mode>
<SD mode>
2Still image settings (page 83)
3Scene select (page 84)
4Filter (page 84)
5 Flash
6Self-timer (page 85)
7 Remaining battery power
(page 134)
&: Record at 1280 ×720
pixels, 30 fps (30p).
(: Record at 640
×480 pixels,
60 fps (60p).
): Record at 640
×480 pixels,
30 fps (30p).
<: Make an audio recording.
I: Image size is 4000 ×3000
pixels.
J: Image size is 3456 ×2592
pixels (low compression).
K: Image size is 3456 ×2592
pixels (normal
compression).
Q: Image size is 3456 ×1944
pixels (16:9 aspect ratio).
G: Image size is 1600 ×1200
pixels.
,: Image size is 1280 × 720
pixels (16:9 aspect ratio).
[: Image size is 640 ×480
pixels.
v: 3456 ×2592-pixel
sequential shots.
t: 1600 ×1200-pixel
sequential shots.
=: Full auto setting
a: Sports mode
>: Portrait mode
+: Landscape mode
/: Night view portrait mode
k: Snow & beach mode
[: Underwater mode
+: Fireworks mode
Q: Lamp mode
&: No filter
%: Cosmetic filter
W: Monochrome filter
,: Sepia filter
k: The camera will detect the
subject brightness and use
the flash only when
necessary.
m: The flash will operate with
every image captured
regardless of the
conditions.
l: The flash will not operate
even in dark situations.
N: Self-timer is off.
y: Shooting begins 2 seconds
after the [ ] or [ ]
button is pressed.
x: Shooting begins
10 seconds after the [ ]
or [ ] button is pressed.

English 48
SETUP
1Video stabilizer (page 86)
h Compensate for camera shake
during video clip recording.
2Focus range (page 87)
h Select the focus range that
corresponds to the distance to
the subject.
3Focus mode (page 88)
4 Light-measuring mode
(page 88)
5ISO sensitivity (page 89)
* The indicated ISO value is the
standard output sensitivity.
6 Remaining battery power
(page 134)
\: Record with image
stabilizer on.
]: Record without image
stabilizer.
*: The camera automatically
focuses on the subject
within a range of 50 cm
(19.69 in.) to infinity
(normal).
-: Set the focus distance
manually (manual).
+: The camera focuses on the
subject within a range of
1 cm (0.39 in.) to 80 cm
(31.50 in.) (super macro).
B: 9-point range finder focus
C: Spot focus
X: Multi-section light
measuring
W: Center-weighted light
measuring
Y: Spot light-measuring
=: Sensitivity is set
automatically
*: Sets sensitivity to ISO 50
u: Sets sensitivity to ISO 100
v: Sets sensitivity to ISO 200
w: Sets sensitivity to ISO 400
6: Sets sensitivity to ISO 800
-: Sets sensitivity to ISO 1600
49 English
SWITCHING THE OPERATING MODE
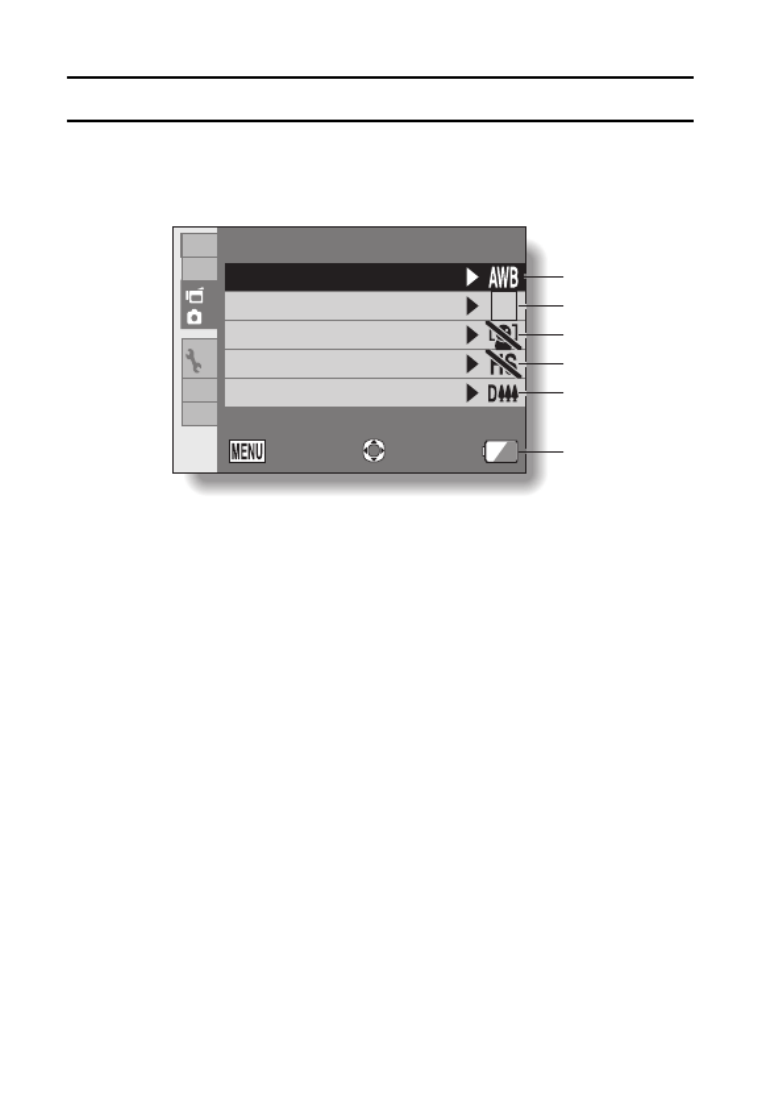
<Tab 3>
2
1
2
3
1
3
P
6
5
4
3
2
1
RECORDING MENU3
WHITE BALANCE
EXPOSURE
FACE CHASER
HIGH SENSITIVITY
DIGITAL ZOOM
EXIT OK

English 50
SETUP
1White balance (page 90)
2Exposure (page 91)
3Face chaser (page 92)
4 High sensitivity mode
(page 93)
5 Digital zoom
6 Remaining battery power
indication (page 134)
>: White balance is
automatically adjusted
depending on the ambient
lighting (auto).
r: For shooting in sunny
conditions (fair)
o: For shooting in overcast
conditions (cloudy)
p: For shooting under
fluorescent lighting
(fluorescent)
q: For shooting under
incandescent lighting
(incandescent)
^: For setting the most
accurate white balance
(one push)
@: The exposure is set
automatically.
T: Set the shutter speed
manually.
g: Set the aperture manually.
H: Set the aperture and
shutter speed manually.
-: Enable face chaser.
.: Disable face chaser.
1: Increased sensitivity
2: Normal sensitivity
Q: Enable the digital zoom.
B: Disable the digital zoom.
Termékspecifikációk
| Márka: | Sanyo |
| Kategória: | videókamera |
| Modell: | Xacti VPC-CA9EX |
Szüksége van segítségre?
Ha segítségre van szüksége Sanyo Xacti VPC-CA9EX, tegyen fel kérdést alább, és más felhasználók válaszolnak Önnek
Útmutatók videókamera Sanyo

7 Október 2024
17 Augusztus 2024
17 Augusztus 2024
17 Augusztus 2024
12 Augusztus 2024
9 Augusztus 2024
8 Augusztus 2024
6 Augusztus 2024
6 Augusztus 2024
2 Augusztus 2024
Útmutatók videókamera
- videókamera Samsung
- videókamera Sony
- videókamera Braun
- videókamera Nedis
- videókamera Milwaukee
- videókamera Philips
- videókamera Olympus
- videókamera Oregon Scientific
- videókamera SilverCrest
- videókamera Garmin
- videókamera Panasonic
- videókamera Canon
- videókamera JVC
- videókamera Sharp
- videókamera Toshiba
- videókamera HP
- videókamera Hyundai
- videókamera BenQ
- videókamera Voltcraft
- videókamera Medion
- videókamera Vimar
- videókamera SBS
- videókamera Insignia
- videókamera Fujifilm
- videókamera Polaroid
- videókamera Kyocera
- videókamera GoPro
- videókamera Speco Technologies
- videókamera Blackmagic Design
- videókamera Ricoh
- videókamera Kenwood
- videókamera Rollei
- videókamera Hama
- videókamera Zoom
- videókamera Renkforce
- videókamera Agfa
- videókamera Midland
- videókamera Lamax
- videókamera Sencor
- videókamera Hitachi
- videókamera Xblitz
- videókamera Kodak
- videókamera Nikon
- videókamera Logitech
- videókamera Bresser
- videókamera Klein Tools
- videókamera Viewsonic
- videókamera Cobra
- videókamera Denver
- videókamera Minox
- videókamera Trevi
- videókamera DJI
- videókamera Extech
- videókamera Gembird
- videókamera Cisco
- videókamera Energy Sistem
- videókamera OK
- videókamera Konica Minolta
- videókamera Mamiya
- videókamera Overmax
- videókamera Kogan
- videókamera SJCAM
- videókamera Intenso
- videókamera AgfaPhoto
- videókamera Marshall
- videókamera Trotec
- videókamera ION
- videókamera Mio
- videókamera DOD
- videókamera Samson
- videókamera TomTom
- videókamera Jay-Tech
- videókamera Trust
- videókamera Konig
- videókamera ARRI
- videókamera Pyle
- videókamera Salora
- videókamera DataVideo
- videókamera Lenco
- videókamera Uniden
- videókamera Best Buy
- videókamera Leica
- videókamera Thinkware
- videókamera Soundmaster
- videókamera Steinberg
- videókamera GoClever
- videókamera RCA
- videókamera Insta360
- videókamera Genius
- videókamera Swann
- videókamera Elmo
- videókamera Vitek
- videókamera Laserliner
- videókamera Hazet
- videókamera Vivitar
- videókamera Aiptek
- videókamera AEE
- videókamera Airis
- videókamera ATN
- videókamera Activeon
- videókamera Lexibook
- videókamera Bushnell
- videókamera Easypix
- videókamera Nilox
- videókamera Maginon
- videókamera Magellan
- videókamera Flir
- videókamera Coby
- videókamera Envivo
- videókamera TacTic
- videókamera Macally
- videókamera Transcend
- videókamera Bauer
- videókamera Naxa
- videókamera Ricatech
- videókamera Tronje
- videókamera Mpman
- videókamera Nikkei
- videókamera T'nB
- videókamera Ematic
- videókamera Tracer
- videókamera Minolta
- videókamera Zagg
- videókamera Veho
- videókamera Dnt
- videókamera Zorki
- videókamera Contour
- videókamera RunCam
- videókamera Drift
- videókamera SeaLife
- videókamera Sakar
- videókamera Jobo
- videókamera Dragon Touch
- videókamera Mediacom
- videókamera Kreator
- videókamera Contax
- videókamera EE
- videókamera Traveler
- videókamera Contour Design
- videókamera Kaiser Baas
- videókamera Bluetech
- videókamera Braun Phototechnik
- videókamera Spypoint
- videókamera Kitvision
- videókamera Praktica
- videókamera MMTC
- videókamera Flip
- videókamera Brinno
- videókamera BlackVue
- videókamera Storex
- videókamera DXG
- videókamera MD 80
- videókamera Berger & Schröter
- videókamera Vupoint Solutions
- videókamera Whistler
- videókamera Curve
- videókamera PCE Instruments
- videókamera CamOne
- videókamera Mobius
- videókamera ISAW
- videókamera Beaulieu
- videókamera Revier Manager
- videókamera Kobian
- videókamera FHD 1080P
- videókamera RSC
- videókamera Stealth Cam
- videókamera Aqua-Vu
- videókamera Hamlet
- videókamera Qoltec
- videókamera Leotec
- videókamera Replay
- videókamera Akaso
- videókamera Hamilton Buhl
- videókamera Aida
- videókamera Rexing
- videókamera IOPLEE
- videókamera Moultrie
- videókamera Bolex
- videókamera Teslong
- videókamera Izzo
Legújabb útmutatók videókamera

30 Március 2025
30 Március 2025
30 Március 2025
30 Március 2025
28 Március 2025
28 Március 2025
28 Március 2025
28 Március 2025

16 Január 2025
16 Január 2025