Használati útmutató Sagem Photo Easy 255
Olvassa el alább 📖 a magyar nyelvű használati útmutatót Sagem Photo Easy 255 (210 oldal) a nyomtató kategóriában. Ezt az útmutatót 5 ember találta hasznosnak és 2 felhasználó értékelte átlagosan 4.5 csillagra
Oldal 1/210

S
User guide
Livret d’utilisation
Bedienungsanleitung
Manual del usuario
Manuale dell'utente
Gebruiksaanwijzing
SA
SA
SA
SASAGE
GE
GE
GEGEM
M
M
MM
PHOT
PHOT
PHOT
PHOTPHOTO
O
O
OO EA
EA
EA
EA EASY 2
SY 2
SY 2
SY 2
SY 2
55
55
55
5555

- I -
ENGLISHFRANÇAIS
DEUTSCHESPAÑOLITALIANONEDERLANDS
CONTENTS
1 WELCOME 1
Safety instructions and recommendations 2
2 DISCOVER YOUR PHOTO EASY 255 PRINTER 3
3 THE USER INTERFACE 4
4 PREPARE YOUR PHOTO EASY 255 PRINTER 6
Connect the mains supply 6
First ribbon installation 7
To change the ribbon 8
Loading paper 9
5 TRANSFERRING YOUR IMAGES 11
Insert a memory card 11
Transferring photos from a photo GSM 12
Using a camera in DPOF mode 13
Print starting from a bluetooth peripheral (optional) 14
Connect a PC (Personal Computer) 15
Print from a camera (PictBrigde mode) 17
6 PRINT YOUR PHOTOGRAPHS 19
Print 19
Create your shopping basket 20
Zoom 21
7 CHOOSING YOUR OWN PRINTER SETTING 22
Formats 22
Set the photo quality 23
Your preferences 24
8 REPLACEMENT OF CONSUMABLES 25
9 MAINTENANCE 26
Cleaning the print head 26
Paper jam 27
Problems 28
Error messages 29
Technical data 31
10 GARANTEE 32

- II -

ENGLISHFRANÇAIS
DEUTSCHESPAÑOLITALIANONEDERLANDS
- 1 -
1 WELCOME
You have just acquired a SAGEM PHOTO EASY 255 printer, and we thank
you for choosing our product. With this high quality printer you can get the
most out of your digital photos. In a few simple steps you can produce photo
prints identical to those from a professional developer, for your personal use
or to share with friends and family.
The easy-to-follow steps in this user guide will walk you through:
• Switching on your PHOTO EASY 255 printer.
• Printing photographs stored on a memory card.
• Printing photographs transferred from a GSM mobile phone, from a
camera in DPOF or Pictbridge mode, or an optional Bluetooth peripheral.
• Installing the image processing software and printer driver on a PC.
• Maintenance and troubleshooting of your PHOTO EASY 255 printer.
• The CD-ROM included with your kit contains an additional guide with
instructions for using the image processing software and printer driver on
your PC.
- 2 -
S AFETY INSTRUCTIONS AND RECOMMENDATIONS
• Do not install your PHOTO EASY 255 printer in a humid room
(bathroom, laundry, kitchen, etc.), or within 1.50 m of a tap or water
source, or outside. The printer should be operated within an ambient
temperature range of 10 °C to 35 °C.
• Do not install your printer in a location where there is a noticeable
amount of dust floating in the air. Such dust can degrade the print quality
of your photos.
• Only the power supply provided with the printer should be used. Connect
this to the mains in accordance with the installation instructions in this
user guide and the information on the identification label affixed to the
power supply (voltage, current, mains frequency). As a precaution, in
case of danger, the mains adapters act as a disconnecting mechanism for
the 230V power supply. They should be placed near the device and
should be easily accessible.
• Never open the cover of the film cartridge compartment during
printing. This could break the film and cause printer malfunction.
• Only use SAGEM consumables, if not you are likely to damage the
equipment and invalidate the guarantee. To obtain the references of the
consumables (refer to the paragraph Replacement of consumables,
page 25).
• The CE marking certifies that the product meets the main requirements of
the European Parliament and Council directive 1999/5/CE on
telecommunications terminal equipment, regarding safety and health of
users, and regarding electromagnetic interference.
The declaration of compliance can be consulted on the site
www.sagem.com category "support", or can be requested at the following
address:
E - Customer relations department
4 rue du petit Albi - 95800 Cergy Saint-Christophe - FRANCE
ENGLISHFRANÇAIS
DEUTSCHESPAÑOLITALIANONEDERLANDS
- 3 -
2 DISCOVER YOUR PHOTO EASY 255 PRINTER
Check that the following elements are present:
1 PHOTO EASY 255 printer
2 User manual
3 CD-ROM with its applications
4 Film cartridge *
5 Photo paper (2 packs of 20 sheets)*
6 USB cable
7 Paper tray
8 Power supply unit
9 Mains cable
10 xD card adapter
*
1
1
1
11
6
6
6
66
4
2
2
2
22
7
8
8
8
88
9
9
9
99
5
*
*
3
10
10
10
10
10
S
Us e
r g
uide
Liv ret d u til isa tion
Be d
ie nu ng
san
leit un g
Ma
nua
l d el u
sua rio
Man
ual e d e
ll'u
ten te
Geb ru
iksa an wijz
ing
S
A
SA
SA
SA
SA
G
EM
G
G
G
G
EM
EM
EM
EM
PH O
PHO
PHO
PHO
PHO
T
T
T
T
TO
EA SY
15
5
O
O
O
O
EA
EA
EA
EA SY
SY
SY
SY 155
155
155
155
depending on model

- 4 -
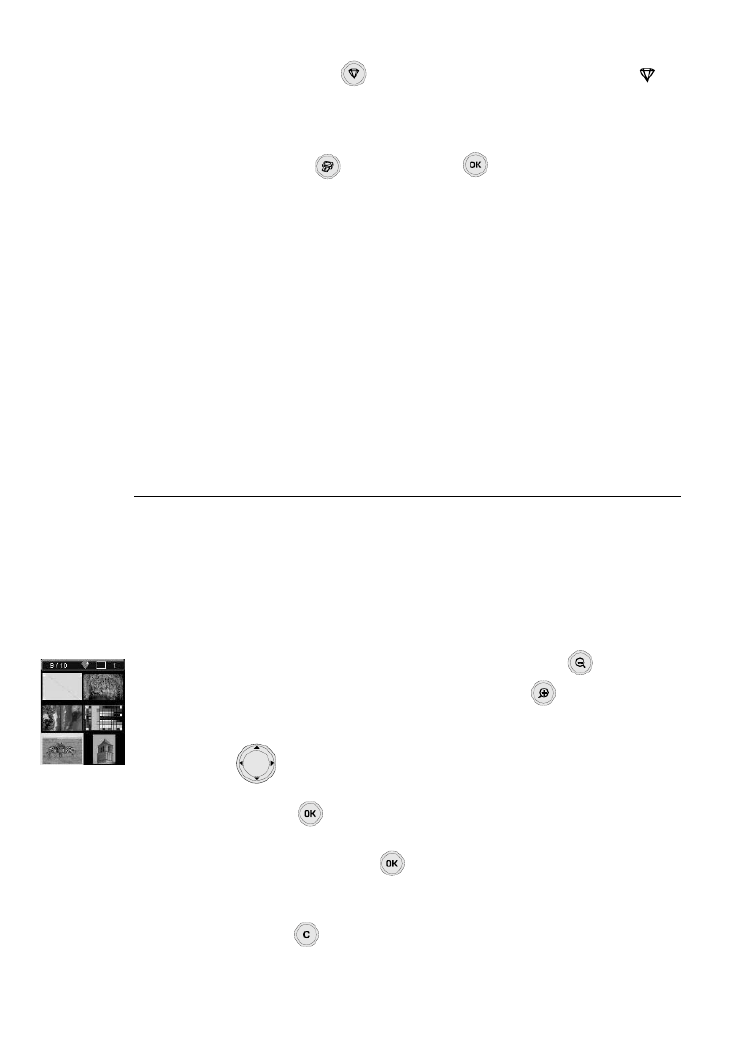
3 THE USER INTERFACE
The user interface enables you to:
• Select photos one by one or switch over to mosaic mode (6 photos
displayed on screen),
• Print a photo directly,
• Activate auto improvement before printing a photo,
• Set the "Format", "Preferences" and "Image settings" parameters
according to your needs,
• Select several photos and choose a different number of copies for each
photo to be printed,
• Zoom onto a photo and print it.
Description of the user interface:
1. Mains lamp
2. On/Off button
3. Menu access button
4. Cancel button (C)
5. Zoom - and mosaic mode activation button
6. CRYSTAL IMAGE button (auto print quality improvement)
7. Print button
8. Confirm button (OK)
9. Zoom + button
10.Browser

ENGLISHFRANÇAIS
DEUTSCHESPAÑOLITALIANONEDERLANDS
- 5 -
The visual interface
All the valid photos are displayed on the screen; use the or buttons to scroll
through them:
The following information is available on the screen:
1. Photo selected
2. Number of the photo selected
3. Total number of valid photos contained in the memory card or connected
source
4. Auto improvement function icon
5. Print format
6. Number of the sheet to be printed
7. Number of copies of the photo
8. Photo filename
9. Date when the photo was taken in Year/Month/Day format
10.Add a copy, button
11.Remove a copy, button
X1
1
1
1
11 3
3
3
33 4
4
4
44 5
5
5
55
2
2
2
22
8
8
8
88
7
7
7
77
11
11
11
11
11
10
10
10
10
10
9
9
9
99
6
6
6
66

- 6 -
4 PREPARE YOUR PHOTO EASY 255 PRINTER
C ONNECT THE MAINS SUPPLY
Remark : When installing your printer near a wall or some other object, keep an open space
of at least 4 inches at the back of the printer, to make sure the movement of the
sheet of paper being printed is not obstructed.
Please refer to the safety instructions at the beginning of this user guide
before making any connections.
Insert one end of the mains lead into the corresponding socket of the
power supply.
Connect the power supply prug to the printer, pushing it in fully as
shown in the illustration below.
Plug the other end of the power supply mains lead into a wall socket.
Press the On/Off button until the red light comes on.
The language selection screen appears when you switch the printer on
for the first time. Use the browser's or keys to select the language
you want and press the key to confirm.
The S and the message "Waiting for memory card or
other image source" are displayed on the screen.

ENGLISHFRANÇAIS
DEUTSCHESPAÑOLITALIANONEDERLANDS
- 7 -
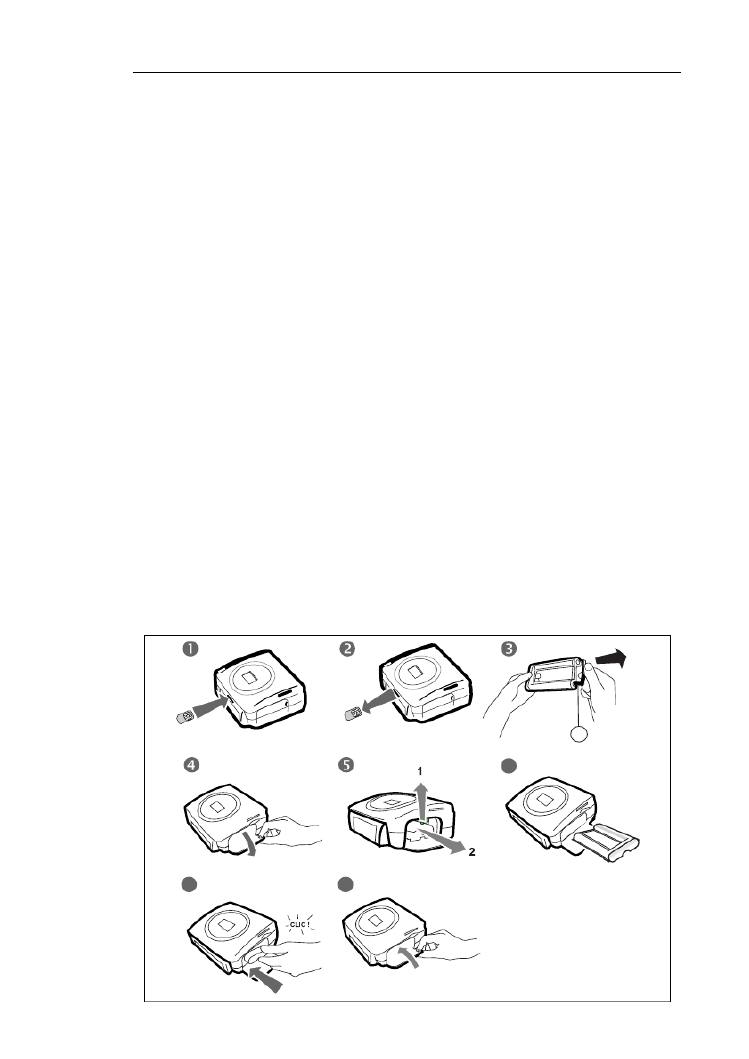
F IRST RIBBON INSTALLATION
Remark : Use DSR400 or DSR400T consumables only. These are specially designed to
provide you with optimum print rendering.
Switch on the printer. Wait 10 seconds for the printhead to lift, then:
1. Open the external flap located on the right-hand side of the printer.
2. Remove the protective foam.
3. Take the new ribbon out of its packaging and make sure that the film is
stretched after removing the card (A).
4. Install the ribbon in the position shown in the illustration below.
5. Lift the locking lever and push in the film cartridge until it touches the
back of the compartment the locking lever must be locked after
insertion.
6. Close the external flap.
A
6
6
6
66

- 10 -
Warning - Protect consumable items against prolonged exposure to light,
humidly, heat and dust. Respect the operation conditions set out (refer to the
paragraph Technical data, page 31). Only use SAGEM brand consumable
items designed for this printer.
Warning - Make sure that a previously printed photograph has not been
slipped inadvertently into a packet of blank pages; this could damage the
ribbon of your printer.

ENGLISHFRANÇAIS
DEUTSCHESPAÑOLITALIANONEDERLANDS
- 11 -
5 TRANSFERRING YOUR IMAGES
I NSERT A MEMORY CARD
Warning - The memory cards do not enter fully in the reader slot.
DO NOT USE FORCE UNDER ANY CIRCUMSTANCES.
Warning - Printing of picture by ascending order relatively to the date of the
pictures on the memory board will be achieved if parameters "dates and hour"
have been set on your camera before the catch of pictures. Otherwise pictures
will be read and printed in a random order.
Card Slot Location
Smart Media
(SM) Left
Memory Stick
(MS) Left
Standard
Digital
(SD)
Left
Multi Media
Card
(MMC)
Left

ENGLISHFRANÇAIS
DEUTSCHESPAÑOLITALIANONEDERLANDS
- 13 -
The message "Infrared transfer - Please wait" blinks on the printer screen
throughout the transfer operation.
You can now:
• Start printing the transferred photograph, after setting the print format
and number of copies if required.
• Transfer another photograph from your GSM mobile phone camera,
which will be added to those already stored in the printer. At the end of
each transfer, the total number of photographs stored is displayed on the
printer screen (the one with the highest number being the last one
transferred).
• The same operations as described in the previous chapters can now be
performed before starting to print the photographs: (selecting the
photographs to be printed, selecting the format, selecting the number of
copies).
After all photographs transferred from your GSM mobile phone camera have
been printed, the SAGEM PHOTO EASY 255 printer screen displays the
information that was on the screen just before you started the print job.
You can now:
• Start another print job, after selecting different parameters (photograph
number, format, number of copies) if required.
• End the transferred photograph processing. To do this, hold the key
down for 3 seconds.
U SING A CAMERA IN DPOF MODE
This function lets you select the photographs to be printed on your camera,
then print them on the SAGEM PHOTO EASY 255 printer from a memory
card. Your camera must comply with the DPOF (Digital Print Order Format)
standard. Refer to your camera documentation to find out if it is compatible
with this standard.
Select the required photographs on the camera (follow the instructions in the
documentation of your camera).
Switch the printer on. Place the memory card into its slot. The following
message is displayed on the screen "Print the camera DPOF selection? - C
: No - OK : Yes".

- 14 -
Start printing by pressing the key.
To exit DPOF mode, press the key.
P RINT STARTING FROM A BLUETOOTH PERIPHERAL
( )OPTIONAL
The adapter of Bluetooth (optional equipment) printer is a fast and effective
solution to pass from a telegraphic connection to a connection without wire.
The adapter makes it possible to transform printing SAGEM PHOTO EASY
255 into Bluetooth receiver thus authorizing equipment equipped with
technology Bluetooth like the personal assistants, the office computers,
portables or others the impression of photographs.
Ensure that all hardware units are powered. Never force installation of
connectors on hardware, as the cable and the connector could be damaged.
Connect the Bluetooth adaptor (optional equipment) to the USB port (A)
of your SAGEM PHOTO EASY-255 printer.
Identification among hardware units is automatic.
Warning - The size of the photo or photos to be transferred to the SAGEM
PHOTO EASY-255 printer must be less than 600 Kbytes. The photo format
required is the JPEG format. An error message "Wireless memory full" will
A

ENGLISHFRANÇAIS
DEUTSCHESPAÑOLITALIANONEDERLANDS
- 15 -
be displayed when the maximum storage capacity is reached.
To transfer new data to the SAGEM PHOTO EASY-255 printer, you must
clear the memory. To do this, press and hold the key for 3 seconds .
When the transfer is complete, the following information is displayed on the
screen "Bluetooth transfer - Please wait"
You can now:
• Start printing the transferred photograph, after setting the print format
and number of copies if required.
• Transfer another photograph, which will be added to those already stored
in the printer. At the end of each transfer, the total number of photographs
stored is displayed on the printer screen (the one with the highest number
being the last one transferred).
Remark : the following message is displayed if the EASY PHOTO 255 printer memory is
full "Wireless memory full".
C )ONNECT A PC (PERSONAL COMPUTER
Your kit includes an installation CD-ROM containing a printer driver, image
processing software.
Make sure that your PC is compatible with the requirements as specified :
PC configuration required:
Pentium or equivalent,
OS : Windows 98 SE / 2000 / Me / XP,
128 MB DRAM or more,
150 MB available on hard disk,
USB port available.

- 16 -
Install the software
Insert the CD-ROM in the drive to start installation. A command window
appears. Follow the instructions displayed on the screen.
If the installation program does not start automatically, you can start it by
double-clicking on the " " file located in the CD-ROM rootsetup.exe
directory.
The SAGEM PHOTO EASY 255 software is installed in three steps: running
the Install program, restarting the computer, and performing the final printer
installation.
Do not connect the printer to the PC before installing the printer driver. After
you have installed the software, a message will be displayed asking you to
restart the PC. After restarting you can connect the printer to the PC.
The CD-ROM contains an installation manual which includes detailed
operating instructions for the printer driver. Refer to this manual for further
information.
Remark : The B/W print option is not available in Windows 98.
Connect your printer
Make sure that both the PC and the printer are switched on. Never apply force
when plugging in connectors into the equipment as this could damage both the
cable and the connector.
Connect the USB cable to a USB port on your PC.
Connect the other end of the USB cable on the SAGEM PHOTO
EASY-255 printer to the USB port (B)..
B

ENGLISHFRANÇAIS
DEUTSCHESPAÑOLITALIANONEDERLANDS
- 17 -
Recognition between the two devices is automatic
P B )RINT FROM A CAMERA (PICT RIGDE MODE
Your printer PHOTO EASY 255 SAGEM supports the standard PictBrigde,
it thus allows the impression of photographs starting from cameras compatible
with this standard.
Read the documentation of the camera to check compatibility with the
PictBrigde standard and to check the connection with the printer.
Start PictBrigde mode printing
Check that camera is set up in PictBrigde mode.
Connect the USB cable to the USB port (A) on the PHOTO EASY 255
printer.
Once the analysis and recognition phase is complete, a screen is
displayed indicating PictBridge mode.
The CRYSTAL IMAGE print quality improvement function is
activated by default. Press the key to remove it.
When the photo is transferred, printing starts automatically and the green
lamp flashes.
Remove the USB cable to exit PictBridge mode.
A

- 18 -
In PictBridge mode, your SAGEM PHOTO EASY-255 printer supports the
following functions:
Printing a photo.
Selecting photos and printing them several times on the same paper.
Printing from a DPOF-standard file.
Monitoring printing and especially the beginning, progress and end of
the printing process. Also, error messages likely to occur (no paper,
paper jam, end of ribbon, system error).
Your SAGEM PHOTO EASY-255 printer does not support the following
functions:
Image cropping.
Choosing a type of paper.
Providing additional data (for example, date and time), in addition to the
photo to be printed.

ENGLISHFRANÇAIS
DEUTSCHESPAÑOLITALIANONEDERLANDS
- 19 -
6 PRINT YOUR PHOTOGRAPHS
Your SAGEM PHOTO EASY 255 printer is designed to be used with or
without a computer. This chapter describes printer operation without a
computer.
Refer to the technical data table at the end of thi user manual to check whether
your memory card is compatible with the printer. In the event of
incompatibility, use a computer and the image processing software supplied
on the CD-ROM.
Warning - Small sized images, less than 76,800 pixels, cannot be printed from
memory cards. On the other hand, these photographs may be printed from a
PC or by means of a wireless IR link (or Bluetooth optional equipment).
Switch your printer on. Insert or connect a source (memory card, camera in
DPOF or PictBridge mode, GSM phone with an InfraRed or Bluetooth
optional peripheral device).
After the analysis and loading phase, the last photo saved is displayed on
screen.
Use the browser's or keys to move from one photo to another.
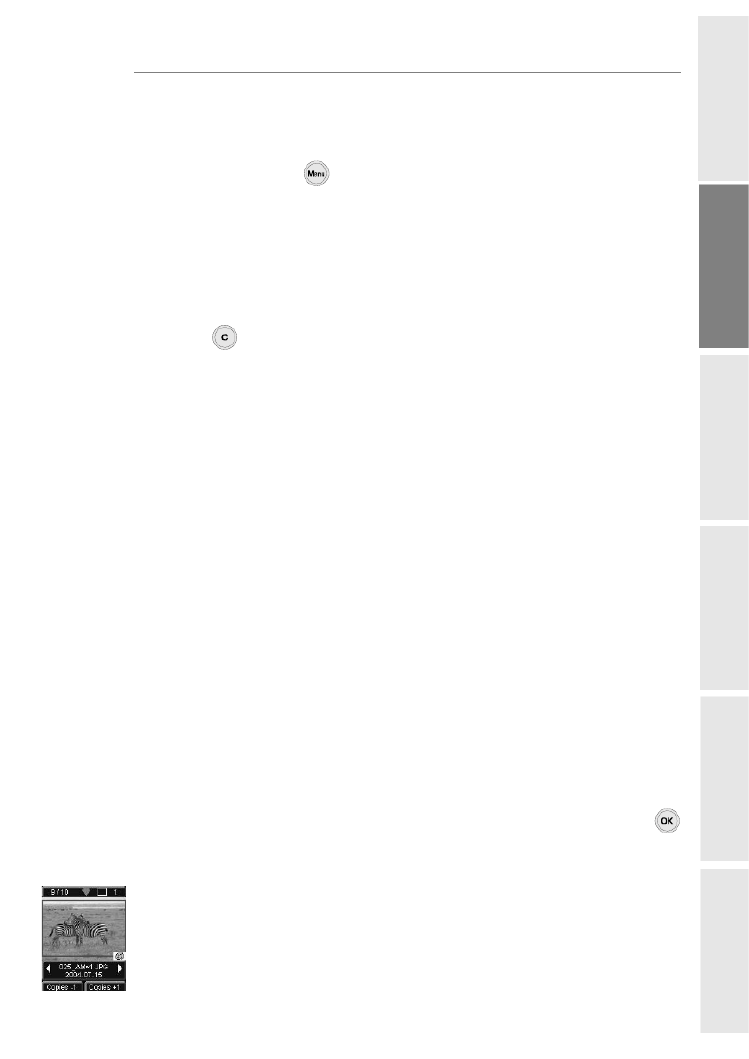
PRINT
Press the key to display the Print menu.
In this menu you may select:
The photo that is displayed on the screen select: Print current photo,
The shopping trolley you selected earlier : select Print selection (refer to
the paragraph Create your shopping basket, page 20),
All the photos recognised on the source : select Print all,
To print all the photos in miniature format with twenty photos per sheet
of paper, select Print index.
Make your selection using the browser's
or keys.
Press the CRYSTAL IMAGE button to improve the quality of your
photo. The icon is displayed on screen when this function is active.
Check that you have enough paper in the drawer. Press the button again
or the button to start printing.

- 20 -
Tips - The CRYSTAL IMAGE process developed by e works on each
photo individually to use its full colour potential and the definition of your printer.
e highly recommends that you use this function.
Tips - You may remove the edges from a series of photos by placing several sheets
one on top of the other.
Warning - When all the photos are printed, do not tear off these edges in one
movement ; fold the edges along the dotte before removing thed lines several times
edges gently.
Idea - The pre-printed postcard format on the back lets you send your photo quickly
to friends or family.
C REATE YOUR SHOPPING BASKET
You may store any selections of series of photos you make, with different
print quantities for each one. To do so, proceed as follows:
There are 2 modes to browse between photos:
Full-screen mode to browse image by image,
Mosaic mode, accessed by pressing the key, lets you browse more
quickly through 6 images (the key then lets you return to full-screen
mode).
The browser lets you move from one image to another.
Press the key to put the photo displayed into you shopping basket.
Press the key again, once for each copy you want.
Press the key to remove the selected photo or to remove a copy from your
shopping basket.
Repeat the operation above for each photo you want to add to your shopping
basket.
Once selected, the quantity is displayed preceded by an X in the top right hand
corner for each photo.
Press the key to display the Print menu.

ENGLISHFRANÇAIS
DEUTSCHESPAÑOLITALIANONEDERLANDS
- 21 -
Make your selection using the browser's or keys.
Check that you have enough paper in the dawer. Press the button again or
the button to start printing.
ZOOM
Select the photo you want using the browser's or keys.
Press the key to activate zoom mode. Use the browser's keys to or
select Portrait or Landscape and confirm by press the or key.
Adjust the size of the zoom you want using the or keys. The zoom
may be adjusted from 100% to 300% with the following ranges 100%, 120%,
140%, 160%, 200%, 240% and 300%.
Use the browser's keys to move to the part of the photo to be enlarged.
Press the key to preview the result.
The enlarged photo is displayed on screen. Press the key to confirm or the
key to cancel.
The print area is represented on screen by a red rectangle. Press the key
for each copy you want; the number of copies is displayed in the top right hand
corner of the photo.
Remark : This photo may be printed immediately or entered into a shopping basket selection
to be printed later.

- 22 -
7 CHOOSING YOUR OWN PRINTER SETTING
There are several parameters that you may set according to how you use your
printer. Press the key to set the paper formats, the image quality and your
own preferences.
FORMATS
This function lets you select a paper format to suit your own needs, for
example, to print passport photos selected the 8 photos per page format.
Press the key, and select the Format menu using the browser's or
keys. Press the key to confirm.
You may print your photos according to the following predefined formats :
• Print your photo in 10 x 15 cm Full Page format with no edging .
• Print your photo in 10 x 15 cm format With Margins .
• Avec Margins .Print your photo in Full Page 4/3 format .
• Print 2 photos per page .
• Print 4 photos per page .
• .Print 8 photos per page .
• Print 20 photos per page (contact sheet or index).
• Print 2 pages per image (the photo is printed over 2 pages).
• Print 4 pages per image (the photo is printed over 4 pages).
Select the paper format you want using the browser's or keys. Press the
key to confirm and return to browse mode.

ENGLISHFRANÇAIS
DEUTSCHESPAÑOLITALIANONEDERLANDS
- 23 -
S ET THE PHOTO QUALITY
This menu lets you adjust the colour parameters for the selected photo
according to your own requirements.
Press the key and select the Image settings menu using the browser's
or keys.
Select the parameter to be modified using the browser's p or q keys. The
browser's or keys are used to modify the value of the selected parameter.
The key lets you exit the current image setting screen without confirming
the modifications. You then return to the previous menu.
You may set:
• The Contrast of the photo between -2 et +2 ; use the browser's or
keys to make your selection.
• The Brightness of the photo between -2 et +2 ; use the browser's or
keys to make your selection.
• The Sharpness of the photo between -2 et +2 ; use the browser's or
keys to make your selection.
• The Effect of the photo: None for no settings, B&W to print a photo in
black and white, Sepia to print a photo in yellow, magenta and cyan over
three sheets of paper. Use the browser's or keys to make your
selection.
• The Colour of the photo between -2 et +2 ; use the browser's or keys
to make your selection.
• A Frame around your photo : No for no frame, Other frames to print a
predefined frame. Use the browser's or keys to make your selection.
When you have made all the modifications you want, press the key to
confirm and return to browse mode.
An icon is displayed at the bottom right of the photo to indicate that specific
settings have been made. The modifications made are only valid for the
selected photo.
Warning - If you press the key while you are setting the parameters you
will automatically return to browse mode without taking any modifications
into account.

- 24 -
Y OUR PREFERENCES
This menu lets you modify the printer's default settings.
Press the key and select the Preferences menu using the browser's or
keys. Press the key to confirm.
Select your preference using the browser's or keys and press the
key to confirm.
You may select:
• The Language which will be used in the screens. Use the browser's or
keys to select between Français, Español, Português, Deutsch,
Nederlands, Italiano and English. Press the key to confirm.
• The Format preference 1, use the browser's keys to select the or
paper format you want. Press the key to confirm.
• The Copies preference 1, use the browser's or keys to select the
number of copies you want, from between 1 and 20 photos. Press the
key to confirm.
• The Image preference 1 menu lets you modify the settings for the
images, refer to the paragraph Set the photo quality, page 23 to modify
these parameters. To modify the automatic image improvement, select the
Auto improvement command and press the key to confirm.
• The After printing lets you keep or erase the selection stored in the
memory. Using the browser's keys select the or Keep selection or
Erase selection command and press the key to confirm.
• The screen's LCD contrast between -8 and +8. Use the browser's or
keys to make your selection and press the X key to confirm.
• The Restore param. Menu lets you return to the original values. Press
the key to confirm and the parameters will be reset after a few
seconds.
1. These preferences are taken into account each time a new card is inserted.

ENGLISHFRANÇAIS
DEUTSCHESPAÑOLITALIANONEDERLANDS
- 25 -
8 REPLACEMENT OF CONSUMABLES
The consumable items used with the SAGEM PHOTO EASY 255
printer (film cartridge, paper) are SAGEM (PLC) brand products.
Consumables may be purchased in all big stores in the photography or
printer sections but also on out internet site www.sagem.com or by using
the consumables order form supplied with your printer.
Use of any consumable items other than SAGEM (PLC) brand products
may result in the loss of the printer's guarantee.
DSR400 consumable item kit references:
(ribbon + paper for 40 photos): ref. 251 559 421
DSR400 consumable kit references:
(ribbon + paper for 120 photos):ref. 251 559 434

- 26 -
9 MAINTENANCE
C LEANING THE PRINT HEAD
Continuous lines across the length of your photographs may be caused by dirt
particles stuck to the printhead.
You will need a methylated alcohol
1 based cleaning product and some
off-the-shelf cotton tips ("Q-tips").
Switch off your printer, disconnect the main cables and wait for five
minutes; since the print head operates at a high temperature, there is a
risk of burning if you touch it.
1. Open the cartridge flap. Press on the locking lever and pull out the film
cartridge.
2. Pull out the paper tray.
3. Turn the printer upside down to remove the lower hatch.
4. Clean the heating line of the print head carefully using a cotton bud.
5. Replace the lower hatch, turn the printer right side up, connect the mains
cable and switch on the printer.
Warning - Never touch the print head with your fingers or any object that
might scratch it.
1. Do not use corrosive chemicals, they may damage your printer.
1
1
1
11 2
2
2
22 3
3
3
33
4
4
4
44 5
5
5
55

ENGLISHFRANÇAIS
DEUTSCHESPAÑOLITALIANONEDERLANDS
- 27 -
Replace the film cartridge. Take care that the film is taut before inserting
the cartridge into its compartment. Check that the locking lever is pushed
down correctly and close the flap.
Push the paper tray back into place until the locking system clicks.
P APER JAM
Follow this procedure if a sheet becomes stuck in the printer and cannot
simply be pulled out:
Switch off your printer.
Turn the printer upside down.
Remove the lower cover.
Gently and carefully remove the sheet causing the jam. Under no
circumstances touch the printhead.
Replace the lower cover and turn the printer right side up.
Switch on the printer and reconnect the mains cable.
Warning - Never use objects that could damage the printer (scissors,
screwdriver, paper cutter, etc.).
ENGLISHFRANÇAIS
DEUTSCHESPAÑOLITALIANONEDERLANDS
- 29 -
E RROR MESSAGES
After any intervention on your printer, do not forget to press the key to
restart the current print job.
Error
displayed
Error
Type Error type Action
Paper tray
empty
Resolve error,
then press
PRINT key to
resume printing
Paper
Check that the paper has been
correctly inserted in the loading
tray.
Paper jam
Resolve error,
then press
PRINT key to
resume printing
Paper
Remove any paper jammed in
printer (do not reuse this sheet of
paper).
Check ribbon
Resolve error,
then press
PRINT key to
resume printing
Ribbon Insert a new film cartridge or
replace the current one.
End of ribbon
Resolve error,
then press
PRINT key to
resume printing
Ribbon Replace the film cartridge with a
new one.
Ribbon error
Resolve error,
then press
PRINT key to
resume printing
Ribbon
Check that the film cartridge is
correctly inserted.
If error persists: replace the
cartridge.
Cassette error
Resolve error,
then press
PRINT key to
resume printing
Ribbon
Check that the cartridge is correctly
inserted and that the locking lever is
locked.
Insert ribbon
parameter card
Resolve error,
then press
PRINT key to
resume printing
Ribbon
The selected number of photos is
greater than the remaining ribbon
capacity to print all photos.
Card empty Remove card SmartCard
The smart card has already been
used. Remove the inserted card and
insert a valid smart card.
Counter
saturated Remove card SmartCard The authorized print quantity has
been reached.
Card
unreadable (01) Remove card SmartCard
Data transfer error. Remove the
inserted card and insert a valid
smart card.
Card
unreadable (02) Remove card SmartCard
Data transfer error. Remove the
inserted card and insert a valid
smart card.

- 30 -
Erreur
affichée
Correction
affichée
Type
d’erreur Action
Card
unreadable (03) Remove card SmartCard
Data transfer error. Remove the
inserted card and insert a valid
smart card.
Consumable
not compliant
(01)
Remove card Smart Card Mechanical problem.
Consumable
not compliant
(02)
Remove card Smart Card Ribbon problem.
Consumable
not compliant
(03)
Remove card Smart Card Brand name not dentified.
Consumable
not compliant
(04)
Remove card Smart Card Colorimetry error.
Consumable
not compliant
(05)
Remove card Smart Card Type (master/pack) unknown.
File damaged
Unrecoverable
error, abort the
operation and try
again
JPEG
decompression
The JPEG file contains an
unsupported feature.
Format not
supported
Unrecoverable
error, abort the
operation and try
again
Transfer error Photograph to be transferred is not
in JPEG format.
Transfer error
Unrecoverable
error, abort the
operation and try
again
Transfer error
Error during transfer of
photographs from GSM mobile
phone camera. Restart transfer from
the GSM phone. Check that both
devices are facing each other.
Wireless
memory full
Unrecoverable
error, abort the
operation and try
again
Transfer error
Switch off printer, wait 30 seconds
and restart. If error persists, contact
your retailer.
System error Please contact
your dealer Other
Switch off printer, wait 30 seconds
and restart. If error persists, contact
your retailer.

ENGLISHFRANÇAIS
DEUTSCHESPAÑOLITALIANONEDERLANDS
- 31 -
T ECHNICAL DATA
PC configuration required:
Pentium or equivalent,
OS : Windows 98 SE / 2000 / Me / XP,
128 MB DRAM or more,
150 MB available on hard disk,
USB port available.
- - - - - - - - - - - - - - - - - - - - - - - - - - - - - - - - - - - - - - - - - - - - - - - - - - - - - - - - - - - - - - - - -
Device name : SAGEM PHOTO EASY 255
Print method : Dye-diffusion thermal transfer
Resolution : 300 x 300 dpi
Colours : 16.7 million continuous
Print speed : Less than 120 seconds per photo (not
including data
transfer)
Interface : Memory cards, type Compact Flash
(support type I & II), SM / MS / MMC /
SD / xD (with adapter),
USB port version 1.1.
Storage of photographs
transferred from a GSM
phone camera : Up to 500 kilobytes
Image resolution supported : Up to 12 million pixels
Consumable items : Photo-quality paper. Film cartridge with
three colours (yellow, magenta, cyan) and
protective coating,
40 print operations per cartridge.
Paper size : 101 X 152,4 mmavailable in packets of
20 sheets
Paper tray : By automatic loader, capacity 20 sheets
Mains supply : 230 V AC 50/60 Hz
Approval : EC
Operating conditions : 10 °C to 35 °C, 30 % to 85 % humidity
Size : 201 x 174 x 94 mm excluding paper tray
Weight : 1.5 kg (except power supply unit)
Power consumption : in standby: 7,6 W
in print mode: 70 W
All data are provided for reference purposes only. SAGEM (PLC) reserves the
right to make any changes without prior notice.

- 32 -
10 GARANTEE
GUARANTEE (UK Terms and Conditions)
In order to apply the guarantee, you should contact your dealer. Proof of pur-
chase will be required. Should malfunctioning arise, the dealer will advise you
what to do.
If you bought your equipment from SAGEM directly, the following shall apply :
ASAGEM undertakes to remedy by repair, free of charge for labour and replacement parts, any defects in the equipment
during a period of twelve (12) months from the date of original delivery of the Equipment, where those defects are a result
of faulty workmanship.
During this twelve month guarantee period, the defective equipment will be repaired free of charge; the
customer must however return the defective equipment at his/her own expense, to the address given by
SAGEM After Sales Department, the phone number of which can be found on the delivery slip. Unless
the customer has concluded with SAGEM a maintenance contract in respect of the equipment which
specifically provides for repairs to be carried out at the customer’s premises, the repairs will not be carried
out on the equipment at the customer’s premises.
The following sentence applies to purchases of equipment for the customer’s trade, business or
profession. Except as otherwise expressly provided in this Document and to the extent permitted by law,
SAGEM makes no representations or warranties, express or implied, statutory or otherwise, and to such
extent, all terms and conditions implied by law are hereby excluded.
This guarantee does not affect the Customer’s statutory rights.
B Exclusions From Guarantee
SAGEM shall have no liability under the guarantee in respect of :
• damage, defects breakdown or malfunction due to :
- failure to properly follow the installation process and instructions for use; or
- an external cause to the equipment (including but not limited to, lightening, fire, shock or
water damage of any nature); or
- modifications made without the written approval of SAGEM SA; or
- a failure or neglect to maintain the equipment or inappropriate maintenance; or
- unsuitable operating conditions, particularly of temperature and humidity; or
- repair or maintenance of the equipment by persons not authorised by SAGEM; or
• wear and tear from normal daily use of the equipment and its accessories
• damage due to insufficient or bad packaging of equipment when returned to SAGEM
• supply of new versions of software
• work on any equipment or software modified or added without the prior written consent of
SAGEM
• malfunctions not resulting from the Equipment or from software installed in user workstations for
the purpose of use of the equipment
• communication problems related to an unsuitable environment, including :
- problems related to access and/or connection to the Internet such as interruptions by access
networks or malfunction of the line used by the subscriber or his correspondent
- transmission faults (for example poor geographical coverage by radio transmitters,
interference or poor line quality)
- the local network fault (wiring, servers, workstations) or the failure of the transmission
network
• the normal servicing (as defined in the user guide supplied with the equipment) as well as
malfunctioning due to servicing not being carried out, servicing costs are in any event always
borne by the customer.
CIn the cases set forth in § B) as well as after expiry of the twelve month guarantee period, the customer must ask SAGEM
for an estimate, and he/she must accept the estimate and agree to pay the charges mentioned in it before returning the
equipment to SAGEM. The repair and delivery costs will be invoiced to the customer.
The foregoing shall apply unless otherwise agreed in writing with the customer and only for the UK. If
any provision of this guarantee shall be held to be in whole or in part invalid or illegal due to an
obligatory rule applicable to consumers pursuant to their national legislation, such invalidity or
illegality shall not impair or affect the remaining provisions or parts of this guarantee.

FRANÇAISDEUTSCHESPAÑOLITALIANO
NEDERLANDS ENGLISH
- I -
SOMMAIRE
BIENVENUE 1
Recommandations et consignes de sécurité 2
DÉCOUVREZ V I EOTRE MPRIMANTE PHOTO ASY 255 3
L’INTERFACE UTILISATEUR 4
PRÉPAREZ VOTRE IMPRIMANTE PHOTO EASY 255 6
Alimentation secteur 6
Première installation du ruban 7
Changez le ruban 8
Chargement du papier 9
T RANSFÉREZ VOS IMAGES 11
Insérez une carte mémoire 11
Transférez des photos depuis un GSM photo 12
Utilisez un appareil photo en mode DPOF 13
Connectez un périphérique Bluetooth (optionnel) 14
Connectez un PC (Personal Computer) 15
Connectez un appareil photo en mode PictBrigde 17
I MPRIMEZ VOS PHOTOS 19
Imprimez 19
Créez votre panier 20
Réalisez un agrandissement (zoom) 21
R ÉGLEZ VOTRE IMPRIMANTE SELON VOS BESOINS 22
Les formats 22
Réglez la qualité des photos 23
Vos préférences 24
R EMPLACEMENT DES CONSOMMABLES 25
ENTRETIEN 26
Nettoyage de la tête d'impression 26
Bourrage papier 27
Incidents 28
Messages d’erreurs 29
Caractéristiques techniques 31
C ONDITIONS DE GARANTIE 32

- II -

FRANÇAISDEUTSCHESPAÑOLITALIANO
NEDERLANDS ENGLISH
- 1 -
1 BIENVENUE
Vous venez d'acquérir une imprimante PHOTO EASY 255 et nous vous
remercions de la confiance que vous nous accordez. Avec cette imprimante de
haute qualité vous pourrez profiter pleinement de vos photos numériques. Par
des étapes très simples vous produirez des impressions de qualité identique
aux laboratoires spécialisés pour votre utilisation personnelle ou pour les
partager avec votre famille, vos amis ou vos collègues.
Ce présent livret d'utilisation vous guidera par des étapes simples :
• Mettez en marche votre imprimante PHOTO EASY 255.
• Imprimez les photos stockées sur une carte mémoire.
• Imprimez les photos transférées depuis un GSM photo, un appareil photo
en mode DPOF ou Pictbrigde ou un périphérique optionnel Bluetooth.
• Installez le logiciel de traitement d'image et le pilote d'impression sur un
PC.
• Entretenez et résolvez vos problèmes sur l'imprimante PHOTO
EASY 255.
• Une documentation additionnelle concernant l'utilisation du logiciel de
traitement d'image et le pilote d'impression PC est disponible sur le
CD-Rom fourni dans votre coffret, reportez-vous à cette documentation.

- 2 -
R ECOMMANDATIONS ET CONSIGNES DE SÉCURITÉ
• Ne pas installer votre imprimante PHOTO EASY 255 ni dans une pièce
humide (salle d'eau, salle de bain, buanderie, cuisine, etc..) à moins de
1,50 m d'un point d'eau ni en extérieur. Votre imprimante doit être utilisée
à une température ambiante comprise entre 10 °C et 35 °C.
• Ne pas installer votre imprimante dans un endroit où il y aurait des
poussières en sustentation dans l’air, ces poussières pourraient dégrader
la qualité d’impression de vos photos.
• Utilisez exclusivement le bloc secteur fourni, raccordez celui-ci sur le
secteur conformément aux instructions d'installation de ce livret et aux
indications portées sur l'étiquette d'identification apposée sur celui-ci
(tension, courant, fréquence du réseau électrique). Par précaution, en cas
de danger, les adaptateurs secteur servent de dispositif de sectionnement
de l'alimentation 230 V. Ils doivent être situés à proximité de l'appareil et
être aisément accessibles.
• Ne jamais ouvrir la trappe du ruban en cours d'impression, vous
risquez la rupture du film et par la suite un dysfonctionnement de
votre imprimante.
• Utilisez seulement les consommables de marque e et
exclusivement ceux-ci sinon vous risquez d'endommager l'appareil et de
perdre la garantie, pour connaître les références des consommables
(reportez-vous au paragraphe Remplacement des consommables,
page 25).
• Le marquage CE atteste de la conformité du produit aux exigences
essentielles de la directive 1999/5/CE du Parlement et du Conseil
Européen concernant les équipements terminaux de télécommunication,
pour la sécurité et la santé des usagers, pour les perturbations
électromagnétiques.
La déclaration de conformité peut être consultée sur le site
www.sagem.com rubrique "Support" ou peut être demandée à l'adresse
suivante :
E - Customer relations department
4 rue du petit albi - 95800 Cergy Saint-Christophe - FRANCE

- 4 -
3 L’INTERFACE UTILISATEUR
Elle vous permet de :
• choisir des photos une à une ou de passer en mode mosaïque (6 photos à
l’écran),
• lancer l’impression d’une photo directement,
• activer l’amélioration automatique de la photo en vue de son impression,
• régler les paramètres "Format", "Préférences" et "Réglages images" en
fonction de vos besoins,
• sélectionner plusieurs photos et de choisir un nombre d’exemplaires
différents pour chaque photo à imprimer,
• réaliser un zoom sur une photo et l’imprimer.
Descriptif de l’interface utilisateur
1. Voyant secteur
2. Touche Marche/Arrêt
3. Touche d’accès au Menu
4. Touche d’annulation (C)
5. Touche zoom - et d’activation du mode mosaïque
6. Touche CRYSTAL IMAGE (auto amélioration de la qualité
d’impression)
7. Touche d’impression
8. Touche de validation (OK)
9. Touche zoom +
10.Navigateur
FRANÇAISDEUTSCHESPAÑOLITALIANO
NEDERLANDS ENGLISH
- 5 -
L’interface visuelle
Les photos valides sont affichées à l’écran, utilisez les touches ` _ ou pour les
faire défiler.
Les informations suivantes sont disponibles sur l’écran :
1. Photo sélectionnée
2. Numéro de la photo affichée
3. Quantité totale de photos valides sur la carte mémoire ou la source
raccordée
4. Icône de la fonction auto-amélioration
5. Format d’impression
6. Nombre de feuille à imprimer
7. Nombre de copies de la photo
8. Nom du fichier de la photo
9. Date de prise de vue de la photo dans le format Année/Mois/Jour
10.Ajouter une copie, touche
11.Retirer une copie, touche
X1
1
1
1
11 3
3
3
33 4
4
4
44 5
5
5
55
2
2
2
22
8
8
8
88
7
7
7
77
11
11
11
11
11
10
10
10
10
10
9
9
9
99
6
6
6
66

- 6 -
4 PRÉPAREZ VOTRE IMPRIMANTE PHOTO EASY 255
ALIMENTATION SECTEUR
Remarque : Lors de l’installation si un mur ou tout objet se trouve à proximité, veillez à ce que
celui-ci soit éloigné d’au moins 10 centimètres par rapport à l’arrière de votre
imprimante, ceci afin de garantir la bonne circulation de la feuille de papier en
cours d’impression.
Avant d'effectuer les connexions, veuillez consulter les consignes de
sécurité placées en début du présent livret d'utilisation.
Branchez l'une des extrémités du cordon secteur sur le connecteur du
bloc alimentation prévu à cet effet.
Raccordez la prise du bloc alimentation à fond sur l'imprimante comme
indiqué sur l'illustration ci-dessous.
Branchez l'autre extrémité du cordon secteur du bloc alimentation sur
une prise secteur murale.
Appuyez sur le bouton Marche/Arrêt jusqu’à ce que le voyant rouge
s’allume.
A la première mise en marche, l’écran de réglage de la langue apparaît.
Sélectionnez avec les touches S T ou du navigateur la langue souhaitée
et appuyez sur la touche pour valider.
Le logo Set le texte "En attente de carte mémoire ou
d’une autre source" apparaissent à l’écran.

FRANÇAISDEUTSCHESPAÑOLITALIANO
NEDERLANDS ENGLISH
- 7 -
P REMIÈRE INSTALLATION DU RUBAN
Remarque : Utilisez uniquement les consommables DSR400 ou DSR400T. Ceux-ci sont
spécialement conçus pour vous apporter un rendu d’impression optimal.
Mettez l'imprimante sous tension. Attendez 10 secondes que la tête
d'impression se relève et procédez de la façon suivante :
1. Ouvrez la trappe extérieure située sur la partie droite de l'imprimante.
2. Retirez la mousse de protection.
3. Sortez le ruban neuf de son emballage et assurez-vous que le film est
tendu après avoir retiré la pièce cartonnée (A).
4. Présentez le ruban en respectant bien sa position conformément à
l’illustration ci-dessous.
5. Soulevez le loquet de fermeture vert, insérez le ruban jusqu'au fond de
son logement, le loquet de fermeture doit impérativement être fermé
après insertion.
6. Refermez la trappe extérieure.
A
6
6
6
66
- 8 -
C HANGEZ LE RUBAN
Remarque : Utilisez uniquement les consommables DSR400 ou DSR400T. Ceux-ci sont
spécialement conçus pour vous apporter un rendu d’impression optimal. A cet
effet, la carte à puce, livrée avec chaque kit consommables, doit être lue par
l’imprimante après toute installation d’un nouveau kit.
Mettez l'imprimante sous tension. Attendez 10 secondes que la tête
d'impression se relève et procédez de la façon suivante :
1. Prenez la carte PLUG N’PRINT livrée avec le ruban et le papier photo,
insérez-la dans le lecteur situé sur la face avant de l’imprimante. La
carte PLUG N’PRINT est reconnue et lue par l’imprimante, en fin de
procédure le message suivant apparaît "Transfert OK (40 ou 120),
retirez la carte".
2. Retirez la carte PLUG N’PRINT, l’affichage s’initialise avec l’écran
d’accueil.
3. Sortez le ruban neuf de son emballage et assurez-vous que le film est
tendu après avoir retiré la pièce cartonnée (A).
4. Ouvrez la trappe extérieure située sur la partie droite de l'imprimante.
5. Soulevez le loquet de fermeture vert et sortez le ruban usagé.
6. Présentez le ruban en respectant bien sa position conformément à
l’illustration ci-dessous.
7. Soulevez le loquet de fermeture vert, insérez le ruban jusqu'au fond de
son logement, le loquet de fermeture doit impérativement être fermé
après insertion.
8. Refermez la trappe extérieure.
A
6
6
6
66
7
7
7
77 8
8
8
88

FRANÇAISDEUTSCHESPAÑOLITALIANO
NEDERLANDS ENGLISH
- 9 -
C HARGEMENT DU PAPIER
1. Retirez le tiroir de l'imprimante.
2. Ouvrez un paquet de feuilles avec sa feuille de protection sur le dessus,
insérez ce dernier dans le tiroir papier en vérifiant que l’emplacement du
rectangle prévu pour recevoir un timbre postal se situe bien vers
l’extérieur du tiroir papier à savoir vers vous.
3. Retirez la feuille de protection située sur le dessus du paquet de feuilles.
4. Présentez le tiroir devant son logement de l'imprimante. Insérez le
lentement jusqu'au déclenchement du système de blocage.
Attention - Manipuler les feuilles de papier par les extrémités prédécoupées,
ne mettez jamais de doigts sur la face brillante avant l'impression.
Votre imprimante PHOTO EASY 255 est maintenant prête à imprimer vos
photos numériques.
Feuille de protection

- 10 -
Attention - Protéger les consommables contre une exposition prolongée à la
lumière, contre l'humidité, la chaleur et les poussières. Respectez les
conditions d'utilisation (reportez-vous au paragraphe Caractéristiques
techniques, page 31). N'utilisez que les consommables de marque SAGEM,
prévus pour cette imprimante. Ne mettez qu'un paquet de 20 feuilles à la fois
dans le bac papier.
Attention - Vérifier qu’une photo déjà imprimée ne se soit pas glissée par
inadvertance dans un paquet de feuilles vierges, cela pourrait endommager le
ruban de votre imprimante.

FRANÇAISDEUTSCHESPAÑOLITALIANO
NEDERLANDS ENGLISH
- 11 -
5 TRANSFÉREZ VOS IMAGES
I NSÉREZ UNE CARTE MÉMOIRE
Attention - Les cartes mémoires ne rentrent pas complètement dans la fente
de lecture. NE FORCEZ EN AUCUN CAS.
Attention - Pour réaliser une impression dans l’ordre croissant des photos
présentes sur la carte mémoire, les paramètres "date et heure" doivent être
réglés sur votre appareil avant la prise de photo. Si ce n’est pas le cas les
photos seront lues et imprimées dans un ordre aléatoire.
Carte Fente Représentation
Smart Media
(SM) Gauche
Memory
Stick (MS) Gauche
Standard
Digital
(SD)
Gauche
Multi Media
Card
(MMC)
Gauche
FRANÇAISDEUTSCHESPAÑOLITALIANO
NEDERLANDS ENGLISH
- 13 -
Le transfert démarre et pendant toute sa durée, le message "Transfert
infrarouge - Attendez SVP" clignote sur l'écran de l'imprimante.
Vous pouvez :
• Soit déclencher l'impression de la photo transférée, après avoir
éventuellement modifié le format d'impression et le nombre de copies.
• Soit transférer depuis votre GSM une autre photo, celle-ci venant
s'ajouter à celle(s) déjà stockée(s) dans l'imprimante. A la fin de chaque
transfert, le nombre total de photos stockées est indiqué sur l'écran de
l'imprimante (celle ayant le numéro le plus élevé étant la dernière
transférée).
• Vous pouvez à ce moment effectuer les opérations décrites dans les
chapitres suivants avant de lancer l'impression de ces photos (sélection
des numéros de photos à imprimer, sélection du format, sélection du
nombre de copies).
A la fin de l'impression de photos transférées depuis votre GSM photo, l'écran
de l'imprimante PHOTO EASY 255 affiche des informations présentes juste
avant de démarrer l'impression.
Vous pouvez :
• Soit déclencher une nouvelle impression, après avoir éventuellement
sélectionné d'autres paramètres (numéro de photo, format, nombre de
copies).
• Soit effacer l’ensemble des photos sélectionnées. Pour cela, pressez la
touche pendant 3 secondes.
U TILISEZ UN APPAREIL PHOTO EN MODE DPOF
Cette fonction vous permet de sélectionner les photos que vous voulez
imprimer sur votre imprimante PHOTO EASY 255 depuis votre appareil
photo. Il doit répondre à la norme DPOF (Digital Print Order Format),
consultez la documentation de votre équipement photo pour savoir s'il est
compatible avec cette norme.
Procédez à la sélection des photos désirées sur l'appareil photo en utilisant les
explications fournies dans la notice de votre appareil photo.

- 14 -
Mettez l’imprimante sous tension. Placez la carte mémoire dans la fente
adéquate. Le message suivant apparaît à l’écran "Imprimer la sélection
DPOF ? - C : Non - OK : Oui".
Lancez l’impression en appuyant sur la touche .
Pour sortir du mode DPOF appuyez sur la touche .
C )ONNECTEZ UN PÉRIPHÉRIQUE BLUETOOTH (OPTIONNEL
L'adaptateur d'imprimante Bluetooth (équipement optionnel) est une solution
rapide et efficace pour transférer sans fils les fichiers JPEG de vos
équipements dotés de la technologie Bluetooth comme les assistants
personnels, les ordinateurs de bureaux, portables ou autres l’impression de
photos.
Assurez-vous que les équipements sont sous tension. Ne forcez jamais à la
mise en place des connecteurs sur les équipements, vous risquez à la fois de
détériorer le câble et le connecteur.
Reliez l’adaptateur Bluetooth (équipement optionnel) sur le port USB
(A) de votre imprimante PHOTO EASY 255.
La reconnaissance entre les équipements est automatique.
A

FRANÇAISDEUTSCHESPAÑOLITALIANO
NEDERLANDS ENGLISH
- 15 -
Attention - La taille de la photo ou des photos à transférer dans l’imprimante
PHOTO EASY 255 doit être inférieure à 600 Koctets. Le format de la photos
doit être au format JPEG. Un message d’erreur "Mémoire interne pleine"
apparaîtra dès que la capacité maximale de la mémoire est atteinte.
Pour transférer de nouvelles données vers l’imprimante PHOTO EASY 255,
vous devrez vider la mémoire. Pour cela appuyez 3 secondes sur la
touche .
Le transfert démarre et pendant toute sa durée, le message "Transfert
Bluetooth - Attendez SVP" clignote sur l'écran de l'imprimante.
Vous pouvez :
• Soit déclencher l'impression de la photo transférée, après avoir
éventuellement modifié le format d'impression et le nombre de copies.
• Soit transférer une autre photo, celle-ci venant s'ajouter à celle(s) déjà
stockée(s) dans l'imprimante. A la fin de chaque transfert, le nombre total
de photos stockées est indiqué sur l'écran de l'imprimante (celle ayant le
numéro le plus élevé étant la dernière transférée).
Remarque : Si la mémoire de l’imprimante EASY PHOTO 255 est pleine, le message suivant
apparaît "Mémoire interne pleine".
C )ONNECTEZ UN PC (PERSONAL COMPUTER
Votre kit comprend un CD-Rom d'installation du pilote de l'imprimante, un
logiciel de traitement d'images ainsi qu'une notice d'utilisation.
Assurez-vous que votre PC est compatible avec les spécifications décrites
ci-après :
Configuration PC requise :
Pentium ou équivalent,
OS : Windows 98 SE / 2000 / Me / XP,
128 MB DRAM ou plus,
150 MB disque dur disponible,
Port USB disponible.

- 16 -
Installez le logiciel
Pour commencer l'installation, insérez le CD-Rom dans le lecteur, une fenêtre
de commande apparaît, suivez les instructions qui s'affichent à l'écran.
Si le programme d'installation ne démarre pas automatiquement : lancez
l'exécution du programme d'installation, en cliquant deux fois sur le fichier
"setup.exe" situé à la racine du CD-Rom.
L'installation du logiciel PHOTO EASY 255 se déroule en trois phases :
l'exécution du programme d'installation, le redémarrage de l'ordinateur puis
l'installation finale de l'imprimante.
Ne connectez pas l'imprimante au PC, avant l'installation du pilote
d'impression. En fin d'installation un message vous demandera de redémarrer
le PC, après le redémarrage vous pourrez connecter l'imprimante au PC.
Le CD-Rom contient un manuel d'installation et d'utilisation détaillé du pilote
d'impression. Reportez-vous à ce manuel pour l'utilisation du pilote.
Remarque : L'option "impression N/B" proposée par le pilote d'impression de windows 98 est
non fonctionnelle.
Connectez votre imprimante
Assurez-vous que les équipements sont sous tension. Ne forcez jamais à la
mise en place des connecteurs sur les équipements, vous risquez à la fois de
détériorer le câble et le connecteur.
Reliez le câble USB sur un port USB de votre PC.
Reliez l'autre extrémité du câble USB sur l'imprimante PHOTO
EASY 255 sur le port USB (B).
B

- 18 -
Votre imprimante PHOTO EASY 255 supporte les fonctions suivantes en
mode PictBrigde:
Imprimer une photo.
Sélectionner des photos et les imprimer plusieurs fois sur la même
feuille de papier.
Imprimer depuis un fichier au standard DPOF.
Suivre l’impression et notamment, le début, la progression et la fin de
l’impression. Mais également les messages d’erreurs pouvant intervenir
(pas de papier, bourrage, fin de ruban, erreur système).
Votre imprimante PHOTO EASY 255 ne supporte pas les fonctions suivantes
en mode PictBrigde:
Cropping (recadrer une image).
Choisir un type de papier.
Indiquer une information supplémentaire (date et heure par exemple) en
complément de la photo à imprimer.

FRANÇAISDEUTSCHESPAÑOLITALIANO
NEDERLANDS ENGLISH
- 19 -
6 IMPRIMEZ VOS PHOTOS
Votre imprimante PHOTO EASY 255 est prévue pour être utilisée avec ou
sans ordinateur. Dans ce chapitre nous décrivons l'utilisation de l'imprimante
sans ordinateur.
Consultez le tableau des caractéristiques techniques en fin de livret utilisation
pour connaître la compatibilité de votre carte mémoire avec l'imprimante, en
cas d'incompatibilité utilisez un ordinateur et le logiciel de traitement d'image
fourni sur le CD-Rom.
Attention - Les images de faibles tailles, inférieure à 76 800 pixels ne sont pas
imprimables à partir des cartes mémoires. En revanche ces photos peuvent
être imprimées à partir d'un PC ou par un lien direct infrarouge (ou Bluetooth
équipement optionnel).
Mettez votre imprimante sous tension. Insérez ou connectez une source (une
carte mémoire, un appareil en mode DPOF ou Pictbridge, un GSM équipé
d’un port InfraRouge ou un périphérique optionnel Bluetooth).
Après une phase d’analyse et de chargement la dernière photo enregistrée est
affichée à l’écran.
Pour passer d’une photo à l’autre, utilisez les touches ou _ ` du navigateur.
IMPRIMEZ
Appuyez sur la touche , le menu Impression apparaît. Depuis ce menu
vous pouvez choisir :
la photo qui est affichée à l’écran, sélectionnez Imprimer photo
courante,
le panier que vous avez précédemment choisi, sélectionnez Imprimer
Sélection (reportez-vous au paragraphe Créez votre panier, page 20),
l’ensemble des photos reconnues sur la source, sélectionnez Imprimer
tout,
d’imprimer toutes les photos en format miniature, vingt photos par
feuille de papier, sélectionnez Imprimer index.
Sélectionnez votre choix avec les touches S T ou du navigateur.
- 20 -
Pour améliorer la qualité de votre photo automatiquement, appuyez sur la
touche CRYSTAL IMAGE . Quand la fonction est active, l’icône est
affichée à l’écran.
Vérifiez que vous avez la quantité nécessaire de papier dans le tiroir. Appuyez
de nouveau sur la touche ou sur la touche pour lancer l’impression.
Astuce - Le procédé CRYSTAL IMAGE développé par e agit
sélectivement sur chaque photo pour utiliser pleinement le potentiel couleur et de
définition de votre imprimante. e recommande vivement l’utilisation de
cette fonction.
Astuce - Les bords peuvent être découpés par petits paquets en superposant plusieurs
feuilles.
Attention - Après l’impression, ne déchirez pas ces bords d'un seul coup, effectuez
plusieurs fois le pliage sur les pointillés, afin de détacher délicatement les bords.
Idée - Le dos pré-imprimé carte postale, vous permet d'envoyer rapidement votre
photo à des amis, de la famille...
C RÉEZ VOTRE PANIER
Vous pouvez mémoriser la sélection d’une série de photos avec des quantités
d’impression indépendantes, pour cela procédez comme suit :
Vous pouvez naviguer d’une photo à l’autre selon 2 modes :
le mode plein écran, permet la navigation image par image,
le mode mosaïque, accessible en appuyant sur la touche , permet une
navigation plus rapide sur 6 images (la touche permet alors de
revenir au mode plein écran).
Le navigateur permet le déplacement d’une image à l’autre.
Appuyez sur la touche pour placer la photo affichée dans votre panier.
Appuyez de nouveau sur la touche et cela au temps de fois de vous voulez
de copies.
Appuyez sur la touche pour retirer la photo sélectionnée ou supprimer une
copie de votre panier.

FRANÇAISDEUTSCHESPAÑOLITALIANO
NEDERLANDS ENGLISH
- 21 -
Recommencez l’opération précédente sur les autres photos que vous voulez
ajouter à votre panier.
Une fois sélectionnée la quantité est affichée, précédée d’un X en haut à droite
pour chacune des photos.
Appuyez sur la touche , le menu Impression apparaît.
Sélectionnez votre choix avec les touches S T ou du navigateur.
Vérifiez que vous avez la quantité nécessaire de papier dans le tiroir. Appuyez
de nouveau sur la touche ou sur la touche pour lancer l’impression.
R )ÉALISEZ UN AGRANDISSEMENT (ZOOM
Sélectionnez la photo voulue avec les touches _ ou ` du navigateur.
Appuyez sur la touche pour activer le mode zoom. Choississez avec les
touches _ ou ` du navigateur le zoom Portrait ou Paysage et validez en
appuyant sur la touche ou .
Réglez la taille de l’agrandissement souhaitée avec les touches ou .
La taille du zoom est réglable de 100 % à 300 % avec les plages suivantes
100 %, 120 %, 140 %, 160 %, 200 %, 240 % et 300 %.
Utilisez les touches du navigateur pour positionner la partie de la photo
à agrandir. Pour prévisualier le résultat, appuyez sur la touche .
La photo agrandie apparaît à l’écran. Appuyez sur la touche pour valider
ou pour annuler.
La zone d’impression est matérialisée sur la photo par un rectangle rouge.
Appuyez sur la touche et cela autant de fois que vous voulez
d’exemplaires, le nombre d’exemplaires s’affiche en haut et à droite de la
photo.
Remarque : Cette photo peut-être imprimée immédiatement ou entrée dans la sélection d’un
panier pour une impression ultérieure.

- 22 -
7 RÉGLEZ VOTRE IMPRIMANTE SELON VOS BESOINS
Vous pouvez réglez plusieurs paramètres selon votre utilisation. Appuyez sur
la touche pour accéder aux réglages des formats papiers, de la qualités des
images et de vos préférences.
L ES FORMATS
Cette fonction vous permet de sélectionner un format papier en fonction de
vos besoins, par exemple pour réaliser des photos d’identité, choississez le
format 8 photos par page.
Appuyez sur la touche , sélectionnez le menu Format avec les touches S
ou T du navigateur. Appuyez sur la touche pour valider.
Vous pouvez imprimer vos photos depuis des formats prédéfinis :
• Imprimez votre photo au format 10 x 15 cm Pleine Page, sans bord
.
• Imprimez votre photo au format 10 x 15 cm Avec Marges .
• Imprimez votre photo au format Pleine Page 4/3 .
• Imprimez 2 photos par page .
• Imprimez 4 photos par page .
• Imprimez 8 photos par page .
• Imprimez 20 photos par page (planche contact ou d'index) .
• Imprimez 2 pages par image (la photo est sur 2 pages).
• Imprimez 4 pages par image (la photo est sur 4 pages.
Avec les touches S T ou du navigateur choississez le format papier voulu.
Appuyez sur la touche pour valider et retourner au mode de navigation.
FRANÇAISDEUTSCHESPAÑOLITALIANO
NEDERLANDS ENGLISH
- 23 -
R ÉGLEZ LA QUALITÉ DES PHOTOS
Ce menu vous permet selon vos critères personnels de procéder à des
ajustements des paramètres de colorimètrie pour la photo sélectionnée.
Appuyez sur la touche , sélectionnez le menu Réglages image avec les
touches S T ou du navigateur.
Sélectionnez le paramètre à modifier avec les touches S T ou du navigateur.
Les touches _ ` ou du navigateur permettent de modifier la valeur du
paramètre selectionné.
La touche vous permet de sortir de l’écran des réglages de l’image en
cours sans prise en compte des modifications. Vous retournez au menu
précédent.
Vous pouvez régler :
• Le Contraste de la photo entre -2 et +2, utilisez les touches _ ` ou du
navigateur pour faire votre choix.
• La Luminosité de la photo entre -2 et +2, utilisez les touches _ ` ou du
navigateur pour faire votre choix.
• La Netteté de la photo entre -2 et +2, utilisez les touches _ ` ou du
navigateur pour faire votre choix.
• L’Effet de la photo, Non pour aucun réglage, N&B pour obtenir une
photo imprimée en noire et blanc, Sép pour obtenir une photo imprimée
sur trois feuilles de papier en couleur jaune, magneta et cyan. Utilisez les
touches _ ou ` du navigateur pour faire votre choix.
• La Couleur de la photo entre -2 et +2, utilisez les touches _ ` ou du
navigateur pour faire votre choix.
• Un Cadre autour de votre photo, Non pour aucun, Autres cadres pour
imprimer un cadre prédéfini, utilisez les touches _ ou ` du navigateur
pour faire votre choix.
Lorsque l’ensemble des modifications a été réalisé, appuyez sur la touche
pour valider et retourner au mode de navigation.
Une icône apparaît en bas et à droite de la photo pour vous signaler la prise en
compte des réglages spécifiques. Les modifications réalisées sont
uniquement valables pour la photo sélectionnée.

FRANÇAISDEUTSCHESPAÑOLITALIANO
NEDERLANDS ENGLISH
- 25 -
• Le Contraste LCD de l’écran entre -8 et +8, utilisez les touches S T ou
du navigateur pour faire votre choix et appuyez sur la touche pour
valider.
• La Réinit Paramètres vous permet de revenir à des valeurs de base,
appuyez sur la touche pour valider après quelques secondes les
paramètres sont réinitialisés.
8 REMPLACEMENT DES CONSOMMABLES
Les consommables employés sur l'imprimante PHOTO EASY 255, le
ruban et le papier sont des produits de marque E. Vous
pouvez vous en procurer dans les magasins grand public aux rayons
photos ou imprimantes, mais également sur notre site internet
www.sagem.com ou utilisez le bon de commande consommables fourni
avec votre imprimante.
Utilisez seulement les consommables de marque E et
exclusivement ceux-ci sinon vous risquez de perdre la garantie de
l'appareil.
Référence kit consommables DSR400 :
(ruban + papier 40 photos) : 251 559 421
Référence kit consommables DSR400T :
(ruban + papier 120 photos) 251 559 434

- 26 -
9 ENTRETIEN
N 'ETTOYAGE DE LA TÊTE D IMPRESSION
Si vos photos présentent une marque constante sur toute la longueur de la
feuille, des impuretés sont peut être collées sur la tête d'impression.
Préparez un produit nettoyant à base d'alcool dénaturé
1 et des cotons tige
du commerce.
Mettez votre imprimante hors tension, débranchez le cordon secteur et
attendez cinq minutes, la tête d'impression étant montée à une
température élevée, vous pourriez vous blesser en la touchant.
1. Ouvrez la trappe ruban, appuyez sur le loquet de maintien et retirez le
ruban.
2. Retirez le tiroir papier.
3. Retournez l'appareil pour retirer la trappe inférieure.
4. Nettoyez avec précautions la ligne de chauffage de la tête d'impression,
à l’aide du coton tige.
5. Replacez la trappe inférieure, retournez l'imprimante, rebranchez le
cordon secteur et remettez votre imprimante sous tension à l’aide de
l’interrupteur.
Attention - Ne jamais toucher la tête d'impression avec les doigts ou des objets
pouvant la rayer.
1. Ne pas utiliser de produits corrosifs, ces derniers pourraient endommagés votre appareil.
1
1
1
11 2
2
2
22 3
3
3
33
4
4
4
44 5
5
5
55

FRANÇAISDEUTSCHESPAÑOLITALIANO
NEDERLANDS ENGLISH
- 27 -
Replacez le ruban en faisant attention de bien tendre ce dernier avant
l'insertion dans son logement, vérifiez que le loquet de maintien est bien
en position et fermez la trappe.
Repositionnez le tiroir papier dans son logement jusqu'au
déclenchement du système de blocage.
B OURRAGE PAPIER
Si une feuille est coincée dans l'imprimante et ne peut être extraite simplement
de l'appareil, procédez comme suit :
Mettez votre imprimante hors tension.
Retournez l'appareil pour accéder au dessous de l'imprimante.
Enlevez le couvercle inférieur.
Retirez délicatement la feuille coincée, ne touchez en aucun cas la tête
d'impression.
Replacez le couvercle inférieur et retournez l'imprimante.
Rebranchez le cordon secteur et remettez votre imprimante sous tension.
Attention - Ne jamais utiliser d'objets pouvant détériorer l'imprimante
(ciseaux, tournevis, coupe papier,…).

- 28 -
INCIDENTS
Remarque : Si vous réalisez des grandes séries d'impression sur votre appareil, celui-ci est
équipé d'un dispositif de éviter une surchauffe detemporisation automatique pour
l'appareil. L'imprimante redémarre automatiquement l'impression en cours dès que
la température a suffisament diminuée.
INCIDENTS REMÈDES
Pas d’alimentation secteur
(voyant éteint)
• Vérifiez que le bloc secteur est correctement relié à
une prise secteur.
• Vérifiez que le connecteur secteur est correctement
branché à l’imprimante.
• Vérifiez que votre fusible et disjoncteur de votre
installation électrique sont en état de marche et que
la prise de courant est bien alimentée.
Un message d’erreur est
affiché à l’écran
• Reportez vous au tableau des messages d’erreurs
(reportez-vous au paragraphe Messages d’erreurs,
page 29).
L’appareil a été débranché
pendant une impression
• Placer l’interrupteur secteur sur O puis, reconnectez
le câble d’alimentaion secteur.
• Mettez l'imprimante sous tension et attendez que la
phase d'initialisation soit terminée.
• Si une feuille de papier est bloquée, (reportez-vous
au paragraphe Bourrage papier, page 27).
• Relancez l'impression.
Aucune photo n'est
imprimée sur la feuille
• Utilisez-vous des feuilles conformes aux
spécifications techniques ? (reportez-vous au
paragraphe Caractéristiques techniques, page 31
• Avez-vous placé les feuilles faces brillantes dessus
?
La photo est imprimée
avec un trait sur la
longueur ou beaucoup des
tâches
• Procédez à un nettoyage de la tête d'impression
(reportez-vous au paragraphe Nettoyage de la tête
d'impression, page 26).
Pas d'impression PC • Vérifiez que le câble USB est bien branché.
• Avez-vous installé le pilote d'impression ?

FRANÇAISDEUTSCHESPAÑOLITALIANO
NEDERLANDS ENGLISH
- 29 -
M ’ESSAGES D ERREURS
Après chaque intervention sur votre imprimante n’oubliez pas d’appuyer sur
la touche pour relancer l’impression en cours.
Erreur
affichée
Correction
affichée
Type
d’erreur Action
Bac papier vide
Corriger erreur, et
appuyer sur
IMPRESSION
pour reprendre
Papier
Vérifiez qu'il y a du papier
correctement placé dans le bac
chargeur.
Bourrage papier
Corriger erreur, et
appuyer sur
IMPRESSION
pour reprendre
Papier
Retirez le papier bloqué dans
l'imprimante (ne pas réutiliser
cette feuille de papier).
Vérifier ruban
Corriger erreur, et
appuyer sur
IMPRESSION
pour reprendre
Ruban Mettez un nouveau ruban ou
remplacez le ruban actuel.
Fin de ruban
Corriger erreur, et
appuyer sur
IMPRESSION
pour reprendre
Ruban Changez le ruban par un neuf.
Erreur Ruban
Corriger erreur, et
appuyer sur
IMPRESSION
pour reprendre
Ruban
Vérifiez la bonne insertion du
ruban, si l'erreur persiste,
remplacez-le.
Erreur Cassette
Corriger erreur, et
appuyer sur
IMPRESSION
pour reprendre
Ruban
Vérifiez que le ruban est
correctement inséré et que le
loquet de fermeture est verrouillé.
Insérer la carte
de paramétrage
du ruban
Corriger erreur, et
appuyer sur
IMPRESSION
pour reprendre
Ruban
Le nombre de photos
sélectionnées est supérieur à la
capacité restant dans le ruban pour
imprimer toutes les photos.
Carte vide Retirer carte Carte à puce
La carte à puce a déjà été utilisée,
retirez la carte insérée et insérez
une carte à puce valide.
Compteur
saturé Retirer carte Carte à puce La quantité d’impression autorisée
est atteinte.
Carte non
reconnue (01) Retirer carte Carte à puce
Erreur de transfert de données,
retirez la carte insérée et insérez
une carte à puce valide.
Carte non
reconnue (02) Retirer carte Carte à puce
Erreur de transfert de données,
retirez la carte insérée et insérez
une carte à puce valide.

- 30 -
Erreur
affichée
Correction
affichée
Type
d’erreur Action
Carte non
reconnue (03) Retirer carte Carte à puce
Erreur de transfert de données,
retirez la carte insérée et insérez
une carte à puce valide.
Consommable
incompatible
(01)
Retirer carte Carte à puce Problème mécanique.
Consommable
incompatible
(02)
Retirer carte Carte à puce Problème de ruban.
Consommable
incompatible
(03)
Retirer cartee Carte à puce Marque non reconnue.
Consommable
incompatible
(04)
Retirer carte Carte à puce Erreur de colorimétrie.
Consommable
incompatible
(05)
Retirer carte Carte à puce Type (master/pack) inconnu.
Fichier
endommagé
Erreur fatale,
annuler l’opération
et recommencer
Décodage
d’image JPEG
Le fichier JPEG contient une
caractéristique non supportée.
Format non
supporté
Erreur fatale,
annuler l’opération
et recommencer
Transfert
sans fil
La photo à transférer n’est pas au
format JPEG
Erreur durant
transfert
Erreur fatale,
annuler l’opération
et recommencer
Transfert
sans fil
Erreur durant le transfert d’une
photo depuis un GSM photo.
Redémarrez le transfert depuis le
GSM. Vérifiez que les 2 appareils
sont face à face.
Mémoire
interne pleine
Erreur fatale,
annuler l’opération
et recommencer
Transfert
sans fil
Photo à transférer trop grosse ou
plus assez de place pour stocker la
photo dans l’imprimante.
Erreur Système Contacter votre
vendeur SVP Autre
Eteignez votre imprimante
30 secondes et rallumez-la. Si
l'erreur persiste contactez votre
revendeur.

FRANÇAISDEUTSCHESPAÑOLITALIANO
NEDERLANDS ENGLISH
- 31 -
C ARACTÉRISTIQUES TECHNIQUES
Configuration PC requise :
Pentium ou équivalent,
OS : Windows 98 SE / 2000 / Me / XP,
128 MB DRAM ou plus,
150 MB disque dur disponible,
1 port USB disponible.
- - - - - - - - - - - - - - - - - - - - - - - - - - - - - - - - - - - - - - - - - - - - - - - - - - - - - - - - - - - - - - - - -
Nom de l'appareil : PHOTO EASY 255 SAGEM
Méthode d'impression : transfert thermique
Résolution : 300 x 300 dpi
Couleur : 16,7 Millions en continu
Vitesse d'impression : inférieur à 120 secondes par photo
(hors transfert informatique)
Interface : carte mémoire du type :
Compact Flash Card (support type I &
II), SM / MS / MMC / SD / xD (avec
adaptateur),
Port USB Version 1.1.
Stockage de photos transférées
dep is n GSM hotou u p : jusq 'à Ki o- ctets u 500 l o
Résolution d'image supportée : jusqu'à 12 Millions de pixels
Consommables : papier photo, ruban trois couleurs
(jaune, magenta, cyan) et un vernis,
40 impressions par ruban
Taille papier : 101 x 152,4 mm conditionnés en
paquets de 20 feuilles
Alimentation papier : par chargeur automatique de capacité
20 feuilles
Alimentation secteur : 230 V AC 50/60 Hz
Approbation : CE
Plage d'utilisation : 10 à 35 °C et 30 à 85 % d'humidité
Dimensions en mm : 201 x 174 x 94 hors bac papier
Poids en kg : 1,5 hors alimentation
Consommation énergétique : en mode repos : 7,6 W
en mode impression : 70 W
Toutes ces données vous sont fournies à titre indicatif. E se réserve
le droit d'apporter toutes modifications sans aucun préavis.

- 32 -
10 CONDITIONS DE GARANTIE
G
ARAN
TIE
Pour toute mise en oeuvre de la garantie, vous devez vous adresser à votre vendeur et lui
présenter le justificatif d'achat qu'il vous a remis.
En cas de panne, c'est lui qui vous conseillera.
Si vous avez acheté directement votre matériel auprès de SAGEM, celui-ci est garanti par SAGEM (pièces et main d'oeuvre), contre
tout défaut de matière et tout vice de fabrication pendant une durée d'un an à compter de la date de livraison. Durant cette période,
tout matériel défectueux sera remplacé ou réparé gratuitement, le client devant retourner à ses frais le matériel défectueux à l'adresse
qui lui sera indiqué par le Service Après-Vente SAGEM dont le numéro de téléphone figure sur le bordereau de livraison. En l'absence
de contrat d'entretien spécifique souscrit par le client, la réparation ou l'échange ne sera en aucun cas effectué dans les locaux du client.
Sont exclus de la garantie :
Les pannes ou dysfonctionnements dus au non-respect des consignes d'installation et d'utilisation, à une cause extérieure au a)
matériel (foudre, incendie, choc...), à des modifications de matériels effectués sans accord écrit de SAGEM, à un défaut
d'entretien courant, de surveillance ou de soins de matériel, ou encore une réparation ou un entretien effectués par des
personnes non agréées par SAGEM.
L'usure normale du matériel ainsi que l'usure des accessoires.b)
Les détériorations consécutives à une insuffisance d'emballage et/ou à un mauvais conditionnement du matériel réexpédié àc)
SAGEM. Dans les cas ci-dessus ainsi qu'à l'expiration de la garantie, le client demandera à SAGEM un devis qu'il devra
accepter avant tout retour du matériel au Service Après-Vente SAGEM. Les frais de réparation et de port (aller et retour) seront
facturés au client. Ces conditions relatives à la garantie sont applicables en France Métropolitaine.
Votre matériel est, en tout état de cause,
soumis à la garantie légale contre les conséquences
des défauts ou vices cachés conformément
aux articles 1641 et suivants du Code Civil

ENGLISHFRANÇAIS
DEUTSCHESPAÑOLITALIANONEDERLANDS
- 1 -
INHALT
WILLKOMMEN 1
Empfehlungen und Sicherheitsvorkehrungen 2
DEN D P ERUCKER HOTO ASY 255 ENTDECKEN 3
DIE BENUTZERSCHNITTSTELLE 4
DEN D P ERUCKER HOTO ASY 255 VORBEREITEN 6
Netzversorgung 6
Zum ersten Mal ein Farbband einlegen 7
Das Band ändern 8
Laden des Papiers 9
ÜBERTRAGEN S I BIE HRE ILDER 11
Führen Sie eine Speicherkarte ein 11
Photos von einem Photo-GSM übertragen 12
Einen photoapparat im DPOF-Modus benutzen 13
Eine Bluetooth - Peripherie anschliessen
(frei nach Wahl) 14
Einen PC (Personal Computer) anschliessen 15
Seit der kamera drucken (PictBrigde modus) 17
I HRE FOTOS AUSDRUCKEN 19
Drucken 19
Ihren Warenkorb Kreieren 20
Eine vergrösserung vornehmern (zoom) 21
S TELLEN SIE IRHEN DRUCKER NACH IHEN WÜNSCHEN EIN 22
Die formate 22
Stellen Sie die Qualität der Fotos ein 23
Ihre präferenzen 24
VERBRAUCHSMATERIALIEN 25
WARTUNG 26
Reinigung des Druckerkopfs 26
Papierstau 27
Störungen 28
Fehlermeldungen 29
Technische Daten 31
GARANTIE 32

- 2 -
- 2 -
E MPFEHLUNGEN UND SICHERHEITSVORKEHRUNGEN
• Installieren Sie Ihren Drucker PHOTO EASY 255 nicht in einem
feuchten Raum (WC, Badezimmer, Waschküche, Küche usw.), weniger
als 1,50 m von einer Wasserstelle entfernt oder im Außenbereich. Ihr
Drucker muss bei Raumtemperatur zwischen 10 °C und 35 °C betrieben
werden.
• Installieren Sie den Drucker nicht an einem Ort, an dem es in der Luft
schwebenden Staub geben könnte. Dieser Staub könnte die Druckqualität
Ihrer Fotos verschlechtern.
• Verwenden Sie ausschließlich das mitgelieferte Netzteil und schließen
Sie dieses gemäß den Installationsanweisungen in dieser Anleitung und
den Hinweisen auf seinem Typenetikett (Spannung, Strom, Frequenz des
Stromnetzes) an das Netz an. Im Gefahrenfall können die Netzstecker
vorbeugend zur Unterbrechung der 230-V-Stromversorgung gezogen
werden. Die Steckdosen müssen daher in der Nähe des Geräts und leicht
zugänglich sein.
•Öffnen Sie während des Ausdrucks niemals die Klappe zum
Farbband. Dies kann zum Reißen des Films und anschließend zu
Funktionsstörungen Ihres Druckers führen.
• Verwenden Sie nur und ausschließlich Verbrauchsgüter der Marke
SAGEM, da Sie andernfalls riskieren, das Gerät zu beschädigen und die
Garantie zu verlieren. Für die Bestellnummern der Verbrauchsgüter s
(siehe Abschnitt Verbrauchsmaterialien, Seite -25).
• Die CE-Markierung bescheinigt die Konformität des Produkts mit den
wesentlichen Anforderungen der Richtlinie 1999/5/CE des europäischen
Parlaments und Rates bezüglich Telekommunikationsendgeräten, der
Sicherheit und Gesundheit der Benutzer, der elektromagnetischen
Störungen.
Die Konformitätserklärung kann auf der Site www.sagem.com unter der
Rubrik „Support“ abgerufen oder an folgender Adresse angefordert
werden:
E - Customer relations department
4 rue du petit albi - 95800 Cergy Saint-Christophe - FRANCE

ENGLISHFRANÇAIS
DEUTSCHESPAÑOLITALIANONEDERLANDS
- 3 -
2 DEN DRUCKER PHOTO EASY 255 ENTDECKEN
Überprüfen Sie, ob alle Elemente vorhanden sind:
1. Drucker PHOTO EASY 255
2. Bedienungsanleitung
3. CD-ROM mit Treiber & Anwendungen
4. Farbband*
5. Photopapier (2 Pakete a 20 Blatt)*
6. USB-Kabel
7. Papierfach
8. Netzleitung
9. Netzteil
10.Adapter für xD Karte
*
1
1
1
11
6
6
6
66
4
2
2
2
22
7
8
8
8
88
9
9
9
99
5
*
*
*
3
10
10
10
10
10
S
Use r g u
ide
L
ivre t d utilisatio n
Be
die nu n
gsa n
le it
ung
Man ual d el usu ario
Man u
al e
de ll'ute
nte
Gebr u
iksa
anw ijz ing
SA
SA
SA
SA
SA
GE M
G
G
G
G
EM
EM
EM
EM
P
HO
PHO
PHO
PHO
PHO
T
T
T
T
TO
EASY 15
5
O
O
O
O
EA
EA
EA
EAS Y
SY
SY
SY 155
155
155
155
Starterpaket

- 4 -
3 DIE BENUTZERSCHNITTSTELLE
Sie können mit ihr :
• ein Foto nach dem anderen auswählen oder zu einem Mosaikmodus
übergehen (6 Fotos pro Bildschirm),
• ein Foto direkt ausdrucken,
• das Foto im Hinblick auf seinen Ausdruck automatisch verbessern,
• die Parameter „Format“, „Präferenzen“ und „Bildeinstellungen“ nach
Ihren Wünschen regulieren,
• mehrere Fotos auswählen und jedes Foto in verschiedener Anzahl
ausdrucken,
• einen Zoom auf ein Foto ausführen und es ausdrucken.
Beschreibung der Benutzerschnittstelle
1. Sektorkontrolle
2. Taste Ein/Aus
3. Taste Menüzugang
4. Taste Annullierung (C)
5. Taste Zoom - und Aktivierung des Mosaikmodus
6. Taste CRYSTAL IMAGE (automatische Verbesser- ung der
Druckqualität
7. Taste ausdrucken
8. Taste bestätigen (OK)
9. Taste Zoom
10.Navigator

ENGLISHFRANÇAIS
DEUTSCHESPAÑOLITALIANONEDERLANDS
- 5 -
Optische Schnittstelle
Die gültigen Fotos werden auf dem Bildschirm angezeigt, benutzen Sie die
Tasten oder , um sie aufzuzeigen.
Folgende Informationen stehen auf dem Bildschirm zur Verfügung:
1. Ausgewähltes Foto
2. Nummer des angezeigten Fotos
3. Gesamtzahl der gültigen Fotos auf der
4. Speicherkarte oder auf der angeschlossenen Quelle
5. Symbol der Funktion Auto-Verbesserung
6. Zu druckende Bogenanzahl
7. Anzahl der auszudruckenden Seiten
8. Anzahl der Kopien des Fotos
9. Name der Datei des Fotos
10.Daten der Aufnahme des Fotos im Format Jahr/Monat/Tag
11.Eine Kopie hinzufügen, Taste
12.Eine Kopie ausspeichern, Taste
X1
1
1
1
11 3
3
3
33 4
4
4
44 5
5
5
55
2
2
2
22
8
8
8
88
7
7
7
77
11
11
11
11
11
10
10
10
10
10
9
9
9
99
6
6
6
66

- 6 -
4 DEN DRUCKER PHOTO EASY 255 VORBEREITEN
NETZVERSORGUNG
Anmerkung : Sollte sich bei der Installation eine Wand bzw. ein anderer Gegenstand in der Nähe
befinden, achten Sie bitte darauf, dass hinter Ihrem Drucker mindestens 10 cm
Raum zur Verfügung steht, damit sich das Blatt während des Druckvorgangs
ungehindert bewegen kann.
Bitte lesen Sie die Sicherheitsvorkehrungen zu Anfang der vorliegenden
Bedienungsanleitung, bevor Sie die Verbindungen zum Drucker
herstellen.
Stecken Sie das passende Ende der 230 V Netzleitung in den dafür
vorgesehenen Anschluss des Netzteils.
Stecken Sie den Stecker des Netzteils wie in der nachfolgenden
Abbildung gezeigt ganz in den Drucker ein..
Stecken Sie den 230 V Eurostecker in eine Netzsteckdose.
Drücken Sie auf den Knopf Ein/Aus , bis das rote Licht aufleuchtet.
Bei dem ersten Start erscheint die Auswahl der Sprache.Wählen Sie mit
den Tasten oder des Navigators die gewünschte Sprache und
drücken zur Bestätigung die Taste.
Das Logo S und der Text „auf Speicherkarte oder eine
andere Quelle wartend“ erscheint auf dem Bildschirm.

ENGLISHFRANÇAIS
DEUTSCHESPAÑOLITALIANONEDERLANDS
- 7 -
Z UM ERSTEN MAL EIN FARBBAND EINLEGEN
Anmerkung : Verwenden Sie nur das Verbrauchsmaterial DSR400 oder DSR400T. Es wurde
speziell für eine optimale Druckleistung entwickelt.
Schalten Sie den Drucker ein. Warten Sie 10 Sekunden, (bis sich der
Druckkopf anhebt), und gehen Sie folgendermaßen vor:
1. Öffnen Sie die äußere Klappe auf der rechten Seite des Druckers.
2. Entfernen Sie den Schaumstoffschutz.
3. Nehmen Sie das neue Farbband aus seiner Verpackung und Stellen Sie
sicher, dass der Film gespannt ist, nachdem Sie das Pappteil (A) entfernt
haben.
4. Beachten Sie die Position des Bandes gemäß der unten abgebildeten
Darstellung.
5. Heben Sie den Sperrhebel an und legen Sie das Farbband ganz in die
Aufnahme ein. Der Sperrhebel muss nach dem Einlegen wieder
geschlossen werden.
6. Schließen Sie die Außenklappe.
A
6
6
6
66

- 8 -
D AS BAND ÄNDERN
Anmerkung : Verwenden Sie nur das Verbrauchsmaterial DSR400 oder DSR400T. Es wurde
speziell für eine optimale Druckleistung entwickelt.
Dazu muss die Chipkarte, die mit jedem Verbrauchsmaterial-Kit mitgeliefert wird,
vor jeder Installation eines neuen Kits vom Drucker eingelesen werden.
Schalten Sie den Drucker ein. Warten Sie 10 Sekunden, (bis sich der
Druckkopf anhebt), und gehen Sie folgendermaßen vor:
1. Fügen Sie die PLUG N’PRINT-Karte, die mit dem Farbband und dem
Fotopapier mitgeliefert wurde, in den Leser ein, der sich auf der
Vorderseite des Druckers befindet. Die PLUG N’PRINT Karte wird
erkannt und vom Drucker gelesen. Am Ende dieses Vorgangs erscheint
die Meldung "Übertragung OK (40 oder 120), Karte entfernen".
2. Ziehen Sie die PLUG N’PRINT Karte heraus. Es erscheint der
Begrüßungsbildschirm.
3. Nehmen Sie das neue Farbband aus seiner Verpackung und Stellen Sie
sicher, dass der Film gespannt ist, nachdem Sie das Pappteil (A) entfernt
haben.
4. Öffnen Sie die äußere Klappe auf der rechten Seite des Druckers.
5. Heben Sie den Sperrhebel an und legen. Entfernen Sie das benutzte
Farbband.
6. Beachten Sie die Position des Bandes gemäß der unten abgebildeten
Darstellung.
7. Heben Sie den Sperrhebel an und legen Sie das Farbband ganz in die
Aufnahme ein. Der Sperrhebel muss nach dem Einlegen wieder
geschlossen werden.
8. Schließen Sie die Außenklappe.
A
6
6
6
66
7
7
7
77 8
8
8
88

ENGLISHFRANÇAIS
DEUTSCHESPAÑOLITALIANONEDERLANDS
- 9 -
L ADEN DES PAPIERS
1. Entfernen Sie das Papierfach.
2. Öffnen Sie die Papierpackung, so dass das Schutzblatt oben auf ist,
legen Sie letzteres in die Papierkassetteein. Überprüfen Sie, dass sich
das für eine Briefmarke vorgesehene Rechteck an der Aussenseite der
Papierkassette d.h. zu Ihnen gerichtet befindet.
3. Entfernen Sie die Schutzfolie.
4. Bringen Sie die Papierkassette mit der offenen Kante voran vor die
Aufnahme in den Drucker. Führen Sie die Kassette langsam bis zum
Einrasten in den dafür vorgesehenen Schacht des Druckers.
Achtung - Fassen Sie die Papierbögen an den perforierten Rändern an.
Berühren Sie die glänzende Seite vor dem Druck niemals mit den Fingern. Es
besteht die Gefahr einer verminderten Druckqualität.
Ihr Drucker SAGEM PHOTO EASY 255 ist jetzt bereit zum Ausdrucken
Ihrer digitalen Fotos.
Schutzfolie

- 12 -
P HOTOS VON EINEM PHOTO-GSM ÜBERTRAGEN
Mit dem Drucker SAGEM PHOTO EASY 255 können Sie die mit einem
Foto-Handy aufgenommenen Fotos ausdrucken. Die Übertragung des fotos
erfolgt über die drahtlose Infrarotverbindung zwischen den beiden Geräten in
den Drucker übertragen.
Handig - Die Handys, die mit Photoapparat ausgestattet sind, arbeiten mit einer
niedrige Auflösung, damit Sie eine gute Qualität erzielen, empfehlen wir Ihnen 2 oder
4 Fotos pro Blatt auszudrucken.
Schliessen Sie den Drucker an das Stromnetz an. Legen Sie Ihr Handy in einer
Entfernung zwischen 3 und 30 Zentimetern so vor den Drucker PHOTO
EASY 255, dass sich die beiden „Infrarotfenster“ gegenüberliegen.
Achtung - Bei Umgebungen, die einer starken Beleuchtung ausgesetzt sind,
wird ein Abstand von maximal 10 cm zwischen den beiden Infrarot-Fenstern
empfohlen.
xD Karte mit
seinem
Adapter
Links
CompactFlash Rechts

ENGLISHFRANÇAIS
DEUTSCHESPAÑOLITALIANONEDERLANDS
- 13 -
Wählen Sie an Ihrem Handy ein Foto aus und übertragen Sie es über die
Infrarotverbindung.Für die genaue Vorgehensweise lesen Sie bitte in der
Bedienungsanleitung Ihres Mobiltelefons nach.
Die Übertragung beginnt und während ihrer Dauer blinkt die Meldung
„Infrarot-Übertragung - Bitte warten“ auf dem Display des Druckers.
Sie können:
• Entweder das übertragene Foto jetzt ausdrucken, nachdem Sie eventuell
das Druckformat und die Kopienanzahl geändert haben.
• Oder ein weiteres Foto aus Ihrem Handy übertragen. Dieses wird zu dem
(den) bereits im Drucker gespeicherten Foto(s) hinzugefügt. Nach jeder
Übertragung wird die Gesamtanzahl gespeicherter Fotos auf dem Display
des Druckers angegeben (das Foto mit der höchsten Nummer ist das
letzte übertragene Foto).
• Sie können jetzt die in den vorherigen Kapiteln beschriebenen
Operationen durchführen, bevor Sie den Ausdruck dieser Fotos starten
(Auswahl der Nummern der zu druckenden Fotos, Auswahl des Formats,
Auswahl der Kopienanzahl).
Am Ende des Ausdrucks der vom Foto-Handy übertragenen Fotos zeigt das
Display des Druckers PHOTO EASY 255 erneut die Informationen an, die
direkt vor dem Ausdruckstart angezeigt worden sind. Die Einstellungen
bleiben dabei erhalten.
Sie können:
• Entweder einen neuen Ausdruck starten, nachdem Sie eventuell andere
Parameter ausgewählt haben (Fotonummer, Format, Kopienanzahl).
• Oder die Bearbeitungsphase der übertragenen Fotos beenden. Drücken
Sie dazu zwei Sekunden lang auf die Taste .
E INEN PHOTOAPPARAT IM DPOF-MODUS BENUTZEN
Mit dieser Funktion können Sie vorab mit Ihrer Digitalkamera auf der
Speicherkarte die Fotos auswählen, die Sie auf Ihrem Drucker SAGEM
PHOTO EASY 255 ausdrucken wollen. Ihr Fotoapparat muss dazu die Norm
DPOF (Digital Print Order Format) erfüllen. Lesen Sie bitte in der
Dokumentation Ihres Digitalfotogerätesnach, ob er mit dieser Norm
kompatibel ist.
Wählen Sie die gewünschten Fotos an Ihrer Digitalkamera aus, indem Sie
vorgehen , wie in der Bedienungsanleitung Ihres Fotoapparats beschrieben.
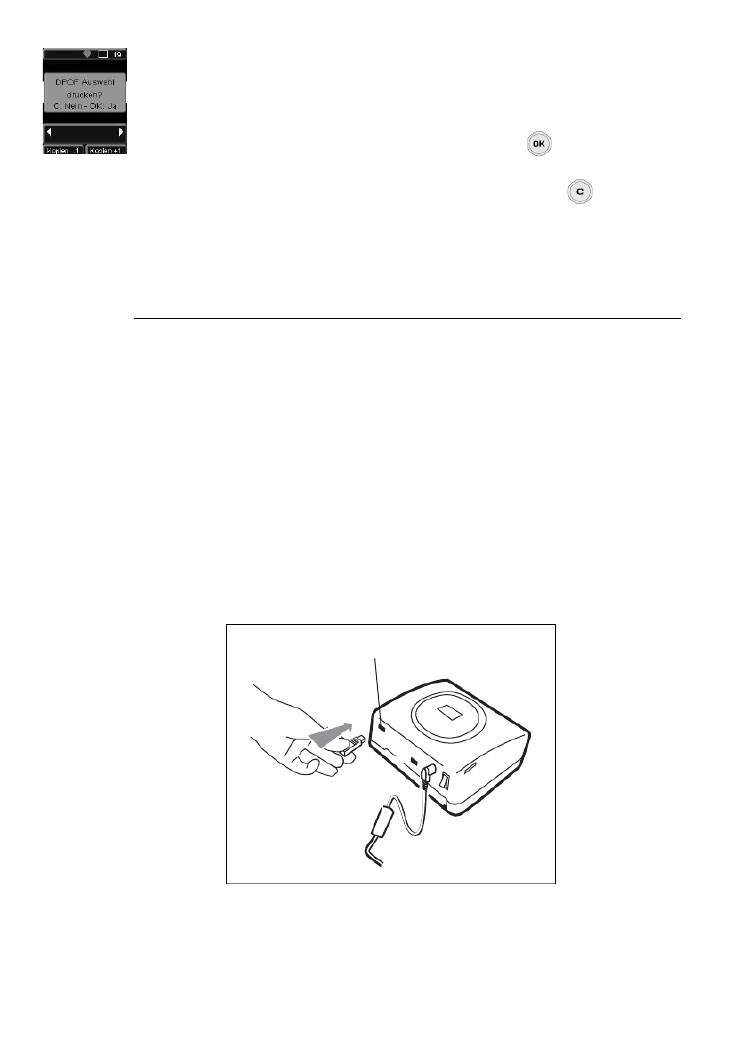
- 14 -
Schliessen Sie den Drucker an das Stromnetz an. Führen Sie die Speicherkarte
in den richtigen Schlitz ein. Es erscheint folgende Meldung auf dem
Bildschirm: „Die Auswahl DPOF ausdrucken? - C: Nein - OK: Ja“
Starten Sie den Ausdruck durch Drücken auf die Taste .
Drücken Sie zum Verlassen des DPOF-Modus auf die Taste .
E INE BLUETOOTH - PERIPHERIE ANSCHLIESSEN
( FREI NACH WAHL)
Der Adapter des Druckers Bluetooth (Sonderausrüstung) ist eine schnelle und
wirksame Lösung zur kabellosen Übertragung der Dateien JPEG Ihrer Anlage
mit Bluetooth Technologie, wie zum Beispiel die persönlichen Assistenten,
die Bürocomputer, Laptops oder ander Druckdateien von Fotos.
Stellen Sie sicher, dass die Geräte mit Spannung versorgt werden. Forcieren
Sie niemals den Anschluss der Stecker in die Geräte. Sie riskieren, sowohl das
Kabel als auch den Stecker zu beschädigen.
Stecken Sie den Bluetooth-Adapter (Sonderausrüstung) in den
USB-Anschluss (A) Ihres Druckers SAGEM PHOTO EASY 255.
Die Geräte erkennen sich automatisch gegenseitig.
A

ENGLISHFRANÇAIS
DEUTSCHESPAÑOLITALIANONEDERLANDS
- 15 -
Achtung - Die Größe des bzw. der Fotos, die an den Drucker SAGEM
PHOTO EASY 255 übertragen werden sollen, muss weniger als 600 KBytes
betragen. Die Fotos müssen das Format JPEG haben. Wenn die maximale
Speicherkapazität erreicht ist, erscheint die Fehlernachricht „Datenspeicher
voll“.
Um neue Daten an den Drucker SAGEM PHOTO EASY 255 zu übertragen,
müssen Sie den Speicher leeren. Drücken Sie dazu lang auf die Taste .
Die Übertragung beginnt und während ihrer Dauer blinkt die Meldung
„Bluetooth Übertragung - Bitte warten “ auf dem Display des Druckers.
Sie können:
• Entweder das übertragene Foto jetzt ausdrucken, nachdem Sie eventuell
das Druckformat und die Kopienanzahl geändert haben.
• Oder ein weiteres Foto, dieses wird zu dem (den) bereits im Drucker
gespeicherten Foto(s) hinzugefügt. Nach jeder Übertragung wird die
Gesamtanzahl gespeicherter Fotos auf dem Display des Druckers
angegeben (das Foto mit der höchsten Nummer ist das letzte übertragene
Foto).
Anmerkung : Wenn der Datenspeicher des Druckers EASY PHOTO 255 voll ist, erscheint die
Meldung „Datenspeicher voll“.
EINEN PC (PERSONAL COMPUTER) ANSCHLIESSEN
Ihr Kit umfasst eine Installations-CD-ROM des Druckertreibers, eine
Bildbearbeitungssoftware sowie eine Bedienungsanleitung.
Vergewissern Sie sich, dass Ihr PC mit den in den technischen Daten
kompatibel ist :
Pentium oder gleichwertig,
OS: Windows 98 SE / 2000 / Me / XP,
128 MB RAM oder mehr,
150 MB freier Speicherplatz auf der Festplatte,
Freier USB-Port.

- 16 -
Die Software installieren
Legen Sie zu Beginn der Installation die CD-ROM in das Laufwerk ein. Es
erscheint ein Befehlsfenster. Befolgen Sie die Anweisungen, die auf dem
Display erscheinen.
Wenn das Installationsprogramm nicht automatisch startet: Führen Sie das
Installationsprogramm aus, indem Sie auf die Datei „ “ imsetup.exe
Stammverzeichnis der CD-ROM doppelklicken.
Die Software SAGEM PHOTO EASY 255 wird in drei Phasen installiert:
Ausführung des Installationsprogramms, Neustart des Computers und
Abschluß der Installation des Druckers.
Schließen Sie den Drucker nicht an den PC an, solange der Druckertreiber
noch nicht installiert ist. Am Ende der Installation fordert Sie eine Meldung
zum Neustart des PCs auf. Bitte schließen Sie den Drucker erst nach dem
Neustart an den PC an.
Die CD-ROM enthält eine detaillierte Bedienungs- und Benutzeranleitung
des Druckertreibers. Diese Anleitung gibt Ihnen nähere Informationen über
die Verwendung des Treibers.
Anmerkung : Die Option „Schwarz / Weiss Drucken“ die Ihnen von dem Windows 98 Treiber
angeboten wird, ist nicht verfügbar.
Ihren Drucker anschließen
Wenden Sie beim Einstecken von Steckern an den Geräten niemals
übermäßige Kraft auf; eskönnten sowohl das Kabel als auch die Gerätebuchse
beschädigt werden.
Schließen Sie das USB-Kabel an einen USB-Port Ihres PCs an.
Stecken Sie das andere Ende des USB-Kabels in den USB-Anschluss
(B) des Druckers PHOTO EASY 255 SAGEM.
B

ENGLISHFRANÇAIS
DEUTSCHESPAÑOLITALIANONEDERLANDS
- 17 -
Die Geräte erkennen sich gegenseitig automatisch.
S B EIT DER KAMERA DRUCKEN (PICT RIGDE MODUS)
Ihr Drucker SAGEM PHOTO EASY 255 das StandardpictBrigde, es erlaubt
stützt folglich, den Eindruck der Fotographien, die von den Kameras
abfahren, die mit diesem Standard kompatibel sind.
Die Unterlagen der Kamera lesen, um Kompatibilität mit dem Standard
PictBrigde zu überprüfen und den Anschluß mit dem Drucker zu überprüfen.
Starten Sie den Druckvorgang im PictBridge Modus
Achten Sie darauf, dass sich der Fotoapparat im PictBridge Modus
befindet.
Verbinden Sie das USB-Kabel des Druckers PHOTO EASY 255 mit
dem USB-Port (A).
Nach der Analyse- und Erkennungsphase erscheint ein Bildschirm im
PictBridge-Modus.
Die Funktion der automatischen Verbesserung der Druckqualität
CRYSTAL IMAGE wird standardmässig aktiviert. Um sie zu löschen,
drücken Sie die Taste .
Nach dem Transfer eines Photos wird der Ausdruck automatisch
gestartet, die grüne LED blinkt.
Ziehen Sie das USB-Kabel heraus, um den Modus PictBridge zu
verlassen.
A

- 20 -
Zur automatischen Verbesserung der Qualität Ihres Fotos drücken Sie die
Taste CRYSTAL IMAGE . Wenn die Funktion aktiv ist, wird das
Symbol auf dem Bildschirm angezeigt.
Überprüfen Sie, ob Sie die nötige Menge Papier im Fach haben. Drücken Sie
von neuem die Taste oder die Taste zum starten des Drucks.
Handig - Das entwickelte Verfahren CRYSTAL IMAGE wirkt selektiv auf jedes
Foto, um das Farb- und Lösungspotenzial Ihres Druckers voll zu nutzen. Die
Benutzung dieser Funktion wird besonders empfohlen.
Handig - Die Ränder können durch kleine Pakete in mehreren übereinanderligenden
Seiten abgeschnitten werden.
Achtung - Reissen Sie diese Ränder nach dem Drucken nicht abrupt ab , falten
Sie mehrmals die Perforationen, um die Ränder behutsam abzulösen.
Handig - Die Rückseite der vorher ausgedruckten Postkarte dient Ihnen zum
schnellen Versenden Ihres Fotos an Freunde, an die Familie...
IHREN WARENKORB KREIEREN
Sie können eine Auswahl einer Fotoserie mit unabhängigen Druckmengen
speichern; das geht wie folgt:
Sie können von einem Foto zum anderen nach 2 Moden navigieren:
der Modus Voller Bildschirm, um von Bild zu Bild zu navigieren.
der Modus Mosaik, über die Taste zugänglich, erlaubt eine schnellere
Navigation auf 6 Bildern (mit der Taste können Sie dann zu dem Modus
Voller Bildschirm zurückgehen)
Der Navigator erlaubt die Versetzung von einem Bild zum anderen.
Drücken Sie die Taste , um das angezeigte Foto in Ihrem Warenkorb
abzulegen.
Drücken Sie jedesmal von neuem die Taste , wenn Sie eine Kopie
möchten.
Drücken Sie die Taste , wenn Sie das ausgewählte Foto ausspeichern oder
eine Kopie aus Ihrem Warenkorb löschen wollen.

ENGLISHFRANÇAIS
DEUTSCHESPAÑOLITALIANONEDERLANDS
- 21 -
Wiederholen Sie die vorhergehende Operation mit den anderen Fotos, die Sie
in Ihrem Warenkorb ablegen wollen.
Nach der Auswahl wird die Menge für jedes Foto oben rechts mit einem X
angezeigt.
Drücken Sie die Taste , das Menü Druck erscheint.
Treffen Sie Ihre Wahl mit den Tasten oder des Navigators.
Überprüfen Sie, ob Sie die nötige Menge Papier im Fach haben. Drücken Sie
von neuem die Taste oder die Taste , um den Druck zu starten.
E )INE VERGRÖSSERUNG VORNEHMERN (ZOOM
Wählen Sie das gewünschte Foto mit den Tasten oder des Navigators.
Drücken Sie die Taste zum aktivieren des Modus Zoom. Wählen Sie mit
den Tasten oder des Navigators den Zoom Portrait oder Landschaft und
bestätigen mit der Taste oder .
Regulieren Sie das Mass der gewünschten Vergrösserung mit den Tasten
oder . Die Zoom-Grösse ist mit den folgenden Massen von 100 % bis 300
% einstellbar : 100 %, 120 %, 140 %, 160 %, 200 %, 240 % et 300 %.
Benutzen Sie die Tasten des Navigators zur Positionierung des zu
vergrössernden Teils des Fotos. Zur Vorschau auf das Resultat drücken Sie
die Taste .
Das vergrösserte Foto erscheint auf dem Bildschirm. Drücken Sie die Taste
zum bestätigen oder annullieren.
Die auszudruckende Zone wird auf dem Foto durch ein rotes Rechteck
markiert. Drücken Sie so oft die Taste , wie Sie Exemplare wollen, die
Anzahl der Exemplare wird oben rechts des Fotos angezeigt.
Anmerkung : Dieses Foto kann sofort ausgedruckt oder in die Auswahl eines Warenkorbs zum
späteren Ausdruck aufgenommen werden.

- 22 -
7 STELLEN SIE IRHEN DRUCKER NACH IHEN WÜNSCHEN
EIN
Sie können mehrere Parameter nach Ihrer Anwendung einstellen. Drücken Sie
die Taste zum Einstellen des Papierformats, der Qualität der Bilder und
Ihrer Präferenzen.
D IE FORMATE
Diese Funktion erlaubt Ihnen die Auswahl eines Papierformats nach Ihren
Wünschen, um Passfotos herzustellen, zum Beispiel, wählen Sie das Format
8 Fotos pro Seite.
Drücken Sie die Taste , wählen Sie mit den Tasten oder des
Navigators das Menü Format. Zum bestätigen die Taste drücken.
Sie können Ihre Fotos nach vorbestimmten Formaten drucken:
• Ihr Foto im Format 10 x 15 cm drucken Volle Seite, ohne Rand .
• Ihr Foto im Format 10 x 15 cm Mit Rand drucken .
• Ihr Foto im Format volle Seite 4/3 drucken .
• 2 Fotos pro Seite drucken .
• 4 Fotos pro Seite drucken .
• 8 Fotos pro Seite drucken .
• 20 Seiten pro Seite drucken (Kontaktstreifen oder Index) .
• 2 Seiten pro Bild drucken (das Photo wird auf 2 Seiten
wiedergegeben).
• 4 Seiten pro Bild drucken (das Photo wird auf 4 Seiten
wiedergegeben).
Mit den Tasten oder des Navigators wählen Sie das gewünschte
Papierformat. Drücken Sie die Taste zum bestätigen und zur Rückkehr
zum Navigationsmodus.

ENGLISHFRANÇAIS
DEUTSCHESPAÑOLITALIANONEDERLANDS
- 23 -
S TELLEN SIE DIE QUALITÄT DER FOTOS EIN
Mit diesem Menü können Sie nach Ihren persönlichen Kriterien die Parameter
Kolorimetrie für das ausgewählte Foto einstellen.
Drücken Sie die Taste , wählen Sie mit den Tasten oder des
Navigators das Menü Bildeinstellungen.
Wählen Sie mit den Tasten oder des Navigators den zu ändernden
Parameter. Mit den Tasten oder des Navigators können Sie den Wert des
ausgewählten Parameters ändern.
Mit der Taste können Sie den Bildschirm zum Einstellen des aktuellen
Bildes verlassen, ohne dass die Änderungen wirksam werden. Sie kehren in
das vorangegangene Menü zurück.
Sie können einstellen:
• Den Kontrast des Fotos zwischen -2 und +2; um Ihre Wahl zu treffen
benutzen Sie die Tasten oder des Navigators.
• Die Beleuchtung des Fotos zwischen -2 und +2; um Ihre Wahl zu treffen,
benutzen Sie die Tasten oder des Navigators.
• Die Schärfe des Fotos zwischen -2 und +2; um Ihre Wahl zu treffen,
benutzen Sie die Tasten oder des Navigators.
• Den Effekt des Fotos, Nein für keine Einstellung, S&W für ein
schwarz-weiss ausgedrucktes Foto, Sep, um ein auf drei Seiten in gelb,
magneta und cyan ausgedrucktes Foto zu erzielen. Um Ihre Wahl zu
treffen, benutzen Sie die Tasten oder des Navigators.
• Die Farbe des Fotos zwischen -2 und +2; um Ihre Wahl zu treffen,
benutzen Sie die Tasten oder des Navigators.
• Den Rahmen um Ihre Fotos, Nein für keinen, Andere Rahmen zum
drucken eines vorbestimmten Rahmens; um Ihre Wahl zu treffen,
benutzen Sie die Tasten oder des Navigators.
Wenn alle Änderungen vorgenommen sind , drücken Sie die Taste zum
bestätigen und zur Rückkehr zum Navigationsmodus.
Rechts unten neben dem Foto erscheint ein Symbol, um Ihnen die
Berücksichtigung der spezifizierten Einstellungen zu signalisieren. Die
durchgeführten Änderungen sind nur für das ausgewählte Foto gültig.

ENGLISHFRANÇAIS
DEUTSCHESPAÑOLITALIANONEDERLANDS
- 25 -
• Den Kontrast LCD des Bildschirms zwischen -8 und +8, benutzen Sie die
Tasten oder des Navigators, um Ihre Wahl zu treffen und bestätigen
mit der Taste .
• Die Taste Zurück Parameter erlaubt Ihnen die Rückkehr zu den
Basiswerten, drücken Sie die Taste zum bestätigen, nach einigen
Sekunden sind die Parameter wieder hergestellt.
8 VERBRAUCHSMATERIALIEN
Die beim Drucker SAGEM PHOTO EASY 255 verwendeten
Verbrauchsmaterialien, d.h. das Farbband und das Papier, sind Produkte
der Marke SAGEM. Sie erhalten Sie in Kaufhäusern und größeren
Geschäften im Foto- oder Druckerbereich oder aber über Internet auf
unserer Webseite www.sagem.com oder über den Stellcoupon für
Verbrauchsgüter, der zu Ihrem Drucker geliefert wurde.
Bitte verwenden Sie ausschließlich das Originalzubehör der Marke
SAGEM. Andernfalls riskieren Sie den Garantieverlust für Ihr Gerät.
Artikelnr. Verbrauchsmaterial - DSR400
(Band + Papier für 40 Fotos): 251 559 421
Artikelnr. Verbrauchsmaterial - DSR400T
(Band + Papier für 120 Fotos):251 559 434

- 26 -
9 WARTUNG
R EINIGUNG DES DRUCKERKOPFS
Wenn Ihre Fotos einen durchgängigen Streifen über die gesamte Bogenlänge
aufweisen, kleben eventuell Fremdkörper am Druckkopf.
Verwenden Sie zur Reinigung Brennspiritus 1 und handelsübliche
Wattestäbchen.
Schalten Sie Ihren Drucker vom Stromnetz ab, ziehen Sie das
entsprechende Kabel, und warten Sie fünf Minuten, das sich der
Druckerkopf evtl. aufgeheizt hat und Sie sich beim Berühren verletzen
könnten.
1. Öffnen Sie die FarbbandKassettenklappe, drücken Sie auf den grünen
Sperrhebel und ziehen Sie die FarbbandKassette heraus.
2. Ziehen Sie das Papierfach heraus.
3. Drehen Sie das Gerät, um die untere Verschlussklappe zu entfernen.
4. Reinigen Sie die Heizleitung des Druckerkopfes mit vorsichtig mit
einem Wattestäbchen..
5. Bringen Sie die untere Verschlussklappe wieder an, drehen Sie den
Drucker wieder, stecken Sie das Kabel wieder ein und schalten Sie Ihren
Drucker mit dem Schalter wieder ein.
Achtung - Berühren Sie den Druckkopf niemals mit den Fingern oder mit
Gegenständen, die ihn zerkratzen könnten.
1. Verwenden Sie keine ätzenden Mittel; sie könnten Ihr Gerät beschädigen.
1
1
1
11 2
2
2
22 3
3
3
33
4
4
4
44 5
5
5
55

ENGLISHFRANÇAIS
DEUTSCHESPAÑOLITALIANONEDERLANDS
- 27 -
Setzen Sie das Farbband wieder ein. Achten Sie darauf, dass das Band
gespannt ist, bevor Sie es wieder in die Aufnahme einführen.
Überprüfen Sie, ob der Sperrhebel richtig verriegelt ist, und schließen
Sie die Klappe.
Schieben Sie das Papierfach wieder in seine Aufnahme, bis eseinrastet.
PAPIERSTAU
Sollte sich ein Blatt im Drucker eingeklemmt haben und sich nicht problemlos
aus dem Gerät entfernen lassen, gehen Sie bitte wie folgt vor:
Schalten Sie Ihren Drucker aus.
Drehen Sie das Gerät um, damit die Unterseite des Druckers zugänglich
wird.
Entfernen Sie die Abdeckung der Unterseite.
Ziehen Sie den verklemmten Bogen vorsichtig heraus. Berühren Sie
dabei auf keinen Fall den Druckkopf.
Setzen Sie die untere Abdeckung wieder ein und drehen Sie den Drucker
um.
Schalten Sie Ihren Drucker wieder an und stecken Sie das Kabel wieder
ein.
Achtung - Verwenden Sie niemals Objekte, die den Drucker beschädigen
könnten (Scheren, Schraubendreher, Brieföffner, Nagelfeilen usw).

- 28 -
STÖRUNGEN
Anmerkung : Für den Fall, dass Sie große Druckreihen mit Ihrem Gerät anfertigen, ist dieser mit
einer automatischen Zeitschaltvorrichtung versehen, um eine Überhitzung des
Gerätes zu vermeiden. Der Drucker geht automatisch mit dem laufenden
Druckvorgang weiter, sobald die Temperatur ausreichend abgekühlt ist.
STÖRUNGEN Lösungen
Keine Versorgung mit
Netzstrom (Anzeige
aus)
Prüfen Sie:
• Ist das Netzteil korrekt an eine Netzsteckdose
angeschlossen ist?.
• Ist das Netzkabel korrekt an den Drucker
angeschlossen?
• Führt die Stromsteckdose Spannung? (ggfs. Mit einem
anderen Gerät z.B. Tischlampe überprüfen)
Eine Fehlermeldung
wird auf dem Bild
schirm angezeigt
• Schlagen Sie auf der Tafel der Fehler meldungen nach
sehen (Sie im siehe Abschnitt Fehlermeldungen,
Seite -29) .
Das Gerät ist während
eines Ausdrucks vom
Netz getrennt worden
• Stellen Sie den Netzschalter auf und schließen Sie O
das Netzkabel wieder an.
• Schalten Sie den Drucker ein und warten Sie das Ende
der Initialisierungsphase ab.
• Wenn ein Papierbogen blockiert ist (siehe Abschnitt
Papierstau, Seite -27).
• Starten Sie den Ausdruck neu.
Es wird kein Foto auf
dem Bogen
ausgedruckt
• Verwenden Sie Bögen, die mit den technischen Daten
übereinstimmen?
• Haben Sie die Bögen mit der glänzenden Seite nach
oben eingelegt? (siehe Abschnitt Technische Daten,
Seite -31)
Das Foto wird mit
Längsstreifen oder mit
vielen Flecken
ausgedruckt
• Reinigen Sie den Druckkopf (siehe Abschnitt
Reinigung des Druckerkopfs, Seite -26).
Kein Ausdruck vom
PC
• Ist das USB-Kabel korrekt angeschlossen?
• Haben Sie den Druckertreiber installiert?

- 30 -
Karte nicht
lesbar (01) Karte entfernen Chipkarte
Fehler beim Übertragen der Daten.
Entnehmen Sie die eingefügte Karte und
führen Sie eine gültige Chipkarte ein..
Karte nicht
lesbar (02) Karte entfernen Chipkarte
Fehler beim Übertragen der Daten.
Entnehmen Sie die eingefügte Karte und
führen Sie eine gültige Chipkarte ein.
Karte nicht
lesbar (03) Karte entfernen Chipkarte
Fehler beim Übertragen der Daten.
Entnehmen Sie die eingefügte Karte und
führen Sie eine gültige Chipkarte ein.
Verbrauchsma
terial nicht
kompatibel
(01)
Karte entfernen Chipkarte Mechanisches Problem.
Verbrauchsma
terial nicht
kompatibel
(02)
Karte entfernen Chipkarte Problem mit dem Farbband.
Verbrauchsma
terial nicht
kompatibel
(03)
Karte entfernen Chipkarte Marke nicht erkannt.
Verbrauchsma
terial nicht
kompatibel
(04)
Karte entfernen Chipkarte Farbmessungs-fehler.
Verbrauchsma
terial nicht
kompatibel
(05)
Karte entfernen Chipkarte Typ (Master/ Pack) unbekannt.
Datei
beschädigt
Schwerer Fehler,
Operation
abbrechen
JPEG-
Dekompressio
ns-fehler
Die JPEG-Datei enthält ein nicht
unterstütztes Merkmal.
Nicht
unterstütztes
Format
Schwerer Fehler,
Operation
abbrechen
Übertragungs-
fehler
Das zu übertragende Foto ist nicht im
JPEG-Format.
Übertragungsf
ehler
Schwerer Fehler,
Operation
abbrechen
Übertragungs-
fehler
Fehler während der Übertragung eines
Fotos von einem Foto-Handy. Starten
Sie die Übertragung am Foto-Handy
neu. Überprüfen Sie, ob sich die beiden
Geräte genau gegenüberstehen.
Datenspeicher
voll
Zulässige
Druckmenge
erreicht
Übertragungs-
fehler
Zu übertragendes Foto zu groß oder
nicht mehr genug Platz, um das Foto im
Drucker zu speichern.
Systemfehler
tzen Sie sich bitte
mit Ihrem
Händler in
Verbindung
Sonstiges
Schalten Sie den Drucker 30 s lang aus
und schalten Sie ihn wieder ein. Wenden
Sie sich an Ihre Verkaufsstelle, wenn der
Fehler weiter fortbesteht.

ENGLISHFRANÇAIS
DEUTSCHESPAÑOLITALIANONEDERLANDS
- 31 -
TECHNISCHE DATEN
PC-Anforderungen:
Pentium oder gleichwertig,
OS: Windows 98 SE / 2000 / Me / XP,
128 MB RAM oder mehr,
150 MB freier Speicherplatz auf der Festplatte,
Freier USB-Port.
- - - - - - - - - - - - - - - - - - - - - - - - - - - - - - - - - - - - - - - - - - - - - - - - - - - - - - - - - - - - - - - - -
Gerätename : SAGEM PHOTO EASY 255
Ruckverfahren : Thermoübertragung
Auflösung : 300 x 300 dpi
Farbe : 16,7 Millionen durchgängig (ausser
Dateiübertragung)
Druckgeschwindigkeit : unter 120 Sekunden pro Foto
Schnittstelle : Speicherkarte vom Typ: Compact Flash Card
(Typ I & II unterstützt), SM / MS/ MMC / SD /
xD (mit Adapter),
USB-Port Version 1.1.
Speicherung der von einem
Foto-Handy übertragenen
Fotos : bis 500 Kilobyte
Unterstützte Bildauflösung: bis 12 Millionen Pixel
Verbrauchsmaterialien : Fotopapier, dreifarbiges Farbband (gelb,
magenta, cyan) und ein Siegellack, 40 Drucke
pro Farbband
Papierformat : 101 x 152,4 mm verpackt in Paketen zu je
20 Bögen
Papierzufuhr : über automatisches Fach mit einer Kapazität
von 20 Bögen
Netzstromversorgung : 230 VAC 50/60 Hz
Zulassung : CE
Verwendungsbereich : 10 bis 35 °C und 30 bis 85 % Luftfeuchtigkeit
Abmessungen in mm : 201 x 174 x 94 ohne Papierfach
Gewicht in kg : 1,5 (ausgenommen Spg.Versorgungsteil)
Energieverbrauch : in Standby-Stellung:7,6 W
im Druckmodus: 70 W

- 32 -
10 GARANTIE
Im Falle eines Defektes wenden Sie sich bitte an Ihren Verkäufer, der
Sie beraten wird, und legen diesem den Kaufbeleg vor, den Sie zuvor
von diesem erhalten haben.
G a r a n t i e
Haben Sie das Gerät direkt bei der SAGEM SA gekauft, so gelten die folgenden Bes-
timmungen:
A Für das Gerät gilt zunächst einmal die vier und zwanzigmonatige gesetzliche Sachmängelgewährleistung, deren genauer
Inhalt und Umfang in den Allgemeinen Geschäftsbedingungen, die auf den mit Ihnen geschlossenen Vertrag anzuwenden
sind, näher geregelt ist. Nach Ablauf der gesetzlichen Sachmängelgewährleistungsfrist, d.h. also in der Regel nach Ablauf
von sechs Monaten ab Lieferung, übernimmt die SAGEM SA bis zu maximal einem Jahr ab Lieferung die Garantie
(Ersatzteile und Reparatur) für die Freiheit des Geräts von Fabrikationsfehlern. Während dieses zusätzlichen Garantie-
zeitraumes wird das fehlerhafte Gerät kostenlos repariert. Der Kunde hat das fehlerhafte Gerät jedoch auf seine
Kosten an die ihm vom Kundendienst der SAGEM SA (die Telefonnummer steht auf dem Lieferschein) angegebene
Adresse zurückzuschicken. Die Reparatur erfolgt auf keinen Fall in den Räumlichkeiten des Kunden, es sei denn, er
daß mit diesem ein speziell Wartungsvertrag abgeschlossen wurde.
Hinweis: Nach Ablauf der gesetzlichen Sachmängelgewährleistungsfrist ist die SAGEM SA bis zu maximal zwei Jahren
ab Lieferung ausschließlich verpflichtet, das fehlerhafte Gerät zu den oben genannten Bedingungen kostenlos zu
reparieren. Ansprüche aus der gesetzlichen Sachmängel-gewährleistung bestehen in diesem Zeitraum nicht mehr.
Ausgeschlossen sind auch Schadensersatzansprüche aus sonstigem Rechtsgrund, es sei denn, die Schadensursache
beruht auf Vorsatz oder grober Fahrlässigkeit oder es wurde eine vertragswesentliche Pflicht verletzt. In letzterem Fall
beschränkt sich die Haftung jedoch auf den vorhersehbaren Schaden.
B Von der Garantie ausgeschlossen sind
• Defekte oder Funktionsstörungen, die auf eine Nichteinhaltung der Installations- und
Gebrauchsanweisungen, auf äußere Einwirkungen (Blitzschlag, Brand, Erschütterung,
Wasserschäden jeglicher Art usw.), auf einen von der SAGEM SA nicht schriftlich genehmigten
Umbau der Geräte, auf eine unterlassene Wartung (gemäß Bedienungsanleitung), Überprüfung
oder Pflege der Geräte, auf ungeeignete Umweltbedingungen für die Geräte (insbesondere im
Zusammenhang mit ungeeigneten Temperatur- oder Luftfeuchtigkeitsbedingungen für die Geräte
und die Verbrauchsmaterialien) oder auf eine Reparatur oder eine Instandhaltung zurückzuführen
sind, die von einer von der SAGEM SA nicht ermächtigten Person vorgenommen wurde,
• die normale Abnutzung der Geräte und die Abnutzung der Zubehörteile,
• Beschädigungen, die auf eine unzureichende oder schlechte Verpackung der an die SAGEM SA
zurückgesendeten Geräte zurückzuführen sind,
• die Lieferung neuer Softwareversionen,
• Reparaturen eines ohne die schriftliche Zustimmung der SAGEM SA geänderten oder
hinzugefügten Gerätes oder Nachbesserungen einer ohne die schriftliche Zustimmung der
SAGEM SA geänderten oder hinzugefügten Software,
• Funktionsstörungen, die weder auf die Ausrüstung noch auf die Software zurückzuführen sind,
die in den Benutzergeräten verwendet wird, um den Zugriff auf die von der Ausrüstung zur
Verfügung gestellten Dienste zu ermöglichen,
• Verbindungsprobleme, die auf ein ungünstiges Umfeld zurückzuführen sind, insbesondere:
- Probleme im Zusammenhang mit dem Zugang oder der Verbindung zum Internet wie z.B.
Unterbrechungen der Zugangsnetze, der Zusammen-bruch der Leitung des Abonnenten oder
seines Gesprächspartners,
- Übertragungsprobleme (unzureichende geographische Abdeckung des Gebietes durch die
radio-elektrischen Sender, Interferenzen, Störgeräusche, Zusammenbruch oder schlechte
Qualität der Telefon-leitungen...)
- Fehler der örtlichen Leitungen (Verkabelung, Server, Benutzergeräte) bzw. Fehler des
Übertragungsnetzes,

ENGLISHFRANÇAIS
DEUTSCHESPAÑOLITALIANONEDERLANDS
- 33 -
• Arbeiten zwecks Generalüberholung der Geräte (so wie in dem den Geräten beigefügten
Benutzerhandbuch beschrieben) sowie Funktionsstörungen, die auf eine Unterlassung der
Generalüberholung zurückgehen, wobei darauf hinzuweisen ist, daß die Kosten für die Arbeiten
zur Generalüberholung auf jeden Fall zu Lasten des Kunden gehen.
C In den oben unter B) genannten Fällen sowie nach Ablauf der Garantiefrist hat der Kunde von der SAGEM SA einen
Kostenvoranschlag einzuholen, den er vor der Rücksendung der Geräte an den Kundendienst der SAGEM SA akzeptieren
muß. Die Reparatur- und Versandkosten (hin und zurück) werden dem Kunden in Rechnung gestellt.
Die vorstehenden Bestimmungen gelten, soweit nicht mit dem Kunden eine schriftliche Sondervereinbarung
abgeschlossen worden ist und sind auf sämtliche in Deutschland verkauften Geräte anzuwenden. Sollte eine dieser
Bestimmungen gegen eine zwingende Verbraucherschutzvorschrift des nationalen Rechts verstoßen, ist diese
Bestimmung nicht anzuwenden; die Wirksamkeit der übrigen Bestimmungen bleibt hiervon unberührt.
Termékspecifikációk
| Márka: | Sagem |
| Kategória: | nyomtató |
| Modell: | Photo Easy 255 |
Szüksége van segítségre?
Ha segítségre van szüksége Sagem Photo Easy 255, tegyen fel kérdést alább, és más felhasználók válaszolnak Önnek
Útmutatók nyomtató Sagem

20 Augusztus 2024
21 Július 2024
6 Július 2024
Útmutatók nyomtató
- nyomtató Samsung
- nyomtató Sony
- nyomtató Fujitsu
- nyomtató LG
- nyomtató Olympus
- nyomtató Panasonic
- nyomtató Canon
- nyomtató StarTech.com
- nyomtató Sharp
- nyomtató Lenovo
- nyomtató Toshiba
- nyomtató HP
- nyomtató Roland
- nyomtató Digitus
- nyomtató Zebra
- nyomtató AVM
- nyomtató Fujifilm
- nyomtató Dell
- nyomtató Xerox
- nyomtató Primera
- nyomtató Thomson
- nyomtató Polaroid
- nyomtató Kyocera
- nyomtató Ricoh
- nyomtató Epson
- nyomtató Huawei
- nyomtató Renkforce
- nyomtató Mitsubishi
- nyomtató Godex
- nyomtató Brother
- nyomtató Citizen
- nyomtató Microboards
- nyomtató Kodak
- nyomtató MSI
- nyomtató Dymo
- nyomtató Testo
- nyomtató Konica Minolta
- nyomtató Datamax O'Neil
- nyomtató Kogan
- nyomtató Honeywell
- nyomtató Velleman
- nyomtató D-Link
- nyomtató Fargo
- nyomtató TSC
- nyomtató Olympia
- nyomtató Tomy
- nyomtató Posiflex
- nyomtató ZKTeco
- nyomtató NEC
- nyomtató CUSTOM
- nyomtató Panduit
- nyomtató OKI
- nyomtató Equip
- nyomtató Pantum
- nyomtató Brady
- nyomtató Bixolon
- nyomtató CSL
- nyomtató Nilox
- nyomtató Seiko
- nyomtató Argox
- nyomtató Royal Sovereign
- nyomtató Lexmark
- nyomtató Olivetti
- nyomtató Intermec
- nyomtató Minolta
- nyomtató DNP
- nyomtató Triumph-Adler
- nyomtató Oce
- nyomtató Paxar
- nyomtató Metapace
- nyomtató Ultimaker
- nyomtató Ibm
- nyomtató Toshiba TEC
- nyomtató Frama
- nyomtató Builder
- nyomtató Star Micronics
- nyomtató Dascom
- nyomtató HiTi
- nyomtató GG Image
- nyomtató Vupoint Solutions
- nyomtató Elite Screens
- nyomtató DTRONIC
- nyomtató Phoenix Contact
- nyomtató Videology
- nyomtató Star
- nyomtató EC Line
- nyomtató Colop
- nyomtató Approx
- nyomtató Fichero
- nyomtató Raspberry Pi
- nyomtató Middle Atlantic
- nyomtató IDP
- nyomtató Evolis
- nyomtató Nisca
- nyomtató Epson 7620
- nyomtató Sawgrass
Legújabb útmutatók nyomtató

10 Április 2025
10 Április 2025

10 Április 2025
10 Április 2025
10 Április 2025
10 Április 2025

9 Április 2025

9 Április 2025

9 Április 2025
3 Április 2025