Használati útmutató Progress PAS6001E
Olvassa el alább 📖 a magyar nyelvű használati útmutatót Progress PAS6001E (60 oldal) a tűzhely kategóriában. Ezt az útmutatót 8 ember találta hasznosnak és 2 felhasználó értékelte átlagosan 4.5 csillagra
Oldal 1/60

PAS6001E
User Manual
Notice d'utilisation
Benutzerinformation
Istruzioni per l’uso
Hob
Table de cuisson
Kochfeld
Piano cottura

CONTENTS
Safety information 2
Safety instructions 4
Installation 6
Product description 7
Daily use 8
Hints and tips 9
Care and cleaning 10
Troubleshooting 11
Technical data 12
Energy efficiency 13
Subject to change without notice.
SAFETY INFORMATION
Before the installation and use of the appliance, carefully
read the supplied instructions. The manufacturer is not
responsible for any injuries or damage that are the result of
incorrect installation or usage. Always keep the instructions
in a safe and accessible location for future reference.
Children and vulnerable people safety
•This appliance can be used by children aged from 8 years
and above and persons with reduced physical, sensory or
mental capabilities or lack of experience and knowledge if
they have been given supervision or instruction concerning
the use of the appliance in a safe way and understand the
hazards involved.
•Children between 3 and 8 years of age and persons with
very extensive and complex disabilities shall be kept away
from the appliance unless continuously supervised.
•Children of less than 3 years of age should be kept away
from the appliance unless continuously supervised.
•Do not let children play with the appliance.
•Keep all packaging away from children and dispose of it
appropriately.
•Keep children and pets away from the appliance when it
operates or when it cools down. Accessible parts may
become hot during use.
•If the appliance has a child safety device, it should be
activated.
•Children shall not carry out cleaning and user maintenance
of the appliance without supervision.
2 Progress

General Safety
•WARNING: The appliance and its accessible parts
become hot during use. Care should be taken to avoid
touching heating elements.
•WARNING: Unattended cooking on a hob with fat or oil
can be dangerous and may result in fire.
•NEVER try to extinguish a fire with water, but switch off the
appliance and then cover flame e.g. with a lid or a fire
blanket.
•CAUTION: The appliance must not be supplied through an
external switching device, such as a timer, or connected to
a circuit that is regularly switched on and off by a utility.
•CAUTION: The cooking process has to be supervised. A
short term cooking process has to be supervised
continuously.
•WARNING: Danger of fire: Do not store items on the
cooking surfaces.
•Metallic objects such as knives, forks, spoons and lids
should not be placed on the hob surface since they can get
hot.
•Do not use the appliance before installing it in the built-in
structure.
•Do not use a steam cleaner to clean the appliance.
•If the glass ceramic surface / glass surface is cracked,
switch off the appliance and unplug it from the mains. In
case the appliance is connected to the mains directly using
junction box, remove the fuse to disconnect the appliance
from power supply. In either case contact the Authorised
Service Centre.
•If the supply cord is damaged, it must be replaced by the
manufacturer, an authorized Service or similarly qualified
persons in order to avoid a hazard.
•WARNING: Use only hob guards designed by the
manufacturer of the cooking appliance or indicated by the
manufacturer of the appliance in the instructions for use as
Progress 3

suitable or hob guards incorporated in the appliance. The
use of inappropriate guards can cause accidents.
SAFETY INSTRUCTIONS
Installation
WARNING! Only a qualified
person must install this
appliance.
WARNING! Risk of injury or
damage to the appliance.
• Remove all the packaging.
• Do not install or use a damaged
appliance.
• Follow the installation instructions
supplied with the appliance.
• Keep the minimum distance from other
appliances and units.
• Always take care when moving the
appliance as it is heavy. Always use
safety gloves and enclosed footwear.
• Seal the cut surfaces with a sealant to
prevent moisture to cause swelling.
• Protect the bottom of the appliance
from steam and moisture.
• Do not install the appliance adjacent to
a door or under a window. This
prevents hot cookware falling from the
appliance when the door or the window
is opened.
• If the appliance is installed above
drawers make sure that the space,
between the bottom of the appliance
and the upper drawer, is sufficient for
air circulation.
• The bottom of the appliance can get
hot. Make sure to install a separation
panel made from plywood, kitchen
carcass material or other non-
flammable materials under the
appliance to prevent access to the
bottom.
• The separation panel has to cover the
area under the hob completely.
Electrical Connection
WARNING! Risk of fire and
electric shock.
• All electrical connections should be
made by a qualified electrician.
• The appliance must be earthed.
• Before carrying out any operation make
sure that the appliance is disconnected
from the power supply.
• Make sure that the parameters on the
rating plate are compatible with the
electrical ratings of the mains power
supply.
• Make sure the appliance is installed
correctly. Loose and incorrect electricity
mains cable or plug (if applicable) can
make the terminal become too hot.
• Use the correct electricity mains cable.
• Do not let the electricity mains cable
tangle.
• Make sure that a shock protection is
installed.
• Use the strain relief clamp on the cable.
• Make sure the mains cable or plug (if
applicable) does not touch the hot
appliance or hot cookware, when you
connect the appliance to the near
sockets.
• Do not use multi-plug adapters and
extension cables.
• Make sure not to cause damage to the
mains plug (if applicable) or to the
mains cable. Contact our Authorised
Service Centre or an electrician to
change a damaged mains cable.
• The shock protection of live and
insulated parts must be fastened in
such a way that it cannot be removed
without tools.
• Connect the mains plug to the mains
socket only at the end of the
installation. Make sure that there is
access to the mains plug after the
installation.
4 Progress

• If the mains socket is loose, do not
connect the mains plug.
• Do not pull the mains cable to
disconnect the appliance. Always pull
the mains plug.
• Use only correct isolation devices: line
protecting cut-outs, fuses (screw type
fuses removed from the holder), earth
leakage trips and contactors.
• The electrical installation must have an
isolation device which lets you
disconnect the appliance from the
mains at all poles. The isolation device
must have a contact opening width of
minimum 3 mm.
Use
WARNING! Risk of injury,
burns and electric shock.
• Remove all the packaging, labelling
and protective film (if applicable) before
first use.
• This appliance is for household use
only.
• Do not change the specification of this
appliance.
• Make sure that the ventilation openings
are not blocked.
• Do not let the appliance stay
unattended during operation.
• Set the cooking zone to “off” after each
use.
• Do not put cutlery or saucepan lids on
the cooking zones. They can become
hot.
• Do not operate the appliance with wet
hands or when it has contact with
water.
• Do not use the appliance as a work
surface or as a storage surface.
• If the surface of the appliance is
cracked, disconnect immediately the
appliance from the power supply. This
to prevent an electrical shock.
• When you place food into hot oil, it may
splash.
WARNING! Risk of fire and
explosion
• Fats and oil when heated can release
flammable vapours. Keep flames or
heated objects away from fats and oils
when you cook with them.
• The vapours that very hot oil releases
can cause spontaneous combustion.
• Used oil, that can contain food
remnants, can cause fire at a lower
temperature than oil used for the first
time.
• Do not put flammable products or items
that are wet with flammable products
in, near or on the appliance.
WARNING! Risk of damage to
the appliance.
• Do not keep hot cookware on the
control panel.
• Do not put a hot pan cover on the glass
surface of the hob.
• Do not let cookware boil dry.
• Be careful not to let objects or
cookware fall on the appliance. The
surface can be damaged.
• Do not activate the cooking zones with
empty cookware or without cookware.
• Do not put aluminium foil on the
appliance.
• Cookware made of cast iron, aluminium
or with a damaged bottom can cause
scratches on the glass / glass ceramic.
Always lift these objects up when you
have to move them on the cooking
surface.
• This appliance is for cooking purposes
only. It must not be used for other
purposes, for example room heating.
Care and cleaning
• Clean the appliance regularly to
prevent the deterioration of the surface
material.
• Deactivate the appliance and let it cool
down before you clean it.
• Disconnect the appliance from the
electrical supply before maintenance.
• Do not use water spray and steam to
clean the appliance.
• Clean the appliance with a moist soft
cloth. Only use neutral detergents. Do
not use any abrasive products,
Progress 5

abrasive cleaning pads, solvents or
metal objects.
Service
• To repair the appliance contact the
Authorised Service Centre.
• Use original spare parts only.
Disposal
WARNING! Risk of injury or
suffocation.
• Contact your municipal authority for
information on how to discard the
appliance correctly.
• Disconnect the appliance from the
mains supply.
• Cut off the mains electrical cable close
to the appliance and dispose of it.
INSTALLATION
WARNING! Refer to Safety
chapters.
Before the installation
Before you install the hob, write down the
information below from the rating plate.
The rating plate is on the bottom of the
hob.
Serial number ...........................
Built-in hobs
Only use the built-in hobs after you
assemble the hob into correct built-in units
and work surfaces that align to the
standards.
Connection cable
• For a single phase or two phase
connection, use the cable type:
H05V2V2-F which withstands a
temperature of 90 °C or higher. Speak
to your local Service Centre.
• To replace the damaged mains cable,
use the cable type: H05V2V2-F which
withstands a temperature of 90 °C or
higher. Speak to your local Service
Centre.
Assembly
min.
50mm
min.
500mm
6 Progress

min.
12 mm
min.
60 mm
PRODUCT DESCRIPTION
Cooking surface layout
210 mm
145 mm 180 mm
145 mm 1
1
1 1
2
1Cooking zone
2Control panel
Control panel layout
1 2 3
Use the sensor fields to operate the appliance. The displays, indicators and sounds tell
which functions operate.
Progress 7

seconds (a pan, a cloth, etc.). An
acoustic signal sounds and the hob
deactivates. Remove the object or
clean the control panel.
• you do not deactivate a cooking zone
or change the heat setting. After some
time comes on and the hob
deactivates.
The relation between the heat setting
and the time after which the hob
deactivates:
Heat setting The hob deacti‐
vates after
1 - 2 6 hours
3 - 4 5 hours
5 4 hours
6 - 9 1.5 hour
The heat setting
Touch to increase the heat setting.
Touch to decrease the heat setting.
Touch and at the same time to
deactivate the cooking zone.
Child Safety Device
This function prevents an accidental
operation of the hob.
To start the function: activate the hob
with . Do not set any heat setting.
Touch of the two front cooking zones at
the same time for 4 seconds. comes
on. Deactivate the hob with .
To stop the function: activate the hob
with . Do not set any heat setting.
Touch of the two front cooking zones at
the same time for 4 seconds. comes
on. Deactivate the hob with .
To suspend the function for only one
cooking session: activate the hob with
. comes on. Touch of the two
front cooking zones at the same time for 4
seconds. Set the heat setting in 10
seconds. You can operate the hob. When
you deactivate the hob with the
function operates again.
HINTS AND TIPS
WARNING! Refer to Safety
chapters.
Cookware
The bottom of the cookware
must be as thick and flat as
possible.
Ensure pan bases are clean
and dry before placing on the
hob surface.
Cookware made of enamelled
steel and with aluminium or
copper bottoms can cause a
colour change on the glass-
ceramic surface.
Examples of cooking
applications
The data in the table is for
guidance only.
Heat setting Use to: Time
(min)
Hints
1 Keep cooked food warm. as
nec‐
essary
Put a lid on the cookware.
Progress 9

Heat setting Use to: Time
(min)
Hints
1 - 2 Hollandaise sauce, melt: but‐
ter, chocolate, gelatine.
5 - 25 Mix from time to time.
1 - 2 Solidify: fluffy omelettes, baked
eggs.
10 -
40
Cook with a lid on.
2 - 3 Simmer rice and milkbased
dishes, heat up ready-cooked
meals.
25 -
50
Add at least twice as much liq‐
uid as rice, mix milk dishes
halfway through the proce‐
dure.
3 - 4 Steam vegetables, fish, meat. 20 -
45
Add a couple of tablespoons
of liquid.
4 - 5 Steam potatoes. 20 -
60
Use max. ¼ l of water for 750
g of potatoes.
4 - 5 Cook larger quantities of food,
stews and soups.
60 -
150
Up to 3 l of liquid plus ingredi‐
ents.
6 - 7 Gentle fry: escalope, veal cor‐
don bleu, cutlets, rissoles,
sausages, liver, roux, eggs,
pancakes, doughnuts.
as
nec‐
essary
Turn halfway through.
7 - 8 Heavy fry, hash browns, loin
steaks, steaks.
5 - 15 Turn halfway through.
9 Boil water, cook pasta, sear meat (goulash, pot roast), deep-fry chips.
CARE AND CLEANING
WARNING! Refer to Safety
chapters.
General information
• Clean the hob after each use.
• Always use cookware with a clean
base.
• Scratches or dark stains on the surface
have no effect on how the hob
operates.
• Use a special cleaner suitable for the
surface of the hob.
• Use a special scraper for the glass.
Cleaning the hob
• melted plastic,Remove immediately:
plastic foil, sugar and food with sugar,
otherwise, the dirt can cause damage
to the hob. Take care to avoid burns.
Use a special hob scraper on the glass
surface at an acute angle and move the
blade on the surface.
•Remove when the hob is sufficiently
cool: limescale rings, water rings, fat
stains, shiny metallic discoloration.
Clean the hob with a moist cloth and a
non-abrasive detergent. After cleaning,
wipe the hob dry with a soft cloth.
•Remove shiny metallic
discoloration: use a solution of water
with vinegar and clean the glass
surface with a cloth.
10 Progress

TROUBLESHOOTING
WARNING! Refer to Safety
chapters.
What to do if...
Problem Possible cause Remedy
You cannot activate or oper‐
ate the hob.
The hob is not connected to
an electrical supply or it is
connected incorrectly.
Check if the hob is correctly
connected to the electrical
supply. Refer to the connec‐
tion diagram.
The fuse is blown. Make sure that the fuse is
the cause of the malfunc‐
tion. If the fuse is blown
again and again, contact a
qualified electrician.
You do not set the heat set‐
ting for 10 seconds.
Activate the hob again and
set the heat setting in less
than 10 seconds.
You touched 2 or more sen‐
sor fields at the same time.
Touch only one sensor field.
There is water or fat stains
on the control panel.
Clean the control panel.
An acoustic signal sounds
and the hob deactivates.
An acoustic signal sounds
when the hob is deactivated.
You put something on one
or more sensor fields.
Remove the object from the
sensor fields.
The hob deactivates. You put something on the
sensor field .
Remove the object from the
sensor field.
Residual heat indicator does
not come on.
The zone is not hot because
it operated only for a short
time or the sensor is dam‐
aged.
If the zone operated suffi‐
ciently long to be hot, speak
to an Authorised Service
Centre.
The sensor fields become
hot.
The cookware is too large or
you put it too near to the
controls.
Put large cookware on the
rear zones if possible.
comes on. Automatic Switch Off oper‐
ates.
Deactivate the hob and acti‐
vate it again.
comes on. Child Safety Device oper‐
ates.
Refer to "Daily use".
Progress 11

Cooking zone Nominal Power (Max heat set‐
ting) [W] Cooking zone diameter [mm]
Right front 1200 145
Right rear 1800 180
For optimal cooking results use cookware
no larger than the diameter of the cooking
zone.
ENERGY EFFICIENCY
Product information according to EU 66/2014 valid for EU market
only
Model identification PAS6001E
Type of hob Built-In Hob
Number of cooking zones 4
Heating technology Radiant Heater
Diameter of circular cook‐
ing zones (Ø)
Left front
Left rear
Right front
Right rear
21.0 cm
14.5 cm
14.5 cm
18.0 cm
Energy consumption per
cooking zone (EC electric
cooking)
Left front
Left rear
Right front
Right rear
200.1 Wh / kg
188.0 Wh / kg
188.0 Wh / kg
191.6 Wh / kg
Energy consumption of the
hob (EC electric hob)
191.9 Wh / kg
EN 60350-2 - Household electric cooking
appliances - Part 2: Hobs - Methods for
measuring performance
Energy saving
You can save energy during everyday
cooking if you follow below hints.
• When you heat up water, use only the
amount you need.
• If it is possible, always put the lids on
the cookware.
• Before you activate the cooking zone
put the cookware on it.
• The cookware bottom should have the
same diameter as the cooking zone.
• Put the smaller cookware on the
smaller cooking zones.
• Put the cookware directly in the centre
of the cooking zone.
• Use the residual heat to keep the food
warm or to melt it.
Progress 13

ENVIRONMENTAL CONCERNS
Recycle materials with the symbol . Put
the packaging in relevant containers to
recycle it. Help protect the environment
and human health by recycling waste of
electrical and electronic appliances. Do
not dispose of appliances marked with the
symbol with the household waste.
Return the product to your local recycling
facility or contact your municipal office.
14 Progress

•Si l'appareil est équipé d'un dispositif de sécurité enfants,
nous vous recommandons de l'activer.
•Les enfants ne doivent pas nettoyer ni entreprendre une
opération de maintenance sur l'appareil sans surveillance.
Sécurité générale
•AVERTISSEMENT : L'appareil et ses parties accessibles
deviennent chauds pendant son fonctionnement. Veillez à
ne pas toucher les éléments chauffants.
•AVERTISSEMENT : Il peut être dangereux de laisser
chauffer de la graisse ou de l'huile sans surveillance sur
une table de cuisson car cela pourrait provoquer un
incendie.
•N'essayez JAMAIS d'éteindre un feu avec de l'eau.
Éteignez l'appareil puis couvrez les flammes, par exemple
avec un couvercle ou une couverture ignifuge.
•ATTENTION : L'appareil ne doit pas être branché à
l'alimentation en utilisant un appareil de connexion externe
comme un minuteur, ou branché à un circuit qui est
régulièrement activé/désactivé par un fournisseur
d'énergie.
•ATTENTION : Toute cuisson doit être surveillée. Une
cuisson courte doit être surveillée en permanence.
•AVERTISSEMENT : Risque d'incendie ! N'entreposez rien
sur les surfaces de cuisson.
•Ne posez pas d'objets métalliques tels que couteaux,
fourchettes, cuillères ou couvercles sur la table de cuisson
car ils pourraient chauffer.
•N'utilisez pas l'appareil avant de l'avoir installé dans la
structure encastrée.
•N'utilisez pas de nettoyeur vapeur pour nettoyer l'appareil.
•Si la surface vitrocéramique / en verre est fissurée,
éteignez l'appareil et débranchez-le. Si l'appareil est
branché à l'alimentation secteur directement en utilisant
une boîte de jonction, retirez le fusible pour déconnecter
l'appareil de l'alimentation secteur. Dans tous les cas,
contactez le service après-vente agréé.
16 Progress

•Si le câble d'alimentation est endommagé, il doit être
remplacé par le fabricant, un service de maintenance
agréé ou un technicien qualifié afin d'éviter tout danger.
•AVERTISSEMENT : Utilisez uniquement les dispositifs de
protection pour table de cuisson conçus ou indiqués
comme adaptés par le fabricant de l'appareil de cuisson
dans les instructions d'utilisation, ou les dispositifs de
protection pour table de cuisson intégrés à l'appareil.
L'utilisation de dispositifs de protection non adaptés peut
entraîner des accidents.
CONSIGNES DE SÉCURITÉ
Installation
AVERTISSEMENT! L'appareil
doit être installé uniquement
par un professionnel qualifié.
AVERTISSEMENT! Risque de
blessure corporelle ou de
dommages matériels.
• Retirez l'intégralité de l'emballage.
• N'installez pas et ne branchez pas un
appareil endommagé.
• Suivez scrupuleusement les
instructions d'installation fournies avec
l'appareil.
• Respectez l'espacement minimal requis
par rapport aux autres appareils et
éléments.
• Soyez toujours vigilants lorsque vous
déplacez l'appareil car il est lourd.
Utilisez toujours des gants de sécurité
et des chaussures fermées.
• Isolez les surfaces découpées à l'aide
d'un matériau d'étanchéité pour éviter
que la moisissure ne provoque de
gonflements.
• Protégez la partie inférieure de
l'appareil de la vapeur et de l'humidité.
• N'installez pas l'appareil près d'une
porte ou sous une fenêtre. Les
récipients chauds risqueraient de
tomber de l'appareil lors de l'ouverture
de celles-ci.
• Si l'appareil est installé au-dessus de
tiroirs, assurez-vous qu'il y a
suffisamment d'espace entre le fond de
l'appareil et le tiroir supérieur pour que
l'air puisse circuler.
• Le dessous de l'appareil peut devenir
très chaud. Veillez à installer un
panneau de séparation sous l'appareil
pour en bloquer l'accès. Ce panneau
peut être en contreplaqué, provenir
d'un autre meuble de cuisine, et doit
être composé d'un matériau non
inflammable.
• Le panneau de séparation doit couvrir
entièrement l'espace sous la table de
cuisson.
Branchement électrique
AVERTISSEMENT! Risque
d'incendie ou d'électrocution.
• L’ensemble des branchements
électriques doit être effectué par un
technicien qualifié.
• L’appareil doit être relié à la terre.
• Avant toute intervention, assurez-vous
que l'appareil est débranché.
• Vérifiez que les paramètres figurant sur
la plaque signalétique correspondent
aux données électriques de votre
réseau.
• Assurez-vous que l'appareil est bien
installé. Un câble d'alimentation lâche
et inapproprié ou une fiche (si
Progress 17

présente) non serrée peuvent être à
l'origine d'une surchauffe des bornes.
• Utilisez le câble d'alimentation
électrique approprié.
• Ne laissez pas le câble d'alimentation
s'emmêler.
• Assurez-vous qu'une protection anti-
électrocution est installée.
• Utilisez un collier anti-traction sur le
câble.
• Assurez-vous que le câble
d'alimentation ou la fiche (si présente)
n'entrent pas en contact avec les
surfaces brûlantes de l'appareil ou les
récipients brûlants lorsque vous
branchez l'appareil à des prises
électriques situées à proximité.
• L’appareil ne doit pas être raccordé à
l’aide d'une prise multiple ou d'un
prolongateur.
• Veillez à ne pas endommager la fiche
secteur (si présente) ni le câble
d'alimentation. Contactez notre service
après-vente agréé ou un électricien
pour remplacer le câble d'alimentation
s'il est endommagé.
• La protection contre les chocs des
parties sous tension et isolées doit être
fixée de telle manière qu’elle ne puisse
pas être enlevée sans outils.
• Ne branchez la fiche d’alimentation à la
prise de courant qu’à la fin de
l’installation. Assurez-vous que la prise
principale est accessible une fois
l’appareil installé.
• Si la prise de courant est lâche, ne
branchez pas la fiche d'alimentation
secteur.
• Ne tirez jamais sur le câble
d’alimentation électrique pour
débrancher l’appareil. Tirez toujours
sur la fiche de la prise secteur.
• N’utiliser que des dispositifs d’isolation
corrects : coupe-circuits de protection
de ligne, fusibles. (les fusibles à visser
doivent être retirés du support), un
disjoncteur différentiel et des
contacteurs.
• L'installation électrique doit être
équipée d'un dispositif d'isolement à
coupure omnipolaire. Le dispositif
d'isolement doit présenter une distance
d'ouverture des contacts d'au moins
3 mm.
Utilisation
AVERTISSEMENT! Risque de
blessures, de brûlures ou
d'électrocution.
• Avant la première utilisation, retirez les
emballages, les étiquettes et les films
de protection (si présents).
• Cet appareil est exclusivement destiné
à une utilisation domestique.
• Ne modifiez pas les caractéristiques de
cet appareil.
• Assurez-vous que les orifices de
ventilation ne sont pas bouchés.
• Ne laissez jamais l'appareil sans
surveillance pendant son
fonctionnement.
• Éteignez les zones de cuisson après
chaque utilisation.
• Ne posez pas de couverts ou de
couvercles sur les zones de cuisson.
Elles sont chaudes.
• N'utilisez jamais cet appareil avec les
mains mouillées ou lorsqu'il est en
contact avec de l'eau.
• N'utilisez jamais l'appareil comme plan
de travail ou comme plan de stockage.
• Si la surface de l'appareil présente des
fêlures, débranchez immédiatement
l'appareil pour éviter tout risque
d'électrocution.
• Lorsque vous versez un aliment dans
de l'huile chaude, elle peut
éclabousser.
AVERTISSEMENT! Risque
d'incendie et d'explosion.
• Les graisses et l'huile chaudes peuvent
dégager des vapeurs inflammables.
Tenez les flammes ou les objets
chauds éloignés des graisses et de
l'huile lorsque vous vous en servez
pour cuisiner.
• Les vapeurs dégagées par l'huile très
chaude peuvent provoquer une
combustion spontanée.
18 Progress

Câble d'alimentation
• Pour un raccordement monophasé ou
biphasé, utilisez le type de câble
d'alimentation suivant : H05V2V2-F qui
doit supporter une température
minimale de 90 °C. Contactez votre
service après-vente.
• Pour remplacer le câble d'alimentation
endommagé, utilisez le type de câble
suivant : H05V2V2-F qui doit supporter
une température minimale de 90 °C.
Contactez votre service après-vente.
Montage
min.
50mm
min.
500mm
min.
12 mm
min.
60 mm
20 Progress

DESCRIPTION DE L'APPAREIL
Description de la table de cuisson
210 mm
145 mm 180 mm
145 mm 1
1
1 1
2
1Zone de cuisson
2Bandeau de commande
Description du bandeau de commande
1 2 3
Les touches sensitives permettent de faire fonctionner l'appareil. Les affichages, les
voyants et les signaux sonores indiquent les fonctions activées.
Tou‐
che
sen‐
siti‐
ve
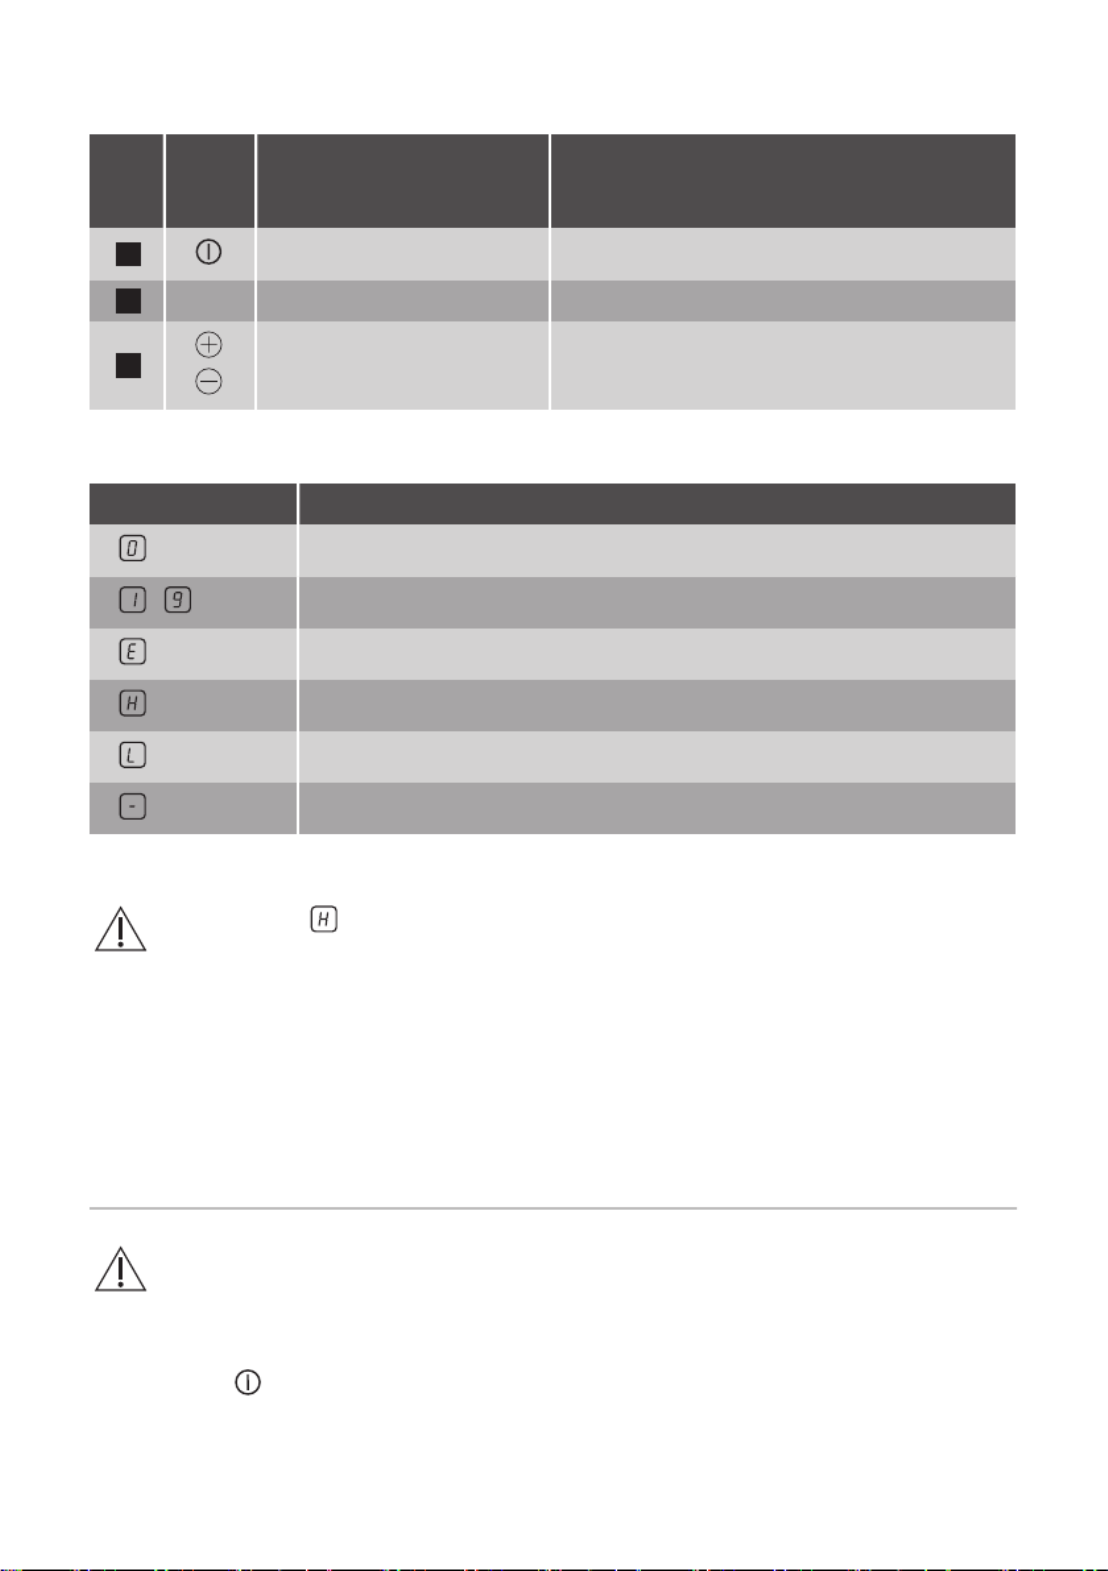
Fonction Commentaire
1MARCHE/ARRÊT Pour allumer et éteindre la table de cuisson.
2- Indicateur du niveau de
cuisson
Pour indiquer le niveau de cuisson.
3 / - Pour sélectionner un niveau de cuisson.
Progress 21

Indicateurs de niveau de cuisson
Écran d'afficha‐
ge
Description
La zone de cuisson est désactivée.
- La zone de cuisson est activée.
+ chiffre Une anomalie de fonctionnement s'est produite.
Une zone de cuisson est encore chaude (chaleur résiduelle).
Dispositif de sécurité enfants est activée.
Arrêt automatique est activée.
Voyant de chaleur résiduelle
AVERTISSEMENT! Il y a
risque de brûlures par la
chaleur résiduelle. Les voyants
indiquent le niveau de chaleur
résiduelle des zones de
cuisson que vous utilisez
actuellement. Les voyants des
zones voisines peuvent
également s'allumer, même si
vous ne les utilisez pas.
UTILISATION QUOTIDIENNE
AVERTISSEMENT! Reportez-
vous aux chapitres concernant
la sécurité.
Activation et désactivation
Appuyez sur pendant 1 seconde pour
activer ou désactiver la table de cuisson.
Arrêt automatique
Cette fonction arrête la table de
cuisson automatiquement si :
• toutes les zones de cuisson sont
désactivées,
• vous ne réglez pas le niveau de
cuisson après avoir allumé la table de
cuisson,
• vous avez renversé quelque chose ou
placé un objet sur le bandeau de
commande pendant plus de
10 secondes (une casserole, un
torchon, etc.). Un signal sonore retentit
et la table de cuisson s'éteint. Retirez
l'objet du bandeau de commande ou
nettoyez celui-ci.
• vous ne désactivez pas la zone de
cuisson ou ne modifiez pas le niveau
de cuisson. Au bout de quelques
instants, s'allume et la table de
cuisson s'éteint.
La relation entre le niveau de cuisson
et la durée après laquelle la table de
cuisson s'éteint :
22 Progress

Niveau de cuisson La table de cuis‐
son s'éteint au
bout de
1 - 2 6 heures
3 - 4 5 heures
5 4 heures
6 - 9 1,5 heure
Niveau de cuisson
Appuyez sur pour augmenter le niveau
de cuisson. Appuyez sur pour diminuer
le niveau de cuisson. Appuyez
simultanément sur et pour
désactiver la zone de cuisson.
Dispositif de sécurité enfants
Cette fonction permet d'éviter une
utilisation involontaire de la table de
cuisson.
Pour lancer la fonction : allumez la table
de cuisson en appuyant sur . Ne
sélectionnez pas de réglage de niveau de
cuisson. Appuyez simultanément sur
des deux zones de cuisson avant pendant
4 secondes. s'allume. Éteignez la table
de cuisson en appuyant sur .
Pour arrêter la fonction : allumez la table
de cuisson en appuyant sur . Ne
sélectionnez pas de réglage de niveau de
cuisson. Appuyez simultanément sur
des deux zones de cuisson avant pendant
4 secondes. s'allume. Éteignez la table
de cuisson en appuyant sur .
Pour suspendre la fonction le temps
d'une cuisson : allumez la table de
cuisson en appuyant sur . s'allume.
Appuyez simultanément sur des deux
zones de cuisson avant pendant 4
secondes. Réglez le niveau de cuisson
dans les 10 secondes qui suivent. Vous
pouvez utiliser la table de cuisson.
Lorsque vous éteignez la table de cuisson
avec , la fonction est de nouveau
activée.
CONSEILS
AVERTISSEMENT! Reportez-
vous aux chapitres concernant
la sécurité.
Récipients
Le fond de l'ustensile de
cuisson doit être aussi plat et
épais que possible.
Assurez-vous que le fond du
récipient est propre avant de le
placer sur la surface de la table
de cuisson.
Les récipients de cuisson avec
un fond en émail, en aluminium
ou en cuivre peuvent laisser
des traces sur la surface
vitrocéramique.
Exemples de cuisson
Les valeurs figurant dans le
tableau suivant sont fournies à
titre indicatif.
Niveau de
cuisson
Utilisation : Durée
(min)
Conseils
1 Conservez les aliments cuits
au chaud.
au be‐
soin
Placez un couvercle sur le ré‐
cipient.
Progress 23

Niveau de
cuisson
Utilisation : Durée
(min)
Conseils
1 - 2 Sauce hollandaise, faire fon‐
dre : beurre, chocolat, gélatine.
5 - 25 Mélangez de temps en temps.
1 - 2 Solidifier : omelettes, œufs co‐
cotte.
10 -
40
Couvrez pendant la cuisson.
2 - 3 Faire mijoter des plats à base
de riz et de laitage, réchauffer
des plats cuisinés.
25 -
50
Ajoutez au moins deux fois
plus de liquide que de riz, mé‐
langez les aliments à base de
laitage à la moitié du temps de
cuisson.
3 - 4 Cuire à la vapeur des légu‐
mes, du poisson et de la vian‐
de.
20 -
45
Ajoutez quelques cuillères à
soupe de liquide
4 - 5 Cuire des pommes de terre à
la vapeur.
20 -
60
Utilisez max. ¼ l d'eau pour
750 g de pommes de terre.
4 - 5 Cuire de grandes quantités
d'aliments, des ragoûts et des
soupes.
60 -
150
Ajoutez jusqu'à 3 l de liquide,
plus les ingrédients.
6 - 7 Faire revenir : escalopes, cor‐
dons bleus de veau, côtelettes,
rissolettes, saucisses, foie,
roux, œufs, crêpes, beignets.
au be‐
soin
Retournez à la moitié du
temps.
7 - 8 Cuisson à température élevée
des pommes de terre risso‐
lées, filets, steaks.
5 - 15 Retournez à la moitié du
temps.
9 Faire bouillir de l'eau, cuire des pâtes, griller de la viande (goulasch, bœuf
braisé), cuire des frites
ENTRETIEN ET NETTOYAGE
AVERTISSEMENT! Reportez-
vous aux chapitres concernant
la sécurité.
Informations générales
• Nettoyez la table de cuisson après
chaque utilisation.
• Utilisez toujours un récipient dont le
fond est propre.
• Les rayures ou les taches sombres sur
la surface n'ont aucune incidence sur le
fonctionnement de la table de cuisson.
• Utilisez un nettoyant spécialement
adapté à la surface de la table de
cuisson.
• Utilisez un racloir spécial pour la vitre.
Nettoyage de la table de
cuisson
• le plastiqueEnlevez immédiatement :
fondu, les feuilles de plastique, le sucre
et les aliments contenant du sucre car
la saleté peut endommager la table de
cuisson. Veillez à ne pas vous brûler.
Tenez le racloir spécial incliné sur la
24 Progress

surface vitrée et faites glisser la lame
du racloir pour enlever les salissures.
•Une fois que la table de cuisson a
suffisamment refroidi, enlevez :
traces de calcaire et d'eau, projections
de graisse, décolorations métalliques
luisantes. Nettoyez la table de cuisson
à l'aide d'un chiffon humide et d'un
détergent non abrasif. Après le
nettoyage, séchez la table de cuisson à
l'aide d'un chiffon doux.
•Pour retirer les décolorations
métalliques brillantes : utilisez une
solution d'eau additionnée de vinaigre
et nettoyez la surface vitrée avec un
chiffon.
DÉPANNAGE
AVERTISSEMENT! Reportez-
vous aux chapitres concernant
la sécurité.
Que faire si…
Problème Cause probable Solution
Vous ne pouvez pas allumer
la table de cuisson ni la faire
fonctionner.
La table de cuisson n'est
pas connectée à une source
d'alimentation électrique ou
le branchement est incor‐
rect.
Vérifiez que la table de cuis‐
son est correctement bran‐
chée à une source d'alimen‐
tation électrique. Consultez
le schéma de raccordement.
Le fusible a disjoncté. Vérifiez que le fusible est
bien la cause de l'anomalie.
Si les fusibles disjonctent de
manière répétée, faites ap‐
pel à un électricien qualifié.
Vous ne réglez pas le ni‐
veau de cuisson dans les
10 secondes.
Allumez de nouveau la table
de cuisson et réglez le ni‐
veau de cuisson en moins
de 10 secondes.
Vous avez appuyé sur plu‐
sieurs touches sensitives en
même temps.
N'appuyez que sur une seu‐
le touche sensitive à la fois.
Il y a de l'eau ou des taches
de graisse sur le bandeau
de commande.
Nettoyez le bandeau de
commande.
Un signal sonore retentit et
la table de cuisson s'éteint.
Un signal sonore retentit
lorsque la table de cuisson
est éteinte.
Vous avez posé quelque
chose sur une ou plusieurs
touches sensitives.
Retirez l'objet des touches
sensitives.
Progress 25

verre) et le message d'erreur qui s'affiche.
Assurez-vous d'utiliser correctement
l'appareil. En cas d'erreur de manipulation
de la part de l'utilisateur, le déplacement
du technicien du service après-vente ou
du vendeur pourra être facturé, même en
cours de garantie. Les instructions
relatives au service après-vente et aux
conditions de garantie figurent dans le
livret de garantie.
CARACTÉRISTIQUES TECHNIQUES
Plaque signalétique
Modèle PAS6001E PNC 949 492 376 00
Type 60 HAD 54 AO 220 - 240 V / 400 V 2N 50 - 60 Hz
Fabriqué en Roumanie
Numéro de série .......... 6.5 kW
PROGRESS
Caractéristiques des zones de cuisson
Zone de cuis‐
son
Puissance nominale (niveau de
cuisson max.) [W]
Diamètre de la zone de cuisson
[mm]
Avant gauche 2300 210
Arrière gauche 1200 145
Avant droite 1200 145
Arrière droite 1800 180
Pour des résultats de cuisson optimaux,
utilisez des récipients qui ne dépassent
pas le diamétre de la zone de cuisson.
RENDEMENT ÉNERGÉTIQUE
Informations sur le produit conformément à la norme EU 66/2014
valable pour le marché européen uniquement
Identification du modèle PAS6001E
Type de table de cuisson Table de cuisson
intégrée
Nombre de zones de cuis‐
son
4
Technologie de chauffage Chauffage par
rayonnement
Progress 27

INHALTSVERZEICHNIS
Sicherheitshinweise 29
Sicherheitsanweisungen 31
Montage 34
Gerätebeschreibung 35
Täglicher Gebrauch 36
Tipps und Hinweise 37
Reinigung und Pflege 38
Fehlersuche 39
Technische Daten 41
Energieeffizienz 42
Änderungen vorbehalten.
SICHERHEITSHINWEISE
Lesen Sie vor der Montage und dem Gebrauch des Geräts
zuerst die Bedienungsanleitung. Bei Verletzungen oder
Schäden infolge nicht ordnungsgemäßer Montage oder
Verwendung übernimmt der Hersteller keine Haftung.
Bewahren Sie die Anleitung zum Nachschlagen an einem
sicheren und zugänglichen Ort auf.
Sicherheit von Kindern und schutzbedürftigen
Personen
•Das Gerät kann von Kindern ab 8 Jahren und Personen
mit eingeschränkten physischen, sensorischen oder
geistigen Fähigkeiten oder mit mangelnder Erfahrung und/
oder mangelndem Wissen nur dann verwendet werden,
wenn sie durch eine für ihre Sicherheit zuständige Person
beaufsichtigt werden oder in die sichere Verwendung des
Geräts eingewiesen wurden und die mit dem Gerät
verbundenen Gefahren verstanden haben.
•Kinder zwischen 3 und 8 Jahren und Personen mit
schweren Behinderungen oder Mehrfachbehinderung
müssen vom Gerät ferngehalten werden, wenn sie nicht
ständig beaufsichtigt werden.
•Halten Sie Kinder unter 3 Jahren vom Gerät fern, wenn sie
nicht ständig beaufsichtigt werden.
•Kinder dürfen nicht mit dem Gerät spielen.
•Halten Sie sämtliches Verpackungsmaterial von Kindern
fern und entsorgen Sie es auf angemessene Weise.
Progress 29

•Halten Sie Kinder und Haustiere während des Betriebs
oder der Abkühlphase vom Gerät fern. Die zugänglichen
Geräteteile werden beim Betrieb sehr heiß.
•Falls Ihr Gerät mit einer Kindersicherung ausgestattet ist,
empfehlen wir, diese einzuschalten.
•Kinder dürfen keine Reinigung und Wartung ohne
Beaufsichtigung durchführen.
Allgemeine Sicherheit
•WARNUNG: Das Gerät und die zugänglichen Geräteteile
werden während des Betriebs heiß. Seien Sie vorsichtig
und berühren Sie niemals die Heizelemente.
•WARNUNG: Kochen mit Fett oder Öl auf einem
unbeaufsichtigten Kochfeld ist gefährlich und kann zu
einem Brand führen.
•Versuchen Sie NIEMALS, ein Feuer mit Wasser zu
löschen, sondern schalten Sie das Gerät aus und decken
Sie die Flamme ab, z.B. mit einem Deckel oder einer
Feuerlöschdecke.
•VORSICHT: Das Gerät darf nicht durch ein externes
Schaltgerät, wie einer Zeitschaltuhr, mit Strom versorgt
oder an einen Schaltkreis angeschlossen werden, der vom
einem Programm regelmäßig ein- und ausgeschaltet wird.
•VORSICHT: Der Kochvorgang muss überwacht werden.
Ein kurzer Kochvorgang muss kontinuierlich überwacht
werden.
•WARNUNG: Brandgefahr: Legen Sie keine Gegenstände
auf dem Kochfeld ab.
•Legen Sie keine Metallgegenstände wie Messer, Gabeln,
Löffel oder Topfdeckel auf die Oberfläche des Kochfelds,
da diese heiß werden können.
•Verwenden Sie ds Gerät nicht, bevor es in den
Einbauschrank gesetzt wird.
•Reinigen Sie das Gerät nicht mit einem
Dampfstrahlreiniger.
•Hat die Glaskeramik-/Glasoberfläche einen Sprung,
schalten Sie das Gerät aus und nehmen Sie es vom
30 Progress

Stromnetz. Falls das Gerät direkt mit dem Stromnetz
verbunden ist und nicht getrennt werden kann, nehmen
Sie die Sicherung für den Anschluss heraus, um die
Stromversorgung zu unterbrechen. Verständigen Sie in
jedem Fall den autorisierten Kundendienst.
•Wenn das Netzkabel beschädigt ist, muss es vom
Hersteller, seinem autorisierten Kundenservice oder einer
gleichermaßen qualifizierten Person ausgetauscht werden,
um Gefahrenquellen zu vermeiden.
•WARNUNG: Verwenden Sie nur Schutzabdeckungen des
Herstellers des Kochgeräts, von ihm in der
Bedienungsanleitung als geeignete und empfohlene
Schutzabdeckungen oder die im Gerät enthaltene
Schutzabdeckung. Es besteht Unfallgefahr durch die
Verwendung ungeeigneter Schutzabdeckungen.
SICHERHEITSANWEISUNGEN
Montage
WARNUNG! Die Montage des
Geräts darf nur von einer
qualifizierten Fachkraft
durchgeführt werden.
WARNUNG!
Verletzungsgefahr sowie Risiko
von Schäden am Gerät.
• Entfernen Sie das gesamte
Verpackungsmaterial.
• Montieren Sie ein beschädigtes Gerät
nicht und benutzen Sie es nicht.
• Halten Sie sich an die mitgelieferte
Montageanleitung.
• Die Mindestabstände zu anderen
Geräten und Küchenmöbeln sind
einzuhalten.
• Seien Sie beim Umsetzen des Gerätes
vorsichtig, da es sehr schwer ist.
Tragen Sie stets
Sicherheitshandschuhe und festes
Schuhwerk.
• Dichten Sie die Ausschnittskanten mit
einem Dichtungsmittel ab, um ein
Aufquellen durch Feuchtigkeit zu
verhindern.
• Schützen Sie die Geräteunterseite vor
Dampf und Feuchtigkeit.
• Installieren Sie das Gerät nicht direkt
neben einer Tür oder unter einem
Fenster. So kann heißes Kochgeschirr
nicht herunterfallen, wenn die Tür oder
das Fenster geöffnet wird.
• Wird das Gerät über Schubladen
eingebaut, achten Sie darauf, dass
zwischen dem Geräteboden und der
oberen Schublade ein ausreichender
Abstand für die Luftzirkulation
vorhanden ist.
• Der Boden des Geräts kann heiß
werden. Achten Sie darauf eine
feuerfeste Trennplatte aus Sperrholz,
Küchenmöbelmaterial oder einem
anderen nicht entflammbaren Material
unter dem Gerät anzubringen, damit
der Boden nicht zugänglich ist.
• Die Trennplatte muss den gesamten
Bereich unter dem Kochfeld abdecken.
Progress 31

Elektrischer Anschluss
WARNUNG! Brand- und
Stromschlaggefahr.
• Alle elektrischen Anschlüsse sind von
einem geprüften Elektriker
vorzunehmen.
• Das Gerät muss geerdet sein.
• Vor der Durchführung jeglicher
Arbeiten muss das Gerät von der
elektrischen Stromversorgung getrennt
werden.
• Stellen Sie sicher, dass die Daten auf
dem Typenschild mit den elektrischen
Nennwerten der Netzspannung
übereinstimmen.
• Vergewissern Sie sich, dass das Gerät
ordnungsgemäß installiert ist. Lockere
und unsachgemäße Kabel oder
Stecker (falls vorhanden) können die
Klemme überhitzen.
• Stellen Sie sicher, dass Sie das richtige
Kabel für den elektrischen
Netzanschluss verwenden.
• Achten Sie darauf, dass das Netzkabel
nicht lose hängt oder sich verheddert.
• Sorgen Sie dafür, dass ein
Berührungsschutz installiert wird.
• Verwenden Sie die Zugentlastung für
das Kabel.
• Stellen Sie beim elektrischen
Anschluss des Gerätes sicher, dass
das Netzkabel oder ggf. der
Netzstecker nicht mit dem heißen
Gerät oder heißem Kochgeschirr in
Berührung kommt.
• Verwenden Sie keine
Mehrfachsteckdosen oder
Verlängerungskabel.
• Achten Sie darauf, Netzstecker (falls
vorhanden) und Netzkabel nicht zu
beschädigen. Wenden Sie sich zum
Austausch eines beschädigten
Netzkabels an unseren autorisierten
Kundendienst oder eine
Elektrofachkraft.
• Alle Teile, die gegen direktes Berühren
schützen, sowie die isolierten Teile
müssen so befestigt werden, dass sie
nicht ohne Werkzeug entfernt werden
können.
• Stecken Sie den Netzstecker erst nach
Abschluss der Montage in die
Steckdose. Stellen Sie sicher, dass der
Netzstecker nach der Montage noch
zugänglich ist.
• Falls die Steckdose lose ist, schließen
Sie den Netzstecker nicht an.
• Ziehen Sie nicht am Netzkabel, wenn
Sie das Gerät von der
Stromversorgung trennen möchten.
Ziehen Sie stets am Netzstecker.
• Verwenden Sie nur geeignete
Trenneinrichtungen: Überlastschalter,
Sicherungen (Schraubsicherungen
müssen aus dem Halter entfernt
werden können),
Fehlerstromschutzschalter und
Schütze.
• Die elektrische Installation muss eine
Trenneinrichtung aufweisen, mit der
Sie das Gerät allpolig von der
Stromversorgung trennen können. Die
Trenneinrichtung muss mit einer
Kontaktöffnungsbreite von mindestens
3 mm ausgeführt sein.
Gebrauch
WARNUNG! Verletzungs-,
Verbrennungs- und
Stromschlaggefahr.
• Entfernen Sie vor dem ersten
Gebrauch das gesamte
Verpackungsmaterial, die Aufkleber
und Schutzfolie (falls vorhanden).
• Dieses Gerät ist ausschließlich zur
Verwendung im Haushalt bestimmt.
• Nehmen Sie keine technischen
Änderungen am Gerät vor.
• Die Lüftungsöffnungen dürfen nicht
abgedeckt werden.
• Lassen Sie das Gerät bei Betrieb nicht
unbeaufsichtigt.
• Schalten Sie die Kochzonen nach
jedem Gebrauch aus.
• Legen Sie kein Besteck und keine
Topfdeckel auf die Kochzonen.
Anderenfalls werden sie sehr heiß.
• Bedienen Sie das Gerät nicht mit
feuchten oder nassen Händen oder
32 Progress

min.
12 mm
min.
60 mm
GERÄTEBESCHREIBUNG
Kochfeldanordnung
210 mm
145 mm 180 mm
145 mm 1
1
1 1
2
1Kochzone
2Bedienfeld
Bedienfeldanordnung
1 2 3
Bedienen Sie das Gerät über die Sensorfelder. Die Anzeigen, Kontrolllampen und
akustischen Signale informieren Sie über die aktiven Funktionen.
Progress 35
Sen‐
sor‐
feld
Funktion Kommentar
1EIN/AUS Ein- und Ausschalten des Kochfeldes.
2- Kochstufenanzeige Zeigt die Kochstufe an.
3 / - Einstellen der Kochstufe.
Anzeigen der Kochstufen
Display Beschreibung
Die Kochzone ist ausgeschaltet.
- Die Kochzone ist eingeschaltet.
+ Zahl Eine Störung ist aufgetreten.
Eine Kochzone ist noch heiß (Restwärme).
Kindersicherung ist aktiviert.
Abschaltautomatik ist aktiviert.
Restwärmeanzeige
WARNUNG! Es besteht
Verbrennungsgefahr durch
Restwärme. Die Anzeigen
zeigen den Restwärmegrad der
Kochzonen an, die Sie gerade
verwenden. Die Anzeigen der
benachbarten Kochzonen
können auch dann leuchten,
wenn Sie sie nicht benutzen.
TÄGLICHER GEBRAUCH
WARNUNG! Siehe Kapitel
Sicherheitshinweise.
Ein- und Ausschalten
Berühren Sie 1 Sekunde lang, um das
Kochfeld ein- oder auszuschalten.
Abschaltautomatik
Mit dieser Funktion wird das Kochfeld
in folgenden Fällen automatisch
ausgeschaltet:
• Alle Kochzonen sind ausgeschaltet.
• Nach dem Einschalten des Kochfelds
wird keine Kochstufe gewählt.
36 Progress

• Das Bedienfeld ist mehr als 10
Sekunden mit verschütteten
Lebensmitteln oder einem Gegenstand
bedeckt (Topf, Tuch usw.). Ein
akustisches Signal ertönt und das
Kochfeld schaltet ab. Entfernen Sie den
Gegenstand oder reinigen Sie das
Bedienfeld.
• Eine Kochzone wurde nicht
ausgeschaltet bzw. die Kochstufe
wurde nicht geändert. Nach einer Weile
leuchtet auf und das Kochfeld
schaltet sich aus.
Verhältnis zwischen der Kochstufe und
der Zeit, nach der das Kochfeld
ausgeschaltet wird:
Kochstufe Das Kochfeld wird
ausgeschaltet
nach
1 - 2 6 Stunden
3 - 4 5 Stunden
5 4 Stunden
6 - 9 1,5 Stunden
Einstellen der Kochstufe
Berühren Sie , um die
Kochstufeneinstellung zu erhöhen.
Berühren Sie , um die
Kochstufeneinstellung zu verringern.
Berühren Sie zum Ausschalten der
Kochzone und gleichzeitig.
Kindersicherung
Diese Funktion verhindert ein
versehentliches Einschalten des
Kochfelds.
Zum Starten der Funktion: Schalten Sie
das Kochfeld mit ein. Stellen Sie keine
Kochstufe ein. Berühren Sie der beiden
vorderen Kochzonen gleichzeitig 4
Sekunden lang. leuchtet. Schalten Sie
das Kochfeld mit aus.
Zum Auschalten der Funktion: Schalten
Sie das Kochfeld mit ein. Stellen Sie
keine Kochstufe ein. Berühren Sie der
beiden vorderen Kochzonen gleichzeitig 4
Sekunden lang. leuchtet. Schalten Sie
das Kochfeld mit aus.
Vorübergehendes Ausschalten der
Funktion für einen einzelnen
Kochvorgang: Schalten Sie das Kochfeld
mit ein. leuchtet. Berühren Sie
der beiden vorderen Kochzonen
gleichzeitig 4 Sekunden lang. Stellen Sie
die Kochstufe innerhalb von 10
Sekunden ein. Das Kochfeld kann jetzt
bedient werden. Wenn Sie das Kochfeld
mit ausschalten, wird diese Funktion
wieder eingeschaltet.
TIPPS UND HINWEISE
WARNUNG! Siehe Kapitel
Sicherheitshinweise.
Kochgeschirr
Der Boden des Kochgeschirrs
sollte so dick und flach wie
möglich sein.
Stellen Sie sicher, dass die
Topfböden sauber sind, bevor
Sie sie auf das Kochfeld
stellen.
Progress 37

Kochgeschirr aus Stahlemaille
oder mit Aluminium- oder
Kupferböden kann
Verfärbungen der
Glaskeramikoberfläche
verursachen.
Anwendungsbeispiele für das
Garen
Bei den Angaben in der
folgenden Tabelle handelt es
sich um Richtwerte.
Kochstufe Verwendung: Dauer
(Min.)
Hinweise
1 Warmhalten von gegarten
Speisen.
Nach
Bedarf
Legen Sie einen Deckel auf
das Kochgeschirr.
1 - 2 Sauce Hollandaise, Schmel‐
zen von: Butter, Schokolade,
Gelatine.
5 - 25 Gelegentlich umrühren.
1 - 2 Stocken: Lockere Omeletts,
gebackene Eier.
10 -
40
Mit Deckel garen.
2 - 3 Köcheln von Reis und Milchge‐
richten, Erhitzen von Fertigge‐
richten.
25 -
50
Mindestens doppelte Menge
Flüssigkeit zum Reis geben,
Milchgerichte nach der Hälfte
der Zeit umrühren.
3 - 4 Dünsten von Gemüse, Fisch,
Fleisch.
20 -
45
Einige Esslöffel Flüssigkeit zu‐
geben.
4 - 5 Dampfgaren von Kartoffeln. 20 -
60
Max. ¼ l Wasser für 750 g
Kartoffeln verwenden.
4 - 5 Kochen größerer Speisemen‐
gen, Eintopfgerichte und Sup‐
pen.
60 -
150
Bis zu 3 l Flüssigkeit plus Zu‐
taten.
6 - 7 Bei geringer Hitze anbraten:
Schnitzel, Cordon bleu, Kote‐
lett, Frikadellen, Bratwürste,
Leber, Mehlschwitze, Eier,
Pfannkuchen, Donuts.
Nach
Bedarf
Nach der Hälfte der Gardauer
wenden.
7 - 8 Braten bei starker Hitze: Rösti,
Lendenstücke, Steaks.
5 - 15 Nach der Hälfte der Gardauer
wenden.
9 Aufkochen von Wasser, Nudeln kochen, Anbraten von Fleisch (Gulasch,
Schmorbraten), Frittieren von Pommes frites.
REINIGUNG UND PFLEGE
WARNUNG! Siehe Kapitel
Sicherheitshinweise.
Allgemeine Informationen
• Reinigen Sie das Kochfeld nach jedem
Gebrauch.
38 Progress

• Verwenden Sie stets Kochgeschirr mit
sauberen Böden.
• Kratzer oder dunkle Flecken auf der
Oberfläche beeinträchtigen die
Funktionsfähigkeit des Kochfelds nicht.
• Verwenden Sie einen Spezialreiniger
zur Reinigung der Kochfeldoberfläche.
• Verwenden Sie einen speziellen
Reinigungsschaber für Glas.
Reinigen des Kochfelds
•Folgendes muss sofort entfernt
werden: Geschmolzener Kunststoff,
Plastikfolie, Zucker und zuckerhaltige
Lebensmittel. Anderenfalls können die
Verschmutzungen das Kochfeld
beschädigen. Achten Sie darauf, dass
sich niemand Verbrennungen zuzieht.
Den speziellen Reinigungsschaber
schräg zur Glasfläche ansetzen und
über die Oberfläche bewegen.
•Folgendes kann nach ausreichender
Abkühlung des Kochfelds entfernt
werden: Kalk- und Wasserränder,
Fettspritzer und metallisch
schimmernde Verfärbungen. Reinigen
Sie das Kochfeld mit einem feuchten
Tuch und nicht scheuernden
Reinigungsmittel. Wischen Sie das
Kochfeld nach der Reinigung mit einem
weichen Tuch trocken.
•Entfernen Sie metallisch
schimmernde Verfärbungen:
Benutzen Sie für die Reinigung der
Glasoberfläche ein mit einer Lösung
aus Essig und Wasser angefeuchtetes
Tuch.
FEHLERSUCHE
WARNUNG! Siehe Kapitel
Sicherheitshinweise.
Was tun, wenn...
Störung Mögliche Ursache Abhilfe
Das Kochfeld kann nicht ein‐
geschaltet oder bedient wer‐
den.
Das Kochfeld ist nicht oder
nicht ordnungsgemäß an die
Spannungsversorgung an‐
geschlossen.
Prüfen Sie, ob das Kochfeld
ordnungsgemäß an die
Spannungsversorgung an‐
geschlossen ist. Nehmen
Sie dazu den Anschlussplan
zu Hilfe.
Die Sicherung ist durchge‐
brannt.
Vergewissern Sie sich, dass
die Sicherung der Grund für
die Störung ist. Brennt die
Sicherung wiederholt durch,
wenden Sie sich an eine zu‐
gelassene Elektrofachkraft.
Sie haben die Kochstufe
nicht innerhalb von 10 Se‐
kunden eingestellt.
Schalten Sie das Kochfeld
erneut ein und stellen Sie in‐
nerhalb von 10 Sekunden
die Kochstufe ein.
Zwei oder mehr Sensorfel‐
der wurden gleichzeitig be‐
rührt.
Berühren Sie nur ein Sen‐
sorfeld.
Progress 39

Störung Mögliche Ursache Abhilfe
Auf dem Bedienfeld befin‐
den sich Wasser- oder Fett‐
spritzer.
Wischen Sie das Bedienfeld
ab.
Ein akustisches Signal er‐
tönt und das Kochfeld schal‐
tet ab.
Wenn das Kochfeld ausge‐
schaltet wird, ertönt ein
akustisches Signal.
Mindestens ein Sensorfeld
wurde bedeckt.
Entfernen Sie den Gegen‐
stand von den Sensorfel‐
dern.
Das Kochfeld wird ausge‐
schaltet.
Sie haben etwas auf das
Sensorfeld gestellt.
Entfernen Sie den Gegen‐
stand vom Sensorfeld.
Die Restwärmeanzeige
funktioniert nicht.
Die Kochzone ist nicht heiß,
da sie nur kurze Zeit in Be‐
trieb war oder der Sensor ist
beschädigt.
War die Kochzone lange ge‐
nug eingeschaltet, um heiß
zu sein, wenden Sie sich an
den autorisierten Kunden‐
dienst.
Die Sensorfelder werden
heiß.
Das Kochgeschirr ist zu
groß, oder Sie haben es zu
nahe an die Bedienelemente
gestellt.
Stellen Sie großes Kochge‐
schirr nach Möglichkeit auf
die hinteren Kochzonen.
leuchtet auf. Abschaltautomatik ist einge‐
schaltet.
Schalten Sie das Kochfeld
aus und wieder ein.
leuchtet auf. Kindersicherung ist einge‐
schaltet.
Siehe hierzu „Täglicher Ge‐
brauch“.
und eine Zahl werden
angezeigt.
Es ist ein Fehler im Kochfeld
aufgetreten.
Schalten Sie das Kochfeld
aus und nach 30 Sekunden
wieder ein. Erscheint er‐
neut, trennen Sie das Koch‐
feld von der Spannungsver‐
sorgung. Schließen Sie
nach 30 Sekunden das
Kochfeld wieder an. Tritt das
Problem weiterhin auf, wen‐
den Sie sich an einen autori‐
sierten Kundendienst.
Es ist ein konstanter Piepton
zu hören.
Unsachgemäßer elektri‐
scher Anschluss.
Trennen Sie das Kochfeld
von der Spannungsversor‐
gung. Wenden Sie sich an
eine Elektrofachkraft zur
Überprüfung der Installation.
40 Progress

Störung Mögliche Ursache Abhilfe
leuchtet auf. Die zweite Phase der Strom‐
versorgung fehlt.
Prüfen Sie, ob das Kochfeld
ordnungsgemäß an die
Spannungsversorgung an‐
geschlossen ist. Nehmen
Sie die Sicherung heraus,
warten Sie eine Minute und
setzen Sie die Sicherung
wieder ein.
Wenn Sie das Problem nicht
lösen können...
Wenn Sie das Problem nicht selbst lösen
können, wenden Sie sich an Ihren Händler
oder einen autorisierten Kundendienst.
Geben Sie die Daten, die Sie auf dem
Typenschild finden, an. Geben Sie dabei
den dreistelligen Buchstaben-Code für die
Glaskeramik (befindet sich in der Ecke der
Glasfläche) und die angezeigte
Fehlermeldung an. Vergewissern Sie sich,
dass Sie das Kochfeld korrekt bedient
haben. Wenn Sie das Gerät falsch bedient
haben, fällt auch während der Garantiezeit
für die Reparatur durch einen Techniker
oder Händler eine Gebühr an. Die
Informationen zum Kundendienst und die
Garantiebedingungen finden Sie im
Garantieheft.
TECHNISCHE DATEN
Typenschild
Modell PAS6001E PNC 949 492 376 00
Typ 60 HAD 54 AO 220 - 240 V/400 V 2N, 50 - 60 Hz
Made in Romania
Ser. Nr. ................. 6.5 kW
PROGRESS
Technische Daten der Kochzonen
Kochzone Nennleistung (höchste Kochstu‐
fe) [W]
Durchmesser der Kochzone
[mm]
Vorne links 2300 210
Hinten links 1200 145
Vorne rechts 1200 145
Hinten rechts 1800 180
Verwenden Sie für optimale
Kochergebnisse kein Kochgeschirr,
dessen Durchmesser größer als der der
Kochzone ist.
Progress 41
Termékspecifikációk
| Márka: | Progress |
| Kategória: | tűzhely |
| Modell: | PAS6001E |
Szüksége van segítségre?
Ha segítségre van szüksége Progress PAS6001E, tegyen fel kérdést alább, és más felhasználók válaszolnak Önnek
Útmutatók tűzhely Progress

13 Augusztus 2024
11 Augusztus 2024
29 Május 2024
22 Május 2024
20 Május 2024
19 Május 2024
15 Május 2024
13 Május 2024
Útmutatók tűzhely
- tűzhely Mestic
- tűzhely Ikea
- tűzhely Samsung
- tűzhely Beko
- tűzhely Dometic
- tűzhely Electrolux
- tűzhely Whirlpool
- tűzhely Nedis
- tűzhely LG
- tűzhely Grundig
- tűzhely Ariston Thermo
- tűzhely Husqvarna
- tűzhely Parkside
- tűzhely Candy
- tűzhely Lamona
- tűzhely Gorenje
- tűzhely Euro Appliances
- tűzhely Adler
- tűzhely Princess
- tűzhely SilverCrest
- tűzhely Bosch
- tűzhely Indesit
- tűzhely Zanussi
- tűzhely MPM
- tűzhely AEG
- tűzhely Emerio
- tűzhely Sharp
- tűzhely Einhell
- tűzhely Hoover
- tűzhely Neff
- tűzhely Ardo
- tűzhely Bartscher
- tűzhely Hisense
- tűzhely Cookology
- tűzhely Scarlett
- tűzhely Tefal
- tűzhely Siemens
- tűzhely Corbero
- tűzhely Miele
- tűzhely Fuxtec
- tűzhely V-Zug
- tűzhely Danby
- tűzhely DeLonghi
- tűzhely Insignia
- tűzhely Heinner
- tűzhely Infiniton
- tűzhely Trumatic
- tűzhely Ariete
- tűzhely Wilfa
- tűzhely Klarstein
- tűzhely Amica
- tűzhely VOX
- tűzhely Omega
- tűzhely Thomson
- tűzhely Fuave
- tűzhely Smeg
- tűzhely Fagor
- tűzhely DPM
- tűzhely Brentwood
- tűzhely Ardes
- tűzhely Baumatic
- tűzhely Orima
- tűzhely Rommelsbacher
- tűzhely AEG-Electrolux
- tűzhely Jocel
- tűzhely Bimar
- tűzhely Etna
- tűzhely Café
- tűzhely Ribimex
- tűzhely Clatronic
- tűzhely Bomann
- tűzhely Bauknecht
- tűzhely Amana
- tűzhely Hotpoint
- tűzhely Bröhn
- tűzhely Frigidaire
- tűzhely Cecotec
- tűzhely Dacor
- tűzhely Sencor
- tűzhely Pelgrim
- tűzhely Qlima
- tűzhely Privileg
- tűzhely Küppersbusch
- tűzhely CATA
- tűzhely Innoliving
- tűzhely Summit
- tűzhely Rowenta
- tűzhely Westinghouse
- tűzhely Güde
- tűzhely Inventum
- tűzhely Xblitz
- tűzhely Aurora
- tűzhely Continental Edison
- tűzhely Eta
- tűzhely Atag
- tűzhely Telefunken
- tűzhely Nevir
- tűzhely Domo
- tűzhely Russell Hobbs
- tűzhely Caso
- tűzhely Solac
- tűzhely JennAir
- tűzhely Stiebel Eltron
- tűzhely Edesa
- tűzhely Mora
- tűzhely Bush
- tűzhely Black & Decker
- tűzhely G3 Ferrari
- tűzhely Global
- tűzhely Severin
- tűzhely Livington
- tűzhely Orbegozo
- tűzhely Respekta
- tűzhely Viking
- tűzhely Gram
- tűzhely ARGO
- tűzhely Balay
- tűzhely Hotpoint Ariston
- tűzhely OK
- tűzhely GE
- tűzhely Concept
- tűzhely SVAN
- tűzhely Bellini
- tűzhely Caple
- tűzhely Nobo
- tűzhely CDA
- tűzhely KitchenAid
- tűzhely Asko
- tűzhely Rosieres
- tűzhely Powerfix
- tűzhely TriStar
- tűzhely Zelmer
- tűzhely Novy
- tűzhely Suntec
- tűzhely BaseTech
- tűzhely Rommer
- tűzhely Atlantic
- tűzhely Ignis
- tűzhely Koenic
- tűzhely Nodor
- tűzhely Artusi
- tűzhely Midea
- tűzhely Steba
- tűzhely Trisa
- tűzhely Blomberg
- tűzhely Profilo
- tűzhely Falmec
- tűzhely Honeywell
- tűzhely Truma
- tűzhely PKM
- tűzhely Dimplex
- tűzhely Aspes
- tűzhely ProfiCook
- tűzhely Saturn
- tűzhely Forza
- tűzhely Fisher & Paykel
- tűzhely Kenmore
- tűzhely Cylinda
- tűzhely Thermex
- tűzhely Tesy
- tűzhely Melissa
- tűzhely Trotec
- tűzhely Efbe-Schott
- tűzhely Manta
- tűzhely Blaupunkt
- tűzhely Ilve
- tűzhely Korona
- tűzhely Elro
- tűzhely Bertazzoni
- tűzhely Foster
- tűzhely Hansa
- tűzhely Thetford
- tűzhely Elektra Bregenz
- tűzhely Taurus
- tűzhely Logik
- tűzhely Junker
- tűzhely Hendi
- tűzhely Finlux
- tűzhely Maytag
- tűzhely KKT Kolbe
- tűzhely Fulgor Milano
- tűzhely Konig
- tűzhely Kalorik
- tűzhely Constructa
- tűzhely Rangemaster
- tűzhely Vedette
- tűzhely Philco
- tűzhely Brandson
- tűzhely ECG
- tűzhely Gaggenau
- tűzhely Technika
- tűzhely Arctic Cooling
- tűzhely Currys Essentials
- tűzhely Vornado
- tűzhely Kaiser
- tűzhely Ufesa
- tűzhely Meireles
- tűzhely Ernesto
- tűzhely BlueStar
- tűzhely Vonroc
- tűzhely Trebs
- tűzhely Cotech
- tűzhely Wolf
- tűzhely Argoclima
- tűzhely Brandt
- tűzhely Edilkamin
- tűzhely Chef
- tűzhely Beper
- tűzhely Bestron
- tűzhely Lofra
- tűzhely Orion
- tűzhely Soler & Palau
- tűzhely Ravanson
- tűzhely Salter
- tűzhely Flavel
- tűzhely De Dietrich
- tűzhely Belling
- tűzhely Olimpia Splendid
- tűzhely EasyMaxx
- tűzhely Orava
- tűzhely Arçelik
- tűzhely Eurom
- tűzhely Magic Chef
- tűzhely Mill
- tűzhely Nutrichef
- tűzhely Apelson
- tűzhely Techwood
- tűzhely Glem Gas
- tűzhely Euromaid
- tűzhely Tectro
- tűzhely ARC
- tűzhely Mastercook
- tűzhely Matsui
- tűzhely Toyotomi
- tűzhely Zibro
- tűzhely Quigg
- tűzhely Aduro
- tűzhely Animo
- tűzhely AKO
- tűzhely Altech
- tűzhely Artel
- tűzhely Invicta
- tűzhely Toolland
- tűzhely Alde
- tűzhely Rika
- tűzhely Sinbo
- tűzhely Jata
- tűzhely Swan
- tűzhely Anslut
- tűzhely Climastar
- tűzhely EWT
- tűzhely Gemini
- tűzhely Mellerware
- tűzhely Nestor Martin
- tűzhely Termozeta
- tűzhely Eldom
- tűzhely Bionaire
- tűzhely Buderus
- tűzhely Profile
- tűzhely Beha
- tűzhely Perel
- tűzhely Zibro Kamin
- tűzhely Proline
- tűzhely Cola
- tűzhely Well Straler
- tűzhely Malmbergs
- tűzhely Piazzetta
- tűzhely Listo
- tűzhely Wamsler
- tűzhely Duux
- tűzhely Imetec
- tűzhely Alpatec
- tűzhely Blaze
- tűzhely M-System
- tűzhely Primo
- tűzhely Dovre
- tűzhely Essentiel B
- tűzhely MaxxHome
- tűzhely Duro
- tűzhely AWB
- tűzhely Faber
- tűzhely Thorma
- tűzhely Palazzetti
- tűzhely Blumfeldt
- tűzhely Ruby
- tűzhely CaterChef
- tűzhely Harvia
- tűzhely Superior
- tűzhely La Nordica
- tűzhely Jotul
- tűzhely Day
- tűzhely Radson
- tűzhely Kero
- tűzhely Fakir
- tűzhely Cadel
- tűzhely Jaga
- tűzhely Kibani
- tűzhely Waves
- tűzhely Lervia
- tűzhely Hwam
- tűzhely Coleman
- tűzhely Extraflame
- tűzhely Tayosan
- tűzhely Thermor
- tűzhely Just Fire
- tűzhely Schmid
- tűzhely Micromaxx
- tűzhely Deville
- tűzhely Livin Flame
- tűzhely Gutfels
- tűzhely Max Blank
- tűzhely Spartherm
- tűzhely El Fuego
- tűzhely Klarbach
- tűzhely Ecoforest
- tűzhely Voltomat Heating
- tűzhely Qlima - Zibro
- tűzhely Veito
- tűzhely Ecoteck
- tűzhely Oranier
- tűzhely Bocal
- tűzhely Haas-Sohn
- tűzhely FlumenFire
- tűzhely Austroflamm
- tűzhely Thermorossi
- tűzhely Saey
- tűzhely Eva Calor
- tűzhely Nordic Fire
- tűzhely Flam
- tűzhely Haas+Sohn
- tűzhely Norsk Kleber
- tűzhely Kabola
- tűzhely Ganz
- tűzhely Olympia Fires
- tűzhely Wanders
- tűzhely Merkloos
- tűzhely Kago
- tűzhely JAcobus
- tűzhely Efel
- tűzhely Hartig Helling
- tűzhely Kerosun
- tűzhely Morso
- tűzhely Eledi
- tűzhely Olsberg
- tűzhely Econo-Heat
- tűzhely Kompernass
- tűzhely Supra
- tűzhely Stover
- tűzhely Cecilware
- tűzhely Laxevaags
- tűzhely Duracraft
- tűzhely Norflam
- tűzhely Rocal
- tűzhely MCZ
- tűzhely Rais
- tűzhely Micronova
- tűzhely Wiking
- tűzhely DRU
- tűzhely PVG
- tűzhely Prem-i-air
- tűzhely PTC
- tűzhely K&H
- tűzhely Bild
- tűzhely Burley
- tűzhely Gimeg
- tűzhely Kruger
- tűzhely Ulma
- tűzhely Panadero
- tűzhely Justus
- tűzhely Enkho
- tűzhely Xeoos
- tűzhely Modena
- tűzhely Hark
- tűzhely Yellow Profiline
- tűzhely Horus
- tűzhely Migros
- tűzhely Zen Fires
- tűzhely Ravelli
- tűzhely Harman
- tűzhely Rowi
- tűzhely Webasto
- tűzhely Scan
- tűzhely Mr Safe
- tűzhely Reny
- tűzhely Hearthstone
- tűzhely Kratki
- tűzhely Flandria
- tűzhely Barbas
- tűzhely Dik Geurts
- tűzhely MSW
- tűzhely ATTACK
- tűzhely Toyoset
- tűzhely Thermocet
- tűzhely Surdiac
- tűzhely Uniprodo
- tűzhely Yamazen
- tűzhely Jøtul
Legújabb útmutatók tűzhely

18 Március 2025
16 Január 2025
16 Január 2025
15 Január 2025
15 Január 2025
15 Január 2025
14 Január 2025
14 Január 2025

14 Január 2025
14 Január 2025