Használati útmutató Google Android 3.0 Honeycomb
Google
Fotó és/vagy videó szoftver
Android 3.0 Honeycomb
Olvassa el alább 📖 a magyar nyelvű használati útmutatót Google Android 3.0 Honeycomb (140 oldal) a Fotó és/vagy videó szoftver kategóriában. Ezt az útmutatót 3 ember találta hasznosnak és 2 felhasználó értékelte átlagosan 4.5 csillagra
Oldal 1/140
1
AUG-3.0-100 Android User’s Guide
Android 3.0
User’s Guide
February 23, 2011
AUG-3.0-100
Android™ mobile technology platform 3.0

2
AUG-3.0-100 Android User’s Guide
Legal
Copyright © 2011 Google Inc. All rights reserved.
Google, the stylized Google logo, Android, the stylized Android logo, Nexus, the
stylized Nexus logo, Nexus S, the stylized Nexus S logo, Android Market, the
stylized Android Market logo, Gmail, Google Apps, Google Calendar, Google
Checkout, Google Earth, Google Latitude, Google Maps, Google Talk, Picasa,
SafeSearch, and YouTube are trademarks of Google Inc. All other company and
product names may be trademarks of the companies with which they are
associated.
Availability of Google applications, services, and features may vary by country,
carrier, Android device model, and manufacturer.

3
AUG-3.0-100 Android User’s Guide
Contents
About this guide 5
Starting Android the first time 7
Welcome to Android! 8
Activating your mobile data service 9
Setting your location preferences 10
Signing into your Google Account 11
Resetting your Google Account password 12
Additional accounts 12
Backing up and restoring your data 13
Finishing setup 15
Home and Android basics 17
Getting to know Home 18
Using the touchscreen 19
Using the Navigation buttons 20
Waking the tablet 21
Finding your apps 22
Monitoring your tablet’s status 23
Status icons 23
Notification icons 23
Managing notifications 24
Status Details and Quick Settings 26
Securing your tablet 29
Customizing Home screens 31
Working with widgets 34
Optimizing battery life 35
Working with apps 37
Opening and switching apps 38
Managing how apps use memory 40
Managing downloads 44
Entering and editing text 45
Using the onscreen keyboard 46
Entering text by speaking 50
Editing text 52
Connecting to networks and devices 55
Connecting to mobile networks 56
Connecting to Wi-Fi networks 58
Connecting to Bluetooth devices 62
Connecting to a Windows computer via USB 65
Connecting to a Macintosh computer via USB 66
Sharing your mobile data connection 68
Connecting to virtual private networks (VPNs) 72
Working with secure certificates 74
Google Search 77
Searching your tablet and the web 78

4
AUG-3.0-100 Android User’s Guide
Using Google Search tips and tricks 82
Changing Google Search settings 84
Searchable items settings 84
Google Search settings 84
Voice Search and Voice Actions 85
Searching the web by speaking 86
Using Voice Actions 88
Changing Voice Search settings 91
Accounts 93
Adding and removing accounts 94
Configuring account sync and display options 97
Android apps 101
Books 102
Browser 103
Camera 104
Calendar 105
Calculator 106
Clock 107
Contacts 108
Email 109
Gallery 110
Gmail 111
Google Talk 112
Maps, Navigation, Places, and Latitude 113
Market 114
Movie Studio 115
Music 116
YouTube 117
Settings 119
Opening Settings 120
Wireless & networks settings 121
Wireless & Network settings screen 121
Wi-Fi settings screen 121
Advanced Wi-Fi settings screen 122
Bluetooth settings screen 122
Tethering & portable hotspot settings screen 123
VPN settings screen 123
Mobile networks settings screen 123
Sound settings 125
Screen settings 126
Location & security settings 127
Applications settings 129
Applications settings screen 129
Development screen 129
Accounts & sync settings 131
Accounts & sync settings screen 131
Account screen 131
Privacy settings 132
Storage settings 133
Language & input settings 134
Language & input screen 134
Google Voice Recognition settings screen 135
Text-to-Speech settings screen 135
Configure input methods screen 136
Android Keyboard settings screen 136
Accessibility settings 138
Date & time settings 139
About tablet 140
About tablet screen 140

About this guide 6
AUG-3.0-100 Android User’s Guide
“Voice Search and Voice Actions”
on page 85
Searching the web and controlling your tablet by speaking Voice Actions.
“Accounts” on page 93 Adding and synchronizing email and other accounts, including Google
Accounts and Microsoft™ Exchange ActiveSync™ accounts.
“Android apps” on page 101 An overview of the diverse Google apps included with many Android tab-
lets, including.
“Settings” on page 119 Opening the Settings application and its many tools for configuring and
customizing your tablet.
Chapter Describes

7
AUG-3.0-100 Android User’s Guide
Starting Android the first
time
When you first turn on your tablet, you have the opportunity to activate your mobile
data service, to sign into your Google Account, and to decide how you want to use
some Google services.
In this section “Welcome to Android!” on page 8
“Activating your mobile data service” on
page 9
“Setting your location preferences” on
page 10
“Signing into your Google Account” on
page 11
“Backing up and restoring your data” on
page 13
“Finishing setup” on page 15

Starting Android the first time 8
AUG-3.0-100 Android User’s Guide
Welcome to Android!
The first time you power on your tablet (after setting it up, as described in your
tablet’s owner’s guide), you’re welcomed to Android and invited to pick a language
to work in and to start setting up and using your tablet.
STouch English if you want to work in a different language.
STouch Start to start setting up your tablet.
Touch Start.
Touch to use a different
language.

Starting Android the first time 9
AUG-3.0-100 Android User’s Guide
Activating your mobile data service
On some mobile data networks, you must activate mobile data service on your
tablet before you can use it to connect to the Internet. As soon as you touch Start
on the Welcome! screen, your tablet starts the activation process.
If your mobile network doesn’t require activation, or if your tablet only connects to
Wi-Fi networks, it skips this step and prompts you to connect to a Wi-Fi network
instead (see “Connecting to Wi-Fi networks” on page 58).
Then you can use that mobile data network Internet connection to sign into your
Google Account and finish setting up your tablet.
If you prefer not to activate you mobile data service now or if you are setting up
your tablet in a location without access to your carrier’s mobile network, you can
touch Skip to set up your tablet using Wi-Fi instead: you’re prompted to connect to
a local Wi-Fi network. See “Connecting to Wi-Fi networks” on page 58.
You can activate your mobile data service later using the Settings app; see
“Wireless & networks settings” on page 121.

Starting Android the first time 10
AUG-3.0-100 Android User’s Guide
Setting your location preferences
Google’s location service uses the Wi-Fi and mobile data networks near you to
make your approximate location available to your apps. This location information
can make finding your precise location by GPS much faster; it can also provide
your location to apps when GPS isn’t available.
When you use Google’s location service, Google collects data about your location
and local networks, without associating the information it gathers with you or your
Google Account, to improve the service.
You can also choose whether to use your location in your Google Search results and
other Google services.
You can change these settings after setup; see “Location & security settings” on
page 127.

Starting Android the first time 11
AUG-3.0-100 Android User’s Guide
Signing into your Google Account
You must sign into a Google Account to use Gmail, Google Talk, and other Google
Apps; to download apps from Android Market; to back up your settings and other
data to Google servers; and to take advantage of other Google services on your
tablet.
Important If you have backed up your Android settings using a Google Account
in the past and you want to restore those settings to your tablet, you
must sign into that account now, during setup: If you sign in after
setup, you can’t restore your settings.
If you don’t have a Google Account, you can also create one.
When you sign in, you’re prompted to enter your username and password, using the
onscreen keyboard. For information about navigating the touchscreen and entering
text, see “Using the touchscreen” on page 19 and “Entering and editing text” on
page 45.
Enter your Gmail account.
Touch to enter your password.
Touch to create a new Google
Account.
Then touch Sign in.

Starting Android the first time 12
AUG-3.0-100 Android User’s Guide
If you have an enterprise Gmail account through your company or other
organization, your IT department may have special instructions on how to sign into
that account.
When you sign in, your contacts, Gmail messages, Calendar events, and other
information from these apps and services on the web are synchronized with your
tablet.
If you don’t sign into a Google Account during setup, you are prompted to sign in or
to create a Google Account the first time you start an app that requires one, such
as Gmail or Android Market.
Resetting your
Google Account
password
If you have a Google Account but forget your password, you must reset it before you
can sign in. Go to http://www.google.com, click Sign In, click “Can’t access your
account?” in the sign-in box, and then follow the instructions for resetting your
password.
Additional accounts After setup, you can add Google and other kinds of accounts to your tablet, and
sync some or all of their data, as described in “Accounts” on page 93. However,
only the first Google Account you sign into is backed up to Google servers. Some
apps that only work with a single account display data only from the first account
that you sign into.
Starting Android the first time 13
AUG-3.0-100 Android User’s Guide
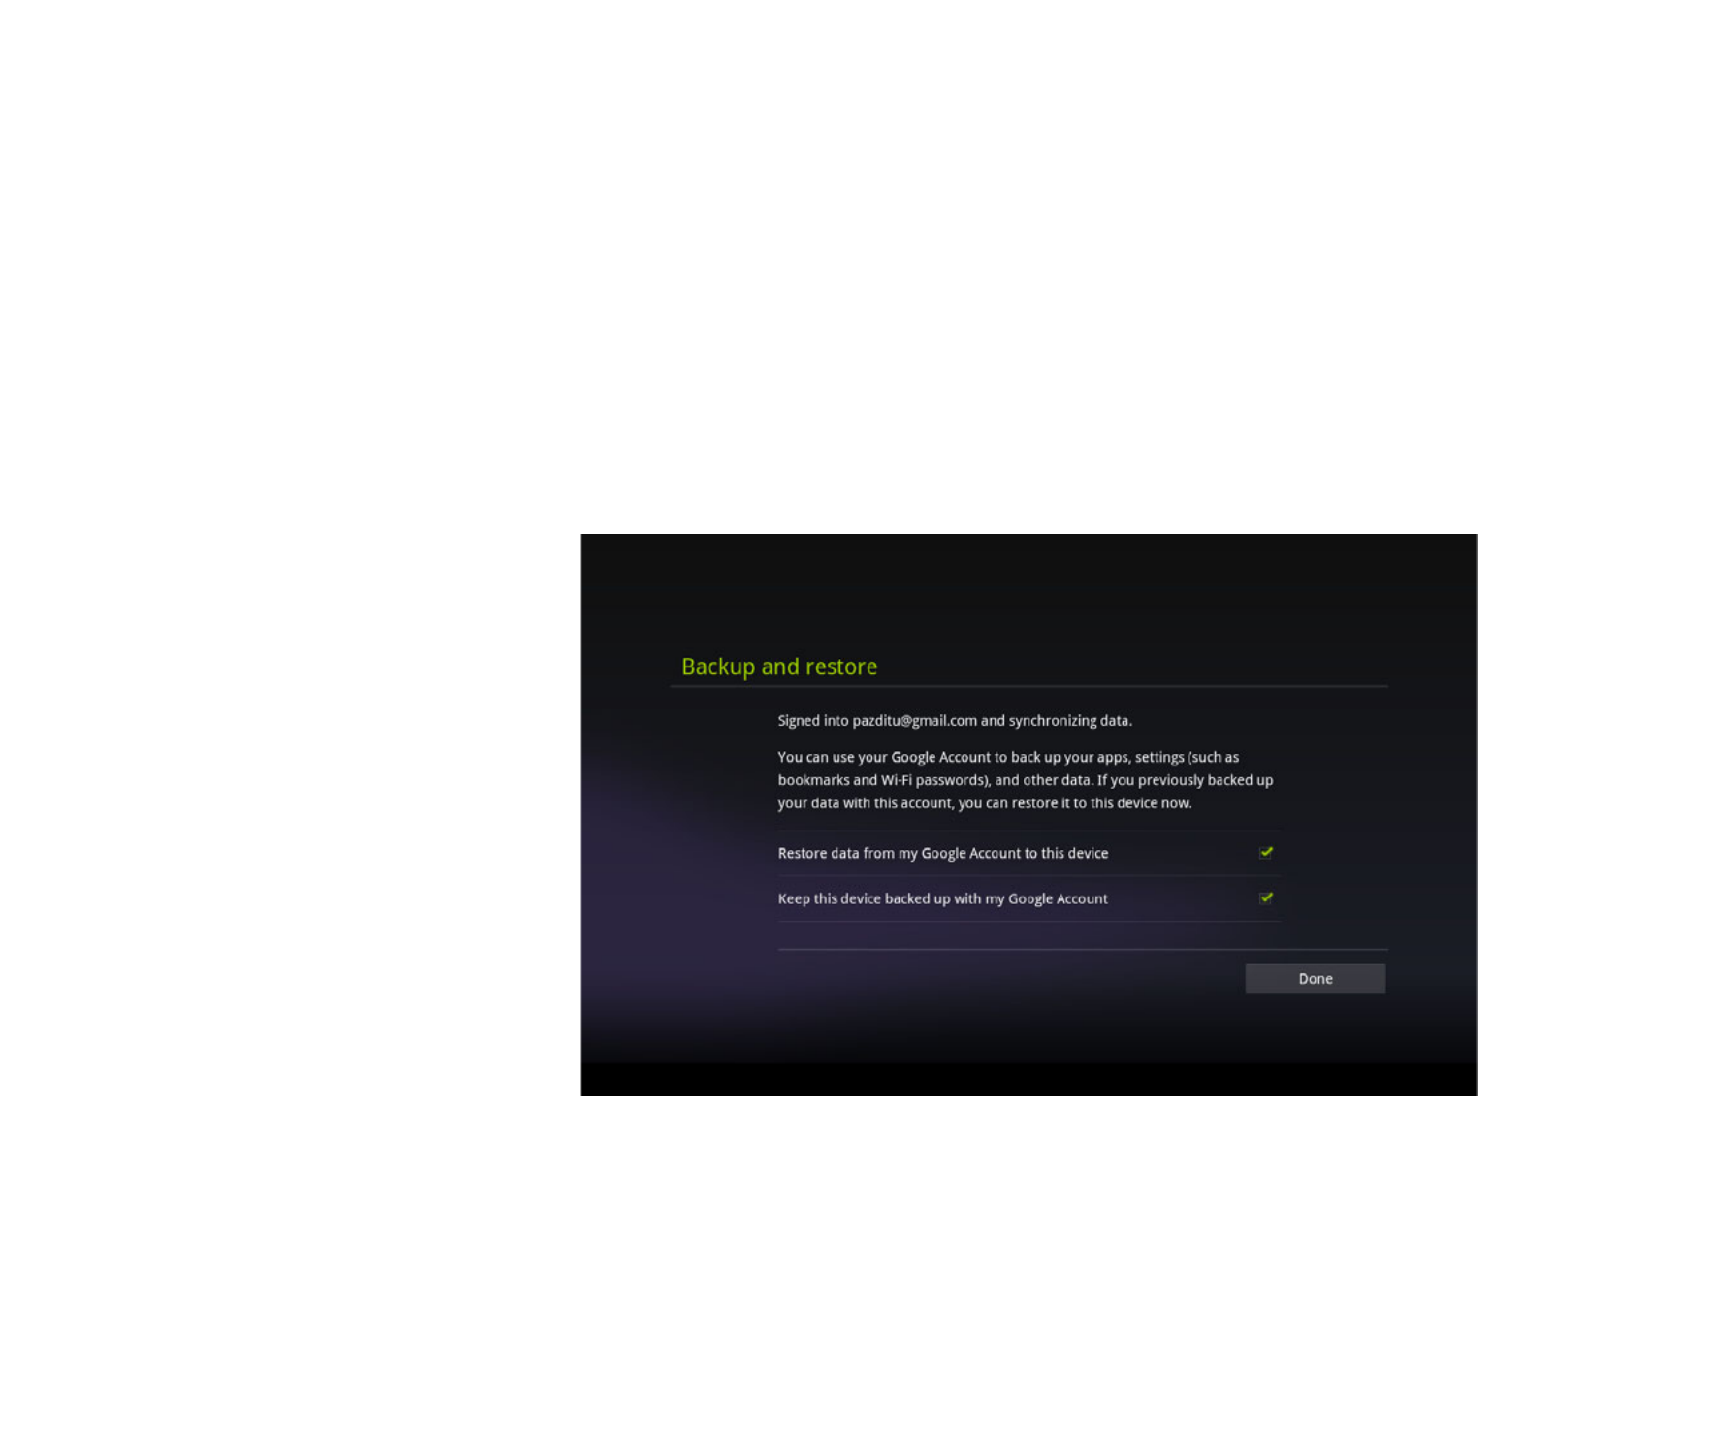
Backing up and restoring your data
You can back up your settings and other data with your Google Account, so if you
ever replace your tablet, you can restore your data on the new one. If you choose to
use this service, your data is backed up automatically.
If you previously used the backup service with the Google Account you just used to
sign in, you can also choose to restore your settings from your Google Account to
your tablet now.
Important If you want to restore your settings, you must do that now during
setup. You can’t restore data after setup is complete.
Many kinds of data are backed up, including:
GYour Android settings, such as your Wi-Fi networks and passwords, user diction-
ary, and so on
GMany Google application settings, such as your Browser bookmarks
GThe apps you download from Android Market

Starting Android the first time 14
AUG-3.0-100 Android User’s Guide
Some third-party apps also make use of the backup service, so if you reinstall one,
its settings and data are restored.
You can change your backup settings after you finishing setting up your tablet, see
“Privacy settings” on page 132.

Starting Android the first time 15
AUG-3.0-100 Android User’s Guide
Finishing setup
If you aren’t connected to a mobile network, you’re prompted to set the date and
time on your tablet. See “Date & time settings” on page 139.
Otherwise, when setup is complete, Home opens, displaying your main Home
screen.
To learn more about Home and the basics of using Android, see “Home and
Android basics” on page 17.

Starting Android the first time 16
AUG-3.0-100 Android User’s Guide

Home and Android basics 19
AUG-3.0-100 Android User’s Guide
Using the touchscreen
The main way to control Android features is by using your finger to manipulate
icons, buttons, menu items, the onscreen keyboard, and other items on the
touchscreen. You can also change the screen’s orientation.
Touch To act on items on the screen, such as app and settings icons, to type
letters and symbols using the onscreen keyboard, or to pres onscreen buttons, you
simply touch them with your finger.
Touch & hold Touch & hold an item on the screen by touching it and not lifting
your finger until an action occurs.
Drag Touch & hold an item for a moment and then, without lifting your finger,
move your finger on the screen until you reach the target position. For example,
you drag items on the Home screen to reposition them, as described in
“Customizing Home screens” on page 31.
Swipe or slide To swipe or slide, you quickly move your finger across the surface
of the screen, without pausing when you first touch it (so you don’t drag an item
instead). For example, you slide the Home screen left or right to view the other
parts, and in some Calendar views you slide to view earlier or later periods.
Double-tap Tap quickly twice on a webpage, map, or other screen to zoom. For
example, you double-tap a section of a webpage in Browser to zoom that section to
fit the width of the screen. Double-tapping after pinching to zoom in some apps
reflows a column of text to fit the width of the screen.
Pinch In some apps (such as Maps, Browser, and Gallery), you can zoom in and
out by placing two fingers on the screen at once and pinching them together (to
zoom out) or spreading them apart (to zoom in).
Rotate the screen On most screens, the orientation of the screen rotates with
the tablet as you turn it. You can turn this feature on and off, as described in
“Screen settings” on page 126.

Home and Android basics 20
AUG-3.0-100 Android User’s Guide
Using the Navigation buttons
The System bar’s Navigation buttons make it easy to quickly switch among Android
apps.
In some media apps, the System bar controls are replaced by dim dots when you’re
watching a movie, slide show, and so on, so you can better enjoy them without the
distraction of the System bar. You can touch it stands a dot as it if were the control
for, or touch a blank area of the System bar to restore it to full view.
Back Opens the previous screen you were working in. If the
onscreen keyboard is open, the button changes to a down
arrow and touching it closes the keyboard.
Home Opens Home. If you’re viewing a left or right Home screen,
opens the central Home screen.
Recent Apps Opens a list of thumbnail images of apps you’ve worked
with recently; touch an app to open it.
Legacy Opens the options menu for applications designed for pre-
vious versions of Android.

Home and Android basics 21
AUG-3.0-100 Android User’s Guide
Waking the tablet
If you don’t use the tablet for a while, the screen dims and then darkens, to
conserve the battery.
1Press the Power button.
The lock screen opens (unless you’ve turned it off; see “Securing your tablet”
on page 29).
2Touch & hold the lock icon and when it turns into a circle, drag it to the edge of
the larger circle that surrounds it. Or if you’ve secured the lock screen, enter a
pattern, PIN, or password.
See “Securing your tablet” on page 29.
The last screen you were viewing opens.

Home and Android basics 24
AUG-3.0-100 Android User’s Guide
Managing notifications
Notifications report the arrival of new messages, calendar events, and alarms, as
well as ongoing events, such as when you have configured your tablet as a Wi-Fi
hotspot.
When you receive a notification, its icon appears in the System bar, to the left of
the time, along with a summary that appears briefly (see “Notification icons” on
page 23).
Depending on your settings and the model of your tablet, you may also hear a
notification sound, a light may blink, and so on. These settings and adjusting
sound volume and other general notification settings are described in “Sound
settings” on page 125.
You can open the Notifications list to view all of your current notifications.
Most apps that send notifications, such as Gmail and Google Talk, have their own
settings, which you can use to configure whether and how they send notifications,
whether they sound a ringtone, and so on. See the documentation for those apps
for details.
Open the Notifications
list
1Touch the time in the System bar.
2Touch a notification summary to respond to it.
You can also touch a notification’s Close button to remove it from the
Notifications list, or touch elsewhere on the screen to close the list.

Home and Android basics 25
AUG-3.0-100 Android User’s Guide
Respond to a
Notification
1Touch a Notification icon in the System bar.
The notification’s summary panel opens.
Notification panels can contain a great variety of information and controls,
including:
GA summary of a message, along with the date and even a picture of the
sender.
GControls, such as buttons to pause a playing song or to skip to the next or
previous track.
GProgress bars, such as those that indicate how much of an app you’ve down-
loaded from Market.
2Touch the summary to open it in its app.
You can also just touch its Close button to remove the notification.
Termékspecifikációk
| Márka: | |
| Kategória: | Fotó és/vagy videó szoftver |
| Modell: | Android 3.0 Honeycomb |
Szüksége van segítségre?
Ha segítségre van szüksége Google Android 3.0 Honeycomb, tegyen fel kérdést alább, és más felhasználók válaszolnak Önnek
Útmutatók Fotó és/vagy videó szoftver Google

18 Szeptember 2024
18 Szeptember 2024
15 Július 2024
12 Július 2024
6 Július 2024
Útmutatók Fotó és/vagy videó szoftver
- Fotó és/vagy videó szoftver Sony
- Fotó és/vagy videó szoftver Canon
- Fotó és/vagy videó szoftver Lego
- Fotó és/vagy videó szoftver Apple
- Fotó és/vagy videó szoftver Roland
- Fotó és/vagy videó szoftver AVM
- Fotó és/vagy videó szoftver Volkswagen
- Fotó és/vagy videó szoftver Microsoft
- Fotó és/vagy videó szoftver Korg
- Fotó és/vagy videó szoftver Hasbro
- Fotó és/vagy videó szoftver Nikon
- Fotó és/vagy videó szoftver Terratec
- Fotó és/vagy videó szoftver Antares
- Fotó és/vagy videó szoftver Atomix
- Fotó és/vagy videó szoftver Razer
- Fotó és/vagy videó szoftver Bang & Olufsen
- Fotó és/vagy videó szoftver Corel
- Fotó és/vagy videó szoftver Cyberlink
- Fotó és/vagy videó szoftver Adobe
- Fotó és/vagy videó szoftver Panduit
- Fotó és/vagy videó szoftver Axis
- Fotó és/vagy videó szoftver Acronis
- Fotó és/vagy videó szoftver Sonos
- Fotó és/vagy videó szoftver LevelOne
- Fotó és/vagy videó szoftver Hema
- Fotó és/vagy videó szoftver Sweex
- Fotó és/vagy videó szoftver QSC
- Fotó és/vagy videó szoftver DoorBird
- Fotó és/vagy videó szoftver Pinnacle
- Fotó és/vagy videó szoftver IoSafe
- Fotó és/vagy videó szoftver PayPal
- Fotó és/vagy videó szoftver AVG
- Fotó és/vagy videó szoftver Yuki
- Fotó és/vagy videó szoftver Auralog
- Fotó és/vagy videó szoftver ABN AMRO
- Fotó és/vagy videó szoftver Autodesk
- Fotó és/vagy videó szoftver FileMaker
- Fotó és/vagy videó szoftver Magix
- Fotó és/vagy videó szoftver Facebook
- Fotó és/vagy videó szoftver Ulead
- Fotó és/vagy videó szoftver 2nd Sense Audio
- Fotó és/vagy videó szoftver Rabobank
- Fotó és/vagy videó szoftver Propellerhead
- Fotó és/vagy videó szoftver LibreOffice
- Fotó és/vagy videó szoftver UNIT4
- Fotó és/vagy videó szoftver Intellinet
- Fotó és/vagy videó szoftver Albelli
- Fotó és/vagy videó szoftver Teklynx
- Fotó és/vagy videó szoftver Omni
- Fotó és/vagy videó szoftver X-Rite
- Fotó és/vagy videó szoftver R-Go Tools
- Fotó és/vagy videó szoftver Gimp
- Fotó és/vagy videó szoftver Foxit
- Fotó és/vagy videó szoftver ABBYY
- Fotó és/vagy videó szoftver Wireshark
- Fotó és/vagy videó szoftver Laplink
- Fotó és/vagy videó szoftver Nik Software
- Fotó és/vagy videó szoftver Paragon
- Fotó és/vagy videó szoftver Western Bank
- Fotó és/vagy videó szoftver Showpad
- Fotó és/vagy videó szoftver Xils Lab
- Fotó és/vagy videó szoftver IRIS
- Fotó és/vagy videó szoftver Nuance
- Fotó és/vagy videó szoftver Cakewalk
- Fotó és/vagy videó szoftver Parallels
- Fotó és/vagy videó szoftver Lavasoft
- Fotó és/vagy videó szoftver Polyverse
- Fotó és/vagy videó szoftver AccSone
- Fotó és/vagy videó szoftver Mariner Software
- Fotó és/vagy videó szoftver Symantec
- Fotó és/vagy videó szoftver NewBlueFX
Legújabb útmutatók Fotó és/vagy videó szoftver

11 Január 2025
15 Október 2024
13 Október 2024
4 Október 2024
11 Szeptember 2024
9 Szeptember 2024
3 Szeptember 2024
30 Augusztus 2024
30 Augusztus 2024
29 Augusztus 2024