Használati útmutató Epson WorkForce DS-770II
Olvassa el alább 📖 a magyar nyelvű használati útmutatót Epson WorkForce DS-770II (171 oldal) a Scanner kategóriában. Ezt az útmutatót 10 ember találta hasznosnak és 2 felhasználó értékelte átlagosan 4.5 csillagra
Oldal 1/171

DS-530 II/DS-575W II/DS-770 II User's
Guide


3
Contents
DS-530 II/DS-575W II/DS-770 II User's Guide............................................................................................. 7
Scanner Basics............................................................................................................................................ 8
Scanner Parts Locations ...................................................................................................................... 8
Scanner Parts.................................................................................................................................. 9
Scanner Buttons and Lights........................................................................................................... 12
User Replaceable Epson Scanner Parts ............................................................................................ 15
Changing the Power Off and Sleep Timer Settings ............................................................................ 16
Using the Epson Smart Panel Mobile App.......................................................................................... 18
Loading Originals...................................................................................................................................... 19
Loading Originals in the Input Tray..................................................................................................... 19
Loading Multiple Sizes of Originals in the Input Tray ..................................................................... 26
Original Document Specifications.................................................................................................. 29
Loading Plastic and Laminated Cards in the Input Tray ..................................................................... 33
Plastic and Laminated Card Specifications ................................................................................... 38
Loading Special Originals................................................................................................................... 38
Special Original Specifications ...................................................................................................... 44
Wi-Fi Networking ....................................................................................................................................... 46
Network Security Recommendations ................................................................................................. 46
Connecting to an Existing Wi-Fi Network .......................................................................................... 47
Manually Connecting to a Wi-Fi Network....................................................................................... 48
Setting Up Wireless Scanning from a Smart Device Using Epson Smart Panel................................. 48
Direct Wi-Fi Mode (AP Mode) Setup .................................................................................................. 50
Enabling a Direct Wi-Fi (AP Mode) Connection............................................................................. 51
Using WPS to Set Up a Direct Wi-Fi Connection ........................................................................... 51
Wi-Fi Protected Setup (WPS)............................................................................................................. 52
Using WPS to Connect to a Network ............................................................................................. 52
Using WPS PIN Mode to Connect to a Network ............................................................................ 53
Setting Up Network Scanning ............................................................................................................ 54
Determining the Scanner's IP Address .......................................................................................... 57
Disabling Wi-Fi Features .................................................................................................................... 57

4
Restoring Default Network Settings.................................................................................................... 57
Scanning .................................................................................................................................................... 59
Starting a Scan................................................................................................................................... 59
Starting a Scan from a Scanner Button.......................................................................................... 59
Adding and Assigning Scan Jobs with Document Capture Pro - Windows ............................... 60
Assigning Start Button Settings or Scan Jobs - Mac ................................................................. 63
Starting a Scan Using the Epson Scan 2 Icon ............................................................................... 64
Starting a Scan from a Scanning Program..................................................................................... 66
Starting a Scan from a Smart Device............................................................................................. 68
Scanning with Simple Scan in Document Capture Pro - Windows ..................................................... 68
Scanning with Job Scan in Document Capture Pro - Windows .......................................................... 70
Scanning with Document Capture - Mac ............................................................................................ 71
Scanning in Epson Scan 2 ................................................................................................................. 75
Additional Scanning Settings - Main Settings Tab ......................................................................... 79
Additional Scanning Settings - Advanced Settings Tab................................................................. 80
Scanning Settings for Special Documents..................................................................................... 81
Image Format Options................................................................................................................... 82
Scan Resolution Guidelines ............................................................................................................... 83
Scanning Special Projects.................................................................................................................. 84
Scanning Two Originals onto One Sheet (Stitching Images) - Windows ....................................... 84
Scanning Multi-Page Originals as Separate Files - Windows ........................................................ 87
Saving Scanned Documents as a Searchable PDF Using Epson Scan 2 ..................................... 89
Saving Scanned Documents as a Searchable PDF with Document Capture - Mac....................... 91
Saving a Scan as an Office Format File - Windows ....................................................................... 94
Saving a Scan as an Office Format File - Mac............................................................................... 96
Scanning to a SharePoint Server or Cloud Service - Windows.................................................... 100
Scanning to a SharePoint Server or Cloud Service - Mac ........................................................... 102
Using the Optional Flatbed Scanner Dock - Windows ......................................................................... 104
Flatbed Scanner Dock Parts ............................................................................................................ 104
Scanning from the Flatbed Scanner Dock........................................................................................ 105
Scanning from the Docked Flatbed Scanner ............................................................................... 105
Scanning from the ADF with the Flatbed Scanner Dock Attached............................................... 107
Cleaning the Flatbed Scanner Dock................................................................................................. 109

5
Transporting the Flatbed Scanner Dock........................................................................................... 109
Cleaning and Transporting Your Scanner............................................................................................. 112
Cleaning Your Scanner .................................................................................................................... 112
Cleaning Inside Your Scanner.......................................................................................................... 112
Resetting the Number of Scans After Cleaning ........................................................................... 117
Replacing the Scanner Rollers......................................................................................................... 119
Resetting the Scanner Roller Counter ......................................................................................... 125
Transporting Your Scanner .............................................................................................................. 126
Solving Problems .................................................................................................................................... 130
Scanner Light Status ........................................................................................................................ 130
Solving Scanning Problems ............................................................................................................. 133
Scanner Does Not Turn On or Turns Off Unexpectedly............................................................... 133
Scanner Button Does Not Work as Expected .............................................................................. 134
Scanning Software Does Not Operate Correctly ......................................................................... 134
Cannot Start Epson Scan 2 ......................................................................................................... 135
Original Feeds Incorrectly in Scanner.......................................................................................... 136
Original Jams in Scanner............................................................................................................. 137
Paper Protection Does Not Work Correctly ................................................................................. 139
Scanning is Slow ......................................................................................................................... 140
Solving Network Scanning Problems ............................................................................................... 140
Cannot Scan Over a Network ...................................................................................................... 141
Scanner Cannot Connect to a Wireless Router ........................................................................... 142
Solving Scanned Image Quality Problems ....................................................................................... 143
Back of Original Image Appears in Scanned Image .................................................................... 143
Scanned Characters are Blurry ................................................................................................... 143
Characters are not Recognized During Conversion to Editable Text (OCR) ............................... 144
Ripple Patterns Appear in an Image............................................................................................ 145
Spots or Lines Appear in All Scanned Images............................................................................. 145
Scanned Image is Cropped ......................................................................................................... 146
Resetting the Epson Scan 2 Settings .............................................................................................. 146
Solving Flatbed Scanner Dock Problems ......................................................................................... 147
Scanned Image Edges are Cropped ........................................................................................... 147
Line of Dots Appears in All Scanned Images............................................................................... 147

6
Back of Original Image Appears in Scanned Document .............................................................. 148
Uninstall Your Scanner Software...................................................................................................... 148
Uninstalling Scanner Software - Windows................................................................................... 148
Uninstalling Scanner Software - Mac........................................................................................... 149
Where to Get Help (U.S. and Canada) ............................................................................................. 150
Where to Get Help (Latin America)................................................................................................... 151
Technical Specifications ........................................................................................................................ 153
Windows System Requirements ...................................................................................................... 153
Mac System Requirements .............................................................................................................. 153
General Specifications ..................................................................................................................... 154
Dimension Specifications ................................................................................................................. 155
Electrical Specifications ................................................................................................................... 156
Environmental Specifications ........................................................................................................... 158
Flatbed Scanner Dock Specifications (DS-530 II/DS-770 II) ............................................................ 158
Network Interface Specifications (DS-575W II) ................................................................................ 159
Safety and Approvals Specifications ................................................................................................ 160
Notices ..................................................................................................................................................... 163
Important Safety Instructions............................................................................................................ 163
Restrictions on Copying ................................................................................................................... 165
Default Delay Times for Power Management for Epson Products.................................................... 166
Binding Arbitration and Class Waiver ............................................................................................... 166
Trademarks...................................................................................................................................... 169
Copyright Notice............................................................................................................................... 170
libTIFF Software Acknowledgment.............................................................................................. 171
A Note Concerning Responsible Use of Copyrighted Materials................................................... 171
Copyright Attribution.................................................................................................................... 171

7
DS-530 II/DS-575W II/DS-770 II User's Guide
Welcome to II/DS-575W the DS-530 II/DS-770 II User's Guide.
For a printable click PDF copy of guide, this here.
Note: Availability of products in this guide by varies country.

9
Scanner Parts
Note: The illustrations show the DS-575W II, but the parts are the same for the DS-530 II and DS-770 II.
1 ADF (Automatic Document Feeder)
2 Edge guides
3 Input tray
4 Input tray extension
5 Output tray
6 Output tray extensions

10
7 Stopper
1 Kensington security slot
2 USB 3.0 port
3 Power inlet

11
1 Cover open lever
2 Scanner cover
3 Pickup rollers
4 Separation rollers
1 AC adapter
2 Power cord
3 USB 3.0 cable
Parent topic: Scanner Parts Locations

12
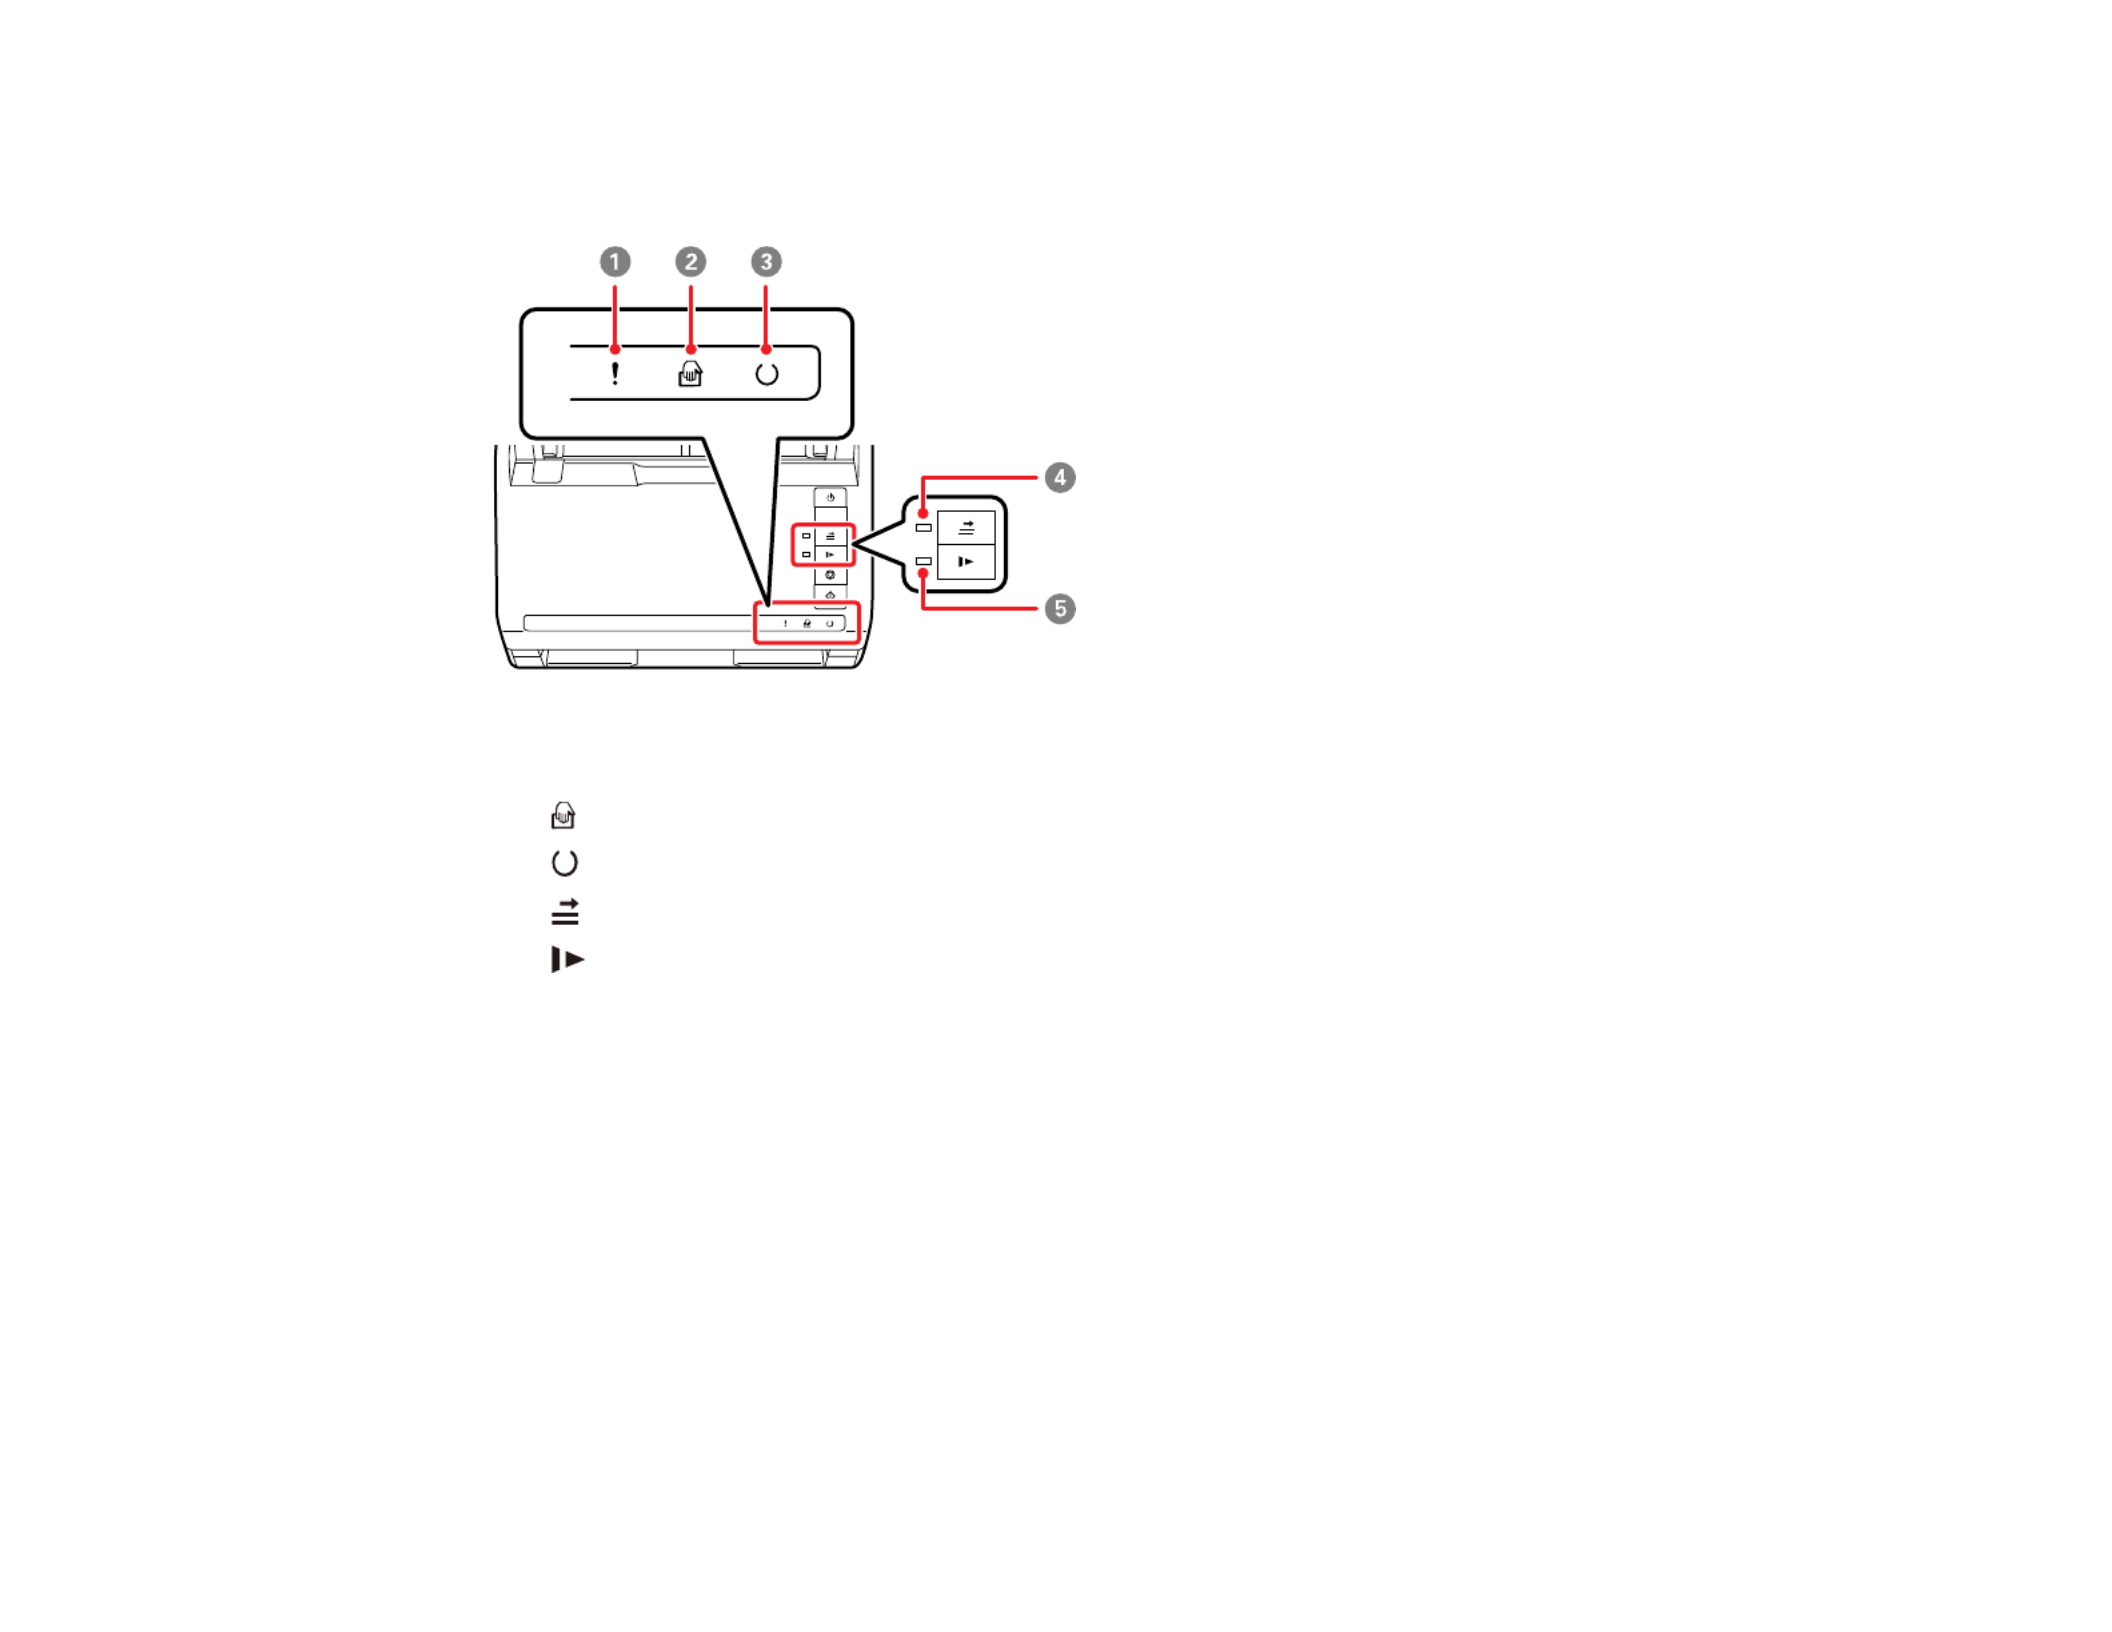
Scanner Buttons and Lights
Buttons
DS-530 II/DS-770 II
1power button
2 double feed detection skip button
3 slow mode button
4stop button
5 start button
14
Lights
DS-530 II/DS-770 II
1 error light!
2 automatic feeding mode light
3 ready light
4 double feed detection skip light
5 slow mode light

15
DS-575W II
1 AP mode light
2 Wi-Fi light
3 error light!
4automatic feeding mode light
5 ready light
6 double feed detection skip light
7 slow mode light
Parent topic: Scanner Parts Locations
User Replaceable Epson Scanner Parts
U.S. and Canada: You can purchase optional accessories and replacement parts at (U.S.epson.com
sales) or (Canadian sales). You can also purchase accessories from an Epson authorizedepson.ca
reseller. To find the nearest one, call 800-GO-EPSON (800-463-7766) in the U.S. or 800-807-7766 in
Canada.
Latin America: You can purchase optional accessories and replacement parts from an Epson
authorized reseller. To find the nearest reseller, go to . Or you can contact your nearestlatin.epson.com
sales office as described in "Where to Get Help".

16
Note: Availability of accessories varies by country.
Part Part number
Carrier sheet (5) B12B819051
Roller assembly kit B12B819671
Cleaning kit B12B819291
Flatbed scanner dock (DS-530 II/DS-770-
II only)
B12B819011
Epson Perfection V19 (for use with
scanner dock)
B11B231201
Epson Perfection V39 (for use with
scanner dock)
B11B232201
Parent topic: Scanner Basics
Related references
Where to Get Help (U.S. and Canada)
Where to Get Help (Latin America)
Changing the Power Off and Sleep Timer Settings
You can use the Epson Scan 2 Utility to change the time period before the scanner enters sleep mode
and turns off automatically.
Note: The Power Off and Sleep Timer settings may not be available when you connect to the scanner
over a network (ES-500W II) (DS-575W II).
1. Do one of the following to access the Epson Scan 2 Utility:
• : Click and select > .Windows 10 EPSON Epson Scan 2 Utility
• : Navigate to the screen and select .Windows 8.x Apps Epson Scan 2 Utility
• : Click or , and select or . SelectWindows (other versions) Start All Programs Programs
EPSON Epson Scan 2 Epson Scan 2 Utility> > .
• Open the folder, open the folder, and selectMac: Applications Epson Software Epson Scan 2
Utility.

17
2. Click the tab.Power Save
3. Select the length of time after which you want the scanner to go to sleep as the setting.Sleep Timer
4. Select the length of time after which you want the scanner to automatically turn off when not in use
as the setting.Power Off Timer
5. Select the length of time after which you want the scanner to automatically turn off when not in use
as the setting. You can also turn off the timer.AC power or AC adapter
6. Turn on the setting if you want the scanner to turn on when it is connected to theDirect Power On
power source, without pressing the power button.
7. Click to save the settings.Set
8. Close the Epson Scan 2 Utility.
Parent topic: Scanner Basics

18
Using the Epson Smart Panel Mobile App
Use this free Apple and Android app to scan with networked Epson products (DS-575W II).
1. Connect your product to your wireless network. See the link below.
2. Visit (U.S), (Canada), orepson.com/connect epson.ca/connect latin.epson.com/connect
(Caribbean) to learn more about Epson Smart Panel and check the compatibility of your mobile
device.
3. Download Epson Smart Panel from the Apple App Store or Google Play.
4. Connect your mobile device to the same wireless network as your product.
5. Open Epson Smart Panel and select your Epson product, if necessary.
Now you are ready to scan with your mobile device and your Epson product.
Parent topic: Scanner Basics
Related tasks
Setting Up Network Scanning

19
Loading Originals
Follow the instructions here to load your originals into the scanner.
Note: The illustrations show the DS-575W II, but the steps are the same for the DS-530 II and DS-770 II.
Loading Originals in the Input Tray
Loading Plastic and Laminated Cards in the Input Tray
Loading Special Originals
Loading Originals in the Input Tray
You can load originals that meet the document specifications in the input tray.
Caution: Do not load photos, valuable original documents or artwork, directly into the input tray. This
may wrinkle or damage the original. Load these originals using an optional carrier sheet.
Note: Photos scanned using a document scanner may not have the same color depth as the original.
Use a flatbed photo scanner with the optional flatbed scanner dock (DS-530 II/DS-770 II) to achieve the
best color reproduction of photos.
The steps below describe loading originals of the same size. To load originals of multiple sizes at once,
see the link at the end of these steps.
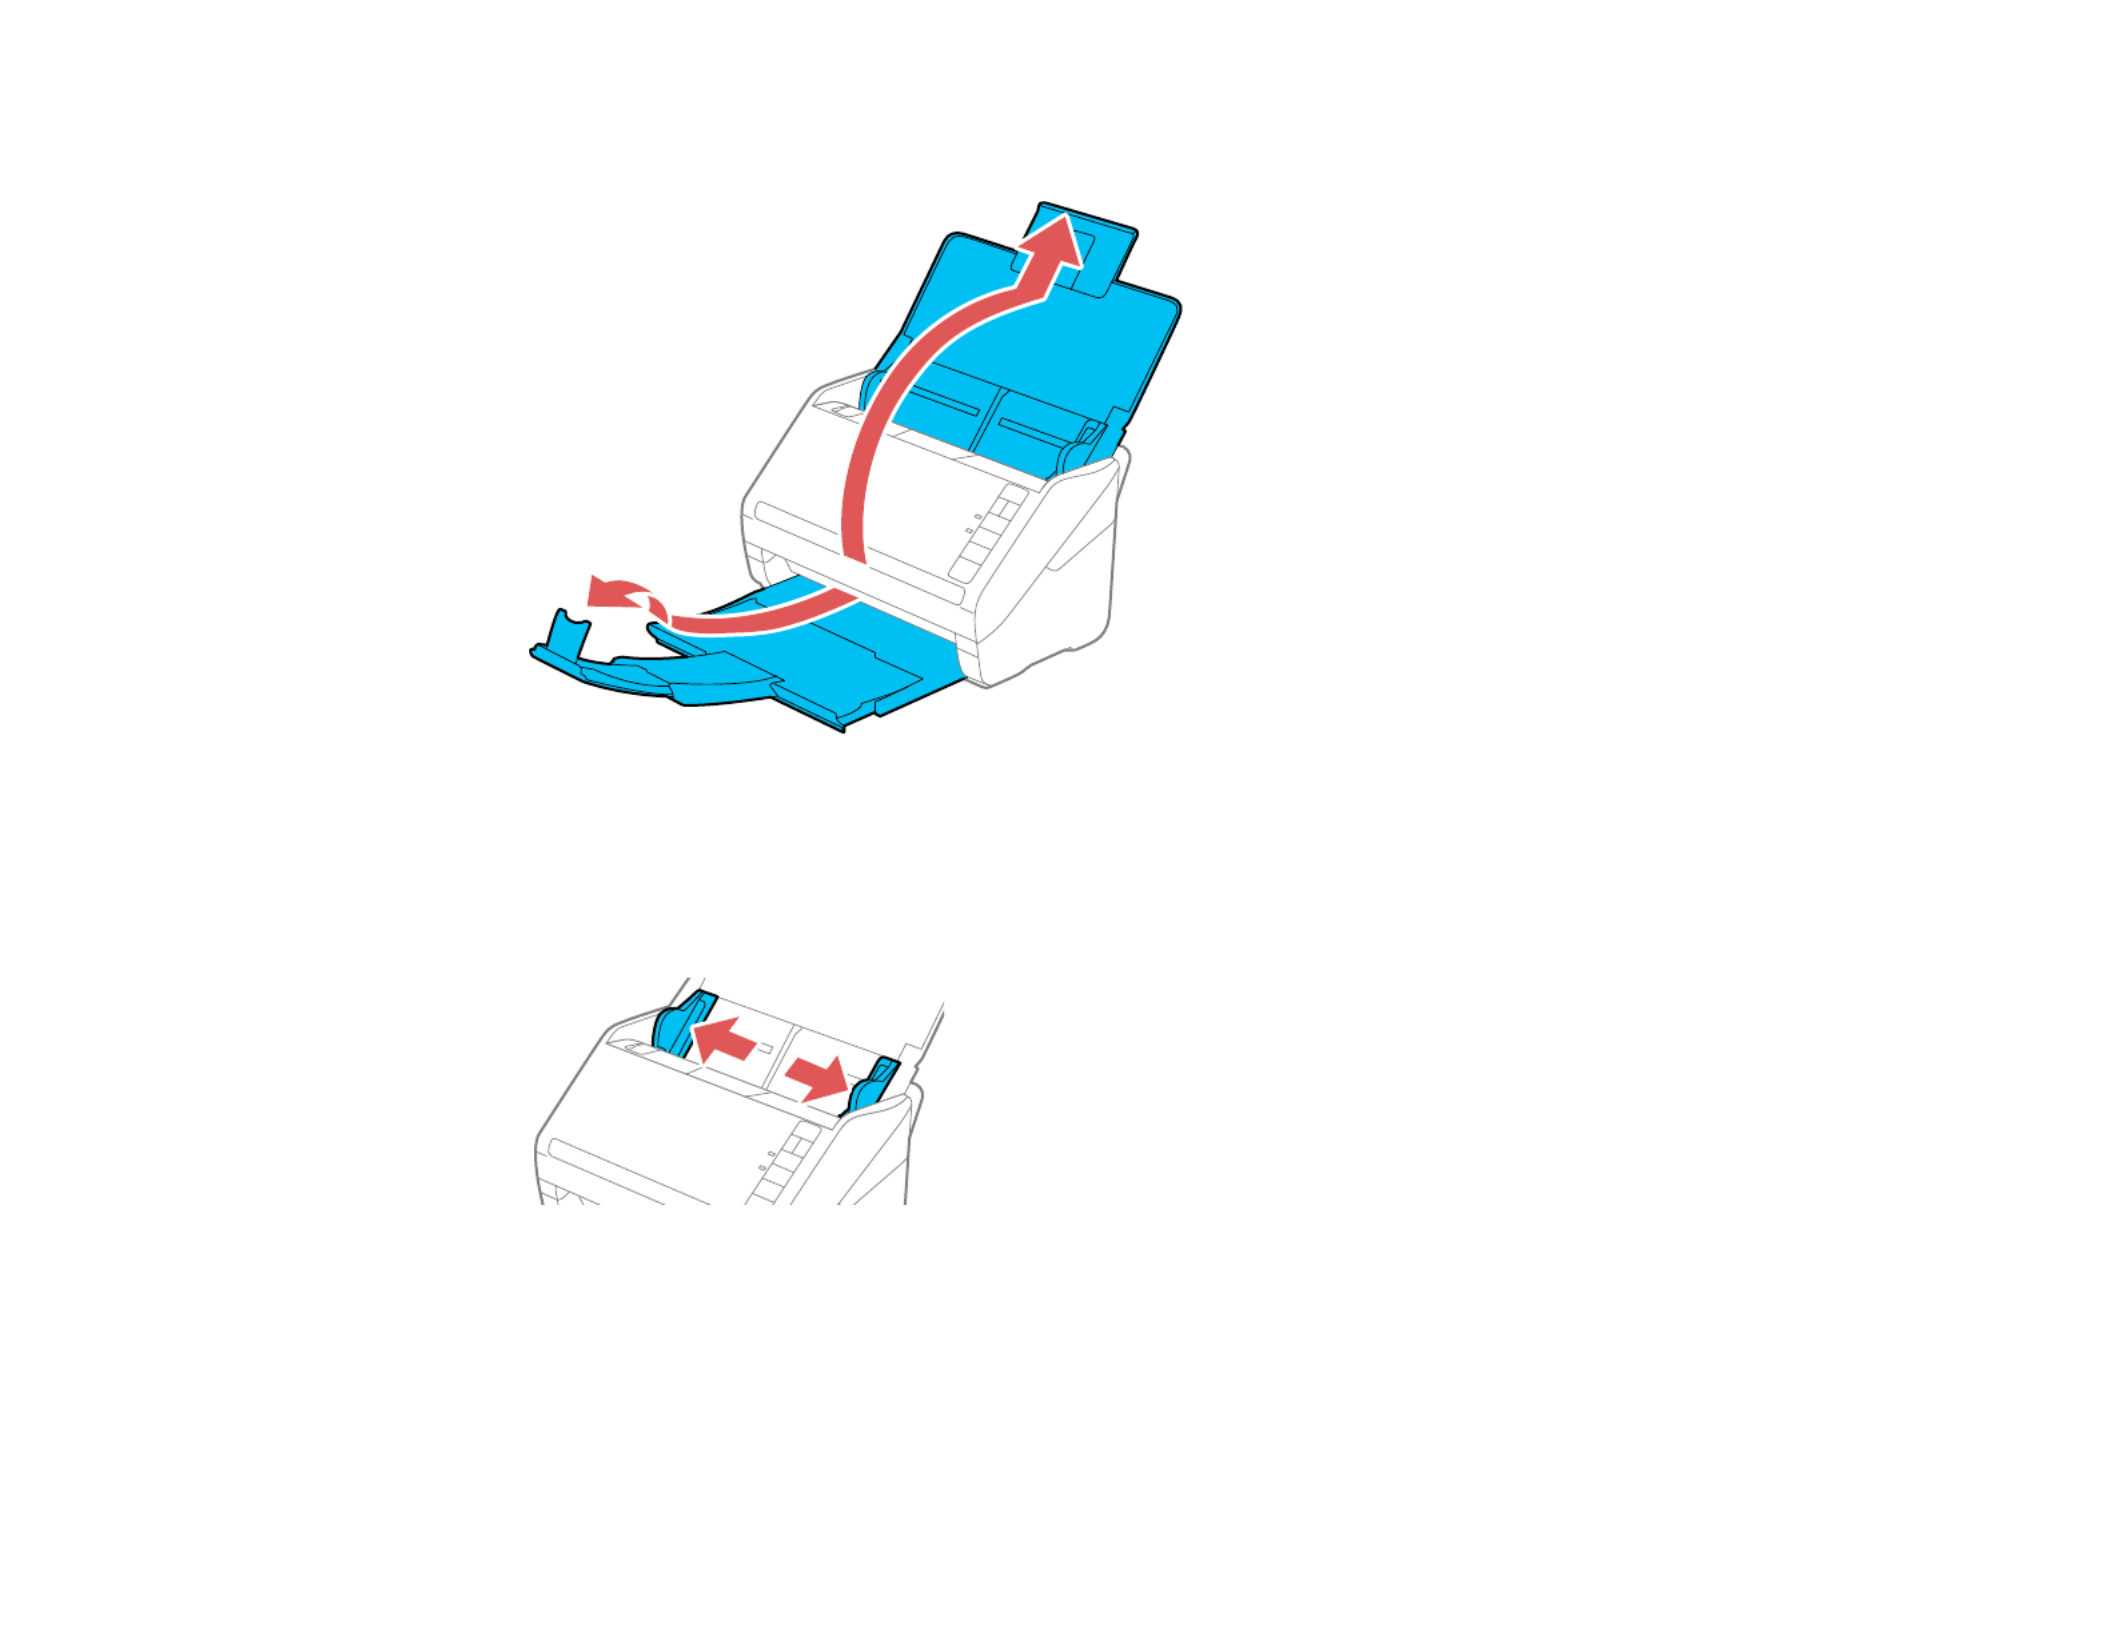
1. Open the input tray and pull up its extension.

20
2. Pull out the output tray and its extension, and open the stopper.
Note: If you are loading an original that is 15.5 inches (393.8 mm) or longer, do not pull out the input
or output tray extensions and do not open the stopper.
3. Slide the input tray edge guides all the way out.

22
6. Load standard originals into the input tray printed side down and top edge first, and guide them in
until they meet resistance.
• If you are loading paper business cards, load up to 15 (DS-530 II/DS-575W II) or 30 (DS-770 II)
cards printed side down and long edge first into the input tray horizontally, and slide them in until
they meet resistance.

23

24
• If you are loading hole-punched originals, load them with the holes facing down or to the side as
shown. The holes must be within 1.2 inches (30 mm) of the edge of the originals.
7. Slide the edge guides against the edges of the original.

25
Note: If you are scanning originals that are 15.5 inches (393.8 mm) or longer, support the original as
it enters into and ejects from the scanner as shown.
8. If necessary during scanning, adjust the position of the stopper on the output tray extension to fit the
ejected originals.
Note: If thicker paper does not eject properly or falls from the output tray, push in the output tray and
allow the originals to eject freely onto the surface below the scanner. If the scanned images are
affected by the originals ejecting below the scanner, try placing the scanner on the edge of a table
where the ejected originals can drop freely.

26
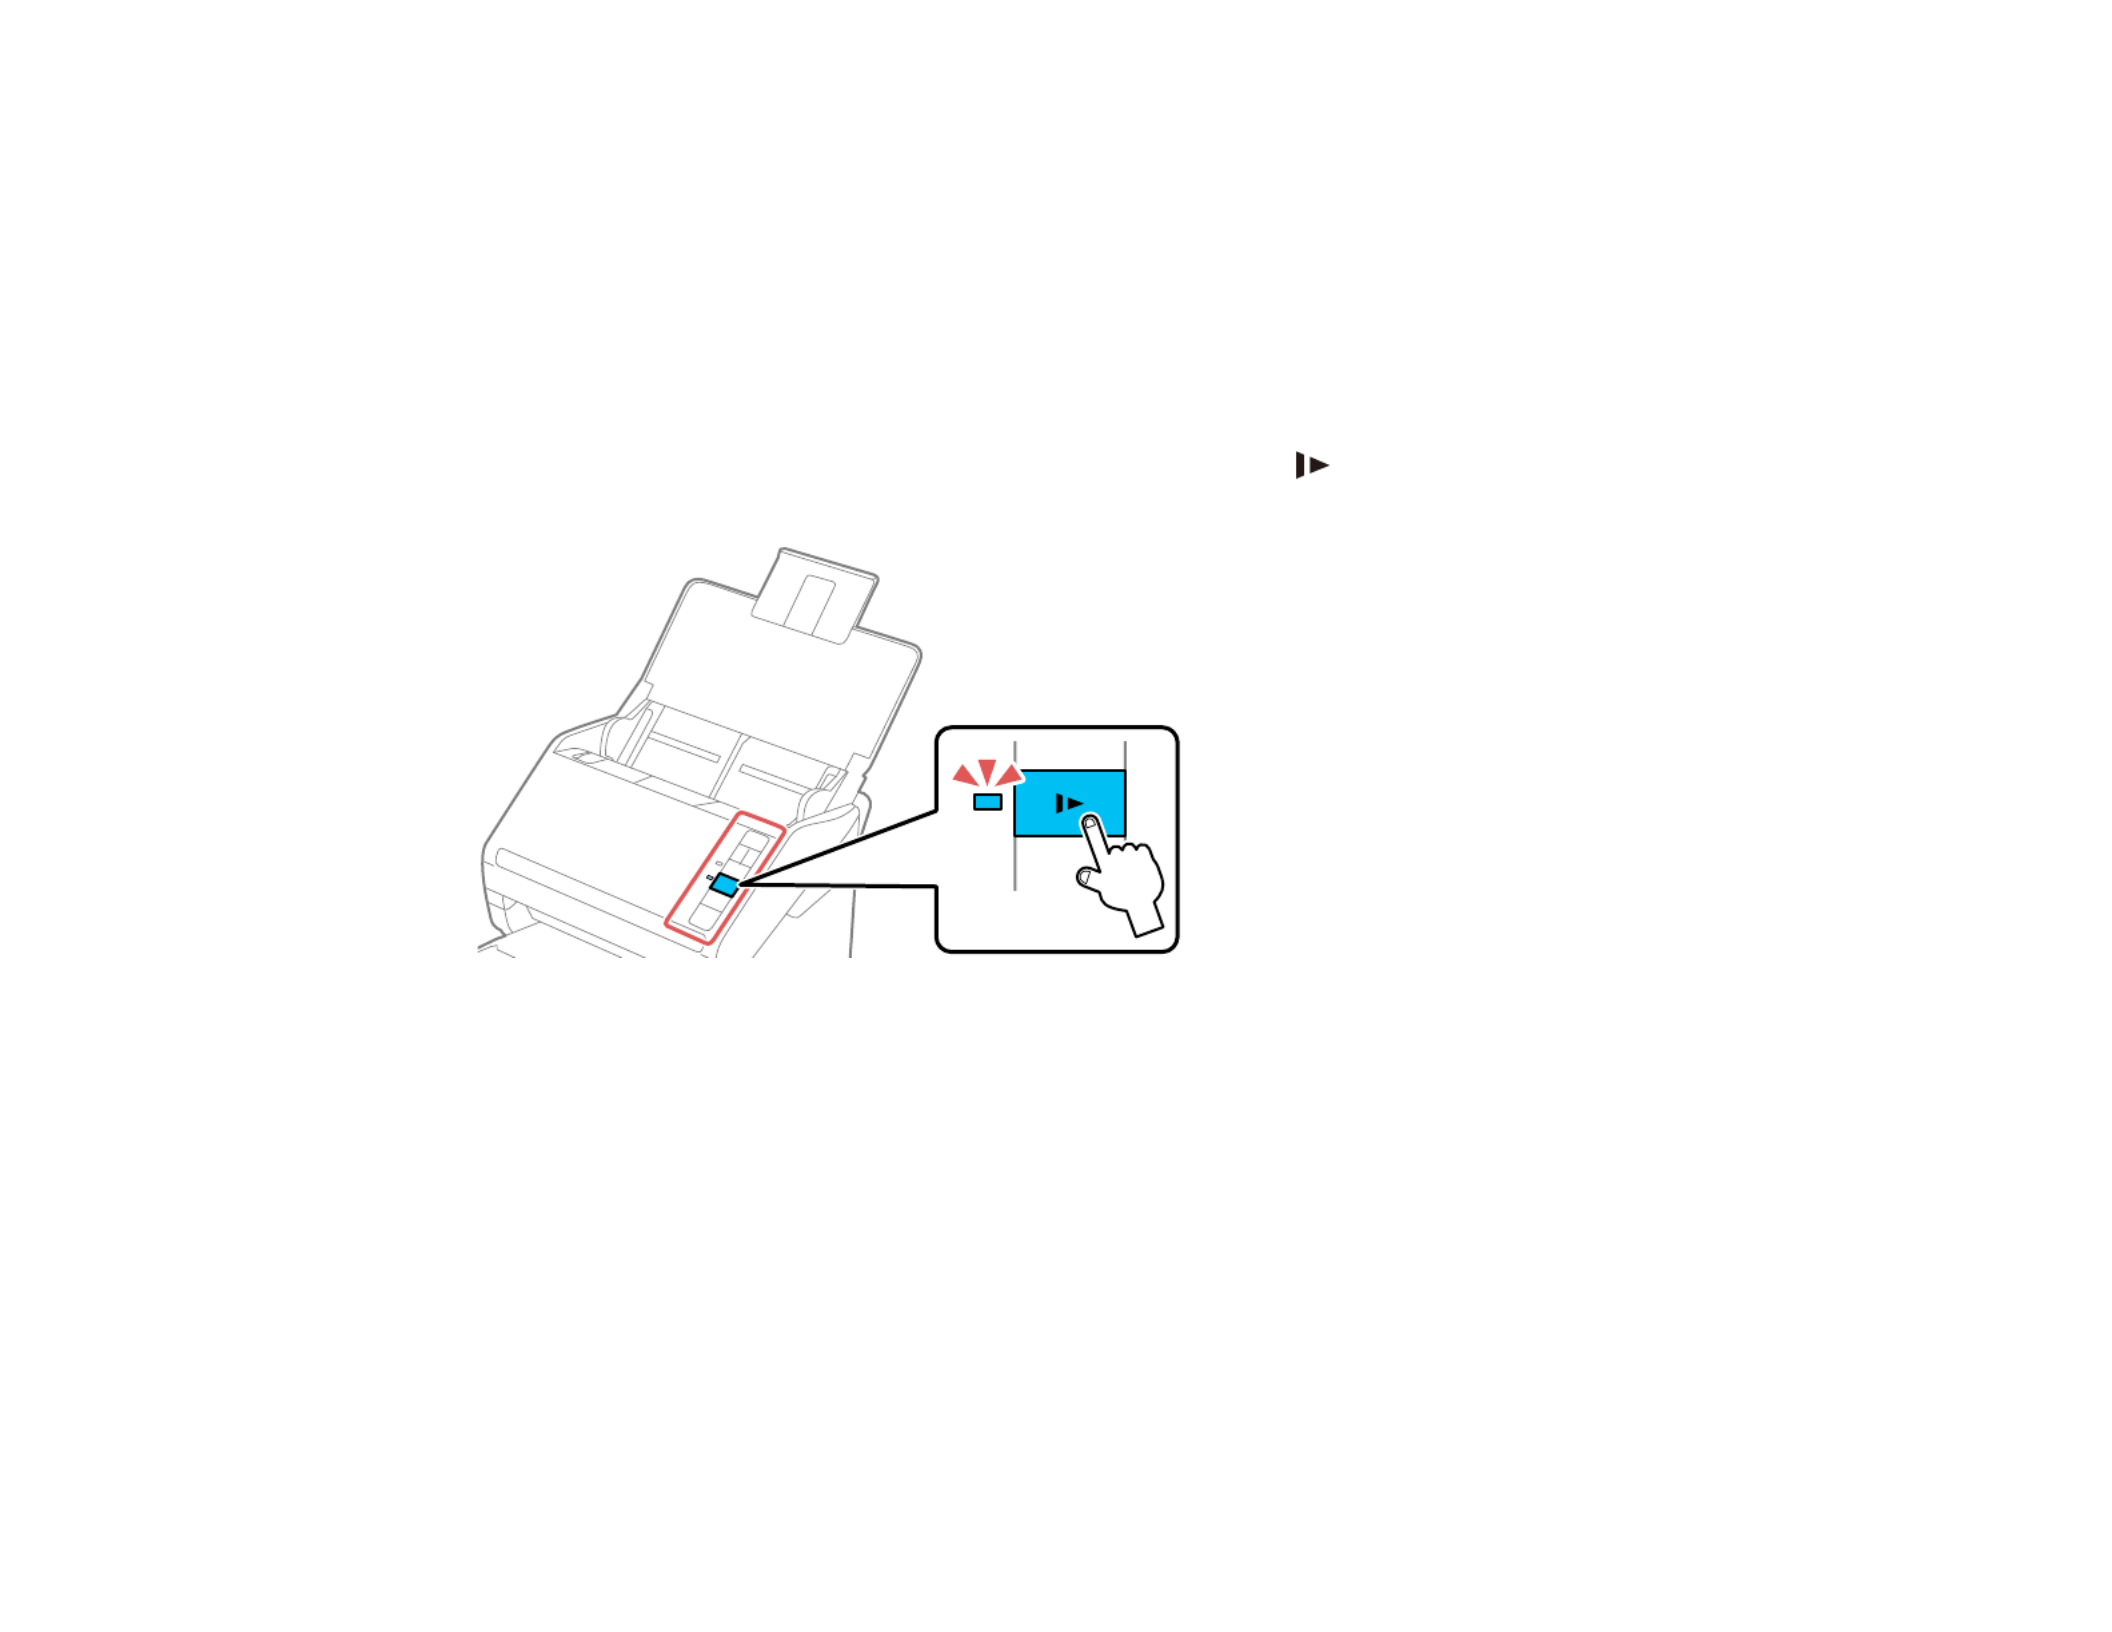
9. If scanning thin or wrinkled paper causes paper jams, press the slow mode button once before
scanning to slow down the feeding speed; press it again to return to normal speed.
If a paper feed error is detected, the Paper Protection feature stops the scanning process automatically
to reduce damage to the original. To change the Paper Protection detection level, open the Epson Scan
2 Utility, click on the tab, and select the desired level from the Paper Protection drop-Scanner Setting
down list.
Note: The Paper Protection feature does not prevent all documents from being damaged. Paper feed
errors may not be detected depending on the paper feeding conditions.
Loading Multiple Sizes of Originals in the Input Tray
Original Document Specifications
Parent topic: Loading Originals
Related references
Original Document Specifications
Related topics
Scanning
Loading Multiple Sizes of Originals in the Input Tray
You can load originals of different sizes, paper types, and thicknesses at one time in the input tray. Just
make sure they meet the original document specifications.
28
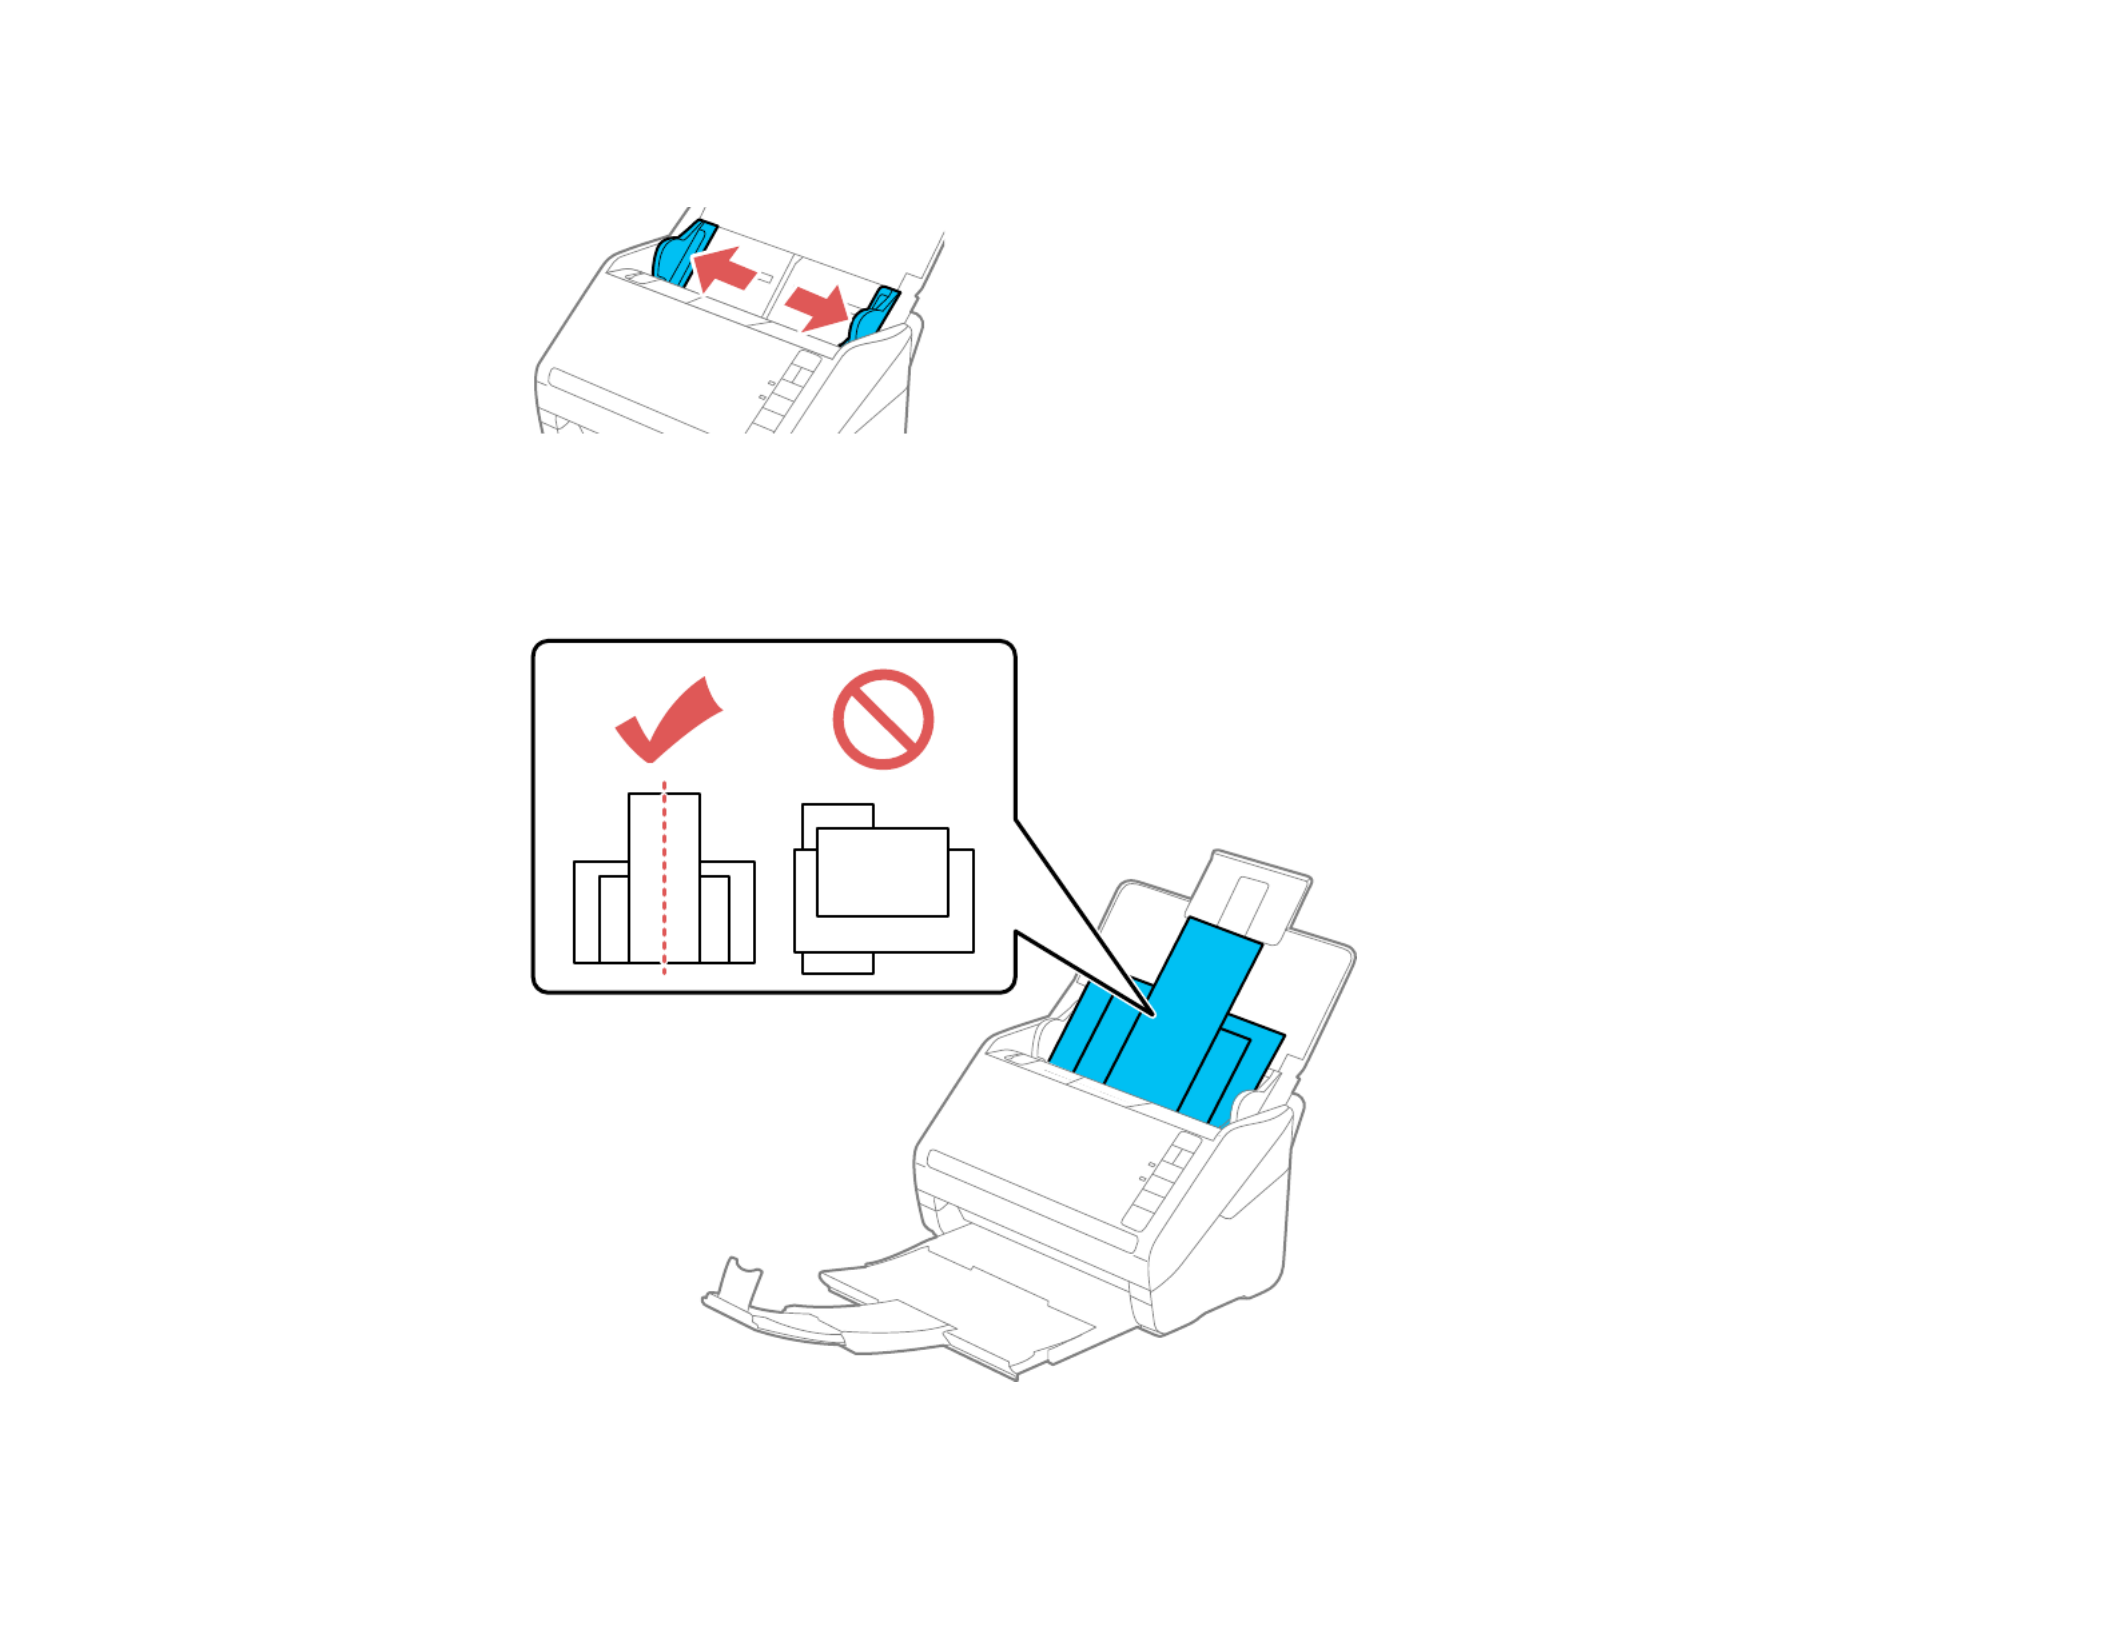
3. Slide the input tray edge guides all the way out.
4. Load the originals in the input tray in descending order of paper size with the widest at the back and
the narrowest at the front. Slide them in until they meet resistance. Make sure the printed sides are
facedown and the top edges are slightly angled in the input tray.
29
5. Slide the edge guides against the edges of the widest original.
6. If necessary during scanning, adjust the position of the stopper on the output tray extension to fit the
ejected originals.
Note: If thicker paper does not eject properly or falls from the output tray, push in the output tray and
allow the originals to eject freely onto the surface below the scanner. If the scanned images are
affected by the originals ejecting below the scanner, try placing the scanner on the edge of a table
where the ejected originals can drop freely.
If scanning thin or wrinkled paper causes paper jams, press the slow mode button once before
scanning to slow down the feeding speed; press it again to return to normal speed.
Parent topic: Loading Originals in the Input Tray
Related topics
Scanning
Original Document Specifications
You can load original documents that meet these specifications in your scanner.
DS-530 II/DS-575W II

30
Paper type Paper size Paper weight Loading capacity
Plain paper
Fine paper
Recycled paper
Letter (8.5 × 11 inches
[216 × 279 mm])
7 to 110 lb
(27 to 413 g/m²)
21 lb (80 g/m²): 50 sheets
24 lb (90 g/m²): 43 sheets
28 lb (104 g/m²): 37
sheets
34 lb (127 g/m²): 31
sheets
42 lb (157 g/m²): 25
sheets
56 lb (209 g/m²): 19
sheets
68 lb (256 g/m²): 15
sheets
110 lb (413 g/m²): 9
sheets
Loading capacity may
vary depending on the
paper type.
Legal (8.5 × 14 inches
[216 × 356 mm])
A4 (8.3 × 11.7 inches
[210 × 297 mm])
A5 (5.8 × 8.2 inches
[148 × 210 mm])
A6 (4.1 × 5.8 inches
[105 × 148 mm])
B5 (7.2 × 10.1 inches
[182 × 257 mm])
B6 (5 × 7.2 inches
[128 × 182 mm])
A8 (2.1 × 2.9 inches
[52 × 74 mm])
34 to 110 lb
(127 to 413 g/m²)
Paper business cards Business cards Up to 56 lb
(210 g/m²)
15 cards loaded
horizontally
DS-770 II

31
Paper type Paper size Paper weight Loading capacity
Plain paper
Fine paper
Recycled paper
Letter (8.5 × 11 inches
[216 × 279 mm])
7 to 110 lb
(27 to 413 g/m²)
21 lb (80 g/m²): 100
sheets
24 lb (90 g/m²): 86 sheets
28 lb (104 g/m²): 74
sheets
34 lb (127 g/m²): 62
sheets
42 lb (157 g/m²): 50
sheets
56 lb (209 g/m²): 38
sheets
68 lb (256 g/m²): 30
sheets
110 lb (413 g/m²): 18
sheets
Loading capacity may
vary depending on the
paper type.
A4 (8.3 × 11.7 inches
[210 × 297 mm])
A5 (5.8 × 8.2 inches
[148 × 210 mm])
A6 (4.1 × 5.8 inches
[105 × 148 mm])
B5 (7.2 × 10.1 inches
[182 × 257 mm])
B6 (5 × 7.2 inches
[128 × 182 mm])
A8 (2.1 × 2.9 inches
[52 × 74 mm])
34 to 110 lb
(127 to 413 g/m²)

33
easily wrinkled. To scan originals that are incorrectly detected as double feeds, press the double feed
detection skip button before scanning, or set the setting to on the Main SettingsDetect Double Feed Off
tab in the Epson Scan 2 window.
Caution: Do not load the following types of originals directly in the scanner, or they may be damaged or
may damage the scanner:
• Photos
• Originals that are bound
• Passports
• Thermal paper
• Fabric or other non-paper originals
• Originals containing staples or paper clips
• Originals with wet ink or glue
• Ripped originals
• Heavily wrinkled or curled originals
• Originals with holes on the bottom of them
• Transparencies
• Originals with carbon paper backing
• Originals with sticky notes attached
• Glossy originals
Note: Photos scanned using a document scanner may not have the same color depth as the original.
Use a flatbed photo scanner with the optional flatbed scanner dock (DS-530 II/DS-770 II) to achieve the
best color reproduction of photos.
Parent topic: Loading Originals in the Input Tray
Loading Plastic and Laminated Cards in the Input Tray
You can load plastic and laminated cards that meet the card specifications in the input tray.

35
3. Load plastic or laminated cards printed side down and long edge first into the input tray horizontally,
and slide them in until they meet resistance.

37
4. Slide the edge guides against the edges of the card.
5. Turn off the setting on the Main Settings tab in Epson Scan 2 when scanningDetect Double Feed
the cards.
Note: Detect Double FeedIf you do not disable the setting and a double feed error occurs, remove
the plastic or laminated card from the input tray and reload it. Press the double feed detection skip
button to disable the Detect Double Feed feature and scan again.

38
Plastic and Laminated Card Specifications
Parent topic: Loading Originals
Related references
Plastic and Laminated Card Specifications
Related topics
Scanning
Plastic and Laminated Card Specifications
You can load original plastic and laminated cards that meet these specifications in your scanner.
Paper type Paper size Paper thickness Loading capacity
Plastic cards,
embossed (ISO781A
ID-1 compliant)
2.1 × 3.3 inches
(54 × 85.6 mm)
0.05 inch (1.24 mm)
maximum
1 card (horizontal)
Plastic cards, standard
(ISO781A ID-1
compliant)
0.03 inch (0.76 mm)
maximum
5 cards (horizontal)
Laminated cards 4.7 × 5.9 inches (120 ×
150 mm) or smaller
0.03 inch (0.8 mm)
maximum
1 card
Note: Plastic cards with glossy surfaces may not scan properly.
Parent topic: Loading Plastic and Laminated Cards in the Input Tray
Loading Special Originals
You can load a photo or large, thick, or folded original in the input tray using one or more carrier sheets.
You can also load envelopes. Make sure the originals meet the specifications for special originals before
loading them.
1. Open the input tray and pull up its extension.
39
2. Pull out the output tray and its extension, and open the stopper.
Note: If you are loading originals that are 15.5 inches (393.8 mm) or longer, do not pull out the input
or output tray extensions and do not open the stopper.
3. Slide the input tray edge guides all the way out.

42
6. Load the carrier sheet in the input tray as shown until it meets resistance.
Folded original
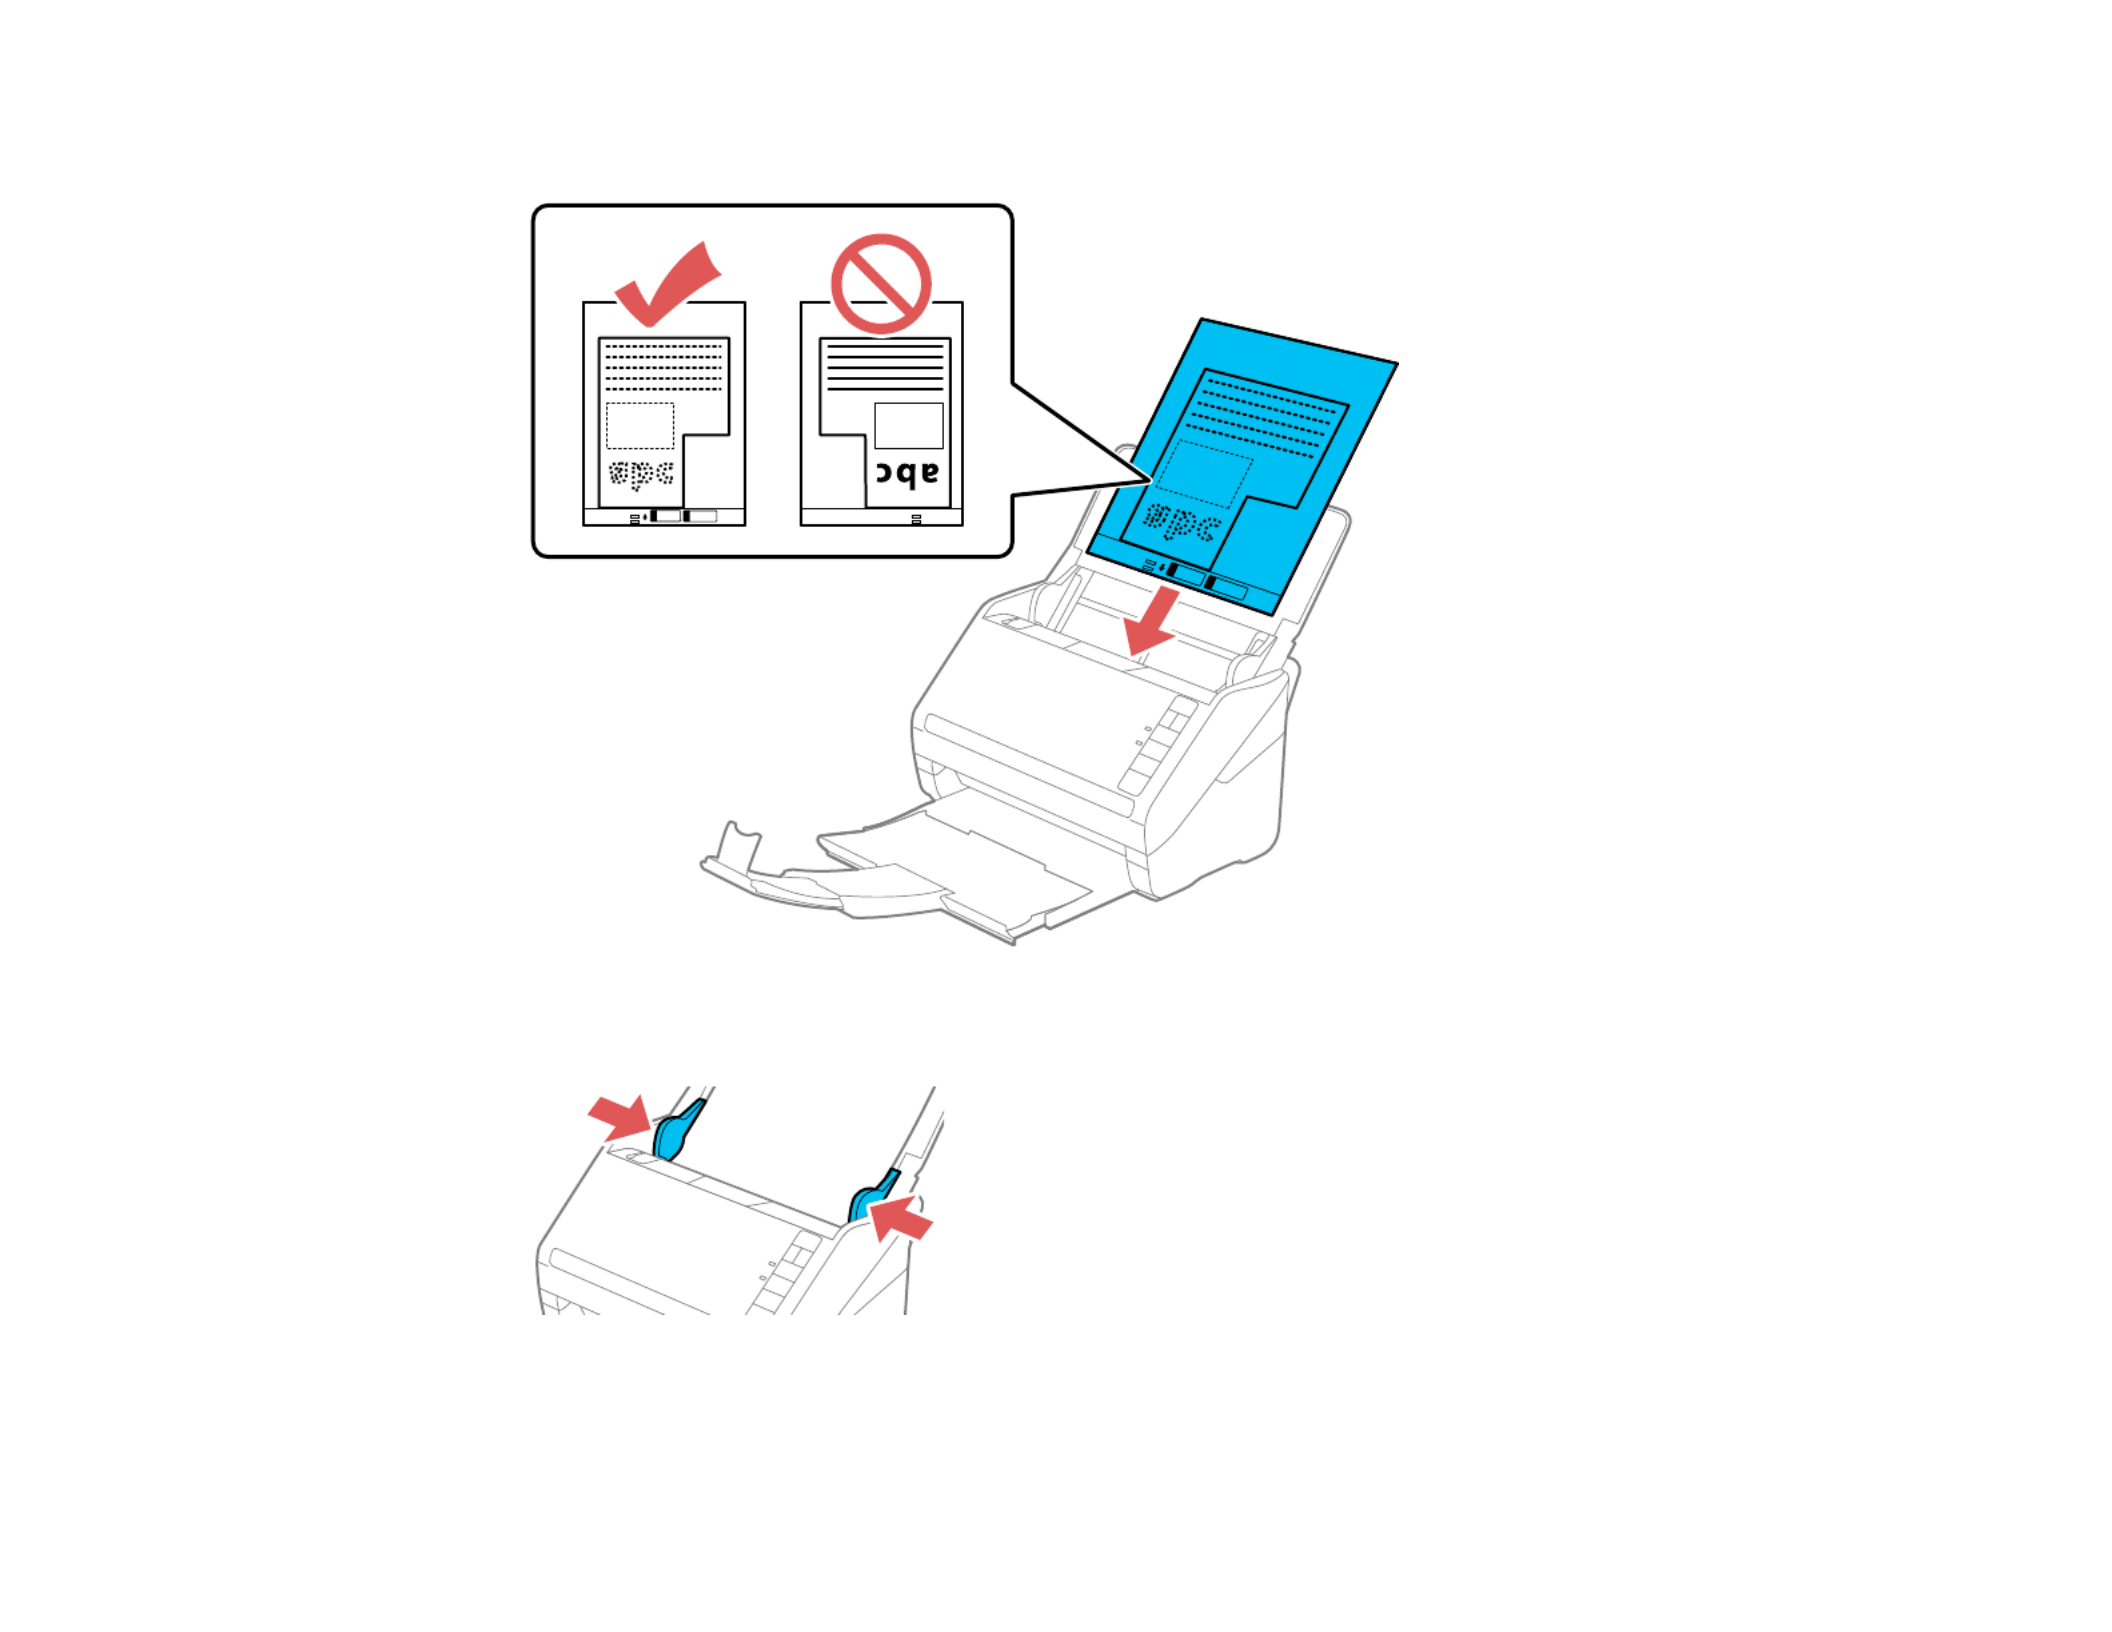
43
Photo or irregularly shaped original
7. Slide the edge guides against the edges of the original or carrier sheet.
8. Turn off the setting on the Main Settings tab in Epson Scan 2 when scanningDetect Double Feed
special originals.

44
9. If necessary during scanning, adjust the position of the stopper on the output tray extension to fit the
ejected originals.
Note: If thicker paper does not eject properly or falls from the output tray, push in the output tray and
allow the originals to eject freely onto the surface below the scanner. If the scanned images are
affected by the originals ejecting below the scanner, try placing the scanner on the edge of a table
where the ejected originals can drop freely.
Special Original Specifications
Parent topic: Loading Originals
Related references
Special Original Specifications
Related topics
Scanning
Special Original Specifications
You can load photos, envelopes, or large, thick, or folded originals that meet these specifications in your
scanner.
Note: Photos scanned using a document scanner may not have the same color depth as the original.
Use a flatbed photo scanner with the optional flatbed scanner dock (DS-530 II/DS-770 II) to achieve the
best color reproduction of photos.
Paper type Paper size Paper thickness Loading capacity
Large originals (plain
paper, fine paper, or
recycled paper)
(load only in a carrier
sheet)
Up to this size: A3 (11.7 × 16.5
inches [297 × 420 mm])
0.012 inch (0.3 mm)
maximum
(excluding the
thickness of the carrier
sheet)
DS-530 II/DS-575W II:
5 carrier sheets
DS-770 II: 10 carrier
sheets
Photos
(load only in a carrier
sheet)
Up to this size: A4 (8.3 × 11.7
inches [210 × 297 mm])
0.012 inch (0.3 mm)
maximum
(excluding the
thickness of the carrier
sheet)
DS-530 II/DS-575W II:
5 carrier sheets
DS-770 II: 10 carrier
sheets

45
Paper type Paper size Paper thickness Loading capacity
Envelopes 4.49 × 6.38 inches (114 ×
162 mm)
4.33 × 8.66 inches (110 ×
220 mm)
0.015 inch (0.38 mm)
maximum
DS-530 II/DS-575W II:
5 envelopes
DS-770 II: 10
envelopes
Irregularly shaped
originals
(load only in a carrier
sheet)
Up to this size: A4 (8.3 × 11.7
inches [210 × 297 mm])
0.012 inch (0.3 mm)
maximum
(excluding the
thickness of the carrier
sheet)
DS-530 II/DS-575W II:
5 carrier sheets
DS-770 II: 10 carrier
sheets
Note: Originals that are wider than 8.5 inches (215.9 mm) need to be folded in half. The leading edge of
originals approximately 11.7 inches (297 mm) long must be placed at the binding part of the carrier
sheet. Otherwise, the length of the scanned image may be longer than intended as the scanner scans to
the end of the carrier sheet when you select as the Document Size setting in the scanningAuto Detect
software.
Parent topic: Loading Special Originals

47
Connecting to an Existing Wi-Fi Network
You can set up your scanner to communicate with your computer using a wireless router. The wireless
router can be connected to your computer over a wireless or wired network.
1 Epson scanner
2 Wireless router
3 Computer with a wireless interface
4 Computer
5 Internet
6 Ethernet cable (used only for wired connection to the wireless router)
Manually Connecting to a Wi-Fi Network
Parent topic: Wi-Fi Networking

53
3. Press and hold the Wi-Fi connect button on the scanner for at least 3 seconds, then release it
when the Wi-Fi light flashes blue.
Note: If you do not complete this step within 2 minutes, repeat steps 1 through 3.
The Wi-Fi and AP mode lights flash alternately while establishing the connection. When the
Wi-Fi light on the scanner stays on, the scanner is connected to the network.
Note: !If the error light turns on, the connection failed. Press the stop button to clear the error,
restart the scanner and router, and repeat these steps.
4. Select the link below to set up network scanner. You must set up network scanning to connect your
computer and wireless scanner.
Parent topic: Wi-Fi Protected Setup (WPS)
Related tasks
Setting Up Network Scanning
Using WPS PIN Mode to Connect to a Network
If you have a WPS-enabled wireless router that supports PIN mode, you can use Wi-Fi Protected Setup
(WPS) PIN mode to connect your scanner to the network.
1. Open the scanner's input tray.
2. Press and hold the Wi-Fi button and the Wi-Fi connect button on the scanner simultaneously
for at least three seconds, then release them when the Wi-Fi light flashes blue.
Note: The scanner enters discovery mode for 2 minutes.
3. Use your computer to enter the PIN code into the WPS PIN number setting in the wireless01234565
router within 2 minutes.
Note: If you do not enter the code within 2 minutes, repeat steps 1 through 3.
The Wi-Fi and AP mode lights flash alternately while establishing the connection. When the
Wi-Fi light on the scanner stays on, the scanner is connected to the network.
Note: !If the error light turns on, the connection failed. Press the stop button to clear the error,
restart the router, and repeat these steps.

60
1. Make sure the scanner is connected to your computer or network.
2. Load an original in your scanner.
3. Press the start button.
The scanner starts the job that was assigned to the start button in Document Capture Pro
(Windows) or Document Capture (Mac).
Note: You can view or change the scan settings using Document Capture Pro (Windows) or
Document Capture (Mac).
Note: If your scanner is connected to one computer via USB and another computer via wireless,
pressing the start button on the scanner will save the scanned images to the wirelessly connected
computer (DS-575W II).
Adding and Assigning Scan Jobs with Document Capture Pro - Windows
Assigning Start Button Settings or Scan Jobs - Mac
Parent topic: Starting a Scan
Related topics
Loading Originals
Adding and Assigning Scan Jobs with Document Capture Pro - Windows
You can view, change, or add available default scan settings when you scan using the start button on
your product or the Job Scan option in Document Capture Pro. You do this by accessing the scan jobs in
the Document Capture Pro program.
Note: The settings may vary, depending on the software version you are using. See the help information
in Document Capture Pro for details.
1. Do one of the following to start Document Capture Pro:
• : Click and select > .Windows 10 Epson Software Document Capture Pro
• : Navigate to the screen and select .Windows 8.x Apps Document Capture Pro
• : Click or , and select or . SelectWindows (other versions) Start All Programs Programs
Epson Software Document Capture Pro> .
You see the Document Capture Pro window.
2. Select the tab.Job Scan
Termékspecifikációk
| Márka: | Epson |
| Kategória: | Scanner |
| Modell: | WorkForce DS-770II |
Szüksége van segítségre?
Ha segítségre van szüksége Epson WorkForce DS-770II, tegyen fel kérdést alább, és más felhasználók válaszolnak Önnek
Útmutatók Scanner Epson

11 Október 2024
24 Szeptember 2024
22 Szeptember 2024
20 Szeptember 2024
13 Szeptember 2024
30 Augusztus 2024
23 Augusztus 2024
23 Augusztus 2024
23 Augusztus 2024
20 Augusztus 2024
Útmutatók Scanner
- Scanner Braun
- Scanner Fujitsu
- Scanner Nedis
- Scanner SilverCrest
- Scanner Panasonic
- Scanner Canon
- Scanner HP
- Scanner Voltcraft
- Scanner Medion
- Scanner Zebra
- Scanner Xerox
- Scanner Technaxx
- Scanner Ricoh
- Scanner Eurolite
- Scanner Rollei
- Scanner Renkforce
- Scanner Brother
- Scanner Kodak
- Scanner Nikon
- Scanner Cobra
- Scanner Albrecht
- Scanner Antec
- Scanner ICarsoft
- Scanner Dymo
- Scanner Konica Minolta
- Scanner Kogan
- Scanner Honeywell
- Scanner AgfaPhoto
- Scanner ION
- Scanner Sagem
- Scanner Jay-Tech
- Scanner Trust
- Scanner Konig
- Scanner GlobalTronics
- Scanner Visioneer
- Scanner Lenco
- Scanner Uniden
- Scanner Newland
- Scanner Martin
- Scanner Panduit
- Scanner Genius
- Scanner Ipevo
- Scanner Microtek
- Scanner Neat
- Scanner Elmo
- Scanner Avision
- Scanner Reflecta
- Scanner Tevion
- Scanner Targus
- Scanner Easypix
- Scanner Kensington
- Scanner Maginon
- Scanner AVerMedia
- Scanner Steren
- Scanner Lexmark
- Scanner Minolta
- Scanner Veho
- Scanner Dnt
- Scanner Hella
- Scanner Rittz
- Scanner Jobo
- Scanner Plustek
- Scanner Zolid
- Scanner Traveler
- Scanner Mustek
- Scanner RadioShack
- Scanner Kenko
- Scanner Yupiteru
- Scanner Vupoint Solutions
- Scanner DTRONIC
- Scanner Ross-Tech
- Scanner DENSO
- Scanner Perfect Choice
- Scanner IRIS
- Scanner CDVI
- Scanner Scan Dimension
- Scanner Dyka
- Scanner Matter And Form
- Scanner Pacific Image
- Scanner Doxie
- Scanner CZUR
- Scanner Cartrend
- Scanner 3DMAKERPRO
- Scanner Ambir
Legújabb útmutatók Scanner

30 Március 2025
13 Január 2025
12 Január 2025
12 Január 2025
11 Január 2025
31 December 2025
30 December 2025
23 December 2024

15 December 2024

15 December 2024