Használati útmutató Coby CAM4000
Coby
videókamera
CAM4000
Olvassa el alább 📖 a magyar nyelvű használati útmutatót Coby CAM4000 (120 oldal) a videókamera kategóriában. Ezt az útmutatót 14 ember találta hasznosnak és 2 felhasználó értékelte átlagosan 4.5 csillagra
Oldal 1/120

EN Instruction Manual ........................................................Page 2
ES Manual de la instrucción ..............................................Page 38
FR Manuel d’instruction ...................................................Page 78
Please read carefully before use • Léa el manual antes de usar • Veuillez lire ce livret avant
utilisation
CAM4000
Mini Digital Camcorder
Mini Videocámara Digital
Mini Caméscope Numérique

Page 2 Coby Electronics Corporation
English
Table of Contents
PaCkage CoNteNts ...........................................4
oVerView .............................................................5
Unit Overview ................................................................... 5
Display Overview ............................................................ 6
gettiNg starteD .................................................8
Installing the Batteries .................................................... 8
Inserting a Memory Card ............................................... 9
BasiC oPeratioN ..............................................10
Turning the Digital Video Camera On/Off ......................... 10
Camera Modes ...................................................................... 10
Video Mode ................................................................... 10
Photo Mode ....................................................................12
PlayBaCk ............................................................15
Video Playback .......................................................................15
Image Playback ......................................................................15
Thumbnail View ..............................................................16
Additional Image Playback Options ..........................16
MeNu oPtioNs ...................................................19
Video Mode Menu .........................................................19
Photo Mode Menu ........................................................ 20
Playback Mode Menu ...................................................21
Setup Menu .................................................................... 22
MaNagiNg Files ...............................................25
Managing Files on the Video Camera ............................... 25
Lock Files ......................................................................... 25
Delete Files ..................................................................... 25

www.cobyusa.com Page 3
English
Table of Contents
Transferring Files to a Computer .......................................... 26
CoNNeCtiNg to a tV .......................................27
aDDitioNal Features .......................................28
Software Installation ..................................................... 28
Using Your Digital Video Camera as a Webcam ..... 28
saFety NotiCes .................................................30
trouBleshootiNg ............................................35
sPeCiFiCatioNs .................................................37

www.cobyusa.com Page 5
English
Overview
Unit Overview
LCD screen1.
Joystick/OK button2.
Charging indicator3.
Shutter button4.
Display button5.
Mode button6.
Power button7.
Menu/Delete button8.
USB jack9.
AV output jack10.
Strap mount11.
SD card slot12.
Microphone13.
Speaker14.
Lens15.
Self-timer indicator16.
Flash strobe17.
Battery cover18.

Page 6 Coby Electronics Corporation
English
Display Overview
Video Mode
AUTO
00 : 06 : 12320
Video mode
Movie Size
Metering
Center
Multi
Spot
640 x 480
320 x 240
Battery level
indicator
Full
Half
Low
White balance indicator
Auto
Daylight
Cloudy
Fluorescent
Tungsten
Auto
Memory
capacity
Memory
card insert
320
640
Photo Mode
AUTO
558
Photo Mode
EV Value
Metering
Center
Multi
Spot
Battery level
indicator
Full
Half
Low
White balance indicator
Auto
Daylight
Cloudy
Fluorescent
Tungsten
Auto
Resolution indicator
4000 x 3000
2592 x 1944
2048 x 1536
1024 x 768
640 x 480
Flash mode
Full ash
Auto ash
Flash off
Memory
capacity
Memory
card insert
Overview
www.cobyusa.com Page 7
English
Overview
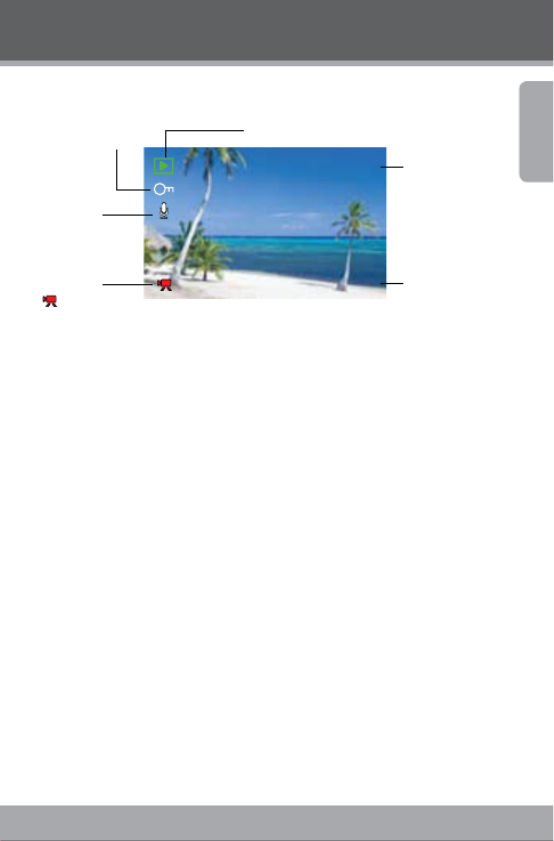
Playback Mode
12/12
2008 / 06 / 12 10:04
Voice memo
indicator
The format of
the le
Movie Clip
Protecting indicator Playback mode
Flash mode
Data and
time stamp
Page 8 Coby Electronics Corporation
English
Getting Started
Please read and complete the following steps to begin using
your digital video camera.
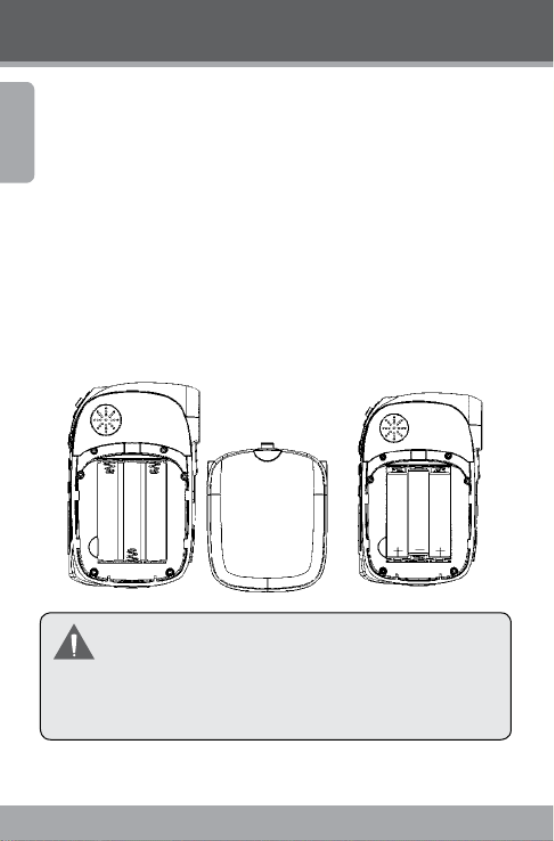
Installing the Batteries
Remove the battery compartment door by sliding it toward
the base of the camera.
Insert three (3) “AAA” batteries. Be sure to match their
polarities to those indicated in the diagram inside the battery
compartment.
Replace the battery compartment door and snap it into
place.
The battery used in this device may present a re or chem-
ical hazard if mistreated. Do not recharge, disassemble,
incinerate, or heat the batteries. Used batteries should be
disposed of safely and not incinerated.
Keep batteries out of the reach of children.

www.cobyusa.com Page 9
English
Getting Started
Inserting a Memory Card
Use an SD/SDHC memory card to expand your digital video
camera’s available memory. The CAM4000 can accommodate
memory cards of up to 8GB. Install a memory card by insert-
ing it gently into the SD card slot on the underside of the
video camera.
To remove the memory card, press it further into the card slot
and then release. The card should automatically eject from
the slot. Grasp it by the edge and pull gently to fully remove.
To avoid data corruption, turn o the digital video camera
before inserting or removing a memory card.
Do not attempt to place any object other than an SD
memory card into the SD card slot. A compatible memory
card should slide easily into the SD card slot; if you en-
counter resistance, do not attempt to force the card in.
For information on formatting a memory card, please see
the Setup Menu section of this manual.
Page 10 Coby Electronics Corporation
English
Basic Operation
Turning the Digital Video Camera On/O
Your digital video camera will turn on automatically when
the LCD screen is ipped open, and turn o when the screen
is closed.
When the LCD screen is open, you may also turn the camera
O/On by pressing the <POWER> button.
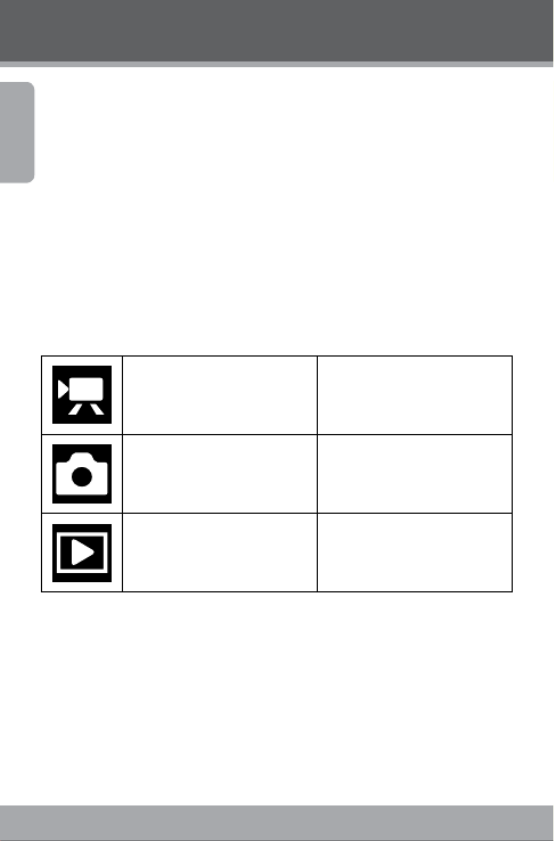
Camera Modes
Your digital video camera includes three modes. Press the
<MODE> button to toggle between them.
Video Mode Record video clips
Photo Mode Capture still images
Playback Mode Review video and image les
Video Mode
When you turn on your digital video camera, it will automati-
cally enter Video Mode. To record video:
Press the <SHUTTER> button to begin recording.
Press the <OK> button to pause recording. Press it
again to resume.

www.cobyusa.com Page 11
English
Basic Operation
Press the <SHUTTER> button to stop recording.
During recording, the total elapsed recording time is dis-
played in the upper righthand corner of the LCD screen.
When the camera is in video mode and not recording, the
estimated available recording time will be displayed in
the upper righhand corner.
Recording will stop automatically when the memory card
is full.
Zoom
To use the camera’s digital zoom function, use the joystick;
press up to zoom in, down to zoom out. The magnication
value will appear in the bottom righthand corner of the LCD
screen.
Movie Size
Your video camera records at a default movie size of 640x480
pixels. To maximize the camera’s available memory, you may
wish to record video at a lower resolution. To change the
movie size, push the joystick to the right. The movie size will
be displayed at the top of the LCD screen as 640 (default size)
or 320 (smaller size).
If you wish to use this function, you must adjust the lm
size before you begin recording. You cannot change the
lm size mid-recording.
Page 12 Coby Electronics Corporation
English
Photo Mode
Turn on the video camera and press the <MODE> but-
ton to enter Photo Mode.
Hold the camera steady, then press the <SHUTTER>
button to take a picture.
After you take a picture, the estimated number of pictures
remaining on the camera memory or memory card will
be displayed in the upper righthand corner of the LCD
screen.
Zoom
To use the camera’s digital zoom function, use the joystick;
press up to zoom in, down to zoom out. The magnication
value will appear on the bottom righthand corner of the LCD
screen.
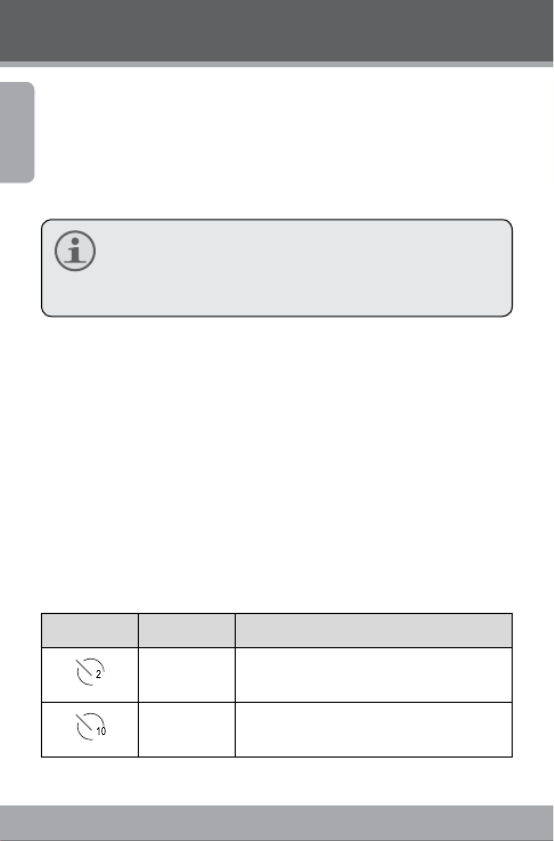
Self-Timer
In Photo Mode, press the joystick to the right to set your
desired self-timer mode. The self-timer icon will display at the
top of the LCD screen. The modes are as follows:
Icon Mode Description
2 seconds The picture will be taken 2 seconds after the
<SHUTTER> button is pressed.
10 seconds The picture will be taken 10 seconds after
the <SHUTTER> button is pressed.
Basic Operation

www.cobyusa.com Page 13
English
Icon Mode Description
Burst When the <SHUTTER> button is presse
the camera will take 3 pictures in rapid
succession.
Once you have selected your desired mode, set the camera
in your desired location and press the <SHUTTER> button to
take the picture.
Flash
In Photo Mode, press the joystick to the left to select your
desired ash mode. The ash icon will display at the top of
the LCD screen. The modes are as follows:
Icon Mode Description
A
Auto The camera will automatically detect
low-light situations and enable the ash
accordingly
Flash on The ash will go o every time a picture
is taken
Flash o The ash will not go o
Once you have selected your desired mode, press the
<SHUTTER> button to take a picture.
Basic Operation

Page 14 Coby Electronics Corporation
English
The ash will not work if the camera’s battery power is
low.
The LCD screen will go temporarily dark when the ash is
charging. If this occurs, wait a few seconds for the ash
to fully charge. Do not attempt to take a photo while the
ash is charging.
Basic Operation

www.cobyusa.com Page 15
English
Playback
To review your video or image les, press the <MODE>
button to select Playback Mode. The most recently recorded
video or image le will appear on the LCD screen.
Video Playback
After setting the video camera to Playback Mode, push the
joystick to the left or right to scroll through the available les.
Video les are indicated by the icon on the lefthand side
of the LCD screen.
When the desired video clip appears on screen, press the •
<OK> button to begin playback.
To pause playback, press the <OK> button. Press it
again to resume playback.
To fast forward through the video le, push the
joystick to the right.
To rewind through the video le, push the joystick
to the left.
To stop playback, press the <MENU> button.
Image Playback
After setting the video camera to Playback Mode, push the
joystick to the left or right to scroll through the available les.
To zoom in on an image, push the joystick upward.
When the image is displayed at your desired zoom
setting, press the <OK> button to lock the zoom ratio
in place. You may then use the joystick to pan back and
forth (or up and down) across the picture.

Page 16 Coby Electronics Corporation
English
Playback
To return the image to full screen view, press the
<MENU> button.
Thumbnail View
To view thumbnail images of all available les, push the dis-
play button. The screen will display les in thumbnail mode.
Use the joystick to select your desired le.
Press the <SHUTTER> button to view the selected le in
full screen.
Additional Image Playback Options
A variety of viewing options are available through the
Playback Mode Menu. Access the menu by pressing the
<MENU> button, and use the joystick to navigate the menu:
Push the joystick up or down to scroll through menu
options.
Push the joystick to the right to enter a submenu or
select a menu item.
Slideshow
To view still images as a slideshow:
In Playback Mode, press the <MENU> button.
Using the joystick, select and enter the “Slideshow”
menu.
Use the joystick to select “Start”. Push the joystick to the
right to begin your slideshow.
To stop the slideshow, press the <MENU> button.

www.cobyusa.com Page 17
English
Playback
You may also use the “Slideshow” menu to change the
slideshow viewing options as follows:
Interval: Set an interval time of 1 – 10 seconds between
slides.
Repeat: Set the slideshow repeat function on/o.
Video playback will not occur in slideshow mode.
Rotate
To rotate an image:
In Playback Mode, use the joystick to select your desired
image.
Press the <MENU> button.
Use the joystick to select and enter the “Rotate” menu.
Press the <OK> button to rotate the image in incre-
ments of 90º.
When you have set the image to your desired rotation,
select “Save” to save the new image.
If you do not wish to save the image, select “Back” to
exit the menu.
Resize
To resize an image:
In Playback Mode, use the joystick to select your desired
image.

Page 18 Coby Electronics Corporation
English
Playback
Press the <MENU> button.
Use the joystick to select and enter the “Resize” menu.
Use the joystick to select your desired image size
(2048x1536, 1024x768, or 640x480 pixels.)
When you have set the image to your desired size, press
the <OK> button to save the newly sized image.
Images can be resized to a smaller size only.
Set Start-Up Image
You can select your favorite image to display whenever your
digital video camera is rst powered on. To set a start-up
image:
In Playback Mode, use the joystick to select your desired
image.
Press the <MENU> button.
Use the joystick to select and enter the “Start Up Image”
menu.
Use the joystick to select “Set”.
Press the <OK> button to conrm the setting.
You must enable the Start-Up Image option in the Setup
Menu before your selected image will display. For more
information, please see the Menu Options section of this
manual.

Page 20 Coby Electronics Corporation
English
Menu Options
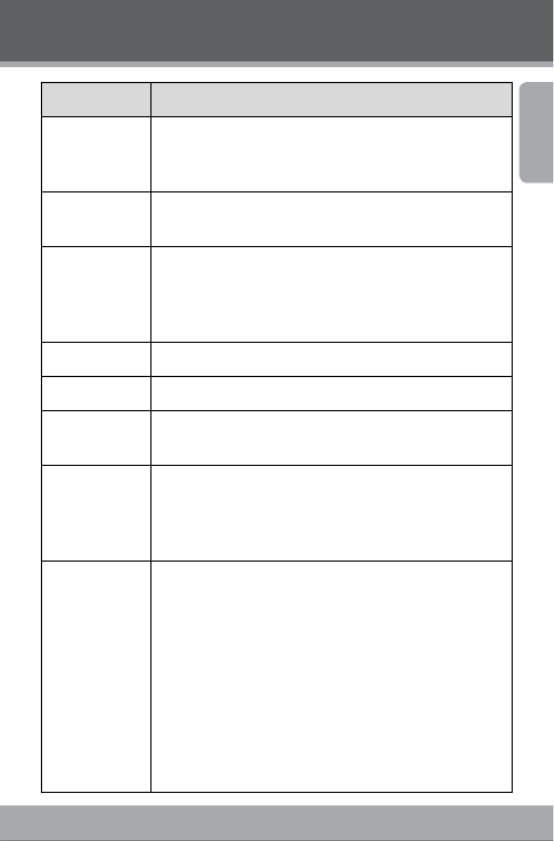
Photo Mode Menu
Menu item Function
Resolution Select the image resolution. Options include:
[8M]3264 x 2448
[3M]2048 x 1536
[1M]1024 x 768
[VGA]640 x 480
NOTE: A lower image resolution will result in a smaller
file size.
Quality Select the image quality (Fine, Super Fine, or Norm
A lower image quality will result in a smaller le size
Metering Adjust the exposure of the image by designating a r
ence area within the frame. Options include:
Center: The exposure will be calculated based on ligh
the central area of the frame. This option is suitable f
general use.
Multi: The exposure will be calculated based on the a
age light throughout the frame.
Spot: The exposure will be calculated based on the li
the very center of the frame.
White Balance Adjust the white balance to current light conditio
Options include: Auto, Daylight, Cloudy, Fluorescent
Tungsten.
Exposure Set the exposure value manually to compensate for
usual lighting conditions such as indirect indoor light
dark backgrounds, or strong backlighting. The expos
value range is –2.0 to 2.0.

www.cobyusa.com Page 21
English
Menu item Function
Driver Mode Set the self-timer mode.
NOTE: For alternate means of setting the self-timer,
please read the Photo Mode section of this
manual’s Basic Operation chapter.
Date Stamp This function can be used to add a date or date/tim
to your pictures as you take them. Options include:
O: No date/time data displayed.
Date: Date is displayed.
Date & Time: Date and time are displayed.
Playback Mode Menu
Menu Item Function
Lock Lock les to protect them from accidental deletion.
Locked le cannot be deleted. Options include:
Lock/Unlock One: Lock/Unlock current le.
Lock All: Lock all les.
Unlock All: Unlock all les.
Delete Delete les from the video camera. Options include
One: Delete current le.
All: Delete all les.
NOTE: The “All” option will not delete locked files.
Slideshow Set slideshow options and view your les in slidesh
mode. For more information, please refer to the Addi
Image Playback Options section of this manual’s Play
chapter.
Menu Options

Page 22 Coby Electronics Corporation
English
Menu Item Function
Rotate Rotate an image le in increments of 90º. For more
information, please refer to the Additional Image Pla
Options section of this manual’s Playback chapter.
Resize Resize an image le. For more information, please r
to the Additional Image Playback Options section of
manual’s Playback chapter.
Start-Up Image Set a favorite image to display on the video came
screen when the camera is turned on. For more inform
tion, please refer to the Additional Image Playback O
section of this manual’s Playback chapter.
Setup Menu
The Setup Menu is designated by the icon and can be ac-
cessed from any one of your digital video camera’s operating
modes. Press the <MENU> button, then push the joystick to
the right to begin accessing the setup menu. Use the joystick
to navigate and access the Setup Menu submenus. Press the
<OK> button to conrm selections.
Menu item Function
Sounds Change or disable the sounds associated with your
era’s functions. Options include:
Shutter: Turn the shutter sound On/O.
Start-up: Select a start-up sound (None, 1, 2, or 3.)
Beep: Turn the operating sound On/O.
Volume: Adjust the sound volume.
Menu Options
www.cobyusa.com Page 23
English
Menu item Function
Auto Review Adjust the time that a captured image remains on-
Options include O (no auto-review), 1 second, or 3
seconds.
Power
frequency
Set the frequency to either 50Hz or 60Hz depending
your region. (USA frequency is 60Hz.)
Power save To preserve battery power, your digital video came
shut o automatically after a set period of time when
in use. You may set the automatic shutdown to occur
1, 3, or 5 minutes.
Date& Time Set the current date and time.
Language Set the display language.
TV Out Set this option to either NTSC or PAL depending o
region. (USA default is NTSC.)
USB Set this option to use your digital camera as a PC ca
removable disk. Options include:
PCCAM: Use as a PC camera;
MSDC: Use as a removable disk.
Start-up Image Select an image to display on your video camera’s
screen immediately upon startup. Options include:
O: No start-up image.
System: Use the default image as the start-up image.
My image: Use your selected image as the start-up im
NOTE: To enable the “My image” option, you must have
already selected a start-up image using the
Playback Mode menu. Please refer to the the Ad-
ditional Image Playback Options section of this
manual’s Playback chapter for more information.
Menu Options

Page 24 Coby Electronics Corporation
English
Menu item Function
Format Select this option to format your video camera’s int
memory or an inserted memory card.
NOTE: Performing this function will delete all data on
your video camera and/or memory card.
Reset all Select this option to restore all menu options and se
to their factory default.
Menu Options

www.cobyusa.com Page 25
English
Managing Files on the Video Camera
Lock Files
After you have taken a video clip or still image, you may wish
to lock the le/s to protect them from accidental deletion. To
lock your le/s:
In Playback Mode, press the <MENU> button.
Use the joystick to select and enter the “Lock” menu.
Use the joystick to select your desired option.
Select Lock/Unlock One to lock/unlock the current
le.
Select Lock All to lock all les.
Select Unlock All to unlock all les.
Delete Files
To delete les from the video camera:
In Playback Mode, press the <MENU> button.
Use the joystick to select and enter the “Delete” menu.
Use the joystick to select your desired option.
Select One to delete the current le.
Select All to delete all les.
Select Unlock All to Unlock all les.
Selecting the “All” option will not delete locked les.
Managing Files

Page 26 Coby Electronics Corporation
English
Managing Files
Transferring Files to a Computer
Connect your digital video camera to a computer to transfer
les from the camera onto your hard drive.
Power on your video camera. In the Setup Menu, set
the USB Mode to “MDSC”. (Please see the Menu Options
section for additional information.)
Connect one end of the supplied USB cable to the USB
port on your digital video camera. Connect the other
end to your computer.
Your computer should automatically recognize the
video camera as a removable disk. Follow the prompt
on your screen to view les on the camera. If no prompt
appears, you may access the camera via “My Computer”
or Windows Explorer.
Copy and paste les from the camera to your computer
as you would with any external disk.
If you wish to transfer les from an SD card, you may leave
the SD card in the card slot and connect the camera di-
rectly to your computer. Your computer will recognize the
inserted SD card as an external drive. Or, remove the SD
card and insert it directly into your computer’s card reader
to transfer les.
If you are using an SD card and wish to access les on your
camera’s internal memory, you must remove the SD card
before connecting the camera to your computer. If an SD
card is present, your computer will not recognize les that
are stored directly on the camera.
www.cobyusa.com Page 27
English
Connecting to a TV
To view your video and image les on a bigger screen, use
the included cable to connect your digital video camera to a
television.
Power on the video camera and place it in the desired
mode.
Select Video Mode if you want to use your televi-
sion to preview content as you record it.
Select Playback Mode if you want to review the
video and/or image les you have already taken.
Plug in the supplied AV cable to your video camera’s AV
Out jack.
Your camera’s LCD screen will go dark when the AV cable
is connected.
Connect the other end of the AV cable to the input jack
on your television. For additional assistance, please see
your television’s instruction manual.
Set your television’s source mode to “AV”. The television
screen will now act as a display for your digital video
camera.
Use the video camera’s controls to preview your record-
ing and/or play back image and video les on your
television.

Page 28 Coby Electronics Corporation
English
Additional Features
Your digital video camera comes with an installation CD
which includes software for photo editing, video editing,
and enabling your video camera’s use as a webcam. To begin
installing software, insert the CD into your computer’s CD
drive.
Software Installation
When the CD is inserted, an AutoRun menu will appear. Click
on an option to begin installing the desired software.
Menu Option Description
Install Driver Install webcam software.
Install Photoimpression Install photo editing software.
Install Videoimpression Install Video editing software.
You must install the corresponding driver before at-
tempting to use your digital video camera as a web-
cam. Click “Install Driver”, then follow the on-screen
instructions to complete installation.
Using Your Digital Video Camera as a Webcam
After you have installed the driver, you may connect your
video camera to your computer for use as a webcam. To
access this function:
Power on your video camera.
Press the <MENU> button and access the Setup Menu.
Using the joystick, enter the USB submenu and select
the “PCCAM” setting.

www.cobyusa.com Page 29
English
Using the supplied USB cable, connect your video
camera to the USB port on your computer.
Once your video camera is connected, it is automatically
ready for use as a webcam with most chat and videoconfer-
encing clients.
Additional Options
If you are using the webcam feature and wish to preview
or capture video directly, you can do so using the software
included on your camera’s installation CD. To begin:
Under your computer’s Start menu, access Program
Files SPCA1528 PC Driver Amcap.
When the program launches, click “Options” and select
“Preview from the drop-down menu. A window will ap-
pear that shows the live feed from your video camera.
Use the other options to capture video or change the
webcam settings on your video camera. For more
information, click the Amcap program “Help” menu.
Additional Features

Page 30 Coby Electronics Corporation
English
The lightning flash with arrowhead symbol within an equilat-
eral triangle is intended to alert the user to the presence of
uninsulated “dangerous voltage” within the product’s enclo-
sure that may be of sufficient magnitude to constitute a risk
of electric shock.
The exclamation point within an equilateral triangle is intend-
ed to alert the user to the presence of important operation
and servicing instructions in the literature accompanying the
appliance.
For Customer Use:
Enter below the serial number that is located on the rear of the unit. Retain
this information for future reference.
Model No.
Serial No.
WARNING: To prevent fire or shock hazard, do not expose this device to rai
or moisture. Dangerous high voltage is present inside the enclosure. Do not
open the cabinet.
CAUTION: To prevent electric shock, match wide blade of plug to wide slot
outlet and fully insert.
WARNING: Handling the cords on this product will expose you to lead, a chem
cal known to the State of California to cause cancer, and birth defects or othe
reproductive harm. Wash hands after handling.
Safety Notices

www.cobyusa.com Page 31
English
Safety Notices
For recycling or disposal information about this product,
please contact your local authorities or the Electronics Indus-
tries Alliance: www.eiae.org.

Page 32 Coby Electronics Corporation
English
FCC Statement:
This device complies with Part 15 of the FCC Rules. Operation is subject to th
following two conditions:
(1) This device may not cause harmful interference.
(2) This device must accept any interference received, including interference
that may cause undesired operation.
Note: This equipment has been tested and found to comply with the limits fo
Class B digital devices, pursuant to Part 15 of the FCC rules. These limits ar
designed to provide reasonable protection against harmful interference in a resi
dential installation. This equipment generates, uses and can radiate radio fre-
quency energy and, if not installed and used in accordance with the instructions
may cause harmful interference to radio communications. However, there is n
guarantee that interference will not occur in a particular installation. If this equi
ment does cause harmful interference to radio or television reception, which ca
be determined by turning the equipment off and on, the user is encouraged to try
to correct the interference by one or more of the following measures:
Reorient or relocate the receiving antenna.•
Increase the separation between the equipment and receiver.•
Connect the equipment into an outlet on a circuit dierent from tha•
the receiver is connected.
Consult the dealer or an experienced radio/TV technician for help•
Use of shielded cable is required to comply with Class B limits in Subpart B
Part 15 of the FCC rules.
Do not make any changes or modifications to the equipment unless otherwise
specified in the manual. If such changes or modifications should be made, you
could be required to stop operation of the equipment.
Safety Notices

www.cobyusa.com Page 33
English
Important Safety Instructions
Read Instructions: All the safety and operating instructions should be 1.
read before the product is operated.
Retain Instructions: The safety and operating instructions should be 2.
retained for future reference.
Heed Warnings: All warnings on the product and in the operating in-3.
structions should be adhered to.
Follow Instructions: All operating and usage instructions should be fol-4.
lowed.
Cleaning: Unplug this product from the wall outlet before cleaning. Do not 5.
use liquid cleaners or aerosol cleaners. Use a damp cloth for cleaning.
Attachments: Use only attachments recommended by the manufacturer. 6.
Use of other attachments may be hazardous.
Water and Moisture: Do not use this product near water (e.g., near a 7.
bath tub, washbowl, kitchen sink, laundry tub, in wet basements, or near
a swimming pool and the like).
Ventilation: Slots and openings in the cabinet are provided for ventila-8.
tion to ensure reliable operation of the product and to protect it from
overheating. These openings should never be blocked by placing the
product on a bed, sofa, rug, or other similar surface. This prvoduct
should not be placed in a built-in installation such as a bookcase or rack
unless proper ventilation is provided or the manufacturer instructions
have been adhered to.
Power Sources: This product should be operated only from the type 9.
of power source indicated on the rating label. If you are not sure of the
type of power supply to your home, consult your product dealer or local
power company. For products intended to operate from battery power or
other sources, refer to the operating instructions.
Overloading: Do not overload wall outlets, extension cords, or integral con-10.
venience receptacles as this can result in a risk of re or electric shock.
Object and Liquid Entr y: Never push objects of any kind into this product 11.
through openings as they may tap dangerous voltage points or shout-
out parts that could result in a re or electric shock. Never spill liquid of
any kind on the product.
Servicing: Do not attempt to service this product yourself as opening or 12.
removing covers may expose you to dangerous voltage or other haz-
ards. Refer all servicing to qualied service personnel.
Safety Notices

Page 34 Coby Electronics Corporation
English
Damage Requiring Service: Unplug this product from the wall outlet and re-13.
fer servicing to qualied service personnel under the following conditions:
a) when the power-supply or plug is damaged; b) if liquid has been spilled
or if objects have fallen into the product; c) if the product has been exposed
to rain or water; d) if the product does not operate normally by following the
operating instructions. Adjust only those controls that are covered by the
operating instructions as improper adjustment of other controls may result
in damage and will often require extensive work by a qualied technician
to restore the product to its normal operation; e) if the product has been
dropped or damaged in any way; f) when the product exhibits a distinct
change in performance—this indicates a need for service.
Replacement Parts: When replacement parts are required, be sure that 14.
your service technician has used replacement parts specied by the manu-
facturer or have the same characteristics as the original part. Unauthorized
substitutions may result in re, electric shock, or other hazards.
Safety Check: Upon completion of any service or repairs to this product, 15.
ask the service technician to perform safety checks to ensure that the
product is in proper operating condition.
Heat: The product should be situated away from heat sources such as 16.
radiators, heat registers, stoves, or other products (including ampliers)
that produce heat.
Safety Notices

www.cobyusa.com Page 35
English
Troubleshooting
If you have a problem with this device, please read the
troubleshooting guide below and check our website at
www.cobyusa.com for Frequently Asked Questions (FAQs)
and rmware updates. If these resources do not resolve the
problem, please contact Technical Support.
Addre ss COBY Electronics Technical Support
56-65 Rust Street
Maspeth, NY 11378
Email techsupport@cobyusa.com
Web www.cobyusa.com
Phone 800-727-3592: Weekdays 8:30AM–11:00PM EST
Saturdays 9:00AM–5:30PM EST
718-416-3197: Weekdays8:00AM–5:30PM EST
Camera does not power on.
Check that the batteries have been inserted correctly.
Check that the batteries have adequate charge. If the
batteries are old or do not have adequate charge,
replace the batteries.
The camera does not take pictures/video.
The camera’s memory or memory card may be full.
Delete several les and try again.
An incompatible memory card may be inserted. Check
that the memory card is in a compatible format.
If the memory card has not been formatted, use
the camera’s Format function to clear data from the
memory card.

Page 36 Coby Electronics Corporation
English
Image is blurry or out of focus.
Blurry images or video may result when the camera
is not held steady during recording. Hold the camera
steady and try again.
Memory card images are not displayed on the LCD
screen.
This camera will only display JPG images that have
lenames in the following format: SUNP####.jpg. If you
have inserted a memory card containing images in an-
other format or lename structure, they will not display.
Check the format of the images on your memory card.
Recorded images are not saved in memory.
Images will not save if the camera is turned o before
data has nished processing. Be sure to allow adequate
time for the image to save completely before turning
o the video camera.
I cannot access the pictures on my camera or
memory card from my computer.
Ensure that the camera’s USB mode is set to MSDC. (See
the Menu Options section for more information.)
Troubleshooting

www.cobyusa.com Page 37
English
Specications
Display Type 2.4” color TFT LCD
Image Sensor 3MP CMOS (2048 x 1536)
Video Resolution VGA (640 x 480) @ 30fps, QVGA (320 x 240)
@ 30fps
Zoom 4x Digital
Photo Resolution
3264 x 2448 (8M by software interpolation)
2048 x 1536 (3M)
1024 x 768 (1M)
640 x 480 (VGA)
Memory 32MB Flash
Removable Memory Support SD/SDHC (up to 8GB)
Key Functions Digital Video Recorder, Image Capture
(Camera)
Other Features Flash, PC Camera
Video Format AVI le, codec: Motion JPEG
Photo Format JPEG
Menu Language Support English, Spanish, French, German, Portuguese
PC Interface Support USB 2.0 Hi-speed
AV Output 3.5mm Composite Video and Mono Audio
Power 3 x “AAA” Batteries (included)
Specications are subject to change without notice.

Page 38 Coby Electronics Corporation
Español
Índice
CoNteNiDo Del Paquete .................................40
CoNtroles De uN Vistazo ..............................41
Generalidades de la unidad .......................................41
Generalidades de la pantalla .................................... 42
Para eMPezar ...................................................44
Instalación de las baterías .......................................... 44
Inserción de una tarjeta de memoria ....................... 45
oPeraCióN BásiCa ..........................................46
Encendido/apagado de la cámara de video digital ..... 46
Modos de la cámara ............................................................. 46
Modo Video ................................................................... 46
Modo Foto ...................................................................... 48
aParato De leCtura .......................................51
Reproducción de video ........................................................ 51
Reproducción de imágenes ................................................ 51
Vista en miniatura ......................................................... 52
Otras opciones de reproducción de imagen .......... 52
oPCioNes Del MeNú.........................................56
Menú del modo Video ................................................. 56
Menú del modo Foto .................................................... 57
Menú de modo Reproducción ................................... 59
Menú Conguración .................................................... 60
FiCheros De MaNejo ......................................63
Administración de archivos en la cámara de video ....... 63
Bloqueo de archivos ..................................................... 63
Borrado de archivos ..................................................... 63

www.cobyusa.com Page 39
Español
Índice
Transferencia de archivos a una computadora ............... 64
CoNexióN CoN uNa tV ..................................66
CaraCterístiCas aDiCioNales .....................67
Instalación de software ............................................... 67
Uso de la cámara de video digital como cámara
Web ................................................................................. 67
PreCauCioNes ..................................................69
soluCióN De ProBleMas ................................74
esPeCiFiCaCioNes ............................................76

Page 40 Coby Electronics Corporation
Español
Contenido del paquete
Gracias por adquirir esta minicámara de video digital
CAM4000 de Coby. Lea estas instrucciones antes de utilizar
su grabadora de video y consérvelas para referencia futura.
Este paquete incluye:
Cámara de video digital CAM4000
Cable AV
Cable USB
CD de instalación
Baterías AAA (3)
Correa para mano desmontable
Si faltara alguno de los artículos mencionados anteriormente,
comuníquese con el distribuidor a quien le compró el
producto.
Termékspecifikációk
| Márka: | Coby |
| Kategória: | videókamera |
| Modell: | CAM4000 |
Szüksége van segítségre?
Ha segítségre van szüksége Coby CAM4000, tegyen fel kérdést alább, és más felhasználók válaszolnak Önnek
Útmutatók videókamera Coby

27 Augusztus 2024
27 Augusztus 2024
26 Augusztus 2024
26 Augusztus 2024
26 Augusztus 2024
Útmutatók videókamera
- videókamera Samsung
- videókamera Sony
- videókamera Braun
- videókamera Nedis
- videókamera Milwaukee
- videókamera Philips
- videókamera Olympus
- videókamera Oregon Scientific
- videókamera SilverCrest
- videókamera Garmin
- videókamera Panasonic
- videókamera Canon
- videókamera JVC
- videókamera Sharp
- videókamera Toshiba
- videókamera HP
- videókamera Hyundai
- videókamera BenQ
- videókamera Voltcraft
- videókamera Medion
- videókamera Vimar
- videókamera SBS
- videókamera Insignia
- videókamera Fujifilm
- videókamera Polaroid
- videókamera Kyocera
- videókamera GoPro
- videókamera Speco Technologies
- videókamera Blackmagic Design
- videókamera Ricoh
- videókamera Kenwood
- videókamera Rollei
- videókamera Hama
- videókamera Zoom
- videókamera Renkforce
- videókamera Agfa
- videókamera Midland
- videókamera Lamax
- videókamera Sencor
- videókamera Hitachi
- videókamera Xblitz
- videókamera Kodak
- videókamera Nikon
- videókamera Logitech
- videókamera Bresser
- videókamera Klein Tools
- videókamera Viewsonic
- videókamera Cobra
- videókamera Denver
- videókamera Minox
- videókamera Trevi
- videókamera DJI
- videókamera Extech
- videókamera Gembird
- videókamera Cisco
- videókamera Energy Sistem
- videókamera OK
- videókamera Konica Minolta
- videókamera Mamiya
- videókamera Overmax
- videókamera Kogan
- videókamera SJCAM
- videókamera Intenso
- videókamera AgfaPhoto
- videókamera Marshall
- videókamera Trotec
- videókamera ION
- videókamera Mio
- videókamera DOD
- videókamera Samson
- videókamera TomTom
- videókamera Jay-Tech
- videókamera Trust
- videókamera Konig
- videókamera ARRI
- videókamera Pyle
- videókamera Sanyo
- videókamera Salora
- videókamera DataVideo
- videókamera Lenco
- videókamera Uniden
- videókamera Best Buy
- videókamera Leica
- videókamera Thinkware
- videókamera Soundmaster
- videókamera Steinberg
- videókamera GoClever
- videókamera RCA
- videókamera Insta360
- videókamera Genius
- videókamera Swann
- videókamera Elmo
- videókamera Vitek
- videókamera Laserliner
- videókamera Hazet
- videókamera Vivitar
- videókamera Aiptek
- videókamera AEE
- videókamera Airis
- videókamera ATN
- videókamera Activeon
- videókamera Lexibook
- videókamera Bushnell
- videókamera Easypix
- videókamera Nilox
- videókamera Maginon
- videókamera Magellan
- videókamera Flir
- videókamera Envivo
- videókamera TacTic
- videókamera Macally
- videókamera Transcend
- videókamera Bauer
- videókamera Naxa
- videókamera Ricatech
- videókamera Tronje
- videókamera Mpman
- videókamera Nikkei
- videókamera T'nB
- videókamera Ematic
- videókamera Tracer
- videókamera Minolta
- videókamera Zagg
- videókamera Veho
- videókamera Dnt
- videókamera Zorki
- videókamera Contour
- videókamera RunCam
- videókamera Drift
- videókamera SeaLife
- videókamera Sakar
- videókamera Jobo
- videókamera Dragon Touch
- videókamera Mediacom
- videókamera Kreator
- videókamera Contax
- videókamera EE
- videókamera Traveler
- videókamera Contour Design
- videókamera Kaiser Baas
- videókamera Bluetech
- videókamera Braun Phototechnik
- videókamera Spypoint
- videókamera Kitvision
- videókamera Praktica
- videókamera MMTC
- videókamera Flip
- videókamera Brinno
- videókamera BlackVue
- videókamera Storex
- videókamera DXG
- videókamera MD 80
- videókamera Berger & Schröter
- videókamera Vupoint Solutions
- videókamera Whistler
- videókamera Curve
- videókamera PCE Instruments
- videókamera CamOne
- videókamera Mobius
- videókamera ISAW
- videókamera Beaulieu
- videókamera Revier Manager
- videókamera Kobian
- videókamera FHD 1080P
- videókamera RSC
- videókamera Stealth Cam
- videókamera Aqua-Vu
- videókamera Hamlet
- videókamera Qoltec
- videókamera Leotec
- videókamera Replay
- videókamera Akaso
- videókamera Hamilton Buhl
- videókamera Aida
- videókamera Rexing
- videókamera IOPLEE
- videókamera Moultrie
- videókamera Bolex
- videókamera Teslong
- videókamera Izzo
Legújabb útmutatók videókamera
30 Március 2025
30 Március 2025
30 Március 2025
30 Március 2025
28 Március 2025
28 Március 2025
28 Március 2025
28 Március 2025

16 Január 2025
16 Január 2025