Használati útmutató Aluratek AWCS06F
Olvassa el alább 📖 a magyar nyelvű használati útmutatót Aluratek AWCS06F (1 oldal) a webkamera kategóriában. Ezt az útmutatót 8 ember találta hasznosnak és 2 felhasználó értékelte átlagosan 4.5 csillagra
Oldal 1/1
Product Highlights Product Installation
Operation Operation
WARNING!!! This equipment has been tested and found to comply with the limits of a
Class B digital device, pursuant to part 15 of the FCC rules. These limits are designed to
provide reasonable protection against harmful interference in a residential installation.
This equipment generates, uses and can radiate radio frequency energy and, if not
installed and used in accordance with the instruction, may cause harmful interference to
radio communications. However, there is no guarantee that interference will not occur in
a particular installation. If this equipment does cause harmful interference to radio or
television reception, which can be determined by turning the equipment off and on, the
user is encouraged to try to correct the interference by whatever measures may be
required to correct the interference.
Radio and TV Interference Statement
qsg Q10594 Copyright © 2021 Aluratek, Inc. All Rights Reserved.
aluratek.com
model AWCS06F
Qu Start uidick G e
HD 1080p Webcam with Built-in Speakers
Technical Support and Warranty
If you need further assistance, please contact the Aluratek support department for
troubleshooting prior to returning this device.
E-mail: support@aluratek.com
Web: www.aluratek.com/helpdesk
Local (Irvine, CA): 714-586-8730
Toll free: 1-866-580-1978
Using Camera On Windows
Windows 10 users can use the Camera app, which is already preinstalled with Windows
OS. This will allow you to preview the camera image, capture still frames and video clips.
If you wish to use the camera with other applications, you will need to enable the camera
in the Windows security settings.
• To begin, select the Start button ( ), and then select Camera in the list of apps, or
type “camera” in the search bar.
• If you want to use the camera within other apps, select the Start button ( ), select
Settings > Privacy > Camera, and then turn on Let apps use my camera.
• From there, turn on each of the listed apps where you want to use the camera.
After you open the Camera app, you may need to switch to the Full HD Camera. Here’s
how to switch from one to the other:
• Select Start > Camera > Change camera. ( ) Top right corner.
Operation
Using Camera On MacOS
2. Go to the “Security & Privacy” preference panel.
3. Select the Privacy tab then choose Camera from the left side list
4. Locate the app(s) you want to enable camera access for and check the box alongside
that app name to enable camera access for that application.
To see an image from the camera in Photo Booth, you may need to select the camera
from the list of attached devices in the app.
• At the top of your screen, click Camera in the app menu, and select the Full HD
camera from the list of options.
When you can see an image from the camera:
• To capture images from the camera, click the red camera icon ( ).
• To switch to video mode, click the film strip icon in the bottom left corner of the app.
The red camera icon will change to a video icon ( ) at which point you will be able
to record video.
Operation
Operation
Using Camera On Windows
When you can see an image from the camera:
• Select Photo ( ) or Video ( ) and take a picture or make a video.
• To see your new pho to or video or, ones you’ ve taken be ore elec ar ho f , s t St t > P tos ( )
and then choose the Collection you want to see.
Aluratek warrants this product against defect in material or workmanship for 1 YEAR
from the date of purchase.
For more information, please visit: https://aluratek.com/warranty-return-policy
You can register your product online at: https://aluratek.com/product-registration
Operation
Capture HD Video with QuickTime Player
QuickTime on MacOS offers a method for easily creating video recordings that use the
full camera resolution.
• To begin, select the Finder button, click Applications, and start QuickTime Player.
• After QuickTime launches, click File > New Movie Recording
• To select the camera input, click the small downward-facing arrow next to the
round record button ( )
• Click the record button to capture video.
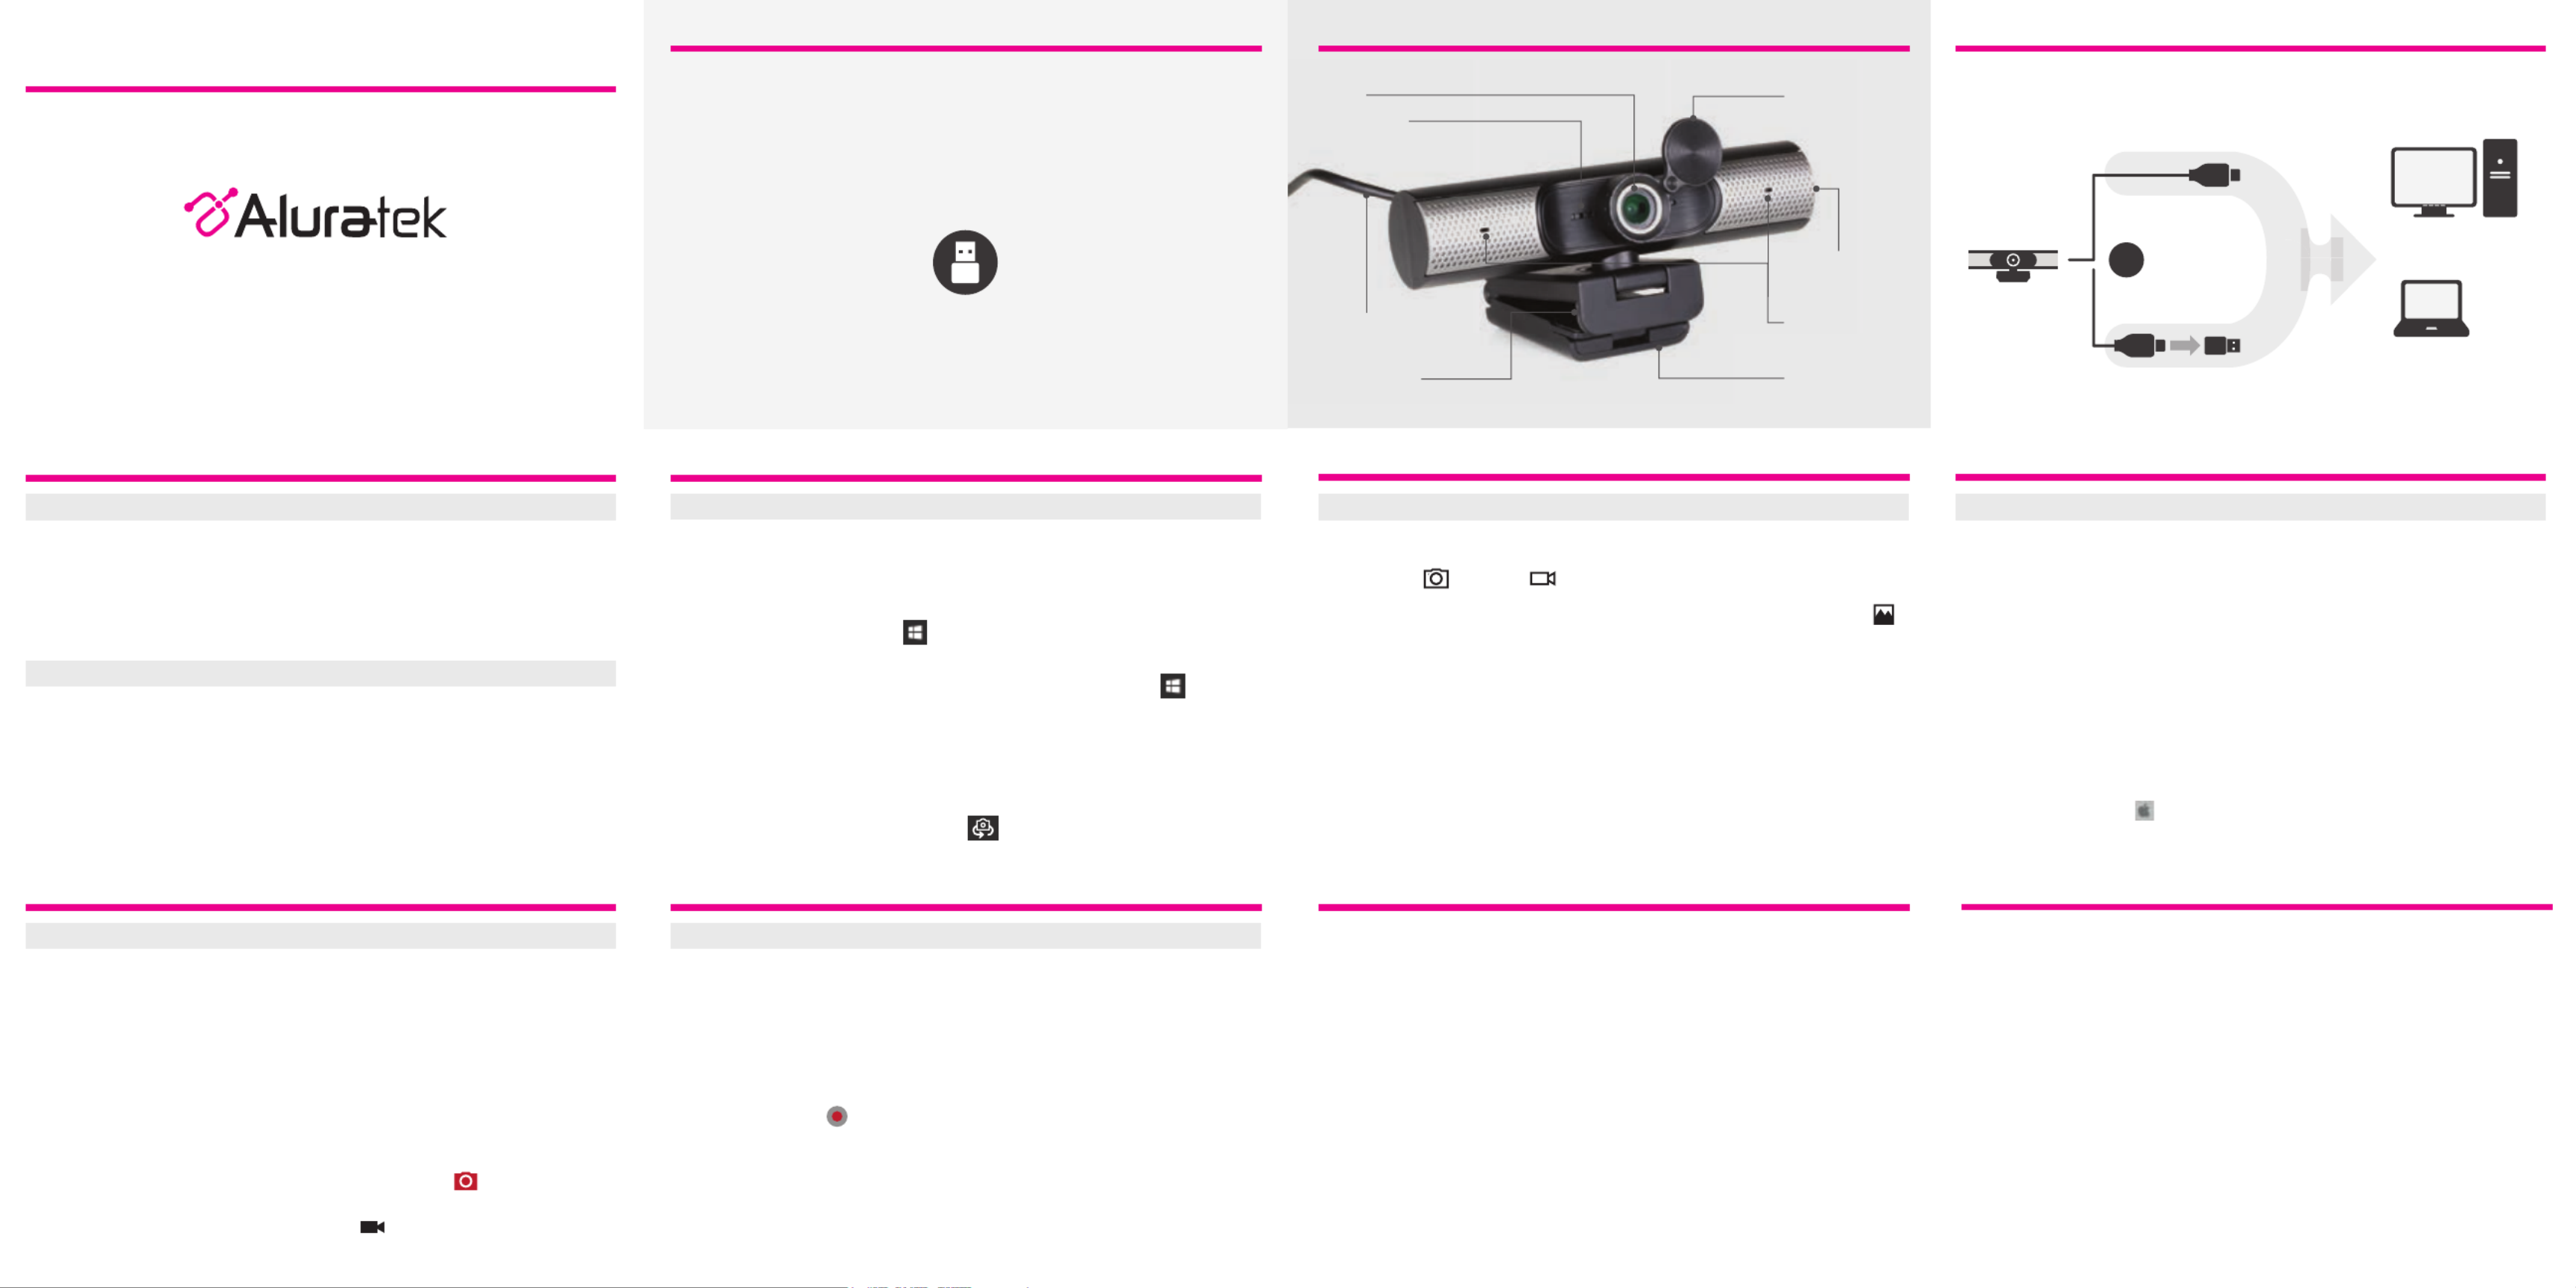
Mounting Clip
Lens
Status Light
Microphones
Speakers
(backside)
Tripod Mount
Getting Started
The Webcam features full plug and play support for Windows and MacOS. After
connecting the camera to computer’s USB port, you may start any application that
accepts a USB video stream, such as Skype, Zoom or Microsoft Teams and begin using
your camera.
NOTE: To use the camera’s internal microphone, you will have to select it as a USB
Audio input in your application settings.
NOTE: If you are using on a laptop with built-in camera, you will need to disable it in
device manager and select to use the USB Webcam.
Using Camera On MacOS
MacOS users can use the Photo Booth app, which is already preinstalled with MacOS.
This will allow you to preview the camera image, capture still frames and video clips.
NOTE: While Photo Booth can be used to quickly preview the camera image,
higher-quality videos using the full camera resolution should be created in iMovie or
QuickTime, since Photo Booth does not use the full camera image
As in Windows, you may need to allow apps installed on your computer to access the
camera in the MacOS security settings.
• To begin, select the Finder button, click Applications, and start Photo Booth.
If you want to use the camera within other apps, you will need to enable access in the
MacOS Security & Privacy settings.
1. Go to the Apple menu ( ) in the top left corner of the screen and choose System
Preferences.
Basic System Requirements
• 3 GHz Intel® eCor ™ 2 Duo or abov e
• 2 GB RAM or more
• USB 2.0 port
OS Support:
• Win XP, Win 7, Win 8, Win 10
• Android 5.0 or above
• Mac OS 10.6 or above
• Linux 2.6.24 or above
• Chrome OS V29.01547 or above
Attached Privacy
Lens Cover
Attached USB Cable
Package Contents
Your order has been carefully packaged and inspected. The following accessories should
be included in your package. Please inspect the contents of the package to ensure that
you have recei ed v all ems it and ha no hing t t t has been damaged ou dis . If y cov a ,er problem
please contact us immediately for assistance.
Plug-n-Play:
Connect the webcam via the connected cable or in addition with USB-C to USB-A
adapter to the appropriate port on your laptop or desktop computer.
USB-C to
U -A A terSB dap
USB-A port or USB-C
port on desktop
USB-A port or USB-C
port on laptop
USB-C to USB-A
Adapter
OR
Termékspecifikációk
| Márka: | Aluratek |
| Kategória: | webkamera |
| Modell: | AWCS06F |
Szüksége van segítségre?
Ha segítségre van szüksége Aluratek AWCS06F, tegyen fel kérdést alább, és más felhasználók válaszolnak Önnek
Útmutatók webkamera Aluratek

14 Augusztus 2024
13 Augusztus 2024
7 Augusztus 2024
7 Augusztus 2024
7 Augusztus 2024
6 Augusztus 2024
5 Augusztus 2024
5 Augusztus 2024
4 Augusztus 2024
Útmutatók webkamera
- webkamera Sony
- webkamera Nedis
- webkamera Philips
- webkamera Pioneer
- webkamera SilverCrest
- webkamera Lenovo
- webkamera Sven
- webkamera HP
- webkamera BenQ
- webkamera TP-Link
- webkamera Medion
- webkamera Digitus
- webkamera Dell
- webkamera MEE Audio
- webkamera Conceptronic
- webkamera Hikvision
- webkamera Vivanco
- webkamera Netgear
- webkamera V7
- webkamera Microsoft
- webkamera Asus
- webkamera Rollei
- webkamera Hama
- webkamera Renkforce
- webkamera Midland
- webkamera Kodak
- webkamera Sennheiser
- webkamera Logitech
- webkamera Dahua Technology
- webkamera Viewsonic
- webkamera Denver
- webkamera Ewent
- webkamera NGS
- webkamera Gembird
- webkamera Xtorm
- webkamera Niceboy
- webkamera Speed-Link
- webkamera BaseTech
- webkamera ModeCom
- webkamera Lorex
- webkamera Foscam
- webkamera Manhattan
- webkamera Plantronics
- webkamera Kogan
- webkamera Alecto
- webkamera Prestigio
- webkamera D-Link
- webkamera Media-Tech
- webkamera Yealink
- webkamera Elro
- webkamera Razer
- webkamera Vivotek
- webkamera Trust
- webkamera Konig
- webkamera Marmitek
- webkamera Pyle
- webkamera Lumens
- webkamera AVer
- webkamera Lindy
- webkamera Fanvil
- webkamera Siig
- webkamera Elo
- webkamera Axis
- webkamera Insta360
- webkamera Creative
- webkamera Genius
- webkamera Ipevo
- webkamera Anker
- webkamera Vivolink
- webkamera Sitecom
- webkamera InLine
- webkamera J5create
- webkamera Elgato
- webkamera PTZ Optics
- webkamera Airlive
- webkamera A4tech
- webkamera Icy Box
- webkamera Eminent
- webkamera Targus
- webkamera Exibel
- webkamera Aukey
- webkamera Easypix
- webkamera Nilox
- webkamera AVerMedia
- webkamera Steren
- webkamera ProXtend
- webkamera Envivo
- webkamera Sandberg
- webkamera AV:link
- webkamera Sweex
- webkamera Vizio
- webkamera T'nB
- webkamera Tracer
- webkamera Interlogix
- webkamera Kunft
- webkamera Day
- webkamera IC Intracom
- webkamera Wanscam
- webkamera Adesso
- webkamera IHome
- webkamera Iluv
- webkamera Prowise
- webkamera Ozone
- webkamera JPL
- webkamera Zalman
- webkamera Bazoo
- webkamera AbleNet
- webkamera Micro Innovations
- webkamera Arozzi
- webkamera Mylife
- webkamera ITek
- webkamera KONFTEL
- webkamera Mitsai
- webkamera Sygonix Connect
- webkamera Perfect Choice
- webkamera OBSBOT
- webkamera Shoplace
- webkamera Canyon
- webkamera AOpen
- webkamera Konig Electronic
- webkamera Hamlet
- webkamera Webcamxp
- webkamera Approx
- webkamera Y-cam
- webkamera Acme Made
- webkamera Acme United
- webkamera WyreStorm
- webkamera VisionTek
- webkamera ALC
- webkamera HuddleCamHD
- webkamera Aplic
Legújabb útmutatók webkamera

3 Április 2025
12 Január 2025

10 Január 2025

31 December 2025
30 December 2025
30 December 2025
29 December 2024

22 December 2024
15 December 2024
15 December 2024