Használati útmutató Alesis Virtue
Olvassa el alább 📖 a magyar nyelvű használati útmutatót Alesis Virtue (100 oldal) a zongora kategóriában. Ezt az útmutatót 5 ember találta hasznosnak és 2 felhasználó értékelte átlagosan 4.5 csillagra
Oldal 1/100

AHP-1
User Guide
English ( 3 – 19 )
Guía del usuario
Español ( 20 – 37 )
Guide d’utilisation
Français ( 38 – 54 )
Guida per l’uso
Italiano ( 55 – 72 )
Benutzerhandbuch
Deutsch ( 73 – 91 )
Appendix
English ( 92 – 98 )

2

3
User Guide (English)
Introduction
Box Contents
Virtue Digital Piano
Piano Stand with Music Rest and 3 Pedals
Adjustable Piano Bench
Assembly Parts
Power Adapter
User Guide
Safety & Warranty Manual
Support
For the latest information about this product (system requirements, compatibility information,
etc.) and product registration, visit alesis.com.
For additional product support, visit alesis.com/support.
Note: Please use a nonabrasive dry cloth when cleaning Virtue.
4
Setup
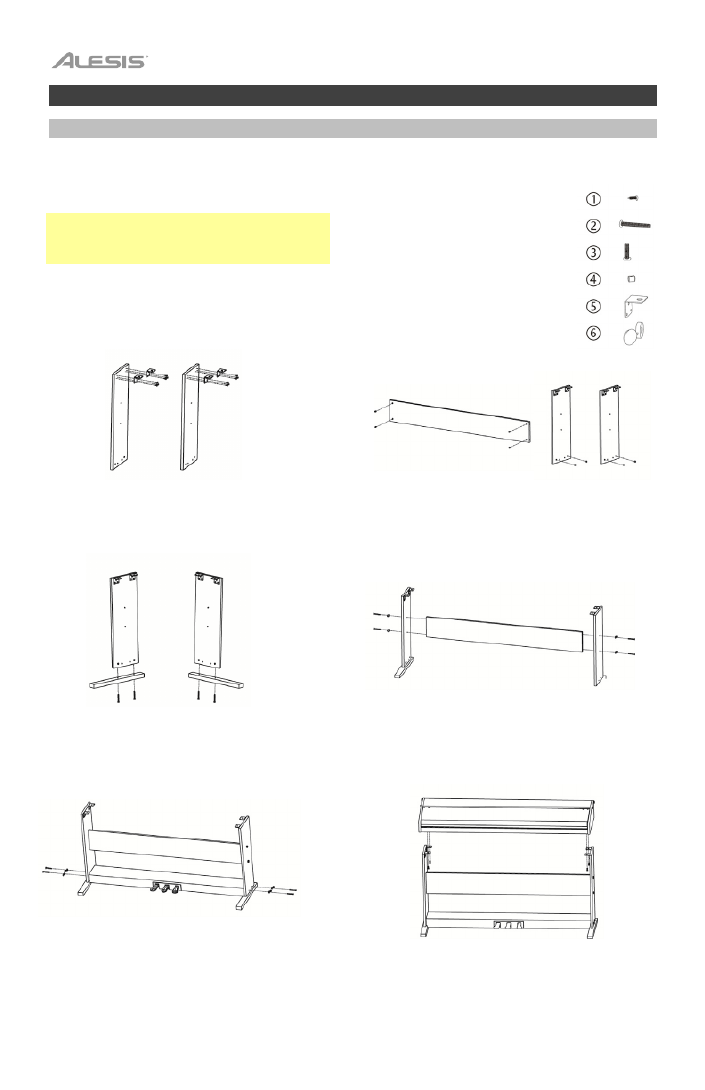
Piano Assembly
Follow these instructions to assemble the
piano:
Note: You will need a Phillips-head (+)
screwdriver (not included) of the
appropriate size for assembly.
1. (12) TA4*12 screws
2. (12) M6*50 screws
3. (4) M6*20 screws
4. (8) Hammer nuts
5. (4) Corner brackets
6. (8) M6 screw plastic caps
1. Use the 12 TA4*12 screws to attach
the 4 corner brackets to the left and
right piano corner panels.
2. Press the 8 hammer nuts into the
corresponding holes on the left and
right corner panels and back panel.
3. Use the 4 M6*50 screws to connect
the left and right panels to the left and
right ground feet.
4. Use the 4 M6*50 screws to connect
the left and right panels and back panel
together; then connect the M6 screw
caps.
5. Use 4 of the M6*50 screws to
connect the left and right panels to the
pedal box; then connect the M6 screw
caps.
6. Use 4 M6*20 screws to connect the
piano body to the piano brackets
Assembly Parts
5
USB (TO DEVICE) SUS DAL
OUTPUT USB (TO HOST)
IN TMIDI
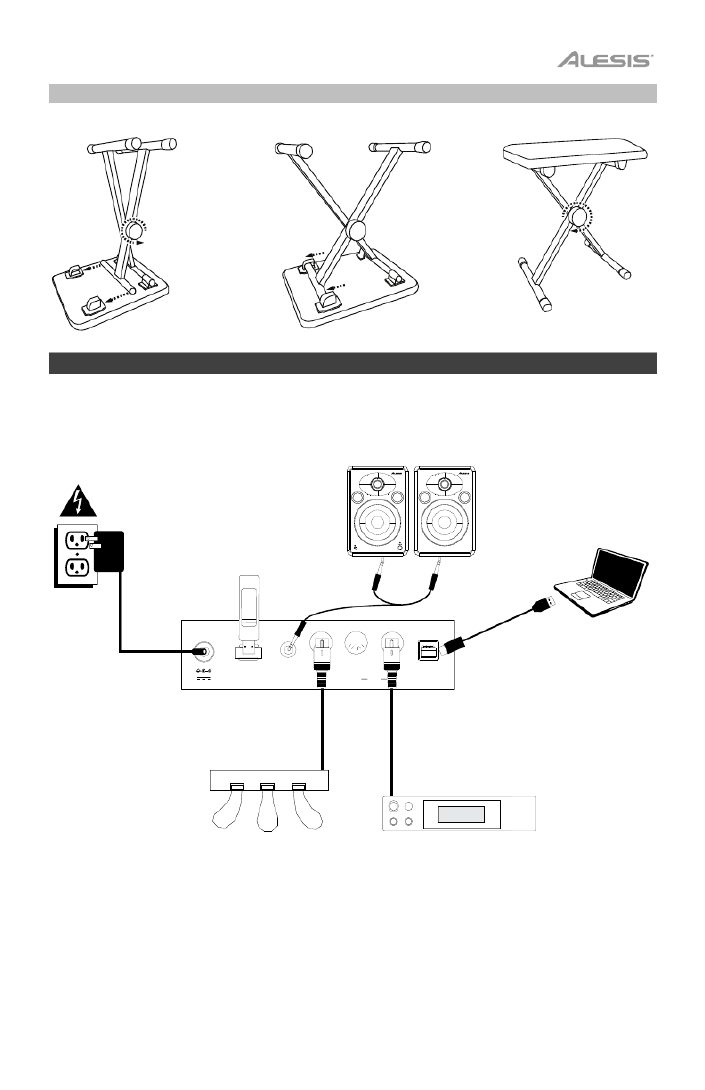
Bench Assembly
Connection Diagram
Items not listed under the Box Contents are sold separately.
Power
Computer
External MIDI Device
Sustain Pedal
Speakers
USB Flash Drive
2 31

6
Features
Top Panel
1. Master Volume: Adjust this knob to change the master volume level.
2. Tempo: Press these buttons to adjust the tempo up or down for an accompaniment
style, song, or metronome. See the section Tempo for more details.
3. Accompaniment Volume: Press these buttons to change the accompaniment volume.
4. Intro/Ending: Press this button to play the intro/ending of the auto accompaniment.
When in Song mode, press this button to set the beginning and ending position of a song
section loop. See the section Intro/Ending for more details.
5. Sync: When this button is pressed with the Auto Chord or Full Range Chord features
enabled, the auto accompaniment style will start immediately once a chord is played.
When in Song mode, press this button to pause a song. See the section Sync for more
details.
6. Fill In 1: Press this button to trigger a fill when playing along with a style. When in Song
mode, press this button to rewind through a song. See the section Fill In 1/Fill In 2 and
Accompaniment Pattern Variations for more details.
7. Fill In 2: Press this button to trigger a fill when playing along with a style. When in Song
mode, press this button to fast forward through a song. See the section Fill In 1/Fill In 2
and Accompaniment Pattern Variations for more details.
8. Start/Stop: Press this button to play or stop song playback or accompaniment style
playback.
9. Auto Chord: Press this button to start the auto chord accompaniment for the left-hand
chord area. See the section Chord Accompaniment Features for more details.
10. Full Range Chord: Press this button to have the whole keyboard use an auto chord
accompaniment. See the section Chord Accompaniment Features for more details.
11. Chord Off: Press this button to disable the auto chord or full range chord features.
12. Split: Press this button to turn the split function on/off. The split point for the keyboard
can be set in the Function .Menu See the section Split for more details.
13. Touch: Press this button to set the touch sensitivity level. See the section Touch
Sensitivity for more details.
14. Record: Press this button to enter Record mode. See the section Song Recording for
more details.
15. Track 1: Press this button to enable recording to track 1.
16. Track 2: Press this button to enable recording to track 2.
17. Track 3: Press this button to enable recording to track 3.
4
4
4
445
5
5
556
6
6
66
7
7
7
778
8
8
88
9
9
9
99
10
10
10
10
10
11
11
11
11
11
12
12
12
12
12
13
13
13
13
13
14
14
14
14
14
15
15
15
15
15
16
16
16
16
16
17
17
17
17
17
18
18
18
18
18
19
19
19
19
19
20
20
20
20
20
21
21
21
21
21
1
1
1
11
2
2
2
223
3
3
33

7
18. Metronome: Press this button to turn the metronome on/off. See the section
Metronome for more details.
19. Transpose: Press this button to adjust the transpose setting. See the section Transpose
for more details.
20. Function Menu: Press this button to enter/exit the Function Menu and adjust
parameters. See the section Function Menu for more details.
21. Mixer: Press this button to adjust the mix of the sounds. See the section Mixer for more
details.
22. Display: Shows all the parameters and values related to the currently selected operation
and mode of the piano.
23. Piano Performance Mode: Press this button to quickly access an acoustic piano sound.
24. Style Mode: Press this button to enter Accompaniment Style mode.
25. Voice Mode: Press this button to enter Voice mode.
26. Song: Press this button to enter Song mode.
27. Lesson: Press this button to enter Lesson mode. See the section Lesson Mode for more
details.
28. Octave -: Press this button to decrease the octave setting in Lesson mode.
29. Octave +: Press this button to increase the octave setting in Lesson mode.
30. Numbers / +/- Selectors: Press these buttons to select voices, accompaniment styles,
songs, or to adjust menu parameters.
31. Layer: Press this button to turn Layer mode on/off.
32. Reverb: Press this button to turn the reverb effect on/off.
33. Chorus: Press this button to turn the chorus effect on/off.
34. Song
/Volume
: Press and release this button to switch to the previous MP3 song.
Press and hold this button to decrease the MP3 playback volume.
35. Song
/Volume
: Press and release this button to switch to the next MP3 song. Press
and hold this button to increase the MP3 playback volume.
36. Store: Hold this button and then press M1 or M2 to store the current user settings into
memory. See the section Memory for more details.
37. M1: Press this button to recall the first user settings preset stored in the currently
selected memory bank.
38. M2: Press this button to recall the second user settings preset stored in the currently
selected memory bank.
39. Bank: Press this button repeatedly to change between the first and second memory
banks.
40. Play/Pause: Press this button to play/pause the MP3 song.
41. Power Switch: Press this button to turn the piano’s power on or off.
22
22
22
22
22
27
27
27
27
27
26
26
26
26
26
23
23
23
23
23
24
24
24
24
24
25
25
25
25
25
28
28
28
28
28
29
29
29
29
29
30
30
30
30
30
31
31
31
31
31
32
32
32
32
32
33
33
33
33
33
34
34
34
34
34
35
35
35
35
35
36
36
36
36
36
37
37
37
37
37
38
38
38
38
38
39
39
39
39
39
40
40
40
40
40
41
41
41
41
41

9
Display
1. Numerical display area
2. Character display area
3. Volume
4. Voice selection
5. Accompaniment Style selection
6. Song selection
7. Tempo
8. Reverb
9. Chorus
10. Layer mode
11. Split mode
12. Chord display area
13. Metronome
14. Fill In 1/Fill In 2
15. Record/Play
16. Touch
17. Memory Bank
18. Staff display area

10
Selecting Voices
Selecting and Playing a Voice
1. Press the Voice button.
2. To select a new voice, press the 0-9, + or – buttons. The name of the newly selected
voice will be shown on the display screen after it is selected.
3. Play the keys to hear the new voice.
Note: If Layer mode or Split mode is on, repeatedly press the Voice button to switch between
the first and second voice or between the upper and lower voice.
Tip: A full list of the 360 built-in voices is available in the Appendix section of this manual.
Layering Voices
Virtue features a Layer mode that enables two sounds to be layered together, creating a more
complex and full sound. To layer two voice together:
1. Select the first voice.
2. Press the Layer button to turn Layer mode on.
3. Press the 0-9, + or – button, or a Voice Select button to select the second voice.
4. Play the keys to hear the two different voices layered together.
To disable Layer mode, press the Layer button again.
If Layer mode is enabled, you can repeatedly press the Voice button to switch between the
first and second voice and select different voices.
Split
Split mode enables you to split the 88 keys into two zones so that you can play two different
voices for each of your hands. For example, you may want the Piano voice for your right hand,
and the Bass voice for your left-hand. When Split mode is enabled, the left-hand voice is
referred to as the Lower voice. To turn the Split mode on or off, press the Split button.
To set the split point:
1. Press the Function Menu button repeatedly to cycle through to the Keyboard Split
setting.
2. Press the -/+ buttons or a piano key to set the keyboard split point.
Tip: Press the -/+ buttons at the same time to reset the split point to the default value, F#3.
If Split mode is enabled, you can repeatedly press the Voice button to switch between the
upper and lower voice and select different voices.
Note: If you are using the Layer mode and Split mode at the same time, only the upper region
will use the Layer Voice function.

11
Function Menu
1. Press the Function Menu button to enter view parameters.
2. Press the Function Menu button repeatedly to cycle through the parameter options.
Press +/- to adjust the menu options for the selected option (Tune, Keyboard Split, Beat
Type, Metronome Volume, Reverb Depth, Chorus Depth, MIDI Receiving Channel, MIDI
Sending Channel).
3. Press the +/- buttons to reset the parameter to its default value.
Parameter Display Name Adjustment Range Default Value
Tune
XXX Tune -50 - +50 000
Keyboard
Split
XXX KeySplit 1 - 88 034
Beat
Type
XXX BeatType 0, 2 - 9 004
Metronome Volume XXX MetroVol 0 - 127 080
Reverb
Depth
XXX Revb Lev 0 - 127 050
Chorus
Depth
XXX Chor Lev 0 - 127 000
MIDI
Receiving
XXX MIDI In 1 - 16, ALL ALL
MIDI
Sending
XXX MIDI Out 1 - 16 001
Functions
Touch Sensitivity
This piano is equipped with touch response to control the level of the voice with your playing
strength—just as on an acoustic piano. That means the harder you play the keys, the greater
volume comes from the speakers. There are 3 types of touch settings (Off, 1–3). The default
setting is 2.
Turning this function off results in a fixed touch response no matter how hard or how soft you
play the keys. Press the Touch repeatedly to adjust this setting.
Transpose
The transpose function allows the overall pitch of Virtue to be transposed up or down by a
maximum of one octave in semitone increments. Press the Transpose Up/Down to set the
transpose value.
Tip: Press the Transpose Up/Down buttons at the same time to reset the transposition back
to the default value of 0.
Tune
The overall tuning of Virtue can be shifted up or down by a maximum of 50 cents (50 cents =
1/2 semitone). To adjust the tuning, press the Function Menu button repeatedly until the Tune
setting is selected, and then use the +/- buttons to set the tune value.
Parameters Description
OFF Fixed
1 Soft
2 Medium
3 Hard

12
Metronome
The built-in Metronome function provides a steady beat to aid in practicing at a consistent
tempo.
To set the metronome time signature, press the Function Menu button repeatedly until the
Beat Type setting is selected, and then use the +/– buttons to set the new time signature.
To set the metronome volume, press the Function Menu button repeatedly until the
Metronome Volume setting is selected, and then use the +/– buttons to set the volume.
Tempo
Each style, song, metronome, and duet of the piano has been programmed with a default
tempo. However, this can be changed with the Tempo Up/Down buttons, adjustable from 30–
280 BPM.
Tip: Press the Tempo Up/Down buttons at the same time to restore the default optional
tempo for the style or song.
Mixer
The volumes for the left-hand voice, right-hand voices, as well as each part of an
accompaniment style or built-in song can be adjusted in the Mixer menu.
To adjust these volumes:
1. Press the Mixer button to enter the mixer menu.
2. Press the Mixer button repeatedly to choose the track that you want to adjust.
3. Press the -/+ buttons to adjust parameters.
Track Type Display Name Adjustment
Range
Percussion music track XXX
Rhythm
0 - 127
Bass track
volume
XXX
Bass
0 - 127
Harmony track
volume
XXX Chord 0 - 127
Phrase track
volume
XXX
P
hr
ase
0 - 127
Left-hand
volume
XXX Lower 0 - 127
Right hand
volume
XXX
Upper
0 - 127

14
When the Auto Chord feature is enabled, Virtue will generate the accompaniment chords
based on the left-hand area of the keyboard. You can use the abbreviated chord shapes
shown below starting on any note to play major, minor, seventh, or minor seventh chords.
When the Full Range Chord feature is enabled, the Virtue will generate the accompaniment
chords based on any chords played across the full keyboard. You can use the abbreviated
chord shapes shown below starting on any note to play major, minor, seventh, or minor
seventh chords.
Start/Stop Style Playing
1. In Style mode, press the Start/Stop button and the Auto Bass Chord function will turn
on. Play chords in the left-hand area, and the style will start playing.
2. Press the Start/Stop button again to stop playing the style and the auto bass chord.
Fill In 1/Fill In 2 and Accompaniment Pattern Variations
When the accompaniment style is playing you can play a fill-in pattern by pressing the Fill In 1
and Fill In 2 buttons.
If you press Fill In 1, when the fill-in pattern is complete, the accompaniment feature will play
the main pattern of the accompaniment style, and you will see NOR lit on the display screen.
If you press Fill In 2, when the fill-in pattern is complete, the accompaniment feature will play a
variation pattern of the accompaniment style, and you will see VAR lit on the display screen.
If you press and hold the Fill In 1 or Fill In 2 buttons, the fill-in pattern will play continuously.
Accompaniment Volume
This function is used to change the volume of all accompaniment tracks to balance the volume
between the accompaniment part and voice.
Use the Accomp + or Accomp – key to set the accompaniment volume, adjustable from 0–
127. Press the Accomp + and Accomp – keys to the volume.

15
Sync
If you are using the Auto Chord feature or the Chord accompaniment feature is turned off, you
can have the full accompaniment start when you play any key in the left-hand area of the
keyboard. If you are using the Full Range Chord feature, you need to play a chord on any part
of the keyboard to start the accompaniment. To enable/disable this feature, press the Sync
button.
Intro/Ending
If you would like an introduction for the accompaniment style to play, press the Intro/Ending
button with the Sync feature, and either the Auto Chord feature or the Full Range Chord
feature enabled.
If you would like an ending for the accompaniment style to play, press the Intro/Ending
button while the style is playing, and the Auto Chord feature or Full Range Chord feature is
enabled.
Songs
Song Recording
Virtue is equipped with a useful record feature that enables you to record and listen to your
practice or performance sessions, as well as compose your own songs. Virtue has 3 user song
slots, enabling you to record and save up to 3 of your own user songs.
Each of the user songs can have up to 3 tracks:
• Track 1 is used for recording an accompaniment track only.
• Track 2 and Track 3 can be used for recording melodies.
In record mode, you can record only one melody track at a time. You can record the
accompaniment track by itself, or at the same time as one of the melody tracks.
To enter record mode, press the Record button once.
After you enter the Record mode, you will see 001, 002, or 003 in the top left of the screen.
This which will let you know which user song slot is currently selected. You can use the + or –
buttons to change the user song slot.
Once you have selected a user song slot, press the Record button again to enter the Record
Ready page. Once you have entered this page, the Record icon below will appear along with
the 3 track icons.
001 RecSong1

16
Each track icon can have one of the following record statuses:
• If the track icon is flashing, this means the track is ready to record. If a recording
already exists on this track, it will be overwritten.
• If the track icon is on, this means the track will playback while recording, however it
will not be recorded to.
• If the track icon is off, this means the track will be muted during recording, and it will
not be recorded to.
To select which tracks that you would like to record to, Press the Track 1, Track 2, or Track 3
buttons to change their status accordingly. After you have selected which tracks you would
like to record to, start playing the keyboard, or press the Start/Stop button to begin the
recording.
Once you have finished recording, press the Record button to end the recording. The
recording will start to play immediately after you have finished recording. To stop the
playback, press the Start/Stop button.
If you would like to record to a different track of the song, press the record button twice to re-
enter the Record Ready page, and select the new track accordingly.
TIP: While you can exit and return to the record mode to change things like your Voice and
Style settings, it is helpful to have these set before entering record mode.
TIP: If you plan on using the Auto Chord or Full Range Chord features in record mode, make
sure that you enable it after entering record mode.
TIP: If the internal recording memory is full, the recording will stop and store the song.
"Rec_Full" will be shown on the display.
Clearing Tracks and Songs
To clear a track, enter the Record Ready page, and then hold the record button. You will then
see a “Delete?” message appear on the screen.
After this has appeared, use the Track 1 – Track 3 buttons to make the track icon appear for
the track or tracks that you would like to delete, then press the + button to confirm deletion.
Alternatively, press the – button to cancel this function.
To delete the full song, clear all 3 tracks at once using this feature.
To clear all 3 user song slots at once, hold the Record and Song buttons while powering on
Virtue.

18
MIDI
Virtue features traditional 5-pin MIDI IN and OUT ports, as well as a USB-MIDI connection so that
you can use it with educational or recording software on Mac or PC.
To set the MIDI receive and send channels, press the Function Menu button repeatedly until the
MIDI IN or MIDI OUT setting is selected, and then use the +/– buttons to select the MIDI channels.
Memory
The memory feature on Virtue enables you can to quickly store and recall four presets of your
favorite settings.
The following parameters are stored in each preset:
• Voice Parameters: main voice, layer voice, split point voice, reverb, chorus, mixer.
• Accompaniment Parameters: style, tempo, auto/full range chord
• Function Parameters: touch
These four different presets are divided into two banks, B1 and B2.
To access presets 1 and 2, press the Bank button until B1 is lit on the display screen, and
then press the M1 or M2 buttons. To store your current settings to preset 1 or 2, hold the
Store button, and then press the M1 M2 or buttons while this bank is selected.
To access presets 3 and 4, press the Bank button until B2 is lit on the display screen, and
then press the M1 or M2 buttons. To store your current settings to preset 3 or 4, hold the
Store button, and then press the M1 M2 or buttons while this bank is selected.
Restore Factory Settings
To restore Virtue to its factory default settings and delete all recorded song data, press and
hold the + and – buttons together while powering on the piano.

19
Troubleshooting
Problem Solution
The piano is turned on, but no sound is
produced when the keys are played.
Make sure the volume is set to an
appropriate level. Check that headphones
are not connected to the Phones jack.
Using a mobile phone produces noise in the
piano sound.
Using a mobile phone in close proximity to
the piano may produce interference. To
prevent this, turn off the mobile phone or
use it far away from the piano.
The wrong notes sound when the keys are
played.
Make sure the Tune setting is set to 0.
Press and hold the + and – buttons while
powering on Virtue to revert the settings
back to factory defaults.
After connecting with the computer, the
piano is not recognized.
Make sure the USB cable is connected
properly, or try to connect it to a different
USB port on your computer.
Make sure the appropriate USB driver is
selected for MIDI input. Depending on your
computer, it may appear as USB Audio
Device, USB Composite Device, etc.)

21
Instalación
Ensamblaje del piano
Siga estas instrucciones para ensamblar el
piano:
Nota: Necesitará un tornillo tipo Phillips (+)
(no incluido) del tamaño apropiado para el
ensamblaje.
1. (12) Tornillos TA4*12
2. (12) Tornillos M6*50
3. (4) Tornillos M6*20
4. (8) Tuerca cilíndrica
transversal
5. (4) Soportes angulares
6. (8) Tapas plásticas para
tornillos M6
1. Utilice los 12 tornillos TA4*12 para
sujetar los 4 soportes angulares a los
paneles laterales izquierdo y derecho del
piano.
Presione las 8 tuercas cilíndricas
transversales en los orificios
correspondientes de los paneles
laterales izquierdo y derecho y en el
p
anel trasero.
3. Utilice los 4 tornillos M6*50 para sujetar
los paneles izquierdo y derecho a las
patas izquierda y derecha.
4. Utilice los 4 tornillos M6*50 para
sujetar los paneles izquierdo y derecho
al panel trasero; a continuación,
coloque las tapas plásticas para
tornillos M6.
5. Utilice 4 tornillos M6*50 para sujetar los
paneles izquierdo y derecho a la
pedalera; a continuación, coloque las
tapas plásticas para tornillos M6.
6. Utilice 4 tornillos M6*20 para sujetar
la base del piano a los soportes del
piano.
Piezas de ensamblado

23
Características
Panel superior
1. Volumen maestro: Ajuste esta perilla para modificar el nivel del volumen maestro.
2. Tempo: Pulse estos botones para ajustar el tempo de un estilo de acompañamiento,
canción o metrónomo hacia arriba o hacia abajo. Consulte los detalles en la sección
Tempo.
3. Volumen del Accompaniment (acompañamiento): Pulse estos botones para ajustar el
volumen del acompañamiento.
4. Intro/Ending: Pulse este botón para reproducir la secuencia inicial/final de un
acompañamiento automático. Estando el modo de canción, pulse el botón para definir la
posición inicial y final de un bucle de una sección de la canción. Consulte los detalles en
la sección Secuencia inicial/final.
5. Sync: Si se pulsa este botón cuando se encuentran activadas las características de
acordes automáticos o de acordes de teclado completo, el estilo del acompañamiento
automático comenzará inmediatamente una vez que se toque un acorde. Estando en
modo de canción, pulse este botón para poner la canción en pausa. Consulte los detalles
en la sección Sincronización.
6. Fill In 1: Pulse este botón para disparar un relleno cuando esté tocando con un estilo.
Estando en modo de canción, pulse este botón para rebobinar la canción. Consulte los
detalles en la sección Relleno 1/Relleno 2 y variaciones en los patrones de
acompañamiento.
7. Fill In 2: Pulse este botón para disparar un relleno cuando esté tocando con un estilo.
Estando en modo de canción, pulse este botón para avanzar rápidamente por la canción.
Consulte los detalles en la sección Relleno 1/Relleno 2 y variaciones en los patrones
de acompañamiento.
8. Start/Stop: Pulse este botón para iniciar o detener la reproducción de una canción o un
estilo de acompañamiento.
9. Auto Chord: Pulse este botón para iniciar el acompañamiento de acordes automático
para el área de acordes de la mano izquierda. Consulte los detalles en la sección
Características del acompañamiento de acordes.
10. Full Range Chord: Pulse este botón para hacer que todo el teclado utilice un
acompañamiento de acordes automático. Consulte los detalles en la sección
Características del acompañamiento de acordes.
11. Chord Off: Pulse este botón para desactivar las características de acordes automáticos
o de acordes de teclado completo.
12. Split: Pulse este botón para encender y apagar la función de división. El punto de
división del teclado puede establecerse en el menú Función. Consulte los detalles en la
sección División.
4
4
4
445
5
5
556
6
6
66
7
7
7
778
8
8
88
9
9
9
99
10
10
10
10
10
11
11
11
11
11
12
12
12
12
12
13
13
13
13
13
14
14
14
14
14
15
15
15
15
15
16
16
16
16
16
17
17
17
17
17
18
18
18
18
18
19
19
19
19
19
20
20
20
20
20
21
21
21
21
21
1
1
1
11
2
2
2
223
3
3
33
Termékspecifikációk
| Márka: | Alesis |
| Kategória: | zongora |
| Modell: | Virtue |
Szüksége van segítségre?
Ha segítségre van szüksége Alesis Virtue, tegyen fel kérdést alább, és más felhasználók válaszolnak Önnek
Útmutatók zongora Alesis

16 Március 2025
16 Szeptember 2024
31 Augusztus 2024
7 Augusztus 2024
29 Július 2024
27 Július 2024
26 Július 2024
3 Július 2024
2 Július 2024
20 Május 2024
Útmutatók zongora
- zongora Yamaha
- zongora Casio
- zongora Technics
- zongora Roland
- zongora VOX
- zongora Korg
- zongora Native Instruments
- zongora Thomann
- zongora Kurzweil
- zongora Medeli
- zongora IDance
- zongora Max
- zongora Kawai
- zongora Viscount
- zongora NUX
- zongora Dexibell
- zongora Artesia
- zongora Crumar
- zongora Nord
- zongora CLXmusic
- zongora Orla
- zongora Carry-on
Legújabb útmutatók zongora
13 Január 2025

10 Január 2025
1 Január 2025
1 Január 2025
1 Január 2025
28 December 2024
20 December 2024
14 December 2024
14 December 2024
14 December 2024