Használati útmutató Whistler TRX-2
Olvassa el alább 📖 a magyar nyelvű használati útmutatót Whistler TRX-2 (76 oldal) a rádió kategóriában. Ezt az útmutatót 5 ember találta hasznosnak és 2 felhasználó értékelte átlagosan 4.5 csillagra
Oldal 1/76

TRX-2
User Guide
All Hazards
NOAA’s National Weather Service
®
DIGITAL TRUNKING
DESKTOP/MOBILE
EZ DIGITAL
SCANNER

2
Contents
Introduction......................................................................4
What is Object Oriented Scanning?...............................4
Features............................................................................5
Package Contents............................................................5
Scanning Legally...............................................................6
FCC Statement.................................................................7
Setup.................................................................................8
Antenna............................................................................8
Earphones, Headphones or Speakers.............................9
Listening Safely.................................................................9
Getting Familiar with your Scanner..............................10
Attaching Remote and Base Unit.................................11
Understanding the Keypad...........................................12
Rotary Encoder...............................................................14
Desktop Operation........................................................15
Mobile Operation..........................................................16
Turning On TRX-2...........................................................17
Set Bandplan and Clock...............................................18
Program Methods..........................................................18
Setting Location.............................................................19
Power-On Password.......................................................21
Understanding the Display............................................21
psDr Indicators...............................................................23
Display Icons...................................................................23
EZ Scan Library...............................................................24
Maximum Card Size......................................................25
Installing EZ Scan Software...........................................26
Library Updates..............................................................26
Preferred Programming from Library..........................27
Backup into the First V-Scanner Folder...........................28
Updating the Library (EZ Scan).....................................28
Library Structure..............................................................29
EZ Scan Library Notes.....................................................29
Manual Programming Conventional Frequency...........29
Standard Text Entry Method.........................................30
Creating Your First New Objects.................................32
Essential Conventional Channel Parameters...............32
Essential Trunking Talkgroup Parameters....................33
Setting up a Trunking System (TSYS) Object.............33
Adding a New Trunking System (TSYS).......................34
Adding the First Talkgroup............................................35
Talkgroup Object (TGRP)...............................................37
Importing DMR..............................................................37
Manually Creating/Adding DMR..................................39
Editing Objects Manually..............................................41

3
Contents
Alert LED Setting...........................................................43
Recording/Playback.......................................................48
IF Output.........................................................................49
Internal Clock/Calendar.................................................50
Time Display...................................................................50
Monitoring and Scanning..............................................50
Frequency or Talkgroups...............................................51
Active Scanlists...............................................................51
Enable / Disable Scanlists...............................................51
Lock Out Objects...........................................................51
Skip Transmission...........................................................52
Rename Scanlists...........................................................52
Set Priority Objects........................................................52
Scanlists and Scan Sets..................................................52
Searching........................................................................53
Using Spectrum Sweeper...............................................54
Perform a Service Search................................................54
Perform a Limit Search..................................................54
To Save Found Frequencies..........................................54
Search Settings...............................................................55
Spectrum Sweeper Settings..........................................55
Service Search Settings..................................................55
Limit Search Settings......................................................55
Saving Found CTCSS, DCS or NAC Codes.................56
Weather Monitoring.......................................................57
Program FIPS Codes......................................................57
Entering SAME Location and Event Codes..................58
SAME Standby Modes...................................................59
Weather Priority..............................................................60
SKYWARN®....................................................................60
Using V-Scanner Storage...............................................61
Configuring Settings......................................................61
Using EZ Scan Software to Update Scanner.................64
DSP Firmware Updates...................................................64
Updating the Library (PC)..............................................64
Maintenance ..................................................................65
Birdie Frequencies.........................................................65
Troubleshooting/Error Messages.................................66
Library Copyright Notice............................................69
Specifications .................................................................70
Frequency Coverage.....................................................71
Consumer Warranty.......................................................72
Service Under Warranty.................................................73
Service Out of Warranty................................................74

4
Introduction
Scanning technology has changed dramatically over the
years. A scanner with Object Oriented User Interface
is designed to help the hobbyist build a collection of
objects to scan:
• Start small and expand
• Organize conventional frequencies and talkgroups
• Remove unwanted channels and talkgroups
What is Object Oriented Scanning?
Historically, programming scanning receivers was
challenging, but object-oriented programming
simplifies the process by using common conventions for
scanning concepts.
A Scannable Object is any defined item that can be
scanned or monitored, including:
• Conventional, non-trunked radio frequencies
• Talkgroups used on a trunked radio system
• Radio services
• Defined searches
Because scannable objects are defined by the same
basic elements, the Object Oriented User Interface
(OOUI) is designed to simplify scanning by managing
all scannable objects similarly. When you learn how to
program one type of object, you can program other
types of scannable objects as well.

5
Features
• Functional keypad and backlit LCD display
• USA/Canada Radio Reference database on SD Card
• Quick Location based Programming (City, Zip,
County)
• Detects and masks encrypted voice audio
• Decodes Radio ID/Talkgroup ID data
• Upgradeable CPU Firmware, DSP Firmware and
Database Library
• USB Interface 2.0 or earlier
• DMR/MotoTRBO™ Tier II
• Improved P25 Functionality (Phase II, X2-TDMA)
• PC Software to customize your settings
• Detachable Remote Control Head w/ Magnet
Mount
• Signal Strength Meter
• 200 Scanlists
• Weather Radio Functions
• Multi–system Trunking
• Spectrum Sweeper
• Headphone/Speaker Jacks
• Programmable Alert LED
• Programmable Audio Alarms
• V-Scanner II Storage System
• Audio Recording
• Built-in Clock / Calendar
• Built-in Services Searches
• Built-in Discriminator output
Package Contents
• Desktop/Mobile Scanner with Remote Head
• Pull up BNC Antenna
• USB Cable
• SD Card (Installed in the Scanner)
• PC Software included on SD Card
• Special 6½ ft. LAN Cable for Remote Head
• Remote Head Mounting Bracket and Screws
• Mounting Bracket and Hardware Kit
• DC Power Cable
• AC Adapter
• User Guide
• Quick Start Guide

8
Setup
Antenna
To connect the included antenna:
1. Align the slots around the antenna’s connector with
the tabs on the antenna jack.
2. Press the antenna down over the jack and turn the
antenna’s base clockwise until it locks into place.
3. Mobile use requires an external antenna.
To connect
an external
antenna, follow
the installation
instructions
supplied with the
antenna. Always
use 50-ohm
coaxial cable,
such as RG-58
or RG-8 low-loss dielectric coaxial cable. You may also
need a BNC adapter.
WARNING: Use extreme caution when installing or
removing an outdoor antenna. If the antenna starts
to fall, let it go! It could contact overhead power
lines. If the antenna touches a power line, touching
the antenna, mast, cable, or guy wires can cause
electrocution and death. Call the power company
to remove the antenna. attempt to do so DO NOT
yourself.
10
Traffic Safety
Wearing headphones while operating a motor vehicle
can create a traffic hazard and is illegal in most areas.
Even though some headphones let you hear some
outside sounds when listening at normal volume levels,
they still can present a traffic hazard. Exercise extreme
caution!
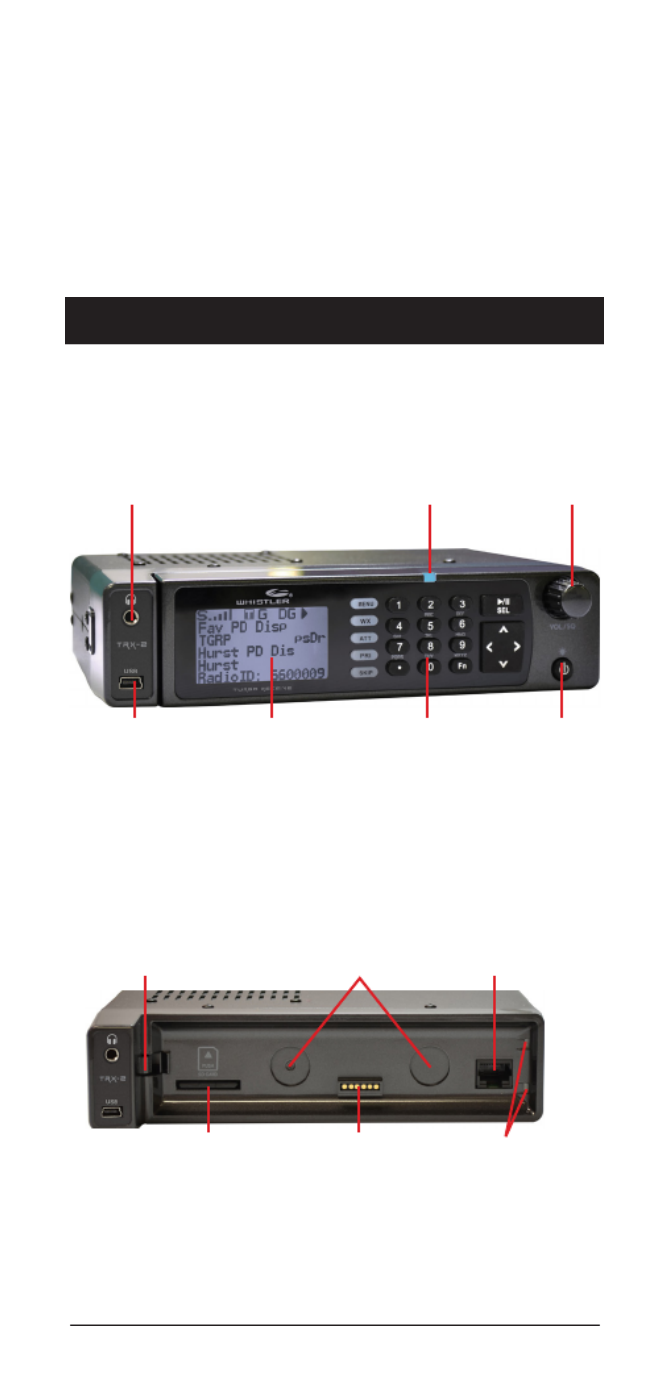
Getting Familiar with your Scanner
Alert LED
Rotary
Encoder
Headphone Jack
USB Connector LCD Display Keypad Power
Button
Remote Head Latch Magnet Sockets LAN Cable Jack
Remote Head Connector Remote Head
Attachment Slots
SD Card Slot

11
Detaching and Attaching
Remote Head and Base Unit
To detach the (Remote Head Unit) from the (Base Unit),
Press and hold the release button on the left side of
the base unit. A gap will appear between the base unit
and the remote head unit. Grasp the remote head and
carefully remove it from the base unit.
If the scanner was on, it will continue to scan, but you
will not be able to make changes until you reconnect
the head or cable to the head unit.
To link the base unit and remote head unit, connect
them using the supplied 8P8C Type B Straight Cable.
To reattach the remote head to the base, unplug the
LAN cable from both units and align the guide pins
on the right side of the remote head with the slots on
the base unit. Then, carefully press the remote head
into the base unit, keeping your fingers out of the gap
between the remote head and the base. The magnets
will “grab”, holding the remote head in place. The
remote head unit can be attached to an AMPS or Lido
mount (not included) if desired.
WARNING: Always install the remote head with care,
keeping your fingers clear; the magnets are very
powerful. Always keep the magnets well away from
persons wearing electrical medical devices such as
pacemakers, as the magnets may cause the devices to
malfunction, endangering the wearer’s life.
Base Unit
Press Here Remote Head

12
Always keep the magnets well away from magnetic
media such as discs and tapes, and from magnetically
sensitive equipment such as computer monitors and
watches to avoid deleting data or damaging the
equipment.
The rare earth magnets can be damaged by heat; avoid
temperatures greater than 175 degrees Fahrenheit
(80 degrees Celsius), such as in parked cars. Hotter
temperatures will permanently weaken the magnets.
LAN Cable Specification:
Interface: RS-485 compatible
Interface cable: 8P8C modular plug, Type B, Straight
cable 6½ feet
WARNING: Use only the supplied 8P8C Type B straight
cable (CAT 5 or CAT 6) to connect the remote head to
the base unit up to 100 feet in length. Other types of
cable including crossover cables may damage both the
remote head and base unit.
Understanding the Keypad
Your scanner features a back-lit keypad as shown below
in addition to the power button located at the front of
the remote control head.
POWER/BACKLIGHT – is located to the bottom
right of the remote head. Press and hold until the
display reads “release button” to turn the scanner on
and off. Press briefly to confirm the backlight level.
When the backlight level appears, rotate rotary encoder
to increase/ decrease the backlight level.
MENU – provides access to additional functions related
to the current operating mode of the scanner, and
provides access to the Main Menu, where the main
functions are controlled.

18
Setting Bandplan and Clock
When you first power up your scanner it will prompt you
to set the bandplan, date and time.
Press the or key to select the USA or Canada
bandplan, then press ./II/SEL
The scanner will then prompt you to enter the current
date and time. Press the or key to select the
desired digit, then press the key. Press the or
key to change the value, then press . You can /II/SEL
skip this process by pressing the SKIP key. You can set
the clock at any time using the PC application.
Program Methods
There are two methods to program your scanner.
To get started quickly, you can use “ ”. Set Location
The set location method stores objects in your area
automatically and puts them in Scanlists 151 and higher.
These Scanlists are already named, “ ”, Multi Dispatch
“ ”, “ ”, “ ”, and so forth. This Law Tac Interop Fire Talk
method gets you scanning in minutes, but you cannot
monitor a single police or a single fire department –
they will all be together in the same Scanlist. Also, if you
use set location, and wish to add a new location, be sure
to “ ” to erase old objects before storing Clear Channels
the new location. If you store more than one ZIP code,
the scanner will spend a great deal of time searching for
objects that are out of range. That will cause the scanner
to miss some local transmissions you want to hear.
Although it takes longer, experienced users will want to
program Scanlists on their own using the " " Preferred
method. Use “ ” to select your state Browse Library
and county and look for agencies of interest. Check the
boxes of objects you wish to import, select the Scanlist
you want to put them in and perform the import (see
Preferred Programming). Once you save objects to a
Scanlist, rename the Scanlist so you don’t forget what
you stored there. Then import more objects into a
different Scanlist and rename that one. In this way, you
can create Scanlists such as Bethel Police, Hurst Police,
Bethel Fire, Shenango EMS, etc. Individual scanlists
allow you to decide exactly what you want to scan.
Termékspecifikációk
| Márka: | Whistler |
| Kategória: | rádió |
| Modell: | TRX-2 |
Szüksége van segítségre?
Ha segítségre van szüksége Whistler TRX-2, tegyen fel kérdést alább, és más felhasználók válaszolnak Önnek
Útmutatók rádió Whistler

12 Augusztus 2024
12 Augusztus 2024
11 Augusztus 2024
Útmutatók rádió
- rádió Sony
- rádió August
- rádió Yamaha
- rádió Moulinex
- rádió Nedis
- rádió Milwaukee
- rádió Grundig
- rádió Philips
- rádió Pioneer
- rádió Kärcher
- rádió Adler
- rádió Oregon Scientific
- rádió SilverCrest
- rádió Garmin
- rádió Bosch
- rádió Panasonic
- rádió JVC
- rádió AEG
- rádió Sharp
- rádió Einhell
- rádió Harman Kardon
- rádió Toshiba
- rádió Sven
- rádió Ozito
- rádió Makita
- rádió Hyundai
- rádió HQ
- rádió Emos
- rádió Medion
- rádió Onkyo
- rádió Motorola
- rádió Vimar
- rádió Technics
- rádió JBL
- rádió Camry
- rádió DAP-Audio
- rádió Zebra
- rádió Xiaomi
- rádió GoGen
- rádió Futaba
- rádió Boss
- rádió Be Cool
- rádió Thomson
- rádió Technaxx
- rádió Aiwa
- rádió Kenwood
- rádió Tesco
- rádió Duronic
- rádió Clatronic
- rádió Hama
- rádió PEAQ
- rádió Renkforce
- rádió Midland
- rádió Sencor
- rádió GPX
- rádió Bose
- rádió Lowrance
- rádió Hitachi
- rádió BLUEPALM
- rádió Telefunken
- rádió Nevir
- rádió Sennheiser
- rádió Tangent
- rádió Cambridge
- rádió Alpine
- rádió Acoustic Solutions
- rádió Roadstar
- rádió Logitech
- rádió Klein Tools
- rádió Cobra
- rádió Hilti
- rádió Sonoro
- rádió Denver
- rádió Bush
- rádió Power Dynamics
- rádió Black & Decker
- rádió Trevi
- rádió Memphis Audio
- rádió Elta
- rádió Albrecht
- rádió Aluratek
- rádió Audio-Technica
- rádió NGS
- rádió Daewoo
- rádió Lenoxx
- rádió PowerPlus
- rádió Denon
- rádió Muse
- rádió OK
- rádió JL Audio
- rádió Metabo
- rádió SPC
- rádió Auna
- rádió Hitec
- rádió Mac Audio
- rádió TriStar
- rádió BaseTech
- rádió Bogen
- rádió RYOBI
- rádió Terratec
- rádió DreamGEAR
- rádió HiKOKI
- rádió Intertechno
- rádió Manhattan
- rádió Alecto
- rádió Festool
- rádió Furrion
- rádió Velleman
- rádió Clarion
- rádió Scott
- rádió Monacor
- rádió ION
- rádió Manta
- rádió Blaupunkt
- rádió Oricom
- rádió Viper
- rádió Easy Home
- rádió Sagem
- rádió Delta
- rádió Busch-Jaeger
- rádió Olympia
- rádió Logik
- rádió Tronic
- rádió Timex
- rádió La Crosse Technology
- rádió Infinity
- rádió AKAI
- rádió Porter-Cable
- rádió Konig
- rádió Stabo
- rádió TechniSat
- rádió GlobalTronics
- rádió Jensen
- rádió Pyle
- rádió Emerson
- rádió DeWalt
- rádió Sanyo
- rádió Salora
- rádió Telestar
- rádió Lenco
- rádió CRUX
- rádió Schneider
- rádió Roberts
- rádió Audizio
- rádió ECG
- rádió Stanley
- rádió Uniden
- rádió Victrola
- rádió Majority
- rádió Hertz
- rádió Vonroc
- rádió Soundmaster
- rádió Monitor Audio
- rádió Cotech
- rádió Audac
- rádió Rockford Fosgate
- rádió Krüger&Matz
- rádió Dual
- rádió ICOM
- rádió Kathrein
- rádió Yaesu
- rádió RCA
- rádió Imperial
- rádió Kicker
- rádió Sangean
- rádió Topcom
- rádió Sirius
- rádió MB Quart
- rádió H-Tronic
- rádió OneConcept
- rádió ILive
- rádió Schwaiger
- rádió EasyMaxx
- rádió Orava
- rádió Lexon
- rádió Vitek
- rádió Geneva
- rádió Craftsman
- rádió Majestic
- rádió Graphite
- rádió Reflexion
- rádió Smartwares
- rádió Teufel
- rádió Sogo
- rádió Crosley
- rádió REVO
- rádió Artsound
- rádió Matsui
- rádió Quigg
- rádió Acoustic Energy
- rádió Argon
- rádió Icy Box
- rádió Brennenstuhl
- rádió Lexibook
- rádió Tevion
- rádió GPO
- rádió Caliber
- rádió Swan
- rádió Exibel
- rádió Brigmton
- rádió Sunstech
- rádió Maginon
- rádió Marquant
- rádió Nordmende
- rádió AudioAffairs
- rádió Binatone
- rádió Steren
- rádió Audiosonic
- rádió Proline
- rádió Coby
- rádió Envivo
- rádió Bigben Interactive
- rádió Pure
- rádió Audiovox
- rádió Terris
- rádió Switel
- rádió Hager
- rádió Bigben
- rádió Sunwind
- rádió Laser
- rádió Alba
- rádió Clas Ohlson
- rádió Naxa
- rádió Ricatech
- rádió Boston Acoustics
- rádió Mpman
- rádió Sweex
- rádió Ices
- rádió Nikkei
- rádió PerfectPro
- rádió Freecom
- rádió Navman
- rádió Gira
- rádió Jung
- rádió Dnt
- rádió Balance
- rádió MT Logic
- rádió Audio Pro
- rádió Kunft
- rádió Difrnce
- rádió Noveen
- rádió Karcher Audio
- rádió Fusion
- rádió PAC
- rádió IHome
- rádió AIC
- rádió Ruarkaudio
- rádió Tivoli Audio
- rádió Go Green
- rádió Wolfgang
- rádió Linn
- rádió Numan
- rádió Iluv
- rádió TELEX
- rádió Multiplex
- rádió Clint
- rádió Soundstream
- rádió Xoro
- rádió Zolid
- rádió Sagemcom
- rádió Block
- rádió Berker
- rádió Woxter
- rádió Xhdata
- rádió View Quest
- rádió Harley Davidson
- rádió Noxon
- rádió Brionvega
- rádió Ferguson
- rádió Wet Sounds
- rádió Eissound
- rádió Dcybel
- rádió Tecsun
- rádió JGC
- rádió Scansonic
- rádió TFA Dostmann
- rádió Audisse
- rádió ETON
- rádió Kruger Matz
- rádió Equity
- rádió EKO
- rádió Pinell
- rádió Videologic
- rádió Tivoli
- rádió Mtx Audio
- rádió Aquatic AV
- rádió Roswell
- rádió Intek
- rádió Digitalbox
- rádió Xact
- rádió Ruark Audio
- rádió Magnavox
- rádió Digitech
- rádió GME
- rádió NUVO
- rádió Narex
- rádió Tiny Audio
- rádió R-MUSIC
- rádió E-bench
- rádió Konig Electronic
- rádió Peha
- rádió SiriusXM
- rádió Sanwa
- rádió SW-Stahl
- rádió Sailor
- rádió SSV Works
- rádió Microlab
- rádió QFX
- rádió Voxx
- rádió SACK It
- rádió BasicXL
- rádió Roth
- rádió Ices Electronics
- rádió AmpliVox
- rádió Elbe
- rádió GBS Elettronica
- rádió Sang
- rádió Gewiss
- rádió Lutron
- rádió Axxess
- rádió Retekess
- rádió Wintal
- rádió Atlantis Land
- rádió Ranger
- rádió MAAS
- rádió Weather X
- rádió Aconatic
- rádió Mebby
- rádió Yamazen
- rádió Blonder Tongue
- rádió RoadKing
Legújabb útmutatók rádió
31 Március 2025
30 Március 2025
29 Március 2025
26 Március 2025

25 Március 2025
16 Január 2025

14 Január 2025
14 Január 2025
13 Január 2025
13 Január 2025