Használati útmutató TRENDnet TEW-411BRP
Olvassa el alább 📖 a magyar nyelvű használati útmutatót TRENDnet TEW-411BRP (36 oldal) a router kategóriában. Ezt az útmutatót 2 ember találta hasznosnak és 2 felhasználó értékelte átlagosan 4.5 csillagra
Oldal 1/36

User’s Guide
0
TEW-411BRP
Wireless 802.11g AP Router
User’s Manual
Version 1.4

User’s Guide
1

User’s Guide
2
Copyright Statement
No part of this publication may be reproduced, stored in a retrieval system, or transmitted in any form or by any means, whether electronic, mechanical,
photocopying, recording, or otherwise without the prior writing of the publisher.
July. 2003

User’s Guide
3
Contents
1. Introduction.............................................................................................................. 4
2. Safety Notification ................................................................................................... 5
3. Hardware Installation .............................................................................................. 6
4 Web Management Settings ...................................................................................... 7
4.1. Primary Setup…..
……………………………………………………………………………………….8
4.2. Security
…………………………………………………………………………………………………..13
4.3. System
……………………………………………………………………………………………………15
4.4. DHCP Server
…….……………………………………………………………………………………..18
4.5. SNMP Info
……………………………………………………………………………………………….20
4.6. Status
…………………………………………………………………………………………………….21
4.7. Advanced Wireless
…………………………………………………………………………………...23
4.8. Access Filters
…………………………………………………………………………………………..26
4.9. Virtual Server
…………..……………………………………………………………………………….29
4.10. Routing
Table
…………………………………………………………………………………………31
4.11. Dynamic DNS
……………….………………………………………………………………………..33
5
. Troubleshooting.................................................................................................... 34

User’s Guide
4
1. Introduction
Thank you for purchasing your AP Router Wireless 802.11g AP Router.
This user guide will assist you with the installation procedure.
The package you have received should contain the following items:
AP Router Wireless 802.11g AP Router
User Guide
Power Supply / Cord
Ethernet Cable
Note: if anything is missing, please contact your vendor

User’s Guide
5
2. Safety Notification
Your Wireless AP Router should be placed in a safe and secure location. To ensure proper operation,
please keep the unit away from water and other damaging elements. Please read the user manual
thoroughly before you install the device. The device should only be repaired by authorized and
qualified personnel.
Please do not try to open or repair the device yourself.
Do not place the device in a damp or humid location, i.e. a bathroom.
The device should be placed in a sheltered and non-slip location within a temperature range of
+5 to +40 Celsius degree.
Please do not expose the device to direct sunlight or other heat sources. The housing and
electronic components may be damaged by direct sunlight or heat sources.

User’s Guide
6
3. Hardware Installation
Front Panel
The front panel provides LED’s for device status. Refer to the following table for the meaning of each
feature.
LED STATUS Description
Off No power
Red On
1. Power on 2. Reset to default 3. Firmware upgrade (first 1
minute)
PWR/STAT
Red Blink
1. System up 2. Power on 3. Firmware upgrade
Off no Ethernet link detected
Green On
10/100Mbps Fast Ethernet link detected. No activity.
LAN
Green
Blink Indicates data traffic on the 10/100 Mbps LAN
WAN Orange
Blink Indicates data traffic on the 10/100 Mbps LAN
G Yellow
Blink
Indicates the device is linking or active data through wireless
links
Rear Panel
The rear panel features 4 LAN ports, 1 WAN port and Reset button. Refer to the following table for the
meaning of each feature.
Power (DC 5v)
Used to connect to the power outlet. Only use the power
adapter provided with the device. Use of an unauthorized
power adapter may cause damage to your device and
violate your warranty.
Reset
Press the Reset Button for approximately ten seconds, all
configurations will set to factory default settings.
LAN The RJ-
45 Ethernet ports used to connect your PC, hub,
switch or Ethernet network.
WAN The RJ-
45 Ethernet port labeled WAN is used to connect
your AP Router to your xDSL or Cable modem.
AP Router Default Settings
The default settings are shown following.
User
Password admin
AP Router IP
Address 192.168.1.1
AP Router Subnet
Mask 255.255.255.0
RF ESSID wlan-g
11g RF Channel 6
Mode 11b+11g
Encryption Disabled
DHCP client Enabled

User’s Guide
7
4
Web Management Settings
START UP & LOGIN
In order to configure the Wireless 11g AP Router, you must use your web browser and manually input
http:// into the Address box and press Enter. The Main Page will appear. 192.168.1.1
In order to configure the Wireless 11g AP Router, you must input the password into the box Password
and leave blank on the box. The default password is “ ”. User Name admin
Once you have logged-in as administrator, it is a good idea to change the administrator password to
ensure a secure protection to the Wireless 11g AP Router. The Security Settings section described
later in this manual describes how to change the password.
Once you have input the correct password and logged-in, the screen will change to the Setup page
screen.
TURN ON POWER SUPPLY
Quick power cycle can caused system corruption. When power on, be careful not to shut down in
about 5 seconds, because data is writing to the flash.

User’s Guide
8
4.1. Primary Setup
Primary Setup
This screen contains all of the Router's basic setup functions.
.
Most users will be able to configure the AP Router and get it working properly using the settings on
this screen. Some Internet Service Providers (ISPs) will require that you enter AP Router Wireless
802.11g AP Router specific information, such as User Name, Password, IP Address, Default Gateway
Address, or DNS IP Address. This information can be obtained from your ISP, if required.
WAN:
MAKE CORRECT NETWORK SETTINGS OF YOUR COMPUTER
To change the configuration, use Internet Explorer (IE) or Netscape Communicator to
connect the
WEB management . 192.168.1.1

User’s Guide
9
Host Name: This entry is necessary for some ISPs and can be provided by them.
Domain Name: This entry is necessary for some ISPs and can be provided by them.
Configuration Type: The Router supports four connection types:
Dynamic IP Setting
Static IP Address
PPPoE (Point-to-Point Protocol over Ethernet)
PPTP (Point-to-Point Tunneling Protocol)
These types can be selected from the drop-down menu next to Internet Connection. The information
required and available features will differ depending on what kind of connection type you select.
Some descriptions of this information are included here:
Internet IP Address and Subnet Mask
This is the Router's IP Address and Subnet Mask as seen by external users on the
Internet (including your ISP). If your Internet connection requires a static IP address,
then your ISP will provide you with a Static IP Address and Subnet Mask.
• Default Gateway
Your ISP will provide you with the Gateway IP Address.
• DNS (Domain Name Server) IP Address
Your ISP will provide you with at least one DNS IP Address.
• User Name and Password
Enter the User Name Password and you use when logging onto your ISP through a
PPPoE or PPTP connection.
• Connect on Demand
You can configure the Router to disconnect your Internet connection after a specified
period of inactivity (Max Idle Time). If your Internet connection has been terminated due
to inactivity, Connect on Demand enables the Router to automatically re-establish your
connection as soon as you attempt to access the Internet again. If you wish to activate
Connect on Demand, click the radio button.
If you want your Internet connection to remain active at all times, enter in the AP 0
Router 802.11g AP Router max Idle Time field. Otherwise, enter the number of minutes
you want to have elapsed before your Internet connection terminates.
• Keep Alive Option
This option keeps you connected to the Internet indefinitely, even when your connection
sits idle. To use this option, click the radio button next to . The default Redial Keep Alive

User’s Guide
10
Period is 30 seconds (in other words, the Router will check the Internet connection every
30 seconds).
LAN IP Address and Subnet Mask:
This is the Router's IP Address and Subnet Mask as seen on
the internal LAN. The default value is 192.168.1.1 for IP Address and 255.255.255.0 for Subnet Mask.
Wireless:
This section provide the Wireless Network settings for your WLAN
SSID: The service set identifier ( SSID ) or network name. It is case sensitive and must not exceed 32
characters, which may be any keyboard character. You shall have selected the same SSID for all the
APs that will be communicating with mobile wireless stations.
Domain: The displaying information is related with each domain regulation.
Channel: Select the appropriate channel from the list provided to correspond with your network
settings. You shall assign a different channel for each AP to avoid signal interference.
Security: There are 3 types of security to be selected. To secure your Wireless Networks, it’s strongly
recommended to enable this feature.
WEP: Make sure that all wireless devices on your network are using the same encryption level and
key. WEP keys must consist of the letters "A" through "F" and the numbers "0" through "9."
Important Notice
In order to make right use of WPA, please ensure that your current Wireless Adapter’
s driver, and
Wi l Utilit t it WPA d 802 1 th ti ti ( h RADIUS d i h )

User’s Guide
11
-WPA-Preshared key
There are two encryption options for WPA Pre-Shared Key, TKIP and AES. TKIP stands for
Temporal Key Integrity Protocol. TKIP utilizes a stronger encryption method and incorporates
Message Integrity Code (MIC) to provide protection against hackers. AES stands for Advanced
Encryption System, which utilizes a symmetric 128-Bit block data encryption.
To use WPA Pre-Shared Key, enter a password in the WPA Shared Key field between 8 and 63
characters long. You may also enter a Group Key Renewal Interval time between 0 and 99,999
seconds.
WPA
Algorithms
Please choose your algorithms method. You can select
between TKIP or AES.
WPA Shared
Key
Please input the Pre-Shared Key. The key should be 8
characters or 63 characters in alphanumeric.
Group Key
Renewal
Please input the period of renewal time. The default selection
is 300 seconds.

User’s Guide
12
-WPA RADIUS
WPA RADIUS uses an external RADIUS server to perform user authentication. To use WPA
RADIUS, enter the IP address of the RADIUS server, the RADIUS Port (default is 1812) and
the shared secret from the RADIUS server.
WPA
Algorithms
Please choose your algorithms method. You can select
between TKIP or AES.
Radius
Server
Address
Please input your RADIUS Server IP address.
RADIUS
Server Port
Please input the Authentication port of your RADIUS server.
The default port being used is 1812
RADIUS
Shared Key
The RADIUS server will accept the authentication if both
Shared Key matched.
Group Key
Renewal
Please input the period of renewal time. The default selection
is 300 seconds.
* Click Apply to save your settings.
User’s Guide
13
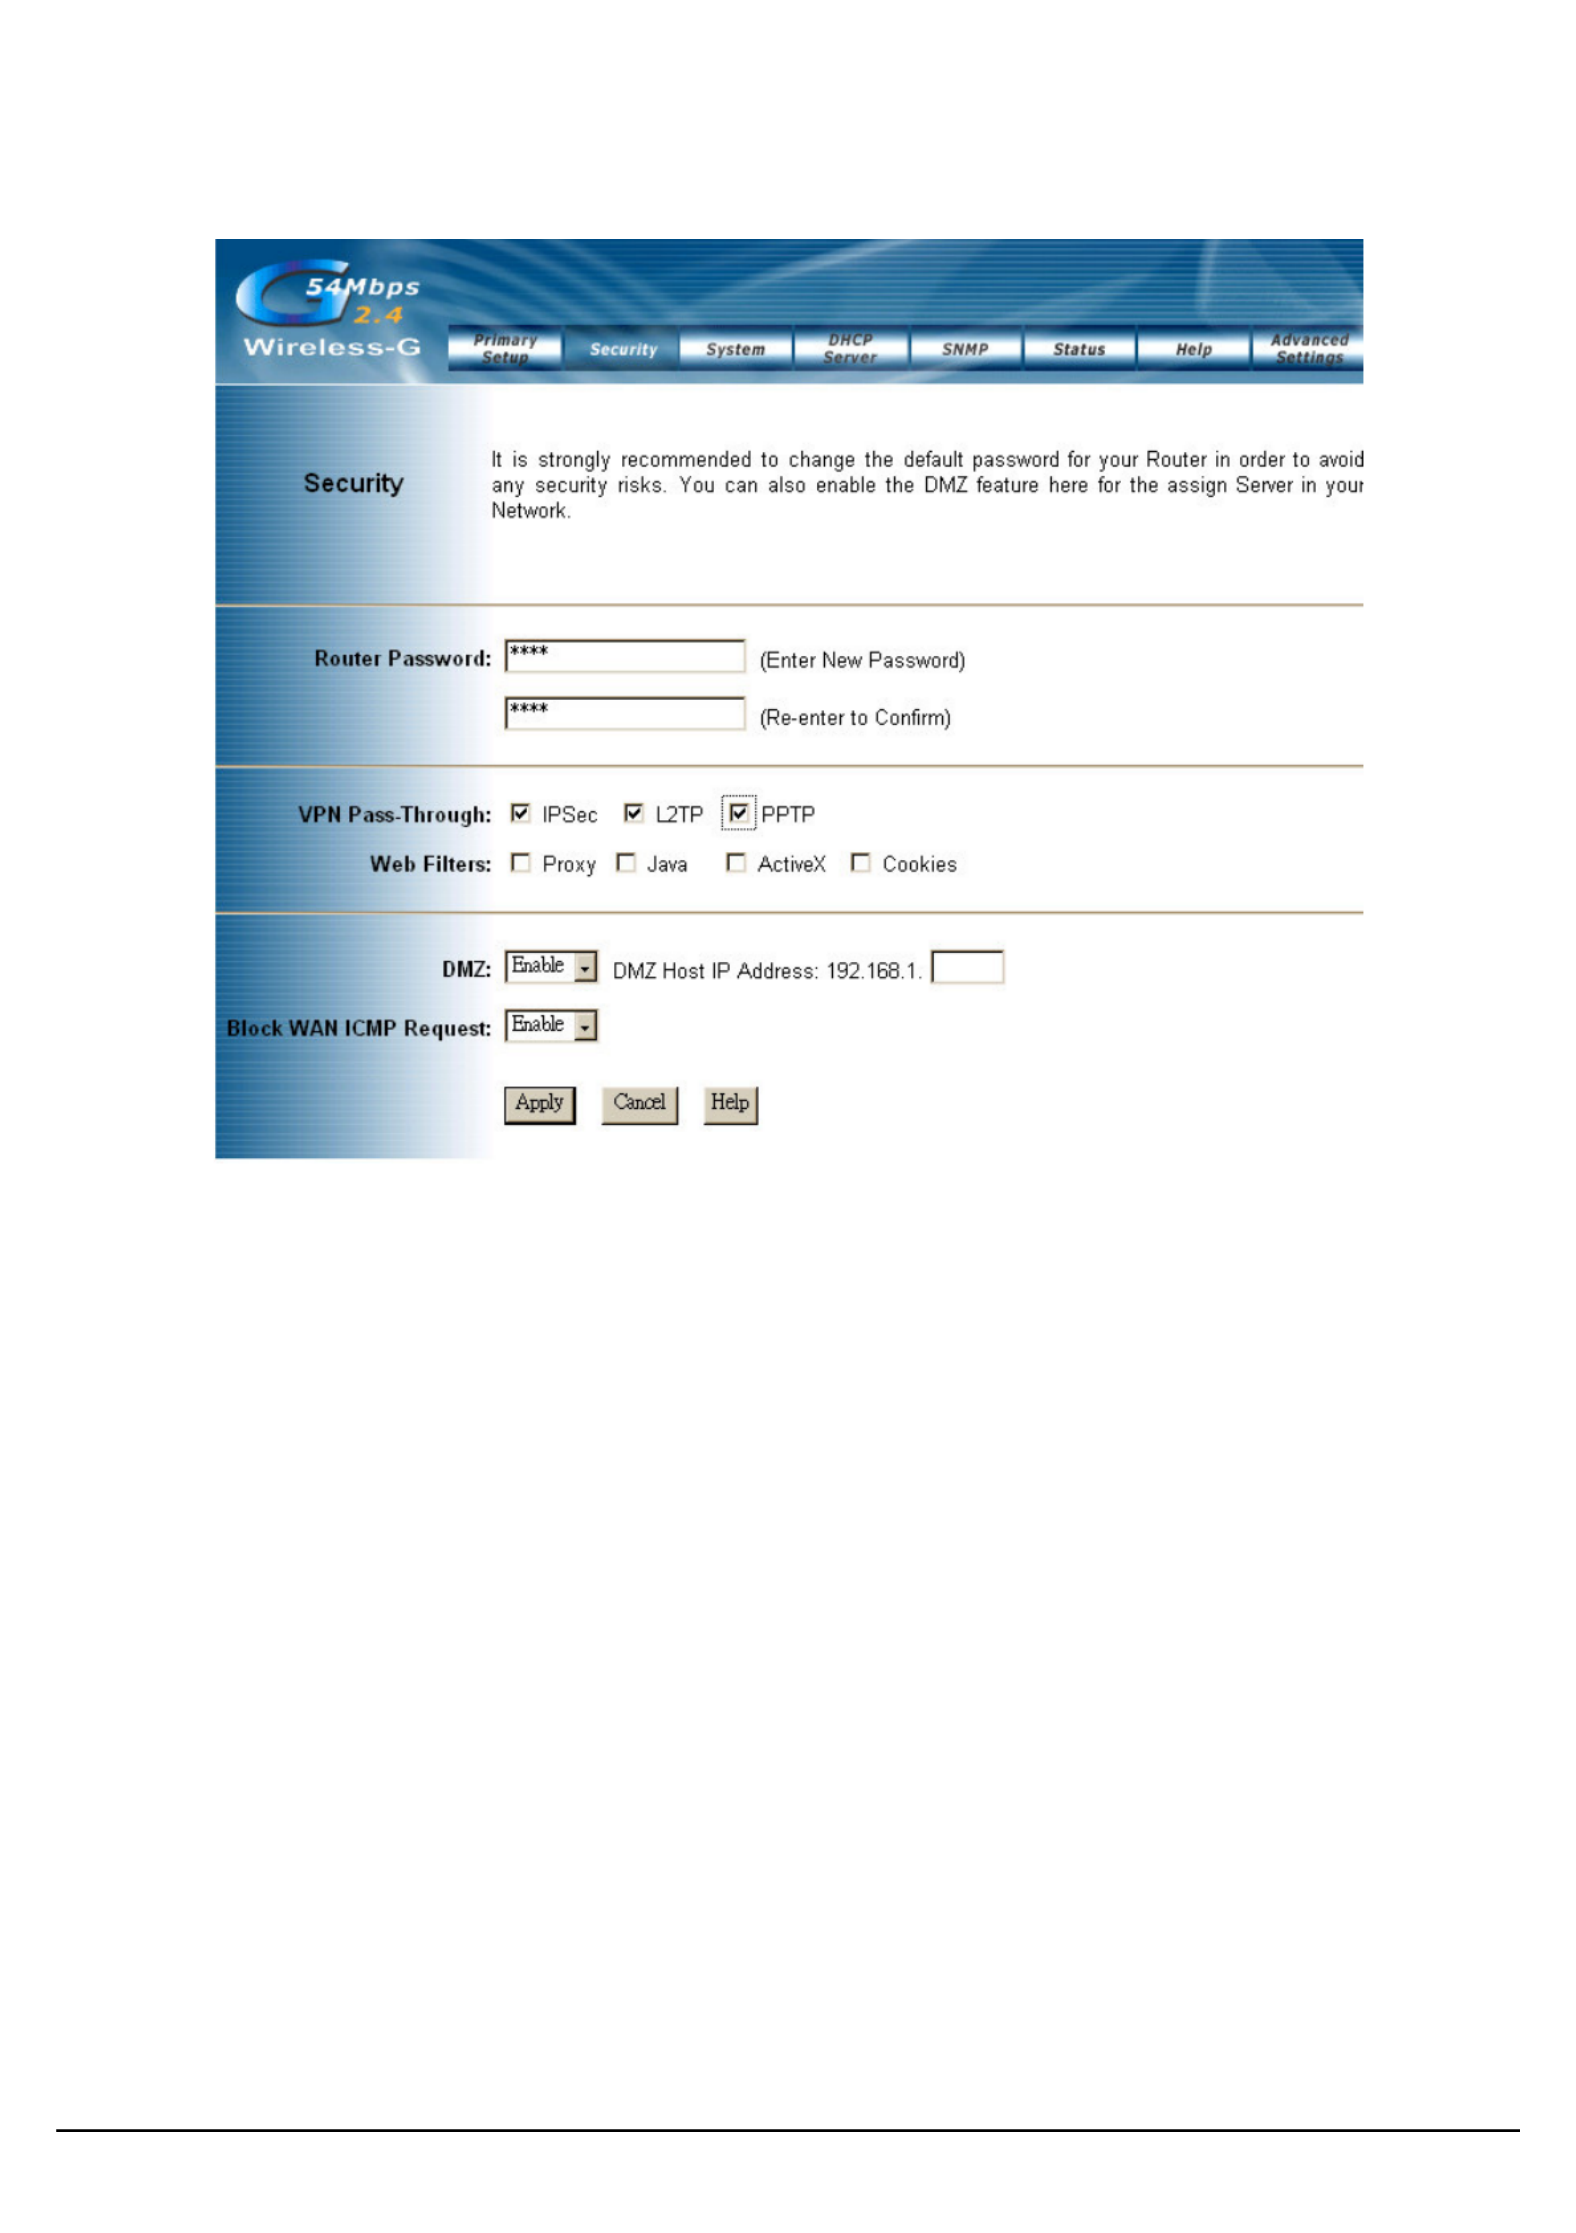
4.2. Security
Router Password: Changing the password for the AP Router is as easy as typing the password into
the field. Then, type it again into the Re-enter to confirm. Enter New Password
* Click the Apply button to save the setting.
Use the default password when you first open the configuration pages, after you have configured
these settings, you should set a new password for the Router (using the Security screen). This will
increase security, protecting the Router from unauthorized changes.
VPN Pass-Through: Virtual Private Networking (VPN) is typically used for work-related networking.
For VPN tunnels, the Router supports IPSec Pass-Through, L2TP Pass-Through, and PPTP Pass-
Through.
•
IPSec - Internet Protocol Security (IPSec) is a suite of protocols used to implement secure
exchange of packets at the IP layer. To allow IPSec tunnels to pass through the Router, IPSec
Pass-Through is enabled by default. To disable IPSec Pass-Through, uncheck the box next to
IPSec.
•
L2TP - Layer 2 Tunneling Protocol is a protocol used to tunnel Point-to-Point Protocol (PPP)
over the Internet. To allow L2TP tunnels to pass through the Router, L2TP Pass-Through is
enabled by default. To disable L2TP Pass-Through, uncheck the box next to .L2TP
•
PPTP - Point-to-Point Tunneling Protocol is the method used to enable VPN sessions to a
Windows NT 4.0 or 2000 server. To allow PPTP tunnels to pass through the Router, PPTP

User’s Guide
14
Pass-Through is enabled by default. To disable PPTP Pass-Through, uncheck the box next to
PPTP.
Web Filters: Using the Web Filters feature, you may enable up to four different filters.
•
Proxy - Use of WAN proxy servers may compromise network security. Denying Proxy will
disable access to any WAN proxy servers. To enable proxy filtering, click the box next to . Proxy
•
Java - Java is a programming language for websites. If you deny Java, you run the risk of not
having access to Internet sites created using this programming language. To enable Java
filtering, click the box next to . Java
•
ActiveX - ActiveX is a programming language for websites. If you deny ActiveX, you run the
risk of not having access to Internet sites created using this programming language. To enable
ActiveX filtering, click the box next to . ActiveX
•
Cookies - A cookie is data stored on your PC and used by Internet sites when you interact with
them. To enable cookie filtering, click the box next to . Cookies
DMZ: The DMZ hosting feature allows one local user to be exposed to the Internet for use of a
special-purpose service such as Internet gaming or videoconferencing. DMZ hosting forwards all the
ports at the same time to one PC. The Port Forwarding feature is more secure because it only opens
the ports you want to have opened, while DMZ hosting opens all the ports of one computer, exposing
the computer so the Internet can see it.
Any PC whose port is being forwarded must have its DHCP client function disabled and should have a
new static IP address assigned to it because its IP address may change when using the DHCP
function.
1. To expose one PC, select . Enable
2. Enter the computer's IP address in the field. DMZ Host IP Address
3. Click the Apply button.
Block WAN ICMP Request: By enabling the Block WAN Request feature, you can prevent your
network from being "pinged," or detected, by other Internet users. The Block WAN Request feature
also reinforces your network security by hiding your network ports. Both functions of the Block WAN
Request feature make it more difficult for outside users to work their way into your network. This
feature is enabled by default. Select to disable this feature.Disable
* Check all the settings and click Apply to save them.

User’s Guide
16
4. On the Firmware Upgrade screen, click the button to find the firmware upgrade file. Browse
5. Double-click the firmware upgrade file.
6. Click the Upgrade button, and follow the on-screen instructions.
Note: Do not power off the Router or press the Reset button while the firmware is being
upgraded.
Multicast Pass-Through: IP Multicasting occurs when a signal data transmission is sent to multiple
recipients at the same time. Using the Multicast Pass-Through feature, the Router allows IP multicast
packets to be forwarded to the appropriate computers. Keep the default setting, , to support the Enable
feature, or select to disable it. Disable
MAC Cloning: The Router’s MAC address is a 12-digit code assigned to a unique piece of hardware
for identification. Some ISPs require that you register the MAC address of your network card/adapter,
which was connected to your cable or DSL modem during installation. If your ISP requires MAC
address registration, find your adapter’s MAC address by following the instructions for your PC’s
operating system.
For Windows 98 and Millennium:
1. Click the button, and select . Start Run
2. Type in the field provided, and press the key. winipcfg OK
3. Select the Ethernet adapter you are using.
4. Click . More Info
5. Write down your adapter’s MAC address.
For Windows 2000 and XP:
1. Click the button, and select . Star Run
2. Type in the field provided, and press the key. cmd OK
3. At the command prompt, run , and look at your adapter’s physical address. ipconfig /all
4. Write down your adapter’s MAC address.
To clone your network adapter’s MAC address onto the Router and avoid calling your ISP to change
the registered MAC address, follow these instructions.

User’s Guide
17
1. Select . Enable
2. Enter your adapter's MAC address in the field. MAC Address
3. Click the Apply button.
To disable MAC address cloning, keep the default setting, . Disable
Remote Management: This feature allows you to manage your Router from a remote location, via the
Internet. To disable this feature, keep the default setting, . To enable this feature, select Disable
Enable, and use the specified port ( default is 8080) on your PC to remotely manage the Router. You
Must also change the Router’s default password to one of your own, if you haven’t already. A unique
password will increase security.
To remotely manage the Router, enter (the x’s represent the Router’s http://xxx.xxx.xxx.xxx:8080
Internet IP address, and 8080 represents the specified port) in your web browser’s address field. You
will be asked for the Router’s password. After successfully entering the password, you will be able to
access the Router’s web-based utility.
Note: If the Remote Management feature is enabled, anyone who knows the Router’s Internet IP
address and password will be able to alter the Router’s settings.
MTU: MTU is the Maximum Transmission Unit. It specifies the largest packet size permitted for
Internet transmission. Keep the default setting, Auto, to have the Router select the best MTU for your
Internet connection, To specify a MTU size, select , and enter the value desired (default is Manual
1400). You should leave this value in the 1200 to 1500 range.
Traffic Log: The Router can keep logs of all incoming or outgoing traffic for your Internet connection.
This feature is disabled by default. To keep activity logs, select .Enable
To keep a permanent record of activity logs as a file on your PC’s hard drive, Log viewer software
must be used. In the Send Log to field, enter the fixed IP address of the PC running the Log viewer
software. The Router will send updated logs to that PC.
To see a temporary log of the Router’s most recent incoming traffic, click the Incoming Access Log
button. To see a temporary log of the Router’s most recent outgoing traffic, click the Outgoing
Access Log button.
Click the Apply button to save the setting.

User’s Guide
18
4.4. DHCP Server
The DHCP Server screen allows you to configure the settings for the Router's Dynamic Host
Configuration Protocol (DHCP) server function. The Router can be used as a DHCP server for your
network. A DHCP server automatically assigns an IP address to each computer on your network. If
you choose to enable the Router's DHCP server option, you must configure your entire network PCs
to connect to a DHCP server, the Router.
If you disable the Router's DHCP server function, you must configure the IP Address, Subnet Mask,
and DNS for each network computer (note that each IP Address must be unique).
DHCP Server: Enable Select the option to enable the Router's DHCP server option.
If you already have a DHCP server on your network or you do not want a DHCP server, then
select from the options. Disable
Starting IP Address: Enter a numerical value for the DHCP server to start with when issuing IP
addresses. Because the Router's default IP address is , the Starting IP Address must 192.168.1.1
be 192.168.1.2 or greater, but smaller than192.168.5.253. The default Starting IP Address is
192.168.1.100.
Maximum Number of DHCP Users: Enter the maximum number of PCs that you want the DHCP
server to assign IP addresses to. The absolute maximum is 253 - possible if 192.168.1.1 is your
starting IP address. The default is 50.
Client Lease Time: The Client Lease Time is the amount of time a network user will be allowed
connection to the Router with their current dynamic IP address.

User’s Guide
19
Enter the amount of time, in minutes, that the user will be "leased" this dynamic IP address. The
default is minutes, which means one day. 0
Static DNS 1-3: The Domain Name System (DNS) is how the Internet translates domain or website
names into Internet addresses or URLs. Your ISP will provide you with at least one DNS Server
IP Address. If you wish to utilize another, enter that IP Address in one of these fields. You can
enter up to three DNS Server IP Addresses here. The Router will utilize these for quicker access
to functioning DNS servers.
WINS: The Windows Internet Naming Service (WINS) manages each PC’s interaction with the Internet.
If you use a WINS server, enter that server’s IP Address here. Otherwise, leave this blank.
Currently Assigned: DHCP Clients Table Click the button to see a list of PCs assigned IP addresses
by the Router. For each PC, the list shows the client hostname, MAC address, IP address, and
the amount of DHCP client lease time left. Click the button to display the most current Refresh
information.
* Click Apply to save your settings.

User’s Guide
21
4.6. Status
This screen displays the Wireless Router's current status and settings. This information is read-only.
This page will auto re-flash every 5 seconds to keep most update information.
Host Name: The Host Name is the name of the Router. This entry is necessary for some ISPs.
Domain Name: The Domain Name is the name of the Router's domain. This entry is necessary for
some ISPs.
WAN IP Release: WAN IP Release Click the button to delete the Router's current Internet IP address.
WAN IP Renew: WAN IP Renew Click the button to get a new Internet IP address for the Router.

User’s Guide
22
*Click the button to refresh the Router's status and settings. Refresh

User’s Guide
24
Click on Edit MAC Filter List to add the client stations MAC list.
The table could store up to different MAC addresses. Please follow the format that it required when 40
an address is input.
Authentication Type:
Auto: Auto is the default authentication algorithm.It will change its authentication type automatically
to fulfill client’s requirement.
Open System: Open System authentication is not required to be successful while a client may
decline to authenticate with any particular other client.
Shared Key: Shared Key is only available if the WEP option is implemented. Shared Key
authentication supports authentication of clients as either a member of those who know a shared
secret key or a member of those who do not. IEEE 802.11 Shared Key authentication accomplishes
this without the need to transmit the secret key in clear. Requiring the use of the WEP privacy
mechanism.
Transmission Rate: The rate of data transmission should be set depending on the speed of your
wireless network. You can select from a range of transmission speeds, or you can select AUTO to
have the Router automatically use the fastest possible data rate and enable the Auto-Fallback feature.
Auto-Fallback will negotiate the best possible connection speed between the Router and a wireless
client. The default setting is AUTO.
DTIM Interval: This value indicates the interval of the Delivery Traffic Indication Message (DTIM). A
DTIM field is a countdown field informing clients of the next window for listening to broadcast and
multicast messages. When the Access Point has buffered broadcast or multicast messages for
associated clients, it sends the next DTIM with a DTIM Interval value.
Access Point Clients hear the beacons and awaken to receive the broadcast and multicast messages.
Beacon Interval: The Beacon Interval value indicates the frequency interval of the beacon. Enter a
value between 20 and 1000. A beacon is a packet broadcast by the Router to synchronize the wireless
network. The default value is .100
RTS Threshold: This value should remain at its default setting of 2346. Should you encounter
inconsistent data flow, only minor modifications are recommended. If a network packet is smaller than
the preset RTS threshold size, the RTS/CTS mechanism will not be enabled. The Router sends
Request to Send (RTS) frames to a particular receiving station and negotiates the sending of a data

User’s Guide
25
frame. After receiving an RTS, the wireless station responds with a Clear to Send (CTS) frame to
acknowledge the right to begin transmission.
Fragmentation Threshold: This value specifies the maximum size for a packet before data is
fragmented into multiple packets. It should remain at its default setting of 2346. If you experience a
high packet error rate, you may slightly increase the Fragmentation Threshold. Setting the
Fragmentation Threshold too low may result in poor network performance. Only minor modifications of
this value are recommended.
AP Mode or Wireless Bridge Mode: 802.11g AP Router can operate in two modes. When the AP
Mode is selected, the device operates as a normal Access Point. Proving every wireless client station
a join network point.
The will be able to join different AP Router wirelessly by input the destination Wireless Bridge Mode
MAC Address.
* Click Apply to save your settings.

User’s Guide
26
4.8. Access Filters

User’s Guide
27
The screen allows you to block or allow specific kinds of Internet usage. You can set up Access Filter
Internet access policies for specific PCs and set up filters by using network port numbers.
Internet Access
Policy
This feature allows you to customize up to 10 different Internet Access Policies for particular
PCs, which are identified by their IP or MAC addresses. For each policy's designated PCs, the
Router can do one or more of the following:
• block or allow Internet access or inbound traffic during the days and time periods
specified
• block designated services
• block websites with specific URL addresses
• block websites that use specific keywords in their URL addresses.
To create or edit a policy, follow these instructions:
1.
Select the policy's number (1-10) in the drop-down menu.
2.
Enter a name in the field.Enter Policy Name
3.
Select Internet Access Inbound Traffic or from the drop-downPolicy Type
box, depending on the kind of access you want to control. Select Internet
Access to control your network PCs' access to the Internet. Select Inbound
Traffic to control Internet PCs' access to your local area network.
Note: The screen's settings will vary depending on which Policy Type you select.
4.
Select or Deny Allow, depending on how you want to control access for specific PCs.
5.
Click the button next to . Edit List PCs or Internet PCs
a.
On the or screen, specify PCs by IP address or List of PCs List of Internet PCs
MAC address. Enter the appropriate IP addresses into the fields. If you have IP
a range of IP addresses to filter, complete the appropriate fields. Enter IP Range
the appropriate MAC addresses into the MAC fields.
b.
Click the button to save your changes. Click the button to cancel Apply Cancel
your unsaved changes. Click the button to return to the Close Internet Filter
screen.
6.
Set the days when access will be filtered. Keep the default setting, , or select the Everyday
appropriate days of the week.
7.
Set the time when access will be filtered. Keep the default setting, , or check the 24 Hours
box next to and use the drop-down boxes to designate a specific time period. From
Note: Access for the listed PCs will be controlled during the selected days and
times. Any blocked services or websites will be blocked at all times.
8.
In the drop-down boxes, select the services you want to block (the default Blocking Services
setting is ). In the fields, the range of ports for this service will None Blocking Services
appear. If you want to change the range of ports, enter the new numbers in the Blocking
Services fields, or edit the service’s settings (see below).
To add a service or edit a service's settings, follow these instructions:
a.
Click the Add Service button.
b.
To create a new service, enter the name of the service in the Service Name
field. To edit a service's settings, select the service from the box on the right of
the screen.
c.
From the drop-down menu, select the protocol type for this service: Protocol
ICMP UDP TCP UDP & TCP, , , or .
d.
In the fields, enter the range of ports for this service.Port Range
Termékspecifikációk
| Márka: | TRENDnet |
| Kategória: | router |
| Modell: | TEW-411BRP |
Szüksége van segítségre?
Ha segítségre van szüksége TRENDnet TEW-411BRP, tegyen fel kérdést alább, és más felhasználók válaszolnak Önnek
Útmutatók router TRENDnet

12 Január 2025
12 Október 2024
19 Szeptember 2024
29 Augusztus 2024
29 Augusztus 2024
29 Augusztus 2024
29 Augusztus 2024
29 Augusztus 2024
20 Augusztus 2024
11 Augusztus 2024
Útmutatók router
- router Samsung
- router Acer
- router Milwaukee
- router Bosch
- router AEG
- router StarTech.com
- router Einhell
- router Nokia
- router HP
- router Makita
- router BenQ
- router Apple
- router Ubiquiti Networks
- router Siemens
- router TP-Link
- router Medion
- router Motorola
- router Vimar
- router LogiLink
- router Alcatel
- router Roland
- router TCL
- router Digitus
- router Zebra
- router Xiaomi
- router Mercusys
- router AVM
- router EZVIZ
- router Dell
- router Lancom
- router Strong
- router Gigabyte
- router Conceptronic
- router Thomson
- router Juniper
- router Kyocera
- router Hikvision
- router Keewifi
- router Vivanco
- router Netgear
- router Huawei
- router Asus
- router Vtech
- router Hama
- router Zoom
- router Renkforce
- router Synology
- router Draytek
- router Iogear
- router Güde
- router Hitachi
- router Mikrotik
- router Toolcraft
- router ZyXEL
- router SPL
- router Dahua Technology
- router Smart-AVI
- router Black & Decker
- router Devolo
- router Planet
- router Tenda
- router BT
- router Black Box
- router MSI
- router Gembird
- router Cisco
- router PowerPlus
- router ATen
- router Google
- router Metabo
- router Bea-fon
- router ZTE
- router Edimax
- router Vodafone
- router ModeCom
- router HiKOKI
- router Foscam
- router Milan
- router Manhattan
- router Kogan
- router Festool
- router EnGenius
- router Sigma
- router Western Digital
- router D-Link
- router Media-Tech
- router Blustream
- router Milesight
- router Moxa
- router Sagem
- router Razer
- router Trust
- router Porter-Cable
- router Konig
- router Alfa
- router MuxLab
- router DeWalt
- router AVMATRIX
- router IFM
- router A-NeuVideo
- router Atlona
- router Schneider
- router AJA
- router Lindy
- router Cudy
- router Barco
- router QNAP
- router NEC
- router Silverline
- router Cotech
- router Siig
- router Gefen
- router Kathrein
- router Avenview
- router Lantronix
- router Technicolor
- router FSR
- router Topcom
- router Holzmann
- router Arris
- router Anker
- router I-TEC
- router Keenetic
- router Linksys
- router Teltonika
- router Sitecom
- router Intelix
- router Comprehensive
- router Ocean Matrix
- router Digitalinx
- router Alfatron
- router Belkin
- router RGBlink
- router Kopul
- router KanexPro
- router Key Digital
- router Kramer
- router BZBGear
- router UPC
- router Allnet
- router Allied Telesis
- router Airlive
- router Proximus
- router Skil
- router Eminent
- router Nilox
- router Sonos
- router Patton
- router Techly
- router Totolink
- router KPN
- router Netis
- router Envivo
- router Buffalo
- router Nest
- router LevelOne
- router ICIDU
- router Clas Ohlson
- router AT&T
- router Sweex
- router Aruba
- router Phicomm
- router Kasda
- router Jung
- router Digi
- router Verizon
- router Billion
- router T-Mobile
- router RAVPower
- router Hawking Technologies
- router Nexxt
- router Beafon
- router Kraun
- router LTS
- router Zolid
- router Sagemcom
- router Telstra
- router Eero
- router Advantech
- router Mercku
- router Hercules
- router Xantech
- router Intellinet
- router Arcadyan
- router Digiconnect
- router Ubee
- router SMC
- router Tele 2
- router Peak
- router CradlePoint
- router Davolink
- router Sixnet
- router 7inova
- router AVPro Edge
- router F-Secure
- router Rosewill
- router Digicom
- router Sabrent
- router On Networks
- router PENTAGRAM
- router Leoxsys
- router Readynet
- router OneAccess
- router Accelerated
- router Nexaira
- router Hamlet
- router Approx
- router T-com
- router Amped Wireless
- router Cambium Networks
- router 3Com
- router WyreStorm
- router Ruckus Wireless
- router Dovado
- router Mach Power
- router EXSYS
- router NetComm
- router Comtrend
- router Premiertek
- router GL.iNet
- router Shinybow
- router Edgewater
- router Atlantis Land
- router Lumantek
- router Starlink
- router PulseAudio
- router Predator
- router Evolution
- router Luxul
- router StarIink
- router Silentwind
- router Keezel
- router United Telecom
- router Wisetiger
Legújabb útmutatók router

9 Április 2025

9 Április 2025
9 Április 2025

31 Március 2025
30 Március 2025
30 Március 2025
30 Március 2025
30 Március 2025
30 Március 2025
23 Március 2025