Használati útmutató Toshiba Encore WT8-A64
Olvassa el alább 📖 a magyar nyelvű használati útmutatót Toshiba Encore WT8-A64 (130 oldal) a tabletta kategóriában. Ezt az útmutatót 2 ember találta hasznosnak és 2 felhasználó értékelte átlagosan 4.5 csillagra
Oldal 1/130

GMAD00378010
10/13
If you need assistance:
Technical support is available online at Toshiba’s Web site at
support.toshiba.com. At this Web site, you will find answers
for many commonly asked technical questions plus many
downloadable software drivers, BIOS updates, and other
downloads.
For more information, see “If Something Goes Wrong” on
page 88 in this guide.
User’s Guide

2
Handling the cord on this product will expose you to lead, a
chemical known to the State of California to cause birth defects
or other reproductive harm. Wash hands after handling.
For the state of California only.
Model: WT8 - A Series
Recordable and/or ReWritable Drive(s)
and Associated Software Warranty
The device system you purchased may include Recordable and/or
ReWritable optical disc drive(s) and associated software, among
the most advanced data storage technologies available. As with
any new technology, you must read and follow all set-up and usage
instructions in the applicable user guides and/or manuals enclosed
or provided electronically. If you fail to do so, this product may not
function properly and you may lose data or suffer other damage.
TOSHIBA AMERICA INFORMATION SYSTEMS, INC.
(“TOSHIBA”), ITS AFFILIATES AND SUPPLIERS DO NOT
WARRANT THAT OPERATION OF THE PRODUCT WILL BE
UNINTERRUPTED OR ERROR FREE. YOU AGREE THAT
TOSHIBA, ITS AFFILIATES AND SUPPLIERS SHALL HAVE NO
RESPONSIBILITY FOR DAMAGE TO OR LOSS OF ANY
BUSINESS, PROFITS, PROGRAMS, DATA, NETWORK
SYSTEMS OR REMOVABLE STORAGE MEDIA ARISING OUT
OF OR RESULTING FROM THE USE OF THE PRODUCT,
EVEN IF ADVISED OF THE POSSIBILITY THEREOF.

3
Protection of Stored Data
For your important data, please make periodic back-up copies of all
the data stored on the hard disk or other storage devices as a
precaution against possible failures, alteration, or loss of the data.
IF YOUR DATA IS ALTERED OR LOST DUE TO ANY TROUBLE,
FAILURE OR MALFUNCTION OF THE HARD DISK DRIVE OR
OTHER STORAGE DEVICES AND THE DATA CANNOT BE
RECOVERED, TOSHIBA SHALL NOT BE LIABLE FOR ANY
DAMAGE OR LOSS OF DATA, OR ANY OTHER DAMAGE
RESULTING THEREFROM. WHEN COPYING OR
TRANSFERRING YOUR DATA, PLEASE BE SURE TO
CONFIRM WHETHER THE DATA HAS BEEN SUCCESSFULLY
COPIED OR TRANSFERRED. TOSHIBA DISCLAIMS ANY
LIABILITY FOR THE FAILURE TO COPY OR TRANSFER THE
DATA CORRECTLY.
Critical Applications
The device you have purchased is not designed for any “critical
applications.” “Critical applications” means life support systems,
medical applications, connections to implanted medical devices,
commercial transportation, nuclear facilities or systems or any other
applications where product failure could lead to injury to persons or
loss of life or catastrophic property damage. ACCORDINGLY,
TOSHIBA, ITS AFFILIATES AND SUPPLIERS DISCLAIM ANY
AND ALL LIABILITY ARISING OUT OF THE USE OF THE
device PRODUCTS IN ANY CRITICAL APPLICATIONS. IF YOU
USE THE device PRODUCTS IN A CRITICAL APPLICATION,
YOU, AND NOT TOSHIBA, ASSUME FULL RESPONSIBILITY
FOR SUCH USE.
Radio Frequency (RF) Energy Exposure
When the transmitter and receiver on your device is powered ON, RF
energy is received and transmitted. The power level your device
transmits at is controlled by your network access while in
communication.
Your device is approved to the radio standard by the country/region
listed in the approved countries table for the module installed in your
device.

4
FCC Notice “Declaration of Conformity
Information”
This equipment has been tested and found to comply with the limits
for a Class B digital device, pursuant to Part 15 of the FCC rules.
These limits are designed to provide reasonable protection against
harmful interference in a residential installation.
This equipment generates, uses and can radiate radio frequency
energy and, if not installed and used in accordance with the
instructions, it may cause harmful interference to radio
communications. However, there is no guarantee that interference
will not occur in a particular installation. If this equipment does
cause harmful interference to radio or television reception, which
can be determined by turning the equipment off and on, the user is
encouraged to try to correct the interference by one or more of the
following measures:
❖Reorient or relocate the receiving antenna.
❖Increase the separation between the equipment and receiver.
❖Connect the equipment to an outlet on a circuit different from
that to which the receiver is connected.
❖Consult the dealer or an experienced radio/TV technician for
help.
Only Peripherals complying with the FCC Class B limits may
be attached to this equipment. Operation with noncompliant
peripherals or peripherals not recommended by Toshiba is
likely to result in interference to radio and TV reception.
Shielded cables must be used between the external devices
and your device's ports. Changes or modifications made to
this equipment not expressly approved by Toshiba or parties
authorized by Toshiba could void the user's authority to
operate the equipment.
This device complies with Part 15 of the FCC Rules. Operation is
subject to the following two conditions:
❖This device may not cause harmful interference.
❖This device must accept any interference received, including
interference that may cause undesired operation.
Contact Toshiba’s Support Web site at support.toshiba.com.
NOTE

5
Bluetooth® Wireless Technology
Interoperability
Bluetooth
® modules are designed to be interoperable with any
product with
Bluetooth
wireless technology that is based on
Frequency Hopping Spread Spectrum (FHSS) radio technology, and
is compliant to:
❖
Bluetooth
Specification as defined and approved by The
Bluetooth
Special Interest Group.
❖Logo certification with
Bluetooth
wireless technology as
defined by The
Bluetooth
Special Interest Group.
Bluetooth
modules enable wireless networks over two or
more (up to a total of seven) TOSHIBA portable devices.
Please contact TOSHIBA computer product support on Web
site http://www.toshiba-europe.com/computers/tnt/
bluetooth.htm in Europe or support.toshiba.com in the
United States for more information.
When you use a
Bluetooth
module close to 2.4 GHz Wireless
LAN devices,
Bluetooth
transmissions might slow down or
cause errors. If you detect certain interference while you use
a
Bluetooth
device, always change the frequency, move your
device to the area outside of the interference range of 2.4
GHz Wireless LAN devices (40 meters/43.74 yards or more)
or stop transmitting from your device. Please contact
TOSHIBA computer product support on Web site http://
www.toshiba-europe.com/computers/tnt/bluetooth.htm in
Europe or support.toshiba.com in the United States for more
information.
Bluetooth
and Wireless LAN devices operate within the
same radio frequency range and may interfere with one
another. If you use
Bluetooth
and Wireless LAN devices
simultaneously, you may occasionally experience a less than
optimal network performance or even lose your network
connection. If you should experience any such problem,
immediately turn off either one of your
Bluetooth
or Wireless
LAN. Please contact Toshiba computer product support on
Web site http://www.toshiba-europe.com/computers/tnt/
bluetooth.htm in Europe or support.toshiba.com in the
United States for more information.

6
Bluetooth® Wireless Technology and Your Health
The products with
Bluetooth
® wireless technology, like other radio
devices, emit radio frequency electromagnetic energy. The level of
energy emitted by devices with
Bluetooth
wireless technology
however is much less than the electromagnetic energy emitted by
wireless devices such as mobile phones.
Because products with
Bluetooth
wireless technology operate within
the guidelines found in radio frequency safety standards and
recommendations, TOSHIBA believes
Bluetooth
wireless technology
is safe for use by consumers. These standards and
recommendations reflect the consensus of the scientific community
and result from deliberations of panels and committees of scientists
who continually review and interpret the extensive research literature.
In some situations or environments, the use of
Bluetooth
wireless
technology may be restricted by the proprietor of the building or
responsible representatives of the organization. These situations may
for example include:
❖Using the equipment with
Bluetooth
wireless technology on
board airplanes, or
❖In any other environment where the risk of interference to other
devices or services is perceived or identified as harmful.
If you are uncertain of the policy that applies on the use of wireless
devices in a specific organization or environment (e.g. airports), you
are encouraged to ask for authorization to use the device with
Bluetooth
wireless technology prior to turning on the equipment.
Exposure to Radio Frequency Radiation
The radiated output power of the
Bluetooth
module is far
below the FCC radio frequency exposure limits.
Nevertheless, the
Bluetooth
module shall be used in such a
manner that the potential for human contact during normal
operation is minimized.

7
Wireless Interoperability
Wireless LAN products are designed to be interoperable with any
wireless LAN product that is based on Direct Sequence Spread
Spectrum (DSSS) radio technology, and is compliant to:
❖The IEEE 802.11 Standard on Wireless LANs (Revision A/B/G),
as defined and approved by the Institute of Electrical and
Electronics Engineers.
❖The Wireless Fidelity (Wi-Fi®) certification as defined by the Wi-Fi
Alliance. The “Wi-Fi CERTIFIED” logo is a certification mark of the
Wi-Fi Alliance.
Bluetooth
® and Wireless LAN devices operate within the
same radio frequency range and may interfere with one
another. If you use
Bluetooth
and Wireless LAN devices
simultaneously, you may occasionally experience a less than
optimal network performance or even lose your network
connection.
If you should experience any such problem, immediately turn
off your
Bluetooth
or Wireless LAN device.
Please contact Toshiba computer product support on Web
site http://www.toshiba-europe.com/computers/tnt/
bluetooth.htm in Europe or support.toshiba.com in the
United States for more information.
Radio Frequency Interference Requirements
This device is restricted to indoor use due to its operation in
the 5.15 GHz to 5.25 GHz frequency range. FCC requires
this product to be used indoors for frequency range 5.15
GHz to 5.25 GHz to reduce the potential for harmful
interference to co-channel Mobile Satellite systems.
Please note that high-power radars are allocated as primary
users of the 5.25 GHz to 5.35 GHz and 5.65 GHz to 5.85
GHz bands. These radar stations can cause interference with
and/or damage this device.
The above caution applies to products that operate with an
802.11a radio device.
NOTE

8
Wireless LAN and Your Health
Wireless LAN products, like other radio devices, emit radio frequency
electromagnetic energy. The level of energy emitted by Wireless LAN
devices however is far much less than the electromagnetic energy
emitted by wireless devices like for example mobile phones.
Because Wireless LAN products operate within the guidelines found
in radio frequency safety standards and recommendations, TOSHIBA
believes Wireless LAN is safe for use by consumers. These standards
and recommendations reflect the consensus of the scientific
community and result from deliberations of panels and committees
of scientists who continually review and interpret the extensive
research literature.
In some situations or environments, the use of Wireless LAN may be
restricted by the proprietor of the building or responsible
representatives of the organization. These situations may for example
include:
❖Using the Wireless LAN equipment on board airplanes, or
❖In any other environment where the risk of interference to other
devices or services is perceived or identified as harmful.
If you are uncertain of the policy that applies on the use of wireless
devices in a specific organization or environment (e.g. airports), you
are encouraged to ask for authorization to use the Wireless LAN
device prior to turning on the equipment.
Exposure to Radio Frequency Radiation
The radiated output power of the Wireless LAN is far below
the FCC radio frequency exposure limits. Nevertheless, the
Wireless LAN shall be used in such a manner that the
potential for human contact during normal operation is
minimized. The antenna(s) used for this transmitter must not
be co-located or operating in conjunction with any other
antenna or transmitter.

9
Specific Absorption Rate (IEEE)
Your device is designed to be in compliance with Radio Waves exposure
regulations and does not exceed the limits for exposure to radio waves
(radio frequency electromagnetic fields) in accordance with the Federal
Communications Commission (FCC) and Industry Canada (IC). A
substantial safety margin is set to assure the safety of all persons,
regardless of health.
A unit of measurement known as the Specific Absorption rate, or SAR is
utilized for the radio wave exposure guidelines. The SAR measurement
for devices does not exceed 1.6W/kg.
The actual SAR values for your device, while in use, are normally well
below the stated values. The operating power of your device is
automatically decreased when full power is not needed for the wireless
connection to increase system efficiency and to minimize interference
on the network. The lower the power output of the device the lower its
SAR value.
As stated by the World Health Organization, present scientific
information indicates no special precautions are needed for the use of
this device. To further reduce any exposure, limit your usage.
Turn Wi-Fi®, Bluetooth®, and Wireless WAN
Functionalities off for Cardiac Pacemakers
❖Turn Wi-Fi
®,
Bluetooth
®, and Wireless WAN
functionality off when you are near a person who may
have a cardiac pacemaker implant or other medical
electric device. Radio waves may affect pacemaker or
medical device operation, possibly resulting in serious
injury. Follow the instructions of your medical device
when using any Wi-Fi® or
Bluetooth
® or Wireless WAN
functionality.

10
Canada – Industry Canada (IC)
This Class B digital apparatus complies with Canadian ICES-003.
Cet appareil numérique de la classe B est conformé à la norme
NMB-003 du Canada.
This device complies with RSS 210 of Industry Canada.
The installer of this radio equipment must ensure that the
antenna is located or pointed such that it does not emit RF
field in excess of Health Canada limits for the general
population; consult Safety Code 6, obtainable from Health
Canada’s Web site www.hc-sc.gc.ca/rpb. The RF device
shall not be co-located with any other transmitter that has
not been tested with this device.
Operation is subject to the following two conditions: (1) this device
may not cause interference, and (2) this device must accept any
interference, including interference that may cause undesired
operation of this device.
L’ utilisation de ce dispositif est soumis aux deux conditions
suivantes: (1) il ne doit pas produire de brouillage et (2) l’utilisateur du
dispositif doit être prêt à accepter tout brouillage radioélectrique
reçu, même s’il est susceptible de compromettre son
fonctionnement.
The term “IC” before the equipment certification number only
signifies that the Industry Canada technical specifications were met.
To prevent radio interference to the licensed service, this device is
intended to be operated indoors and away from windows to provide
maximum shielding. Equipment (or its transmit antenna) that is
installed outdoors is subject to licensing.
Pour empecher que cet appareil cause du brouillage au service
faisant l’objet d’une licence, il doit etre utilize a l’interieur et devrait
etre place loin des fenetres afin de Fournier un ecram de blindage
maximal. Si le matriel (ou son antenne d’emission) est installe a
l’exterieur, il doit faire l’objet d’une licence.

11
This device is restricted to indoor use due to its operation in
the 5.15 GHz to 5.25 GHz frequency range. Industry Canada
requires this product to be used indoors for frequency range
5.15 GHz to 5.25 GHz to reduce the potential for harmful
interference to co-channel Mobile Satellite systems.
Please note that high-power radars are allocated as primary
users of the 5.25 GHz to 5.35 GHz and 5.65 GHz to 5.85
GHz bands. These radar stations can cause interference with
and/or damage this device.
Les dispositifs fonctionnant dans la bande 5150-5250 MHz sont
réservés uniquement pour une utilisation à l’intérieur afin de réduire
les risques de brouillage préjudiciable aux systèmes de satellites
mobiles utilisant les mêmes canaux.
Veuillez noter que les utilisateurs de radars de haute puissance sont
désignés utilisateurs principaux (c.-à-d., qu’ils ont la priorité) pour les
bandes 5250-5350 MHz et 5650-5850 MHz et que ces radars
pourraient causer du brouillage et/ou des dommages aux dispositifs
LAN-EL.
The above caution applies to products that operate with an
802.11a radio device.
Regulatory statements
This product complies with any mandatory product specification in
any country/region where the product is sold. In addition, the product
complies with the following:
EU Declaration of Conformity
TOSHIBA declares that this product conforms to the following
Standards:
This product is carrying the CE-Mark in accordance with the related
European Directives. The party responsible for CE-Marking is
TOSHIBA Europe GmbH, Hammfelddamm 8, 41460 Neuss,
Germany.
Supplementary
Information:
*The product complies with the
requirements of the Low Voltage
Directive 73/23/EEC, the EMC
Directive 89/336/EEC and/or the
R&TTE Directive 1999/5/EC.
NOTE

12
The European Union WEEE (Waste from
Electrical and Electronic Equipment)
Directive Information
The European Union WEEE (Waste from Electrical and Electronic
Equipment) Directive is intended to protect the quality of the
environment and human health through the responsible use of
natural resources and the adoption of waste management strategies
that focus on recycling and reuse. This Directive requires producers
of electrical and electronic products put on the market in European
Union (EU) member countries after August 2005 to mark such
products with a crossed-out wheeled bin with a black bar symbol. If
the product’s battery or accumulator contains more than the
specified values of lead (Pb), mercury (Hg), and/or cadmium (Cd)
defined in the Battery Directive (2006/66/EC), then the chemical
symbols for lead (Pb), mercury (Hg) and/or cadmium (Cd) will appear
below the crossed out wheeled bin symbol on the battery.
In the European Union, these symbols indicate that when the last end
user wishes to discard this product, it must be sent to appropriate
facilities for recovery and recycling. This Directive applies to EU
member countries only and does not apply to end users in other
countries such as the United States.
Although the initial emphasis is in Europe, Toshiba is already working
with design engineers, suppliers, and other partners to determine
appropriate worldwide product life cycle planning and end-of-life
strategies for our products. Please contact your local government for
applicable laws and regulations governing the disposal of this
product. For information on how to trade-in or recycle your product,
visit www.reuse.toshiba.com.
Pb, Hg, Cd

13
Europe - Restrictions for use of 2.4 GHz
Frequencies in European Community
Countries
België/
Belgique:
For private usage outside buildings across public grounds over
less than 300m no special registration with IBPT/BIPT is
required. Registration to IBPT/BIPT is required for private
usage outside buildings across public grounds over more than
300m. For registration and license please contact IBPT/BIPT.
Voor privé-gebruik buiten gebouw over publieke groud over
afstand kleiner dan 300m geen registratie bij BIPT/IBPT nodig;
voor gebruik over afstand groter dan 300m is wel registratie bij
BIPT/IBPT nodig. Voor registratie of licentie kunt u contact
opnemen met BIPT.
Dans le cas d’une utilisation privée, à l’extérieur d’un bâtiment,
au-dessus d’un espace public, aucun enregistrement n’est
nécessaire pour une distance de moins de 300m. Pour une
distance supérieure à 300m un enregistrement auprès de
l’IBPT est requise. Pour les enregistrements et licences,
veuillez contacter l’IBPT.
Deutschland: License required for outdoor installations. Check with reseller
for procedure to follow.
Anmeldung im Outdoor-Bereich notwendig, aber nicht
genehmigungspflichtig. Bitte mit Händler die Vorgehensweise
abstimmen.
France: Restricted frequency band: only channels 1 to 7 (2400 MHz
and 2454 MHz respectively) may be used outdoors in France.
Please contact A.R.T. (http://www.art-telecom.fr) for applicable
procedures to follow.
Bande de fréquence restreinte: seuls les canaux 1- 7 (2400 et
2454 MHz respectivement) doivent être utilisés endroits
extérieur en France. Vous pouvez contacter l’Autorité de
Régulation des Télécommunications (http://www.art-
telecom.fr) pour la procédure à suivre.
Italia: License required for indoor use. Use with outdoor installations
not allowed.
È necessaria la concessione ministeriale anche per l’uso
interno.
Verificare con i rivenditori la procedura da seguire.
Nederland: License required for outdoor installations. Check with reseller
for procedure to follow.
Licentie verplicht voor gebruik met buitenantennes. Neem
contact op met verkoper voor juiste procedure.
14
Europe - Restrictions for Use of 5 GHz
Frequencies in European Community
Countries
O: allowed x: forbidden
❖To remain in conformance with European spectrum usage laws
for Wireless LAN operation, the above 2.4 GHz and 5 GHz
channel limitations apply. The user should use the wireless
LAN utility to check the current channel of operation. If
operation is occurring outside of the allowable frequencies as
listed above, the user must cease operating the Wireless LAN
at that location and consult the local technical support staff
responsible for the wireless network.
❖The 5 GHz Turbo mode feature is not allowed for operation in
any European Community country.
❖This device must not be operated in ad-hoc mode using
channels in the 5 GHz bands in the European Community.
Ad-hoc mode provides a direct communication between two
client devices without a Wireless LAN Access Point.
European Community
Countries
5150-5250
MHz
Channels: 36,
40, 44, 48
Indoor Only
5250-5350
MHz
Channels: 52,
56, 60, 64
Indoor Only
5470-5725 MHz
Channels: 100, 104,
108, 112, 116, 120,
124, 128, 132, 136,
140
Indoor/Outdoor
Austria O x x
Belgium, France,
Switzerland/
Liechtenstein
OOx
Denmark, Finland,
Germany, Greece,
Ireland, Italy,
Luxembourg,
Netherlands, Norway,
Portugal, Sweden, UK
OOO
Iceland, Spain O O O

15
❖This device must be used with Access Points that have
employed and activated a radar detection feature required for
European Community operation in the 5 GHz bands. This
device will operate under the control of the Access Point in
order to avoid operating on a channel occupied by any radar
system in the area. The presence of nearby radar operation
may result in temporary interruption of operation of this device.
The Access Point’s radar detection feature will automatically
restart operation on a channel free of radar. You may consult
with the local technical support staff responsible for the
wireless network to ensure the Access Point device(s) are
properly configured for European Community operation.
Taiwan
The legal communications mentioned in the above item refer to radio
communications operated in accordance with telecommunication
laws and regulations.
Low power radio frequency electric machinery shall resist against
interference from legal communications or from industrial, scientific
and medical radio emission electric machinery.
Using this Equipment in Japan
In Japan, the frequency bandwidth of 2,400 MHz to 2,483.5 MHz for
second generation low-power data communication systems such as
this equipment overlaps that of mobile object identification systems
(premises radio station and specified low-power radio station).
1. Sticker
Please put the following sticker on devices incorporating this
product.
Article 14 Unless approved, for any model accredited low power radio
frequency electric machinery, any company, trader or user shall
not change the frequency, increase the power or change the
features and functions of the original design.
Article 17 Any use of low power radio frequency electric machinery shall
not affect aviation safety and interfere with legal
communications. In the event interference is caused, the use of
such electric machinery shall be immediately discontinued.
Operation of such products can be resumed only when they are
modified and can no longer cause interference.

16
2. Indication
The indication shown below appears on this equipment.
12.4: This equipment uses a frequency of 2.4 GHz.
2DS: This equipment uses DS-SS modulation.
OF: This equipment uses OFDM modulation.
3The interference range of this equipment is less than 40m.
4This equipment uses a frequency bandwidth from
2,400 MHz to 2,483.5 MHz.
It is possible to avoid the band of mobile object identification
systems.
The indication shown below appears on this equipment.
12.4: This equipment uses a frequency of 2.4 GHz.
2FH: This equipment uses FH-SS modulation.
3The interference range of this equipment is less than 10m.
4This equipment uses a frequency bandwidth from 2,400 MHz to
2,483.5 MHz.
3. TOSHIBA Direct PC
Monday – Friday: 10:00 – 17:00
Toll Free Tel: 0120-15-1048
Direct Dial: 03-3457-4850
Fax: 03-3457-4868
The frequency bandwidth of this equipment may operate within the
same range as industrial devices, scientific devices, medical
devices, microwave ovens, licensed radio stations and non-licensed
specified low-power radio stations for mobile object identification
systems (RFID) used in factory product lines (Other Radio Stations).
1. Before using this equipment, ensure that it does not interfere with
any of the equipment listed above.
2. If this equipment causes RF interference to other radio stations,
promptly change the frequency being used, change the location
of use, or turn off the source of emissions.
3. Contact TOSHIBA Direct PC if you have problems with interference
caused by this product to Other Radio Stations.
2.4DSOF4
(1)
(2)
(3)
(4)
2.4FH1
(1)
(2)
(3)
(4)

17
VCCI Class B Information
Device Authorization
This device obtains the Technical Regulation Conformity Certification
and the Technical Conditions Compliance Approval, and it belongs to
the device class of radio equipment of low-power data
communication system radio station stipulated in the Radio Law and
the Telecommunications Business Law of Japan.
Copyright
This guide is copyrighted by Toshiba America Information Systems,
Inc. with all rights reserved. Under the copyright laws, this guide
cannot be reproduced in any form without the prior written
permission of Toshiba. No patent liability is assumed, however, with
respect to the use of the information contained herein.
©2013 by Toshiba America Information Systems, Inc. All rights
reserved.
Export Administration Regulation
This document contains technical data that may be controlled under
the U.S. Export Administration Regulations, and may be subject to
the approval of the U.S. Department of Commerce prior to export.
Any export, directly or indirectly, in contravention of the U.S. Export
Administration Regulations is prohibited.

18
Notice
The information contained in this manual, including but not limited to
any product specifications, is subject to change without notice.
TOSHIBA CORPORATION AND TOSHIBA AMERICA
INFORMATION SYSTEMS, INC. (TOSHIBA) PROVIDES NO
WARRANTY WITH REGARD TO THIS MANUAL OR ANY
OTHER INFORMATION CONTAINED HEREIN AND HEREBY
EXPRESSLY DISCLAIMS ANY IMPLIED WARRANTIES OF
MERCHANTABILITY OR FITNESS FOR ANY PARTICULAR
PURPOSE WITH REGARD TO ANY OF THE FOREGOING.
TOSHIBA ASSUMES NO LIABILITY FOR ANY DAMAGES
INCURRED DIRECTLY OR INDIRECTLY FROM ANY
TECHNICAL OR TYPOGRAPHICAL ERRORS OR OMISSIONS
CONTAINED HEREIN OR FOR DISCREPANCIES BETWEEN
THE PRODUCT AND THE MANUAL. IN NO EVENT SHALL
TOSHIBA BE LIABLE FOR ANY INCIDENTAL,
CONSEQUENTIAL, SPECIAL, OR EXEMPLARY DAMAGES,
WHETHER BASED ON TORT, CONTRACT OR OTHERWISE,
ARISING OUT OF OR IN CONNECTION WITH THIS MANUAL
OR ANY OTHER INFORMATION CONTAINED HEREIN OR
THE USE THEREOF.

19
Trademarks
Encore is a trademark of Toshiba America Information Systems, Inc.
and/or Toshiba Corporation.
Adobe and Photoshop are either registered trademarks or
trademarks of Adobe Systems Incorporated in the United States
and/or other countries.
Bluetooth word mark and logos are owned by the Bluetooth SIG, Inc.
and any use of such marks by Toshiba is under license. Other
trademarks and trade names are those of their respective owners.
U.S. patents apply to this product. See http://patents.dts.com.
Manufactured under license from DTS Licensing Limited. DTS, the
Symbol, & DTS and the Symbol together are registered trademarks
and DTS Premium Voice Pro is a trademark of DTS, Inc. ©DTS, Inc.
All Rights Reserved.
The terms HDMI and HDMI High-Definition Multimedia Interface, and
the HDMI logo are trademarks or registered trademarks of HDMI
Licensing LLC in the United States and other countries.
Intel, Intel Core, Celeron, Centrino and Pentium are trademarks or
registered trademarks of Intel Corporation or its subsidiaries in the
United States and other countries.
Microsoft, Outlook, Windows, and Windows Media are either
registered trademarks or trademarks of Microsoft Corporation in the
United States and/or other countries.
microSD is a trademark or registered trademark of SD-3C, LLC in the
United States, other countries or both.
Wi-Fi is a registered trademark of the Wi-Fi Alliance.
All other brand and product names are trademarks or registered
trademarks of their respective companies.
Licenses
This Product is licensed under the AVC, the VC-1 and the MPEG-4
Part 2 Visual patent portfolio licenses for the personal and non-
commercial use of a consumer to (i) encode video in compliance with
the above standards (“Video Standards”) and/or (ii) decode AVC,
VC-1 and MPEG-4 Part 2 Visual that was encoded by a consumer
engaged in personal and non-commercial activity or was obtained
from a video provider licensed to provide such video. None of the
licenses extend to any other product regardless of whether such
product is included with this product in a single article. No license is
granted or shall be implied for any other use. Additional information
may be obtained from MPEG LA, LLC. See www.mpegla.com.

20
Device Recycling Information
As part of a commitment to people and the future, Toshiba promotes
the efficient use of resources by working to achieve our zero-waste-
to-landfill goal at all our production sites. In addition to our existing
waste reduction and recycling policies, Toshiba is strongly
committed to reducing electronic waste. In order to ensure efficient
use of resources and appropriate treatment of hazardous
substances, in accordance with recycling regulations in each state,
country, and territory, Toshiba wants to make it easy for customers to
recycle products at the end of the life cycle. To learn more about
Toshiba's sustainability commitment, visit us.toshiba.com/green.
Reuse, Donation, Recycling
Functional devices can be donated to a local charity or resold easily
through a Toshiba-branded program.
Non working Toshiba devices can be mailed-back for free recycling.
For additional details, please visit us.toshiba.com/recycle.

21
Contents
Introduction.............................................................25
This guide ............................................................ 26
Safety icons ......................................................... 27
Other icons used............................................ 27
Your device’s features and specifications ..... 28
Documentation .................................................... 28
Service options .................................................... 28
Precautions .................................................... 29
File management tips........................................... 30
Chapter 1: Getting Started......................................31
Selecting a place to work .................................... 31
Features and components................................... 32
Front............................................................... 32
Back ............................................................... 33
Left side ......................................................... 33
Right side ....................................................... 34
Top ................................................................. 34
Bottom ........................................................... 35
Setting up your device ......................................... 35
Connecting to a power source ............................ 36

22
Contents
Charging the battery ............................................ 37
Using the device for the first time........................ 38
Turning on the power .................................... 38
Initial setup..................................................... 38
Setting up your software................................ 39
Registering your device with Toshiba.................. 39
To Shut down your device................................... 40
To place your device in Sleep mode ................... 40
Adding optional external devices......................... 41
Recovering the Internal Storage Drive ................. 41
Creating recovery media................................ 42
Restoring from recovery media...................... 50
Installing drivers and applications.................. 54
Connecting an external device ............................ 55
Using external display devices ............................ 55
Selecting video cables ................................... 55
Connecting an HDMI™-compatible
television or display device...................... 56
Connecting an external monitor or
projector................................................... 56
Directing the display output........................... 56
Adjusting the quality of the external
display...................................................... 57
Customizing your device’s settings..................... 57
Caring for your device.......................................... 58
Cleaning the device ....................................... 58
Chapter 2: Learning the Basics.............................. 59
Computing tips .................................................... 59
Touch screen ....................................................... 60
Touch screen navigation................................ 61
Mouse properties................................................. 62
Starting an app .................................................... 62
Starting an app using Search ........................ 62
Saving your work ................................................. 63
Backing up your work .......................................... 63
Toshiba’s online resources .................................. 63

23
Contents
Chapter 3: Mobile Computing ................................64
Toshiba’s energy-saver design............................ 64
Running the device on battery power.................. 64
Battery Notice ................................................ 65
Power management....................................... 66
Charging the battery ............................................ 66
Charging the RTC battery .............................. 67
Determining remaining battery power............ 67
What to do when the battery runs low........... 68
Setting battery notifications ........................... 68
Conserving battery power ............................. 70
Power Plans ................................................... 70
Changing the battery ........................................... 72
Taking care of your battery.................................. 72
Safety precautions ......................................... 72
Maintaining your battery ................................ 73
Disposing of your device ..................................... 73
Traveling tips........................................................ 73
Chapter 4: Exploring Your Device’s Features .........75
Exploring the Start screen ................................... 75
Charms........................................................... 76
Tiles................................................................ 77
Exploring the desktop.......................................... 77
Finding your way around the desktop ........... 77
Windows® Store................................................... 79
Setting up for communications............................ 80
Connecting your device to a network ............ 80
Exploring audio features ...................................... 81
Recording sounds.......................................... 81
Using external speakers or headphones ....... 82
Using the Web Camera........................................ 82
Using a microSD™ Card...................................... 83
Inserting memory media ................................ 83
Removing memory media .............................. 84

24
Contents
Chapter 5: Utilities.................................................. 85
Create Recovery Media ....................................... 86
Service Station..................................................... 86
TOSHIBA Application Installer ............................. 87
Chapter 6: If Something Goes Wrong .................... 88
Problems that are easy to fix ............................... 88
Problems when you turn on the device ............... 89
The Windows® operating system is not
working .......................................................... 90
Using Startup options to fix problems ........... 90
Internet problems........................................... 92
The Windows® operating system can
help you.................................................... 93
Fixing a problem with Device Manager ............... 93
Checking device properties ........................... 94
Power and the batteries....................................... 94
Display problems ................................................. 95
Disk or storage drive problems............................ 97
Error-checking ............................................... 97
Sound system problems...................................... 99
Printer problems .................................................. 99
Wireless networking problems........................... 100
Develop good computing habits........................ 102
Data and system configuration backup in
the Windows® operating system............ 103
If you need further assistance............................ 107
Contacting Toshiba...................................... 107
Other Toshiba Internet Web sites ...................... 107
Toshiba’s worldwide offices .............................. 108
Appendix A: Power Cord/Cable Connectors ....... 109
Glossary ............................ ........... 110........................
Index.................................. ........... 126........................

25
Introduction
Welcome to the world of powerful, portable, multimedia
computing. With your Toshiba device, your work and
entertainment can accompany you wherever you go.
This device is compatible with European Union Directive
2002/95/EC, Restriction of the use of certain Hazardous
Substances in electrical and electronic equipment
(RoHS), which restricts use of lead, cadmium, mercury,
hexavalent chromium, PBB, and PBDE. Toshiba requires
its device component suppliers to meet RoHS
requirements and verifies its suppliers’ commitment to
meeting RoHS requirements by conducting component
sampling inspections during the product design approval
process.
NOTE

26
Introduction
This guide
Certain Microsoft ® software product(s) included with this
device may use technological measures for copy
protection. IN SUCH EVENT, YOU WILL NOT BE ABLE
TO USE THE PRODUCT IF YOU DO NOT FULLY
COMPLY WITH THE PRODUCT ACTIVATION
PROCEDURES. Product activation procedures and
Microsoft’s privacy policy will be detailed during initial
launch of the product, or upon certain reinstallations of
the software product(s) or reconfigurations of the device,
and may be completed by Internet or telephone (toll
charges may apply).
Some software may differ from its retail version (if
available), and may not include user manuals or all
program functionality.
The product specifications and configuration information
are designed for a product Series. Your particular model
may not have all the features and specifications listed or
illustrated. For more detailed information about the
features and specifications on your particular model,
please visit Toshiba’s Web site at support.toshiba.com.
While Toshiba has made every effort at the time of
publication to ensure the accuracy of the information
provided herein, product specifications, configurations,
prices, system/component/options availability are all
subject to change without notice. For the most
up-to-date product information about your device, or to
stay current with the various computer software or
hardware options, visit Toshiba’s Web site at
support.toshiba.com.
This guide
This guide introduces the device's features as well as some
basic procedures needed to perform tasks in
Windows 8.1. You can:
❖Read the entire guide from beginning to end.
❖Skim through and stop when a topic interests you.
❖Use the table of contents and the index to find specific
information.
NOTE
NOTE
27
Introduction
Safety icons
Safety icons
This manual contains safety instructions that must be
observed to avoid potential hazards that could result in
personal injuries, damage to your equipment, or loss of data.
These safety cautions have been classified according to the
seriousness of the risk, and icons highlight these instructions
as follows:
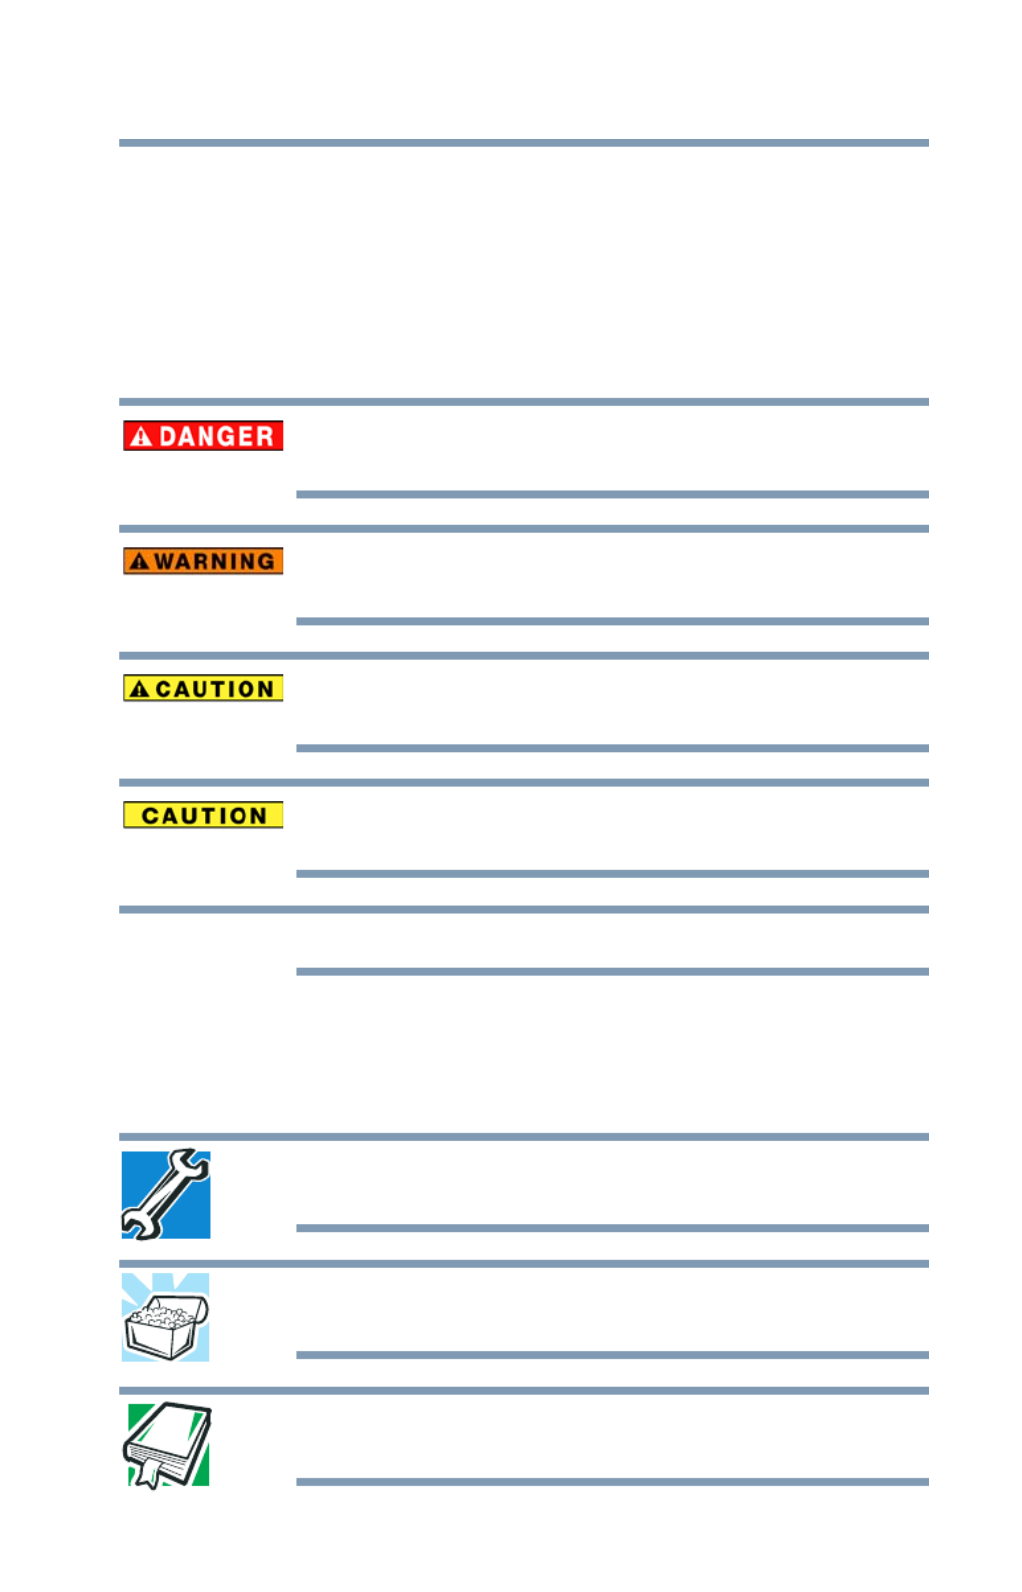
Indicates an imminently hazardous situation which, if not
avoided, will result in death or serious injury.
Indicates a potentially hazardous situation which, if not
avoided, could result in death or serious injury.
Indicates a potentially hazardous situation which, if not
avoided, may result in minor or moderate injury.
Indicates a potentially hazardous situation which, if not
avoided, may result in property damage.
Provides important information.
Other icons used
Additional icons highlight other helpful or educational
information:
TECHNICAL NOTE: This icon indicates technical
information about the device.
HINT: This icon indicates helpful hints and tips.
DEFINITION: This icon indicates the definition of a term
used in the text.
NOTE

28
Introduction
Documentation
Your device’s features and specifications
Certain device chassis are designed to accommodate all
possible configurations for an entire product Series. Your
select model may not have all the features and specifications
corresponding to all of the icons or switches shown on the
device chassis, unless you have selected all those features.
This information applies to all the features and icons
described in this guide.
Below are examples of some of the many possible icons
used on your device:
(Sample Illustration) System icons
Documentation
Your device comes with the following documentation:
❖An electronic version of the User’s Guide (this document)
❖A Quick Start document
❖It may also include other documentation
For accessory information, visit Toshiba’s Web site at
accessories.toshiba.com.
Service options
Toshiba offers a full line of service programs to complement
its standard limited warranty. Toshiba’s standard limited
warranty, extended warranty, and service upgrade terms and
conditions are available at warranty.toshiba.com.
To stay current on the most recent software and hardware
options for your device, and for other product information,
be sure to regularly check the Toshiba Web site at
support.toshiba.com.
If you have a problem or need to contact Toshiba, see “If
Something Goes Wrong” on page 88.
29
Introduction
Service options
Precautions
Your device is designed to provide optimum safety and ease
of use, and to withstand the rigors of travel. You should
observe certain precautions to further reduce the risk of
personal injury or damage to the device.
Keep this device away from small children. This device is
not a toy and may be hazardous to small children, for
example, small detachable parts may be a choking
hazard. Improper use of device could result in loud
volume emitting from the device possibly causing
hearing damage, and improper use and handling of
batteries could result in possible injury.
Never place a heavy object on the device and be careful
not to drop a heavy object onto the device. It could
damage the device or cause system failure.
❖Turning off the device while it is reading from or writing
to flash media may damage the flash media.
❖Keep the device and disks away from objects that
generate strong magnetic fields, such as large stereo
speakers.
❖Scan all new files for viruses.
This precaution is especially important for files you
receive via email or download from the Internet.
Occasionally, even new programs you buy from a
supplier may contain a virus. You need a special
program to check for viruses.

30
Introduction
File management tips
File management tips
❖Back up your files to external media on a regular basis.
Label the backup copies clearly and store them in a safe
place.
As you work with data it exists in the device’s memory.
This memory is called “volatile memory” because it is
only active while the device is turned on. When you turn
off the device, all the data remaining in volatile memory
is lost. To help avoid data loss, save your work to
Internal Storage or network storage. Your work (data) will
remain in internal storage to be called up when you need
it. As long as the internal storage remains healthy, your
data is relatively safe. However on occasion, hardware
failures do happen. If you experience a hardware failure,
your data could be lost. As an extra step to help avoid
data loss, back up your data. See “Backing up your
work” on page 63 for more information.
❖Scan all new files for viruses.
This precaution is especially important for files you
receive via external media, email, or download from the
Internet.

31
Chapter 1
Getting Started
This chapter provides tips for using your device effectively,
summarizes how to connect components, and explains what
to do the first time you use your device.
Please read the safety instruction information on the Quick
Start document (that shipped with your device) carefully and
make sure you fully understand the instructions before you
attempt to use your device in order to avoid potential
hazards that could cause bodily injury, property damage, or
damage the device.
Selecting a place to work
Your device is portable and designed to be used in a variety
of circumstances and locations.

32
Getting Started
Features and components
Features and components
For further details on each of the items listed in the following
section, be sure to follow the provided references to sections
later in this document.
Front
(Sample Illustration) Front view
❖Web Camera indicator*—Glows when the Web
Camera is active. For more information, see “Using the
Web Camera” on page 82.
❖Web Camera*—Allows you to take still photos
(includes flash settings) or record videos. For more
information, see “Using the Web Camera” on page 82.
Display
Web Camera*
Web Camera indicator*
*Available on certain models

33
Getting Started
Features and components
Back
(Sample Illustration) Back view
❖Web Camera*—Allows you to take still photos
(includes flash settings) or record videos. For more
information, see “Using the Web Camera” on page 82.
Left side
(Sample Illustration) Left side view
❖microSD™ slot—Supports the use of microSD™
(SD™) media. For more information, see “Using a
microSD™ Card” on page 105.
Web Camera*
*Available on certain models
microSD™ slot

34
Getting Started
Features and components
Right side
(Sample Illustration) Right side view
❖Volume control button—Allows you to
increase/decrease the volume.
❖Power button—Turns the device on and off. Press and
hold the button for several seconds to turn the device
ON/OFF. Press the button quickly to wake the device
from Sleep mode or to place it into Sleep mode. For
more information, see “To Shut down your device” on
page 40.
Top
(Sample Illustration) Top view
❖Internal microphones—Allow you to record sounds
using the device’s internal microphones or an optional
external microphone. You can listen to audio files using
the built-in speakers, headphones, or external speakers.
❖Headphone/Microphone jack—Allows you to listen
to or record sounds onto your device. For more
information, see “Using external speakers or
headphones” on page 82.
Power button
Volume control button
Internal microphone
Internal microphone
Headphone/Microphone jack
Micro HDMI™ Out port
Micro USB port

35
Getting Started
Setting up your device
❖Micro HDMI™ port—Allows connection to an
HDMI™-compatible television or external display device.
❖Micro USB port—Allows the transfer of data via the
USB cable and charging of the battery via the USB/AC
adaptor.
Bottom
(Sample Illustration) Bottom view
❖Speakers—Allow you to listen to sounds on your
device. For more information, see “Using the built-in
speakers” on page 104.
Setting up your device
TECHNICAL NOTE: You must complete all setup steps
up to and including “Setting up your software” on
page 39 before adding external or internal components
to your device. These components include, but are not
limited to, a mouse, keyboard, and printer.
Your device contains a rechargeable battery that need to be
charged before you can use it.
To use external power or to charge the battery you must
attach the USB/AC adaptor. See “Connecting to a power
source” on page 36.
Please handle your device carefully to avoid scratching or
damaging the surface.
SpeakerSpeaker
NOTE

36
Getting Started
Connecting to a power source
Connecting to a power source
Your device requires power to operate. Use the USB Power
cable and USB/AC adaptor to connect the device to a live
electrical outlet, or to charge the device’s battery.
Always confirm that the USB/AC adaptor (and extension
cable plug if used) has been fully inserted into the socket,
to ensure a secure electrical connection. Failure to do so
may result in a fire or electric shock, possibly resulting in
serious injury.
Be careful if you use a multiple connector. An overload on
one socket could cause a fire or electric shock, possibly
resulting in serious injury.
Always use the TOSHIBA USB/AC adaptor that was
provided with your device, or use USB/AC adaptors
specified by TOSHIBA to avoid any risk of fire or other
damage to the device. Use of an incompatible USB/AC
adaptor could cause fire or damage to the device
possibly resulting in serious injury. TOSHIBA assumes no
liability for any damage caused by use of an incompatible
adaptor.
To connect AC power to the device:
1Connect the USB Power cable to the USB/AC adaptor.
(Sample Illustration) Connecting the USB Power cable to the
USB/AC adaptor.

37
Getting Started
Charging the battery
Handling the cord on this product will expose you to
lead, a chemical known to the State of California to
cause birth defects or other reproductive harm.
Wash hands after handling.
2Plug the USB Power cable into the Micro USB port on
the device.
(Sample Illustration) Connecting the USB/AC adaptor cord to
the device
Do not force the plug into device.
3Connect the USB/AC adapter to a live electrical outlet.
Never attempt to connect or disconnect a power plug
with wet hands. Failure to follow this instruction could
result in an electric shock, possibly resulting in serious
injury.
Charging the battery
The device’s battery is not accessible by the user.
Before using the battery to power the device, you must
charge the battery.
To charge the battery, leave the device plugged into the
USB/AC adaptor with the device turned off.
Battery life and charge time may vary depending on the
applications power management settings, and features
used.
_
_
_
__ +
NOTE
NOTE
NOTE

38
Getting Started
Using the device for the first time
Using the device for the first time
The device is now ready for you to turn it on and begin using
it, see “Exploring Your Device’s Features” on page 75.
Turning on the power
To turn on the device:
1Make sure any external devices (such as the USB/AC
adaptor, if you plan to use AC power rather than battery
power) are properly connected and ready.
2Check to ensure that all slots are empty.
3Press and hold the Power button for several seconds.
(Sample Illustration) Turning on the power
Small bright dots may appear on your screen display when
you turn on your device. Your display contains an extremely
large number of thin-film transistors (TFT) and is
manufactured using high-precision technology. Any small
bright dots that may appear on your display are an intrinsic
characteristic of the TFT manufacturing technology. Over a
period of time, and depending on the usage of the device,
the brightness of the screen will deteriorate. This is also an
intrinsic characteristic of the screen technology. When the
device is operated on battery power, the screen will dim and
you may not be able to increase the brightness of the screen
while on battery power.
Initial setup
The Startup screen is the first screen displayed when you
turn on your device for the first time. Follow the on-screen
instructions on each screen in order to properly install the
operating system and begin using your device.

39
Getting Started
Registering your device with Toshiba
Setting up your software
When you turn on the device for the first time, do not turn
off the power again until the operating system has loaded
completely.
The names of windows displayed, and the order in which
windows appear, may vary according to your software
setup choices.
The first time you turn on your device, the setup guides you
through steps to set up your software. Follow the on-screen
instructions.
Registering your device with Toshiba
Product registration is strongly recommended, and allows
Toshiba to send you periodic updates, announcements, and
special offers applicable to your Product. Product
registration can be completed by one of three methods:
1From the Toshiba Web site at register.toshiba.com:
Touch a field to activate the on-screen keyboard, type in
the requested information, and complete the registration
process.
2From the Start or Desktop screen, swipe in from the right
edge of the screen. When the Windows
® charms appear,
touch the Search ( ) charm and, in the Search field,
type Registration. In the list that appears, touch
Toshiba Registration and complete the registration
process.
Failure to complete Product Registration will not diminish
your rights under the Toshiba Standard Limited Warranty.
To register online, an Internet connection is required.
NOTE
NOTE
40
Getting Started
To Shut down your device
To Shut down your device
1From the Start or Desktop screen, swipe in from the right
edge of the screen.
2When the Windows
® charms appear, touch the Settings
( ) charm.
Pressing the power button before shutting down the
Windows® operating system could cause you to lose
your work.
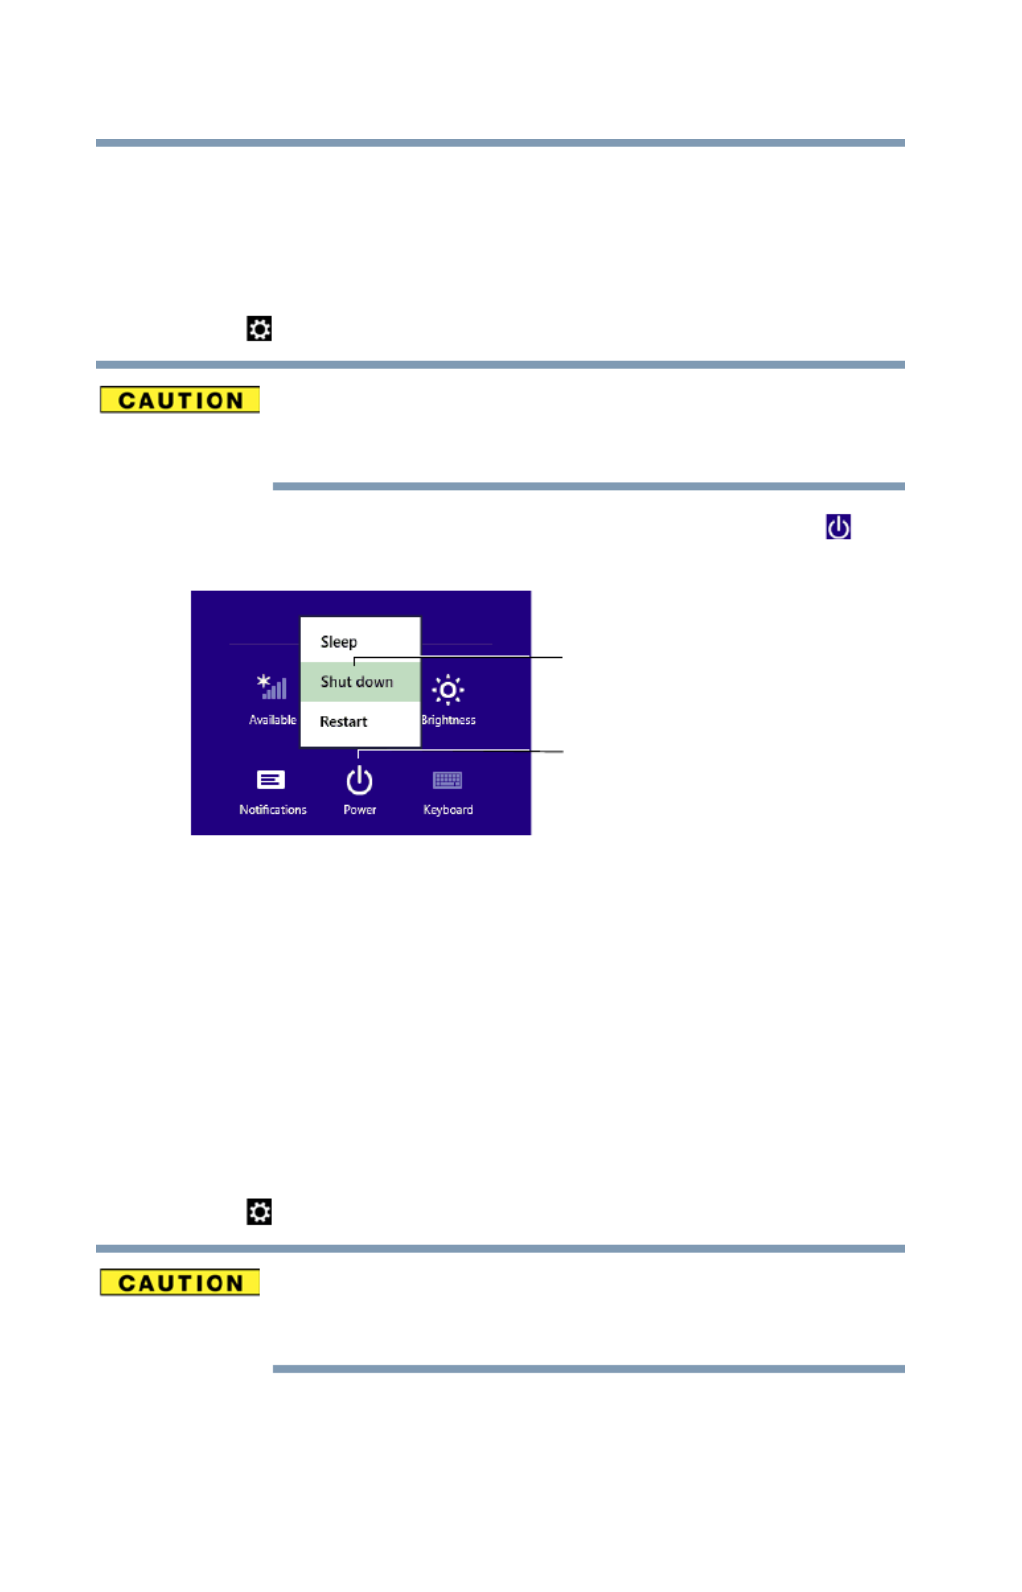
3In the lower right of the screen touch the Power ( )
icon.
(Sample Image) Shut down
4Highlight Shut down, and then touch the Shut down
option.
The device closes all open applications, shuts down the
operating system, and then turns off.
To place your device in Sleep mode
1From the Start or Desktop screen, swipe in from the right
edge of the screen.
2When the Windows
® charms appear, touch the Settings
( ) charm.
If you power down using the Sleep command and the
battery discharges fully, your unsaved information will be
lost. Be sure to save your work first.
Power
Shut down option

41
Getting Started
Adding optional external devices
3In the lower right of the screen touch the Power ( )
icon.
(Sample Image) Sleep
4Highlight Sleep, and then touch the Sleep option.
Sleep mode saves the current state of the device to
memory so that, when you restart the device, you can
continue working from where you left off.
Adding optional external devices
Before adding external devices, Toshiba recommends
setting up your software. See “Setting up your software”
on page 39.
After starting your device for the first time you may want to:
❖Connect external devices (see “Connecting an external
device” on page 55)
❖Connect an external monitor (see “Using external
display devices” on page 55)
Recovering the Internal Storage Drive
Your device includes recovery utilities to allow you to recover
your internal storage drive if necessary.
The following internal storage drive recovery options are
available:
Recovery option Description
Creating recovery
media
This option allows you to create the recovery
media you will use to restore your device.
See “Creating a PBR (Push Button Reset) USB
Recovery” on page 43.
Power
Sleep option
NOTE

42
Getting Started
Recovering the Internal Storage Drive
A recovery image of your device is stored on the internal
storage drive, and the image can be restored by running the
recovery utilities directly from your internal storage drive as
described in the sections below. However, it is strongly
recommended that you create recovery media. If the
recovery files on your internal storage drive become
corrupted or are deleted, you can restore your system from
your recovery media. Also, if your original internal storage
drive fails, you can restore your system to a new internal
storage drive from your recovery media. It is strongly
recommended that you create recovery media before using
your system for the first time. See “Creating a PBR (Push
Button Reset) USB Recovery” on page 43 and “Recovering
from a USB Recovery PBR (Push Button Reset)” on page 50.
❖During the recovery process your device must first be
fully charged via the USB/AC adaptor.
❖When you restore your system, only the operating
system files and drivers originally shipped with the
device are restored. Any files that you created are not
restored during this process. Be sure to separately
save the files you have created to external media
using Windows® or another backup program. For
more information, see “Backing up your work” on
page 63.
Creating recovery media
It is strongly recommended that you create recovery media.
If the recovery files on your internal storage drive become
corrupted or are deleted, you can restore your system from
your recovery media. Also, if your original internal storage
drive fails, you can restore your system to a new internal
storage drive from your recovery media.
Restoring from
recovery media
This option allows you to restore your system from
the recovery media you created. You can remove
all data from your system and reinstall Windows
®.
See “Recovering from a USB Recovery PBR (Push
Button Reset)” on page 50.
Recovery option Description
NOTE

43
Getting Started
Recovering the Internal Storage Drive
During the recovery process your device must first be
fully charged via the USB/AC adaptor.
When you create recovery media, only the operating
system files and drivers originally shipped with the device
are backed up to the external media and can be restored
from this media. Any files that you created are not
backed up on the recovery media. You will need to
separately back up the files you created; for more
information, see “Backing up your work” on page 63.
When you create recovery media, the system will prompt you
to connect a USB flash drive (8GB minimum capacity) to
your device.
All information stored on your USB flash drive will be
erased during the process of creating the recovery
media. Be sure to save the information stored on your
external media to another storage device before
executing this procedure, or use blank media.
Creating a PBR (Push Button Reset) USB
Recovery
You will need two items before proceeding:
1. USB Flash Drive (minimum 8GB)
(sold separately)
2. Micro USB to USB On-the-Go Adapter
(sold separately)
1From the Start or Desktop screen, swipe in from the right
edge of the screen. When the Windows
® charms appear
touch the Search ( ) charm and, in the Search field,
type Create Recovery Media. In the list that appears,
touch your selection.
A pop-up screen displays the following message, “Do
you want to allow the following program to make
changes to this computer?”
NOTE
NOTE
NOTE

44
Getting Started
Recovering the Internal Storage Drive
2Touch the Yes button.
The Recovery Image Utility dialog box appears.
(Sample Image) Recovery Image Utility screen
3Touch Create a Recovery Drive.
A message displays indicating that you will need two
items before proceeding.
(Sample Image) Recovery Image Utility message screen
4Touch OK to proceed.

45
Getting Started
Recovering the Internal Storage Drive
The Recovery Drive screen appears.
(Sample Image) Recovery Drive - Create a recovery drive
screen
5With the default checkbox checked, touch the Next
button.
You must have a Micro USB to USB On-the-Go adapter
attached so that a USB flash drive of 8GB or higher can
be attached.
Recovery via microSD™ is not supported.
NOTE
NOTE

46
Getting Started
Recovering the Internal Storage Drive
The Recovery Drive screen appears, displaying the
available drive(s).
(Sample Image) Recovery Drive - available drive(s) screen
The Next button is greyed out if the attached USB drive is
not at least 8GB in size.
If there are multiple USB flash drives connected to the
device, the top drive will be selected by default. Be sure
to select the correct drive intended for your recovery
purpose.
6Touch the Next button.
NOTE
NOTE

47
Getting Started
Recovering the Internal Storage Drive
The Recovery Drive screen appears, displaying a warning
message, stating “Everything on the drive will be deleted.
If you have any personal files on this drive, make sure
you’ve backed up the files.”
(Sample Image) Recovery Drive - Warning screen
7When you are ready to begin, touch the Create button.
The drive is then formatted and copies all files needed
for the PBR (Push Button Reset).
(Sample Image) Recovery Drive - Copying screen
NOTE

48
Getting Started
Recovering the Internal Storage Drive
The message, “the recovery drive is ready” appears
when the copy process is complete.
(Sample Image) Recovery Drive - The recovery drive is ready
screen
8Touch the Finish button if you are done, otherwise
proceed to step 9.
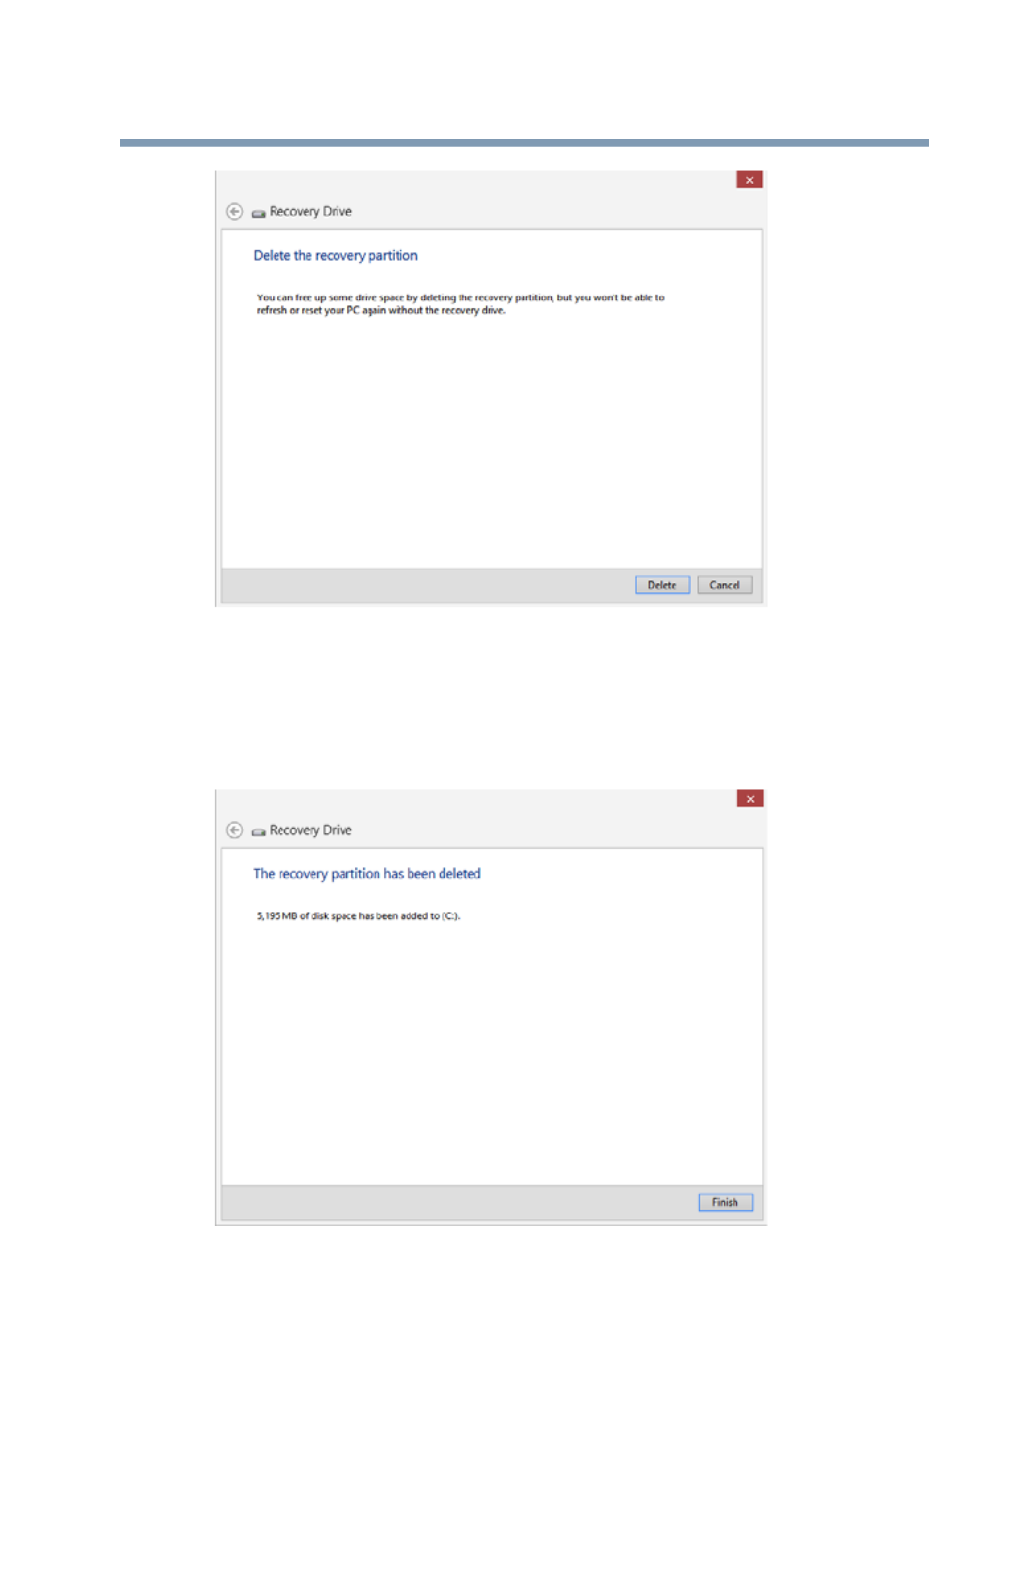
The Delete the recovery partition link is an option
that allows you to reclaim the recovery partition space.
9If you wish to reclaim the recovery partition space, touch
the Delete the recovery partition link.
You will not be able to make another USB recovery drive
after this function is performed.
NOTE
NOTE
49
Getting Started
Recovering the Internal Storage Drive
(Sample Image) Recovery Drive - Delete the recovery partition
screen
10 Touch the Delete button when prompted.
The partition drive will be deleted.
(Sample Image) Recovery Drive - recovery partition deleted
screen
11 Touch the Finish button when completed.

50
Getting Started
Recovering the Internal Storage Drive
Toshiba does not guarantee successful data back up. Be
sure to save your work to external media before
executing the recovery (see “Backing up your work” on
page 63).
Restoring from recovery media
The recovery process deletes information stored on the
internal storage drive. Be sure to save your work to
external media before executing the recovery (see
“Backing up your work” on page 63).
During the recovery process your device must first be
fully charged via the USB/AC adaptor.
If you have created recovery media for your system, you can
restore your system from such media, if necessary. For
example, if your original internal storage drive fails, you can
restore your system to a new internal storage drive from your
recovery media. For instructions on creating recovery media,
see “Creating recovery media” on page 42.
When you restore your system, only the operating
system files and drivers originally shipped with the device
are restored. Any files that you created are not restored
during this process. Be sure to separately save the files
you have created to external media using Windows
® or
another backup program. For more information, see
“Backing up your work” on page 63.
Recovering from a USB Recovery PBR
(Push Button Reset)
1Insert the USB recovery drive you created using the USB
to Micro USB On-the-Go adapter.
2With your device off, push the Volume up (+) button and
hold it down while pressing the Power button until the
Boot menu appears.
NOTE
NOTE

51
Getting Started
Recovering the Internal Storage Drive
3Select your USB boot device.
The device reboots, and then the “Choose your
keyboard layout” menu appears.
(Sample Image) Choose your keyboard layout menu
4Touch US (for a US keyboard) to continue.
The “Choose an option” menu appears.
(Sample Image) Choose an option menu
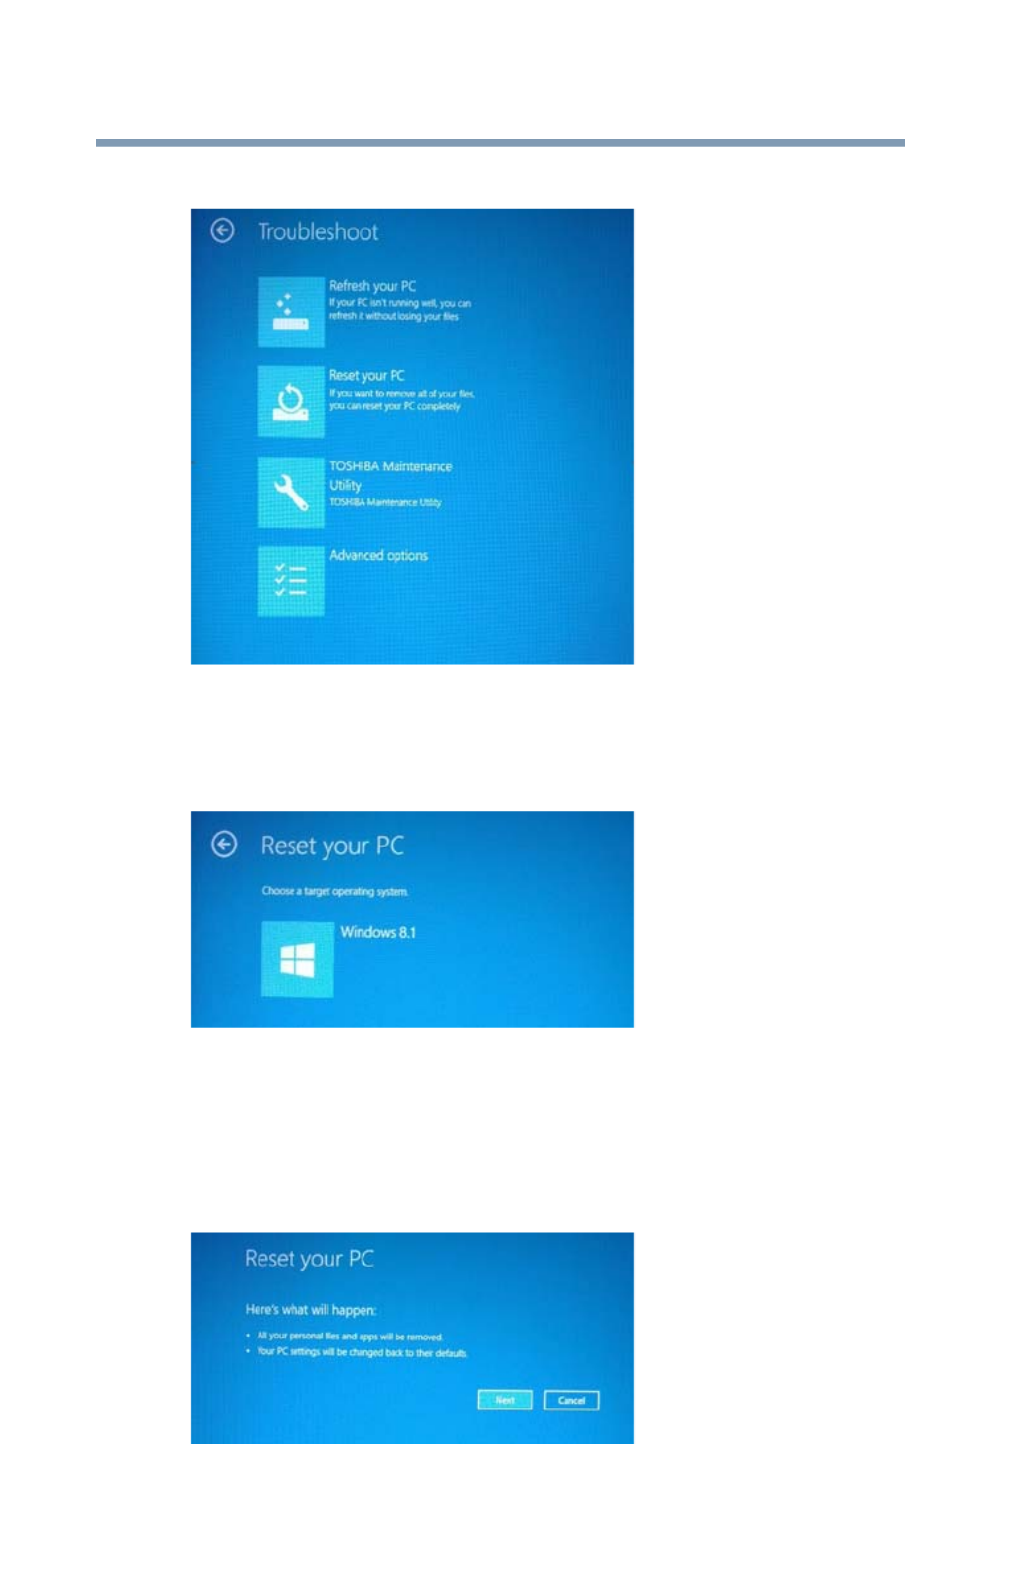
5Touch Troubleshoot.
52
Getting Started
Recovering the Internal Storage Drive
The “Troubleshoot” menu appears.
(Sample Image) Troubleshoot menu
6Touch Reset your PC to perform the recovery.
The “Reset your PC” menu appears.
(Sample Image) Reset your PC menu
7Touch Windows 8.1 to choose your target operating
system.
A message appears stating “Here’s what will happen.”
This may take a few moments.
(Sample Image) Reset your PC - “Here’s what will happen”
menu

53
Getting Started
Recovering the Internal Storage Drive
8Touch Next.
Two options are now available:
❖Yes, repartition the drives
❖No, keep the existing partitions
(Sample Image) Reset your PC menu
9If you select Yes, two more options become available:
❖Just remove my files
❖Fully clean the drive
(Sample Image) Reset your PC menu
Choosing the first option formats the drive quickly and
restores it in the normal fashion. The second option may
take several hours.
Once you have made the selection, a message appears
stating “All ready to go.”
10 Touch Reset to continue or Cancel to exit.
NOTE
54
Getting Started
Recovering the Internal Storage Drive
Installing drivers and applications
The TOSHIBA Application Installer allows you to reinstall the
drivers and applications that were originally bundled with
your device.
You must have an Internet connection to reinstall
applications.
To reinstall drivers and applications:
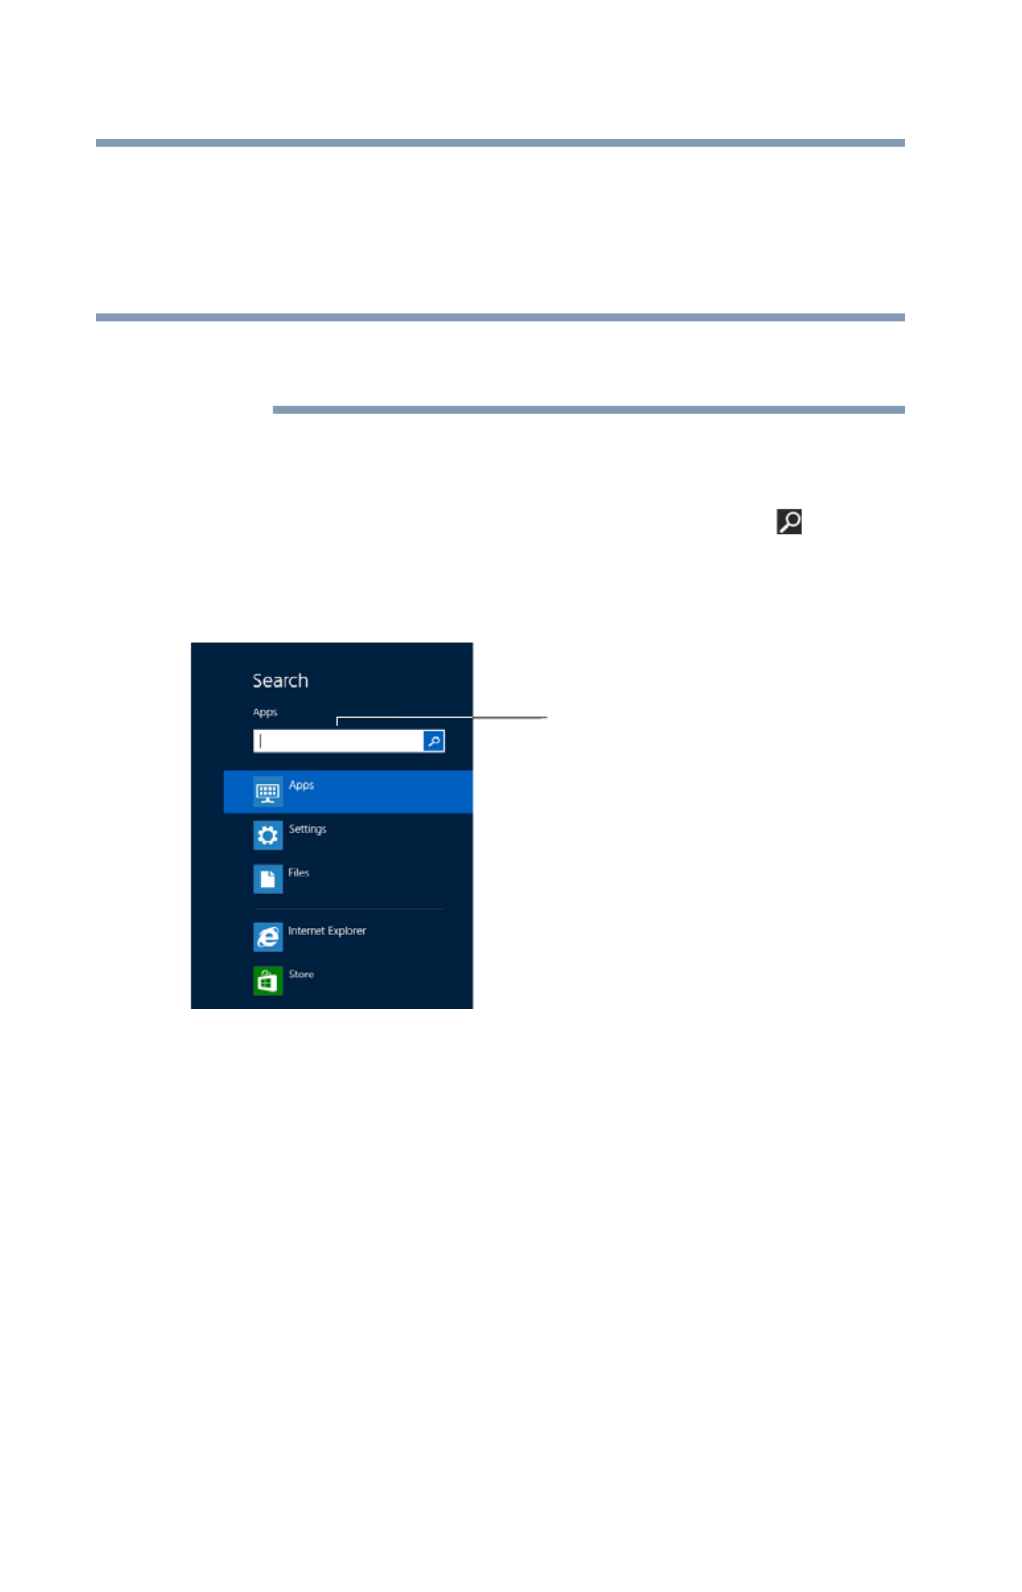
1Swipe in from the right edge of the screen. When the
Windows® charms appear touch the Search ( ) charm.
Then touch the Search field and type
TOSHIBA
Application Installer
. In the list that appears, touch
your selection.
(Sample Image) Installing drivers and applications
2Touch Next.
3Touch the item you want to install.
4Touch Install.
5Follow the on-screen prompts to complete the
installation process, see “TOSHIBA Application Installer”
on page 87.
NOTE
Search field

55
Getting Started
Connecting an external device
Connecting an external device
You can easily attach an external device to your device.
To do this:
1Read the directions that came with the external device
to see if you first need to install new software.
2Connect the external device’s video or USB cable to the
port on your device and to the external device.
3Connect the external device’s power cable to a live
electrical outlet (if applicable).
4Turn on the external device (if applicable).
Your device may automatically detect the external
device.
Using external display devices
Your device comes with a built-in display, but you can also
connect an HDMI™-compatible television or external display
device via the Micro HDMI™ Out port.
To locate your Micro HDMI™ Out port, please refer to
your Quick Start document.
(Sample Illustration) Video port
Selecting video cables
To connect a device to the Micro HDMI™ Out port, you must
purchase the appropriate cable.
NOTE
Micro HDMI™ Out port on display panel/tablet

56
Getting Started
Using external display devices
Connecting an HDMI™-compatible television or
display device
To connect an HDMI™-compatible television or display
device:
❖Connect one end of the cable (not included with your
device) to the Micro HDMI™ Out port on the side of the
display panel/tablet, and then connect the other end of
the cable to your television or display device. Refer to
the manual that came with the television or display
device for more information.
Your device should automatically detect the external
display device.
Connecting an external monitor or projector
You can easily attach an external monitor or projector to your
device if you need a larger screen.
To do this:
1Read the directions that came with the monitor to see if
you first need to install new software.
2Connect the monitor’s video cable to the Micro HDMI™
Out port on the side of the display panel/tablet.
3Connect the device’s power cable to a live electrical
outlet.
4Turn on the external device.
Your device will automatically detect the external display
device.
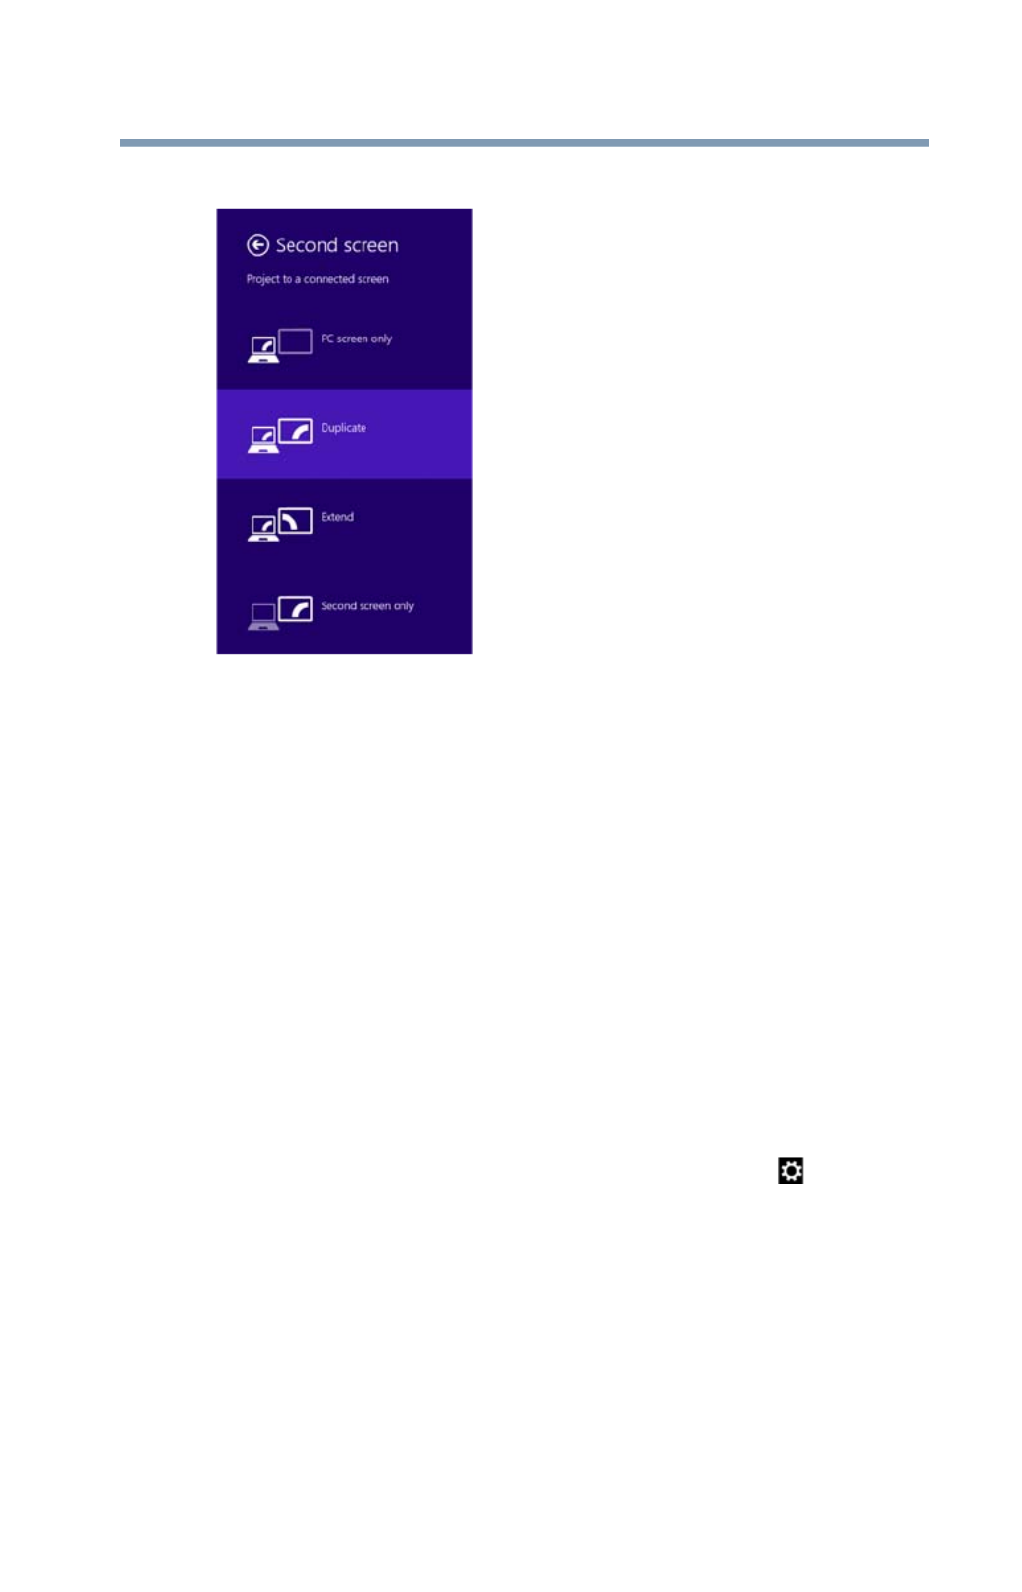
Directing the display output
You can select the display output using the following steps:
1Swipe in from the right edge of the screen.
2When the Windows® charms appear, touch
Devices ( ).
3Touch Project ( ).
57
Getting Started
Customizing your device’s settings
4Touch Second screen.
(Sample Image) Display options window
5Select the desired display setting.
Adjusting the quality of the external display
To obtain the best picture quality from your television (or
other video display device), you may need to adjust the
video settings. See the video device documentation for
additional configuration steps.
Customizing your device’s settings
There are several ways in which you can customize your
device to suit your particular requirements. You can go into
your device settings to make adjustments to your device to
suit your needs.
Swipe in from the right edge of the screen. When the
Windows® charms appear, touch the Settings ( ) charm,
and then touch Change PC Settings. Then choose a
category you wish to change. Refer to your operating system
documentation or Help and Support for details.
You may also wish to customize your power usage settings.
For more information, see “Power Plans” on page 70. There
are additional custom settings you can choose. See
“Utilities” on page 85.

58
Getting Started
Caring for your device
Caring for your device
This section gives tips on cleaning and moving your device.
For information about taking care of your device’s battery,
see “Taking care of your battery” on page 72.
Please handle your device carefully to avoid scratching or
damaging the surface.
Cleaning the device
Keep liquids, including cleaning fluid, out of the device’s
speakers and other openings. Never spray cleaner
directly onto the device and/or display. Never use harsh
or caustic chemical products to clean the device.
To keep your device clean, gently wipe the display
panel/tablet and exterior case with a lightly dampened cloth.
NOTE

59
Chapter 2
Learning the Basics
This chapter gives some computing tips and provides
important information about basic features.
Computing tips
❖Save your work frequently.
Your work stays in the device’s temporary memory until
you save it to the internal storage drive. If the network
you are using goes down and you must restart your
device to reconnect, or your battery runs out of charge
while you are working, you will lose all work since you
last saved.
See “Saving your work” on page 63 for further
information.
HINT: Some programs have an automatic save feature
that can be activated. This feature saves your file to the
internal storage drive at preset intervals. See your
software documentation for details.

60
Learning the Basics
Touch screen
❖Back up your files to external media on a regular basis.
Label the backup copies clearly and store them in a safe
place.
It is easy to put off backing up because it takes time.
However, if your internal storage drive suddenly fails, you
will lose all the data on it unless you have a separate
backup copy. For more information, see “Data and
system configuration backup in the Windows®
operating system” on page 103.
❖Use Error-checking and Disk Defragmenter regularly to
check and optimize disk space and improve
performance.
❖Scan all new files for viruses.
This precaution is especially important for files you
receive via external media, email, or download from the
Internet.
❖Take frequent breaks to avoid repetitive-motion injuries
and eyestrain.
❖Do not turn off the device if a drive is active.
Turning off the device while it is reading from or writing
to a disk may damage the disk, the drive, or both.
The Windows®
operating system records information,
such as your desktop setup, during its shutdown
procedure. If you do not let the Windows
® operating
system shut down normally, details such as new icon
positions may be lost.
Touch screen
Your device may come with a digitizer feature, enabling
direct interaction with display, apps, and programs.
Your device comes with a touch screen, enabling direct
interaction with displayed apps and programs through
simple or multi-touch gestures.
NOTE
NOTE

61
Learning the Basics
Touch screen
Touch screen navigation
Use your finger to manipulate the on-screen icons, buttons,
menu items, and other items on the touch screen. You can
also change the screen’s orientation.
The screen is made of glass so avoid contact with sharp,
rough, or abrasive objects or substances as screen may
break or scratch if not handled properly. If you see a
crack in the glass, discontinue use of the device to avoid
injury.
Touch—Touch to activate items displayed on the screen,
such as app and setting icons or on-screen buttons. Touch
to type using the keyboard.
Touch & hold—Touch and hold an item on the screen by
touching and holding the item in place until an action occurs.
Drag—Touch and hold an item for a moment and then,
without lifting your finger, move the item until you reach the
target position. For example, drag items on any app screen
to reposition them.
Swipe or slide—To swipe or slide, quickly move your finger
across the surface of the screen without pausing. For
example, swipe your finger to the left from the right edge of
the screen to display the Windows
® charms.
Double-tap—Tap quickly twice to zoom in. For example,
double-tap a section of a Web page to zoom in on that
section. Double-tap again to zoom out.
Pinch—In some apps (such as Maps and Games), you can
zoom in and out by placing two fingers on the screen at once
and pinching them together (to zoom out) or spreading them
apart (to zoom in).
Rotate—Place two or more fingers on an item and rotate
your hand. The item rotates in the direction you turn your
hand. (Not functional in all apps).

62
Learning the Basics
Mouse properties
Mouse properties
If you have attached an external mouse to your device,
Mouse properties allow you to change your pointing device
or mouse settings.
To access Mouse properties:
1Swipe in from the right edge of the screen. When the
Windows® charms appear, touch the Search ( ) charm,
touch Settings and, in the Search field, type Mouse. In
the list that appears, touch your selection.
The Mouse screen appears.
Adjust the settings as desired, and then touch OK.
Starting an app
To Start an app on the Start screen, swipe left or right as
needed to reveal the desired app. Then touch the
appropriate tile.
Starting an app using Search
To Start an app using the Search function, swipe in from the
right edge of the screen. When the Windows
® charms
appear, touch the Search ( ) charm.
To use the Search field:
1Touch the Search field to open the on-screen keyboard.
(Sample Image) Searching for apps
2Start typing the app’s name in the Search field.
As you type, all matching files and apps are displayed.
3Touch the app you wish to open.

63
Learning the Basics
Saving your work
Saving your work
Before you turn off the device using the Shut down
command, save your work on the internal storage drive,
external media, or flash media. This is one of the most
important rules of computing.
Many applications offer a feature that saves documents at
regular intervals. Check your program’s documentation to
see if it has an automatic save feature.
Backing up your work
Back up all the files you create in case something happens
to your device. You can back up your files to different types
of media such as an external storage drive, or to a network, if
available.
To back up several files at one time, use the Microsoft
®
Windows® file recovery program preinstalled on the device’s
internal storage drive. Also see “Backing up your data or
your entire device with the Windows® operating system” on
page 105.
HINT: Backing up all the files on your internal storage
drive may take a considerable amount of time. You may
prefer to use a high-capacity file recovery system, such
as an external hard drive or a high-capacity microSD™
Card.
Toshiba’s online resources
Toshiba maintains a number of online sites to which you can
connect. These sites provide information about Toshiba
products, give help with technical questions and keep you
up to date with future upgrades. For more information, see
“Contacting Toshiba” on page 107.

64
Chapter 3
Mobile Computing
This chapter covers all aspects of using your device while
traveling.
Toshiba’s energy-saver design
Your device enters a low-power suspension mode when it is
not being used, thereby conserving energy and saving
money in the process. It has a number of other features that
enhance its energy efficiency.
Many of these energy-saving features have been preset by
Toshiba. We recommend you leave these features active,
allowing your device to operate at its maximum energy
efficiency, so that you can use it for longer periods while
traveling.
Running the device on battery power
The device contains a Lithium-Ion (Li-Ion) battery that
provides power when you are away from an AC outlet. You
can recharge it many times.

65
Mobile Computing
Running the device on battery power
Battery Notice
Battery life rating is for comparison purposes only, and does
not indicate the battery life that will be obtained by any
individual user. Actual battery life may vary considerably
from specifications depending on product model,
configuration, applications, power management settings and
features utilized, as well as the natural performance
variations produced by the design of individual components.
The battery life rating is only achieved on the select models
and configurations tested by Toshiba under the specific test
settings at the time of publication and is not an estimate of a
system’s battery life under any conditions other than the
specific test settings.
Recharge time varies depending on usage. Battery may not
charge while the device is consuming full power. After a
period of time, the battery will lose its ability to perform at
maximum capacity and will need to be replaced. This is
normal for all batteries.
To ensure that the battery maintains its maximum capacity,
operate the device on battery power at least once a month.
The Lithium-Ion battery has no memory effect so it is not
necessary to let the battery fully discharge each time.
However, for better accuracy of the battery meter, it is helpful
to fully discharge the battery periodically. Please see
“Maintaining your battery” on page 73 for procedures. If the
device is continuously operated on AC power, either through
an USB/AC adaptor or a port replicator (if applicable to your
system), for an extended period (more than a month), the
battery may fail to retain a charge. This may shorten the life
of the battery, and may cause the battery meter to be
inaccurate.
For best performance when playing streaming media
(especially streaming video), either power the device from
its USB/AC adaptor, or set up a power plan that keeps
the device running at full performance even when
powered from its battery. For more information about
Windows® power plans, see “Power Plans” on page 70.
The device also has an internal real-time-clock (RTC) battery.
The RTC battery powers the RTC memory that stores your
system configuration settings and the current time and date
information. It maintains this information for up to a month
while the device is turned off.
NOTE

66
Mobile Computing
Charging the battery
TECHNICAL NOTE: Depending on your system, the RTC
battery may only charge while the device is turned on.
Power management
Your device ships with the power management options
preset to a configuration that will provide the most stable
operating environment and optimum system performance for
both AC power and battery modes.
Changes to these settings may result in system
performance or stability issues. Users who are not
completely familiar with the power management
component of the system should use the preset
configuration. For assistance with setup changes,
contact Toshiba’s Customer Support Center.
Charging the battery
If the device is leaking or its case is cracked, put on
protective gloves to handle it.
Your device’s battery is not accessible to the user.
Your device contains a rechargeable battery that may need
to be charged prior to use.
To use external power or to charge the battery you must
attach the USB/AC adaptor. See “Connecting to a power
source” on page 36.
To charge the device plug it into a power source.
Battery life and charge time may vary depending on the
external conditions, or the applications and features
used.
Please handle your device carefully to avoid scratching or
damaging the surface.
NOTE
NOTE
NOTE

67
Mobile Computing
Charging the battery
Wall Outlet—The fastest way to charge your tablet is with
the included USB/AC adaptor plugged into a wall outlet.
Charging the RTC battery
Your device has an internal real-time clock (RTC) battery. The
RTC battery powers the System Time Clock and BIOS
memory used to store your device’s configuration settings.
When fully charged, it maintains this information for up to a
month when the device is powered off.
The RTC battery may have become completely discharged
while your device was shipped, resulting in a CMOS error
message during startup. The error message may vary by
device model.
Depending on your system, the RTC battery may only
charge while the device is turned on.
To recharge the RTC battery, plug the device into a live
electrical outlet via the USB/AC adaptor and leave the device
powered on for 24 hours.
It is seldom necessary to charge the RTC battery
because it charges while the device is on. If the RTC
battery is low, the real-time clock and calendar may
display the incorrect time and date or stop working.
The device can be used while the RTC battery is being
charged, although the charging status of the RTC battery
cannot be monitored.
Determining remaining battery power
Wait a few moments after turning on the device before
trying to monitor the remaining battery power. The device
needs this time to check the battery’s remaining capacity
and perform its calculations.
Touch the power icon in the notification area. (See “Finding
your way around the desktop” on page 77 for more
information on the notification area.) The window displays
the remaining battery power as a percentage.
NOTE
NOTE
NOTE

68
Mobile Computing
Charging the battery
With repeated discharges and recharges, the battery’s
capacity gradually decreases. A frequently used older
battery does not power the device for as long as a new
battery, even when fully charged.
TECHNICAL NOTE: The device drains the battery faster
at low temperatures. Check your remaining charge
frequently if you are working in temperatures below 50
degrees Fahrenheit.
The device calculates the remaining battery charge
based on your current rate of power use and other
factors such as the age of the battery.
What to do when the battery runs low
When the battery run low you can:
❖Plug the device into an external power source and
recharge the battery via the Micro USB port, using the
USB Power cable and USB/AC adaptor. See
“Connecting to a power source” on page 36
❖Save your work and turn off the device
If you do not manage to do either of these things before the
battery completely runs out of power, the device
automatically enters a power-saving state and turns itself off
so that when you turn on the power again after connecting
the USB/AC adaptor, you can continue where you left off.
Setting battery notifications
You can set two notifications. Each notification can be set to
alert you when a specified percentage of remaining battery
power has been reached. You can also set the device to
enter Sleep mode or to completely shut down when the
notification goes off.
To change the default notification settings:
1While on the desktop, touch the Battery ( ) icon in the
notification area.
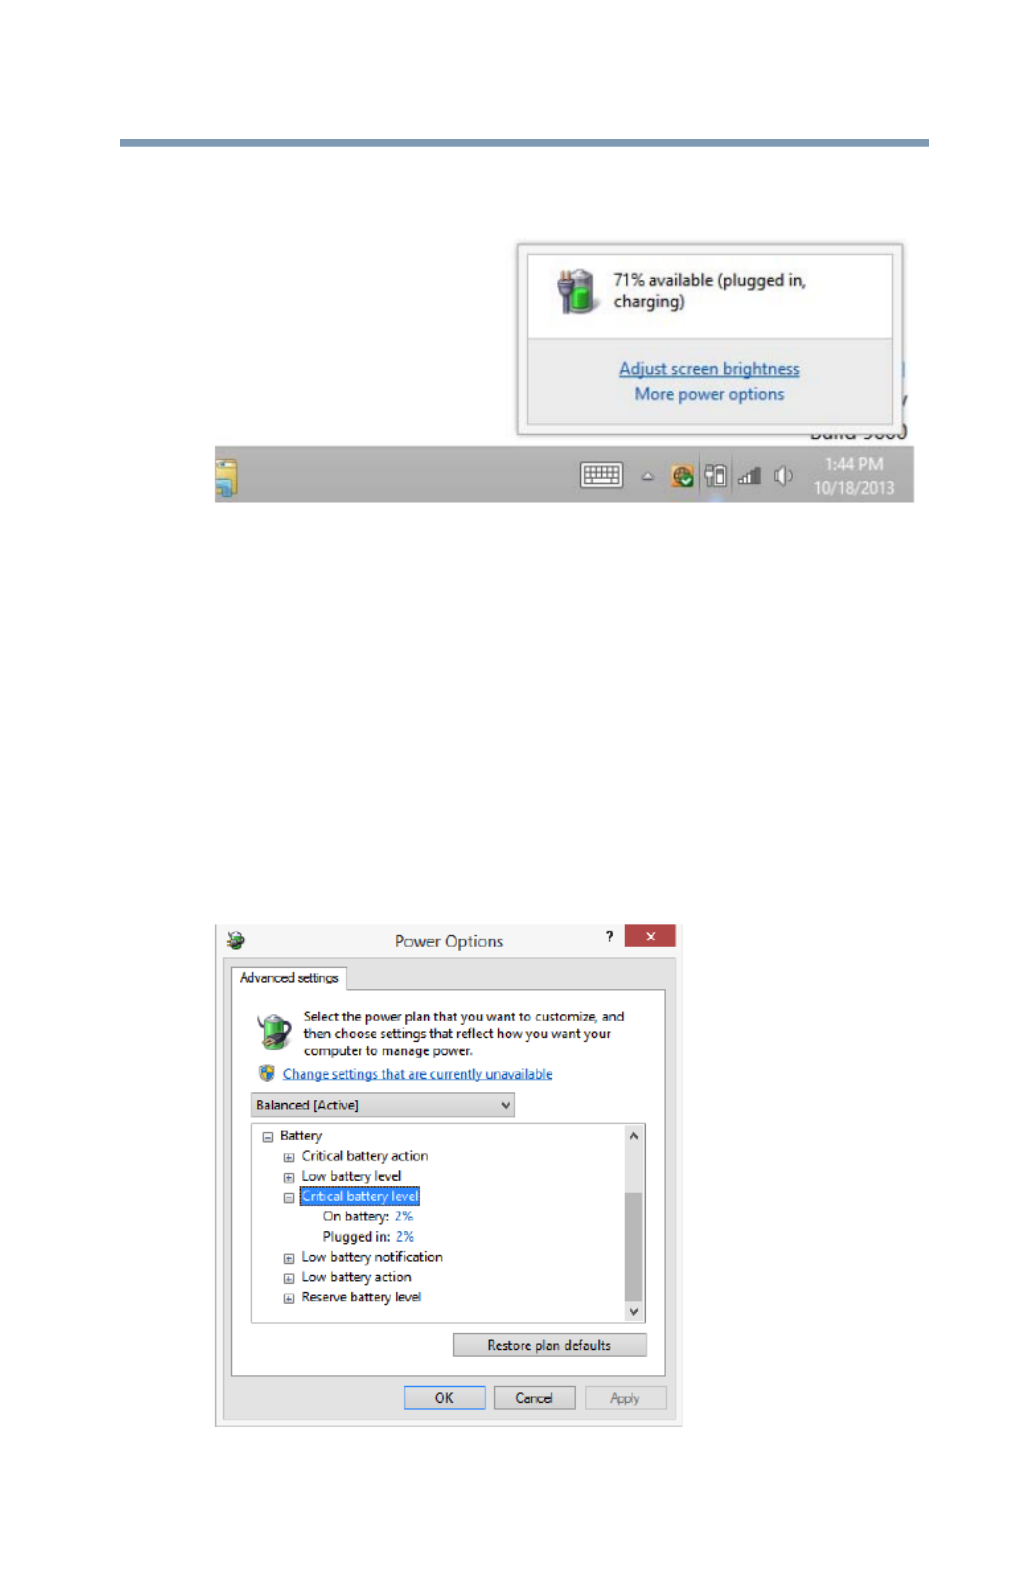
69
Mobile Computing
Charging the battery
A window appears displaying the power level of the
battery.
(Sample Image) Power Options screen
2Touch More power options.
The Power Options window appears.
3Touch Change plan settings under the power plan to
be customized.
The Edit Plan Settings window appears.
4Touch Change advanced power settings.
The Advanced settings tab of the Power Options
window appears.
5Touch Battery to display the battery options.
(Sample Image) Advanced settings tab of Power Options screen
6Configure the alarm settings to suit your needs.

70
Mobile Computing
Charging the battery
Conserving battery power
How long a fully charged battery lasts when you are using
the device depends on a number of factors, such as:
❖How the device is configured
❖How much you use the internal storage drive or other
optional devices
❖Where you are working, since operating time decreases
at low temperatures
There are various ways in which you can conserve power
and extend the operating time of your battery:
❖Enable Sleep, which saves power when you turn off the
device and turn it back on again
❖Use the Windows® power-saving option plans
These power-saving options control the way in which the
device is configured. By using them, you can increase the
length of time you can use the device before you need to
recharge the battery.
Microsoft® has combined these options into preset Power
Plans. Using one of these power plans lets you choose
between maximum power savings and peak system
performance. You may also set individual power-saving
options to suit your own needs.
The following sections describe how to choose a Power Plan
and discuss each power-saving option.
Power Plans
You can choose a predefined Power Plan or select your own
combination of power options.
To do this:
1While on the desktop, touch the Battery ( ) icon in the
notification area.

71
Mobile Computing
Charging the battery
2Touch More power options.
The Power Options window appears.
(Sample Image) Power Options window
3Select an appropriate plan for your work environment or
create your own custom plan.
4Touch Create a power plan in the left pane to set up a
new plan.
To edit a plan or to edit advanced settings, continue to
the following steps.
5Touch Change plan settings to choose the plan you
want to edit.
This screen allows you to change basic settings.
6Touch Change advanced power settings to access
settings for battery notification levels, internal storage
drive power save time, etc.
You can touch the plus signs to expand each item and to
see what settings are available for each item.
7Touch OK to save the plan changes you have
performed.
NOTE

72
Mobile Computing
Changing the battery
Changing the battery
The device’s battery is not accessible by the user.
When your battery has run out of power, plug in the USB/AC
adaptor.
If you find that a new battery is needed, contact the location
where you purchased the device for more information on
replacing the battery. Toshiba will not be responsible for any
product damage, data loss, service, or part replacement
made necessary by improper installation of a new battery.
If the device is leaking or its case is cracked, put on
protective gloves to handle it.
Taking care of your battery
The following sections offer tips on how to take care of your
battery and prolong its life.
Safety precautions
Always immediately turn the power off and disconnect the
power cable/cord plug from the plug socket and stop using
the device if you observe any of the following conditions:
❖Offensive or unusual odor
❖Excessive heat
❖Discoloration
❖Deformation, cracks, or leaks
❖Smoke
❖Other unusual events during use, such as abnormal
sound
Do not expose the device to fire. The batteries could
explode.
Do not turn on the device’s power again until an authorized
Toshiba service provider has checked it for safety.
Continued use could cause a fire or rupture possibly
resulting in serious injury or device failure including but not
limited to the loss of data.
NOTE

73
Mobile Computing
Disposing of your device
Maintaining your battery
Fully discharging a battery will allow better accuracy of the
battery meter.
To fully discharge your battery:
❖Periodically, disconnect the device from a power source
and operate it on battery power until the battery fully
discharges.
Disposing of your device
Never attempt to dispose of a device by burning or by
throwing it into a fire, and never allow exposure to a
heating apparatus (e.g., microwave oven). Heat can
cause a device to explode and/or release caustic liquid,
both which may possibly cause serious injury.
Discard this device in accordance with applicable laws and
regulations.
Disposal of this product may be regulated due to
environmental considerations. For disposal, reuse or
recycling information, please contact your local government.
For more information, see “Device Recycling Information” on
page 20, or for complete information about Toshiba's
recycling programs and initiatives, please visit
http://us.toshiba.com/recycle.
Traveling tips
The environmental precautions listed in “Selecting a place to
work” on page 31, also apply while traveling.
❖Never leave your device on a sunny ledge or in a place
where it could get wet or covered in dust.
❖Always travel with the device in a carrying case. Toshiba
offers a choice of carrying cases for the device. They all
provide plenty of extra space for manuals, power cords,
and compact discs. Contact your authorized Toshiba
representative for more information or visit Toshiba’s
Web site at accessories.toshiba.com.

74
Mobile Computing
Traveling tips
TECHNICAL NOTE: When traveling by air, you may be
required to pass your device through airport security
equipment. The X-ray equipment will not harm your
device.
Before using your device aboard an aircraft, make sure
the Wireless antenna is OFF (Airplane mode is ON) if your
device has wireless LAN capability.
To enable/disable the wireless antenna, use the Airplane
mode switch located under Networks, see “Setting up for
communications” on page 80.
NOTE
NOTE

75
Chapter 4
Exploring Your
Device’s Features
In this chapter, you will explore some of the special features
of your device.
Exploring the Start screen
The Start screen is the launching pad for everything you can
do in the Windows® operating system, providing new and
easy ways to access everything from your favorite apps and
Web sites to your contacts and other important information.
When you swipe in from the right edge of the screen, a list of
Windows® charms will slide out from the right. These
Windows® charms perform various commands, including
basics tasks like turning off the power and advanced PC
settings.
You can go to the Start screen by touching the Start charm,
see “Charms” on page 76. You can also use the Windows
®
button ( ) on the LCD screen to go to the Start screen. For
detailed information, please refer to the Windows
® Help and
Support.
By or touching the Desktop tile from the Start screen, you
will find the Windows® settings and features you are most
familiar with.
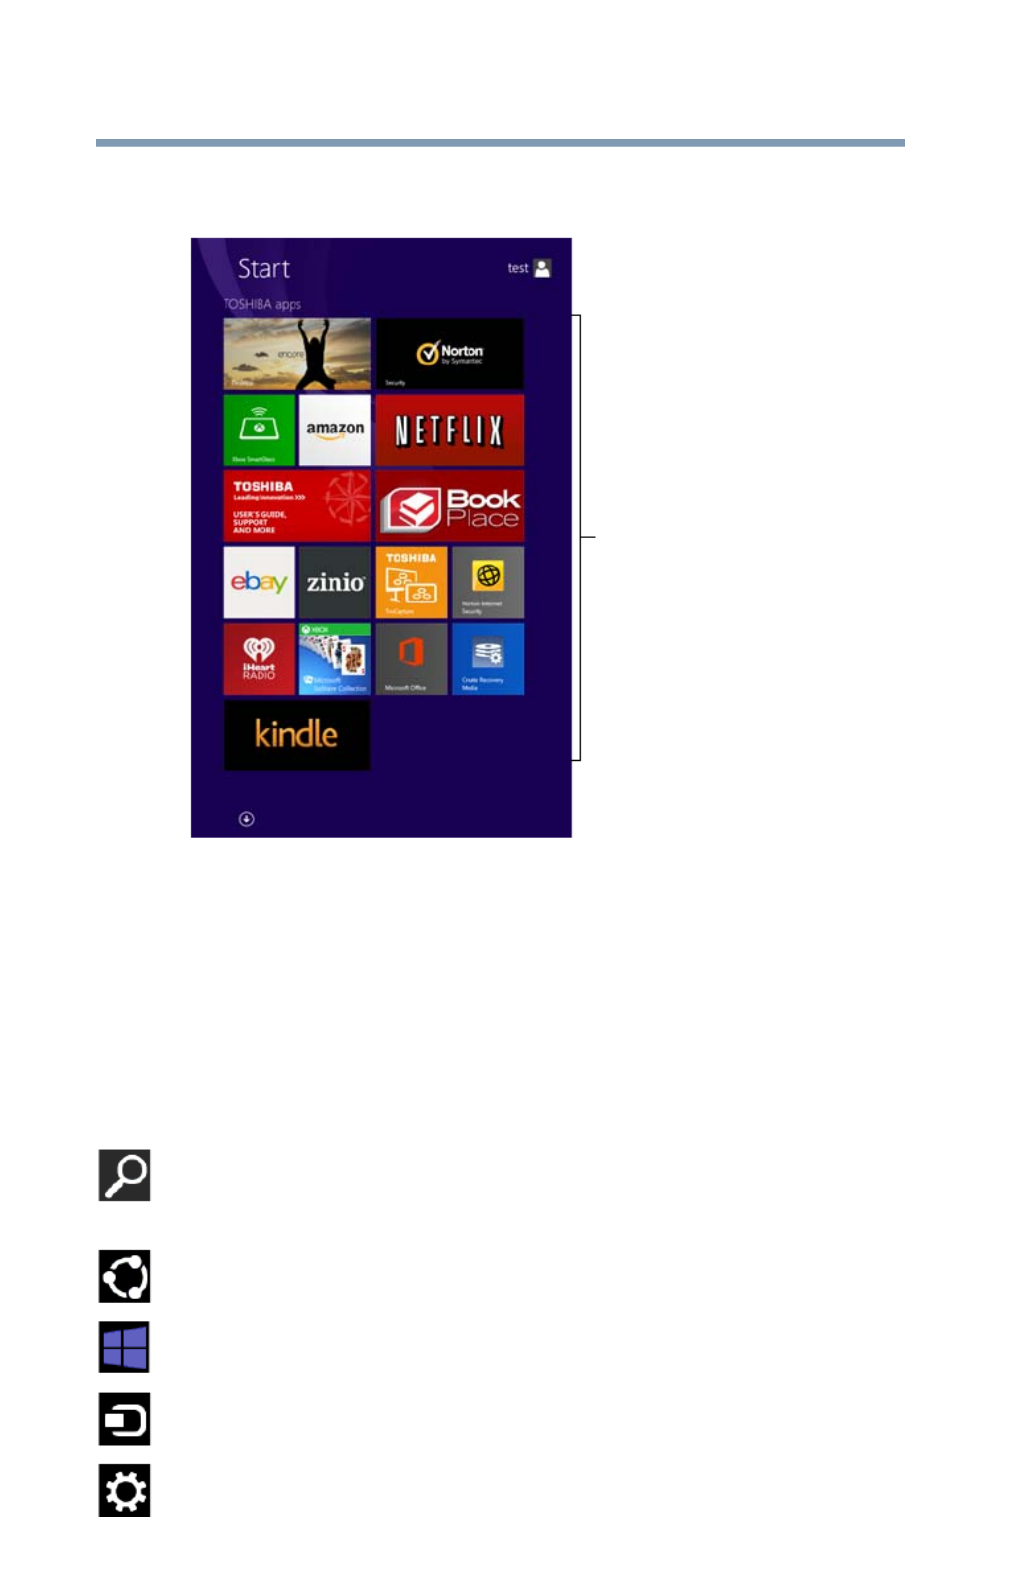
76
Exploring Your Device’s Features
Exploring the Start screen
For detailed information on the new functionality, refer to the
Windows® Help and Support.
(Sample Image) Windows
®
Start screen
Charms
Use the Windows® charms to start apps, find documents,
set up system components, and perform most other
computing tasks.
By swiping in from the right edge of your screen, you will find
a list of charms: Search, Share, Start, Devices and
Settings.
Search—This charm allows you to search for most anything
you need to locate on your device. It can help you find apps,
documents, photos, and your favorite music.
Share—This charm allows you to share music and photos
with your favorite social Web sites.
Start—This charm allows you to view all of the available
apps downloaded to your system.
Devices—This charm allows you to manage your hardware
devices.
Settings—This charm allows you to manage your system
settings.
App tiles

77
Exploring Your Device’s Features
Exploring the desktop
Tiles
Tiles can be accessed and launched from the Start screen.
Typical Start screen tiles are the Desktop tile and Mail tile, as
well as tiles representing all other applications downloaded
to your system.
Exploring the desktop
You can use its features to start applications, find
documents, set up system components, and perform most
other computing tasks.
HINT: The illustrated examples in this guide may appear
slightly different from the screens displayed by your
system. The differences are not significant and do not
indicate any change in the functionality of your system.
Finding your way around the desktop
Your device’s desktop includes several standard features:
icons, taskbar, notification area, notifications, and
background pattern.
(Sample Image) Windows
®
Desktop screen
Tas kbar
Icons
Notification area
Notifications

78
Exploring Your Device’s Features
Exploring the desktop
Icons
An icon represents a folder, file, or program that can be
quickly activated by touching the icon.
You can create a new desktop icon for any folder, file, or
program by dragging the element’s icon from its location in a
window to the desktop area.
You may see various icons displayed on your system
desktop, for example:
Recycle Bin—Holds files you have deleted. You may be able
to retrieve these files until you empty the Recycle Bin.
❖TECHNICAL NOTE: If you delete a large number of
files or very large files from the internal storage drive,
there may be insufficient space available in the
Recycle Bin to hold these files. In this case,
Windows® will prompt you to either permanently
delete the file(s) or cancel the deletion.
❖If you delete a file (of any size) from an external
media or flash media, it does not go into the
Recycle Bin. The file is permanently deleted.
❖Permanently deleted files cannot be recovered from
the Recycle Bin.
For more information on the Recycle Bin, see
Windows® online Help.
Touch and hold an icon to display a popup description of
the file contents.
Your desktop may contain other icons depending on your
configuration. See Windows® online Help for more specific
information on each icon and how to use it.
Taskbar
Each time you open a program, a button associated with
that program appears on the taskbar. With some programs,
a button appears on the taskbar for each document or
window you open. You can use these buttons to quickly
switch between the programs or windows.
To make a program or window the currently active one,
touch the associated taskbar button.
NOTE

79
Exploring Your Device’s Features
Windows
®
Store
Notification area
The notification area displays icons of tasks or programs that
run continuously in the background and displays
notifications.
Typical tasks in the notification area are Current time, Power
usage mode, network connectivity status, and speaker
volume.
To activate a specific task, touch the appropriate notification
area icon.
Notifications
There are many types of notifications you can employ to help
you with the many tasks you perform every day.
User experience notifications can be set for toast, tile,
badge, and raw notifications.
Toast notifications—Designed for time-sensitive delivery
of personalized content, such as an instant message from a
friend.
Tile notifications—Used by applications that are not
currently running with an at-a-glance characteristic, giving
you a quick preview of the subject line of your latest email or
the current weather conditions.
Badge notifications—A specialized type of tile notification
(shown on the Start screen tile) using glyphs to indicate the
number of applications that have updates available or the
status of a running application.
Raw notifications—These run a background task on behalf
of an application while that application is not running in order
to make available the latest content, such as an online
newspaper.
Windows® Store
Although many applications will be pre-installed or built-in to
your device, you will also have the ability to download many
other applications with just a touch.
In the Windows® Store you can search for and browse
thousands of apps, all grouped into easy to find categories.

80
Exploring Your Device’s Features
Setting up for communications
Setting up for communications
To connect to the Internet you need:
❖A browser or communications program
❖An Internet Service Provider (ISP) or online service if you
plan to use the Internet
❖A way to connect to the ISP (for example
Wi-Fi®/broadband connection, etc.)
Connect to the Internet
Wireless connectivity and some features may require you
to purchase additional software, external
hardware or services. Availability of public wireless
LAN access points may be limited.
Follow the steps below to set up your Wireless connection.
1Swipe in from the right edge of the screen. When the
Windows® charms appear, touch the Settings ( )
charm.
2Touch the Wi-Fi ( ) icon.
The Networks screen appears.
3Select your network.
4Touch Connect.
5Enter the network security key (if applicable).
6Touch Next.
Your device should then be connected.
To enable/disable the wireless antenna, use the Airplane
mode switch located under Networks.
For help with common Wi-Fi
® networking problems, see
“Wireless networking problems” on page 100.
Connecting your device to a network
You can connect your device to a network to increase its
capabilities and functionality.
NOTE
NOTE

81
Exploring Your Device’s Features
Exploring audio features
Accessing a network
For specific information about connecting to the network,
consult your network administrator. Many hotels, airports,
and offices offer Wi-Fi® access.
Exploring audio features
You can use your device to record sounds using the device’s
internal microphones (available on certain models) or an
optional external microphone. You can listen to sound files or
audio CDs using the built-in speakers, headphones, or
external speakers.
Recording sounds
You may record sounds using the device’s internal
microphones or by connecting an optional external
microphone.
Using a microphone
To locate your headphone/microphone jack, please refer
to your Quick Start document.
1If you want to use an external microphone, connect it to
the device.
2Swipe in from the right edge of the screen. When the
Windows® charms appear, touch the Search ( ) charm
and, in the Search field, type Sound Recorder.
(Sample Image) Sound Recorder screen
3Touch the Start Recording button.
4Speak normally into the microphone.
5When you have finished recording, touch the
Stop
Recording button.
The Save As dialog box appears.
6To save the file, touch the field to open the on-screen
keyboard. Then type a file name and touch Save.
NOTE
Start Recording/Stop Recording button

82
Exploring Your Device’s Features
Using the Web Camera
Using external speakers or headphones
To locate your headphone/microphone jack, please refer
to your Quick Start document.
Your device is equipped with a full stereo sound system with
internal speakers. Instead of using the internal speakers, you
can connect headphones or a pair of external stereo
speakers.
Before putting on headphones to listen, turn the volume
down. Do not set the volume too high when using
headphones. Continuous exposure to loud sound can
harm your hearing.
TECHNICAL NOTE: When using amplified speakers, use
speakers that require an external power source. Other
types of speakers will be inadequate to produce sound
from the device.
To play back sound files through external speakers or
headphones:
1Locate the headphone/microphone jack on the device.
2Using any necessary adapters, plug the cable from the
headphones or external speakers into the
headphone/microphone jack.
The headphone/microphone jack requires a 16-ohm
stereo mini connector.
To adjust the volume:
❖For external speakers, use the volume controls on each
speaker.
❖For headphones, use the device’s volume control.
Using the Web Camera
Your device comes with a built-in Web Camera. With this
Web Camera you can do the following:
❖Take pictures and record videos with your device
❖Chat with others and have them see you while using
instant messaging (IM) programs
NOTE

83
Exploring Your Device’s Features
Using a microSD™ Card
❖Have video conference calls
To email, instant message or video conference, you must
be connected to the Internet.
To access the Web Camera, on the Start screen touch the
Camera tile. The Web Camera indicator light glows when
the Web Camera is active.
When the Web camera is not active the indicator light is
off.
Using a microSD™ Card
The Memory card reader supports the use of a microSD™
Card. This medium can be used with a variety of digital
products: digital music players, cellular phones, PDAs,
digital cameras, digital video camcorders, etc.
Do not use the Copy Disk function for this type of media.
To copy data from one media to another, use the drag-
and-drop feature of the Windows
® operating system.
Inserting memory media
To locate your Memory card reader, please refer to your
Quick Start document.
The following instructions apply to all types of supported
media devices.
1Turn the media so that the contacts (metal areas) are
facing down, away from the display.
2Push the media into the microSD™ slot until it stops.
(Sample Illustration) Inserting memory media
NOTE
NOTE
NOTE
NOTE

84
Exploring Your Device’s Features
Using a microSD™ Card
When inserting memory media, do not touch the metal
contacts. You could expose the storage area to static
electricity, which can destroy data.
Always remove memory media when not in use.
Removing memory media
1If you are not currently on the Desktop, choose the
Desktop tile on the Start screen, otherwise skip to step 2.
2Prepare the card for removal by touching the
Show
hidden icons button ( ), if necessary, in the
notification area and then selecting the
Safely Remove
Hardware and Eject Media icon.
3Touch the item you would like to eject.
If the system is unable to prepare the media for safe
removal, a message will tell you to try again later. If the
media can be removed now, the system displays
Safe
to Remove Hardware.
If the device has a spring-loaded adapter slot, see step
4; otherwise, skip to step 5.
4Gently press the card inward to release it.
The card pops out slightly.
5Grasp the card and pull it straight out.
(Sample Illustration) Removing memory media
Do not remove memory media while data is being written
or read. Even when the Windows
® message “copying...”
disappears, writing to the media might still be in progress
and your data could be destroyed. Wait for the indicator
light to go out.
NOTE

85
Chapter 5
Utilities
Your device includes several utilities designed to help you to
reconfigure your system to best meet your individual needs.
Together, these allow you to ascertain certain system details,
set additional options, or change default options. These
utilities are described in this chapter.
The utilities described in this chapter, and the icons
shown in the sample images are applicable only if the
related utility is available on your system.
❖Create Recovery Media
❖Service Station
❖TOSHIBA Application Installer
NOTE

86
Utilities
Create Recovery Media
Create Recovery Media
The Create Recovery Media utility enables you to create
recovery media that can be used to return your system to its
out-of-box state, if necessary. For detailed information on
using the utility to create recovery media, see “Creating
recovery media” on page 42.
Service Station
The Service Station helps you keep your new device running
at its best by notifying you when updated software, firmware,
documentation or other information is available for your
device. The Service Station will alert you when updates are
available, and you can then choose to install the updates if
you wish.

87
Utilities
TOSHIBA Application Installer
TOSHIBA Application Installer
The TOSHIBA Application Installer allows you to reinstall the
drivers and applications that were originally bundled with
your device.
You must have an Internet connection to reinstall
applications.
To reinstall drivers and applications:
1Swipe in from the right edge of the screen. When the
Windows® charms appear, touch the Search ( ) charm.
Then touch the Search field, and begin typing
Application Installer.
2Touch TOSHIBA Application Installer.
The TOSHIBA Application Installer window appears.
(Sample Image) TOSHIBA Application Installer selection screen
3Touch the item you want to install.
4Touch Install, then follow the on-screen prompts to
complete the installation process.
NOTE

88
Chapter 6
If Something Goes
Wrong
Some problems you may encounter when using your device
are relatively easy to identify and solve. Others may require
help from your network administrator or the manufacturer of
the software program.
This chapter aims to help you solve many problems by
yourself. It covers the problems you are most likely to
encounter.
If all else fails, contact Toshiba. You will find information on
Toshiba’s support services at the end of this chapter.
Problems that are easy to fix
Your program or application stops responding.
The operating system allows for the use of both
applications (“Apps” used with the Windows
® “Modern
UI”) and programs (used in the traditional Windows
®
desktop environment). For the purpose of simplifying the
information we will use the terms interchangeably in this
chapter.
If you are working in a program that suddenly freezes,
chances are the program has stopped responding. You can
exit the program without shutting down the operating system
or closing other programs.
NOTE

89
If Something Goes Wrong
Problems when you turn on the device
Problems when you turn on the device
These problems may occur when you turn on the power.
The device will not start.
Make sure you attached the USB Power cable to the
USB/AC adaptor properly.
Press and hold the Power button for at least 5 seconds, and
then swipe down where indicated.
If you are using the USB/AC adaptor, check that the wall
outlet is working by plugging in another device, such as a
lamp.
The device displays the WARNING RESUME
FAILURE/Windows Error Recovery – Windows did not shut down
successfully message.
To continue, select Start Windows normally. This can
happen if the device was put into Sleep mode and the
battery has discharged. If you performed a shutdown before
this message was displayed, a program or driver may have
prevented Windows® from shutting down.
Data stored in the device’s memory has been lost. Data
stored in the device’s internal storage drive may not be
affected.
Always save your data even when you are using Sleep
mode. If your battery fully discharges, information that has
not been saved will be lost. Your device can be configured to
warn you when a battery is running low see “What to do
when the battery runs low” on page 68.
If you are running on battery power, it is recommended that
you do not leave the device in Sleep mode for long periods
of time.
To charge a battery, leave the device plugged into a live wall
outlet for several hours. For more information see “Charging
the battery” on page 66.

90
If Something Goes Wrong
The Windows
®
operating system is not working
The Windows® operating system is not
working
Once you are familiar with your device and used to the way
the operating system responds to your work routine, you can
easily detect if the operating system is not working correctly.
For example:
❖The operating system fails to start after the initial startup
appears.
❖The operating system takes a long time to start.
❖The operating system responds differently from the
normal routine.
❖The screen does not look right.
Unless a hardware device has failed, problems usually occur
when you change the system in some way such as installing
a new program or adding a device.
If you experience any of these problems, use the options in
the Startup menu to fix the problem.
Using Startup options to fix problems
If the operating system fails to start properly, you may need
to troubleshoot the Operating System and/or its settings.
There are several options to choose from depending on the
severity of the problem and your level of expertise with
computers.
If Windows® fails to start properly twice, the Windows
® Boot
menu will launch. To enter the Advanced Startup options
manually:
1Swipe in from the right edge of the screen.
2When the Windows® charms appear, touch the Settings
( ) charm.
3Touch Change PC Settings.
4Touch Update and recovery.
5Touch Recovery.
6Touch Restart Now under Advanced Startup.
The device restarts.
7Touch Troubleshoot from the menu.

91
If Something Goes Wrong
The Windows
®
operating system is not working
You now have several options:
Refresh your device
❖Your files and personalization settings won't change
❖Your device settings will be changed back to their
defaults
❖Your Apps from the Windows
® Store are retained
❖Apps you installed from discs or Web sites are removed
❖A list of removed apps is saved to your desktop
For more information, see “Recovering from a USB Recovery
PBR (Push Button Reset)” on page 50.
Reset your device
❖All of your personal files and apps are removed
❖Your device settings are changed back to their defaults
For more information, see “Recovering from a USB Recovery
PBR (Push Button Reset)” on page 50.
Advanced options
Choosing this option presents you with another set of
options:
System Restore
❖System Restore allows you to use a Restore point to
return the device to a state at which it was performing
properly. Restore points may be created:
❖When new hardware or software is installed
❖Manually by the user
System Image Recovery
Windows® will “Recover” the Operating system using a
specific image provided by the user.
Startup Repair
This feature automates the repair process. The Operating
System will automatically look for problems and repair them
if possible.
Command Prompt
The command prompt is a very powerful tool for advanced
users.

92
If Something Goes Wrong
The Windows
®
operating system is not working
Startup Settings
In previous Operating Systems the majority of the options
found on this menu were available by pressing the F8 key
during the Windows
® boot process:
❖Enable low resolution video mode
Restarts Windows® using your current video driver at low
resolution. This allows you to reset your display settings
in the event they have been improperly set.
❖Enable debugging mode
Starts Windows® in an advanced troubleshooting mode
❖Enable boot logging
Creates a file that lists all the drivers that are installed
during startup
❖Enable Safe Mode
Starts Windows® with a minimal set of drivers and
services. If the device starts and runs in Safe Mode, you
will know the Operating System is most likely working
properly and that you should look to third-party
applications or drivers for the source of your problem.
❖Disable driver signature enforcement
Allows drivers containing improper signatures to be
installed
❖Disable early-launch anti-malware protection
Allows drivers to initialize without being measured by the
Anti-malware driver
❖Disable automatic restart on system failure
Prevents Windows® from automatically restarting if an
error causes it to fail. Choose this option only if
Windows® is stuck in a loop where it fails, attempts to
restart, and fails again repeatedly.
Internet problems
My Internet connection is very slow.
Many factors contribute to the speed with which you can
surf the Internet. They include: network speed, network
conditions, time of day (when everyone else is surfing, your
access can be slow) and popularity of the sites you are trying
to access. If accessing a particular site is very slow, try later.

93
If Something Goes Wrong
Fixing a problem with Device Manager
My browser cannot find the URL address I typed in.
Make sure you separated the domain names of the address
with the forward slash (/). Check the spelling of each name
and the syntax of the address carefully. A single incorrect
letter or missed character will make it impossible for your
browser to locate the site.
My browser cannot find a site I bookmarked.
The World Wide Web is constantly changing. A site you
bookmarked yesterday may not be available today or its
server may be down for temporary repair. Try again later.
The Windows® operating system can help you
If the operating system has started properly but you still have
a problem using your device, the online Help can assist you
in troubleshooting the problem. To open online Help:
❖Swipe in from the right edge of the screen. When the
Windows® charms appear, touch the Search ( ) charm.
Then touch the Search field, and begin typing
Help and
Support.
When the “Windows Help and Support” screen appears, do
one or both of the following:
❖Touch the search field, type the topic you need help
with, and follow the on-screen instructions
❖Touch one of the options listed in the window and
follow the instructions
You can connect to Support Online by going to Toshiba
support at support.toshiba.com.
Fixing a problem with Device Manager
Device Manager provides a way to check and change the
configuration of a device.
Changing the default settings using Device Manager can
cause other conflicts that make one or more devices
unusable. Device Manager is a configuration tool for
advanced users who understand configuration
parameters and the ramifications of changing them.

94
If Something Goes Wrong
Power and the batteries
Checking device properties
Device Manager provides a way to view the properties of a
device. Properties include the name of the manufacturer, the
type of device, the drivers installed, and the system
resources assigned to the device.
To check a device’s properties:
1Swipe in from the right edge of the screen. When the
Windows® charms appear, touch the Search ( ) charm.
Then touch the Search field, and begin typing
Device
Manager.
2Touch Device Manager.
The Device Manager screen appears.
3In the list of device(s), touch the device type.
4To view the device(s) installed, touch the device.
The operating system displays the device Properties
dialog box, which provides an array of tabs. They may
include:
❖The General tab, which provides basic information
about the device.
❖The Resources tab, which lists resources assigned
to the device. This tab does not appear if the device
is not using resources.
❖The Driver tab, which displays the drivers being
used by the device. This tab also provides options
for updating the driver or rolling back the driver in
case the new version is causing a problem.
The tabs that appear in the dialog box vary from one
device to another.
For more information about Device Manager, refer to
Windows® online Help.
Power and the batteries
The device’s battery is not accessible by the user.
Your device receives its power through the USB Power cable
to the USB/AC adaptor or from the system batteries (one
main battery and a real-time clock (RTC) battery). Power
problems are interrelated. For example, a faulty USB Power
cable or USB/AC adaptor will neither power the device nor
recharge the batteries.
NOTE

95
If Something Goes Wrong
Display problems
Here are some typical problems and how to solve them:
The USB Power cable to the USB/AC adaptor work
correctly, but the battery will not charge.
The tablet’s battery does not charge while the device is
consuming full power. Try turning off the device.
The battery may be too hot or too cold to charge properly. If
you think this is the probable cause, let the battery reach
room temperature and try again.
If the battery has completely discharged, it will not begin
charging immediately. Leave the USB/AC adaptor and power
cord/cable connected, wait 20 minutes and see if the battery
is charging.
The battery appears not to power the device for as
long as it usually does.
If you frequently repeat shallow charge and discharge, the
battery meter may become inaccurate. Let the battery
discharge completely, then try charging it again.
Check the power options via your Power Plans (see “Power
Plans” on page 70). Have you added a device that takes its
power from the battery? Is your software using the internal
storage drive more? Is the display power set to turn off
automatically? Was the battery fully charged to begin with?
All these conditions affect how long the charge lasts.
After a period of time, the battery will lose its ability to
perform at maximum capacity and will need to be replaced.
This is normal for all batteries. Visit the Toshiba Web site at
accessories.toshiba.com. Refer to this site often to stay
current on the most recent software and hardware options
for your device, and for other product information.
For more information on maintaining battery power, see
“Changing the battery” on page 72.
Display problems
Here are some typical display problems and their solutions:
The screen is blank.
Display Auto Off may have gone into effect. Touch the screen
to activate it.
❖If you are using the built-in screen, make sure the display
priority is not set for an external monitor. To do this,
swipe in from the right, and when the charms appear,
touch Devices ( ). Touch Project ( ), and then touch
Second screen.

96
If Something Goes Wrong
Display problems
If you are using an external monitor:
❖Check that the monitor is turned on.
❖Check that the monitor’s Power cable is firmly plugged
into a working power outlet.
❖Check that the cable connecting the external monitor to
the device is firmly attached.
❖Try adjusting the contrast and brightness controls on the
external monitor.
❖Check the display priority as described above.
The screen does not look correct.
Choose a theme for your desktop background, under
Change the visuals and sounds on your device, in the
Themes panel. You can also change the setting for
individual components separately by selecting an item from
just below the Themes panel (Desktop Background,
Color, Sounds, and Screen Saver).
For more information, see the Windows
® online Help.
A message displays saying that there is a problem
with your display settings and that the adapter
type is incorrect or the current settings do not
work with your hardware.
Reduce the size of the color palette to one that is supported
by the device’s internal display.
To change the display properties:
1Touch & hold in a blank area of the Windows
® desktop.
2Touch Personalize, and then Display.
3Use the menu on the right hand side of the page to:
❖Adjust resolution
❖Adjust brightness
❖Calibrate color
❖Change display settings
❖Project to a second screen
❖Adjust ClearType text
4Touch OK.

97
If Something Goes Wrong
Disk or storage drive problems
The display mode is set to Simultaneous and the
external display device does not work.
Make sure the external monitor is capable of displaying at
resolutions of 1280 x 800 or higher. Devices that do not
support this resolution will only work in Internal/External
mode, and not simultaneous mode.
Small bright dots appear on your TFT display when
you turn on your device.
Small bright dots may appear on your screen display when
you turn on your device. Your display contains an extremely
large number of thin-film transistors (TFT) and is
manufactured using high-precision technology. Any small
bright dots that may appear on your display are an intrinsic
characteristic of the TFT manufacturing technology. Over a
period of time, and depending on the usage of the device,
the brightness of the screen will deteriorate. This is also an
intrinsic characteristic of the screen technology. When the
device is operated on battery power, the screen will dim and
you may not be able to increase the brightness of the screen
while on battery power.
Disk or storage drive problems
Problems with the storage drive or with external media
usually show up as an inability to access the drive or as
sector errors. Sometimes a drive problem may cause one or
more files to appear to have garbage in them.
Error-checking
Run Error-checking, which analyzes the directories and files
on the storage drive and repairs any damage it finds.
To run Error-checking:
1Swipe in from the right edge of the screen. When the
Windows® charms appear, touch the Search ( ) charm.
Then touch the Search field, and begin typing
computer.
2Touch This PC in the list that appears.

98
If Something Goes Wrong
Disk or storage drive problems
3Touch and hold the drive you wish to check.
(Sample Image) Selecting the drive
4In the pop-up menu, touch Properties.
The drive’s Properties box appears.
5Touch the Tools tab.
6Touch the Check button.
The Error Checking box appears.
The system will alert you if you need to scan the drive.
7Even if you do not need to scan the drive for errors you
can scan by touching Scan drive.
Error-checking tests and repairs the storage drive.
Your hard disk seems very slow.
If you have been using your device for a long time, your files
may have become fragmented. Run Disk Defragmenter.
To do this:
1Swipe in from the right edge of the screen. When the
Windows® charms appear, touch the Search ( ) charm,
then type Defragment in the Search field.
2Touch Defragment and Optimize Drives.
3From the Optimize Drives menu touch the drive you wish
to defragment.
4Touch the Optimize button.
The system will display the status as it optimizes and
defragments the drive.

99
If Something Goes Wrong
Sound system problems
Your data files are damaged or corrupted.
Refer to your software documentation for file recovery
procedures. Many software packages automatically create
backup files.
You may also be able to recover lost data using utility
software. Consult your network administrator.
Some programs run correctly but others do not.
This is probably a configuration problem. If a program does
not run properly, refer to its documentation and check that
the hardware configuration meets its needs.
Sound system problems
No sound is coming from the device’s speakers.
Adjust the volume control.
Check that the volume control on the device is turned up.
If you are using external headphones or speakers, check that
they are securely connected to your device.
The device emits a loud, high-pitched noise.
This is feedback between the microphone and the speakers.
It occurs in any sound system when input from a microphone
is fed to the speakers and the speaker volume is too loud.
Adjust the volume control.
Printer problems
This section lists some of the most common printer
problems.
The printer will not print.
Check that the printer is connected to a working power
outlet, turned on and ready (on line).
Check that the printer has plenty of paper. Some printers will
not start printing when there are just two or three sheets of
paper left in the tray.
Make sure the printer cable is firmly attached to the device
and the printer.
Run the printer’s self-test to check for any problem with the
printer itself.
Make sure you installed the proper printer drivers as shown
in the instructions that came with the printer.

100
If Something Goes Wrong
Wireless networking problems
You may have connected the printer while the device is on.
Disable Sleep mode, turn off the device, and turn off the
printer. Turn the printer back on, make sure it is online, and
then turn the device back on.
Try printing another file. For example, you could create and
attempt to print a short test file using Notepad. If a Notepad
file prints correctly, the problem may be in your original file.
If you cannot resolve the problem, contact the printer’s
manufacturer.
The printer will not print what you see on the
screen.
Many programs display information on the screen differently
from the way they print it. See if your program has a print
preview mode. This mode lets you see your work exactly as
it will print. Contact the software manufacturer for more
information.
Wireless networking problems
This section provides general troubleshooting tips for
networking problems, specifically wireless (Wi-Fi
®)
networking.
The terms and concepts used assume a basic
understanding of networks, and may be for more
advanced users. If you need assistance or if you are not
familiar with the terminology, please see Windows
® Help
and Support or contact your computer technician.
❖If your device is equipped with an internal Wi-Fi
®
adapter, verify that Airplane mode is OFF, see “Setting
up for communications” on page 80.
❖Verify that your device can detect access points or
routers. If it can detect a Wi-Fi® access point or router
then it may be a configuration issue.
❖Verify that signal strength is good using the utility
provided with the Wi-Fi® adapter.
❖If another device is on the same network, verify that it
has network access, and can connect to the Internet. If,
for example, the other device cannot browse to a public
Web site, the ISP’s (Internet Service Provider) service
may be disrupted.
NOTE

101
If Something Goes Wrong
Wireless networking problems
❖Verify that the Service Set Identifier (SSID), or network
name, is correct - i.e., that it matches the SSID assigned
to the access point you are attempting to connect
through. SSIDs are case-sensitive.
❖Check the Windows® Control Panel's Device Manager to
verify that the Wi-Fi® adapter is recognized by the
Windows® operating system, and that the driver is
loaded. To access the Device Manager, swipe in from the
right edge of the screen. When the Windows
® charms
appear touch the Search ( ) charm, and then type
Control Panel. Touch Control Panel, and then select
System and Security, and then System. Launch the
Device Manager and carefully note any error messages -
these will be very helpful if you should confer with a
support technician at a later time.
To enable/disable the wireless antenna, use the Airplane
mode switch located under Networks, see “Setting up for
communications” on page 80.
❖Use IPCONFIG to verify that the device has a useful IP
address - one other than the private address of
169.254.xxx.xxx assigned by Windows
®.
1Swipe in from the right edge of the screen. When the
Windows® charms appear, touch the Search ( )
charm. Then touch the Search field, and begin
typing Cmd.
2Touch Command Prompt.
3Enter IPCONFIG/ALL, and then press ENTER.
The IP address for each active network adapter will be
displayed.
❖If you have enabled any security provisions (closed
system, MAC address filtering, Wired Equivalent Privacy
[WEP], etc.), check the access point vendor's Web site
for recent firmware upgrades. Problems with WEP keys,
in particular, are frequently addressed in new firmware
releases.
NOTE

102
If Something Goes Wrong
Develop good computing habits
Develop good computing habits
Save your work frequently.
You can never predict when your device will lock, forcing you
to close a program and lose unsaved changes. Many
software programs build in an automatic backup, but you
should not rely solely on this feature. Save your work! See
“Computing tips” on page 59 for instructions.
On a regular basis, back up the information stored
on your internal storage drive.
Use Windows® to back up files, or the entire device, to an
external hard disk. Here are some ways you can do this:
❖Use the Windows® operating system to back up files or
your entire device to an external hard disk.
❖Copy files to a rewritable external storage device.
❖Connect your device to the office network and copy files
to your network partition.
Some people use a combination of these methods, backing
up all files weekly and copying critical files to external media
on a daily basis.
If you have installed your own programs, you should back up
these programs as well as your data files. If something goes
wrong that requires you to reformat your internal storage
drive and start again, reloading all your programs and data
files from a backup source will save time.
Read the documentation.
It is very difficult to provide a fail-safe set of steps you can
follow every time you experience a problem with the device.
Your ability to solve problems will improve as you learn about
how the device and its software work together.
Get familiar with all of the documentation provided with your
device, as well as the information that may come with the
programs and devices you purchase.
Your local computer store or book store sells a variety of
self-help books you can use to supplement the information
in the manuals.

103
If Something Goes Wrong
Develop good computing habits
Data and system configuration backup in the
Windows® operating system
The Windows® operating system offers some easy-to-use
features for backing up your Windows
® settings and your
data - documents and other important files. Take advantage
of these features to protect yourself from much more difficult
and time-consuming restoration procedures, and to
safeguard your valuable data from loss.
Saving system configuration with restore
points
The System Restore feature of the Windows
® operating
system quickly creates restore points - ‘snapshots’ of your
Windows® operating system configuration - and saves them
for later recall. If you experience problems after installing
some new hardware or software, you can easily select a
previously established Control Point to ‘turn back the clock,’
restoring the Windows® operating system to the state it was
in just prior to the installation. This is much easier and more
effective than uninstalling the hardware or software, which
often leaves behind unwanted files and settings. It is also
easy to undo a restore point selection, if you change your
mind.
Follow these steps to create a restore point using the
System Restore utility:
1Swipe in from the right edge of the screen. When the
Windows® charms appear, touch the Search ( ) charm.
Then touch the Search field, and type Control. Touch
Control Panel in the list that appears.
2Touch System and Security, and then System.
3In the left pane, touch System Protection.
The System Protection tab of the System Properties
window appears.
4Touch Configure.
5Under Restore settings select Turn on System
Protection.
6Touch OK.
7Touch Create.

104
If Something Goes Wrong
Develop good computing habits
8Touch the input field, and enter a name that is
descriptive enough to be easily understood in the future,
such as “Before installing Brand X Accounting app.”
Then touch Create.
The Windows® operating system creates the restore
point, automatically stamps it with the current date and
time, and displays a message that the restore point was
successfully created.
9Touch Close.
Then, at a later time, you can re-establish your Windows
®
configuration using the saved restore point. To do this:
1Swipe in from the right edge of the screen. When the
Windows® charms appear, touch the Search ( ) charm.
Then touch the Search field, and type Control. Touch
Control Panel in the list that appears.
2Touch System and Security, and then System.
3In the left pane, touch System Protection.
The System Protection tab of the System Properties
window appears.
4Touch System Restore...
5Touch Next.
6Touch the Restore point you want to use, and then touch
Next.
The time stamp and description of each Restore point is
displayed.
At this point you can touch “Scan for affected programs”
to determine what the impact of using the chosen
Restore Point will be.
7Verify that the Restore point you chose is the correct
one. If it is not, touch Back to return to the previous
step.
8Close all programs and save all open files.
9Touch Finish, and then Yes to begin the system restore.
Your Windows® operating system configuration will now
be restored to the state it was in when the chosen
restore point was created, and then the device will be
automatically restarted.
NOTE

105
If Something Goes Wrong
Develop good computing habits
Backing up your data or your entire device
with the Windows® operating system
The most valuable component of your device system is the
data you create and store on its internal storage drive. Since
problems with either hardware or software can make the
data inaccessible or even destroy it, the next most valuable
component of your device system may be a recent backup
of your data.
Fortunately, the Windows
® operating system offers a
convenient way to back up your device or just your
important files to or hard drives. An external hard drive is
recommended in case the internal storage drive fails. No
additional software is required.
Follow these steps to back up your device or files to external
media, or a storage drive:
You cannot back up the device while running on battery
power. Connect the USB/AC adaptor before continuing.
1Swipe in from the right edge of the screen. When the
Windows® charms appear, touch the Search ( ) charm.
Then touch the Search field, and type Control. Touch
Control Panel in the list that appears.
2Touch Save backup copies of your files with File
History under the System and Security heading.
Follow the on-screen instructions to back up your files.
For additional Help, launch the Windows
® Help and Support
screen, and search for “back up files,” see “The Windows®
operating system can help you” on page 93.
General tips for installing hardware and
software
Here are a few tips to help ensure safe and easy installation
of new hardware (printers, pointing devices, external hard
drives, scanners, etc.) and software (applications like
Microsoft® Office and Adobe
® Photoshop®, or utility software
such as special toolbars for your web browser).
❖Create a restore point (refer to “Saving system
configuration with restore points” on page 103). Before
installing anything, use the System Restore utility to set
a restore point (see the section titled restore points). If
anything goes wrong, you will then be able to easily
NOTE
Termékspecifikációk
| Márka: | Toshiba |
| Kategória: | tabletta |
| Modell: | Encore WT8-A64 |
Szüksége van segítségre?
Ha segítségre van szüksége Toshiba Encore WT8-A64, tegyen fel kérdést alább, és más felhasználók válaszolnak Önnek
Útmutatók tabletta Toshiba

13 Október 2024
26 Augusztus 2024
7 Augusztus 2024
2 Augusztus 2024
30 Július 2024
27 Július 2024
27 Július 2024
25 Július 2024
24 Július 2024
22 Július 2024
Útmutatók tabletta
- tabletta Samsung
- tabletta Sony
- tabletta Fujitsu
- tabletta Acer
- tabletta LG
- tabletta Grundig
- tabletta Realme
- tabletta Philips
- tabletta Oregon Scientific
- tabletta Panasonic
- tabletta Lenovo
- tabletta Evolveo
- tabletta HP
- tabletta Hyundai
- tabletta Hisense
- tabletta Apple
- tabletta Medion
- tabletta Motorola
- tabletta Alcatel
- tabletta TCL
- tabletta Zebra
- tabletta Xiaomi
- tabletta GoGen
- tabletta CAT
- tabletta Dell
- tabletta Cyrus
- tabletta Gigabyte
- tabletta Thomson
- tabletta Polaroid
- tabletta Aiwa
- tabletta Tesco
- tabletta Huawei
- tabletta Microsoft
- tabletta Asus
- tabletta Vtech
- tabletta PocketBook
- tabletta Haier
- tabletta Navitel
- tabletta Sencor
- tabletta AOC
- tabletta Telefunken
- tabletta Nevir
- tabletta Kobo
- tabletta Doro
- tabletta Logitech
- tabletta Viewsonic
- tabletta Denver
- tabletta Bush
- tabletta Trevi
- tabletta Aluratek
- tabletta Amazon
- tabletta MSI
- tabletta Tesla
- tabletta Energy Sistem
- tabletta Google
- tabletta Honor
- tabletta SPC
- tabletta Control4
- tabletta ZTE
- tabletta ESTAR
- tabletta Vodafone
- tabletta ModeCom
- tabletta Terratec
- tabletta Overmax
- tabletta OnePlus
- tabletta Archos
- tabletta Kogan
- tabletta Honeywell
- tabletta Intenso
- tabletta Prestigio
- tabletta Media-Tech
- tabletta Digiland
- tabletta Manta
- tabletta Blaupunkt
- tabletta IRiver
- tabletta Razer
- tabletta AKAI
- tabletta TechniSat
- tabletta Pyle
- tabletta Salora
- tabletta Lenco
- tabletta Maxell
- tabletta ECG
- tabletta Micromax
- tabletta Best Buy
- tabletta Vorago
- tabletta Newland
- tabletta GoClever
- tabletta Krüger&Matz
- tabletta Getac
- tabletta Allview
- tabletta RCA
- tabletta Orion
- tabletta Creative
- tabletta ECS
- tabletta Adj
- tabletta Wacom
- tabletta Bluebird
- tabletta Packard Bell
- tabletta TechBite
- tabletta Majestic
- tabletta IGET
- tabletta Lava
- tabletta I.safe Mobile
- tabletta Vivitar
- tabletta Xiron
- tabletta Yarvik
- tabletta Lexibook
- tabletta Proscan
- tabletta Trekstor
- tabletta Sonim
- tabletta Gemini
- tabletta Easypix
- tabletta Konrow
- tabletta Cresta
- tabletta Brigmton
- tabletta Sunstech
- tabletta Sylvania
- tabletta Binatone
- tabletta Blackberry
- tabletta Audiosonic
- tabletta Exagerate
- tabletta Coby
- tabletta Bigben Interactive
- tabletta Wolder
- tabletta Audiovox
- tabletta Disgo
- tabletta Olivetti
- tabletta Pantech
- tabletta Laser
- tabletta Naxa
- tabletta RugGear
- tabletta Ricatech
- tabletta Hema
- tabletta Arnova
- tabletta Mpman
- tabletta Vizio
- tabletta Cello
- tabletta Logicom
- tabletta Ematic
- tabletta Hannspree
- tabletta Zagg
- tabletta Ingo
- tabletta Plum
- tabletta Difrnce
- tabletta Nextbook
- tabletta Memup
- tabletta Engel Axil
- tabletta BQ
- tabletta Butler
- tabletta Rand McNally
- tabletta Odys
- tabletta Dragon Touch
- tabletta Primux
- tabletta DEXP
- tabletta Eken
- tabletta Tom-tec
- tabletta Mediacom
- tabletta Xoro
- tabletta Billow
- tabletta Empire
- tabletta Woxter
- tabletta Storage Options
- tabletta Advantech
- tabletta Kurio
- tabletta Linx
- tabletta Ferguson
- tabletta Leap Frog
- tabletta I-onik
- tabletta Microtech
- tabletta Empire Electronix
- tabletta Vulcan
- tabletta Storex
- tabletta Skytex
- tabletta Electrovaya
- tabletta Durabook
- tabletta Mymaga
- tabletta Vinci
- tabletta Vizmo
- tabletta General Dynamics Itronix
- tabletta Xplore
- tabletta Lark
- tabletta Bookeen
- tabletta Elements
- tabletta I-Joy
- tabletta Hamlet
- tabletta Approx
- tabletta Leotec
- tabletta Bauhn
- tabletta ADS-TEC
- tabletta Nabi
- tabletta Barnes And Noble
- tabletta Sungale
- tabletta Aqprox
- tabletta Fossibot
- tabletta Hip Street
Legújabb útmutatók tabletta

9 Április 2025
3 Április 2025

1 Április 2025
1 Április 2025
1 Április 2025
1 Április 2025
1 Április 2025
31 Március 2025

30 Március 2025

30 Március 2025