Használati útmutató Swann SODVR-84575H
Swann
Hangrögzítő
SODVR-84575H
Olvassa el alább 📖 a magyar nyelvű használati útmutatót Swann SODVR-84575H (158 oldal) a Hangrögzítő kategóriában. Ezt az útmutatót 8 ember találta hasznosnak és 2 felhasználó értékelte átlagosan 4.5 csillagra
Oldal 1/158

Security Made Smarter
PRO-SERIES HD
Professional HD
Security System
INSTRUCTION MANUAL


2Click for contents
Important Information
FCC Verification
This equipment has been tested and found to comply with the limits for Class
B digital device, pursuant to part 15 of the FCC Rules. These limits are de-
signed to provide reasonable protection against harmful interference in a
residential installation. This equipment generates, uses and can radiate ra-
dio frequency energy and, if not installed and used in accordance with the
instructions, may cause harmful interference to radio or television reception,
which can be determined by turning the equipment off and on, the user is
encouraged to try to correct the interference by one or more of the following
measures:
·Reorient or relocate the receiving antenna
·Increase the separation between the equipment and the receiver
·Connect the equipment into an outlet on a circuit different from that to
which the receiver is connected
·Consult the dealer or an experienced radio/TV technician for help
These devices comply with part 15 of the FCC Rules. Operation is subject to
the following two conditions:
·These devices may not cause harmful interference
·These devices must accept any interference received, including interfer-
ence that may cause undesired operation
Important Notice: All jurisdictions have specific laws and regulations relat-
ing to the use of cameras. Before using any camera for any purpose, it is the
buyer’s responsibility to be aware of all applicable laws and regulations that
prohibit or limit the use of cameras and to comply with the applicable laws
and regulations.
FCC Regulation (for USA): Prohibition against eavesdropping
Except for the operations of law enforcement officers conducted under lawful
authority, no person shall use, either directly or indirectly, a device operated
pursuant to the provisions of this Part for the purpose of overhearing or re-
cording the private conversations of others unless such use is authorized by
all of the parties engaging in the conversation.
Warning: Changes or modifications made to this device not approved
expressly by the party responsible for compliance could void the user’s
authority to operate the equipment.
Important Safety Instructions
·Do not operate if wires and terminals are exposed
·Do not cover vents on the side of your device and allow adequate space for
ventilation
·Only use the power adapter supplied with your DVR
About this Instruction Manual
This instruction manual is written for the DVR-1590, DVR-1600 and DVR-4575
series and was accurate at the time it was completed. However, because of
our on-going efforts to constantly improve our products, additional features
and functions may have been added since that time.
Important Password Information
This DVR does have a default password. A password is created durnot -
ing the Startup Wizard. If password protection has been enabled and you
have forgotten your password, your DVR’s MAC address can be used to
create a new password (see page 3 - Password Recovery).


3Click for contents
Password Recovery
Forgotten your password? Please do the following:
1. Right-click the mouse on the Live View screen to display the Menu Bar
then click “Main Menu”.
2. At the password login screen click “Forgot Password”.
3. After a short moment, you will receive a password reset request email
containing your DVR’s MAC address (if it’s not in your inbox, check your junk
or spam folder).
4. Input the MAC address including the semicolons (see left example) then
click “OK”.
5. A message will appear on-screen stating that your password has been
reset. Click “OK” to continue.
6. Enter a new password (see bottom left example). The password has to
be a minimum of six characters and can contain a mixture of numbers and
letters. Use a password that you are familiar with, but is not easily known to
others.
7. Write down your password in the space provided below for safe keeping.
8. Complete the Startup Wizard as normal (the settings that you previously
selected in the Startup Wizard will remain unchanged).
Don’t forget to write down your password: _________________________
I haven’t created an email for my DVR, what can I do? Don’t worry, we’re
here to help. Please contact Swann Helpdesk & Technical Support (phone
numbers located on page 79) for assistance.
CH1 CH2
19/07/2016 04:30:15 PM
CH3 CH4
CH1 CH2
19/07/2016 04:30:15 PM
CH3 CH4


4
Contents
Important Information ������������������������������������������������������������������������������������������ 2
Password Recovery ����������������������������������������������������������������������������������������������� 3
Live View ���������������������������������������������������������������������������������������������������������������� 6
Live View Mode (4 & 8 channel model) ��������������������������������������������������������������� 7
Live View Icons & Controls (4 & 8 channel model) ������������������������������������������� 8
Live View Mode (16 channel model) �������������������������������������������������������������������� 9
Live View Icons & Controls (16 channel model) ���������������������������������������������� 10
Main Menu ������������������������������������������������������������������������������������������������������������ 11
Menu Layout ��������������������������������������������������������������������������������������������������������� 12
Camera Configuration ��������������������������������������������������������������������������������������� 13
Display: Live ��������������������������������������������������������������������������������������������������������� 14
Display: Privacy Zone ������������������������������������������������������������������������������������������ 16
Creating a Privacy Mask ������������������������������������������������������������������������������������� 17
Record: Mainstream (720p) �������������������������������������������������������������������������������� 18
Record: Mainstream (1080p) ������������������������������������������������������������������������������ 20
Record: Mainstream (3 Megapixel) ������������������������������������������������������������������� 22
Record: Substream���������������������������������������������������������������������������������������������� 24
Alarm: Motion ������������������������������������������������������������������������������������������������������ 25
Motion Detection Setup �������������������������������������������������������������������������������������� 27
Motion Detection Tips ����������������������������������������������������������������������������������������� 28
Thermal-Sensing Camera Tips ������������������������������������������������������������������������� 29
Device: PTZ ����������������������������������������������������������������������������������������������������������� 30
Controlling your PTZ Camera ���������������������������������������������������������������������������� 31
Creating a Preset ������������������������������������������������������������������������������������������������� 32
Recording Configuration ����������������������������������������������������������������������������������� 33
Record: Record ����������������������������������������������������������������������������������������������������� 34
Record: Schedule ������������������������������������������������������������������������������������������������� 35
Capture: Capture ������������������������������������������������������������������������������������������������� 36
Capture: Schedule ����������������������������������������������������������������������������������������������� 37
Playback & Backup ��������������������������������������������������������������������������������������������� 38
Search: General ��������������������������������������������������������������������������������������������������� 39
Playback Interface ����������������������������������������������������������������������������������������������� 40
Playback: Smart �������������������������������������������������������������������������������������������������� 42
Search: Events ����������������������������������������������������������������������������������������������������� 44
Search: QuickShot ����������������������������������������������������������������������������������������������� 45
Playing a Slideshow �������������������������������������������������������������������������������������������� 46
Search: QuickReview ������������������������������������������������������������������������������������������� 47
QuickReview Playback ���������������������������������������������������������������������������������������� 48
System Configuration ���������������������������������������������������������������������������������������� 50
Display: Output ����������������������������������������������������������������������������������������������������� 51
Network: Network ����������������������������������������������������������������������������������������������� 52
Network: Email ���������������������������������������������������������������������������������������������������� 54
Network: Email Schedule����������������������������������������������������������������������������������� 55
Network: DDNS ��������������������������������������������������������������������������������������������������� 56
Network: RTSP ���������������������������������������������������������������������������������������������������� 57
System: NTP ��������������������������������������������������������������������������������������������������������� 58
Device: HDD ���������������������������������������������������������������������������������������������������������� 59
Device: S.M.A.R.T. ������������������������������������������������������������������������������������������������ 60
System: General �������������������������������������������������������������������������������������������������� 61
System: DST ��������������������������������������������������������������������������������������������������������� 62


5
Contents
System: Users ������������������������������������������������������������������������������������������������������ 63
Advanced: Maintain ��������������������������������������������������������������������������������������������� 64
Advanced: Events ������������������������������������������������������������������������������������������������� 65
Advanced: Auto Upgrade ������������������������������������������������������������������������������������ 66
System Status ������������������������������������������������������������������������������������������������������ 67
System: Info ���������������������������������������������������������������������������������������������������������� 68
System: Channel Info ������������������������������������������������������������������������������������������ 69
System: Record Info �������������������������������������������������������������������������������������������� 70
Search: Log ���������������������������������������������������������������������������������������������������������� 71
Glossary ���������������������������������������������������������������������������������������������������������������� 72
Frequently Asked Questions ������������������������������������������������������������������������������ 77
Warranty Information ������������������������������������������������������������������������������������������ 78
Helpdesk & Technical Support �������������������������������������������������������������������������� 79


6Click for contents
Live View
Live View is the default display mode for
your DVR. Each camera connected will
be displayed on-screen. You can check
the status or operation of your DVR and
cameras using the icons and Menu Bar
on the Live View screen. Right-click the
mouse to access the Menu Bar.
CH1 CH2
19/07/2016 04:30:15 PM
CH3 CH4
CH1
19/07/2016 04:30:15 PM


7Click for contents
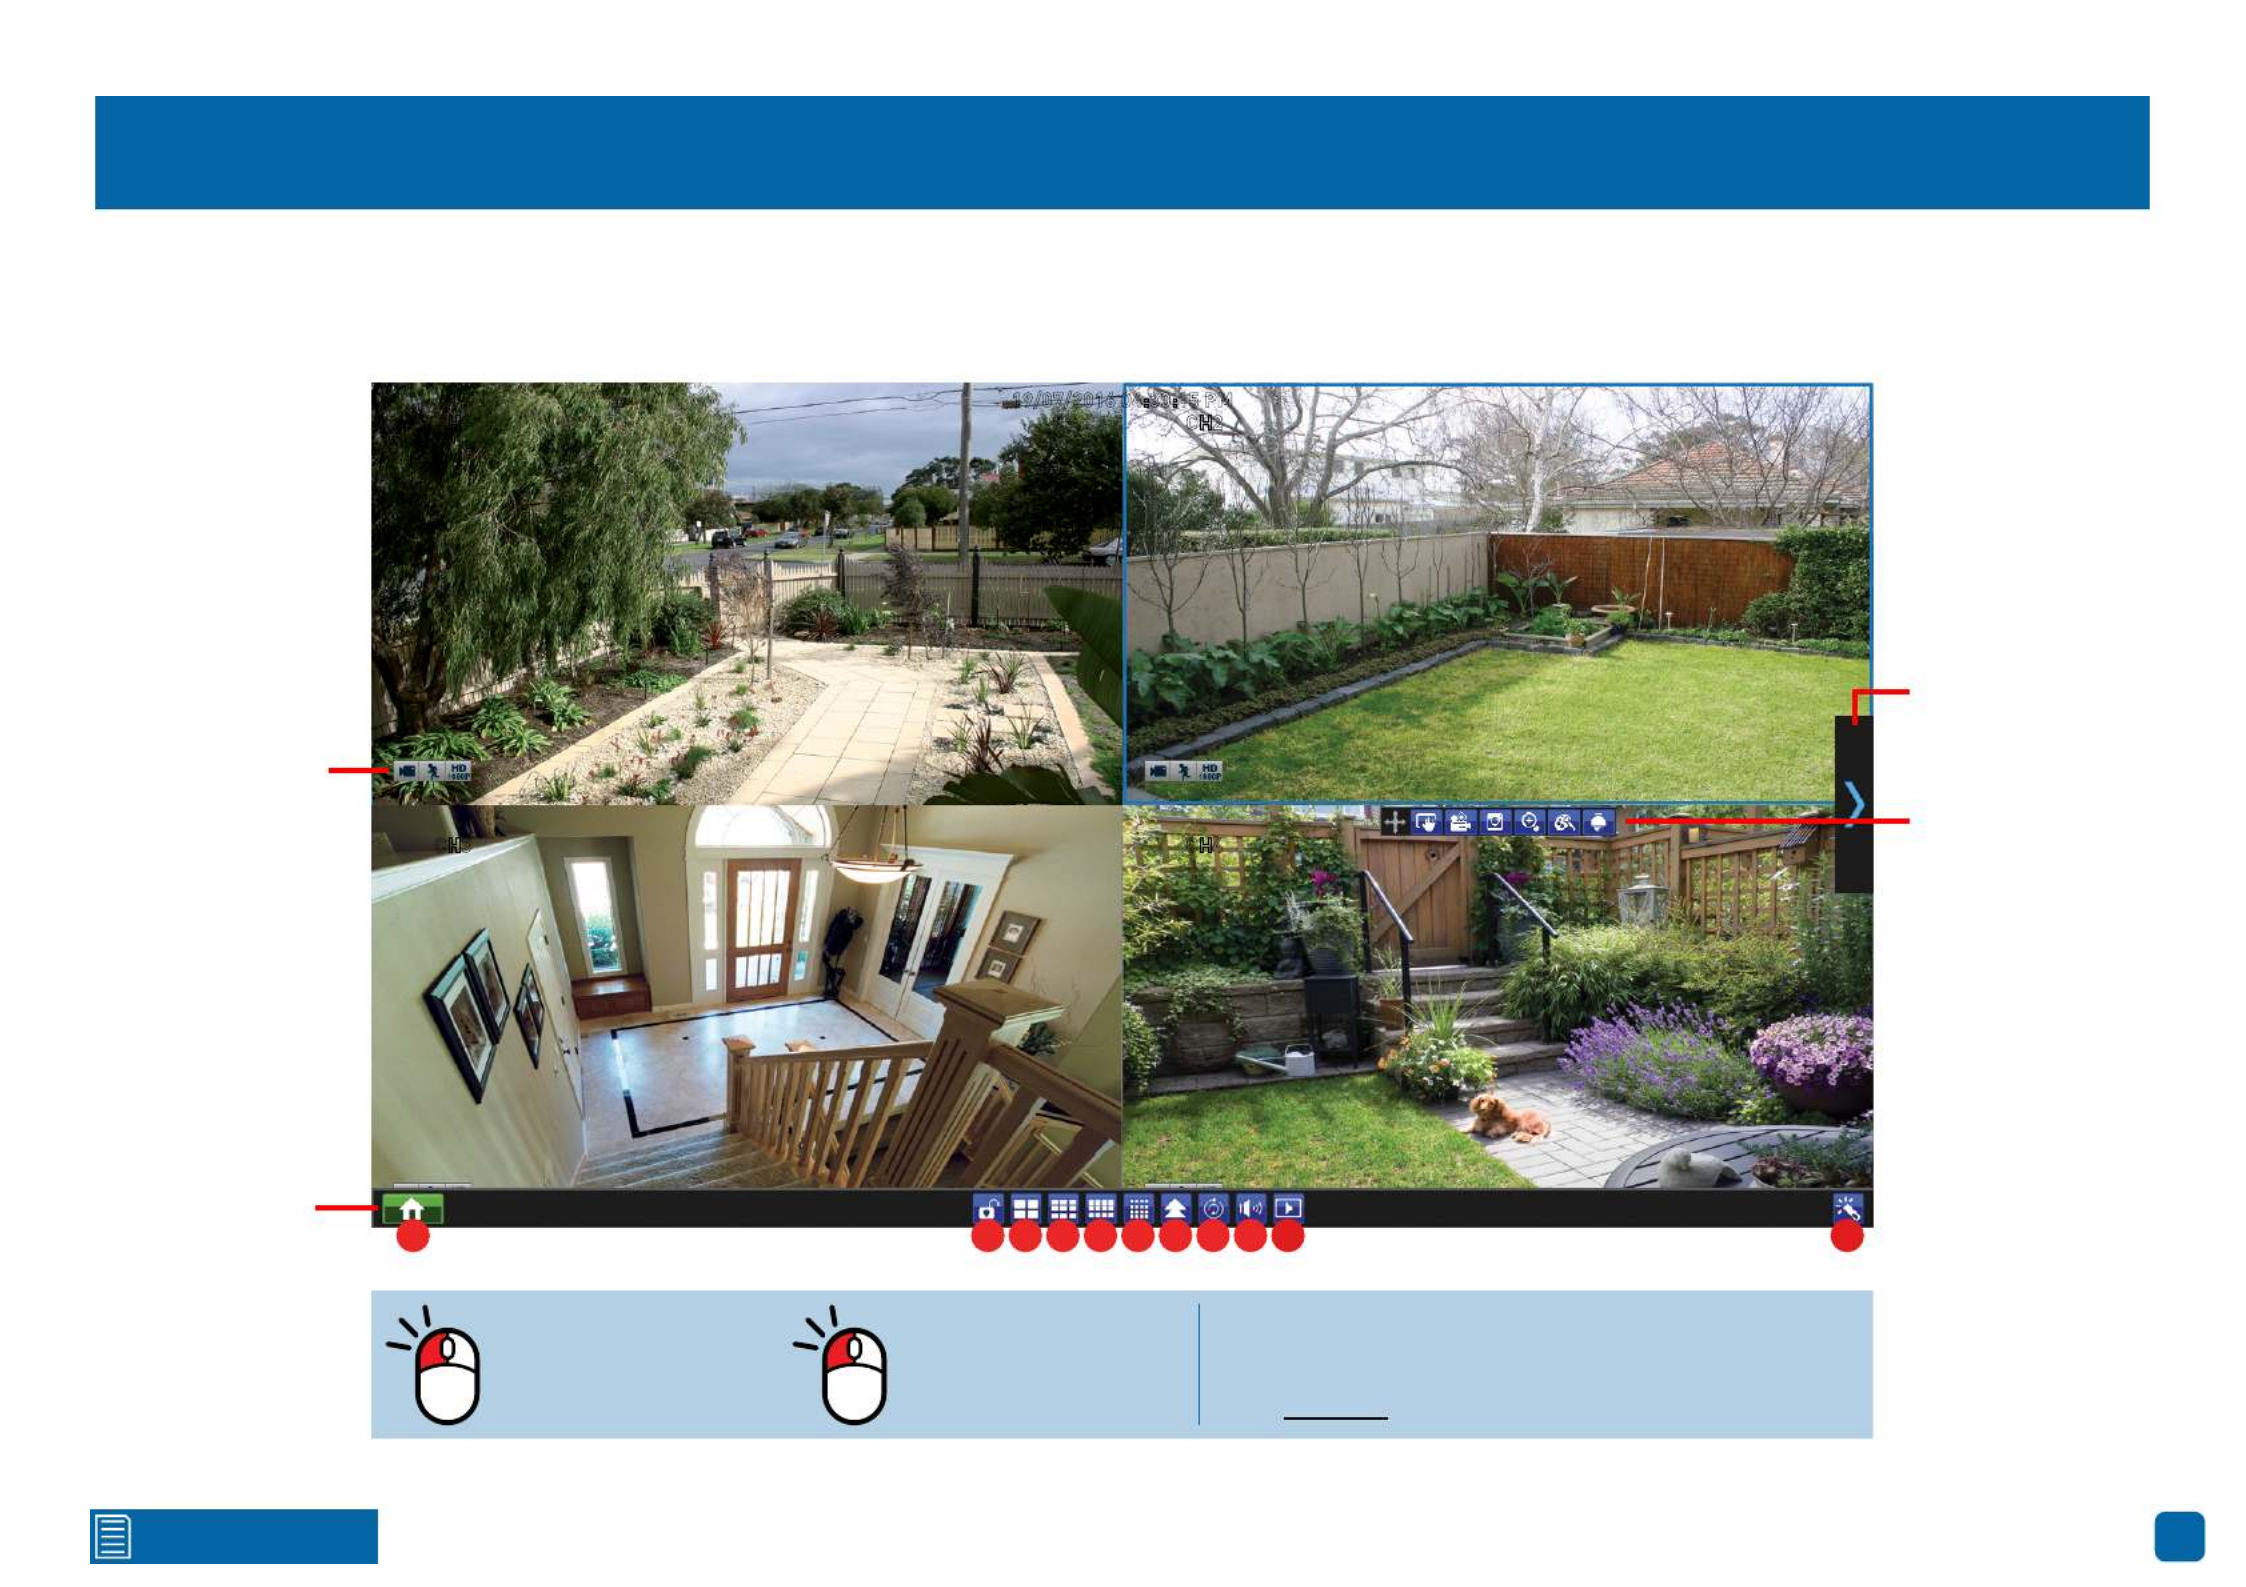
Live View Mode (4 & 8 channel model)
Live View mode is the default display for your DVR. Each camera connected will be displayed (multiple view modes available). You can check the operation of
your DVR by using the status icons on the Live View screen. The date and time as well as the name for each camera is also displayed.
Double-click a live
video channel to
view full screen.
Click & drag a live
video channel to
reposition it.
To access the Main Menu, right-click the mouse
on the Live View screen to display the Menu Bar
(see page 8 for more information).
CH1 CH2
19/07/2016 04:30:15 PM
CH3 CH4 Camera Toolbar
Status Icons
Menu Bar
1 2 3 4 95 6 7 8
Camera/Group


9Click for contents
Live View Mode (16 channel model)
Live View mode is the default display for your DVR. Each camera connected will be displayed (multiple view modes available). You can check the operation of
your DVR by using the status icons on the Live View screen. The date and time as well as the name for each camera is also displayed.
Double-click a live
video channel to
view full screen.
Click & drag a live
video channel to
reposition it.
To access the Main Menu, right-click the mouse
on the Live View screen to display the Menu Bar
(see page 10 for more information).
CH1 CH2
19/07/2016 04:30:15 PM
CH3 CH4 Camera Toolbar
Status Icons
Menu Bar
1 2 3 4 95 6 7 8 10 11
Camera/Group


10Click for contents
Live View Icons & Controls (16 channel model)
Menu Bar
1. Click this to open the Main Menu.
2. Manually lock your DVR to prevent access
to the Main Menu when “Menu Timeouts” is
turned off.
3. Four camera view.
4. Nine camera view.
5. Twelve camera view.
6. Sixteen camera view.
7. Select from a variety of different camera lay-
outs available.
8. Click this to repeatedly cycle through each
video channel full screen. Each video channel
will be displayed for 5 seconds.
9. Click this to change the volume or mute the
audio (click the speaker icon to mute).
10. Click this to enter playback mode.
11. Click this to enter the Startup Wizard.
The Camera Toolbar provides quick access to
video playback, manual capture, zoom, PTZ
and the ability to change image settings.
To ensure the integrity of your recordings,
enter your password and select “Shutdown”
when powering off your DVR.
Camera/Group: In single or four camera
view, move the mouse to the far left or right
to reveal the camera/group button. You
can cycle through each camera or group of
cameras to view.
Status Icons
This icon indicates that the camera is being
recorded (either manually or triggered by
motion).
This icon indicates that your DVR is detect-
ing motion from the camera.
This icon indicates that your DVR is record-
ing at 720p (1280 x 720) resolution.
This icon indicates that your DVR is record-
ing at 1080l (960 x 1080) resolution.
This icon indicates that the channel
has lost the feed from its camera.
This icon indicates that your DVR is record-
ing at 1080p (1920 x 1080) resolution.
This icon indicates that your DVR
does not have a hard drive or it fails to
detect the drive that is installed.
This icon indicates that your PIR camera
has detected one or more warm objects.
NO HDD
PIR
VIDEO LOSS
This icon indicates that your DVR is record-
ing at 3 megapixel (1920 x 1536) resolution.

11Click for contents
Main Menu
The “Main Menu” is where you control the
various actions and options that are available
on your DVR. You can also access previous-
ly recorded video for playback and to copy to
a storage device such as a USB flash drive.
To maintain system integrity, a firmware up-
grade can be performed when available and
access to the “Shutdown” menu to restart or
safely turn off your DVR.


12Click for contents
The various functions and options
available, are categorised on the left-
hand side of the Menu.
Clicking each category will reveal a
number of tabs or sub-categories
that can be changed from their de-
fault value.
To exit or access the
previous menu, right-
click the mouse.
Save changes that have been made
or restore default settings.
Menu Layout

13Click for contents
Camera Configuration
The camera configuration options are avail-
able in the “Display”, “Record”, “Alarm” and
“Device” menus that are accessible from the
Main Menu. You can change the resolution,
bitrate, OSD (on-screen display) position as
well as image settings for hue, brightness,
contrast and saturation. Your DVR has con-
trols for detecting motion, allowing you to
define specific areas to alert you to a poten-
tial threat in and around your home. You also
have the ability to create one or more zones
for privacy.

15Click for contents
Display: Live
Camera SET: This setting is used to instruct your DVR on the camera type
connected. For the cameras included with your DVR, leave the default set-
ting. However, if you are connecting cameras that you have purchased previ-
ously or upgrading from an older security system and the image is black &
white, change this to TVI or AHD, depending on your camera type. Click the
“Setup” button then select the camera type for your camera. If the image is
in color, the correct camera type has been selected.
Covert: When enabled, the camera will detect motion and trigger your DVR
to record, but you will not see an image of the camera in Live View mode.
This may be suitable if your DVR and TV are displayed in a public area (shop,
warehouse, school, etc.), but you don’t want others to see an image from the
camera.
Show Time: By default, the date and time is displayed in Live View mode. You
can disable this if you wish.
·Don’t forget to click “Save”
to apply settings.
·Use the “Copy” function to
apply all settings to the other
cameras.
·Click the “Default” button to
revert back to default settings.
·Click the “Close” button to
exit the Main Menu.

Termékspecifikációk
| Márka: | Swann |
| Kategória: | Hangrögzítő |
| Modell: | SODVR-84575H |
Szüksége van segítségre?
Ha segítségre van szüksége Swann SODVR-84575H, tegyen fel kérdést alább, és más felhasználók válaszolnak Önnek
Útmutatók Hangrögzítő Swann

28 Július 2024
27 Július 2024
25 Július 2024
22 Július 2024
21 Július 2024
17 Július 2024
13 Július 2024
10 Július 2024
9 Július 2024
Útmutatók Hangrögzítő
- Hangrögzítő Sony
- Hangrögzítő Yamaha
- Hangrögzítő Nedis
- Hangrögzítő Grundig
- Hangrögzítő Marantz
- Hangrögzítő Philips
- Hangrögzítő Olympus
- Hangrögzítő Oregon Scientific
- Hangrögzítő SilverCrest
- Hangrögzítő Panasonic
- Hangrögzítő Toshiba
- Hangrögzítő Saramonic
- Hangrögzítő Onkyo
- Hangrögzítő Motorola
- Hangrögzítő Roland
- Hangrögzítő Digitus
- Hangrögzítő Boss
- Hangrögzítő Aiwa
- Hangrögzítő Speco Technologies
- Hangrögzítő Blackmagic Design
- Hangrögzítő Hikvision
- Hangrögzítő Zoom
- Hangrögzítő Korg
- Hangrögzítő Focusrite
- Hangrögzítő M-Audio
- Hangrögzítő Hitachi
- Hangrögzítő Kodak
- Hangrögzítő Dahua Technology
- Hangrögzítő Trevi
- Hangrögzítő Planet
- Hangrögzítő Qian
- Hangrögzítő PreSonus
- Hangrögzítő Lorex
- Hangrögzítő Velleman
- Hangrögzítő Teac
- Hangrögzítő D-Link
- Hangrögzítő Manta
- Hangrögzítő Samson
- Hangrögzítő Olympia
- Hangrögzítő Abus
- Hangrögzítő Vivotek
- Hangrögzítő Konig
- Hangrögzítő Line 6
- Hangrögzítő Pyle
- Hangrögzítő Sanyo
- Hangrögzítő Salora
- Hangrögzítő DataVideo
- Hangrögzítő AJA
- Hangrögzítő Audioline
- Hangrögzítő GoClever
- Hangrögzítő Gefen
- Hangrögzítő RCA
- Hangrögzítő Provision-ISR
- Hangrögzítő Axis
- Hangrögzítő EverFocus
- Hangrögzítő Sangean
- Hangrögzítő Lectrosonics
- Hangrögzítő OM SYSTEM
- Hangrögzítő Tascam
- Hangrögzítő Airlive
- Hangrögzítő GPO
- Hangrögzítő Marquant
- Hangrögzítő AVerMedia
- Hangrögzítő Audiovox
- Hangrögzítő GeoVision
- Hangrögzítő LevelOne
- Hangrögzítő Profoon
- Hangrögzítő Mpman
- Hangrögzítő Humax
- Hangrögzítő Pinnacle
- Hangrögzítő Dnt
- Hangrögzítő Engel Axil
- Hangrögzítő Comica
- Hangrögzítő Atomos
- Hangrögzítő Lervia
- Hangrögzítő Livescribe
- Hangrögzítő Griffin
- Hangrögzítő Bontempi
- Hangrögzítő Avid
- Hangrögzítő Kguard
- Hangrögzítő Neo
- Hangrögzítő Epcom
- Hangrögzítő Hanwha
- Hangrögzítő TIE Audio
- Hangrögzítő LifeGood
- Hangrögzítő Syscom
- Hangrögzítő Pixel Maker
- Hangrögzítő AVTech
- Hangrögzítő Feelworld
- Hangrögzítő HiLook
- Hangrögzítő Jammin Pro
- Hangrögzítő Mach Power
- Hangrögzítő Nexium
- Hangrögzítő API Audio
Legújabb útmutatók Hangrögzítő

6 Április 2025

5 Április 2025

3 Április 2025
16 Január 2025
14 Január 2025
31 December 2025
27 December 2024

27 December 2024
26 December 2024
22 December 2024