Használati útmutató StarTech.com NETRS232_2
StarTech.com
hálózati kártya/adapter
NETRS232_2
Olvassa el alább 📖 a magyar nyelvű használati útmutatót StarTech.com NETRS232_2 (16 oldal) a hálózati kártya/adapter kategóriában. Ezt az útmutatót 8 ember találta hasznosnak és 2 felhasználó értékelte átlagosan 4.5 csillagra
Oldal 1/16
Rev. B05
NETRS232 Series
Quick Install tion & Advanced Features Guidea

Congratulations on your purchase of a StarTech NETRS232. NETRS232s connect serial
devices to Ethernet networks. Any serial device—POS equipment, factory machinery,
monitoring hardware, or security devices, for example—can send its information to the
NETRS232.The NETRS232 places the serial data in a TCP/IP wrapper and sends it out its
Ethernet port.Data moving the other direction,from the Ethernet side of the
NETRS232 to the serial device, undergoes the same process in reverse.StarTech
NETRS232s use industry-standard hardware interfaces and are supported in Windows®
2000,Windows® XP, Linux, and QNX.
• Network serial devices
• Make devices available to multiple users
• Manage multiple serial devices from a single PC
• Eliminate long dedicated serial runs
• Stop using costly PCs as dedicated serial port servers
• Remotely access and control serial devices
• Eliminate long-distance phone-modem charges
With a NETRS232, you can:
Included with your package, you should have the following:
• StarTech NETRS232
• Power supply
• Installation diskette
• Quick Installation Guide
1
Getting Started
Please note! NETRS232 is factory pre-configured with passwords as follows:
Administrative password: admin
Port 1 password: port1
Port 2 password: port2
etc..
Before using NETRS232 you will need to unlock the unit using the
administrative password in order to configure the device's IP address and
other settings. We recommend changing the administrative password to
something other than the factory default for best security.
Port passwords can be removed or altered as needed, provided
administrative access is granted.

2
Hardware Setup
1. Connect the power supply to the NETRS232 and to AC power.
2. The power (red) LED will light to indicate that the unit is receiving power.
3. Connect a network cable to the RJ-45 jack of the NETRS232.The other end of the
network cable can be attached to either:
• an Ethernet hub or switch,using a length of standard Ethernet network cable
• a host PC directly, using an Ethernet cross-over cable.
Network status is indicated by two LEDs on the RJ-45 connector.The left (yellow) LED
indicates network activity. It is on by default, turning off when network activity occurs
at the NETRS232.The right (green) LED indicates a network link. It is off by default, but
lights when a network link exists.
4. Connect a serial device to the NETRS232.
Serial port activity is indicated by two status LEDs per port. The upper (yellow) LED
lights when the serial port is transmitting data.The lower (green) LED lights when the
serial port is receiving data.
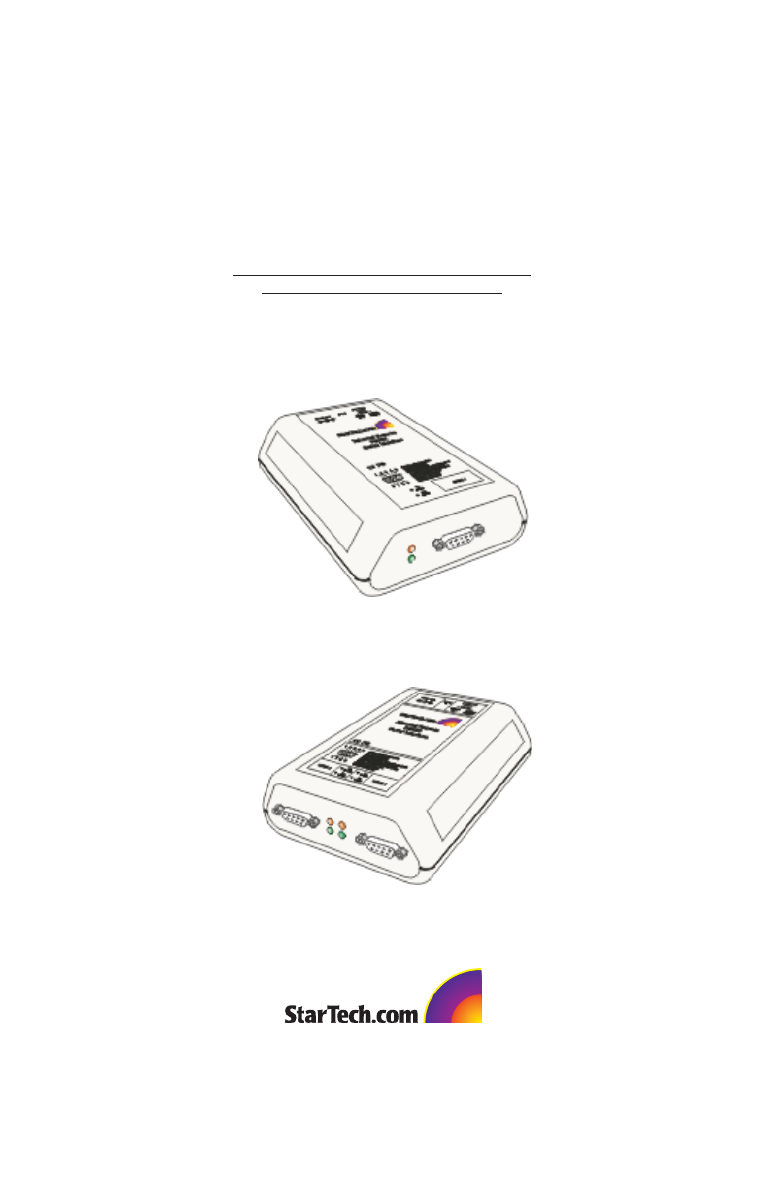
Power
connector
Single Port Dual Port
Power
indicator
Network
connector (RJ-45)
Network
Activity and Link
indicators
Serial connector
(DB-9 shown)
Serial Tx
indicator
Serial Rx
indicator Serial 1
connector
(DB-9 shown)
Serial 2
connector
(DB-9 shown)
Serial Tx
indicators
Serial Rx
indicators
Termékspecifikációk
| Márka: | StarTech.com |
| Kategória: | hálózati kártya/adapter |
| Modell: | NETRS232_2 |
Szüksége van segítségre?
Ha segítségre van szüksége StarTech.com NETRS232_2, tegyen fel kérdést alább, és más felhasználók válaszolnak Önnek
Útmutatók hálózati kártya/adapter StarTech.com

15 Január 2025
15 Január 2025
10 Január 2025
30 December 2025
30 December 2025
29 December 2024
29 December 2024
29 December 2024
17 December 2024
3 Október 2024
Útmutatók hálózati kártya/adapter
- hálózati kártya/adapter Sony
- hálózati kártya/adapter Yamaha
- hálózati kártya/adapter Microchip
- hálózati kártya/adapter Sharkoon
- hálózati kártya/adapter Nedis
- hálózati kártya/adapter Philips
- hálózati kártya/adapter Pioneer
- hálózati kártya/adapter Canon
- hálózati kártya/adapter Lenovo
- hálózati kártya/adapter Evolveo
- hálózati kártya/adapter Toshiba
- hálózati kártya/adapter Ubiquiti Networks
- hálózati kártya/adapter TP-Link
- hálózati kártya/adapter LogiLink
- hálózati kártya/adapter Alcatel
- hálózati kártya/adapter Rocstor
- hálózati kártya/adapter Digitus
- hálózati kártya/adapter TRENDnet
- hálózati kártya/adapter Mercusys
- hálózati kártya/adapter AVM
- hálózati kártya/adapter Martin Logan
- hálózati kártya/adapter Crestron
- hálózati kártya/adapter Lancom
- hálózati kártya/adapter Strong
- hálózati kártya/adapter Gigaset
- hálózati kártya/adapter Gigabyte
- hálózati kártya/adapter Tripp Lite
- hálózati kártya/adapter Conceptronic
- hálózati kártya/adapter Klipsch
- hálózati kártya/adapter Kenwood
- hálózati kártya/adapter Vivanco
- hálózati kártya/adapter Netgear
- hálózati kártya/adapter Microsoft
- hálózati kártya/adapter Asus
- hálózati kártya/adapter Hama
- hálózati kártya/adapter ELAC
- hálózati kártya/adapter Renkforce
- hálózati kártya/adapter Draytek
- hálózati kártya/adapter Supermicro
- hálózati kártya/adapter Thrustmaster
- hálózati kártya/adapter Iogear
- hálózati kártya/adapter Mikrotik
- hálózati kártya/adapter Sennheiser
- hálózati kártya/adapter ZyXEL
- hálózati kártya/adapter Dahua Technology
- hálózati kártya/adapter Viewsonic
- hálózati kártya/adapter SVS
- hálózati kártya/adapter Devolo
- hálózati kártya/adapter Planet
- hálózati kártya/adapter Ewent
- hálózati kártya/adapter Ernitec
- hálózati kártya/adapter Tenda
- hálózati kártya/adapter Black Box
- hálózati kártya/adapter Aluratek
- hálózati kártya/adapter MSI
- hálózati kártya/adapter Antec
- hálózati kártya/adapter Gembird
- hálózati kártya/adapter Cisco
- hálózati kártya/adapter ATen
- hálózati kártya/adapter Speed-Link
- hálózati kártya/adapter Akasa
- hálózati kártya/adapter Suunto
- hálózati kártya/adapter Edimax
- hálózati kártya/adapter APC
- hálózati kártya/adapter SEH
- hálózati kártya/adapter Manhattan
- hálózati kártya/adapter Alecto
- hálózati kártya/adapter EnGenius
- hálózati kártya/adapter Sigma
- hálózati kártya/adapter Velleman
- hálózati kártya/adapter Russound
- hálózati kártya/adapter D-Link
- hálózati kártya/adapter Media-Tech
- hálózati kártya/adapter EQ-3
- hálózati kártya/adapter IDIS
- hálózati kártya/adapter Yealink
- hálózati kártya/adapter Moxa
- hálózati kártya/adapter Abus
- hálózati kártya/adapter Vivotek
- hálózati kártya/adapter Trust
- hálózati kártya/adapter Iiyama
- hálózati kártya/adapter Konig
- hálózati kártya/adapter Marmitek
- hálózati kártya/adapter Emerson
- hálózati kártya/adapter Lindy
- hálózati kártya/adapter Cudy
- hálózati kártya/adapter Arctic Cooling
- hálózati kártya/adapter QNAP
- hálózati kártya/adapter NEC
- hálózati kártya/adapter Audac
- hálózati kártya/adapter Siig
- hálózati kártya/adapter Elo
- hálózati kártya/adapter Eaton
- hálózati kártya/adapter Kathrein
- hálózati kártya/adapter AViPAS
- hálózati kártya/adapter Axis
- hálózati kártya/adapter Altronix
- hálózati kártya/adapter EverFocus
- hálózati kártya/adapter Topcom
- hálózati kártya/adapter Ipevo
- hálózati kártya/adapter Anker
- hálózati kártya/adapter I-TEC
- hálózati kártya/adapter Hughes & Kettner
- hálózati kártya/adapter Vivolink
- hálózati kártya/adapter Tascam
- hálózati kártya/adapter Linksys
- hálózati kártya/adapter Sitecom
- hálózati kártya/adapter Savio
- hálózati kártya/adapter Teufel
- hálózati kártya/adapter Ugreen
- hálózati kártya/adapter InLine
- hálózati kártya/adapter Lava
- hálózati kártya/adapter Belkin
- hálózati kártya/adapter Xcellon
- hálózati kártya/adapter Kramer
- hálózati kártya/adapter Allnet
- hálózati kártya/adapter Allied Telesis
- hálózati kártya/adapter Airlive
- hálózati kártya/adapter Icy Box
- hálózati kártya/adapter Eminent
- hálózati kártya/adapter Targus
- hálózati kártya/adapter Aukey
- hálózati kártya/adapter Kensington
- hálózati kártya/adapter Techly
- hálózati kártya/adapter Totolink
- hálózati kártya/adapter Steren
- hálózati kártya/adapter Netis
- hálózati kártya/adapter Buffalo
- hálózati kártya/adapter GeoVision
- hálózati kártya/adapter LevelOne
- hálózati kártya/adapter Terris
- hálózati kártya/adapter ICIDU
- hálózati kártya/adapter Valcom
- hálózati kártya/adapter Goobay
- hálózati kártya/adapter Simplecom
- hálózati kártya/adapter Clas Ohlson
- hálózati kártya/adapter Grixx
- hálózati kártya/adapter Intel
- hálózati kártya/adapter Mede8er
- hálózati kártya/adapter Intermec
- hálózati kártya/adapter Sweex
- hálózati kártya/adapter ESI
- hálózati kártya/adapter Veho
- hálózati kártya/adapter Maxxter
- hálózati kártya/adapter Pinnacle
- hálózati kártya/adapter IC Intracom
- hálózati kártya/adapter Emtec
- hálózati kártya/adapter Paradigm
- hálózati kártya/adapter Atomos
- hálózati kártya/adapter EQ3
- hálózati kártya/adapter Satechi
- hálózati kártya/adapter Hawking Technologies
- hálózati kártya/adapter Nexxt
- hálózati kártya/adapter OSD Audio
- hálózati kártya/adapter Aeon Labs
- hálózati kártya/adapter OpenVox
- hálózati kártya/adapter Sonnet
- hálózati kártya/adapter UTEPO
- hálózati kártya/adapter Twelve South
- hálózati kártya/adapter Advantech
- hálózati kártya/adapter Hercules
- hálózati kártya/adapter Ferguson
- hálózati kártya/adapter Micro Connect
- hálózati kártya/adapter Extron
- hálózati kártya/adapter Minute Man
- hálózati kártya/adapter Vantec
- hálózati kártya/adapter Intellinet
- hálózati kártya/adapter Motu
- hálózati kártya/adapter SMC
- hálózati kártya/adapter Star Micronics
- hálózati kártya/adapter CradlePoint
- hálózati kártya/adapter Digium
- hálózati kártya/adapter Riello
- hálózati kártya/adapter Iconbit
- hálózati kártya/adapter 7inova
- hálózati kártya/adapter Oehlbach
- hálózati kártya/adapter Perfect Choice
- hálózati kártya/adapter NUVO
- hálózati kártya/adapter AVPro Edge
- hálózati kártya/adapter Canyon
- hálózati kártya/adapter Rosewill
- hálózati kártya/adapter Digicom
- hálózati kártya/adapter Tycon Systems
- hálózati kártya/adapter Code Corporation
- hálózati kártya/adapter Hamlet
- hálózati kártya/adapter Atto
- hálózati kártya/adapter Raidsonic
- hálózati kártya/adapter Approx
- hálózati kártya/adapter Cambium Networks
- hálózati kártya/adapter Barox
- hálózati kártya/adapter Raspberry Pi
- hálózati kártya/adapter Mach Power
- hálózati kártya/adapter Panamax
- hálózati kártya/adapter EtherWAN
- hálózati kártya/adapter EXSYS
- hálózati kártya/adapter J5 Create
- hálózati kártya/adapter Microsemi
- hálózati kártya/adapter Atlantis Land
- hálózati kártya/adapter CLUB3D
- hálózati kártya/adapter Luxul
- hálózati kártya/adapter Vigitron
- hálózati kártya/adapter SMK-Link
- hálózati kártya/adapter ScreenBeam
Legújabb útmutatók hálózati kártya/adapter

8 Április 2025
3 Április 2025
3 Április 2025
2 Április 2025
2 Április 2025
1 Április 2025
30 Március 2025
29 Március 2025
15 Március 2025
15 Március 2025