Használati útmutató Sony NWZ-E343
Sony
mp3 lejátszó
NWZ-E343
Olvassa el alább 📖 a magyar nyelvű használati útmutatót Sony NWZ-E343 (120 oldal) a mp3 lejátszó kategóriában. Ezt az útmutatót 2 ember találta hasznosnak és 2 felhasználó értékelte átlagosan 4.5 csillagra
Oldal 1/120

Click! You can directly jump
Operation Guide
NWZ-E343/E344/E345
©2009 Sony Corporation 4-154-414-11(1)
Troubleshooting
Transferring Videos/Photos
Transferring Music
Table of
Contents
Index
Home
Menu

2
2
Note
Depending on the country/region in which you have purchased the player, some models
may not be available.
Browsing the Operation Guide
To use the buttons in the Operation Guide
Click the buttons located in the upper right of the pages of this manual to jump
to “Table of Contents,” “About the Home Menu” or “Index.”
Hint
You can jump to the indicated page by clicking a page number in the table of contents or
in the index.
You can jump to the indicated page by clicking a page reference indication (e.g., p. 5)
on each page.
To search for a reference page by keyword, enter the keyword into the find text field on
the Adobe Reader window.
Operation procedures may differ, depending on your Adobe Reader version.
To change the page layout
The buttons on the Adobe Reader window enable you to select how pages are
displayed.
Continuous
Pages are displayed as a continuous
roll of pages, fitting the page width
inside the window. When you scroll,
the previous or next pages scroll up
or down continuously.
Single Page
Pages are displayed one at a time,
fitting the page into the window.
When you scroll, the display changes
to the previous or next page.
Jumps to the table of contents
Find what you are looking for from a list of topics in the manual.
Jumps to the [Home] menu list
Find what you are looking for from a list of the option items in the player’s menu.
Jumps to the index
Find what you are looking for from a list of key words mentioned in the manual.
Text field to find text
Table of
Contents
Home
Menu
Index

3
3
Table of Contents
Basic Operations and Screens
Parts and Controls ...................................5
Turning the Player On and Off ...............7
About the Home Menu ............................8
How to Use the Home Menu .................11
How to Use the Option Menu ................14
About the Software ................................16
Bundled Software ...........................................16
Compatible Software .....................................16
Preparing the Player
Charging the Battery .............................17
Selecting the Display Language ............19
Setting the Date and Time .....................20
Transferring Music
Selecting the Way to Transfer Music .....21
Transferring Music Using Windows
Media Player 11 ..............................................22
Importing music from CDs ..........................22
Transferring Music ........................................24
Transferring Music Using Content
Transfer ...............................................26
Transferring Music Using Windows
Explorer ...............................................28
Transferring Videos/Photos
Selecting the Way to Transfer
Videos/Photos .....................................30
Transferring Videos/Photos Using
Content Transfer ............................................31
Transferring Videos/Photos Using
Windows Explorer ............................................33
Playing Music
Playing Music [Music] .............................35
Music playback screen ...................................36
Music list screen .............................................37
Searching for Songs ...............................38
Playing a playlist .............................................39
Playing All Songs in Random Order.....40
Deleting Songs .......................................41
Using the Music Option Menu ..............42
Displaying the detailed information screen
[Detailed Information] .......................................44
Displaying the cover art screen
[Cover Art] .......................................................44
Changing the Music Settings .................45
Setting the play mode [Play Mode] ..................45
Setting the sound quality [Equalizer] ..............46
Listening with Clear Stereo [Clear Stereo] ......47
Adjusting the volume level
[Dynamic Normalizer] .......................................48
Watching Videos
Playing a Video ..........................49[Videos]
Video playback screen ...................................50
Deleting Videos .....................................51
Using the Video Option Menu ..............52
Changing the Video Settings .................53
Setting the zoom function
[Zoom Settings] ................................................53
Setting the display of the video screen
[Display] ..........................................................55
Setting the video orientation
[Video Orientation] ...........................................56
Continued
Table of
Contents
Home
Menu
Index

4
4
Viewing Photos
Viewing Photos [Photos] .........................57
Photo display screen ......................................58
Playing a Slide Show ..............................59
Deleting Photos .....................................60
Using the Photo Option Menu ..............61
Changing the Photo Settings .................62
Photo orientation [Photo Orientation] ..............62
Setting the display of the photo screen
[Display] ..........................................................63
Setting the slide show play mode
[Slide Show Repeat] ...........................................63
Setting the interval of a slide show
[Slide Show Interval] ..........................................64
Listening to FM Radio
Listening to FM Radio ...........................65
FM Radio screen ............................................66
Presetting broadcast stations
automatically [Auto Preset] ............................67
Presetting broadcast stations manually .......68
Deleting preset broadcast stations ...............68
Using the FM Radio Option Menu ........69
Changing the FM Radio Settings ..........70
Setting the reception [Scan Sensitivity] ............70
Setting monaural/stereo [Mono/Auto] ............70
Using the Timer
Setting the Timer ...................................71
Setting the alarm ................................72[Alarm]
Setting the sleep timer [Sleep Timer] ...............73
Common Settings
Changing the Common Settings ...........74
Displaying the player information
[Unit Information] .............................................74
Limiting the volume [AVLS (Volume Limit)] ....75
Turning off the beep sound [Beep Settings] ....75
Setting a screensaver type [Screensaver] .........76
Adjusting the brightness of the screen
[Brightness] ......................................................76
Setting the current time [Set Date-Time] .........77
Setting the date format
[Date Display Format] ........................................78
Setting the time format
[Time Display Format] .......................................78
Returning to the factory settings
[Reset all Settings] .............................................79
Formatting memory [Format] .........................79
Selecting the Display Language
[Language Settings] ...................................80
Useful Facts
About Battery Life .................................81
What are Format and Bit Rate? .............82
What is audio format? ...................................82
What is video format? ...................................83
What is photo format? ...................................83
Storing Data ...........................................84
Upgrading the Player’s Firmware .........85
Troubleshooting
Troubleshooting ....................................86
Messages ................................................97
Additional Information
Precautions ............................................99
License and Trademark Notice ...........108
Specifications.......................................110
Index ....................................................117
Table of
Contents
Home
Menu
Index

5
5
Basic Operations and Screens
Parts and Controls
BACK/HOME button
Press to go up one list screen level, or
to return to the previous menu.
Press and hold the BACK/HOME
button to display the [Home] menu
( p. 8).
5-way button*1
Starts playback and enables
navigation of the player’s on-screen
menus ( p. 11, 14).
Display
See p. 8.
VOL +*1/− button
Adjusts the volume.
HOLD switch
You can protect the player against
accidental operation during
transportation by setting the HOLD
switch. By sliding the HOLD switch
in the direction of the arrow ,
all operation buttons are disabled. If
you slide the HOLD switch in the
opposite position, the HOLD
function is released.
OPTION/PWR OFF button
Press to display the option menu (
p. 14, 42, 52, 61, 69).
If you press and hold the OPTION/
PWR OFF button, the screen turns
off and the player enters standby
mode ( p. 7).
*1 There are tactile dots. Use them to help with
button operations.
Continued
Basic Operations and Screens
Front
Table of
Contents
Home
Menu
Index

10
10
Basic Operations and Screens
About the information area
The icons, shown in the table below, appear in the information area. The icons
vary according to the playback status, setting or the screen.
For details about the icons, see each reference page.
Icons Description
, , , ,
, ,
, , etc
Playback status ( p. 36, 50, 58)
, , , Song name, artist name, video title, or photo title
FM radio
, , etc Play mode ( p. 45)
, etc Equalizer ( p. 46)
, Zoom setting ([Auto] or [Full]) ( p. 53)
Sleep timer ( p. 73)
Remaining battery power ( p. 17)
Table of
Contents
Home
Menu
Index

11
11
Basic Operations and Screens
How to Use the Home Menu
The [Home] menu is the starting point of each application, such as searching
for songs, changing settings, etc.
You can display the [Home] menu by pressing and holding the BACK/HOME
button of the player.
From the [Home] menu, you can select the desired item on the screen by using
the 5-way button.
Press the / / / button to select an item, and then press the * 1 button to
confirm.
*1 There are tactile dots. Use them to help with button operations.
/ / / button: Selects an item.
button: Confirms an item.
Continued
BACK/HOME
button
5-way button
Table of
Contents
Home
Menu
Index

12
12
Basic Operations and Screens
In this manual, operating instructions from the [Home] menu are described as
below.
Example: From the [Home] menu, select [Music] [Album] desired
album desired song.
The actual operations for the example above are shown below.
Press and hold the BACK/HOME button.
The [Home] menu appears.
BACK/HOME button
Press the / / / button to select
[Music], and then press the button
to confirm.
The search menu appears.
Press the / / / button to select
[Album], and then press the button
to confirm.
The album list appears.
Continued
Table of
Contents
Home
Menu
Index

13
13
Basic Operations and Screens
Press the / / / button to select an
album, and then press the button to
confirm.
The song list for the selected album appears.
Y
ou can scroll the list by pressing the /
button.
Press the / / / button to select a
song, and then press the button to
confirm.
The music playback screen appears and
playback begins.
To return to the [Home] menu during operation
Press and hold the BACK/HOME button.
To return to the previous screen during operation
Press the BACK/HOME button.
Table of
Contents
Home
Menu
Index

14
14
Basic Operations and Screens
How to Use the Option Menu
The option menu items vary function-to-function, allowing you to change the
settings of each application.
You can display the option menu by pressing the OPTION/PWR OFF button.
From the option menu, you can select the desired item on the screen by using
the 5-way button.
Press the / / / button to select an item, and then press the * 1 button to
confirm.
*1 There are tactile dots. Use them to help with button operations.
/ / / button: Selects an item.
button: Confirms an item.
For example, the operations for setting [Play Mode] option to [Shuffle] are
shown below.
From the music playback screen, press
the OPTION/PWR OFF button.
The option menu appears.
OPTION/PWR OFF button
Continued
5-way button
OPTION/PWR OFF
button
Table of
Contents
Home
Menu
Index

15
15
Basic Operations and Screens
Press the / / / button to select
[Play Mode], and then press the
button to confirm.
Press the / / / button to select
[Shuffle], and then press the button
to confirm.
The play mode changes to [Shuffle].
The items of the option menu differ, depending on the screen on which you
press the OPTION/PWR OFF button.
For details, see the following pages.
“Using the Music Option Menu” ( p. 42)
“Using the Video Option Menu” ( p. 52)
“Using the Photo Option Menu” ( p. 61)
“Using the FM Radio Option Menu” ( p. 69)
Table of
Contents
Home
Menu
Index

16
16
Basic Operations and Screens
About the Software
Bundled Software
Content Transfer
Content Transfer can transfer music, videos or photos from a computer to the
player by a simple drag-and-drop operation. You can use Windows Explorer or
iTunes, etc., to drag-and-drop data to Content Transfer. Content Transfer can
also convert a video file of a format not supported by the player into a playable
format. For details on operation, refer to the Help of the software.
Transferable files: Music (MP3, WMA, AAC, WAV), Photo (JPEG), Video
(WMV*1)
*1 Some WMV files cannot be played back after being transferred by Content Transfer. If you
retransfer them using Windows Media Player 11, they may become playable.
Hint
ATRAC files managed by SonicStage can be transferred to the player after conversion to
MP3 file format. To convert files, download the MP3 Conversion Tool from the
customer support Web site ( p. 107).
Compatible Software
Windows Media Player 11
Windows Media Player can import audio data from CDs and transfer data to
the player.
Transferable files: Music (MP3, WMA), Video (WMV), Photo (JPEG)
For details on operation, refer to the Help of the software or visit the following
website.
http://www.support.microsoft.com/
Hint
Some computers that already have Windows Media Player 10 installed may encounter
file limitations (AAC, video files, etc.) when transferring by drag-and-drop. If you install
Windows Media Player 11 from the Windows Media Player download site, you can solve
this problem, allowing you to transfer by drag-and-drop again. Before installing
Windows Media Player 11 on your computer, make sure to check whether your software
or service corresponds to Windows Media Player 11.
Table of
Contents
Home
Menu
Index
17
17
Preparing the Player
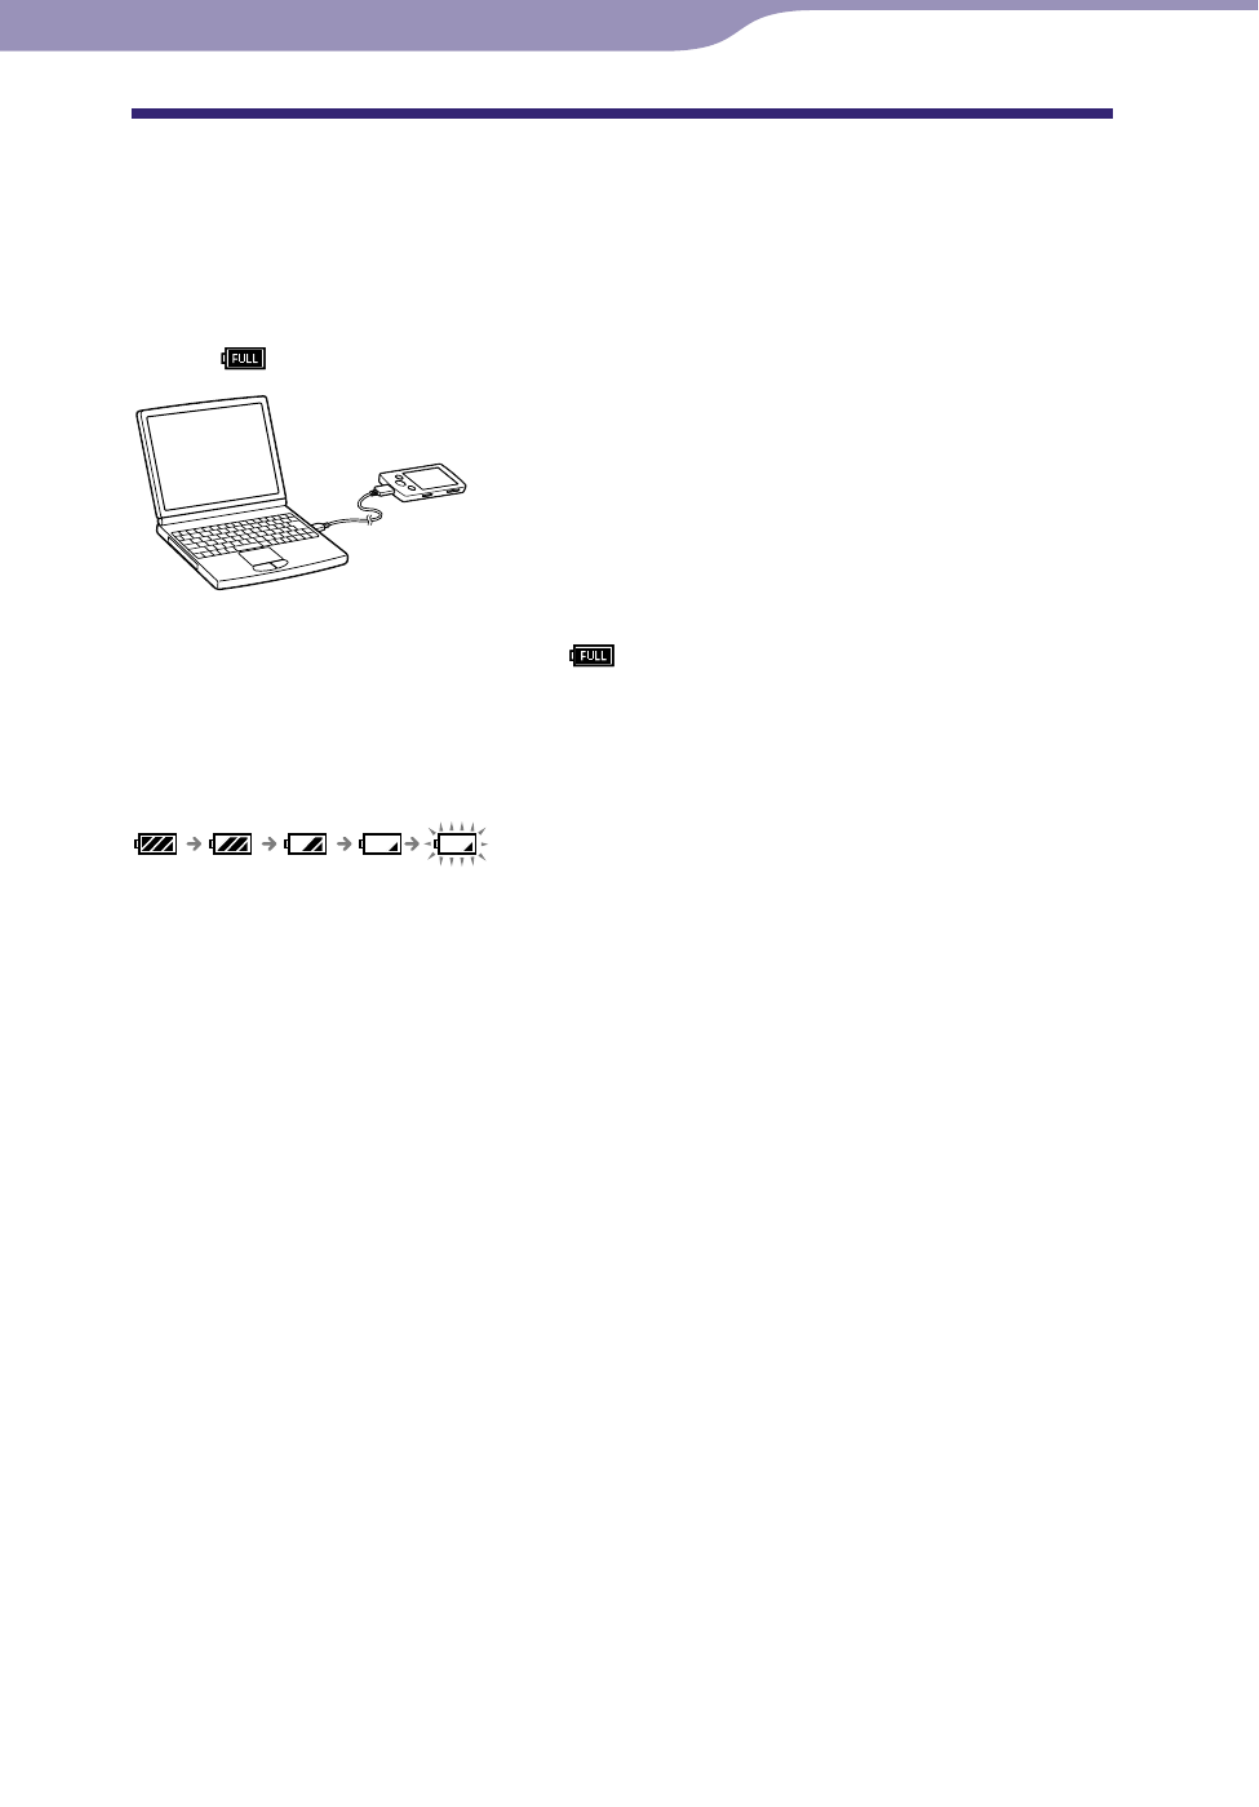
Charging the Battery
The player’s battery is recharged while the player is connected to a running
computer.
When you connect the player to your computer, use the supplied USB cable.
When the remaining battery indication in the lower right corner of the display
shows: , charging is completed (charging time is approx. 2 hours).
When you use the player for the first time, or if you have not used the player
for a long time, recharge it fully (to in the remaining battery indication of
the display).
About the battery indicator
The battery indicator in the information area shows remaining battery charge.
As the battery power gets lower, the bars of the icon disappear. If [LOW
BATTERY. Please Charge.] appears, you cannot use the player. In this case,
charge the battery by connecting to your computer. See p. 114 on battery
duration.
Continued
Preparing the Player
Table of
Contents
Home
Menu
Index

18
18
Preparing the Player
Note
If you charge the player when it has not been used for a long period, your computer may
not recognize the player or nothing may appear on the display. Charge the player for
about 5 minutes, and it starts operating properly.
Charge the battery in an ambient temperature of between 5 ºC to 35 ºC (41 ºF to 95 ºF).
If you try to charge the battery in an ambient temperature outside this range, the battery
indicator may blink, and charging cannot be performed.
The number of times the battery can be recharged before it is used up is approximately
500 times. This number may vary, depending on the conditions under which you use the
player.
The battery indicator on the display is only an estimate. For example, one section of
black in the indicator will not always indicate exactly one-fourth of the battery’s charge.
[Do not disconnect.] appears in the display while the computer accesses the player. Do
not disconnect the supplied USB cable while [Do not disconnect.] appears or data being
transferred may be damaged.
The control buttons on the player become inoperative while it is connected to a
computer.
If you do not intend to use the player for over half a year, charge the battery at least once
during this time to maintain battery performance.
Some USB devices connected to the computer may interfere with proper operation of
the player.
We do not guarantee battery recharging using a personally assembled/modified
computer.
If the computer enters a power saving mode, such as the Sleep or Hibernation mode,
while the player is connected via the USB cable, the player’s battery will not be charged.
Instead, the player continues to draw power from the battery, discharging it.
Do not leave the player connected for extended periods to a laptop computer that is not
connected to AC power, since the player may discharge the computer’s battery.
While the player is connected to a computer, do not turn on, restart, wake up from sleep
mode, or shut down the computer. These operations may cause the player to
malfunction. Disconnect the player from the computer before performing these
operations.
Heat may build up in the player while charging. This is not malfunction.
Table of
Contents
Home
Menu
Index

19
19
Preparing the Player
Selecting the Display Language
You can select from a variety of languages for menus and messages.
From the [Home] menu, select [Settings] [Language Settings]
desired language setting.
Language Messages and menus are displayed in
[Deutsch] German
[English] English
[Español] Spanish
[Français] French
[Italiano] Italian
[Português] Portuguese
[Русский] Russian
[ ] Korean
[ ] Simplified Chinese
[ ] Traditional Chinese
BACK/HOME
button
5-way button
[Settings]
Table of
Contents
Home
Menu
Index

20
20
Preparing the Player
Setting the Date and Time
Some applications of the player do not work correctly until the date and time
are set. Set the current date and time before using the player.
From the [Home] menu, select [Settings] [Common Settings]
[Set Date-Time].
Press the / button to select a year, and then press the /
button to change the value.
As in step , adjust the settings for month, date, hour, and
minute.
Press the button to confirm.
To display the current time
Select [Clock Display] on the [Home] menu.
Press the OPTION/PWR OFF button on the [Home] menu or the playback
screen, and select [Clock Display] from the option menu.
Hint
You can select the date format from among [YYYY/MM/DD], [MM/DD/YYYY], and
[DD/MM/YYYY]. Furthermore, you can select the time format from either [12-hour] or
[24-hour ]. For details, see “Setting the date format [Date Display Format]” (
p. 78), or
“Setting the time format [Time Display Format]” ( p. 78).
Note
If the battery power is used up because, for example, the player has not been used for a
long time, your settings for date and time may be lost and “-” will be displayed instead of
the current date and time.
The clock may gain or lose up to 60 seconds per month. In this case, set the clock again.
BACK/HOME
button
5-way button
[Settings]
Table of
Contents
Home
Menu
Index

21
21
Transferring Music
Selecting the Way to Transfer Music
You can import music from audio CDs or from the Internet, etc. To import
music into your computer, use appropriate software.
You can transfer music to the player in the following three ways.
Transferring music from CDs using Windows Media Player 11 (
p. 22)
You can import music from your CDs, etc., to your computer, and transfer
them to the player using Windows Media Player 11.
Transferring music from iTunes, etc., using Content Transfer (
p. 26)
If you have already managed music with iTunes, etc., you can transfer
them to the player using Content Transfer.
Transferring music by drag-and-drop using Windows Explorer (
p. 28)
You can directly transfer music stored on your computer by drag-and-drop
using Windows Explorer.
Hint
For detailed information on how to import music, refer to the Help of each software.
For details about supported file formats, see “Supported file format” ( p. 110).
The player does not use SonicStage software (SonicStage software, developed by Sony,
manages music on a computer or transfers music to other types of players). For this
player, you can transfer music in the above three ways, not using SonicStage.
ATRAC files managed by SonicStage can be transferred to the player after conversion to
MP3 file format. To convert files, download the MP3 Conversion Tool from the
customer support Web site ( p. 107).
The maximum number of files per folder in the [MUSIC] folder is 4,000.
Transferring Music
Table of
Contents
Home
Menu
Index
22
22
Transferring Music
Transferring Music Using Windows Media Player 11
You can import songs from your CDs, etc., to your computer, and transfer
them to the player using Windows Media Player 11.
Hint
For details about usage, or support on Windows Media Player, refer to the Windows
Media Player information from the following web site:
http://support.microsoft.com/
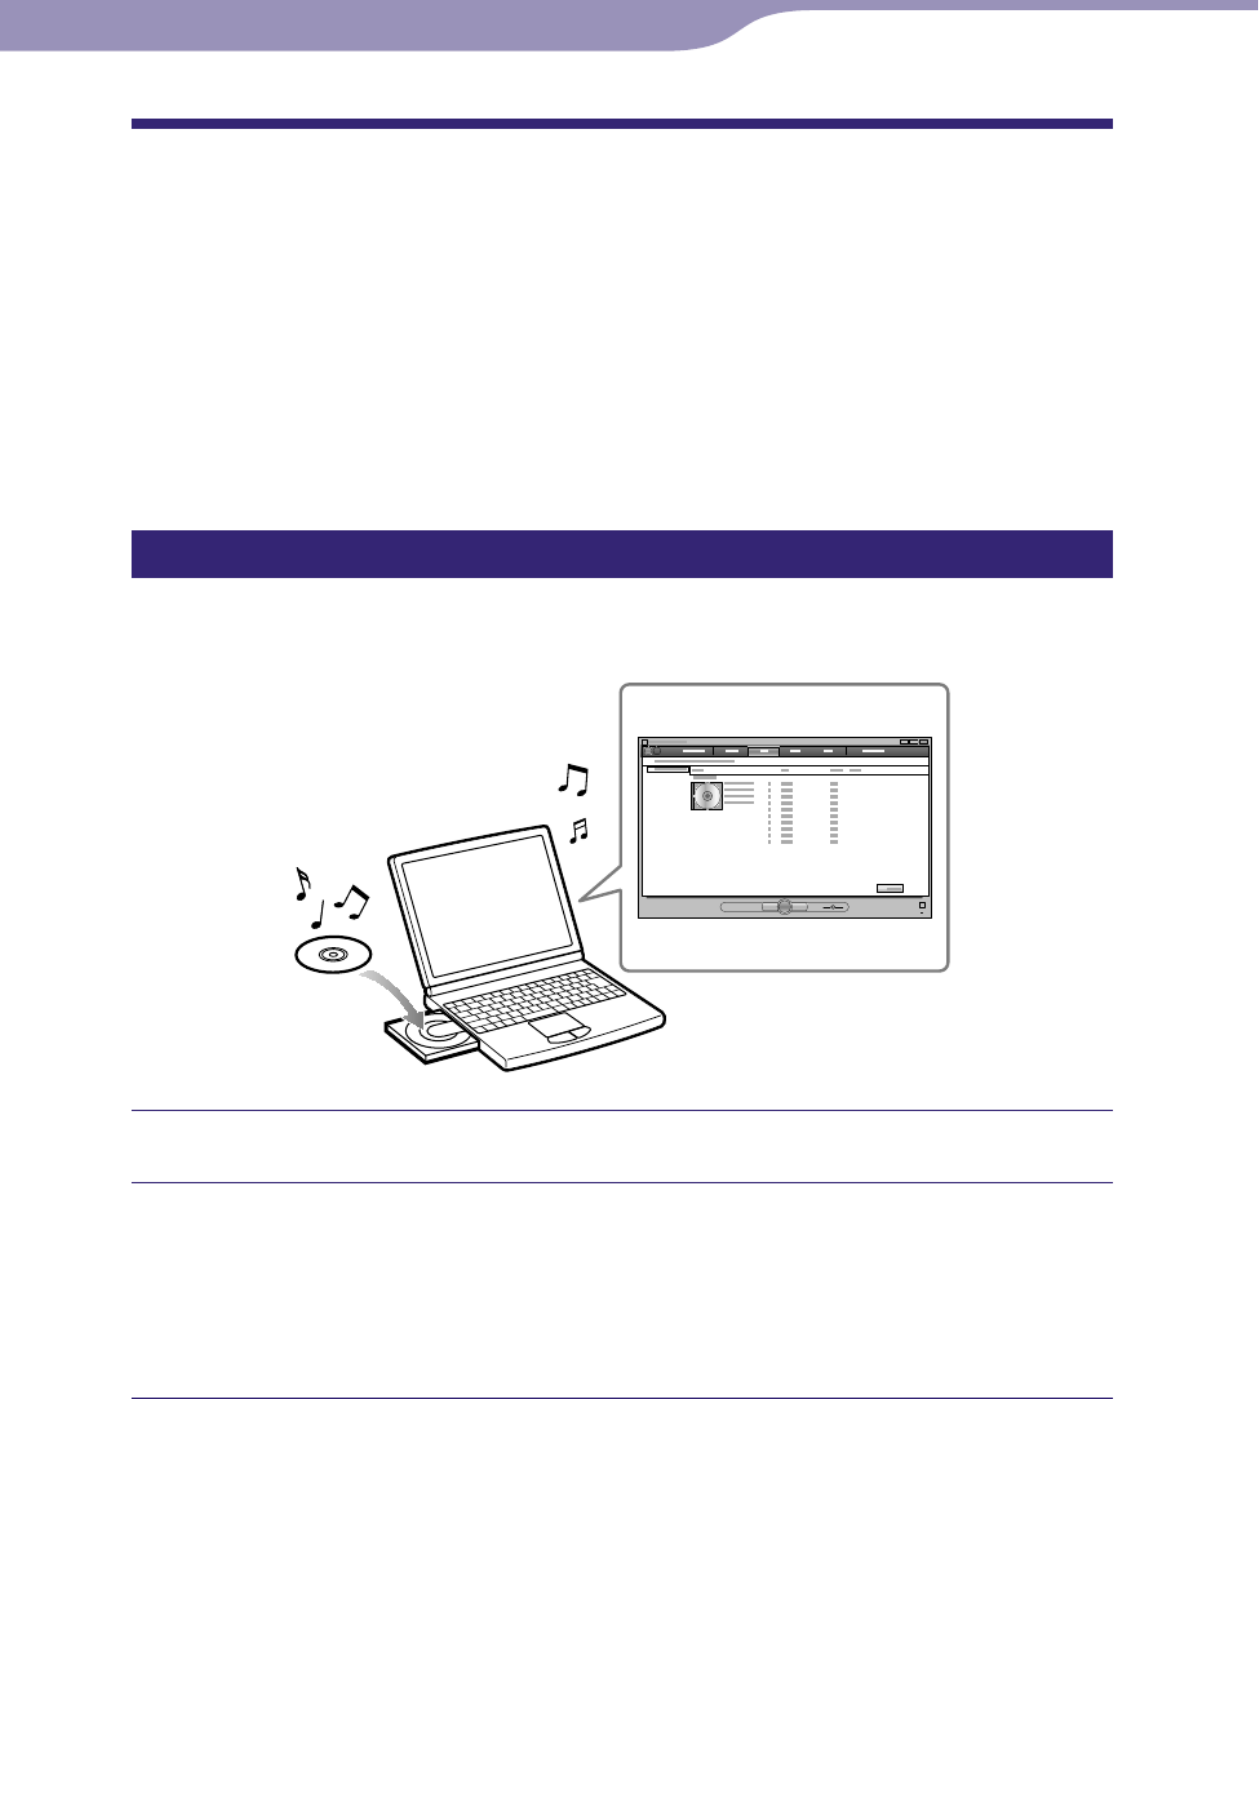
Importing music from CDs
You can use Windows Media Player 11 to copy (rip) music from your CDs.
Follow these instructions to rip songs from a CD to your computer.
Insert an audio CD.
Start up Windows Media Player 11, and then click the [Rip] tab at
the top of the window.
When connected to the Internet, Windows Media Player 11 obtains CD
information (CD title, song name or artist name, etc.) and displays it in the
window.
Continued
Table of
Contents
Home
Menu
Index

23
23
Transferring Music
Click [Start Rip].
Windows Media Player 11 begins to import the CD.
The imported songs are indicated as [Ripped to library]. Wait until all
songs have been imported.
Hint
Imported songs are stored in the [My Music] folder (Windows XP) or [Music] folder
(Windows Vista) of the computer. Click the [Library] tab of the Windows Media Player
11 window to find them.
Windows Media Player 11 obtains the CD information from a database on the Internet.
However, some CDs’ information may not be available in the database. If your CDs’
information is missing, you can add it after importing. For information about adding
and editing CD information, refer to the Help of Windows Media Player 11.
If you want a song not to be imported, uncheck the checkbox to the left of the song title.
Note
Imported songs are limited to private use only. Use of a song beyond this limitation
requires permission of the copyright holders.
Table of
Contents
Home
Menu
Index
24
24
Transferring Music
Transferring Music
You can use Windows Media Player 11 to transfer music from your computer
to the player.
Note
Do not disconnect the USB cable while [Do not disconnect.] appears on the player, as
the data being transferred may be damaged.
If Content Transfer starts automatically after connecting the player to your computer
using the supplied USB cable, close or ignore Content Transfer as Content Transfer need
not be used. For details on setting automatic start of Content Transfer, refer to the Help
of Content Transfer.
Start up Windows Media Player 11, and then connect the player to
your computer using the supplied USB cable.
Insert the connector of the USB cable into the player.
The [Device Setup] window appears.
Click [Cancel].
Close the auto play window, if it appears, by clicking [Cancel] or the Close
icon.
If you click [Finish] instead of [Cancel], the entire library data of
Windows Media Player is automatically copied to the player. If the
library data size is larger than the available storage space on the player,
the copy process will not start.
You can open the [Device Setup] window at any time. To open it, right-
click [WALKMAN] on the left side of the Windows Media Player
window, and then click [Set Up Sync].
Continued
Table of
Contents
Home
Menu
Index

25
25
Transferring Music
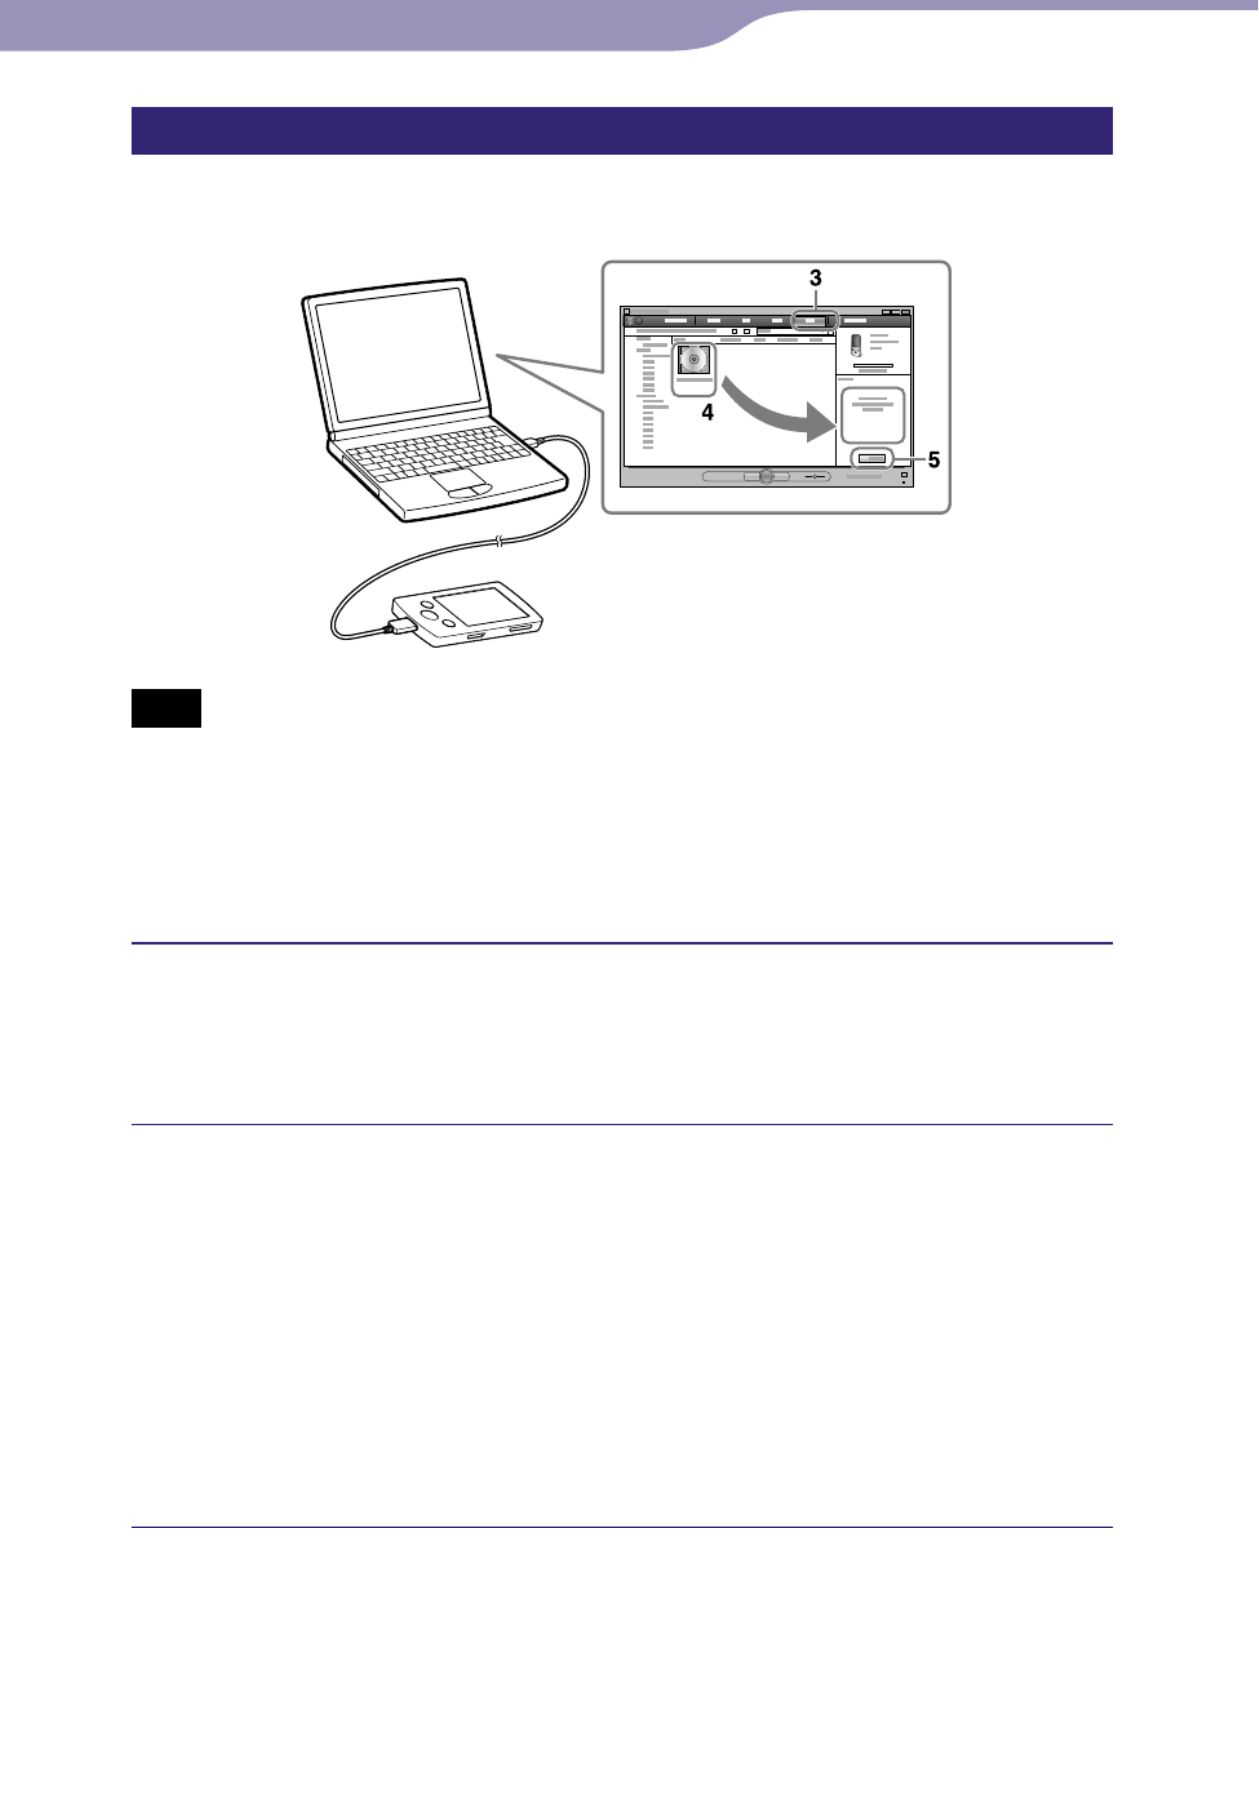
Click the [Sync] tab on the Windows Media Player 11 window.
Drag-and-drop the desired songs to the Sync List on the right side
of the window.
The songs are added to the Sync List.
Click [Start Sync] to start synchronization.
When synchronization is complete, a message confirming you can
disconnect the player appears on the Sync List. After completion, close
Windows Media Player 11, and disconnect the player from the computer.
Table of
Contents
Home
Menu
Index

26
26
Transferring Music
Transferring Music Using Content Transfer
If you have already managed music with iTunes, etc., you can transfer them to
the player using Content Transfer. You can use iTunes, etc., to drag-and-drop
music to Content Transfer.
Note
Do not disconnect the USB cable while [Do not disconnect.] appears on the player, or
the data being transferred may be damaged.
Content Transfer cannot be used for Windows Media Player contents.
Contents with copyright protection cannot be transferred.
Content Transfer supports data transfer from iTunes 8.1 to the player. For details on
restrictions on transferring songs from iTunes, visit the customer support Web sites (
p. 107).
Connect the player to your computer using the supplied USB cable.
Insert the connector of the USB cable into the player.
Content Transfer starts automatically.
For details on setting automatic start and general operation of Content
Transfer, refer to the Help of Content Transfer.
You can also click [All programs] in the [start] menu, and then [Content
Transfer] - [Content Transfer] to start the software.
Start up iTunes, etc.
Continued
Table of
Contents
Home
Menu
Index

27
27
Transferring Music
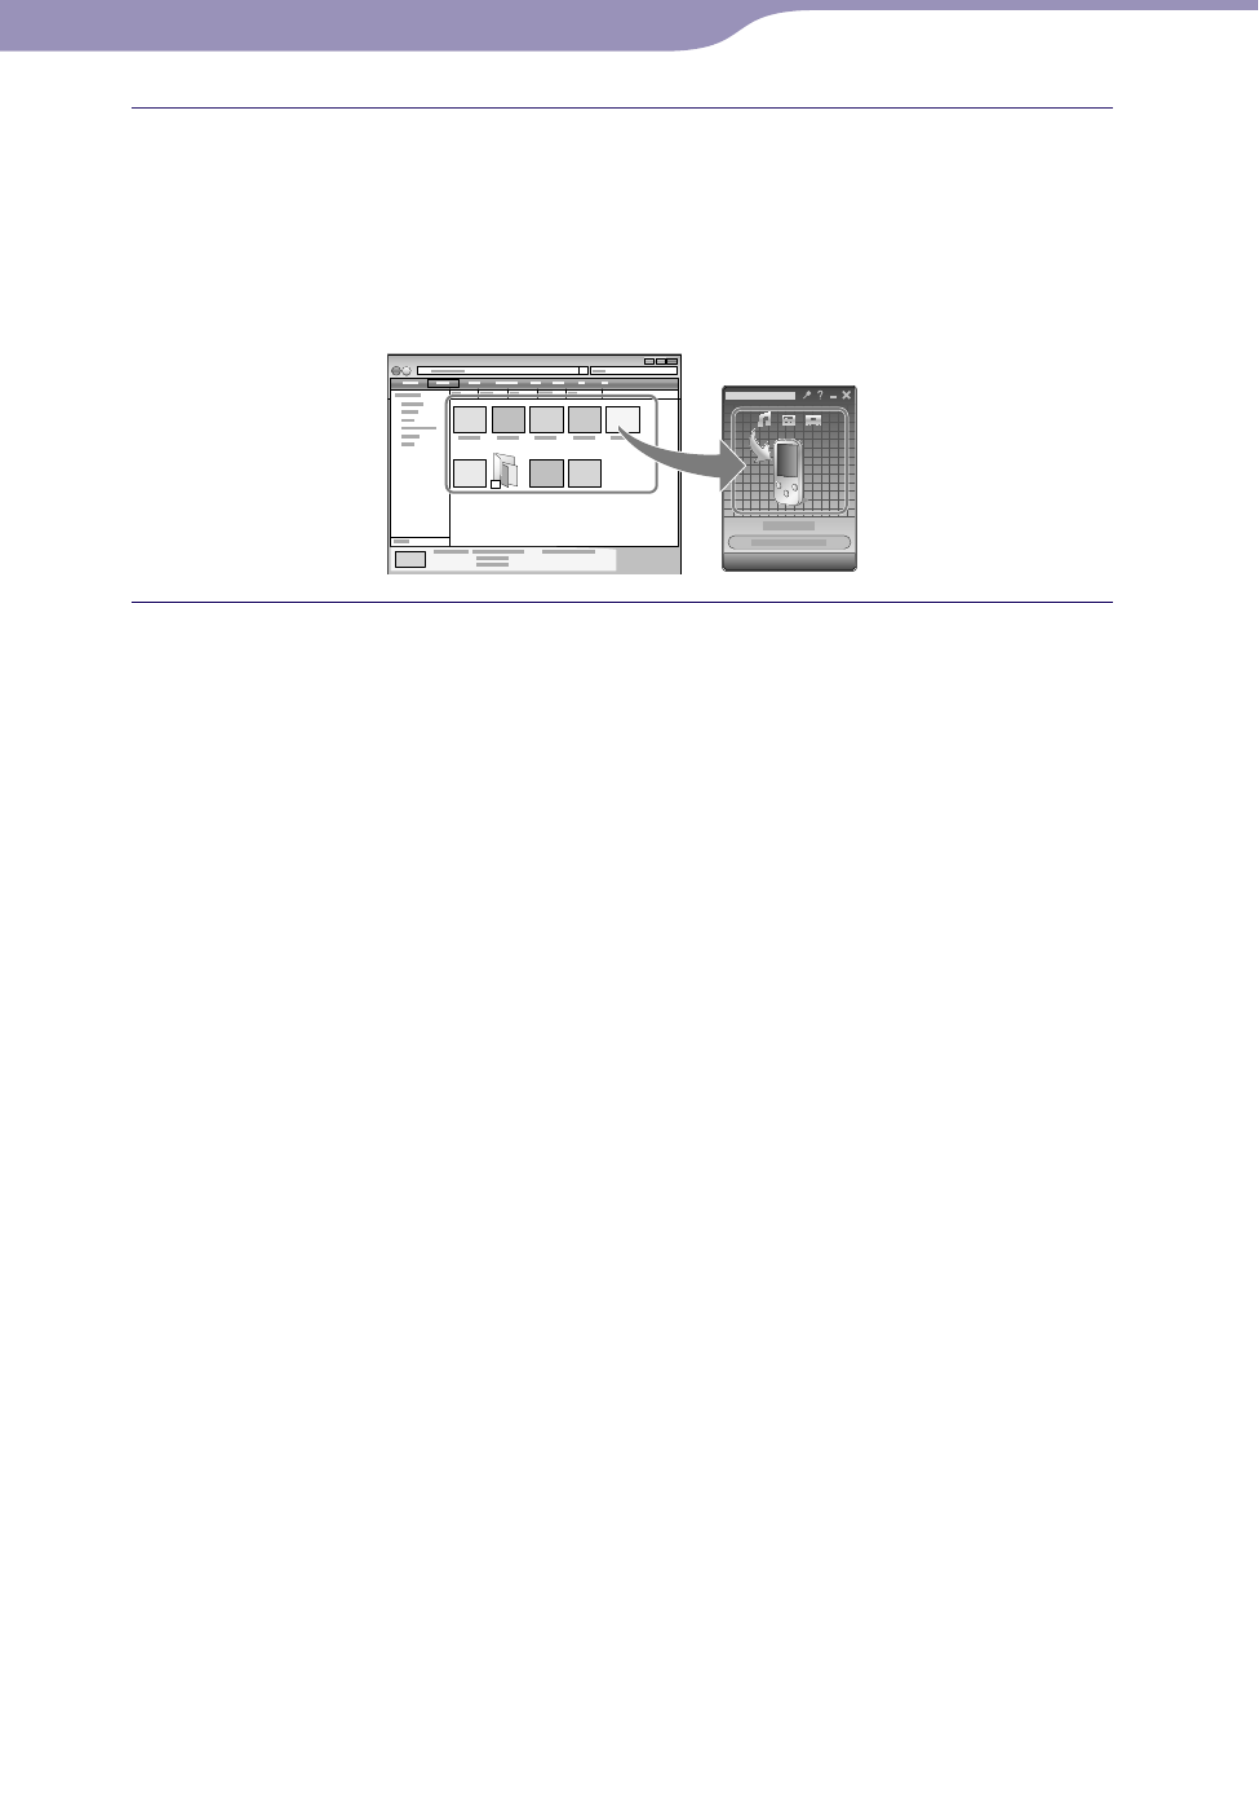
Select the desired songs from iTunes, etc., and drag-and-drop them
to Content Transfer.
Content Transfer recognizes the type of data by filename extension, and
sends it to the appropriate folder of the player.
iTunes, etc.
Content Transfer
Table of
Contents
Home
Menu
Index
28
28
Transferring Music
Transferring Music Using Windows Explorer
You can directly transfer data by drag-and-drop using Windows Explorer on
your computer.
Playable data hierarchy has rules. To transfer data properly, see the following
instructions.
Hint
Some computers that already have Windows Media Player 10 installed may encounter a
limitation on the number of files (AAC, video files, etc.) that can be transferred by drag-
and-drop. If you install Windows Media Player 11 from the Windows Media Player
download site, you can solve this problem, allowing you to transfer by drag-and-drop
again. Before installing Windows Media Player 11 on your computer, make sure to check
whether your software or service corresponds to Windows Media Player 11.
Continued
Table of
Contents
Home
Menu
Index
29
29
Transferring Music
Note
Data hierarchy may differ, depending on your computer environment.
Do not disconnect the USB cable while [Do not disconnect.] appears on the player, as
the data being transferred may be damaged. If the player is disconnected while files are
being transferred, unnecessary files may be left in the player. In this case, transfer usable
files back to the computer and format the player ( p. 79).
Do not change folder names or delete the [MUSIC], [MP_ROOT], [MPE_ROOT],
[VIDEO], [PICTURE] and [PICTURES] folders.
Do not change folder or file names directly under the [MP_ROOT] and [MPE_ROOT]
folders. Otherwise, they will not be displayed on the player.
Some files may not be played back on the player due to copyright protection. Although
you can transfer more files or folders to the player, the player cannot display or play any
files, folders, or levels that exceed this limit.
If Content Transfer starts automatically after connecting the player to your computer
using the supplied USB cable, close or ignore Content Transfer as Content Transfer need
not be used. For details on setting automatic start of Content Transfer, refer to the Help
of Content Transfer.
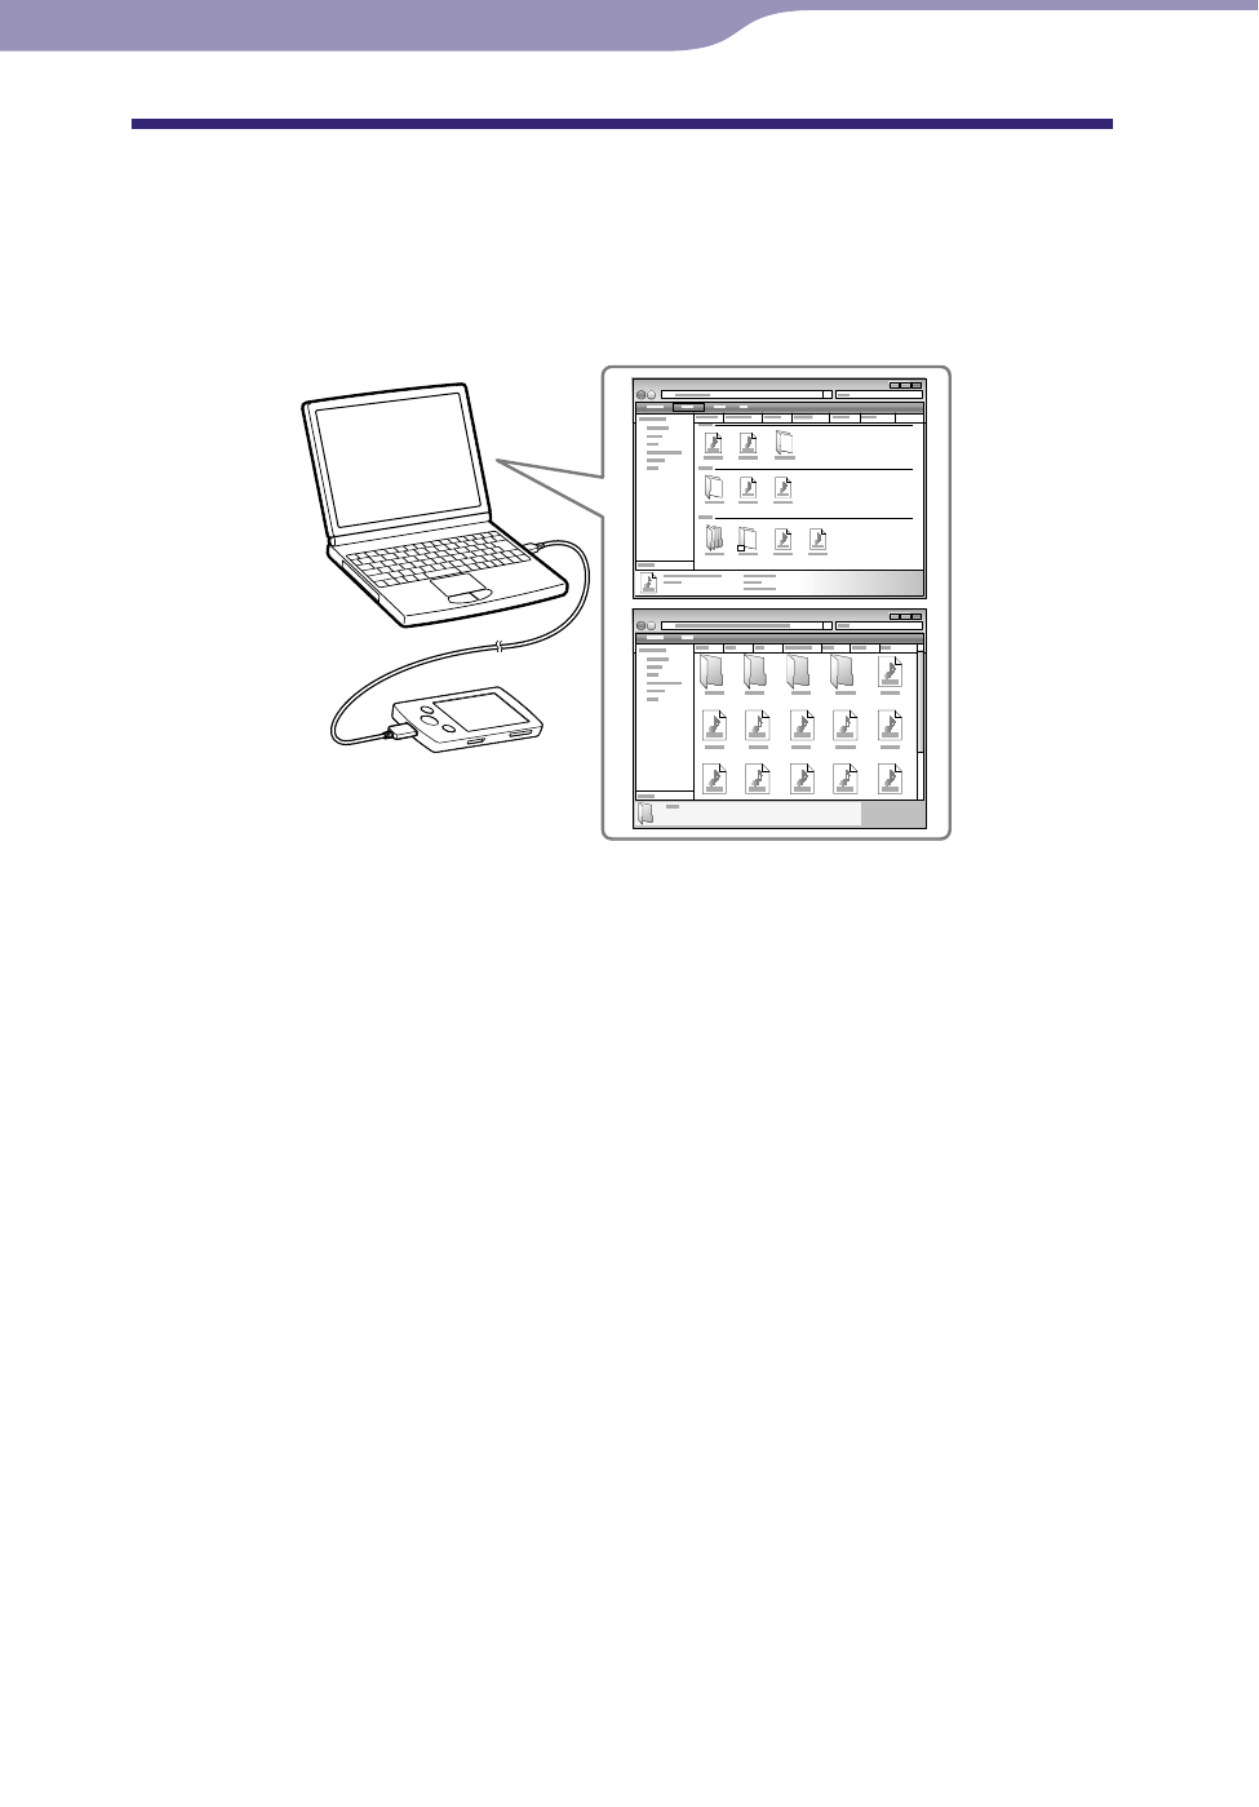
Connect the player to your computer using the supplied USB cable.
Insert the connector of the USB cable into the player.
Click [start] – [My Computer] or [Computer] – [WALKMAN] –
[Storage Media], and then select the [MUSIC] folder.
Data hierarchy may differ, depending on your computer environment.
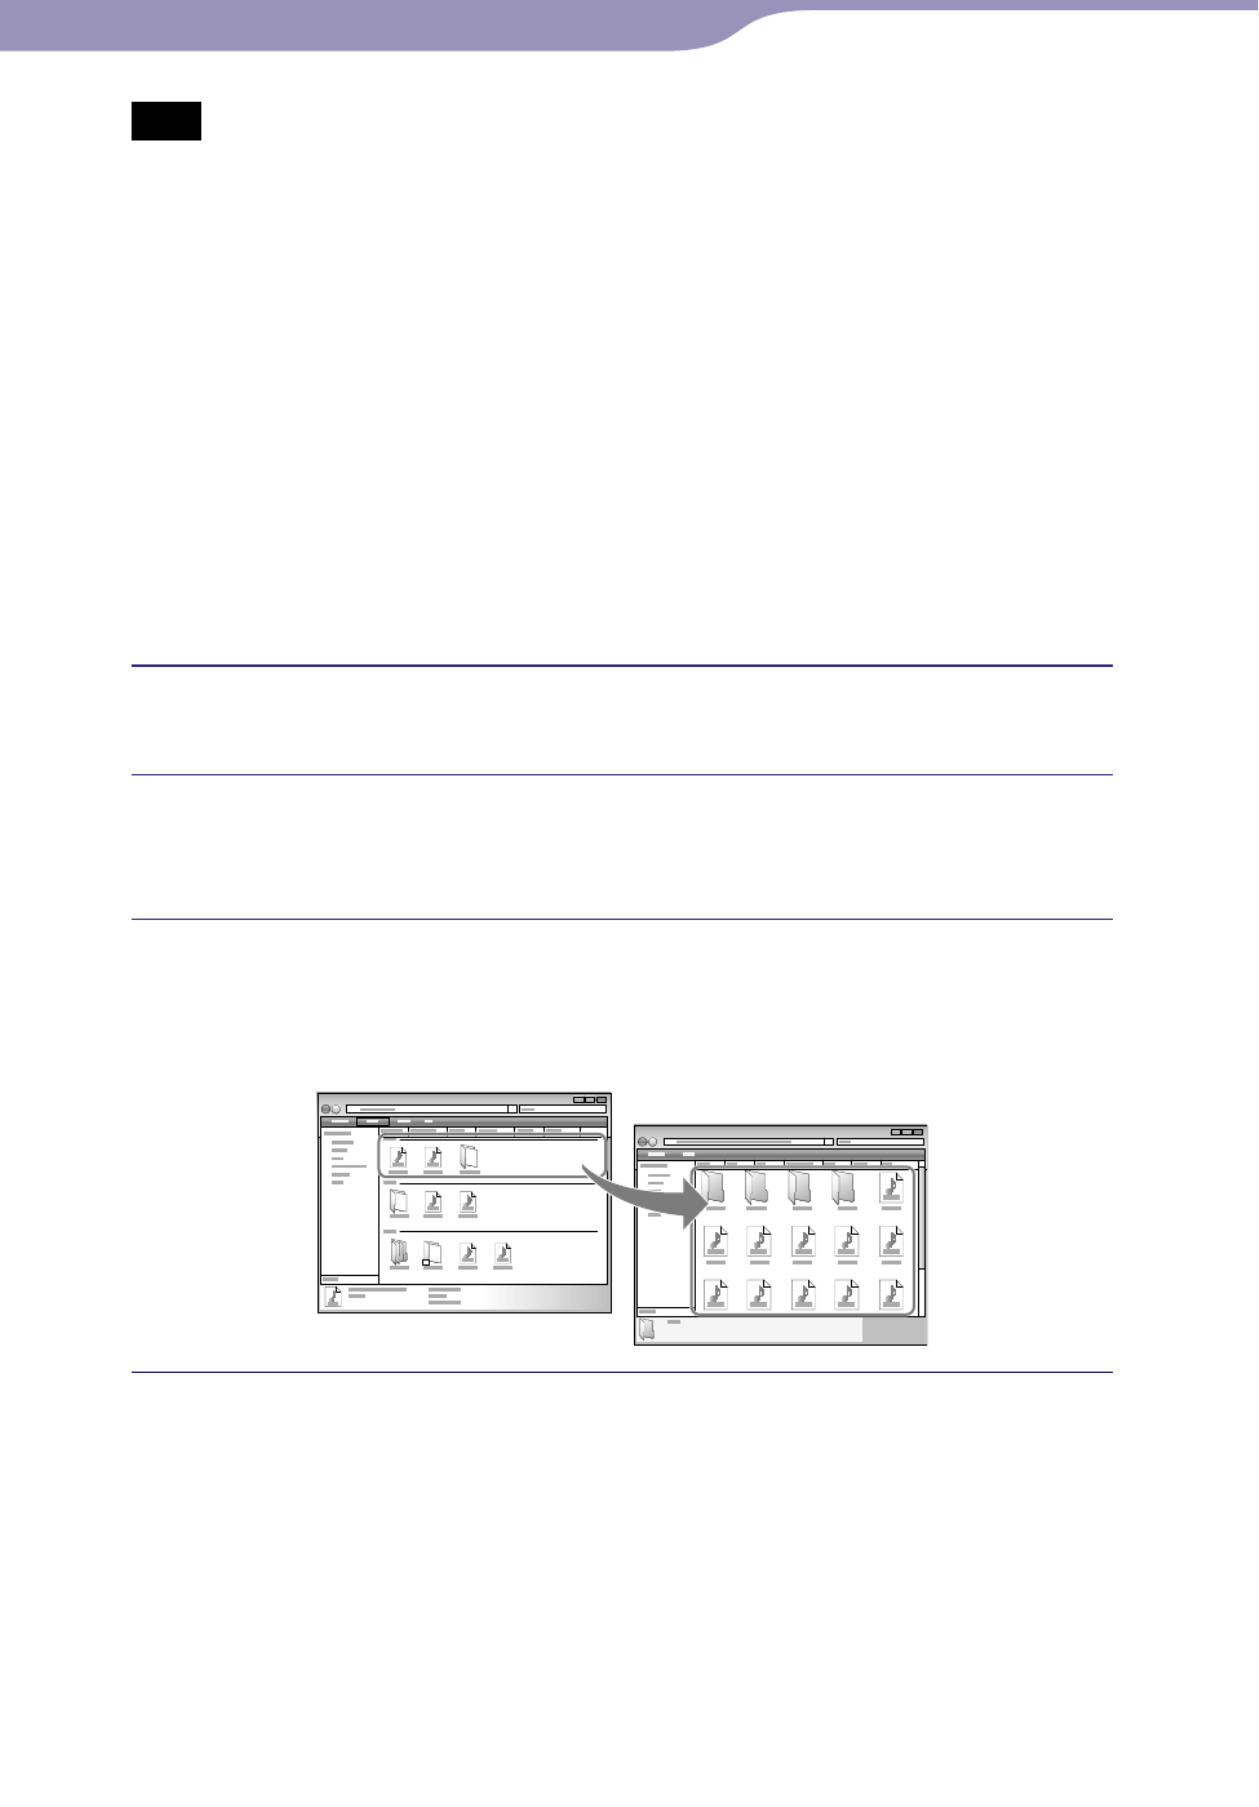
Drag-and-drop files or folders into the [MUSIC] folder, or one of its
subfolders.
Accessibility to files and folders beyond the 8th level is not guaranteed.
Music files or folders in your computer
[MUSIC] folder in your player
Table of
Contents
Home
Menu
Index

30
30
Transferring Videos/Photos
Selecting the Way to Transfer Videos/Photos
You can import videos from recorded videos or from the Internet, etc.
You can import photos from a digital camera, etc.
To import videos/photos into your computer, use appropriate software.
You can transfer videos/photos to the player in the following three ways.
Transferring videos/photos using Content Transfer ( p. 31)
You can transfer videos/photos stored on your computer to the player
using Content Transfer.
Transferring videos/photos by drag-and-drop using Windows
Explorer ( p. 33)
You can directly transfer videos/photos stored on your computer by drag-
and-drop using Windows Explorer.
Transferring videos/photos using Windows Media Player 11
You can transfer videos/photos managed with Windows Media Player 11
to the player using Windows Media Player 11.
For details about usage, or support on Windows Media Player, refer to the
Windows Media Player information from the following web site:
http://support.microsoft.com/
Hint
For detailed information on how to import videos/photos, refer to the Help of each
software.
For details about supported file formats, see “Supported file format” ( p . 110).
The maximum number of files per folder in the [PICTURE], [PICTURES] or [DCIM]
folder is 4,000.
Transferring Videos/Photos
Table of
Contents
Home
Menu
Index

31
31
Transferring Videos/Photos
Transferring Videos/Photos Using Content Transfer
You can transfer videos/photos stored on your computer to the player using
Content Transfer. You can transfer videos/photos by drag-and-drop of the
desired videos/photos from Windows Explorer to Content Transfer.
Note
Do not disconnect the USB cable while [Do not disconnect.] appears on the player, as
the data being transferred may be damaged.
Contents with the copyright protection cannot be transferred.
Connect the player to your computer using the supplied USB cable.
Insert the connector of the USB cable into the player.
Content Transfer starts automatically.
For details on setting automatic start and general operation of Content
Transfer, refer to the Help of Content Transfer.
You can also click [All programs] in the [start] menu, and then [Content
Transfer] - [Content Transfer] to start the software.
Continued
Table of
Contents
Home
Menu
Index
32
32
Transferring Videos/Photos
Select the desired videos/photos from Windows Explorer, and drag-
and-drop them to Content Transfer.
Content Transfer recognizes the type of data by filename extension, and
sends it to the appropriate folder of the player.
Content Transfer
Video/photo files or folders
in your computer
Table of
Contents
Home
Menu
Index

33
33
Transferring Videos/Photos
Transferring Videos/Photos Using Windows Explorer
You can directly transfer data by drag-and-drop using Windows Explorer on
your computer.
Playable data hierarchy has rules. To transfer data properly, see the following
instructions.
Hint
Some WMV files can be played back only by transferring using Windows Media Player
11.
Some computers that already have Windows Media Player 10 installed may encounter a
limitation on the number of files (AAC, video files, etc.) that can be transferred by drag-
and-drop. If you install Windows Media Player 11 from the Windows Media Player
download site, you can solve this problem, allowing you to transfer by drag-and-drop
again. Before installing Windows Media Player 11 on your computer, make sure to check
whether your software or service corresponds to Windows Media Player 11.
Continued
Table of
Contents
Home
Menu
Index

34
34
Transferring Videos/Photos
Note
Data hierarchy may differ, depending on your computer environment.
Do not disconnect the USB cable while [Do not disconnect.] appears on the player, as
the data being transferred may be damaged. If the player is disconnected while files are
being transferred, unnecessary files may be left in the player. In this case, transfer usable
files back to the computer and format the player ( p. 79).
Do not change folder names or delete the [MUSIC], [MP_ROOT], [MPE_ROOT],
[VIDEO], [PICTURE] and [PICTURES] folders.
Do not change folder or file names directly under the [MP_ROOT] and [MPE_ROOT]
folders. Otherwise, they will not be displayed on the player.
Some files may not be played back on the player due to copyright protection. Although
you can transfer more files or folders to the player, the player cannot display or play any
files, folders, or levels that exceed this limit.
If Content Transfer starts automatically after connecting the player to your computer
using the supplied USB cable, close or ignore Content Transfer as Content Transfer need
not be used. For details on setting automatic start of Content Transfer, refer to the Help
of Content Transfer.
Connect the player to your computer using the supplied USB cable.
Insert the connector of the USB cable into the player.
Click [start] – [My Computer] or [Computer] – [WALKMAN] –
[Storage Media], and then select the [VIDEO] or [PICTURE] folder.
Data hierarchy may differ, depending on your computer environment.
Drag-and-drop files or folders into the [VIDEO] or [PICTURE] folder
or one of its subfolders.
Video files or folders: drag-and-drop into the [VIDEO] folder, or one of
its subfolders.
Photo files or folders: drag-and-drop into the [PICTURE] folder, or one
of its subfolders.
Accessibility to files and folders beyond the 8th level is not guaranteed.
Video or photo files or folders
in your computer
Video: [VIDEO] folder in your player
Photo: [PICTURE] folder in your player
Table of
Contents
Home
Menu
Index

35
35
Playing Music
Playing Music
[Music]
To play music, select [Music] to display the [Music] screen.
From the [Home] menu, select [Music].
The search menu appears.
You can select the desired search method to display the music list screen
and search for songs. For details, see “Searching for Songs” (
p. 38).
Select desired search method desired
song.
The music playback screen appears and
playback of the songs begins.
Select items until a song list appears.
For details on how to operate the music
playback screen, see “Music playback
screen” ( p. 36).
Note
It may take time to start up the player or display the file/folder list when many files or
folders are stored on the player.
BACK/HOME
button
5-way button
[Music]
Playing Music
Table of
Contents
Home
Menu
Index

36
36
Playing Music
Music playback screen
Operations on the music playback screen
To (screen indication) Do this
Play ( )/pause ( ) *1 Press the button.
Fast forward ( )/
fast rewind ( )
Press and hold the / button.
Find the beginning of the previous
(or current) song ( )/
find the beginning of the next
song ( )
Press the / button.
Display the cursor and scroll all
through the displayed items
Press the / button.
*
1 During pause, if there is no operation for more than 3 minutes, the player automatically enters
standby mode.
Song name
Artist name
Album title
Genre
Release year
Playing status
Table of
Contents
Home
Menu
Index
37
37
Playing Music
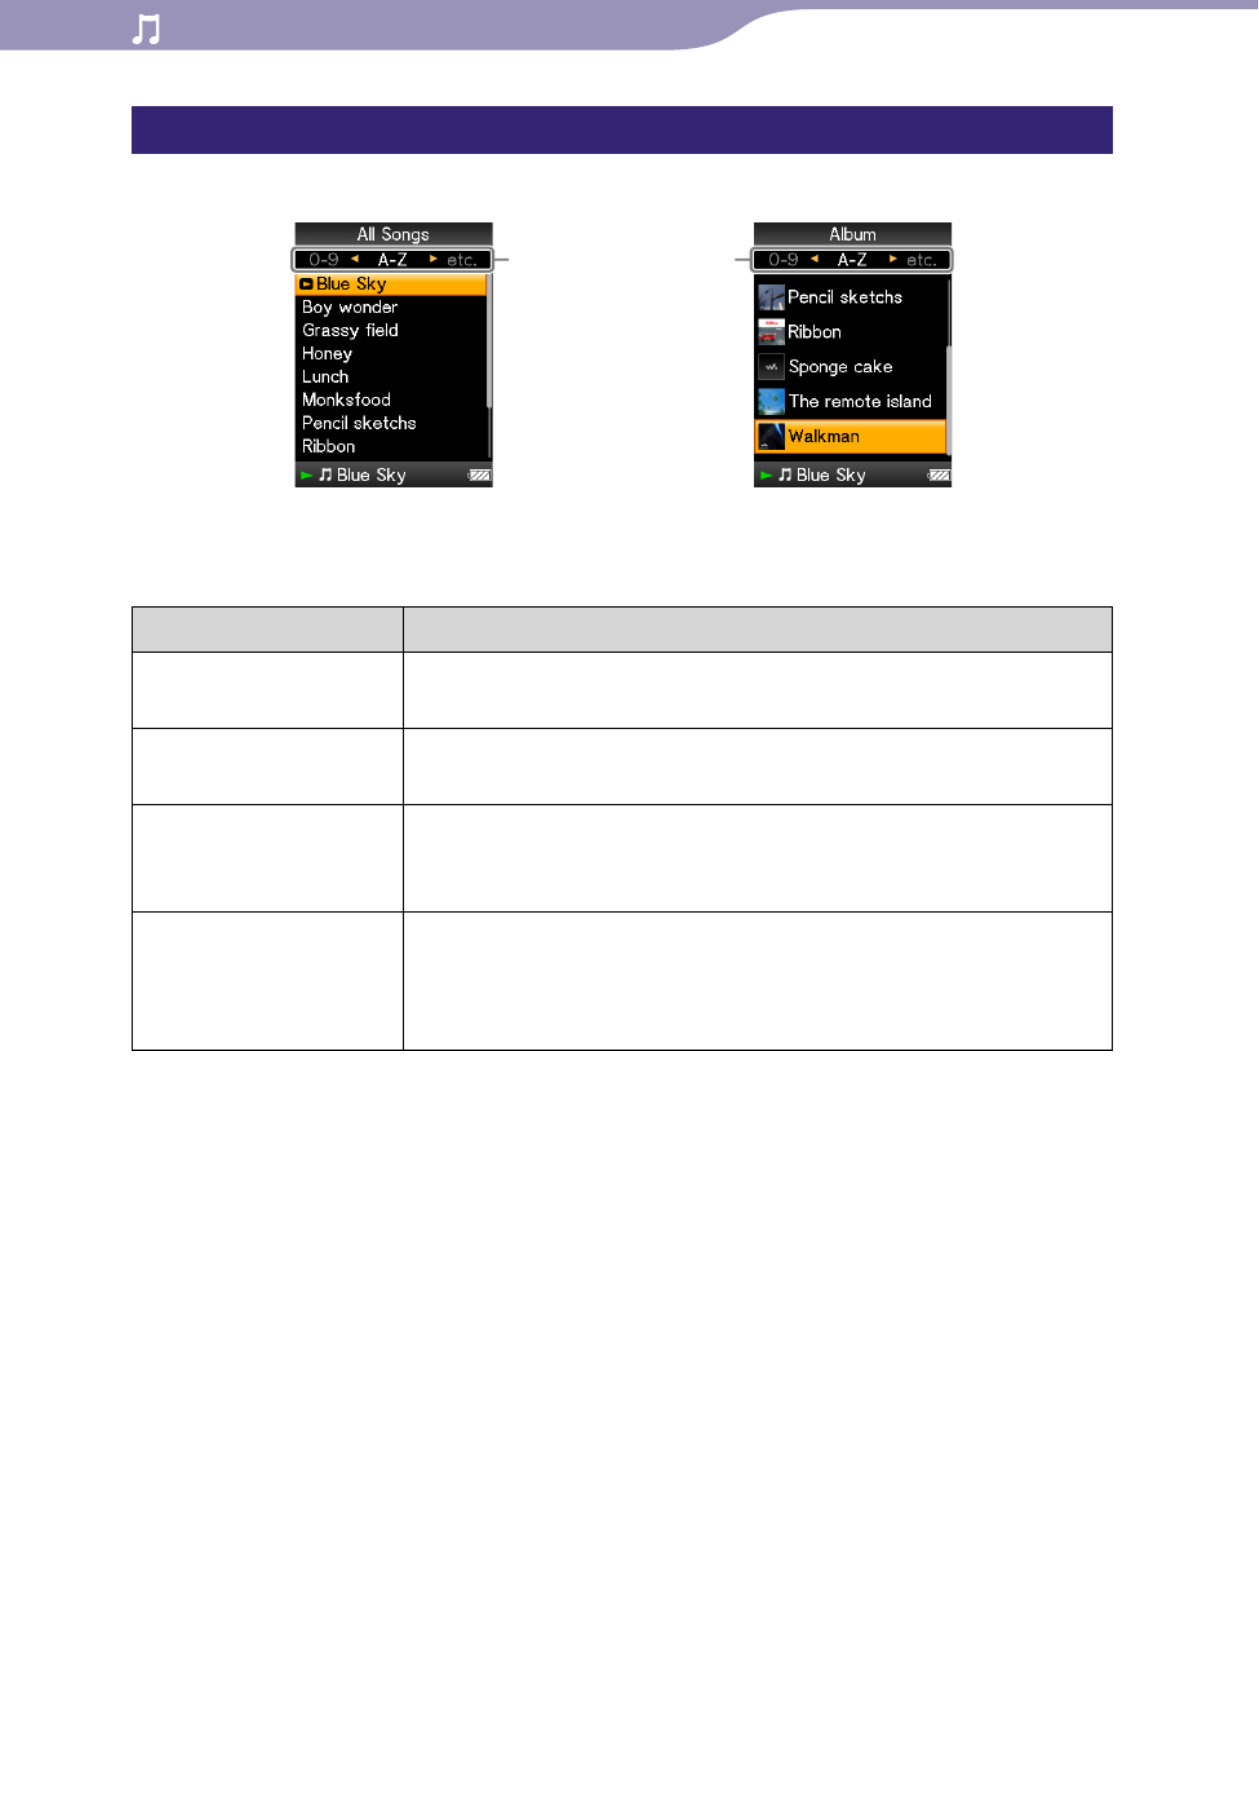
Music list screen
The following are examples of music list screens.
Operations on the music list screen
To Do this
Confirm an item in the
list
Press the button.
Move the cursor up or
down
Press the / button.
Press and hold the / button to scroll up or down faster.
Move the cursor left/
right when an index is
displayed
Press the / button.
Display the previous/
next screen of the list
when an index is not
displayed
Press the / button.
Index
The initials of song and album,
etc., names in the list section
appear.
Song list screen Album list screen
Table of
Contents
Home
Menu
Index

38
38
Playing Music
Searching for Songs
When you select [Music] on the [Home] menu, the search menu appears.
You can select the desired search method on the search menu to search the
music list for desired song.
Also, you can search the music list for a desired song by selecting [Playlists]
on the [Home] menu.
Hint
[All Songs], [Album] and [Artist] lists are arranged in alphanumeric order.
From the [Home] menu, select [Music] desired search method
desired song.
Select items as follows until a song list appears.
Continued
BACK/HOME
button
[Music]
5-way button [Playlists]
Table of
Contents
Home
Menu
Index

39
39
Playing Music
Search method
Method Description
[All Songs] Select a song from the song list.
[Album] Select an album song.
[Artist]*1, *2Select an artist an album song.
[Genre]*2Select a genre an artist an album song.
[Release Year]*2Select a release year an artist song.
[Folder]*3Select a folder song.
*1 “The” at the beginning of the artist name is omitted when arranging the list.
*2 You can see all the songs of the selected artist, genre or release year. On the [Artist], [Genre] or
[Release Year] list screen, select [All [XXX]].
*3 Folders are displayed in name order first, then files are displayed in name order. In this case,
upper or lower case letters are not distinguished.
Playing a playlist
You can play lists of songs (playlists).
Playlists are created using Windows Media Player 11. For information on how
to create a playlist, refer to the Help of Windows Media Player 11. Cover art
images registered to a playlist are not displayed on the player.
From the [Home] menu, select [Playlists] desired playlist
desired song.
Table of
Contents
Home
Menu
Index
40
40
Playing Music
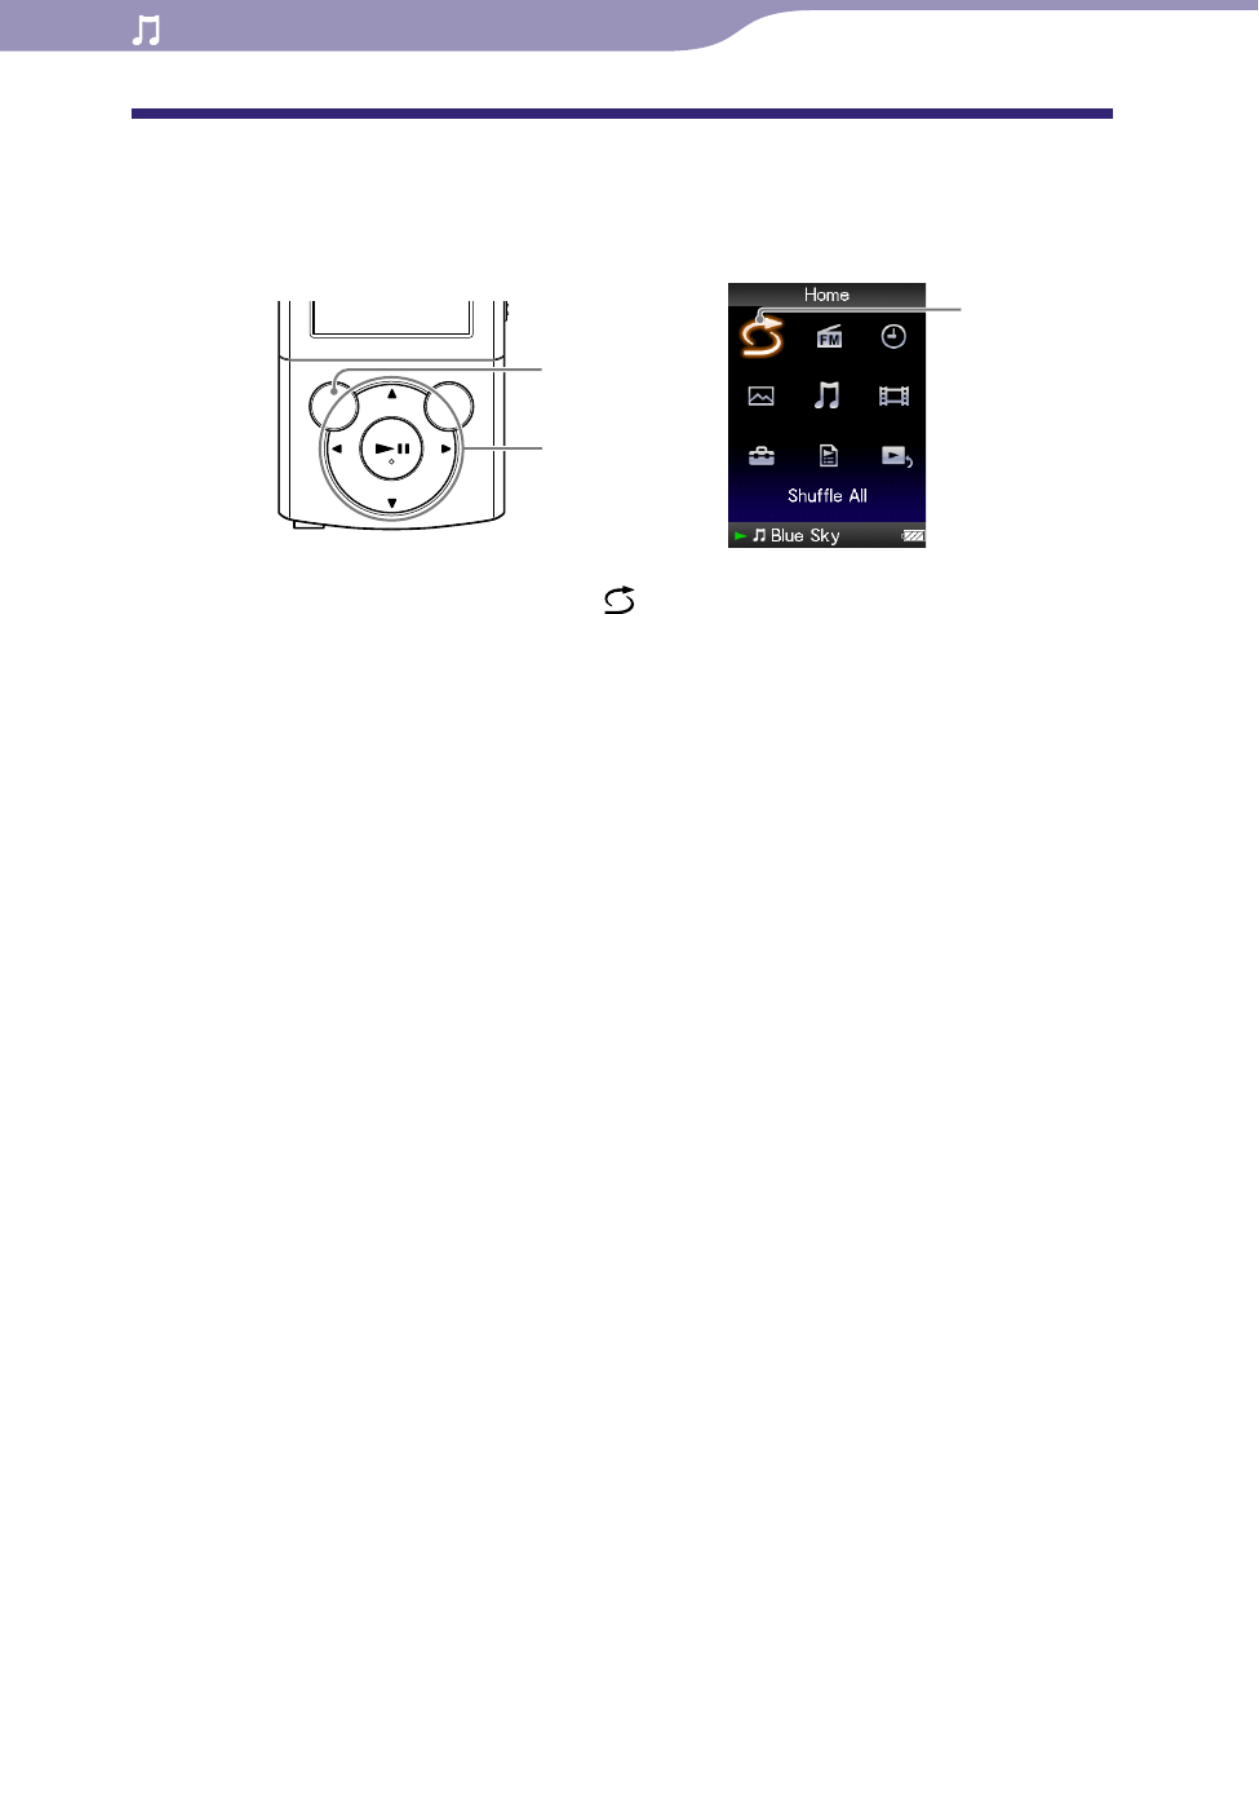
Playing All Songs in Random Order
All the songs stored on the player are played in random order.
From the [Home] menu, select [Shuffle All].
All songs are shuffled. Then the music playback screen appears and
playback of the songs begins.
Hint
When you start [Shuffle All] play, the play mode changes to [Shuffle] or
[Shuffle&Repeat]( p. 45). Even if you cancel [Shuffle All], the [Shuffle] or
[Shuffle&Repeat] setting for the play mode is retained.
[Shuffle All] play is automatically cancelled by any of the following operations:
Starting playback of a song by selecting it from the [Music], etc.
Changing the play mode.
[Shuffle All]
BACK/HOME
button
5-way button
Table of
Contents
Home
Menu
Index

41
41
Playing Music
Deleting Songs
When you delete songs from the player, use the software you used to transfer
the songs, or Windows Explorer.
For details about using the software, see the Help of the software.
Note
The player itself cannot delete songs without connecting to a computer.
Table of
Contents
Home
Menu
Index
Termékspecifikációk
| Márka: | Sony |
| Kategória: | mp3 lejátszó |
| Modell: | NWZ-E343 |
Szüksége van segítségre?
Ha segítségre van szüksége Sony NWZ-E343, tegyen fel kérdést alább, és más felhasználók válaszolnak Önnek
Útmutatók mp3 lejátszó Sony

29 Szeptember 2024
29 Szeptember 2024
19 Szeptember 2024
19 Szeptember 2024
18 Szeptember 2024
18 Szeptember 2024
1 Szeptember 2024
26 Augusztus 2024
14 Augusztus 2024
7 Augusztus 2024
Útmutatók mp3 lejátszó
- mp3 lejátszó Samsung
- mp3 lejátszó Acer
- mp3 lejátszó Grundig
- mp3 lejátszó Philips
- mp3 lejátszó Oregon Scientific
- mp3 lejátszó SilverCrest
- mp3 lejátszó Panasonic
- mp3 lejátszó JVC
- mp3 lejátszó AEG
- mp3 lejátszó Sharp
- mp3 lejátszó Toshiba
- mp3 lejátszó Hyundai
- mp3 lejátszó BenQ
- mp3 lejátszó Sandisk
- mp3 lejátszó Apple
- mp3 lejátszó Medion
- mp3 lejátszó Motorola
- mp3 lejátszó Geemarc
- mp3 lejátszó GoGen
- mp3 lejátszó Insignia
- mp3 lejátszó Boss
- mp3 lejátszó Thomson
- mp3 lejátszó Polaroid
- mp3 lejátszó Technaxx
- mp3 lejátszó Aiwa
- mp3 lejátszó Kenwood
- mp3 lejátszó Tesco
- mp3 lejátszó Renkforce
- mp3 lejátszó Haier
- mp3 lejátszó Sencor
- mp3 lejátszó GPX
- mp3 lejátszó Hitachi
- mp3 lejátszó Roadstar
- mp3 lejátszó Denver
- mp3 lejátszó Bush
- mp3 lejátszó Power Dynamics
- mp3 lejátszó Trevi
- mp3 lejátszó Audio-Technica
- mp3 lejátszó NGS
- mp3 lejátszó Energy Sistem
- mp3 lejátszó OK
- mp3 lejátszó SPC
- mp3 lejátszó Auna
- mp3 lejátszó BaseTech
- mp3 lejátszó Archos
- mp3 lejátszó Intenso
- mp3 lejátszó Teac
- mp3 lejátszó D-Link
- mp3 lejátszó Media-Tech
- mp3 lejátszó Scott
- mp3 lejátszó Manta
- mp3 lejátszó IRiver
- mp3 lejátszó Logik
- mp3 lejátszó Bang & Olufsen
- mp3 lejátszó AKAI
- mp3 lejátszó Konig
- mp3 lejátszó TechniSat
- mp3 lejátszó Pyle
- mp3 lejátszó Sanyo
- mp3 lejátszó Lenco
- mp3 lejátszó ECG
- mp3 lejátszó Soundmaster
- mp3 lejátszó RCA
- mp3 lejátszó Creative
- mp3 lejátszó Schaub Lorenz
- mp3 lejátszó OneConcept
- mp3 lejátszó Tascam
- mp3 lejátszó Packard Bell
- mp3 lejátszó Sitecom
- mp3 lejátszó FiiO
- mp3 lejátszó Orava
- mp3 lejátszó Majestic
- mp3 lejátszó Yarvik
- mp3 lejátszó Aiptek
- mp3 lejátszó Apacer
- mp3 lejátszó Lexibook
- mp3 lejátszó Tevion
- mp3 lejátszó Trekstor
- mp3 lejátszó Nilox
- mp3 lejátszó Cresta
- mp3 lejátszó Brigmton
- mp3 lejátszó Sunstech
- mp3 lejátszó Sylvania
- mp3 lejátszó Marquant
- mp3 lejátszó Proline
- mp3 lejátszó Coby
- mp3 lejátszó Envivo
- mp3 lejátszó TakeMS
- mp3 lejátszó Vieta
- mp3 lejátszó Pure
- mp3 lejátszó Audiovox
- mp3 lejátszó Transcend
- mp3 lejátszó Terris
- mp3 lejátszó Bigben
- mp3 lejátszó Clas Ohlson
- mp3 lejátszó Naxa
- mp3 lejátszó Ricatech
- mp3 lejátszó Mpman
- mp3 lejátszó Sweex
- mp3 lejátszó Ices
- mp3 lejátszó Natec
- mp3 lejátszó Nikkei
- mp3 lejátszó Freecom
- mp3 lejátszó Ingo
- mp3 lejátszó Apart
- mp3 lejátszó Difrnce
- mp3 lejátszó Hipstreet
- mp3 lejátszó Irradio
- mp3 lejátszó Rio
- mp3 lejátszó Emtec
- mp3 lejátszó Victory
- mp3 lejátszó Memup
- mp3 lejátszó Sakar
- mp3 lejátszó Qware
- mp3 lejátszó Jobo
- mp3 lejátszó Odys
- mp3 lejátszó Tom-tec
- mp3 lejátszó Zipy
- mp3 lejátszó Cowon
- mp3 lejátszó Zolid
- mp3 lejátszó Native Union
- mp3 lejátszó Woxter
- mp3 lejátszó Citronic
- mp3 lejátszó Becker
- mp3 lejátszó Napa
- mp3 lejátszó MPIO
- mp3 lejátszó Verbatim
- mp3 lejátszó IBasso
- mp3 lejátszó Maxfield
- mp3 lejátszó JGC
- mp3 lejátszó Lavod
- mp3 lejátszó Loomax
- mp3 lejátszó Dane Elec
- mp3 lejátszó Sensation
- mp3 lejátszó Visual Land
- mp3 lejátszó Finis
- mp3 lejátszó Ultra
- mp3 lejátszó Jaton
- mp3 lejátszó ZipyLife
- mp3 lejátszó Astell&Kern
- mp3 lejátszó HiFiMAN
- mp3 lejátszó Oracom
- mp3 lejátszó Q-BE
- mp3 lejátszó On-Hold Plus
- mp3 lejátszó Truly
- mp3 lejátszó OXX Digital
- mp3 lejátszó PENTAGRAM
- mp3 lejátszó D-Jix
- mp3 lejátszó Konig Electronic
- mp3 lejátszó JWIN
- mp3 lejátszó MiTone
- mp3 lejátszó Yakumo
- mp3 lejátszó Onearz
- mp3 lejátszó Hip Street
Legújabb útmutatók mp3 lejátszó

2 Április 2025
1 Április 2025
1 Április 2025

24 Március 2025
16 Március 2025

15 Január 2025

15 Január 2025
14 Január 2025
14 Január 2025
13 Január 2025