Használati útmutató Sony MHC-GN1300D
Sony
hi-fi rendszer
MHC-GN1300D
Olvassa el alább 📖 a magyar nyelvű használati útmutatót Sony MHC-GN1300D (116 oldal) a hi-fi rendszer kategóriában. Ezt az útmutatót 2 ember találta hasznosnak és 2 felhasználó értékelte átlagosan 4.5 csillagra
Oldal 1/116

©2009 Sony Corporation
4-132-091-14(2)
Mini HI-FI
Component
System
Operating Instructions
MHC-GN1300D

2
To reduce the risk of fire or electric shock, do
not expose this apparatus to rain or moisture.
To reduce the risk of fire, do not cover the
ventilation opening of the apparatus with
newspapers, tablecloths, curtains, etc.
Do not place the naked flame sources such as
lighted candles on the apparatus.
To reduce the risk of fire or electric shock, do
not expose this apparatus to dripping or
splashing, and do not place objects filled
with liquids, such as vases, on the apparatus.
Do not expose batteries or apparatus with
battery-installed to excessive heat such as
sunshine, fire or the like.
Do not install the appliance in a confined
space, such as a bookcase or built-in cabinet.
As the main plug is used to disconnect the
unit from the mains, connect the unit to an
easily accessible AC outlet. Should you
notice an abnormality in the unit, disconnect
the main plug from the AC outlet
immediately.
The unit is not disconnected from the mains
as long as it is connected to the AC outlet,
even if the unit itself has been turned off.
Excessive sound pressure from earphones
and headphones can cause hearing loss.
CAUTION
The use of optical instruments with this
product will increase eye hazard.
This appliance is classified as a CLASS 1
LASER product. This marking is located on
the rear exterior.
WARNING

3
About this manual
The MHC-GN1300D consists of:
– Unit HCD-GN1300D
– Speaker System
• Front speaker SS-GN1300D
• Center speaker SS-CT1300D
• Surround speaker SS-RSX1300D
• Subwoofer SS-WGV1300D
• Icons, such as , listed at the top
of each explanation indicate the type of
media that can be used with the
function being explained.
• The Control Menu items may be
different depending on the disc and
USB device.
• The Control Menu items may be
different depending on the area.
• The Setup Menu items may be different
depending on the area.
• The order of the displayed items may
be different from the actual display.

4
Table of Contents
About this manual ....................... 3
Playable discs .............................. 6
Guide to parts and controls........ 10
Hooking up the system ..............16
Hooking up the TV....................19
Positioning the speakers ............ 21
Setting the clock ........................ 23
Performing “QUICK” setup ...... 23
Using the THEATRE SYNC
function.................................25
Playing a disc............................. 26
— Normal Play
Using play mode........................ 31
Searching/selecting a disc.......... 35
Playing MP3 audio files/JPEG
image files ............................ 37
Enjoying video files................... 41
Adjusting the delay between the
picture and sound.................. 43
— A/V SYNC
Restricting playback of the
disc........................................43
— PARENTAL CONTROL
Using the Setup Menu ............... 46
Listening to the radio.................52
Playing a tape.............................54
Recording onto a tape ................55
Transferring music onto an USB
device....................................57
Playing back files of an USB
device....................................62
Selecting the playback source
or transferring destination on
the Sony Ericsson mobile
phone ....................................69
Adjusting the sound ...................70
Singing along: Karaoke .............73
Using the timer ..........................78
Changing the display .................80
Viewing information about the
disc and USB device............. 81
Using optional components .......84
Getting Started
Disc
Tuner
Tape
USB Device
Sound Adjustment
Other Operations

5
Troubleshooting .........................86
Precautions.................................98
Specifications...........................100
Guide to the Control Menu
display .................................103
Language code list ...................106
Playback priority of file
types ....................................108
Compatible USB devices with
this system...........................109
Glossary ...................................110
Index ........................................113
Additional Information

6
Playable discs
Type Disc logo Characteristics Icon used in
this manual
DVD VIDEO • DVD VIDEO
• DVD-R/DVD-RW in DVD
VIDEO format or video
mode
• DVD+R/DVD+RW in
DVD VIDEO format
VR (Video
Recording) mode
• DVD-R/DVD-RW in VR
(Video Recording) mode
(except for DVD-R DL)
VIDEO CD • VIDEO CD (Ver. 1.1 and
2.0 discs)
• Super VCD
• CD-R/CD-RW/CD-ROM
in VIDEO CD format or
Super VCD format
CD • AUDIO CD
• CD-R/CD-RW in AUDIO
CD format
DATA CD – • CD-ROM/-R/-RW in
DATA CD format,
containing MP3 audio
files1), JPEG image files2),
DivX video files or
MPEG4 video files, and
conforming to ISO 96603)
Level 1 or Level 2, or Joliet
(expansion format)
DATA DVD – • DVD-ROM/-R/-RW/+R/
+RW in DATA DVD
format, containing MP3
audio files1), JPEG image
files2), DivX video files
or MPEG4 video files,
and conforming to UDF
(Universal Disk Format)

7
1) MP3 (MPEG 1 Audio Layer 3) is a standard
format defined by ISO/MPEG which
compresses audio data. MP3 audio files must
be in MPEG 1 Audio Layer 3 format.
2) JPEG image files must conform to the DCF
image file format. (DCF “Design rule for
Camera File System”: Image standards for
digital cameras regulated by Japan
Electronics and Information Technology
Industries Association (JEITA)).
3) A logical format of files and folders on
CD-ROMs, defined by ISO (International
Organization for Standardization).
• CD-ROMs recorded in PHOTO CD
format
• DATA CDs recorded in MP3 PRO
format
• Data part of CD-Extras
1)
• Data part of Mixed CDs2)
• Super Audio CDs
• DVD Audio discs
• DVD-RAMs
• A DVD VIDEO with a different region
code
• CPRM3) compatible DVD-Rs/-RWs
recorded in Copy-Once programs
• A disc that has a non-standard shape
(e.g., heart, square, star)
• A disc that has adhesive tape, paper or
sticker attached to it
• Rental or used discs with attached seals
where the glue extends beyond the seal
• A disc that has labels printed using ink
that feels tacky when touched
1) CD-Extra: This format records audio
(AUDIO CD data) on the tracks in session 1
and data on the tracks in session 2.
2) Mixed CD: This format records data on the
first track and audio (AUDIO CD data) on the
second and subsequent tracks of a session.
3) CPRM: Content Protection for Recordable
Media is a coding technology that protects
copyright for Copy-Once programs.
Your system has a region code printed on
the back of the unit and will only play
back DVD VIDEOs labeled with identical
region code.
DVD VIDEOs labeled will also be
played back on this system.
If you try to play back any other region
code DVD VIDEO, the message
“Playback prohibited by area limitations.”
will appear on the TV screen. Depending
on the DVD VIDEO, no region code
indication may be labeled even though
playing the DVD VIDEO is prohibited by
area restrictions.
A DualDisc is a two sided disc product
which mates DVD recorded material on
one side with digital audio material on the
other side. However, since the audio
material side does not conform to
Compact Disc (CD) standard, playback
on this product is not guaranteed.
Discs that cannot be played
Region code of DVD VIDEOs
you can play back on this
system
Note on DualDiscs
ALL

8
• In some cases, CD-Rs/-RWs and
DVD-Rs/-RWs/+Rs/+RWs cannot be
played back on this system due to the
recording quality or physical condition
of the disc, or the characteristics of the
recording device and authoring
software. The disc will not be played
back if it has not been correctly
finalized. For more information, see the
operation instructions for the recording
device.
• Note that some playback functions may
not work with some DVD+Rs/+RWs,
even if they have been correctly
finalized. In this case, view the disc by
normal playback.
• A disc created in Packet Write format
cannot be played back.
Some playback operations of DVD
VIDEOs and VIDEO CDs may be
intentionally set by software producers.
Since this system play back DVD
VIDEOs and VIDEO CDs according to
the disc contents the software producers
designed, some playback features may not
be available. Also, refer to the instructions
supplied with the DVD VIDEOs or
VIDEO CDs.
This product is designed to play back
discs that conform to the Compact Disc
(CD) standard. Recently, various music
discs encoded with copyright protection
technologies are marketed by some record
companies. Please be aware that among
those discs, there are some that do not
conform to the CD standard and may not
be playable by this product.
• This system can play back Multi
Session discs when an MP3 audio file
(or a JPEG image file) is contained in
the first session. Any subsequent MP3
audio files (or JPEG image files)
recorded in later sessions can also be
played back.
• If the first session is recorded in AUDIO
CD or VIDEO CD format, only the first
session will be played back.
• The system will recognize a Multi
Session disc as an AUDIO CD if there is
a session recorded in AUDIO CD
format on the disc. However, the system
will only play back the disc if the first
session is recorded in AUDIO CD
format.
Notes on CD-R/-RW and
DVD-R/-RW/+R/+RW
Note on playback operations
of DVD VIDEOs and VIDEO CDs
Music discs encoded with
copyright protection
technologies
Notes on Multi Session disc

9
This product incorporates copyright
protection technology that is protected by
U.S. patents and other intellectual
property rights. Use of this copyright
protection technology must be authorized
by Macrovision, and is intended for home
and other limited viewing uses only
unless otherwise authorized by
Macrovision. Reverse engineering or
disassembly is prohibited.
This system incorporates Dolby1)
Digital,
Dolby Pro Logic (II) adaptive matrix
surround decoder, and the DTS2) Digital
Surround System.
1) Manufactured under license from Dolby
Laboratories. Dolby, Pro Logic, and the
double-D symbol are trademarks of Dolby
Laboratories.
2) Manufactured under license under U.S.
Patent #’s: 5,451,942; 5,956,674; 5,974,380;
5,978,762; 6,487,535 & other U.S. and
worldwide patents issued & pending. DTS
and DTS Digital Surround are registered
trademarks and the DTS logos and Symbol
are trademarks of DTS, Inc. © 1996-2008
DTS, Inc. All Rights Reserved.
“DVD+RW”, “DVD-RW”, “DVD+R”,
“DVD-R”, “DVD VIDEO”, and the “CD”
logos are trademarks.
DivX® is a video file compression
technology, developed by DivX, Inc.
DivX, DivX Certified, and associated
logos are trademarks of DivX, Inc. and are
used under license.
MPEG Layer-3 audio coding technology
and patents licensed from Fraunhofer IIS
and Thomson.
Windows Media is a registered trademark
of Microsoft Corporation in the United
States and/or other countries.
“Memory Stick” is a trademark of Sony
Corporation.
“WALKMAN” and “WALKMAN” logo
are registered trademarks of Sony
Corporation.
About MPEG-4 Visual
THIS PRODUCT IS LICENSED
UNDER THE MPEG-4 VISUAL
PATENT PORTFOLIO LICENSE
FOR THE PERSONAL AND
NON-COMMERCIAL USE OF A
CONSUMER FOR DECODING
VIDEO IN COMPLIANCE WITH THE
MPEG-4 VISUAL STANDARD
(“MPEG-4 VIDEO”) THAT WAS
ENCODED BY A CONSUMER
ENGAGED IN A PERSONAL AND
NON-COMMERCIAL ACTIVITY
AND/OR WAS OBTAINED FROM A
VIDEO PROVIDER LICENSED BY
MPEG LA TO PROVIDE MPEG-4
VIDEO. NO LICENSE IS GRANTED
OR SHALL BE IMPLIED FOR ANY
OTHER USE. ADDITIONAL
INFORMATION INCLUDING THAT
RELATING TO PROMOTIONAL,
INTERNAL AND COMMERCIAL
USES AND LICENSING MAY BE
OBTAINED FROM MPEG LA, LLC.
SEE HTTP://WWW.MPEGLA.COM
Copyrights

10
Guide to parts and controls
This manual mainly explains operations using the remote, but the same operations can
also be performed using the buttons on the unit having the same or similar names.
Unit
– Front view
– Top view
wa
ws
wd
wf wg
2 41 3
qj
qk
ql
w;
qh
qg
qfqd
qs
qs qa
q;q;
9
87
6
5
wh
wk wj
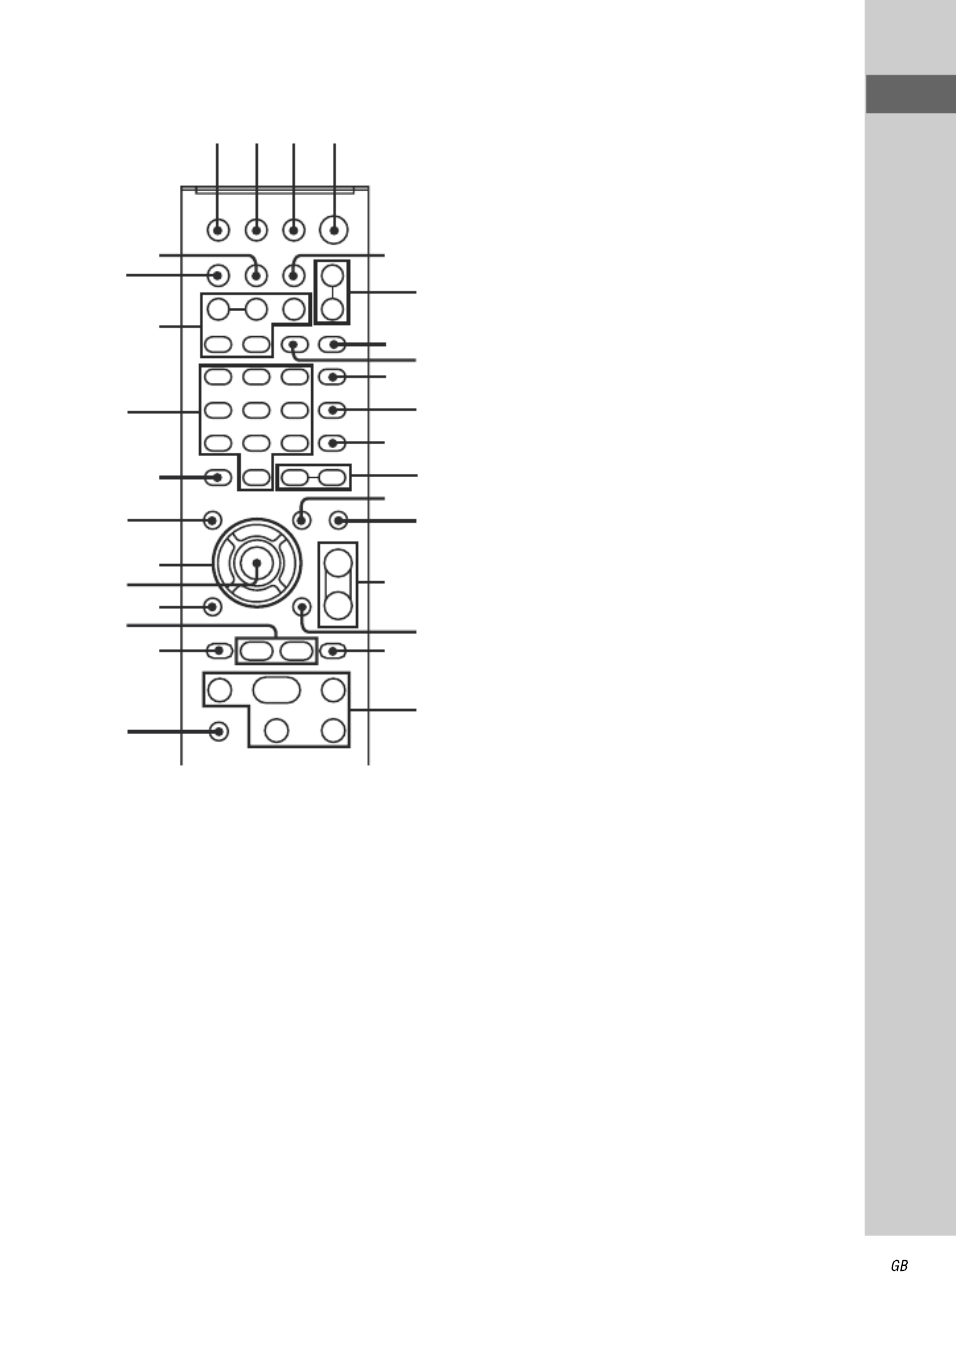
11
Guide to parts and controls
Remote
1 "/1 (on/standby) (pages 18, 19,
53, 84, 86, 95)
Press to turn the system on or off.
Unit: STANDBY indicator
(page 86)
Lights up in green when the system is
turned on.
Lights up in red when the system is
turned off.
Remote: TV "/11) (on/standby)
(page 21)
Press to turn the TV on or off.
B Remote sensor (page 87)
C Unit: MASTER VOLUME
(pages 26, 27, 73, 78, 86, 87)
Turn to adjust the volume.
Remote: VOLUME +/–2)
(pages 26, 27, 73, 78, 86, 87)
Press to adjust the volume.
Remote: TV VOL +/–1)2)
(page 21)
Press to adjust the TV volume.
D Display (pages 15, 80, 81, 97)
Meter display (page 80)
E REC TO TAPE (page 55)
Press to record onto a tape.
REC TIMER (pages 78, 79)
Press to set the Recording Timer.
F DIRECTION (pages 54, 55)
Press to select the tape playback
option.
G METER MODE (page 80)
Press to select a preset display
pattern.
H Unit: PRESET EQ (page 70)
Press to select a preset sound effect.
Unit: GROOVE (page 70)
Press to reinforce the bass.
SOUND FIELD (page 71)
Press to select a sound field.
I ENTER (pages 23, 24, 52, 53,
56, 58, 70, 78, 80, 95)
Press to select or enter the selection.
1
3
8
9
q;
qs
qs
qs
qs
qf
wd
wg
wl e; ea
esed
ef
eg
eh
r;
el
ek
ej
rg
ra
rs
rd
rf
rh
Continued
l
12
JUnit: DVD (pages 18, 19, 23, 26,
55, 58, 73, 80)
Unit: (pages 57, 60, 62, 73,
80)
Unit: TV/SAT (pages 80, 84, 87)
Unit: TUNER/BAND (pages 52,
53, 80)
Unit: TAPE (pages 54, 80)
Unit: VIDEO (pages 80, 85)
Remote: FUNCTION +/–
(pages 23, 26, 52, 54, 57, 84, 85)
Press to select a function.
KREC TO (page 58)
Press to transfer onto the connected
optional USB device.
Press to create a new MP3 audio file.
L TUNING +/– (pages 52, 53)
Press to tune in a radio station.
m/M (fast forward/rewind)
(pages 27, 54)
Press to find a point in a track,
chapter or file.
Unit: / (page 27)
Remote: SLOW/SLOW
(page 27)
Press to watch the slow-motion play.
PRESET +/– (page 52)
Press to select a preset station.
./> (go forward/go
backward) (pages 26, 38, 64, 95)
Press to select a track, chapter or file.
Unit: nN (play) (pages 26, 54,
63)
Remote: H2) (play) (pages 26,
54, 63)
Press to start playback.
X (pause) (pages 26, 54)
Press to pause playback.
x (stop) (pages 26, 52, 54, 62)
Press to stop playback.
Remote: +/– (pages 25, 27)
Press to select a folder.
Remote: TV CH +/–1) (page 21)
Press to select a TV channel.
M MUTING (pages 27, 53, 54, 64)
Press to turn off the sound
temporarily.
N Unit: DISC SKIP/EX-CHANGE
(pages 18, 26, 27)
Press to exchange other discs.
Press to select a disc.
Unit: DISC 1 ~ 3 (pages 27, 55,
58, 59)
Press to select a disc.
Press to switch to the DVD function
from other function.
Unit: OPEN/CLOSE Z
(pages 18, 26, 88)
Press to load or eject a disc.
Remote: DISC SKIP (pages 27,
58, 59)
Press to select a disc.
O Disc tray (pages 15, 26, 88)
P ECHO LEVEL (page 73)
Turn to adjust the microphone echo
effect.
MIC 1/2 (jack) (pages 73, 87)
Connect the microphones.
MIC 1/2 LEVEL (pages 56, 73,
87)
Turn to adjust the microphone
volume.
Q VIDEO IN (jacks) (page 17)
Connect an audio or video
component.
USB
USB

13
Guide to parts and controls
R PHONES (jack) (page 86)
Connect the headphones.
S (indicator)
Lights up in red when transferring to
the connected optional USB device,
or when erasing audio files or
folders.
(USB) port (pages 57, 62,
69)
Connect an optional USB device.
T Power illuminator (pages 72, 80)
U NIGHT MODE (page 72)
Press to activate the NIGHT MODE
function.
SOUND FLASH (page 72)
Hold down to create sound flash
effect.
V SUBWOOFER ON/OFF
(page 22)
Press to turn the subwoofer on or off.
The SUBWOOFER ON/OFF
indicator lights up in green when the
subwoofer is turned on.
SUBWOOFER LEVEL (page 22)
Press to enter or exit the subwoofer
level setting.
W Unit: RETURN (pages 38, 67)
Remote: O RETURN (pages 38,
67)
Press to return to the previous
display.
X EQ BAND/MEMORY (page 70)
Press to select a frequency band
when adjusting the graphic
equalizer.
USER EQ (page 70)
Press to select the stored user
equalizer setting.
Y DISPLAY (pages 19, 23, 53, 80,
81)
Press to change the information in
the front panel display.
Z OPTIONS (page 80)
Press to select the display pattern.
wj PUSH Z OPEN/CLOSE
(page 54)
Press to insert or eject a tape.
Tape deck (pages 54, 55)
wk OPERATION DIAL (pages 22,
70, 72, 78, 80)
Turn to select a setting.
wl TV INPUT1) (page 21)
Press to switch the TV’s input
source.
SLEEP (pages 25, 78)
Press to activate the sleep timer.
e; TIMER MENU (pages 23, 78, 79)
Press to set the time and timer.
ea THEATRE SYNC (page 25)
Press to activate the THEATRE
SYNC function.
es PICTURE NAVI (pages 38, 65)
Press to search for a scene or a file.
ed REPEAT (pages 34, 68)
Press to play back a disc, an USB
device, a single track or file
repeatedly.
FM MODE (page 53)
Press to select FM reception mode
(monaural or stereo).
ef AUDIO (pages 28, 74, 83)
Press to select the audio format.
eg SUBTITLE (page 28)
Press to switch the language of the
subtitle.
Continued
l

14
D.TUNING (page 53)
Press to switch to the direct tuning
mode.
eh ANGLE (page 28)
Press to change the angle (DVD
VIDEO with multi-angles only).
MEMORY SELECT (page 69)
Press to select the memory of the
Sony Ericsson mobile phone.
ej DVD/TUNER MENU (pages 35,
37, 38, 52, 63, 64)
Press to display the menu items on
the TV screen.
Press to preset a radio station.
ek DISPLAY (pages 24, 31, 32,
75, 84, 96, 103)
Press to display the Control Menu on
the TV screen.
The Control Menu is displayed only
when the DVD function or USB
function is selected.
el TV1) (page 21)
Hold down TV and press the button
you want to operate the TV.
r; c C STEP (page 27)
Press to watch one frame at a time
when playback is paused.
ADVANCE (page 27)
Press to fast forward the current
scene during playback.
REPLAY (page 27)
Press to replay the previous scene
during playback.
ra V v B b/// (pages 23, 31, 52,
78)
Press to select the menu items.
rs DVD TOP MENU (page 35)
Press to display the DVD title on the
TV screen.
rd CLEAR (pages 23, 25, 32, 36, 39,
60)
Press to delete a pre-programmed
step.
Press to erase audio files or folders
from the connected optional USB
device.
-/--1)
(page 21)
Press to enter a single digit or double
digit number.
rf Numeric buttons1)2) (pages 21,
26, 29, 30, 35, 36, 44, 52)
Press to select a track, chapter or file.
Press to enter a password.
Press to tune or preset a radio station.
10/01)
Press to enter a double digit number.
rg KEY CONTROL 2 #/ (page 74)
Press to change the key to suit your
vocal range.
SCORE (page 77)
Press to start or stop calculating your
vocal score.
KARAOKE MODE (page 73)
Press to select the Karaoke Mode.
KARAOKE PON (page 75)
Press to activate the Karaoke Pon
function.
rh TIME/TEXT (pages 81, 82)
Press to change the information
appearing in the front panel display
or on-screen display.
1) This button is used to operate a Sony TV. For
details, see “Operating a Sony TV” (page 21).
2) The numeric button 5, TV VOL +, VOLUME
+ and H buttons on the remote have a tactile
dot. Use the tactile dot as a reference when
operating the system.

15
Guide to parts and controls
Display
A Lights up when USB function is
selected.
B Indicates the playback status of the
disc, USB device or tape.
C Indicates the type of disc or file that
the system recognized.
D Lights up when a file name is
displayed.
E Displays the current status and
information (page 81).
F Lights up when the timer is set
(page 78).
G Lights up during transferring onto an
USB device or recording onto a tape.
H Lights up when NIGHT MODE is
activated (page 72).
I Lights up when Karaoke Mode is
turned on (page 73).
J Indicates the current audio format.
K Lights up when “PROGRESSIVE
(COMPONENT OUT)” is set to
“ON” (page 20).
L Indicators for the TAPE function
(page 54).
“TAPE” lights up when there is a tape
in the tape deck.
“n” or “N” indicates the tape
playback direction. “g” and “j”
indicates the tape playback option.
M Lights up when the color system of
the video output is NTSC (page 19).
N Indicators for the TUNER function
(page 52).
O Indicators for the disc tray (page 26).
“ ” lights up when the disc is
selected. “1”, “2” and “3” light up
when there is(are) disc(s) on the disc
tray.
P Lights up when VIDEO CD with PBC
functions is played back (page 29).
Q Lights up when the MP3 audio file
contains ID3 tag information.
R Indicates the selected play mode
(pages 31, 67).
S Lights up when an optional USB
device is recognized (page 57).
T Lights up when “GROOVE” or
“Z-GROOVE” is turned on (page 70).
321
CD
WMA
DVD
USB
USB
USB SYNC
TAPE
USB
DTS
VIRTUAL LINK
MONO
TAPE
ST
NTSC PROGRESSIVE
TUNED
AUTO
DCS
DPL
TAPE PLAY
SLEEP NIGHT
REC
REC
SHUF PGM REP 1
PBC TAG
MP3
AAC
VCD
Z-GROOVE
qgqjqhqkqlw;
7 864 5
q;qa qsqf qd
9

16
Hooking up the system
A Antennas
Find a location and an orientation that
provide good reception, and then set up
the antennas.
The FM 75 COAXIAL jack varies
according to area.
Note
Keep the antennas away from the speaker cords,
the power cord and the USB cable to avoid
picking up noise.
B Speakers
The speaker connectors are color-coded
with their respective speaker terminals.
Front speakers
Getting Started
B
B
F
I
C
D
E
A
GH
1 2
5678
34
1 To FM lead antenna
2 To AM loop antenna
3 To front speaker (right)
4 To front speaker (left)
5 To subwoofer
6 To center speaker
7 To surround speaker (right)
8 To surround speaker (left)
Extend the FM lead
antenna horizontally
AM loop antenna
RL
ONLY FOR SS-GN1300D
FRONT SPEAKER
White
Red

17
Getting Started
Center speaker
Surround speakers
Subwoofer
Notes
• Be sure to use only the supplied speakers.
• Be sure to connect the speakers securely and
correctly. When connecting speaker cords,
insert the connector straight into the
terminals.
C VOLTAGE SELECTOR
For models equipped with a voltage
selector, set VOLTAGE SELECTOR to
the position of your local power line
voltage.
Depending on the model, the VOLTAGE
SELECTOR may differ.
* Saudi Arabian model: 120 - 127V
D TV/SAT AUDIO IN L/R jacks
Use an audio cord to connect to the audio
output jacks of an optional component
(such as a TV or satellite tuner).
E AUDIO OUT L/R jacks
Use an audio cord to connect to the audio
input jacks of an optional component
(such as a VCR).
Note
There is no audio output from the AUDIO OUT
jacks when you select the VIDEO, TV or SAT
function.
F COMPONENT VIDEO OUT jacks
Use a component video cord to connect to
the component video input jacks of a TV
or projector. If your TV accepts
progressive format signals, you must use
this connection and set “PROGRESSIVE
(COMPONENT OUT)” to “ON”
(page 20). You can enjoy higher quality
video images.
Note
You cannot output the video signal from the
VIDEO IN VIDEO jack through the
COMPONENT VIDEO OUT jacks of this unit.
G VIDEO OUT jack
Use a video cord to connect to the video
input jack of a TV or projector.
H S VIDEO OUT jack
Use an S video cord to connect to the
S video input jack of a TV or projector.
You can enjoy higher quality video
images.
Note
You cannot output the video signal from
the VIDEO IN VIDEO jack through the
S VIDEO OUT jack of this unit.
CENTER
SPEAKER
ONLY FOR
SS-CT 1300D
Green
SURRO
UND
SPEAKER
ONLY FOR
SS-RSX1300D
RL
Blue
Grey
SUBWOOFER
ONLY FOR
SS-WGV1300D
Purple
VOLTAGE SELECTOR
120V * 220V 230-240V
Continued
l

18
I Power
Connect the power cord to a wall outlet.
The demonstration appears in the display.
When you press "/1, the system turns on
and the demonstration automatically
ends.
If the supplied adaptor on the plug does
not fit your wall outlet, detach it from the
plug (only for models equipped with an
adaptor).
Slide and remove the battery
compartment lid, and insert the two
supplied R6 (size AA) batteries, E side
first, matching the polarities shown
below.
Note
If you do not use the remote for a long period of
time, remove the batteries to avoid possible
damage from battery leakage and corrosion.
Tip
When the remote no longer operates the system,
replace both batteries with new ones.
Attach the supplied speaker pads at each
corner on the bottom of the speakers to
stabilize the speakers and to prevent them
from slipping.
Inserting two R6 (size AA)
batteries into the remote
Attaching the speaker pads
When carrying the unit
Perform the following procedure to
protect the disc mechanism.
Use the buttons on the unit for the
operation.
1 Press "/1 to turn on the system.
2 Press DVD.
3 Press OPEN/CLOSE Z to open
the disc tray and remove the
disc. If there are more than one
disc in the disc tray, press
DISC SKIP/EX-CHANGE to
remove the discs.
4 Press OPEN/CLOSE Z again to
close the disc tray. Wait until
“DVD No Disc” appears in the
display.
5 Hold down DVD and then press
"/1 until “STANDBY” appears
in the display. Then, “MECHA
LOCK” appears in the display.
6 Unplug the AC power cord.

19
Getting Started
Hooking up the TV
Connect the video input jack of your TV
to the VIDEO OUT jack with the supplied
video cord.
When connecting a video deck
Connect the video deck to the TV using a
video cord (not supplied). However, do
not connect this unit to the TV through the
video deck. Otherwise, you may
experience video leakage when watching
video images from this system. Connect
this unit directly to the TV as shown
below.
Tip
For higher quality video images:
– Use the optional component video cords to
connect the COMPONENT VIDEO input
jacks on your TV to the COMPONENT
VIDEO OUT jacks of this unit. If your TV is
compatible with progressive format file
signals, use this connection and set
“PROGRESSIVE (COMPONENT OUT)” to
“ON” (page 20).
– You can use an optional S Video cord to
connect the S VIDEO input jack on your TV
to the S VIDEO OUT jack of this unit.
Changing the color system
Set the color system to PAL or NTSC
depending on the color system of your
TV.
The default setting for color system is
different depending on the area.
Each time you perform the procedure
below, the color system changes as
follows:
NTSC y PAL
Use the buttons on the unit for the
operation.
1 Press "/1 to turn on the system.
2 Press DVD.
3 Press "/1 to turn off the system.
4 Press DISPLAY repeatedly until
“SONY DEMO” appears, then
press "/1 while holding down X.
The system turns on automatically and
the color system is changed.
“COLOR NTSC” or “COLOR PAL”
appears in the display.
S VIDEO
OUT
VIDEO
OUT
COMPON ENT
VIDEO OUT
Y
P
B
/
C
B
P
R
/
C
R
TV
Unit
Video deck
Do not connect
directly

20
Progressive is a method for displaying TV
images which reduces flickering and
sharpens the image. To use this method,
you need to connect to a TV that can
accept progressive signals.
You can output video signals from
COMPONENT VIDEO OUT jacks in
Interlace or Progressive format.
1 Press FUNCTION +/– repeatedly
to select “DVD” or “USB” (or
press DVD or on the unit).
2Press DISPLAY when
playback is stopped.
The Control Menu appears on the TV
screen.
3 Press V v or repeatedly to
select (SETUP), then
press ENTER.
The options for “SETUP” appear.
4 Press V v or repeatedly to
select “CUSTOM”, then press
ENTER.
The Setup Menu appears.
5 Press V v or repeatedly to
select “VIDEO SETUP”, then
press ENTER.
The options for “VIDEO SETUP”
appear.
6 Press V v or repeatedly to
select “PROGRESSIVE
(COMPONENT OUT)”, then
press ENTER.
The options for “PROGRESSIVE
(COMPONENT OUT)” appear.
7 Press V v or repeatedly to
select the setting you want, then
press ENTER.
The default setting is underlined.
• OFF: Outputs interlace signals.
Select this setting when:
– your TV does not accept
progressive signals.
– your TV is connected to jacks other
than the COMPONENT VIDEO
OUT jacks.
• ON: Outputs progressive signals.
Select this setting when:
– your TV accepts progressive
signals.
– your TV is connected to the
COMPONENT VIDEO OUT
jacks.
When you select “ON”, the
confirmation display appears. Follow
the steps below.
8 Press B b or repeatedly to
select “START”, then press
ENTER.
The system outputs the progressive
signal for few seconds. Check that the
screen is displayed correctly.
9 Press B b or repeatedly to
select “YES”.
The system outputs the progressive
signal. When you select “NO”, the
system does not output the progressive
signal.
Note
There would be no image on your TV or the
image is not clear if your setting does not match
your TV or connection.
Changing the format of the
video signal from COMPONENT
VIDEO OUT jacks
USB

21
Getting Started
Turn on the TV and select the video input
so that you can view the images from this
system.
Operating a Sony TV
You can use the following buttons to
operate a Sony TV. These buttons have
been marked in orange.
* For double digit number, hold down TV and
press -/--, then press the number. (For
example, hold down TV, press -/--, then 2 and
5 for entering 25.)
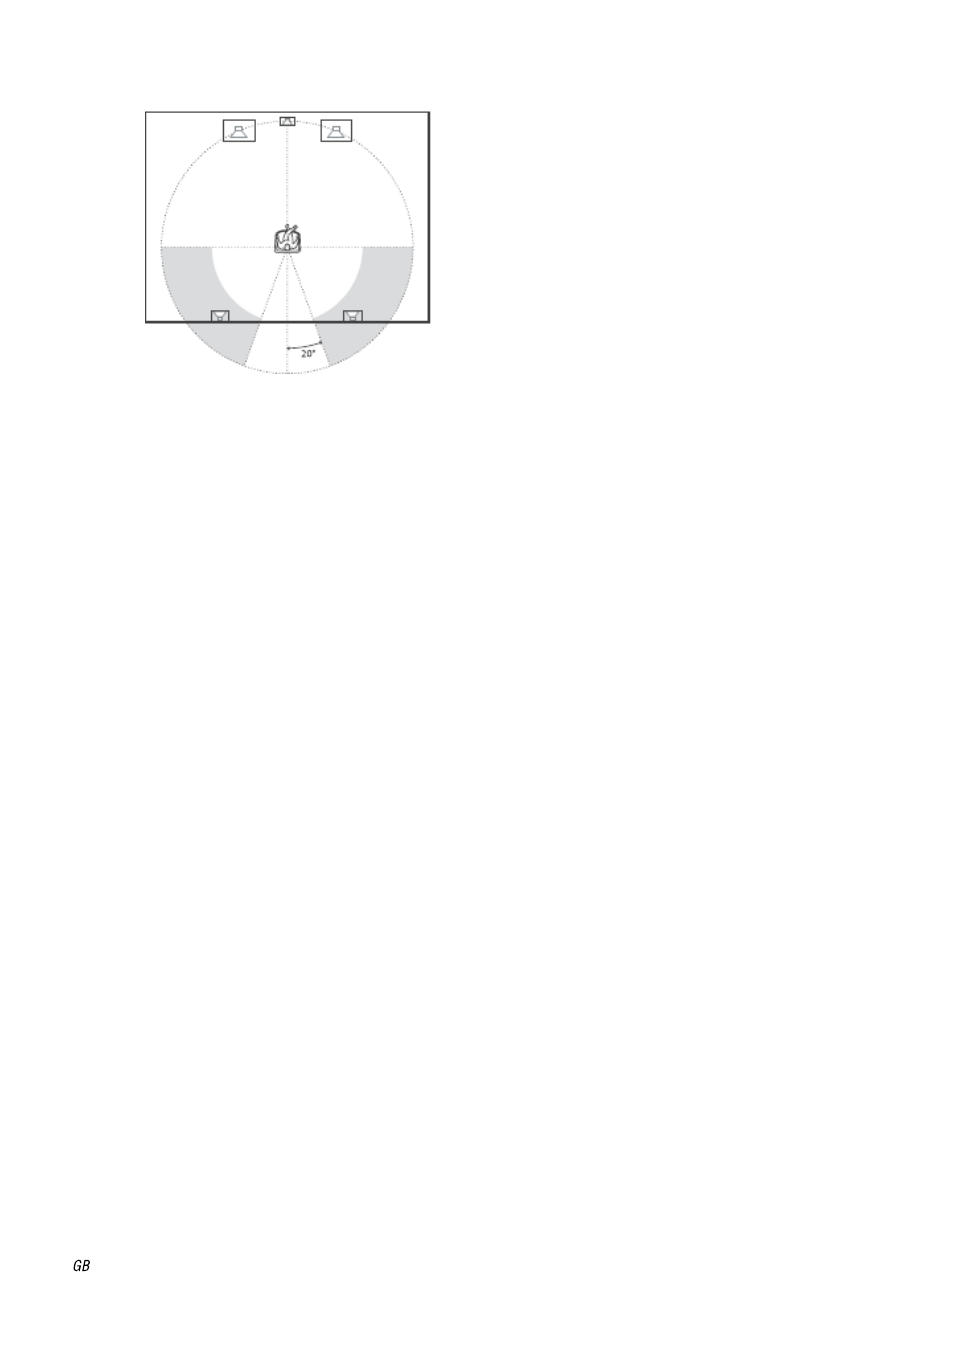
Positioning the
speakers
1Place the front speakers at an
angle of 45 degrees from your
listening position.
A Front speaker (left)
B Front speaker (right)
C Center speaker
D Surround speaker (left)
E Surround speaker (right)
F Subwoofer
G Unit
H TV
2 Place the center speaker at
about the same height as the
front speakers.
Align the center speaker with the front
speakers or place it slightly behind the
front speakers.
When using a TV
To Hold down TV and
press
Turn the TV on or off TV "/1
Switch the TV’s
input source between
the TV and other input
sources
TV INPUT
Select the TV
channels
TV CH +/– or
numeric buttons*
Adjust the volume of
the TV speaker(s)
TV VOL +/–
Continued
l
22
3 Place the surround speakers.
Position the surround speakers within
the respective gray ranges. Positioning
both surround speakers the same
distance from the listening position is
effective.
4 Place the subwoofer, then press
SUBWOOFER ON/OFF on the
unit.
The SUBWOOFER ON/OFF indicator
on the unit lights up.
Press SUBWOOFER LEVEL on the
unit. Then, turn OPERATION DIAL
on the unit to adjust the subwoofer
level.
To obtain a better bass reproduction,
we recommend you to place the
subwoofer on a solid floor where
resonance is unlikely to occur.
Notes
• Place the speakers at least 0.3 meter away
from the unit.
• Do not place the surround speakers on top of
a TV. This may cause distortion of the colors
in the TV screen.
• Be sure to connect the both left and right
surround speakers. Otherwise, the sound will
not be heard.
• Do not place the surround speakers further
away from your listening position than the
front speakers.
• Do not place the center speaker on top of the
unit.
• Always place the subwoofer vertically,
keeping it a few centimeters away from the
wall.
• If the subwoofer is placed in the center of a
room, the bass could be extremely weakened.
This is due to the influence of the standing
wave of the room. If this happens, move the
subwoofer away from the center of the room
or eliminate the cause of the standing wave,
by placing a bookshelf against the wall, etc.
Speaker settings
To enjoy DVD VIDEOs and files with
multi-channel sound and Dolby Surround
effects, you need to adjust the speaker
settings. Set the distance from the
listening position to the speakers, and the
balance and level. Then use the test tone
to adjust the volume of each speaker to the
same level.
For details, see “Setting the speakers –
SPEAKER SETUP” on page 50.

23
Getting Started
Setting the clock
1Press "/1 to turn on the system.
2 Press TIMER MENU.
The hour indication flashes in the
display.
If “PLAY SET?” flashes in the
display, press V v or repeatedly to
select “CLOCK SET?”, then press
ENTER.
3 Press V v or repeatedly to set
the hour.
4 Press ENTER.
The minute indication flashes in the
display.
5 Press V v or repeatedly to set
the minute.
6 Press ENTER.
The clock starts functioning.
Note
The clock settings are canceled when you
disconnect the power cord or if a power failure
occurs.
To display the clock when the
system is off
Press DISPLAY repeatedly until the clock
is displayed. The clock is displayed for a
few seconds.
Performing “QUICK”
setup
Before using the system, you can make
the minimum basic adjustments in
“QUICK” setup.
If you do not want to perform “QUICK”
setup, press CLEAR in step 3. The guide
message will disappear from the TV
screen.
1 Turn on your TV and select the
video input.
2 Press "/1 to turn on the system.
Notes
• Make sure there is no disc in the disc tray.
Otherwise, the guide message does not
appear.
• Make sure that the headphone or microphone
is not connected. Otherwise, you cannot
perform “SPEAKER SETUP”.
3 Press FUNCTION +/– repeatedly
to select “DVD” (or press DVD
on the unit).
The guide message appears at the
bottom of the TV screen.
4 Press ENTER without loading a
disc.
The “LANGUAGE SETUP” display
appears on the TV screen.
Continued
l

24
5 Press V v or repeatedly to
select a language, then press
ENTER.
The setting is selected and the
“VIDEO SETUP” display appears on
the TV screen.
Tips
• The selected language is for “OSD”,
“MENU” and “SUBTITLE”.
• The selectable language is different
depending on the area.
6 Press V v or repeatedly to
select the setting that matches
your TV type.
If you have a 4:3 standard TV:
Select “4:3 LETTER BOX” or
“4:3 PAN SCAN” (page 47)
If you have a wide-screen TV or a
4:3 standard TV with wide-screen
mode:
Select “16:9” (page 47)
7 Press ENTER.
The setting is selected and the
“SPEAKER SETUP” display appears
on the TV screen.
8 Press V v or repeatedly to
select the front speaker distance
from your listening position,
then press ENTER.
Repeat this step to adjust the center and
surround speaker distance.
The setting is selected and “QUICK
SETUP is complete.” appears on the
TV screen.
The system is ready for playback.
To perform further speaker settings,
see “Setting the speakers – SPEAKER
SETUP” (page 50).
If you want to change each setting
individually, see “Using the Setup
Menu” (page 46).
If you make a mistake
Press ., then select the item again.
To quit “QUICK” setup
Press DISPLAY.
To recall “QUICK” setup settings
1 Press
DISPLAY when playback
is stopped.
The Control Menu appears on the TV
screen.
2 Press V v or repeatedly to select
(SETUP), then press
ENTER.
3 Press V v or repeatedly to select
“QUICK”, then press ENTER.
Note
The guide message appears at the bottom of the
TV screen when you turn on the system for the
first time or after performing “RESET”
(page 96).
25
Getting Started
Using the THEATRE
SYNC function
THEATRE SYNC allows you to turn on
your Sony TV and this system, changes
the system’s function to “DVD” and then
switches the TV’s input source you have
set with just one button.
Install the unit near the TV, then register
the TV’s input source connected to this
system.
To select the TV’s input
The selected TV’s input source is
memorized into the remote.
Point the remote in the direction of
the TV and this unit. Then, hold
down THEATRE SYNC until the TV
is turned on and the input source is
changed correctly.
If this function does not work, change the
transmission time. The transmission time
varies depending on the TV.
To change the transmission time
Hold down > and press the
numeric button.
Note
This function is only for Sony TV series,
however, some TV products may also not work.
Preparing to use the THEATRE
SYNC function
Hold down
SLEEP and
press
TV’s input source
0 No input source
(Default)
1 to 8 VIDEO 1 to VIDEO 8
9 COMPONENT 1
CLEAR COMPONENT 2
– COMPONENT 3
+ COMPONENT 4
Operating the THEATRE SYNC
function
Numeric
button
Transmission time
1
2
3
4
5
6
7
8
Longer
transmission
time

26
Playing a disc
— Normal Play
Depending on the DVD VIDEO or
VIDEO CD, some operations may be
different or restricted. Refer to the
operating instructions supplied with the
disc.
Note on the maximum number of
tracks, files and folders on a DATA
CD/DVD
This system cannot play back a DATA
CD/DVD in the following cases.
– When the number of tracks or files on a
folder exceeds 150.
– When the number of folders on a disc
exceeds 200.
These numbers may vary depending on
the track structure, the file structure and
the folder structure.
Example: When playing a DVD
VIDEO:
1 Press FUNCTION +/– repeatedly
to select “DVD” (or press DVD
on the unit).
2 Press OPEN/CLOSE Z on the
unit.
3 Load a disc with the label side
facing up on the disc tray.
To load additional discs, press
DISC SKIP/EX-CHANGE on the unit
to rotate the disc tray.
4 Press OPEN/CLOSE Z on the
unit to close the disc tray.
Do not forcibly push the disc tray to
close it as this may cause a
malfunction.
If playback does not start
automatically, press H (or
nN on
the unit).
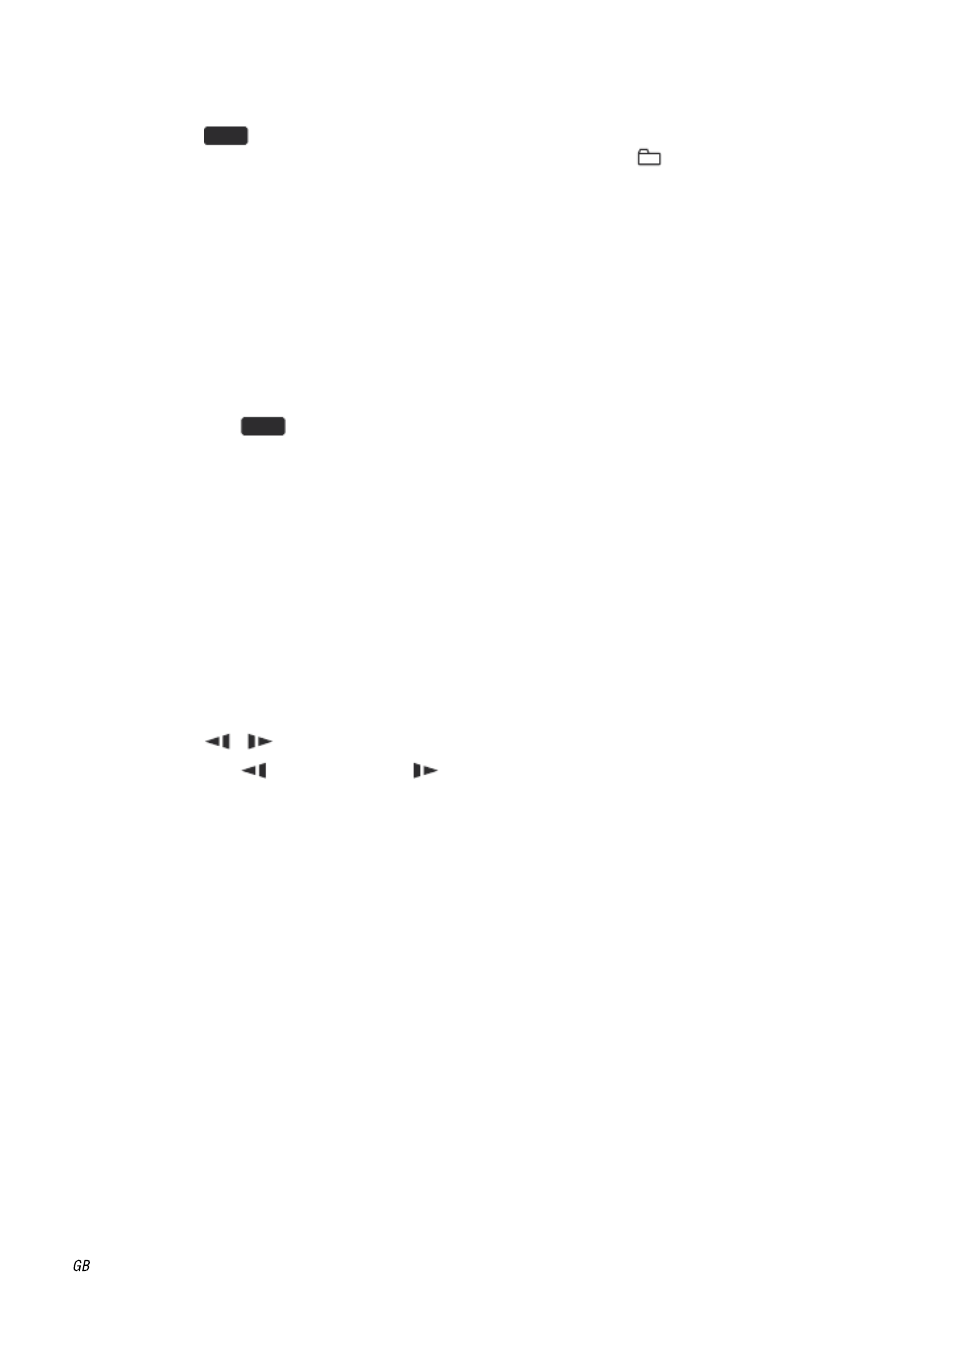
5 Press VOLUME +/– (or turn
MASTER VOLUME on the unit) to
adjust the volume.
Note
Depending on the system status, the volume
level may not appear on the TV screen.
Other operations
Disc
DVD
GROOVE
Elapsed playing time
Disc playing indicator
To Do this
Stop playback Press x.
Pause playback Press X1). Press X again
or H (or nN on the
unit) to resume playback.
Select a track,
audio file, chapter
or video file2)
Press . or >
repeatedly during
playback.
Or, press the numeric
buttons when the Control
Menu is turned off, then
press ENTER3).
When you play
back an 8 cm disc
such as a CD
single, place it on
the inner circle of
the tray

27
Disc
1) There may be some disturbance in the video
image.
2) Except for JPEG image files. You cannot
select an audio file during Lock Search
operation of MP3 audio files.
3) DVD VIDEO, DVD-R/-RW in VR mode,
VIDEO CD, AUDIO CD and video file only.
4) MP3 audio files, JPEG image files and video
files only.
5) Except for JPEG image files.
6) Depending on the disc, the actual speed may
differ.
7) DVD VIDEO, DVD-R/-RW in VR mode,
video files and VIDEO CD only.
8) Except for VIDEO CD and video file.
9) DVD VIDEO and DVD-R/-RW in VR mode
only.
Notes
• You cannot search for a still picture on a
DVD-R/-RW in VR mode.
• You may not be able to use the Instant Replay
or Instant Advance function in Repeat Play
mode or with some scenes.
• You cannot open the disc tray during USB
transferring or erasing.
To Do this
Select a folder4) Press +/– repeatedly
during playback or when
playback is paused.
Locate a point
quickly in fast
forward or fast
reverse (Lock
Search)5)
Press m or M during
playback. Each time you
press m or M, the
playback speed changes
cyclically.6)
To return to normal
playback, press H
(or nN on the unit).
Watch frame by
frame (Slow-
motion Play)7)
Press SLOW or
SLOW (or or
on the unit) when
playback is paused.
Each time you press
SLOW8) or SLOW
(or or on
the unit), the playback
speed changes.
To return to normal
playback, press H
(or nN on the unit).
Play one frame
at a time (Freeze
Frame)7)
Press STEP C to go to
the next frame when
playback is paused.
Press c STEP8) to go
to the preceding frame
when playback is
paused.
To return to normal
playback, press H
(or nN on the unit).
Replay the
previous scene
(10 seconds
before)
(Instant Replay)9)
Press REPLAY
during playback.
Briefly fast
forward the
current scene
(30 seconds after)
(Instant
Advance)9)
Press ADVANCE
during playback.
To Do this
Turn off the
sound
temporarily
Press MUTING on the
unit.
To cancel, press
MUTING again or press
VOLUME + (or turn
MASTER VOLUME on
the unit clockwise).
Select a disc Press DISC SKIP on the
remote (or one of the
DISC 1 ~ 3 buttons on
the unit).
Switch to DVD
function from
another source
and start playback
automatically
Press one of the
DISC 1 ~ 3 buttons on
the unit (Automatic
Source Selection).
Exchange other
discs while
playing
Press DISC SKIP/
EX-CHANGE on the
unit.

28
Changing the angles
You can change the viewing angle while
playing a DVD VIDEO on which various
angles (multi-angles) for a scene are
recorded.
Press ANGLE repeatedly during
playback. Each time you press ANGLE,
the angle changes.
Note
Depending on the DVD VIDEO, you may not
be able to change the angle, even if multi-angles
are recorded on the DVD VIDEO.
Displaying the subtitles
(DVD VIDEO, DVD-R/-RW in VR mode
and video files only)
While playing a DVD VIDEO,
DVD-R/-RW in VR mode or DivX video
files, you can
– turn the subtitles on or off if the subtitles
are recorded.
– change the language of the subtitles if
multilingual subtitles are recorded.
Press SUBTITLE repeatedly during
playback. Each time you press
SUBTITLE, the subtitle language
changes or turns off.
Notes
• Depending on the DVD VIDEO, you may not
be able to change the subtitles even if
multilingual subtitles are recorded. You also
may not be able to turn the subtitles off.
• You can change the subtitles if the DivX
video file has an “.avi” or “.divx” extension
and contains subtitle information within the
same file.
When playing a DVD VIDEO or a video
file recorded in multiple audio formats,
you can select the audio format you want.
If the DVD VIDEO is recorded with
multilingual tracks, you can also change
the language.
When playing a VIDEO CD, AUDIO CD
or MP3 audio files, you can select the
sound from the right or left channel and
listen to the sound of the selected channel
through both the right and left speakers.
For example, when playing a track with
the vocals on the right channel and the
instruments on the left channel, you can
hear the instruments from both speakers
by selecting the left channel.
Press AUDIO repeatedly during
playback to select the audio signal
you want.
The default settings are underlined.
When playing a DVD VIDEO:
Depending on the DVD VIDEO, the
option of language and audio format
varies.
When a 4-digit number is displayed, the
digits represent a language code (see
“Language code list” on page 106). When
the same language is displayed two or
more times, the DVD VIDEO is recorded
in multiple audio formats. Note that the
sound changes automatically depending
on the disc.
Displaying multi-angles and
subtitles
Selecting the audio format

29
Disc
When playing a DVD-R/-RW in VR
mode:
The number of audio tracks recorded on a
disc are displayed.
Example:
• 1: MAIN: the main sound of the audio
track 1.
• 1: SUB: the sub sound of the audio track
1.
• 1: MAIN+SUB: the main and sub sound
of the audio track 1.
• 2: MAIN*: the main sound of the audio
track 2.
• 2: SUB*: the sub sound of the audio
track 2.
• 2: MAIN+SUB*: the main and sub
sound of the audio track 2.
* These items do not appear if only one audio
stream is recorded on the disc being played
back.
When playing a video file:
The options for audio format differ
depending on the video files.
When playing a VIDEO CD, AUDIO CD
or MP3 audio file:
• STEREO: the standard stereo sound.
• 1/L: the sound of the left channel
(monaural).
• 2/R: the sound of the right channel
(monaural).
When playing a Super VCD:
• 1: STEREO: the stereo sound of the
audio track 1.
• 1: 1/L: the sound of the left channel of
the audio track 1 (monaural).
• 1: 2/R: the sound of the right channel of
the audio track 1 (monaural).
• 2: STEREO*: the stereo sound of the
audio track 2.
• 2: 1/L*: the sound of the left channel of
the audio track 2 (monaural).
• 2: 2/R*: the sound of the right channel
of the audio track 2 (monaural).
* If the audio track 2 is not recorded on the
Super VCD, no sound will come out when you
select this setting.
— PBC Playback
You can use the PBC (Playback Control)
menus on your TV screen to enjoy the
disc’s interactive software. The menu
format and structure may differ depending
on each disc.
1 Press H (or nN on the unit)
to start playing a VIDEO CD with
PBC functions (Version 2.0).
The PBC menu appears on the TV
screen. Depending on the VIDEO CD,
the menu may not appear.
2 Press the numeric buttons to
select the item number you
want.
3 Press ENTER.
Depending on the VIDEO CD,
“Press ENTER” may appear as “Press
SELECT” in the operating instructions
supplied with the disc. In this case,
press H (or nN on the unit).
4 Continue playback according to
the instructions on the menus.
Refer to the operating instructions
supplied with the VIDEO CD, as the
operating procedure may differ
depending on the VIDEO CD.
Note
PBC playback is canceled when Shuffle Play,
Program Play or Repeat Play is activated.
Playing VIDEO CDs with PBC
functions (Version 2.0)
Continued
l

30
To cancel playback with PBC
functions
1 Press . or > repeatedly or
press the numeric buttons to select
a track when playback is stopped.
2 Press H (or nN on the unit) or
ENTER.
Playback starts from the selected track.
Still images, such as the menu screens,
will not be shown.
To return to PBC playback, press x
twice, then press H (or nN on the
unit).
— Resume Play
This system memorizes the point where
you stopped the disc so you can resume
playback from that point. Resume Play is
not canceled when you turn off the system
except for MP3 audio files, JPEG image
files and video files.
1 While playing a disc, press x to
stop playback.
“Resume” appears in the display.
If “Resume” does not appear, Resume
Play is not available.
2 Press H (or nN on the unit).
The system starts playback from the
point you stopped the disc in step 1.
Notes
• You cannot perform Resume Play during
Shuffle Play or Program Play.
• This function may not work properly with
some discs.
• Resume Play is canceled when you
– press x when playback is stopped.
– open the disc tray.
– change the disc.
– change the function.
– change the settings in the Setup Menu.
– change the Parental Control level.
Tip
To play back from the beginning of the disc,
press x twice, then press H (or nN on the
unit).
— Multi-disc Resume
This system can store the point where you
stopped the playback of the disc for up to
10 discs and resumes playback when you
insert the same disc again. If you store a
playback resume point for the 11th disc,
the playback resume point for the first
disc will be deleted.
To activate this function, set “MULTI-
DISC RESUME” in “SYSTEM SETUP”
to “ON” (page 49).
Notes
• If “MULTI-DISC RESUME” in “SYSTEM
SETUP” is set to “ON” and you play back a
recorded disc such as DVD-R, the system may
play back other recorded discs from the same
playback resume point. To start playback
from the beginning of the disc, press x twice
and then press H (or nN on the unit).
• The playback resume point is deleted when
the power cord is disconnected.
Resuming playback from the
point you stopped the disc
Resuming playback of a disc
that was stopped

31
Disc
Using play mode
— Program Play
You can make a program of up to 99 steps
in the order you want them to be played
back.
You can only program the tracks from the
current disc.
1Press DISPLAY when
playback is stopped.
The Control Menu appears on the TV
screen.
2 Press V v or repeatedly to
select (PROGRAM),
then press ENTER.
The options for “PROGRAM” appear
on the TV screen.
3 Press V v or repeatedly to
select “SETt”, then press
ENTER.
4 Press b.
The cursor moves to the track row “T”
(in this case, “01”).
5 Select the track you want to
program.
For example, select track “02”.
Press V or v repeatedly to select “02”
under “T”, then press ENTER.
6 To program other tracks, repeat
steps 4 to 5.
7 Press H (or nN on the unit).
Program Play starts.
When the Program Play ends, you can
restart the same program by pressing
H (or nN on the unit).
Creating your own program
Track number
Selected track
Total time of the programmed tracks
Continued
l

32
To change or delete a programmed
step
1 Follow steps 1 to 3 of “Creating your
own program” (page 31).
2 Press V v or repeatedly to select
the programmed step number you
want to change or delete.
3 To delete the programmed step,
press CLEAR.
To change the programmed step,
follow step 5 of “Creating your own
program”.
To cancel a programmed step,
select “--” under “T”, then press
ENTER.
To delete all of the programmed
steps in the program list
1 Follow steps 1 to 3 of “Creating your
own program” (page 31).
2 Press V to select “ALL CLEAR”,
then press ENTER.
To cancel Program Play
Press CLEAR or select “OFF” in step 3.
To play back the same program again,
select “ON” in step 3 and press ENTER.
To turn off the Control Menu
Press DISPLAY repeatedly until the
Control Menu disappears from the TV
screen.
Notes
• When you press CLEAR to return to Normal
Play, Shuffle Play and Repeat Play are also
canceled.
• When Program Play is activated, the
“REPEAT” setting is automatically changed
to “ON” if the current setting is “ALL
DISCS”, “ONE DISC” or “TRACK”.
• You cannot perform Program Play with
VIDEO CDs during PBC playback.
• Program Play is canceled and the program list
is cleared when you
– open the disc tray.
– change the disc.
– turn off the system.
– change the function.
— Shuffle Play
You can play back the tracks or files on
the current disc in random order. Each
time you perform Shuffle Play, the
playing order may differs.
Shuffle Play is only available for the
tracks on the current disc.
1 Press
DISPLAY.
The Control Menu appears on the TV
screen.
2 Press V v or repeatedly to
select (SHUFFLE), then
press ENTER.
The options for “SHUFFLE” appear
on the TV screen.
Playing in random order

33
Disc
3 Press V v or repeatedly to
select the setting you want.
When playing a VIDEO CD or
AUDIO CD:
• TRACK: all tracks on the current
disc is played back randomly.
When Program Play is activated:
• ON: all tracks in the program list is
played back randomly.
When playing a DATA CD/DVD
(except for video files):
• ON (MUSIC): all MP3 audio files in
the selected folder on the current disc
is played back randomly.
When no folder is selected, the first
folder is played back randomly.
4 Press ENTER.
Shuffle Play starts.
To cancel Shuffle Play
Press CLEAR or select “OFF” in step 3.
To turn off the Control Menu
Press DISPLAY repeatedly until the
Control Menu disappears from the TV
screen.
Notes
• When you press CLEAR to return to Normal
Play, Program Play and Repeat Play are also
canceled.
• You cannot perform Shuffle Play with
VIDEO CDs during PBC playback.
• The same song may be played back repeatedly
for MP3 audio files.
• Shuffle Play is canceled when you
– open the disc tray.
– change the disc.
– turn off the system.
– change the function.
– perform Track/Index Search.
– perform CD-TAPE Synchro Recording.
– transfer music from a disc to an USB
device.
— Repeat Play
You can play back the contents on a disc
repeatedly.
You can select Shuffle Play and Program
Play at the same time.
1 Press
DISPLAY.
The Control Menu appears on the TV
screen.
2 Press V v or repeatedly to
select (REPEAT), then
press ENTER.
The options for “REPEAT” appear on
the TV screen.
3 Press V v or repeatedly to
select the setting you want.
The default settings are underlined.
When playing a DVD VIDEO or
DVD-R/DVD-RW in VR mode:
• OFF: does not play back repeatedly.
• ALL DISCS: repeats all discs.
• ONE DISC: repeats all the titles on
the current disc.
• TITLE: repeats the current title.
• CHAPTER: repeats the current
chapter.
When playing a VIDEO CD or
AUDIO CD:
• OFF: does not play back repeatedly.
• ALL DISCS: repeats all discs.
• ONE DISC: repeats all the tracks on
the current disc.
• TRACK: repeats the current track.
Playing repeatedly
Continued
l

34
When playing a DATA CD or DATA
DVD:
• OFF: does not play back repeatedly.
• ALL DISCS: repeats all discs.
• ONE DISC: repeats all the folders on
the current disc.
• FOLDER: repeats the current folder.
• TRACK1): repeats the current track.
• FILE2): repeats the current file.
1) MP3 audio files only.
2) Video files only.
When Program Play or Shuffle Play
is activated:
• OFF: does not play back repeatedly.
• ON: repeats the Program Play or
Shuffle Play.
4 Press ENTER.
5 Press H (or nN on the unit).
Repeat Play starts.
To cancel Repeat Play
Press CLEAR or select “OFF” in step 3.
To turn off the Control Menu
Press DISPLAY repeatedly until the
Control Menu disappears from the TV
screen.
Notes
• You can also change the Repeat Play setting
by pressing REPEAT repeatedly.
• “REP” lights up in the display when Repeat
Play is set to “ALL DISCS”, “ONE DISC” or
“FOLDER”.
• “REP 1” lights up in the display when Repeat
Play is set to “TITLE”, “CHAPTER”,
“TRACK” or “FILE”.
• When you press CLEAR to return to Normal
Play, Program Play and Shuffle Play are also
canceled.
• Depending on the DVD VIDEO, you cannot
perform Repeat Play.
• You cannot perform Repeat Play with VIDEO
CDs during PBC playback.
• When playing a DATA CD/DVD which
contains MP3 audio files and JPEG image
files, the audio sound will not match the image
if their playing time are different.
• Repeat Play is canceled when you
– open the disc tray.
– change the disc (except when “ALL
DISCS” is selected).
– turn off the system.
– change the function (except when “ALL
DISCS” is selected).
– perform CD-TAPE Synchro Recording.
– transfer music from a disc to an USB
device.

35
Disc
Searching/selecting a
disc
Some DVD VIDEOs have menus to help
you enjoy the DVD VIDEOs. You can
play back DVD VIDEOs using these
menus on the TV screen.
Using DVD TOP MENU
A DVD VIDEO contains a lot of sections
of picture or music feature called “title”.
When you play back a DVD VIDEO
which contains several titles, you can
select the title you want using DVD TOP
MENU.
Using DVD MENU
Some DVD VIDEOs allow you to select
the disc contents using a menu. When you
play back these DVD VIDEOs, you can
select items such as the language for the
subtitles and the language for the sound
using DVD/TUNER MENU.
1 Press DVD TOP MENU or DVD/
TUNER MENU.
The menu appears on the TV screen.
The contents of the menu vary
depending on the disc.
2 Press V v B b/// or the numeric
buttons to select the title or item
you want to play back.
3 Press ENTER.
This function is only available for
DVD-R/-RW in VR mode with a playlist
created.
1Press DISPLAY when
playback is stopped.
The Control Menu appears on the TV
screen.
2 Press V v or repeatedly to
select (ORIGINAL/PLAY
LIST), then press ENTER.
The options for “ORIGINAL/PLAY
LIST” appear on the TV screen.
3 Press V v or repeatedly to
select the setting you want.
• PLAY LIST: play back according to
the playlist created on the disc.
• ORIGINAL: play back according to
the originally recorded sequence.
4 Press ENTER.
You can search by different information
recorded on a disc, such as title, track and
folder. Each item is assigned a unique
number on the disc, and you can select the
numbered item you want from the Control
Menu.
You can also search for a particular point
using the time code (Time Search) (DVD
VIDEO and DVD-R/-RW in VR mode
only).
Playing DVD VIDEOs using the
menu
Selecting an original title or
edited title on a DVD-R/-RW in
VR mode
Using the on-screen display to
search for a title/chapter/
scene/track/index/folder/file
Continued
l

36
1Press DISPLAY. (If “MEDIA”
is set to “MUSIC/PHOTO”,
press DISPLAY twice)
The Control Menu appears on the TV
screen.
2 Press V or v repeatedly to
select the search item.
Example: when you select
(CHAPTER)
“** (**)” is selected (** refers to a
number). The number in parentheses
indicates the total number of titles,
chapters, tracks, indexes, scenes,
folders or files.
3 Press ENTER.
“** (**)” change to “– – (**)”.
4 Press V v or repeatedly or the
numeric buttons to select the
title number, track number, etc.
If you make a mistake, press CLEAR
to cancel the number.
5 Press ENTER.
The system starts playback from the
selected title, track, etc.
To turn off the Control Menu
Press DISPLAY repeatedly until the
Control Menu disappears from the TV
screen.
Tip
When the Control Menu display is turned off,
you can search for a chapter (DVD VIDEO and
DVD-R/-RW in VR mode), track (AUDIO CD
and VIDEO CD) or video file (DATA CD/
DVD) by pressing the numeric buttons and
ENTER.
To search for a particular point
using the time code – Time Search
1 Press
DISPLAY.
The Control Menu appears on the TV
screen.
2 Press V or v repeatedly to select
(TIME).
“T **:**:**” (elapsed playing time of
the current title) is selected.
3 Press ENTER.
“T **:**:**” changes to “T--:--:--”.
4 Input the time code using the
numeric buttons.
For example, to find the scene at 2
hours, 10 minutes, and 20 seconds after
the beginning, enter “21020”.
If you make a mistake, press CLEAR to
cancel the number.
5 Press ENTER.
Note
Depending on the disc, you cannot perform
Time Search.
Selected row

37
Disc
Playing MP3 audio
files/JPEG image files
Notes
• The system can recognize up to 200 folders,
and will not play back any folders beyond the
200th. (Depending on the folder
configuration, the number of folders that can
be recognized by the system may decrease).
• The maximum number of MP3 audio files or
JPEG image files on a folder which this
system can recognize is 150 respectively.
• The system can play back MP3 audio files and
JPEG image files. The system will play back
any data with the extension “.mp3”, “.jpg” or
“.jpeg” even if they are not in MP3 or JPEG
format. Playing this data may generate a loud
noise which could damage your speaker
system.
• Depending on the encoding/writing software,
recording device, or the recording media used
to record an MP3 audio file, you may
encounter problems such as cannot play back,
sound interruptions and noise.
• The following discs/situations can increase
the time it takes to start playback:
– a disc recorded with a complicated tree
structure.
– a disc recorded in Multi Session.
– a disc to which data can be added (non-
finalized disc).
– when the tracks or files in another folder
have just been played back.
• Some CD-Rs/-RWs or DVD-Rs/-RWs/+Rs/
+RWs cannot be played back on the system
depending on the file format.
• The system can play back to a depth of 8
folders only.
• The system may not playback certain types of
JPEG image files (For example, a JPEG
image file that is less than 8 (width) × 8
(height)).
1 Load a disc on the disc tray.
“FOLDER LIST” appears on the TV
screen.
If “FOLDER LIST” does not appear,
press DVD/TUNER MENU.
2 Press V v or repeatedly to
select a folder.
Playing a folder:
Press H (or nN on the unit).
The system starts playback from the
first file of the selected folder.
To stop playback, press x.
Playing a MP3 audio file:
1 Press ENTER.
“TRACK LIST” appears.
2 Press V or v repeatedly to select
the MP3 audio file you want, then
press ENTER.
The system starts playing the
selected MP3 audio file.
To stop playback, press x.
Playing an MP3 audio file or
folder
Continued
l

38
To display the next or previous page
of “TRACK LIST” or “FOLDER LIST”
Press or repeatedly when
“TRACK LIST” or “FOLDER LIST” is
displayed.
To play back the next folder of MP3
audio files
You can select the next folder by pressing
> repeatedly until the last audio file of
the current folder, then press > once.
The first audio file of the next folder is
selected. However, you cannot select the
previous folder by pressing .
repeatedly. To select the previous folder,
select folder from “FOLDER LIST”.
To return to “FOLDER LIST” when
“TRACK LIST” is displayed
Press O RETURN (or RETURN on the
unit).
To turn on or off “FOLDER LIST” or
“TRACK LIST”
Press DVD/TUNER MENU repeatedly.
1 Load a disc on the disc tray.
“FOLDER LIST” appears on the TV
screen.
If “FOLDER LIST” does not appear,
press DVD/TUNER MENU.
2 Press V v or repeatedly to
select a folder.
Playing a folder:
Press H (or nN on the unit).
The system starts a slide show from the
first image file of the selected folder.
Playing a JPEG image file:
1 Press PICTURE NAVI.
Thumbnail picture for the first 16
JPEG image files in the selected
folder is displayed on the TV
screen.
If there are more than 16 image files
in the selected folder, the scroll bar
appears at the right.
2 Press V v B b/// to select the
image you want to view, then
press H (or nN on the unit).
The slide show starts from the
selected image file.
To stop playback, press x.
To display the next or previous page
of “TRACK LIST” or “FOLDER LIST”
Press or repeatedly when
“TRACK LIST” or “FOLDER LIST” is
displayed.
To display the next or previous JPEG
image file
Press B or b repeatedly during the slide
show.
Playing a JPEG image file or
folder
1 2 3 4
5 6 7 8
13 14 15 16
9 10 11 12
39
Disc
To play back the next folder of JPEG
image files
You can select the next folder by pressing
b repeatedly until the last file of the
current folder, then press
b once. The
first file of the next folder is selected.
However, you cannot select the previous
folder by pressing
B repeatedly. To select
the previous folder, select folder from
“FOLDER LIST”.
To turn on or off “FOLDER LIST”
Press DVD/TUNER MENU repeatedly.
To rotate a JPEG image file
When a JPEG image file is displayed on
the TV screen, you can rotate the image
by 90 degrees.
Press
V or v repeatedly while viewing an
image.
Press CLEAR to return to the original
view.
Notes
• The PICTURE NAVI button does not work
when “MEDIA” is set to “MUSIC”.
• When you press B b or to select the next or
previous image, the image will return to its
original view even if you have rotated the
image previously.
• The slide show stops when you press V or v.
You can play back a slide show with
sound by first placing both JPEG image
files and MP3 audio files in the same
folder on a DATA CD/DVD.
1 Load a DATA CD/DVD on the
disc tray.
2Press DISPLAY when
playback is stopped.
The Control Menu appears on the TV
screen.
3 Press V v or repeatedly to
select (MEDIA), then
press ENTER.
The options for “MEDIA” appear on
the TV screen.
4 Press V v or repeatedly to
select “MUSIC/PHOTO”, then
press ENTER.
5 Press DVD/TUNER MENU.
“FOLDER LIST” appears on the TV
screen.
6 Press V v or repeatedly to
select the folder you want, then
press H (or nN on the unit).
The slide show with sound starts from
the selected folder.
To stop playback, press x.
To turn on or off “FOLDER LIST”
Press DVD/TUNER MENU repeatedly.
To cancel slide show with sound
Select setting other than “MUSIC/
PHOTO” in step 4.
Playing a slide show with
sound
Continued
l

40
Note
If you play back a large data size of MP3 audio
files and JPEG image files at the same time, the
sound may skip. It is recommended that you
reduce the data size by creating the MP3 audio
files with a bit rate of 128 kbps or lower. If the
skipping sound still occurs, reduce the data size
of JPEG image files by creating the JPEG image
files in smaller size or lower resolution.
Specifying the slide show speed
(JPEG image files only)
1 Press
DISPLAY repeatedly until
the Control Menu for JPEG image
files appears on the TV screen.
2 Press V v or repeatedly to select
(INTERVAL), then press
ENTER.
The options for “INTERVAL” appear
on the TV screen.
3 Press V v or repeatedly to select
the transition interval you want.
The intervals become longer in the
order from “FAST”, “NORMAL”
(default setting), “SLOW 1” to
“SLOW 2”.
4 Press ENTER.
The selected setting takes effect.
Note
Some JPEG image files (especially progressive
JPEG image files or JPEG image files with
3,000,000 pixels or more) may take a longer
time to display than others, which may make the
transitions seem longer than the option you
selected.
Selecting a transition effect for
image files in the slide show
(JPEG image files only)
1 Press
DISPLAY repeatedly until
the Control Menu for JPEG image
files appears on the TV screen.
2 Press V v or repeatedly to select
(EFFECT), then press
ENTER.
The options for “EFFECT” appear on
the TV screen.
3 Press V v or repeatedly to select
the setting you want.
The default setting is underlined.
• MODE 1: the image sweeps in from
top to bottom of the screen.
• MODE 2: the image sweeps in from
left to right of the screen.
• MODE 3: the image stretches out
from the center of the screen.
• MODE 4: the image randomly cycles
through the effects.
• MODE 5: the next image slides over
the current image.
• OFF: turns off this function.
4 Press ENTER.
The selected setting takes effect.

41
Disc
You can select playback priority when
there is more than 1 type of media (MP3
audio files, JPEG image files, or video
files) in the disc.
1 Load a DATA CD/DVD on the
disc tray.
2Press DISPLAY when
playback is stopped.
The Control Menu appears on the TV
screen.
3 Press V v or repeatedly to
select (MEDIA), then
press ENTER.
The options for “MEDIA” appear on
the TV screen.
4 Press V v or repeatedly to
select the setting you want.
The default setting is underlined.
• MUSIC/PHOTO: You can play back
both JPEG image files and MP3
audio files in the same folder as a
slide show.
• MUSIC: MP3 audio file playback
has priority.
• VIDEO: Video file playback has
priority.
• PHOTO: JPEG image files playback
has priority. You can play back JPEG
image files as a slide show.
5 Press ENTER.
For details of the playback priority of
file types in the “MEDIA” setting, see
“Playback priority of file types”
(page 108).
Enjoying video files
You can play back DivX video files and
MPEG4 video files.
DivX® is a video file compression
technology, developed by DivX, Inc. This
product is an official DivX
® Certified
product.
DivX video files that the system can
play back
The system can play back data that is
recorded in DivX format, and which has
the extension “.avi” or “.divx”. The
system will not play back files with the
extension “.avi” or “.divx” if they do not
contain a DivX video.
Notes
• The system may not play back a DivX video
file when the file has been combined from two
or more DivX video files.
• The system cannot play back a DivX video
file size of more than 720 (width) x 576
(height)/2GB.
• Depending on the DivX video file, the picture
may be unclear or the sound may skip.
• The system cannot play back some DivX
video files that are longer than 3 hours.
MPEG4 video files that the system
can play back
The system can play back data that is
recorded in MP4 file format, and which
has the extension “.mp4” or “.m4v”. The
system will not play back files with the
extension “.mp4” or “.m4v” if they do not
contain a MPEG4 video.
Note
Compatibility with all MPEG4 video encoding/
writing software, recording devices, and
recording media cannot be guaranteed.
Selecting playback priority of
the file type

42
1 Load a DATA CD/DVD with video
files on the disc tray.
“FOLDER LIST” appears on the TV
screen.
If “FOLDER LIST” does not appear,
press DVD/TUNER MENU.
2 Press V v or repeatedly to
select a folder.
Playing a folder:
Press H (or nN on the unit).
The system starts playback from the
first video file of the selected folder.
To stop playback, press x.
Playing a video file:
1 Press ENTER.
“FILE LIST” appears.
2 Press V v or repeatedly to
select the video file you want,
then press ENTER.
The system starts playing the
selected video file.
To stop playback, press x.
To display the next or previous page
of “FILE LIST” or “FOLDER LIST”
Press or repeatedly when “FILE
LIST” or “FOLDER LIST” is displayed.
To play back the next folder of
video files
You can select the next folder by pressing
> repeatedly until the last file of the
current folder, then press > once. The
first file of the next folder is selected.
However, you cannot select the previous
folder by pressing . repeatedly. To
select the previous folder, select folder
from “FOLDER LIST”.
To return to “FOLDER LIST” when
“FILE LIST” is displayed
Press O RETURN (or RETURN on the
unit).
To turn on or off “FOLDER LIST” or
“FILE LIST”
Press DVD/TUNER MENU repeatedly.
Notes
• Depending on the video file, the picture may
pause or be unclear. In this case, it is
recommended that you create the file at a
lower bit rate.
• Due to the compression technology used for
video files, it may take some time after you
press H (or nN on the unit) for the
picture to appear.
• Depending on the video file, the sound may
not match the pictures on the screen.
• The system can recognize up to 150 video
files in a single folder. A maximum of 200
folders can be recognized.
Tip
If the number of viewing times has been preset,
you can play back the video files as many times
as the preset number. The following
occurrences are counted:
– when the system is turned off.
– when the disc tray is opened.
– when another video file is played back.
Playing a video file or folder

43
Disc
Adjusting the delay
between the picture
and sound
— A/V SYNC
When the sound does not synchronize
with the pictures on the TV screen, you
can adjust the delay between the picture
and sound.
A/V SYNC does not work for MP3 audio
files and JPEG image files in DATA CD/
DVD.
1 Press DISPLAY.
The Control Menu appears on the TV
screen.
2 Press V v or repeatedly to
select (A/V SYNC), then
press ENTER.
The options for “A/V SYNC” appear
on the TV screen.
3 Press V v or repeatedly to
select the setting you want.
The default setting is underlined.
• OFF: does not adjust.
• ON: adjusts the difference between
picture and sound.
4 Press ENTER.
Note
Depending on the input stream, this function
may not be effective.
Restricting playback of
the disc
— PARENTAL CONTROL
You can limit the playback of some DVD
VIDEOs according to a predetermined
level such as the age of the users. When a
limited scene is played back, that scene
may be skipped or replaced with different
scenes.
1Press DISPLAY when
playback is stopped.
The Control Menu appears on the TV
screen.
2 Press V v or repeatedly to
select (SETUP), then
press ENTER.
The options for “SETUP” appear on
the TV screen.
3 Press V v or repeatedly to
select “CUSTOM”, then press
ENTER.
The Setup Menu appears on the TV
screen.
4 Press V v or repeatedly to
select “SYSTEM SETUP”, then
press ENTER.
5 Press V v or repeatedly to
select “PARENTAL
CONTROL”, then press
ENTER.
Continued
l

44
If you have not entered a
password:
The display for registering a new
password appears on the TV screen.
Enter a 4-digit password using the
numeric buttons, then press ENTER.
The display for confirming the
password appears on the TV screen.
When you have already
registered a password:
The display for entering the
password appears on the TV screen.
6 Enter or re-enter your 4-digit
password using the numeric
buttons, then press ENTER.
The display for setting the playback
limitation level appears on the TV
screen.
7 Press V v or repeatedly to
select “STANDARD”, then
press ENTER.
The options for “STANDARD”
appear on the TV screen.
8 Press V v or repeatedly to
select a geographic area as the
playback limitation level, then
press ENTER.
The area is selected.
When you select “OTHERS t”,
enter the area code for the
geographic area you want according
to the “Parental Control area code
list” on page 107 by using the
numeric buttons.
9 Press V v or repeatedly to
select “LEVEL”, then press
ENTER.
The options for “LEVEL” appear on
the TV screen.
10 Press V or v repeatedly to
select the level you want, then
press ENTER.
“PARENTAL CONTROL” setting
is completed.
The lower the value, the stricter the
limitation.
If you make a mistake when entering
your password
Press B repeatedly to delete the number
you have entered, then re-enter your
password again.
To turn off the “PARENTAL
CONTROL” function
Set “LEVEL” to “OFF” in step 10.

45
Disc
To play back a disc for which
“PARENTAL CONTROL” is set
1 Load the disc and press H
(or nN on the unit).
The display for entering your password
appears on the TV screen.
2 Enter your 4-digit password using
the numeric buttons, then press
ENTER.
The system starts playback.
Notes
• The Control Menu display will show different
items depending on the disc type.
• When you play back DVD VIDEOs which do
not have the “PARENTAL CONTROL”
function, playback cannot be limited on this
system.
• Depending on the DVD VIDEO, you may be
asked to change the “PARENTAL
CONTROL” level while playing the disc. In
this case, enter your password, then change
the level. If Resume Play is canceled, the level
returns to the original level.
Tip
If you forget your password, remove the disc
and repeat steps 1 to 5 of “Restricting playback
of the disc” (page 43). When you are asked to
enter your password, enter “199703” using the
numeric buttons, then press ENTER. The
display will ask you to enter a new 4-digit
password. After you enter a new 4-digit
password, reload the disc and press H (or
nN on the unit). When the display for
entering your password appears, enter your new
password.
1Press DISPLAY when
playback is stopped.
The Control Menu appears on the
TV screen.
2 Press V v or repeatedly to
select (SETUP), then
press ENTER.
The options for “SETUP” appear on
the TV screen.
3 Press V v or repeatedly to
select “CUSTOM”, then press
ENTER.
The Setup Menu appears on the TV
screen.
4 Press V v or repeatedly to
select “SYSTEM SETUP”, then
press ENTER.
5 Press V v or repeatedly to
select “PARENTAL
CONTROL”, then press
ENTER.
The display for entering the
password appears on the TV screen.
6 Enter your 4-digit password
using the numeric buttons,
then press ENTER.
7 Press V v or repeatedly to
select “CHANGE
PASSWORD”, then press
ENTER.
8 Enter a new 4-digit password
using the numeric buttons,
then press ENTER.
9 To confirm your password,
re-enter it using the numeric
buttons, then press ENTER.
If you make a mistake when entering
your password
Press B repeatedly to delete the number
you have entered, then re-enter your
password again.
Changing the password

46
Using the Setup Menu
By using the Setup Menu, you can make
various adjustments to items such as
picture and sound.
Displayed items vary depending on the
country or region.
Note
Playback settings stored in the disc take priority
over the Setup Menu settings. Therefore, some
of the Setup Menu settings may not be
performed.
1Press DISPLAY when
playback is stopped.
The Control Menu appears on the TV
screen.
2 Press V v or repeatedly to
select (SETUP), then
press ENTER.
The options for “SETUP” appear on
the TV screen.
3 Press V v or repeatedly to
select “CUSTOM”, then press
ENTER.
The Setup Menu appears on the TV
screen.
4 Press V v or repeatedly to
select the setup item from the
displayed list: “LANGUAGE
SETUP”, “VIDEO SETUP”,
“AUDIO SETUP”, “SYSTEM
SETUP” or “SPEAKER SETUP”.
Then press ENTER.
The setup item is selected.
Example: VIDEO SETUP
5 Press V v or repeatedly to
select the item you want, then
press ENTER.
The options for the selected item
appear on the TV screen.
Example: TV TYPE
6 Press V v or repeatedly to
select the setting you want, then
press ENTER.
The setting is selected and setup is
completed.
Selected item
Setup items
Options
Selected setting

47
Disc
Setting the language – LANGUAGE
SETUP
Set various languages for the on-screen
display or sound track.
OSD
(On-Screen Display)
Switches the language of the on-screen
display.
MENU*
(DVD VIDEO only)
Select the language for the DVD menu.
AUDIO*
(DVD VIDEO only)
Switches the language of the sound track.
When you select “ORIGINAL”, the
language given priority in the disc is
selected.
SUBTITLE*
(DVD VIDEO only)
Switches the language of the subtitle
recorded on the DVD VIDEO.
When you select “AUDIO FOLLOW”,
the language for the subtitles changes
according to the language you selected for
the sound track.
* When you select a language in “MENU”,
“AUDIO”, or “SUBTITLE” that is not
recorded on the DVD VIDEO, one of the
recorded language is automatically selected.
However, depending on the disc, the language
may not be selected automatically. If you
select “OTHERS t” in “MENU”,
“AUDIO”, and “SUBTITLE”, enter a
language code from the “Language code list”
(page 106) using the numeric buttons.
Setting the TV screen – VIDEO SETUP
Choose the settings according to the TV
you connected.
The default settings are underlined.
TV TYPE1)
(DVD VIDEO only)
16:9: Select this when you connect a
wide-screen TV or a TV with a wide mode
function.
4:3 LETTER BOX2): Select this when
you connect a 4:3 screen TV. This setting
displays a wide picture with bands on the
upper and lower portions of the screen.
Setup menu item list
Continued
l

48
4:3 PAN SCAN2): Select this when you
connect a 4:3 screen TV. This setting
displays the wide picture on the entire
screen and cuts off the portions that do not
fit.
PROGRESSIVE (COMPONENT OUT)
Sets the progressive signal output from
the COMPONENT VIDEO OUT jacks to
on or off.
OFF: Outputs interlace signals.
ON: Outputs progressive signals.
For details, see “Changing the format of
the video signal from COMPONENT
VIDEO OUT jacks” (page 20).
COLOR SYSTEM (VIDEO CD)
Select the color system when you play
back a VIDEO CD.
AUTO: Output the video signal
according to the color system of the disc,
either PAL or NTSC. Select this setting, if
your TV uses a DUAL system.
PAL: Change the video signal of an
NTSC disc and output it in PAL system.
NTSC: Change the video signal of a PAL
disc and output it in NTSC system.
For details, see “Changing the color
system” (page 19).
PAUSE MODE
(DVD VIDEO and DVD-R/-RW in VR
mode only)
AUTO: The picture, including subjects
that move dynamically, is output with no
jitter. Normally select this position.
FRAME: The picture, including subjects
that do not move dynamically, is output in
high resolution.
1) The default setting varies depending on the
area.
2) Depending on the DVD VIDEO,
“4:3 LETTER BOX” may be selected
automatically instead of “4:3 PAN SCAN”
or vice versa.
Setting the audio options – AUDIO
SETUP
Configure audio related settings.
The default settings are underlined.
AUDIO DRC1)
(Dynamic Range Compression)
(DVD VIDEO and DVD-R/-RW in VR
mode only)
Useful for watching movies at low
volume late at night.
OFF: No compression of dynamic range.
STANDARD: Reproduces the sound
track with the kind of dynamic range that
the recording engineer intended.
MAX: Narrows the dynamic range fully.
TRACK SELECTION
(DVD VIDEO only)
Gives priority to the sound track which
contains the highest number of channels
when you play back a DVD VIDEO on
which multiple audio format (PCM, DTS,
MPEG audio, or Dolby Digital formats)
2)
are recorded.
OFF: No priority given.
AUTO3): Priority given.

49
Disc
1) AUDIO DRC can only be performed with
Dolby Digital sources.
2) If each audio sound track has the same
number of channels, the system selects the
audio sound track in the order from PCM,
DTS, Dolby Digital to MPEG.
3) When you set “TRACK SELECTION” to
“AUTO”, the language may change. The
“TRACK SELECTION” setting has higher
priority than the “AUDIO” settings in
“LANGUAGE SETUP” (page 47). However,
depending on the disc, this function may not
be performed.
Setting the system – SYSTEM SETUP
The default settings are underlined.
SCREEN SAVER
The screen saver will help prevent your
display device from becoming damaged
(ghosting). Press any button (e.g.,
VOLUME +/–) to cancel the screen saver.
ON: The screen saver image appears if
you do not operate the system for about
15 minutes.
OFF: The screen saver does not appear.
BACKGROUND
Selects the background color or picture to
be displayed on the TV screen. The
background color or picture is displayed
when playback is stopped or while
playing an AUDIO CD and MP3 audio
files.
JACKET PICTURE: The jacket picture
(still picture) appears in the background,
but only when the jacket picture is already
recorded on the disc (DVD VIDEO,
CD-EXTRA, etc.). If the disc does not
contain a jacket picture, the
“GRAPHICS” picture appears.
GRAPHICS: A preset picture stored in
the system appears in the background.
BLUE: The background color is blue.
BLACK: The background color is black.
PARENTAL CONTROL
Sets the playback restrictions. For details,
see “Restricting playback of the disc”
(page 43).
DivX
Display the registration code for this
system.
For more information, go to
http://www.divx.com on the Internet.
MULTI-DISC RESUME
(DVD VIDEO and VIDEO CD only)
ON: Stores the resume playback point in
the memory for up to 10 discs.
OFF: Does not store the resume playback
point in the memory. Playback starts at
the resume playback point only for the
current disc in the system.
RESET
Returns “SETUP” settings to the default
settings except for “PARENTAL
CONTROL” settings. For details, see
“Returning the “SETUP” settings to the
default” (page 96).
Continued
l

50
Setting the speakers – SPEAKER
SETUP
To obtain the best possible surround
sound, set the connection of the speakers
you have connected and their distance
from your listening position. Then, use
the test tone to adjust the level and the
balance of the speakers to the same level.
The default settings are underlined.
Note
You cannot perform SPEAKER SETUP when
you connect headphones or microphones to the
unit.
CONNECTION
FRONT: YES
CENTER:
YES: Normally select this.
NONE: Select this if the center speaker is
not connected.
SURROUND:
BEHIND: Select this if the surround
speakers are located in section B.
SIDE: Select this if the surround speakers
are located in section A.
NONE: Select this if the surround
speakers are not connected.
SUBWOOFER1):
YES: Select this if you have connected the
subwoofer.
NONE: Select this if the subwoofer is not
connected.
DISTANCE2)
FRONT 3.0 m3): Front speaker distance
from the listening position can be set in
0.2 meter increments from 1.0 to 7.0
meters.
CENTER 3.0 m4): Center speaker
distance from the listening position can be
set in 0.2 meter increments from 0.0 to 7.0
meters.
SURROUND 3.0 m3)4): Surround
speaker distance from the listening
position can be set in 0.2 meter
increments from 0.0 to 7.0 meters.
90
20
45 AA
BB
Position diagram

51
Disc
LEVEL (FRONT)5)
Be sure to set “TEST TONE” to “ON” for
easy adjustment.
L 0.0 dB: Set this between -6.0 dB and
0.0 dB in 1.0 dB increments.
R 0.0 dB: Set this between -6.0 dB and
0.0 dB in 1.0 dB increments.
CENTER 0.0 dB: Set this between
-6.0 dB and +6.0 dB in 1.0 dB increments.
SUBWOOFER 0.0 dB : Set this between
-6.0 dB and +6.0 dB in 1.0 dB increments.
Depending on the subwoofer, the sound
output may be smaller compared to other
speakers when you adjust this level during
the test tone.
LEVEL (SURROUND) 6)
You can adjust the level of each surround
speakers as follows. Be sure to set “TEST
TONE” to “ON” for easy adjustment.
L 0.0 dB: Set this between -6.0 dB and
+6.0 dB in 1.0 dB increments.
R 0.0 dB: Set this between -6.0 dB and
+6.0 dB in 1.0 dB increments.
TEST TONE7)
OFF: The test tone is not emitted from the
speakers.
ON: The test tone is emitted from each
speaker in sequence.
The test tone is emitted from the selected
speakers when you select “LEVEL
(FRONT)” or “LEVEL (SURROUND)”.
1 Press V v B b/// repeatedly to
select the speaker or level you
want.
2 Press ENTER.
3 Repeat steps 1 and 2 to adjust the
speaker level for other speakers.
Press V v B b/// repeatedly to set
“TEST TONE” to “OFF” when you
have finished adjusting the speaker
level.
1) Depending on the settings of other speakers,
the subwoofer may output excessive sound.
2) The items that are set to “NONE” in
“CONNECTION” cannot be selected.
Depending on the input stream, the
“DISTANCE” setting may not be effective.
When you perform “QUICK” setup
(page 23), the default settings are changed.
3) If each left and right speakers are not placed at
an equal distance from your listening position,
set the distance according to the closest
speaker.
4) The setting range changes depending on the
front speaker setting.
5) The items that are set to “NONE” in
“CONNECTION” cannot be selected.
6) This setting cannot be selected when
“SURROUND” is set to “NONE” in
“CONNECTION”.
7) When you adjust the speaker settings, the
sound may cut off for a moment.
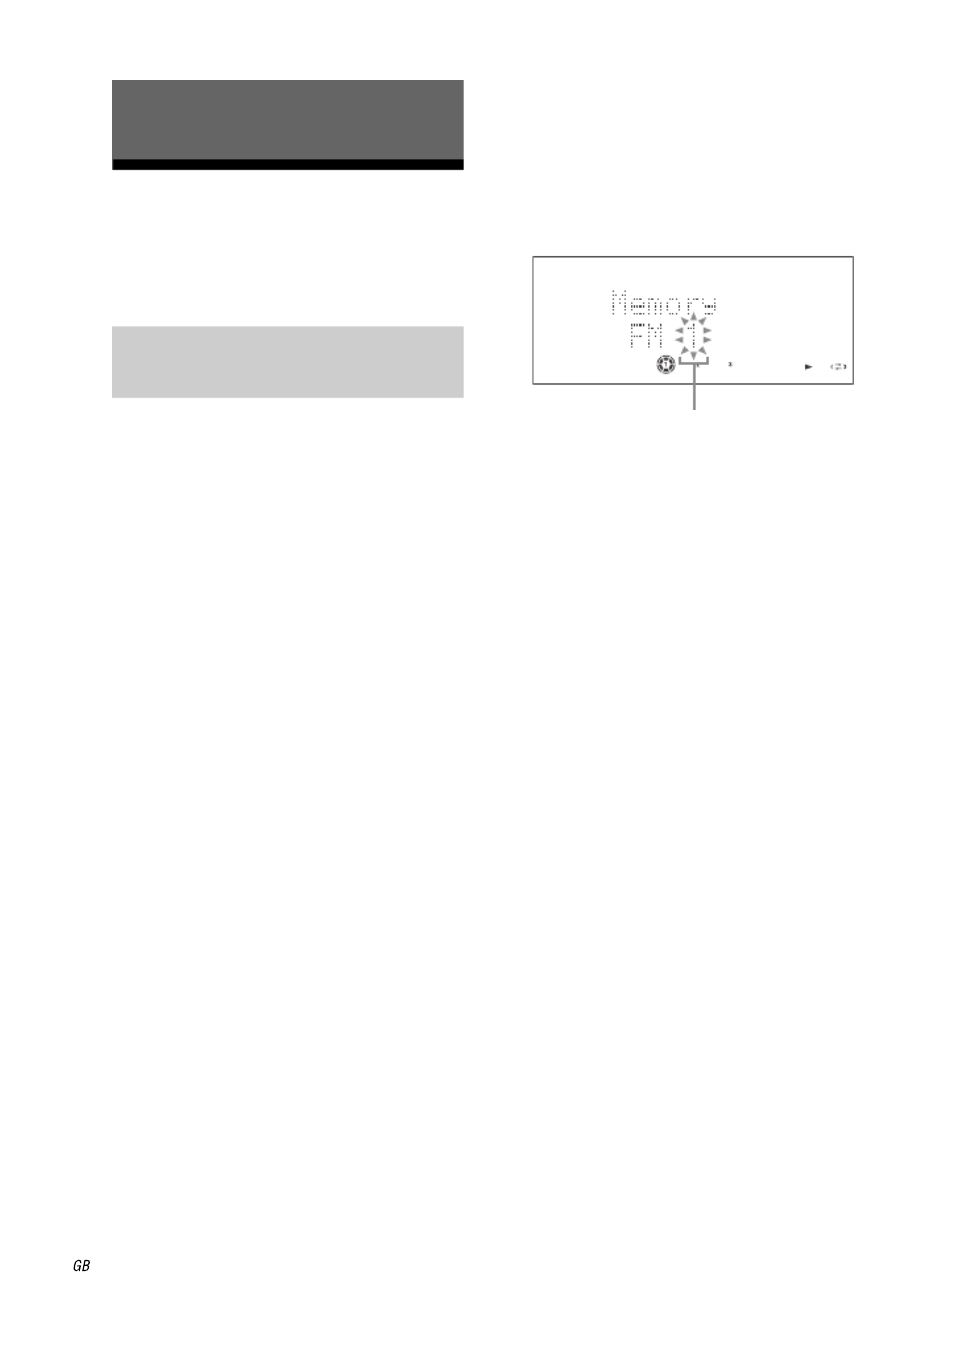
52
Listening to the radio
You can listen to a radio station either by
selecting a preset station, or by manually
tuning in the station.
1 Press FUNCTION +/– repeatedly
to select “TUNER FM” or
“TUNER AM” (or press TUNER/
BAND on the unit repeatedly to
select “FM” or “AM”).
2 Press and hold TUNING +/– until
the frequency indication
changes and then release.
“AUTO” lights up in the display.
Scanning stops automatically when a
station is tuned in and “TUNED” lights
up in the display. When a FM stereo
program is tuned in, “ST” lights up in
the display.
If the scanning does not stop, press
TUNING +/– repeatedly to tune in the
station you want.
3 Press DVD/TUNER MENU.
“Memory?” flashes in the display.
4 Press ENTER or b.
A preset number flashes in the display.
The stations are stored from preset
number 1.
5 Press V v or repeatedly to
select the preset number you
want.
6 Press ENTER.
“Complete!” appears in the display.
The station is stored.
7 Repeat steps 1 to 6 to store other
stations.
You can preset up to 20 FM stations
and 10 AM stations.
The preset stations are retained for half
a day even if you unplug the power
cord or if a power failure occurs.
8 To listen to a preset station,
press PRESET +/– repeatedly to
select the preset station you
want.
You can also press the numeric
buttons, then press ENTER to select a
preset station.
To stop automatic scanning
Press x.
To cancel presetting
Press DVD/TUNER MENU.
Tuner
Listening to a preset radio
station
T APE
GROOVE
Preset number

53
Tuner
You can use manual tuning to tune in a
station with a weak signal and direct
tuning if you know the frequency of the
station.
1 Press FUNCTION +/– repeatedly
to select “TUNER FM” or
“TUNER AM” (or press TUNER/
BAND on the unit repeatedly to
select “FM” or “AM”).
2 Tune in the station you want.
For manual tuning:
Press TUNING +/– repeatedly.
For direct tuning:
Press D.TUNING, then use the
numeric buttons to enter the frequency
of the station you want. For example,
press 1, 0, 2, 5 and 0 to enter the
frequency of FM 102.50 MHz, then
press ENTER. If you cannot tune in the
station, make sure you have entered
the right frequency. If you still cannot
tune in the station, the frequency is not
used in your area.
To cancel direct tuning
Press D.TUNING.
To change the AM tuning interval
(Except for Saudi Arabian model)
The factory setting for AM tuning interval
is 9 kHz (or 10 kHz for some areas).
Use the buttons on the unit for the
operation.
1 Press TUNER/BAND repeatedly to
select “AM”.
2 Press "/1 to turn off the system.
3 Press DISPLAY repeatedly until
“SONY DEMO” appears, then hold
down ENTER and then press "/1
to turn on the system.
“AM 9K STEP” or “AM 10K STEP”
appears in the display.
When you change the interval, all the AM
preset stations are erased.
Tips
• To improve broadcast reception, adjust the
supplied antennas, or connect an external
antenna.
• When an FM stereo program has static noise,
press FM MODE repeatedly until “MONO”
lights up in the display. There will be no stereo
effect, but the reception will improve.
• You can also set the frequency by viewing the
tuner information on the TV screen.
• You can turn off the sound temporarily by
pressing MUTING on the unit. To cancel the
muting function, press MUTING again or
increase the volume.
Listening to a non-preset radio
station
Current band and
preset number Current station

54
Playing a tape
You can use TYPE I (normal) tape.
1 Press FUNCTION +/– repeatedly
to select “TAPE” (or press TAPE
on the unit).
2 Insert a tape.
Press PUSH OPEN/CLOSE on the Z
unit to open the tape deck.
Press PUSH OPEN/CLOSE on the Z
unit to close the tape deck.
3 Press DIRECTION on the unit
repeatedly to select “g” to play
back one side or “j”* to play
back both sides.
* The playback stops automatically after
repeating the sequence five times.
4 Press H (or nN on the unit).
The tape starts playing.
Press
H (or nN on the unit) again
to play back the reverse side.
Other operations
Tape
Insert a tape
into the deck
with the side
you want to
play back or
record facing
upward.
To Do this
Stop playback Press x.
Pause playback Press X. Press X again to
resume playback.
Fast-forward or
rewind
Press m or M. To
return to normal playback,
press H (or nN on
the unit).
Turn off the
sound
temporarily
Press MUTING on the
unit.
To cancel, press MUTING
again or press VOLUME
+ (or turn MASTER
VOLUME on the unit
clockwise).
Remove a tape Press PUSH Z OPEN/
CLOSE on the unit when
playback is stopped.
T APE
GROOVE
Front side indicator

55
Tape
Recording onto a tape
There are three ways to record on a
TYPE I (normal) tape.
Use the buttons on the unit for the
operation.
CD-TAPE Synchro Recording:
You can record an entire AUDIO CD onto
a tape.
Manual Recording:
You can record just the portion you want
from a sound source, including connected
audio components.
Sound Mixing:
You can “mix” sound from any one of the
sound sources and singing or speaking
into a microphone (not supplied). The
mixed sound can be recorded onto a tape.
1 Load a recordable tape into tape
deck.
If you select both sides recording or
front side recording, press nN
repeatedly until N indicator lights
up, then press x at the point you want
to start recording.
If you record on the reverse side, press
nN repeatedly until n indicator
lights up, then press x at the point you
want to start recording.
2 Press DIRECTION repeatedly to
select “g” to record on one
side or “j” to record on both
sides.
If you select “j”, be sure to start
from the front side. If you start from
the reverse side, recording stops at the
end of the reverse side.
3 Prepare the recording source.
For CD-TAPE Synchro Recording:
Press DVD and load the disc you want
to record. If you have already loaded
the disc, press DISC 1 ~ 3 to select the
disc. When the disc starts playback
automatically, press x twice to cancel
resume play.
For Manual Recording and Sound
Mixing:
Press the function button (except
TAPE) to select the source you want to
record.
When recording from a disc, select the
track or file you want, then start
playing the selected track or file.
For Sound Mixing, if you want to
record your voice through the
microphone only, you can do so by
selecting the USB function and do not
playing USB device.
4 Set tape deck to stand by for
recording.
For CD-TAPE Synchro Recording:
Press REC TO TAPE.
“TAPE” and “SYNC” light up
and “REC” flashes in the display.
“Push ENTER” and “CD-TAPE
SYNCHRO Recording” appear
alternately in the display.
If the play mode is set to Shuffle Play,
Program Play or Repeat Play, it
automatically switches to Normal
Play.
For Manual Recording and Sound
Mixing:
Press REC TO TAPE.
“TAPE” lights up and “REC” flashes
in the display.
Continued
l

56
5 Start recording.
While recording, you cannot listen to
other sources.
For CD-TAPE Synchro Recording:
Press ENTER. When the recording is
completed, the disc and the tape stop
automatically.
For Manual Recording:
To start recording from a disc, press
ENTER.
To start recording from source other
than disc, press ENTER, then start
playing the recording source.
If there is noise while recording from
the tuner, reposition the respective
antenna to reduce the noise.
For Sound Mixing:
Press ENTER, and then start playing
the source and start singing or
speaking into the microphone.
Adjust the microphone volume by
turning MIC 1 LEVEL or MIC 2
LEVEL.
After you have finished, turn MIC 1
LEVEL or MIC 2 LEVEL to MIN.
If acoustic feedback (howling) occurs,
reduce the volume, move the
microphone away from the speakers,
or change the direction of the
microphone.
To stop recording
Press x.
Notes
• CD-TAPE Synchro Recording is not available
with DVDs.
• You cannot perform tape recording when the
disc tray is opened.
• You cannot eject the disc during CD-TAPE
Synchro Recording.
• When you press REC TO TAPE in step 4, the
surround effect may automatically change.
• When you press REC TO TAPE or when you
connect a microphone in DVD function, the
following sound field is automatically
selected.
– “LINK” if the headphones are not
connected.
– “HP 2CH” if the headphones are connected.
• If you connect or disconnect a microphone or
headphones during recording, the sound may
cut off for a moment.
• Do not eject the tape during recording, as this
may cause irreparable damage to the tape and
the tape deck.
• If you press REC TO TAPE during Manual
Recording or Sound Mixing, the recording is
paused. To resume recording, press REC TO
TAPE again.
• The system may continue playback of other
discs even after the CD-TAPE Synchro
Recording is completed.
Tip
For AUDIO CD, if you select both sides
recording and the tape reaches the end of the
front side part-way through a track, the entire
track is recorded again from the beginning of the
reverse side (CD-TAPE Synchro Recording
only).

57
USB Device
Transferring music
onto an USB device
You can connect an optional USB device
to the (USB) port on the unit and
transfer music from a disc to the USB
device.
You can transfer music from an AUDIO
CD or DATA CD/DVD (MP3 audio files
only) only.
The audio format of files transferred by
this system is MP3.
The amount of free space required on the
USB device is about 1 MB per minute
when transferring music from an AUDIO
CD.
Required free space may be larger when
transferring music from a DATA CD/
DVD (MP3 audio files only).
See “Compatible USB devices with this
system” (page 109) for a list of USB
devices that can be connected to this
system.
Note on the maximum number of files
and folders on an USB device
This system cannot transfer music from a
disc in the following cases.
– When the number of files on a folder
exceeds 150.
– When the number of folders on an USB
device exceeds 200.
These numbers may vary depending on
the file structure and the folder structure.
1 Press FUNCTION +/– repeatedly
to select “USB” (or press
on the unit).
2 Connect a transferable USB
device to the (USB) port as
shown below.
When USB cable connection is
necessary, connect the USB cable
supplied with the USB device to be
connected.
Refer to the operating instructions
supplied with the USB device to be
connected for details on the operation
method.
When the USB device is connected,
“Reading” appears and “USB” lights
up in the display.
Notes
• Do not use the USB devices other than
those listed in “Compatible USB devices
with this system” (page 109). Operation of
models not listed is not guaranteed.
• Operation is not guaranteed, even when
using these USB devices.
• When inserting the USB device, make
sure of the direction and insert it all the
way to the (USB) port on the unit.
• Do not forcibly insert the USB device, as
this may cause the device to be damaged.
• Do not insert other device or objects
besides the USB device.
• It may take a few seconds before
“Reading” appears in the display
depending on the type of USB device
connected.
USB Device
The transferred music is limited to private
use only. Use of the music beyond this limit
requires permission of the copyright
holders.
Connecting the USB device
USB
USB device
Continued
l

58
To remove the USB device
1 Press x to stop playback.
2 Press "/1 to turn off the system.
3 Remove the USB device.
You can transfer tracks, MP3 audio files
or audio sources simply onto an USB
device by using REC TO button on
the unit.
CD-USB Synchronized Transfer:
You can easily transfer all the music on a
disc to an USB device.
REC 1 Transferring:
You can easily transfer a single track or
file that is currently being played back
onto an USB device.
Analog Transferring:
You can transfer the sound from analog
audio sources to an USB device.
1 Prepare the transferring source.
CD-USB Synchronized Transfer
and REC 1 Transferring:
Press FUNCTION +/– repeatedly to
select “DVD” (or press DVD on the
unit).
Load the disc you want to transfer.
If you have loaded the disc, press
DISC SKIP repeatedly (or DISC 1 ~ 3
on the unit) to select the disc. When the
system automatically starts playback,
press x twice to cancel resume play.
Analog Transferring:
Press FUNCTION +/– repeatedly (or
press function button on the unit) to
select audio source you want (except
for DVD and USB function).
Tips
• When transferring from tape, if the
playback direction of the tape is set to
“j”, the system will transfer both sides
of the tape five times. If you want to stop
at one transferring, be sure to set the
playback direction of the tape to “g”.
• Transferring from tape continues even
though tape playback has ended.
2 Set the USB device to stand by
for transferring.
CD-USB Synchronized Transfer:
Press REC TO on the unit.
“Reading”, “xxx XByte Free Space”*
and “Push ENTER” appear in the
display.
REC 1 Transferring:
Start playing the track or file you want
to transfer, then press REC TO
on the unit.
“Reading”, “xxx XByte Free Space”*
and “Push ENTER” appear in the
display.
Analog Transferring:
Start play back the source you want.
Then, press REC TO .
“Please Wait”, “xxx XByte Free
Space”* and “Push ENTER” appear in
the display.
* Remaining space on the USB device
3 Press ENTER.
“Don’t Remove USB Device” appear
in the display.
Transferring starts.
No sound is output during transferring.
CD-USB Synchronized Transfer:
When the transfer is completed, the
disc and USB device stop
automatically.
Transferring by single button
press
USB USB
USB
USB
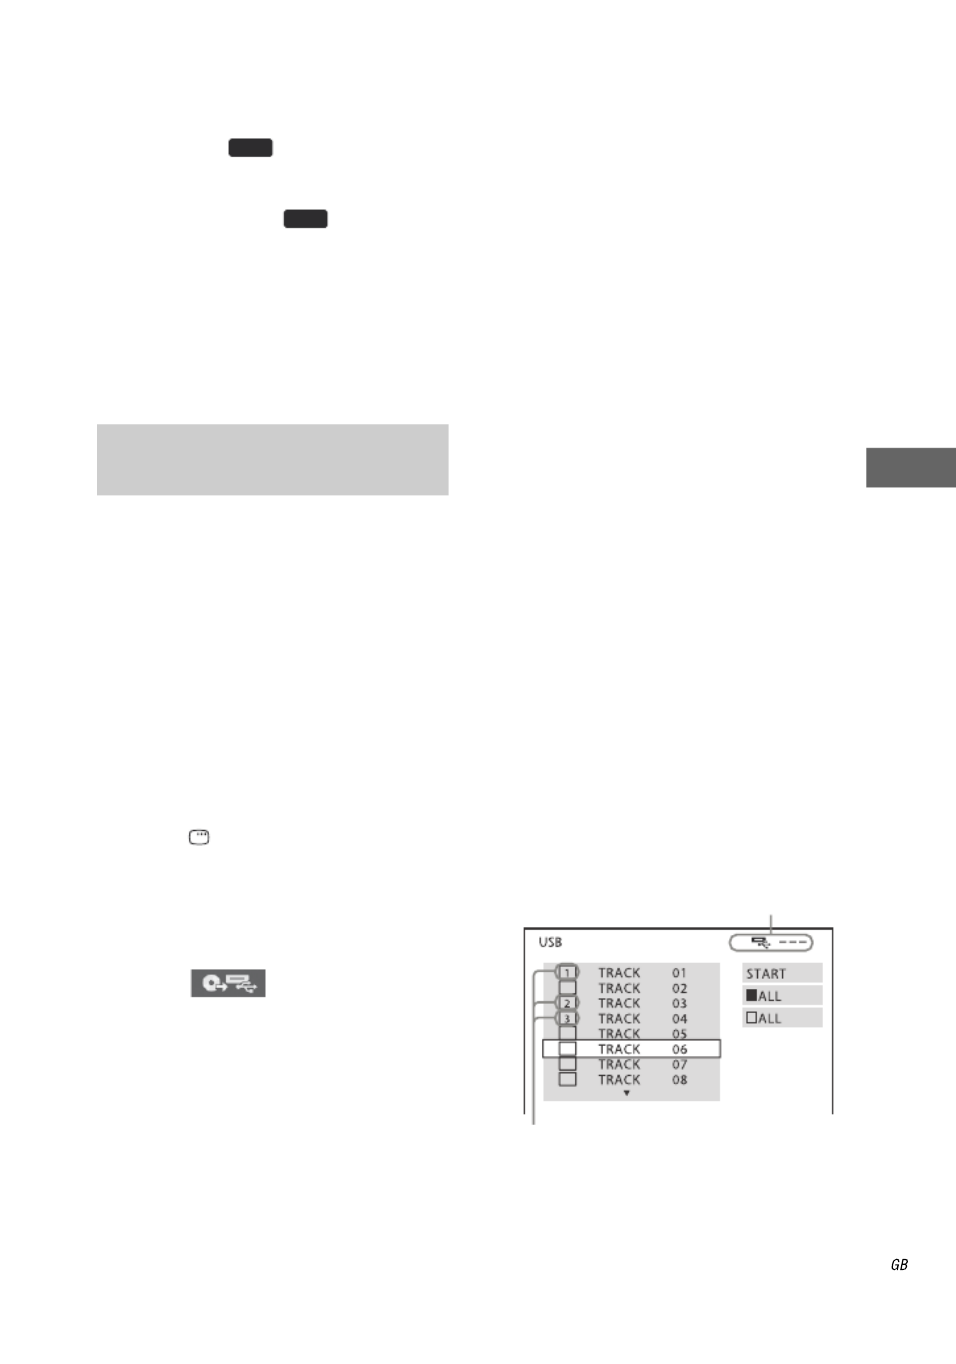
59
USB Device
To create a new MP3 audio file
(Analog Transferring only)
Press REC TO on the unit during
transferring.
“New Track” appears in the display.
If you press REC TO again after a
few seconds, a new MP3 audio file cannot
be created.
Notes
• When a new MP3 audio file is created,
transferring is disabled for the time being.
• The track numbers are automatically marked
when you transfer more than 60 minutes.
You can transfer tracks (on AUDIO CD)
or MP3 audio files (on DATA CD/DVD)
onto an USB device by using the
on-screen display.
1 Load an AUDIO CD or DATA CD/
DVD on the disc tray.
If you have loaded the disc, press
DISC SKIP repeatedly (or DISC 1 ~ 3
on the unit) to select the disc. When the
system automatically starts playback,
press x twice to cancel resume play.
2Press DISPLAY when
playback is stopped.
The Control Menu appears on the TV
screen.
3 Press V v or repeatedly to
select (USB
TRANSFER), then press ENTER.
The options for “USB TRANSFER”
appear on the TV screen.
4 Press V v or repeatedly to
select the option you want, then
press ENTER.
For AUDIO CD:
• TRACK: The tracks on the AUDIO
CD appear. You can transfer the
track you want.
For DATA CD/DVD:
• TRACK: The audio files on the
DATA CD/DVD appear. You can
transfer the MP3 audio file you want.
• FOLDER: The folders on the DATA
CD/DVD appear. You can transfer
all MP3 audio files in the folder.
“Reading.” appears, and the tracks, file
or folders appear on the TV screen.
Note
It may take some time to display the tracks,
files or folders depending on the number of
tracks, files or folders on the disc.
5 Select the tracks, audio files or
folders that you want to transfer.
For AUDIO CD:
x To select a track
Press V or v repeatedly to select the
track, then press ENTER.
The tracks are marked in the order that
you select. To cancel the selection,
press ENTER again.
Transferring tracks or MP3
audio files onto a USB device
USB
USB
TRANSFER
Remaining space of
the USB device
Tracks to be transferred
Continued
l
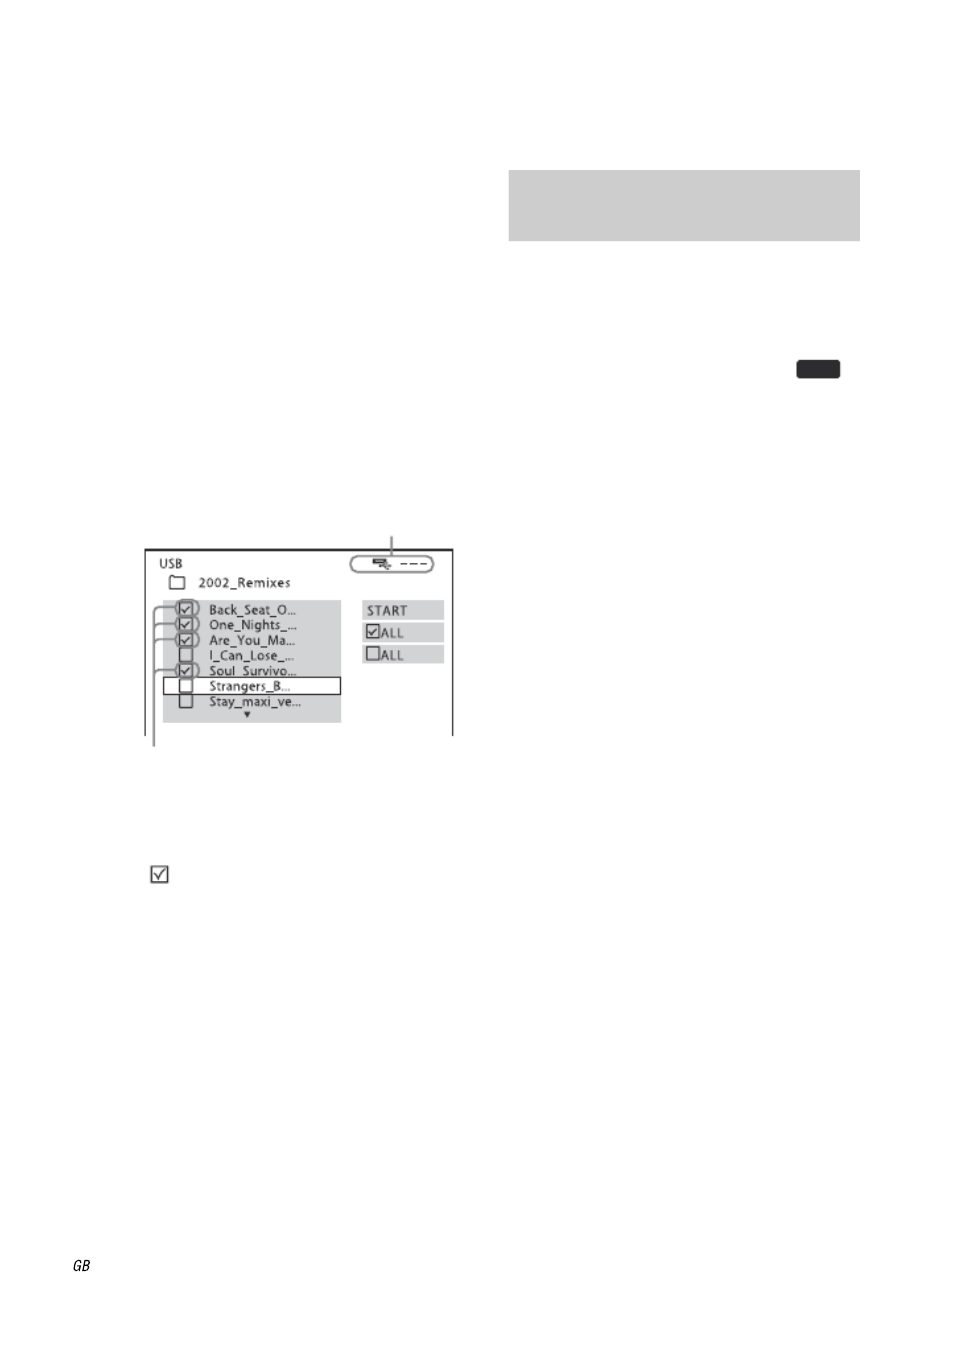
60
xTo select all tracks
Press V v B b/// repeatedly to select
“x ALL”, then press ENTER.
xTo cancel all the selection at
once
Press V v B b/// repeatedly to select
“s ALL”, then press ENTER.
For DATA CD/DVD:
x To select a MP3 audio file or
folder
Press V or v repeatedly to select the
MP3 audio files or folders, then press
ENTER.
The MP3 audio files or folders are
marked. To cancel the selection, press
ENTER again.
xTo select all audio files or
folders
Press V v B b/// repeatedly to select
“ ALL”, then press ENTER.
xTo cancel all the selection at
once
Press V v B b/// repeatedly to select
“s ALL”, then press ENTER.
6 Press V v B b/// repeatedly to
select “START”, then press
ENTER.
The system starts transferring and the
transfer status appears. No sound is
output during transfer.
To stop transferring, press x.
To return to the previous display
Press O RETURN (or RETURN on the
unit).
You can erase audio files or folders on the
USB device.
1 Press FUNCTION +/– repeatedly
to select “USB” (or press
on the unit).
“FOLDER LIST” appears on the TV
screen.
2 Press V v or repeatedly to
select a folder.
To erase all audio files in a folder
Press CLEAR.
To erase an audio file
Press ENTER.
“TRACK LIST” appears.
Press V v or repeatedly to select the
audio file you want, then press
CLEAR.
3 Press B b or repeatedly to
select “YES”, then press ENTER.
To cancel, select “NO”, then press
ENTER.
Notes
• Do not remove the USB device during
transfer or erase operations. Doing so may
corrupt the data on the USB device or damage
the USB device itself.
• Do not connect the system and the USB
device through an USB hub.
• You cannot perform USB transferring and
erasing when the disc tray is opened.
• When transferring music from a DATA CD/
DVD, MP3 audio files are transferred with the
same bit rate as the original MP3 audio files.
• When transferring from other sound source,
the sound are transferred as 128 kbps MP3
audio files.
• CD text information is not transferred in the
created MP3 audio files.
TRANSFER
Remaining space of
the USB device
MP3 audio files or folders to be transferred
To erase audio files or folders
from the USB device
USB
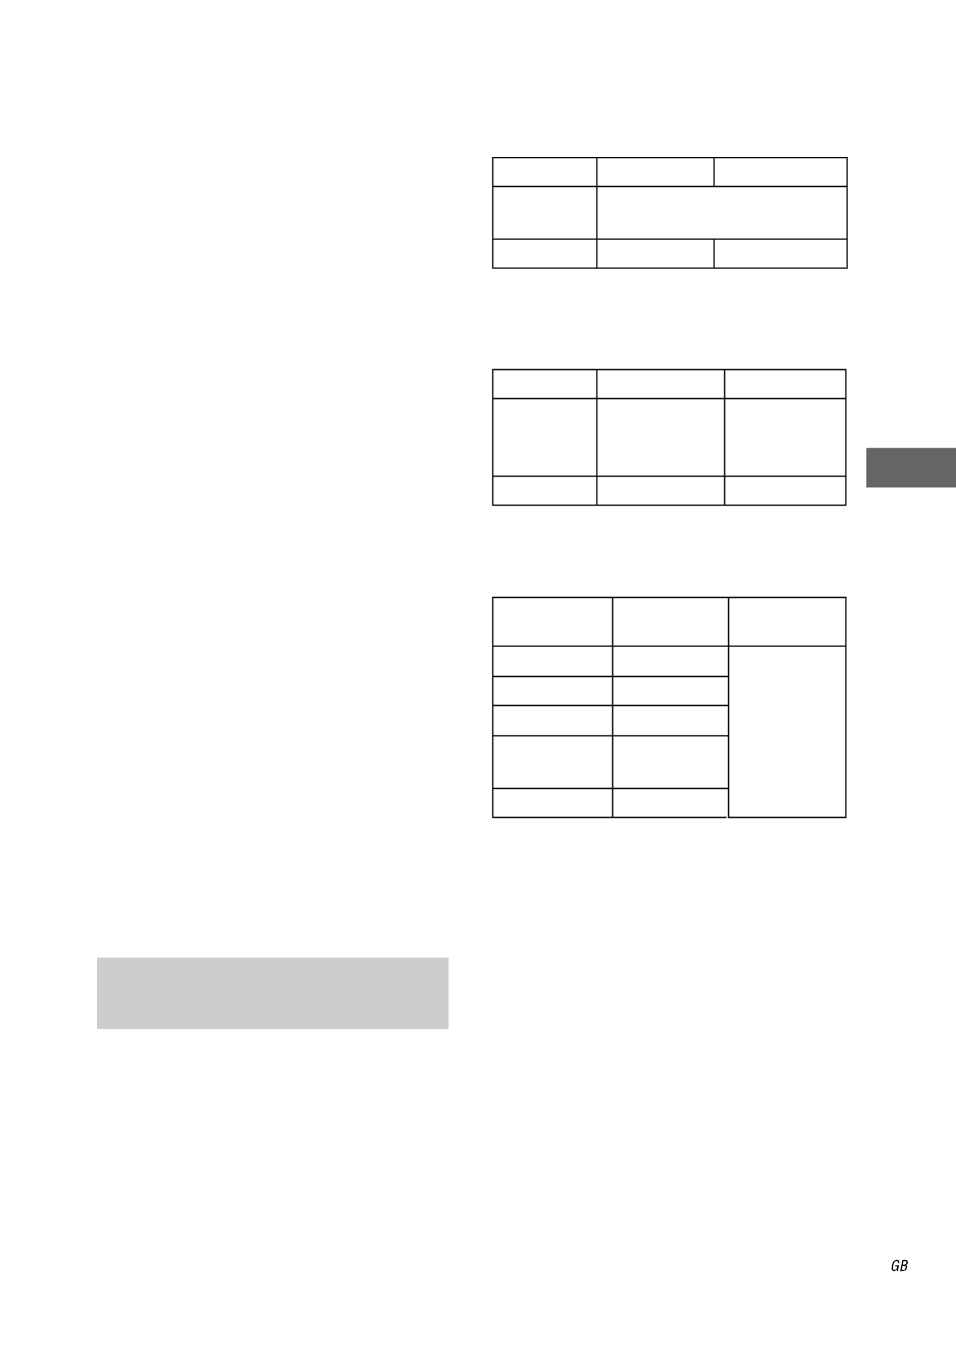
61
USB Device
• Transferring stops automatically when
– you change the function.
– you turn off the system.
– the USB device runs out of space during the
transfer process.
– the number of audio files and folders on the
USB device reaches the limit for the number
that the system can recognize.
• The maximum number of folders that can be
created on a single USB device by this system
is 200.
The maximum number of MP3 audio files that
can be created on a single folder by this
system is 150.
The maximum number of audio files and
folders may vary depending on the audio file
and folder structure.
• For the USB device with more than 200
folders, the system may not recognize the first
200 folders according to alphanumerical
order.
• A folder that contains non-MP3/WMA
(Windows Media Audio)/AAC format audio
files or sub folders cannot be erased.
• If a folder or audio track that you are trying to
transfer already exists on the USB device with
the same name, a sequential number is added
after the name without overwriting the
original folder or file.
• You cannot eject the disc during transferring
from disc to USB device.
• While transferring from a disc to USB device,
no sound is output.
• If you stop a transfer halfway, the MP3 audio
file that was being created is deleted (except
for Analog Transferring).
• You cannot select a sound field during USB
transferring.
• Depending on the transferring method, the
transferring progress shown on the display
may vary (1 track/file/folder).
When first transferring music to an USB
device, a “MUSIC” folder is created
directly below the “ROOT”. Folders and
files are generated within this “MUSIC”
folder as follows:
When transferring all tracks
(on AUDIO CD) or all MP3 audio files
(on DATA CD/DVD)
When transferring a single track
(on AUDIO CD) or a single MP3 audio
files (on DATA CD/DVD)
When transferring from analog
source other than DVD function
1) Up to 64 characters of the name are assigned
(including the extension).
2) Folder numbers are assigned serially
thereafter.
3) File number are assigned serially thereafter.
4) A new file is transferred in the “REC1-MP3”
or “REC1-CD” folder each time REC 1
Transferring is performed.
Folder and file generation
rules
Source Folder name File name
MP3 Same as the transferring
source1)
AUDIO CD FLDR0012) TRACK0013)
Source Folder name File name
MP3 REC1-MP34) Same as the
transferring
source1)
AUDIO CD REC1-CD4) TRACK0013)
Transferring
source
Folder
name
File name
TUNER FM FM0012)
TRACK0013)
TUNER AM AM0012)
TAPE TAPE0012)
TV/SAT SAT0012) or
TV0012)
VIDEO VIDEO0012)

62
Playing back files of an
USB device
You can play back the following files
stored in an optional USB device by
connecting it to the unit.
– Audio files (MP3/WMA/AAC files)
– JPEG image files
– Video files (DivX/MPEG4 video files)
When playback from a mobile phone,
you can select the internal memory or a
Memory Stick as a playback source
(page 69).
See “Compatible USB devices with this
system” (page 109) for a list of USB
devices that can be connected to this
system.
The audio formats that can be played back
by this system are MP3/WMA/AAC
files* only. However, the system cannot
play back WMA/AAC files on a DATA
CD/DVD.
* Files with copyright protection (Digital
Rights Management) cannot be played back
by this system.
Note on the maximum number of files
and folders on an USB device
This system cannot play back an USB
device in the following cases.
– When the number of files on a folder
exceeds 150.
– When the number of folders on an USB
device exceeds 200.
These numbers may vary depending on
the file structure and the folder structure.
1 Press FUNCTION +/– repeatedly
to select “USB” (or press
on the unit).
2 Connect an USB device to the
(USB) port.
For details, see “Connecting the USB
device” (page 57).
To remove the USB device
1 Press x to stop playback.
2 Press "/1 to turn off the system.
3 Remove the USB device.
Notes on the USB device
• The system can play back the following files.
The system will play back any data with the
extension above, even if it is not MP3/WMA/
AAC/JPEG/DivX/MPEG4 format. Playing
this data may generate a loud noise which
could damage your speaker system.
• The system may not be able to play an audio
file, JPEG image file, or video file depending
on the file type.
• The following USB devices/situations can
increase the time it takes to start playback:
– an USB device transferred with a
complicated tree structure.
– when the audio files, JPEG image files, or
video files in another folder have just been
played back.
• Some USB devices cannot be played back on
the system depending on the file format.
• The system can play back to a depth of 8
folders only.
• When the USB device is inserted, the system
reads all the files on the USB device. If there
are many folders or files on the USB device, it
may take a long time to finish reading the
USB device.
• Do not connect the system and the USB
device through an USB hub.
• With some connected USB devices, after an
operation is performed, there may be a delay
before it is performed by this system.
• Resume Play is canceled when you turn off
the system.
USB
File Extension of the file
MP3 file “.mp3”
WMA file “.wma”
AAC file “.m4a”
JPEG image file “.jpg” or “.jpeg”
DivX video file “.avi” or “.divx”
MPEG4 video file “.mp4” or “.m4v”

63
USB Device
• This system does not necessarily support all
the functions provided in a connected USB
device.
• Files transferred by a device such as a
computer may not be played back in the order
in which they were transferred.
• The playback order for the system may differ
from the playback order of the connected USB
device.
• Always turn off the system before removing
the USB device. Removing the USB device
while the system is on may corrupt the data on
the USB device.
• Do not save other types of files or unnecessary
folders on an USB device that has audio files,
JPEG image files, or video files.
• Folders that have no audio files, JPEG image
files, or video files are skipped.
• The maximum number of audio files and
folders may vary depending on the file and
folder structure.
• Compatibility with all MP3/WMA/AAC
encoding/writing software, recording devices,
and recording media cannot be guaranteed.
An incompatible USB device may produce
noise or interrupted audio or may not play at
all.
• Compatibility with all DivX/MPEG4 video
encoding/writing software, recording devices,
and recording media cannot be guaranteed.
• Before using the USB device, make sure that
no virus-ridden files are on the USB device.
1 Press DISPLAY when
playback is stopped.
The Control Menu appears on the TV
screen.
2 Press V v or repeatedly to
select (MEDIA), then
press ENTER.
The options for “MEDIA” appear on
the TV screen.
3 Press V v or repeatedly to
select “MUSIC”, then press
ENTER.
A list of folders that contain audio files
appears.
If “FOLDER LIST” does not appear,
press DVD/TUNER MENU.
4 Press V v or repeatedly to
select a folder.
Playing a folder:
Press H (or nN on the unit).
The system starts playback from the
first file of the selected folder.
To stop playback, press x.
Playing an audio file or folder
FOLDER LIST
1st Album (19 6)8
In the Middle of Nowhere (19 6)8
Ready for Romance (19 6)8
In the Garden of V 8enus (19 7)
Romantic Warriors (19 7)8
Back for Good (1988)
Alone (1999)
Let's T Talk About Love (19 5)8
Continued
l
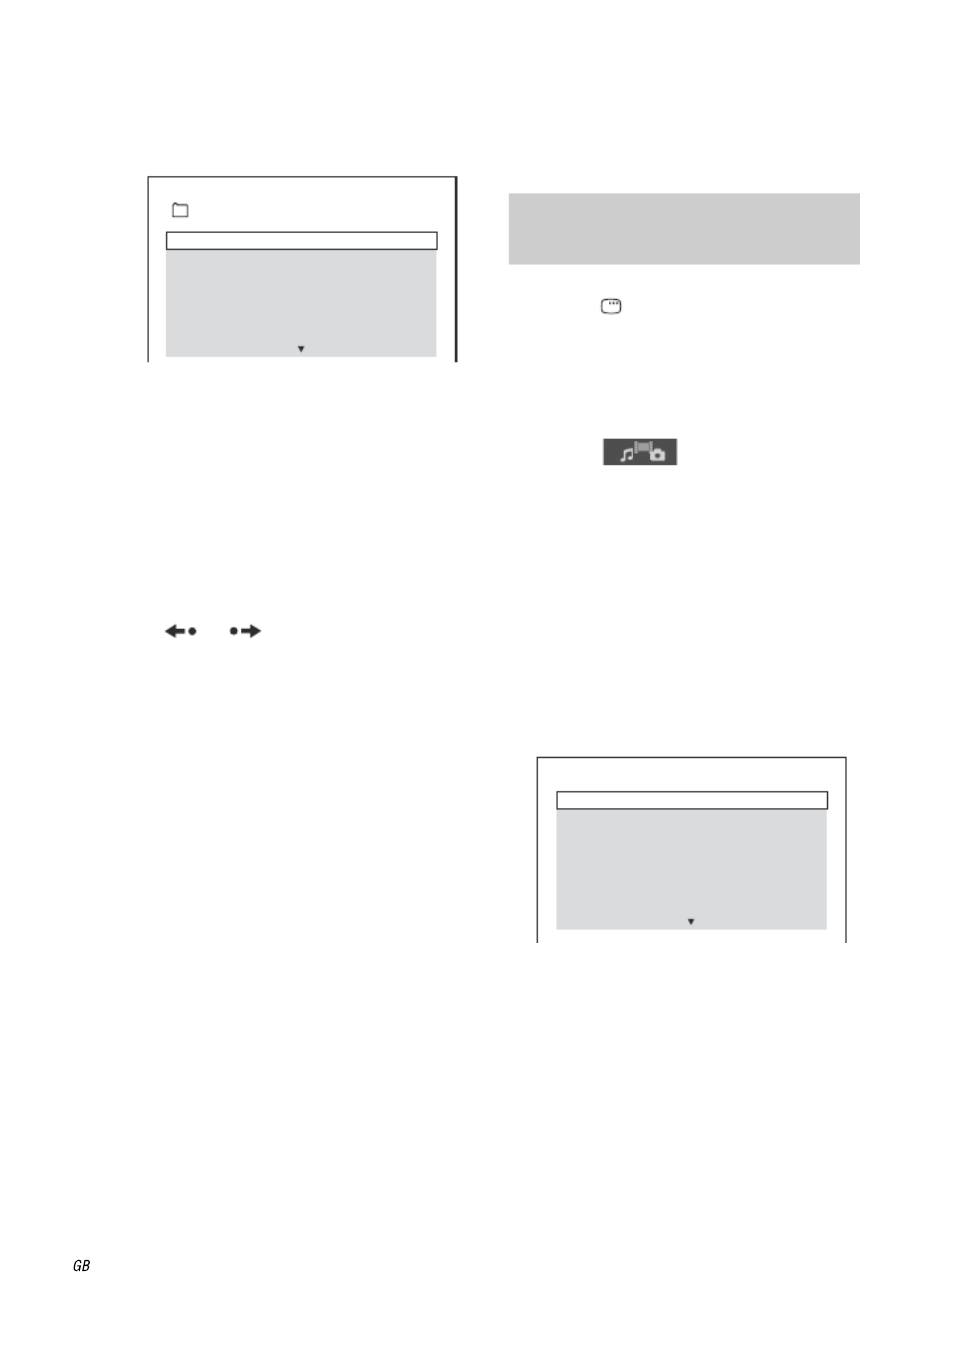
64
Playing an audio file:
1 Press ENTER.
“TRACK LIST” appears.
2 Press V v or repeatedly to
select the audio file you want,
then press ENTER.
The system starts playing the
selected audio files.
To stop playback, press x.
To display the next or previous page
of “TRACK LIST” or “FOLDER LIST”
Press or repeatedly when
“TRACK LIST” or “FOLDER LIST” is
displayed.
To play back the next folder of audio
files
You can select the next folder by pressing
> repeatedly until the last file of the
current folder, then press > once. The
first file of the next folder is selected.
However, you cannot select the previous
folder by pressing .repeatedly. To
select the previous folder, select the folder
from “FOLDER LIST”.
To return to “FOLDER LIST” when
“TRACK LIST” is displayed
Press O RETURN (or RETURN on the
unit).
To turn on or off “FOLDER LIST” or
“TRACK LIST”
Press DVD/TUNER MENU repeatedly.
To turn off the sound temporarily
Press MUTING on the unit. To cancel the
muting function, press MUTING again or
increase the volume.
1 Press DISPLAY when
playback is stopped.
The Control Menu appears on the TV
screen.
2 Press V v or repeatedly to
select (MEDIA), then
press ENTER.
The options for “MEDIA” appear on
the TV screen.
3 Press V v or repeatedly to
select “PHOTO”, then press
ENTER.
A list of folders that contain JPEG
image files appears.
If “FOLDER LIST” does not appear,
press DVD/TUNER MENU.
4 Press V v or repeatedly to
select a folder.
Playing JPEG image file in a folder
as a slide show:
Press H (or nN on the unit).
The system starts a slide show from the
first image file of the selected folder.
You can change the interval of the
slide show (page 65), and add effects
to the slide show (page 66).
TRACK LIST
In the Middle of Nowher...
02_Riding_On_A_White_Swan
03_Give_Me_Peace_On_Earth
04_Sweet_Little_Shella
05_Ten_Thousand_Lonely_Drums
06_Lonely_Tears_In_Chinatown
07_In_Shaire
01_Geronimo_s_Cadillac
Playing a JPEG image file or
folder
FOLDER LIST
Travelling 01
2003.0 .20 8
Flowers
Travelling 02
Animals
2003.11.16
2003.12.03
Happy birthday

65
USB Device
Selecting a JPEG image file by
displaying the image browser:
1 Press PICTURE NAVI.
Thumbnail picture for the first 16
JPEG image files in the selected
folder is displayed.
If there are more than 16 image files
in the selected folder, the scroll bar
appears at the right.
2 Press V v B b/ / / to select the
JPEG image file you want to
view, then press H (or nN
on the unit).
The slide show starts from the
selected image file.
To stop playback, press x.
To display the next or previous page
of “FOLDER LIST”
Press or repeatedly when
“FOLDER LIST” is displayed.
To display the next or previous JPEG
image file
Press B or b repeatedly during the slide
show.
To play back the next folder of JPEG
image files
You can select the next folder by pressing
b repeatedly until the last file of the
current folder, then press
b once. The
first file of the next folder is selected.
However, you cannot select the previous
folder by pressing
B repeatedly. To select
the previous folder, select the folder from
“FOLDER LIST”.
To turn on or off “FOLDER LIST”
Press DVD/TUNER MENU repeatedly.
To rotate a JPEG image file
When a JPEG image file is displayed on
the TV screen, you can rotate the image
by 90 degrees.
Press V v or repeatedly while viewing an
image.
Press CLEAR to return to the original
view.
Notes
• When you press B or b to select the next or
previous image, the image will return to its
original view even if you have rotated the
image previously.
• The slide show stops when you press V v or .
Specifying the slide show speed of
JPEG image files
1Press DISPLAY repeatedly until
the Control Menu for JPEG image
files appears on the TV screen.
2 Press V v or repeatedly to select
(INTERVAL), then press
ENTER.
The options for “INTERVAL” appear
on the TV screen.
3 Press V v or repeatedly to select
the transition interval you want.
The intervals become longer in the
order from “FAST”, “NORMAL”
(default setting), “SLOW 1” to
“SLOW 2”.
4 Press ENTER.
The selected setting takes effect.
Note
Some JPEG image files (especially progressive
JPEG image files or JPEG image files with
3,000,000 pixels or more) may take a longer
time to display than others, which may make the
transitions seem longer than that of the option
you selected.
Continued
l

66
Selecting a transition effect for
JPEG image files in the slide show
1Press DISPLAY repeatedly until
the Control Menu for JPEG image
files appears on the TV screen.
2 Press V v or repeatedly to select
(EFFECT), then press
ENTER.
The options for “EFFECT” appear on
the TV screen.
3 Press V v or repeatedly to select
the setting you want.
The default setting is underlined.
• MODE 1: The image sweeps in from
top to bottom of the screen.
• MODE 2: The image sweeps in from
left to right of the screen.
• MODE 3: The image stretches out
from the center of the screen.
• MODE 4: The image randomly
cycles through the effects.
• MODE 5: The next image slides over
the current image.
• OFF: Turns off this function.
4 Press ENTER.
The selected setting takes effect.
1Press DISPLAY when
playback is stopped.
The Control Menu appears on the TV
screen.
2 Press V v or repeatedly to
select (MEDIA), then
press ENTER.
The options for “MEDIA” appear on
the TV screen.
3 Press V v or repeatedly to
select “VIDEO”, then press
ENTER.
A list of folders that contain video files
appears.
If “FOLDER LIST” does not appear,
press DVD/TUNER MENU.
4 Press V v or repeatedly to
select a folder.
Playing a folder:
Press H (or nN on the unit).
The system starts playback from the
first file of the selected folder.
To stop playback, press x.
Playing a video file:
1 Press ENTER.
“FILE LIST” appears.
2 Press V v or repeatedly to
select the file you want, then
press ENTER.
The system starts playing the
selected file.
To stop playback, press x.
Playing a video file or folder
FOLDER LIST
NEW YEAR'S DAY
SUMMER 2003
MY FA OURITESV
FILE LIST
MY FAVOURITES
VE USN
HAWAII 2004
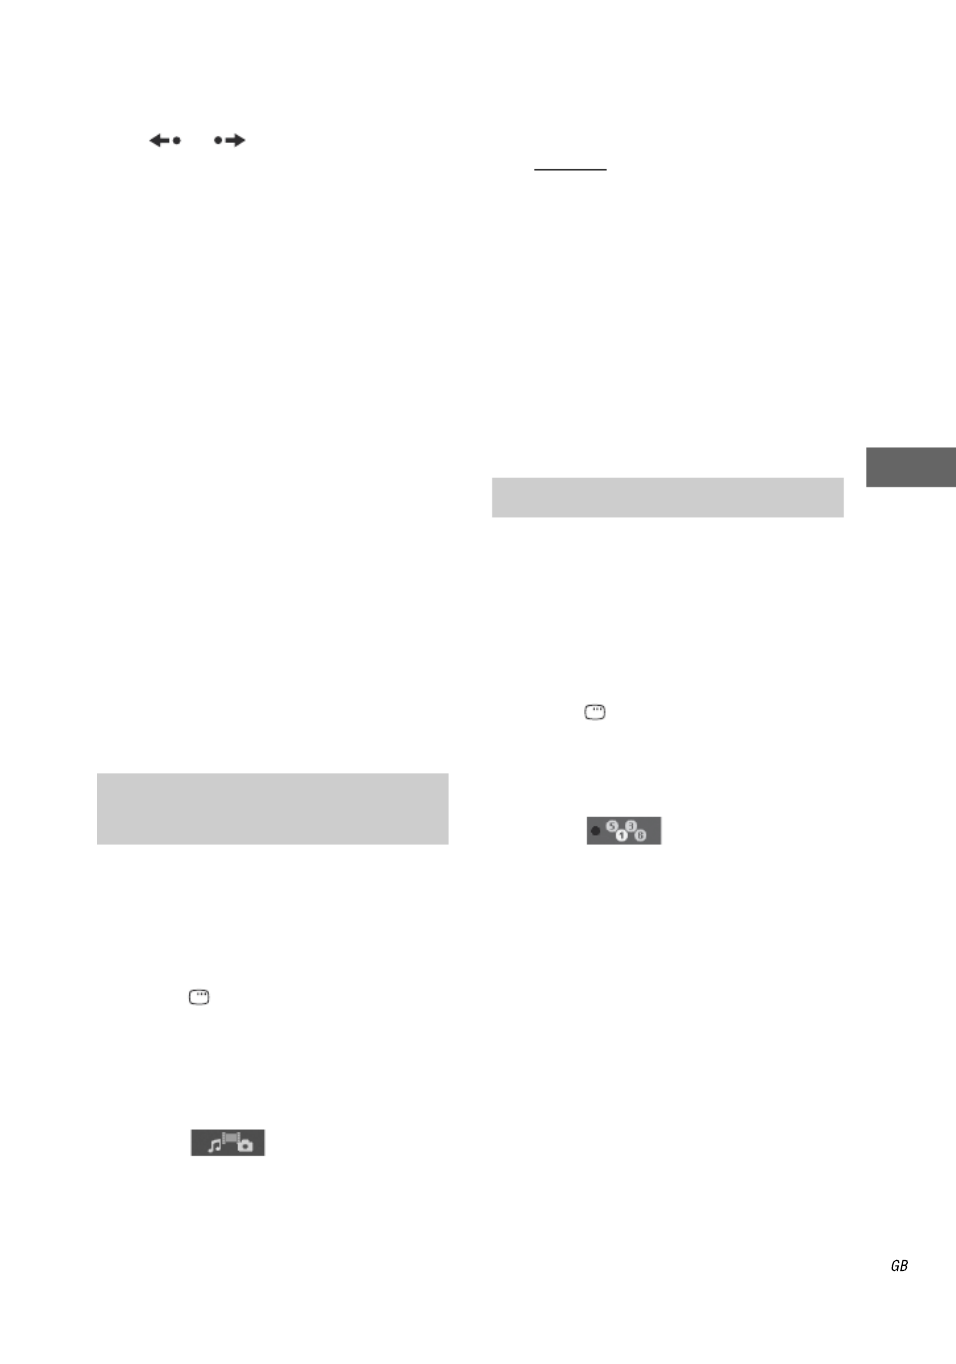
67
USB Device
To display the next or previous page
of “FOLDER LIST”
Press or repeatedly when
“FOLDER LIST” is displayed.
To play back the next folder of video
files
You can select the next folder by pressing
> repeatedly until the last file of the
current folder, then press > once. The
first file of the next folder is selected.
However, you cannot select the previous
folder by pressing . repeatedly. To
select the previous folder, select the folder
from “FOLDER LIST”.
To return to the previous display
Press O RETURN (or RETURN on the
unit).
To turn on or off “FOLDER LIST”
Press DVD/TUNER MENU repeatedly.
To turn off the sound temporarily
Press MUTING on the unit. To cancel the
muting function, press MUTING again or
increase the volume.
You can select playback priority when
there is more than 1 type of media (audio
files, JPEG image files, or video files) in
the USB device.
1Press DISPLAY when
playback is stopped.
The Control Menu appears on the TV
screen.
2 Press V v or repeatedly to
select (MEDIA), then
press ENTER.
The options for “MEDIA” appear on
the TV screen.
3 Press V v or repeatedly to
select the setting you want.
The default setting is underlined.
• MUSIC: Audio file playback has
priority.
• VIDEO: Video file playback has
priority.
• PHOTO: JPEG image file playback
has priority. You can playback JPEG
image files as a slide show.
4 Press ENTER.
For details of the playback priority of
file types in the “MEDIA” setting, see
“Playback priority of file types”
(page 108).
— Shuffle Play
You can play back the audio files on the
USB device in random order. Each time
you perform Shuffle Play, the playing
order may differ.
1 Press DISPLAY.
The Control Menu appears on the TV
screen.
2 Press V v or repeatedly to
select (SHUFFLE), then
press ENTER.
The options for “SHUFFLE” appear
on the TV screen.
3 Press V v or repeatedly to
select the setting you want.
• ON (MUSIC): all audio files in the
selected folder on the USB device is
played back randomly.
When no folder is selected, the first
folder is played back randomly.
4 Press ENTER.
Shuffle Play starts.
To cancel Shuffle Play, press CLEAR
or select “OFF” in step 3.
Selecting playback priority of
the file type
Playing in random order
Continued
l

68
To turn off the Control Menu
Press DISPLAY repeatedly until the
Control Menu disappears from the TV
screen.
Notes
• Shuffle Play is canceled when you
– remove the USB device.
– turn off the system.
– change the function.
– set “MEDIA” to “PHOTO” or “VIDEO”
when playback is stopped.
• The same song may be played back repeatedly
for audio files.
— Repeat Play
You can play back the audio files, JPEG
image files and video files on the USB
device repeatedly.
You can select Repeat Play and Shuffle
Play at the same time when audio file is
played back.
1 Press DISPLAY.
The Control Menu appears on the TV
screen.
2 Press V v or repeatedly to
select (REPEAT), then
press ENTER.
The options for “REPEAT” appear on
the TV screen.
3 Press V v or repeatedly to
select the setting you want.
The default settings are underlined.
• OFF: does not play back repeatedly.
• MEMORY: repeats all the folders on
the USB device.
• FOLDER: repeats the current folder.
• TRACK1): repeats the current audio
file.
• FILE2): repeats the current video file.
1) Audio files only.
2) Video files only.
When Shuffle Play is activated:
• OFF: does not play back repeatedly.
• ON: repeats the Shuffle Play.
4 Press ENTER.
5 Press H (or nN on the unit).
Repeat Play starts.
To cancel Repeat Play, press CLEAR
or select “OFF” in step 3.
To turn off the Control Menu
Press DISPLAY repeatedly until the
Control Menu disappears from the TV
screen.
Notes
• You can also change the Repeat Play setting
by pressing REPEAT repeatedly.
• “REP” lights up in the display when Repeat
Play is set to “MEMORY”, “FOLDER” or
“ON”.
• “REP 1” lights up in the display when Repeat
Play is set to “TRACK” or “FILE”.
• Repeat Play is canceled when you
– remove the USB device.
– turn off the system.
– change the function.
Playing repeatedly

69
USB Device
Selecting the playback
source or transferring
destination on the Sony
Ericsson mobile phone
(W302/W595/W760i/W890i/W902/
W910i only)
When listening to music from a Sony
Ericsson mobile phone or when
transferring music from this system to the
mobile phone, you can select the playback
source or transferring destination as
follows:
– Internal memory of the mobile phone
– Memory Stick
1 Connect the mobile phone to the
(USB) port on the unit.
2 Set the data transfer mode of
your mobile phone to “File
Transfer” or “Mass Storage”.
For details, refer to the operating
instructions supplied with the mobile
phone.
3 Press MEMORY SELECT
repeatedly to select the memory
number you want.
The memory number appears on the
TV screen but varies depending on the
specification of the mobile phone.
If there is no Memory Stick inserted in
the mobile phone, you cannot select
which memory to use.
Example: Select the playback source
Playing the files in the selected
memory
See “Playing back files of an USB
device” (page 62).
Transferring to the selected
memory
See “Transferring music onto an USB
device” (page 57).
Notes
• You cannot select the playback source or
transferring destination during playback or
USB transferring. Stop playback or USB
transferring, and then select the playback
source or transferring destination.
• You can select a Memory Stick when the
selected memory number is as follows:
• Select a transferring destination before
transfer.
Sony Walkman®
phone
Memory Number
W302 #1
W595 #2
W760i #2
W890i #2
W902 #2
W910i #2
FOLDER LIST
1st Album (19 6)8
In the Middle of Nowhere (19 6)8
Ready for Romance (19 6)8
In the Garden of V 8enus (19 7)
Romantic Warriors (19 7)8
Back for Good (1988)
Alone (1999)
Let's Talk About Love (19 5)8
#1
Selected memory number

70
Adjusting the sound
You can reinforce the bass and create a
more powerful sound.
Press GROOVE on the unit
repeatedly.
GROOVE ON* t
Z-GROOVE ON*
t
GROOVE OFF t
GROOVE ON
t …
* The volume switches to power mode and the
equalizer curve changes.
Note
“EFFECT ON” appears when you press
DISPLAY repeatedly while “GROOVE” or
“Z-GROOVE” is turned on.
Tip
The default setting is “GROOVE ON”.
Press PRESET EQ repeatedly on
the unit to select the preset effect
you want.
Preset effect options
You can adjust the sound by raising or
lowering the level of specific frequency
band, then store up to three user equalizer
settings in the memory.
Use the buttons on the unit for the
operation.
1 Press EQ BAND/MEMORY
repeatedly to select a frequency
band.
2 Turn OPERATION DIAL clockwise
or counterclockwise to adjust the
level.
3 Repeat steps 1 and 2 to adjust the
level of other frequency bands.
4 Press ENTER.
A user equalizer number flashes in the
display.
5 Turn OPERATION DIAL to select a
user equalizer number (1~3) you
want to store the equalizer setting.
Select “EXIT?” to cancel storing.
6 Press ENTER.
This setting is automatically stored as
the user equalizer setting you selected
in step 5.
The previous setting stored at this
memory location is erased and replaced
by the new setting.
To call up the user equalizer setting
Press USER EQ repeatedly to select
“USER EQ 1”, “USER EQ 2” or
“USER EQ 3”.
Sound Adjustment
Reinforcing the sound
Selecting the preset effect
Effect Category
ROCK, POP,
JAZZ, DANCE,
SOUL, TECHNO,
HIP HOP
Standard music sources
MP3 EQ MP3 audio files
FLAT Original music source
(cancel the preset effect)
Creating your own sound
effect
TAP E
GROOVE
Frequency band Frequency level

71
Sound Adjustment
You can take advantage of the surround
sound simply by selecting one of the
sound fields. They bring the exciting and
powerful sound of movie theaters into
your home.
Press SOUND FIELD repeatedly to
select the sound field you want.
The last selected sound field appears in
the display.
When the headphones are not
connected:
SBS MULTI1)2) (Sound Broadcasting
System Multi mode)
Performs suitable decoding based on the
source to maximize the sound field effect.
This mode lets you enjoy audio playback
of all types of discs from multiple
speakers.
A.F.D. AUTO2) (Auto Format Direct
Auto)
The number of sound channels depends
on the source. During DVD function,
when 2 channel sources such as AUDIO
CD, VIDEO CD and MP3 audio files are
played back, only 2 sound channels would
be output. However, the number of sound
channels output during DVD VIDEO and
DivX video files playback would depend
on the audio format selection. During
other functions, the system would only
output 2 sound channels. This setting is
ideal when you want to listen to the
original sound from the source.
PRO LOGIC2)
Performs Pro Logic decoding. The source
recorded in 2 channels is decoded into 4.1
channels.
PLII MOVIE2)
Performs Pro Logic II Movie mode
decoding. This setting is ideal for movies
encoded in Dolby Surround. In addition,
this mode can reproduce sound in 5.1
channels when watching videos of
overdubbed or old movies. The source
recorded in 2 channels is decoded into 5.1
channels.
PLII MUSIC2)
Performs Pro Logic II Music mode
decoding. This setting is ideal for normal
stereo sources such as AUDIO CDs. The
source recorded in 2 channels is decoded
into 5.1 channels.
V.M.DIM.2) (Virtual Multi Dimension)
Performs DCS (Digital Cinema Sound)
decoding. The source recorded in 2
channels is decoded into 5.1 channels.
LINK
Reproduces the surround channels from
the front channels.
2CH STEREO
Reproduces stereo output from multi
channel sources such as DVD VIDEOs
during DVD function. The system outputs
the original sound during functions other
than DVD and during playback of stereo
sources such as AUDIO CD, VIDEO CD
and MP3 audio files.
Selecting the sound field
Continued
l

72
When the headphones are connected:
HP 2CH
The normal sound field for headphones.
HP VIRTUAL2)
The sound field for headphones with
virtual surround effect. This sound field is
only effective when you play back multi
channel sources.
1) When playing a DVD, the effect is the same as
“A.F.D. AUTO”.
2) These sound fields cannot be selected when:
– you perform tape recording or USB
transferring operation.
– a microphone is connected.
– the Karaoke Mode is turned on.
Notes
• Depending on the disc, the surround effect
may not be as much as expected.
• If “NONE” is selected in surround speaker
setup, no sound will be output from the
surround speakers even if “LINK” is selected.
• You cannot change the sound field when
transferring to the USB device.
You can listen to the music at low volume
late at night.
Press NIGHT MODE on the unit
repeatedly to select “NIGHT MODE
ON”
“NIGHT” lights up in display.
The bass sound of the music is reduced
and the display dims.
To cancel the NIGHT MODE function
Press NIGHT MODE on the unit again.
The bass sound of the music is reinforced
and the display brightens up.
The METER MODE is automatically set
to “STANDARD” and the “GROOVE
ON” is selected.
Notes
• The illumination effect is not available when
you hold down SOUND FLASH on the unit
during night mode function.
• The function does not work when the
headphones are connected.
• This function is automatically turned off when
you
– turn off the system.
– connect the headphones.
– change the GROOVE effect.
With the sound flash function, you can
flash the sound output. The sound cuts off
periodically.
Use the buttons on the unit for the
operation.
Hold down SOUND FLASH during
playback.
The flashing effect is activated.
Release SOUND FLASH to cancel the
effect.
To change the sound flash speed
Hold down SOUND FLASH and turn
OPERATION DIAL to change the sound
flash speed (1 ~ 20).
The power illuminator will synchronize
with the selected SOUND FLASH effect.
Enjoying the sound at low
volume
Creating sound flash effect

73
Sound Adjustment
Singing along: Karaoke
(DVD VIDEO, DVD-R/-RW in VR
mode, VIDEO CD, AUDIO CD, audio
files* and video files* only)
* Including those on the USB device.
1 Press FUNCTION +/– repeatedly
to select “DVD” or “USB” (or
press DVD or on the unit).
2 Turn MIC 1 LEVEL or MIC 2
LEVEL on the unit to MIN to
reduce the microphone volume
and turn ECHO LEVEL on the
unit to MIN to cancel the echo
effect.
3 Connect an optional microphone
to MIC 1 or MIC 2 jack on the unit.
Connect another optional microphone
if you want to sing in duet.
The Karaoke Mode is turned on.
“KARAOKE MODE: ON” appears on
the TV screen and “m” appears in the
display.
4 Start playing the music and
adjust the volume.
DVD VIDEO, DVD-R/-RW in VR
mode or video files:
The system outputs the audio format
that you have selected.
AUDIO CD, VIDEO CD or MP3
audio files:
The audio setting automatically
changes to “1/L” and the system
outputs the left channel audio on both
front and surround channels.
If you want to hear vocal:
Press AUDIO repeatedly to select
another audio channel.
5 Start singing along with the
music.
Other operations
To turn off the Karaoke Mode
Disconnect all the microphones or press
KARAOKE MODE. “KARAOKE
MODE: OFF” appears on the TV screen.
Notes
• Karaoke Mode is automatically turned off
when you
– turn off the system.
– change the function.
– connect the headphones.
– set “TEST TONE” to “ON”.
• If howling occurs:
– move the microphone away from the
speakers.
– change the direction of the microphone.
– lower the MIC 1 LEVEL, MIC 2 LEVEL or
ECHO LEVEL.
– press VOLUME – repeatedly (or turn
MASTER VOLUME on the unit
counterclockwise).
Preparing for karaoke
USB
To Do this
adjust the
microphone
volume
Turn MIC 1 LEVEL or
MIC 2 LEVEL on the
unit.
adjust the
microphone
echo
Turn ECHO LEVEL on
the unit.
cancel the echo
effect
Turn ECHO LEVEL on
the unit to MIN.
Continued
l

74
Dolby Digital Karaoke format
(DVD VIDEO only)
The Dolby Digital format, which
reproduces surround sound using 5
channels, can also contain the “Dolby
Digital Karaoke” format which is
specialized for karaoke. In the Dolby
Digital Karaoke format discs, guide
melody and guide vocal tracks are
recorded in addition to the
accompaniment. You can select them
when Karaoke Mode is turned on.
Speaker output in normal Dolby
Digital format (5 channel)
Speaker output in Dolby Digital
Karaoke format
You can check the audio information by
pressing AUDIO (page 28). When
playing a Dolby Digital Karaoke disc, “9”
appears at the current audio format
(page 83).
Example:
— Key Control
You can change the key to suit your vocal
range, except when the playback is
stopped.
Press KEY CONTROL 2 #/ to suit
your vocal range in Karaoke mode.
You can adjust the key higher or lower in
13 steps (2 #6 – 6).
Notes
• Depending on the disc, you may not be able to
change the key.
• The key automatically returns to the original
key when
– you turn off the system.
– you change the function.
– you change the disc.
– the disc tray is opened.
– you stop playback.
– the title or track changes.
– you change the folder.
– the played back item is changed during PBC
playback.
– you perform Lock Search.
– you cancel Karaoke mode.
– DVD layer is changed.
Front
(Left) Center Front
(Right)
Surround
(Left)
Surround
(Right)
Accompaniment
(Left)
Accompanimen
t
(Right)
Guide vocal 1 Guide vocal 2
You can select any of these. These are output
from the respective speakers.
Guide melody
Changing the key
DOLBY DIGITAL
3
/
2
2/0: Recorded only with accompaniment.
3/0: Recorded with guide melody.
3/1: Recorded with guide melody and one
guide vocal.
3/2: Recorded with guide melody and two
guide vocals.

75
Sound Adjustment
— Karaoke Pon
You can enjoy karaoke with a stereo-
recorded track, audio file or video file,
even if it is a non-karaoke disc or media,
by reducing the sound of the vocals.
Press KARAOKE PON in Karaoke
Mode.
To cancel Karaoke Pon mode
Press KARAOKE PON again.
Notes
• This function may not work well when
– only a few instruments are playing.
– a duet is playing.
– the vocals on the disc deviate from the
center.
– playing monaural-recorded discs (the
accompaniment is also reduced).
– playing multiplex discs.
– the source has strong echoes or chorus.
– the voice on the source is singing in high
soprano or tenor.
• During Karaoke Pon mode, the stereo effect is
reduced.
• Karaoke Pon mode is automatically canceled
when you
– turn off the system.
– change the function.
– change the disc.
– open the disc tray.
– press AUDIO.
– set “VOCAL SELECT” to other than
“OFF”.
– cancel Karaoke Mode.
— Vocal Select (DVD VIDEO,
VIDEO CD, AUDIO CD only)
When playing a DVD with the Dolby
Digital Karaoke format in Karaoke Mode,
you can turn on or off the guide vocal
recorded in the karaoke track.
When playing a VIDEO CD or AUDIO
CD in Karaoke mode, you can listen to the
vocals.
You can also change the guide vocal
channel. You can select different kinds of
vocals.
1Press DISPLAY in Karaoke
Mode.
The Control Menu appears on the TV
screen.
2 Press V v or repeatedly to
select (VOCAL
SELECT), then press ENTER.
The options for “VOCAL SELECT”
appear on the TV screen.
3 Press V v or repeatedly to
select the vocal channel you
want.
The output channel changes as
follows.
The default settings are underlined.
When playing a DVD VIDEO
• OFF: Turns off the guide vocal.
• 1+2: Guide vocal 1+2
• 1: Guide vocal 1
• 2: Guide vocal 2
Playing karaoke with any
stereo track, audio file or
video file
Selecting the vocals
Continued
l

76
When playing a VIDEO CD or
AUDIO CD
• OFF: Turns off the guide vocal.
• L+R: The same sound is output from
both speakers.
• STEREO: The standard stereo
sound.
When playing a Super VCD
• OFF: Turns off the guide vocal.
• 1:L+R: The same sound of the audio
track 1 is output from both speakers.
• 1:STEREO: The stereo sound of the
audio track 1
• 2:L+R: The same sound of the audio
track 2 is output from both speakers.
• 2:STEREO: The stereo sound of the
audio track 2
4 Press ENTER.
Notes
• Depending on the disc, you may not be able to
change the guide vocal channel.
• The channel returns to the default setting
when you
– turn off the system.
– change the function.
– change the disc.
– open the disc tray.
– press AUDIO.
– cancel Karaoke mode.
– turn on the Karaoke Pon.
• When playing a DVD VIDEO recorded only
with one kind of guide vocal, select “1”.
— Score Mode
When Karaoke Mode is turned on, you
can use the scoring mode.
Your score is calculated by comparing
your voice with the music source.
1Press DISPLAY in Karaoke
Mode.
The Control Menu appears on the TV
screen.
2 Press V v or repeatedly to
select (SCORE MODE),
then press ENTER.
The options for “SCORE MODE”
appear on the TV screen.
3 Press V v or repeatedly to
select a setting.
The default setting is underlined.
• BEGINNER 1: Beginner level. The
score is displayed while singing.
• BEGINNER 2: Beginner level.
• EXPERT 1: Advance level. The
score is displayed while singing.
• EXPERT 2: Advance level.
• DEMO: Demonstration mode. The
score is displayed regardless of
singing.
4 Press ENTER.
5 Start playing the music.
Selecting the scoring mode

77
Sound Adjustment
6 Press SCORE before singing a
song in Karaoke mode.
The previous highest score appears on
the TV screen and the display changes
as follows according to the level
selected for “SCORE MODE”.
: When you select “BEGINNER
1” or “EXPERT 1”.
: When you select “BEGINNER
2” or “EXPERT 2”.
: When you select “DEMO”.
7 After singing for more than a
minute, press SCORE again to
view your score.
Your score is calculated from a scale of
0 to 99.
The playback is paused and your score
is displayed for few seconds.
After your score, the ranking is
displayed as follows:
– The ranking is displayed as a list with
top 3 scores.
– Your score and ranking for the last
song flash.
– If you are in the top 10, your ranking
is displayed. If not, “10+” is
displayed.
– If your score is “0” your score is not
displayed in the ranking list.
Notes
• The highest score is reset when the system is
turned off.
• The “SCORE MODE” function may be
canceled when certain remote buttons are
pressed.
• In some cases, you may not be able to use the
scoring mode.
• The “SCORE MODE” setting is
automatically changed to “BEGINNER 1”
when the system is turned off.

78
Using the timer
— Sleep Timer
You can set the system to turn off after a
certain time, so that you can fall asleep to
music.
Press SLEEP repeatedly.
The minute display (turn-off time)
changes cyclically as follows:
90 min 80 min 10 min t t t ... t
OFF
To cancel the Sleep Timer
Press SLEEP repeatedly to select “SLEEP
OFF”.
Tip
To check the remaining time, press SLEEP once.
— Play Timer/Recording Timer
You cannot activate both the Play Timer
and the Recording Timer at the same
time. Make sure you have set the clock
(page 23).
Play Timer:
You can wake up to music from disc, tape,
tuner or optional USB device at a preset
time.
Recording Timer:
You can record onto a tape or transfer
onto a transferable USB device from a
preset station at a specified time.
1 Prepare the sound source.
For Play Timer:
Prepare the sound source and then
press VOLUME +/– (or turn
MASTER VOLUME on the unit) to
adjust the volume.
To start from a specific track or file,
create your own program (page 31).
For Recording Timer:
Tune in the preset radio station you
want (page 52).
2 Press TIMER MENU.
For Recording Timer, you can
also press REC TIMER on the
unit, then proceed to step 4.
3 Press V v or repeatedly (or turn
OPERATION DIAL on the unit) to
select “PLAY SET?” or “REC
SET?”, then press ENTER.
“ON” appears and the hour indication
flashes in the display.
4 Set the time to start playback or
recording/transferring.
Press V v or repeatedly (or turn
OPERATION DIAL on the unit) to set
the hour, then press ENTER.
The minute indication flashes in the
display. Use the procedure above to set
the minute. “OFF” appears and the
hour indication flashes in the display.
5 Set the time to stop playback or
recording/transferring using the
same procedure as step 4.
Other Operations
Falling asleep to music
Setting the timer

79
Other Operations
6 Select the sound source or
prepare the tape or USB device.
For Play Timer:
Press V or v repeatedly (or turn
OPERATION DIAL on the unit) until
the music source you want appears in
the display, then press ENTER.
The display will show the timer
settings.
For Recording Timer:
Press V or v repeatedly (or turn
OPERATION DIAL on the unit) to
select “TAPE REC” or “USB REC”,
then press ENTER.
The display will show the timer
settings.
Load a recordable tape or connect a
transferable USB device.
7 Press "/1 to turn off the system.
Other operations
Notes
• If you use the Play Timer or Recording Timer
and the Sleep Timer at the same time, the
Sleep Timer has priority.
• The system turns on before the preset time.
If the system is turned on at the preset time
or if “STANDBY” flashes in the display, the
Play Timer and the Recording Timer will not
play or transfer/record.
• The Play Timer setting remains as long as the
setting is not canceled manually.
• The Recording Timer is automatically
canceled after the Recording Timer has been
activated.
• The volume is reduced to minimum during
Recording Timer.
To Do this
Check the setting 1Press TIMER MENU.
“TIMER SELECT?”
flashes in the display.
2 Press ENTER.
3 Press V v or
repeatedly to select
“PLAY SELECT?” or
“REC SELECT?”, then
press ENTER.
Check the
Recording Timer
setting using
controls on the
unit
1 Press REC TIMER on
the unit.
2 Turn OPERATION
DIAL on the unit to
select “REC
SELECT?”.
3 Press ENTER.
Change the
setting
Start from step 1.
To Do this
Cancel the Play
Timer or
Recording Timer
1 Press TIMER MENU.
“TIMER SELECT?”
flashes in the display.
2 Press ENTER.
3 Press V v or
repeatedly to select
“TIMER OFF?”, then
press ENTER.

80
Changing the display
Use the buttons on the unit for the
operation.
1 Press OPTIONS.
2 Turn OPERATION DIAL to select
the item you want, then press
ENTER.
ILLUM
Change the illumination pattern
around MASTER VOLUME.
BACKLIGHT
Change the meter backlight pattern.
POINTER
Change the meter pointer pattern.
DISPLAY
Change the front panel display pattern.
3 Turn OPERATION DIAL to select
the setting you want.
4 Press ENTER.
5 Repeat steps 2 to 4 to make
other settings.
To exit the OPTIONS menu
Press OPTIONS again.
Press DISPLAY repeatedly while
the system is turned off.
You can select the following display
mode.
Demonstration
The display changes and the indicators
flash even when the system is turned off.
No display (Power Saving Mode)*
The display is turned off to conserve
power. The timer and clock continue to
operate.
Clock
The clock is displayed. The clock display
automatically turns to Power Save Mode
after a few seconds.
* You cannot perform the following operations
during Power Saving Mode:
– Setting the clock (page 23).
– Changing the AM tuning interval (page 53).
– Turning on the system by pressing DVD,
, TV/SAT, TUNER/BAND, TAPE or
VIDEO on the unit.
– Changing the color system (page 19).
You can easily view the information
through the meter display such as the
music source level.
To select a preset display pattern
Press METER MODE repeatedly to
select the preset display pattern
you want.
Front panel display, meter display and
power illuminator will change according
to the preset pattern you have selected.
Changing the front panel
display mode
Using the Meter Display
USB

81
Other Operations
Viewing information
about the disc and USB
device
Press DISPLAY repeatedly.
Each time you press DISPLAY, the
display changes from 1 t 2 t 3t
1 t …
1 Disc or USB device information
2 Clock display (for few seconds)
3 Effect name (for few seconds)
Checking the elapsed playing time,
remaining time and titles
Press TIME/TEXT during playback.
Each time you press TIME/TEXT, the
display changes from 1 t 2 t t …
1 t …
When playing a DVD VIDEO or
DVD-R/-RW in VR mode:
• When the menu or the title without a
chapter is played back
1 Elapsed playing time of the menu or
the current title
2 Title of the disc1)
• When a chapter other than above
condition is played back
1 Elapsed playing time of the current
title
2 Remaining time of the current title
3 Elapsed playing time of the current
chapter
4 Remaining time of the current
chapter
5 Title of the disc1)2)
When playing an AUDIO CD or VIDEO
CD without PBC function:
1 Elapsed playing time of the current
track
2 Remaining time of the current track
3 Elapsed playing time of the current
disc3)
4 Remaining time of the current disc3)
5 Title of the disc1)5)
When playing a VIDEO CD/Super
VCD:
1 Elapsed playing time of the current
scene/track
2 Title of the disc1)5)
When playing audio files or video
files:
1 Elapsed playing time of the current
track/file
2 Title of the track/file4)6)7)
Checking the total playing time and
titles
Press TIME/TEXT repeatedly when
playback is stopped.
Each time you press TIME/TEXT, the
display changes from 121 t t
t …
DVD VIDEO or DVD-R/-RW in VR
mode:
1 Total number of titles on the disc
2 Title of the disc1)
VIDEO CD without PBC playback or
AUDIO CD:
1 Total number of the tracks on the disc
and the total playing time of the disc
2 Title of the disc1)
VIDEO CD with PBC playback:
1 Total number of scene on the disc
2 Title of the disc1)
Viewing information in the
front panel display
Continued
l

82
1) “NO TEXT” appears in the display if the
DVD VIDEO is not a DVD-TEXT disc, the
AUDIO CD is not a CD-TEXT disc or the
VIDEO CD does not have text information.
2) The current chapter number and the current
title number are displayed for 2 seconds
before the display returns to elapsed playing
time when you press TIME/TEXT during
display of title of the disc.
3) When Program Play or Shuffle Play is turned
on, the elapsed playing time and the
remaining time of the disc would be skipped.
4) When playing video files, the current folder
number and the current file number are
displayed for 2 seconds before the display
returns to elapsed playing time when you
press TIME/TEXT during display of title of
the file.
5) The current track number and the current
index number (for a disc without PBC
function) or the current scene number (for a
disc with PBC function) is displayed for 2
seconds before the display returns to elapsed
playing time when you press TIME/TEXT
during display of the title of the disc.
6) If an MP3 audio file has the ID3 tag, the
system will display an album name or title
name from the ID3 tag information.
The system supports ID3 ver 1.0/1.1/2.2/2.3.
ID3 ver 2.2/2.3 tag information display has
priority when both ID3 ver 1.0/1.1 and ver
2.2/2.3 tags are used for a single MP3 audio
file.
7) If the audio file or video file title contains
characters which cannot be displayed, these
characters will be displayed as “*”.
Notes
• If you play back JPEG image files only,
“PHOTO” appears in the display.
• You cannot use TIME/TEXT to change the
display of disc information when:
– a JPEG image file is played back.
– playback is stopped for DATA CD/DVD
with MP3 audio files and/or JPEG image
files.
– playback is stopped for DATA CD/DVD
with video files.
• The elapsed playing time of audio files and
video files may not be displayed correctly.
Press TIME/TEXT repeatedly
during playback.
Each time you press TIME/TEXT while
playing the disc or USB device, the
display changes from 1 t 2 t t …
1 t …
The time display that you can view on the
TV screen depends on the disc or USB
device you are playing.
When playing a DVD VIDEO or
DVD-R/-RW in VR mode:
1 Elapsed playing time of the current
title
2 Remaining time of the current title
3 Elapsed playing time of the current
chapter
4 Remaining time of the current chapter
5 Elapsed playing time of the current
title and title of the disc
2)
Viewing information in the
on-screen display
Bit rate
Track/File title1)
Folder title
Time information
T: title or track
C: chapter
D: disc

83
Other Operations
When playing a VIDEO CD/Super
VCD:
Elapsed playing time of the current scene/
track and title of the disc2)
When playing an AUDIO CD or VIDEO
CD without PBC function:
1 Elapsed playing time of the current
track
2 Remaining time of the current track
3 Elapsed playing time of the current
disc
4 Remaining time of the current disc
5 Elapsed playing time of the current
track and title of the disc2)
When playing audio files or video
files:
Elapsed playing time of the current file
and folder/file name
1)
1) If an MP3 audio file has the ID3 tag, the
system will display an album name or title
name from the ID3 tag information. The
system supports ID3 ver 1.0/1.1/2.2/2.3. ID3
ver 2.2/2.3 tag information display has
priority when both ID3 ver 1.0/1.1 and ver
2.2/2.3 tags are used for a single MP3 audio
file.
2) “NO TEXT” appears on the TV screen if the
DVD VIDEO is not a DVD-TEXT disc, the
AUDIO CD is not a CD-TEXT disc or the
VIDEO CD does not have text information.
Notes
• The Control Menu display will show different
items depending on the disc type.
• Only alphabet letters, numbers and some
symbols can be displayed.
• Depending on the disc and USB device, the
system can only display a limited number of
characters.
• For audio files and video files with format
other than ISO 9660 Level 1 and Level 2,
folder title and file title may not be displayed.
Displaying the audio information of
the disc
(DVD VIDEO and video files only)
When you press AUDIO repeatedly
during playback, the format of the current
audio signal is displayed on the TV
screen.
When playing a DVD VIDEO:
For example, in Dolby Digital format,
multiple signals ranging from monaural to
5.1 channel signals can be recorded on a
DVD VIDEO. Depending on the DVD
VIDEO, the number of recorded channels
may differ.
The symbols shown on the TV screen
represent the audio signal channels which
are output from different speakers.
• L: Front Left
• R: Front Right
• C: Center
• LS: Surround Left
• RS: Surround Right
• S: Surround signal which is produced
from Dolby Surround Sound processing
or monaural surround audio signal.
• LFE: Low Frequency Effect
Example:
For Dolby Digital 5.1 channel:
L RC
LFE
LS RS
1:
ENGLISH DOLBY DIGITAL
3 / 2 .1
Surround
(left/right) LFE (Low Frequency Effect)
Front (left/right)+
Center
The audio format of
current track
DOLBY DIGITAL
3 / 2
.
1
2 Surround components
2 Front component +
1 Center component
1 LFE (Low Frequency
Effect) component
Continued
l

84
When playing a video file:
Example:
MP3 audio file
You can check the date information
during playback when Exif* tag is
recorded in the JPEG image files.
Press DISPLAY repeatedly
during playback until the Control
Menu for JPEG image files appears
on the TV screen.
* “Exchangeable Image File Format” is a digital
camera image format defined by the Japan
Electronics & Information Technology
Industries Association (JEITA).
Notes
• If there is no date information or the data is
damaged on the disc, the system cannot
display the date information.
• The date information format varies depending
on the area.
Using optional
components
To enhance your system, you can connect
optional components (page 16). Refer to
the operating instructions supplied with
each component for details.
1 Press FUNCTION +/– repeatedly
(or press TV/SAT on the unit) to
select “TV” or “SAT”.
2 Start playing the connected
component.
To switch between the “TV” and
“SAT” function
Use the buttons on the unit for the
operation.
Hold down TV/SAT and press "/1 while
the system is turned on. Release "/1 first,
then release TV/SAT. The system
switches the function from “TV” to
“SAT” or vice versa.
Note
If the sound is distorted or too loud when “TV”
is selected, change the function to “SAT”.
Tip
You can turn off the sound temporarily by
pressing MUTING on the unit. To cancel the
muting function, press MUTING again or
increase the volume.
Checking the date information
of JPEG image files
Bit rate
DATA CD
10 ( 1 5)
5( 8)
1 8 / 9/ 20 02
Date information
Listening to a connected TV or
satellite tuner

85
Other Operations
Press FUNCTION +/– repeatedly to
select “VIDEO” (or press VIDEO on the
unit) and start playing the connected
VCR.
Note
The video signal from the connected VCR is
only output through the VIDEO OUT jack of
this unit.
Tip
You can turn off the sound temporarily by
pressing MUTING on the unit. To cancel the
muting function, press MUTING again or
increase the volume.
1 Use an audio cord (not supplied)
to connect AUDIO OUT jacks to
the audio input jacks of the VCR.
2 Use a video cord (supplied) to
connect VIDEO OUT jacks to the
video input jacks of the VCR.
3 Start recording.
Refer to the operating instructions
supplied with the connected
component for details.
Note
The audio signal from the AUDIO OUT jacks
may cut off for a moment during some
operations such as when you press SOUND
FIELD, AUDIO or KARAOKE MODE.
Listening to a connected VCR
Recording the audio and video
signals from a VIDEO CD onto a
video tape

86
Troubleshooting
Should you encounter a problem with
your system, do the following:
1 Make sure the power cord and
speaker cords are connected
correctly and firmly.
2 Find your problem in the
troubleshooting checklist below and
take the indicated corrective action.
If the problem persists after doing all of
the above, consult your nearest Sony
dealer.
General
The display starts flashing as soon as
you plug in the power cord even
though you have not turned on the
system.
• The demonstration mode started. Press
"/1 (page 18).
The clock or timer setting is canceled.
• The power cord is disconnected or a
power failure occurred. Redo “Setting
the clock” (page 23). If you have set the
timer, redo “Using the timer” (page 78).
“– –:– –” appears in the display.
• The clock is not set. Set the clock
(page 23).
• A power failure has occurred. Set the
clock (page 23) and timer settings
(page 78) again.
There is no sound.
• Press VOLUME + repeatedly (or turn
MASTER VOLUME on the unit
clockwise).
• The headphones are connected to the
PHONES jack.
• Check the speaker connections
(page 16).
• There is no audio output during
Recording Timer.
• The system is in pause mode, in Slow-
motion Play or in Lock Search. Press
H (or nN on the unit) to start the
playback.
• No sound is output when transferring
music to the USB device.
• Press MUTING on the unit if
“MUTING” appears in the display.
The CLEAR button does not work.
• When the disc tray is opened, the
CLEAR button does not work.
Additional Information
When the STANDBY indicator
flashes
Immediately unplug the power cord
and check the following items.
• If your unit have a voltage selector,
is the voltage selector set to the
correct voltage?
Check the voltage for your region,
then make sure the voltage selector
is set correctly.
• Are the + and – speaker cords short-
circuited?
• Are you using the supplied
speakers?
• Is anything blocking the ventilation
holes on the rear of the unit?
After checking the above items and
fixing any problems, plug in the power
cord again and turn on the unit. If the
STANDBY indicator still flashes, or if
the cause of the problem cannot be
found even after checking all the
above items, consult your nearest
Sony dealer.

87
Additional Information
There is no microphone sound.
• Press VOLUME + repeatedly (or turn
MASTER VOLUME on the unit
clockwise) or turn MIC 1 LEVEL or
MIC 2 LEVEL on the unit clockwise to
adjust the microphone volume.
• Make sure the microphone is connected
to the MIC 1 or MIC 2 jack correctly.
• Make sure the microphone is turned on.
• Press MUTING on the unit if
“MUTING” appears in the display.
There is severe hum or noise.
• A TV or VCR is placed too close to the
unit. Move the unit away from the TV or
VCR.
• Move the unit away from the source of
noise.
• Connect the unit to a different wall
outlet.
• Install a noise filter (commercially
available) to the power cord.
The timer does not function.
• Check the timer setting and set the
correct time (page 78).
• Cancel the Sleep Timer function
(page 78).
• You cannot select the Play Timer and
the Recording Timer at the same time.
The remote does not function.
• Remove the obstacles between the
remote and the unit.
• Move the remote closer to the unit.
• Point the remote at the unit’s sensor.
• Replace the batteries (R6/size AA).
• Move the unit away from the
fluorescent light.
The color irregularity on a TV screen
persists.
• Turn off the TV at once, then turn it on
after 15 to 30 minutes. If the color
irregularity still persists, place the
speakers farther away from the TV.
There is acoustic feedback.
• Reduce the volume.
• Move the microphone away from the
speakers or change the direction of the
microphone.
The sound from the component
connected to the TV/SAT AUDIO IN
L/R jacks is distorted.
• If “TV” appears in the display when you
press TV/SAT on the unit, switch to
“SAT” function (see “To switch
between the “TV” and “SAT” function”
on page 84).
THEATRE SYNC function does not
work.
• If the distance between the TV and this
unit is too far, this function may not
work. Install the unit near the TV.
Meter
Meter pointer does not move.
• “POINTER” is set to “OFF” in the
OPTIONS menu. Select other settings.
• Meter mode is set to “METER OFF”.
Press METER MODE on the unit
repeatedly to select other modes.
• The headphones are connected to the
PHONES jack. Disconnect the
headphones.
Meter display is turned off.
• “POINTER” and “BACKLIGHT” are
set to “OFF” in the OPTIONS menu.
Select other settings.
• Meter mode is set to “METER OFF”.
Press METER MODE on the unit
repeatedly to select other modes.
Meter display is flashing.
• “POINTER” and “BACKLIGHT” are
set to “FLASH” in the OPTIONS menu.
Select other settings.
• Meter mode is set to “EXCITE 1” or
“EXCITE 2”. Press METER MODE on
the unit repeatedly to select other
modes.
Continued
l

88
Speakers
Sound comes from one channel or
unbalanced left and right volume.
• Place the speakers as symmetrically as
possible.
• Check that the speaker are connected
securely and correctly.
• The source being played back is
monaural.
• Adjust the level of each speaker
(page 51).
The sound comes from the center
speaker only.
• Depending on the disc, the sound may
come from the center speaker only.
There is no sound from the
subwoofer.
• Set the subwoofer level to the
appropriate level.
• No sound is produced from the
subwoofer when you play back a DVD
VIDEO that does not have subwoofer
output recorded.
• Check that the subwoofer is connected
securely and correctly.
• Make sure that “SUBWOOFER” is set
to “YES” (page 50).
• Make sure you have turned on the
subwoofer by pressing SUBWOOFER
ON/OFF on the unit.
• Press MUTING on the unit if
“MUTING” appears in the display.
There is no sound from the center/
surround speaker.
• Set the center/surround speaker level to
the appropriate level.
• The software being played back has
limited sound effects. Check the volume
with the test tone (page 51).
• Check that the center/surround speakers
are connected securely and correctly.
• Make sure that “SURROUND” is set to
“SIDE” or “BEHIND” (page 50).
• Make sure that “CENTER” is set to
“YES” (page 50).
• Press MUTING on the unit if
“MUTING” appears in the display.
Disc Player
The disc tray does not open and
“LOCKED” appears in the display.
• Consult your nearest Sony dealer or
local authorized Sony service facility.
The disc tray does not close.
• Load the disc correctly.
• Always close the disc tray by pressing
OPEN/CLOSE Z on the unit. Do not
forcibly push the disc tray to close it as
this may cause a malfunction.
The disc does not eject.
• You cannot eject the disc during USB
transferring or tape recording. Press x
to cancel the transferring/recording,
then press OPEN/CLOSE Z to eject the
disc.
• Consult your nearest Sony dealer.
Playback does not start.
• Open the disc tray and check whether a
disc is loaded.
• Wipe the disc clean (page 98).
• Reload the disc.
• Load the disc that this system can play
back (page 6).
• Load the disc on the disc tray with the
label side facing up.

89
Additional Information
• Remove the disc and wipe away the
moisture on the disc, then leave the
system turned on for a few hours until
the moisture evaporates.
• Press
H (or nN on the unit) to start
playback.
• The region code on the DVD VIDEO
does not match the system.
The sound skips.
• Wipe the disc clean (page 98).
• Reload the disc.
• Move the unit to a place without
vibration (e.g., on top of a stable stand).
• Move the speakers away from the unit,
or place them on separate stands. When
you listen to a track with bass sounds at
high volume, the speaker vibration may
cause the sound to skip.
Playback does not start from the first
track or file.
• The system is in Program Play, Repeat
Play or Shuffle Play mode. Turn off
Program Play and Shuffle Play.
• Resume Play has been selected. Press x
twice. Then, press H (or nN on
the unit) to start playback (page 30).
• The title of DVD VIDEO or PBC menu
automatically appears on the TV screen.
Playback starts automatically.
• The DVD VIDEO features an auto
playback function.
Playback stops automatically.
• Some discs may contain an auto pause
signal. While playing such a disc, the
playback stops at auto pause signal.
You cannot perform some functions
such as Stop, Lock Search, Slow-
motion Play, Repeat Play, Shuffle
Play or Program Play.
• Depending on the disc, you may not be
able to do some of the operations above.
Refer to the operating instructions
supplied with the disc.
The DATA CD/DVD (MP3 audio file/
JPEG image file/video file) cannot be
played back.
• The DATA CD is not recorded in a
format that conforms to ISO 9660 Level
1, Level 2, or Joliet (expansion format).
• The DATA DVD is not recorded in a
format that conforms to UDF (Universal
Disk Format).
• The MP3 audio file does not have the
extension “.mp3”.
• The data is not stored in the desired
format.
• The MP3 audio files in format other
than MPEG 1 Audio Layer 3 cannot be
played back.
• The system can playback to a depth of 8
folders only.
• For MP3 audio files/JPEG image files,
check the “MEDIA” setting (page 41).
• The disc contains more than 200 folders.
• For MP3 audio files/JPEG image files,
the folder contains more than 150 files
respectively when the “MEDIA” is set
to “MUSIC/PHOTO”.
• The JPEG image files does not have the
extension “.jpg” or “.jpeg”.
• The JPEG image file is larger than 3,072
(width) × 2,048 (height) in normal
mode, or more than 2,000,000 pixels in
Progressive JPEG mode which is
mainly used on the Internet website.
• JPEG image files and video files with a
high width to length ratio cannot be
played back.
• The DivX video file does not have the
extension “.avi” or “.divx”.
• The MPEG4 video file does not have the
extension “.mp4” or “.m4v”.
• The video files is larger than
720 (width) × 576 (height).
Continued
l

90
The MP3 audio files take a longer time
to play back than others.
• After the system reads all the files on the
disc, playback may take more time than
usual if:
– the number of folders or files on the
disc is very large.
– the folder or file organization structure
is very complex.
“Data error” appears on the TV
screen when playing a DATA CD/DVD.
• The MP3 audio file/JPEG image file
you want to play is broken.
• The data is not MPEG 1 Audio Layer 3
data.
• The JPEG image file format does not
conform to DCF.
• The JPEG image file has the extension
“.jpg” or “.jpeg”, but is not in JPEG
format.
• The DivX video file has the extension
“.avi” or “.divx”, but is not in DivX
format.
• The DivX video file does not conform to
a DivX Certified profile.
• The MPEG4 video file has the extension
“.mp4” or “.m4v”, but is not in MPEG4
format.
The disc title, album title, track title,
CD-TEXT and DVD-TEXT characters
do not appear properly.
• Use a disc that conforms to the ISO
9660 Level 1, Level 2, or Joliet
(expansion format).
• The character code that can be displayed
by this system are as follows:
– Upper cases (A to Z)
– Lower cases (a to z)
– Numbers (0 to 9)
– Symbols (< > * +, ? / [ ] \ _)
Other characters may not be displayed
correctly.
The surround effect is difficult to hear
when you are playing a Dolby Digital
or MPEG audio sound track.
• Make sure the sound field is set properly
(page 71).
• Check the speaker connections and
settings (pages 16, 50).
• Depending on the DVD VIDEO, the
output signal may not be the entire 5.1
channel. It may be monaural or stereo,
even if the sound track is recorded in
Dolby Digital or MPEG audio format.
The sound loses stereo effect when
you play back an AUDIO CD, VIDEO
CD, audio file, video file or DVD
VIDEO.
• Unplug the microphone or press
KARAOKE MODE repeatedly until
“m” disappears from the display.
• Make sure the system is connected
properly.
• Check the speaker connections and
settings (pages 16, 50).
USB device
Transferring to USB device does not
start.
• The following problems may have
occurred.
– The USB device is full.
– The number of files and folders on the
USB device has reached the upper
limit.
– The USB device is write-protected.
Transferring is stopped before it is
finished.
• You are using an unsupported USB
device. Refer to “Compatible USB
devices with this system” (page 109) for
the supported device types.
• The USB device is not formatted
correctly. Refer to the operating
instructions supplied with the USB
device for how to format.

91
Additional Information
• Turn off the system and remove the
USB device. If the USB device has a
power switch, turn the USB device off
and then on again after removing it from
the system. Then perform transferring
again.
• If the transfer and erase operations are
repeated multiple times, the file
structure within the USB device
becomes fragmented. Refer to the
operating instructions supplied with the
USB device for how to deal with this
problem. If the problem persists, contact
your nearest Sony dealer.
Transferring results in an error.
• You are using an unsupported USB
device. Refer to “Compatible USB
devices with this system” (page 109) for
the supported device types.
• Turn off the system and remove the
USB device. If the USB device has a
power switch, turn the USB device off
and then on again after removing it from
the system. Then perform transferring
again.
• The USB device was disconnected or
the power was turned off during the
transfer process. Delete the partially-
transferred file, and perform
transferring again. If this does not fix the
problem, the USB device may be
broken. Refer to the operating
instructions supplied with the USB
device for how to deal with this
problem. If the problem persists, contact
your nearest Sony dealer.
Audio files or folders on the USB
device cannot be erased.
• Check if the USB device is
write-protected.
• The USB device was disconnected or
the power was turned off during the
erase operation. Delete the partially-
erased file. If this does not fix the
problem, the USB device may be
broken. Refer to the operating
instructions supplied with the USB
device for how to deal with this
problem. If the problem persists, contact
your nearest Sony dealer.
Are you using a supported USB
device?
• If you connect an unsupported USB
device, the following problems may
occur. Refer to “Compatible USB
devices with this system” (page 109) for
the supported device types.
– The USB device is not recognized.
– File or folder names are not displayed
on this system.
– Playback is not possible.
– The sound skips.
– There is noise.
– A distorted sound is output.
– Transferring stops before it is finished.
“Over Current” appears in the
display.
• A problem has been detected with
the level of electrical current from the
(USB) port. Turn off the system
and remove the USB device from the
(USB) port. Make sure there is no
problem with the USB device. If this
display pattern persists, contact your
nearest Sony dealer.
There is no sound.
• The USB device is not connected
correctly. Turn off the system and
reconnect the USB device, then turn on
the system and check if “USB” lights
up.
• Press MUTING on the unit if
“MUTING” appears in the display.
Continued
l

92
There is noise, skipping, or distorted
sound.
• Turn off the system, then reconnect the
USB device.
• The music data itself contains noise, or
the sound is distorted. Noise may have
entered during the transfer process.
Delete the file, and try transferring
again.
• The bit rate used when encoding audio
files was low. Send audio files with
higher bit rate to the USB device.
The USB device cannot be connected
into the (USB) port.
• The USB device is being connected
backwards. Connect the USB device in
the correct orientation.
“Reading” is displayed for an
extended time, or it takes a long time
before playback starts.
• The reading process can take a long time
in the following cases.
– There are many folders or files on the
USB device.
– The file structure is extremely
complex.
– The memory capacity is excessive.
– The file size is extremely large.
– The internal memory is fragmented.
Thus, we recommend following these
guidelines.
– Total folders on USB device: 200 or
less
– Total files per folder: 150 or less
Erroneous display
• Transfer the music data to the USB
device again, as the data stored in the
USB device may have been corrupted.
• The character code that can be displayed
by this system are as follows:
– Upper cases (A to Z)
– Lower cases (a to z)
– Numbers (0 to 9)
– Symbols (< > * +, ? / [ ] \ _)
Other characters may not be displayed
correctly.
The USB device is not recognized.
• Turn off the system and reconnect the
USB device, then turn on the system.
• Connect the supported USB device
(Refer to “Compatible USB devices
with this system” (page 109)).
• The USB device does not work
properly. Refer to the operating
instructions supplied with the USB
device for how to deal with this
problem. If the problem persists, contact
your nearest Sony dealer.
“Data Error” appears in the display
when playing an USB device.
• The audio file/JPEG image file/video
file you want to play is broken.
• The JPEG image file format does not
conform to DCF.
• The JPEG image file has the extension
“.jpg” or “.jpeg”, but is not in JPEG
format.
• The MPEG4 video file has the extension
“.mp4” or “.m4v”, but is not in MPEG4
format.
• The DivX video file has the extension
“.avi” or “.divx”, but is not in DivX
format.
Playback does not start.
• Turn off the system and reconnect the
USB device, then turn on the system.
• Connect the supported USB device
(Refer to “Compatible USB devices
with this system” (page 109)).
• Press H (or nN on the unit) to start
playback.
Playback does not start from the first
file.
• Set the play mode to Normal Play mode.
• Resume Play has been selected. Press x
twice. Then, press H (or nN on
the unit) to start playback.
Files cannot be played back.
• The MP3 audio file does not have the
extension “.mp3”.
• The WMA audio file does not have the
extension “.wma”.

94
Picture noise appears.
• Clean the disc.
• If video signal from your system has to
go through your VCR to your TV, the
copy-protection applied to some DVD
VIDEO programs could affect the
picture quality. If you still experience
problems after checking your
connections, connect your unit directly
to your TV’s S Video input (page 19).
• Keep the speaker cords away from the
antennas.
• When you play back a VIDEO CD
recorded in a different color system
from the one you set to the system, the
picture image may be distorted
(pages 19, 48).
• When you connect your TV to the
COMPONENT VIDEO OUT jacks and
play back video-based software in
progressive signal format, some
sections of the image may appear
unnatural due to the conversion process.
• Set the color system to match your TV
(pages 19, 48).
The aspect ratio of the TV screen
cannot be changed even though you
can set “TV TYPE” under “VIDEO
SETUP” in the Setup Menu when you
play back a wide picture.
• The aspect ratio is fixed on your DVD
VIDEO and video file.
• If you connect the unit with the S Video
cord, connect directly to the TV.
Otherwise, you may not change the
aspect ratio.
• Depending on the TV, you may not
change the aspect ratio.
Messages do not appear on the TV
screen in the language you want.
• Select the language you want for the on-
screen display in “OSD” under
“LANGUAGE SETUP” in the Setup
Menu (page 47).
The language for the sound track
cannot be changed.
• Multilingual tracks are not recorded on
the DVD VIDEO or DivX video file
being played back.
• The DVD VIDEO and DivX video file
prohibit changing the language for the
sound track.
The subtitles language cannot be
changed.
• Multilingual subtitles are not recorded
on the DVD VIDEO or DivX video file
being played back.
• The DVD VIDEO and DivX video file
prohibit changing the subtitles.
The subtitles cannot be turned off.
• The DVD VIDEO and DivX video file
prohibit turning off subtitles.
The angles cannot be changed.
• Multi-angles are not recorded on the
DVD VIDEO being played back.
• The DVD VIDEO prohibits changing
the angles.
Tuner
The radio presetting is canceled.
• The power cord is disconnected or a
power failure occurred for longer than
half a day. Redo “Listening to a preset
radio station” (page 52).
There is severe hum or noise.
(“TUNED” or “ST” flashes in the
display)
• Set the proper band and frequency
(page 52).
• Connect the antenna properly (page 16).
• Find a place and an orientation that
provide good reception, then set up the
antenna again. If you cannot obtain
good reception, we recommend that you
connect a commercially available
external antenna.
• The supplied FM lead antenna receives
signals along its entire length, so make
sure you extend it fully.

95
Additional Information
• Locate the antennas as far away from
the speaker cords and the power cord as
possible, to avoid picking up noise.
• Try turning off the surrounding
electrical equipment.
A stereo FM program cannot be
received in stereo.
• Press FM MODE repeatedly until
“MONO” disappears from the display.
Tape deck
The tape does not record or playback,
or there is a decrease in sound level.
• The tape heads are dirty (see “Cleaning
the tape heads” on page 99).
• The record/playback heads are
magnetized.
The tape does not erase completely.
• The record/playback heads are
magnetized.
There is excessive wow or flutter, or
the sound drops out.
• The capstans or pinch rollers are dirty
(see “Cleaning the tape heads” on
page 99).
Noise increases or the high
frequencies are erased.
• The record/playback heads are
magnetized.
The tape does not record.
• No tape is loaded. Load a tape.
• The tab has been removed from the tape.
Cover the broken tab with adhesive tape
(page 99).
• The tape has reeled to the end.
When you press . or >, “Not in
Use” flashes in the display.
• The system does not have AMS
(Automatic Music Sensor) function.
This is not a malfunction.
Optional components
There is no sound.
• Refer to General item “There is no
sound.” (page 86) and check the
condition of the system.
• Connect the component properly
(page 16) while checking:
– if the cords are connected properly.
– if the cord plugs are firmly inserted all
the way.
• Turn on the connected component.
• Refer to the operating instructions
supplied with the connected component
and start playing.
• Press MUTING on the unit if
“MUTING” appears in the display.
If the system still does not operate
properly after performing the above
measures or other troubles not
described above occur, reset the
system as follows:
Use the buttons on the unit for the
operation.
1 Unplug the power cord.
2 Plug the power cord back in.
3 Press "/1 to turn on the system.
4 Press x, ENTER and "/1 at the
same time.
“COLD RESET” appears in the
display.
The system is reset to the factory settings
except for the “SETUP” settings. You
need to readjust all the settings you made,
such as the preset stations, clock and
timer.
Continued
l

96
Returning the “SETUP” settings to
the default
You can return the “SETUP” settings
(except for “PARENTAL CONTROL”
settings) to the default settings.
1Press DISPLAY when playback
is stopped.
The Control Menu appears on the TV
screen.
2 Press V v or repeatedly to select
(SETUP), then press
ENTER.
3 Press V v or repeatedly to select
“CUSTOM”, then press ENTER.
The Setup Menu appears on the TV
screen.
4 Press V v or repeatedly to select
“SYSTEM SETUP”, then press
ENTER.
5 Press V v or repeatedly to select
“RESET”, then press ENTER.
6 Press B b or repeatedly to select
“YES”, then press ENTER.
It takes a few seconds to complete. Do
not press "/1 when resetting the
system.
Note
Turn off the subwoofer before you reset the
system.
(When letters/numbers appear in the
display)
When the self-diagnosis function is
activated to prevent the system from
malfunctioning, a 5-character service
number (e.g. C 13 50) with a combination
of a letter and 4 digits appears on the TV
screen or the front panel display. In this
case, check the following table.
When the version number appears
on the TV screen
When you turn on the system, the version
number “VER.X.XX” (X is a number)
may appear on the TV screen. Although
this is not a malfunction and for Sony
service use only, normal system operation
will not be possible. Turn off the system,
and then turn on the system again to
operate.
Self-diagnosis Function
First 3
characters of
the service
number
Cause and corrective
action
C 13 This disc is dirty.
• Clean the disc with a
soft cloth (page 98).
C 31 The disc is not inserted
correctly.
• Restart the system, then
re-insert the disc
correctly.
E XX
(XX is a number)
To prevent a
malfunction, the system
has performed the self-
diagnosis function.
• Contact your nearest
Sony dealer or local
authorized Sony
service facility and
give the 5-character
service number.
Example: E 61 10
VER.X.XX

97
Additional Information
One of the following messages may
appear or flash in the front panel display
during operation.
Cannot Play
• A disc that cannot be played back was
inserted.
• A DVD VIDEO with unsupported
region code was inserted.
Data Error
• You tried to play back a file on the disc
or USB device that is not playable.
• The MP3 audio file, JPEG image file
and DivX video file you want to play
back is damaged.
• The MP3 audio file does not conform to
MPEG 1 Audio Layer 3 format.
• The JPEG image file does not conform
to DCF format.
• The DivX video file does not conform to
a DivX Certified profiles.
• The MP3 audio file has the extension
“.mp3” but it is not in MP3 format.
• The JPEG image file has the extension
“.jpg” or “.jpeg” but it is not in JPEG
format.
• The DivX video file has the extension
“.avi” or “.divx” but it is not in DivX
format.
• The MPEG4 video file has the extension
“.mp4” or “.m4v”, but is not in MPEG4
format.
Device Error
The USB device could not be recognized
or an unknown device is connected.
Device Full!
The memory of the USB device is full.
Erase Error
Erase of audio files or folders on the USB
device failed.
Fatal Error
The USB device was removed during
transferring or erase operation, and may
have been damaged.
Folder Full!
You cannot transfer onto the USB device
because the number of folder has reached
its maximum.
HUB not Supported
An unsupported USB hub device is
connected.
Invalid
You have pressed an invalid button.
LOCKED
The disc tray does not open.
Contact your nearest Sony dealer.
NO DATA
There is no file or folder to be played
back.
No Device
No USB device is connected.
No Disc
There is no disc on the disc tray.
No Tab
You cannot record the tape because the
tab has been removed from the tape.
No Tape
There is no tape in the tape deck.
Not in Use
You tried to perform a specific operation
under conditions where that operation is
prohibited.
Not Supported
An unsupported USB device is connected
or the USB device is connected through
an USB hub.
OFF TIME NG!
The on time and off time of Play Timer or
Recording Timer is the same.
Over Current
An over current from the (USB) port
was detected.
Messages
Continued
l

98
PASSWORD
Parental Control is set.
PHOTO
The playback mode is “PHOTO” and the
JPEG image file is being played back.
Please Wait
• The system is doing initialization
process.
• The system is readying for usage of an
USB device.
Protected!
The USB device is write-protected.
Push STOP!
You have pressed the buttons whose
operation is only possible when playback
is stopped.
Reading
The system is reading information of the
disc or USB device. Some buttons are
not available.
REC Error
Transferring did not start, stopped
partway, or otherwise could not be
performed.
Track Full!
You cannot transfer onto the USB device
because the number of file has reached its
maximum.
UNLOCKED
The disc theft-preventive function is
released.
Precautions
Notes on discs
• Before playing, wipe the disc with a cleaning
cloth from the center out to the edge.
• Do not clean discs with solvents, such as
benzine thinner, or commercially available
cleaners or anti-static spray intended for vinyl
LPs.
• Do not expose discs to direct sunlight or heat
sources such as hot air ducts, nor leave it in a
car parked in direct sunlight.
On cleaning discs, disc/lens cleaner
Do not use a commercially available cleaning
disc or disc/lens cleaner (wet or spray type).
These may cause apparatus to malfunction.
On operating voltage
Before operating the system, check that the
operating voltage of the unit is identical with the
voltage of your local power supply.
On safety
• The unit is not disconnected from the AC
power source (mains) as long as it is
connected to the wall socket, even if the unit
itself has been turned off.
• Completely disconnect the power cord (mains
lead) from the wall socket (mains) if it is not
going to be used for an extended period of
time. When unplugging the unit, always grip
the plug. Never pull the cord itself.
• Should any solid object or liquid get into the
system, unplug the system, and have it
checked by qualified personnel before
operating it again.
• The AC power cord can be changed only by a
qualified service facility.

99
Additional Information
On placement
• Do not place the system in an inclined
position or in locations that are extremely hot,
cold, dusty, dirty, or humid or lacking
adequate ventilation, or subject to vibration,
direct sunlight or a bright light.
• Be careful when placing the unit or speakers
on surfaces that have been specially treated
(for example, with wax, oil, polish) as staining
or discoloration of the surface may result.
• If the system is brought directly from a cold to
a warm location or is placed in a very damp
room, moisture may condense on the lens
inside the unit, and cause the system to
malfunction. In this situation, remove the
disc, and leave the system turned on for about
an hour until the moisture evaporates.
On heat buildup
• Heat buildup on the unit during operation is
normal and is not a cause for alarm.
• Do not touch the cabinet if it has been used
continuously at a high volume because the
cabinet may have become hot.
• Do not obstruct the ventilation holes.
On the speaker system
The front speakers, center speaker and
subwoofer are magnetically shielded to allow it
to be installed near a TV set. However, color
irregularity may still be observed on the TV
screen depending on the type of your TV set. In
this situation, turn off the TV, wait 15 to 30
minutes, and turn it back on. If there is no
improvement, move the speakers far away from
the TV.
Cleaning the cabinet
Clean this system with a soft cloth slightly
moistened with a mild detergent solution. Do
not use any type of abrasive pad, scouring
powder, or solvent, such as thinner, benzine, or
alcohol.
To prevent a tape from being
accidentally recorded over
Break off the tape’s overwrite protection tab
from side A or B as illustrated.
To later reuse the tape for recording, cover the
broken tab with adhesive tape.
About a tape longer than 90 minutes
The use of the tape with more than 90 minutes
of play time is not recommended except for
long, continuous recording or playback.
Cleaning the tape heads
Use a dry- or wet-type cleaning cassette
(available separately) after every 10 hours of
use, before you start an important recording, or
after playing an old tape. Failure to clean the
tape heads can cause degraded sound quality or
an inability of the unit to record or play tapes.
For details, refer to the instructions of the
cleaning cassette.
IMPORTANT NOTICE
Caution: If you leave a still video image
or on-screen display image displayed on
your TV for an extended period of time via
this system, you risk permanent damage to
your TV screen. Projection TVs are
especially susceptible to this.
Break off the
tape tab

100
Specifications
Amplifier section
The following are measured at AC 120, 127,
220, 240V 50/60 Hz
Power Output (rated):
130 W + 130 W (6 , 1 kHz, 1% THD)
RMS output power (reference)
Front speaker:
215 W + 215 W (per channel at 6 ,
1 kHz, 10% THD)
Center speaker:
85 W (per channel at 6 , 1 kHz,
10% THD)
Surround speaker:
90 W + 90 W (per channel at 6 ,
1 kHz, 10% THD)
Subwoofer:
210 W (per channel at 8 , 100 Hz,
10% THD)
Inputs
VIDEO IN:
VIDEO: 1 Vp-p, 75 ohms
AUDIO L/R: Voltage 250 mV,
impedance 47 kilohms
TV/SAT AUDIO IN L/R:
Voltage 250 mV/450 mV, impedance
47 kilohms
MIC 1 or 2:
Sensitivity 1 mV, impedance
10 kilohms
(USB) port:
Type A
Outputs
AUDIO OUT L/R:
Voltage 250 mV, impedance 1 kilohm
VIDEO OUT:
Max. output level 1 Vp-p, unbalanced,
Sync. negative load impedance
75 ohms
COMPONENT VIDEO OUT:
Y: 1 Vp-p, 75 ohms
PB/CB: 0.7 Vp-p, 75 ohms
PR/CR: 0.7 Vp-p, 75 ohms
S VIDEO OUT:
Y: 1 Vp-p, unbalanced, Sync. negative
C: 0.286 Vp-p, load impedance
75 ohms
PHONES:
accepts headphones of 8 ohms or more
USB section
Supported bit rate
MP3 (MPEG 1 Audio Layer 3):
32 – 320 kbps
WMA: 48 – 192 kbps
AAC: 48 – 320 kbps
Sampling frequencies
MP3 (MPEG 1 Audio Layer 3):
32/44.1/48 kHz
WMA: 44.1 kHz
AAC: 44.1 kHz
Transfer speed
Full-Speed
Supported USB device
Mass Storage Class
Maximum current
500 mA
Disc player section
System
Compact disc and digital audio and
video system
Laser Diode Properties
Emission Duration: Continuous
Laser Output*: Less than 44.6 W
* This output is the value measurement
at a distance of 200 mm from the
objective lens surface on the Optical
Pick-up Block with 7 mm aperture.
Frequency response
DVD (PCM 48 kHz): 2 Hz – 22 kHz
(±1 dB)
CD: 2 Hz – 20 kHz (±0.5 dB)
Video color system format
NTSC and PAL

101
Additional Information
Tape deck section
Recording system
4-track 2-channel stereo
Frequency response
50 – 13,000 Hz (±3 dB),
using Sony TYPE I tape
Tuner section
FM stereo, FM/AM superheterodyne tuner
FM tuner section
Tuning range
87.5 – 108.0 MHz (50 kHz step)
Antenna
FM lead antenna
Antenna terminals
75 ohms unbalanced
Intermediate frequency
10.7 MHz
AM tuner section
Tuning range
Saudi Arabian model:
531 – 1,602 kHz (with the interval set
at 9 kHz)
Other models:
531 – 1,602 kHz (with the interval set
at 9 kHz)
530 – 1,610 kHz (with the interval set
at 10 kHz)
Antenna
AM loop antenna
Antenna terminals
External antenna terminal
Intermediate frequency
450 kHz
Speaker
Front speaker (SS-GN1300D)
Speaker system
2-way, 2-driver, Bass reflex,
magnetically shielded
Speaker unit
Woofer: 200 mm, cone type
Tweeter: 25 mm, horn type
Rated impedance
6 ohms
Dimensions (w/h/d)
Approx. 280 × 401 × 325 mm
Mass
Approx. 6.9 kg net per speaker
Surround speaker (SS-RSX1300D)
Speaker system
2-way, 2-driver, Bass reflex
Speaker unit
Woofer: 100 mm, cone type
Tweeter: 40 mm, piezo type
Rated impedance
6 ohms
Dimensions (w/h/d)
Approx. 180 × 401 × 225 mm
Mass
Approx. 3.0 kg net per speaker
Center Speaker (SS-CT1300D)
Speaker system
Full range, 2-driver, Bass reflex,
magnetically shielded
Speaker unit
Full range, 80 mm, cone type × 2
Rated Impedance
6 ohms
Dimensions (w/h/d)
Approx. 268 × 107 × 117 mm
Mass
Approx. 1.6 kg
Continued
l

102
Subwoofer (SS-WGV1300D)
Subwoofer system
1-way, 1-driver, Bass reflex,
magnetically shielded
Speaker unit
Subwoofer: 250 mm, cone type
Rated impedance
8 ohms
Dimensions (w/h/d)
Approx. 401 × 366 × 355 mm
Mass
Approx. 8.5 kg
General
Power requirements
Saudi Arabian model: 120 – 127 V,
220 V or 230 – 240 V AC, 50/60 Hz,
adjustable with voltage selector
Other models: 120 V, 220 V or
230 – 240 V AC, 50/60 Hz, adjustable
with voltage selector
Power consumption
365 W
Dimensions (w/h/d) (Approx.)
295 × 380 × 457 mm
Mass (Approx.)
17.5 kg
Supplied accessories:
Remote Commander (1)
R6 (size AA) batteries (2)
AM loop antenna (1)
FM lead antenna (1)
Video cord (1)
Front speaker pads (8)
Surround speaker pads (8)
Center speaker pads (4)
Subwoofer pads (4)
Microphone (1) (Philippine models
only)
Design and specifications are subject to
change without notice.
• Standby power consumption: 0.5 W
• Halogenated flame retardants are not
used in the certain printed wiring boards.
Termékspecifikációk
| Márka: | Sony |
| Kategória: | hi-fi rendszer |
| Modell: | MHC-GN1300D |
Szüksége van segítségre?
Ha segítségre van szüksége Sony MHC-GN1300D, tegyen fel kérdést alább, és más felhasználók válaszolnak Önnek
Útmutatók hi-fi rendszer Sony

16 Január 2025
23 December 2024
23 December 2024
30 Szeptember 2024
13 Szeptember 2024
1 Szeptember 2024
31 Augusztus 2024
29 Augusztus 2024
28 Augusztus 2024
28 Augusztus 2024
Útmutatók hi-fi rendszer
- hi-fi rendszer Samsung
- hi-fi rendszer Yamaha
- hi-fi rendszer Sharkoon
- hi-fi rendszer Nedis
- hi-fi rendszer LG
- hi-fi rendszer Grundig
- hi-fi rendszer Marantz
- hi-fi rendszer Philips
- hi-fi rendszer Pioneer
- hi-fi rendszer Kärcher
- hi-fi rendszer Olympus
- hi-fi rendszer Oregon Scientific
- hi-fi rendszer SilverCrest
- hi-fi rendszer Garmin
- hi-fi rendszer RCF
- hi-fi rendszer Panasonic
- hi-fi rendszer JVC
- hi-fi rendszer AEG
- hi-fi rendszer Sharp
- hi-fi rendszer Harman Kardon
- hi-fi rendszer Nokia
- hi-fi rendszer Sven
- hi-fi rendszer Oppo
- hi-fi rendszer Hyundai
- hi-fi rendszer Saramonic
- hi-fi rendszer Medion
- hi-fi rendszer Onkyo
- hi-fi rendszer Motorola
- hi-fi rendszer Geemarc
- hi-fi rendszer Vimar
- hi-fi rendszer Technics
- hi-fi rendszer Roland
- hi-fi rendszer JBL
- hi-fi rendszer Camry
- hi-fi rendszer DAP-Audio
- hi-fi rendszer GoGen
- hi-fi rendszer Boss
- hi-fi rendszer Crestron
- hi-fi rendszer Cyrus
- hi-fi rendszer Tripp Lite
- hi-fi rendszer Vivax
- hi-fi rendszer Thomson
- hi-fi rendszer Klipsch
- hi-fi rendszer Technaxx
- hi-fi rendszer Aiwa
- hi-fi rendszer Speco Technologies
- hi-fi rendszer Kenwood
- hi-fi rendszer Rega
- hi-fi rendszer Duronic
- hi-fi rendszer Netgear
- hi-fi rendszer Huawei
- hi-fi rendszer Asus
- hi-fi rendszer Jabra
- hi-fi rendszer Vtech
- hi-fi rendszer Clatronic
- hi-fi rendszer Arturia
- hi-fi rendszer Hama
- hi-fi rendszer PEAQ
- hi-fi rendszer ELAC
- hi-fi rendszer Zoom
- hi-fi rendszer Korg
- hi-fi rendszer Sencor
- hi-fi rendszer GPX
- hi-fi rendszer Focusrite
- hi-fi rendszer Polsen
- hi-fi rendszer Bose
- hi-fi rendszer M-Audio
- hi-fi rendszer AOC
- hi-fi rendszer Lowrance
- hi-fi rendszer Hitachi
- hi-fi rendszer BeamZ
- hi-fi rendszer Continental Edison
- hi-fi rendszer Telefunken
- hi-fi rendszer Nevir
- hi-fi rendszer Sennheiser
- hi-fi rendszer Cambridge
- hi-fi rendszer Monster
- hi-fi rendszer Alpine
- hi-fi rendszer Acoustic Solutions
- hi-fi rendszer Roadstar
- hi-fi rendszer Kiloview
- hi-fi rendszer Omnitronic
- hi-fi rendszer Logitech
- hi-fi rendszer SPL
- hi-fi rendszer Pro-Ject
- hi-fi rendszer TOA
- hi-fi rendszer SVS
- hi-fi rendszer Cobra
- hi-fi rendszer Nextbase
- hi-fi rendszer Scosche
- hi-fi rendszer Crunch
- hi-fi rendszer Sonoro
- hi-fi rendszer Denver
- hi-fi rendszer Dynaudio
- hi-fi rendszer Smart-AVI
- hi-fi rendszer Bush
- hi-fi rendszer Power Dynamics
- hi-fi rendszer Trevi
- hi-fi rendszer Memphis Audio
- hi-fi rendszer Elta
- hi-fi rendszer Audio-Technica
- hi-fi rendszer NGS
- hi-fi rendszer Konig & Meyer
- hi-fi rendszer Daewoo
- hi-fi rendszer Lenoxx
- hi-fi rendszer Dali
- hi-fi rendszer Gembird
- hi-fi rendszer Denon
- hi-fi rendszer ATen
- hi-fi rendszer Muse
- hi-fi rendszer Energy Sistem
- hi-fi rendszer Native Instruments
- hi-fi rendszer OK
- hi-fi rendszer Honor
- hi-fi rendszer Electro-Voice
- hi-fi rendszer JL Audio
- hi-fi rendszer SPC
- hi-fi rendszer Sanus
- hi-fi rendszer Auna
- hi-fi rendszer Mac Audio
- hi-fi rendszer Behringer
- hi-fi rendszer TriStar
- hi-fi rendszer Loewe
- hi-fi rendszer Chord
- hi-fi rendszer Lotronic
- hi-fi rendszer Terratec
- hi-fi rendszer DreamGEAR
- hi-fi rendszer Electro Harmonix
- hi-fi rendszer Shure
- hi-fi rendszer PreSonus
- hi-fi rendszer Steelseries
- hi-fi rendszer Manhattan
- hi-fi rendszer Tannoy
- hi-fi rendszer Plantronics
- hi-fi rendszer Peavey
- hi-fi rendszer Marshall
- hi-fi rendszer Velleman
- hi-fi rendszer Universal Audio
- hi-fi rendszer Morel
- hi-fi rendszer Russound
- hi-fi rendszer Teac
- hi-fi rendszer Clarion
- hi-fi rendszer Scott
- hi-fi rendszer TC Helicon
- hi-fi rendszer Røde
- hi-fi rendszer Monacor
- hi-fi rendszer MXL
- hi-fi rendszer Anthem
- hi-fi rendszer IK Multimedia
- hi-fi rendszer McIntosh
- hi-fi rendszer Sony Ericsson
- hi-fi rendszer ION
- hi-fi rendszer LD Systems
- hi-fi rendszer Jamo
- hi-fi rendszer Blaupunkt
- hi-fi rendszer NAD
- hi-fi rendszer Sagem
- hi-fi rendszer Razer
- hi-fi rendszer Samson
- hi-fi rendszer Logik
- hi-fi rendszer Mackie
- hi-fi rendszer Vonyx
- hi-fi rendszer Alto
- hi-fi rendszer Infinity
- hi-fi rendszer Walrus Audio
- hi-fi rendszer Magnat
- hi-fi rendszer Bang & Olufsen
- hi-fi rendszer AKAI
- hi-fi rendszer Konig
- hi-fi rendszer Marmitek
- hi-fi rendszer TechniSat
- hi-fi rendszer Fenton
- hi-fi rendszer Jensen
- hi-fi rendszer Pyle
- hi-fi rendszer Audioengine
- hi-fi rendszer Rolls
- hi-fi rendszer Salora
- hi-fi rendszer Musical Fidelity
- hi-fi rendszer DataVideo
- hi-fi rendszer Lenco
- hi-fi rendszer Atlona
- hi-fi rendszer Watson
- hi-fi rendszer Schneider
- hi-fi rendszer Audizio
- hi-fi rendszer Brandson
- hi-fi rendszer ECG
- hi-fi rendszer NACON
- hi-fi rendszer Victrola
- hi-fi rendszer Best Buy
- hi-fi rendszer Fender
- hi-fi rendszer Majority
- hi-fi rendszer Rotel
- hi-fi rendszer Bowers & Wilkins
- hi-fi rendszer Franklin
- hi-fi rendszer KEF
- hi-fi rendszer NEC
- hi-fi rendszer Audiolab
- hi-fi rendszer Atlas Sound
- hi-fi rendszer AKG
- hi-fi rendszer AudioControl
- hi-fi rendszer Soundmaster
- hi-fi rendszer Monitor Audio
- hi-fi rendszer Steinberg
- hi-fi rendszer Technical Pro
- hi-fi rendszer Siig
- hi-fi rendszer Rockford Fosgate
- hi-fi rendszer Krüger&Matz
- hi-fi rendszer Dual
- hi-fi rendszer Cardo
- hi-fi rendszer Canton
- hi-fi rendszer WAGAN
- hi-fi rendszer RCA
- hi-fi rendszer Vocopro
- hi-fi rendszer Imperial
- hi-fi rendszer Kicker
- hi-fi rendszer Creative
- hi-fi rendszer DBX
- hi-fi rendszer Sangean
- hi-fi rendszer Topcom
- hi-fi rendszer PowerBass
- hi-fi rendszer Focal
- hi-fi rendszer MB Quart
- hi-fi rendszer IFi Audio
- hi-fi rendszer OneConcept
- hi-fi rendszer ILive
- hi-fi rendszer Auvi
- hi-fi rendszer Tascam
- hi-fi rendszer Homedics
- hi-fi rendszer Arcam
- hi-fi rendszer FiiO
- hi-fi rendszer House Of Marley
- hi-fi rendszer Sound Devices
- hi-fi rendszer Geneva
- hi-fi rendszer Majestic
- hi-fi rendszer Reflexion
- hi-fi rendszer Teufel
- hi-fi rendszer Crosley
- hi-fi rendszer DPA
- hi-fi rendszer REVO
- hi-fi rendszer Advance Acoustic
- hi-fi rendszer MoFi
- hi-fi rendszer CSL
- hi-fi rendszer BSS Audio
- hi-fi rendszer HK Audio
- hi-fi rendszer SWIT
- hi-fi rendszer RGBlink
- hi-fi rendszer KanexPro
- hi-fi rendszer Key Digital
- hi-fi rendszer Glide Gear
- hi-fi rendszer Hosa
- hi-fi rendszer Kramer
- hi-fi rendszer ART
- hi-fi rendszer Music Hall
- hi-fi rendszer Ade
- hi-fi rendszer Altec Lansing
- hi-fi rendszer American Audio
- hi-fi rendszer Audison
- hi-fi rendszer Caliber
- hi-fi rendszer Exibel
- hi-fi rendszer Gemini
- hi-fi rendszer Vision
- hi-fi rendszer Sonos
- hi-fi rendszer Brigmton
- hi-fi rendszer Sunstech
- hi-fi rendszer Sonance
- hi-fi rendszer Swissvoice
- hi-fi rendszer Marquant
- hi-fi rendszer AudioAffairs
- hi-fi rendszer Magnum
- hi-fi rendszer Steren
- hi-fi rendszer Polk
- hi-fi rendszer Audiosonic
- hi-fi rendszer Coby
- hi-fi rendszer Envivo
- hi-fi rendszer Galaxy Audio
- hi-fi rendszer Bigben Interactive
- hi-fi rendszer Pure
- hi-fi rendszer Apogee
- hi-fi rendszer Pyle Pro
- hi-fi rendszer Autotek
- hi-fi rendszer Bigben
- hi-fi rendszer Massive
- hi-fi rendszer IDance
- hi-fi rendszer Laser
- hi-fi rendszer Alba
- hi-fi rendszer Naxa
- hi-fi rendszer QTX
- hi-fi rendszer Boston Acoustics
- hi-fi rendszer Mpman
- hi-fi rendszer Vizio
- hi-fi rendszer Nikkei
- hi-fi rendszer Ematic
- hi-fi rendszer ESI
- hi-fi rendszer Anchor Audio
- hi-fi rendszer Audio Pro
- hi-fi rendszer Superior
- hi-fi rendszer Kunft
- hi-fi rendszer Quantis
- hi-fi rendszer Bluesound
- hi-fi rendszer Irradio
- hi-fi rendszer Karcher Audio
- hi-fi rendszer Cmx
- hi-fi rendszer Revox
- hi-fi rendszer Comica
- hi-fi rendszer Audient
- hi-fi rendszer Paradigm
- hi-fi rendszer Bluetrek
- hi-fi rendszer Starkey
- hi-fi rendszer PAC
- hi-fi rendszer Skytec
- hi-fi rendszer Luxman
- hi-fi rendszer Stereoboomm
- hi-fi rendszer Tivoli Audio
- hi-fi rendszer Senal
- hi-fi rendszer Wolfgang
- hi-fi rendszer Numan
- hi-fi rendszer Iluv
- hi-fi rendszer Ibiza Sound
- hi-fi rendszer Nxg
- hi-fi rendszer Lynx
- hi-fi rendszer Solid State Logic
- hi-fi rendszer HiFi ROSE
- hi-fi rendszer OSD Audio
- hi-fi rendszer Andover
- hi-fi rendszer Mark Levinson
- hi-fi rendszer Auto-T
- hi-fi rendszer RME
- hi-fi rendszer Soundstream
- hi-fi rendszer Xoro
- hi-fi rendszer Adastra
- hi-fi rendszer Block
- hi-fi rendszer Avante
- hi-fi rendszer Shokz
- hi-fi rendszer JB Systems
- hi-fi rendszer Orbitsound
- hi-fi rendszer HUMANTECHNIK
- hi-fi rendszer Hercules
- hi-fi rendszer Primare
- hi-fi rendszer Sonifex
- hi-fi rendszer Griffin
- hi-fi rendszer Xantech
- hi-fi rendszer Ferguson
- hi-fi rendszer Eissound
- hi-fi rendszer Extron
- hi-fi rendszer ClearOne
- hi-fi rendszer Ebode
- hi-fi rendszer Werma
- hi-fi rendszer Motu
- hi-fi rendszer Devialet
- hi-fi rendszer Mission
- hi-fi rendszer Teradek
- hi-fi rendszer TCM
- hi-fi rendszer Crown
- hi-fi rendszer Zvox
- hi-fi rendszer Antelope Audio
- hi-fi rendszer CE Labs
- hi-fi rendszer Z CAM
- hi-fi rendszer Avid
- hi-fi rendszer Icon
- hi-fi rendszer Mtx Audio
- hi-fi rendszer General Electric
- hi-fi rendszer Aquatic AV
- hi-fi rendszer Parasound
- hi-fi rendszer Promate
- hi-fi rendszer SoundCast
- hi-fi rendszer Hollyland
- hi-fi rendszer Boytone
- hi-fi rendszer Astell&Kern
- hi-fi rendszer TV One
- hi-fi rendszer Maretron
- hi-fi rendszer Xact
- hi-fi rendszer Ruark Audio
- hi-fi rendszer Magnavox
- hi-fi rendszer Esoteric
- hi-fi rendszer ANT
- hi-fi rendszer Leviton
- hi-fi rendszer Rane
- hi-fi rendszer ESX
- hi-fi rendszer NUVO
- hi-fi rendszer JK Audio
- hi-fi rendszer Lexicon
- hi-fi rendszer Fluance
- hi-fi rendszer Altra
- hi-fi rendszer On-Q
- hi-fi rendszer Vantage Point
- hi-fi rendszer Planet Audio
- hi-fi rendszer Fluid
- hi-fi rendszer IFi
- hi-fi rendszer Goodis
- hi-fi rendszer E-bench
- hi-fi rendszer Roon
- hi-fi rendszer Voco
- hi-fi rendszer Linear
- hi-fi rendszer SSV Works
- hi-fi rendszer DAP
- hi-fi rendszer Vankyo
- hi-fi rendszer Glorious
- hi-fi rendszer CAD Audio
- hi-fi rendszer The Box
- hi-fi rendszer AmpliVox
- hi-fi rendszer Audiofrog
- hi-fi rendszer WyreStorm
- hi-fi rendszer Accsoon
- hi-fi rendszer Juke Audio
- hi-fi rendszer Meridian
- hi-fi rendszer DiGiGrid
- hi-fi rendszer CLXmusic
- hi-fi rendszer Nuheara
- hi-fi rendszer Metric Halo
- hi-fi rendszer Universal Remote Control
- hi-fi rendszer Prism Sound
- hi-fi rendszer Antelope
- hi-fi rendszer Switchcraft
- hi-fi rendszer Digigram
- hi-fi rendszer Defender
- hi-fi rendszer Titanwolf
- hi-fi rendszer Liam&Daan
- hi-fi rendszer Aplic
- hi-fi rendszer Crystal Video
- hi-fi rendszer Atoll
- hi-fi rendszer Bennett & Ross
- hi-fi rendszer INKEE
- hi-fi rendszer Vaxis
Legújabb útmutatók hi-fi rendszer

9 Április 2025

6 Április 2025

2 Április 2025
1 Április 2025
31 Március 2025
29 Március 2025
29 Március 2025
29 Március 2025
29 Március 2025
29 Március 2025