Használati útmutató Snom D717
Snom
irodai telefon
D717
Olvassa el alább 📖 a magyar nyelvű használati útmutatót Snom D717 (124 oldal) a irodai telefon kategóriában. Ezt az útmutatót 5 ember találta hasznosnak és 2 felhasználó értékelte átlagosan 4.5 csillagra
Oldal 1/124

IP Phone D717
User Manual

2
TABLE OF CONTENTS
Copyright, Trademarks, GPL, Legal Disclaimers 7 ...........................................................
Important information 8 ......................................................................................................
Safety instructions 8 .................................................................................................................
Standards conformance 8 ........................................................................................................
Product specifications 9 ...........................................................................................................
Disposal of the device 9 ............................................................................................................
Cleaning 9 ....................................................................................................................................
Setting up the phone 10 ......................................................................................................
Delivery Content 10 ....................................................................................................................
Attaching footstand and handset .......................................................................................10
Wall mounting 11 .......................................................................................................................
Rotating the tab of the cradle 11 .............................................................................................
Connecting the phone 12 ..........................................................................................................
Connecting a headset ............................................................................................................13
Initializing and registering the phone 14 ...............................................................................
Prerequisites 14 ....................................................................................................................
Initialization 14 ......................................................................................................................
What to do if initialization and registration are unsuccessful 16 ................................
Correcting the clock 17 ........................................................................................................
Getting to know your phone 18 ..........................................................................................
At a glance 18 .............................................................................................................................
LED indicators 20 .......................................................................................................................
Call indicator 20 ....................................................................................................................
Function key LEDs 20 ...........................................................................................................
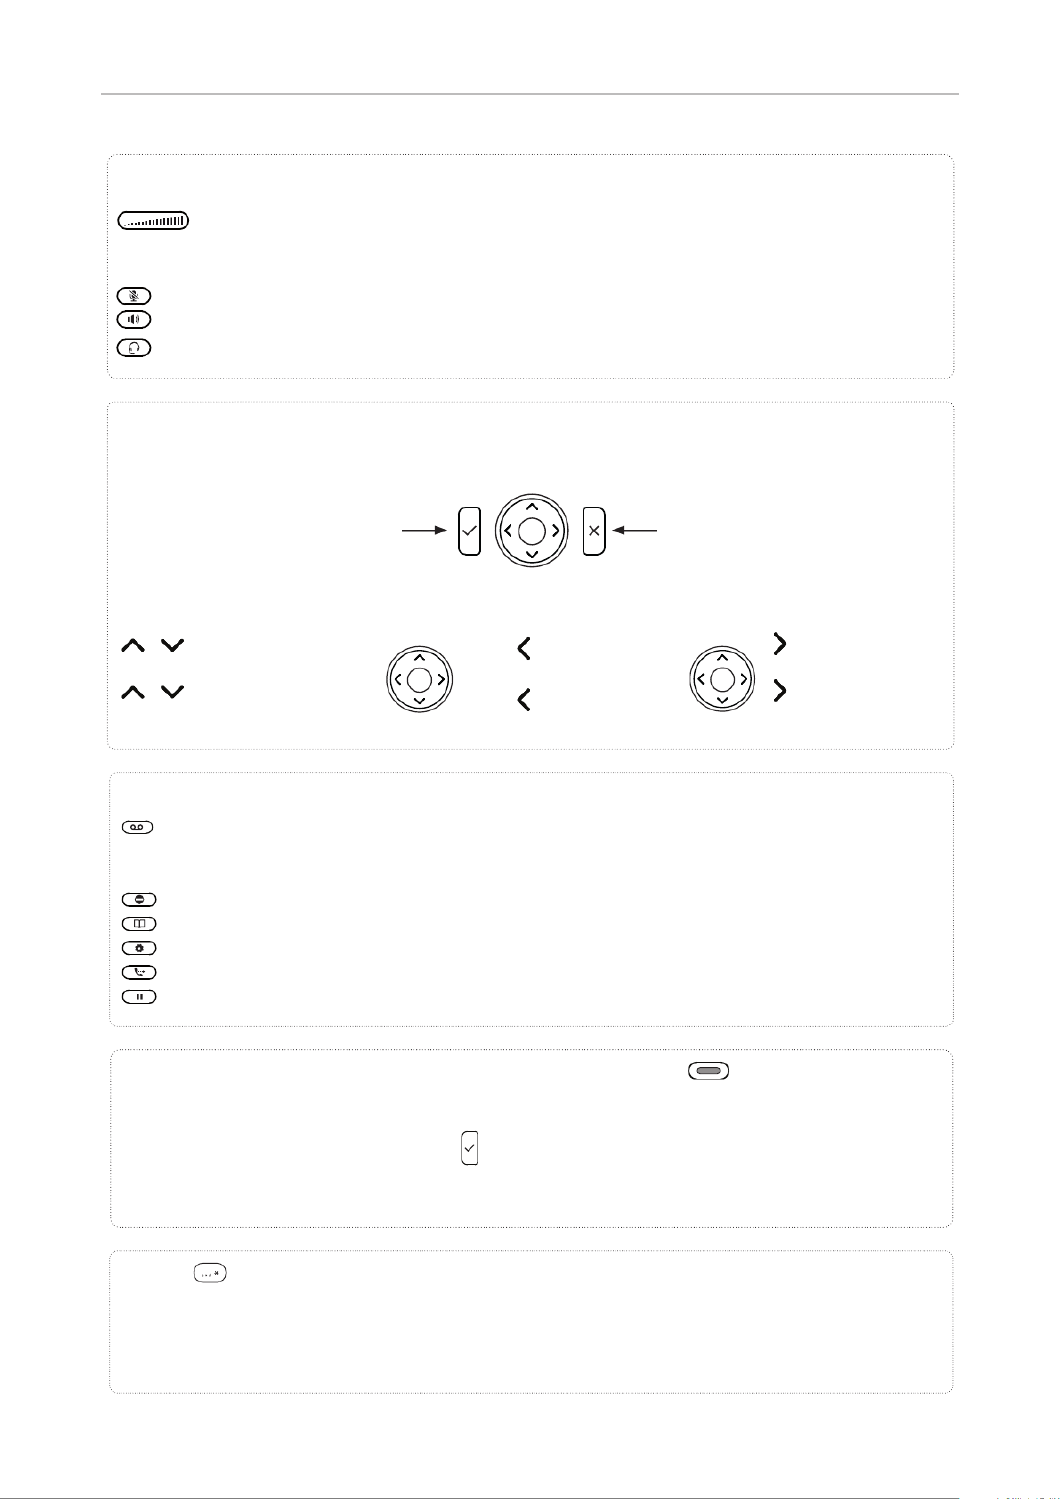
Hard keys 21 ...............................................................................................................................
Context-sensitive, programmable function keys 21 ......................................................
Navigation, confirmation, and cancel keys 21 .................................................................
Preprogrammed, variably programmable function keys 21 ........................................
Audio control keys 22 ...........................................................................................................
SmartLabel keys (freely programmable function keys with LEDs) 22 .......................
Alphanumeric Keypad 23 ....................................................................................................
Input modes and navigation 23 ....................................................................................
Entering numerals, letters, special characters, and symbols 24 ..........................
Display layout 25 ........................................................................................................................
In idle mode 25 ......................................................................................................................
When the phone is active 27 ...............................................................................................

3
Settings 28 ...................................................................................................................................
Phone settings 28 .................................................................................................................
Settings available in administrator mode 28 .............................................................
Settings available in user mode 30 .............................................................................
Display settings 31 ...............................................................................................................
Adjusting the backlight on the phone's display 31 ...................................................
Adjusting display settings for connected D7s 33 ......................................................
The phone's web interface 36 .............................................................................................
Opening the web interface 37 .......................................................................................
How the web interface works 38 ..................................................................................
User mode/administrator mode 39 ........................................................................................
Directories 41 ......................................................................................................................
Directory 41 .................................................................................................................................
Definitions, explanations 41 ...............................................................................................
Directory entries 41 ........................................................................................................
Contact Types .............................................................................................................42
Outgoing identity 42 ........................................................................................................
Group 42 ............................................................................................................................
Ringtones 42 ..........................................................................................................................
Adding/Editing Entries on the Phone 43 ..........................................................................
Adding new entry manually 43 .....................................................................................
Adding new entry from call list 43 ...............................................................................
Adding current caller 44 ................................................................................................
Sorting entries 44 ...........................................................................................................
Editing existing entry 44 ................................................................................................
Deleting an entry 44 .......................................................................................................
Adding/editing entries on the web interface 45 .............................................................
Adding new entry 45 .......................................................................................................
Editing an entry 46 ..........................................................................................................
Deleting entry on web interface 48 ..............................................................................
Dialing from phone directory 48 ........................................................................................
Deleting whole directory 48 ................................................................................................
Importing/Exporting Directory 48 .....................................................................................
External directories ..............................................................................................................48
LDAP 48 ..................................................................................................................................
Contacts 48 ............................................................................................................................

4
Using the phone 50 .............................................................................................................
Making calls 50 ...........................................................................................................................
Selecting identity for current outgoing call 50 ...............................................................
Using dierent audio devices 50 .......................................................................................
Handset ........................................................................................................................50
Headset 50 ........................................................................................................................
Speakerphone 50 ............................................................................................................
Handset or headset and casing speaker 50 ...............................................................
Using dierent dialing methods 51 ...................................................................................
Auto dial 51 .......................................................................................................................
Redialing 51 ......................................................................................................................
Calling number from call history (missed, received, dialed calls) 51 ...................
Calling number from phone directory 52 ...................................................................
Calling number from external directory 52 ...............................................................
Speed dialing 53 ..............................................................................................................
Calling emergency numbers 53 ...................................................................................
Call completion 53 ..........................................................................................................
QuickLookup (number guessing/auto completion) 54 .............................................
Accepting calls 55 ......................................................................................................................
Using dierent audio devices 55 .....................................................................................
Automatically accepting calls 55 .......................................................................................
Call pick-up from another extension 55 ...........................................................................
Call waiting 56 .......................................................................................................................
Active calls 58 .............................................................................................................................
Hold 58 ....................................................................................................................................
Conference 59 .......................................................................................................................
Transferring calls 60 ............................................................................................................
Attended transfer 60 ......................................................................................................
Blind transfer 61 .............................................................................................................
Terminating calls 63 ..................................................................................................................
Missed calls 63 ...........................................................................................................................
Call lists 64 ..................................................................................................................................
Locking and unlocking the keyboard 65 ................................................................................
Rejecting or redirecting incoming calls ............................................................................65
Manually 65 ............................................................................................................................
Automatically ...................................................................................................................66
Rejecting anonymous calls ............................................................................................66

5
Call forwarding 67 .....................................................................................................................
Making/changing the settings on the phone and turning on call forwarding 68 .....
Turning o call forwarding 68 ............................................................................................
Turning forwarding of all calls on/o with a function key 69 ......................................
Configuring the function keys 70 .......................................................................................
Function key types on Snom phones 70 ................................................................................
Programming the function keys 72 ........................................................................................
Function key settings on the phone 72 .............................................................................
Context-sensitive keys 72 ..............................................................................................
Dedicated keys 74 ...........................................................................................................
SmartLabel keys 75 ........................................................................................................
Expansion module keys 76 ............................................................................................
Programming the function keys on the phone's web interface ..............................77
Configuration of function keys 77 ................................................................................
Key assignment page 78 ................................................................................................
Selected examples for function key programming 79 ..................................................
Example 1, Extension monitoring and call pick-up 80 .............................................
Example 2, Extension monitoring and call pick-up on D7 expansion module 81
Example 3, Speed dialing 82 .........................................................................................
Example 4, Changing setting of context-sensitive key 83 .......................................
Display options for SmartLabel keys 84 ..........................................................................
Settings on the phone 84 ...............................................................................................
Settings on the web interface 86 .................................................................................
Customizing the phone settings 87 ...................................................................................
Identities/accounts 87 ...............................................................................................................
Configuring and editing identity/account 87 ...................................................................
Assigning ringtones 89 ........................................................................................................
Date and time formats 90 .........................................................................................................
Date 90 ....................................................................................................................................
Time 91 ...................................................................................................................................
Time zone 91 ...............................................................................................................................
Language settings of phone and web interface ..............................................................92
Phone language 92 ...............................................................................................................
Web interface language 93 .................................................................................................
Dial tones 93 ...............................................................................................................................
Emergency numbers 93 ............................................................................................................
Keyboard locking 94 ..................................................................................................................
Setting a PIN for locking and unlocking 94 ......................................................................
Allow/disallow keyboard locking 95 .................................................................................
Automatic keyboard locking after inactivity 95 ..............................................................

6
Call forwarding 96 .....................................................................................................................
Call completion 97 .....................................................................................................................
Call waiting 98 ............................................................................................................................
Hiding my caller ID 99 ...............................................................................................................
Rejecting anonymous calls 100 ..............................................................................................
QuickLookup (number guessing/auto completion) 100 .....................................................
Speed dial 101 ...........................................................................................................................
Auto dial ............................................................................................................................... 102
Auto dial target ................................................................................................................... 103
Software update ........................................................................................................... 104
Manual update 104 ....................................................................................................................
Auto provisioning 104 ...............................................................................................................
Troubleshooting 105 ...........................................................................................................
Reboot 105 ..................................................................................................................................
Hard reboot 105 .........................................................................................................................
Reset to factory values 105 .....................................................................................................
TFTP Update 105 .......................................................................................................................
Manual initialization 105 ..........................................................................................................
Contacting Snom Support 106 ................................................................................................
Traces ................................................................................................................................... 106
Appendix 1 - Display Symbols and Icons 108 ...................................................................
Symbols found in the function key line 108 .........................................................................
SmartLabel function symbols 110 .........................................................................................
Display indications 112 ............................................................................................................
Appendix 2 - Status Messages 113 .....................................................................................
Appendix 3 - Wall Mounting 114 ..........................................................................................
Appendix 4 - Programmable Functions 115 .....................................................................
Freely programmable functions 115 .....................................................................................
Key Events 119 ...........................................................................................................................
Appendix 5 - GNU General Public License 121 ...................................................................

7
D717 User Manual Copyright, Trademarks, GPL, Disclaimers
Copyright, Trademarks, GPL, Legal Disclaimers
© 2020 Snom Technology GmbH
All Rights Reserved.
Snom, the names of Snom products, and Snom logos are trademarks owned by Snom Technology
GmbH. All other product names and names of enterprises are the property of their respective
owners.
Product specifications are subject to change without notice.
Snom Technology GmbH reserves the right to revise and change this document at any time, without
being obliged to announce such revisions or changes beforehand or after the fact.
Texts, images, and illustrations and their arrangement in this document are subject to the protection
of copyrights and other legal rights worldwide. Their use, reproduction, and transmittal to third
parties without express written permission may result in legal proceedings in the criminal courts as
well as civil courts.
When this document is made available on Snom’s web page, Snom Technology GmbH gives its
permission to download and print copies of its content for the intended purpose of using it as a
manual. No parts of this document may be altered, modified or used for commercial purposes without
the express written consent of Snom Technology GmbH.
Although due care has been taken in the compilation and presentation of the information in this
document, the data upon which it is based may have changed in the meantime. Snom therefore
disclaims all warranties and liability for the accurateness, completeness, and currentness of the
information published, except in the case of intention or gross negligence on the part of Snom or
where liability arises due to binding legal provisions.
Our firmware includes some source code that may be used and modified by anyone and everyone
under the GNU Public License (GPL) (see "Appendix 5 - GNU General Public License" on page 121),
provided they, in turn, make it available to everyone else with the same licensing agreement. Please
go to https://www.snom.com/footer/source-code-gpl-open-source/ for the original GPL license and
the source code of components licensed under GPL and used in Snom products.

8
D717 User Manual Safety, Disposal, Cleaning of Product
Important information
Please read the instructions on safety and disposal and on how to set up and use the device before
using it and also give them to other users to read or inform those users of their contents. Save this
manual and do not give the device to third parties without it.
Safety instructions
Follow the instructions in this manual and other applicable documentation of the device.
• If the phone is not supplied with power via an Ethernet cable, use only a power adapter expressly
recommended by Snom Technology (see "Product specifications" on page 9). Other power
supplies may damage or destroy the phone, aect its behavior, or induce noise.
• Avoid placing the cables where people may trip over them or where they may be exposed to
mechanical pressure as this may damage them. If cables or power adapter have been damaged,
disconnect them from the product and use authorized replacements or contact authorized service
personnel.
• This device is for indoor use only! NOT FOR OUTDOOR USE!
• Do not install the device in rooms with high humidity (for example, in bathrooms, laundry rooms,
or damp basements). Do not immerse the device in water and do not spill or pour liquids of any
kind onto or into the device.
• Do not install the device in surroundings at risk for explosions (paint shops, for example). Do not
use the device if you smell gas or other potentially explosive fumes.
• Do not use the device during thunderstorms. Lightning striking the power grid may cause electric
shocks.
• Warning: The handset contains a magnet, and its earpiece may attract small dangerous objects
such as needles or pins. Please ensure before each use that no such objects are present.
SELV (Safety Extra Low Voltage) compliance
Safety status of input/output connections comply with SELV requirements.
Warning: To avoid electric shock, do not connect safety extra-low voltage (SELV)
circuits to telephone-network voltage (TNV) circuits. LAN ports contain SELV circuits,
and PSTN ports contain TNV circuits. Some LAN and PSTN ports both use RJ-45
(8P8C) connectors. Use caution when connecting cables.
Standards conformance
This device complies with the essential health, safety, and environmental requirements of
all relevant European directives.
This phone is FCC Class A verified and meets US health, safety, and environmental standards.

9
D717 User Manual Safety, Disposal, Cleaning of Product
This product meets the applicable Innovation, Science and Economic Development Canada technical
specications.
You can download the declaration of conformity at www.snom.com/conformity.
Unauthorized opening, changing, or modifying the device will cause the warranty to lapse and may
also result in the loss of CE conformity and the FCC certication. In case of malfunction contact
authorized service personnel, your seller, or Snom.
Product specications
• IEC 60950Safety:
• Verication: FCC Class A
• Mark CE
• 2 x IEEE 802.3/1 Gigabit switchEthernet:
• Power: Power over Ethernet (PoE), IEEE 802.3af, Class 2. If PoE is not available, one of the
following power adapters (not included in delivery) can be ordered separately:
◦ EU: Snom power adapter A6, Phihong model PSM10R-050, Snom PN 00004325
◦ US: Snom power adapter A6, Snom PN 00004326
◦ EU: Ten Pao, model S018BAM0500200, Snom PN 00004393
• Connectors:
◦ 2 x RJ45 (Ethernet): 1 x LAN, 1 x PC
◦ 2 x 4P4C for handset and optional wired headset (headset not included)
◦ 1 x 6P6C for Snom EHS Advanced (not included)
◦ 1 x USB 2.0, type A
◦ 1 x coaxial power connector DC 5V (power adapter not included)
Disposal of the device
This device is subject to European Directive 2012/19/EU and may not be disposed of with
general household garbage. If you do not know where you may dispose of the device at
the end of its lifespan, contact your municipality, your local waste management provider,
or your seller.
Cleaning
To clean the device, use an anti-static cloth. Please avoid cleaning liquids as they might damage the
surface or internal electronics of the device.

10
D717 User Manual Setting up the Phone
Setting up the phone
Delivery Content
GNU
General Public License
Quick
Installation
Guide
D717
- Base phone unit
- Footstand
- Handset
- Handset cord
- Ethernet cable
- Quick Installation Guide, GNU General Public Licence
Attaching footstand and handset
The footstand can be attached at two dierent angles: 46° and 28°.
Note: Before attaching the footstand to the phone, plug the long end of the handset
cord into the connector labelled " " on the back of the phone and place the cord in the
cable guide.
1. Place the top of the grooves on the footstand below the slideguides on the back of the phone.
2. Push the footstand upwards onto the slideguides until they lock in place.

11
D717 User Manual Setting up the Phone
3. Plug the short end of the handset cord into the connector on the handset.
4. Place the phone on an even, horizontal surface.
Wall mounting
See "Appendix 3 - Wall Mounting" on page 114.
Rotating the tab of the cradle
The phone is delivered with the tab level with the inner edge of the cradle. If you are going to mount
the phone on a wall, we recommend that you rotate the tab 180°. After rotation, the tip of the tab will
protrude slightly above the edge of the "cradle". The small rectangular hole in the receiver casing ts
perfectly over the now protruding tip, holding the receiver safely in place in the upright position on the
wall.
Fig./Abb. 1 Fig./Abb. 2 Fig./Abb. 3
1. Slide the plastic tab from the cradle (Fig. 1)
2. Rotate the tab 180°.
3. Slide the tab back into the cradle (Fig. 2). The top of the tab now protrudes slightly above the
inner edge of the cradle (Fig. 3), so that it will hold the handset more securely.

12
D717 User Manual Setting up the Phone
Connecting the phone
EHS
(2, 3)
(2, 3)
(1, 2)
(2, 3)
(2, 3)
(1) If PoE not available
(2) Not included in delivery
(3) Optional
The phone can be operated with Power over Ethernet (PoE) provided via the network cable or, if
PoE is not avaible in your network, with the separately available 5V DC power adapter (see "Product
specications" on page 9).
• Plug one end of the Ethernet (network) cable into the RJ45 connector labeled “NET” and the other
one into the network side to establish a data link.
If PoE is not available, insert the plug of the power supply into the connector labeled "5V DC" and
hook up the plug to the wall outlet.
• The second RJ45 connector, labeled “PC”, is for daisy-chaining further Ethernet devices without
the need for a second Ethernet connection line.

13
D717 User Manual Setting up the Phone
Connecting a headset
You can use wired as well as wireless headsets with the phone.
• Wired headsets
If you want to use a wired headset, connect it to the RJ audio jack labeled .
Note: If both a wired and a wireless headset are connected to the phone, incoming calls
will go to the wireless headset.
• Wireless headsets
◦ Connecting the base station of your headset via the Snom EHS Adapter.
1. Connect the plug labeled on the 2xRJ12 cable that came with the Snom EHS D3xx/D785
Adapter to the jack marked on the D717, and the plug labeled to the Snom EHS EHS box
EHS Adapter's RJ12 jack. For more information, see the illustrated EHS Advanced Quick
Installation Guide at http://wiki.snom.com/Accessories/Documentation.
2. Connect the EHS box to the headset's base station with the 2xRJ45 cable also provided
with the Snom Advanced.
3. Connect the 4P4C/4P4C audio cable that came with the headset to the phone's RJ
audio jack labeled . Connect the other end to the headset's base station. For more
information, please refer to the headset's user guide.
◦ Connecting the headset to the phone via a Bluetooth-compatible adapter.
Insert the adapter into the USB port of the phone. See also the Quick Start Guides of the Snom
USB BT and the Snom HS BT or the manual of the third-party headset.
Attention: The default settings for USB headsets are VID=0a12:PID=100d:HOOK=38/1
for 8.7.2.11 and higher.
- If your phone is running an earlier rmware version, enter these parameters manually on
the phone's web interface at > Advanced Audio > > text eld of "Audio parameters". Click
on the question mark
?
to look up the parameters.
- If you are using a dierent headset, whatever the rmware version, enter the parameters
of the headset manually on the phone's web interface at > Advanced Audio > > text eld of
"Audio parameters". Click on the question mark ? to nd out which parameters you need
to use for your respective headset.

14
D717 User Manual Setting up the Phone
Initializing and registering the phone
Prerequisites
To be able to use VoIP, you or your company must have:
• A broadband internet connection.
• Access to the internet via a router. This could be a separate device available in various versions
from many dierent manufacturers or in the form of a router on a server or a PC.
• Account information provided by your network administrator or a VoIP account with a VoIP service
provider who supports the VoIP SIP standard. The phone supports up to 6 VoIP accounts with one
or more VoIP providers.
The registration information received from your Internet service provider or your network
administrator may dier and may contain required and optional data. The required data normally
includes:
• Account (usually the phone number). On Snom phones, an account is called an "identity".
• Registrar
• Password
User name, authentication name, and outbound proxy may also be required. These are settings that
can only be congured on the web interface of the phone after it has been successfully registered. If
your provider or your network provides a mailbox account, that setting is also congured on the web
interface. For more information, see "Identities/accounts" on page 87.
Initialization
Snom phones are plug-and-play. Once the phone is connected to your network, it will begin to
initialize.
Note: Normally the initialization is completely automatic, using DHCP. If the phone
cannot discover a DHCP server in the subnet, you will be asked: Are you using DHCP?
If your network does not support DHCP, press and enter the IP address, netmask, IP
gateway, and DNS server manually. Ask your Internet service provider or your network
administrator for them.
Watch the display and, when asked to, make selections with and on the navigation key
and save with .
1. You will be prompted in English to select a language. Use or to select another language,
if applicable, and press to save the highlighted language.

15
D717 User Manual Setting up the Phone
2. Next, you will be prompted in the language of your choice to select a time zone. This aects the
time shown on your display.
Fig. 1 Fig. 2 Fig. 3
◦ Press or , respectively, on the navigation key to move up or down the list one item at a
time; press the function key underneath or , respectively, to jump to the beginning of
the next or the previous time zone.
◦ Press the function key underneath (Fig. 2) to show only those time zones where the
selected phone language is spoken. If you have selected English, all time zones are shown.
◦ If you have selected a time zone other than English, press the function key underneath to
show all time zones and all countries or cities within the individual time zones, if there are any
(Fig. 3).
◦ Press to save the selected time zone, indicated by the white bar.
3. Next, you will be prompted to select the tone scheme of a country. This aects the dial tone you
hear when you pick up the receiver. Dierent countries use dierent dial tones.
◦ Press or to move up or down the list one item at a time.
◦ Press to jump to the last country on the screen; when the last country is selected, press
to jump to the last country on the next screen.
◦ Press to jump to the rst country on the screen; when the rst country is selected, press
to jump to the rst country on the preceding screen.
◦ Press to save the selected country's tone scheme.
4. The display shows the "Welcome" screen. Press any key to log on.
5. Enter the account number and save with .

16
D717 User Manual Setting up the Phone
Note: See "Entering numerals, letters, special characters, and symbols" on page 24
on how to enter numbers and letters.
6. Enter the registrar and save with .
7. If required, enter the password received from your Internet service provider or administrator and
press .
After successful registration you will see the identity symbol and the registered account (identity)
on the display:
Note: If the account is preceded by or and the phone is not working, the
server may be down, either for servicing or due to a malfunction. The registration and
initialization should be completed as soon as the server is up and running again. You
may want to check with your administrator or your provider if nothing happens within a
reasonable amount of time.
What to do if initialization and registration are unsuccessful
Your network or your VoIP provider may require more login data than requested by the Snom phone
during the initialization and registration process. This data is entered on the web interface of the
phone. Contact your network system administrator or your VoIP provider for more information.
Infobar with date& time
Identity

17
D717 User Manual Setting up the Phone
1. When you have received all necessary data, open the phone’s web interface. See "Opening the
web interface" on page 37 for more information.
2. Open Conguration Identity 1 and enter any additional login information you have received from
your provider. See "Identities/accounts" on page 87 for more information.
Note: A number of IP telephony service providers and a number of SIP PBXs require
settings that are dierent from Snom’s standard factory settings. Snom’s web page
lists numerous providers and PBXs that have been tested for interoperability with
our phones and specic settings that may be required. Do not change the standard
conguration unless you know what you are doing. Expert help may be required.
Correcting the clock
The phone receives the time and date from your NTP time server. If the time and/or date on the
display are incorrect, you may need to set the correct time zone.
• Changing the settings on the phone and on the web interface: See "Time zone" on page 91.
If the time is still incorrect, there may be a problem with the time server. Contact your network
administrator or your IP provider.
Default formats:
• Time. 24-hour clock, e.g. 17:35. Changing to AM and PM formats: See "Time" on page 91.
• Date. US date format MM/DD/YEAR, eg. 11/23/2010. Changing to European format
DD.MM.YEAR, e.g. 23.11.2010: See "Date" on page 90.

18
D717 User Manual Getting to Know Your Phone
Getting to know your phone
At a glance
The factory settings at a glance:
Handset
speaker
Handset
microphone
Casing microphone
Context-sensitive, programmable function symbols and function keys F1 F4 –
Press the function key underneath the display
symbol to activate the function, open the list
etc. depicted by the symbol above the key.
Standard functions available on idle screen. Default settings and
icons depend on rmware installed on phone.
Internal phone directory
Call lists (missed, received, dialled calls)
/ Forwarding all calls (turning CFwd on/o )
Status information (call forwarding active, passwords not
set, missed calls, etc.) or, if no status info,
to show phone's IP address and URL to Snom's Wiki
Call LED
• Blinking fast: Incoming call
• Steady light: Busy or missed call
• Blinking slowly: Call on hold
Outgoing
identity:
F1 F2 F3 F4
Alphanumeric
keypad
Display - idle screen
MWI key with LED
Function keys F1–F4
3 SmartLabel keys
with LEDs
Key P3 - press for 2 sec.
to switch to alternative
display mode
Casing
speaker
Handset
rest tab
19
D717 User Manual Getting to Know Your Phone
MWI key with LED
◦ LED is lit when message is waiting on mailbox (if mailbox supplied on PBX)
◦ Press key to listen to message(s)
Turn DND (do not disturb) on and o . Callers hear the busy signal.
Directory
Settings menu
Transfer
Hold
Dedicated, customizable function keys
Adjusting the volume
◦of the ringer when the phone is idle or ringing
◦ of the handset/casing loudspeaker when in a call
Mute/unmute microphone
Toggling between handsfree and handset mode. Press to dial number and accept calls on speakerphone.
Headset mode on/o
Audio control keys
Star key
• In editing mode:
◦ Press for one second to change input mode (numerals > lower case > upper case)
◦Press briefl y to type *
• On idle screen: Press for 3 seconds to lock/unlock the keypad
Default setting: Line
• Fast-blinking LED: Incoming call. Press key or to accept
• Steadily lit LED: In call
• Slow-blinking LED: Call on hold
SmartLabel keys P1 P3, freely programmable, self-labeling, with LEDs –
Navigation keys
• Confi rming, saving actions & input,
and returning to previous screen
• Accepting calls on speakerphone and
in headset mode
• From idle screen: Dialed calls
(redial)
• Canceling actions & input, and retur-
ning to previous screen
• Terminating calls on speakerphone
and in headset & handset modes
/ From idle screen: Select
outgoing identity
/ In other contexts (settings,
lists): Navigate up/down
From idle screen:
Received calls
In other contexts:
Navigate/space left
From idle screen :
Missed calls
In other contexts:
Navigate/space right

20
D717 User Manual Getting to Know Your Phone
LED indicators
Call indicator
The bright-red LED situated on the top right corner of the phone indicates incoming, ongoing, held,
and missed calls. LED status indications:
• Blinking rapidly when a call is coming in.
• Glowing steadily when dialing, when in a call, and when you have missed a call. To turn the LED
o after a missed call, press the right arrow on the navigation key to view the Missed calls
menu and simultaneously turn o the LED.
• Blinking slowly when you have put a call on hold.
Function key LEDs
SmartLabel keys P1–P3
Depending on the function mapped onto the key, the red or green LEDs on the key will be activated
when the key event occurs. The factory setting is red LED and “line”. The LEDs of a line key will:
• blink rapidly when a call is ringing on the line;
• glow steadily when there is an ongoing call on the line;
• blink slowly when a call is on hold on the line;
• be o when the line is free.
When other functions are mapped onto the keys, the LEDs may glow or blink. For example: When the
"extension" function has been mapped onto a key and monitoring of extensions is enabled on both
phones, the LED will
• blink rapidly when a call is ringing on the extension;
• glow steadily when the extension is busy;
• be o when the extension is not busy
MWI key : Has a red LED that lights up when there is a new message on the mailbox.
Mute key : Has a red LED that lights up when and as long as the microphone is muted.
Speakerphone and headset keys: Have green LEDs that light up when and as long as
speakerphone or headset mode, respectively, are turned on.

21
D717 User Manual Getting to Know Your Phone
Hard keys
Context-sensitive, programmable function keys
These function keys can be programmed on the Function Keys page of the phone's web interface with
a number of key events; these functions will then be available when the phone is in idle mode. For
more information, see "Configuring the function keys" on page 70. For the factory default settings,
see "At a glance" on page 18.
You cannot change the functions that are available when the phone is active, e.g., when you are in a
call, when the phone is ringing, etc. Depending on the activity, dierent functions will be available.
Navigation, confirmation, and cancel keys
can be programmed with the key events available in their drop-down menus. See "Configuring the
function keys" on page 70 for further information. Factory settings:
Navigation key
• On idle screen: Press to select identity for outgoing calls
• In other contexts: Moving up and down lists one item/button at a time
• On idle screen, press to open list of received calls.
• In text fields, press to move the cursor to the left one character at a time.
• On idle screen, press to open the list of missed calls and simultaneously
turn o the missed call LED
• In text fields, press to move the cursor to the right one character at a time.
• On idle screen: Redial (view list of dialed calls).
• Press to accept calls on speakerphone and in headset mode.
• Press to confirm actions/settings and return to preceding screen.
• Press to terminate calls on speakerphone and in headset and handset modes.
• Press to cancel actions and return to preceding screen.
Preprogrammed, variably programmable function keys
The factory settings is printed on the key. Other functionalities can be programmed onto them. See
"Configuring the function keys" on page 70 for more information.
Message key. The LED of the key is lit when a new message is waiting on the mailbox.
Press the key to retrieve messages.
Phone directory. See "Directory" on page 41 for further information.
Settings menu. See "Settings" on page 28 for further information.
Transfer. See "Transferring calls" on page 60 for further information.

22
D717 User Manual Getting to Know Your Phone
Hold key. See "Hold" on page 58 for further information.
Turn "do not disturb" (DND) mode on and o for all identities registered on the phone
(Fig. 1). If you want to turn on DND for one or more, but not all of the identities (Fig. 2),
use the Configuration identity settings on the phone's web user interface. In DND mode
incoming calls do not ring; callers hear the busy signal.
Exception:
Phone numbers on your directory's VIP list (see "Contact Types" on page 42)
.
When DND is on, you'll see the DND symbol on the display.
Fig.1 - DND active Fig. 2 - DND active for one of the configured identities
Audio control keys
Press the right or left edge of the key to adjust the volume
• of the ringer when the phone is idle or ringing
• of the loudspeaker in handset, casing, or headset, respectively, when in call
Muting and unmuting the microphone
• Toggling between handsfree and handset mode
• Dialing numbers on speakerphone
• Accepting calls on speakersphone
Toggling between headset and handset modes.
Note: Handset mode overrides headset mode. When the handset is picked up, the
headset symbol in the status line will be replaced by the handset symbol, indicating
that you can now use only the handset for the call. To return audio to the headset,
press again. The headset symbol will reappear in the status line. You can then
place the handset in the cradle without ending the call.
SmartLabel keys (freely programmable function keys with LEDs)
These three freely programmable function keys on the right side of the display control the
SmartLabels (see "SmartLabels" on page 27). They can be programmed and labeled on the phone
and on the Function Keys page of the phone's web interface. For information on how to map functions
onto these keys, see "Configuring the function keys" on page 70. The factory default setting is line.
23
D717 User Manual Getting to Know Your Phone
Alphanumeric Keypad
Input modes and navigation
Input mode
numerals
when dialing
Activity
Delete character
to the left of the
cursor Pool: Directory,
LDAP, call lists
Redial
Move cursor
to the left
to the right
Current audio mode:
Handset
Headset
Speakerphone
Fig. 1
Current input mode:
123: Numerals
abc: Lower case
ABC: Upper case letters
Next input mode:
: Numerals
: Lower case letters
: Upper case letters
Delete character to
the left of the cursor
Current input mode
Status info
Next input mode
Changing input mode
Fig. 2
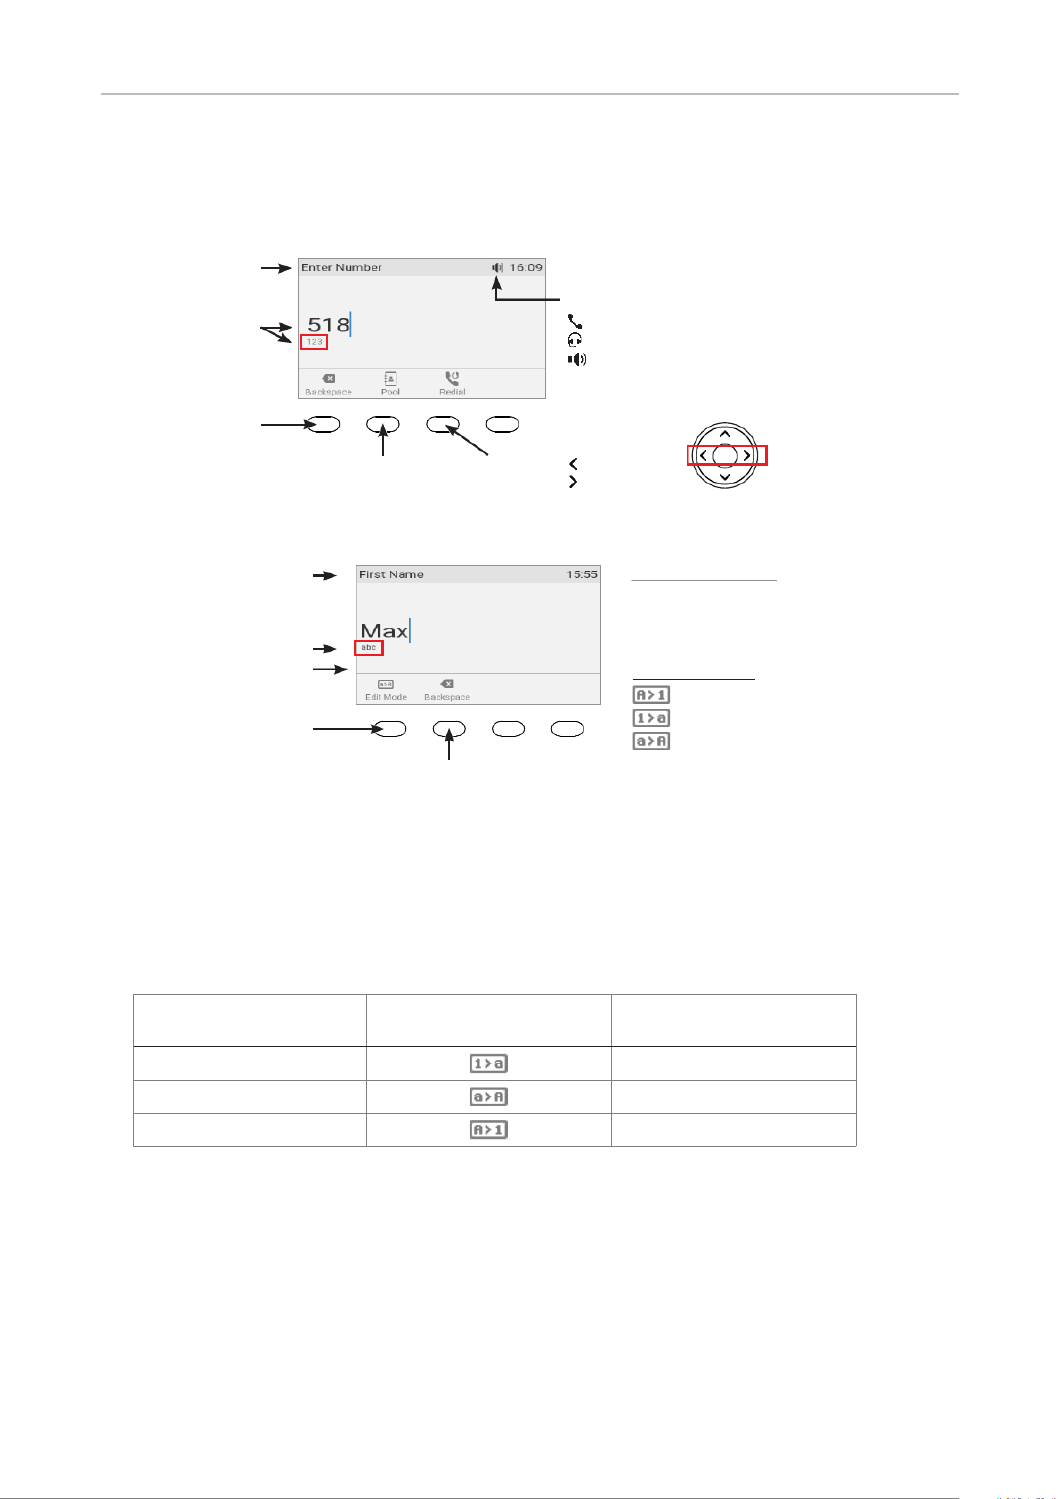
Press any key on the alphanumeric keypad or pick up the handset to open the "Enter Number" screen.
When dialing a number (Fig. 1), the input mode is always numerals. When editing directory entries
(Fig. 2) and identities, the current input mode is indicated in the line underneath the cursor. Press the
left function key underneath the display to switch to the next input mode.
Text underneath cursor
= current input mode
Press function key to
switch to next input mode Next input mode
123 abc
abc ABC
ABC 123

25
D717 User Manual Getting to Know Your Phone
Display layout
Info/status bar
Function key line
Context-sensitive function key symbols
In idle mode
Confi gured
identities
Smart
labels
Fig. 1
Info/status bar
Function key line
Showing SmartLabels Not showing SmartLabelsWhen active
Context-sensitive function key symbols Context-sensitive function key symbols
Context information
Smart
labels
Fig. 2
In idle mode
In idle mode, the display presents the following information:
Info bar/status line
• When there are no status messages or if they have been deleted until the next reboot: Date and
time.
• When there are status messages: Any of numerous messages concerning the current status
of the phone might be displayed in this bar, for example the availability of a firmware update, a
reboot being required, etc. If there is more than one current status message at any one time, the
one with the highest priority will be shown. Some of the status messages you may see in idle
mode are:
◦ The text "Missed:" and the total number of missed calls since the last time you turned o the
misssed call indication (the text in the info bar as well as the call LED). The missed calls will
remain in your missed call list, however.
◦ The texts "Forward All:", "Forward when busy:", or "Forward after timeout:" and the phone
number calls will be forwarded to.
◦ The warnings "HTTP Password not set" and "Admin Password not set". They can be turned
o by setting the passwords or manually on the phone's web interface (admin mode only; not
recommended due to increased security risk).
Deleting or temporarily suppressing status messages:

27
D717 User Manual Getting to Know Your Phone
Function key line
The symbols on the buttons in this line depict the functions that can be activated by pressing the
function key underneath the respective symbol. See "Appendix 1 - Display Symbols and Icons" on
page 108 for a complete list. The factory defaults are:
Directory. See "Directory" on page 41.
Call history (lists of received, dialed, and missed calls). See "Call lists" on page 64.
Forwarding all calls (on/o). See "Call forwarding" on page 67 and 94.
Pressing this key will put the IP address of the phone on-screen. If another function
is mapped onto the key or if the key has been replaced by because of new status
messages, IP address and URL can also be looked up in the settings menu: >
Information Help > .
Displaying all currently available status messages. This key is available whenever a
status message becomes newly available even when a dierent function is mapped
onto the far-right function key underneath the display.
Press the key to display the status messages; press to delete the highlighted
status message. When all messages have been deleted, the symbol will disappear
from the function key line; the message in the status line will also disappear.
The function mapped onto the key is now available on this key again. If you have
mapped the "Status messages" function onto the key, the key will remain blank until
a new status message becomes available or until a reboot when all current status
messages will be displayed anew.
When the phone is active
The display will inform you of any activity the phone is engaged in (see Fig. 1 on page 25). This
information is presented in the form of text or symbols or both.
Info/status bar. Name of current activity and time.
Context area
Depending on the activity, this area will contain symbols (incoming call ringing, outgoing call
ringing, list entries, etc.) and text like the phone number calling, the extension number being called,
conference partners, etc. Depending on the context, the SmartLabels will or not be shown.
Function key line
Depending on the current activity of the phone, the key function key line will present various functions
that can be activated by pressing the function key underneath the respective symbol. See "Appendix
1 - Display Symbols and Icons" on page 108 for a list of available functions.
SmartLabels
When the phone is idle and—in some contexts—when it is active the labels of the three freely
programmable function keys (SmartKeys) are displayed in the three SmartLabel areas on the right
side of the display (Fig. 1 and 2 on page 25). In the default setting, the display mode is short label

28
D717 User Manual Getting to Know Your Phone
(Fig. 3). By pressing LED key P3 (see "At a glance" on page 18) for 2 seconds, the labels will be
displayed in the alternative display mode, full label (Fig. 4), for 3 seconds. You can turn the display
modes o, switch default and alternative display mode, and set a dierent timespan for returning to
default mode on the phone and on the phone's web interface; see "Configuring the function keys" on
page 70 for more information.
Fig. 3 Fig. 4
The LED of the key associated with the label will react in accordance with the label's mapping;
pressing the key may aect what you see on the label.
The function keys can be mapped on the phone and, faster and more comfortably, on the phone's web
interface. For information on programming the function keys, see "Configuring the function keys" on
page 70.
Settings
A comparatively small number of settings can be adjusted on the phone; many more are available on
the phone's web interface.
Phone settings
Press to open the settings menu on the display. To open submenus and settings, scroll to the
submenu/setting and press .
Settings available in administrator mode
All settings of the phone menu and on the phone's web interface are accessible.

29
D717 User Manual Getting to Know Your Phone
1 Preferences 2 Call Features 3 Identity 4 Network 5 Maintenance 6 Information
1 Language 1 Call forwarding 1 Select outgoing
identity 1 IP Settings 1 Security 1 Status info
2 Date & Time 1 Forward all 2 Reregister
identity 1 IPv4 1 Admin mode
on(2) 2 System info
1 Time zone 2 Forward
when busy 3 Edit identity 2 IPv6 2 Set keyboard
lock PIN 3 Demo mode
2 Date format 3 Fwd after
timeout 1 Hotdesking 2 Webserver 2 Reboot 4 Help
3
24-hour clock
2 Outgoing calls 2 Edit identity 1 On/o 3 Reset values
3 Audio 4 Logo identity1 Auto dial 2 Webserver
type
1 Headset
Detection
2 Auto redial
on busy
1 Log o all
identities 3 User name
2 Tone
Scheme
3 Number
guessing
2-7 (select
individ. identity) 4 Password
3 Ringer 4 Call
completion 3 VLAN
4 Volume 5 Hide own
outgoing ID 1 VLAN ID
4 Display 3 Incoming calls 2 VLAN
Priority
1 (Primary (1))
Display 1 Call waiting 4 WLAN
1 Ambient light 2 Auto answer
indication 1 On/o
2 Backlight on
activity
3 Reject
anonymous 5 Advanced
3 Backlight
when idle 4 Silent mode 1 802.1X
4 SmartLabel
options 5 DND 2 Hardware
Idle screen 4 Speed dial 3 NTP
Call screens 4 DNS
Return to
default mode 5 Function keys 5 LLDP
4 Color and
opacity
1 Dedicated
keys
2 Expansion
modules (1)
2 SmartLabel
keys
1 Backlight on
activity
Retrieve msg,
DND, hold, etc.
2 Backlight
when idle
3 Expansion
keys(1)
3 Contrast 6 General
4 Appearance 1 Quick dial
contacts
2 Quick
look-up
(1) Only if phone model supports expansion modules and when
an expansion module is connected.
(2) Pressing this key will put the phone in user mode; many
settings will not be accessible (see next page). The
administrator password will be needed to return the phone
to admin mode.
NOTE: The factory default administrator password is 0000
(4 x zero). For security reasons, we recommend that you
set your own administrator password. Be sure to write
it down and store it in a safe place because if it is lost or
forgotten, you will not be able to return the phone from user
to administrator mode and gain access to all phone settings.

30
D717 User Manual Getting to Know Your Phone
Settings available in user mode
1 Preferences 2 Call Features 3 Identity 4 Maintenance 5 Information
1 Language 1 Call forwarding 1 Select outgoing
identity 1 Security 1 Status info
2 Date & Time 1 Forward all 2 Reregister identity 1 Administrator
mode o (2) 2 System info
1 Date format 2 Forward when
busy
2 Set keyboard
lock PIN 3 Help
2
24-hour clock
3 Forward after
timeout 2 Reboot
3 Audio 2 Outgoing calls
1 Headset
detection
1 Auto redial on
busy
2 Tone Scheme 2 Number
guessing
3 Ringer 3 Call completion
4 Volume 4 Hide own
outgoing ID
4 Display 3 Incoming calls
1 (Primary (1))
Display 1 Call waiting
1 Backlight on
activity
2 Auto answer
indication
2 Backlight when
idle
3 Reject
anonymous
3 SmartLabel
options 4 Silent mode
Idle screen 4 Speed dial
Call screens
Other screens
Timer - default
display mode 5 Fkeys
Timer - back to
page 1
1 SmartLabel
keys
2 Expansion
modules (1) 1-4 Page 1-4
1 Backlight on
activity
2 Expansion mod.
keys(1)
2 Backlight when
idle 6 Miscellaneous
3 Contrast 1 Quick dial
contacts
4 Appearance
(1) Only if phone model supports expansion modules
and when an expansion module is connected.
(2) Pressing this key will put the phone in
administrator mode. The administrator password
is needed to return the phone to admin mode.
NOTE: The factory default administrator
password is 0000 (4 x zero). If it doesn't
work, someone changed it. Please ask your
administrator or your IP Service Provider.
Most of the individual settings are described elsewhere in this manual: See "Using the phone" on
page 50 and "Customizing the phone settings" on page 87.

31
D717 User Manual Getting to Know Your Phone
Display settings
The backlight on the display of the phone and on the displays of the connected expansion modules are
adjusted separately on the phone and on the phone's web interface for the times when the devices are
active and when they are idle. For the phone's display you also have the option to to use the built-in
ambient light sensor to automatically adjust the backlight's intensity in accordance with the ambient
light within the sensor's detection area.
NOTE: When the phone has been inactive for a specified number of seconds, the backlight will return
to idle mode (not applicable to the phone display when the ambient light sensor is turned on). This
setting is available only on the phone's web user interface, not on the phone itself. The phone setting
is applied to all D7 extension modules connected to the phone, as well.
For the display modes and options of the SmartLabels, see "Display options for SmartLabel keys" on
page 84.
Adjusting the backlight on the phone's display
• Ambient light sensor. The sensor is located in the lower left corner of the glass covering the
display and the surrounding area (Fig. 1).
Detection
area approx.
100 degrees
Fig. 1 Fig. 2
Settings:
◦On. The sensor adjusts the backlight in accordance with the ambient light within the sensor's
detection area (Fig. 2) when the phone is idle and when it is active. The settings for
manual adjustment of the backlight when the phone is idle and when it is active are not
available.
◦O. The sensor is turned o. The settings "backlight on idle" and "backlight on activity"
for the manual adjustment of the backlight are available. See "Manual adjustment of
backlight intensity," below, for more information.
◦On a ctive. When the phone is active, i.e., in a call, the phone book being edited, etc., the sensor
adjusts the backlight's intensity in accordance with the ambient light within the sensor's
detection area (Fig. 2). When this setting is selected and saved, the item "Backlight when
idle" is added to the "Display" menu where you can adjust backlight intensity for the idle
state.
• Manual adjustment of backlight intensity. When the ambient light sensor is turned o for both
active and idle state or just for the active phone, the intensity of the backlight for the phone's
display is adjusted with these two settings.
1. Press .

32
D717 User Manual Getting to Know Your Phone
2. Select Preferences and press .
3. Select and press Display .
- If there is no D7 expansion module connected to the phone, the Display menu appears
(Fig. 3, if the ambient light sensor setting is o; Fig. 4, if it is set to regulate backlight on
activity).
- If a D7 expansion module is connected to the phone, the menu has two submenus Display
(Fig. 5), Primary Display and Expansion Modules. Select and press Primary Display .
The menu appears ((Fig. 5, if the ambient light sensor setting is o; Fig. 6 Primary Display
if it is set to regulate backlight ).on activity
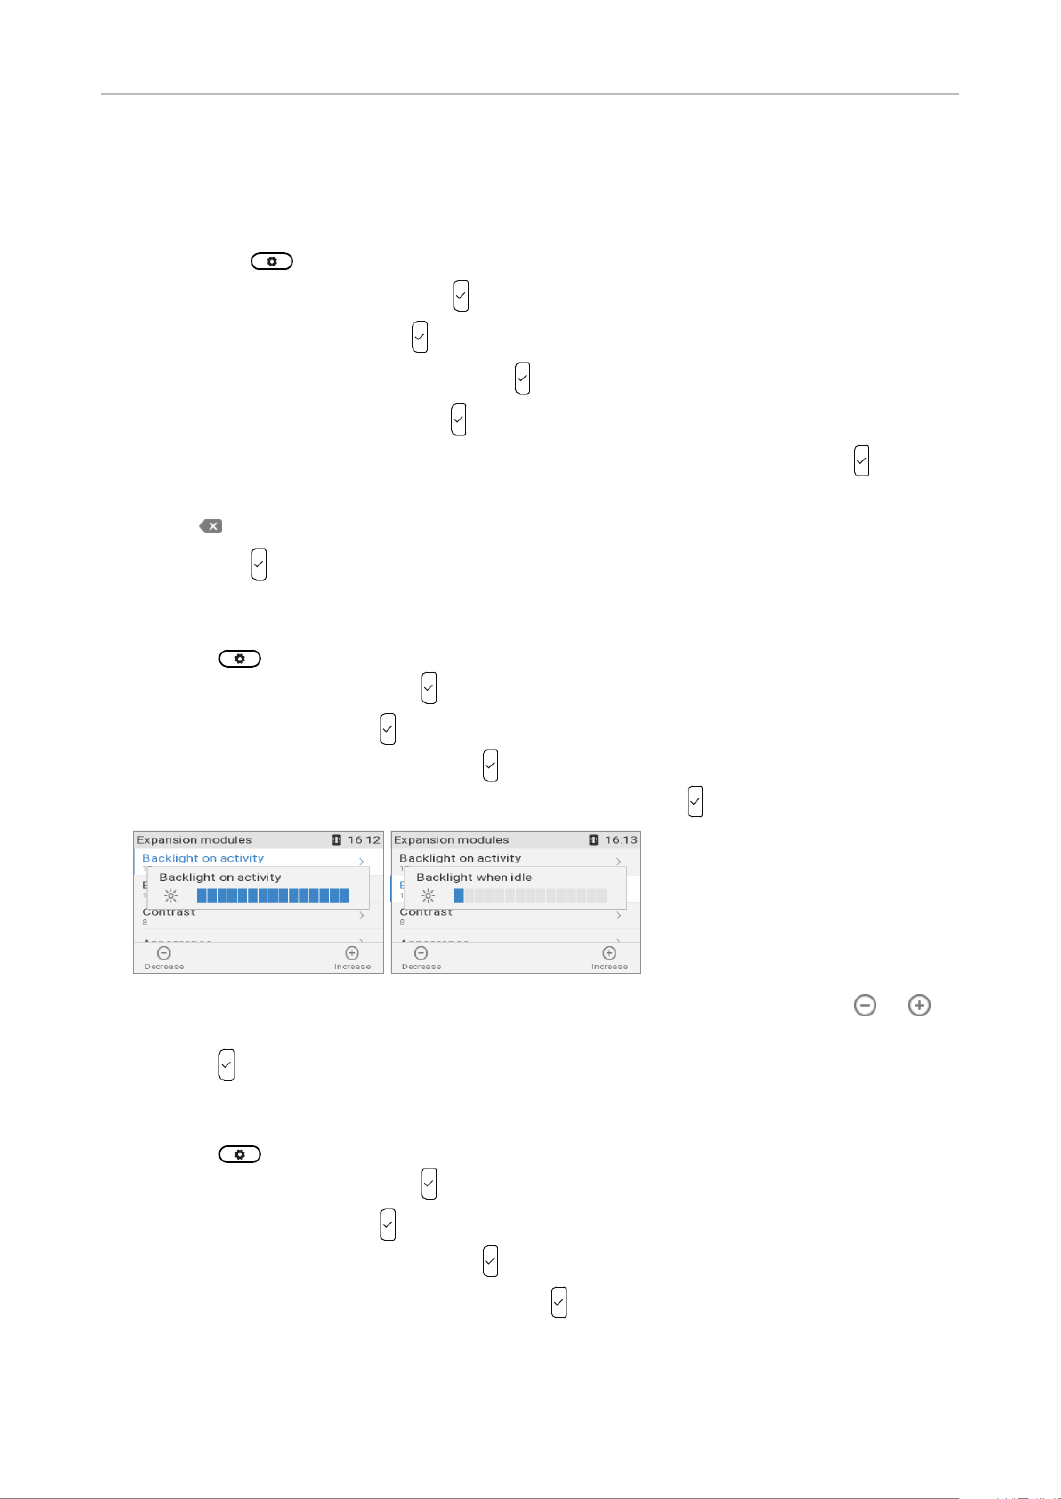
Fig. 3 Fig. 4 Fig. 5
Fig. 6 Fig. 7 Fig. 8
4. When the ambient light sensor is o, select or and Backlight on activity Backlight when idle
press . If it is set for active states (Fig. 8, Backlight on Activity), only the setting for Backlight
when idle is available.
5. Press the right or left arrow on the navigation key or the function key underneath or in
the function key line to decrease or increase the backlight's intensity (Fig. 9 and 10).
Fig. 9 Fig. 10
6. Press to save and return to the or Display Primary Display menu.
• Period of inactivity. The number of seconds after which the phone will switch from backlight on
activity to idle backlight can be set on the phone's web interface only.
1. Open the phone's web interface (see "Opening the web interface" on page 37).
2. Click on Preferences (see "How the web interface works" on page 38).
3. If necessary, click on the tab General.

33
D717 User Manual Getting to Know Your Phone
4. Enter the number of seconds in the text field of "Dim after (in seconds)". The default is 20
seconds.
5. . Click on and/or Apply Save
Adjusting display settings for connected D7s
You can adjust the intensity of the display's backlight, the display contrast, and the font size of the
function key labels for the connected D7 expansion modules. The label layout can be adjusted for
each D7 separately. For more information on the module's display layout, please refer to its user
manual at http://wiki.snom.com/Snom_D7/Documentation.
Note: The number of seconds after which the D7 expansion modules will switch from
activity to idle backlight is the number set for the primary display's backlight (see
"Period of Inactivity" on page 32).
• Appearance.
◦ Layout. The available options are line or tile layout. Line layout is the default. The layout
is adjusted separately for each module, and only connected modules appear in the menu. If
there is more than one, the first D7 in the daisy-chain is listed as "Expansion Module 1", the
second one as "Expansion Module 2", and the third one as "Expansion Module 3".
1. Press .
2. Select Preferences and press .
3. Select and press .Display
4. Select and press . Expansion Modules
5. Select Appearance and press .
6. , orSelect ,Expandion Module 1 2 3.
1
2
3
10
11
1
2
3
10
11
7. Press to change the display layout of the selected D7 expansion module from lines to
tiles and vice versa and simultaneously save the modification.
8. Press to return to the menu; press for approx. 3 seconds to Expansion modules
return to the idle screen.
Line layout
Tile layout
34
D717 User Manual Getting to Know Your Phone
◦ Font size. As of FW version 8.9.3, it is possible to adjust the font size for the connected
expansion modules. The size is set separately for line and tile layout, and the respective
setting is applied to all connected modules with line or tile layout, respectively. The default for
both is 14.
1. Press .
2. Select Preferences and press .
3. Select and press .Display
4. . Select and press Expansion Modules
5. Select Appearance and press .
6. Select Font size (line layout) Font size (tile layout)or , respectively, and press ..
7. Use the alphanumeric keypad to enter the font size. Press the function key underneath
to delete the character to the left of the cursor if you need to correct your input.
8. Press to save the setting and to return to the Appearance menu.
• Intensity of backlight . The setting is applied to all D7 expansion modules connected to the phone.
1. Press .
2. Select Preferences and press .
3. Select and press .Display
4. Select and press . Expansion Modules
5. Select Backlight on activity Backlight when idle or and press .
6. Press the right or left arrow on the navigation key or the function key underneath or in
the function key line to decrease or increase the backlight's intensity.
7. Press to save and return to the menu.Expansion Modules
• Contrast . The setting is applied to all D7 expansion modules connected to the phone.
1. Press .
2. Select Preferences and press .
3. Select and press .Display
4. Select and press . Expansion Modules
5. Select Contrast or scroll down to it and press .

35
D717 User Manual Getting to Know Your Phone
6. Press the right or left arrow on the navigation key or the function key underneath or in
the function key line to decrease or increase the backlight's intensity.
7. Press to save and return to the menu.Expansion Modules

37
D717 User Manual Getting to Know Your Phone
characters on the phone's keypad (see "Entering numerals, letters, special characters, and
symbols" on page 24). Write the password down and store it in a safe place!
◦ HTTP user name and password. Enter the data in the text fields of the section HTTP Server
and click . The default value is blank. Apply
-User name. Valid values are character strings of letters and numerals, e.g. or .john jh24
-Password. Text string.
Opening the web interface
1. Look up the phone's IP address: Press , if available, or > > .Information Help
2. Open a web browser on your PC. Enter the IP address, preceded by "http://" or "https://" in the
address bar (for example: http://192.168.10.115) and press ENTER.
3. The home screen opens:

38
D717 User Manual Getting to Know Your Phone
How the web interface works
The vertical menu on the left side of the window is always the same, no matter which window
happens to be open at the time. Available menu items depend on whether the phone is running in
user or administrator mode.
Click on a menu item to open that page. Some pages contain several documents. To make a
document visible, click on its tab. The font weight of the characters on the active tab is . Only one bold
tab can be active at a time.
Note: Any changes you make will not take eect until you click on . Changes will Apply
be lost if you open another page of the web interface or if you close the web interface
without first clicking on .Apply
After you have clicked on , in some cases the button will appear at the top of Apply Save
the page. Click on to save the changes permanently. Changes that have not been Save
saved will be lost when the phone is rebooted and if and when the phone loses power or
is disconnected from its power source.
As of Firmware 10.1.33, the button appears at the top of the page whenever you Save
change a setting without having been clicked first.Apply
To the right of each setting, there is a link symbolized by the question mark . Click on this link
to open a wiki page with information on the setting (description, valid and default value, links to
connected issues, etc.). Click on the return button of your browser to return to the phone's web
interface.
Note: You may have to enter your HTTP password to return to the phone's web interface.
Web settings overriding manual phone settings
In some cases settings activated on the web interface override manual settings on the phone. If a
setting you have made on the phone does not appear to take eect, look for a conflicting setting on
the web interface or check with your administrator.

39
D717 User Manual Getting to Know Your Phone
User mode/administrator mode
Snom phones can be operated in administrator or user mode. In administrator mode, all settings are
accessible and can be modified; in user mode, a number of settings are not accessible. The factory
default is administrator mode.
When the phone is running in user mode, the administrator password is required to switch to
administrator mode. The default administrator password is 0000 (4 x zero). We recommend that you
change the password for security reasons.
Note: Do not forget to write the new password down and store it in a safe place; without
it, a TFTP reset to factory values is necessary to return the phone to administrator mode.
If your phone is administered centrally, user mode may be the rule. Please check with
your administrator.
User mode on the phone
The "Network" menu and various other settings are inaccessible in user mode. See
"Settings" on page 28. To switch admin and user mode, proceed as follows:
1. Press .
2. Select and press .Maintenance
3. Select Security and press . If the phone is running in user mode, the menu at Fig. 1 appears; if it
is running in admin mode, the menu at Fig. 2 appears.
4. Select Administrator Mode, if necessary, and press .
◦Please note: In admin mode the Step 5, below, will switch the phone into user mode.
◦In user mode you will be prompted to enter the Admin Mode Password. Enter the password.
5. Press to save and return to the menu where Security Administrator Mode has been changed to
o or on.
Fig. 1 Fig. 2
6. Press for two seconds to return to the idle screen.
User mode on the web interface
Some windows like Preferences are available in user mode while many others, like the identities,
are not. The menu item Advanced is available in user mode but the settings normally found on the
Advanced Settings page are not; in its place is the admin login. In user mode the two pages look like
this:

40
D717 User Manual Getting to Know Your Phone
Fig. 1 Fig. 2
To return the phone and its web interface to administrator mode, open the Advanced Settings page,
enter the administrator password in Administrator Login Apply and click on (Fig. 2). The default
password is 0000 (4 x zero).
In administrator mode, the two pages look like this:
Fig. 3 Fig. 4

41
D717 User Manual Directories
Directories
Directory
The directory is the built-in directory of the phone. It can hold up to 1000 entries. Entries can be
added and edited on the phone and on the web interface.
Any changes you make on the web interface will not take eect until you click on "Save" or on "Apply"
and "Save", depending on your rmware version. Changes will be lost if you open another page of the
web interface without rst clicking on "Apply"/"Save".
Denitions, explanations
Directory entries
Each entry must have at least one phone number; multiple associated phone numbers are possible. If
you do not enter a rst and/or last name and/or nickname, the phone number will appear under both
"Name" and "Number".
• Entry with one phone number:
• Entry with several associated phone numbers:
Name area. Same data
for the master record and all
subentries.
Blue area. Data can be
different for each associated
phone number. If subentry
text elds are blank, the data
from the master record is
displayed.
Blue area of Subentry 2: Different "Group" selection (S), dif-
ferent entry in text eld of "Email" (S). No entry in text elds of
"Title" and "Organization", therefore same as Master Record.
Number area (N): Individual
settings for the master record
and each subentry possible.
Subentry 1
M
N
M
M
N
M
Master record (M) Subentry 2
M
M
M
N
S
S

42
D717 User Manual Directories
Contact Types
VIP: Calls from numbers with this contact type will ring on your phone even when DND mode is active.
You can assign a ringtone to this contact type. If your VIP is also assigned to a group (see below) and
if that group has a distinct ringtone, the ringtone assigned to the group will be played.
Deny List: Calls from phone numbers with this contact type will not ring on your phone. The caller
hears the "Busy" signal. To remove the number from the Deny list, you can either
◦ delete the entry from the directory by clicking on the "delete" symbol
◦ or - if you want to keep the number in the directory - change the contact type to none or VIP by
editing the entry. See "Editing existing entry" on page 44 (editing on the phone) and "Editing
an entry" on page 46 (editing on the web interface) for more information.
Outgoing identity
The default setting is "Active" which means that the phone will use the current outgoing identity
whenever you dial the number of the phone book entry.
You can also select a specic identity to be used as the outgoing identity whenever the number is
dialed, for example, if you want to use a specic VoIP provider for these calls.
Note: To use an outgoing identity specied in the directory, you must dial the number
from the directory. If you simply type it on the keypad, the current outgoing identity, as
indicated on the display, will be used.
Group
The available group types are Friends Family Work Colleagues, , , , or . The default setting is None
none. You can assign a distinct ringtone to each group type.
Ringtones
The phone has 10 built-in ringtones that can be assigned to identities, group types, and contact types.
It is also possible to download a custom melody.
Assigning ringtones to identities: See "Assigning ringtones" on page 89.
Assigning ringtones to contact type VIP and group types
1. Open the phone's web interface, Preferences Directory Ringtones page, section.
2. Select a ringtone from the respective drop-down menu and click on "Apply". If you choose
"Custom Melody URL", enter the URL to the data le in the text eld. It must be a le of the type
PCM 8 kHz 16 bit/sample (linear) mono WAV.
Note: Ringers assigned to contact type VIP and to any of the group types override the
ringers assigned to the identities. For example, if you have assigned ringer 1 to one of
the identities and ringer 2 to the group "Colleagues", the phone will play ringer 2 when
a contact from the "Colleagues" group calls that identity.

43
D717 User Manual Directories
Adding/Editing Entries on the Phone
Adding new entry manually
1. Press to open the phone's directory.
2. Press the function key underneath .
Note: See "Input modes and navigation" and "Entering numerals, letters, special
characters, and symbols" on page 24 for information on how to enter data.
3. . Enter the phone number and press
4. Enter a rst name and/or press .
5. Enter a last name and/or press .
Note: Entering a rst and/or name is optional. If you don't enter either one, the entry
will be listed under the phone number. You can add a rst and last name later by editing
the entry on the phone or on the web interface.
6. See "Editing existing entry" on page 44 on how to continue.
Adding new entry from call list
For further information on call lists, see "Call lists" on page 64.
1. Press the function key underneath to open the call history. The list of calls appears.all
◦ Press / on the navigation key to show the lists of missed, received, or calls dialed
instead.
2. Press / on the navigation key to select a call.
3. . Press to view call Details
4. Press to add the name (if the name was transmitted) and the number to the phone directory. If
the name has not been transmitted, the number will be used in its place.
See "Editing existing entry" on page 44 on how to add a name, phone type, group, etc.

44
D717 User Manual Directories
Adding current caller
With the call on the line, you can add the caller's name (if transmitted) and phone number to the
directory. If the name has not been transmitted, the number will be used for both name and number.
See "Editing existing entry" on page 44 on how to add a name, phone type, group, etc., later.
1. With the call on the line, press .
2. Press to add the caller to the directory.
Sorting entries
1. Press to open the phone's directory.
2. . Press
3. Use to select the criterion for sorting (nickname, rst name, last name, organization, etc.)
and press to sort.
Editing existing entry
1. Press to open the phone's directory.
2. Selecting an entry: Scroll to the entry or enter the rst letter of the name.
3. Press to open the screen for the entry.Contact details
4. Use / to scroll to the detail you want to edit and press . Depending on the detail,
a. In some cases, you will see the prompt screen where you can enter or modify text. Edit
the data, if necessary, and press to save and to open the next screen. See also "Entering
numerals, letters, special characters, and symbols" on page 24.
In other cases, you will see a succession of screens with context-sensitive buttons. Example:
Modifying the settings of "group".
i. . Select "group" with / and
ii. / to select family, friend, colleague, work, or none. Use
iii. Press to save and return to the Details menu.
b. When you are done editing the entry, press .
Deleting an entry
1. Press to open the phone's directory.
2. Selecting an entry: Scroll to the entry or enter the rst letter of the name.
3. If you want to delete the entry, press (Fig. 1) and continue with step 5, below.

45
D717 User Manual Directories
Fig. 1 Fig. 2
a. If there is more than one phone number associated with the entry and you want to delete only
one of them, press (Fig. 2).
b. Select the number you want to delete with / (Fig. 2) and press .
4. You will be asked, "Are you sure?".
Fig. 3
5. If you are, press to delete the entry or phone number.
Adding/editing entries on the web interface
Click on in the menu on the left side.Directory
Adding new entry
1. Type data in text elds of Add or Edit Entry.
◦ Number: Type the number exactly as you would dial it, with country and area codes, if
necessary, and without parentheses, hyphens, blank spaces. plenty
◦ Number Type: Select the type of connection from the drop-down menu. The default setting is
SIP.
◦ Contact Type: Select "None", "VIP", or Deny" from the drop-down list. The default setting is
"None".
- Calls from entries on the "VIP" list will always ring on the phone, even when the phone is
in a call or in DND mode.
Note: You can assign a distinct ringtone to the contact type "VIP": Preferences
page > tab > Audio Directory Ringtones section.
- Calls from entries on the "Deny" list will not ring on the phone. The caller will always hear
the busy signal.
◦ Outgoing Identity: The drop-down list shows all identities congured on the phone. If you
select one of the identities for one of the numbers listed in the phone book, all calls to that
number initiated from the phone book will show that identity on the callee’s phone.

46
D717 User Manual Directories
◦ Blue area: The data entered in the textelds will be displayed when the entry is opened on
the phone. The data can be used to sort entries by group, name, organization, etc., and can be
edited on the phone.
- "Group" drop-down menu: Available types are "Friends“, "Family“, "Colleagues“, or "Work".
You can assign a distinct ringtone to each group type: Preferences > Directory Ringtones.
- "Nickname": If you enter a nickname, it will appear under the "Name" header of the
Directory on the web interface.
◦ First name, family (last) name: Will be added in this order under "Name" in the directory,
unless you have also entered a nickname.
◦ Birthday. Uses the format set at Preferences Appearance General information > tab > > U.S.
Date Format (mm/dd): "On" or "O". Enter in DD.MM.YR or MM/DD/YR format. Examples:
Output when US Date Format setting is
Date Input On O
March 5, 1980 5.3.80 or 3/5/1980 03/05/80 05.03.80
March 12, 1980 12.3.80 or 3/12/1980 03/12/80 12.03.80
October 5, 1980 5.10.80 or 10/5/1980 10/05/80 05.10.80
October 12, 1980 12.10.80 or 10/12/1980 10/12/80 12.10.80
◦ Favorite: Tick box to add entry to "Favorites" list.
2. Click on "Add/Edit" to save new entry to directory.
Editing an entry
When you open an existing entry, the current information is displayed in the text elds of "Add or Edit
Entry" and two additional buttons, "Add Sub" and "Change", are available (see Fig. 2 and 3, below).
• Editing
Fig. 1
◦ If single entry, click on in the entry's line.
◦ If there is more than one number associated with a name:
- Click on in the name's line if you want to edit/add the rst or last name of the date of
birth and the data in the blue area applicable to the master record.
- Click on in a phone number's line if you want to edit the subentry's data (phone
number, number & contact type, outgoing identity, and any blue area data applicable to this
subentry only).
Make changes as necessary and click on "Change".

47
D717 User Manual Directories
• Adding additional phone number (subentry) for a name
◦ Jane Smith's entry has only one phone number, her SIP phone number. In this example, the
phone number of Jane Smith's landline will be added to the directory.
- Click on in Jane Smith's line (Fig. 1, above). The data is shown in "Add or Edit" area
(Fig. 2).
Fig. 2 Fig. 3
- Enter the phone number in the text eld of "Number" (Fig. 3).
- Select "xed" from the drop-down menu of "Number type" (Fig. 3).
- Optional: Select a contact type and an outgoing identity from drop-down lists (Fig. 3).
- Click on "Add Sub" (Fig. 3).
◦ John Miller's entry has a SIP number and a private number. In this example, his cell phone
number will be added as a third number.
- Click on in the line containing John Miller's name. The data is shown in "Add or Edit"
area.
- Enter the phone number in the text eld of "Number".
- Select the number type.
- Optional: Select a contact type and an outgoing identity from the respective drop-down
list.
- Click on "Add Sub".
The directory now contains Jane Smith's landline number and John Miller's mobile phone number
(Fig. 4).
Fig. 4

48
D717 User Manual Directories
Deleting entry on web interface
• Entry with one phone number. Click on in the entry's lines to delete the entry.
• Entry with more than one phone number.
◦ Deleting the entry. Click on in the line of the master record to delete the name and all
associated phone numbers.
◦ Deleting one of the phone numbers. Click on in the line of a phone number subentry to
delete that subentry, but keeping the master record and all other subentries.
Dialing from phone directory
To dial, click on the phone symbol on the right side of the line with the phone number.
Deleting whole directory
Deletes the entire directory irretrievably!
Importing/Exporting Directory
See our Wiki at http://wiki.snom.com/Web_Interface/V8/Directory.
External directories
Available if provided by your network, your VoIP provider, or another external source.
LDAP
Enter the necessary data received from your administrator, VoIP provider or other external source in
the text elds of the phone‘s web interface > Advanced Settings Network LDAP page > tab > section
and click on and .Apply Save
LDAP search on the phone: Enter the rst letter of the name you are searching for. Type more letters
if the name shown isn't the right one or scroll through the list. Press to dial.
Contacts
If you want to use an external contacts list, the and settings are Contact list Contact list URI
mandatory. Publish presence is optional; when enabled, the phone sends out "PUBLISH" SIP
messages with the phone's status, e.g. busy, etc.
1. On the phone's web interface, Conguration Identity # page, tab, click on the radio button SIP on
of the entry. Contact list

49
D717 User Manual Directories
2. Enter the URI received from your administrator, VoIP provider or other external source in the text
eld of .Contact list URI
3. Optional: Click on the radio button of the on Publish presence setting.
4. Click on and . Apply Save
To dial a contact on the phone, enter the rst letter of the name you are searching for. Type more
letters if the name shown isn‘t the right one, or scroll through the list. Press to dial.
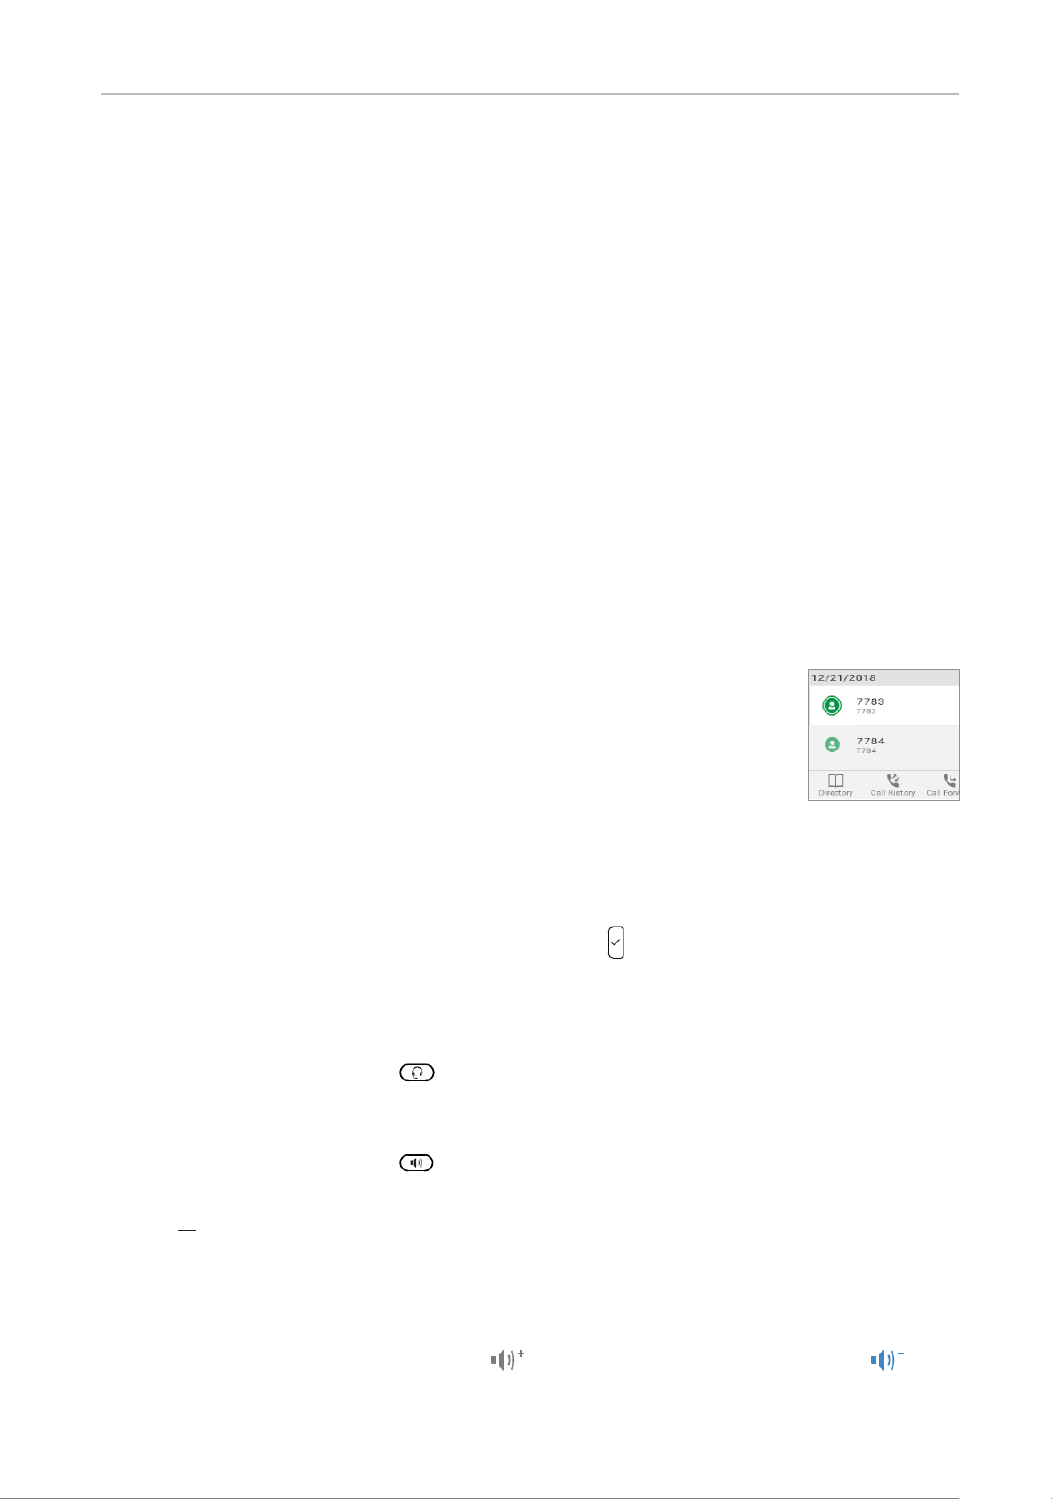
50
D717 User Manual Using the Phone
Using the phone
This section describes the functions of the phone with the factory default settings. If your phone was
installed and/or set up by someone else, the default settings may have been changed. Please check
with that person or company if the phone does not react as described here.
The caller information displayed on the screen is controlled by a setting on the phone‘s web interface.
The default setting is "Name Number". You can change the setting at Preferences Appearance > tab
> section > setting Interface elements Number Display Style by selecting a dierent option from the
drop-down list.
Making calls
See "Entering numerals, letters, special characters, and symbols" on page 24 for information on
input modes and entering letters, numerals, and special characters.
Selecting identity for current outgoing call
See "Identities/accounts" on page 87 on how to congure identities.
If more than one identity is shown on the display, the one on the white bar with the
white and green rings around the green circle is the outgoing identity for the call
and the number/name that will show on the callee’s phone. Use the up or down
arrow on the navigation key to select another identity.
Using dierent audio devices
Handset
• Pick up the handset, enter the phone number, and press OR
• enter the phone number and pick up the handset.
Headset
Enter the phone number and press .
Speakerphone
Enter the phone number and press .
Handset or headset and casing speaker
With dual audio mode activated, other persons present in the room are allowed to listen in to the third
party over the phone's casing loudspeaker.
1. Use the method for handset or headset use to dial.
2. When the call has been established, press to enable the casing loudspeaker. Press to
turn the speaker o.
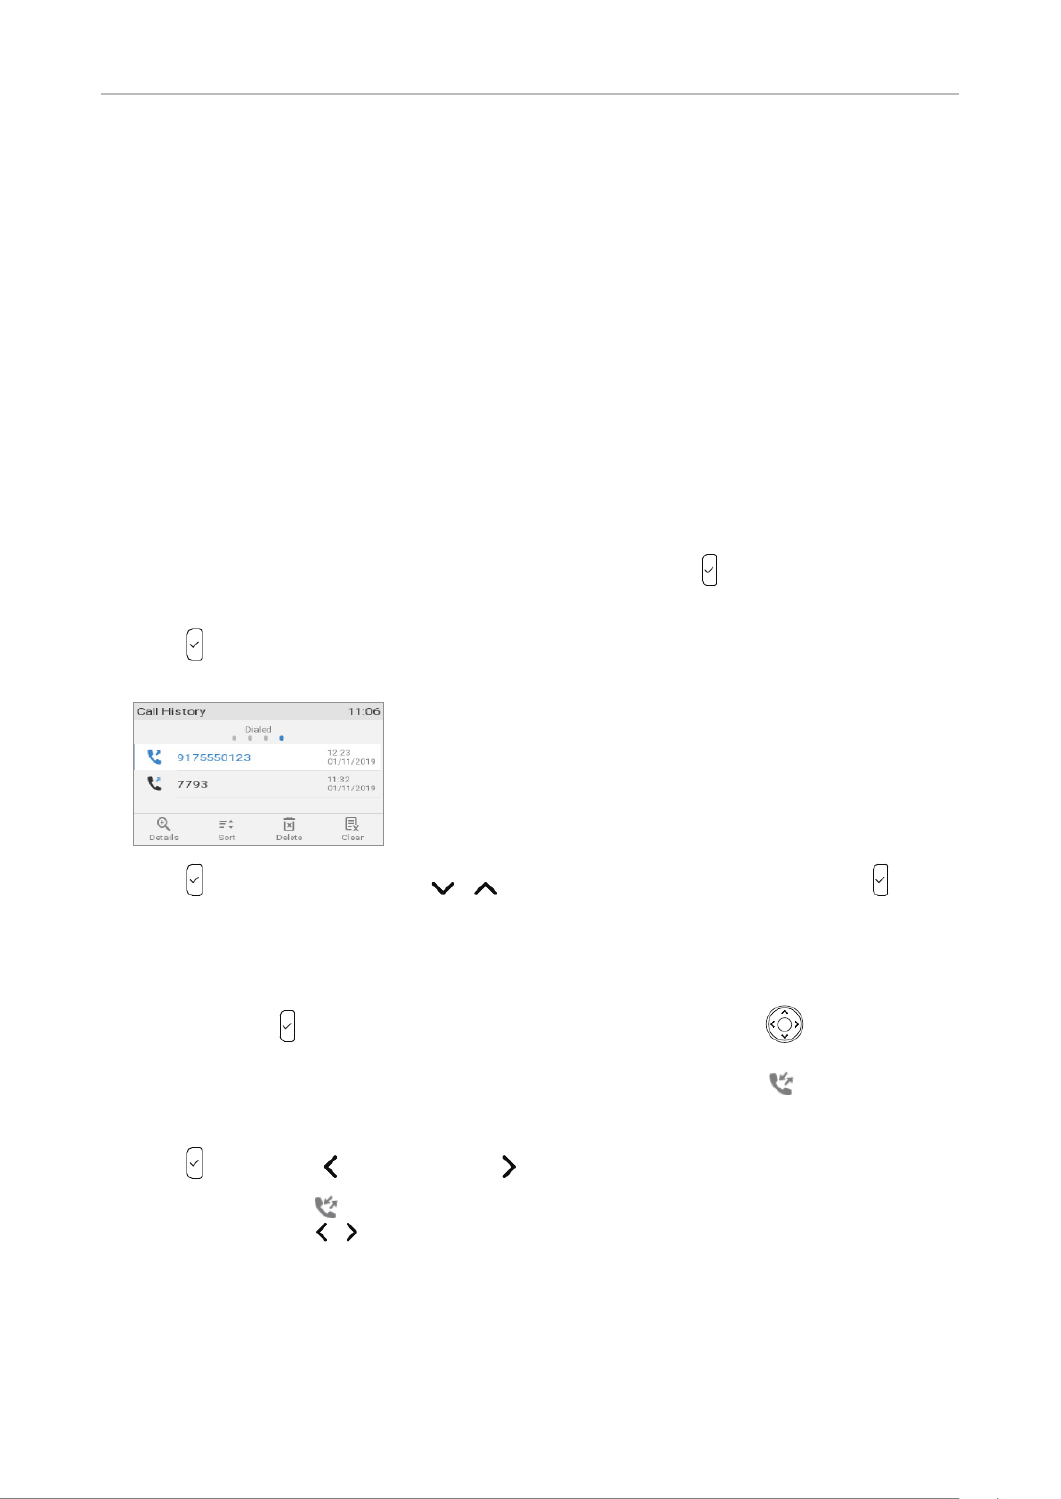
51
D717 User Manual Using the Phone
Using dierent dialing methods
Auto dial
When this function is enabled, the phone will dial the number on the display when the time span in
seconds specied in this setting has elapsed since the last digit was typed. In the default setting, the
function is switched o. It can be enabled on the phone and on its web interface. For the settings, see
"Auto dial" on page 102.
Note: This function can also be used on phones restricted to dialing a single number
when the receiver is taken o the hook, in waiting areas like airport lounges or waiting
rooms, for example. In this case, the phone number or IP address to be dialed by the
phone without the user's input is specied in an additional setting, Auto Dial Target. For
the settings, see "Auto dial target" on page 103.
Redialing
In the default setting, the list of dialed calls is mapped onto the call key and can be used to redial
the last number called.
1. Press to show the last numbers dialed (i.e., the call history for dialed calls), with the very last
number at the top.
2. . Press to dial that number or use / to select a dierent number and then press
Calling number from call history (missed, received, dialed calls)
In the default setting, the lists of dialed, received, and missed calls can be accessed directly by
pressing the call key and the left and right arrow "key" on the navigation key , respectively. The
three lists as well as the list of all calls are also available in the call history menu which is accessed
from the idle screen by pressing the context-sensitive function key underneath . For further
information, see "Call lists" on page 64.
1. Press (dialed calls), (received calls), or (missed calls) to open the respective call list.
Alternatively: Press on the idle screen (Fig. 1) to open the call history menu (Fig. 2) and select
a call list by pressing / on the navigation key.

52
D717 User Manual Using the Phone
Fig. 1 Fig. 2 Fig. 3
2. Use / on the navigation key to select a call from the call list.
3. Press to dial the selected number.
Calling number from phone directory
1. Press to open the phone's directory.
2. Use / to select a name or enter the rst letter(s) of the name on the alphanumeric keypad.
3. Press to dial the number.
Calling number from external directory
If an external directory (LDAP, for example) is available, you can access it from the dial screen.
1. Lift the handset o the cradle or press the speakerphone key to open the dial screen (Fig. 1).
2. Press the function key underneath to show the list of available directories and call lists
(Fig. 2).
Fig. 1 Fig. 2
3. Select the external directory from the list.
4. Use / to select a name or, if LDAP for example, enter the rst letter(s) of the name on the
alphanumeric keypad.
5. Press to dial the number.

53
D717 User Manual Using the Phone
Speed dialing
Setting speed dial numbers: See "Speed dial" on page 101. Mapping a speed dial number onto one
of the freely programmable function keys: See "Conguring the function keys", "Example 3, Speed
dialing" on page 82.
• Speed dial number on speed dial list
1. Enter the speed dial number (0-30) or character (#, *) assigned to the phone number you wish
to dial.
2. Press to dial.
• Speed dial number mapped onto a freely programmable function key 1-3: Press the key.
Calling emergency numbers
Numbers specied as emergency numbers can be dialled even when the keyboard is locked. See
"Emergency numbers" on page 93 on how to set emergency numbers. Several numbers (911, 112,
110, 999) have been precongured.
• On an unlocked keyboard: Enter the number and press to dial.
• On a locked keyboard: Enter the number. The phone dials the number as soon as you have
entered all the digits of one of the programmed emergency numbers.
Call completion
Note: This function depends on whether it is available in your network or not. On Snom
phones call completion means that when a called number is busy or not available, you
can have your phone call you back as soon as the dialed number is not busy anymore or
available again. The default setting is "o".
Changing the setting to turn on call completion : See "Call completion" on page 97.
1. When call completion is available and enabled, the symbol appears in the function key line
when you are calling a number (Fig. 1). Press the function key underneath to activate call
completion for this call.
Fig. 1 Fig. 2 Fig. 3
2. Press / if you wish to dial another number while waiting for call completion (Fig. 2). You
can now hang up the handset to return to the idle screen (Fig. 3); use handset, headset, or
speakerphone to dial another number; receive calls etc. Call completion will not interfere with the
normal operation of your phone.
Note: If you want to turn o call completion for this call (Fig. 2), press / .
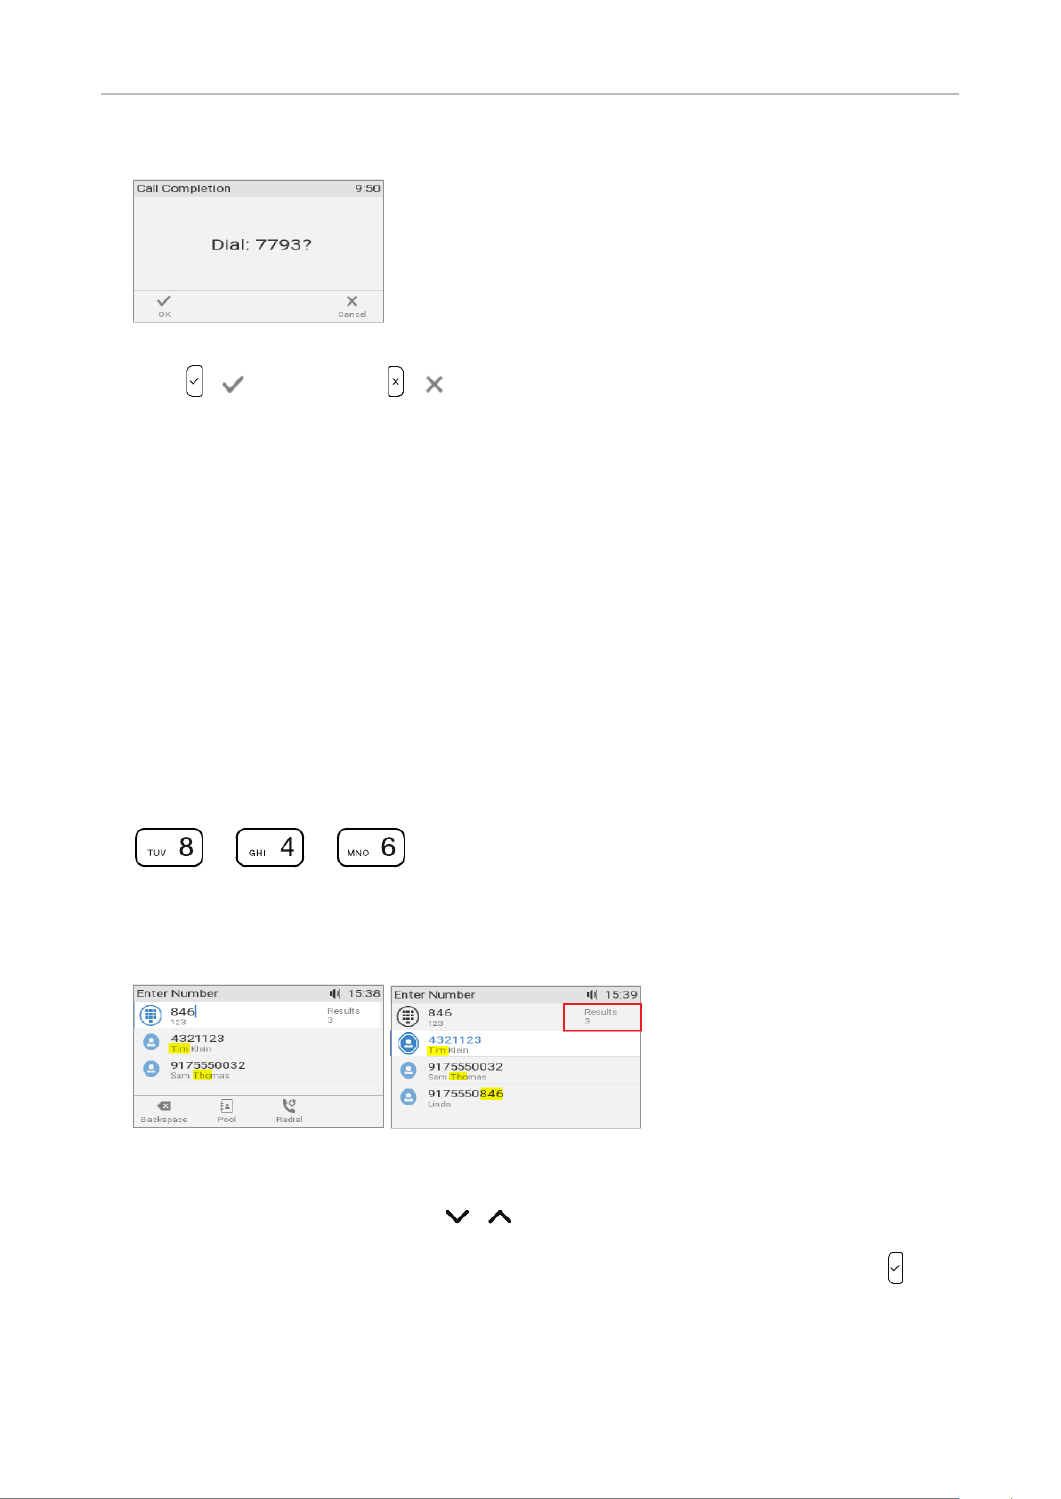
54
D717 User Manual Using the Phone
3. When the number becomes available, you will see it announced on the display (Fig. 4).
Fig. 4
4. Press / to dial; or press / to turn o call completion for this call.
QuickLookup (number guessing/auto completion)
When QuickLookup is enabled, the phone will search its directory and call lists - and send an LDAP
query if LDAP is configured - for names and numbers containing the sequence typed on the phone's
keypad. The search is triggered 500 ms (0.005 seconds) after the last digit of the required number
of digits has been entered. The default minimum number of characters that must be entered before
number guessing will start is 3.
The QuickLookup function can be disabled on the phone and on the phone's web interface. See
"QuickLookup (number guessing/auto completion)" on page 100 for the information on changing the
required number of digits and on disabling and enabling the function.
Using QuickLookup:
1. Start entering the name of the person or the phone number or any part of the phone number you
want to call. In our example, we are looking up the name "Tim" by pressing the number keys 8, 4,
and 6 on the phone's keypad.
+ +
Fig. 1
2. The matching results are names containing the letter sequences T, I, M, and T, H, O (Fig. 1) and a
number containing the digit sequence 8, 4, and 6 (Fig. 3).
Fig. 2 Fig. 3
3. If the number of matches, as indicated on the right side of the edit line, exceeds the number that
can be shown on the display, use the / arrows on the navigation key to scroll through the
list (Fig. 3).
4. Select the number you want to dial, in our example Tim Klein's number (Fig. 3), and press to
dial.

55
D717 User Manual Using the Phone
Accepting calls
Using dierent audio devices
Handset: Pick up the handset.
Headset: Press . If the phone is already in headset mode, you can also press the blinking line key.
Speakerphone: Press or or the blinking line key.
Automatically accepting calls
The default is "o". Turning the function on (admin mode only): On the phone's web interface >
Configuration Identity SIP # > tab > setting "Auto answer": Click the radio button . With this on
setting, your phone will automatically accept incoming calls when it is idle.
• If your are using Firmware version 8.7.2 and higher, calls will be accepted on speakerphone and
you will be alerted acoustically by a single long beep; press the headset key if you want calls
to go to the headset.
To turn o the acoustic alert, open the phone's web interface to the Preferences Audio page >
tab > section > "Auto Answer Indication" and click the radio button . Auto Answer o
• Firmware version 8.7.1 and lower: Open the phone's web interface to the Preferences page >
Auto Answer section > "Type of Answering" and select Handsfree (speakerphone) or Headset
from the drop-down menu.
If you want to be alerted acoustically by a single long beep, whenever the phone accepts an
incoming call, you need to change another default setting on the phones's web interface from o
to : on Preferences Auto Answer > > "Auto Answer Indication".
Call pick-up from another extension
You can pick up calls ringing on another extension, for example when the other extension is busy or
when the user is absent, by pressing a SmartLabel key on your phone (see "SmartLabels" on page
27). The prerequisites for this function are as follows:
◦It must be supported by the PBX.
◦ The extensions whose calls you want to pick up on your own extension must permit this
function. It is possible but not required to restrict the permission for monitoring to certain
users or groups of users.
Settings: See "Example 1, Extension monitoring and call pick-up" on page 80.
◦ Each extension to be monitored must be programmed onto one of the SmartLabel keys with
LEDs on the phone or onto a function key on a connected D7 Expansion Module. See chapter
"Configuring the function keys", "Example 1, Extension monitoring and call pick-up" on page
80 and "Example 2, Extension monitoring and call pick-up on D7 expansion module" on page
81 .
◦ If you want to see who is connected to or calling any of your monitored extensions, the
function must be enabled; the default setting is o. It can be turned on in admin mode only.
Open the phone's web interface > Advanced Settings Behavior Phone behavior page > tab >
section > setting and click the radio button Go to call-monitor on activity on.

56
D717 User Manual Using the Phone
When these prerequisites are met, the status of the monitored extension is indicated by the LED of the
function key:
◦ Blinking LED: Incoming call ringing. If the call is not answered, press the key to pick it up;
◦LED glowing steadily: The monitored extension is busy (in call, dialing, etc.);
and by the idle display showing the call-monitor state.
◦ When your phone is idle, any ongoing activity on all extensions monitored by your phone will
be shown on the display. In the above example, "7788 > 7904" indicates that extension 7788 is
calling extension 7904; "7781 x 7793" indicates that 7781 is connected to 7793 and that 7781
is the caller, 7793 the callee.
◦Press to close the screen and return to the idle screen.Calls
Call waiting
When you are in a call, another call coming in will be announced visually by the flashing call LED and
by the symbol appearing in the function key line (Fig. 1); it will also be announced acoustically
by a double beep. Call waiting can be restricted to visual or acoustic announcement only. In the
default setting, call waiting is enabled. See "Call waiting" on page 98 for the instructions on how to
change the setting.
When a call is waiting, you have the following options:
• Press the blinking line key of the call waiting to put your current call on hold and to accept the
second call (Fig. 1). This option is available only when there is a free line key available at the time
the call comes in.
Fig. 1 Fig. 2 Fig. 3
• Press the function key underneath (Fig. 1) to put the Call waiting screen on the display (Fig.
2); you will see the caller ID on-screen if it is being transmitted. With the waiting call on-screen:
◦press to reject the call waiting. The caller will hear the busy signal.
◦ press to accept the waiting call (Fig. 3) and put your current call on hold. With the newly
connected call on-screen (Fig. 3), press to put the newly held call on-screen (Fig. 4).

57
D717 User Manual Using the Phone
Fig. 4
◦ Press to return to the screen with your current connection (Fig. 2 and - if Connected
there is more than one call waiting - Fig. 7).
Note: Pressing and will aect the call shown on the display, i.e., your current
connection in Fig. 1, 3, and 5, the call waiting in Fig. 2, 6, and 7, and the call on hold in
Fig. 4.
◦ If there is more than one call waiting (Fig. 5, 6, and 7), press the keys , or , ,
respectively, to bring them on-screen and to return to the connected call.
Fig. 5 Fig. 6 Fig. 7
• If you do not wish to accept the waiting call, you can:
◦ ignore the announcement. If you have set call forwarding when busy, the call will be
transferred to that phone.
◦ reject the incoming call by putting the screen on the display and pressing Call waiting .
The caller hears the busy signal. Pressing for three seconds will also put the caller on the
"Deny" list of the phone's directory. Future calls from this number will not ring on the phone;
the caller hears the busy signal. For more information on the "Deny" list and how to remove
entries from it, see "Contact Types" on page 42.

58
D717 User Manual Using the Phone
Active calls
Hold
One call on hold
Press to put the ongoing call on hold. Held calls are indicated threefold:
◦By the text on the display.
◦By the slowly blinking line key.
◦By the slowly blinking call indication LED.
◦By the double beep.
You can now:
◦ transfer the held call blindly or with prior announcement - see
"Transferring calls" on page 60.
◦receive and make calls and put other calls on hold.
Pick up the held call by pressing its line key or by pressing again. If the other party hangs up
while on hold, the call is terminated on your phone as well, and the LED indicators are turned o.
Holding multiple calls
If you are in a call with one party and have one or more calls on hold or if there is more than one call
on hold, the symbol is available in the function key line. You can switch back and forth between
the active call and any call on hold. Up to six simultaneous calls are possible, if supported by the PBX.
• In Fig. 1–2 the phone is in one active call with a second call on hold. Fig. 1 shows the connected
call, Fig. 2 the call on hold. Press the function key underneath / to show the call not
currently on screen.
Fig. 1 Fig. 2
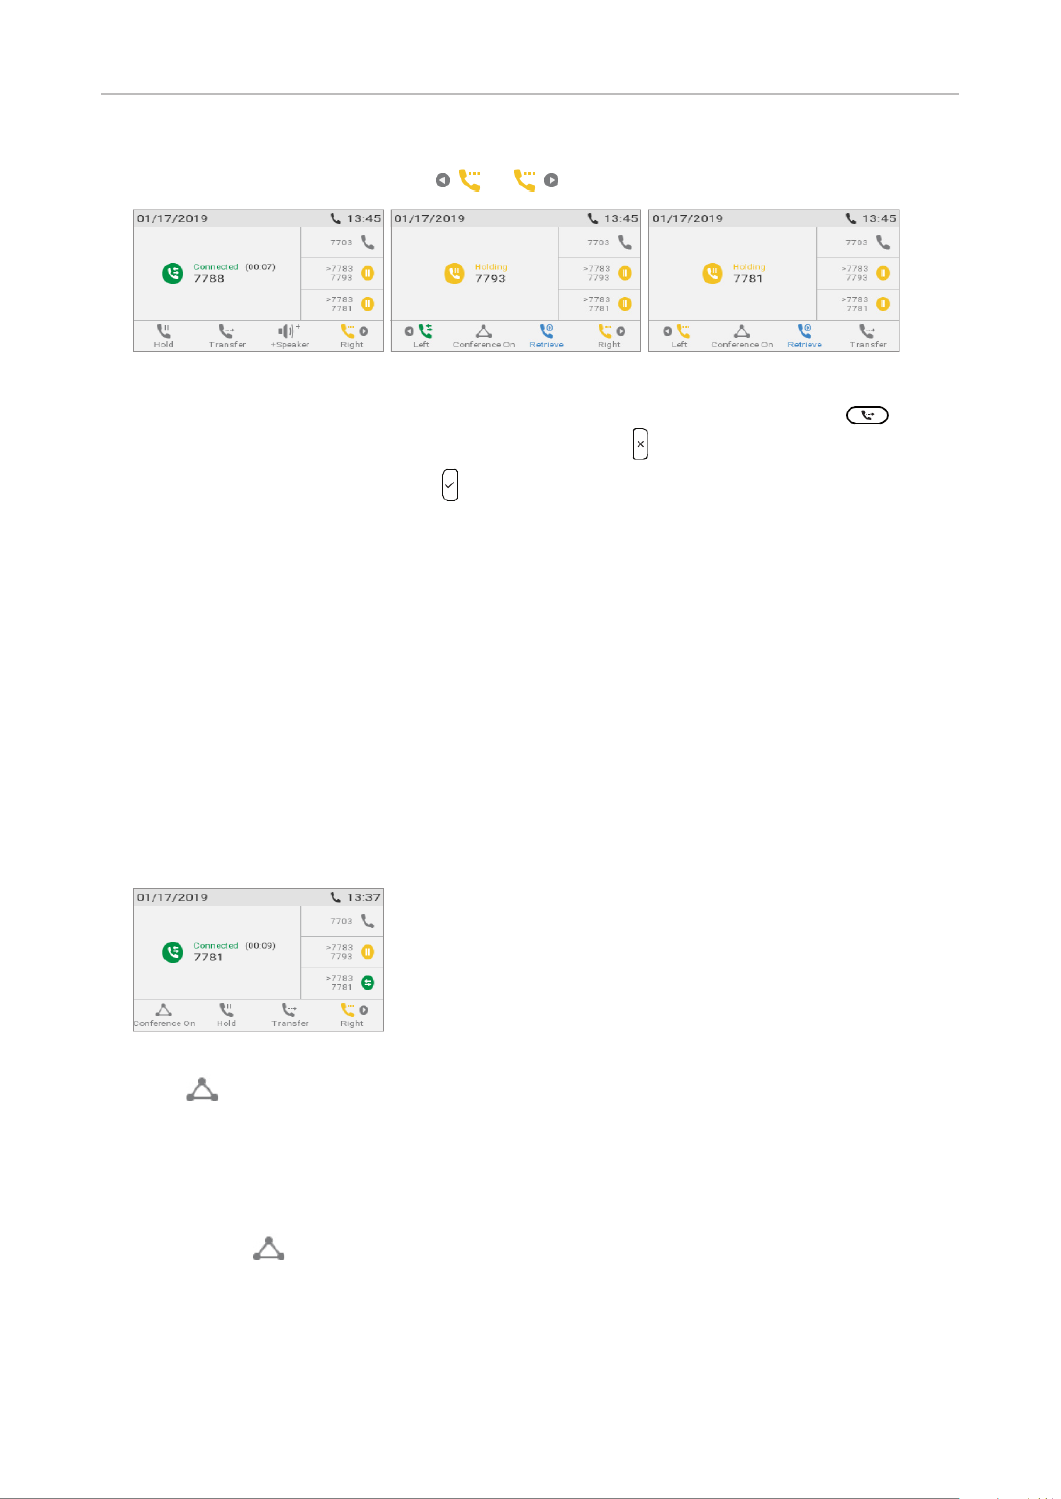
59
D717 User Manual Using the Phone
In Fig. 3–5 there are two calls on hold. Fig. 3 shows the connected call, Fig. 4–5 the calls on hold.
Press the function keys underneath / to show the call not currently on screen.
Fig. 3 Fig. 4 Fig. 5
• When the connected call is on-screen, you can transfer it to a third party by pressing (see
"Transferring calls" on page 60) or terminate it by pressing .
• When a held call is on-screen, press to connect to it and put the currently connected call on
hold.
Conference
The maximum number of participants is three.
Note: This section refers to phone-based conferences. For the number of participants
in server-based conferences and how to set up and join them, please check with your
network administrator or your VoIP provider.
Initiating a conference
1. Call the first intended participant and put him or her on hold.
2. Call the second intended participant.
Fig. 1
3. Press to start the conference.
Conference screen navigation
Your input on the phone's keys will aect the caller/callee(s) or the entire conference shown in the
contact area of the display. Example: A conference with three participants, including yourself. After
you have pressed (Fig. 1) to start the conference, the names, if available, and/or phone numbers
of the other participants are shown on-screen (Fig. 2 - 4). Fig. 2 shows the conference screen, i.e., all
of your conference partners while Fig. 3 and 4 show the screens for individual participants.

60
D717 User Manual Using the Phone
Fig. 2 Fig. 3 Fig. 4
• Selecting individual participants.
◦ On the conference screen (Fig. 2), press to select the first of the participants of the
conference; press again to select the next one of the participants (Fig. 3).
◦When viewing the second participant (Fig. 4), press to view the first participant.
◦ When viewing the first participant (Fig. 3), press to return to the conference screen
(Fig. 2).
• Talking to one participant in private. With one of the participants on-screen (Fig. 3 or 4), press
to converse with that participant in private; the other party is put on hold. To restart the
conference, press .
• Putting one participant on hold. With one of the participants on-screen (Fig. 3 or 4), press to
put this party on hold and to converse with the other party in private. To restart the conference,
press .
• To terminate the conference and the connections to both parties, return to the conference screen
(Fig. 2) and press .
Transferring calls
You can transfer connected calls as well as calls ringing on your phone.
• When you have a call on the line, there are two ways to transfer it to a third party:
◦ Announcing the call to the third party first, to make sure the call is welcome and will be
accepted: Attended transfer.
◦ Transferring the call unannounced: Blind transfer. There will be no feedback on whether the
third party is available and/or picking up the call.
• When a call is ringing on your phone, you can transfer it to a third party without answering it first
(blind transfer only).
Attended transfer
• With a single call on the phone.
1. Put the call on hold. In our example, the caller on hold is 7781.
Fig. 1 Fig. 2 Fig. 3

61
D717 User Manual Using the Phone
2. Dial the number you want to transfer the call to and announce the call (Fig. 2). You can also
select a number from the internal directory or one of the available external phone directories
(see "Calling number from phone directory" on page 52 and "Calling number from external
directory" on page 52).
3. If the third party wants to accept the call, press . The "holding 7781" screen appears
again, and 7793 is shown as having been put on hold (Fig. 3).
4. Press to complete the transfer. You may briefly see the messages "Disconnected 7781" (Fig.
4) and "Disconnected 7793", indicating that the transfer was completed.
Fig. 4
• With more than one call. All calls must be on hold. In the below example you have two calls from
phone numbers 7781 and 7788 on hold. You want to transfer the call from 7788 to 7793.
1. Dial 7793 and announce the call.
2. If the third party wants to accept the call, press . If the "holding 7781" screen, i.e., the call
you want to transfer, appears on-screen (Fig. 4), press to bring "holding 7788" do not
on-screen (Fig. 5).
Fig. 4 Fig. 5 Fig. 6
3. Press . The remaining call on hold or the first of the remaining calls on hold will then
appear on-screen (Fig. 6).
Blind transfer
• Blind transfer of active call
1. With a call on the line (Fig. 7), press . The dial screen will appear.
Fig. 7 Fig. 8 Fig. 9

62
D717 User Manual Using the Phone
2. Dial the number (Fig. 8), or press to select a number from the internal directory or one of
the available external phone directories (see "Calling number from phone directory" on page
52 and "Calling number from external directory" on page 52).
3. Press . You may briefly see two "Disconnected" messages followed by the callee and caller's
name/number, indicating that the transfer was completed (Fig. 9).
Note: If a call is waiting (Fig. 10), as indicated by the symbol in the lower right corner,
you must reject or transfer the call waiting you can transfer your active call blindly. before
Fig. 10 Fig. 11
a. Press the function key underneath . The "Call Waiting" screen (Fig. 11) appears.
b. Press to reject the call. The caller hears the busy signal.
Note: If you want to transfer the call waiting, see next section, "Blind transfer of
call waiting".
• Blind transfer of call waiting
1. If you are in a call and want to transfer a call waiting (Fig. 10, above), press the function key
underneath . The "Call Waiting" screen (Fig. 11, above) appears.
Note: Your active call remains active while you are transferring the ringing
call.
2. Press . The dial screen (Fig. 2, above) appears.
3. Enter the number of the third party you intend to transfer the call to and press . The
"Connected" screen with your current call reappears.
• Blind transfer of ringing call
1. With a call ringing (Fig. 12), press .
Fig. 12
2. The dial screen (Fig. 8, above) appears.
3. Enter the number of the third party you intend to transfer the call to and press .
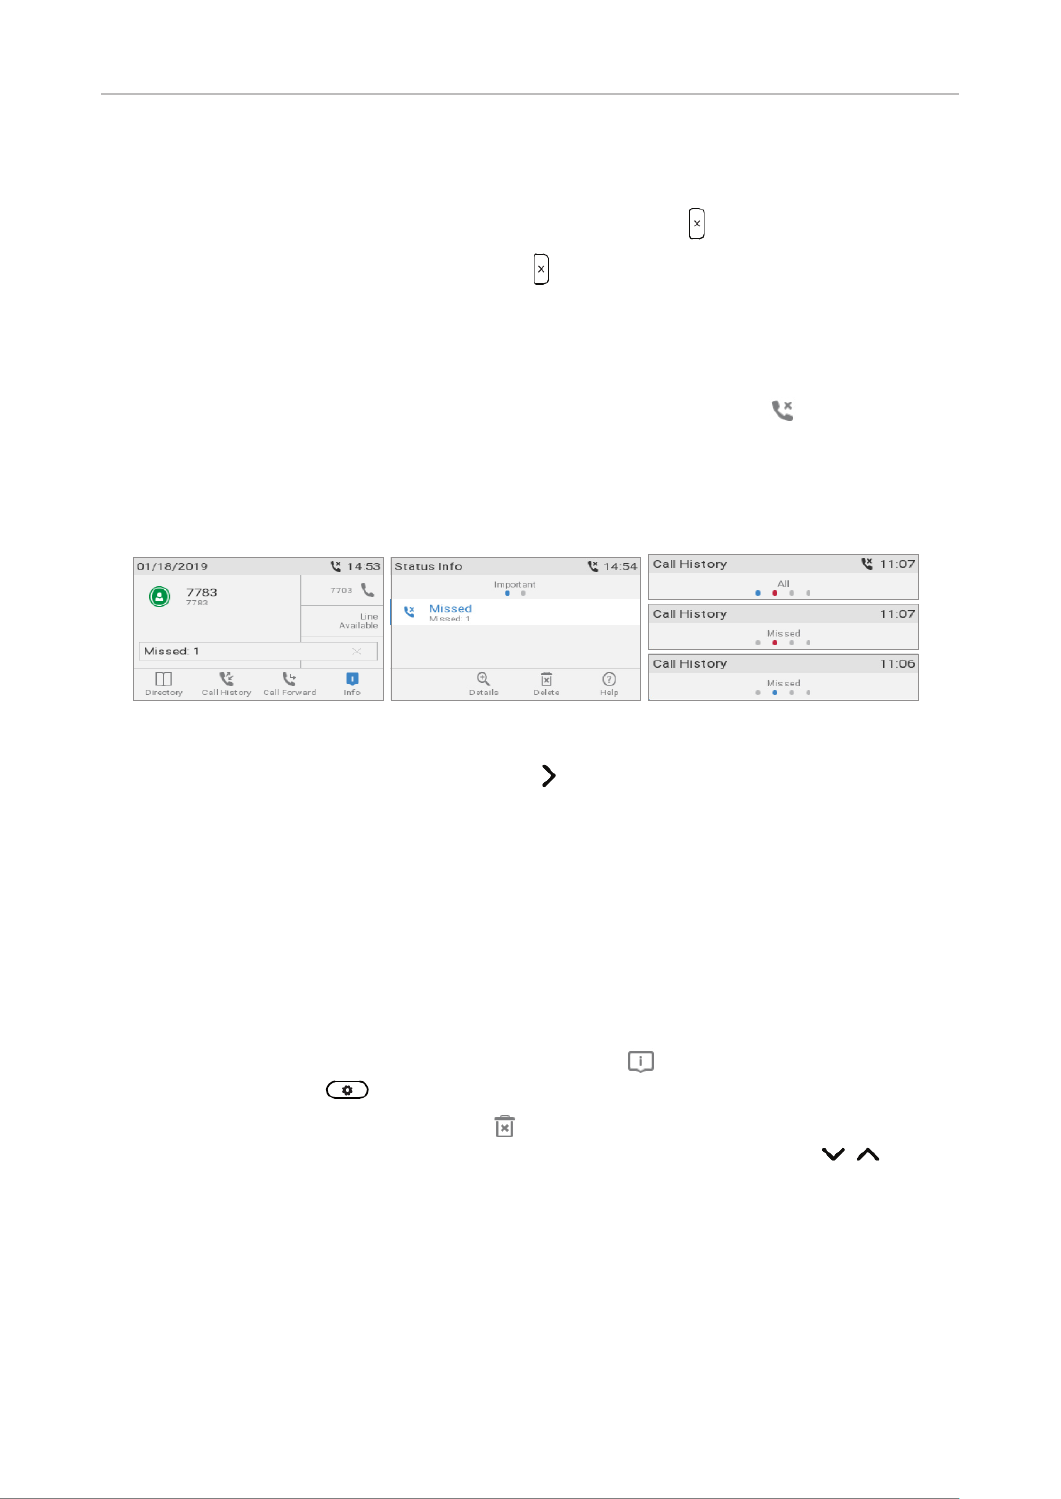
63
D717 User Manual Using the Phone
Terminating calls
• When using the handset: Place the handset in the cradle or press .
• When using speakerphone or a headset: Press .
Missed calls
Missed calls are indicated by the call LED (steady light), the missed call symbol in the status line
(Fig. 1, 2, and 3), and the "Missed" message with the number of new missed calls on the display (Fig.
1) and/or on the Status info screen (Fig. 2).
Note: If there are status messages with a higher priority, the status line will show the
message with the highest priority.
Fig. 1 Fig. 2 Fig. 3
• To view your missed calls, press the right arrow on the navigation key. The red dot indicates
the arrival of new missed messages since the last time the missed calls were viewed (Fig. 3). It
is removed from the list of all calls and turns blue in the list of missed calls once the list has been
viewed.
• Turning o the missed call indications (LED and "Missed" message). Use one of the following
methods:
◦ View the details of the missed call(s) (see "Call lists" on page 64). You can open the details
either from the list of all calls (Fig. 5 of "Call lists") or from the list of missed calls (Fig. 6 of
"Call lists")
◦ Via the Status info screen.
1. Press the function key underneath the symbol , if available (Fig. 1), or open the Info
Settings Information Status Info menu > > to view the status info messages.
2. Press the function key underneath to delete the "Missed" message line (Fig. 2). If there
are other status info messages, you may need to use the up/down arrows on the
navigation key to select the "Missed" message line.
Note: This will only remove the status message "missed" from the idle display and turn o
the LED. The call history will continue to show a new missed call (Fig. 3) until the details of
the missed call have been viewed.

64
D717 User Manual Using the Phone
Call lists
Four call lists of missed, dialed, received, and all calls are stored on the phone. They contain the
number, time and date, and duration of the calls. If the memory allotted to storing the call lists is full,
the oldest ones will be overwritten. You can view all calls in the list of all calls, sorted by date and
time.
1. Press to open the call history (Fig. 1).
Fig. 1 Fig. 2 Fig. 3 Fig. 4
The red dot indicates the arrival of new missed messages since the last time the missed calls
were viewed (Fig. 4). When the list has been viewed, the red dot is removed from the list of all
calls, and it turns blue in the list of missed calls.
2. To view the list of missed, received, or dialed calls, press the left and right arrows on the
navigation key to put the lists on-screen one after the other (Fig. 2).
Note: On the idle screen you can also use the following keys to view the lists directly
(default setting):
- Missed calls: Press the right arrow on the navigation key. See also "Missed calls" on
page 63.
- Received calls: Press the left arrow on the navigation key.
- Dialed calls: Press .
3. On each list, the latest call is at the top of the list (Fig. 1, above). Scroll through the list with the
up/down arrows on the navigation key. The icons indicate the type of call:
- missed call
- received call
- dialed call
◦ Press to dial the number of the selected call.
◦ Press to delete the selected call.
◦ Press to delete the entire list.
◦ Press for three seconds to return to idle screen.
◦ Press to sort the calls.
◦ Press to show the call details of the selected call.

65
D717 User Manual Using the Phone
Fig. 5 Fig. 6 Fig. 7
- Missed calls: To, from, time (and date if not today), total number of missed calls from
caller (Fig. 5 and 6).
- Received and dialed calls: To, from, time (and date if not today), duration of call (Fig. 7).
◦ When viewing the details of a call:
- Press to add the caller/callee to the phone's directory. See "Editing existing entry" on
page 44 for information on adding a name and other data to the new directory entry.
- Press to delete the call.
Locking and unlocking the keyboard
Press a A» for three seconds to lock and unlock the keyboard; you may need to enter a PIN to unlock,
if a PIN has been set. When the keyboard is locked, only the emergency numbers congured on the
Preferences page of the phone's web user interface can be dialed.
Setting a timer for automatically locking the keyboard after inactivity, setting a PIN for locking and
unlocking the keyboard, and disabling keyboard locking: see "Keyboard locking" on page 94. For
more information on dialing and setting emergency numbers, see "Calling emergency numbers" on
page 53 and "Emergency numbers" on page 93.
Rejecting or redirecting incoming calls
This includes manual and automatic rejection and redirection and automatic rejection of anonymous
calls.
Manually
If you do not want to pick up a ringing call, you have three options: Letting the call ring and not
picking it up, rejecting it manually, or transferring it manually to a third party.
• Rejecting a ringing call manually.
◦ Press . The caller will hear the busy signal.
◦ Press for two seconds to reject the call and additionally place the caller on the "Deny" list of
the phone's directory so that calls from that number will never ring on your phone; the caller
will always hear the busy signal. For more information on the "Deny" list and how to edit or
remove entries from it, see "Contact Types" on page 42.
• Transferring the ringing call to another phone (blind transfer). See "Blind transfer of ringing call"
on page 62.
66
D717 User Manual Using the Phone
Automatically
There are four options for rejecting incoming calls automatically or to have them forwarded
automatically, either always or under certain conditions:
• Deny List. Calls from phone numbers on this list will not ring on your phone; callers will hear the
busy signal. For further information, see "Contact Types" on page 42.
• DND - do not disturb mode . When this function is turned on, callers hear the busy signal.
If there is an active setting for call forwarding on busy, incoming calls will be forwarded to
the number specied in the setting. For more information, see "Preprogrammed, variably
programmable function keys" on page 21.
Exception: Phone numbers designated VIP in your phone's directory will ring on
your phone even when DND is on.
• Call forwarding. For further information, see "Call forwarding" on page 67 and 94.
• Rejecting anonymous calls: See next section.
Rejecting anonymous calls
With this setting you can have your phone reject calls from phones that are blocking or not
transmitting their numbers.
Please note: Calls from analog phone connections without caller ID will, most likely,
be received as anonymous calls. They will be rejected when you turn this function on.
Activating rejection of anonymous calls
1. . Press
2. Select Call Features and press .
3. Select Incoming Calls and press .
4. Select Reject anonymous. The default setting is o (Fig. 1).
5. Press to change the setting to on (Fig. 2). (When the function is active, pressing will turn it
o.)
Fig. 1 Fig. 2
6. Press for two seconds to return to the idle screen.
68
D717 User Manual Using the Phone
Making/changing the settings on the phone and turning on call forwarding
Forward all Forward when busy Forward after timeout
Press
Press Call Features Call Features Call Features
Press Call Forwarding Call Forwarding Call Forwarding
Press Forward All Forward when Busy Forward after Timeout
Press or Enable forwarding or Enable forwarding or Enable forwarding
The setting will change from o (Fig. 7, below) to on, and the setting for the forwarding target
will appear (Fig. 8). In the case of forwarding after timeout, the setting for the time span will
also appear (Fig. 9).
Press Target Target Target
Type phone number phone number phone number
Press
Press Call Forwarding time
Type number of seconds
Press
Press for two seconds to return to the idle screen.
Fig. 7 Fig. 8 Fig. 9
Turning o call forwarding
Forward all Forward when busy Forward after timeout
Press
Press Call Features Call Features Call Features
Press Call Forwarding Call Forwarding Call Forwarding
Press Forward All Forward when Busy Forward after Timeout
Press
or Enable forwarding or Enable forwarding or Enable forwarding
The setting will change from on to o, and the settings for the forwarding target and, in the
case of timeout, for the time span will disappear.
Press for two seconds to return to the idle screen.

69
D717 User Manual Using the Phone
Turning forwarding of all calls on/o with a function key
Turning call forwarding on
Note: Call forwarding is set separately for each congured identity. When the setting is
done on the phone, it applies to the identity selected as the outgoing identity at the time.
To turn on call forwarding for several congured identities, select each one in turn as
the outgoing identity and repeat the setting.
1. Select the identity if there is more than one active identity.
2. Press the function key underneath . The display will show the Target when Forwarding
screen.
Note: If is not available when the display is in idle mode, you can make it available in
the phone's settings menu and on the Function Keys page of the phone's web interface.
For further information see "Conguring the function keys", "Example 4, Changing
setting of context-sensitive key" on page 83. Default settings: See "At a glance" on
page 18.
3. If no forwarding number has been set or if it needs to be changed, make the necessary entries.
4. . Press
Turning call forwarding o:
1. Select the identity if there is more than one active identity.
2. Press the function key underneath .
3. Repeat for other identities, if applicable.
Termékspecifikációk
| Márka: | Snom |
| Kategória: | irodai telefon |
| Modell: | D717 |
Szüksége van segítségre?
Ha segítségre van szüksége Snom D717, tegyen fel kérdést alább, és más felhasználók válaszolnak Önnek
Útmutatók irodai telefon Snom

22 Augusztus 2024
21 Augusztus 2024
21 Augusztus 2024
13 Augusztus 2024
13 Augusztus 2024
12 Augusztus 2024
10 Augusztus 2024
8 Augusztus 2024
8 Augusztus 2024
7 Augusztus 2024
Útmutatók irodai telefon
- irodai telefon Samsung
- irodai telefon Yamaha
- irodai telefon LG
- irodai telefon Panasonic
- irodai telefon Siemens
- irodai telefon Geemarc
- irodai telefon Vimar
- irodai telefon Alcatel
- irodai telefon Crestron
- irodai telefon Gigaset
- irodai telefon Alcatel-Lucent
- irodai telefon TOA
- irodai telefon Cisco
- irodai telefon Unify
- irodai telefon Bogen
- irodai telefon Avaya
- irodai telefon Shure
- irodai telefon Plantronics
- irodai telefon EnGenius
- irodai telefon Grandstream
- irodai telefon Yealink
- irodai telefon Bang & Olufsen
- irodai telefon Tiptel
- irodai telefon Uniden
- irodai telefon AKG
- irodai telefon Topcom
- irodai telefon Ericsson
- irodai telefon Teltonika
- irodai telefon Aastra
- irodai telefon AGFEO
- irodai telefon Ascom
- irodai telefon Argus
- irodai telefon Fortinet
- irodai telefon Swissvoice
- irodai telefon KPN
- irodai telefon Belgacom
- irodai telefon Profoon
- irodai telefon Innovaphone
- irodai telefon Vaddio
- irodai telefon Mitel
- irodai telefon Ranex
- irodai telefon Beyerdynamic
- irodai telefon Gigaset Pro
- irodai telefon DeTeWe
- irodai telefon Telegartner
- irodai telefon Polycom
- irodai telefon ClearOne
- irodai telefon Nortel
- irodai telefon AT-T
- irodai telefon DSS
- irodai telefon KONFTEL
- irodai telefon Philips-NEC
- irodai telefon Aspi
- irodai telefon Telekom
- irodai telefon Futiro
- irodai telefon AudioCodes
- irodai telefon Ooma
Legújabb útmutatók irodai telefon

15 Január 2025

1 Január 2025
1 Január 2025
1 Január 2025
30 December 2025
30 December 2025
22 December 2024
11 December 2024
16 Október 2024
16 Október 2024