Használati útmutató Segway Navimow H500E
Segway
Fűnyírógép
Navimow H500E
Olvassa el alább 📖 a magyar nyelvű használati útmutatót Segway Navimow H500E (69 oldal) a Fűnyírógép kategóriában. Ezt az útmutatót 7 ember találta hasznosnak és 2 felhasználó értékelte átlagosan 4.5 csillagra
Oldal 1/69

Read the User Manual carefully before use.
Make sure you understand all the instructions and safety warnings.
Version 2.1
04/13/2023
User Manual
Navimow

Table of Contents
Original Instructions
1. Navimow Overview
1.1 Introduction
1.2 Safety Warning
1.3 What's in the Box
1.4 Parts and Functions
1.5 Symbols and Decals
1.6 How the EFLS Works
1.7 How to Choose a Model
1.8 Specifications
2. Setup & Mapping
2.1 Before You Start
2.2 Install the Charging Station and the Antenna
2.3 Charge and Activate the Mower
2.4 Set up the Work Area
2.5 Test Drive
3. Daily Use
3.1 Display and Control on the Mower
3.2 Light Cue
3.3 Mow
3.4 Navimow app
3.5 Notifications
3.6 Settings (Mower)
3.7 Settings (app)
3.8 IoT
3.9 Obstacle Avoidance
3.10 VisionFence Sensor (optional)
3.11 Accessories (optional)
4. Maintenance
4.1 Cleaning
4.2 Replace Blades
4.3 Transportation
4.4 Battery
4.5 Power Supply
4.6 Storage
4.7 Recycling and End-of-life Disposal
4.8 Others
5. FAQ & Troubleshooting
6. Important Information
6.1 Trademark and Legal Statement
6.2 EC DECLARATION OF CONFORMITY
6.3 UKCA DECLARATION OF CONFORMITY
6.4 Certifications
6.5 Limited Warranty
6.6 About the Manual
6.7 Contact Us
3
3
4
6
7
9
10
11
13
15
15
16
20
23
27
28
28
30
32
34
36
37
41
42
43
43
46
49
49
50
51
51
53
53
53
54
55
59
59
60
61
62
64
67
67

Welcome
Thank you for choosing Navimow!
With Exact Fusion Locating System (EFLS) and superb
traversing capabilities, Navimow can handle lawns of all
types. No perimeter wires are needed and it's super easy to
use, thanks to smart app connectivity and the intuitive
control panel.
Collection of grass is not necessary because the fine grass
clippings serve as a natural fertilizer. Enjoy the fun of
carefree mowing and a perfectly maintained lawn.

1. Navimow Overview
1.1 Introduction
Navimow
Segway Navimow is an advanced robotic mowing system that uses a virtual boundary, eliminating the need for complicated
perimeter wiring. Easy to operate and manage, Navimow gives you more free time to do the things you love and an effortlessly
impeccable lawn with every use.
Navimow contains a robotic mower, a charging station, and a GNSS (Global Navigation Satellite System) antenna. The robotic
mower and GNSS antenna simultaneously receive positioning signals from satellites to locate the mower and the work area. The
charging station charges the mower and transmits the satellite positioning signal received by the GNSS antenna to the mower to
improve the positioning accuracy of the mower.
The Mower
The robotic mower is powered by a lithium battery and can automatically cut grass in a defined work area. The work area can be
defined by remotely controlling the mower through the Navimow app as needed. When mowing, the mower's driving path is
automatically planned by the algorithm according to the shape of the work area to achieve the highest mowing efficiency. If the
entire lawn cannot be completed at one time, the mower will automatically return to the charging station to charge. When the
charging level reaches 85%, the mowing resumes from the position where it stopped.
Navimow app
The Navimow app is an important part of the Navimow system. You can follow the interactive guidance shown via the app to
complete the system installation and set up the work area. You can also use the app to adjust the settings of the mower, manage
the work area, view the work status of the mower, control the mower remotely, etc. You can also get the latest and most compre-
hensive official Help and Support content through the app.
MOW NOW
3

1) Be sure to install and operate the mower and the charging station according to the instructions. Go to navimow.segway.com for
the complete User Manual and the latest user materials.
2) The product can be used both by consumers and for professional purposes. Using the mower for purposes other than mowing
can bring serious injury. To avoid risks of injuries, please read and understand all the warnings and cautions. Please understand
that you can reduce the risk by following the instructions and warnings in this manual, but you cannot eliminate all risk. The
operator or user is responsible for accidents or hazards occurring to other people on their property.
3) Navimow has many built-in safety sensors, however, safety risks still exist. Set a mowing time when there are no people or pets
on the lawn. Inform the neighbors about the risks for accidents or hazards. When using the mower on a public lawn, or when
your lawn is open to your neighbor or street, protect or fence the lawn, or put up a warning sign around the working area that
says: WARNING! Automatic lawn mower! Keep away from the machine! Supervise children!
4) DO NOT modify the mower by yourself. Modifications could interfere with mower operations, result in serious injury and/or
damage, or void the Limited Warranty. Use only Segway approved parts and accessories.
5) The manufacturer recommends the user to be 18–70 years old. Be sure to get the necessary training before operating the machine.
WARNING
Never allow children, persons with reduced physical, sensory or mental capabilities or lack of experience and knowledge or people
unfamiliar with these instructions to use the machine. Local regulations may restrict the age of the operator.
Before Mowing:
Regularly check that all parts of the mower can function normally.
For the best mowing results, it is recommended to mow in dry weather. Mowing in the rain can make the grass stick on the
product and the mower may slip. DO NOT mow in bad weather, such as heavy rain, thunderstorms or snow.
Periodically inspect the area where the machine is to be used and remove all stones, sticks, wires, bones and other foreign
objects. The Limited Warranty does not cover damages caused by objects left on the lawn.
To avoid possible damage, keep the operating mower at least 1 m (3 feet) away from sprinkler heads. The mower and sprinklers
should NOT work simultaneously. Time the mower so that it works at a different time from sprinklers.
NEVER allow children to touch the power supply unit, charging station, blades, the battery compartment, or any parts with gaps such as
the wheels.
WARNING
Never operate the machine and/or its peripherals with defective guards or shields, or if the cord is damaged or worn.
When Mowing:
Keep away from the rotating blades! DO NOT put hands or feet under or near the rotating blades.
Watch out for projectile objects! Keep a safe distance from the mower when operating.
DO NOT leave the machine to operate unattended if you know that there are pets, children or people in the vicinity.
DO NOT overreach. Keep your balance at all times and always be sure of the footing on slopes. Walk, never run while operating
the machine or its peripherals.
WARNING
DO NOT allow children to be in the vicinity or play with the machine when it is operating.
DO NOT lift the mower in operation. DO NOT ride on the mower.
DO NOT mow on areas with slopes steeper than the maximum incline inside the working area (45%), as well as the boundary (10%).
If the mower makes an abnormal sound or signals an alarm, press the STOP button immediately.
If there are abnormal vibrations, turn off the mower, place it on level ground for about 30 seconds and then restart. If the issue
persists, contact authorized after-sales service.
DO NOT touch moving hazardous parts before they have come to a complete stop.
1.2 Safety Warnings
IMPORTANT
READ CAREFULLY BEFORE USE
KEEP FOR FUTURE REFERENCE
4

Safe Usage:
DO NOT operate the mower outside the temperature limits: 0–50℃ (32–122°F), because low/high temperatures can decrease
mower performance and even lead to accidents.
DO NOT place anything on the mower or the charging station.
It is recommended to conduct regular maintenance of the mower (see 4. Maintenance) by an adult.
Regularly check the warning devices to ensure they are effective. These devices include the buzzer, the LED light on the
charging station, and the ambient light on the mower.
Before charging, please read How to Charge in Chapter 2.3. Improper use may cause electric shock, overheating, or leakage of
corrosive liquid.
If the cord on the power supply or the extension cable becomes damaged or entangled during use, disconnect the power supply
from the power socket and then untangle. To avoid a hazard, pull the body of the plug rather than the cord when separating the
power supply from the power socket. Contact after-sales service and have a professional technician to repair or replace the
cord.
5

1.3 What’s in the Box?
If there are missing or defective parts, please contact
after-sales service. We recommend retaining the
package for future transportation and shipping.
Navimow
Quick Start Guide
Welcome Card Important Information
User materials
Quick Start GuideImportant Information
Welcome Card
Ultrasonic sensor
*For H3000E
Spare blades and bolts
12 12
Power supply Extension cable Pegs to secure the extension cable
Charging station and the installation kit
Antenna installation kit
GNSS antenna kit
10
5
WARNING
Sharp edges. Do not point at people.
4
6

Ambient light: Navimow will have specific lighting effects to remind you to pay attention to the state of the mower. See 3.2 Light Cue.
Lifting handle: Helps you to lift the mower when necessary. See 4.3 Transportation.
Stop button: Stops the mower and the blade immediately. When the mower encounters a fault and displays a 4-digit error code,
press the STOP button to clear the error code and try to fix the fault. See 5. FAQ & Troubleshooting for detailed guidance.
Control panel: The buttons on the control panel can be used for the basic operations of the mower: switch the mower on and off,
start mowing, return to the charging station, enter the PIN code to unlock the mower, etc. See 3.1 Display and Control on the Mower.
Rain sensor: For raindrop detection. See Rain sensor in 3.6 Settings (Mower).
Bumper: When the bumper hits an obstacle and triggers the internal sensor, the mower will go backward and avoid the obstacle.
See Bumper in 3.9 Obstacle Avoidance.
GNSS antenna in the mower: In addition to the GNSS antenna connected to the charging station, there is also a GNSS antenna
inside the mower to improve positioning accuracy. See 1.6 How the EFLS Works.
Ultrasonic sensor: Certain models are equipped with an Ultrasonic sensor, which could detect obstacles and avoid collision. The
sensor is also sold separately and can be installed on all Navimow models. Consult your dealer for details.
1.4 Parts and Functions
Top view
STOP button
Control panel
Rain sensor
Buzzer
Ultrasonic sensor
Charging strip
Bumper
Lifting handle
Ambient light
GNSS antenna in the mower
7

NOTE: If the GNSS antenna has poor signal due to surrounding buildings or trees, the mower will not work properly. You need to
find a better spot for the antenna until the LED indicator turns green/blue. If no suitable place can be found, Segway recommends
purchasing the antenna extension kit for roof/wall installation.
Bottom view
submerge the mower in water, otherwise, the components may be damaged and the Limited Warranty will be voided.
Blade disc
Blade
Rear wheel/Hub motor
Blade fender
Battery compartment
Front wheel
Drainage outlet
Power interface
GNSS antenna
LED indicator
Contact strip
Antenna interface
LED indicator: Indicate different working states with various colors. See 3.2 Light Cue for details.
Blade: The blades can rotate freely after being attached to the blade disc. When mowing, the spinning blade disc will generate
centrifugal force to keep the blades pointing outside so that the blades can cut grass. When hitting an obstacle, the blade will
turn inside. See 4.2 Replace Blades for replacement guide.
Blade disc: Blade disc height adjustment through Navimow App. See How to change the cutting height in 3.6 Settings (Mower).
Charging station and the GNSS antenna
GNSS antenna: Receives satellite signals to improve the positioning accuracy of the mower. See 1.6 How the EFLS Works for
8
This product conforms to the applicable
EC Directives.
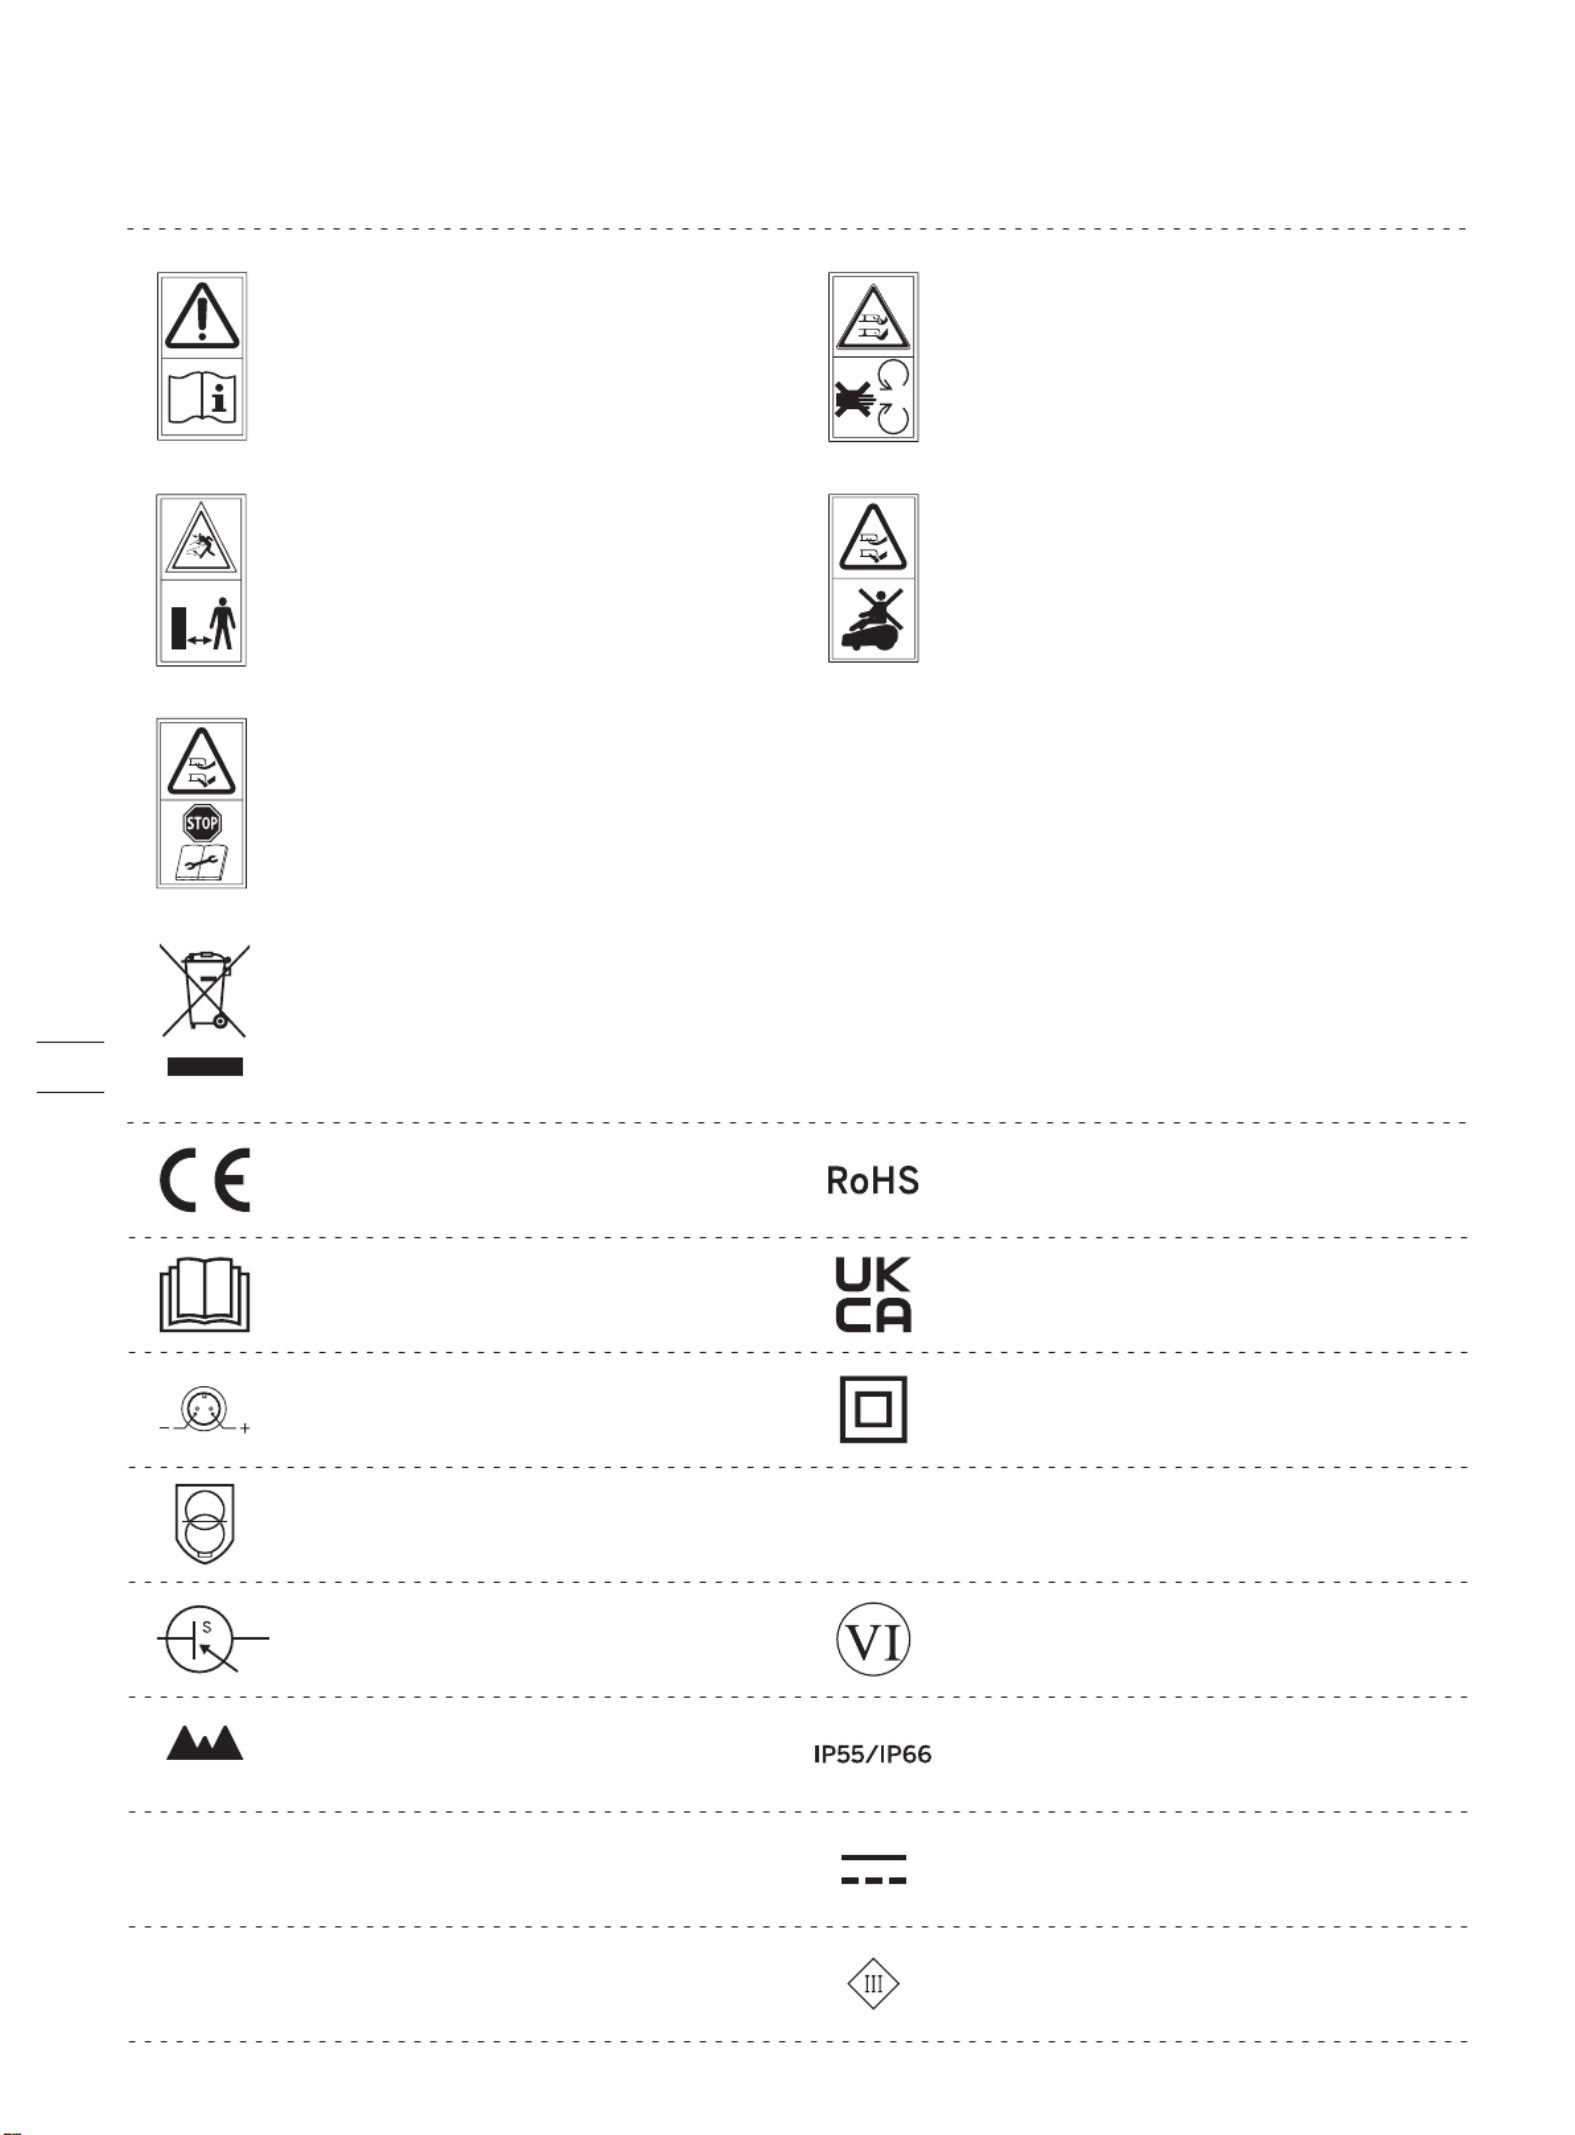
1.5 Symbols and Decals
Please study the symbols on the product and labels carefully and understand their meaning:
WARNING Read instruction -
manual before operating the
machine.
WARNING-Do not touch
rotating blade.
WARNING-Keep a safe
distance from the machine
when operating.
WARNING-It is not permitted to dispose of this product as normal household
waste. Ensure that the product is recycled in accordance with local legal
requirements.
WARNING-Do not ride on the
machine.
*The disabling device hereby refers to the PIN code. Make sure the mower is locked by
the PIN code before lifting or operating.
Polarity of the charging port
Class II appliance
IP55/IP66
SMPS incorporating a short-circuit-proof safety isolating transformer (inherently or
non-inherently)
SMPS (Switch mode power supply unit)
DoE Level VI efficiency
The maximum altitude of use is 5000m
The maximum temperature of use is 40
℃
Direct current
Alternating current
Before charging, read the instructions.
This product conforms to the applicable
UK legislation.
This product conforms to the regulations
of Restriction of Hazardous Substances.
ta: 40℃
≤ 5000m
~Class III appliance
9

Multi-sensor data fusion improves the applicability of EFLS to complex environments, but serious satellite signal issues will still
greatly affect the normal operation of Navimow. Below are major cases of satellite signal issues:
Blocking
If there are any obstacles on or surrounding the antenna and/or the mower, the signal will be weakened or blocked.
Solution: DO NOT install the charging station and antenna under a roof, tree or anywhere that may block the signal. You can also
buy the antenna extension kit and install the antenna on the roof/wall.
Signal Interference
Signals from the satellite are transmitted to the antenna after being reected by the wall, instead of directly from the sky. This
is called Multipath Effect.
Solution: install the antenna far from the house to get rid of the multipath effect. It is recommended not to use the mower in a
scenario with walls that have long and at surfaces or that are made of glass or metal. The long and at surface/glass and metal
surface will interfere with the signal, hence the mower may bump into the walls. The map should not be built between two high
walls, because the walls will block the signal and the mower will not be able to work in this area.
technology integrates various sensor data to improve positioning accuracy and fault tolerance through algorithm fusion.
The mower can locate itself through satellite signals, which can also be picked up by the antenna. By comparing the satellite
signals from the antenna and the mower, errors in the transmission of the signal (such as the offset of the satellite signal as it
travels through the ionosphere) can be minimized, improving satellite positioning accuracy to the centimeter level.
In addition, the data collected by the gyroscope, accelerometer, magnetic compass, and odometer sensors can also be integrated
into this system through Segway's data fusion algorithms, further improving the applicability of Navimow to various environments.
With EFLS technology, Navimow can draw a precise work area in complex outdoor environments without laying boundary wires,
and optimize the mowing path through algorithms in the work area to achieve planned mowing results and maximize the
mower's work efficiency.
lonosphere & troposphere lonosphere & troposphere
≥2m
1.6 How the EFLS Works
10

The use of Navimow relies on ne satellite positioning signals and has certain requirements for the site being used: relatively open
and at, no high-rise buildings and trees, and a large area of the sky is visible.
We created a checklist with questions on lawn shapes, houses, trees and other objects in yards. After completing the checklist, you
will have a clearer understanding of whether Navimow is suitable for your yard and get a purchase suggestion. To complete the
checklist, visit https://navimow.segway.com/checklist.
If your yard has the following features, you will need to purchase the VisionFence sensor to help Navimow handle more complex
yards. For more information, visit https://navimow.segway.com.
There is a large area of a glass/metal wall or a wall
with a long and at surface.
1.7 How to Choose a Model
Is Navimow suitable for your yard?
There are tall trees (usually above 5 m) with big tree crowns. The density of the trees is thick.
The lawn tightly surrounds the building, and other buildings are within close proximity.
If your yard has the following features, you may need to purchase the Antenna Extension Kit, and install the antenna at a higher
position to obtain better satellite signals, but the possibility of poor performance cannot be ruled out.
The satellite signal is poor in the narrow path connecting the front yard and the back yard.
The lawn has a long and narrow area with high walls
≥5m
≥160°
≥160°
11

How to choose a Navimow model for your yard?
The charging time and working efficiency are different for each model. Refer to the following chart to choose a suitable model
according to your lawn size and expected working hours (e.g., H500E model can cut a 500m lawn in approx. 8 hours).²
01h
00h
H500E H800E H1500E H3000E
02h
03h
04h
05h
06h
07h
08h
09h
10h
11h
12h
13h
14h
15h
16h
17h
18h
19h
20h
21h
22h
23h
24h
25h
26h
27h
28h
29h
30h
31h
32h
33h
34h
35h
36h
37h
38h
39h
40h
41h
Working Time
m2
m2
m2
800 m2
500
100 m2
m2
m2
m2
200
300
400
600
700
m2
m2
m2
m2
m2
m2
m2
m2
m2
m2
m2
m2
m2
m2
1500 m2
100
200
300
400
500
600
700
800
900
1000
1100
1200
1300
1400
m2
m2
m2
m2
m2
m2
m2
m2
m2
m2
m2
m2
m2
m2
m2
m2
m2
m2
m2
2400 min
3000 m2
150
300
450
600
750
900
1050
1200
1350
1500
1650
1800
1950
2100
2250
2400
2550
2700
2850
100 m2
m2
m2
m2
200
300
400
500 m2
1620 min
840 min
480 min
Charging Mowing
12

1.8 Specifications
Navimow
Segway
603 × 468 × 264 mm ( 23.7 × 18.4 × 10.4 in)
16.3 kg (35.93 lbs) 16.6 kg (36.59 lbs) 16.9 kg (37.26 lbs)
Mower frame: PP; cover: ASA
Basic Information
Product Name
Brand
Net Weight
(Battery Included)
Material
Dimensions:
Length × Width × Height
H500E H800E H1500E H3000E
GPS, Beidou, Galileo, GLONASS
500 m m m² (0.12 acre) 800 ² (0.20 acre) 1500 ² (0.37 acre)
About 180 min
3000 (0.74 acre) m²
About 240 min
21 cm (8.3 in)
30–60 mm (1.2–2.4 in)
About 3 h About 4 h About 5 h
Mower Parameters
Recommended Mowing Area
Area Capacity per Hour
Cutting Width
Cutting Height
Charging Time
GNSS Working Mode
Typical Mowing Time
Per Full Charge[1]
Noise Emissions
[2]
Measured Sound Power
Level LWA
Sound Power
Uncertainties KWA
54 dB(A)
3 dB(A)
Sound pressure
level LpA
Sound pressure
uncertainties KpA
43 dB(A)
3 dB(A)
100 m² (0.025 acre) 150 m² (0.04 acre)
8-inch hub motor
Driving Motor
Rated Speed
Motor Type
2800/min
Brushless motor
Blade Motor
Top Speed
Motor Type
Wi-Fi 2.4 GHz
(2400–2483.5M)
Connectivity
ISM band radio connection
Bluetooth®
Frequency Range
Wi-Fi/Cellular Network
865-868 MHz
2400.0–2483.5 MHz
Cellular network
LTE-FDD: B1/B3/B5/B7/B8/B20/B28
LTE-TDD: B38/B40/B41
-20–50 (-4–122°F); 10–35 (50–95°F) recommended℃ ℃
Mower body IP66; charging station IP56; power supply IP55
Working Conditions
Working Temperature
Storage Temperature
IP Rating
Max. Incline at Boundary
Max. Incline Inside
Woking Area
Minimum Angle
for Cutting Area
45%
10%
90°
Battery Pack
Battery
Management System
Lithium-ion battery
21.6 V DC
Over-heating, short circuit, over-current and over-charge protection
Battery Type
Nominal Voltage
Nominal Capacity/Energy 5200 mAh /112 Wh 7800 mAh /168 Wh 10400 mAh/224 Wh
0.4 m/s 0.6 m/s
For the European Union: NBW32D002D5N-EU, for the United Kingdom: NBW32D002D5N - UK
100–240 V AC
32 V DC MAX
2.5 A
Power Supply
Supply Unit Model
Input Voltage
Output Voltage
Output Current
Wi-Fi 2.4 GHz
(2400–2483.5M) [3]
+
13

H500E H800E H1500E H3000E
[1] Tested at a standard cutting speed with a full battery at an ambient temperature of 25°C (77°F) while mowing a flat lawn. The
product can mow more per hour on open areas than on separated small lawns. When the grass is wet or long, the working capacity
is also smaller. The flatter the lawn surface, the larger the working capacity.
[2] The noise emission declarations conform to EN 50636-2-107.
[3] Wi-Fi connectivity is only available for products manufactured after week 39 2022.
Omni-directional wheel with built-in Hall sensor
Rubber tyres with hub motor
Other Features
Front Wheel
Rear Wheel
Sensors
IMU Sensor,
BladeHalt Sensor,
Bump Sensor, Lift
Sensor, Rain
Sensor, Wheel
Encoder
IMU Sensor,
BladeHalt Sensor,
Ultrasonic sensor,
Bump Sensor, Lift
Sensor, Rain Sensor,
Wheel Encoder
32 V DC
2.5 A MAX
25.2 V DC
2.5 A
LED
Charging Station
Input Voltage
Input Current
Output Voltage
Output Current
Indicator
14
To ensure a successful setup, please scan the QR
code to download the Navimow app. Alternatively,
go to the Google Play Store (Android) or the
Apple App Store (iOS) and search "Navimow".
After installing the app, please register and log in.
2. Setup & Mapping
2.1 Before You Start
Prepare the app
NOTE: During use, the app will ask you for Bluetooth, GPS positioning, and Wi-Fi networking accesses when necessary. To ensure
normal use, it is recommended that you enable the above accesses. For more information, please refer to our Privacy Policy. Go to
Settings>app>About>Privacy Policy.
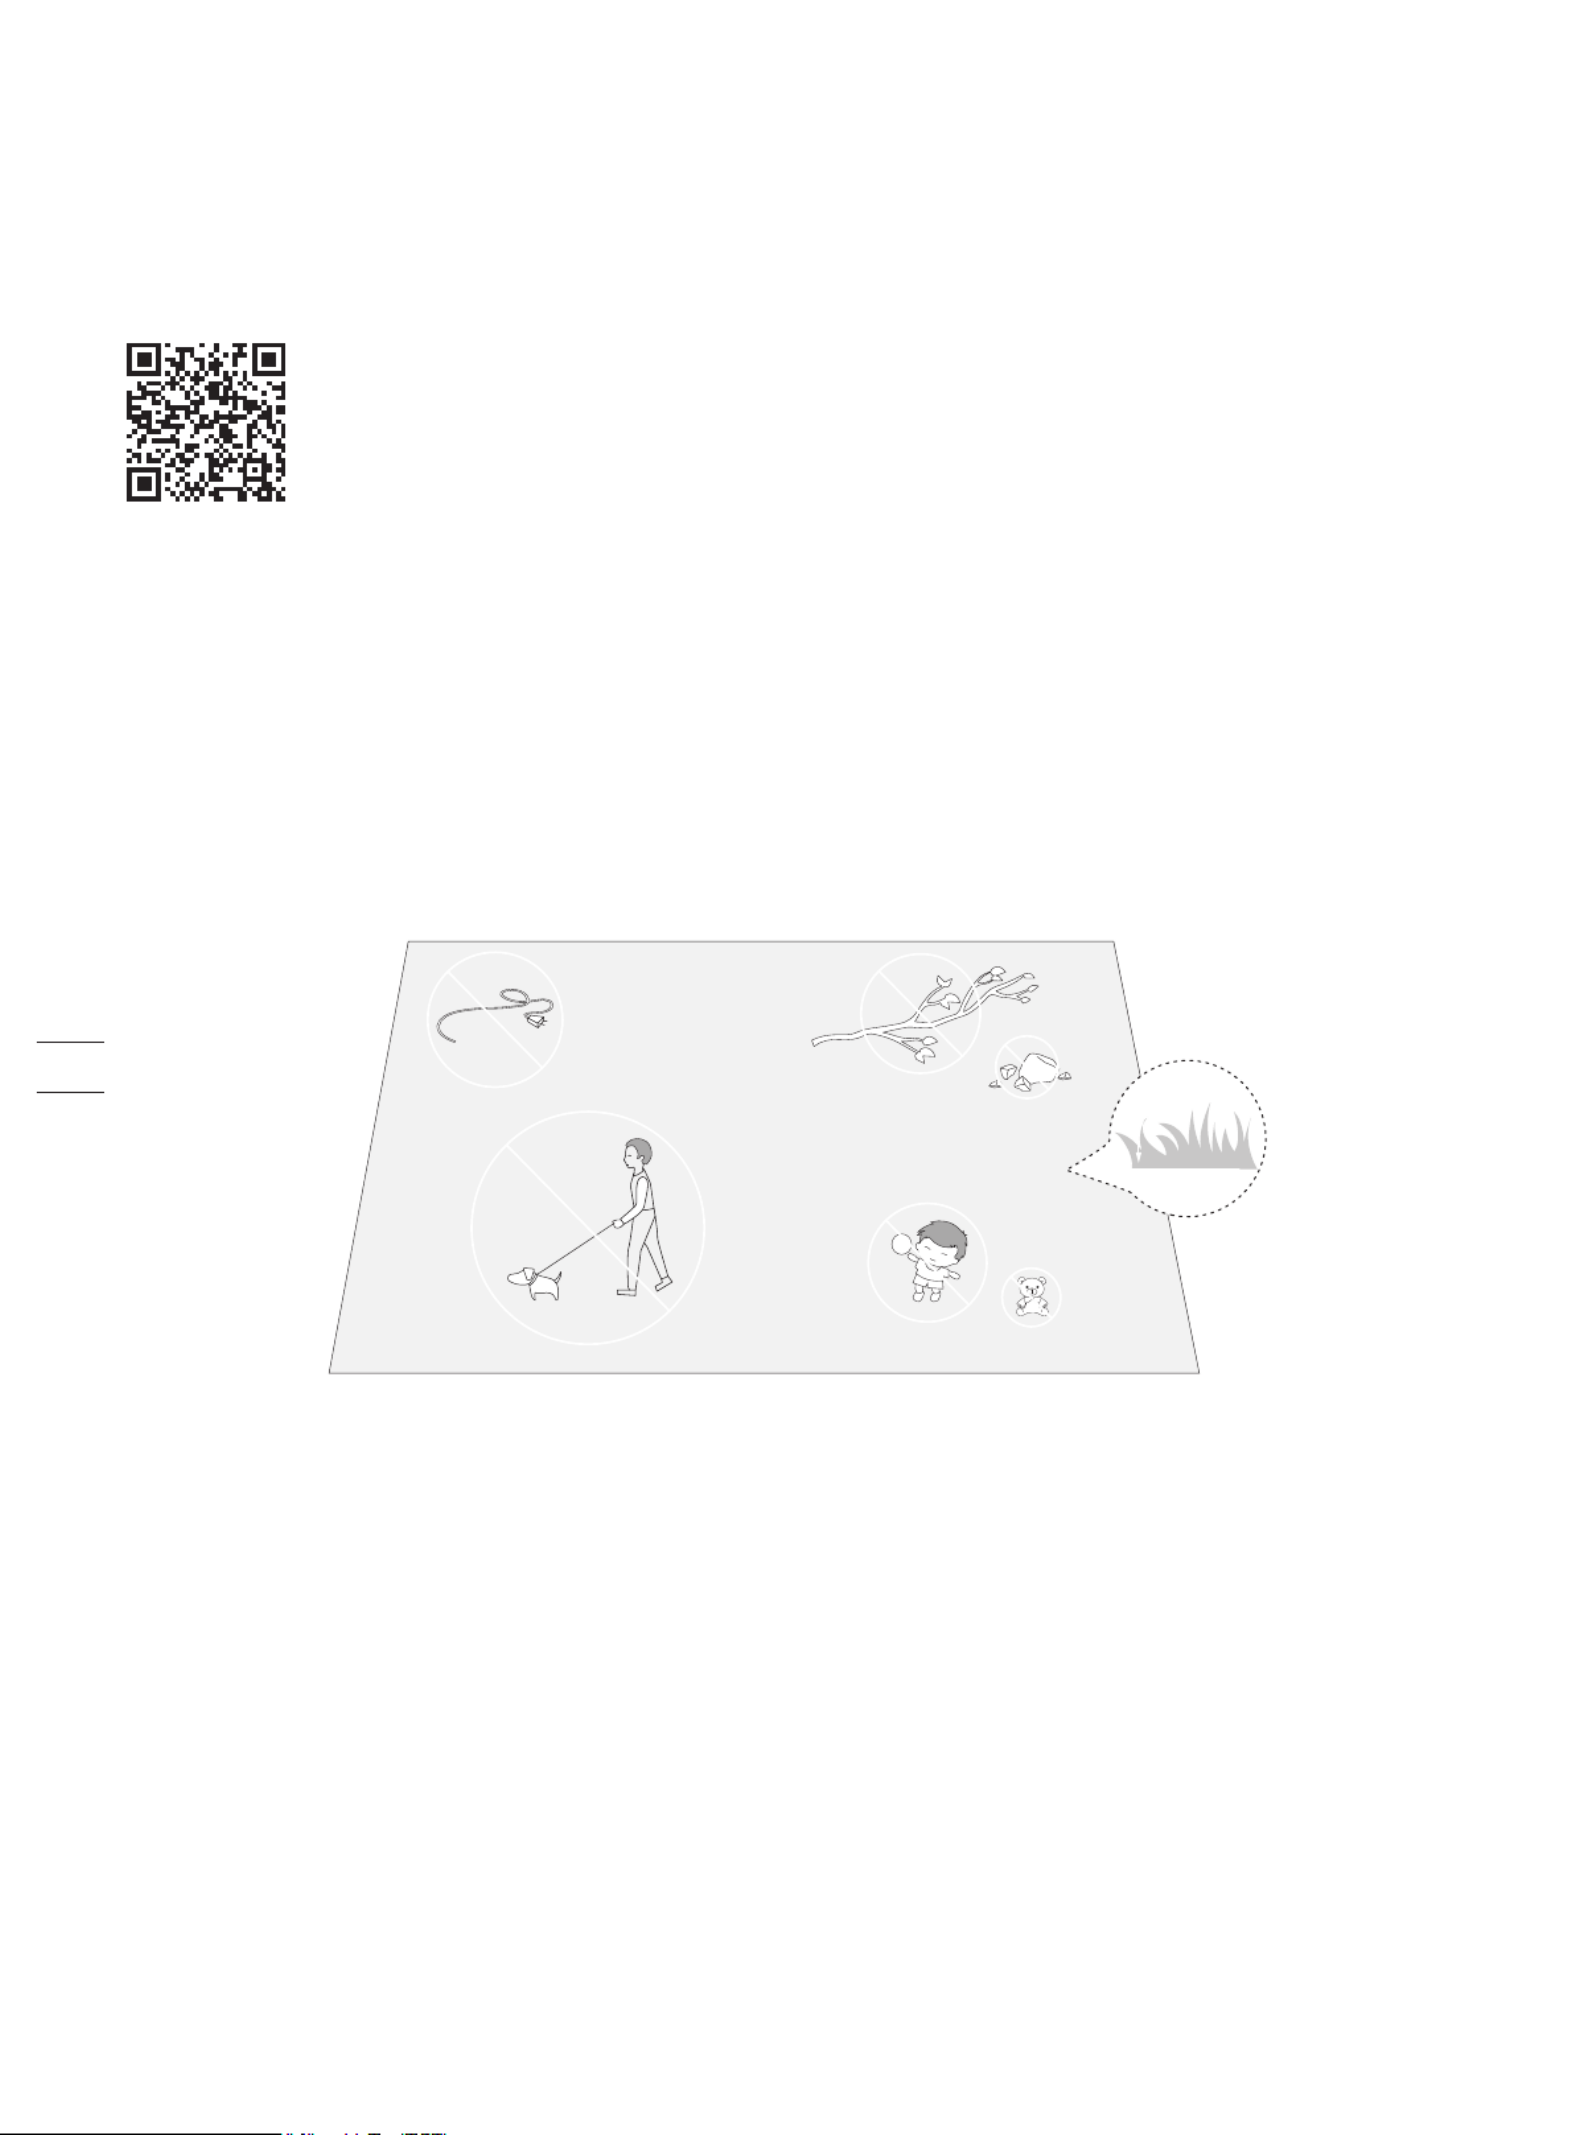
Prepare the lawn
Remove debris, piles of leaves, toys, wires, stones and other obstacles. Make sure children and pets are off the lawn. Please cut
your lawn to a height of no more than 6 cm.
<
6 cm
15

2.2 Install the Charging Station and the Antenna
Step 1: Find a good spot
Install the charging station on a soft and flat surface.
When placed outside, the charging station and the lawn should be kept at the same level.
In order to ensure that the antenna can receive good satellite signals, please choose a suitable location to install the charging
station and antenna:
1. Remain a certain distance away (greater than 2 m) from houses, trees and walls.
2. Install the charging station and antenna in an open space with nothing blocking the signal (for example, the tree canopy or the
sunshade umbrella), where the antenna has a clear sky view that at least 110° of the sky is unobstructed.
3. Please place the charging station on a flat non-hardened ground with the antenna upright. Do not install the antenna at an angle.
4. To ensure smooth docking, leave a minimum of 10 cm at the back of the charging station and 1 m at the front.
5. Stay away from sprinkler heads, fountains or other outdoor water systems.
6. Stay away from substations, generators, water pump stations and air conditioners.
Please choose the location carefully. Once the map is saved, if the location of the charging station or GNSS antenna is
changed, you need to create a new map.
≥ ≥2m 2m
<2m
<2m
>110°
35° 35° 16

If you can't find a suitable location on the ground, consider using the Antenna Extension Kit (sold separately) to mount the antenna
on a roof or wall for a better satellite signal. See Antenna Extension Kit in 3.10 Accessories (optional) for more information.
1. When installing the Antenna Extension Kit, please ensure that the antenna stays upward, and is not blocked by leaves, chimneys
and other facilities, so that the antenna has a clearance range greater than 110°.
2. When using the Extension Kit to install the antenna at a high place, it is also necessary to ensure that the charging station is not
too close to tall walls and trees on the ground.
≥ ≥2m 2m
<2m
<2m
WARNING! Roof top antennas of any sort should have lightening protection.
>110°
35° 35°
17

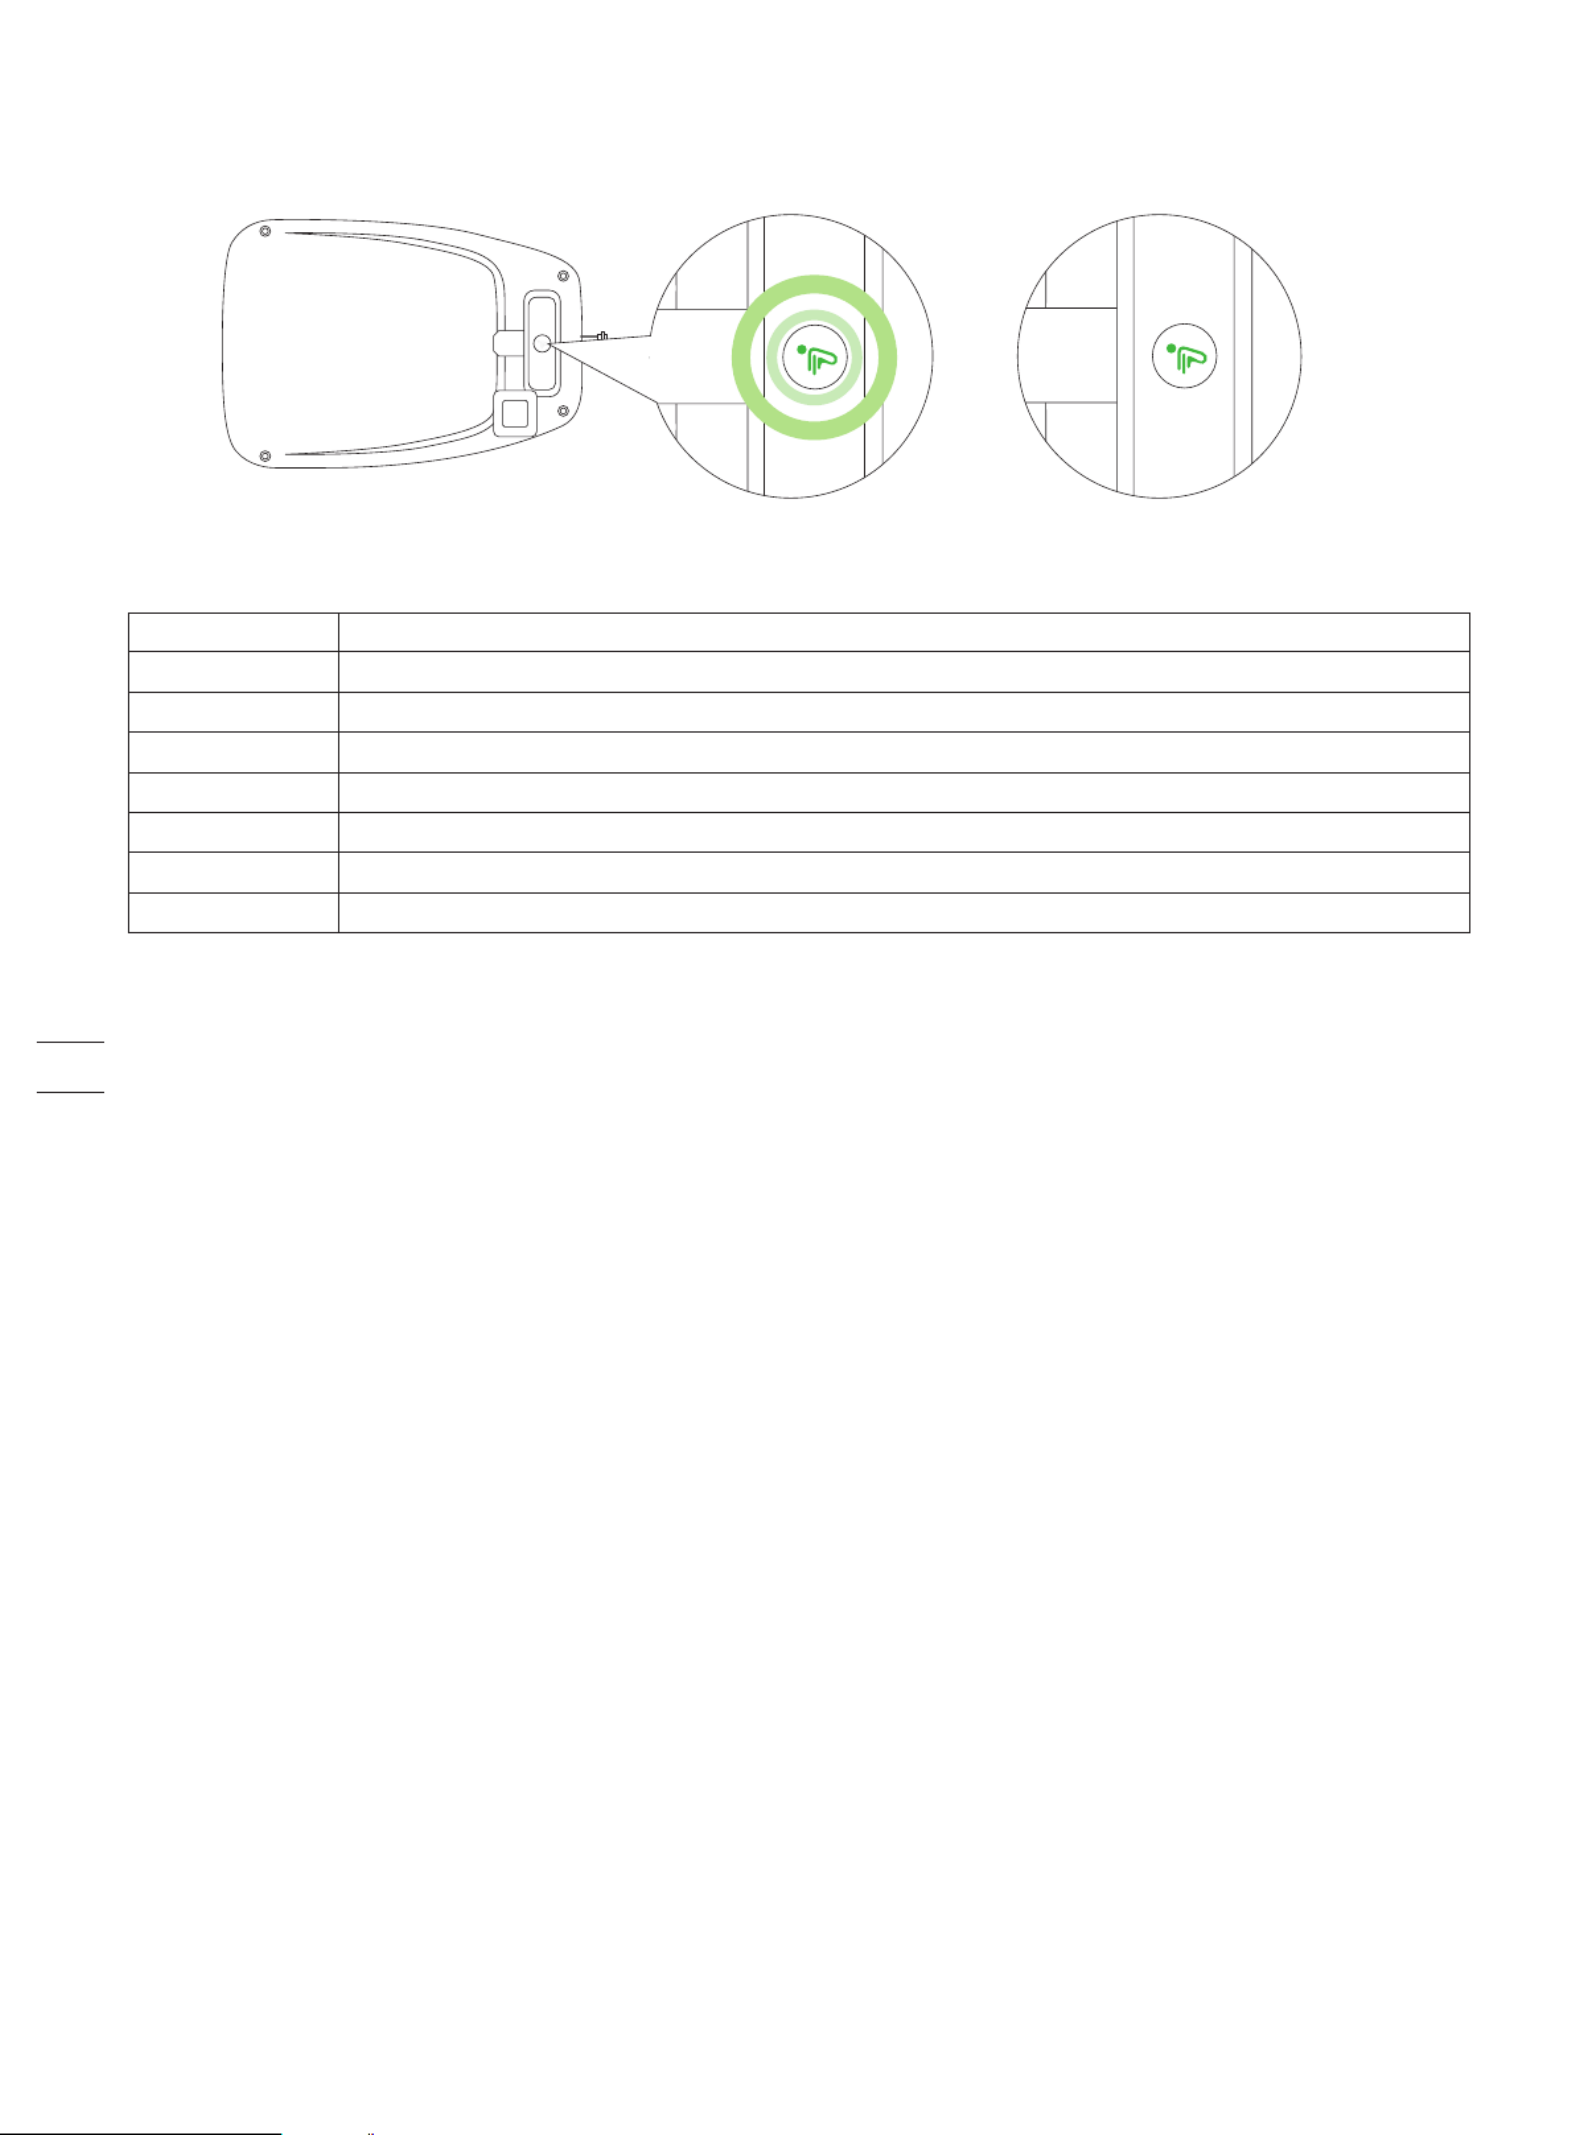
Step 2: Install the GNSS antenna
Connect the GNSS antenna to the charging station.5Secure the cable on the pole with the supplied hook and loop tape.6
3Slide in the tube with the antenna.
4
Fix the GNSS antenna on the tube.
12
A B
To make sure that the
antenna can be stably
connected to the charging
station once the
installation is completed,
please fully insert the base
fork into the groud.
Secure the nuts tightly to prevent water from
entering them.
Power interface
GNSS antenna
LED indicator
Contact strip
Antenna interface
90°
Rotate the other extension tube onto the base fork.
To ensure satellite signal, DO NOT put
anything on the antenna.
Caution: The illustrations in this user manual are for
your reference only. For the actual distance between
the antenna assembling metal tube and the charging
station, please keep it as long as possible. If the
distance is too small, the radio-frequency signal
generated by the charging station might interfere with
the satellite signal reception.
18

Check the signal.
4
Insert the power plug into a suitable power socket.
3
Connect the extension cable and the power interface.
2
If the signal is poor, relocate the GNSS antenna to an open space. Buy the antenna extension kit individually if you need to install it on
a wall or roof.
Flashing red:
Malfunction. Please contact after-sales service.
Solid blue:
Satellite signal is strong. No connection between the charging station and the mower.
The mower might be powered off.
Align the notch on the extension cable (A)
with the groove on the power supply connector (B).
A B
Turn the nuts until they are locked into each other.
Step 3: Check the satellite signal
Connect the extension cable with the power supply.
1
Note: To avoid performance degradation, always keep the
connectors, accessories, connection part of the charging station
and antenna away from any dirt or mud. Never allow water to get
into the connectors or any parts and connection points.
Poor signal, please relocate the charging station to
an open space (see Step 1).
The GNSS antenna is not connected to the charging
Flashing yellow:
19

2.3 Charge and Activate the Mower
How to charge
How to charge for the first time:
A new mower may have a low battery after long storage. Fully charge the mower before the first use.
Place the mower in the charging station. Make sure the charging strip on the mower and the contact strip on the charging station
are in good contact.
Charging: pulsating green Fully charged: solid green
20

30 cm (12 in)
WARNING
DO NOT charge if the mower, the power supply, the charging station, or the power socket is damaged.
DO NOT charge the mower when the temperature is above 45 (113°F), or below 5 (41°F). The battery has built-in ℃ ℃
temperature protection and will not charge if the limit is exceeded.
When there is an abnormal smell, sound or light display, stop charging immediately and contact after-sales service.
Keep away from inflammable and explosive materials when charging.
Where to place the power supply:
Protection from direct sunlight and rain
Indoors with good ventilation
Keep it at least 30 cm (12 in) above the floor to avoid possible damages caused by water.
Automatic charging:
After setting up the virtual boundary, the mower will return to the charging station automatically when the mowing task is
command the mower to go back to the charging station.
21

Note: Before updating the firmware ensure that
The mower is in the charging station.
The mower is connected to a network and the signal is strong (through 4G or Wi-Fi).
The battery power is more than 20%.
There is no mowing task scheduled in the next hour.
Activate the mower
Enable Bluetooth on your phone, log in to the app and
follow the instructions to pair with the mower.
2
Wait patiently for 3 min until the ambient light turns green (or blue).
3
Connect the charging station to the power supply. Make
sure the mower is in the charging station.
1
XXXXXXXXX
If the light flashes yellow for more than
3min, it means the satellite signal is weak.
Please return to Step 1 in chapter 2.2 .
4
Secure the charging station with the nails supplied and secure the extension cable.
4
Update the mower to the latest firmware
To fully experience Navimow, prior to use, please upgrade to the latest firmware.
How to update:
After activating the device, maintain the network connection state, follow the guidance in the pop-up window, and wait for 10-15 min to
automatically complete the device update. During this process, please do not power off or perform other operations. You can start
using it after the app prompts that the update is successful.
22

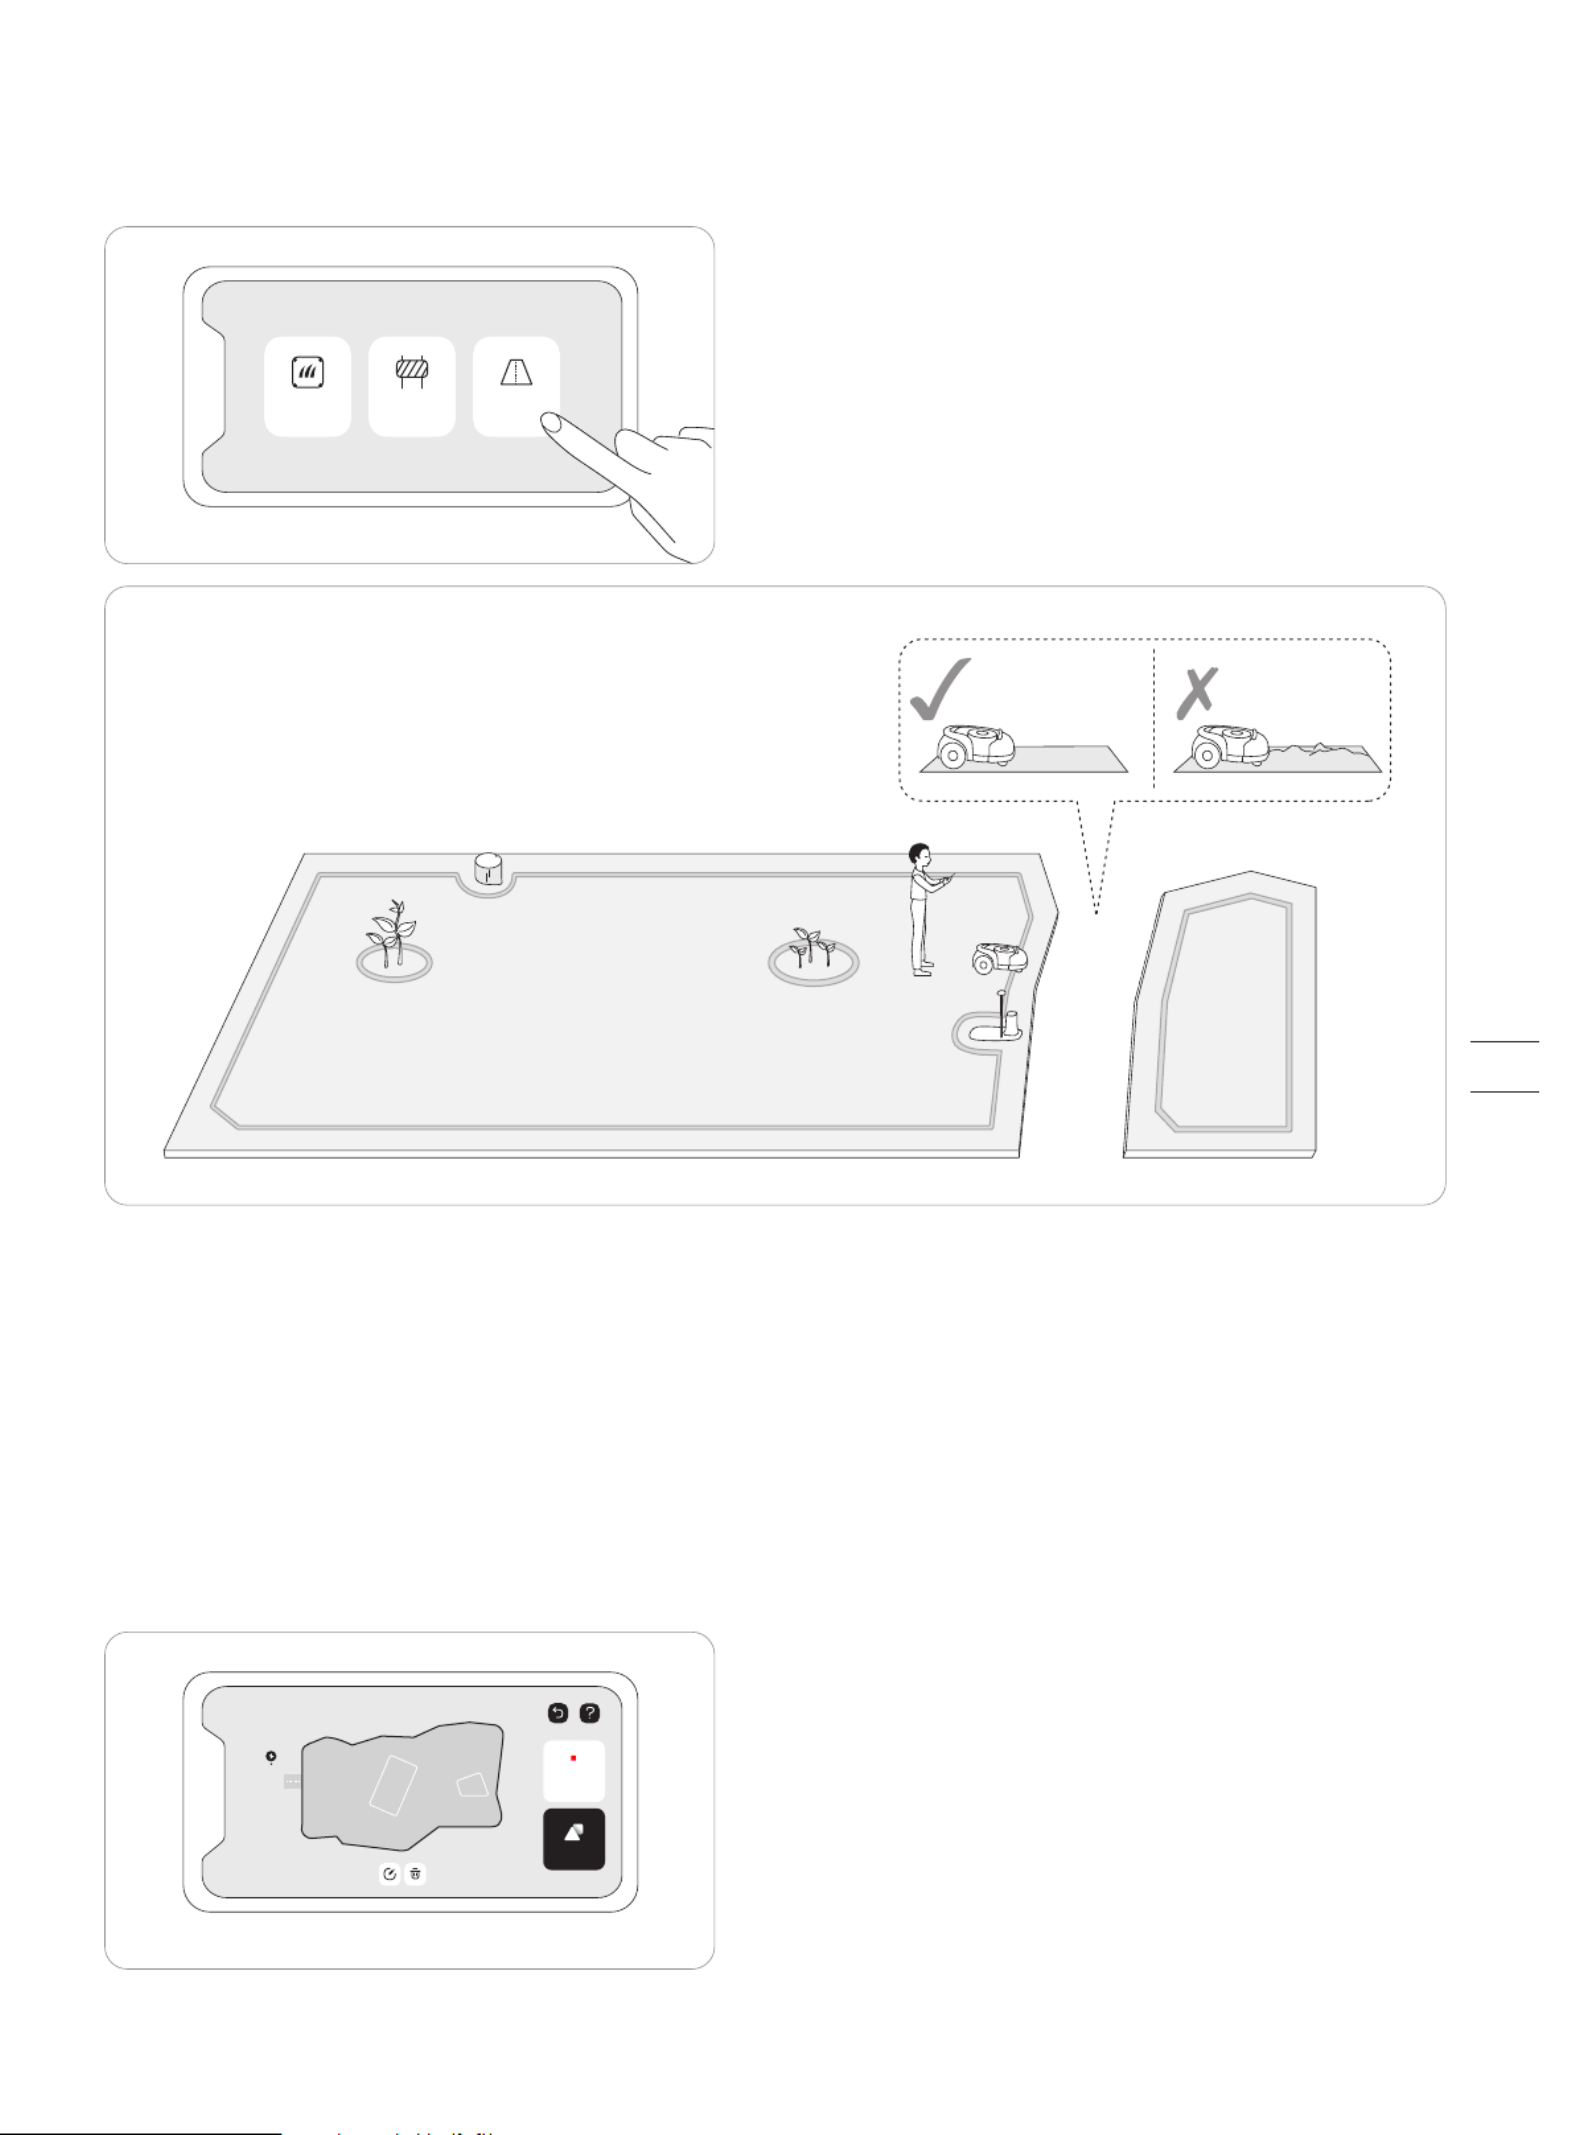
The work area consists of Boundary, Off-limit Island and Channel.
Boundaries delineate one single complete work area, Off-limit Islands delineate areas where the mower is prohibited, and Channels are
used to connect multiple work areas.
Inside the Channel, the mower will just pass through without cutting the grass.
The charging station and the GNSS antenna can be installed inside or outside the work area. If the charging station is outside the work
area, a channel towards the nearest boundary will be automatically set once the map is completed. The mower will return to the
charging station using this channel. This channel cannot be edited or deleted.
2.4 Set up the Work Area
Follow the instructions in the app and control the mower to create the work area (referred to as the map in the manual). The
mower will intelligently decide its moving pattern within the map.
NOTES:
If the location of the charging station or GNSS antenna is changed, the existing map CANNOT be used anymore and you MUST
create a new map.
Make sure your phone and mower are fully charged before mapping. Mapping will only start when the mower battery power level
is above 50%.
Boundary
Off-limit lsland
Channel
23
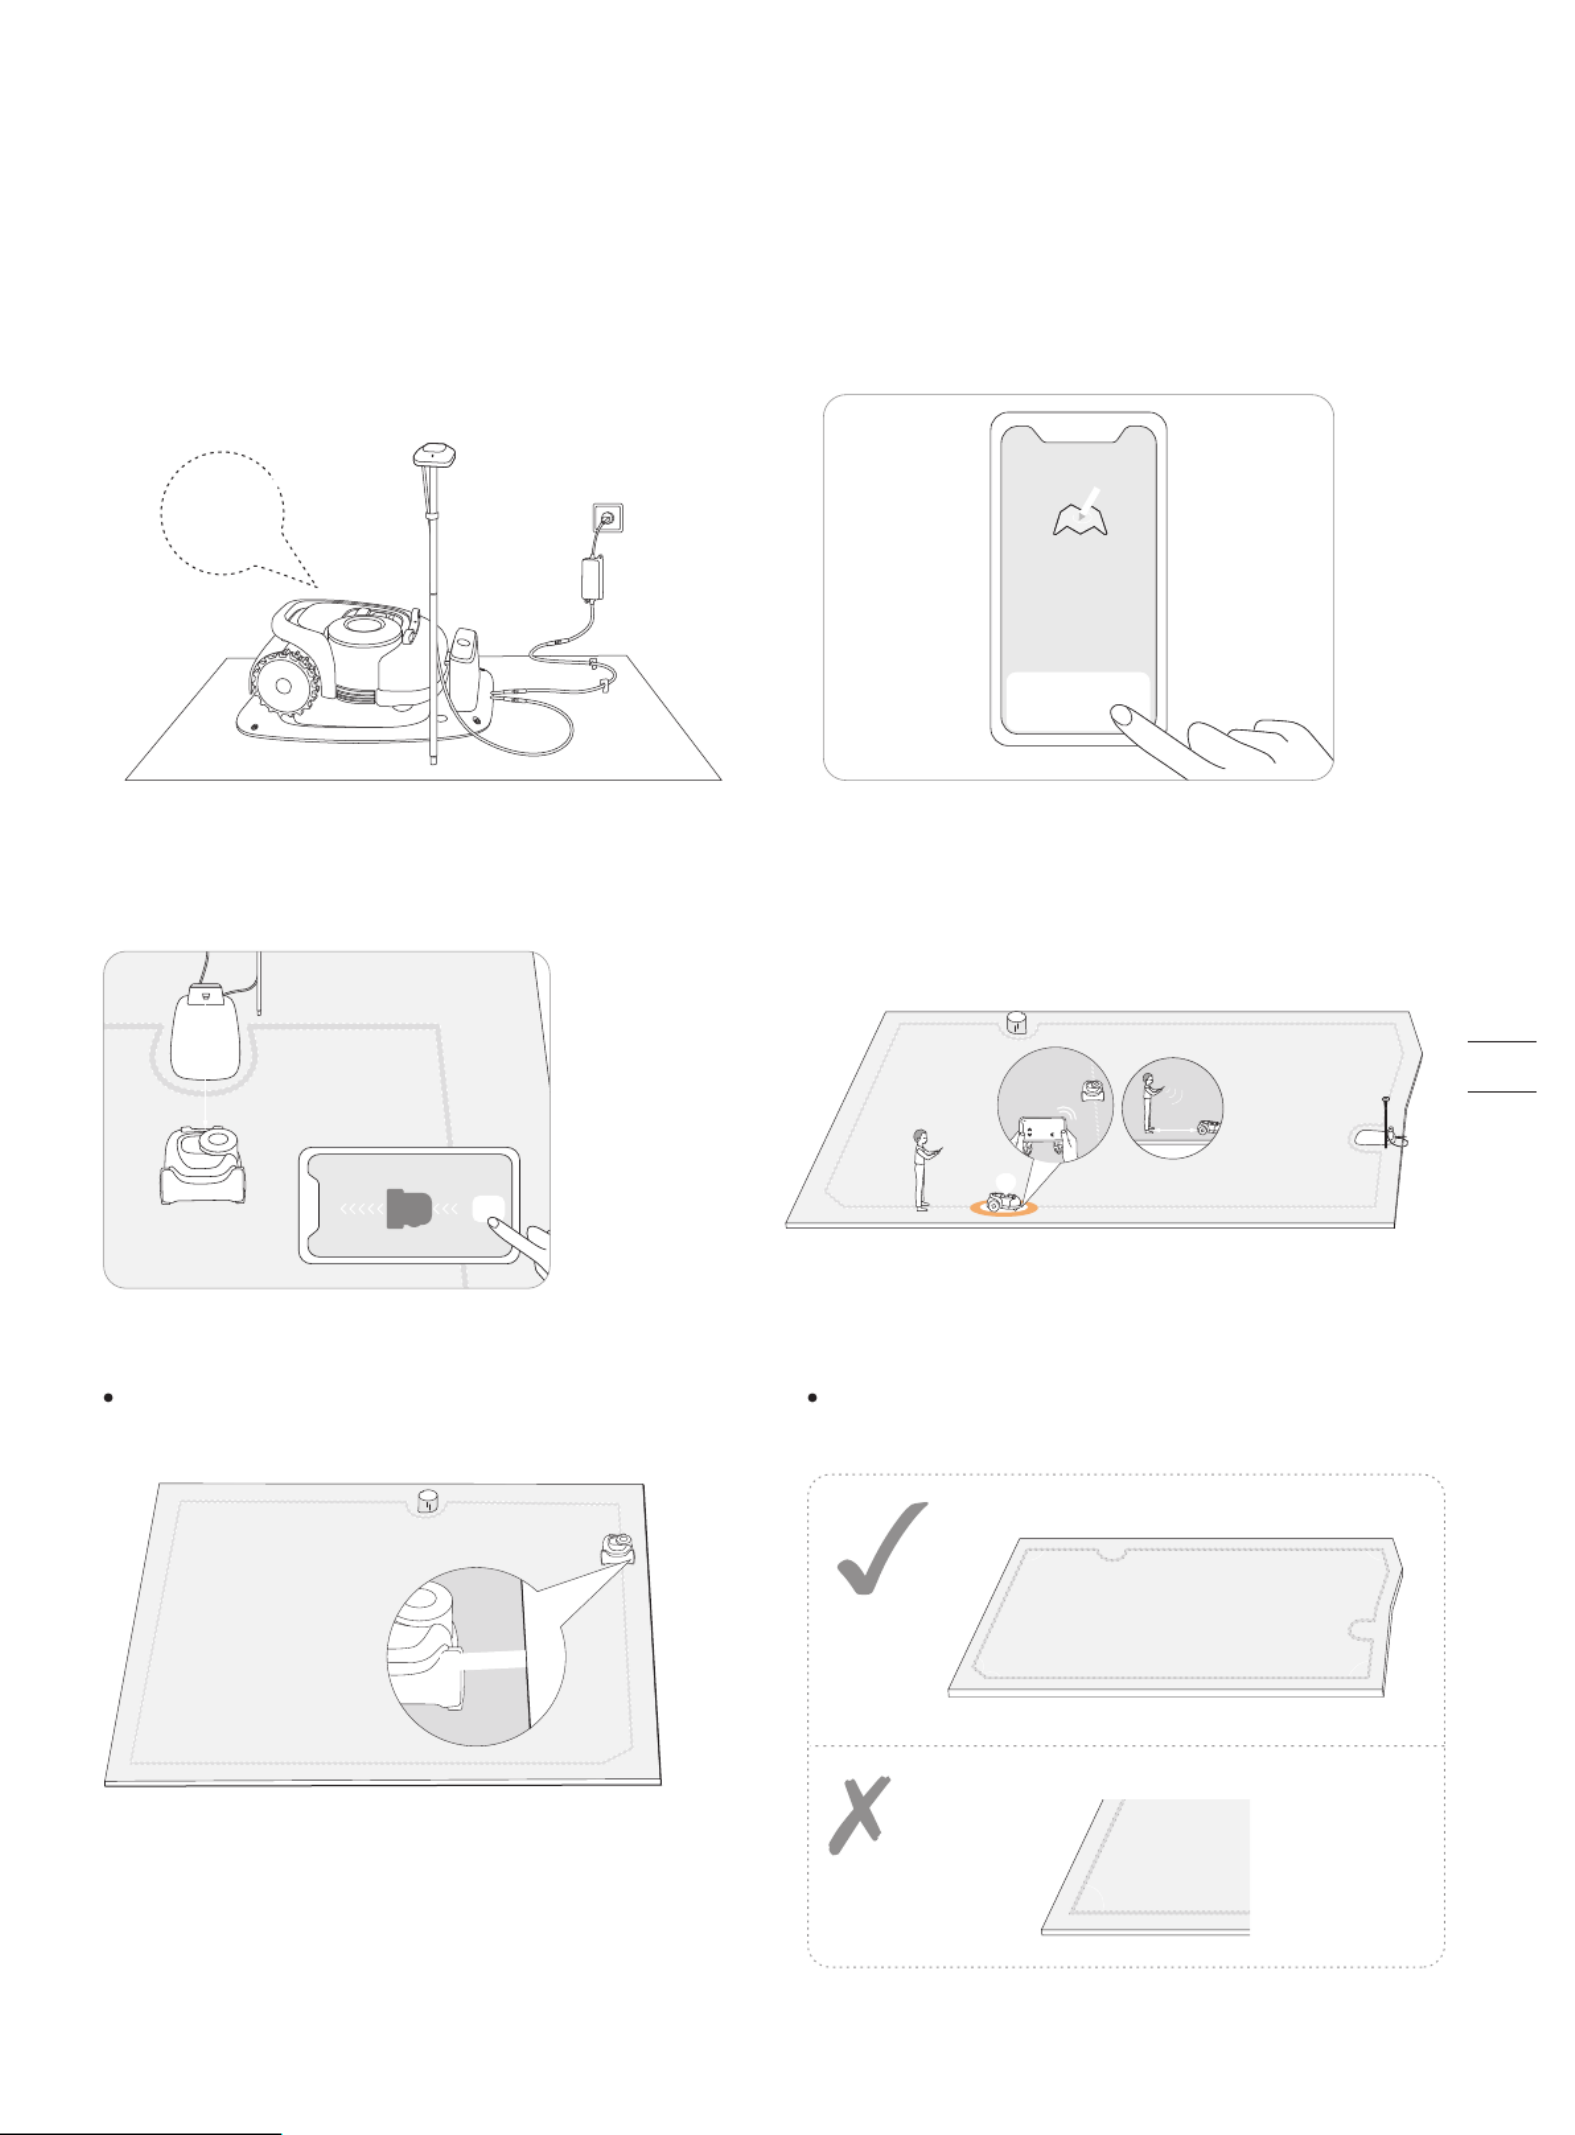
Step 1: Map out the boundary
3
2
1Tap “Create a map” to start mapping. Make sure the mower is powered on. With Bluetooth
connection, your phone will connect to the mower
automatically.
O N
Note: If the mower is in lock status, you must enter the
PIN code before operating the mower. The default code
is 0000 and can be reset via the Navimow app. See 3.1
Display and Control on the Mower.
4
≤6m
ST AR T
Use the Navimow ruler to measure the distance. The
outer side ruler end should not exceed the edge of the
lawn.
Angle: Make sure to follow a straight line with a smooth
turning angle of no smaller than 90°.
Distance from the edge: always keep 15 cm.
Walk along the edge.5
<90°
>90° >90°
>90°
>90°
>
90°
15cm
Find a proper starting point along the edge of your lawn
(15 cm between the mower's right side and the edge).
Keep within 6 m from the mower during the mapping
process.
Calibrate the mower to ensure accurate positioning.
Calibra te
+
Create a map
x x x x
24
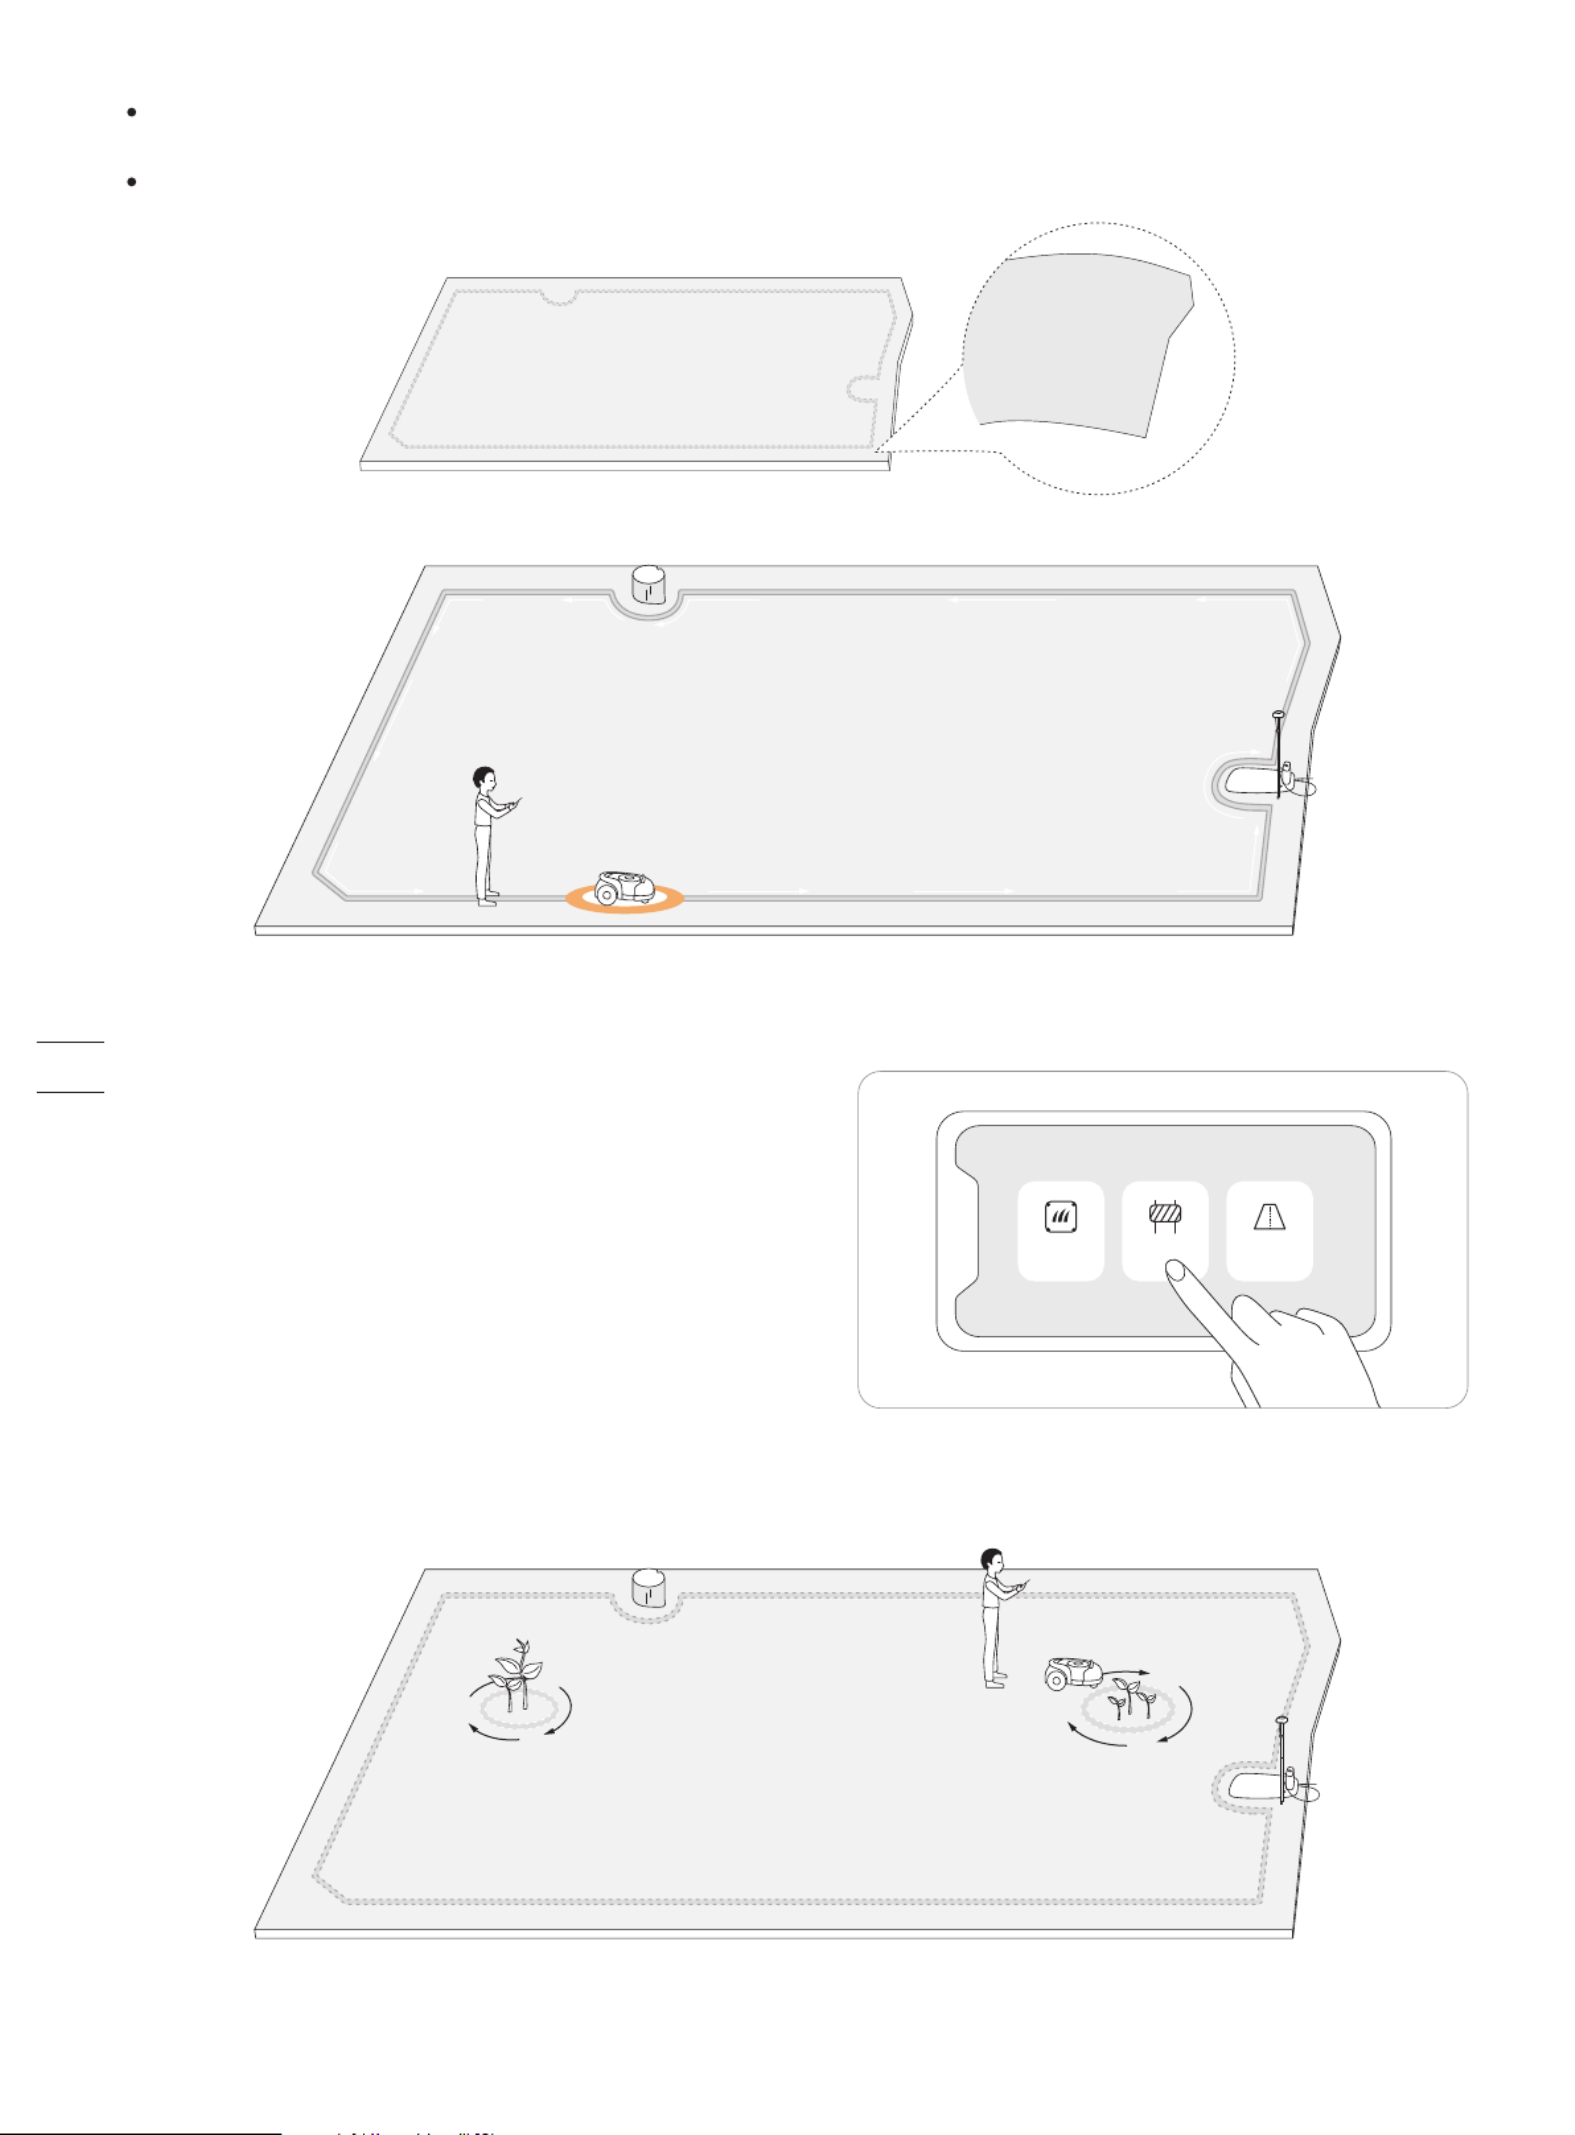
Step 2: Set up off-limit island
Go back to the starting point to finish the boundary mapping.6
Direction: Make sure the mower's right side (when moving forward) faces the boundary, so that the mower can cut as close to the
boundary as possible.
Slope: Even though the mower can traverse slopes up to 45% within the lawn, make sure the slope along the edge does not exceed 10%.
%
If there is a sudden interruption and failure, follow the instructions in the app to continue or restart.
If you have multiple separate lawns, please repeat this step.
How: Follow the instructions in the app. When you need to cancel the area (like when you remove the trampoline from the lawn),
just delete it via the app. See How to edit the map in 3.6 Settings (Mower).
When the mower hits a hard obstacle taller than 10 cm (such as big
rocks or a tree trunk), it will reverse and change the direction
automatically. However, you need to lay borders for objects that
need protection or areas you don't want the mower to enter, e.g., a
flowerbed, small trees, lawn decorations, pond, sprinkler heads,
emerged roots, etc. If you recently installed a trampoline or grill on
the lawn, you can also set an off-limit island to protect it.
Boundary
Off-limit island
Channel
NOTE: Make smooth turning angles when setting the islands. The angles should not be smaller than 90°. Make sure the
mower's right side faces the islands. You also need to walk along the edge when setting the island. Refer to part 5 of Step 1.
25
Step 3: Create a channel to connect separate areas
Following the instructions in the app, create a channel between separate boundaries.
>1m
Boundary
Off-limit island
Channel
NOTE: When creating a channel:
Do not choose ground that is bumpy, muddy, or wet.
The width of the channel needs to be greater than 1 m. In order to ensure smooth passage, when establishing the channel, please
drive along the centerline of the passable area. Being too close to the edge may scratch the mower during work.
Step 4: Adjust the map
You can always adjust parts of the map in the Navimow app instead of re-creating it. Just go to Settings>MOWER>Map management>Edit,
tap a boundary or off-limit island, and then tap the edit icon.
Save Map
Add More
A
26

If the mower goes beyond the boundary, make sure the satellite signal is strong at the problematic spot. The mower and the GNSS
antenna need to see satellites to have accurate positioning. You can try to relocate the charging station, set the map again, and
then test one more time. Get help from professional technicians when necessary. Contact your nearest dealer to solve problems.
You can also send an email to our after-sales service. Email: support-navimow@rlm.segway.com
2.5 Test Drive
After saving the map, tap 'TEST' in the app to see if the mower works within the map. The mower will navigate along the
boundary, off-limit island, and channel to test the map. After completing the test, the mower should be able to drive into the
charging station and exit on its own. During the test, you need to observe whether the walking path is consistent with the
mapping.
If you are adjusting the map or have a VisionFence Sensor installed, This test drive can be skipped.
TEST
27
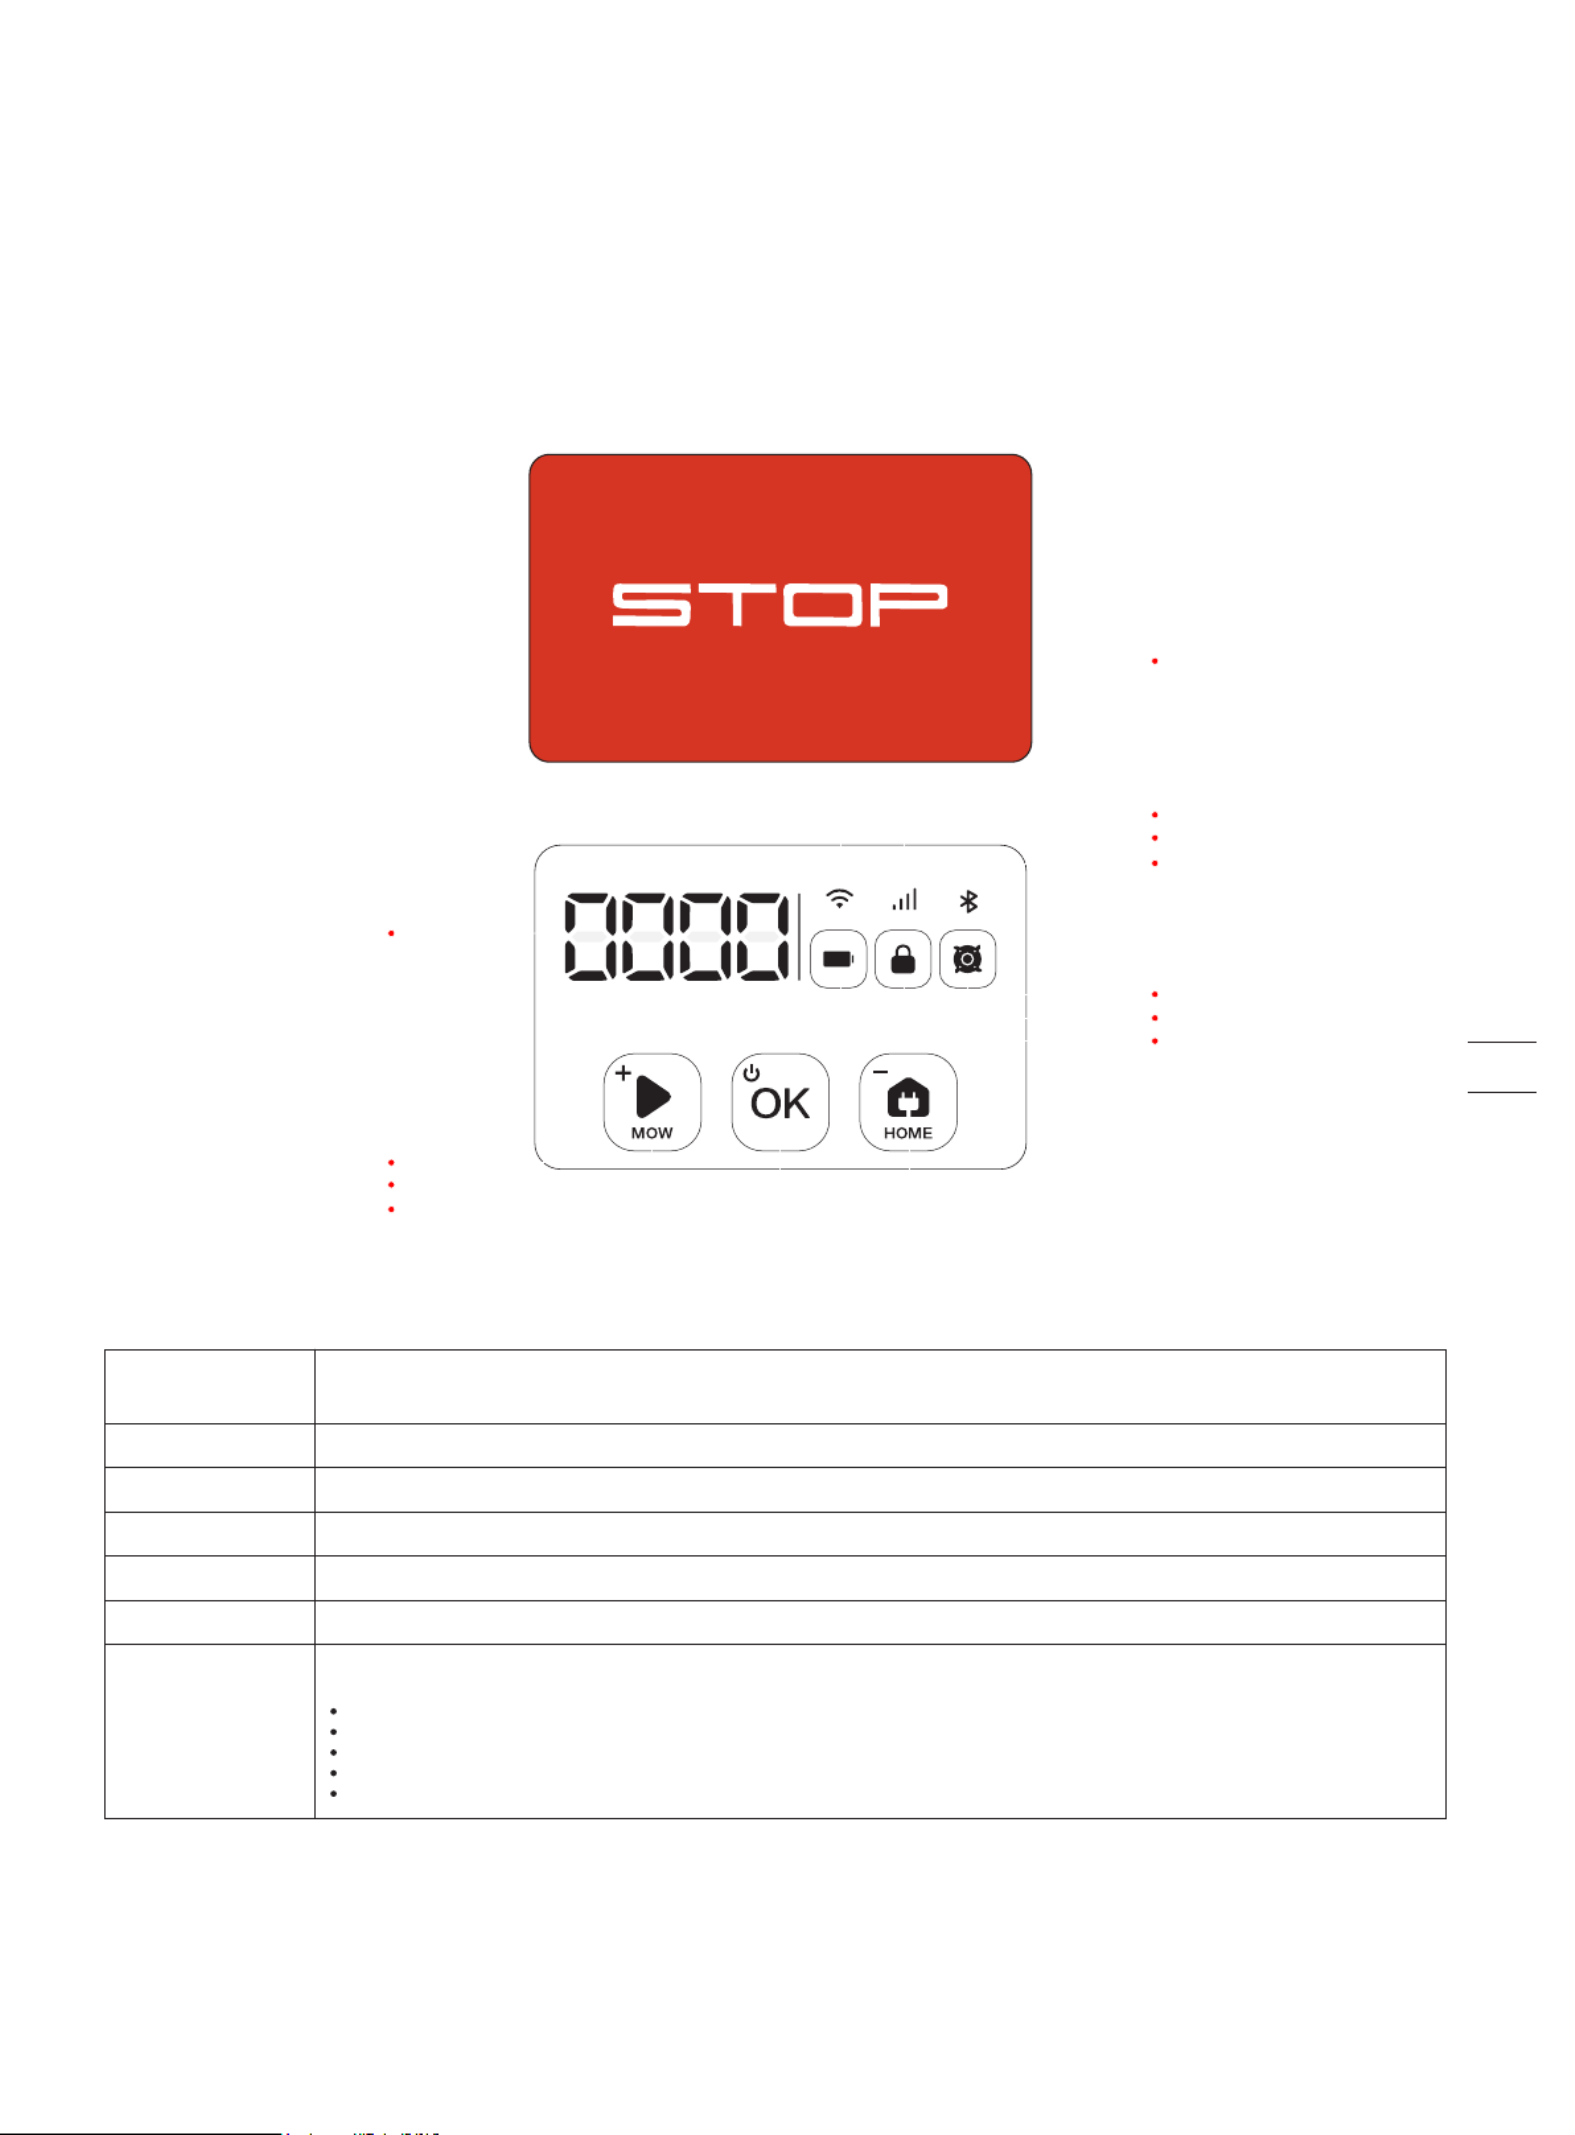
OK
HOME
MOW
Wi-Fi
Cellular data
Bluetooth
Battery level
PIN code lock status
Blade indicator
Dashboard display
3. Daily Use
3.1 Display and Control on the Mower
The display shows various states of the mower, and the control buttons can be used for the basic operations:
power the machine on and off, start mowing, return to the charging station, enter the PIN code to unlock the
machine, emergency stop, etc.
The color indicates the battery level: 50%–100% solid green, 20%–49% solid yellow, 5%–19% solid red, 5% red flashing.
When the battery level is below 10%, the mower will return to the station and charge.
It shows the mowing percentage, PIN code, error code, etc.
Meanings of the numbers and symbols on the display :
----: no map.
Four-digit number: error code, for example, 4011. See for further instruction.
StOP: the STOP button is pressed during mowing.
OtA: Updating firmware.
Battery level
PIN code lock status
Blade indicator
Wi-Fi
Cellular data
Bluetooth
Dashboard display
Mower locked. Please enter the PIN code to unlock
Blade disc is rotating. Please do not approach
WiFi connected
4G connected (for H800E, H1500E and H3000E models)
Bluetooth connected
Display
5. FAQ & Troubleshooting
STOP button
28
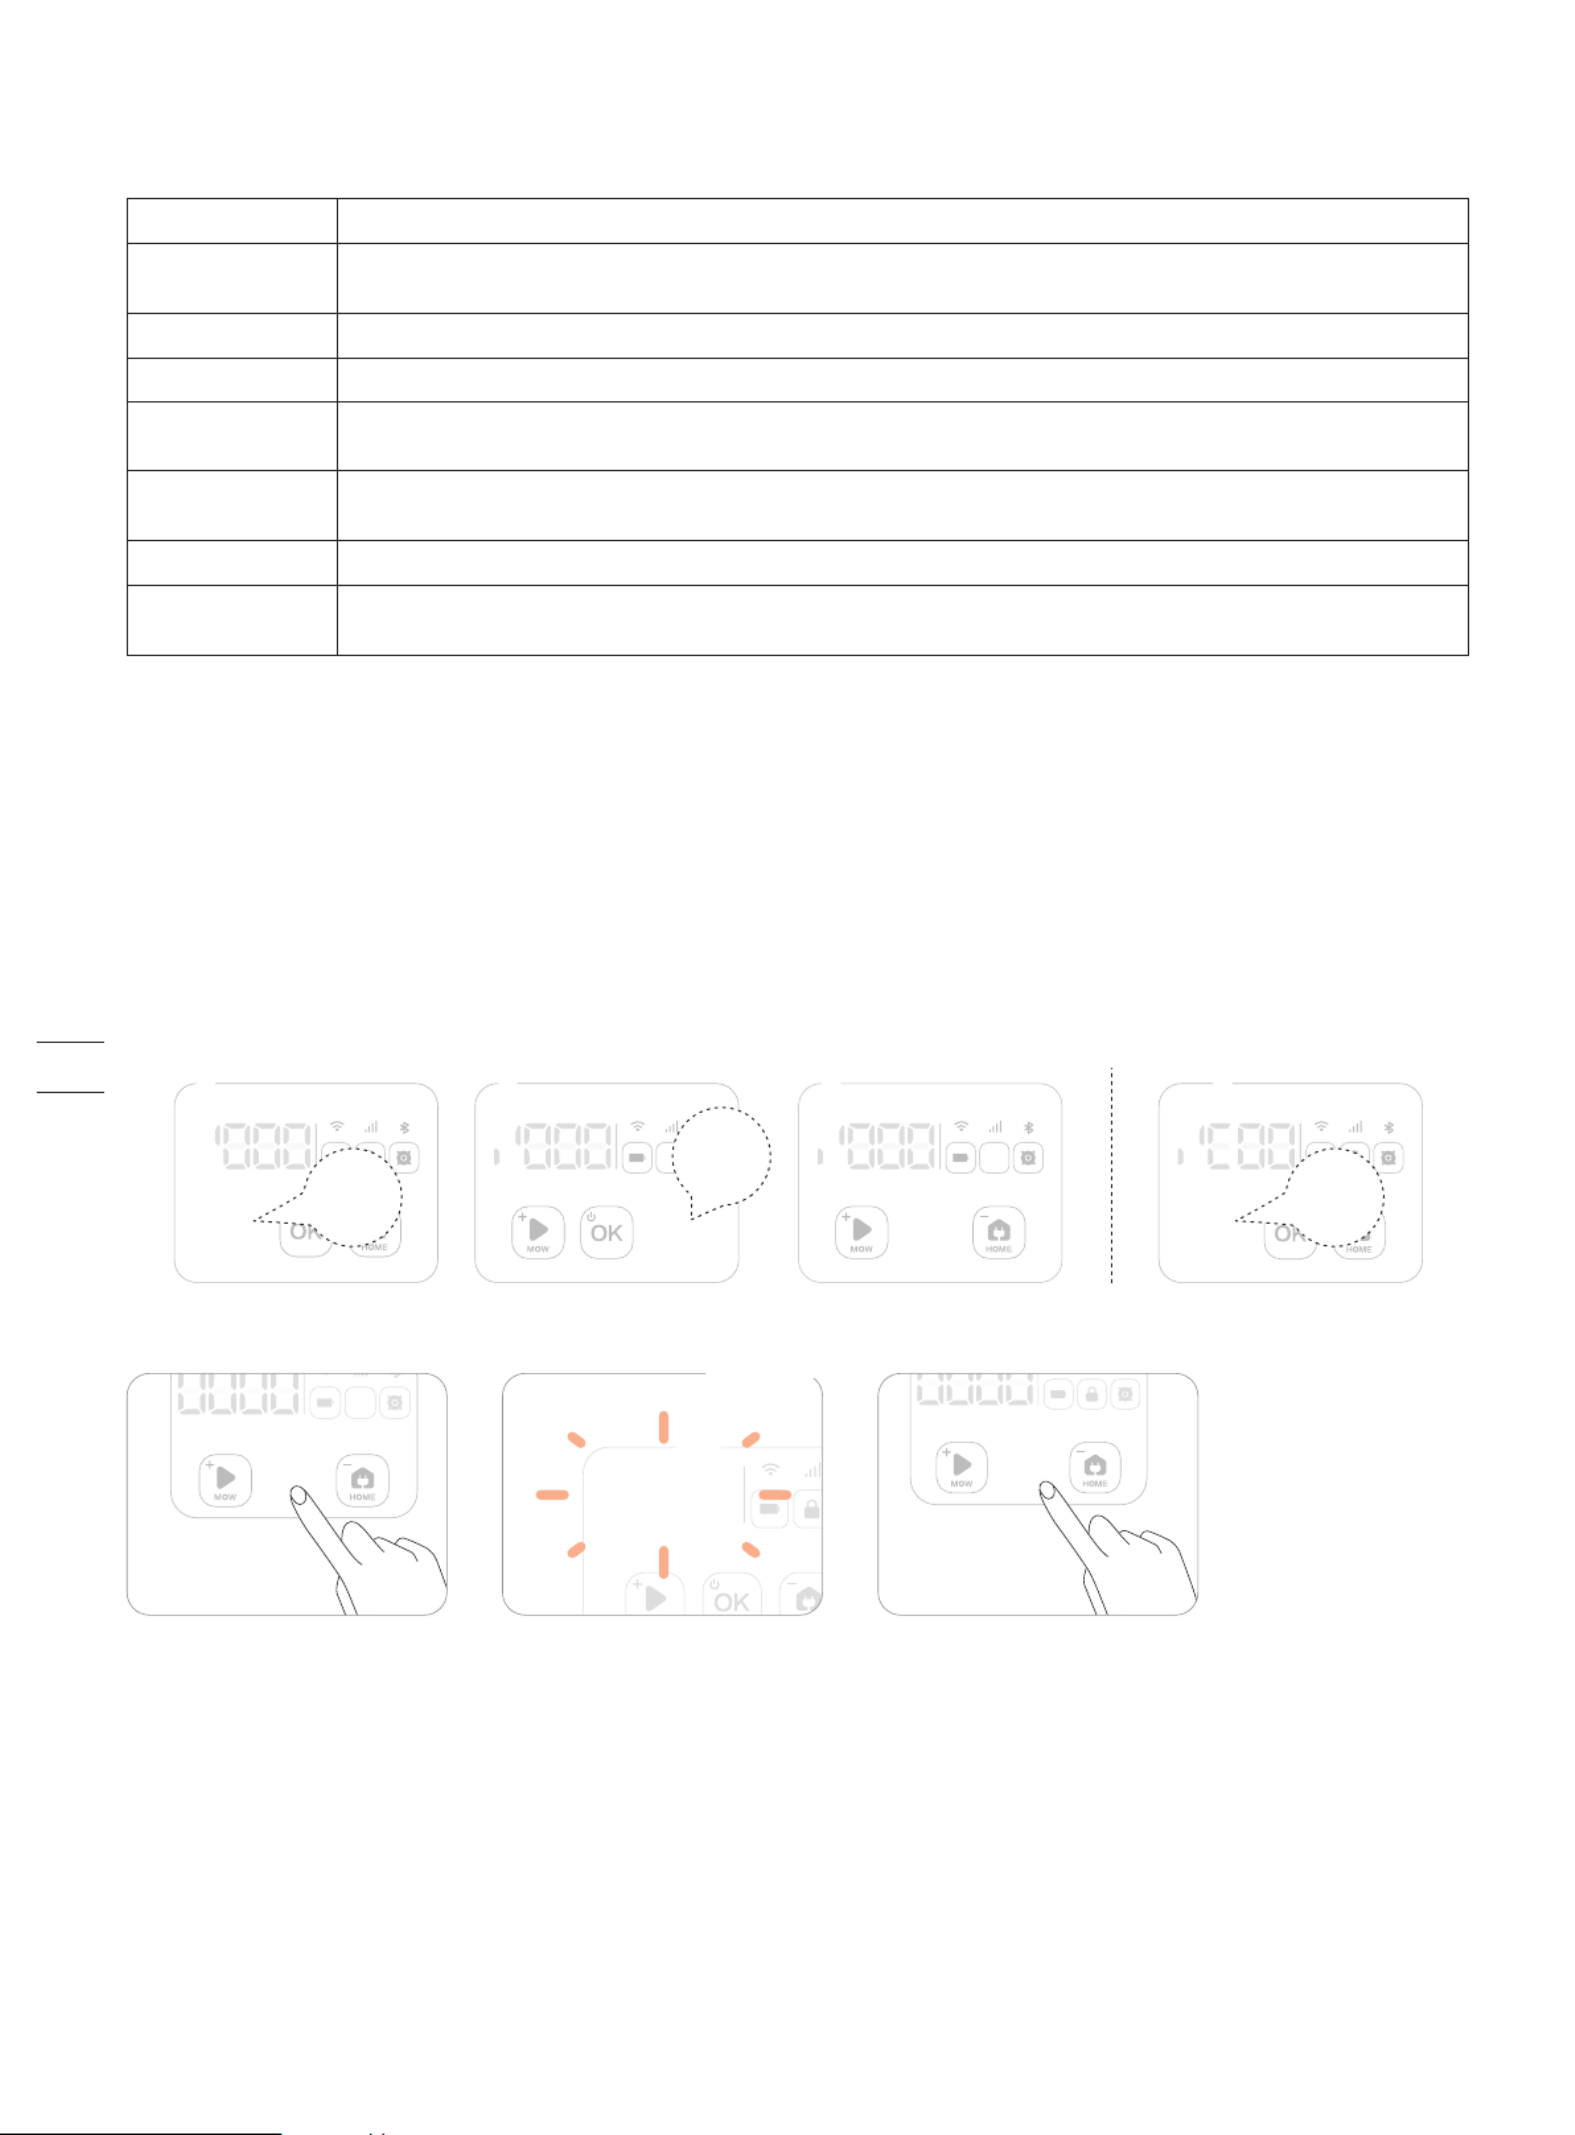
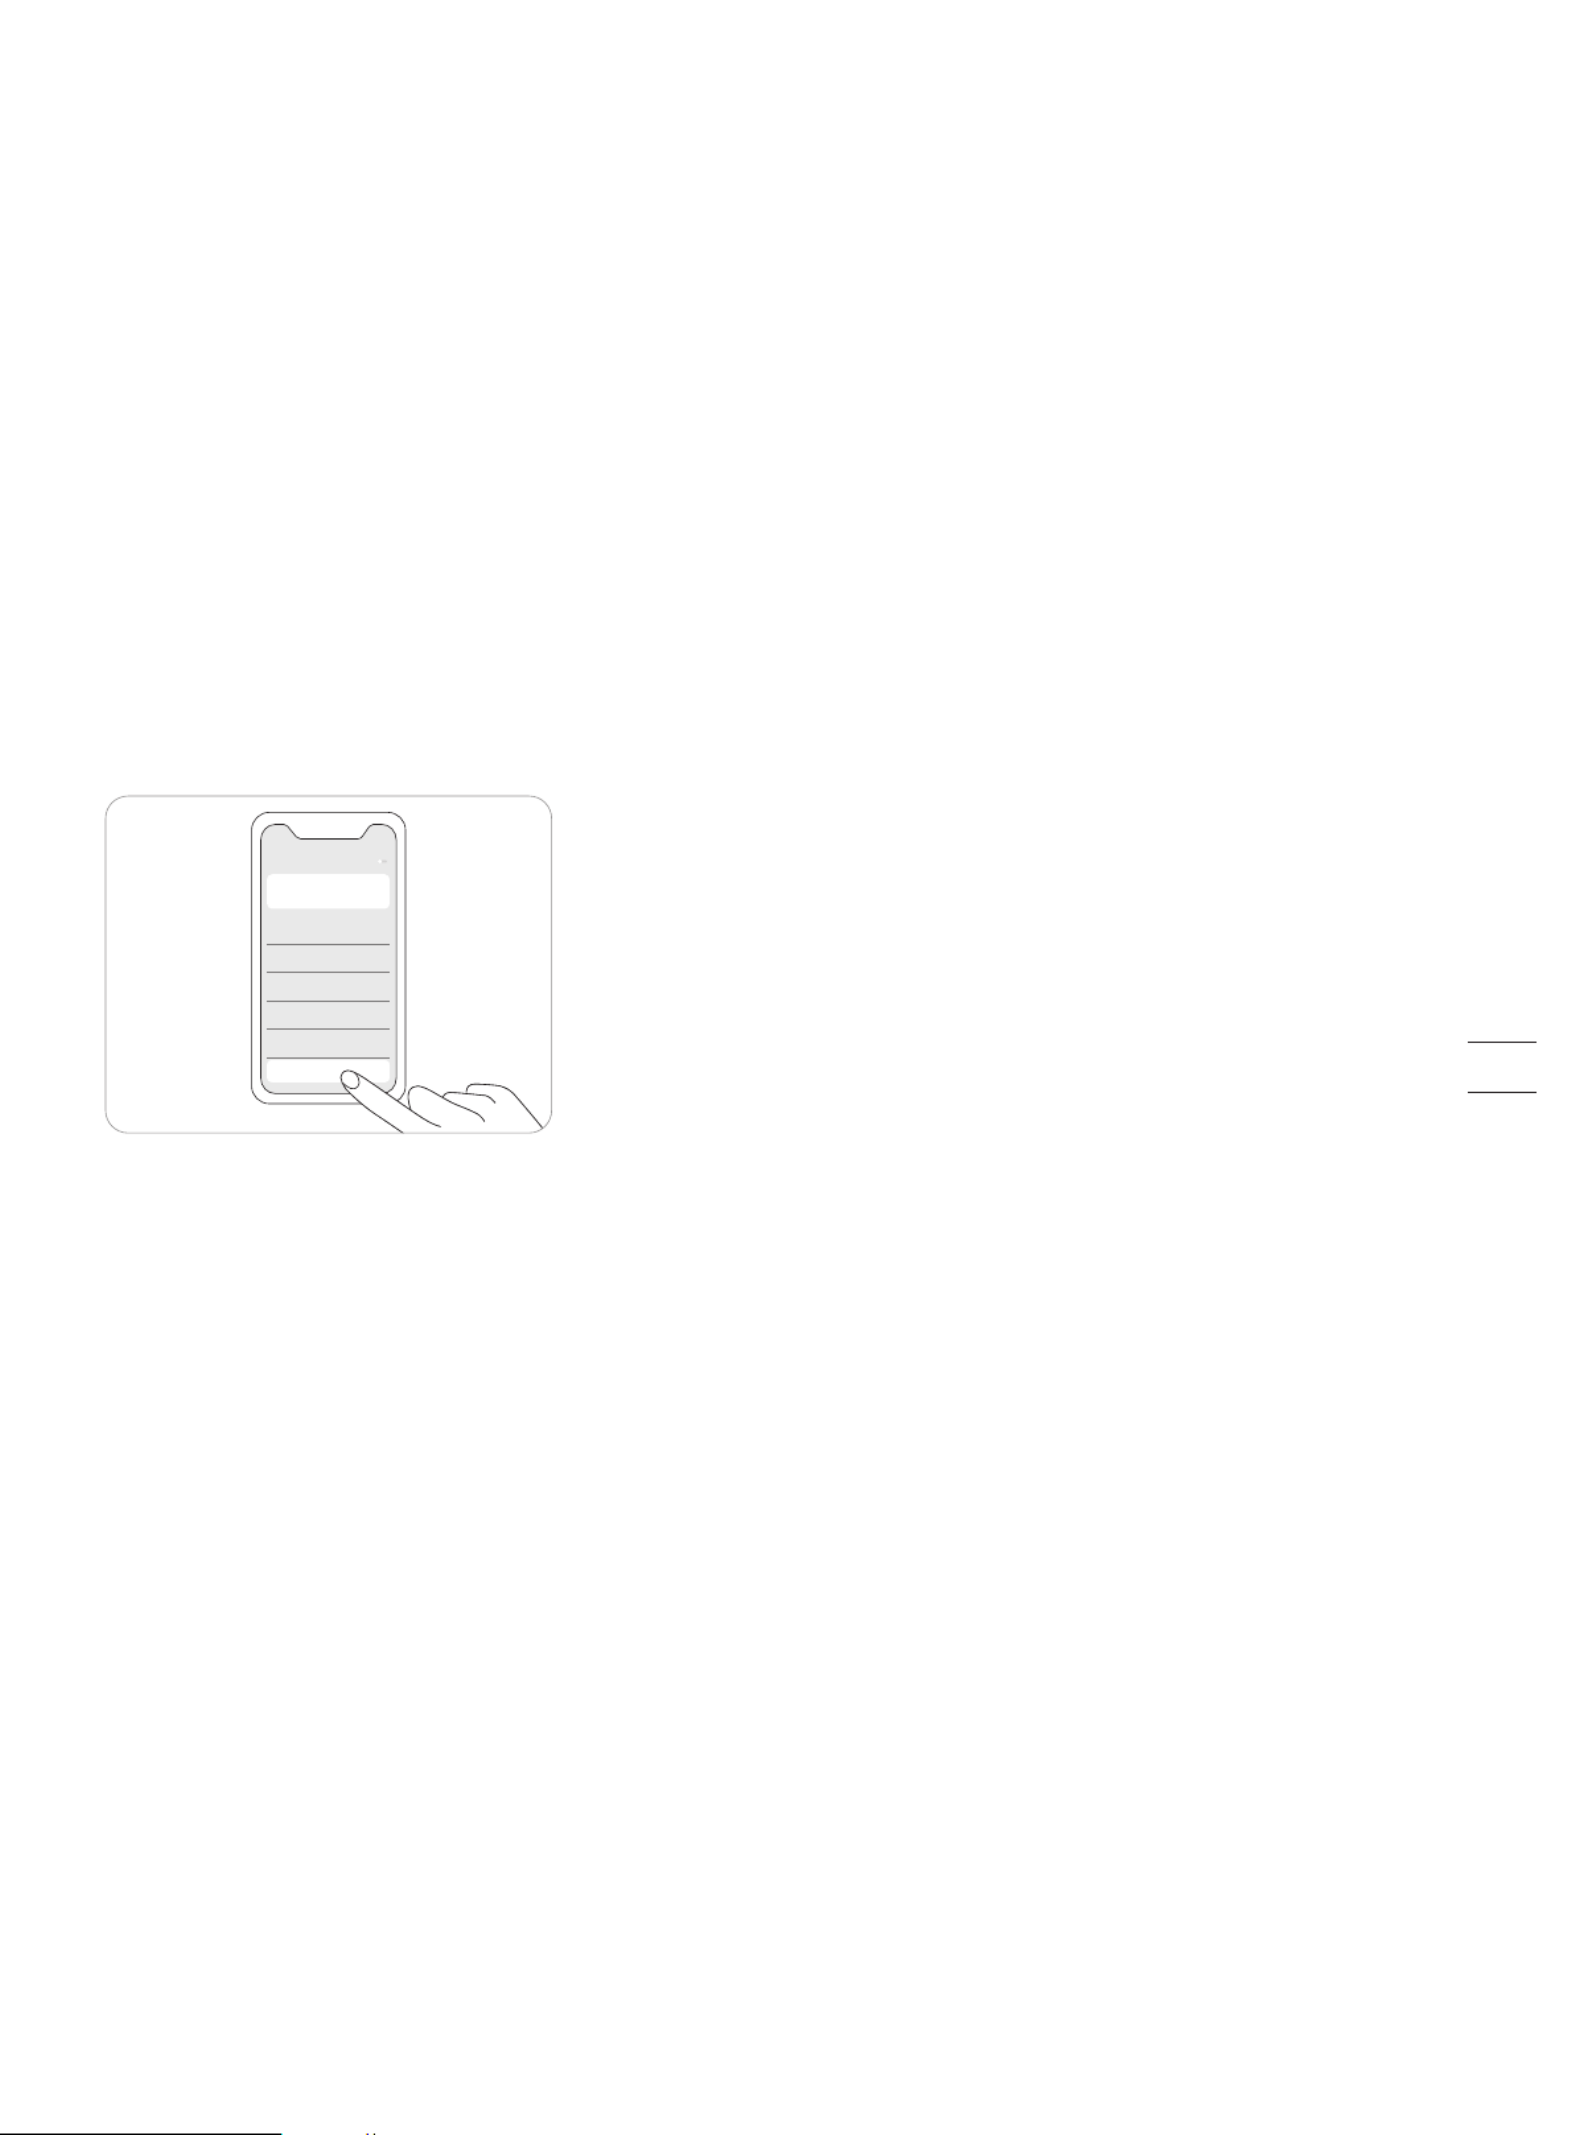
How to enter PIN code
Press MOW/HOME to increase/decrease the number and press OK to confirm the code.
How to lock the mower Press and hold MOW + HOME for 4s.
Power on
Power off
Start mowing
Stop mower operation
Mower returns to the
charging station
Press MOW and then OK.
Press STOP.
Press HOME and then OK.
Control
Basic operations
Press OK.
Press and hold OK for 4s. The mower cannot be turned off when it's in the charging station. When the mower is turned off, you will hear a sound, display on
the mower and the ambient light will be off.
To restart the mower, please turn it off first. Then press the OK button on the mower, or push the mower into the charging station.
How to restart the
mower
Enter the PIN code.
How to unlock the
mower
29

3.2 Light Cue
Navimow will have specific light effects, reminding you to pay attention to the state of the mower.
Ambient light color and meaning:
Mower ambient light cue
NOTE: When an abnormality occurs, the LED ring flashes red along with a four-digit error code on the dashboard display. Check the
app for error code meanings and solutions.
Pulsating blue
Flashing blue
Solid blue
Solid green
Flashing yellow
Solid red
Flashing red
Flashing white
Mowing.
The satellite signal is weak but still works fine.
Normal working status.
Mower is in the charging station.
Poor satellite signal.
Emergency stop/lifted up/no connection between the charging station and the mower.
Under error status.
OTA/Blade starts to work.
Dark mode
When Navimow works at night, you can turn on the dark mode to reduce the brightness of the ambient light. Go to Settings >
MOWER > Light setting to turn on the dark mode. Then, customize your active time.
Da rk mode
Bef ore Af t er
Act ive t ime 21:00-07:00
xxxxx
xxxxxxxxxxxx
30
Charging station light cue
Charging station LED indicator color and meaning
Solid blue
Solid green
Pulsating green
Solid yellow
Flashing yellow
Pulsating yellow
Solid red
Flashing red
Strong satellite signal, the mower is not in the charging station.
Mower is in the charging station and fully charged.
Mower is charging.
Poor satellite signal, the mower is not in the charging station.
No signal from GNSS antenna/ GNSS antenna is not connected.
Antenna connected, no GNSS data.
No connection between the charging station and the mower./ The mower might be powered off.
Under error status.
31

How does Navimow mow your lawn
1. Before mowing for the first time, please cut your lawn to a height of no more than 6 cm.
2. During the working process, if the battery is low (< 10%), the mower will stop mowing and return to the charging station to
charge. After fully charged, it will automatically return to the position where it previously stopped and continue mowing.
3. The mowing progress can be seen on both the app and the display of the mower. The mowing progress is defined as: current
mowed area/total work area.
Start Mowing
NOTE: If the mower is in lock status, first enter the PIN code to unlock the mower (see How to enter PIN code in 3.1).
There are three ways to start mowing:
3.3 Mow
This part is mainly about how the mower works, how to start and pause it during daily work, etc. Work settings related to mowing,
such as: scheduled mowing, how to change cutting height, map management, etc., see 3.6 Settings (Mower).
Edge cut
For optimal mowing results, the mowing path pattern rotates at certain angle for each new mowing task. Therefore, Navimow will
not leave indentations on the lawn.
Planned cut
Unlike most robotic lawnmowers, inside the work area, the lawnmower will mow the lawn along a planned path by an algorithm for
maximum efficiency.
32

Save
0 4 8 12 16 20 24
S
M
T
W
T
F
S
Pause
Press the STOP button on the mower or in the app to pause mower operation at any time.
Resume Mowing
Continue mowing by tapping the MOW button in the app or by pressing the MOW and then OK button on the control panel.
Return to the Charging Station
Send the mower back to the charging station in the app or press HOME and then OK button on the mower.
NOTES:
1. If the satellite signal is weak for more than one minute, the mower will return to the charging station. And if the satellite signal is
recovered in the return process, the mower will continue the mowing task.
2. The mower cannot be powered off when it is in the charging station.
HOMESTOP
HOMEMOW
HOMESTOP
c. The mower starts automatically according to the mowing schedule.
See How to set mowing schedule in 3.6 Settings (Mower) for details.
a. In the app, tap Mow Now.
b. On the mower, press MOW and then OK to start mowing.
NOTE: If a scheduled mowing task is paused and resumed later, Navimow will still stick to the preset schedule.
33

+
Create a map
x x x x
Add device
+
3.4 Navimow app
NOTE: The following illustrations regarding the app are for demonstration purposes only. Depending on software version, the
options available may be different.
The Navimow app is an important part of Navimow, you can use the app to:
1. Bind and activate the mower
2. Create a map (work area)
3. Check the status and work progress of the mower, remotely control the mower to start, stop or return to the charging station, etc.
4. View and change mower work settings (Mowing schedule, Cutting height, Map management)
5. View and change mower security/function settings (PIN, ambient light, BladeHalt, Anti-theft, etc.)
6. Update firmware, and change network connection
7. Unbind and add devices
8. Get help information and after-sales support
To Use the Navimow App
1. Please search and download the Navimow app through the APP store or Play Store.
2. Register and log in to your account
3. Turn on your phone's Bluetooth function and make sure your phone has a network signal
1. If you have registered an account through other services of Segway-Ninebot, you can log in to the Navimow app with the account
and vice versa.
2. If you cancel your Navimow account, all data related to Segway-Ninebot will be deleted.
3. During use, the Navimow app will ask you for Bluetooth (iOS/Android), location (iOS/Android), and Wi-Fi access (Android). To
ensure normal use, please grant the above accesses.
4. If you use Navimow with an iOS mobile device, when configuring the mower's Wi-Fi network for the first time, please make sure
that your mobile phone is connected to the same Wi-Fi network.
See the following chapters for more information:
2.2 Install the Charging Station and the Antenna
2.3 Charge and Activate the Mower
Create a map
Before mowing your lawn with Navimow, you need to create a
work area (map) using the Navimow app. Tap “Create a map”, and
follow the instructions in the app. For detailed steps and tips, see
2.4 Set up the Work Area.
Maps can also be edited or deleted on the settings page. See How
to edit the map in 3.6 Settings (Mower).
After registration and login, you will come to Device
Activation Guidance, which will guide you to install,
connect and activate your Navimow. Tap Add device.
Activate your mower
34

Homepage
After mapping, you will come to the Homepage, where you can view the entire work area, the status of the mower, and the work progress
(percentage and actual area), and remotely control the mower to start, pause or return to the charging station. Settings and Notification
pages can also be accessed from here.
Battery level Battery level and charging status
Lock status Mower locked. Unlock the mower before any operation. See how to enter PIN code in 3.1
Bluetooth Bluetooth connected. When disconnected, tap to reconnect
Connectivity Connects to internet (Wi-Fi or 4G)
Mower status Displays the current status of the mower
Notifications Notifications from the device & app
Settings Settings of the mower and the app
VisionFence VisionFence sensor status
Check the signal
After the map is saved, satellite signal strength across the whole map will be measured and displayed. You can check or adjust the
position of the charging station according to the tips in the app so that the mower can perform better.
To check the signal distribution of the newly created map, you need to tap the signal icon in the upper right corner in the Navimow app.
You can also tap "How to check" for further guidance and advice.
NOTES:
1. You can review the signal distribution map at any time in Map management.
2. The signal distribution map only reflects the state of the satellite signal at the time the map data was recorded.
TEST
How to check?
MOW STO
170 64
Coverage Progress
35

3.5 Notifications
System notifications
Latest news and updates from Navimow team.
Device notifications
The mower will send you device notifications in the following situations: work status update (such as mowing completed), blade
replacement, unexpected behaviors, abnormal position, etc.
Pop-up messages
Pop-up messages appear at the center of the screen. For example, an error code message appears if an error has occurred.
System notifications
xxxxx
xxxxx
xxxxx
xxxxx
xxxxx
xxxxx
xxxxx
Notifications
XXXX
OK
36

3.6 Settings (Mower)
All mower-related settings can be adjusted in the app. You can:
1. Change mower work settings (mowing schedule, cutting height, map managemen, etc.)
2. Change mower security settings and function settings (reset PIN code, ambient light and sound settings, BladeHalt, etc.)
3. View device firmware information, network connection status, unbind devices, switch devices, etc.
NOTE: Setting adjustment requires the mower to be online or connected to your phone via Bluetooth.
How to set mowing schedule
You can set the mowing schedule in the mower settings. The mower will work automatically according to the schedule.
0 4 8 12 16 20 24
M
T
W
T
F
S
S
Delet ed s ucc essf ully
0 4 8 12 16 20 24
M
T
St art and end t ime
08:00 12:00
12:30
11:30
08 :30
07:30
xxxx
Delet e t he schedule
Confirm
Cancel
Choose a specific date and time period on the schedule page to set your mowing schedule:
Tap the Hour bar on the page to add or delete working hours in the pop-up page.
Tap a day of the week to toggle the mowing schedule on/off for that day.
MO WER APP
XXXXXXXXX
XXXXXXXXX
XXXXXXXXX
XXXXX
XXXXXXXXX
XXXXXXXXX
XXXXX
XXXXXXXXX
XXXXX
XXXXXXXXX
XX
XXXXXXXXX
XXXXXXXXX
37

Adjust cutting heig ht
Ca nce l
60m m
55mm
50m m
45mm
40mm
35m m
30mm
How to change the cutting height
The cutting height can be adjusted in Settings >MOWER>Cutting height, the adjustment range is 30~60mm, and the minimum
adjustable segment is 5mm.
By tapping "Edit" you can: add or delete boundary, off-limit island, and channels. You can also fine-tune parts of the map. Tap a
boundary or off-limit island in the map and then tap the edit icon to fine-tune the map. For the definition of boundary, off-limit
island, and channels, see 2.4 Set up the Working Area.
1. The channel leading to the charging station is automatically generated and cannot be deleted.
2. When you delete a boundary, the element associated with the boundary (channel) is also deleted.
3. By tapping Delete you will delete the entire map. You need to create a new map before using the mower.
Rain sensor
If it rains when mowing, the rain sensor will be triggered after receiving a certain amount of rainwater, and the mower will
automatically return to the charging station. After the water on the rain sensor dries, it will automatically resume the mowing task.
Before the water dries, the mower cannot be started via the app or by pressing the buttons on the mower. This is normal and not a
malfunction of the mower. To continue mowing, please wait for the water to dry up and then press MOW and then OK, start via the
app or wait for the next mowing schedule to start.
You can also turn off the rain sensor in Settings>MOWER>Rain sensor. See 4.1 Cleaning for maintenance tips.
Edit Delet e
For the best mowing results, it is recommended to mow in dry weather. Mowing in the rain can make the grass stick on the
wheel and the mower may slip.
DO NOT mow in bad weather, such as heavy rain, thunderstorms or snow.
How to edit the map
You can edit or delete the entire map in Settings>MOWER>Map management. Make sure your phone is connected to the mower via
Bluetooth.
38

How to turn on Anti-theft
The anti-theft function can precisely locate Navimow and effectively prevent accidents such as mower theft. When moving out of a
designated area, Navimow will sound an alarm and you will receive a notification on the app simultaneously. When Anti-theft is on,
you can set the geofence and check Navimow's location in the map in real time.
BladeHalt
BladeHalt is a sensor that will be triggered when humans
or animals touch it. This is an experimental function and
will not guarantee 100% accuracy. The sensor is off by
default. It will be enabled when the sensor area is touched.
Meanwhile the blades will stop spinning automatically. This
sensor will only work when the blade disc is spinning.
NOTES:
When the mower is performing the edge cutting, the
BladeHalt sensor won't work.
We recommend disabling this feature when mowing for the
first time to ensure normal function because the sensor may
mistake tall or thick grass as a pet or other sensitive object
and stop the blades.
BladeHalt se nsor
xxxxx
xxxxxxxxxxxx
How to reset PIN code
In factory settings, the default PIN code: 0000. You can
reset the PIN code in Settings>MOWER>Reset PIN code.
NOTE: It is recommended that you reset the PIN code
after activating your mower.
Confirm
xxxxxx
xxxxxx
Operation steps:
Step 1: Turn on Anti-theft.
Step 2: Tap 'Geofence extension' to configure the distance of the geofence extension, and then tap 'save' to save.
Step 3: Tap 'Find my mower' to check the location of the mower on the map.
NOTES:
1. If Anti-theft is enabled, you need to enter PIN on the mower before powering off the mower.
2. If Anti-theft is accidentally activated, you need to enter PIN on the mower to disable the alarm and end the push notification.
3. Anti-theft is only available with 4G connection.
Ant i-theft
Ant i-t heft alarm
xxxxx
xx
xxxxx
39
How to unbind a mower
Each mower currently only supports binding to one app account. Before unbinding, it cannot be bound to another app account. You
can unbind the mower in the app. When unbinding, you need to verify your identity through email or SMS verification code.
Network setting
You can manage the network used by Navimow on the Network management page. For H800E, H1500E, and H3000E models, go to
Settings > MOWER > Network management to switch between Wi-Fi and 4G networks.
On the Wi-Fi settings page, you can view the currently connected Wi-Fi network or reconnect to the Wi-Fi.
NOTES:
1. Changing Wi-Fi settings requires your phone to be connected to the mower via Bluetooth.
2. Network switching is only available on products manufactured after week 39 2022.
Firmware version
We will update the functions and firmware of Navimow from time to time. In order to better experience the functions of Navimow, it
is recommended that you regularly check and update the firmware to the latest version.
Aut o -u pda t e
xxxxx
xxx
xxxxx
xxx
xxxxx
xxx
xxxxx
xxx
xxxxx
xxx
Check fo r upda tes
NOTES:
When activating the device for the first time the firmware will be updated automatically. Once the update is completed, you will
be noticed by the update result. Refer to Update the mower to the latest firmware in 2.3 Charge and Activate the Mower.
When updating the firmware for the device that is not activated for the first time, the conditions below need to be met before
updating.
-The mower is in the charging station.
-The mower is connected to a network and the signal is strong (through 4G or Wi-Fi).
-The battery power is more than 20%.
-There is no mowing task scheduled in the next hour.
If the pop-up window for updating is closed, you can also search for the new firmware in Settings>MOWER>Firmware version to
update the firmware.
40

3.7 Settings (app)
Account and security
You can check your bound email address or mobile number, change the password, download the data, and delete your account.
Language
You can set the language to the one that you need. Up to now, fifteen languages are supported, which are English, German, French,
Dutch, Italian, Swedish, Norwegian, Finnish, Danish, Portuguese, Spanish, Russian, Czech, Slovak, and Polish.
Help and support
You can view the latest User Manual, FAQ and contact of after-sales service here.
About
You can view the User Agreement and Privacy Policy here.
Log out
You can log out of your account here, and your data will not be deleted after logging out.
MO WER APP
XXXXXXXXX
XXXXXXXXX
XXXXX
XXXXXXXXX
XXXXX
XXXXXXXXX
XXXXXXXXX
41

3.8 IoT
Navimow is an Internet of Things (IoT) device. Connect the mower to the Internet via cellular network or your Wi-Fi network,
enabling the following functionalities:
1. Firmware Updates Over-The-Air (OTA), keep your mower updated to the latest features.
2. Enables remote control through the network: start mowing, stop mowing, return to charging station, set mowing schedule, set
cutting height and other functions.
3. Remotely monitor the mowing progress and mower location.
4. Report error code and mower status through the network.
5. Anti-theft ( 4G connection only).
Wi-Fi
H500E model only uses Wi-Fi to connect to a network. See Network setting in 3.6 Settings (Mower) for more details.
NOTES:
Navimow only supports 2.4GHz Wi-Fi network.
If you are using an iOS device, the mower can only connect to the Wi-Fi that your mobile device is connected to. Please follow
the instructions in the app. Connect your mobile device to the Wi-Fi first, then connect the mower to the same Wi-Fi. There are
no such requirements for Android devices.
4G
H800E, H1500E and H3000E models use both Wi-Fi and cellular data networks, which will connect the mower to the Internet after
activation. The usage of cellular data will incur charges. H800E and H1500E models come with one year of free data after
activation. The H3000E model comes with three years of free data after activation. You can go to Settings > MOWER > Basic info in
the app to check the expiration date of free data.
When the free data period expires, you need to recharge your 4G data plan via the app so that you can continue to use the IoT
and OTA functions.
If the 4G data is not recharged, the SIM card will remain effective for 2 years. The recharging and activation can be done at
anytime during these 2 years. However, after 2 years you cannot activate it anymore. You need to replace the hardwares through
the after-sales service. You need to pay the repairment and service fee as well.
Firmware updates
We will update the firmware periodically to fix security vulnerabilities and improve the existing features. After firmware updating,
you can experience new features and have a better use experience. When a new firmware version is available, you will receive a
pop-up notification in the app. Please follow the instructions shown on the pop-up window to complete the update. A firmware
update usually takes 10-15 minutes.
To update the firmware successfully, the following conditions need to be met:
-The mower is in the charging station.
-The mower is connected to a network and the signal is strong (through 4G or Wi-Fi).
-The battery power is more than 20%.
-There is no mowing task scheduled in the next hour.
NOTE: Some new features might require the app and the mower to be updated to certain versions and above, please check our
release notes for more details.
WARNING
Do not power off the device or run other operations during the update.
42

1. Some factors, such as high temperature and an irregular surface, can affect the accuracy, making the mower unable to avoid an
obstacle effectively.
2. Obstacles below 15 cm cannot be detected by the ultrasonic sensor. If the mower does not avoid a low obstacle automatically,
please know that this is not a mower malfunction.
3. If the mower is testing the map, or in edge cut mode at the end of a mowing task, the ultrasonic sensor will not be triggered.
Ultrasonic sensor (optional)
Specific models are equipped with an Ultrasonic sensor. See 1.8 Specifications for details. The ultrasonic sensor is also sold
separately and can be installed on all Navimow models. Consult your dealer for further information.
The ultrasonic sensor uses sound waves to measure the distance from an obstacle so that the mower can avoid it automatically.
With the ultrasonic sensor, the mower can have higher safety performance and work more efficiently.
3.9 Obstacle Avoidance
Obstacle avoidance features are designed to increase the performance of your mower and your safety.
Bumper sensor
Sensors are installed inside the Navimow’s front rubber bumper to detect obstacles. When the bumper bumps into an obstacle and
triggers the sensor, the mower will go backward and avoid the obstacle.
Your Navimow is able to avoid objects after bumping into them. However, it is still recommended to remove excess clutter
before mowing.
If your yard has a lot of trees and continuous obstacles, we recommend that you install an ultrasonic sensor for active obstacle
avoidance.
43

How to install ultrasonic sensor
Installation guidance:
≥4s
1. Power off the mower. 2. Take off the cover.
3. Connect the communication plug. 4. Use the Allen wrench to tighten the two screws.
3.10 VisionFence Sensor (optional)
VisionFence Sensor can significantly improve Navimow's obstacle recognition and avoidance capability. It is sold separately and
can be installed on all Navimow models. Consult your dealer for further information.
The VisionFence Sensor is designed to achieve accurate obstacle avoidance by identifying and calculating grass and non-grass
objects. When the signal is weak, the mower will start avoiding obstacles through visual recognition. Thanks to the advanced visual
recognition algorithm, the sensor can identify obstacles and start avoiding obstacles when the mower is about 0.3 m away from
them. With the VisionFence Sensor, the mower can avoid some obstacles, such as trees and flowerpots, without setting them as
off-limit islands. However, there is a certain probability that the VisionFence Sensor will fail to recognize obstacles that are too
small (less than 10 cm in length and width), too thin, tilted, dangling, or easily confused with lawn. For example wire fences, moss,
ornamental grass, bushes, dirt, roots, leaves, etc.
With the VisionFence Sensor installed, the mower is more adaptable to complex yards. When the satellite signal is weak in areas
with challenging layouts, the VisionFence Sensor can identify the lawn's edge and allow the mower to keep mowing the lawn.
Separate from the mower, the VisionFence Sensor has its own Wi-Fi module to connect to the internet. The VisionFence Sensor can
function normally without network, but it must be connected to a Wi-Fi network when the firmware needs to be updated.
44

How to install VisionFence Sensor
How to change the VisionFence Sensor setting
You can go to Settings >MOWER>VisionFence Sensor to turn on/off the sensor, check the sensor firmware version and configure
the sensor network setting.
≥4s
MO WER APP
XXXXXXXXX
XXXXXXXXX
XXXXXXXXX
XXXXX
XXXXXXXXX
XXXXXXXXX
XXXXX
XXXXXXXXX
XXXXX
XXXXXXXXX
XX
XXXXXXXXX
XXXXXXXXX
4. Place the rubber stoppers and bumps
against the surface of the mower.
3. Connect the plug.
1. Power off the mower. 2. Take off the cover.
5. Tighten the screws. 6. Install the decorative cover.
7. Power on the mower. 8. Tap VisionFence Sensor in the Navimow
app to configure the network.
NOTES:
1. VisionFence Sensor may not work well in low-light situations, resulting in limited obstacle avoidance performance in some complex yards.
2. Clean the lens of VisionFence Sensor by spraying water regularly, avoiding the lens being obscured by stains or mud.
3. For the best obstacle avoidance effect, we recommend that obstacles larger than 1 m and smaller than 0.1 m in diameter should
be set as off-limit islands.
4. To update VisionFence's firmware, please connect it to a Wi-Fi first. Make sure the charging station is also in the coverage of a 2.4
GHz Wi-Fi network.
45
Termékspecifikációk
| Márka: | Segway |
| Kategória: | Fűnyírógép |
| Modell: | Navimow H500E |
Szüksége van segítségre?
Ha segítségre van szüksége Segway Navimow H500E, tegyen fel kérdést alább, és más felhasználók válaszolnak Önnek
Útmutatók Fűnyírógép Segway

14 Augusztus 2024
13 Augusztus 2024
11 Augusztus 2024
9 Augusztus 2024
Útmutatók Fűnyírógép
- Fűnyírógép Husqvarna
- Fűnyírógép Dolmar
- Fűnyírógép Parkside
- Fűnyírógép Worx
- Fűnyírógép Kärcher
- Fűnyírógép Oregon Scientific
- Fűnyírógép Bosch
- Fűnyírógép Honda
- Fűnyírógép Einhell
- Fűnyírógép Florabest
- Fűnyírógép Stihl
- Fűnyírógép Yard Force
- Fűnyírógép Ozito
- Fűnyírógép Makita
- Fűnyírógép Hyundai
- Fűnyírógép Fuxtec
- Fűnyírógép Hecht
- Fűnyírógép AL-KO
- Fűnyírógép Scheppach
- Fűnyírógép Ergotools Pattfield
- Fűnyírógép Rapid
- Fűnyírógép Tesco
- Fűnyírógép EGO
- Fűnyírógép Cecotec
- Fűnyírógép Güde
- Fűnyírógép Hitachi
- Fűnyírógép Wolf Garten
- Fűnyírógép Remington
- Fűnyírógép Toolcraft
- Fűnyírógép Proviel
- Fűnyírógép Cobra
- Fűnyírógép Black & Decker
- Fűnyírógép Gardena
- Fűnyírógép Fieldmann
- Fűnyírógép Hanseatic
- Fűnyírógép Viking
- Fűnyírógép PowerPlus
- Fűnyírógép Biltema
- Fűnyírógép SABO
- Fűnyírógép Bavaria
- Fűnyírógép RYOBI
- Fűnyírógép Stiga
- Fűnyírógép Solo
- Fűnyírógép Robomow
- Fűnyírógép HiKOKI
- Fűnyírógép Texas
- Fűnyírógép Grizzly
- Fűnyírógép McCulloch
- Fűnyírógép Greenworks
- Fűnyírógép Rover
- Fűnyírógép Yato
- Fűnyírógép Gardenline
- Fűnyírógép Budget
- Fűnyírógép Baumr-AG
- Fűnyírógép OKAY
- Fűnyírógép EcoFlow
- Fűnyírógép Zipper
- Fűnyírógép Herkules
- Fűnyírógép Tanaka
- Fűnyírógép Gtech
- Fűnyírógép Pyle
- Fűnyírógép DeWalt
- Fűnyírógép MacAllister
- Fűnyírógép Mountain Buggy
- Fűnyírógép Alpina
- Fűnyírógép Stanley
- Fűnyírógép Hurricane
- Fűnyírógép Vonroc
- Fűnyírógép Cotech
- Fűnyírógép John Deere
- Fűnyírógép Kubota
- Fűnyírógép Pattfield
- Fűnyírógép Sovereign
- Fűnyírógép ATIKA
- Fűnyírógép Spear & Jackson
- Fűnyírógép GARDA
- Fűnyírógép Garden Feelings
- Fűnyírógép Gianni Ferrari
- Fűnyírógép Maxxmee
- Fűnyírógép Toro
- Fűnyírógép Cocraft
- Fűnyírógép Craftsman
- Fűnyírógép Graphite
- Fűnyírógép Ambrogio
- Fűnyírógép AS Motor
- Fűnyírógép Ferm
- Fűnyírógép Walker
- Fűnyírógép Draper
- Fűnyírógép ACG
- Fűnyírógép Skil
- Fűnyírógép Meec Tools
- Fűnyírógép Sun Joe
- Fűnyírógép Ferrex
- Fűnyírógép Homelite
- Fűnyírógép Flymo
- Fűnyírógép Hustler
- Fűnyírógép Troy-Bilt
- Fűnyírógép Challenge
- Fűnyírógép Topcraft
- Fűnyírógép Gamma
- Fűnyírógép Sterwins
- Fűnyírógép Aqua Joe
- Fűnyírógép Kress
- Fűnyírógép Mountfield
- Fűnyírógép McGregor
- Fűnyírógép Qualcast
- Fűnyírógép Varo
- Fűnyírógép Defort
- Fűnyírógép IKRA
- Fűnyírógép JCB
- Fűnyírógép Kibani
- Fűnyírógép Masport
- Fűnyírógép Eliet
- Fűnyírógép Echo
- Fűnyírógép VARI
- Fűnyírógép Klippo
- Fűnyírógép Zoef Robot
- Fűnyírógép Powerblade
- Fűnyírógép Hayter
- Fűnyírógép Ariens
- Fűnyírógép Andis
- Fűnyírógép Grouw
- Fűnyírógép Lumag
- Fűnyírógép McConnel
- Fűnyírógép Yard Machines
- Fűnyírógép Central Park
- Fűnyírógép Park
- Fűnyírógép Snapper
- Fűnyírógép Sanli
- Fűnyírógép CentralPark
- Fűnyírógép MTD
- Fűnyírógép Levita
- Fűnyírógép Efco
- Fűnyírógép Black Decker
- Fűnyírógép Blackline
- Fűnyírógép Brill
- Fűnyírógép Gardol
- Fűnyírógép Gartenmeister
- Fűnyírógép Plantiflor
- Fűnyírógép Powertec Garden
- Fűnyírógép Lux Tools
- Fűnyírógép Orec
- Fűnyírógép Scotts
- Fűnyírógép Chapin
- Fűnyírógép Giardino
- Fűnyírógép Fiskars
- Fűnyírógép Germania
- Fűnyírógép Garden Gear
- Fűnyírógép Anova
- Fűnyírógép Fleurelle
- Fűnyírógép Deltafox
- Fűnyírógép Palmera
- Fűnyírógép Yardforce
- Fűnyírógép Murray
- Fűnyírógép PLUS
- Fűnyírógép PowerG
- Fűnyírógép LEA
- Fűnyírógép Yamabiko
- Fűnyírógép Jacobsen
- Fűnyírógép Exgain
- Fűnyírógép Stabilo
- Fűnyírógép Robot Mower
- Fűnyírógép Garden
- Fűnyírógép Toledo
- Fűnyírógép Earthwise
- Fűnyírógép Practixx
- Fűnyírógép Belrobotics
- Fűnyírógép Mr Gardener
- Fűnyírógép Einhell Royal
- Fűnyírógép Ransomes
- Fűnyírógép Kingcraft
- Fűnyírógép Mac Allister
- Fűnyírógép Jonsered
- Fűnyírógép Gude Pro
- Fűnyírógép Green Technology
- Fűnyírógép Do It Garden
- Fűnyírógép Victa
- Fűnyírógép Robust
- Fűnyírógép Ultranatura
- Fűnyírógép LawnMaster
- Fűnyírógép Do It + Garden
- Fűnyírógép G-Technology
- Fűnyírógép Morrison
- Fűnyírógép Cub Cadet
- Fűnyírógép Bestgreen
- Fűnyírógép Maxbear
- Fűnyírógép Lawn Star
- Fűnyírógép NAC
- Fűnyírógép Craftfull
Legújabb útmutatók Fűnyírógép
5 Április 2025
1 Április 2025
31 Március 2025

29 Március 2025
27 Március 2025
27 Március 2025
27 Március 2025
16 Március 2025
15 Január 2025
15 Január 2025