Használati útmutató Seek Thermal ShotPRO
Seek Thermal
nincs kategorizálva
ShotPRO
Olvassa el alább 📖 a magyar nyelvű használati útmutatót Seek Thermal ShotPRO (2 oldal) a nincs kategorizálva kategóriában. Ezt az útmutatót 24 ember találta hasznosnak és 12.5 felhasználó értékelte átlagosan 4.7 csillagra
Oldal 1/2
ERSTE SCHRITTE ÜBERBLICK
Wärmebildkamera
Standardkamera
Blitz/Taschenlampe
Stativhalterung
USB-Datenübertragung/
Ladeanschluss
Auslöser
Einschaltknopf
Touchscreen
SCHRITT 1
Entnehmen Sie die Kamera und Zubehörteile der Schachtel.
SCHRITT 2
Laden Sie den Akku mit dem beigelegten USB-Kabel auf.
SCHRITT 3
Schalten Sie das Gerät ein, indem Sie den Einschaltknopf oben
an der Kamera drücken. Halten Sie ihn 2-3 Sekunden gedrückt.
Herzlichen Glückwunsch zum Kauf Ihrer neuen Seek SHOT PRO
Kamera. Diese Schnellstartanleitung zeigt Ihnen die Grundlagen
für die Aufnahme professioneller Wärmebilder mit Seek.
AUFNEHMEN VON FOTOS UND VIDEOS
Drücken Sie den Auslöser der Kamera, um ein Foto oder Video
aufzunehmen.
EIN FOTO AUFNEHMEN
Drücken Sie kurz auf den Auslöser, um ein Foto aufzunehmen
und das Bild in der Galerie der Kamera zu speichern.
VIDEO AUFNEHMEN
Halten Sie den Auslöser gedrückt, um mit der Videoaufnahme
zu beginnen; lassen Sie den Auslöser los, während Sie das
Video aufnehmen. Drücken Sie den Auslöser erneut, um die
Aufnahme zu beenden. Das Video wird automatisch in der
Galerie der Kamera gespeichert.
ANPASSEN DER KAMERAEINSTELLUNGEN
Tippen Sie zuerst das aktive Display und dann die Leiste für
die Schnelleinstellungen oben am Bildschirm an, um auf die
folgenden Optionen zuzugreifen:
HELLIGKEIT
Passen Sie die Helligkeit des Bildschirms manuell an.
WIFI
Passen Sie die WiFi-Einstellungen der Kamera an.
BLITZ
Schnelles Einschalten des Kamerablitzes für zusät-
zliche Beleuchtung, wenn Sie ein Foto aufnehmen.
TASCHENLAMPE
Schnelles Einschalten der Kamera-Taschenlampe.
HILFE
Zugri auf Seek SHOT Benutzerhandbücher.
ERWEITERTE EINSTELLUNGEN
Im Abschnitt Erweiterte Einstellungen finden Sie
eine vollständige Liste konfigurierbarer Funktionen.
EINHEITEN
Schnelleinstellung der bevorzugten Temperaturmaßeinheit.
EMISSIONSGRAD
Der Emissionsgrad ist eine Materialeigenschaft, die angibt, wie viel
Infrarotlicht von einer bestimmten Fläche reflektiert wird. Sie können
entsprechend dem Emissionsgrad manuell Anpassungen vornehmen,
um eine exakte Temperaturwiedergabe in den Bildern sicherzustellen.
ANSICHTSMODI
Durch Antippen der folgenden Symbole können Sie mühelos
zwischen den drei Ansichtsmodi der Kamera wechseln:
ERFASSUNG DES SICHTBAREN BILDES
Durch Antippen dieses Symbols rufen Sie
die digitale Standardkameraansicht auf.
THERMISCHE ANSICHT
Durch Antippen dieses Symbols rufen Sie
die Thermografieansicht auf.
SEEKFUSION™-ANSICHT
Tippen Sie auf das Symbol, um eine Echtzeit-
Komposition des sichtbaren und des
Wärmebildes anzuzeigen.
Um das Anzeigeverhältnis des sichtbaren
und thermalen Bildes manuell anzupassen,
tippen und schieben Sie den linken
Schieber bis zur gewünschten Transparenz.
Um Bilder, die sich innerhalb von
zwei Metern von der Kamera entfernt
befinden, manuell anzugleichen,
tippen und schieben Sie den rechten
Schieber auf die gewünschte Position.
KAMERAFUNKTIONEN
MITTLERE TEMPERATUR
Benutzen Sie das Fadenkreuz, um die Temperatur
im Zentrum der aktiven Szene anzuzeigen.
PUNKTTEMPERATUR
Erstellen Sie bis zu drei verschiebbare
Temperaturfadenkreuze auf der aktiven
Szene. Tippen Sie wiederholt, um bis zu drei
Markierungen hinzuzufügen.
BEREICHSTEMPERATUR
Erstellen Sie bis zu drei größenveränderbare und
verschiebbare Interessensbereiche (ROI – Regions
of Interest) auf der aktiven Szene. Tippen Sie
wiederholt, um bis zu drei Felder hinzuzufügen.
HOCH/TIEF
Zeigen Sie sofort die Höchst- und
Tiefsttemperaturen des aktiven Bildes an.
ÄNDERN DER BILDVERARBEITUNG
Wechseln Sie einfach zwischen den folgenden Modi für eine
optimierte Bildgebung hin und her:
HIGH DYNAMIC RANGE (HDR)
Benutzen Sie diesen Modus bei Szenen mit extremen
Temperaturunterschieden.
MODUS FÜR PRÄZISE BILDGEBUNG
Benutzen Sie diesen Modus, um einen exakten Temperaturbereich
in der aktiven Szene anzuzeigen und einzufärben. Dieser
Modus wird durch Schloss-Symbole neben den Höchst- und
Mindestwerten auf der Bereichsanzeige angegeben.
BIEN DÉMARRER LES BASES
Caméra thermique
Caméra visible
Flash/lampe
Installation du
trépied
Transfert de
données par USB/
Port de charge
Bouton de capture
Bouton de mise
en marche
Écran tactile
ÉTAPE1
Retirez l'appareil photo et les autres éléments contenus dans
la boîte.
ÉTAPE2
Chargez la batterie à l'aide du câble USB inclus.
ÉTAPE3
Allumez l'appareil à l'aide du bouton Allumer/Éteindre, situé
sur le haut de l'appareil photo. Maintenez-le appuyé pendant
2 à 3secondes.
Félicitations pour l'achat de votre appareil photo
SeekSHOTPRO. Ce guide de démarrage rapide vous
présentera les informations de base pour capturer des images
thermiques de qualité professionnelle avec Seek.
PRENDRE DES PHOTOS ET VIDÉOS
Utilisez le bouton Capture de votre appareil photo pour
prendre une photo ou enregistrer une vidéo.
PRENDRE UNE PHOTO
Appuyez brièvement sur le bouton Capture puis relâchez-le
pour prendre une photo et enregistrer l'image dans la galerie
de votre appareil photo.
ENREGISTRER UNE VIDÉO
Appuyez longuement sur le bouton Capture pour démarrer
un enregistrement vidéo. Relâchez le bouton Capture lors de
l'enregistrement de la vidéo. Pour mettre fin à l'enregistrement,
appuyez et relâchez de nouveau le bouton Capture. Votre
vidéo sera automatiquement enregistrée dans la galerie de
l'appareil photo.
AJUSTER LES PARAMÈTRES
DEL'APPAREIL PHOTO
Appuyez tout d'abord sur l'écran actif, puis appuyez sur la
barre Configuration rapide, située en haut de l'écran, afin
d'accéder aux options suivantes:
LUMINOSITÉ
Ajustez manuellement la luminosité de votre écran.
WI-FI
Ajustez les paramètres Wi-Fi de votre appareil photo.
FLASH
Allumez rapidement le flash de votre appareil
photo afin d'ajouter de la lumière lorsque vous
prenez votre photo.
LAMPE
Allumez rapidement la lampe de votre appareil photo.
AIDE
Accédez aux guides d'utilisation du Seek SHOT.
PARAMÈTRES AVANCÉS
Découvrez la section Paramètres avancés pour
consulter une liste complète des fonctionnalités
configurables.
UNITÉS
Paramétrez rapidement votre mesure de température favorite.
ÉMISSIVITÉ
L'émissivité est la propriété d'un matériau qui définit la quantité
de lumière infrarouge reflétée par une surface spécifique. Vous
pouvez l'ajuster manuellement en fonction de l'émissivité pour
garantir des relevés de température précis au sein de vos images.
FONCTIONNALITÉS DE L'APPAREIL PHOTO
TEMPÉRATURE AU CENTRE
Utilisez le réticule pour acher la température au
centre de votre scène active.
TEMPÉRATURE PONCTUELLE
Créez jusqu'à trois réticules de température
repositionnables sur l'écran actif. Appuyez plusieurs
fois afin d'ajouter jusqu'à trois marqueurs.
TEMPÉRATURE DE ZONE
Créez jusqu'à trois régions d'intérêt (ROI)
repositionnables et redimensionnables sur l'écran
actif. Appuyez plusieurs fois afin d'ajouter jusqu'à
trois cadres.
ÉLEVÉE/FAIBLE
Achez rapidement la température la plus élevée
et la plus faible de votre image active.
MODIFIER LE TRAITEMENT DES IMAGES
Alternez facilement entre les modes suivants pour une
imagerie optimisée:
HIGH DYNAMIC RANGE (HDR)
Utilisez ce mode lorsque vous visualisez des scènes
comportant de très grandes diérences de température.
MODE IMAGERIE DE PRÉCISION
Utilisez ce mode pour visualiser et coloriser une plage
de température exacte dans votre scène active. Ce mode
est indiqué par des icônes de cadenas à côté des valeurs
minimales et maximales de la barre de plage d'achage.
MODES DE VISUALISATION
Changez facilement de mode de visualisation, parmi les trois
existants, en appuyant sur les icônes suivantes:
IMAGERIE VISIBLE
Appuyez sur l'icône pour accéder au mode de
visualisation standard de l'appareil photo numérique.
VUE THERMIQUE
Appuyez sur l'icône pour accéder au mode de
visualisation d'imagerie thermique.
VUE SEEKFUSION™
Appuyez sur l'icône pour accéder à une image
composite en temps réel des modes Visible et
Thermique.
Afin d'ajuster le ratio entre
visualisation visible et visualisation
thermique, appuyez sur la barre de
gauche et déplacez-la afin d'obtenir
la transparence souhaitée.
Afin d'aligner les images étant à moins
de deux mètres de distance de votre
appareil photo, appuyez sur la barre
de droite et déplacez-la sur la position
souhaitée.
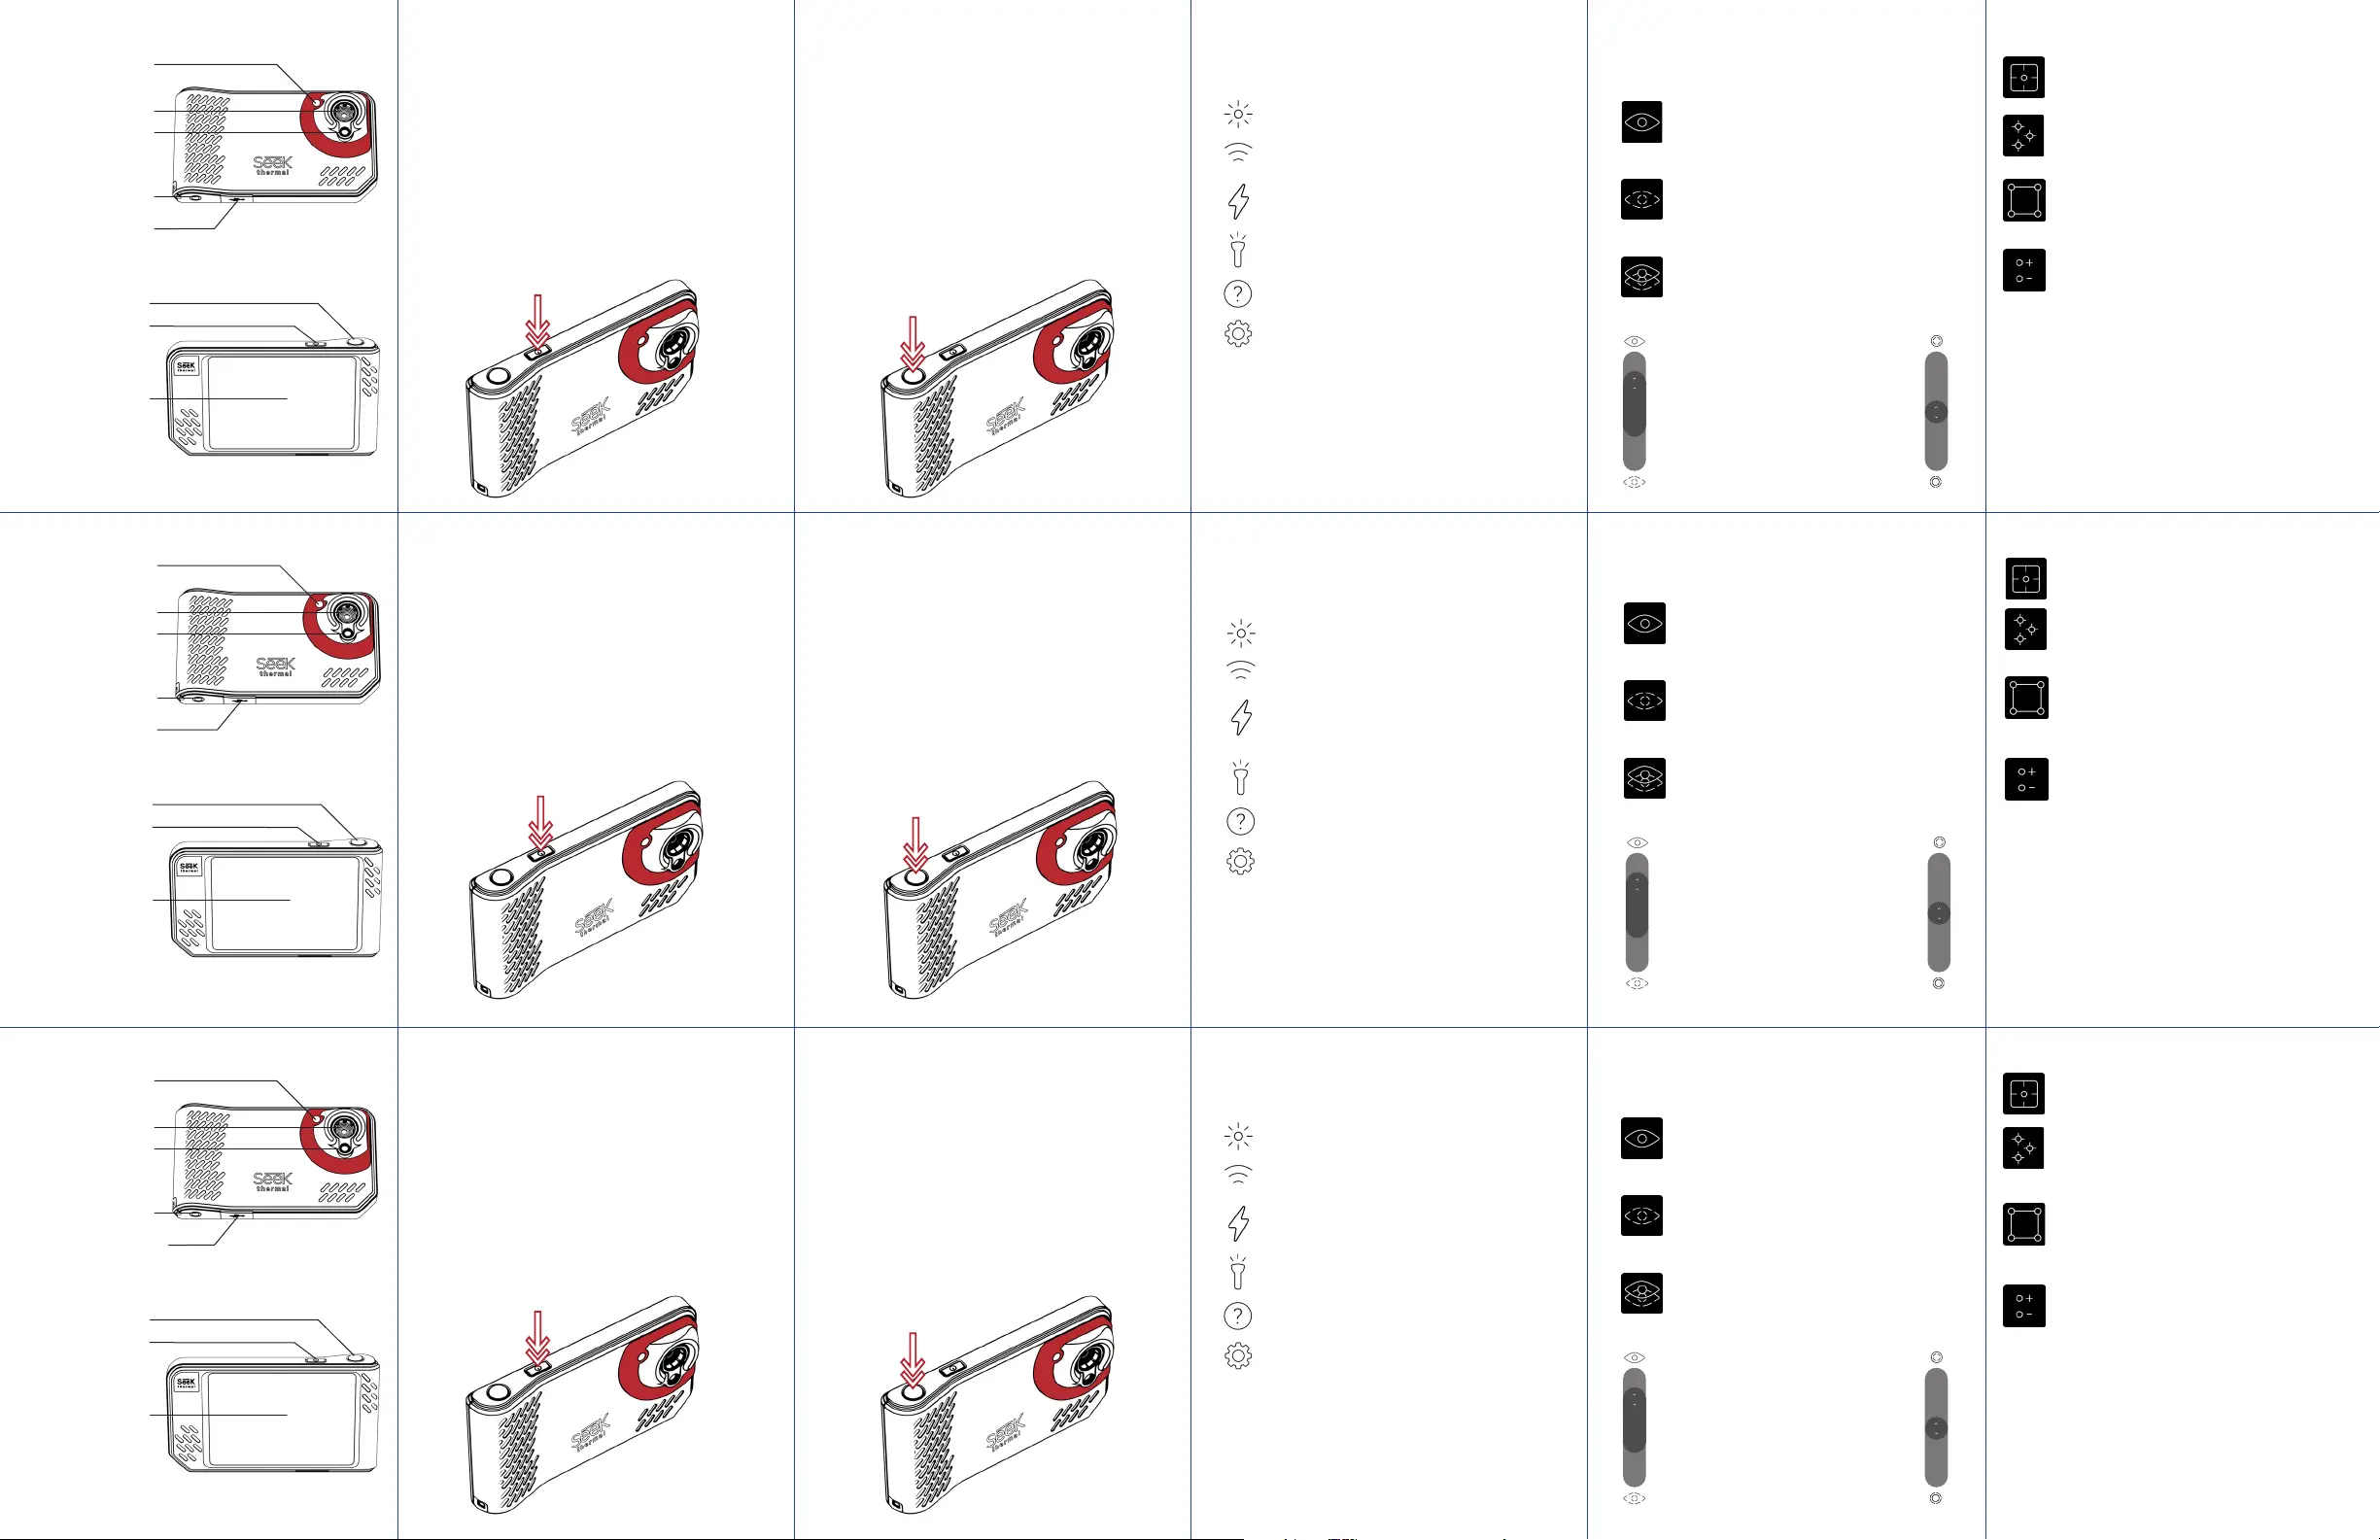
GETTING STARTED THE BASICS
Thermal Camera
Visible Camera
Flash/Flashlight
Tripod Mount
USB Data Transfer
/Charging Port
Capture Button
Power Button
Touch Screen
STEP 1
Remove camera and contents from box.
STEP 2
Charge the battery using the included USB cable.
STEP 3
Power on device using the Power button located at the top of
the camera. Press and hold 2-3 seconds.
Congratulations on your new Seek SHOT PRO camera. This
Quick Start Guide will show you the basics of capturing
professional thermal images with Seek.
ADJUSTING CAMERA SETTINGS
CAPTURING PHOTOS AND VIDEO
Use your camera’s Capture button to capture a photo or video.
TAKE A PHOTO
Use a short press and release of the Capture button to capture
a photo and save the image to your camera’s gallery.
RECORD A VIDEO
Use a long press of the Capture button to begin a video
recording; release the Capture button while capturing your
video. To end the recording, press and release the Capture
button again. Your video will be automatically saved to the
camera’s gallery.
First tap the active display, then tap the Quick Settings bar
across the top of the screen to access the following options:
BRIGHTNESS
Manually adjust your screen’s brightness.
WIFI
Adjust your camera’s WiFi settings.
FLASH
Quickly turn on your camera’s flash to add light
when taking your photo.
FLASHLIGHT
Quickly turn on your camera’s flashlight.
HELP
Access Seek SHOT user guides.
ADVANCED SETTINGS
See the Advanced Settings section for a com-
plete list of configurable features.
UNITS
Quickly set your preferred measurement of temperature.
EMISSIVITY
Emissivity is a material property that defines how much
infrared light is reflected from a particular surface. You can
manually adjust for emissivity to ensure accurate temperature
reporting in your images.
VIEW MODES
Easily switch between your camera’s three view modes by
tapping the following icons:
VISIBLE IMAGING
Tap icon to access the standard
digital camera view.
THERMAL VIEW
Tap icon to access the thermal
imaging view.
SEEKFUSION™ VIEW
Tap icon to access a real-time composite
of the Visible and Thermal modes.
To manually adjust the ratio of visible
to thermal views, tap and drag the left
slider to the desired transparency.
To manually align the images when
they are within two meters of your
camera, tap and drag the right slider
to the desired position.
CAMERA TOOLS
CENTER TEMPERATURE
Use the cross-hair to display the temperature at
the center of your active scene.
SPOT TEMPERATURE
Create up to three repositionable temperature
cross-hairs on the active scene. Tap repeatedly
to add up to three markers.
REGION TEMPERATURE
Create up to three resizable and repositionable
Regions of Interest (ROI) on the active scene.
Tap repeatedly to add up to three boxes.
HIGH/LOW
Quickly display both the high and low
temperatures of the active image.
SWITCH IMAGE PROCESSING
Easily toggle between the following modes for optimized
imaging:
HIGH DYNAMIC RANGE (HDR)
Use this mode when viewing scenes with extreme
temperature dierence.
PRECISION IMAGING MODE
Use this mode to view and colorize an exact temperature
range in your active scene. This mode is indicated by lock
icons next to the max and min values on the range bar.
Termékspecifikációk
| Márka: | Seek Thermal |
| Kategória: | nincs kategorizálva |
| Modell: | ShotPRO |
Szüksége van segítségre?
Ha segítségre van szüksége Seek Thermal ShotPRO, tegyen fel kérdést alább, és más felhasználók válaszolnak Önnek
Útmutatók nincs kategorizálva Seek Thermal

27 Augusztus 2024

26 Augusztus 2024
Útmutatók nincs kategorizálva
- nincs kategorizálva Gtech
- nincs kategorizálva Ecler
- nincs kategorizálva Olympus
- nincs kategorizálva Kohler
- nincs kategorizálva Flexson
- nincs kategorizálva MEE Audio
- nincs kategorizálva XCell
- nincs kategorizálva Alogic
- nincs kategorizálva GLORIA
- nincs kategorizálva EPEVER
- nincs kategorizálva Meade
- nincs kategorizálva Carnielli
- nincs kategorizálva Muse
- nincs kategorizálva Everdure
- nincs kategorizálva Foreo
Legújabb útmutatók nincs kategorizálva

10 Április 2025

10 Április 2025

10 Április 2025

9 Április 2025

9 Április 2025

9 Április 2025

9 Április 2025

9 Április 2025

9 Április 2025

9 Április 2025