Használati útmutató Sanyo Xacti VPC-E60
Olvassa el alább 📖 a magyar nyelvű használati útmutatót Sanyo Xacti VPC-E60 (189 oldal) a kamera kategóriában. Ezt az útmutatót 8 ember találta hasznosnak és 2 felhasználó értékelte átlagosan 4.5 csillagra
Oldal 1/189

VPC-E60EX
VPC-E60
INSTRUCTION MANUAL
Digital Camera
Please read these instructions carefully before using the camera.
Make sure to read and understand the separate booklet “SAFETY MANUAL”.
Keep this manual in a safe place for later reference.
Important note
This manual explains how to safely operate the VPC-E60EX and VPC-E60.
Any information regarding only one of these products will be labeled as such.

iEnglish
Warning
TO PREVENT THE RISK OF FIRE OR ELECTRIC SHOCK, DO NOT
EXPOSE THIS APPLIANCE TO RAIN OR MOISTURE
FOR AMERICAN USERS
The following advisory is included in accordance with the laws of the State of
California (USA):
WARNING:
This product contains chemicals, including lead, known to the State of
California to cause cancer, and birth defects or other reproductive harm.
Wash hands after handling.
iThis equipment has been tested and found to comply with the limits for a
Class B digital device, pursuant to Part 15 of the FCC Rules. These limits
are designed to provide reasonable protection against harmful interference
in a residential installation. This equipment generates, uses and can
radiate radio frequency energy and, if not installed and used in accordance
with the instructions, may cause harmful interference to radio
communications. However, there is no guarantee that interference will not
occur in a particular installation. If this equipment does cause harmful
interference to radio or television reception, which can be determined by
turning the equipment off and on, the user is encouraged to try to correct
the interference by one or more of the following measures:
hReorient or relocate the receiving antenna.
hIncrease the separation between the equipment and receiver.
hConnect the equipment into an outlet on a circuit different from that to
which the receiver is connected.
hConsult the dealer or an experienced radio/TV technician for help.
iChanges or modifications not expressly approved by the party responsible
for compliance could void the user’s authority to operate the equipment.
Model number: VPC-E60
Trade Name: SANYO
Responsible party: SANYO FISHER COMPANY
Address: 21605 Plummer Street, Chatsworth, California 91311
Telephone No.: (818) 998-7322
This device complies with Part 15 of the FCC Rules. Operation is subject
to the following two conditions:
(1) this device may not cause harmful interference, and
(2) this device must accept any interference received, including interfer-
ence that may cause undesired operation.
Declaration of Conformity

English ii
FOR CANADIAN USERS
iThis Class B digital apparatus complies with Canadian ICES-003.
FOR EU USERS
Note:
iThis symbol mark and recycle system apply only to EU
countries and do not apply to the countries in the other
areas of the world.
Your SANYO product is designed and manufactured with
high quality materials and components which can be
recycled and reused.
This symbol means that electrical and electronic
equipment, at their end-of-life, should be disposed of
separately from your household waste.
Please dispose of this equipment at your local community
waste collection/recycling centre.
In the European Union there are separate collection
systems for used electrical and electronic products.
Please help us to conserve the environment we live in!
Symbols used in this manual
HINT Points giving some extended instructions or special points to pay
attention to.
CAUTION Points that require special attention.
(page xx) Refer to the page indicated for detailed information.
You may find the answers to questions or problems concerning camera
operation in the sections “COMMONLY ASKED QUESTIONS” (page 154)
and “TROUBLESHOOTING” (page 161).
vEnglish
Playback
k
k
k
kkStill image playback
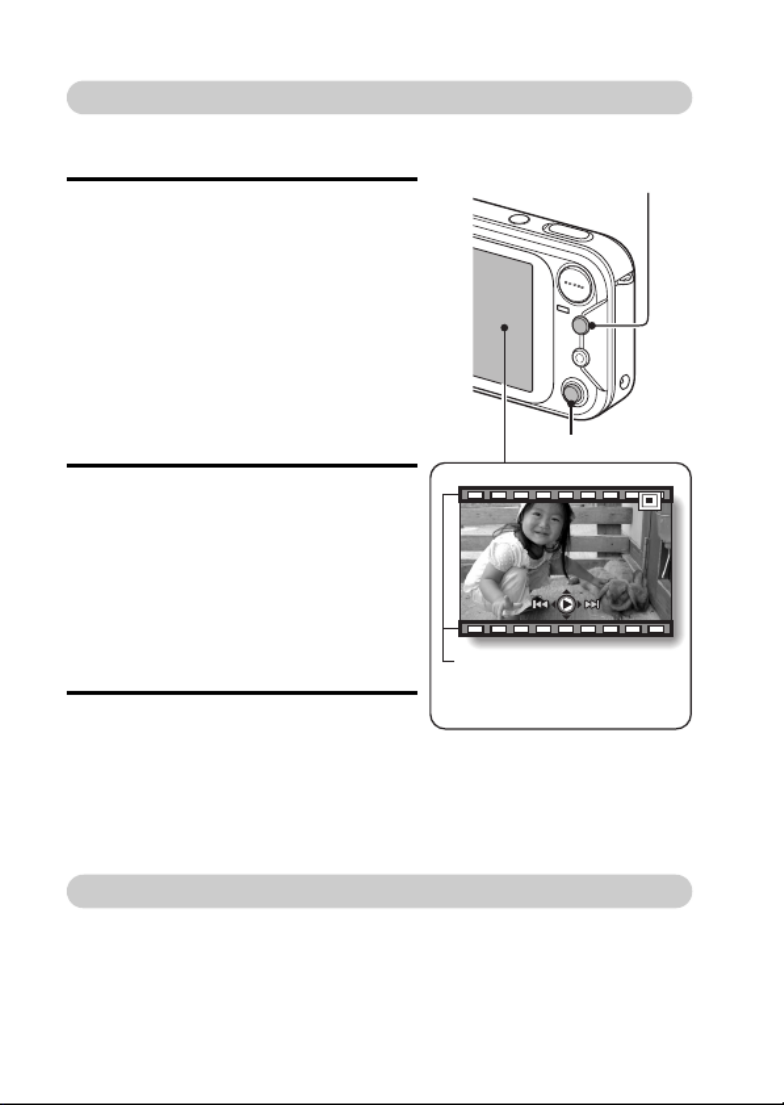
1 Press the playback button [H].
hThe display switches to the
Playback Screen.
hTo view other images, toggle the
SET button to the left or right.
hIf the playback button [H] is
pressed, the display returns to the
Shooting Screen.
k
k
k
kkVideo clip playback
1 Press the playback button [H].
hThe display switches to the
Playback Screen.
hToggle the SET button to the left
or right to display the video clip
you wish to play back.
hVideo clips are indicated by a
video clip pattern along the top
and bottom of the screen.
2 Press the SET button.
hPlayback of the selected video
clip begins.
hIf the playback button [H] is
pressed again, the display
changes to the Shooting Screen.
When you are finished taking pictures...
Press the ON/OFF button to turn the camera off.
Playback button [H]
SET button
<Video Clip Playback
Screen>
Video clip pattern

1English
QUICK SEARCH BY OPERATION
Your camera has an abundance of convenient features and functions. From
creating precisely the photo you want, to viewing images using various
techniques, you can locate the exact operation for your purposes in the
following table.
Basic operation Convenient
functions Additional functions
Shooting/recording
Getting started
shooting/recording
• “Recording a video clip”
on page 39
• “Shooting single shots”
on page 33
• “Shooting sequential
shots” on page 76
• “MAKE AN AUDIO
RECORDING” on
page 67
Change the setting
to sequential shots
• “How to use the best
shot feature” on
page 52
Log the date and
time of your photos
• “DATE AND TIME
SETTING” on page 23
Zoom in on the
subject
• “USING THE ZOOM”
on page 43
Close-up
photography
• “FOCUS RANGE”
(supermacro mode) on
page 69
For more accurate
focus
• “FOCUS RANGE”
(manual focus) page 70
Set the focus to a
narrow range
• “FOCUS AREA
SETTING” on page 81
Check the focus
status
• “Zoom jump playback”
on page 38
Optimize the photo
quality
• “RESOLUTION
SETTING” on page 66
Reduce video clip flicker
• “FLICKER-REDUCTION SETTING” on page 80

English 4
Data managing/processing
Search for image/audio data
• “9-image/36-image display playback” on page 36
Delete data
• “ERASING DATA” on
page 93
Protect images from accidental erasure
• “IMAGE PROTECT” on page 91
Format a card
• “INITIALIZING THE CARD MEMORY AND
INTERNAL MEMORY” on page 137
Add an audio track to still image data
• “ADDING A VOICE MEMO” on page 86
• “ADDING/DELETING A VOICE MEMO” on page 100
Create a calendar from a captured still image
• “Making a calendar shot” on page 77
• “ENTER AN IMAGE IN THE CALENDAR” on page 97
Change the “red eyes” in flash photos to make them look more
natural
• “RED-EYE CORRECTION” on page 110
Specify the number of prints, index print, and date imprint
• “PRINT SETTINGS” on page 102
View the settings that were in effect when the image/audio data
was recorded
• “DISPLAYING IMAGE PROPERTIES (INFORMATION SCREEN)” on page 117
Basic operation Convenient
functions Additional functions

5English
CONTENTS
QUICK SEARCH BY OPERATION ............ ..................... ....................... 1
CONTENTS ........................................................................................... 5
CHECKING THE INCLUDED ACCESSORIES ...................................... 9
GETTING THE MOST OUT OF YOUR CAMERA ............................... 11
SYSTEM MAP ..................................................................................... 13
SETUP
PARTS NAMES ................................................................................... 14
INSTALLING THE CARD ..................................................................... 16
POWER FOR THE CAMERA .............................................................. 18
TURNING THE CAMERA ON AND OFF ............................................. 21
DATE AND TIME SETTING ................................................................. 23
BASIC OPERATION
ABOUT THE 2WAY SHOOTING GUIDE (Guidance display) .............. 26
BEFORE TAKING PICTURES ............................................................. 28
CAPTURING AND PLAYING BACK STILL IMAGES .......................... 33
VIDEO CLIP RECORDING AND PLAYBACK ..................................... 39
USING THE ZOOM .............................................................................. 43
FLASH SETTING ................................................................................. 44
EXPOSURE CORRECTION ................................................................ 46
SHOOTING (EASY SETTING MODE)
EASY SETTINGS SCREEN ................................................................ 47
OVERVIEW OF THE EASY SETTINGS SCREEN .............................. 48
SCENE SELECT .................................................................................. 49
FILTERS .............................................................................................. 53

English 6
SHOOTING (SHOOTING SETTING SCREEN)
ACCESSING THE SHOOTING SETTING SCREEN ............................55
TOUCH SENSOR (TOUCH FOCUS) SETTING ..................................65
RESOLUTION SETTING ......................................................................66
MAKE AN AUDIO RECORDING ..........................................................67
FOCUS RANGE ...................................................................................69
SELF-TIMER ........................................................................................71
CAMERA SHAKE COMPENSATION ...................................................73
SHUTTER OPERATION SETTING ......................................................75
FLICKER-REDUCTION SETTING .......................................................80
FOCUS AREA SETTING ......................................................................81
LIGHT-MEASURING MODE SETTING ................................................82
ISO SENSITIVITY .................................................................................83
WHITE BALANCE ................................................................................84
ADDING A VOICE MEMO ....................................................................86
PLAYBACK
DISPLAYING THE PLAYBACK SETTING SCREENS .........................87
IMAGE PROTECT ................................................................................91
ERASING DATA ...................................................................................93
PLAYBACK VOLUME ...........................................................................95
DISPLAYING THE CALENDAR ...........................................................96
ENTER AN IMAGE IN THE CALENDAR ..............................................97
ADDING/DELETING A VOICE MEMO ...............................................100
PRINT SETTINGS ..............................................................................102
CHANGING IMAGE SIZE (RESIZE) ..................................................109
RED-EYE CORRECTION ...................................................................110
ROTATE IMAGE .................................................................................112
EXTRACTING A STILL IMAGE FROM A VIDEO CLIP ......................113
COPY DATA .......................................................................................114
SLIDESHOW PLAYBACK ..................................................................116
DISPLAYING IMAGE PROPERTIES (INFORMATION SCREEN) .....117

7English
OPTION SETTINGS
DISPLAYING THE OPTION SCREEN ............................................... 118
SET THE 2WAY SHOOTING GUIDE SETTING ................................ 121
SELECT THE STARTUP DISPLAY ................................................... 122
OPERATION SOUNDS ............. .......... ..................... ........... .............. 123
HELP DISPLAY ................................................................................. 125
POST-VIEW SETTING ...................................................................... 126
ZOOM SETTINGS ............................................................................. 127
LCD MONITOR BRIGHTNESS .......................................................... 129
SCREEN LANGUAGE ....................................................................... 130
TV SYSTEM SETTING ......................................................................131
POWER SAVE FUNCTION ............... .......... ..................... ........... ...... 132
FILE No. RESET FUNCTION ............ .......... ..................... ........... ...... 134
INITIALIZING THE CARD MEMORY AND INTERNAL MEMORY ....137
RESETTING THE CAMERA SETTINGS ........................................... 139
CHECKING THE REMAINING INTERNAL MEMORY AND
CARD MEMORY ........................................................................... 140
CHECKING THE REMAINING BATTERY PACK CHARGE .............. 142

English 8
OTHER DEVICES AND CONNECTIONS
CONNECTING TO A TV .....................................................................144
DIRECT PRINTING ............................................................................145
APPENDICES
COMMONLY ASKED QUESTIONS ...................................................154
TROUBLESHOOTING ........................................................................161
SPECIFICATIONS ..............................................................................169
HINTS FOR TAKING PICTURES .......................................................179

English 12
Mode Select Screen
Switch between the still photo shooting and video clip recording modes with a
single on-screen action. Accessing the Shooting Setting Screen has never
been so fast.
Create a schedule from your photos: schedule-
making feature (see page 77)
Enter your photos in the calendar to create a custom image-based schedule.
For example, you could snap a photo of a movie poster and record it in the
calendar on the date of the movie’s premiere.
SCENE
SETTING SETTING
SCENE
MOVIEPHOTO
<Still photo shooting
mode>
<Video clip recording
mode>
30
23
16
9
2
31
24
17
10
3
25
18
11
4
26
19
12
5
27
20
13
6
28
21
14
7
29
22
15
8
1
10
OCT. 2005 05.10.11
SUN MON TUE WED THU FRI SAT

13 English
SYSTEM MAP
The included accessories can be used to connect your camera to a computer,
printer or TV. By connecting the camera to your computer, you can, for
example, copy your photos to the computer’s hard disk. You can connect it to
a printer for direct printing of your photos. Or take the card to a photo shop to
have your photos printed there.
Dedicated
USB interface
cable
Dedicated AV
interface cable
Computer
Printer
TV
AC adaptor
(Supplied)
Separately sold or
commercially available
SD Memory Card/
Multi Media Card
Internet
Battery charger
(Optional)
iCard reader
iDPOF-
compatible
printer
iPhoto shop

English 16
INSTALLING THE CARD
Your camera has an internal 32MB memory, which means that you can take
photos (record image data) even when no card is installed. By using a card,
however, you will be able to take many more photos.
The card can be used after it has been formatted with the camera (page 137).
1 Open the battery/card cover.
hWhile gently pressing the battery/card cover, slide it open.
2 Insert the card, and close the battery/card cover.
hFirmly insert the card until it clicks into place.
Battery/card cover
(on the camera bottom)
Card
J mark
Termékspecifikációk
| Márka: | Sanyo |
| Kategória: | kamera |
| Modell: | Xacti VPC-E60 |
Szüksége van segítségre?
Ha segítségre van szüksége Sanyo Xacti VPC-E60, tegyen fel kérdést alább, és más felhasználók válaszolnak Önnek
Útmutatók kamera Sanyo

23 Szeptember 2024
26 Augusztus 2024
19 Augusztus 2024
10 Augusztus 2024
10 Augusztus 2024
3 Augusztus 2024
2 Augusztus 2024
1 Augusztus 2024
1 Augusztus 2024
31 Július 2024
Útmutatók kamera
- kamera Samsung
- kamera Sony
- kamera Braun
- kamera National Geographic
- kamera Acer
- kamera Nedis
- kamera Philips
- kamera Reolink
- kamera Olympus
- kamera Oregon Scientific
- kamera SilverCrest
- kamera Panasonic
- kamera Canon
- kamera JVC
- kamera Lenovo
- kamera Casio
- kamera Toshiba
- kamera Ozito
- kamera HP
- kamera BenQ
- kamera TP-Link
- kamera Medion
- kamera Vimar
- kamera Xiaomi
- kamera Fujifilm
- kamera EZVIZ
- kamera Prixton
- kamera Polaroid
- kamera Kyocera
- kamera Technaxx
- kamera GoPro
- kamera Speco Technologies
- kamera Ricoh
- kamera Hikvision
- kamera Epson
- kamera Netgear
- kamera Vtech
- kamera Rollei
- kamera Agfa
- kamera Lamax
- kamera Hitachi
- kamera Kodak
- kamera Ring
- kamera Nikon
- kamera Alpine
- kamera Optoma
- kamera Logitech
- kamera Bresser
- kamera Dahua Technology
- kamera Viewsonic
- kamera Cobra
- kamera Scosche
- kamera Denver
- kamera Minox
- kamera Trevi
- kamera Joy-It
- kamera Daewoo
- kamera Gembird
- kamera GE
- kamera SPC
- kamera Powerfix
- kamera Eufy
- kamera Avaya
- kamera Levenhuk
- kamera Konica Minolta
- kamera Mamiya
- kamera Lorex
- kamera Foscam
- kamera Kogan
- kamera SJCAM
- kamera Imou
- kamera AgfaPhoto
- kamera Sigma
- kamera Pentax
- kamera Velleman
- kamera D-Link
- kamera Blaupunkt
- kamera InfiRay
- kamera Fluke
- kamera Arlo
- kamera Trust
- kamera Konig
- kamera ARRI
- kamera Pyle
- kamera Emerson
- kamera MuxLab
- kamera Lumens
- kamera DataVideo
- kamera Lenco
- kamera Leica
- kamera Azden
- kamera Vemer
- kamera Burris
- kamera Marshall Electronics
- kamera Getac
- kamera AViPAS
- kamera Creative
- kamera EverFocus
- kamera SereneLife
- kamera Swann
- kamera Anker
- kamera Microtek
- kamera Linksys
- kamera Elmo
- kamera UniView
- kamera Laserliner
- kamera IGET
- kamera Vivitar
- kamera PTZ Optics
- kamera BZBGear
- kamera Argus
- kamera Lexibook
- kamera Bushnell
- kamera Easypix
- kamera Maginon
- kamera AVerMedia
- kamera Celestron
- kamera Yashica
- kamera Flir
- kamera Daitsu
- kamera Nest
- kamera Ansco
- kamera Sygonix
- kamera Intel
- kamera Zenit
- kamera EVE
- kamera Fuji
- kamera Minolta
- kamera Zorki
- kamera RunCam
- kamera SeaLife
- kamera FIMI
- kamera Liiv360
- kamera Watec
- kamera Meade
- kamera Contax
- kamera Sinji
- kamera Traveler
- kamera Exakta
- kamera Digital Watchdog
- kamera ZeissIkon
- kamera Silvergear
- kamera Dorr
- kamera Spypoint
- kamera HOLGA
- kamera Praktica
- kamera Hasselblad
- kamera Moto Mods (Motorola)
- kamera Fantasea Line
- kamera Brinno
- kamera Z CAM
- kamera General
- kamera Ergoguys
- kamera Strex
- kamera General Electric
- kamera Berger & Schröter
- kamera Leitz Focomat IIc
- kamera Syrp
- kamera Cosina
- kamera Hanwha
- kamera Videology
- kamera Pelco
- kamera Videotec
- kamera Cambo
- kamera Kobian
- kamera Kyocera Yashica
- kamera Red Digital Cinema
- kamera Bauhn
- kamera Konica
- kamera Akaso
- kamera Seek Thermal
- kamera Aida
- kamera Ikegami
- kamera Ikelite
- kamera Adeunis
- kamera Hoppstar
- kamera IOptron
- kamera Moultrie
- kamera PatrolEyes
- kamera Camouflage
- kamera HuddleCamHD
- kamera Aplic
- kamera Linhof
- kamera GoXtreme
- kamera KanDao
- kamera Aquapix
Legújabb útmutatók kamera

10 Április 2025

9 Április 2025
3 Április 2025
1 Április 2025
29 Március 2025
29 Március 2025
28 Március 2025
27 Március 2025
27 Március 2025

20 Március 2025