Használati útmutató Samsung UA46H6203AK
Olvassa el alább 📖 a magyar nyelvű használati útmutatót Samsung UA46H6203AK (166 oldal) a televízió kategóriában. Ezt az útmutatót 2 ember találta hasznosnak és 2 felhasználó értékelte átlagosan 4.5 csillagra
Oldal 1/166

E-MANUAL
Thank you for purchasing this Samsung product.
To receive more complete service, please register
your product at
www.samsung.com/register
Model______________ Serial No.______________

Contents
Connecting Antenna and External
devices
Connecting - Aerial
Video Device Connection
3 Connecting - HDMI
4 Connecting - Component
5 Connecting - External Input
6 Connecting - SCART
TV Audio through the External Speakers
8 Connecting - Digital Audio (Optical)
9 Connecting - Headphone
Connecting to a Computer
11 Connecting - HDMI Port
12 Connecting - HDMI (DVI) Port
13 Connecting - Samsung Link
13 Connecting - Home Network (DLNA)
Connecting with a Mobile Device
15 Mobile Device Screen on TV (Screen Mirroring)
16 Connecting Mobile Devices without a Wireless Router
(Wi-Fi Direct)
16 Connecting - Samsung Link
17 Connecting - Home Network (DLNA)
18 Name of TV on Network
Input Signal Selection
Using Remote and Peripheral
Devices
Displaying the Remote Control on the Screen
Controlling External Devices with the TV Remote
(Universal Remote Setup)
20 Setting Up the Universal Remote Control
21 Controlling External Devices with the TV Remote
Controlling the TV with a Keyboard
23 Connecting a Keyboard
23 Using the Keyboard
Controlling the TV with a Mouse
25 Connecting a Mouse
26 Using the Mouse
Entering Text Using QWERTY
27 Using Additional Functions
Internet Connection
Establishing a Wired Internet Connection
28 Connecting a LAN Cable
29 Connecting to a Wired Internet Network Automatically
29 Connecting to a Wired Internet Network Manually
Establishing a Wireless Internet Connection
31 Connecting to a Wireless Internet Network Automatically
32 Connecting to a Wireless Internet Network Manually
33 Connecting to a Wireless Internet Network with WPS
Troubleshooting Internet Connectivity Issues
34 Troubleshooting Wired Internet Connectivity Issues
35 Troubleshooting Wireless Internet Connectivity Issues
Mobile Network
36 Supported Telecom and Model Name
Checking the Internet Connection Status

Smart Features
Smart Hub
38 Testing Smart Hub connections
39 Opening the Home Screen
40 Moving to the Panel Screen
40 Using the Smart Hub Tutorial
40 Resetting Smart Hub
Using Smart Hub with Samsung Account
41 Creating a Samsung Account
43 Signing into Samsung Account
44 Linking My Samsung and App Accounts
45 Changing and Adding Information to Samsung Account
45 Deleting All Samsung Accounts from the TV
Using SAMSUNG APPS Panel
47 Using Pop-Up Menu Functions
48 Installing an App
49 Default Apps
49 Using Web Browser Web Browser
52 Rearranging Apps on the SAMSUNG APPS Screen
53 Removing an App from the TV
53 Rating/Reviewing an App
54 Updating an App
54 SAMSUNG APPS Features
Using On TV Panel
58 Using Pop-Up Menu Functions
58 Viewing Detailed Programme Information
59 Configuring On TV Settings
Playing Photos, Videos, and Music (MULTIMEDIA)
60 Playing Media Content from a USB Device
61 Playing Multimedia Content Saved in a Computer/Mobile
Device
63 Playing Photos
64 Playing Videos
66 Playing Music
67 Functions on the Media Content List Screen
TV Viewing Features
Digital Broadcast Information at a Glance
68 Using the Guide
69 Checking the Current Programme Info
69 Change the Broadcast Signal
69 Digital Signal Info and Strength
Setting Up a Schedule Viewing
70 Setting Up Schedule Viewing
71 Managing the Schedule Viewing List
Using the Channel List
Registering, Removing, and Editing Channels
73 Registering and Removing Channels
73 Editing Registered Channels
74 Enabling/Disabling Password Protection on Channels
74 Changing Numbers
74 Locking/ Unlocking Channels
74 Edit Channel Number
Creating a Personal Favourites List
75 Registering a Channel as Favourites
76 Viewing Favourites List Channels Only
76 Editing a Favourites List
Adding Realism to Sports
79 Enabling Football Mode
80 Functions Available in Football Mode

TV-Viewing Support Features
81 Showing Subtitles
81 Subtitle Options
82 Changing Teletext Language
82 Digital Text
83 PIP Broadcast Viewing
84 Scanning for Available Channels
85 Selecting the Broadcast Audio Options
85 Audio Description
85 Genre Selection
85 Adult genre enabling
Using the Channel Settings
86 Country (Area)
86 Manual Tuning
87 Fine-Tuning the Screen
88 Transfer Channel List
88 Delete CAM Operator Profile
88 Satellite System
90 Common Interface
Picture and Sound Settings
Changing the Picture Mode and Adjusting the Picture
Quality
91 Choosing the Right Picture Mode for the Viewing
Environment
92 Adjusting the Picture Quality for Each Picture Mode
93 Fine-Tuning Each Picture Mode (Advanced Settings)
95 Adjusting the Picture for Easier Viewing (Picture Options)
Viewing in 3D
97 Starting 3D
98 Changing the 3D Mode
99 Adjusting the 3D Effect
Picture Support Functions
100 PIP Broadcast Viewing
101 Changing the Picture Size and Position
102 Listening to Audio Only with the Screen Turned Off
(Picture Off)
102 Resetting the Picture Mode Settings
Changing the Sound Mode and Using Sound Effects
103 Choosing the Right Sound Mode for the Environment
104 Using Sound Effects
Sound Support Functions
105 Selecting Speakers
105 Designating the TV's Installation Type
105 Enabling the Sound (Additional Settings)
106 Listening to 3D Audio in 3D Mode
106 Resetting All Sound Settings
General
Setting the Time and Using the Timer
107 Setting the Current Time
108 Using the Timers
Using the Screen Burn Protection and Energy Saving
Features
110 Preventing Screen Burn
110 Using Energy Saving Features
Using the e-Manual
111 Launching the e-Manual
111 Additional e-Manual Features
112 Updating the e-Manual to the Latest Version
Updating the Software
113 Updating Software over the Internet
113 Updating Software using a USB connection
114 Enabling Automatic Software Updates
114 Software update via satellite channel
Protecting the TV from Hacking and malicious code
115 Checking the TV and Connected Storage Media
115 Automatically Scanning when the TV is Powered On
115 Automatically Adding malicious code to the Blocked List
Using Other Functions
116 Enabling the High Contrast
116 Adjusting the Menu Transparency
116 Expanding the Smart Hub's Focus Area

Connecting - External Input
Before connecting any external device or cable to the TV, first verify the TV's model number. A
sticker containing the model number is attached to the back of the TV. The connection method varies
depending on the model.
Refer to the diagram and connect the AV cable to the TV's AV input connectors and the device's AV
output connectors.
If you are using the TV's AV input connectors, connect the video cable to the Y connector. Some
models feature a video connector as well. In this case, connect the cable to the video connector.
Once the connection has been made, you will be able to select the connected external device using
the SOURCE button.

Connecting - SCART
" Availability depends on the specific model and area.
Before connecting any external devices and cables to the TV, first verify the model number of the
TV you purchased. A sticker containing the model number is attached to the back of the TV. The
connection method varies depending on the model.
Connect the TV’s SCART input connector to the device’s SCART output connector using a SCART
cable. An extra audio connection is not needed because SCART also carries audio.
" SCART can only carry standard-definition video.

TV Audio through the External Speakers
Your TV has a variety of connectors for audio input from devices such as Blu-ray players and DVD
players and for audio output to such devices as amplifiers. The connectors are listed below.
●Digital Audio (Optical)
There are several issues to bear in mind when using audio input:
●For better audio quality, it is a good idea to use an AV receiver.
●The number of connectors and their names and locations may vary depending on the model.
●Refer to the external device's operating manual when connecting it to the TV. The number
of external device connectors and their names and locations may vary depending on the
manufacturer.

Connecting - Digital Audio (Optical)
" Availability depends on the specific model and area.
Before connecting any external device or cable to the TV, first verify the TV's model number. A sticker
showing the model number is attached to the back of the TV. The connection method varies depending
on the model.
Connecting an AV receiver to the TV via a digital audio (optical) connector lets you listen to digital
audio.
Connecting a device using an optical cable does not automatically turn off the TV speakers. To turn off
the TV's speakers, set ( > > ) to something TV Sound Output Sound Speaker Settings TV Sound Output
other than TV Speaker.
Adjust the audio device's volume using its remote control.
" An unusual noise coming from the audio device while you are using it may indicate a problem with the
audio device itself. If this occurs, ask for assistance from the audio device manufacturer.
" Digital audio is only available with 5.1-channel broadcasts.
Refer to the diagram and connect the optical cable to the TV's digital audio output connector and the
device's digital audio input connector.

Connecting - Headphone
" Availability depends on the specific model and area.
Before connecting any external device or cable to the TV, first verify the TV's model number. A
sticker containing the model number is attached to the back of the TV. The connection method varies
depending on the model.
Refer to the diagram and connect the headphones to the headphone output connector. Only use
headphones with a 3-conductor TRS type jack. The headphone volume and the TV volume are
adjusted independently of each other. While the headphone is connected, the TV speakers are muted
and certain options are deactivated.Sound
" The connectors may not be supported depending on the model.

Connecting to a Computer
You can directly connect a computer to the TV or to the network to view the computer screen or
content on the TV. Connect the computer to the TV as follows.
●Connecting via HDMI Port
You can connect the computer to the TV using the HDMI cable to display the computer screen on
the TV.
●Connecting with the HDMI (DVI) Port
You can connect a computer to the TV by connecting the computer's DVI port to the TV's HDMI
port with the DVI to HDMI cable to display the computer screen on the TV.
●Connecting via Samsung Link
Quickly access the photo, video and music files saved on a computer on which Samsung Link
software is installed, even if you do not connect the TV directly to the computer.
●Connecting via Home Network (DLNA)
Quickly access the photo, video and music files saved on a computer by connecting the TV and
the computer to the same router or AP.
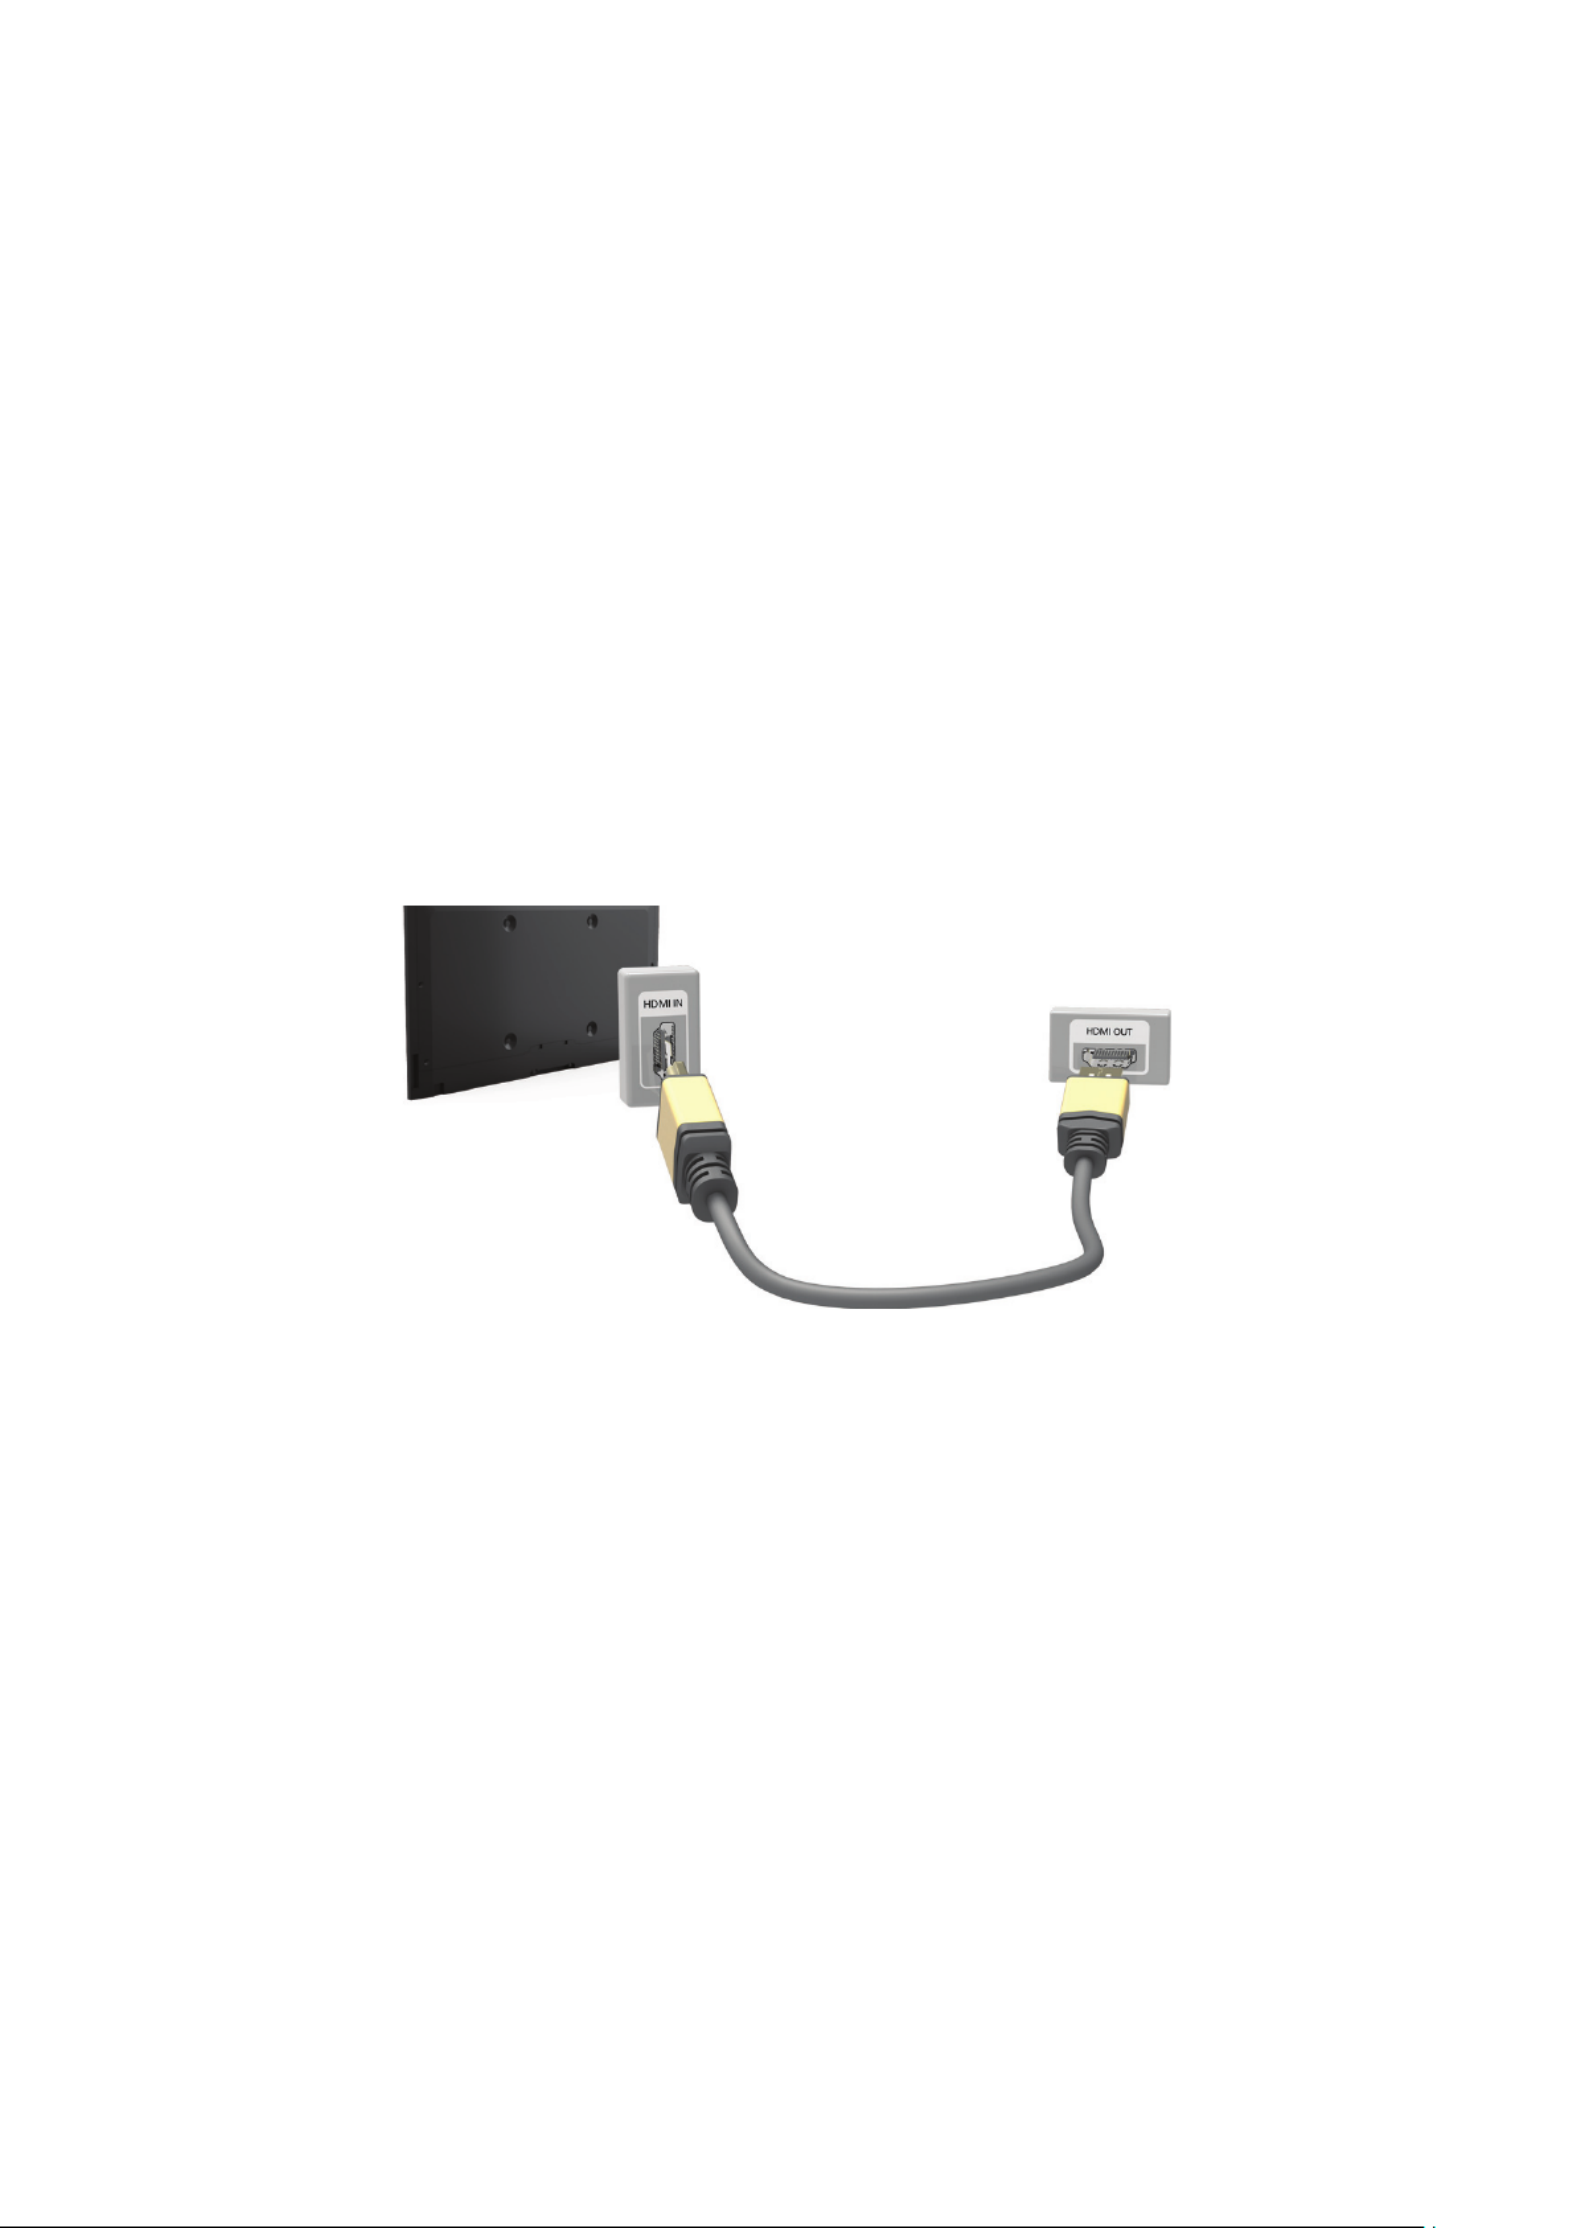
Connecting - HDMI Port
Before connecting any external device or cable to the TV, first verify the TV's model number. A sticker
showing the model number is attached to the back of the TV. The connection method varies depending
on the model.
For HDMI connection, one of the following HDMI cable types is recommended:
● High-Speed HDMI Cable
● High-Speed HDMI Cable with Ethernet
" Use an HDMI cable with a thickness of 14 mm or less. Using a non-certified HDMI cable may result in a
blank screen or a connection error.
" Some HDMI cables and devices may not be compatible with the TV due to different HDMI specifications.
" This TV does not support HDMI Ethernet Channel. Ethernet is a LAN (Local Area Network) built on coaxial
cables standardised by the IEEE.
" Some computers do not support HDMI interface, depending on its graphics adapter specifications. In this
case, use a DVI-to-HDMI cable to connect the computer to the TV.
Refer to the diagram and connect the HDMI cable to the external video device's HDMI output
connector and the TV's HDMI input connector.
Once the connection has been made, you will be able to select the connected external device using
the SOURCE button.

Connecting - HDMI (DVI) Port
If the graphics adapter of your computer does not support HDMI interface, connect the computer to
the TV with the DVI (Digital Visual Interactive) to HDMI cable. However, DVI-to-HDMI connection is
supported by the HDMI port for DVI only and does not support audio signal transmission. To listen to
the computer sound, connect the external speaker to the computer's audio output connector.
" For information on resolutions supported by the TV, refer to "Computer Connection Precautions".
Refer to the diagram and connect the DVI-to-HDMI cable to the TV's HDMI (DVI) port and the
computer's DVI output port.
Once the connection has been made, you will be able to select the connected external device using
the SOURCE button.

Connecting - Samsung Link
Quickly access photo, video and music files saved on a computer with Samsung Link software
installed. Also, use Samsung Link to play and view the content of a computer that has been registered
to Samsung Link under your Samsung account, even if the computer and the TV are not connected to
the same router or AP.
1.
Visit the Samsung content and service portal (http://link.samsung.com) on a computer and sign
into your Samsung account.
" To install Samsung Link desktop software, you will need to first sign into your Samsung account. If
you don't have a Samsung account, create one first.
2.
Install Samsung Link desktop software. When the installation is complete, the computer will be
registered to Samsung Link.
3.
Specify the folder you wish to link to the TV. You can view and play photo, video and music files
contained in the specified folder on the TV screen.
" For more information on using Samsung Link desktop software, refer to the software's Help section.
Connecting - Home Network (DLNA)
Quickly access and view/play photo, video and music files from a computer on the TV screen.
1.
Connect the TV and the computer to the same router or AP. A home network will be configured
once the two connections are established.
" Home Network (DLNA) enables content-sharing between the TV, computers and mobile devices
connected to the same wired or wireless router.
2.
From the computer, select [Control Panel] > [Network and Internet] > [Network and Sharing
Centre] > [Change advanced sharing settings] and select [Choose media streaming options...] to
activate media streaming.
3.
From the list, set TV to [Allowed].
4.
Launch Windows Media Player from the computer, select [Settings] > [Library Management] and
then add the location where the photo, video and music files are saved to view/play the files on
the TV screen.
" It will be possible to view/play on the screen files moved to Windows Media Player's default folder.
" As long as File Sharing is activated, unauthorised access may be allowed. Disable File Sharing if data
access is not required.

Connecting with a Mobile Device
Connect mobile device such as a smartphone or tablet to the TV directly or indirectly over a shared
network and display the mobile device screen or content on the TV screen. Connect the mobile device
to the TV as follows.
●Mobile Device Screen on TV (Screen Mirroring)
Wirelessly connect the TV to the mobile device with the mirroring function to view the mobile
device's screen on the TV.
" This option is available only with mobile devices that support mirroring.
●Connecting Mobile Devices without a Wireless Router (Wi-Fi Direct)
Wi-Fi Direct enables you to connect the TV to a mobile device without a router or AP. Quickly
access and play photo, video and music files from a connected mobile device on the TV screen.
" This option is available only with mobile devices that support Wi-Fi Direct.
●Connecting via Samsung Link
Samsung Link enables you to play photo, video and music files from a Samsung Link-enabled
mobile device without having to manually connect the device to the TV.
●Connecting via Home Network (DLNA)
View/play on the TV photo, video and music files from a mobile device connected to the same
router or AP as the TV.

Mobile Device Screen on TV (Screen Mirroring)
" Availability depends on the specific model and area.
Network Screen Mirroring > Try Now
Wirelessly connect a mirroring-enabled mobile device to the TV and play the video and audio files
stored on the device on the TV. Mirroring refers to the function that plays the video and audio files
located on a mobile device on a TV and on the mobile device simultaneously.
" To use the function, the mobile device must support a mirroring function such as AllShare Screen Mirroring
Cast or . To check whether your mobile device supports the mirroring function, please visit Screen Mirroring
the mobile device manufacturer's website.
" The video or audio may intermittently stop depending on network conditions.
Connecting via a mobile device
1.
On the mobile device, run . The mobile device searches for available devices to Screen Mirroring
connect to.
2.
From the search result list, select TV. The TV displays a pop-up window.
3.
In the pop-up window, select to connect the mobile device.Allow
" All previously allowed mobile devices will automatically connect without needing approval.
" If you select Deny, the device won't appear and can't be activated in this way. Navigate to > Network
Screen Mirroring Device Manager > to allow the previously denied mobile device.
Not searching for the TV on mobile devices...
1.
Navigate to > to run . Also, you can select Network Screen Mirroring Screen Mirroring Screen
Mirroring on a list by pressing .SOURCE
2.
Run mirroring on the mobile device. Display a list while automatically searching for mobile
devices.
3.
Select the TV and it connects automatically.
" When the mobile devices cannot connect, try turning the TV off and on.
Allow/Reject the connection via mobile devices
" This is only available for watching when mobile devices allow the connection.
1.
Navigate to > > to activate . This Network Screen Mirroring Device Manager Device Manager
displays a list of required mobile devices connection.
2.
You can allow access or deny connections with mobile devices.

Connecting Mobile Devices without a Wireless Router (Wi-Fi
Direct)
Network Wi-Fi Direct > Try Now
Wi-Fi Direct lets you connect mobile devices directly to your TV using wireless technology. After
connecting a device to the TV using Wi-Fi Direct, it will be possible to view/play video, photo, and
music files from the device on the TV.
" The mobile device must support Wi-Fi Direct. Make sure the mobile device you intend to use supports Wi-Fi
Direct.
1.
Enable Wi-Fi Direct on the mobile device and then launch . The TV automatically Wi-Fi Direct
scans for and displays a list of available devices. The TV's name also appears on the mobile
device.
2.
Select the device from the list to initiate a connection. If a connection request is made by the TV,
a permission message appears on the mobile device and vice versa.
3.
Allow the connection. This completes the connection process.
Connecting - Samsung Link
Samsung Link enables you to view/play photo, video and music files from a Samsung Link-enabled
mobile device with ease. Also use Samsung Link to play and view the content of a mobile device that
has been registered to Samsung Link under your Samsung account, even if the mobile device and the
TV are not connected to the same router or AP.
1.
Run the Samsung Link app on the mobile device and then sign in with your Samsung account.
" To use Samsung Link, you have to sign in with a Samsung account. If you don't have a Samsung
account, create one first.
2.
Quickly access and play photo, video and music files from the mobile device running Samsung
Link app under your Samsung account.
" For more information on using the Samsung Link app, refer to the Help section of the manual.

Connecting - Home Network (DLNA)
View/play photo, video and music files from a mobile device on the TV.
1.
Connect both the TV and the mobile device to the same router or AP. A home network will be
configured once the connections are established.
" Home Network (DLNA) enables content-sharing between the TV, computers and mobile devices
connected to the same wired or wireless router.
2.
Enable File Sharing on the mobile device. The mobile device's shared content can be viewed/
played on the TV.
" As long as File Sharing is activated, unauthorised access may be allowed. Disable File Sharing if data
access is not required.

Name of TV on Network
Network Device Name > Try Now
Choose or enter a TV name to be displayed on the network.
1.
Select from the menu. A list will appear.Device Name Network
2.
Choose a name from the list. Alternatively, select to enter a name manually. You can User Input
view the specified TV name on the network.
Input Signal Selection
You can select a connected external device using the button.SOURCE
For example, to switch to a gaming console connected to the second HDMI connector, press . SOURCE
From the list, select to change the input signal to HDMI mode. Connector names may Source HDMI2
vary depending on the model.
The following options are available in the screen:Source
●TOOLS Button
Select a port connected to an external device, and press and hold the Enter button. The following
functions are available:
" Available options for each connector may vary.
–Edit Name: Rename devices connected to the TV for easier identification of external sources.
For example, you can designate a computer connected to the TV via an HDMI-DVI cable as
DVI PC. Alternatively, simply designate a computer connected to the TV via an HDMI cable as
PC. You can also designate an AV device connected to the TV via an HDMI-DVI cable as DVI
Devices.
–Information: View detailed information about the connected devices.
–Disconnect USB Device: Used to safely remove a USB device connected to the TV.
" This option is only available when a USB device has been selected.
●Universal remote setup
Select on the screen to configure the universal remote function. By Universal remote setup
configuring a universal remote control, you can control cable boxes, Blu-ray players, home
theatres, and other external devices using a single remote control.
" Availability depends on the specific model and area.

Displaying the Remote Control on the Screen
Press the KEYPAD button to display the virtual remote control on the screen. You can easily enter
digits, control content, and use TV buttons with the virtual remote control.
" The virtual remote control buttons may vary depending on the TV's current status.
Button Description
Web Browser Launch the Web Browser.
PIP Display the video from an external device or computer on the main screen and the
TV as a picture-in-picture.
P.Mode Lets you select the Picture Mode.
"Availability depends on the specific model and area.
Speaker Settings Select the speakers which you want to use to listen to the TV's sound. To set this
option, external speakers must be connected to the TV.
Schedule Manager Move to the Schedule Manager screen.
"Availability depends on the specific model and area.
3D Turn the 3D effect on or off.
"Availability depends on the specific model and area.
Media Play Run the Media Play. Lets you play media content saved on USB devices.
MENU Displays the menu on the screen.
e-Manual Launch the e-Manual.

Controlling External Devices with the TV Remote
(Universal Remote Setup)
System Universal Remote Setup > Try Now
" Availability depends on the specific model and area.
The universal remote control feature lets you control cable boxes, Blu-ray players, home theatres, and
other external devices connected to the TV using the TV's remote control. In order to use the TV's
remote control as a universal remote, you must first connect the IR extender cable (included).
" Certain external devices connected to the TV may not support the universal remote feature.
Setting Up the Universal Remote Control
Before connecting any external devices and cables to the TV, first verify the model number of
the purchased TV. A sticker containing the model number is attached to the back of the TV. The
connection method varies depending on the model.
To use the TV remote as a universal remote, connect the IR extender cable (included) to the TV and
position it within 10 cm of the external device's remote control receiver.
" The colour and design of the IR extender cable may vary depending on the model.
" When you connect the cable, you have to match the cable’s colour and socket’s colour.
Connect the IR extender cable to the TV's IR output connector as shown in the diagram and place the
transmitter end within 10 cm of the external device's receiver pointing in the direction of the remote
receiver. However, there must be no obstacles between the IR extender cable and the external device.
The presence of obstacles interferes with the transmission of the remote control signal.

Controlling External Devices with the TV Remote
External Device Registration
1.
Turn on the external device to set up the universal remote function for, and bring up the Source
screen.
2.
Select from the top of the screen. This initiates the universal remote Universal remote setup
setup process.
3.
Follow the on-screen instructions and register the external device.
Using the TV Remote
Registering an external device to the TV remote also registers the connector through which the device
is connected. Accordingly, simply selecting the external device using the button makes it SOURCE
possible to control the device using the TV's remote.

Universal Remote Features
1.
Press SOURCE to bring up the screen.Source
2.
Select from the top of the screen. This initiates the universal remote Universal remote setup
setup process.
3.
Select an external registered device on the screen. The following options Universal remote setup
are available:
● Use External Speakers
Listen to the audio from the external device through the connected home theater.
" This is available only on the set-top box or Blu-ray player.
● Link Set-top Box
Listen to the audio from the set-top box through the home theater that is connected to the TV.
" This is available only on the home theater system.
● Link Blu-ray Player
Listen to the audio from the Blu-ray player through the home theater that is connected to the TV.
" This is available only on the home theater system.
● Source Setup
Change the TV's input source to your selected external device.
● Sync with TV power
Configure the set-top box to turn off when the TV is turned off
" This is available only on the set-top box.
● Rename
Rename the registered external device (up to 15 characters long)
● Delete
Remove the registered external device.

Controlling the TV with a Keyboard
System Device Manager Keyboard Settings > > Try Now
You can use a keyboard to control the TV.
" Certain models do not support USB HID class keyboards.
Connecting a Keyboard
Connecting a USB Keyboard
Plug the keyboard cable into the TV's USB port. A connection message appears on the screen.
Using the Keyboard
Use the following remote features with the USB keyboard connected to the TV.
● Arrow Keys (moving the focus), Windows Key ( Button), Menu List Key ( Button), MENU TOOLS
Enter Key (Select/run item), ESC ( Button), Number Keys (Number Buttons)RETURN
● F1 ( a), F2 ( b), F3 ( {), F4 ( }), F5 ( ), F6 ( Button), F7 ( Button), F8 ( SOURCE CH.LIST MUTE
Button), F9/F10 (Volume Buttons), F11 / F12 (Channel Buttons)
● Page Up/Page Down: Scroll web browser pages up/down.
● Holding down the Enter key: On the Smart Hub screen, navigate to an item and hold down the
Enter key to display the Options menu.
" The Options menu depends on the context.

Changing Keyboards Try Now
" Availability depends on the specific model and area.
Select System Device Manager Keyboard Settings Select Keyboard > > > . Designate which keyboard
to use.
" Only one keyboard can be used at a time.
Input Languages, Keyboard Type, and Switch Language Key Try Now
Select System Device Manager Keyboard Settings Keyboard Options > > > . The following options are
available:
●Keyboard Language
If the keyboard supports multiple languages, choose which language you want to use from the
list.
●Keyboard type
Specify the type of language selected under Keyboard Language.
" The Keyboard type list varies depending on which language was selected under .Keyboard Language
●Switch Input Language
If the keyboard supports multiple languages, choose from the list which key to use to switch
between languages.

Controlling the TV with a Mouse
System Device Manager Mouse Settings > > Try Now
This TV can be operated with ease using a mouse instead of a remote control.
" Certain models do not support USB HID class mice.
Connecting a Mouse
Connecting a USB Mouse
Plug the mouse cable into the TV's USB port. A connection message appears on the screen.

Using the Mouse
Once a USB mouse is connected to the TV, a pointer will appear on the TV's screen. You can use this
pointer to control the TV as you would a computer.
●Selecting and Running an Item
Left-click on the mouse.
●Displaying the Volume, Mute, and Channel Buttons
Select the volume/channel icon on the screen while watching TV. Use the onscreen buttons to
adjust the volume or switch the channel.
" Select the volume/channel icon again to hide the buttons.
●Showing shortcut icons
Right-clicking shows the shortcut icons on the screen so that you can easily use the TV
functions.
" The shortcut icons may vary depending on the function.
●Displaying the Context-sensitive Menu on Smart Hub
On the Smart Hub screen, navigate to an item, and hold down the left mouse button for 1 second.
The Options menu available to the selected item appears.
" The Options menu depends on the context.
●Scrolling the TV Menu or Screen
Move the mouse wheel up or down. This scrolls the TV menu or screen up/down.
●Exiting the TV Menu or Feature
Click on the X button. This closes the menu.
" The X button appears when a mouse is being used. Left-clicking once while using a feature displays
the X button.
Changing Mice Try Now
Select System Device Manager Mouse Settings Select Mouse > > > . Designate which mouse to use.
" Only one mouse may be used at a time.
Changing Mouse Buttons and Pointer Speed Try Now
Select System Device Manager Mouse Settings Mouse Options > > > . The following options are
available:
●Primary Button
Choose which (left or right) button to use to select and run items.
●Pointer Speed
Adjust the movement speed of the pointer that appears on the screen.

Entering Text Using QWERTY
A QWERTY keypad appears when you need to enter text (entering the network password, logging into
your Samsung account, etc.), allowing you to enter text using your remote control.
Using Additional Functions
Select on the QWERTY keyboard screen. The following options are available:
● Language
Select a language from the list.
● Recommend text
Enable/disable the Recommended Text feature. Enabling the feature allows you Recommend text
to quickly enter text starting with the characters you typed in by displaying recommended words.
To enter the word "Internet," for example, all you have to do is enter "In" and select the word
"Internet" from the list of recommended words. The word is memorised so that you can enter the
same text again more easily.
● Reset recommended text data
Delete both the recommended words and the memorised words to clear the list.
● Predict Next Letter
Enable/disable the Text Prediction feature. Enabling the Text Prediction feature eliminates the
need to find and select individual character keys. To enter the word "Internet," for example, select
"I". A predicted word will then appear next to the I key. Simply select the predicted word to enter
"Internet".
" This feature is limited to words that have previously been added to the dictionary.
Establishing a Wired Internet Connection
Connecting the TV to the Internet gives you access to online services and SMART features, and lets
you update the TV's software quickly and easily through the Internet.
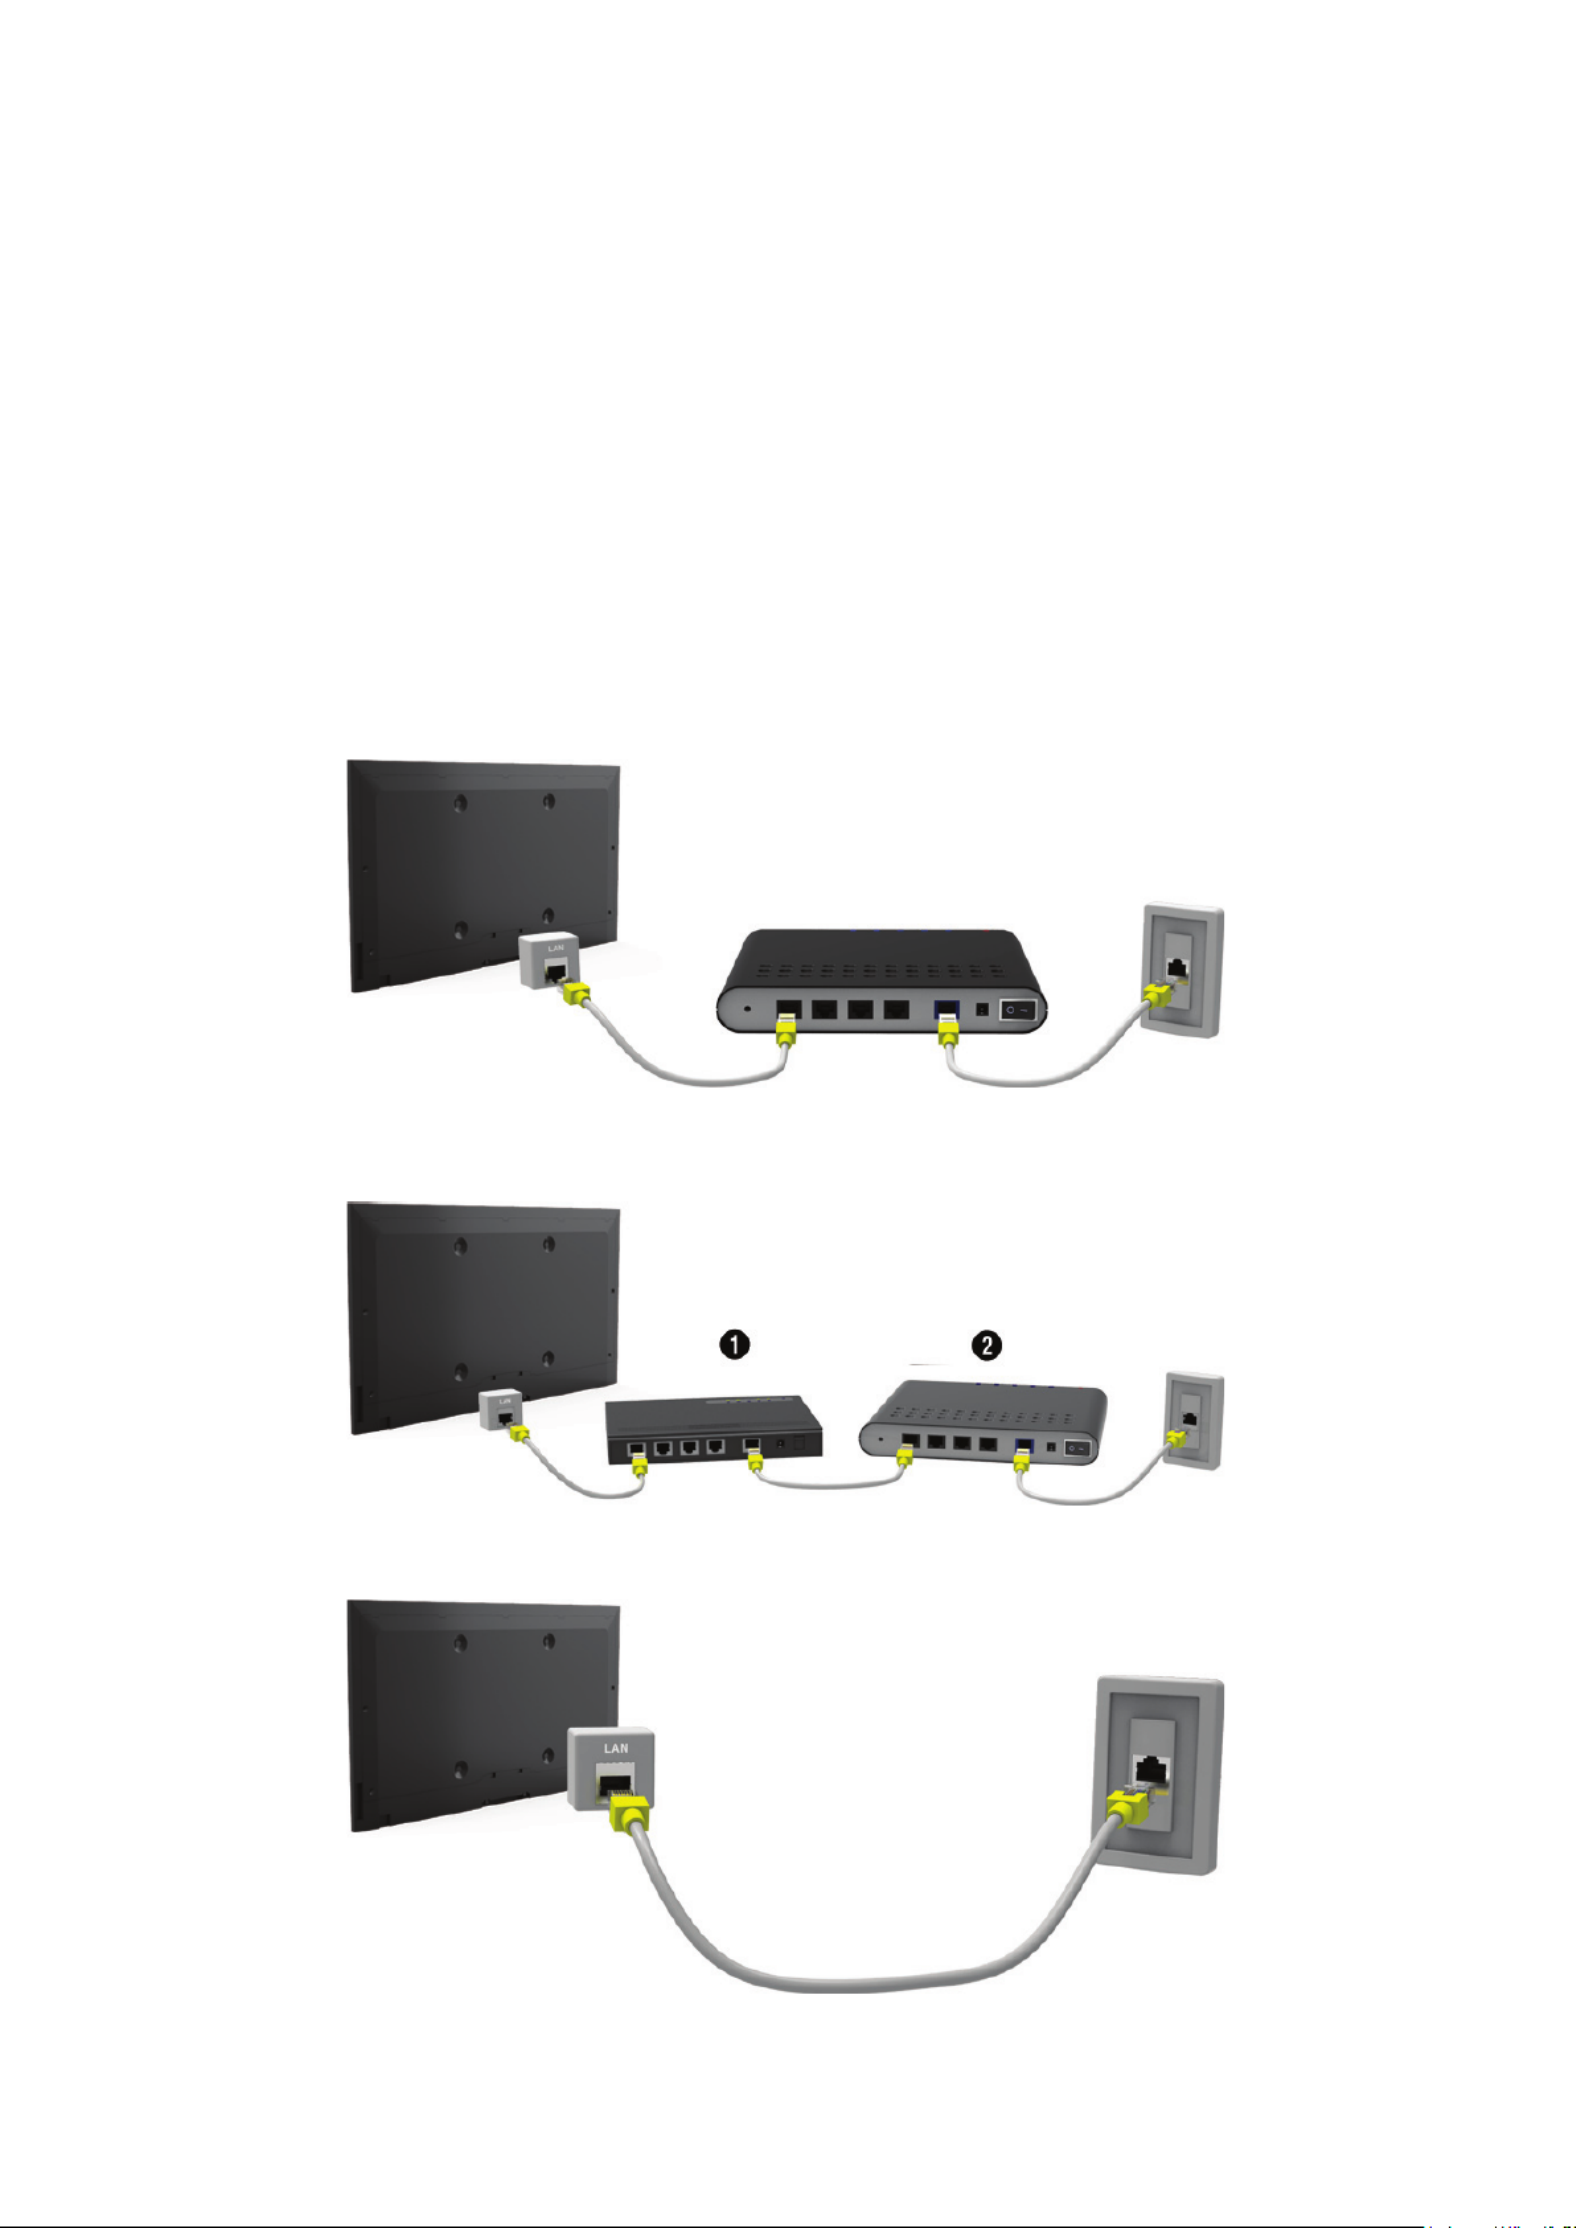
Connecting a LAN Cable
Use a LAN cable.
" The TV will not be able to connect to the Internet if the network speed is below 10Mbps.
" Use Cat 7 LAN cables to link your TV to the Internet Access Points.
There are three ways to connect the TV to the Internet. Refer to the diagrams and connect the LAN
cable to the LAN connector on the back of the TV.
● External Modem
● ① IP Router + ② External Modem
● Wall-mounted LAN Outlet
Connecting to a Wired Internet Network Automatically
Network Network Settings > Try Now Settings - Network
Automatically connect to an available network.
1.
Set the , and then select .Network Type to Wired Connect
2.
The TV attempts to connect to an available network. Once successful, you will see a confirmation
message. Select . If the attempt fails, try again, or connect manually.OK
Connecting to a Wired Internet Network Manually
Network Network Settings >
With networks that require a static IP address, you will need to enter the IP address, subnet mask,
gateway, and DNS values manually to connect to the network. To get these values, contact your
Internet Service Provider (ISP).
" Refer to the "Dynamic versus Static IP Addresses" section for more information on dynamic IP and static IP
addresses.
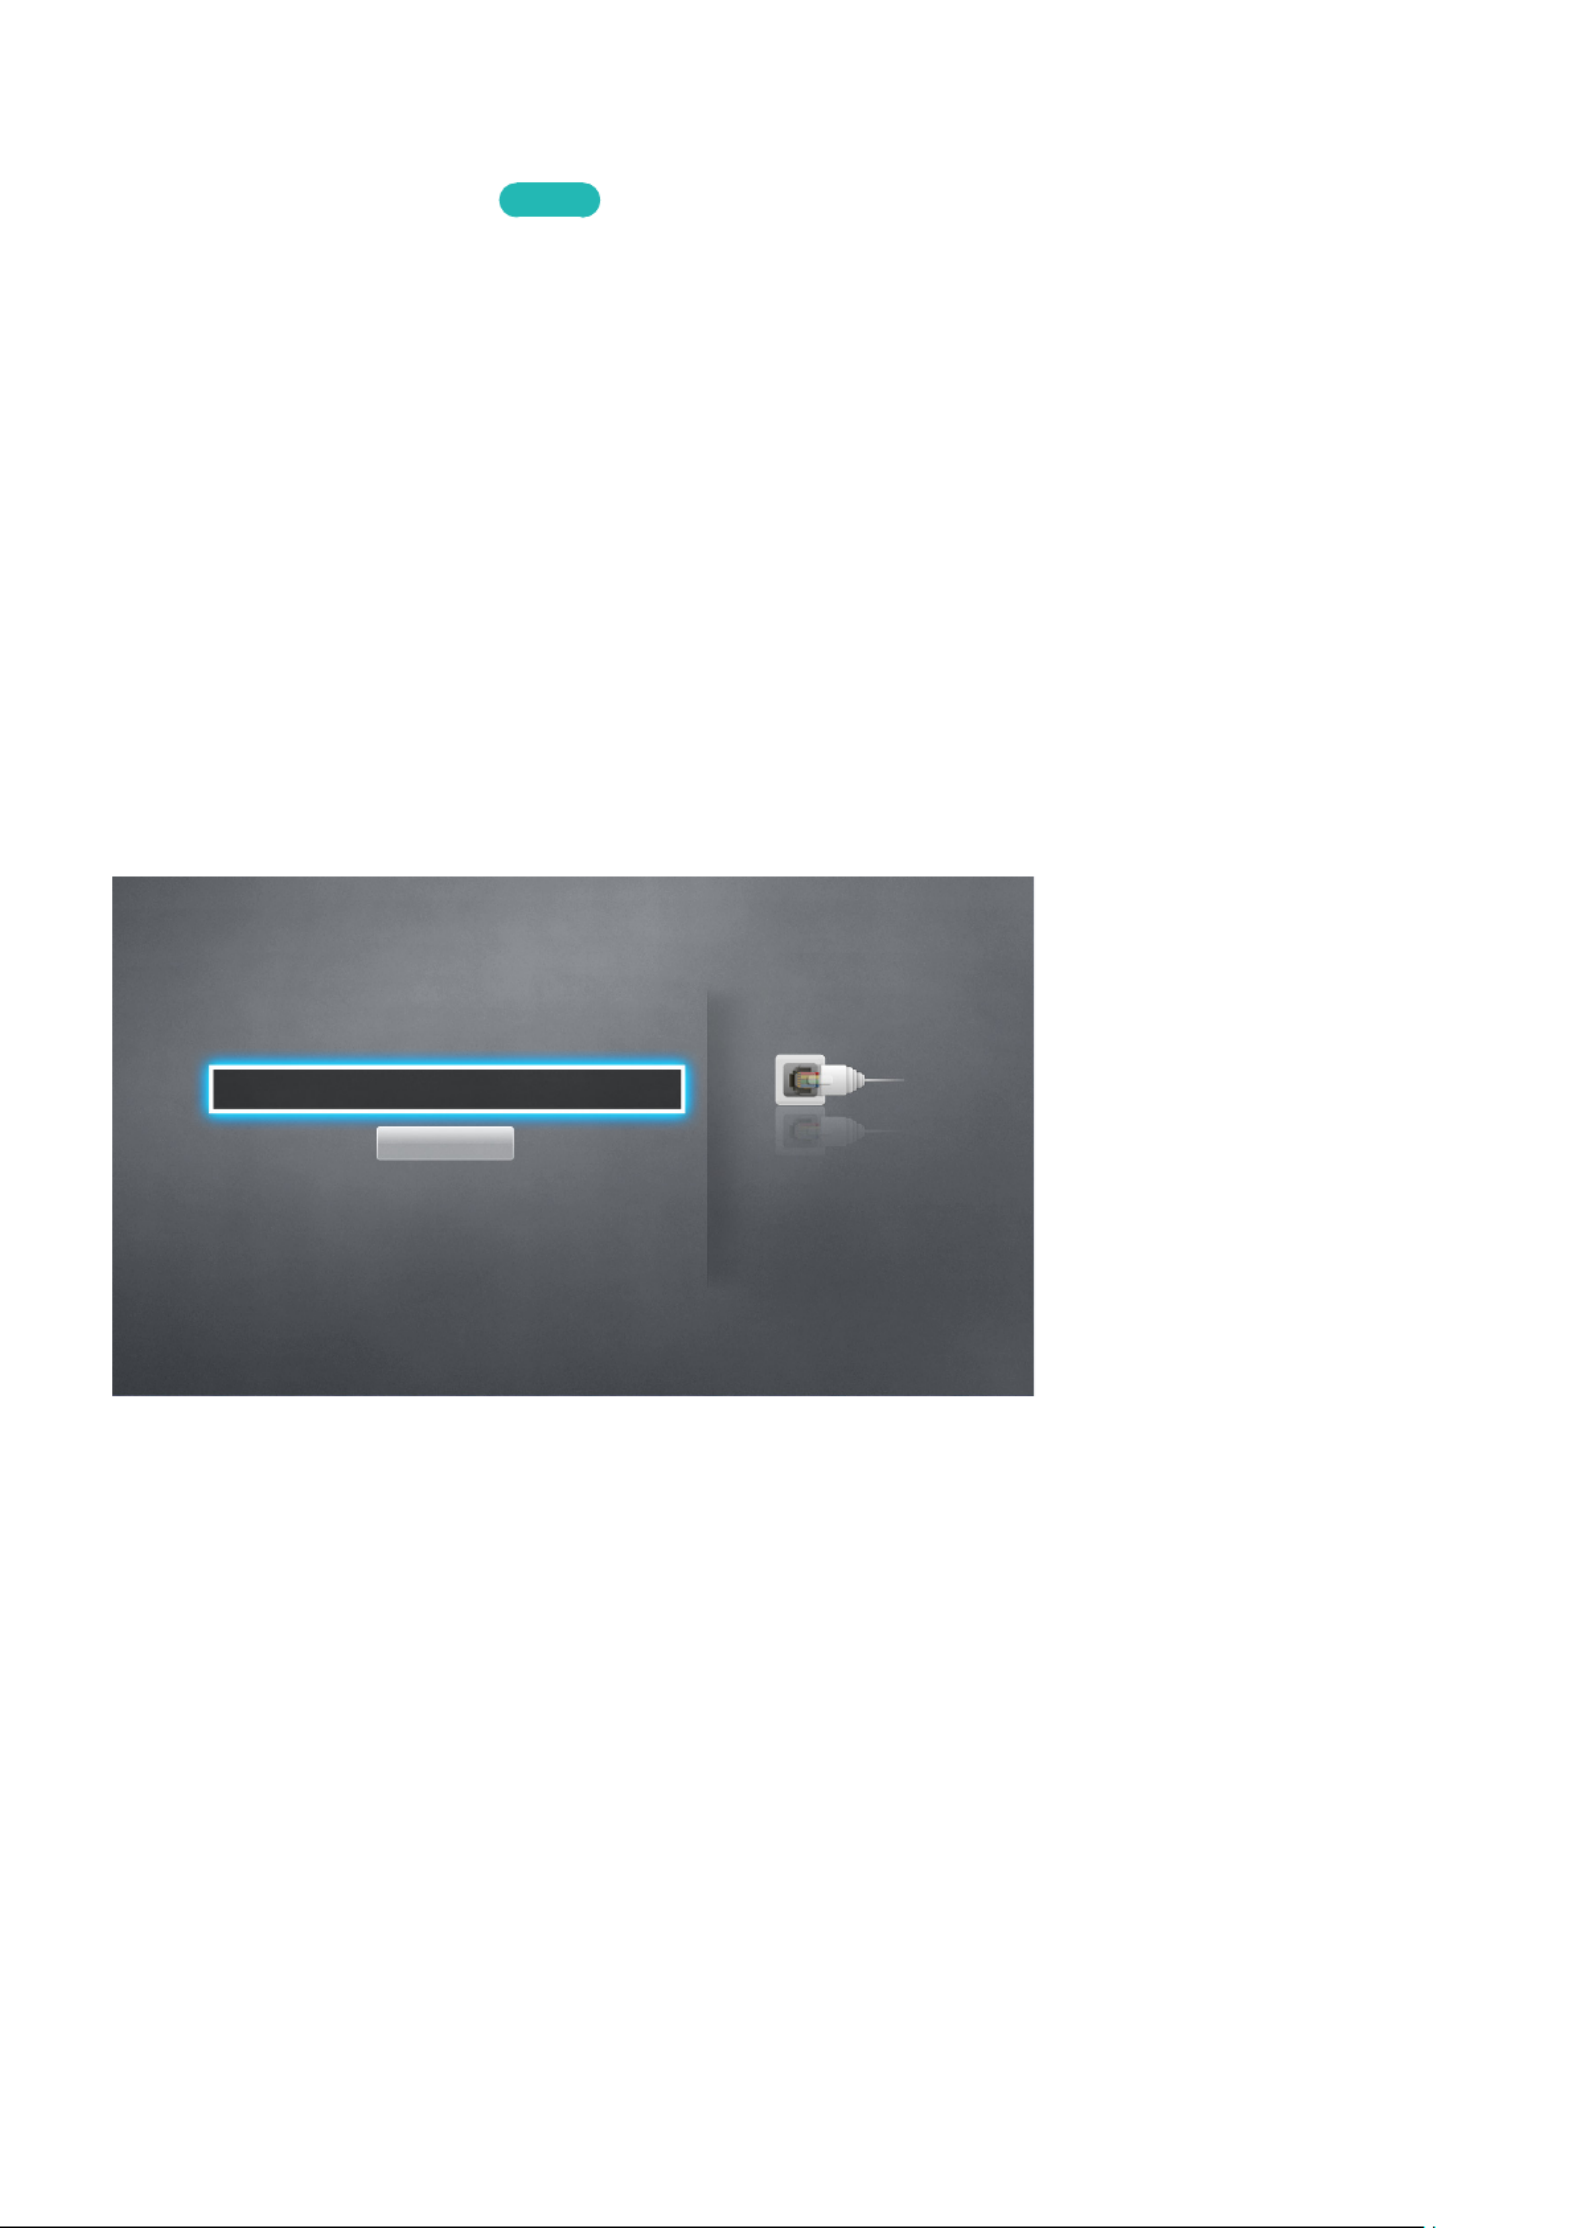
1.
Set the , and then select .Network Type to Wired Connect
Network Settings
Select your network type.
Network Type Wired
Connect
You can connect your TV
to the internet.

21
Select Stop when the TV attempts to connect to the network. Once the network connection has
been interrupted, select IP Settings.
Network Settings
Connection verification cancelled.
Wired network connection test stopped.
Change Network IP Settings Retry Close
31
In the IP Settings screen, set the , IP setting to Enter manually, enter the IP Address Subnet
Mask Gateway DNS Server, , and values, and then select .OK
● Use one of the following methods to enter the numerical values.
Set the numbers using the u and d buttons.
Enter the numbers directly using numerical button.
IP Settings
IP setting Enter manually
IP Address 0.0.0.0
Subnet Mask 0.0.0.0
Gateway 0.0.0.0
DNS setting Enter manually
DNS Server 0.0.0.0
OK Cancel
41
The TV attempts to connect to the network again using the specified settings. A confirmation
message appears once a connection is established. Select .OK
" The network connection speed may differ depending on the DNS server settings.
" For details on the DNS server settings, contact your Internet service provider (ISP).

Establishing a Wireless Internet Connection
" The connection method varies depending on the model.
Connecting the TV to the Internet gives you access to online services and SMART features, and lets
you update the TV's software quickly and easily through the Internet.
Connecting to a Wireless Internet Network Automatically
Network Network Settings >
Connect the TV to the Internet via a wireless router. Make sure you have the wireless router's SSID
(name) and security key settings before attempting to connect. The security key can be found on the
wireless router's configuration screen.
1.
On the Network Settings screen, set Network Type Wireless to . The TV automatically displays a
list of available wireless networks.
2.
Select a network (SSID). If the network you want doesn't appear in the list, select , Add Network
and enter the network's SSID manually.
3.
Enter the security key and select . If the selected network is not security-enabled, the TV Done
attempts to connect right away.
4.
A network connection will be attempted. Once a connection is established, the TV displays a
confirmation message. Select . If the attempt fails, try again, or connect manually.OK

Connecting to a Wireless Internet Network Manually
Network Network Settings >
With networks that require a static IP address, you will need to enter the IP address, subnet mask,
gateway and DNS values manually to connect to the network. To get the IP address, subnet mask,
gateway and DNS values, contact your Internet Service Provider (ISP).
" Refer to the "Dynamic versus Static IP Addresses" section for more information on dynamic IP and static IP
addresses.
1.
Setting the Network Type Wireless to automatically displays a list of available wireless networks.
Network Settings
Select your network type.
Network Type Wireless
Wireless network
AP0000 You can connect your TV to the
internet. Please select which
wireless network to use.
AP0001
Add Network
Refresh WPS(PBC)
2.
Select the network (SSID) you want to connect to. If the wireless router doesn't appear in the list,
select Add Network, and enter the network's SSID manually.
3.
Enter the security key and select . If the selected network is not security-enabled, the TV OK
attempts to connect right away.
4.
Select when the TV attempts to connect to the network. Once the network connection has Stop
been interrupted, select IP Settings.
Network Settings
Connection verification cancelled.
Wireless network connection test stopped.
Change Network IP Settings Retry Close

5.
In the IP Settings screen, set the , IP setting to Enter manually, enter the IP Address Subnet
Mask Gateway DNS Server, , and values, and then select .OK
● Use one of the following methods to enter the numerical values.
Set the numbers using the u and d buttons.
Enter the numbers directly using numerical button.
IP Settings
IP setting Enter manually
IP Address 0.0.0.0
Subnet Mask 0.0.0.0
Gateway 0.0.0.0
DNS setting Enter manually
DNS Server 0.0.0.0
OK Cancel
6.
The TV attempts to connect to the network again using the specified settings. A confirmation
message appears once a connection is established. Select .OK
" The network connection speed may differ depending on the DNS server settings.
" For details on the DNS server settings, contact the Internet service provider (ISP).
Connecting to a Wireless Internet Network with WPS
Network Network Settings >
With wireless routers that support WPS (Wi-Fi Protected Setup) or PBC (Push Button Configuration),
it's possible to press a button on the router to connect the TV to the Internet.
" This functionality is not available with wireless routers that do not support WPS. Check to see if your
wireless router supports WPS.
1.
Setting the Network Type Wireless to automatically displays a list of available wireless networks.
2.
Select WPS(PBC) and then press the WPS or PBC button located on the wireless router within two
minutes.
3.
The TV exchanges the network name (SSID) and security key automatically and then attempts to
connect to the Internet. A confirmation message appears once a connection is established. Select
OK.

Troubleshooting Internet Connectivity Issues
If you are not able to connect the TV to the Internet, read the information below.
Troubleshooting Wired Internet Connectivity Issues
No network cable found Try Now Try Now
Make sure the network cable is plugged in. If it is connected, make sure the router is turned on. If it is
on, try turning it off and on again.
IP auto setting failed Try Now
Do the following or configure the manually.IP Settings
1.
Ensure that the DHCP server is enabled on the router and reset the router.
2.
If this does not work, contact your Internet Service Provider for more information.
Unable to connect to the network Try Now
Do the following:
1.
Check all .IP Settings
2.
Ensure that the DHCP server is enabled on the router. Then, unplug the router and plug it back in.
3.
If this does not work, contact your Internet Service Provider for more information.
Connected to a local network, but not to the Internet Try Now
1.
Make sure that the Internet LAN cable is connected to the router's external LAN port.
2.
Check the DNS values in the .IP Settings
3.
If the problem persists, contact your Internet Service Provider.
Network setup is complete, but unable to connect to the Internet Try Now
If the problem persists, contact your Internet Service Provider.

Troubleshooting Wireless Internet Connectivity Issues
Wireless network connection failed, Try Now Try Now
Selected wireless router not found. Go to and select the correct router.Network Settings
Unable to connect to a wireless router Try Now Try Now
Check the following:
1.
Check if the router is turned on. If it is, turn it off and on again.
2.
Enter the correct security key if required.
IP auto setting failed Try Now
Do the following or configure the manually.IP Settings
1.
Make sure that the DHCP server is enabled on the router. Then, unplug the router and plug it back
in.
2.
Enter the correct security key if required.
3.
If this does not work, contact your Internet Service Provider for more information.
Unable to connect to the network Try Now
Do the following:
1.
Check all .IP Settings
2.
Enter the correct security key if required.
3.
If this does not work, contact your Internet Service Provider for more information.
Connected to a local network, but not to the Internet Try Now
1.
Make sure that the Internet LAN cable is connected to the router's external LAN port.
2.
Check the DNS values in the .IP Settings
3.
If the problem persists, contact your Internet Service Provider.
Network setup is complete, but unable to connect to the Internet Try Now
If the problem persists, contact your Internet Service Provider.

Mobile Network
" Availability depends on the specific model and area.
While connecting to the mobile network, some functions might be unavailable.
Refer to the diagram and insert the Mobile Dongle (sold separately) into the USB port. The Mobile
Dongle must be connected to the TV in order to connect to the mobile network. However, the Mobile
Dongle is sold separately and is not available from Samsung.
" If you have any problems using online services, please contact your Internet service provider.
Supported Telecom and Model Name
● Vodacom (Model No: K4605)
● MTN (Model No: E3131S, E3251)
● Safaricom (Model No: E303)

Checking the Internet Connection Status
Network Network Status > Try Now
Network
Network Status
Network Settings
Wi-Fi Direct
Multimedia Device Settings
Screen Mirroring
Device Name [TV]Samsung LE...
" Actual menu screen may differ depending on the TV model.
View the current network and Internet status.

Smart Hub
Smart Hub Open Smart Hub > Try Now
With Smart Hub, you can surf the web, download apps. In addition, you can use photo, video, and
music files stored on external storage devices.
"Some Smart Hub services are paid services. To purchase such a service, the service provider account or
Samsung Apps TV account (Samsung account) is required.
"Make sure the TV is connected to the Internet. The TV must be connected to the Internet in order to use
Smart Hub.
"Some features of Smart Hub require an Internet connection and may not be available depending on the
service provider, language, or region.
"To use Smart Hub, you must agree to the end user agreement and privacy policy. Otherwise, you will not
be able to access the features and services related to them. You can view the entire content of the Terms &
Policy by navigating to > Smart Hub Terms & Policy. If you don't wish to use Smart Hub anymore, you can
withdraw the agreement.
"Smart Hub service outages can be caused by disruptions in your Internet service.
Testing Smart Hub connections
Support Self Diagnosis Smart Hub Connection Test > >
"Availability depends on the specific model and area.
If Smart Hub is not functioning, navigate to > > Support Self Diagnosis Smart Hub Connection Test.
Diagnose the problem by checking the internet connection, your ISP, the Samsung server and the
Samsung Apps panels.
"After completing the test, if Smart Hub continues to have problems, contact your Internet Service Provider
or a Samsung Contact Centre.

Opening the Home Screen
Press while watching TV to open the Home Screen.
On the Home Screen, search through favourites apps, channels or sources and access previously run
or frequently used functions.
Setting your favourite item
1.
Press while watching TV to open the Home Screen, and move to a desired item.
2.
Press and hold the Enter button. The Options menu appears.
3.
In the Options menu, select Add to Favourites to add the selected item to the favourite list, which
will move top of the list.
" To delete a favourite item, select it and press and hold the Enter button to display the context menu.
Then, select .Remove from Favourites
Deleting browsing history
1.
Press while watching TV to open the Home Screen, and select . You will be asked to Clear All
confirm your selection.
2.
Select Yes on the screen. Your browsing history is deleted completely.
" However, the Favourites list items will not be deleted.
" You can also delete your browsing history by selecting in the > Clear All Smart Hub Home Screen
Settings menu.

Moving to the Panel Screen
Press the button to open the , and select the Panel icon. On the Panel screen for each Home Screen
service panel, the following are available:
" Usability depends on the specific model and local region.
● SAMSUNG APPS
You can enjoy variety of free and paid news, sports, weather, and gaming apps on the TV as you
would on a smart phone or tablet.
● On TV
You can view the current programmes on TV at a glance and view the Programme
Recommendations by Channel and Programme Recommendations by Time from the programmes
that will be broadcasted.
Using the Smart Hub Tutorial
Support Smart Hub Tutorial >
From the Support menu, select Smart Hub Tutorial. This will familiarise yourself with the basics of
Smart Hub and panels.
Resetting Smart Hub
Smart Hub Reset Smart Hub > Try Now
Reset all saved information relating to Samsung accounts and linked service accounts, as well as
Smart Hub service agreements and applications.

Adjusting the Picture for Easier Viewing (Picture Options)
Picture Picture Options > Try Now
Select > to make additional adjustments for an easier viewing experience.Picture Picture Options
"When the TV is connected to a computer via an HDMI-DVI cable, only Colour Tone can be adjusted.
Choose a Picture Mode and then adjust the settings.
●Colour Tone Try Now
Adjusts the colour tone. The setting is applied on an individual basis. When a Picture Mode
Picture Mode is changed, the corresponding setting will be applied automatically.
"If the Picture Mode Dynamic is set to , you will only be able to choose .Cool or Standard
●Digital Clean View Try Now
Reduces static and ghosting caused by a weak signal. Selecting displays the Auto Visualisation
signal strength at the bottom the screen. Green indicates the best possible signal.
"Available for analogue channels only.
●MPEG Noise Filter Try Now
Reduces MPEG noise and improves video quality.
●HDMI Black Level Try Now
Some external devices connected to the TV via an HDMI cable can have issues, such as low
black level, low contrast, and dull colours. Use to adjust the black level to HDMI Black Level
compensate.
"This is only available when the Input Signal, connected to the TV via an HDMI connector, is set to
RGB444.

●Film Mode Try Now
Optimises the picture quality for movies. Select this mode for watching movies.
"This feature is only available when watching TV or when the input signal is AV, Component (480i,
1080i), or HDMI (1080i).
●Motion Plus Try Now
"Availability depends on the specific model and area.
Removes blurring and judder from scenes with rapid movement. If you select , you can Custom
configure Blur Reduction and Judder Reduction manually and set on for a LED Clear Motion
sharper LED image.
"The Info screen on your TV displays the resolution and frequency of the incoming signal (60Hz), but
not the frequency the TV is generating for the image it is displaying by using function.Motion Plus
"If noise occurs on the screen, please set up the . If , you can Motion Plus to Off Motion Plus is Custom
set up the , , and manually.Blur Reduction Judder Reduction LED Clear Motion Reset
"If at 60Hz video signal, the screen may flicker.LED Clear Motion is On
Blur Reduction: Adjusts the blur reduction level from video sources.
Judder Reduction: Adjusts the judder reduction level from video sources when playing films.
LED Clear Motion: Removes drag from fast scenes with a lot of movement to provide a clear
picture.
Reset: Reset the custom settings to the factory defaults.
"If you have Motion Plus on, and then bring up the INFO screen, the INFO screen displays the resolution
and frequency of the incoming video signal (60Hz). This frequency is not the same as the frequency of
the picture the TV is displaying when Motion Plus is on.
●LED Clear Motion
"Availability depends on the specific model and area.
Removes drag from fast scenes with a lot of movement to provide a clear picture.
"If at 60Hz video signal, the screen may flicker.LED Clear Motion is On

Viewing in 3D
"Availability depends on the specific model and area.
Picture 3D >
The 3D option lets you view 3D media content and broadcasts. You will need to wear Samsung 3D
Active Glasses to play 3D content. IR-type Samsung 3D Active Glasses and third-party 3D glasses are
not supported.
"Carefully read the health and safety information concerning 3D viewing before viewing 3D content. Refer to
the "3D Precautions" section for more information.
"Whether 3D video is displayed in true HD is usually determined by the quality of the content.
Starting 3D
1.
Play 3D content or turn on a channel that's showing a 3D broadcast.
2.
Put the Samsung 3D glasses on and then select . 3D viewing is enabled.3D
The ideal viewing distance is three times the height of the screen or more. 3D images may not appear
if you do not adhere to the recommended viewing angle or distance.
The 3D feature may not work properly if there is another 3D product or an electronic device running
nearby. If there is a problem, keep other electronic devices as far away as possible from the 3D Active
Glasses.
The left and right 3D images may initially overlap when the TV is turned on. It takes a moment for the
display to optimise for the overlapping to go away.
There are several restrictions when using 3D TV:
●Launching Smart Hub automatically disables 3D mode.
●PIP cannot be used.
●Certain Picture options are disabled.

Changing the 3D Mode
Picture 3D 3D Mode > >
1.
Launch 3D and then select under 3D Mode Picture 3D > .
2.
Choose from the 3D modes that appear on the screen. Supported may vary depending 3D Mode
on the 3D content.
" 3D Mode is automatically configured for most 3D content.
The following 3D Mode is available. However, mode availability may vary depending on the 3D
content's format.
" The supported resolutions vary for each mode. Refer to the "Supported Resolutions for each 3D Mode"
section for more information.
● (Off)
Deactivates 3D viewing.
● (Normal)
Converts normal images to 3D images.
" Some formats do not support this mode.
● (L/R)
Splits a single image into left and right overlapping images to create the 3D effect.
● (T/B)
Splits a single image into top and bottom overlapping images to create the 3D effect.

Adjusting the 3D Effect
Picture 3D >
Configure the viewpoint, depth, and other 3D settings for a custom viewing experience.
● Adjusting the 3D perspective
Select Picture > > 3D 3D Perspective. Use the adjustment bar shown on the screen to adjust the
perspective.
● Adjusting the 3D Depth
Select Picture > > . Use the adjustment bar shown on the screen to adjust the depth.3D Depth
" This option cannot be used if 3D mode is set to (L/R) or (T/B).
● Reversing the Left/Right 3D Images
Select Picture > > . This option is used to reverse the left and right images.3D L/R Change
● Displaying 3D Content in 2D
Select Picture > > . This option is used to enable 2D viewing of 3D content.3D 3D → 2D
" This function is not available if 3D mode is set to (Normal) or (Off).

Changing the Picture Size and Position
Choosing the Right Screen Size
Picture Picture Size Picture Size > > Try Now
Most TV programmes and videos are displayed in full screen, but some programmes and videos are
larger or smaller. Change the screen size for such programmes and videos so that the picture fits the
screen better.
"Supported screen sizes vary depending on the input signal. Refer to the "Picture Sizes and Input Signals"
section for more information about supported screen sizes.
●Auto Wide
Automatically adjusts the picture size to the 16:9 aspect ratios.
●16:9 Picture Size - 16:9
Set the picture to the 16:9 wide-screen format.
●Wide Zoom
Magnifies the picture size more than 4:3. A magnified picture can be moved up and down.
●Zoom
Magnifies the 16:9 wide pictures vertically to fit the screen size. A magnified picture can be
moved up and down.
"Zoom is not available when .Picture Size set to Wide Zoom
●4:3 Picture Size - 4:3
Sets the picture to basic 4:3 mode.
[ Do not leave the TV in 4:3 mode for an extended period. The dark borders displayed on the
left and right / top and bottom of the screen may cause image retention. This phenomenon can
appear on LED and PDP TVs. (Screen burn - this phenomenon can appear on PDP TVs.) This is
not covered by the warranty.
●Screen Fit
Displays the full image without any cutoff.
●Smart View 1
Reduces a 16:9 picture by 50%.
●Smart View 2
Reduces a 16:9 picture by 25%.

Changing the Sound Mode and Using Sound Effects
Choosing the Right Sound Mode for the Environment
Sound Sound Mode > Try Now
Sound modes apply preset adjustments to the sound output, optimised for different viewing and
listening circumstances.
" The sound modes cannot be used when you are listening to audio through external speakers.
●Standard
This is the normal sound mode.
●Music
This mode emphasises normal music instead of voice.
●Movie
This mode is calibrated to provide the best sound for movies.
●Clear Voice
This mode emphasises voice.
●Amplify
This mode increases the overall intensity of high-frequency sounds for a better listening
experience. It is designed for hearing-impaired listeners.
●Stadium
Setting Football Mode System Football Mode ( > ) to automatically configures On Sound Mode to
Stadium for a more realistic viewing experience.
" Stadium cannot be selected by the user.

Using Sound Effects
Sound Sound Effect > Try Now
Use sound effects to alter how the TV projects sound.
Restrictions:
●Sound effects can only be used with the .Sound Mode set to Standard
●Sound effects cannot be used when you are listening to audio through external speakers.
Choose a and then adjust the settings.Sound Effect
●DTS TruSurround Try Now
Produces sound that will make you feel like you are sitting in a movie theatre or concert hall.
●DTS TruDialog Try Now
Increases voice intensity to make dialog clearer.
●Equaliser Try Now
Lets you adjust the speaker balance and make bandwidth adjustments. Select Reset to reset the
settings.

Sound Support Functions
Selecting Speakers
Sound Speaker Settings TV Sound Output > > Try Now
This lets you choose which speakers the TV uses for audio output. To listen to the audio through
the speakers of a connected receiver or home theatre only, select Receiver or Audio Out. To listen
to audio through the TV's speakers and the speakers of a connected AV receiver or home theatre
simultaneously, select . If this causes an echo effect, choose any speaker option other than TV Speaker
TV Speaker to mute the TV speakers, or turn off the receiver or home theatre.
" Using external speakers alone disables the volume button and the mute function. In addition, certain Sound
options will also be disabled.
Designating the TV's Installation Type
Sound Speaker Settings TV Speaker TV Installation Type > > >
Specify the TV's installation type. Choose between Wall Mount Stand and to optimise the TV's sound
automatically.
Enabling the Sound (Additional Settings)
Sound Additional Settings > Try Now Settings - Additional
Configure additional settings for optimum audio output.
●DTV Audio Level Try Now
(Digital channels only)
The TV cannot freely control the volume of the digital audio that it sends to the AV receiver. Use
this to set the digital audio volume at a comfortable level.
" According to the type of broadcast signal, MPEG / HE-AAC can be adjusted between -10dB and 0dB.
" To increase or decrease the volume, adjust between the range 0 and -10 respectively.
●Audio Format Audio Delay,
This Smart TV is SPDIF-enabled. The Sony Philips Digital Interface (SPDIF) provides digital audio
output to speakers and various digital devices, including A/V Receivers and home theatres.
Audio Format Try Now
Selects the Digital Audio output (SPDIF) format. The available Digital Audio output (SPDIF)
formats may vary depending on the input source.

Setting the Time and Using the Timer
Setting the Current Time
System Time Clock > > Try Now
Set the clock manually or automatically. Once the clock has been set, you can select the button INFO
to check the current time.
" The clock must be reset every time the power is disconnected.
Setting the Clock using Digital Broadcast Info
System Time Clock Clock Mode > > > Try Now
Set . The TV automatically downloads the correct time from a digital channel. To Clock Mode to Auto
enable this option, the TV's Antenna jack must be connected to either an antenna or a cable output
and must be receiving digital broadcasts. The accuracy of the time information received may vary
depending on the channel and signal. If your TV is connected to a set-top-box or satellite box using
HDMI or Component connections, you must set the time manually.
" Availability depends on the specific model and area.
If the Clock is Wrong in Auto Mode...
System Time Clock Time Offset > > > Try Now
If the time set automatically is incorrect, you can offset the clock in 1-hour increments by as much as
-/+ 12 hours. Select System > > > and offset the clock to the correct time.Time Clock Time Offset
" Time Offset adjusts the time through network connections and is only available if the Clock Mode is set to
Auto and the TV is connected to the Internet though a local area network.
" Time Offset will adjust the time if the TV fails to receive time information through normal digital broadcast
signals.
Setting the Clock Manually
Manually enter the time. Set and then select Clock Mode to Manual Clock Set to enter the current
time and date.
Clock Set: Set the current and .Date Time
Time Zone: Select your time zone.
" This function is only available when the .Clock Mode is set to Auto
DST: Switches the DST (Daylight Saving Time) function on or off.
" This function is only available when the .Clock Mode is set to Auto
GMT: Selects your time zone.
" When Country is set to others, you can use this function.

Using the Timers
Using the Sleep Timer
System Time Sleep Timer > > Try Now
This automatically shuts off the TV after a preconfigured period of time. Select > > System Time Sleep
Timer. You can set the timer up to 180 minutes in 30-minute increments.
Turning On the TV using On Timer
System Time On Timer > > Try Now Timer - On
Set the On Timer so that the TV turns on automatically at a chosen time. Select > > System Time On
Timer. The timer configuration window appears. Configure the following settings:
" The is only available if the has been set.On Timer Clock
●Setup
Specify the dates and the duration. Use to specify the days of the week.Manual
●Time
Set the time that the TV turns on automatically.
●Volume
Specify the volume when the TV turns on.
●Source
Select the signal source from the list. Specify the channel or source to be displayed when the
TV turns on. To specify a USB device, a USB device must first be connected to the TV. To play
media from an HDMI or Component source such as a DVD player or Blu-ray player, the device
must already be turned on, and playing the media when the TV is turned on.

●Aerial
Set the to select a broadcast signal.Source to TV
●Channel
Set the to select a channel.Source to TV
●Music Photo /
Set the to choose a USB folder that contains music or photo files. Selecting both Source to USB
music and image files plays the music files and displays the images at the same time.
Restrictions:
●This feature will not function properly if the selected USB device does not contain media files or
a folder has not been specified.
●The slideshow will not start if there is only one image file on the USB device.
●Folders with long names cannot be selected.
●Always use different folder names for multiple USB devices.
●Use a USB memory stick or multi-card reader. The may not work with certain battery-On Timer
powered USB devices, MP3 players, or PMPs because the TV may take too long to recognise the
device.
Turning Off the TV Using Off Timer
System Time Off Timer > > Try Now Timer - Off
Set the Off Timer to turn the TV off automatically at a specific time. Select > > System Time Off
Timer. The timer configuration window appears. Configure the following settings:
" The is only available if the has been set.Off Timer Clock
●Setup
Specify the dates and the duration. Use to specify the days of the week.Manual
●Time
Set the time that the TV turns off automatically.

Using the Screen Burn Protection and Energy Saving
Features
Preventing Screen Burn
System Auto Protection Time > Try Now
Still images can leave burned-in after-images on the screen if left for a long time. Use Screen Burn
Protection to protect the screen. Select > and then choose a time System Auto Protection Time
setting from the list. If a still image is shown on the screen for longer than the time you selected, the
TV will automatically activate Screen Burn Protection to prevent burned-in after- images that may
damage the screen.
Using Energy Saving Features
System Eco Solution > Try Now
Eco Solution adjusts the TV's brightness level and prevents overheating to reduce overall power
consumption.
●Energy Saving Try Now
Select a brightness setting from the list to reduce the TV's power consumption.
●Eco Sensor
" Availability depends on the specific model and area.
Automatically adjusts the TV's brightness level based on the ambient light level to reduce the
TV's power consumption. If the Eco Sensor has adjusted the screen's brightness level, you can
manually adjust the screen's minimum brightness level by adjusting the . Changing Min. Backlight
the Picture menu's setting while is running automatically disables Backlight Eco Sensor Eco
Sensor.
●No Signal Power Off Try Now
Select a time from the list. If no signal is received for the specified duration, the TV automatically
cuts off the power to reduce power consumption.
●Auto Power Off Try Now
If the TV remains turned on for four hours without any user input, the TV will automatically turn
off to prevent overheating.

Using the e-Manual
Launching the e-Manual
Support e-Manual >
The embedded e-Manual contains information.
" You can also download a copy of the e-Manual from Samsung's website, and read it on your computer or
print it out.
" Yellow words indicate a menu item; white bold words indicate remote control buttons. Arrows are used to
indicate the menu path. (Example: Picture Picture Mode > )
1.
Select e-Manual. The e-Manual loads.
2.
Select a category from the side of the screen. Once a selection has been made, the contents of
the selected category appear.
3.
Select an item from the list. This opens the e-Manual on the corresponding page.
If a description doesn't fit on a single screen...
You can scroll pages in one of the following ways.
● Position the focus on the page to display / on the screen. Press <, > button.
Additional e-Manual Features
Loading Pages using Keywords
Select Search from the side of the screen to bring up the search screen. Enter a search term and then
select Done. Select an item from the search results to load the corresponding page.

Loading Pages from the Index Page
Select Index from the side of the screen to bring up the index screen. Select a keyword from the list to
navigate to the relevant page.
Using History to Load Previously Read Pages
Select Recent pages from the side of the screen. A list of previously read pages is shown. Select a
page. The e-Manual jumps to the selected page.
Accessing the Menu from the e-Manual (Try Now)
Select (Try Now) on a feature-description to directly move to the corresponding menu and try out
the feature.
If you want to read an entry on a specific screen menu feature, press the e-Manual E-MANUAL
button.
" Certain menu options cannot be used.
Loading Reference Pages
Select ( ) from the side of a feature-description page to access the corresponding reference Link
page.
Updating the e-Manual to the Latest Version
You can update the e-Manual in the same way as updating apps.
1.
Select the e-Manual item in the screen.SAMSUNG APPS
2.
Press and hold the Enter button. The Options menu appears.
3.
From the Options menu on the screen, select . A pop-up window appears.Update apps
" Update apps is shown on the screen only when an update is required.
4.
Select e-Manual in the pop-up window and then select . You can update the e-ManualUpdate to
the latest version.

Updating the Software
Support Software Update > Try Now
Check your TV's software version and upgrade it if necessary.
If the TV is connected to the Internet, TV is set to update software automatically. If you don’t want to
update it automatically, set ( > ) to .Auto update Software Update Auto update Off
Updating Software over the Internet
Support Software Update Update now > > Update now - Software
Select > Support Software Update Update now > . An online upgrade downloads and installs the
upgrade software directly from the Internet.
" This option requires an Internet connection.
[ DO NOT turn off the TV’s power until the upgrade is complete. The TV will turn off and on
automatically after completing the software upgrade. All video and audio settings return to the
default settings after a software upgrade.
Updating Software using a USB connection
Support Software Update Update now > >
1.
Visit Samsung's website on a computer and download the update package to a USB device.
" Save the update package in the USB device's top-level folder. Otherwise, the TV will not be able to
locate the update package.
2.
Connect the USB device with the update package to the TV.
3.
Select > Support Software Update Update now > . The software is updated using the update
package on the USB device.
[ DO NOT turn off the TV’s power until the upgrade is complete. The TV will turn off and on
automatically after completing the software upgrade. All video and audio settings return to the
default settings after a software upgrade.

Enabling Automatic Software Updates
Support Software Update Auto update > > Try Now
If the TV is connected to the Internet, the option upgrades the TV’s software while it is in Auto update
Standby Mode. In Standby Mode, the TV appears to be turned off, but still has access to the Internet.
This allows the TV to upgrade itself automatically while it is not in use.
" This option requires an Internet connection.
Because the TV’s internal processes are operating, the screen may emit a faint glow, and this may
continue for more than 1 hour until the software download is complete.
If you agree to the Smart Hub terms and conditions, will be set to , If you don't want Auto update On
the TV's software updated automatically, set ( > > ) Auto update Support Software Update Auto update
to Off.
1.
Select > > .Support Software Update Auto update
2.
Specify when you want the upgrade to take place. The TV will connect to the server at the
specified time, download the update package, and upgrade its own software.
Software update via satellite channel
" Availability depends on the specific model and area.
Support Software Update Manage Satellite Channels > >
(When the was set to ) Manage software downloads via a satellite channel.Aerial Satellite

Using Other Functions
Enabling the High Contrast
System Accessibility High Contrast > > Try Now
Navigate to > and set the option to . This option changes major System Accessibility High Contrast On
service screens to white text on black background or change the transparent TV menus to opaque so
that text can be more easily read.
Adjusting the Menu Transparency
System Accessibility Menu Transparency > > Try Now
Navigate to > and adjust the opacity level. Adjust the menu's transparency.System Accessibility
" When the ( > > ) setting is set to , menu display is High Contrast System Accessibility High Contrast On
automatically set to opaque and you cannot change the settings.Menu Transparency
Expanding the Smart Hub's Focus Area
System Accessibility Enlarge > > Try Now
Navigate to > and set . This zooms in the focused item when you System Accessibility Enlarge to On
use Smart Hub.
Changing the Menu Language
System Menu Language > Try Now
Select > and then choose a language from the list. Use this option to change System Menu Language
the menu language.

Checking Notifications
System Notifications > Try Now
Select from the Notifications System menu to view the list of event messages generated by the TV.
Notifications appear on the screen when events such as an update release for an app or Samsung
Account login/logout occurs.
" Select to delete all notifications.Delete All
" Select to check the SMART TV service notifications in a web browser.Service Notice
Setting Up a Password
System Change PIN > Try Now
Set a PIN (Personal Identification Number) to lock channels, reset the TV, and change the TV settings.
1.
Select > System Change PIN. The PIN input window appears.
2.
Enter a PIN. The default PIN is 0000. (For France, Italy: “1-1-1-1”)
3.
Enter a new PIN and then enter it again to confirm it. The PIN change is complete.
" If you forget the PIN code, press the buttons in the following sequence which resets the PIN to "0-0-0-
0"(For France, Italy: "1-1-1-1"): In Standby mode, press the following buttons on the remote to reset the
PIN to 0000: ¢ → 8 2 4 POWER → → → (on).

Programme Rating Lock
Broadcasting Programme Rating Lock > Try Now
" Availability depends on the specific model and area.
The Programme Rating Lock blocks programmes with ratings higher than those desired. This is useful
for controlling what children watch on TV. This will not function for programmes originating from
external sources, such as DVD players or USB files.
This PIN is required to watch a blocked programme.
The Programme Rating Lock is not available in HDMI or Component mode.
Enabling Game Mode
System General Game Mode > > Try Now
Game Mode optimises the TV's settings for playing video games on a gaming console such as
PlayStation™ or Xbox™.
Requirements:
●Game Mode cannot be used for normal TV viewing.
●Connect the gaming console before enabling Game Mode. Otherwise, the picture quality may
suffer.
●The screen may shake a little.
●Enabling Game Mode automatically sets the and the Picture Mode to Standard Sound Mode to
Movie.
●To use a different external device, first disconnect the game console and disable Game Mode.
Enjoying Rich Colours and Superior Picture Quality (BD Wise)
" Availability depends on the specific model and area.
System General BD Wise > > Try Now
Connecting a Samsung DVD player, Blu-ray player, or home theatre system that supports BD Wise
enables the richest colours and best possible picture quality. Enabling BD Wise automatically optimises
the TV's resolution.
" This feature is only available when the external device is connected via an HDMI cable.
Locking/Unlocking the Panel Keys
System General Panel Lock > > Try Now
Use to lock and unlock the TV's panel buttons.

Showing/Hiding the Samsung Logo while Booting
System General Boot Logo > > Try Now
Use to enable or disable the Samsung logo display that appears when the TV starts up.
Registering the TV as a DivX-Certified Device (Watching Paid DivX
Movies)
System DivX® Video On Demand > Try Now
Viewing DivX® DRM-protected DivX movies on the TV first requires registration of the TV as a DivX-
certified device.
" DRM ("Digital rights management") Digital Rights Management is a digital security measure designed to
protect copyright.
" You can watch personally-created and free DivX content without registering the TV.
" Visit the DivX website (http://www.divx.com) and log into your user account before registering the TV as a
DivX-certified device. If you do not have an account, please create one.
1.
Select > . A window with a registration code appears on the System DivX® Video On Demand
screen.
2.
Visit the DivX website on a computer and click [Register Your Device] under [Support] from the
top menu.
3.
Enter the registration code shown on the TV's screen in the [Enter your registration code] field.
4.
Enter the TV's name in the [Name your device] field and then select [NEXT].
5.
Click [DOWNLOAD] and save the [device_name.divx] file.
6.
Transfer the [device_name.divx] file from the computer onto a USB device and then plug the USB
device into the TV.
7.
Play the [device_name.divx] file on the TV to register the TV as a DivX-certified device.

Restoring the TV to the Factory Settings
Support Self Diagnosis Reset > > Try Now
This option restores all TV settings (excluding the Internet) to the factory defaults.
1.
Select > > . The Security PIN entry window appears on the screen.Support Self Diagnosis Reset
2.
Enter the Security PIN and then select . All settings are then reset. The TV turns off and on Yes
again automatically, and then displays the screen.Setup
" For more information on Setup, refer to the user manual that came with the TV.
Turning the TV into a Display Model (for retail stores)
Support Use Mode > Try Now
Select > > . This turns the TV into a display model for use in a retail Support Use Mode Store Demo
environment.
" For all other uses, select .Home Use
" Store Demo should be used in retail environments only. With , certain functions are disabled and Store Demo
the TV automatically resets itself after a certain amount of time.
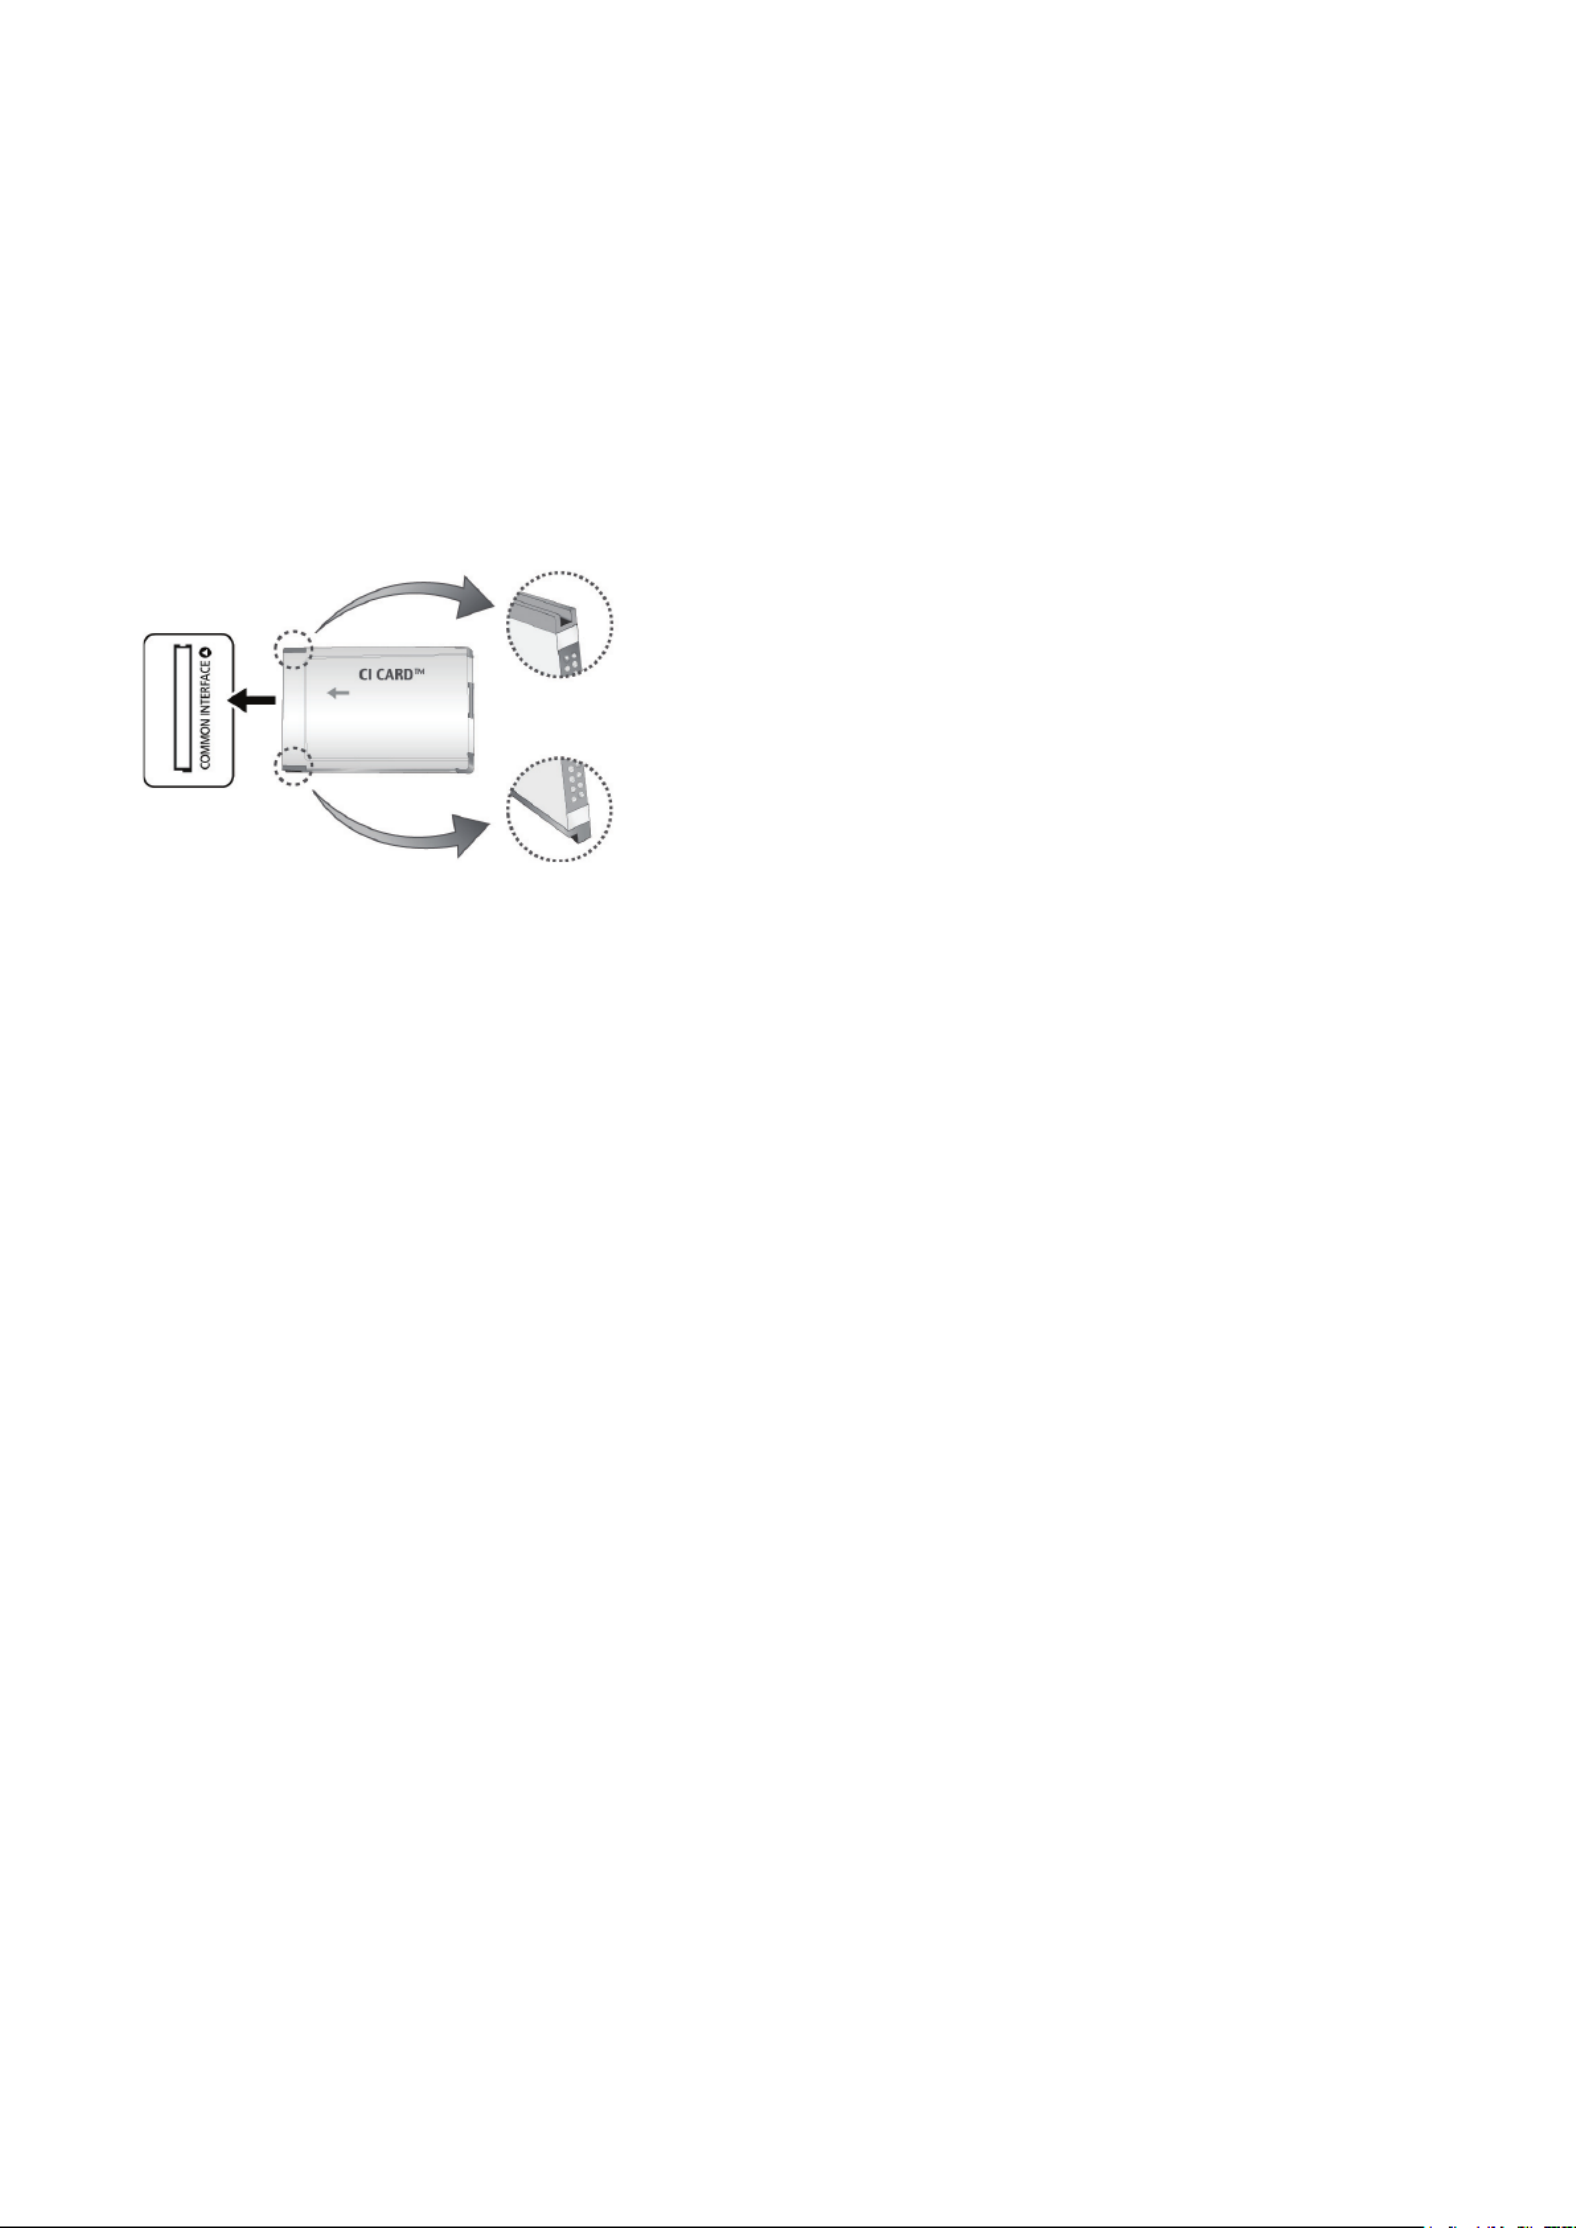
Connecting to a TV Viewing Card slot
" The connection method differs depending on the model.
To connect the CI CARD, follow these steps:
Using the “CI or CI+ CARD”
To watch paid channels, the “CI or CI+ CARD” must be inserted.
" Turn the TV off to connect or disconnect a CI card.
● If you don’t insert the “CI or CI+ CARD”, some channels will display the message “Scrambled
Signal”.
● The pairing information containing a telephone number, the “CI or CI+ CARD” ID the Host ID and
other information will be displayed in about 2~3 minutes. If an error message appears please
contact your service provider.
● When the configuration of channel information has finished, the message “Updating Completed”
appears indicating the channel list is updated.
Requirements:
● You must obtain a “CI or CI+ CARD” from a local cable service provider.
● When removing the “CI or CI+ CARD”, carefully pull it out with your hands since dropping the “CI
or CI+ CARD” may cause damage to it.
● Insert the “CI or CI+ CARD” in the direction marked on the card.
● The location of the COMMON INTERFACE slot may be different depending on the model.
● “CI or CI+ CARD” is not supported in some countries and regions; check with your authorised
dealer.
● If you have any problems, please contact a service provider.
● Insert the “CI or CI+ CARD” that supports the current aerial settings. The screen will be distorted
or will not be seen.

To connect the CI CARD Adapter, follow these steps:
" We recommend attaching the adapter before installing the wall mount, or inserting the “CI or CI+ CARD”.
" Turn the TV off to connect or disconnect a CI card adapter.
<TV Rear>
1.
Insert the CI CARD Adapter into the two holes on the product 1.
" Please find two holes on the rear of the TV. Two holes are beside the COMMON INTERFACE port.
2.
Connect the CI CARD Adapter into the COMMON INTERFACE port on the product 2.
3.
Insert the “CI or CI+ CARD”
[ We recommend that you insert the CI card before you mount the TV on a wall. It may be
difficult to insert after the mounting. Insert the card after attaching the CI-Module on TV. It is
difficult to attach the module if you insert the card before attaching.

Using the “CI or CI+ CARD”
To watch paid channels, the “CI or CI+ CARD” must be inserted.
● If you don’t insert the “CI or CI+ CARD”, some channels will display the message “Scrambled
Signal”.
● The pairing information containing a telephone number, the “CI or CI+ CARD” ID the Host ID and
other information will be displayed in about 2~3 minutes. If an error message appears please
contact your service provider.
● When the configuration of channel information has finished, the message “Updating Completed”
appears indicating the channel list is updated.
Requirements:
● You must obtain a “CI or CI+ CARD” from a local cable service provider.
● When removing the “CI or CI+ CARD”, carefully pull it out with your hands since dropping the “CI
or CI+ CARD” may cause damage to it.
● Insert the “CI or CI+ CARD” in the direction marked on the card.
● The location of the COMMON INTERFACE slot may be different depending on the model.
Termékspecifikációk
| Márka: | Samsung |
| Kategória: | televízió |
| Modell: | UA46H6203AK |
Szüksége van segítségre?
Ha segítségre van szüksége Samsung UA46H6203AK, tegyen fel kérdést alább, és más felhasználók válaszolnak Önnek
Útmutatók televízió Samsung

29 Március 2025
28 Március 2025
28 Március 2025
26 Március 2025
16 Március 2025
16 Március 2025
16 Március 2025
16 Március 2025
16 Március 2025
15 Január 2025
Útmutatók televízió
- televízió Sony
- televízió Beko
- televízió Fujitsu
- televízió Acer
- televízió Nedis
- televízió LG
- televízió Grundig
- televízió Marantz
- televízió Philips
- televízió Pioneer
- televízió SilverCrest
- televízió Panasonic
- televízió JVC
- televízió AEG
- televízió Sharp
- televízió Nokia
- televízió Lenovo
- televízió Casio
- televízió Toshiba
- televízió Oppo
- televízió Hyundai
- televízió Hisense
- televízió BenQ
- televízió SunBriteTV
- televízió Siemens
- televízió Medion
- televízió TCL
- televízió Xiaomi
- televízió GoGen
- televízió Insignia
- televízió Infiniton
- televízió Dell
- televízió Strong
- televízió VOX
- televízió Vivax
- televízió Thomson
- televízió Polaroid
- televízió Aiwa
- televízió Orima
- televízió V7
- televízió Clatronic
- televízió PEAQ
- televízió Qilive
- televízió Haier
- televízió Mitsubishi
- televízió Cecotec
- televízió Sencor
- televízió GPX
- televízió Küppersbusch
- televízió Innoliving
- televízió AOC
- televízió Citizen
- televízió Westinghouse
- televízió Hitachi
- televízió Continental Edison
- televízió Telefunken
- televízió Nevir
- televízió Monster
- televízió Roadstar
- televízió Optoma
- televízió CHiQ
- televízió Viewsonic
- televízió Nextbase
- televízió Denver
- televízió Bush
- televízió Trevi
- televízió Albrecht
- televízió Daewoo
- televízió Funai
- televízió Tesla
- televízió Smart Tech
- televízió Muse
- televízió Energy Sistem
- televízió OK
- televízió SVAN
- televízió Loewe
- televízió RevolutionHD
- televízió Polar
- televízió Manhattan
- televízió Kogan
- televízió Horizon
- televízió Intenso
- televízió Furrion
- televízió Teac
- televízió Aspes
- televízió Digihome
- televízió Manta
- televízió Blaupunkt
- televízió Sagem
- televízió Jay-Tech
- televízió Logik
- televízió Finlux
- televízió Peerless-AV
- televízió Abus
- televízió AG Neovo
- televízió Bang & Olufsen
- televízió Iiyama
- televízió AKAI
- televízió TechniSat
- televízió Seiki
- televízió Jensen
- televízió Pyle
- televízió Emerson
- televízió Sanyo
- televízió Kemo
- televízió Salora
- televízió Lenco
- televízió Schneider
- televízió Philco
- televízió ECG
- televízió Uniden
- televízió Technika
- televízió NEC
- televízió Element
- televízió Soundmaster
- televízió Alphatronics
- televízió AYA
- televízió MBM
- televízió Krüger&Matz
- televízió Dual
- televízió Brandt
- televízió Wharfedale
- televízió Allview
- televízió RCA
- televízió OKI
- televízió Orion
- televízió SereneLife
- televízió Schaub Lorenz
- televízió Luxor
- televízió Metz
- televízió ILive
- televízió Graetz
- televízió Tatung
- televízió Packard Bell
- televízió EasyMaxx
- televízió Orava
- televízió Arçelik
- televízió Planar
- televízió Zenith
- televízió Doffler
- televízió QBell Technology
- televízió SYLVOX
- televízió Majestic
- televízió Reflexion
- televízió FFalcon
- televízió Megasat
- televízió Sogo
- televízió United
- televízió Techwood
- televízió Newstar
- televízió Matsui
- televízió Alden
- televízió Aldi
- televízió Airis
- televízió Aristona
- televízió Apex
- televízió Icy Box
- televízió Lexibook
- televízió Palsonic
- televízió Walker
- televízió Saba
- televízió Antarion
- televízió Kernau
- televízió Tevion
- televízió Proscan
- televízió Vestel
- televízió Tucson
- televízió Sunstech
- televízió Nabo
- televízió Sylvania
- televízió Sunny
- televízió Marquant
- televízió Nordmende
- televízió AudioAffairs
- televízió Magnum
- televízió Audiosonic
- televízió Kubo
- televízió Proline
- televízió Coby
- televízió Seg
- televízió Vivo
- televízió Daitsu
- televízió Terris
- televízió Changhong
- televízió Alba
- televízió Naxa
- televízió Star-Light
- televízió Fantec
- televízió Mpman
- televízió Sweex
- televízió Vizio
- televízió Cello
- televízió Mx Onda
- televízió Nikkei
- televízió Hannspree
- televízió DGM
- televízió Yasin
- televízió Humax
- televízió XD Enjoy
- televízió MT Logic
- televízió Superior
- televízió Kunft
- televízió ITT
- televízió Grunkel
- televízió Avtex
- televízió Inovia
- televízió Odys
- televízió NPG
- televízió Bluesky
- televízió Videocon
- televízió Xoro
- televízió Durabase
- televízió HKC
- televízió Edenwood
- televízió Woxter
- televízió Premier
- televízió Onn
- televízió Teleco
- televízió Opera
- televízió LTC
- televízió JTC
- televízió Zalman
- televízió Ferguson
- televízió Viewpia
- televízió JGC
- televízió Online
- televízió Dyon
- televízió DirecTV
- televízió Tele 2
- televízió Telesystem
- televízió EKO
- televízió E-motion
- televízió Mitsai
- televízió Selfsat
- televízió High One
- televízió Tve
- televízió ISymphony
- televízió Pantel
- televízió Magnavox
- televízió ATYME
- televízió HCI
- televízió Inno-Hit
- televízió Lin
- televízió Engel
- televízió TechLine
- televízió Elements
- televízió Englaon
- televízió Time
- televízió Reflex
- televízió Astar
- televízió Visco
- televízió Tivax
- televízió H&B
- televízió Norcent
- televízió TELE System
- televízió TIM
- televízió Oyster
- televízió Belson
- televízió Vision Plus
- televízió Sbr
- televízió Bauhn
- televízió Voxx
- televízió Rm 2000
- televízió Hoher
- televízió Felson
- televízió Mach Power
- televízió Elbe
- televízió Axing
- televízió CGV
- televízió Séura
- televízió Mitzu
- televízió Caratec
- televízió JTC24
- televízió Coocaa
- televízió Kivi
- televízió Smart Brand
- televízió Voxicon
- televízió Aconatic
- televízió Mitchell & Brown
- televízió FOX Electronics
- televízió Mystery
Legújabb útmutatók televízió

2 Április 2025

2 Április 2025

2 Április 2025
2 Április 2025
1 Április 2025

31 Március 2025
31 Március 2025
31 Március 2025

31 Március 2025
30 Március 2025