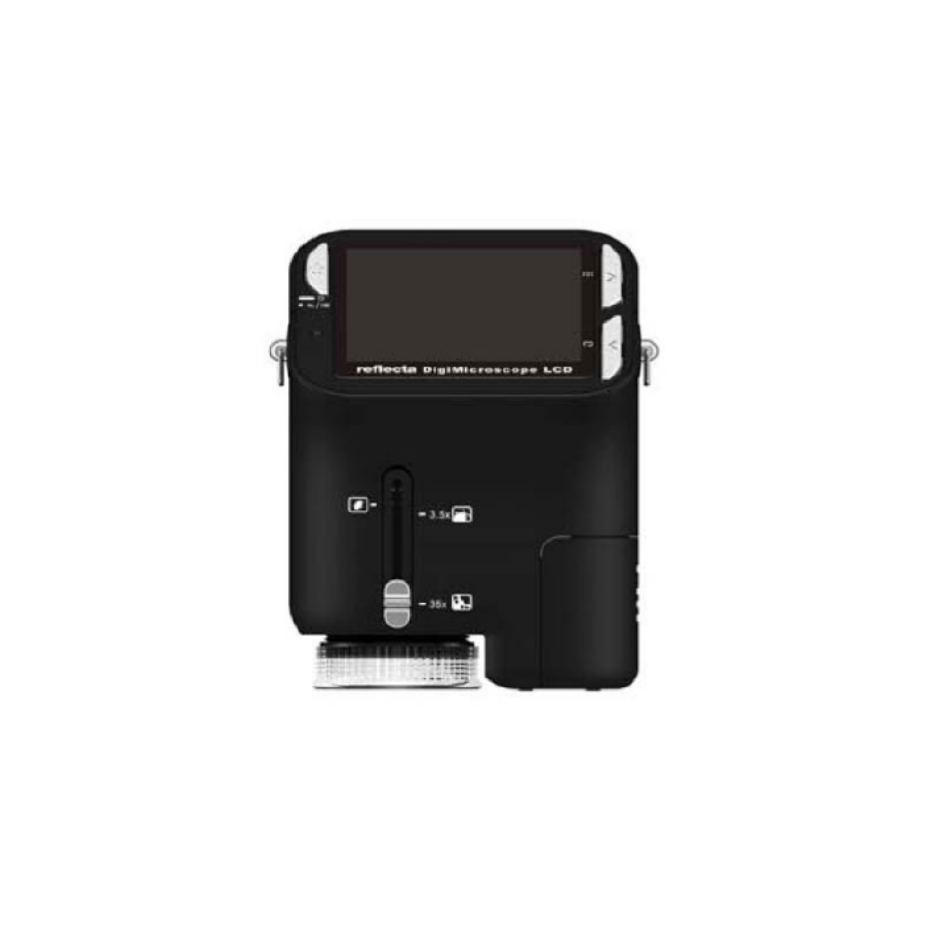
Használati útmutató Reflecta DigiMicroscope LCD
Reflecta
mikroszkóp
DigiMicroscope LCD
Olvassa el alább 📖 a magyar nyelvű használati útmutatót Reflecta DigiMicroscope LCD (293 oldal) a mikroszkóp kategóriában. Ezt az útmutatót 2 ember találta hasznosnak és 2 felhasználó értékelte átlagosan 4.5 csillagra
Oldal 1/293

Mikroskop
Bedienungsanleitung


Für Kunden in Nord- und Südamerika
Für Kunden in den USA
Dieses Gerät entspricht Abschnitt 15 der FCC-Bestimmungen. Der Betrieb ist unter den
folgenden beiden Bedingungen gestattet:
(1) Dieses Gerät darf keine nachteiligen Störungen verursachen
und
(2) dieses Gerät muss jegliche Störungen zulassen,
einschließlich jener, die zu einem unerwünschten Betrieb
führen.
Für Kunden in Canada
Dieses Klasse B Digitalgerät entspricht allen Anforderungen der kanadischen Bestimmungen für
störungsverursachende Geräte.
Für Kunden in Europa
Die CE-Kennzeichnung bestätigt, dass das Produkt den europäischen
Anforderungen an Sicherheit, Gesundheits- Umwelt- und Kundenschutz
entspricht. Mit CE-Kennzeichnung versehene Mikroskope sind zum Verkauf
in Europa bestimmt.


Inhalt Seite
FÜR KUNDEN IN EUROPA -----------------------------------------------------------------------------------1
1. SYSTEMANFORDERUNGEN -----------------------------------------------------------------------------3
2. LIEFERUMFANG----------------------------------------------------------------------------------------------3
3. BEDIENELEMENTE UND FUNKTIONEN MIKROSKOP ------------------------------------------4
4. SCHNELLANLEITUNG--------------------------------------------------------------------------------------5
• Batterien einsetzen -----------------------------------------------------------------------------------------5
• SD-Karte einsetzen ----------------------------------------------------------------------------------------5
• Mikroskop einschalten-------------------------------------------------------------------------------------6
• Bild aufnehmen----------------------------------------------------------------------------------------------6
• Video aufnehmen -------------------------------------------------------------------------------------------6
• Digital-Zoom--------------------------------------------------------------------------------------------------6
• Optischer ZOOM--------------------------------------------------------------------------------------------7
5. DISPLAY---------------------------------------------------------------------------------------------------------8
6. FUNKTION WÄHLEN --------------------------------------------------------------------------------------10
• DV-Modus --------------------------------------------------------------------------------------------------10
• Einstellungen-----------------------------------------------------------------------------------------------10
• Belichtungswert ------------------------------------------------------------------------------------------13
• Mehrfachbilder aufnehmen ----------------------------------------------------------------------------13
• DC-Modus -------------------------------------------------------------------------------------------------14
7. WIEDERGABE-----------------------------------------------------------------------------------------------14
8. DATEIEN AUF PC HERUNTERLADEN---------------------------------------------------------------16
• Für Windows 98 SE/ME---------------------------------------------------------------------------------16
• Für Windows Vista / XP ---------------------------------------------------------------------------------16
• Für Windows 2000 ---------------------------------------------------------------------------------------16
9. MIKROSKOP ALS PC-KAMERA BENUTZEN------------------------------------------------------16
• PC-Kamera einstellen -----------------------------------------------------------------------------------16
10. ARCSOFT MEDIA IMPRESSION 2-------------------------------------------------------------------17
• Organisieren -----------------------------------------------------------------------------------------------18
• Freigabe-----------------------------------------------------------------------------------------------------21
• Schutz -------------------------------------------------------------------------------------------------------22
11. ANHANG: ----------------------------------------------------------------------------------------------------23


1. Systemanforderungen
• PC mit Pentium 166 MHz Prozessor oder schneller.
• Freier USB-Port (Universal Serial Bus) auf dem Computer.
• Windows 98SE/ME/2000/XP/Vista/7, CD-ROM Laufwerk, Farbmonitor, Maus und Tastatur.
• Farbdrucker zum Ausdruck von Farbbildern.
• Zur Übertragung von Standbildern über das Internet muss der Computer ein Modem und
Kommunikationssoftware für Internetanschluss besitzen.
2. Lieferumfang
Vergewissern Sie sich, dass alle nachstehenden Artikel für Ihr Mikroskop mitgeliefert wurden.
• USB-Kabel
• Nackengurt
•TV-Kabel
•Handgelenkgurt
• Mikroskop
• Bedienungsanleitung
• Installations-CD
•Abstandhalter


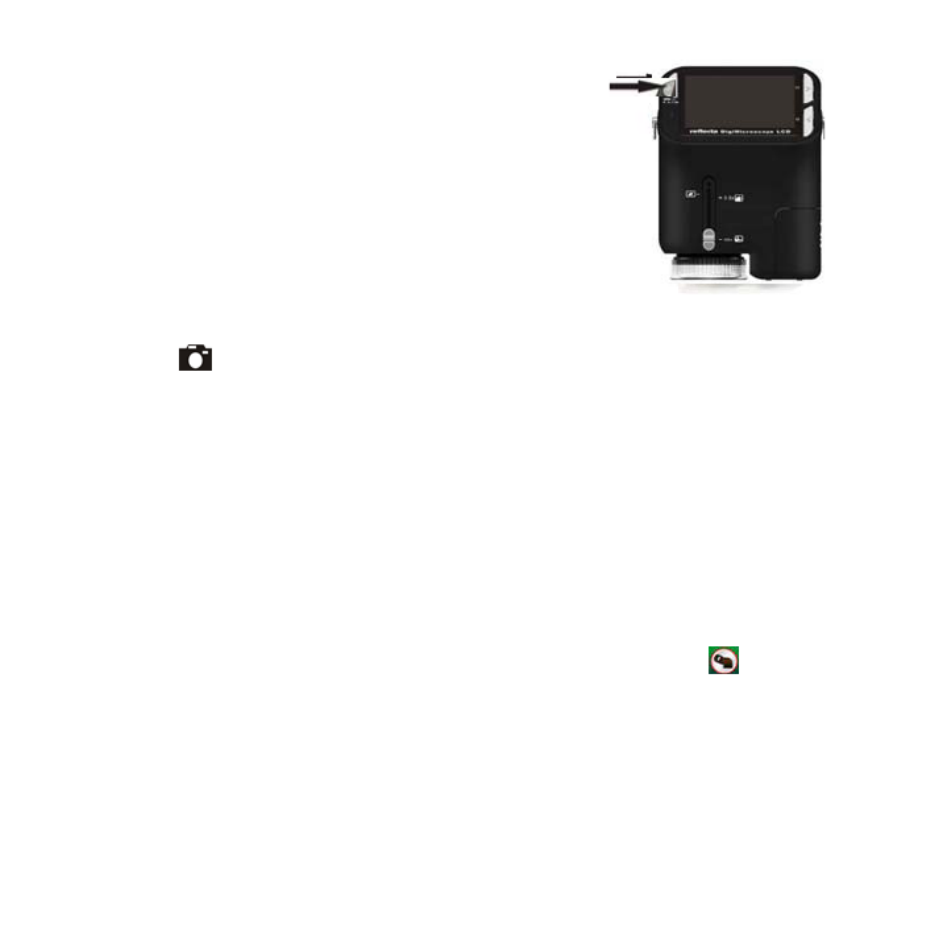
3. Bedienelemente und Funktionen Mikroskop
Die nachstehenden Abbildungen helfen Ihnen, sich mit den Bedienelementen dieses Mikroskops
vertraut zu machen.
1. Optischer Zoom
2. Status-LED
3. EIN/AUS / VERGRÖßERN / MENÜ
4. LCD
5. FUNKTION (Navigation rechts)
6. WIEDERGABE (Navigation links)
7. USB-Port
8. SD-Kartenleser
9. Öse für Tragegurt
10. AUSLÖSER/OK
11. TV-Ausgang
12. Abstandhalter
13. Batteriefach
14. Objektiv
15. Stativaufnahme
16. LED-Lampen
17. Vergrößerungsring


4. Schnellanleitung
VORSICHT
• Bitte installieren Sie den Mikroskoptreiber, bevor Sie Ihr Mikroskop am PC anschließen.
• Die beste Übertragungsmethode von Bildern auf den PC ist mit dem
Massenspeichermodus. Kopieren Sie auf diese Weise alle Bilder auf den Computer.
Rändelschraube
• Batterien einsetzen
1. Drehen Sie die Rändelschraube und nehmen Sie
Abstandhalter ab.
2. Öffnen Sie das Batteriefach.
3. Setzen Sie die Batterien mit korrekter Polarität (+/–) ein, wie im Batteriefach aufgedruckt.
4. Schließen Sie das Batteriefach wieder.
• SD-Karte einsetzen
1. Schalten Sie das Mikroskop aus.
2. Setzen Sie die Speicherkarte in korrekter Ausrichtung ein, wie
dargestellt. Drücken Sie die Karte in den Kartenleser, bis sie
einrastet.
3. Zum Herausnehmen der Karte drücken Sie sie an, sie springt
etwas heraus und kann abgezogen werden.
Hinweis: Wird „MEMORY FULL“ angezeigt, so ist die SD-Karte voll.
Übertragen Sie die Dateien auf Ihren Computer und löschen Sie sie auf der Karte. Nun
können Sie die Karte wieder benutzen.

Hinweis: Das Mikroskop unterstützt nur SD-Karten.
• Mikroskop einschalten
1. Mit POWER schalten Sie das Mikroskop ein.
2. Die Status-LED) leuchtet auf.
Das LCD zeigt den Begrüßungsbildschirm.
3. Halten Sie POWER zum Ausschalten des Mikroskops gedrückt.
• Bild aufnehmen
1. Schalten Sie das Mikroskop ein.
2. Das Symbol wird oben links im Bild angezeigt.
3. Richten Sie das Mikroskop auf das Ziel aus. Das Ziel wird auf dem Bildschirm angezeigt.
4. Halten Sie das Mikroskop ruhig und drücken Sie vorsichtig den Auslöser, um ein Foto
aufzunehmen.
Hinweis: 1. Mit ZOOM (POWER) vergrößern/verkleinern Sie das Bild.
2. Das Bild wird grobkörniger, wenn es digital vergrößert wird.
• Video aufnehmen
1. Schalten Sie das Mikroskop ein.
2. Drücken Sie FUNCTION (Navigation rechts) und wählen Sie das Symbol . Drücken Sie OK
zur Bestätigung.
3. Drücken Sie erneut OK, um ein Video aufzunehmen. Drücken Sie OK, um die Aufnahme zu
beenden.
4. Mit FUNCTION (Navigation rechts) kehren Sie in das Funktionsmenü zurück.
• Digital-Zoom


Während der Aufnahme können Sie mit POWER vergrößern und verkleinern. Der Digital-Zoom
vergrößert Ihre Bilder 1x bis 4x.
• Optischer ZOOM
Schieben Sie den Schalter für den optischen Zoom zur Einstellung
der Vergrößerung. Der optische Zoom vergrößert das Zielbild 3,5x und 35x.
Mit dem Vergrößerungsring nehmen Sie die Feineinstellung vor.
1. Schieben Sie auf und halten Sie 60 mm Abstand zwischen
dem Abstandhalter (optional) und dem Ziel. In dieser Einstellung sehen Sie
das Ziel in Originalgröße.
2. Schieben Sie auf „3.5X“ oder „35X“, um das Ziel 3,5x bzw. 35x zu
vergrößern.


5. Display
Capture mode indicator Aufnahmemodus
Zoom indicator Zoom
Single picture icon Einzelbild
Battery capacity Batteriekapazität
Memory capacity (Remaining number of
storable pictures)
Speicherkapazität (Anzahl verbleibender
Bilder)
SD-Karte indicator SD-Karte
Picture Size Bildgröße
Date Datum
Video mode indicator Videomodus


V ideo size Videogröße
Battery capacity Batteriekapazität
Memory capacity (Remaining record time of
storable audio)
Speicherkapazität (verbleibende
Aufnahmedauer)
SD-Karte SD-Karte


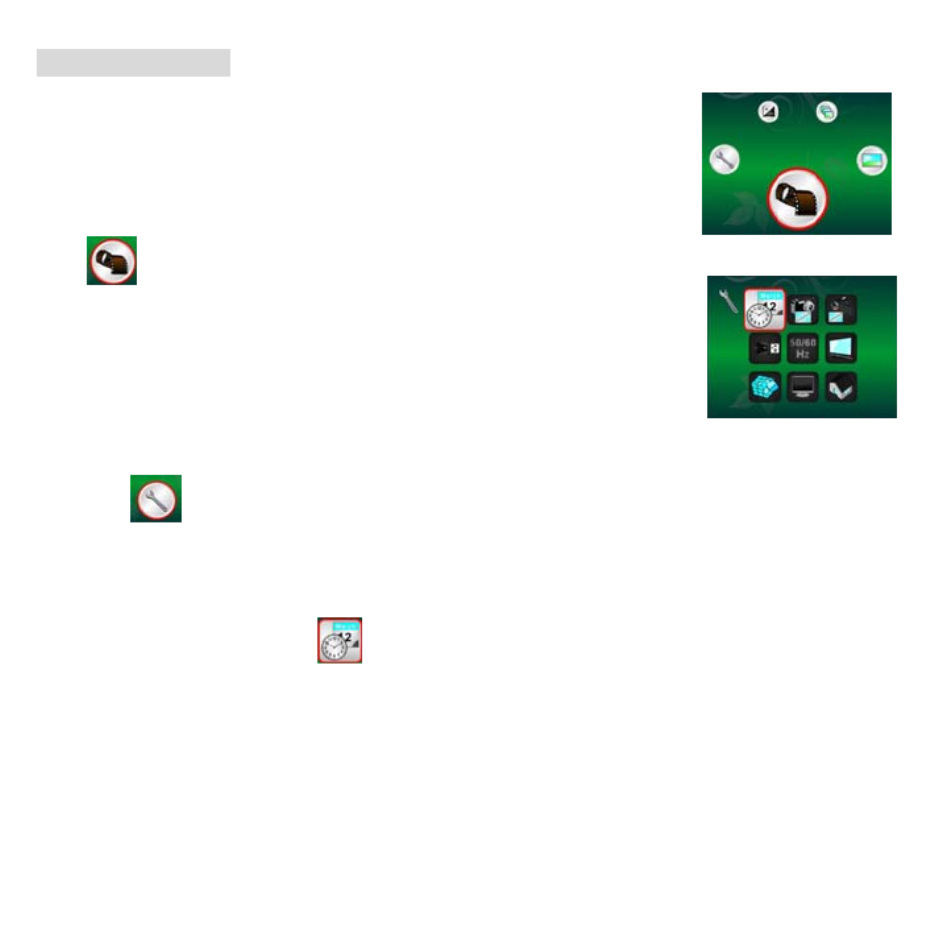
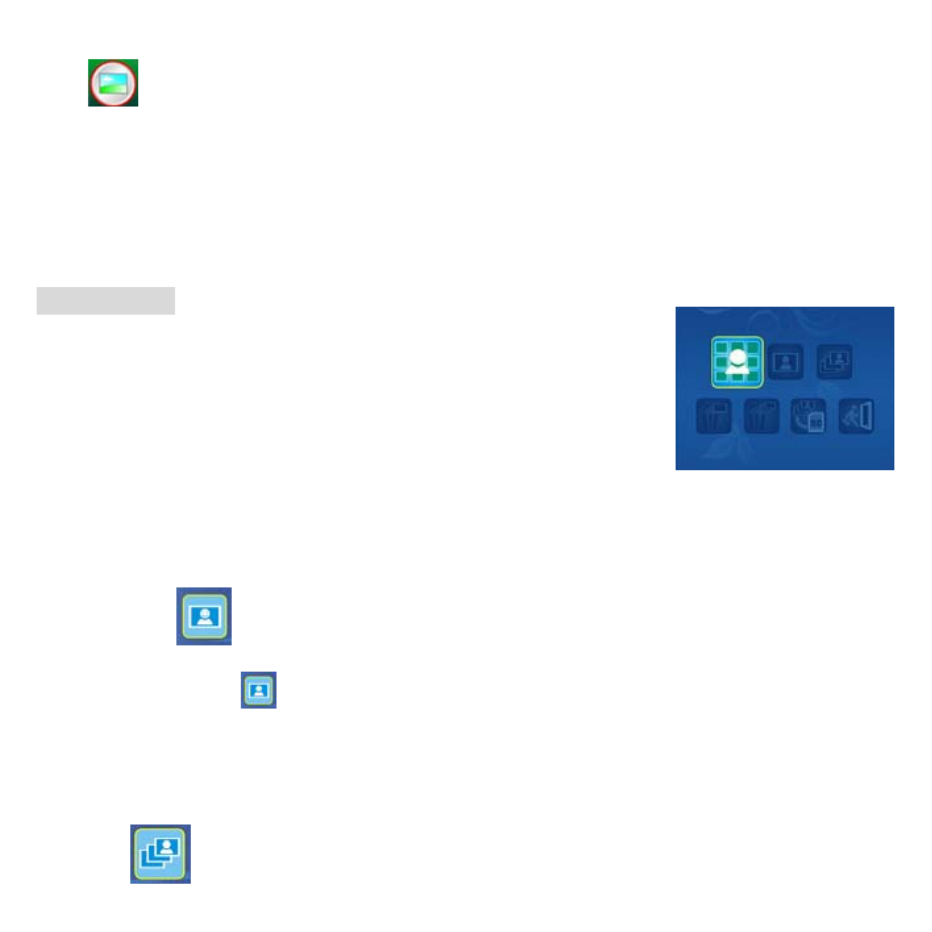
6. Funktion wählen
Mit FUNCTION rufen Sie das Funktionsmenü auf. Auf dem Bildschirm
werden Symbole angezeigt. Mit der linken/rechten Navigationstaste
wählen Sie die Funktion.
• DV-Modus
Wählen Sie den DV-Modus und drücken Sie OK.
Mit OK starten Sie die Videoaufnahme, mit erneutem Tastendruck
beenden Sie die Aufzeichnung.
• Einstellungen
Im Einstellungsmenü werden auf dem Bildschirm Symbole angezeigt.
1. Uhrzeit und Datum einstellen
Mit der linken/rechten Navigationstaste wählen Sie das Datumformat als MM/DD/YYY,
DD/MM/YYYY oder YYYY/MM/DD. Mit OK bestätigen Sie und die Zeiteinstellung wird aufgerufen.
Mit der linken/rechten Navigationstaste stellen Sie Datum und Uhrzeit ein. Mit OK bestätigen Sie
und kehren Sie in das Funktionsmenü zurück.


2. Bildgröße einstellen
Wählen Sie die Bildqualität zur Einstellung der Auflösung. Mit der linken/rechten Navigationstaste
wählen Sie die Bildgröße, mit OK bestätigen Sie und kehren Sie in das Funktionsmenü zurück. Als
Optionen stehen 2M (1600x1200 Pixel), 1,3M (1280x 960 Pixel) und VGA (640x480 Pixel) zur
Verfügung.
3. Videogröße einstellen
Wählen Sie die Videoqualität zur Einstellung der Auflösung. Mit der linken/rechten
Navigationstaste wählen Sie die Videogröße, mit OK bestätigen Sie und kehren Sie in das
Funktionsmenü zurück. Als Optionen stehen VGA (640x480 Pixel) und QVGA (320x240 Pixel) zur
Verfügung.
4. USB-Anschluss
Wählen Sie USB-Anschluss und bestätigen Sie mit OK.
PC-Cam: Benutzen Sie Ihr Mikroskop als PC-Kamera (PC-Mikroskop).
Disk Driver: Benutzen Sie Ihr Mikroskop als Massenspeichergerät zur Übertragung von Dateien
auf den Computer.
5. Anti-Flicker-Frequenz
Stellen Sie die Anti-Flicker-Frequenz auf 50 Hz ein (benutzen Sie 50 Hz, wenn Sie das Mikroskop


in Europa, Japan oder Asien benutzen).
Stellen Sie die Anti-Flicker-Frequenz auf 60 Hz ein (benutzen Sie 60 Hz, wenn Sie das Mikroskop
in den USA benutzen).
6. TV-Ausgang
Schließen Sie das Mikroskop über das TV-Kabel am Fernseher an.
NTSC: Stellen Sie den TV-Ausgang auf NTSC ein.
PAL: Stellen Sie den TV-Ausgang auf PAL ein.
7. Formatieren
Wählen Sie Formatieren und drücken Sie OK zur Bestätigung. Wählen Sie „√“ und drücken Sie OK
ierung abzubrechen.
Vorsicht: Formatierte Dateien können nicht wiederhergestellt werden.
zum Formatieren. Wählen Sie „X“ und drücken Sie OK, um die Format
8. Automatische Abschaltung
Wählen Sie Automatische Abschaltung und drücken Sie OK zur Bestätigung.
5MIN: Stellen Sie das Mikroskop zur automatischen Abschaltung nach ca. 5 Minuten ein.
X: Funktion nicht benutzen.
9. Verlassen
Wählen Sie Verlassen, um das Einstellungsmenü zu verlassen und in das Funktionsmenü

zurückzukehren.
• Belichtungswert
sch eingestellt. Die Funktion dient der entsprechenden
Auf dem Bildschirm können Sie das Ergebnis der Kompensation direkt betrachten.
• Mehrfachbilder aufnehmen
Wählen Sie den EV-Modus und drücken Sie OK zur Bestätigung.
Hiermit wird die Belichtung automati
Wiedergabe des betrachteten Objekts.
Die Einstellung erfolgt mit 1/3-Schritten zwischen –2EV ~ +2EV.
en und drücken Sie OK zur Bestätigung. Das Symbol Wählen Sie Mehrfachbilder aufnehm
wird unten links im Bild angezeigt.
Richten Sie das Mikroskop auf das Ziel aus. Das Ziel wird auf dem Bildschirm dargestellt.
Halten Sie das Mikroskop ruhig und drücken Sie vorsichtig den Auslöser, um das Mehrfachbild
nsmenü wählen Sie
aufzunehmen.
Zurück im Funktio und drücken Sie OK, um in den Einzelbildmodus
zurückzukehren.


Mode und drücken Sie OK zur Bestätigung. Mit OK starten Sie die Aufnahme.
• DC-Modus
Wählen Sie den DC
7. Wiedergabe
Schalten Sie das Mikroskop ein. Drücken Sie die Wiedergabetaste zur
Auf dem Bildschirm werden die abgebildeten Symbole dargestellt.
en/re hten Navigationstaste wählen Sie eine Funktion.
Anzeige der Bilder auf dem Bildschirm. Mit POWER starten Sie die
Wiedergabe.
Mit der link c
• Einzeln
Wählen Sie das Symbol und drücken Sie OK zur Bestätigung. Mit der linken/rechten
Navigationstaste rufen Sie das vorherige oder nächste Bild auf. Mit POWER kehren Sie in den
modu zurück. Wiedergabe s
• Diashow
Wählen Sie den Diashowmodus und drücken Sie OK zur Bestätigung. Das Mikroskop zeigt alle


Bilder nacheinander an. Mit einer beliebigen Taste beenden Sie die Diashow.
e in d n Wiedergabemodus zurück.
• Einzelbild löschen
Mit POWER kehren Si e
, dr
Wählen Sie das Symbol
ücken Sie OK und bestätigen Sie die Löschung des aktuellen
er dr ken Sie „X“, um die Löschung nicht durchzuführen. Bildes mit „√“ od üc
• Alle löschen
Wählen Sie das Symbol , drücken Sie OK und bestätigen Sie die Löschung aller gespeicherten
Bilder im internen Speicher oder auf SD-Karte. Gelöschte Dateien können nicht wiederhergestellt
ren
werden.
• Auf Karte kopie
Wählen Sie das Symbol und drücken Sie OK zur Bestätigung. Alle Dateien werden auf die
piert. SD-Karte ko
• Verlassen
Wählen Sie das Symbol und drücken Sie OK zur Bestätigung. Sie kehren in den

Aufnahmemodus zurück.
8. Dateien auf PC herunterladen
•
am PC an.
„USB-Massenspeichergerät” wird angezeigt.
igen“,
das
echsellaufwerk mit dem Ordner unter „Arbeitsplatz“ („Computer“ für Windows Vista).
•
atz“, dann doppelklicken Sie das Wechsellaufwerk.
Hier finden Sie den Ordner.
Für Windows 98 SE/ME
Schließen Sie das Mikroskop über USB-Kabel
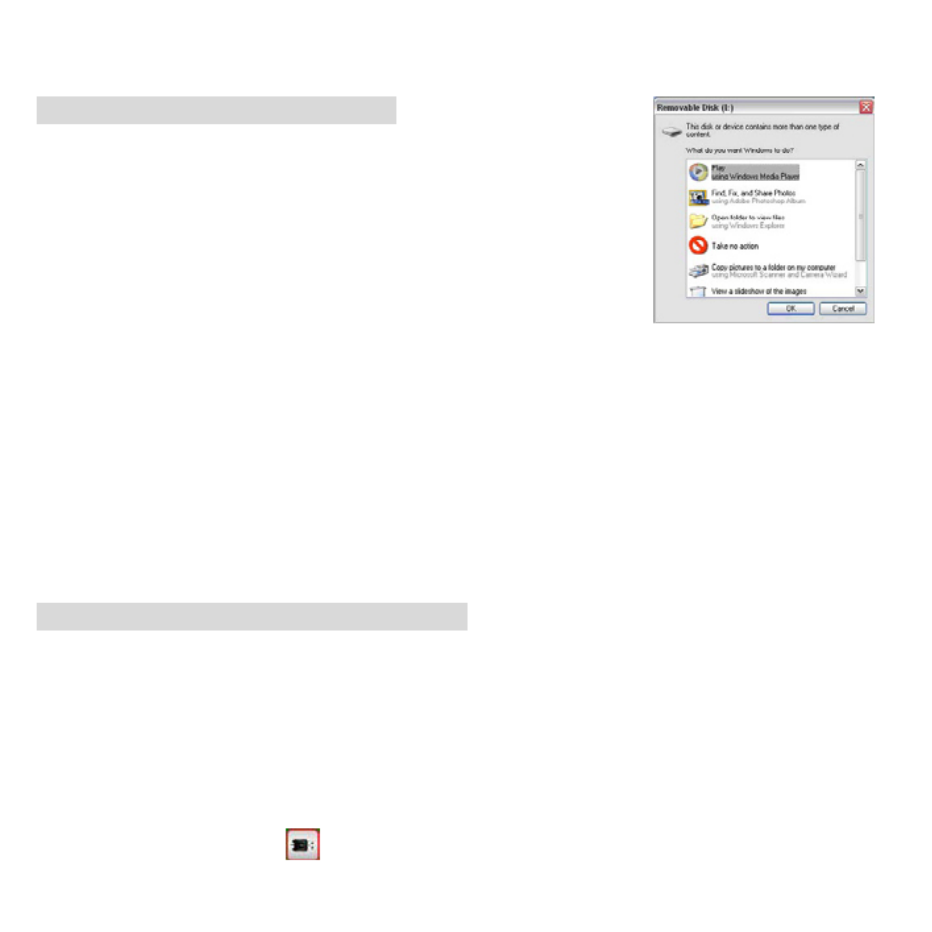
• Für Windows 7/Vista / XP
Schließen Sie das Mikroskop über USB-Kabel am PC an. Ein
Dialogfenster mit Optionen wird angezeigt. Wählen Sie „Ordner öffnen, um Dateien anzuze
um den Ordner zu öffnen oder wählen Sie „Keine Aktion durchführen“ und suchen Sie
W
Für Windows 2000
Doppelklicken Sie „Arbeitspl
9. Mikroskop als PC-Kamera benutzen
Hinweis: Bitte installieren Sie den Mikroskoptreiber, bevor Sie das Mikroskop am PC anschließen.
n Si ste
• PC-Kamera einstellen
1. Schalten Sie das Mikroskop ein und drücken Sie FUNCTION zur Auswahl des
Einstellungsmenüs. Drücke e OK zur Bestätigung. Mit der linken/rechten Navigationsta
wählen Sie USB-Anschluss . Wählen Sie PC-Cam. Drücken Sie OK zur Bestätigung.
2. Schließen Sie das Mikroskop über USB-Kabel am PC an.


3. Benutzen Sie das Mikroskop als PC-Kamera mit Ihrer eigenen Videosoftware.
Doppelklicken Sie beispielsweise in Windows XP „Arbeitsplatz“ (oder „Computer“ in Windows
V
ista), dann klicken Sie „Standard Kamera“, um die Live-PC-Kameraübertragung zu sehen.
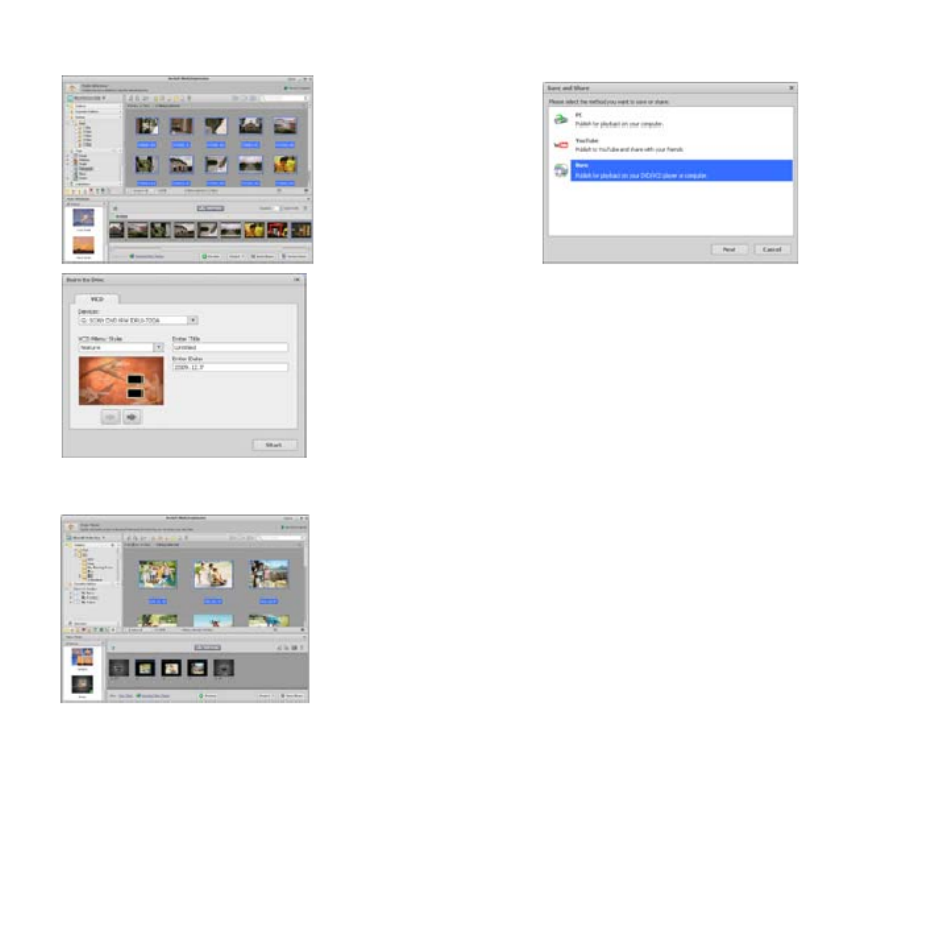
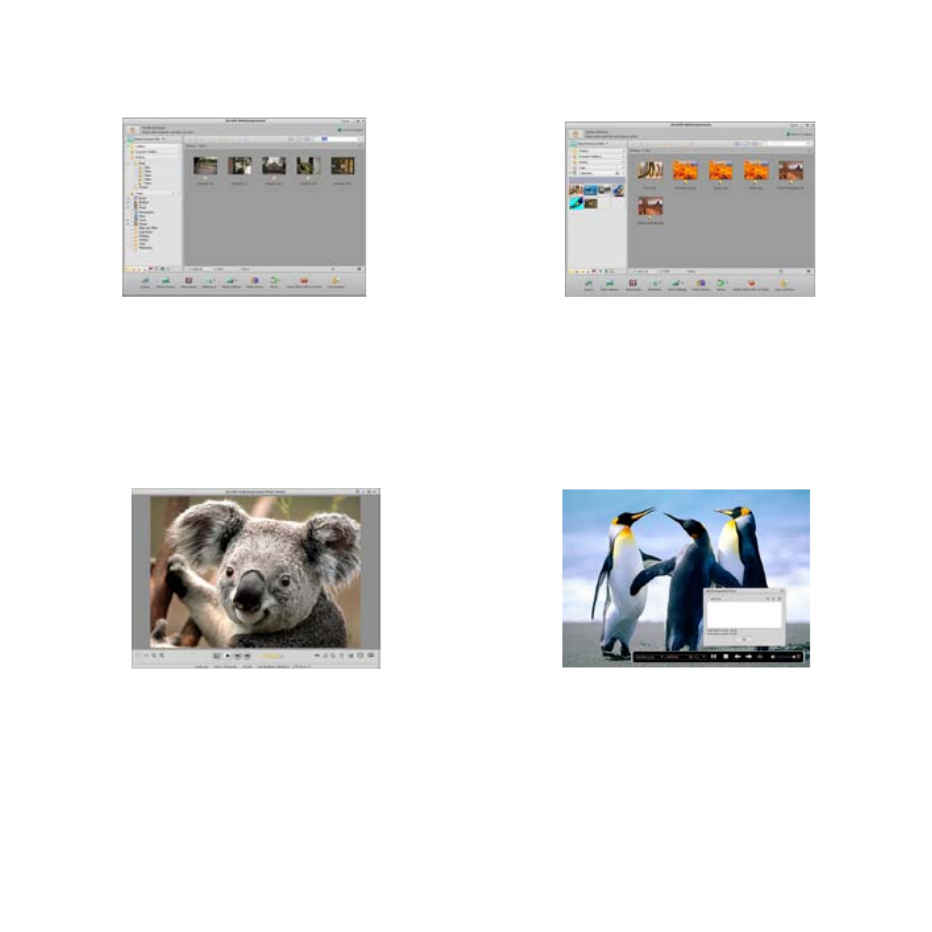
10. ArcSoft Media Impression 2
ArcSoft Media Impression 2 ermöglicht die einfache, kreative und produktive Verwaltung von
Multimedia mit einfachen Arbeitsabläufen und leistungsstarken Werkzeugen. Organisieren Sie Ihre
Medien kinderleicht und erstellen Sie einfach Projekte mit den Bearbeitungswerkzeugen. Es gibt
endlose Wege zur Präsentation und gem
einsamen Nutzung, problemlose Sicherheitskopien und
Wiederherstellung von Mediendateien.
Klicken Sie „Media Impression 2“ „Setup.exe“ „Choose Language“ „Weiter“ „J
„Weiter“ “Weiter“ „Fertigstellen“ zum Herunterladen. Doppelklicken Sie das „Me
a“
dia
Impression 2“ Symbol auf dem Desktop zur Anzeige des nachstehenden Fensters.


• Organisieren
Schließen Sie das Digitalmikroskop über USB-Kabel am PC an. Klicken Sie Import zum Aufrufen
der Organisationsgruppen.
1. Auto Gesichts-Tagging findet automatisch alle Gesichter in Fotos, gruppiert und markiert sie.
2. Auto Szene-Tagging analysiert automatisch Fotoinhalte und markiert sie mit unterschiedlichen
Szenen.
3. Auto Bewertung erkennt und bewertet Aufnahmen von guter und schlechter Qualität
automatisch. Bewertung und Markierungen sind mit Windows Vista kompatibel
(XMP-Unterstützung).
4. Suchen Sie Mediendateien mit mehrfachen Kriterien (wie eine Kombination aus Ordnern,
Bewertungen, Markierungen, Freigaben und Zeit).
5. Geomarkieren Sie Fotos und zeigen Sie Fotos in Google Earth an dem genauen Standort an, an


dem sie aufgenommen wurden.
6. Schnelle Textsuche: Suche nach Dateiname, Ordnername und Markierung.
7. Kalender Jahr/Monat/Tag-Anzeige
• Präsentation
Klicken Sie die Bilder/Videos zur Anzeige/Bearbeitung/Freigabe Ihrer Fotodateien.
1. Eine Foto-Schnellanzeige zeigt Fotos in
einem Bildfenster oder im Vollbildmodus mit
häufig benutzen Bearbeitungswerkzeugen
an.
2. Zeigen Sie Fotos als Diashow mit
Hintergrundmusik und coolen Themen an.
3. Der Mediaplayer spielt Videos/Musik in
einem Fenster oder als Vollbild ab.
4. Fotos als Bilderalbum anzeigen.


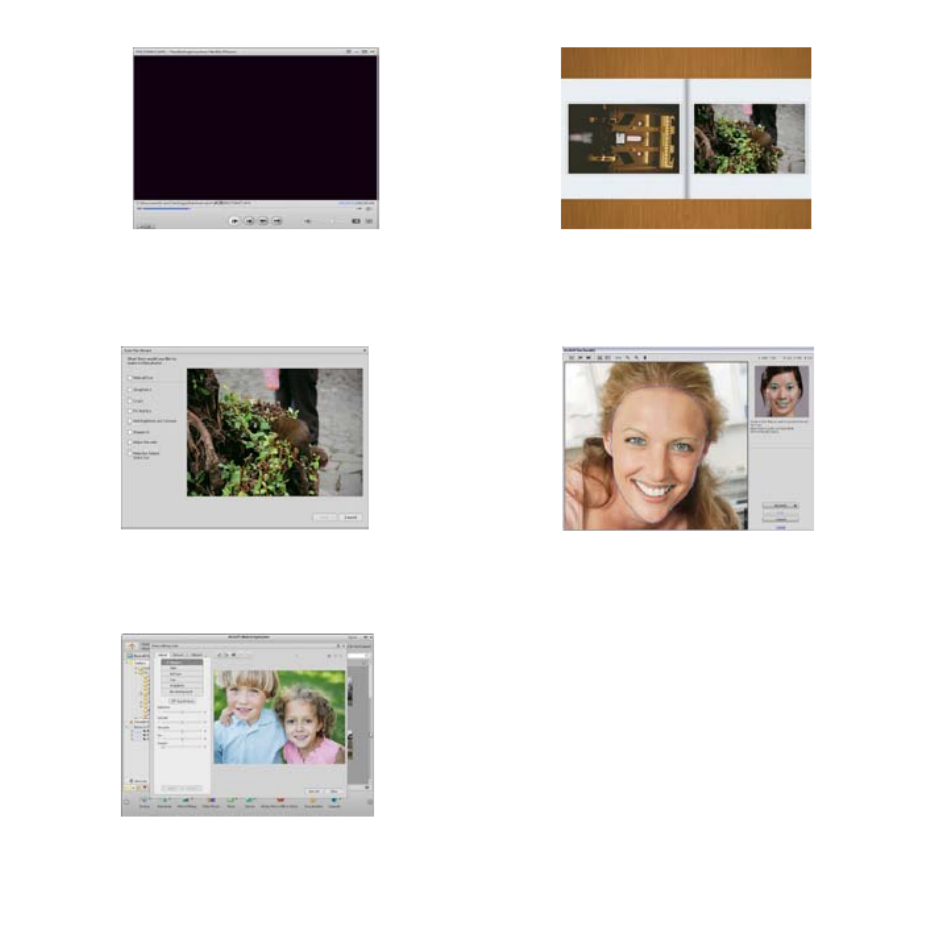
• Foto- und Videobearbeitung
1. Easy Fix – Einfache Berichtigung mit nur
wenigen Klicks von Mund oder Gesichtsfarbe.
2. Gesicht verschönern hilft bei der
Berichtigung von Augen, Mund und
Gesichtsfarbe.
3. Kreativität – Text und Clipart, Bilderrahmen und Ränder, Farbeffekte.
4. Videobearbeitung: Schnitt, dynamische Beleuchtung, Helligkeit, Kontrast und Farbsättigung
einstellen.

5. Diashow und Video als VCD oder DVD brennen.
6. Film erstellen: Fotos, Musik und Video mit coolen Themen kombinieren.
• Freigabe
1. Fotos auf einen digitalen Bilderrahmen exportieren.
2. Bilder auf Flickr und Facebook hochladen,
3. Videos auf YouTube hochladen.
4. Fotodrucke, Fotobuch, Tasse, Leinwand, T-Shirt, Puzzle und Mousepad direkt im Programm


bestellen.
5. Fotos, Musik und Videos an DLNA-kompatible Player wie Sony PS3, Fernseher, digitale
Bilderrahmen und Handys übertragen.
6. Fotos und Videos über E-Mail an Freunde und Familie senden.
7. Leichter Ausdruck zu Hause.
• Schutz
1. Mediendateien auf CD/DVD archivieren.
2. Sicherheitskopien und Wiederherstellung von/zu CD/DVD, externer Festplatte und Websites
(ab Frühjahr 2009).

11. Anhang:
Spezifikationen
Sensor Auflösung CMOS 1280x1024 Pixel, Sensorbereich 1/3 Zoll
Objektiv F 8.0, f = 7,1 mm, Winkel 44°, 2G2P
Beleuchtung 4 integrierte LEDs
Betriebssystem Microsoft Windows 98 SE / 2000 / ME / XP/ Vista
Vergrößerung 2,4-Zoll Bildschirm: 3,5x/35x 17-Zoll Bildschirm: 19x/90x
Weißabgleich Automatisch
Belichtung Automatisch
Kapazität Standbildmodus
VGA - 640x480 Pixel
1,3M - 1280x960 Pixel
TV-Ausgang NTSC/PAL
Videomodus
Video: (ohne Audio)
VGA 640x480 Pixel 30 fps
Kompression JPEG/MJPEG (AVI)
Digital-Zoom 4 x Digital-Zoom für Vorschau und Wiedergabe
Display 2,4-Zoll LCD
PC-Schnittstelle USB 1.1, MSD-Funktion
Speicher SD-Kartenleser (SD-Karte nicht mitgeliefert)
Spannungsversorgung 2 x 1,5 V AA-Alkalibatterien
Abmessun
g
en
(
LxBxH
)
54
,
5x73x96
,
5 mm
,
40x64
,
5x15 mm
(
Abstandhalter
)
Zubehör USB-Kabel, Bedienungsanleitung, CD-Software, Tv-Kabel, Abstandhalter
Gebündelte Software ArcSoft Media Impression™ 2.0


Dieses Produkt darf nicht mit dem Hausmüll entsorgt
werden. Geben Sie es an einer Sammelstelle für
Elektroaltgeräte oder bei Ihrem Fachhändler zum
Recycling ab.
Entsorgung


Microscope
User Manual


For customers in North and South America
For customers in USA
This device complies with Part 15 of the FCC rules. Operation is subject to the following two
conditions:
(1) This device may not cause harmful interference.
(2) This device must accept any interference received,
including interference that may cause undesired
operation.
For customers in Canada
This Class B digital apparatus meets all requirements of the Canadian Interference-Causing
Equipment Regulations.
For customers in Europe
“CE” mark indicates that this product complies with the European requirements
for safety, health, environment and customer protection. “CE” mark
microscopes are intended for sales in Europe.
1


Table of Contents Page
1.System Requirements ----------------------------------------------------------------------- 3
2.Package Contents ----------------------------------------------------------------------------- 3
3.About the Microscope------------------------------------------------------------------------ 4
4.Quick Start -------------------------------------------------------------------------------------- 5 -
•Install Batteries ------------------------------------------------------------------------------- 5
•Insert an SD Card --------------------------------------------------------------------------- 5 -
•Turn On the Microscope ------------------------------------------------------------------- 6 -
•Take a Picture -------------------------------------------------------------------------------- 6 -
•Use Digital Zoom ---------------------------------------------------------------------------- 6 -
•Use Optical Zoom --------------------------------------------------------------------------- 6 -
5.Display Information -------------------------------------------------------------------------- 7 --
6.Select Function----------------------------------------------------------------------------------8
•DV Mode--------------------------------------------------------------------------------------- 8 -
•Setup ------------------------------------------------------------------------------------------- 8 -
•Exposure Value------------------------------------------------------------------------------- 10-
•Take Continuous Pictures------------------------------------------------------------------ 10-
•DC mode -------------------------------------------------------------------------------------- 10--
7.Playback ------------------------------------------------------------------------------------------ 11-
•Single ------------------------------------------------------------------------------------------- 11-
•Slide Show ------------------------------------------------------------------------------------- 11
•Delete One ------------------------------------------------------------------------------------- 11
•Delete All --------------------------------------------------------------------------------------- 11
C•Copy to ard ---------------------------------------------------------------------------------- 12
•Exit----------------------------------------------------------------------------------------------- 12
8.Download Images to PC --------------------------------------------------------------------- 12
9.Use the Microscope as a PC Cam -------------------------------------------------------- 13
10.Arcsoft Media lmpression 2----------------------------------------------------------------- 13
11.Appendix-------------------------------------------------------------------------------------------20
2


1. System Requirements
• PC with Pentium 166 MHz or faster processor,
• An active USB (Universal Serial Bus) port on the computer.
• Windows 98SE/ME/2000/XP/7, CD ROM drive, color monitor, mouse and keyboard.
• Color printer for printing color pictures.
• For transferring still images via the Internet, the computer must have modem and communication
software for Internet connection.
2. Package Contents
All of the items shown below are included in the package.
• USB cable
• Neck strap
•TV Cable
•Wrist strap
• Microscope
• User Manual
• Installation CD
•View Case
3


3. About the Microscope
Refer to the following illustrations to familiarize yourself with the buttons and controls of this
microscope.
1. Optical Zooming switch
2. Power LED
3. POWER & ZOOM IN & MENU button
4. LCD monitor
5. FUNCTION (Right) button
6. PLAYBACK (left) button
7. USB Port
8. SD Card Socket
9. Strap Eyelet
10. SHUTTER/OK button
11. TV OUT port
12. View case (optional)
13. Battery Compartment Cover
14. Lens
15. Tripod /Screw Socket
16. LED lights
17. Magnification Revolving Switch
4


4. Quick Start
CAUTION
• Please install the microscope driver before connecting your microscope to a PC.
• The best way to transfer pictures to PC is by using the Mass Storage mode. Copy all
pictures to your computer in this mode.
• Install Batteries:
1. Rotate the screw .Take off the View case.
2. Slide and open the battery compartment cover.
3. Put in the batteries in the correct direction.+ and –
terminals has shown.
4. Slide and close the battery compartment cover.
• Insert an SD card:
1.At first, turn off the microscope.
2.Then, insert the card in the correct direction as shown.Push the card
into the slot and be locked.
3. To remove the card, push it in, then release it.When the card is
partially ejected, pull it out.
Note: If the “MEMORY FULL” warning message appears on the
LCD monitor, it means the SD card is full. Please transfer all the files to your computer and
delete the files on the card.Then you can use the card again.
Note: The microscope supports SD card only.
5


• Turn on the microscope:
1. Press the POWER button as shown.
2. The indicator (power LED) will light.
The welcome screen will show on the LCD monitor.
3. Long press the POWER button to shutdown the microscope.
• Take a Picture
1. Turn on the microscope.
2. icon will show on the upper left corner of the screen.
3. Move the microscope to aim at the target. The target will show on the screen.
4. Hold the microscope firmly and gently press the shutter button to take a picture.
Note: 1.User can press the ZOOM (Power) button for zooming out/in.
2. The image will be grainier as the image is digitally zoomed.
• Take a Video
1. Turn on the microscope.
2. Press the FUNCTION (Right) button, select the icon. Press OK button to confirm.
3. Press the OK button again to take a video. Press the OK button again to stop.
4. Press the right button to return the function menu.
• Use Digital Zoom
During taking a picture, user can press the POWER button to zoom in or zoom out. The Digital
Zoom provides 1X up to 4X magnification of your pictures.
•Use Optical ZOOM
User can slide Optical Zooming switch to adjust optical zoom. The optical zoom provides
6


3.5x and 35x magnification of the target. User can also screw the
Magnification Revolving Switch to make fine adjustment.
1. Slide the switch to “ ” station, keep 60mm distance
between the view case (optional)and the target. The user can
view the target in its original size.
2. Slide the switch in “3.5X” station and “35X” station, the target will
be magnified by 3.5X and 35X.
5. Display Information
7


6. Select Function
Press the Function button to enter function menu. You can see the icons on the
screen as shown.Press the Left or Right buttons to select function.
• DV Mode
Select the DV Mode button and press the OK button to confirm.
Press the OK button to take the video, and press it again to stop recording.
• SETUP
In SETUP, You can see the icons show on the screen.
1. Set time and date
Press the left or right button to select the date format from MM/DD/YYY, DD/MM/YYYY or
YYYY/MM/DD. Press the OK button to confirm. Then it will go to date and time setting. Press Left or
Right button to adjust the date and time. Press the OK button to confirm the setting and return to main
menu.
2. Set the picture size
Select the image quality setting to set a picture resolution. Press the left or right button to select the picture
size, and press OK button to confirm and return to main menu. The Options would be 2M (1600x1200
pixels), 1.3M (1280x 960 pixels), VGA (640x480 pixels).
3. Setting the video size
Select the video quality setting to set the resolution. Press the left or right button to select the
video size, and press OK button to confirm and return to main menu. The Options would be
VGA (640x480 pixels); QVGA (320x240 pixels).
8


4. USB Connection
Select USB Connection and press OK button to confirm.
PC Cam: Use your microscope as a PC camera (PC microscope).
Disk Driver: Use your microscope as a mass storage for transfering files to your computer.
5. anti-flicker Frequency
Set the anti-flicker frequency to 50Hz. (Please use 50Hz if using the microscope in Europe, Japan and Asia)
Set the anit-flicker frequency to 60 Hz. (Default setting. Please select if using the microscope in the United
States)
6. TV Output
Connect the scanner to the TV with TV cable.
NTSC :Setting the TV Output to NTSC
PAL: Setting the TV Output to PAL
7. Format
Select Format and press OK button to confirm. Select ‘√’ , press OK button to format. Select ‘X’ and press
OK button to abort.
Caution: Formatted files cannot be recovered.
8. Automatic Shutdown
Select Automatic Shutdown, press OK button to confirm.
5MIN: Set the microscope to power off automatically in approximately 5 minutes.
‘X’: Do not use this function.
9


9. Exit
Select Exit to exit SETUP and back to Function menu.
• Exposure value
Select EV mode and press OK button to confirm.
Exposure compensation helps you increase or decrease the EV to adjust the results. This feature
is applied to render the subject appropriately.
The adjustment unit is 1/3, within the range –2EV ~ +2EV
You can check the result of the compensation by viewing the image on the screen.
• Take Continuous Pictures
Select Take Continuous Pictures and press the OK button to confirm. The icon will appear on
the bottom left corner of the screen.
Move the microscope to aim at the target. The target will show on the screen.
Hold the microscope firmly and gently press the shutter button to take a picture.
Back to the function menu, select , press OK button to go back to Single-shot Mode
• DC MODE
Select the DC Mode button and press the OK button to confirm. Press the OK button to take a
picture.
7. Playback
Turn on the microscope. Press the Playback button you will see some
pictures on the screen. Then press the POWER button to playback
mode.
10


You will see the icons on the screen as shown.
Press the Left or Right buttons to select one function.
• Single
When you select the icon, press OK button to
confirm. You need press Left or Right button to review the previous or next picture. Press
the POWER button to go back to the Playback mode.
• Slide Show
Select the Slide Show Mode and press OK button to confirm. The microscope will
automatically play the photos continuously . Press any button to stop the slide show.
Press the POWER button to go back to the Playback mode.
• Delete One
Select , press OK button and confirm with ‘ ’ to delete current image; ‘X’ to abort. √
• Delete All
Select , press OK button to delete all the stored images from the internal memory or SD card.
Deleted files are impossible to be recovered.
• Copy to card
Select , press OK button to confirm. All files will be copied into the SD card.
• Exit
Select , press OK button to confirm. It will return to be ready to capture image.
11


8. Download Files to PC
• For Windows 98 SE/ME customers:
Connect the microscope to PC via USB cable. “USB Mass Storage driver” will appear on the
computer screen.
• For Windows 2000:
Double click on “My computer”, and then double click on Removable
Disk Drive. Check the folder in the drive.
9. Use the microscope as a PC-Cam
Note: Please install microscope drive before you connect it to your PC.
• Setup PC-Cam
1. Turn on the microscope and press the Function button to select SETUP. Press the OK button to
confirm. Press Right / Left button to select USB Connection . Select PC Cam. Press OK
button to confirm.
2. Connect the microscope to PC via USB cable.
3. You could use this PC-cam with other video software you prefer.
12
• For Windows Vista / : XP/ 7
Connect the microscope to PC via USB cable.A dialogue box with
options will appear as shown.You could select “Open folders to View
files” to open the folder.Or select “Take no action” and find Removable
disk drive in “My Computer” (“Computer” for Windows Vista)and check
the folder.


E.g. In Windows XP, Double click “my computer” (or “Computer” in Windows Vista), then click
the “standard camera”, you can live view in PC-Cam mode now.
10. ArcSoft Media Impression 2
ArcSoft Media Impression 2 enables users to easily, creatively, and productively manage their
multimedia with simple workflow and powerful tools. Organize your media easily and create simple
projects with editing tools. There are endless ways to present and share; worry-free media file
backup & restore.
Click “Media Impression 2”Æ
“Setup.exe”Æ
“choose language“Æ
“next” Æ
“Yes” Æ
“next”
Æ
“next” Æ “finish” to download it. Double click “Media Impression 2” icon on the desktop and you
will see a window as shown.
13


• Organize
Connect the Digital Microscope to PC via USB cable .Click Import, and then you can enter the
Organize groups.
1. Auto face tagging automatically finds all faces in photos, groups them, and then tags them
2. Auto scene tagging automatically analyzes content of photos then tags them with different
scenes
3. Auto rating automatically detects and rates poor-quality and high-quality photos Ratings &
tags compatible with Windows Vista (XMP support)
4. Search media files with multiple criteria combinations (such as combining folders, ratings,
tags, Share and time)
5. Geotag photos and view photos in the exact spot you took them in Google Earth
6. Quick Text Search: search by File Name, Folder Name, and Tag
7. Calendar Year/Month/Day View
14


• Present
Click the pictures / videos then you can view / editing / share your photo files.
1. A quick Photo Viewer to view photos in a window 2.View photos in a slideshow mode
or full screen mode with frequently used editing with background music and cool
tools themes
3. Light weight Media Player plays video/music View photos as a Photo Book 4.
in a window or full screen
15


• Photo and video editing
1. Easy Fix – Simply fixes in a few clicks 2.Face beautify helps beautify the eyes,
mouth, and skin of the face mouth, and skin of the face
3. Creativity – Text and clip art, frames and edges, color effects
4. Video Editing: trim, dynamic lighting, adjust brightness, contrast and saturation
16


5. Burn slideshow and video as a VCD or DVD
6. Make Movie: combine photos, music, and video with cool themes
17


• Share
1.Export photos to a digital photo frame
2.Upload pictures to Flickr and Facebook
3.Upload video to YouTube
4.Order Photo Prints, Photo Book, Mug, Canvas, T-shirt, Puzzle, and Mouse Pad right in
application
5.Stream photos, music, and videos to DLNA compatible players such as Sony PS3, TV, DPF, and
mobile phones etc
6.Send photos & videos to friends and family via email
7.Make home printing a breeze
18


• Protect
1.Archive media files to CD/DVD
2.Back Up & Restore from/to CD/DVD, external hard drive and online websites (available in early 09)
19


20
A
ppendix:
Specifications
Sensor Resolution CMOS 1280 x 1024 Pixels, Sensor Area 1 / 3"
Lens Specification F8.0, f = 7. mm, View Angle °, 2G2P 45 55
Illumination Built-in LED x 4 (TBD)
O / S Microsoft Windows 98 SE / 2000 / ME / XP/ Vista / Win 7
Magnification 2.4” Screen: 3.5x / 35x 17” Screen: 19x /190x
White Balance Auto
Exposure Control Automatic,
Still image size
VGA---640 x 480 Pixels
1.3M ---1280 x 960 Pixels
TV OUT
NTSC/PAL
Video Mode Video: ( w/o Audio function)
VGA 640 x 480 pixels 30 fps
Compression JPEG / MJPEG (AVI)
Digital zoom 4 x Digital Zoom for Preview & Playback (TBD)
Display 2.4” TFT
PC Interface USB 1.1, MSD Function
Storage Type SD Card Slot (SD card not included)
Power 2 x “AA” 1.5V, Alkaline
Dimension (LxWxH) 54.5 x 73 x 96.5 mm , 40x 64.5x15 mm (view case )
Accessories USB cable User Manual CD software , , ,TV cable,Hand Strap,View Case
Bundled Software ArcSoft Media Impression 2


21
WEEE Directive & Product Disposal
At the end of its serviceable life, this product should not be treated as
household or general waste. It should be handed over to the applicable
collection point for the recycling of electrical and electronic equipment,
or returned to the supplier for disposal.


Microscopio
Manual del Usuario


Para clientes de Norte América y Sudamérica
Para clientes de EE.UU.
Este dispositivo cumple con la Parte 15 de las normas de la FCC. La operación está sujeta a las
siguientes condiciones:
(1) Este dispositivo no podrá causar interferencias
perjudiciales.
(2) Este dispositivo debe aceptar cualquier
interferencia recibida, incluyendo interferencias que
pueda provocar un funcionamiento no deseado.
Para clientes de Canadá
Este aparato digital Clase B cumple todos los requisitos de las regulaciones canadienses sobre
equipos que causan interferencias.
Para clientes de Europa
La marca "CE" indica que este producto cumple con los requisitos europeos
de seguridad, salud, medio ambiente y protección del cliente. Los
microscopios con la marca ”CE" están destinados para su venta en Europa.


Tabla de Contenidos Página
PARA CLIENTES DE EUROPA ------------------------------------------------------------------------------1
1. REQUISITOS DEL SISTEMA------------------------------------------------------------------------------3
2. CONTENIDOS--------------------------------------------------------------------------------------------------3
3. SOBRE EL MICROSCOPIO--------------------------------------------------------------------------------4
4. INICIO RÁPIDO------------------------------------------------------------------------------------------------5
• Instalar las baterías ----------------------------------------------------------------------------------------5
• Insertar una tarjeta SD ------------------------------------------------------------------------------------5
• Encender el Microscopio:---------------------------------------------------------------------------------6
• Hacer una fotografía ---------------------------------------------------------------------------------------6
• Hacer un video ----------------------------------------------------------------------------------------------6
• Uso del Zoom Digital---------------------------------------------------------------------------------------7
• Uso del ZOOM Óptico -------------------------------------------------------------------------------------7
5. MUESTREO DE INFORMACIÓN-------------------------------------------------------------------------8
6. FUNCIÓN DE SELECCIÓN ------------------------------------------------------------------------------10
• Modo DV ---------------------------------------------------------------------------------------------------10
• SETUP (configuración) ---------------------------------------------------------------------------------10
• Valor de Exposición -------------------------------------------------------------------------------------13
• Hacer Fotos de Forma Continua ---------------------------------------------------------------------13
• MODO CC -------------------------------------------------------------------------------------------------13
7. REPRODUCCIÓN-------------------------------------------------------------------------------------------15
8. DESCARGA DE ARCHIVOS A PC---------------------------------------------------------------------17
• Para clientes de Windows 98 SE/ME ---------------------------------------------------------------17
• Para Windows Vista / XP -------------------------------------------------------------------------------17
• Para Windows 2000--------------------------------------------------------------------------------------17
9. USO DEL MICROSCOPIO COMO PC-CAM --------------------------------------------------------17
• Configuración de la PC-Cam --------------------------------------------------------------------------18
10. ARCSOFT MEDIA IMPRESSION 2-------------------------------------------------------------------18
• Organizar ---------------------------------------------------------------------------------------------------19
• Compartir ---------------------------------------------------------------------------------------------------23
• Proteger -----------------------------------------------------------------------------------------------------24
11. APÉNDICE:--------------------------------------------------------------------------------------------------26


1. Requisitos del sistema
• PC con procesador Pentium 166 MHz o más rápido,
• Un puerto USB (universal serial bus) activo en su computadora.
• Windows 98SE/ME/2000/XP/Vista/7, unidad de CD ROM, monitor en color, ratón y teclado.
• Impresora a color para imprimir fotografías en color.
• Para la transferencia de imágenes fijas a través de Internet, el equipo debe tener módem y
software de comunicación para conexión a Internet.
2. Contenidos
Asegúrese de que todos los elementos que figuran a continuación se incluyen con su
microscopio.
• Cable USB
• Correa de cuello
• Cable de TV
• Correa de muñeca
• Microscopio
• Manual del usuario
• CD de instalación
• Cubierta visor


3. Sobre el Microscopio
Consulte las ilustraciones siguientes para familiarizarse con los botones y controles de este
microscopio.
1. Interruptor de zoom óptico
2. LED de alimentación
3. Botón de POWER & ZOOM IN &
MENU (alimentación, aumento, menú)
4. Monitor LCD
5. Botón de FUNCTION/FUNCIÓN
(derecho)
6. Botón de
PLAYBACK/REPRODUCCIÓN
(izquierdo)
7. Puerto USB
8. Ranura de Tarjeta SD
9. Enganche para correa
10. Botón de OBTURADOR / Aceptar
11. Puerto de SALIDA DE TV
12. Cubierta visor
13. Compartimiento de pilas
14. Lente
15. Trípode / Zócalo
16. Luces LED
17. Interruptor Rotatorio de Ampliación


4. Inicio Rápido
PRECAUCIÓN
• Instale el controlador antes de conectar su microscopio a su PC.
• La mejor manera de transferir imágenes a su PC es utilizando el modo de almacenamiento
masivo. Copie todas las imágenes a su computadora de este modo.
tornillo
• Instalar las baterías
1. Gire el tornillo. Quite la cubierta visor.
2. Deslice y abra la tapa del compartimiento.
3. Coloque las baterías en la dirección correcta. Terminales + y - como se
muestra.
4. Deslice y cierre la tapa del compartimiento.
• Insertar una tarjeta SD
1. Apague el microscopio.
2. Inserte la tarjeta en la dirección correcta como se muestra. Empuje
la tarjeta hacia la ranura y se bloqueará.
3. Para retirar la tarjeta, empújela, y luego suéltela. Cuando la tarjeta
se expulse parcialmente, tire de ella.
Nota: Si el mensaje de advertencia "MEMORIA COMPLETA” aparece
en el monitor LCD, significa que la tarjeta SD está llena. Por favor, transfiera todos los archivos a
su computadora y elimine los archivos en la tarjeta. A continuación podrá utilizar la tarjeta otra vez.
Nota: El microscopio soporta tarjetas SD solamente.
5

• Encender el Microscopio:
1. Pulse el botón de POWER como se muestra.
2. El indicador (LED) se encenderá.
La pantalla de bienvenida aparecerá en el monitor LCD.
3. Mantenga presionado el botón POWER para apagar el microscopio.
• Hacer una fotografía
1. Encienda el microscopio.
2. El icono aparecerá en la esquina superior izquierda de la pantalla.
3. Mueva el microscopio para apuntar al objetivo. El objetivo se mostrará en la pantalla.
4. Sostenga firmemente el microscopio y presione suavemente el botón del obturador para hacer
una foto.
Nota: 1.El usuario podrá pulsar el botón de ZOOM (Power) para hacer un zoom out / in
(alejamiento/aumento).
2. La imagen será como más granulada con zoom digital.
• Hacer un video
1. Encienda el microscopio.
2. Pulse el botón FUNCTION (derecho), seleccione el icono . Pulse el botón de Aceptar para


confirmar.
3. Pulse el botón de Aceptar de nuevo para tomar un video. Pulse el botón de Aceptar de nuevo
para detener.
4. Pulse el botón derecho para volver al menú de funciones.
• Uso del Zoom Digital
Mientras haga una foto, el usuario podrá pulsar el botón de POWER para aumentar o alejar la
imagen. El Zoom Digital proporciona una magnificación de las imágenes de 1 a 4 aumentos.
• Uso del ZOOM Óptico
El usuario podrá deslizar el interruptor óptico zoom para ajustar el zoom óptico. El zoom
óptico 35x proporciona una magnificación de 3,5 y 35 respecto al objetivo. El usuario también
podrá atornillar el Interruptor rotatorio de magnificación para hacer ajustes
finos.
1. Deslice el interruptor a la posición " " estación; mantenga la
distancia de 60 mm entre la cubierta de visor (opcional) y el objetivo. El
usuario podrá ver el objetivo en su tamaño original.
2. Deslice el interruptor en la estación "3,5X" y la estación "35X”; el
objetivo se verá magnificado hasta 3,5 y 35.


5. Muestreo de Información
Capture mode indicator Indicador del modo de captura
Zoom indicator Indicador de zoom
Single picture icon Icono de imagen individual
Battery capacity Capacidad de la batería
Memory capacity (Remaining number of
storable pictures)
Capacidad de memoria (número restante
de imágenes almacenables)
SD card indicator Indicador de tarjeta SD
Picture Size Tamaño de la imagen
Date Fecha


Video mode indicator Indicador del modo de video
Video size Tamaño del video
Battery capacity Capacidad de la batería
Memory capacity (Remaining record time of
storable audio)
Capacidad de memoria (tiempo restante de
grabación de audio almacenable)
SD Card Tarjeta SD


6. Función de Selección
Pulse el botón de Function para entrar en el menú de
funciones. Usted podrá ver los iconos en la pantalla como se
muestra. Presione el botón izquierdo o derecho para seleccionar la
función.
• Modo DV
Seleccione el botón de modo DV y pulse el botón de Aceptar para confirmar.
Pulse el botón de Aceptar para tomar el video y pulse de nuevo para detener la grabación.
• SETUP (configuración)
En SETUP, podrá ver los iconos que se muestran en pantalla.
1. Configurar fecha y hora
Pulse el botón izquierdo o derecho para seleccionar el formato de fecha de MM / DD / AAAA, DD /
MM / AAAA o AAAA / MM / DD. Presione el botón de Aceptar para confirmar. Luego pasará al
ajuste de la fecha y de la hora. Pulse el botón Izquierdo o Derecho para ajustar la fecha y la
hora. Pulse el botón de Aceptar para confirmar el ajuste y volver al menú principal.


2. Configurar el tamaño de la imagen
Seleccione la calidad de la imagen para establecer una resolución de imagen. Pulse el botón
izquierdo o derecho para seleccionar el tamaño de la imagen, y pulse el botón de Aceptar para
confirmar y volver al menú principal. Las opciones son 2M (1600x1200 píxeles); 1,3 millones (1280
x 960 píxeles); y VGA (640x480 píxeles).
3. Configurar el tamaño del video
Seleccione la opción de calidad de video para establecer la resolución. Pulse el botón izquierdo o
derecho para seleccionar el tamaño del video, y pulse el botón de Aceptar para confirmar y volver
al menú principal. Las opciones serían VGA (640x480 píxeles) y QVGA (320x240 píxeles).
4. Conexión USB
Selecciones Conexión a USB y pulse el botón de Aceptar para confirmar.
PC Cam: Use su microscopio como una cámara para PC (PC microscopio).
Controlador de Disco: Use su microscopio como un medio de almacenamiento masivo para
transferir archivos a su computadora.
5. Frecuencia anti-parpadeo
Establezca la frecuencia de anti-parpadeo a 50Hz. (Por favor, use 50Hz si se utiliza el microscopio
en Europa, Japón y Asia)


Establezca la frecuencia de anti-parpadeo a 60 Hz. (Ajuste por defecto. Por favor, seleccione si se
utiliza el microscopio en los Estados Unidos)
6. Salida TV
Conecte el escáner a la TV con el cable de TV.
NTSC: Ajuste de la salida de TV a NTSC
PAL: Ajuste de la salida de TV a PAL
7. Formateo
Seleccione Formato y pulse el botón de Aceptar para confirmar. Seleccione. ‘√’, y pulse el botón de
Aceptar para formatear. Seleccione 'X' y pulse el botón de Aceptar para abortar.
Precaución: los archivos formateados no se podrán recuperar.
8. Apagado Automático
Seleccione Apagado automático; presione el botón de Aceptar para confirmar.
5MIN: Configura el microscopio para que se apague automáticamente en aproximadamente 5
minutos.
9. Salir
Seleccione Salir para salir de SETUP y volver al menú de funciones.

• Valor de Exposición
Seleccione el modo EV y pulse el botón de Aceptar para confirmar.
La compensación de exposición le ayuda a aumentar o disminuir el EV para ajustar los
resultados. Esta característica se aplica para renderizar al sujeto adecuadamente.
La unidad de ajuste es 1 / 3, dentro del rango-2EV +2 EV ~
Puede comprobar el resultado de la compensación viendo la imagen en la pantalla.
• Hacer Fotos de Forma Continua
Seleccione Hacer Fotos de Forma Continua y pulse el botón de Aceptar para confirmar. El icono
aparecerá en la esquina inferior izquierda de la pantalla.
Mueva el microscopio para apuntar al objetivo. El objetivo se mostrará en la pantalla.
Sostenga firmemente el microscopio y presione suavemente el botón del obturador para hacer una
foto.
Vuelva al menú de funciones, seleccione y pulse el botón de Aceptar para volver al modo de
un solo disparo.
• MODO CC


Seleccione el botón de modo CC y pulse el botón de Aceptar para confirmar. Pulse el botón de
Aceptar para hacer una foto.


7. Reproducción
Encienda el microscopio. Pulse el botón de reproducción (PLAYBACK) y podrá ver algunas fotos
en pantalla. A continuación, pulse el botón POWER para el modo
de reproducción.
Usted verá los iconos en pantalla como se muestran.
Pulse el botón Izquierdo o Derecho para seleccionar una función.
• Individuales
Cuando se seleccione el icono , presione el botón de Aceptar para confirmar. Es necesario
presionar el botón Izquierdo o Derecho para revisar la imagen anterior o siguiente. Pulse el botón
POWER para volver al modo de reproducción.
• Diapositivas
Seleccione el modo de diapositivas y pulse el botón de Aceptar para confirmar. El microscopio
reproducirá automáticamente las fotos de forma continua. Pulse cualquier botón para detener la
presentación.


• Borrar Una
Seleccione , presione el botón de Aceptar y confirme con "√" para eliminar la imagen actual,
'X' para abortar.
• Borrar Todas
Seleccione , presione el botón de Aceptar para borrar todas las imágenes almacenadas de la
memoria interna o la tarjeta SD. Los archivos borrados son imposibles de recuperar.
• Copiar a Tarjeta
Seleccione , presione el botón de Aceptar para confirmar. Todos los archivos serán copiados a
la tarjeta SD.
• Salida
Seleccione , presione el botón de Aceptar para confirmar. Regresará al modo de listo para
capturar imágenes.


8. Descarga de Archivos a PC
• Para clientes de Windows 98 SE/ME
Conecte el microscopio para PC mediante un cable USB. La frase
“Controlador de almacenamiento masivo USB" aparecerá en la
pantalla de la computadora.
• Para Windows 7/Vista / XP
Conecte el microscopio para PC mediante un cable USB. Aparecerá
un cuadro de diálogo con opciones como se muestra. Podrá seleccionar "Abrir las carpetas para
archivos de Vista" para abrir la carpeta. O seleccione "No realizar ninguna acción" y encontrará la
unidad de disco extraíble en "Mi PC" ("PC" para Windows Vista); y compruebe la carpeta.
• Para Windows 2000
Haga doble clic en "Mi PC", ya continuación, haga doble clic en Comprobar Unidad de Disco
Extraíble
Compruebe la carpeta en la unidad.
9. Uso del microscopio como PC-Cam
Nota: Por favor, instale la unidad del microscopio antes de conectarlo a su PC.


• Configuración de la PC-Cam
1. Encienda el microscopio y pulse el botón de Function para seleccionar Configuración
(SETUP). Pulse el botón de Aceptar para confirmar. Pulse el botón Derecho / Izquierdo para
seleccionar la conexión USB . Seleccione PC Cam. Pulse el botón de Aceptar para confirmar.
2. Conecte el microscopio para PC mediante un cable USB.
3. Usted podría utilizar su PC Cam con el software de video que prefiera.
Por ejemplo, en Windows XP, haga doble clic en "Mi PC" (o "PC" en Windows Vista), a
continuación, haga clic en el la “cámara” estándar; usted podrá ver el modo PC-Cam en directo.
10. ArcSoft Media Impression 2
Permite a los usuarios fácilmente, de manera creativa, productiva y gestionar su flujo de trabajo
multimedia con simples y poderosas herramientas. Organice sus medios de un modo fácil y
sencillo y cree proyectos con herramientas de edición. Hay infinitas maneras de presentar y
compartir; archivado y restauración de copias de seguridad sin problemas.


Haga clic sobre “Media Impression 2” “Setup.exe” “elegir idioma“ “siguiente” “Sí”
“siguiente” “siguiente” “finalizar” para descargarlo. Haga un doble clic sobre el icono de
“Media Impression 2” de su Escritorio y verá la ventana a continuación.
• Organizar
Conecte el microscopio digital a su PC mediante un cable USB. Haga clic en Importar y, a
continuación podrá entrar en los grupos de Organizar.
1. El etiquetado automático de caras encuentra automáticamente todas las caras en las fotos, los
grupos de ellos, y luego los etiqueta

2. El etiquetado automático de caras analiza automáticamente el contenido de las fotos y luego las
etiqueta con diferentes escenas
3. La auto evaluación detecta automáticamente y evalúa la mala y la alta calidad de las fotos. Las
evaluaciones y el etiquetado son compatibles con Windows Vista (soporte XMP)
4. Busque archivos media con múltiples combinaciones de criterios (como la combinación de
carpetas, evaluaciones, etiquetas, Compartir y hora)
5. Etiquete sus fotos de forma geográfica y vea las fotos en el sitio exacto en que las tomó a través
de Google Earth
6. Haga una búsqueda por texto rápido: búsqueda por nombre de archivo, nombres de carpetas y
etiquetas
7. Año Calendario / Mes / Día Ver

• Presentar
Haga clic en las imágenes / videos; le permitirá ver/ editar / compartir sus archivos de fotos.
1. Un rápido Visor de Fotos para ver fotos en
una ventana o pantalla completa con la
edición de las herramientas utilizadas con
frecuencia
2. Ver fotos en un modo de diapositivas con
música de fondo y temas frescos
3. Media Player de peso ligero reproduce
videos / música en una ventana o pantalla
completa
4. Ver fotos como un álbum de fotos

• Editar fotos y videos
1. Easy Fix – Arregle de forma simple con unos
pocos clics la boca y la piel de la cara
2. Belleza facial que ayuda a embellecer los
ojos, la boca y la piel de la cara
3. Creatividad - Texto e imágenes prediseñadas, marcos y bordes, efectos de color
4. Edición de video:, iluminación dinámica recortar, ajustar el brillo, contraste y saturación


5. Grabar presentación de diapositivas y de video como un VCD o DVD
6. Crear película: combinar fotos, música y video con temas interesantes
• Compartir
1. Exportar fotos a un marco de fotos digital


2. Subir fotos a Flickr y Facebook
3. Subir videos a YouTube
4. Encargar: Fotografías, Libros de Fotos, Tazones con fotos, Lienzos, Camisetas, Puzzles, y
almohadillas para el ratón directamente desde la aplicación
5. Modular fotos, música y videos a reproductores compatibles con DLNA, tales como Sony PS3,
TV, DPF, y los teléfonos móviles, etc
6. Enviar fotos y videos a sus amigos y familiares a través del correo electrónico
7. Haga de su impresión en casa algo extraordinario
• Proteger
1. Guarde los archivos de medios en un CD / DVD


2. Copia de seguridad y restauración desde / a un CD / DVD, disco duro externo y sitios web en
línea (disponible a principios de 09)


Al final de su vida útil, este producto no debe ser tratado
como residuos domésticos o generales. Debe ser
entregado a un punto de recogida para el reciclaje de
aparatos eléctricos y electrónicos, o devuelto al proveedor
para su eliminación.
Dimensiones (LxAnxAl) 54,5 x 73 x 96,5 mm, 40x 64,5x15 mm (cubierta del visor)
Accesorios cable USB, manual de usuario, CD del software, Cable de TV,
Cubierta visor
Software incluido ArcSoft Media Impression ™ 2.0
Directiva WEEE y eliminación de productos

Microscoop
Gebruikershandleiding


Voor gebruikers in Noord- en Zuid-Amerika
Voor gebruikers in de VS
Dit apparaat voldoet aan Deel 15 van de FCC regels. De functionering is onderworpen aan de
volgende twee voorwaarden:
(1) Dit apparaat mag geen gevaarlijke interferentie
veroorzaken.
(2) Dit apparaat moet elke ontvangen interferentie,
inclusief de interferentie die een ongewenste
functionering kan veroorzaken, accepteren.
Voor gebruikers in Canada
Dit Klasse B digitale apparaat voldoet aan alle vereisten van de Canadese Wetgeving voor
Interferentieveroorzakende Apparatuur.
Voor gebruikers in Europa
De “CE-markering” geeft aan dat het product voldoet aan de Europese
vereisten voor veiligheid, gezondheid, milieu en bescherming van cliënten. De
microscopen met een “CE-markering” mogen in Europa worden verkocht.
1


Inhoudsopgave Pagina
VOOR GEBRUIKERS IN EUROPA -------------------------------------------------------------------------1
1. SYSTEEMVEREISTEN --------------------------------------------------------------------------------------3
2. INHOUD VAN DE VERPAKKING -------------------------------------------------------------------------3
3. OVER DE MICROSCOOP ----------------------------------------------------------------------------------4
4. OPSTARTEN ---------------------------------------------------------------------------------------------------5
• De Batterijen installeren-----------------------------------------------------------------------------------5
• Een SD-kaart installeren ----------------------------------------------------------------------------------5
• De microscoop inschakelen: -----------------------------------------------------------------------------6
• Een Foto maken --------------------------------------------------------------------------------------------6
• Een Filmpje maken -----------------------------------------------------------------------------------------6
• De Digitale Zoom gebruiken -----------------------------------------------------------------------------6
• De OPTISCHE ZOOM gebruiken ----------------------------------------------------------------------7
5. DISPLAY INFORMATIE -------------------------------------------------------------------------------------7
6. FUNCTIE KIEZEN---------------------------------------------------------------------------------------------9
-• DV -------------------------------------------------------------------------------------------------------------9
• SET-UP -------------------------------------------------------------------------------------------------------9
-• Belichting --------------------------------------------------------------------------------------------------12
• Doorlopend Foto’s Maken -----------------------------------------------------------------------------12
-• DC -----------------------------------------------------------------------------------------------------------13
7. WEERGAVE --------------------------------------------------------------------------------------------------13
8. FILES NAAR PC DOWNLOADEN ---------------------------------------------------------------------15
• Voor Windows 98 SE/ME gebruiker -----------------------------------------------------------------15
• Voor Windows Vista / XP -------------------------------------------------------------------------------15
• Voor Windows 2000 --------------------------------------------------------------------------------------15
9. DE MICROSCOOP ALS EEN PC-CAMERA GEBRUIKEN--------------------------------------15
• PC-Camera Set-up ---------------------------------------------------------------------------------------15
10. ARCSOFT MEDIA IMPRESSION 2-------------------------------------------------------------------16
• Organiseren ------------------------------------------------------------------------------------------------17
• Delen ---------------------------------------------------------------------------------------------------------20
• Beschermen------------------------------------------------------------------------------------------------21
11. BIJLAGE: ----------------------------------------------------------------------------------------------------22
2

1. Systeemvereisten
• PC met Pentium 166 MHz of snellere processor.
• Een computer met een actieve USB-poort (Universele Seriële Bus).
• Windows 98SE/ME/2000/XP/Vista/7, CD ROM drive, kleurenscherm, mouse en keyboard.
• Kleurenprinter voor het afdrukken van gekleurde afbeeldingen.
• Voor het verzenden via Internet van stilstaande beelden moet uw computer uitgerust zijn met een
modem en communicatiesoftware voor een Internetverbinding.
2. Inhoud van de Verpakking
Controleer of alle aangegeven voorwerpen in de doos van uw microscoop aanwezig zijn.
• USB-kabel
• Halsriem
• TV-kabel
• Polsbandje
• Microscoop
• Gebruikershandleiding
• Installatie CD
•View Case
3


3. Over de Microscoop
Raadpleeg de volgende afbeelding om met de verschillende knoppen en bedieningen van de
microscoop bekend te raken.
1. Optische Zoomschakelaar
2. LED voeding
3. Knop AAN & INZOOMEN & MENU
4. LCD monitor
5. FUNCTIEKNOP (Rechts)
6. WEERGAVEKNOP (links)
7. USB Poort
8. SD-kaart Sleuf
9. Riemoogje
10. SLUITER/OK knop
11. TV UIT poort
12. View case (optie)
13. Klepje Batterijhouder
14. Lens
15. Statief/Schroefopening
16. LED lampjes
17. Versterking Draaiknop
4


4. Opstarten
VOORZICHTIG
• Installeer de driver van de microscoop alvorens u de microscoop op uw PC aansluit.
• De beste manier om afbeeldingen naar de PC te versturen is door gebruik te maken van de
Massageheugen functie. Kopieer op deze manier alle afbeelding naar uw computer.
Schroef
• De Batterijen installeren
1. Draai aan de schroef. Verwijder de View case.
2. Schuif het klepje van de batterijenhouder.
3. Breng de batterijen aan volgens de + en – pool, zie de
afbeelding.
4. Schuif het klepje weer op de batterijenhouder.
• Een SD-kaart installeren
1. Schakel de microscoop uit.
2. Breng de kaart aan in de richting die aangegeven is. Duw de kaart
de sleuf in tot hij vastzit.
3. Druk op de kaart en ontgrendel hem om de kaart te kunnen
verwijderen. Haal de kaart uit de sleuf als hij gedeeltelijk uit de sleuf
steekt.
Opmerking: Uw SD-kaart is vol als op de LCD monitor het bericht
“GEHEUGEN VOL” wordt weergegeven. Zend alle files naar uw computer en wis de files
van uw kaart. Nu kunt u uw kaart weer gebruiken.
Opmerking: De microscoop ondersteunt uitsluitend SD-kaarten.
5


• De microscoop inschakelen:
1. Druk op de aangegeven AAN knop.
2. De indicator (LED voeding) gaat branden.
Een welkomscherm wordt op de LCD monitor weergegeven:
3. Houd de AAN knop lang ingedrukt om de microscoop uit te
schakelen.
• Een Foto maken
1. Schakel de microscoop in.
2. Het symbool wordt aan de bovenaan in de linkerhoek van het scherm weergegeven.
3. Beweeg de microscoop tot u het apparaat op het voorwerp gericht heeft. Het voorwerp wordt op
het scherm weergegeven.
4. Houd de microscoop stevig vast en druk voorzichtig op de sluiterknop om een foto te maken.
Opmerking: 1. De gebruiker kan op de ZOOM (AAN) knop drukken om in/uit te zoomen.
2. De afbeelding zal minder scherp zijn aangezien het apparaat over een digitale zoom
beschikt.
• Een Filmpje maken
1. Schakel de microscoop in.
2. Druk op de FUNCTIEKNOP (Rechts) en kies voor het symbool. Druk ter bevestiging op
de OK knop.
3. Druk vervolgens wederom op de OK knop om het filmpje te maken. Druk nogmaals op de OK
knop om het filmen te onderbreken.
4. Druk op de rechterknop om naar het functiemenu terug te keren.
• De Digitale Zoom gebruiken
De gebruiker kan tijdens het maken van een foto op de AAN knop drukken om in of uit te zoomen.
De Digitale Zoom kan uw foto’s 1X tot 4X vergroten.
6


• De OPTISCHE ZOOM gebruiken
De gebruiker kan met behulp van de Optische Zoomschakelaar de
optische zoom afstellen. De optische zoom kan het voorwerp 3,5x en 35X
vergroten. De gebruiker kan tevens aan de Vergroting Draaiknop draaien
om de vergroting beter af te stellen.
1. Schuif de schakelaar op “ ” en houd de view case (optie) op
een afstand van 60mm van het voorwerp. De gebruiker kan het voorwerp in
de oorspronkelijke afmeting bestuderen.
2. Schuif de schakelaar op “3.5X” en op “35X” om het voorwerp
3,5x en 35x te vergroten.
5. Display informatie
Capture mode indicator Foto maken indicator
7


Zoom indicator Zoom indicator
Single picture icon Symbool enkele afbeelding
Battery capacity Batterijcapaciteit
Memory capacity (Remaining number of
storable pictures)
Geheugencapaciteit (Resterend aantal
foto’s dat opgeslagen kan worden)
SD card indicator SD-kaart indicator
Picture Size Fotoformaat
Date Datum
Video mode indicator Video indicator
Video size Videoformaat
Battery capacity Batterijcapaciteit
Memory capacity (Remaining record time of
storable audio)
Geheugencapaciteit (Resterende audio
opnametijd die opgeslagen kan worden)
SD Card SD-kaart
8

6. Functie Kiezen
Druk op de Functieknop om het functiemenu te betreden. De hiernaast
aangegeven symbolen worden weergegeven. Maak gebruik van de
Linker- of Rechterknop om de functie te kiezen.
• DV
Kies voor de DV Wijze en druk op OK om uw keuze te bevestigen.
Druk vervolgens op de OK knop om het filmen op te starten. Druk nogmaals
op de OK knop om het filmen te onderbreken.
• SET-UP
In SET-UP worden de aangegeven symbolen op het scherm weergegeven.
1. De datum en de tijd instellen
Druk op de rechterknop om te kiezen voor het formaat MM/DD/JJJJ, DD/MM/JJJJ of JJJJ/MM/DD.
Druk ter bevestiging op de OK knop. De datum- en tijdinstelling wordt ingevoerd. Druk op de
Linker- of Rechterknop om de datum en de tijd bij te werken. Druk vervolgens op de OK knop om
de instelling te bevestigen en naar het hoofdmenu terug te keren.
9


2. Het fotoformaat instellen
Kies de afbeelding kwaliteitinstelling om de resolutie van de foto in te stellen. Druk met de linker- of
rechterknop tot u het gewenste formaat ingesteld heeft en druk vervolgens op de OK knop om uw
instelling te bevestigen en naar het hoofdmenu terug te keren. U heeft de keuze uit 2M (1600x1200
pixels), 1.3M (1280x 960 pixels), VGA (640x480 pixels).
3. Het videoformaat instellen
Kies de video kwaliteitinstelling om de resolutie van de opname in te stellen. Druk met de linker- of
rechterknop tot u het gewenste formaat ingesteld heeft en druk vervolgens op de OK knop om uw
instelling te bevestigen en naar het hoofdmenu terug te keren. U heeft de keuze uit VGA (640x480
pixels); QVGA (320x240 pixels).
4. USB-aansluiting
Kies voor de USB-aansluiting en druk ter bevestiging op de OK knop.
PC Camera: Gebruik uw microscoop als een PC camera (PC microscoop).
Disk Driver: Gebruik uw microscoop als een massageheugen voor het verzenden van files naar uw
computer.
5. Frequentie ter voorkoming van Beeldflikkering
Stel de frequentie ter voorkoming van beeldflikkering in op 50/60Hz. (Gelieve op 50Hz in te stellen
10


• Belichting
Kies voor EV wijze en druk ter bevestiging op de OK knop.
De compensatie van de belichting maakt het mogelijk om de belichting toe of af te laten nemen en
de resultaten bij te werken. Deze functies is aanwezig om het voorwerp zo goed mogelijk te
kunnen weergeven.
U kunt de belichting met 1/3 per stap in een range van –2EV ~ +2EV afstellen.
Controleer het resultaat van de compensatie door de afbeelding op het display weer te laten
geven.
• Doorlopend Foto’s Maken
Kies voor Doorlopend Foto’s Maken en druk ter bevestiging op de OK knop. Het symbool
wordt onderaan in de linkerhoek van het display weergegeven.
Beweeg de microscoop tot u het apparaat op het voorwerp gericht heeft. Het voorwerp wordt op
het scherm weergegeven.
Houd de microscoop stevig vast en druk voorzichtig op de sluiterknop om een foto te maken.
Ga terug naar het functiemenu, kies voor en druk op de OK knop om naar de Enkele Foto
Wijze terug te keren.
12

• DC
Kies voor de DC Wijze en druk op OK om uw keuze te bevestigen. Druk op de OK knop om een
foto te maken.
7. Weergave
Schakel de microscoop in. Druk op de Weergave knop. Een aantal
foto’s worden op het display weergegeven. Druk vervolgens op de
AAN knop om de weergave op te starten.
De aangegeven symbolen worden op het display weergegeven.
Maak gebruik van de Linker- of Rechterknop om een van de functies te kiezen.
• Enkelvoudig
Kies voor het symbool en druk ter bevestiging op de OK knop. Druk op de Linker- of
Rechterknop om de vorige of volgende foto te laten weergeven. Druk vervolgens op de AAN knop
om naar de Weergave terug te keren.
• Diashow
13

Kies voor Diashow en druk ter bevestiging op de OK knop. De microscoop zal automatisch de
foto’s doorlopend weergeven. Druk op een willekeurige knop op de diashow te onderbreken.
Druk vervolgens op de AAN knop om naar de Weergave terug te keren.
• Een enkele afbeelding Wissen
Kies voor , druk op de OK knop en bevestig met ‘√’ om de weergegeven afbeelding te wissen.
Druk op ‘X’ om het wissen te onderbreken.
• Alles Wissen
Kies voor , druk op de OK knop om alle opgeslagen foto’s uit het interne geheugen of van de
SD-kaart te wissen. De gewiste foto’s kunnen niet gerecupereerd worden.
• Naar kaart kopiëren
Kies voor en druk ter bevestiging op de OK knop. Alle files worden naar de SD-kaart
gekopieerd.
• Verlaten
Kies voor en druk ter bevestiging op de OK knop. De microscoop zal zich weer gereed m
voor het maken van foto’s.
aken
14


8. Files naar PC Downloaden
• Voor Windows 98 SE/ME gebruiker
Sluit de microscoop met de USB-kabel aan op de PC. Op het
scherm van uw computer zal het bericht “USB Mass Storage
Driver” worden weergegeven.
• Voor Windows 7/Vista / XP
Sluit de microscoop met de USB-kabel aan op de PC. Een dialoogvenster met de mogelijke opties
wordt weergegeven. Kies voor “Open folder to View Files” om het mapje te openen. Of kies voor
“Take no action” en zoek in “My Computer” (“Computer” in Windows Vista) naar uw verwijderbare
disk drive en controleer het mapje.
• Voor Windows 2000
Klik tweemaal op “My computer” en druk vervolgens tweemaal op Removable Disk Drive.
Controleer de folder in de drive.
9. De microscoop als een PC-Camera gebruiken
Opmerking: Installeer de driver van de microscoop alvorens u de microscoop op uw PC aansluit.
• PC-Camera Set-up
1. Schakel de microscoop in en druk op de Functietoets om voor SET-UP te kiezen. Druk ter
bevestiging op de OK knop. Druk op de Linker- / Rechterknop en kies voor de USB-aansluiting
. Kies voor PC Camera. Druk ter bevestiging op de OK knop.
15


2. Sluit de microscoop met de USB-kabel aan op de PC.
3. U kunt deze PC-camera naar wens gebruiken met andere video software.
Bijv. In Windows XP klik tweemaal op “my computer” (of “Computer” in Windows Vista), en klik
vervolgens op “standard camera”. Nu kunt u live de PC-Camera gebruiken.
10. ArcSoft Media Impression 2
ArcSoft Media Impression 2 biedt de gebruikers de mogelijkheid om eenvoudig en creatief hun
multimedia files te beheren met een eenvoudige werkstroom en krachtige hulpmiddelen.
Organiseer uw mediafiles op eenvoudige en creatieve wijze en creëer met de editing hulpmiddelen
eenvoudige projecten. U heeft oneindig veel manieren om uw files te presenteren en met anderen
te delen. Gebruiksvriendelijke mediafile back-up & recuperatie functie.
Klik op “Media Impression 2” “choose language“
“Setup.exe”
“next” “Yes” “next”
“next” “finish” om het programma te downloaden. Klik tweemaal op de “Media Impression 2”
icoon op uw desktop. Het onderstaande venster wordt geopend.
16


6. Quick Text Search: zoek naar de naam van een File, Mapje en Tag.
7. Kalender Jaar/Maand/Dag Weergave
• Presenteren
Klik op de foto’s / video’s om de fotofiles te kunnen weergeven / editen / met anderen delen.
1. Een snelle Foto Viewer voor de weergave
van foto’s in een venster of full screen met de
regelmatig gebruikte editing hulpmiddelen
2. Toon de foto’s in een diashow met
achtergrondmuziek en coole thema’s
3. Lichtgewicht Mediaspeler voor het
afspelen van video/muziek in een venster of
full screen
4. Toon de foto’s alsof ze in een fotoalbum
geplakt zijn
18

• Foto en video editing
1. Easy Fix – Met een aantal klikken kunt u de
mond en de huid van het gezicht bijwerken
2. Face beautiful helpt u de ogen, mond en de
huid van het gezicht mooier te maken.
3. Creativity – Tekst en clip art, lijsten en randen, kleureffecten
4. Video Editing: trimmen, dynamische belichting, helderheid, contrast en verzadiging afstellen
5. Brand diashows en video’s op een VCD of DVD
19


6. Make Movie: combineer foto’s, muziek en video’s met coole thema’s
• Delen
1. Exporteer foto’s naar een digitaal fotolijstje
2. Upload foto’s in Flickr en Facebook
3. Upload video’s in YouTube
4. Bestel Fotoafdrukken, Fotoalbums, Mokken, Canvas, T-shirts, Puzzels en Mousepads met deze
applicatie
20

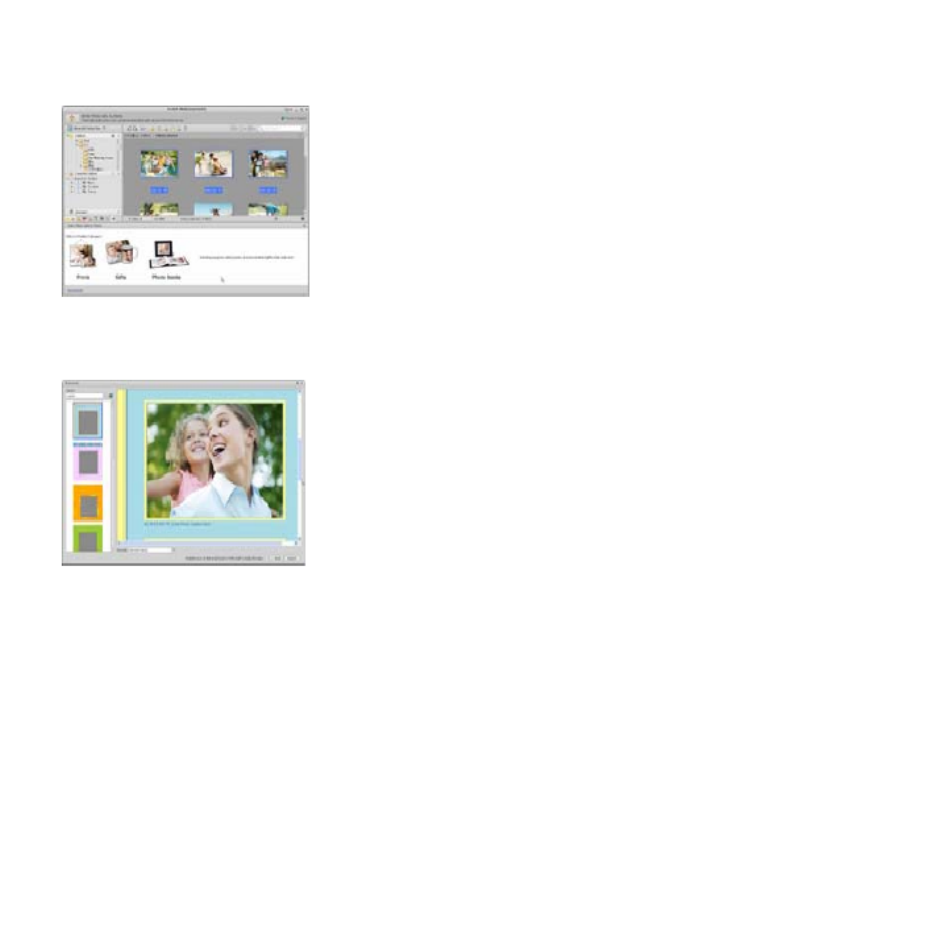
5. Verzend foto’s, muziek en video’s naar DLNA compatibele spelers zoals Sony, PS3, TV., DPF en
mobiele telefoons, enz.
6. Stuur foto’s en video’s per e-mail naar familieleden en vrienden
7. Maak thuis afdrukken een plezier
• Beschermen
1. Sla mediafiles op CD/DVD op
2. Sla op & Recupereer van/naar CD/DVD externe harde schijven en online websites (beschikbaar
aan het begin van 09)
21


11. Bijlage:
Specificaties
Sensorresolutie CMOS 1280 x 1024 Pixels, Sensor Zone 1 / 3"
Lens Specificatie F8.0, f = 7.1 mm, Zichthoek 44°, 2G2P
Verlichting 4 ingebouwde LEDs
Besturingssysteem Microsoft Windows 98 SE / 2000 / ME / XP/ Vista/7
Vergroting 2.4” Display: 3.5x / 35x 17” Display: 19x /190x
Witbalans Automatisch
Belichtingscontrole Automatisch
Stilstaande Capaciteit
VGA---640 x 480 Pixels
1.3M ---1280 x 960 Pixels
TV OUTPUT NTSC/PAL
Video
Video: ( w/o Audio functie)
VGA 640 x 480 pixels 30 fps
Compressie JPEG / MJPEG (AVI)
Digitale zoom 4 x Digitale Zoom voor Preview & Weergave
Display 2.4” LCD MONITOR
PC Interface USB 1.1, MSD Functie
Opslag Type SD-kaart Slot (SD-kaart niet inbegrepen)
Voeding 2 x “AA” 1.5V, Alkaline Batterijen
Afmetin
g
(
LxWxH
)
54.5 x 73 x 96.5 mm
,
40x 64.5x15 mm
(
view case
)
Accessoires USB-kabel, Gebruikershandleiding, CD software, Tv-kabel, View case
Bijgesloten Software ArcSoft Media Impression™ 2.0
22


Aan het einde van zijn leven mag u dit product niet bij het
normale of huishoudelijke afval stoppen. Breng het product
naar een bevoegd lozingscentrum voor de recycling van de
elektrische en elektronische apparatuur of lever het
apparaat voor verwerking bij de verkoper in.
AEEA Richtlijn & Het Product Afdanken
23


Microscope
Guide d’utilisation


Pour les clients en Amérique du Nord et du Sud
Pour les clients aux États-Unis
Cet appareil est conforme aux normes de la Section 15 des directives de la FCC. Son utilisation
est sujette aux deux conditions suivantes :
(1) Cet appareil ne doit pas générer d’interférences
nuisibles.
(2) Cet appareil doit être en mesure d’accepter toute
interférence reçue, y compris les interférences
pouvant générer un fonctionnement indésirable.
Pour les clients au Canada
Cet appareil numérique de la classe B respecte toutes les exigences de la réglementation sur le
Matériel Brouilleur du Canada.
Pour les clients en Europe
La marque "CE" indique que ce produit est conforme aux normes européennes
en matière de sécurité, de santé, d'environnement et de protection du
consommateur. Les microscopes marqués "CE" sont destinés pour la vente en
Europe.


Table des matières Page
POUR LES CLIENTS EN EUROPE -------------------------------------------------------------------------1
1. CONFIGURATION SYSTEME REQUISE---------------------------------------------------------------3
2. CONTENU DE L'EMBALLAGE ---------------------------------------------------------------------------3
3. A PROPOS DU MICROSCOPE ---------------------------------------------------------------------------4
4. MISE EN MARCHE RAPIDE-------------------------------------------------------------------------------5
• Installer les piles --------------------------------------------------------------------------------------------5
• Insérer une carte SD---------------------------------------------------------------------------------------5
• Allumer le microscope : -----------------------------------------------------------------------------------6
• Prendre une photo------------------------------------------------------------------------------------------6
• Prendre une vidéo ------------------------------------------------------------------------------------------6
• Utiliser le zoom numérique-------------------------------------------------------------------------------6
• Utiliser le zoom optique -----------------------------------------------------------------------------------7
5. INFORMATIONS SUR LES AFFICHAGES------------------------------------------------------------7
6. SELECTION D'UNE FONCTION--------------------------------------------------------------------------9
• Mode DV -----------------------------------------------------------------------------------------------------9
-• Configuration -----------------------------------------------------------------------------------------------9
• Valeur d'exposition --------------------------------------------------------------------------------------- 11
• Prendre des photos en continu -------------------------------------------------------------------12
• MODE DC -------------------------------------------------------------------------------------------------- 12
7. LECTURE -----------------------------------------------------------------------------------------------------13
8. TELECHARGER DES FICHIERS VERS LE PC----------------------------------------------------14
• Pour les utilisateurs de Windows 98 SE/ME ------------------------------------------------------14
• Pour Windows Vista / XP :------------------------------------------------------------------------------14
• Pour Windows 2000--------------------------------------------------------------------------------------15
9. UTILISEZ LE MICROSCOPE COMME UNE CAMERA PC -------------------------------------15
• Configuration de la caméra PC -----------------------------------------------------------------------15
10. ARCSOFT MEDIA IMPRESSION 2-------------------------------------------------------------------15
• Organiser --------------------------------------------------------------------------------------------------- 16
• Partager -----------------------------------------------------------------------------------------------------20
• Protéger -----------------------------------------------------------------------------------------------------21
11. ANNEXE : ----------------------------------------------------------------------------------------------------22
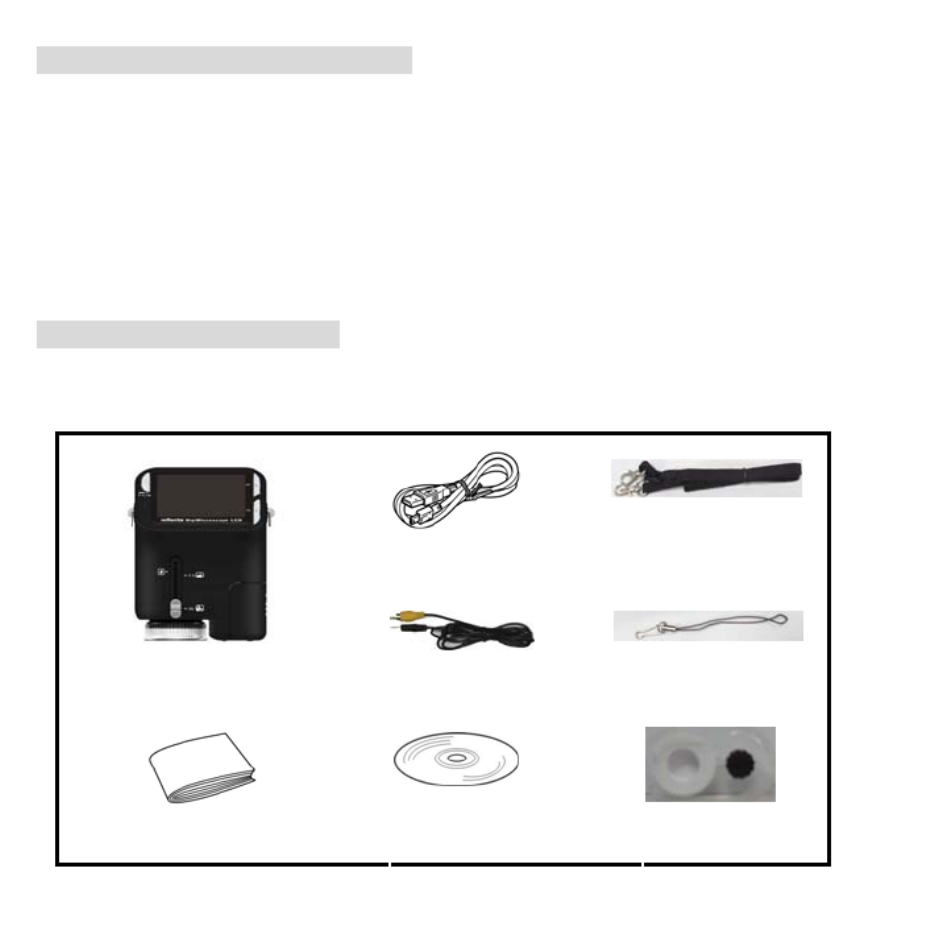
1. Configuration système requise
• PC avec processeur Pentium 166 MHz ou plus,
• Un port USB (Universal Serial Bus) actif sur l'ordinateur.
• Windows 98SE/ME/2000/XP/Vista/7, lecteur CD ROM, écran couleur, souris et clavier.
• Imprimante couleur pour l'impression d'images en couleur.
• Pour le transfert d'images fixes via Internet, l'ordinateur doit être connecté à un modem et disposer
de logiciel de connexion Internet.
2. Contenu de l'emballage
Vérifiez que tous les articles montrés ci-dessous sont présents avec votre microscope.
• Câble USB
• Sangle de cou
• Câble télé
• Dragonne
• Microscope
• Guide d’utilisation
• CD d'installation
• Boîte de
visualisation


3. A propos du microscope
Reportez-vous aux diagrammes suivants pour vous familiariser avec les boutons et touches de
commandes de ce microscope.
1. Commutateur zoom optique
2. Voyant alimentation
3. Touche Alimentation, Zoom avant et
Menu
4. Écran LCD
5. Touche Fonction (droite)
6. Touche Lecture (gauche)
7. Port USB
8. Fente pour carte mémoire SD
9. Œillet de sangle
10. Touche Obturateur / OK
11. Prise sortie télé
12. Boîte de visualisation (en option)
13. Couvercle du logement pour piles
14. Objectif
15. Douille pour trépied à visser
16. Témoins LED
17. Bouton rotatif de grossissement


4. Mise en marche rapide
MISE EN GARDE
• Veillez à installer le pilote du microscope avant de connecter ce dernier à un PC.
• La meilleure façon de transférer des images vers le PC est d'utiliser le mode stockage de
masse. Copier toutes les images sur votre ordinateur dans ce mode.
Vis
• Installer les piles
1. Tournez la vis. Retirez la boîte de visualisation.
2. Faire coulisser le couvercle du logement pour piles pour l'ouvrir.
3. Placer les piles avec les bornes + et – dans la bonne direction
comme illustré.
4. Faire coulisser le couvercle du logement pour piles pour le fermer.
• Insérer une carte SD
1. Eteindre le microscope.
2. Insérer une carte SD dans la bonne direction comme illustré.
Pousser la carte dans la fente jusqu'à ce qu'elle se bloque.
3. Pour retirer la carte, pousser puis relâcher cette dernière. Retirer la
carte lorsque la carte est partiellement éjectée.
Remarque : Si le message d'avertissement «Mémoire pleine»
apparaît sur l'écran LCD, cela signifie que la carte SD est pleine. Transférer tous les fichiers
sur l'ordinateur et supprimer les fichiers sur la carte. Ensuite, vous pouvez utiliser à nouveau
la carte.
Remarque : Le microscope ne supporte que les cartes de type SD.
5

• Allumer le microscope :
1. Appuyez sur la touche POWER comme illustré.
2. Le voyant alimentation s'allume.
L'écran de bienvenue s'affiche sur l'écran LCD.
3. Appuyer longuement sur la touche POWER pour éteindre le microscope.
• Prendre une photo
1. Allumer le microscope :
2. L'icône apparaîtra dans le coin supérieur gauche de l'écran.
3. Déplacez le microscope pour viser la cible. La cible sera affichée l'écran.
4. Tenez fermement le microscope et appuyez doucement sur le déclencheur pour prendre une
photo.
Remarque : 1. L'utilisateur peut appuyer sur la touche zoom (Power) pour effectuer un zoom
arrière / avant.
2. Plus l'image est agrandie numériquement plus elle sera granuleuse.
• Prendre une vidéo
1. Allumer le microscope.
2. Appuyez sur la touche FUNCTION (à droite), sélectionnez l'icône . Appuyez sur OK pour
confirmer.
3. Appuyez de nouveau sur la touche OK pour prendre une vidéo. Appuyez de nouveau sur la
touche OK pour arrêter.
4. Appuyez sur la touche droite pour retourner au menu Fonction.
• Utiliser le zoom numérique


Lors de prise de photo, vous pouvez appuyer sur la touche POWER pour effectuer un zoom avant
ou un zoom arrière. Le zoom numérique permet un agrandissement de vos photos jusqu'à 4 fois.
• Utiliser le zoom optique
L'utilisateur peut glisser le Commutateur de zoom optique pour ajuster
le zoom optique. Le zoom optique offre un grossissement de la cible de 3,5 à
35 fois. L'utilisateur peut également tourner le Bouton rotatif de
grossissement pour faire un réglage plus fin.
1. Faites glisser le commutateur sur la position , laissez une
distance de 60mm entre la boîte de visualisation (en option) et la cible.
L'utilisateur peut visualiser la cible dans sa taille originale.
2. Faites glisser le commutateur sur la position"3.5X" ou "35X", la cible
sera agrandie de 3,5 et 35 fois respectivement.
5. Informations sur les affichages


Capture mode indicator Indicateur du mode Capture
Zoom indicator Indicateur de Zoom
Single picture icon Icône d'image unique
Battery capacity Capacité des piles
Memory capacity (Remaining number
of storable pictures)
Capacité de la mémoire (nombre de photos
qu'on peut encore stocker)
SD card indicator Indicateur de carte SD
Picture Size Taille de l'image
Date Date
Video mode indicator Indicateur du mode Vidéo
Video size Taille de la vidéo
Battery capacity Capacité des piles
Memory capacity (Remaining record
time of storable audio)
Capacité de la mémoire (nombre de photos
qu'on peut encore stocker)
SD Card Carte mémoire SD


6. Sélection d'une fonction
Appuyez sur la touche Function pour accéder au menu de Fonctions.
Vous pouvez voir les icônes sur l'écran, comme illustré. Appuyez sur la
touche Gauche ou Droite pour sélectionner une fonction.
• Mode DV
Sélectionnez le bouton DV Mode et appuyez sur le bouton OK pour
confirmer.
Appuyez sur le bouton OK pour prendre la vidéo et appuyez de nouveau
pour arrêter l'enregistrement.
• Configuration
Dans Configuration, vous pouvez voir les icônes affichés à l'écran.
1. Régler la date et l'heure
Appuyez sur le bouton gauche ou droit pour sélectionner le format de la date entre MM/JJ/YYYY,
JJ/MM/AAAA ou AAAA/MM/JJ. Appuyez sur OK pour confirmer. Puis il ira au réglage de la date et
de l'heure. Appuyez sur le bouton gauche ou droit pour régler la date et l'heure. Appuyez sur le
bouton OK pour confirmer le réglage et retourner au menu principal.


2. Régler la taille de l'image
Sélectionnez le paramètre qualité d'image pour définir la résolution d'image. Appuyez sur le bouton
gauche ou droit pour sélectionner la taille de l'image, et appuyez sur le bouton OK pour confirmer et
retourner au menu principal. Les options seraient 2M (1600x1200 pixels), 1,3M (1280x 960 pixels),
VGA (640x480 pixels).
3. Régler la taille de la vidéo
Sélectionnez le paramètre qualité vidéo pour définir la résolution. Appuyez sur le bouton gauche ou
droit pour sélectionner la taille de la vidéo, et appuyez sur le bouton OK pour confirmer et retourner
au menu principal. Les options seraient VGA (640x480 pixels); QVGA (320x240 pixels).
4. Connexion USB
Sélectionnez le bouton de connexion USB et appuyez sur OK pour confirmer.
PC Cam : utilisez votre microscope comme une caméra PC (PC microscope).
Lecteur de disque : Utilisez votre microscope comme une mémoire de masse pour transférer des
fichiers sur votre ordinateur.
5. Fréquence anti-scintillement
Régler la fréquence anti-scintillement sur 50Hz. (Utilisez 50Hz si vous utilisez le microscope en
Europe, au Japon ou en Asie)


Régler la fréquence anti-scintillement sur 60 Hz. (Paramètres par défaut. Á sélectionner si
l'utilisation du microscope est aux États-Unis)
6. Sortie TV
Connectez le scanner à la télévision au moyen du câble TV.
NTSC : Réglage de la sortie TV sur NTSC
PAL : Réglage de la sortie TV sur PAL
7. Format
Sélectionnez Formater et appuyez sur le bouton OK pour confirmer. Sélectionnez ‘√’et appuyez sur
le bouton OK pour confirmer. Sélectionnez ‘X’ et appuyez sur le bouton OK pour abandonner.
Attention : Les fichiers formatés ne peuvent plus être récupérés.
8. Arrêt automatique
Sélectionnez Arrêt automatique et appuyez sur le bouton OK pour confirmer.
5MIN: Règle le microscope pour s'arrêter automatiquement en environ 5 minutes.
‘X’: Ne pas utiliser cette fonction.
9. Quitter
Sélectionnez Quitter pour quitter Configuration et retourner au menu Fonctions.
• Valeur d'exposition


Sélectionnez VE et appuyez sur le bouton OK pour confirmer.
La compensation de l'exposition vous permet d'augmenter ou de diminuer la VE pour ajuster les
résultats. Cette fonctionnalité est appliquée pour faire des rendus de sujets de manière appropriée.
L'unité de réglage est 1/3, dans l'intervalle -2 VE à +2 VE
Vous pouvez vérifier le résultat de la compensation en regardant l'image sur l'écran.
• Prendre des photos en continu
Sélectionnez Prendre des photos en continu et appuyez sur le bouton OK pour confirmer L'icône
apparaît dans le coin inférieur gauche de l'écran.
Déplacez le microscope pour viser la cible. La cible sera affichée l'écran.
Tenez fermement le microscope et appuyez doucement sur le déclencheur pour prendre une photo.
Retournez au menu Fonctions, sélectionnez , appuyez sur le bouton OK pour revenir au mode
prise d'une seule photo.
• MODE DC
Sélectionnez le bouton Mode DC et appuyez sur le bouton OK pour confirmer. Appuyez sur le
bouton OK pour prendre une photo


7. Lecture
Allumer le microscope : Appuyez sur le bouton Lecture pour voir
quelques photos sur l'écran. Appuyez ensuite sur le bouton POWER
en mode de lecture.
Vous pouvez voir les icônes sur l'écran, comme illustré.
Appuyez sur la touche Gauche ou Droite pour sélectionner une fonction.
• Une seule
Lorsque vous sélectionnez l'icône , appuyez sur le bouton OK pour confirmer. Vous devez
appuyer sur le bouton Gauche ou Droite pour voir la photo précédente ou suivante. Appuyez sur le
bouton POWER pour retourner en mode de Lecture.
• Diaporama
Sélectionnez le mode Diaporama et appuyez sur le bouton OK pour confirmer. Le microscope lira
automatiquement les photos en continu. Appuyez sur un bouton quelconque pour arrêter le
diaporama.
Appuyez sur le bouton POWER pour retourner en mode de Lecture.
• Supprimer une seule


Sélectionnez , appuyez sur OK et confirmez avec ‘√’ pour supprimer l'image courante; 'X' pour
abandonner.
• Supprimer tout
Sélectionnez , appuyez sur OK pour supprimer toutes les images stockées dans la mémoire
interne ou sur la carte SD. Il est impossible de récupérer les fichiers supprimés.
• Copier sur la carte
Sélectionnez , et appuyez sur le bouton OK pour confirmer Tous les fichiers seront copiés sur la
carte SD.
• Quitter
Sélectionnez , et appuyez sur le bouton OK pour confirmer Il retournera pour être prêt à
capturer des images.
8. Télécharger des fichiers vers le PC
• Pour les utilisateurs de Windows 98 SE/ME
Connecter le microscope au PC via un câble USB.
"Périphérique de stockage de masse USB" s'affiche sur l'écran
de l'ordinateur.
• Pour Windows 7/Vista / XP :
Connecter le microscope au PC via un câble USB. Une boîte de dialogue avec des options apparaît


comme illustré. Vous pouvez sélectionner "Ouvrir les dossiers pour voir les fichiers" pour ouvrir le
dossier. Ou sélectionnez "Ne prendre aucune action" et trouvez le disque amovible dans "Poste de
travail" ("Ordinateur" pour Windows Vista) et cochez le dossier.
• Pour Windows 2000
Double-cliquez sur "Poste de travail", puis double-cliquez sur Disque amovible
Cochez le dossier dans le disque.
9. Utilisez le microscope comme une caméra PC
Remarque : Installez le pilote du microscope avant de le connecter à votre PC.
• Configuration de la caméra PC
1. Allumez le microscope et appuyez sur la touche Function pour sélectionner Configuration.
Appuyez sur OK pour confirmer. Appuyez sur la touche Droite / Gauche pour sélectionner
Connexion USB . Sélectionnez caméra PC. Appuyez sur OK pour confirmer.
2. Connecter le microscope au PC via un câble USB.
3. Vous pouvez utiliser ce PC-CAM avec d'autres logiciels vidéo de votre choix.
Par exemple, dans Windows XP, double-cliquez "Poste de travail" (ou "Ordinateur " dans Windows
Vista), puis cliquez sur la "caméra standard", vous pouvez voir en direct en mode PC-Cam.
10. ArcSoft Media Impression 2
ArcSoft Media Impression 2 permet aux utilisateurs, de manière créative et productive de gérer
facilement leurs fichiers multimédia avec un flux de production simple et des outils puissants.
Organisez vos fichiers multimédia facilement et créer des projets simples avec des outils d'édition. Il


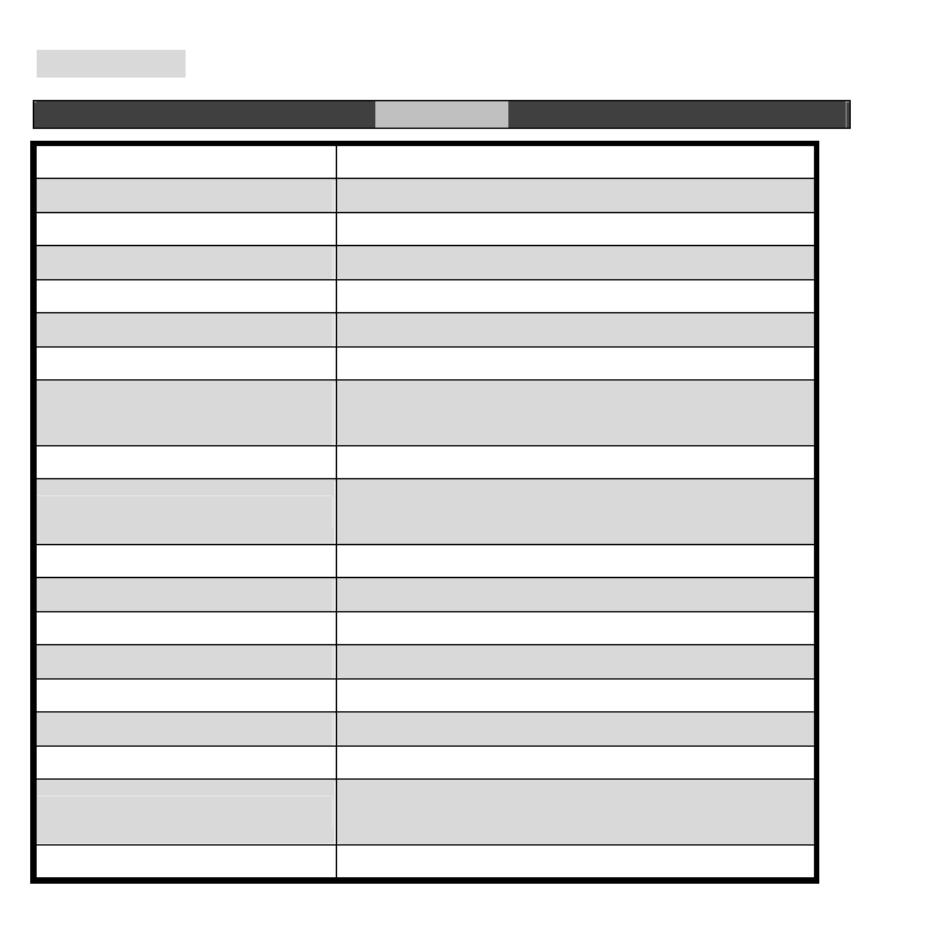
11. Annexe :
Spécifications
Résolution du capteur CMOS 1280 x 1024 Pixels, zone de détection 1/3"
Spécifications de l'objectif F8.0, f = 7,1 mm, Angle de vue 44°, 2G2P
Eclairage 4 LED intégrées
Système d'exploitation Microsoft Windows 98 SE / 2000 / ME / XP/ Vista
Agrandissement Écran 2,4” : 3,5 / 35 fois; Écran 17” : 19 /190 fois
Balance des blancs Auto
Contrôle de l'exposition Automatique
Mode capacité fixe
VGA---640 x 480 Pixels
1,3M ---1280 x 960 Pixels
Sortie TV NTSC/PAL
Mode Vidéo Vidéo : (avec/sans fonction Audio)
VGA 640 x 480 pixels 30 ips
Compression JPEG / MJPEG (AVI)
Zoom numérique 4 x Zoom numérique pour Prévisualisation et lecture
Affichage Ecran LCD 2,4”
Interface PC USB 1.1, Fonction MSD
Type de stockage Fente pour carte SD (carte SD non fournie)
Alimentation 2 piles alcalines “AA” 1,5V
Dimension (LxPxH) 54,5 x 73 x 96,5 mm, 40x 64,5x15 mm (boîtier de visualisation)
Accessoires Câble USB, Guide d'utilisation, CD de logiciel, cable tele, boite de
visualisation
Logiciels livrés avec le matériel ArcSoft Media Impression 2.0

À la fin de sa durée de vie, ce produit ne doit pas être traité
comme un déchet ménager ou un déchet ordinaire. Il
devrait être remis à un point de collecte pour le recyclage
des équipements électriques et électroniques, ou retourné
au fournisseur pour l'élimination.
Directive DEEE et mise au rebut du produit

1. Requisiti del Sistema
• PC con processore Pentium 166 MHz o più veloce,
• Una porta USB (Universal Serial Bus) attiva nel computer.
• Windows 98SE/ME/2000/XP, unità CD ROM, monitor a colori, mouse e tastiera.
• Stampante a colori per la stampa di foto a colori.
• Per il trasferimento di immagini via Internet, il computer deve disporre di modem e software di
comunicazione per la connessione a Internet.
2. Contenuto della confezione
Assicurarsi che tutti gli elementi riportati di seguito siano inclusi con il microscopio.
• Cavo USB
• Tracolla
• Cavo TV
• Cinturino da polso
• Microscopio
• Manuale per l'utente
• CD per l'installazione
• Custodia di
visualizzazione


• Utilizzare lo zoom digitale
Quando scatta una foto, l'utente può premere il tasto POWER per ingrandire o rimpicciolire. La
Zoom digitale fornisce da 1X fino a 4X d'ingrandimento delle immagini.
• Utilizzare lo zoom ottico
L'utente può far scorrere l'interruttore dello zoom ottico per regolare
lo zoom ottico. Lo zoom ottico fornisce 3,5x e 35x d'ingrandimento
dell'oggetto. L'utente può anche avvitare l'Interruttore Girevole
d'Ingrandimento per fare una regolazione di precisione.
1. Spostare l'interruttore nella posizione " ", mantenere 60mm
di distanza tra la custodia di visualizzazione (opzionale) e l'oggetto.
L'utente può visualizzare l'oggetto nella sua dimensione originale.
2. Fare scorrere l'interruttore nella posizione "3,5X" e "35x",
l'oggetto verrà ingrandita di 3,5X e 35X.
5. Informazioni visualizzate


tagga
2. Il tagging automatico della scena analizza automaticamente il contenuto di foto poi le tagga con
diverse scene
3. La classificazione automatica rileva automaticamente e classifica le foto di scarsa qualità e di
alta qualità. Valutazioni & tag compatibili con Windows Vista (supporto XMP)
4. Cerca i file multimediali con più combinazioni di criteri (per esempio combinando cartelle, voti,
tag, condivisione e tempo)
5. Fa il Geotag delle foto e visualizza le foto nel punto esatto in cui sono state scattate in Google
Earth
6. Ricerca Rapida del Testo: ricerca per nome del file, nome cartella, e tag
7. Visualizzazione Anno / Mese / Giorno Calendario
• Presentazione
Fare clic sulla foto / video poi è possibile visualizzare / modificare / condividere i vostri file di foto.

1. Un rapido Visualizzatore di Foto per
visualizzare le foto in una finestra o a pieno
schermo con strumenti di editing di uso
frequente
2. Visualizzare le foto in modalità
presentazione con musica di sottofondo e
bellissimi temi
3. Il leggero Media Player riproduce video /
musica in una finestra o a pieno schermo
4. Visualizza le foto come un Album
Fotografico
• Editing di foto e video
1. Risolvi Facile - Aggiusta semplicemente in
pochi clic la bocca e la pelle del viso
2. L' abbellimento della faccia aiuta ad abbellire
gli occhi, la bocca e la pelle del viso
Termékspecifikációk
| Márka: | Reflecta |
| Kategória: | mikroszkóp |
| Modell: | DigiMicroscope LCD |
Szüksége van segítségre?
Ha segítségre van szüksége Reflecta DigiMicroscope LCD, tegyen fel kérdést alább, és más felhasználók válaszolnak Önnek
Útmutatók mikroszkóp Reflecta

28 Július 2024
24 Július 2024
10 Július 2024
Útmutatók mikroszkóp
- mikroszkóp National Geographic
- mikroszkóp Hama
- mikroszkóp Nikon
- mikroszkóp Toolcraft
- mikroszkóp Bresser
- mikroszkóp Carson
- mikroszkóp Levenhuk
- mikroszkóp Leica
- mikroszkóp Steinberg
- mikroszkóp Swift
- mikroszkóp Kern
- mikroszkóp Vivitar
- mikroszkóp Maginon
- mikroszkóp Celestron
- mikroszkóp Barska
- mikroszkóp Veho
- mikroszkóp Dnt
- mikroszkóp Traveler
- mikroszkóp Ideal Tek
- mikroszkóp Discovery
- mikroszkóp PCE Instruments
- mikroszkóp BeaverLab
- mikroszkóp Dino-Lite
- mikroszkóp National Optical
Legújabb útmutatók mikroszkóp
9 Április 2025
2 Április 2025
2 Április 2025
1 Április 2025
1 Április 2025
1 Április 2025
1 Április 2025
1 Április 2025
1 Április 2025
1 Április 2025