Használati útmutató Qtek 2020
Olvassa el alább 📖 a magyar nyelvű használati útmutatót Qtek 2020 (186 oldal) a Mozgó kategóriában. Ezt az útmutatót 10 ember találta hasznosnak és 2 felhasználó értékelte átlagosan 4.5 csillagra
Oldal 1/186

Pocket PC Phone

Pocket PC Phone User Manual2
Contents
Pocket PC Phone User Manual 3
Contents

Pocket PC Phone User Manual2
Contents
Pocket PC Phone User Manual 3
Contents
Welcome
Congratulations on the purchase of a new Windows MobileTM-based Pocket
PC Phone. The integrated wireless voice and data capabilities mean that as well as
keeping your important PIM information up-to-date and close at hand, you can make
calls, send and receive e-mail, and look up valuable information from the Internet or
your company’s network anytime, anywhere. Also, with Microsoft ActiveSync
the power of your device is increased by allowing you to synchronize the information
on your PC with your device.
Before getting started to use and explore your new device, some warning notes here
are very important for you to get through.
Warnings! Please Read Before Operating your Device
THE DEVICE IS NOT CHARGED WHEN YOU TAKE IT OUT OF THE
BOX. (For information, see Chapter 1 : Getting Started)
DO NOT REMOVE THE BATTERY PACK WHEN THE DEVICE IS
CHARGING.
WHEN INSERT A SIM CARD, MAKE SURE THE DEVICE IS TURNED
OFF THEN CLICK IT INTO PLACE. (For more information, see
Chapter 3 : Using Your Phone)
IN MANY COUNTRIES YOU ARE REQUIRED BY LAW TO TURN OFF
YOUR PHONE WHEN YOU FLY. TURNING OFF YOUR POCKET PC
DOESN’T TURN OFF YOUR PHONE; YOU MUST TURN OFF YOUR
WIRELESS CONNECTION TO YOUR OPERATOR’S NETWORK.
YOUR WARRANTY IS INVALIDATED IF YOU OPEN OR TAMPER
WITH THE DEVICE’S OUTER CASING. (For more information, see
the enclosed warranty information)

Pocket PC Phone User Manual4
Contents
Pocket PC Phone User Manual 5
Contents
Contents
Chapter 1 Getting Started ---------------------- 11
1.1 Knowing Your Device------------------------- 12
Front , Top and Left Side Panel Components ----------- 12
Back, Bottom and Right Side Panel Components------- 13
1.2 Battery----------------------------------------- 14
Data Retention--------------------------------------------- 14
To recharge your device ---------------------------------- 15
When Your Battery is Low -------------------------------- 16
1.3 Accessories ------------------------------------ 16
USB/Serial Cradle ----------------------------------------- 16
AC Adapter Converter ------------------------------------- 17
USB/Serial Sync cable------------------------------------- 17
Stereo headset --------------------------------------------- 17
Backpack (Optional)--------------------------------------- 17
Chapter 2 Knowing Your Pocket PC------------ 19
2.1 Starting Up ------------------------------------ 20
Screen tapping, Calibration and Re-calibration -------- 20
Today Screen----------------------------------------------- 20
Indicators -------------------------------------------------- 21
Programs --------------------------------------------------- 22
Navigation Bar and Command Bar ----------------------- 24
Pop-Up Menus --------------------------------------------- 24
Notications ----------------------------------------------- 25
2.2 Entering Information --------------------------- 25
Using the Input Panel ------------------------------------- 26
2.3 Writing on the Screen ------------------------ 30
To write on the screen ------------------------------------ 30
To select writing ------------------------------------------ 30
Converting writing to text -------------------------------- 31
To get good recognition ---------------------------------- 31
2.4 Drawing on the Screen ----------------------- 32
To create a drawing -------------------------------------- 32

Pocket PC Phone User Manual4
Contents
Pocket PC Phone User Manual 5
Contents
2.5 Recording a Message------------------------- 33
2.6 Finding and Organizing Information-------- 34
Chapter 3 Using Your Phone-------------------- 35
3.1 About Your Phone ---------------------------- 36
About SIM cards ------------------------------------------- 36
About The Dialer Screen ---------------------------------- 38
Indicators -------------------------------------------------- 38
The Navigation Pad and Dialing -------------------------- 39
Entering Your PIN ----------------------------------------- 39
Checking Your Connection-------------------------------- 40
Turning The Phone On and Off --------------------------- 40
Adjusting The Phone Volume----------------------------- 41
3.2 Making a Call ---------------------------------- 42
To make a call from the Dialer --------------------------- 42
To make a call from Contacts ---------------------------- 43
To make a call from Speed Dial -------------------------- 44
To make a call from the Call History -------------------- 45
To make a call from SIM Manager: ---------------------- 45
3.4 In-Call Options-------------------------------- 46
Putting a call on hold-------------------------------------- 46
3.3 Receiving a Call ------------------------------- 46
To answer an incoming call------------------------------- 46
To end a call ----------------------------------------------- 46
To swap between calls ----------------------------------- 47
To set up conference calls -------------------------------- 47
Making a Note---------------------------------------------- 47
Enabling the Speakerphone Mode ----------------------- 48
Checking Your Voice Mail --------------------------------- 49
3.5 Contacts Information ------------------------ 49
SIM Manager ----------------------------------------------- 50
Call History ------------------------------------------------- 51
Manage Your Call History --------------------------------- 52

Pocket PC Phone User Manual6
Contents
Pocket PC Phone User Manual 7
Contents
3.6 Photo Contacts-------------------------------- 53
To create a new photo contact --------------------------- 53
To preview and adjust settings -------------------------- 54
Toolbar Icons ---------------------------------------------- 54
To assign a photo from the camera ---------------------- 55
To unassign a photo --------------------------------------- 55
To view your contacts by photo -------------------------- 55
To disable the displaying of photos ---------------------- 56
To manage your groups ----------------------------------- 56
To assign a contact to a group --------------------------- 56
Show Contact Names Only-------------------------------- 57
Set Default Photos----------------------------------------- 57
3.7 Additional Dialing Information -------------- 58
To make an emergency call------------------------------- 58
To make an international call ---------------------------- 58
3.8 Secure Your Phone --------------------------- 58
Locking the keypad---------------------------------------- 59
Locking your phone --------------------------------------- 59
Locking the SIM card-------------------------------------- 60
Chapter 4 Synchronizing Information --------- 61
4.1 Using ActiveSync ----------------------------- 62
Installing ActiveSync-------------------------------------- 62
Creating a Partnership ------------------------------------ 63
4.2 Synchronizing information------------------- 64
Synchronizing Inbox -------------------------------------- 64
Synchronizing Calendar ----------------------------------- 65
Synchronizing Contacts ----------------------------------- 65
Synchronizing Tasks--------------------------------------- 65
4.3 Synchronizing Using an Infrared Connection66
Transferring Items Using Infrared----------------------- 66
4.4 ActiveSync Errors ----------------------------- 67
To view ActiveSync error information ------------------- 67

Pocket PC Phone User Manual6
Contents
Pocket PC Phone User Manual 7
Contents
Chapter 5 Personalizing Your Pocket PC Phone69
5.1 Device Settings ------------------------------- 70
Buttons ----------------------------------------------------- 72
Input -------------------------------------------------------- 72
Menus------------------------------------------------------- 73
Owner Information ---------------------------------------- 74
Password --------------------------------------------------- 74
Sounds and Notications --------------------------------- 75
Today ------------------------------------------------------- 75
Backlight --------------------------------------------------- 76
Clock -------------------------------------------------------- 77
Memory ----------------------------------------------------- 77
Power ------------------------------------------------------- 78
5.2 Phone Settings -------------------------------- 78
Sounds ------------------------------------------------------ 79
Services----------------------------------------------------- 80
Network ---------------------------------------------------- 80
Chapter 6 Scheduling and Communicating
- Microsoft Pocket Outlook --------- 81
6.1 Calendar --------------------------------------- 82
To Create an Appointment -------------------------------- 83
Using the Summary Screen ------------------------------- 83
Creating Meeting Requests ------------------------------- 84
To schedule a meeting ------------------------------------ 84
6.2 Contacts --------------------------------------- 84
To create a contact --------------------------------------- 85
To Find a contact ------------------------------------------ 86
Using the Summary Screen ------------------------------- 87
6.3 Tasks : Keeping a To Do List ----------------- 87
To create a task-------------------------------------------- 88
Using the Summary Screen ------------------------------- 88
6.4 Notes ------------------------------------------ 89
To create a note ------------------------------------------- 89

Pocket PC Phone User Manual8
Contents
Pocket PC Phone User Manual 9
Contents
Chapter 7 Getting Connected------------------- 91
7.1 About Connections --------------------------- 92
7.2 Connect to the Internet ---------------------- 93
CSD Line Type---------------------------------------------- 94
To change a CSD Line Type: ------------------------------ 94
GPRS Settings---------------------------------------------- 94
Set up a WAP gateway ------------------------------------ 95
7.3 Pocket Internet Explorer--------------------- 96
To switch to Pocket Internet Explorer------------------- 96
To browse the Internet ----------------------------------- 97
To view mobile favorites and channels------------------ 97
The Mobile Favorites Folder ------------------------------ 98
Using AvantGo Channels --------------------------------- 100
7.4 Terminal Services Client ------------------- 101
To connect to a Terminal Server ------------------------ 101
7.5 Wireless Modem ---------------------------- 102
7.6 Bluetooth ------------------------------------ 102
Bluetooth modes------------------------------------------ 103
Bonds ------------------------------------------------------ 104
Beaming Information with Bluetooth ------------------ 106
Receiving a Bluetooth Beam----------------------------- 107
Using a Bluetooth Phone as a Modem ------------------ 107
Chapter 8 Messaging Features ---------------- 109
8.1 E-mail Messages : Using Inbox------------ 110
To set up an e-mail service ----------------------------- 110
Sending and Receiving E-mail--------------------------- 112
8.2 SMS Messages ------------------------------ 115
To send SMS in phone dialer----------------------------- 115
8.3 MSN Messenger : Instant Messaging ----- 116
To switch to MSN Messenger ---------------------------- 116
Setting Up and Signing In ------------------------------- 117
Working with Contacts----------------------------------- 117

Pocket PC Phone User Manual8
Contents
Pocket PC Phone User Manual 9
Contents
Chatting with Contacts----------------------------------- 118
8.4 MMS Messages ------------------------------ 119
Message Boxes-------------------------------------------- 119
Menu Commands ----------------------------------------- 122
Viewing a Message --------------------------------------- 122
Sending a Message --------------------------------------- 123
8.5 Managing Messages and Folders ---------- 124
Chapter 9 Companion Programs -------------- 127
9.1 Pocket Word--------------------------------- 128
To create a new le -------------------------------------- 128
Entering Information in a New File --------------------- 129
9.2 Pocket Excel--------------------------------- 131
To Create a new Pocket Excel File ---------------------- 131
Tips for Working in Pocket Excel------------------------ 132
9.3 Windows Media Player for Pocket PC----- 133
9.4 Microsoft Reader---------------------------- 133
Getting Books on Your Device--------------------------- 134
Reading a Book ------------------------------------------- 135
Using Reader Features ----------------------------------- 136
Removing a Book ----------------------------------------- 137
9.5 Pictures -------------------------------------- 138
Transferring Pictures------------------------------------- 138
Finding and listing pictures------------------------------ 138
Viewing Pictures ------------------------------------------ 138
Sorting Pictures------------------------------------------- 139
Edit Pictures----------------------------------------------- 139
Set Pictures as Background------------------------------ 140
Customizing Pictures ------------------------------------- 140
Chapter 10 Using Your Camera ----------------- 141
10.1 Before Using the Camera ------------------- 142
File formats supported ----------------------------------- 142

Pocket PC Phone User Manual10
Contents
10.2 Camera -------------------------------------- 143
Usage of Buttons in Camera Mode ---------------------- 144
Image Capture submode--------------------------------- 145
Zooming In/Out ------------------------------------------ 146
Video Capture submode---------------------------------- 147
Composition Capture submode-------------------------- 148
Camera Settings screen---------------------------------- 150
10.3 Album --------------------------------------- 154
Thumbnail View Mode------------------------------------ 154
To make an annotation on your le:-------------------- 155
Sending MMS, E-mail in Album -------------------------- 156
To set audio les as Ring Tones: ------------------------ 156
Assign to Contact ----------------------------------------- 157
Options in Album Settings ------------------------------- 157
Detailed View Mode -------------------------------------- 159
Slide Show View ------------------------------------------ 161
Appendix A Maintaining Your Pocket PC ------- 163
Adding or Removing Programs -------------------------- 164
Managing Memory ---------------------------------------- 166
Backing Up Files ------------------------------------------ 168
Reset the Pocket PC Phone and Clear Memory ------- 169
Appendix B Regulatory Notice ------------------ 171
Troubleshooting ----------------------------------179
Index-----------------------------------------------184

Chapter 1
Getting Started
1.1 Knowing your device
1.2 Battery
1.3 Accessories

Getting
Started
Pocket PC Phone User Manual12
Getting
Started
Pocket PC Phone User Manual 13
1.1 Knowing Your Device
Front , Top and Left Side Panel Components
Contacts
Press for quick access to your
Contacts.
Record
Press to record a voice note.
Volume
Press up/down to adjust the
volume of your device.
Camera
Press to launch camera
capture utility. Press again
to take a picture.
Soft Reset
Press into the hole with the
stylus to reset your device.
Send
Press to answer and incoming
call or to dial a number.
Microphone
Speak here when receiving or
making a phone call or voice
recording.
MMC/SD cards or SDIO
accessories slot
Insert either MMC/SD cards or
SDIO accessories in this slot.
Infrared port
Enables you to exchange le(s)
or data with other devices
without cables/ wires.
Speaker
Listen to audio media or a
phone call from here.
Calendar
Press for quick Calendar
access.
Touch Screen
For handwriting, drawing
or for making a selection
with the stylus.
End
Press to end a call.
Power Button/Backlight
Press to turn your pocket PC or backlight
on or off.
Notication LED
See the description
on opposite page.
Navigation Pad
Press to move up/down and left/right
through any of the drop down menus or
program instructions; select by pressing in
the center. When in the dialer screen :
Left - Press once to access the Speed
Dial feature.
Right- Press once to access the Call Log
feature.

Getting
Started
Pocket PC Phone User Manual12
Getting
Started
Pocket PC Phone User Manual 13
Back, Bottom and Right Side Panel Components
Camera Lens
Car Antenna
Connector
If available, you can attach
your phone to its antenna and
utilize its superior reception
quality.
Preview Mirror
Back Cover
Fixing Lock
Press to release the back
cover.
Earphone Jack
Allows you to listen to audio
media or use the phone's
hands-free kit.
Stylus and Stylus Slot
Notication LED
Bi-color LED on the right :
For GSM standby, GSM
message, GSM network status,
PDA notication, PDA charging
status.
Blue LED on the left :
For Bluetooth system notication
of powered-on and ready to
transmit RF signal.
Soft Reset
Press into the hole with the
stylus to reset your device.
Sync Connector
Use this connector when
synchronizing / transmitting data
or recharging.

Getting
Started
Pocket PC Phone User Manual14
Getting
Started
Pocket PC Phone User Manual 15
1.2 Battery
Warning : To reduce risk of re or burns, do
not disassemble, crush, puncture, short external
contacts, heat above 100℃ (212℉), or dispose
of in re or water. Replace only with manufacturer
specied batteries. Recycle or dispose of used
batteries to the local regulations.
Your Pocket PC Phone contains a rechargeable Li-ion poly-
mer battery under the back cover. Battery power depends on
whether you are talking on the phone, using the PDA functions
or if the device is on standby.
Battery life estimates :
nTalk-time : 2 ~ 4 hrs,
nPDA : 13 hrs (approx.),
nStandby : 150 ~ 170 hrs (approx.),
nData retention time : 72 hrs.
The above times are based on using one function at a time,
interchanging between functions will vary the battery life.
Data Retention
It is vital to keep your battery charged. Because your Pocket
PC does not have a hard drive, all data and any new programs
you install are stored in RAM. If the battery completely drains
any data or new programs you installed will be erased. Only
the default programs on the device when you bought it will
remain.
To prevent this kind of data loss, a portion of the main battery
will keep your data safe for 72 hours if your device runs out of
power. An additional battery, the backup battery, is designed
to keep your data safe when you remove the main battery. It
will keep this data safe for 20 minutes.
WARNING : BE SURE TO CHECK THE BACKUP
BATTERY POWER REMAINS AT LEAST AT
50% OR ABOVE BEFORE YOU REMOVE THE
MAIN BATTERY BY TAPPING → Settings
→ System tab → Power
F

Getting
Started
Pocket PC Phone User Manual14
Getting
Started
Pocket PC Phone User Manual 15
To recharge your device
You can recharge your device in the following ways :
1
Place your Pocket PC Phone in the cradle and
connect it to an external power source with the
AC Adapter. Before using your Pocket PC,
charge the battery for at least 8 hours for the
rst time. Then, place it in the cradle for a short
time each day to recharge it to its full capacity.
2
Plug the AC adapter into the optional USB/Serial
cable head and then connect your Pocket PC
Phone directly to an external power source.
3
Plug the AC adapter into the optional AC Adapter
Converter and then connect to sync connector
of your Pocket PC Phone directly to an external
power source without using the cradle.
4
If you have spare battery for your Pocket PC
Phone, you can also put the battery into the slot
in the cradle for recharging.
AC Adapter plugs
into the back of the
cradle
To your Pocket
PC Phone
Plug the AC adapter
into a socket
USB synchronization
cable, connect to
your PC
To the sync
connector of your
Pocket PC Phone
To AC adapter
AC Adapter plugs
into the back of the
cradle
Put an spare
unit into
the slot for
recharging

Getting
Started
Pocket PC Phone User Manual16
Getting
Started
Pocket PC Phone User Manual 17
When Your Battery is Low
When the low battery-warning message appears, immediately
save any data you are working on, perform a synchronization
with your PC, then turn off your Pocket PC. If your device
does shut down, the backup portion of your main battery will
protect data for about 72 hours.
To view the battery status:
Tap → Settings → System tab → Power.
ALWAYS TO KEEP THE POWER STATUS OF
THE BACKUP BATTERY REMAINS AT LEAST
AT 50% OR ABOVE.
1.3 Accessories
USB/Serial Cradle
Your Pocket PC Phone comes with a USB cradle. This allows
you to recharge your Pocket PC Phone with the AC Adapter,
as well as synchronize information between your Pocket PC
and a PC using ActiveSync.
GPRS will not work when your device is plugged
into the cradle.
To synchronize the USB Cradle must be plugged
into an available USB port on your PC.
For battery recharging, you must plug the AC
Adapter into the back of cradle.
An optional cradle with Audio output is available,
please contact your operator/dealer for the
purchase.
AC Adapter plugs into
the back of the cradle for
battery recharging
Audio output is
available in an
optional unit.
F

Getting
Started
Pocket PC Phone User Manual16
Getting
Started
Pocket PC Phone User Manual 17
AC Adapter Converter
AC adaptor converter in combination with the AC adapter
allows you to recharge your device without the cradle.
USB/Serial Sync cable
The USB / Serial cable allows you to synchronize
with your desktop without the cradle. The DC con-
verter in the head also allows you, in combination
with an AC adapter, to recharge your device.
Stereo headset
The stereo wired headset has a volume control jog dial
and buttons to pick up and hang up incoming and outgoing
calls.
Backpack (Optional)
This optional backpack is an expansion pack for CF cards
type I and II and VGA/TV output. The CF expansion card is
a most popular interface card currently on the market. It can
support a VGA/CRT output for a Microsoft Powerpoint presen-
tation or Mirror image from the LCD display of your device.
For CF and VGA/TV applications, the Backpack has a built-
in extended battery. This extended battery will recharge the
main battery when attached.
A Backpack tab will be available by tapping
→ Settings → System tab → Power once you
have attached an optional backpack unit on your
device.
Resolution supports
n For LCD display : XGA 1024x768, VGA 800x600 and
640x480.
n For TV output : 640x480 NTSC and PAL system.
USB Cable
Serial Cable
Insert your
CF card here.
For VGA/TV
output

Getting
Started
Pocket PC Phone User Manual18
VGA
Output
Video
Output
S-Video
Output
To attach the backpack:
1
Remove the back cover.
2
First slot the hooks at the top of
the pack into the device, similar
to with the back cover.
3
Hold in the grey buttons on the
side of the pack and gently push
down so that the connector
clicks into place.
4
To remove press the side buttons and pull up.
VGA/TV Adapter
The VGA/TV adapter allows you to play video and presenta-
tions through your computer (VGA socket), or TV (Video and
S-Video).
To attach the cable:
1
Attach the USB head to your device.
2
For VGA attach the VGA/TV adapter directly
into your computer or projector. For TV plug an
S-Video or Video Output cable into the relevant
socket then into the back of your TV.
1
2
3
3
For VGA/TV
output

Chapter 2
Knowing Your Pocket PC
2.1 Starting Up
2.2 Entering Information
2.3 Writing on the Screen
2.4 Drawing on the Screen
2.5 Recording a Message
2.6 Finding and Organizing Information

Pocket PC Phone User Manual 20
Knowing your
pocket PC
Pocket PC Phone User Manual 21
Knowing your
pocket PC
2.1 Starting Up
Screen tapping, Calibration and
Re-calibration
When you rst start up your Pocket PC Phone, you will be
asked to calibrate the screen by tapping the center of a cross
with your stylus as it moves around the screen. This process
ensures that when you tap the screen with your stylus the item
tapped is activated.
If your device does not accurately respond to screen taps, you
will need to re-calibrate it.
To re-calibrate the screen :
1
Tap → Settings → System → Screen.
2
As described above, tap the center of the cross to
with your stylus as it moves around the screen.
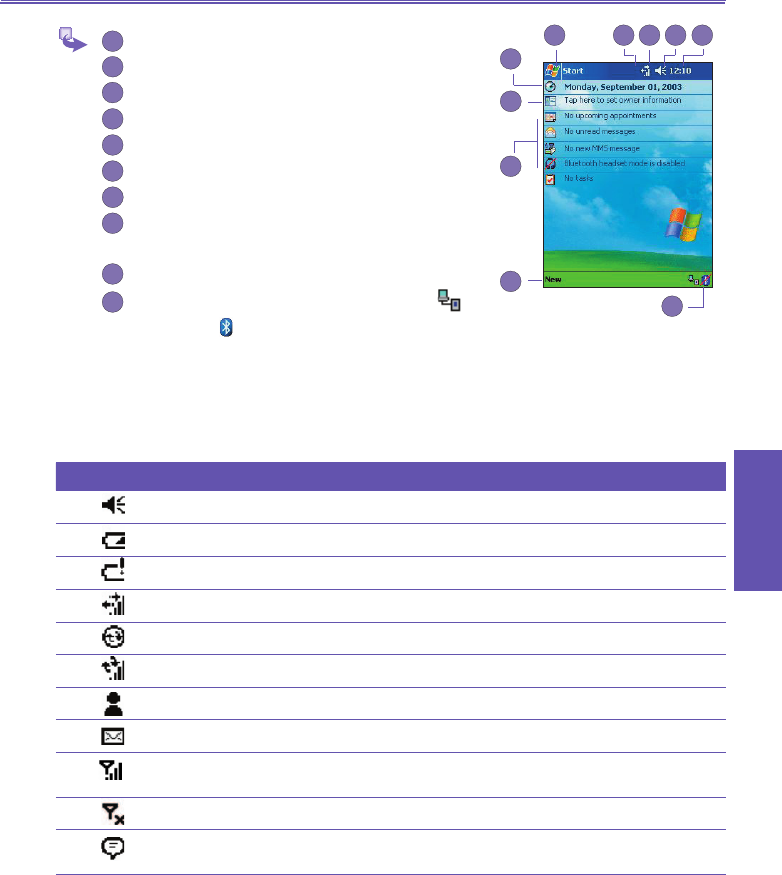
Today Screen
The Today screen displays important information, such as
today’s appointments and status icons for your device. Tap
the information listed on the Today screen to open the asso-
ciated program.
Access the Today screen by tapping → Today.
To customize the Today screen display, including the back-
ground image, tap Today at the top of the Today screen or
tap → Settings → Personal tab → Today.
Pocket PC Phone User Manual 20
Knowing your
pocket PC
Pocket PC Phone User Manual 21
Knowing your
pocket PC
Indicators Meaning
Turns all sounds on and off.
Main battery low.
Main battery very low.
Connection is active.
Synchronization is beginning or ending.
Synchronization is occurring.
Notication that one or more instant messages were received.
Notication that one or more mobile e-mail / SMS messages were received.
Indicates the connection to your mobile phone service provider is on and the
strength of the signal.
Indicates your phone is switched off.
If more notication icons need to be displayed and there is no room to display
them, this indicator will display. Tap the icon to view all notication icons.
Tap to go to a program.
Tap to view notication information.
Tap to view network status and options.
Tap to change volume or mute all sounds.
Tap and hold to change time format.
Tap to change date and time.
Tap to change owner information.
Your day at a glance. Tap to open the associated
program
Tap to create a new item.
Tap to disconnect from ActiveSync or
Bluetooth .
6
7
8
Indicators
Following are some of the status icons you may see.
1
2
3
4
5
9
10
1
2
3
4
5
6
7
8
9
10

Pocket PC Phone User Manual 22
Knowing your
pocket PC
Pocket PC Phone User Manual 23
Knowing your
pocket PC
Icon Program Description
ActiveSync Synchronizes information between your device and PC.
Calendar Keeps track of your appointments and creates meeting
requests.
Contacts Keeps track of your friends and colleagues.
Inbox Sends and receives e-mail/ SMS messages.
Pocket IE Pocket Internet Explorer browses Web and WAP sites, and
downloads new programs and les from the Internet.
Notes Creates handwritten or typed notes, drawings, and record-
ings.
Phone Makes and receives calls, switches between calls and sets
up conference calling.
Tasks Keeps track of your tasks.
Windows
Media Player Enables the multimedia function on your Pocket PC
Phone.
Pocket Excel Creates new workbooks or view and edit Excel work-
books.
Pocket Word Creates new documents or view and edit MS-Word docu-
ments.
MSN
Messenger Sends and receives instant messages with your MSN Mes-
senger contacts.
Microsoft
Reader Collects and reads e-Books on your device.
Programs
nYou can switch from one program to another by selecting
it from the menu. To access some programs, tap
→ Programs, and then the program name.
nThe following table contains a partial list of programs that
are on your device. Look on the Pocket PC Companion
CD for additional programs that you can install onto your
device.

Pocket PC Phone User Manual 22
Knowing your
pocket PC
Pocket PC Phone User Manual 23
Knowing your
pocket PC
Icon Program Description
Camera Snaps photos or shoots video clips with accompanying
audio.
Album Collects, organizes and sorts .JPG/.BMP/.GIF picture les
on your Pocket PC phone from Camera or ActiveSync.
Photo
Contacts
Input the image les according to your Contacts list and
set up the Caller-ID function
MMS Send and receive MMS messages.
Calculator Performs basic arithmetic, such as addition, subtraction,
multiplication, and division.
Games Two games, Jawbreaker and Solitaire are included in this
folder by default.
Wireless
Modem
Enable your device as an external modem for a PC or
Notebook by using a serial/USB port, or infrared.
SIM
Manager
Collects, organizes and sorts the Contacts list stored in
your SIM card.
xBackup Back up your Pocket PC Phone les to ROM or an SD
card
Pictures Collects, organizes and sorts .jpg picture les on your
Pocket PC phone or on a storage card.
nYou can also switch to some pro-
grams by pressing a program but-
ton. Your device has one or more
program buttons located on the front
or side of the device. The icons on
the buttons identify the programs
they turn on . For more information
about the Button settings, please
see Chapter 5.

Pocket PC Phone User Manual 24
Knowing your
pocket PC
Pocket PC Phone User Manual 25
Knowing your
pocket PC
Navigation Bar and Command Bar
The navigation bar, located at the top of the screen, displays
active programs and current time, enables you to switch to
programs and close screens.
1
Use the command bar at the bottom of the
screen to perform tasks in programs.
2
The command bar includes menu names,
buttons, and the Input Panel button. To create
a new item in the current program, tap New. To
see the name of a button, tap and hold the stylus
on the button. Drag the stylus off the button so
that the command is not carried out.
Pop-Up Menus
Use pop-up menus to quickly perform an action on an item.
For example, you can use a pop-up menu to delete or make
a copy of an item. To access a pop-up menu, tap and hold
the item that you want to perform the action on. When the
menu appears, tap the action you want to perform, or tap
anywhere outside the menu to close it without performing
an action.
1
Tap and hold to display the pop-up menu.
2
Lift the stylus and tap the action you want.
3
Tap outside the menu to close it without
performing an action.
Tap to switch to a
program that you
recently used.
Tap to switch to a
program.
Tap to see more
programs.
Tap to change device
settings.
Tap to see a Help topic
for the current screen.
Tap to select
menu commands
Tap to select
button commands
Tap to display the
input panel
1
2
3
Pocket PC Phone User Manual 24
Knowing your
pocket PC
Pocket PC Phone User Manual 25
Knowing your
pocket PC
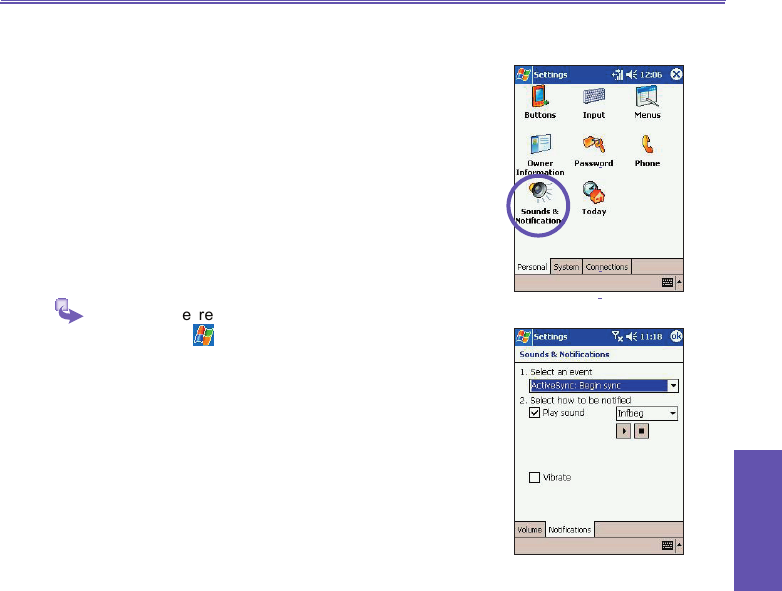
Notications
Your device reminds you in a variety of ways when you have
something to do or receive a SMS. For example, if you’ve
set up an appointment in Calendar, a task with a due date
in Tasks, or an alarm in Clock, you will be notied in any of
the following ways:
nA message box appears on the screen.
nA sound, which you can specify, is played.
nA light ashes on your device.
nThe device vibrates.
To choose reminder types and sounds for your
device, tap → Settings → Personal → Sounds
& Notications. The options you choose here apply
throughout the device.
2.2 Entering Information
You can enter information on your device in several ways,
depending on the type of device you have and the program
you are using.
n Synchronizing - Using ActiveSync, exchange infor-
mation between your PC and device.
n Typing - Using the input panel, enter typed text into
the device. You can do this by tapping keys on the soft
keyboard or by using the handwriting recognition soft-
ware.
n Writing - Using the stylus, write directly on the screen.
n Drawing - Using the stylus, draw directly on the
screen.
n Recording - Create a stand-alone recording or embed
a recording into a document or note.
For more information on ActiveSync, see Chapter 4.
Pocket PC Phone User Manual 26
Knowing your
pocket PC
Pocket PC Phone User Manual 27
Knowing your
pocket PC
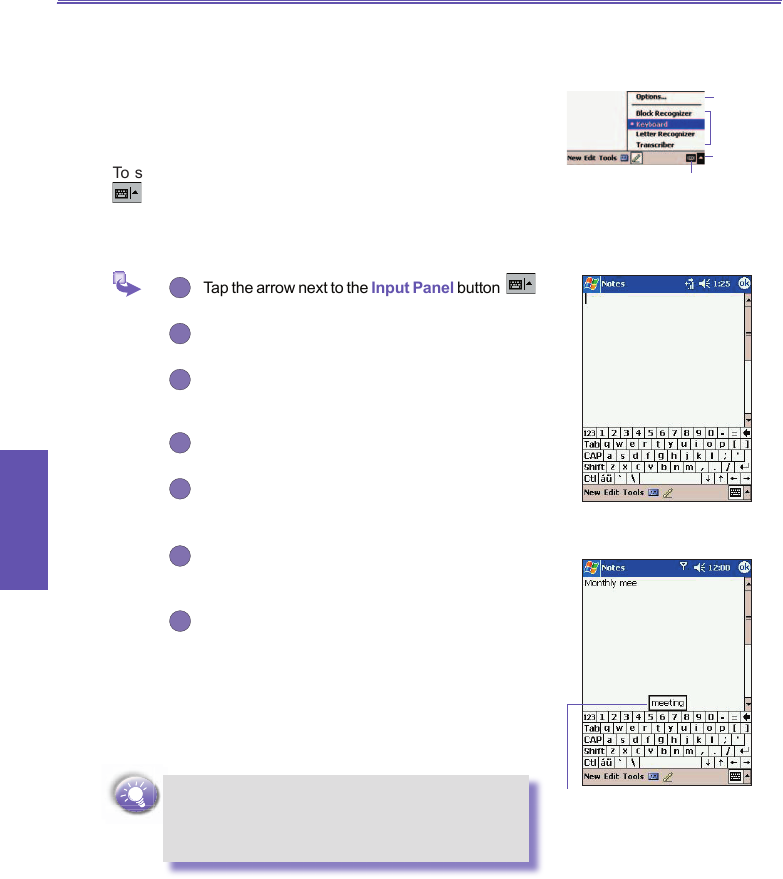
Using the Input Panel
Use the input panel to enter information in any program on
your device. You can either type using the soft Keyboard
or write using Letter Recognizer, Block Recognizer, or
Transcriber. In either case, the characters appear as typed
text on the screen.
To show or hide the input panel, tap the Input Panel button
. To see your choices tap the arrow next to the Input
Panel button.
a. To type with the soft keyboard
1
Tap the arrow next to the Input Panel button
and then Keyboard.
2
To type lowercase letters, tap the keys with the
stylus.
3
To type a single uppercase letter or symbol, tap
the Shift key. To tap multiple uppercase letters
or symbols, tap the CAP key.
4
For uppercase, tap and hold the stylus on the
key and drag up.
5
To add a space, tap and hold any key and then
drag the stylus to the right across at least two
others.
6
To backspace one character, tap and hold any
key and then drag the stylus to the left across
at least two others.
7
To insert a carriage return, tap and hold the stylus
anywhere on the keyboard and drag down.
When you use the input panel, your device anticipates the
word you are typing or writing and displays it above the input
panel. When you tap the displayed word, it is automatically
inserted into your text at the insertion point. The more you use
your device, the more words it learns to anticipate.
If you want to use larger keys, tap the arrow next
to the Input Panel button → then tap Options →
select Keyboard in Input method and → then
select Large Keys.
Tap here if this
is the right word.
Tap to change
input panel
options.
Tap to select an
input panel.
Tap to see the
lists of input
panels.
Tap to open the selected
input panel.
F

Pocket PC Phone User Manual 26
Knowing your
pocket PC
Pocket PC Phone User Manual 27
Knowing your
pocket PC
b. Using Letter Recognizer
With Letter Recognizer you can write letters using the stylus
just as you would on paper.
1
Tap the arrow next to the Input Panel button
and then Letter Recognizer.
2
Write a letter in the box.
When you write a letter, it is converted to typed text that ap-
pears on the screen. For specic instructions on using Letter
Recognizer, with Letter Recognizer open, tap the question
mark next to the writing area.
c. Using Block Recognizer
With Block Recognizer you can input character strokes using
the stylus that are similar to those used on other devices.
1
Tap the arrow next to the Input Panel button
and then Block Recognizer.
2
Write a letter in the box.
When you write a letter, it is converted to typed text that ap-
pears on the screen. For specic instructions on using Block
Recognizer, with Block Recognizer open, tap the question
mark next to the writing area.
F

Pocket PC Phone User Manual 28
Knowing your
pocket PC
Pocket PC Phone User Manual 29
Knowing your
pocket PC
d. Switching to Transcriber
With Transcriber you can write anywhere on the screen using
the stylus just as you would on paper. Unlike Letter Recog-
nizer and Block Recognizer, you can write a sentence or
more of information. Then, pause and let Transcriber change
the written characters to typed characters.
1
Tap the arrow next to the Input Panel button
and then Transcriber.
2
Write anywhere on the screen.
For specic instructions on using Transcriber, with Tran-
scriber open, tap the question mark in the lower right hand
corner of the screen.
e. To punctuate in Transcriber :
1
Tap the keyboard button on the toolbar.
2
Tap the desired punctuation.
3
Tap OK to hide the keyboard.
f. To learn about writing in Transcriber :
1
Tap button on the toolbar.
2
In the screen that appears, select the letter you
want to learn about, and then tap on one of the
examples given above.
For specic instructions on using Transcriber, with Tran-
scriber open, tap the question mark in the right hand
corner of the tool bar.
Click on a letter
for a demonstration
F

Pocket PC Phone User Manual 28
Knowing your
pocket PC
Pocket PC Phone User Manual 29
Knowing your
pocket PC
g. To select typed text :
If you want to edit or format typed text, you must select it
rst.
Drag the stylus across the text you want to select.
You can cut, copy, and paste text by tapping and
holding the selected words and then tapping an
editing command on the pop up menu, or by tapping
the command on the Edit menu
To change word suggestion options, such as the
number of words suggested at one time,
Tap → Setting → Personal tab → Input →
Word Completion tab
h. Editing text
Each input program provides curser keys to move through text
and backspace so that you can correct spelling, grammar or
insert additional information. Alternatively, you can use your
stylus to make an insert.
After you have made an insert, you can use any of the in-
put methods described above to add additional text at the
insertion point.

Pocket PC Phone User Manual 30
Knowing your
pocket PC
Pocket PC Phone User Manual 31
Knowing your
pocket PC
2.3 Writing on the Screen
In any program that accepts writing, such as the Notes
program, and in the Notes tab in Calendar, Contacts,
and Tasks, you can use your stylus to write directly on the
screen. Write the way you do on paper. You can edit and
format what you have written and convert the information to
text at a later time.
To write on the screen :
Tap the pen button to switch to writing mode.
This action displays lines on the screen to help you
write.
Some programs that accept writing may not
have the pen button. See the documentation for
that program to nd out how to switch to writing
mode.
To select writing :
If you want to edit or format writing, you must select it rst.
1
Tap and hold the stylus next to the text you want
to select until the insertion point appears.
2
Without lifting, drag the stylus across the text
you want to select.
If you accidentally write on the screen, tap Tools, then Undo
and try again. You can also select text by tapping the Pen
button to deselect it and then drag the stylus across the
screen.
You can cut, copy, and paste written text in the same way
you work with typed text: tap and hold the selected words
and then tap an editing command on the pop up menu, or
tap the command on the Edit menu.
Tap the Pen button and
use your stylus like a pen.
Tap the Pen button again to select
the writing you want

Pocket PC Phone User Manual 30
Knowing your
pocket PC
Pocket PC Phone User Manual 31
Knowing your
pocket PC
Converting writing to text
1
Tap Tools and then Recognize.
2
If you want to convert only certain words, select
them before tapping Recognize on the Tools
menu (or tap and hold the selected words and
then tap Recognize on the pop up menu). If a
word is not recognized, it will be left as writing.
If the conversion is incorrect, you can select different words
from a list of alternates or return to the original writing.
Tap and hold the incorrect word (tap one word at a
time). On the pop up menu, tap Alternates. A menu
with a list of alternate words appears. Tap the word
you want to use, or tap the writing at the top of the
menu to return to the original writing.
To get good recognition :
1
Write neatly.
2
Write on the lines and draw descanters below the
line. Write the cross of the “t” and apostrophes
below the top line so that they are not confused
with the word above. Write periods and commas
above the bottom line.
3
For better recognition, use the Tools menu to
increase the zoom to 300%.
4
Write the letters of a word closely and leave
big gaps between words so that the device can
easily tell where words begin and end.
5
Hyphenated words, foreign words that use
special characters such as accents, and some
punctuation cannot be converted.
If you edit or add to a word after attempting to recognize it,
the new writing will not be included if you attempt to recog-
nized it again. Tap the word you want to use
or, tap to return to your original
writing.
The writing is turned
into text.

Pocket PC Phone User Manual 32
Knowing your
pocket PC
Pocket PC Phone User Manual 33
Knowing your
pocket PC
2.4 Drawing on the Screen
You can draw on the screen in the same way that you write
on the screen. The difference between writing and drawing
on the screen is how you select items and how they can be
edited. For example, selected drawings can be re-sized,
while writing cannot.
To create a drawing :
Cross three ruled lines on your rst stroke. A drawing
box appears. Subsequent strokes in or touching the
drawing box become part of the drawing. Drawings
that do not cross three ruled lines will be treated as
writing.
To select a drawing :
If you want to edit or format a drawing, you must select it
rst.
1
Tap and hold the stylus on the drawing until the
selection handle appears. To select multiple
drawings, deselect the pen button and then
drag to select the drawings you want.
2
You can cut, copy, and paste selected drawings
by tapping and holding the selected drawing and
then tapping an editing command on the pop
up menu, or by tapping the command on the
Edit menu. To re-size a drawing, make sure the
Pen button is not selected, and drag a selection
handle.
To change the zoom level so it is easier to work
or view your drawing, tap Tools and then select
a zoom level.
Pen button
The drawing box indicates
the boundaries of the drawing.

Pocket PC Phone User Manual 32
Knowing your
pocket PC
Pocket PC Phone User Manual 33
Knowing your
pocket PC
2.5 Recording a Message
In any program where you can write or draw on the screen,
you can also quickly capture thoughts, reminders, and phone
numbers by recording a message. In Calendar, Tasks, and
Contacts, you can include a recording in the Notes tab. In the
Notes program, you can either create a stand-alone recording
or include a recording in a written note. If you want to include
the recording in a note, open the note rst. In the Inbox pro-
gram, you can add a recording to an e-mail message.
To create a recording
1
Hold your device’s microphone near your mouth
or other source of sound.
2
Tap → Notes →
3
To start recording, tap . A beep will sound.
4
To stop recording, tap . Two beeps will sound.
The new recording appears in the note list or as
an embedded icon.
You can also make a recording by tapping the
Record button on the Recording toolbar.
Indicates an embedded
recording.
Tap to begin recording
Tap to show or hide
the Recording toolbar

Pocket PC Phone User Manual 34
Knowing your
pocket PC
The Find feature on your device helps you quickly locate
information.
1
On the → tap Find.
2
In Find, enter the le name, word, or other
information you want to search for. If you have
looked for this item before, tap the Find arrow
and select the item from the list.
3
To help narrow your search select a data type
under Type.
4
Tap Go. The My Documents folder and sub-
folders are searched.
5
In the Results list, tap the item you want to
open.
To quickly nd information that is taking up storage
space on your device, select Larger than 64 KB
in Type.
2.6 Finding and Organizing
Information

Chapter 3
Using Your Phone
3.1 About Your Phone
3.2 Making a Call
3.3 Receiving a Call
3.4 In-call Options
3.5 Contacts Information
3.6 Photo Contacts
3.7 Additional Dialing Information
3.8 Secure Your Phone

Pocket PC Phone User Manual36
Using Your
Phone
Pocket PC Phone User Manual 37
Using Your
Phone
3.1 About Your Phone
Like a standard mobile phone you can use your Pocket PC
to keep track of calls and send SMS messages. You can also
take notes while talking, dial directly from Microsoft Contacts
and easily transfer contacts between your SIM card and the
RAM of your device.
About SIM cards
The Subscriber Identication Module (SIM) card, also referred
to as a smart card, ts into your device. It can contain:
nMobile phone service provider account details.
nInformation regarding service access and preferences.
nContact information, which can be moved to Contacts on
your device.
nAny additional services to which you may have a sub-
scription.
For more information regarding SIM cards, see your mobile
phone service provider’s documentation.
To install a SIM cards :
1
Turn over your device and press the xing lock
button to remove the back cover.
REMOVING THE BATTERY WILL TURN OFF
YOUR DEVICE, MAKE SURE YOU HAVE SAVED
ANY DATA IN OPENED PROGRAMS.
BE SURE TO CHECK THE BACKUP BATTERY
POWER REMAINS AT LEAST AT 50% OR
ABOVE BEFORE YOU REMOVE THE MAIN
BATTERY BY TAPPING → Settings →
System tab → Power.
G
F

Pocket PC Phone User Manual38
Using Your
Phone
Pocket PC Phone User Manual 39
Using Your
Phone
About The Dialer Screen
To access the Dialer Screen, tap , then Phone, or press
on your device. From this screen, you can access Call
Log, Speed Dial and Phone Setting. Signal status informa-
tion and important icons that tell you about your call include
:
1
The icon indicates the strength of the signal.
2
Last number details are displayed here.
3
Keypad for inputting.
4
Task bar to access phone setting.
5
View all history including all received, dialed and
missed calls.
6
Stores numbers you call often.
7
Tap to make a call.
Indicators
Below are some of the status icons you may see.
1
2
3
4
5
6
7
Indicator Meaning
Phone off or out of network service. Tap this
icon to turn on the phone
In network service, tap this icon to turn off
the phone.
Call Missed. Tap this icon to view the call(s)
you missed.
Unread E-mail or SMS. Tap the icon to view
unread SMS or E-mail.
Connecting in progress. The icon will dis-
appear when you are connected to your
ISP.
Indicates your connection is at full
strength.

Pocket PC Phone User Manual38
Using Your
Phone
Pocket PC Phone User Manual 39
Using Your
Phone
The Navigation Pad and Dialing
1
Take Call - Press to take an incoming call.
Dialer Screen -Press to activate the dialer
screen.
Speakerphone - During a call, press and hold
to turn the speakerphone on or off.
Dial - Press to dial a number.
2
Scroll Up - Press to scroll up through a list.
3
End Call - Press to end a call.
Phone Signal - Press and hold to turn phone
on or off.
4
Call Log - After launching the dialer screen,
press to enter the Call Log feature.
5
Scroll Down - Press to scroll down through a
list.
6
Center - Press to select a menu item.
7
Speed Dial - After launching the dialer screen,
press to enter the Speed Dial feature.
Entering Your PIN
Most SIM cards are preset with a PIN ( Personal Identi-
cation Number), provided by your mobile service provider,
which you need to enter whenever you use your device.
1
Enter the preset PIN assigned to you by your
mobile phone service provider (please contact
your mobile service provider).
2
Tap button.
If your PIN is entered incorrectly three times, the
SIM card will be blocked. If this happens, you can
unblock it with the PIN Unblocking Key from your
mobile phone service provider.
1
2
3
4
5
6
7

Pocket PC Phone User Manual40
Using Your
Phone
Pocket PC Phone User Manual 41
Using Your
Phone
Checking Your Connection
The default settings for your device are programmed to as-
sume that you want to use your phone. Provided you have
inserted a SIM card, your device will automatically connect
your mobile phone to your service provider’s network.
The icon indicates that you are connected to your service
provider's network. A full strength signal is indicated by .
As the strength of the signal diminishes so will the number of
vertical bars in the icon, with no bars indicating no signal.
IN MANY COUNTRIES YOU ARE REQUIRED BY
LAW TO TURN OFF YOUR PHONE WHEN YOU
FLY. TURNING OFF YOUR POCKET PC DOESN'T
TURN OFF YOUR PHONE; YOU MUST TURN
OFF YOUR WIRELESS CONNECTION TO YOUR
OPERATOR’S NETWORK.
Turning The Phone On and Off
You can turn your phone on and off while keeping your actual
device turned on.
1
While using any program on your device, tap
in the title bar at the top of the phone’s display.
2
Tap Turn on or Turn off option in the pop-up
menu.
3
To receive calls when your device is turned off,
leave the Phone turned on.
You can use other programs on your device during
a call. To quickly switch back to Phone, tap ,
or tap → Phone.

Pocket PC Phone User Manual40
Using Your
Phone
Pocket PC Phone User Manual 41
Using Your
Phone
Adjusting The Phone Volume
1
During a call, tap or press the volume on
the side of your device.
2
You can select to adjust the phone volume
(ring) or device volume (notication levels
and MP3) on the pop-up menu.
3
If you select Vibrate mode, will appear in
the title bar at the top of the phone display.
4
Turn off the volume by choosing the Off
option.
To adjust the conversation phone volume, you
must do it during a call. Adjusting the volume at
another time will affect the ring, notication and
MP3 levels.

Pocket PC Phone User Manual42
Using Your
Phone
Pocket PC Phone User Manual 43
Using Your
Phone
3.2 Making a Call
With your Pocket PC Phone, you can make a call from
the Dialer, Contacts, Speed Dial, Call History, and SIM
Manager.
To make a call from the Dialer :
The most direct method is by using the Phone keypad.
1
Press to bring up the dialer screen.
2
Tap the number on the keypad then tap
or press button.
Back Spacing and Deleting
If you tap a wrong number, you can back space to
erase individual numbers one at a time.
You can also delete all the numbers in the window by
tapping Edit and then Clear.

Pocket PC Phone User Manual42
Using Your
Phone
Pocket PC Phone User Manual 43
Using Your
Phone
To make a call from Contacts :
You can make a call from Contacts in the following ways :
Option 1
Press the Microsoft Contacts Button, nd the contact
and then tap twice -- once to send to the dialer
screen and once to call.
The pop up menu and button will by default
display Call Work Tel. However, you can
customize it so that the mobile number or e-mail
is displayed instead, see Option 3 below for
specic details.
Option 2
Select a contact in the contacts list and then press
left or right on the navigation pad -- the number on
the screen will change.
Option 3
1
In the contacts list, tap the w in the right column
next to the contact you want to customize. A
pop-up menu will display the phone numbers
and e-mail addresses for this contact with a dot
next to the priority number.
2
In the pop-up menu select a priority -- If you
selected mobile number, m should now be in
the right column next to the contact.
tap the w here to pop-up all the phoned
numbers and e-mail for this contact
G

Pocket PC Phone User Manual44
Using Your
Phone
Pocket PC Phone User Manual 45
Using Your
Phone
To make a call from Speed Dial :
Create speed dials to call frequently-used numbers with a
single tap. Before you can create a speed dial entry for a
phone number, that number must already exist in Contacts.
1
From the Phone keypad, tap →
New.
2
Tap the desired contact name and number.
3
In the Location eld, tap the Up/Down arrows to
select an available location to assign as the new
speed dial entry. The rst speed dial location is
reserved for your voice mail.
By memorizing the position in the Speed Dial list of a number,
you can dial the number by entering its position number.
For example:
In the picture on the up-right, Alex Liang is at position 3. To
dial his number simply tap and hold 3 on the dialer keypad; if
the number holds a position of 10 or more, tap the rst number,
and then tap and hold the second to dial.
By default the Location function will give you the
next available position in the Speed Dial list. If you
want to put a number in a position that is already
occupied, the new number will replace the number
already there.
Tips for Speed Dial setting
To create a speed dial entry from Contacts, tap and
hold the contact name, tap Add to Speed Dial, and
then tap the Up/Down arrows to select an available
location to assign as the new speed dial entry.
To delete a speed dial entry, go to the Speed Dial
list, tap and hold the contact name in the box to the
right of the assigned speed dial number, and then
tap Delete.

Pocket PC Phone User Manual44
Using Your
Phone
Pocket PC Phone User Manual 45
Using Your
Phone
To make a call from the Call
History :
1
Go to Phone and press the right side of the
navigation pad or tap
2
Find the call details by rst selecting the category
it is led under. For example, if it is in All calls
select All calls from the drop down menu in the
top-left corner.
3
Use the navigation pad to nd the number and
then tap or the icon to the left of the number
you wish to call.
4
Call History icons include :
→ incoming calls ; → outgoing calls;
→ missed calls.
To make a call from SIM Manager :
1
Tap → Programs → SIM Manager -- wait
for your SIM card contents to load.
2
Tap and hold the name or phone number of the
person you wish to call, and then select Call
from the pop-up menu.

Pocket PC Phone User Manual46
Using Your
Phone
Pocket PC Phone User Manual 47
Using Your
Phone
3.3 Receiving a Call
To answer an incoming call :
1
Tap Answer, or press on your device.
2
Tap Ignore or press to reject the call.
If you reject a call the busy tone will be sent out.
To end a call :
Once an incoming or outgoing call is proceeding, you
can press or tap to end the call.
3.4 In-Call Options
Your device noties you when you have another incoming
call and gives you the choice of rejecting or accepting the
call. If you accept, you can choose to switch between the two
callers or set up a conference call between all three parties.
A conference call can include up to six people. See page 47
for more details.
Putting a call on hold
1
Tap Answer to the take the 2nd call and put the
1st on hold.
2
To end the 2nd call and go back to the 1st, tap
or press .

Pocket PC Phone User Manual46
Using Your
Phone
Pocket PC Phone User Manual 47
Using Your
Phone
To swap between calls :
You can choose to swap backwards and forwards
between 2 callers by pressing .
To set up conference calls :
1
Either put a call on hold, dial a 2nd number and
wait for it to be picked up. Or, accept a 2nd
incoming call when you already have one in
progress.
2
In the screen that appears tap .
3
If the conference connection is successful the
word Conference will appear at the top of the
phone dialer screen (see right).
4
To add additional people to your conference
call tap , key in the number, and then
to return and continue.
Making a Note
Regardless of whether you call from the Dialer, Contacts,
Call Log, Speed Dial or SIM Manager, you can take notes
during a call. After you have nished the note it will be saved
as an attachment to your call in one of the Call Log folders.
a. To make a note :
1
After you have entered a number and tapped
or , tap the icon at the bottom
of the screen.
2
Use any of the input methods to record your note
and then tap OK. You can nish your note during
or after the call.

Pocket PC Phone User Manual48
Using Your
Phone
Pocket PC Phone User Manual 49
Using Your
Phone
Checking Your Voice Mail
The rst speed dial location defaults as your voice mailbox.
When you insert your SIM card into your Pocket PC Phone, it
will automatically detect and set as default the voice mailbox
number of your mobile service provider.
To retrieve your voice mail :
On the Phone screen, tap or press the left
side of the navigation pad, select Voice Mail
and then press .
3.5 Contacts Information
Contacts can be imported in the following different ways:
1
Your SIM card - You interchange your SIM card
between your Pocket PC Phone and another
device; while using the other device you create
one or more new contacts on the SIM card.
2
Call History - New contact numbers can be
found in incoming or missed calls.
Important to import contacts -
1 Backup your SIM numbers to your device.
2 Speed Dial numbers must be set in Contacts,
not on the SIM card.
3 Creating Contacts in Microsoft Contacts
creates more detailed records.
Pocket PC Phone User Manual50
Using Your
Phone
Pocket PC Phone User Manual 51
Using Your
Phone
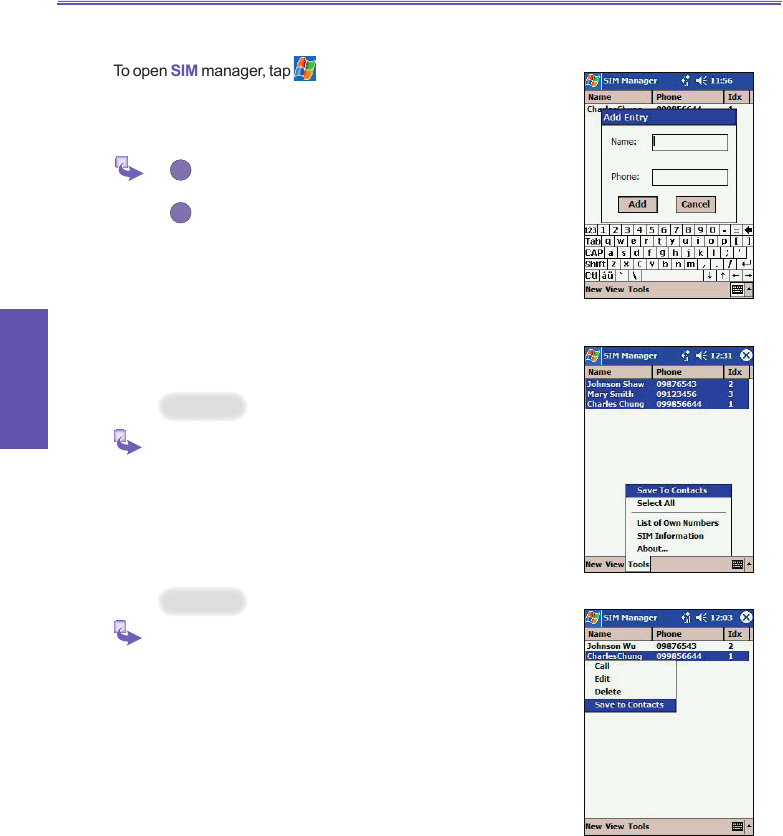
SIM Manager
To open SIM manager, tap → Programs → SIM Manager
-- wait for your SIM card contents to load.
a. To create a SIM contact :
1
After the SIM contents have loaded, tap New.
2
Fill in the Name and Phone details then tap
Add.
b. To transfer contacts from SIM to
Contacts :
Option 1
On SIM Manager display, tap Tools → Select All →
and then Save to Contacts.
Option 2
Press and hold the center of the navigation pad - or
tap and hold a contact from the list - and then select
Save to Contacts from the pop up menu.

Pocket PC Phone User Manual50
Using Your
Phone
Pocket PC Phone User Manual 51
Using Your
Phone
c. To save personal numbers :
You can choose to save your personal phone numbers in a
separate screen in SIM Manager.
1
Tap → Programs → SIM Manager → Tools
→ and then List of Own Numbers.
2
Add a number to the screen and then tap OK.
Call History
Tap on the phone screen to pop-up the call history
list to the right :
To add a record to Contacts from Call
History :
1
Find the call details you want to add.
2
Press and hold the stylus or press and hold the
navigation pad center; select Save to Contacts
in the pop-up menu that appears .
3
In the Save to Contacts screen, add additional
contact details and press the navigation pad
center or tap OK.
The call details in the Call History will then be amended
and displayed under the name of the contact, not their tele-
phone number.

Pocket PC Phone User Manual52
Using Your
Phone
Pocket PC Phone User Manual 53
Using Your
Phone
Manage Your Call History
Call History details all incoming, outgoing, and missed calls
and also provides a summary of total calls. Call History can
also tell you when a call was initiated, how long it lasted, and
provides easy access to any notes taken during the call.
a. Viewing calls details
Tap in the top left corner of the screen and then select a
category from the drop down menu.
Calls are categorized as follows:
nAll Calls - displays all calls made to and from the
phone in chronological order.
nMissed - displays calls that were not
answered.
nOutgoing - displays calls made from the
phone.
nIncoming - displays calls made to the
phone.
nBy Caller - list calls alphabetically
according to caller.
b. To view duration of calls :
Go to Call History, nd the call you are looking in,
and then tap it once.
c. To delete Individual calls from Call
History :
Tap and hold the stylus on the call to be deleted, and
then select delete from the pop up menu.
d. To delete all calls from Call History :
Tap Tools → and then Delete all Calls.
Pocket PC Phone User Manual54
Using Your
Phone
Pocket PC Phone User Manual 55
Using Your
Phone
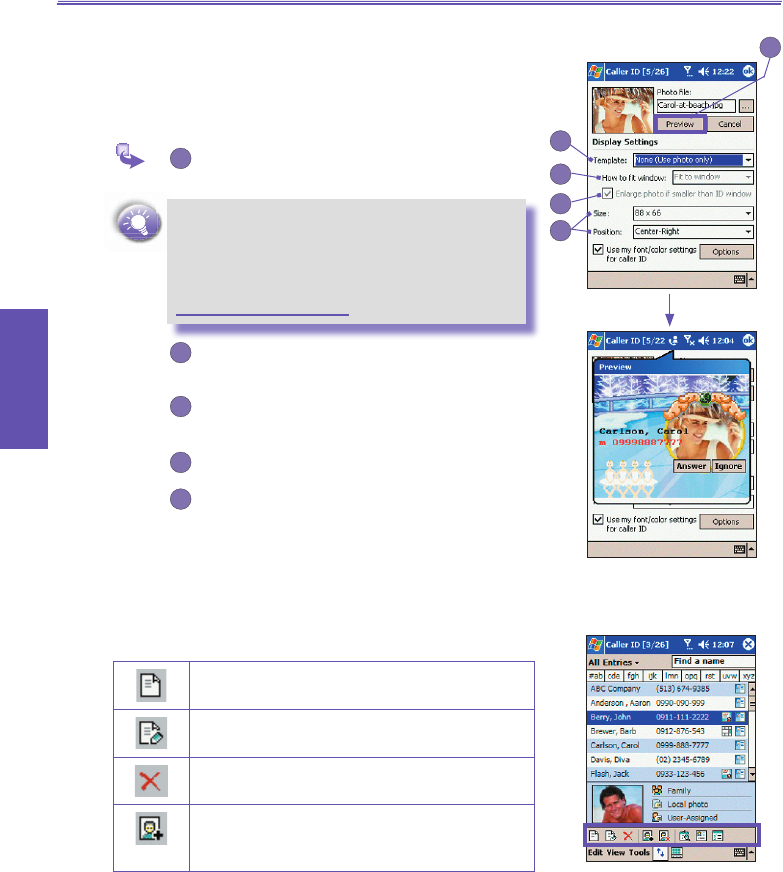
To preview and adjust settings:
In step 5 above, after you tap OK once you will arrive at the
preview and display settings screen.
In Display Settings you can:
1
Add extra style by assigning a template to the
photo.
A few sample Photo Contacts templates
(animated graphical templates that can frame your
assigned photos) are included in your Pocket PC’s
local storage in the \My Documents\Templates
folder. For more templates go to IA Style website
http://www.iastyle.com
2
Choose how you want the photo to t to the
window.
3
Enlarge the photo if it is smaller than the
window.
4
Choose a size and position for the picture.
5
Preview all of these changes by tapping
Preview.
Toolbar Icons
The Toolbar provides a convenient way for you to select fre-
quently-used commands. Each is explained in more detail
in its own subsection later in this Manual. From left to right,
the functions of the icons on the Toolbar are:
n Create a new Contact entry (same as
New... on the Edit Menu).
n Modify data for the selected Contact entry
(same as Edit... on the Edit Menu).
n Delete the selected Contact entry (same
as Delete on the Edit Menu).
n Assign a Photo ID to a Contact entry
(same as Assign Photo... on the Edit
Menu).
1
2
3
4
5
Preview with a selected
template.

Pocket PC Phone User Manual54
Using Your
Phone
Pocket PC Phone User Manual 55
Using Your
Phone
n Remove a Photo ID assignment (same as
Unassign Photo on the Edit Menu).
n Preview the current Photo/template as-
signment (same as Preview... on the View
Menu).
n Invokes “Detailed View” for the current
entry (same as Properties... on the View
Menu).
n Opens the Options screen (same as Op-
tions... on the Tools Menu).
To assign a photo from the camera:
1
Tap → Programs → Photo Contacts.
2
Select a contact from the list, or create a new
one by tapping Edit, then New. Contacts here
fully mirror those in Microsoft Contacts.
3
Tap Edit then Assign Photo From Camera.
4
After you take the picture, you will be returned
to the Display Settings and Preview screen.
To unassign a photo:
1
Tap → Programs → Photo Contacts..
2
Select an existing contact entry that you want to
remove.
3
Tap Edit → then Unassign Photo → Tap yes in
the pop-up box.
To view your contacts by photo:
1
Tap → Programs → Photo Contacts.
2
Tap -- on the Command Bar; Or, tap View →
then Photo Dialer View.

Pocket PC Phone User Manual56
Using Your
Phone
Pocket PC Phone User Manual 57
Using Your
Phone
When in Photo Dialer view mode, the View Menu contains
three additional commands that allow you to specify the
size of the thumbnail images: Large Thumbnails, Normal
Thumbnails and Small Thumbnails.)
You can enter the Detailed View of Photo Contact using
any of these methods:
n Select the desired Contact entry → then select Proper-
ties... on the View Menu.
n Select the desired Contact entry → then tap the Proper-
ties icon on the Toolbar.
n Select the desired Contact entry → then press the Action
button on your Pocket PC.
n Double-tap a Contact entry.
To disable the displaying of photos:
1
Tap → Programs → Photo Contacts..
2
Tap Tools → Options → then uncheck the
Display photo during incoming or waiting
call box.
To manage your groups:
You can create a new group, rename, delete, and assign and
unassign a photo to a group.
Tap Tools → then Manage group.
To assign a contact to a group:
1
Tap → Programs → Photo Contacts..
2
Select a contact from the list, or create a new
one by tapping Edit, then New. Contacts here
fully mirror those in Microsoft Contacts.
3
Tap Edit → then Assign Group.
4
Select a group from the list, then tap OK.
5
To unassign tap Unassign Group on the Edit
menu.

Pocket PC Phone User Manual58
Using Your
Phone
Pocket PC Phone User Manual 59
Using Your
Phone
3.7 Additional Dialing
Information
To make an emergency call :
Enter the international emergency number 112 then
or press button.
n Some mobile phone service providers may
require that a SIM card is inserted and/or a
PIN entered in order to 112. Consult with your
service provider for more information.
n Additional emergency numbers may be
included on your SIM card. Consult with your
mobile service provider for more information.
To make an international call :
1
Tap and hold the key until the+ sign
appears. The + replaces the international prex
of the country of where you are calling.
2
Enter the full phone number you want to dial. It
includes country code, area code (without the
leading zero) and phone number.
3
Tap or press .
3.8 Secure Your Phone
You can customize the level of security you want to have on
your Pocket PC phone by locking the keypad, the entire device,
or the SIM card.

Pocket PC Phone User Manual58
Using Your
Phone
Pocket PC Phone User Manual 59
Using Your
Phone
Locking the keypad
The keypad lock turns off the keypad functionality. This is a
helpful feature if, for example, your Pocket PC phone is turned
off and in your pocket, and you want to prevent accidental
keypress from pressing a button etc .
1
Tapping → Settings → System tab →
Button Lock
2
Select Lock all buttons except Power
button.
3
To unlock your keypad, tap Do not lock
buttons.
Locking your phone
Locking your Pocket PC phone prevents access to personal
data. When you enable this feature, your Pocket PC phone
will automatically lock after a specied time of inactivity. A
screen will be displayed requiring your Pocket PC phone lock
password before access is granted.
1
Tap → Settings → Personal →
Password.
2
Select the type of password you would like
to use : Simple 4 digit password or Strong
alphanumeric password.
A strong password must have at least 7 characters
that are a combination of uppercase and lowercase
letters, numerals, and punctuation.
3
Enter the password and, if necessary, conrm
the password.
4
Select how long your mobile device must be
turned off before the password is required for
using the device by tapping Prompt if device
unused for.

Pocket PC Phone User Manual60
Using Your
Phone
Locking the SIM card
You can protect your Pocket PC phone from unauthorized
use by assigning a PIN (Personal Identication Number).
Your rst PIN will be given to you by your mobile phone
service provider.
1
From the Phone keypad, tap Tools → Options
→ Phone tab.
2
Select Require PIN when phone is used.
3
To change the PIN at any time, tap Change
PIN.
Emergency calls can be placed at any time,
without requiring a PIN.

Chapter 4
Synchronizing Information
4.1 Using ActiveSync
4.2 Synchronizing Information
4.3 Synchronizing by Using an Infrared
Connection
4.4 ActiveSync Errors

Pocket PC Phone User Manual62
Synchronizing
Information
Pocket PC Phone User Manual 63
Synchronizing
Information
4.1 Using ActiveSync
Using Microsoft ActiveSync you can synchronize the
information on your PC with the information on your Pocket
PC Phone. Synchronization compares the data on your device
with your PC and updates both with the most recent informa-
tion. With ActiveSync, you can:
nKeep Pocket Outlook data up-to-date by synchronizing
your device with Microsoft Outlook data on your PC.
nChoose to synchronize Inbox, Calendar, and Contacts
with a server so that you have the latest information, even
when your desktop computer is turned off.
nCopy (rather than synchronize) les between your device
and your desktop PC.
nControl when synchronization occurs by selecting a syn-
chronization mode.
nSelect which information types are synchronized and
control how much data is synchronized.
By default, ActiveSync does not automatically
synchronize all types of information. Use
ActiveSync options to turn synchronization on
and off for specic information types.
Using Server ActiveSync, you can synchronize
information directly with a Microsoft Exchange
Server if your company is running Microsoft®
Mobile Information Server 2002 or later.
Installing ActiveSync
Before you begin synchronization, install ActiveSync on
your desktop computer from the Pocket PC Phone 2003
Companion CD. ActiveSync is already installed on your
Pocket PC Phone.

Pocket PC Phone User Manual62
Synchronizing
Information
Pocket PC Phone User Manual 63
Synchronizing
Information
Creating a Partnership
After the installation is complete, the New
Partnership Wizard helps you set up a part-
nership between your phone and your desktop
computer and/or a server so that you can start
synchronizing information and customizing your
synchronization settings.
In the New Partnership Wizard
select Synchronize with this desk-
top computer. Unless you are
certain that your company is running
Microsoft Mobile Information Server
2002 or later and you know the server
name, then choose Synchronize
with Microsoft Mobile Information
Server and/or this desktop
compute. For more information,
contact your network administrator
or service provider.
Select the items you want in the synchronization setting
then you can start to synchronize your data between
your device and your PC.
Your rst synchronization will automatically begin
when you nish using the wizard. After the rst
synchronization, you will notice that your Out-
look information now appears on your pocket
PC phone.
Tap to synchronized via IR or change
synchronization settings.
View connection status.
Tap to connect and
synchronize
Tap to stop
synchronization
View synchronization
status.

Pocket PC Phone User Manual64
Synchronizing
Information
Pocket PC Phone User Manual 65
Synchronizing
Information
Synchronizing Calendar
nCalendar items stored on your Pocket PC
Phone can be synchronized with calendar
items stored on your desktop PC and/or on
a Microsoft Exchange Server. By default,
calendar items from the last two weeks will
be synchronized.
nCalendar items created on your Pocket
PC Phone are copied to your desktop PC
and/or server during synchronization, and
vice versa. Similarly, Calendar items that are
deleted from your phone are deleted from your
desktop computer and/or server during syn-
chronization, and vice versa. This keeps your information
up-to-date in all locations.
Synchronizing Contacts
nContacts stored on your phone can be synchronized with
contacts stored on your desktop computer or on a Micro-
soft Exchange Server. By default, all of your contacts will
be synchronized.
nContacts created on your phone are copied to your desk-
top computer and/or server during synchronization, and
vice versa. Similarly, contacts that are deleted from your
phone are deleted from your desktop computer and/or
server during synchronization, and vice versa. This keeps
your information up-to-date in all locations.
Synchronizing Tasks
nTasks stored on your phone can be synchronized with
tasks stored on your desktop computer. Task synchroniz-
ation is automatically selected in ActiveSync. By default,
all of your incomplete tasks will be synchronized.
nTasks created on your phone are copied to your desktop
computer during synchronization, and vice versa. Simi-
larly, tasks that are deleted from your phone are deleted
from your desktop computer during synchronization, and
vice versa. This keeps your information up-to-date in all
locations.
Tasks can be synchronized only with your desktop
computer. They cannot be synchronized with a
server.

Pocket PC Phone User Manual66
Synchronizing
Information
Pocket PC Phone User Manual 67
Synchronizing
Information
4.3 Synchronizing Using an
Infrared Connection
You can use an infrared connection to create a direct con-
nection between your phone and another mobile device or
desktop computer quickly. This method is ideal for quickly
switching between multiple devices since there are no
cables or adapters to change. When creating a partner-
ship, you must connect using infrared, a cable, or a cradle
connection.
For more information about synchronizing using an infrared
connection or other connection types, see ActiveSync Help
on your desktop computer.
Transferring Items Using Infrared
Using infrared (IR), you can also send and receive information,
such as contacts and appointments, between two devices.
a. To send information :
1
Switch to the program where you created the
item you want to send and locate the item in the
list.
2
Align the IR ports so that they are unobstructed
and within close range.
3
Tap and hold the item, and tap Beam Item on
the pop up menu.
You can send items, but not folders, from File
Explorer. Tap and hold the item you want to send,
and then tap Beam File on the pop up menu.
b. To receive information :
1
Align the IR ports so that they are unobstructed
and within close range.
2
Have the owner of the other device send the
information to you. Your device will automatically
receive it.

Pocket PC Phone User Manual68
Synchronizing
Information

Chapter 5
Personalizing Your Pocket PC
Phone
5.1 Device Settings
5.2 Phone Settings

Pocket PC Phone User Manual70
Personalizing
Pocket PC Phone User Manual 71
Personalizing
Icon Program
Backlight
Customizes the backlight and brightness for
power saving purpose.
Button Lock
Enables you to lock the buttons on your device
except Power button when device is off.
Certicates
Displays the name of the certicate issuer and
the expiration date.
Clock
Changes the time and sets alarms
Device information
Find information about version, hardware,
identity and call duration.
Memory
Displays the memory allocation status and cur-
rent running programs.
Microphone AGC
Adjusts the volume automatically when you
are recording
Permanent save
Saves contacts to permanent ash memory.
Power
Maximizes battery life.
Regional settings
Customizes the region and relative format for
the region you use.
Remove programs
Creates more memory by removing pro-
grams.
Screen
Re-calibrates the screen and enable/disable
Clear Type feature.

Pocket PC Phone User Manual72
Personalizing
Pocket PC Phone User Manual 73
Personalizing
1
2
4
3
Buttons
To change the assignments for your device's four program
buttons :
1
Tap → Settings → Personal → Buttons.
2
Select a button, a program in Button
Assignment, and then tap OK.
3
In the Up/Down Control tab Delay before rst
repeat changes the time elapsed before scrolling
begins. Repeat rate changes the time it takes
to scroll from one item to the next.
Input
1
Tap → Settings → Personal tab → Input.
2
Select an input method and change desired
options on the Input Method tab; Select
desired option for word completion on the
Word Completion tab, and options for writing
and recording on the Options tab. These options
apply to any program on the device where you
can record or write.
You can also change input Options by tapping
the arrow and then options.

Pocket PC Phone User Manual80
Personalizing
Services
Services settings on the Settings → Phone → Services tab
are primarily used to set options for incoming calls, such as
Call Forwarding, Call Waiting, and Caller ID.
Tap Get Settings to access the settings for a
service.
To change service settings from the phone keypad,
tap Tools → Options → Services tab → tap a
service → Get Settings.
Network
With network settings, you can view available networks,
determine the order in which your phone accesses another
network if the current one is unavailable, and specify whether
you want to change networks manually or automatically. The
current network will remain active until you change it, lose
your signal, or change your SIM card.
nThe network currently in use will be listed at
the top of the screen.
nWhen your current network is unavailable, tap
Select Network to select an alternate.
G
Current network used
on your device.
Feature Function
Call Barring Enables you to block incoming and/or
outgoing calls.
Caller ID Identies caller by displaying their
name and/or phone number.
Call Forwarding Enables you to forward all or selected
incoming calls to a different number.
Call Waiting Noties you of an incoming calls while
you're already on the phone .
Termékspecifikációk
| Márka: | Qtek |
| Kategória: | Mozgó |
| Modell: | 2020 |
Szüksége van segítségre?
Ha segítségre van szüksége Qtek 2020, tegyen fel kérdést alább, és más felhasználók válaszolnak Önnek
Útmutatók Mozgó Qtek

1 Július 2024
30 Június 2024
Útmutatók Mozgó
- Mozgó Samsung
- Mozgó LG
- Mozgó Panasonic
- Mozgó Sharp
- Mozgó Nokia
- Mozgó Lenovo
- Mozgó Toshiba
- Mozgó HP
- Mozgó Hyundai
- Mozgó Hisense
- Mozgó Siemens
- Mozgó Medion
- Mozgó Motorola
- Mozgó Geemarc
- Mozgó Alcatel
- Mozgó Gigaset
- Mozgó Polaroid
- Mozgó Huawei
- Mozgó PEAQ
- Mozgó Sencor
- Mozgó Telefunken
- Mozgó Doro
- Mozgó Google
- Mozgó ZTE
- Mozgó Vodafone
- Mozgó O2
- Mozgó MaxCom
- Mozgó Festool
- Mozgó Sony Ericsson
- Mozgó Sagem
- Mozgó Ulefone
- Mozgó Olympia
- Mozgó TechniSat
- Mozgó Sanyo
- Mozgó NEC
- Mozgó Allview
- Mozgó RCA
- Mozgó HTC
- Mozgó Ericsson
- Mozgó IGET
- Mozgó Lava
- Mozgó Brondi
- Mozgó Fysic
- Mozgó Aligator
- Mozgó Amplicomms
- Mozgó Airbus
- Mozgó Ecom
- Mozgó Sonim
- Mozgó Blu
- Mozgó Sunstech
- Mozgó Swissvoice
- Mozgó NGM
- Mozgó Profoon
- Mozgó Pantech
- Mozgó Kazam
- Mozgó Hagenuk
- Mozgó Palm
- Mozgó Emporia
- Mozgó Phicomm
- Mozgó Crosscall
- Mozgó Neonode
- Mozgó T-Mobile
- Mozgó ITT
- Mozgó Avus
- Mozgó Beafon
- Mozgó Teleline
- Mozgó BenQ Siemens
- Mozgó Telstra
- Mozgó Hiptop
- Mozgó Swisstone
- Mozgó Benefon
- Mozgó STK
- Mozgó Multi Care Systems
- Mozgó Energizer
- Mozgó Kdi
- Mozgó Mobistel
- Mozgó Itel
- Mozgó KhoCell
- Mozgó Jablotron
- Mozgó Elson
- Mozgó Sydney
- Mozgó AT-T
- Mozgó AT Mobile
- Mozgó Black-Berry
- Mozgó Real Phone
- Mozgó Auro
- Mozgó Simvalley
- Mozgó Binom
- Mozgó Elliptik 8
- Mozgó Orange
- Mozgó Ubiquio
- Mozgó I-mate
- Mozgó Telme
- Mozgó GoldGMT
- Mozgó Matsunichi
- Mozgó Meizu
- Mozgó Gionee
- Mozgó Hi
- Mozgó WayteQ
- Mozgó Utano
- Mozgó Siswoo
- Mozgó Tecmobile
- Mozgó Uniwa
- Mozgó Raytac
- Mozgó Sendo
Legújabb útmutatók Mozgó

15 Január 2025
12 Január 2025
12 Január 2025
11 Január 2025

22 December 2024

19 December 2024
5 Október 2024
5 Október 2024
5 Október 2024
5 Október 2024