Használati útmutató Pentax Optio E40
Olvassa el alább 📖 a magyar nyelvű használati útmutatót Pentax Optio E40 (169 oldal) a kamera kategóriában. Ezt az útmutatót 5 ember találta hasznosnak és 2 felhasználó értékelte átlagosan 4.5 csillagra
Oldal 1/169
To ensure the best performance
from your camera, please read
the Operating Manual before
using the camera.
Digital Camera
Operating Manual

Thank you for purchasing this PENTAX Digital Camera.
Please read this manual before using the camera in order to get the most out of
all the features and functions. Keep this manual safe, as it can be a valuable tool
in helping you to understand all the camera’s capabilities.
Regarding copyrights
Images taken using this PENTAX Digital Camera that are for anything other than personal
enjoyment cannot be used without permission according to the rights as specified in the
Copyright Act. Please take care, as there are even cases where limitations are placed on
taking pictures even for personal enjoyment during demonstrations, performances or of items
on display. Images taken with the purpose of obtaining copyrights also cannot be used
outside the scope of use of the copyright as laid out in the Copyright Act, and care should be
taken here also.
Regarding trademarks
• PENTAX and Optio are trademarks of PENTAX Corporation.
• SDHC logo is trademark.
• ImageLink and the ImageLink print system logo are trademarks of Eastman Kodak
Company used under license.
• This product supports PRINT Image Matching III. PRINT Image Matching enabled digital
still cameras, printers and software help photographers to produce images more faithful to
their intentions. Some functions are not available on printers that are not PRINT Image
Matching III compliant.
Copyright 2001 Seiko Epson Corporation. All Rights Reserved.
PRINT Image Matching is a trademark of Seiko Epson Corporation.
The PRINT Image Matching logo is a trademark of Seiko Epson Corporation.
• All other brands or product names are trademarks or registered trademarks of their
respective companies.
To users of this camera
• There is a possibility that recorded data may be erased or that the camera may not function
correctly when used in surroundings such as installations generating strong
electromagnetic radiation or magnetic fields.
• The liquid crystal panel used in the LCD display is manufactured using extremely high
precision technology. Although the level of functioning pixels is 99.99% or better, you
should be aware that 0.01% or fewer of the pixels may not illuminate or may illuminate
when they should not. However, this has no effect on the recorded image.
Regarding PictBridge
PictBridge allows the user to connect the printer and digital camera directly, using the unified
standard for the direct printout of images. You can print images directly from the camera
through a few simple operations.
There is a possibility that the illustrations and the display screen of the LCD monitor in this
manual are different form the actual product.
Regarding Product Registration
In order to better serve you, we request that you complete the product registration, which
can be found on the CD-ROM supplied with the camera or on the PENTAX website. Thank
you for your cooperation.
Refer to the PC Connection Manual (bottom right on page 1) for more information.

1
We have paid close attention to the safety of this product. When using
this product, we request your special attention regarding items marked
with the following symbols.
Warning
• Do not attempt to take the camera apart or remodel the camera. High
voltages are present within the camera, and there is therefore a danger of
electric shocks if the camera is taken apart.
• If the inside of the camera should become exposed as a result of, for
example, the camera being dropped, please do not under any
circumstances touch such exposed portions, as there is a danger of
receiving an electric shock.
• To avoid the risk of it being swallowed by mistake, keep the SD Memory
Card out of the reach of small children. Seek medical attention immediately
if a card is accidentally swallowed.
• Wrapping the strap of the camera around your neck is also dangerous.
Please take care that small children do not hang the strap around their
necks.
• Use an AC adapter that is of the power and voltage specified for exclusive
use with this product. The use of an AC adapter other than that specified
exclusively for use with this product may cause fire or electric shocks.
• If the camera emits smoke or a strange smell, or in the event of any other
irregularity, stop using the camera immediately, remove the batteries or
unplug the AC adapter, and contact your nearest PENTAX Service Center.
Continued use of the camera may result in fire or electric shock.
• During thunderstorms, unplug and discontinue use of the AC adapter.
Continued use could cause equipment failure, a fire, or electric shock.
USING YOUR CAMERA SAFELY
Warning This symbol indicates that violating this item could
cause serious personal injuries.
Caution This symbol indicates that violating this item could
cause minor or medium personal injuries, or material
losses.
About the Camera

2
Caution
• Never try to disassemble or short the batteries. Also, do not dispose of the
batteries in a fire, as they may explode.
• Do not charge any batteries other than rechargeable Ni-MH batteries. The
batteries could explode or catch fire. Batteries for use with this camera
other than Ni-MH batteries cannot be charged.
• Do not place your finger on the flash when it is discharging as there is a
risk of burns.
• Do not discharge the flash while it is touching your clothing as there is a
risk of discoloring of the clothing.
• If any of the battery leakage should come in contact with your eyes, do not
rub them. Flush your eyes with clean water and get medical attention
immediately.
• If any of the battery leakage should come in contact with skin or clothes,
wash the affected areas thoroughly with water.
• Remove the batteries from the camera immediately if they become hot or
emit smoke. Be careful not to burn yourself during removal.
• Some portions of the camera heat up during use, so please take care, as
there is a risk of low temperature burns if such portions are held for long
periods of time.
• Should the LCD be damaged, be careful of glass fragments. Also, be
careful not to allow the liquid crystal to get on your skin or in your eyes or
in your mouth.
• This camera uses two AA alkaline, AA lithium, AA Ni-MH or AA nickel
manganese batteries. Do not use batteries other than those specified here.
Using some other type of battery may cause the camera to function poorly,
or the batteries may rupture or cause a fire.
• AA alkaline, AA lithium and AA nickel manganese batteries cannot be
recharged. Do not try to take the batteries apart. The batteries may rupture
or leak if you try to charge them or take them apart.
• Do not remove the external seal of the battery. If the seal is removed, the
battery may short and may cause a fire, rupture, leak or heat.
• When replacing the batteries, do not combine different brands, types or
capacities. Also, do not combine old batteries with new ones. Doing so may
cause the batteries to rupture or cause a fire.
•
Do not insert the batteries with the positive (+) and negative (–) poles in the
wrong orientation. Doing so may cause the batteries to rupture or cause a fire.
Handling Precautions for Batteries

3
Caution
• Do not place heavy objects on the AC plug cord, allow heavy objects to
drop onto it or allow the AC plug cord to become damaged due to
excessive bending. If the AC plug cord becomes damaged, consult a
PENTAX Service Center.
• Do not short or touch the output terminals of the product while it is still
plugged in.
• Do not plug in the AC plug cord with wet hands. This can cause an
electrical shock.
• Do not subject the product to strong impacts or allow it to drop onto a hard
surface. This can cause a malfunction.
• To reduce the risk of hazards, use only CSA/UL Certified power supply
cord set, cord is Type SPT-2 or heavier, minimum NO.18 AWG copper,
one end with a molded-on male attachment plug cap (with a specified
NEMA configuration), and the other is provided with a molded-on female
connector body (with a specified IEC nonindustrial type configuration) or
the equivalent.
• Take the Worldwide Service Network listing that is included in the package
with you when traveling. This will be useful if you experience problems
abroad.
• When the camera has not been used for a long time, confirm that it is still
working properly, particularly prior to taking important pictures (such as at
a wedding or during traveling). Contents of the recording cannot be
guaranteed if recording, playback or transferring your data to a computer,
etc. is not possible due to a malfunction of your camera or recording media
(SD Memory Card), etc.
• The lens on this camera is not interchangeable. The lens is not removable.
• Do not clean the product with organic solvents such as thinner, alcohol or
benzene.
•
Places of high temperature and humidity should be avoided. Particular care
should be taken regarding vehicles, which can become very hot inside.
• Storing the camera where pesticides and chemicals are handled should be
avoided. Remove from case and store in a well-ventilated place to prevent
the camera from becoming moldy during storage.
About the AC Adapter
Care to be Taken During Handling

4
• As this camera is not waterproof, do not use the camera where it may come
in contact with rain, water or any other liquid.
• Ensure that the camera is not subjected to substantial vibrations, shock, or
pressure. Use a cushion to protect the camera when it is subjected to the
vibrations of a motorbike, car, ship, etc.
• The temperature range in which the camera can be used is 0°C to 40°C
(32°F to 104°F).
• The LCD monitor will become black at a high temperature but will return to
normal when normal temperatures are returned to.
•
The response speed of the
LCD monitor
becomes slow at low temperatures.
This is due to the properties of the liquid crystal and is not a fault.
• Periodic checks are recommended every 1 to 2 years in order to maintain
high performance.
• If the camera is subjected to rapid temperature changes, condensation
may form on the inside and outside of the camera. Therefore put the
camera in a bag or plastic bag, and take the camera out when the
difference in temperature has subsided.
• Be careful not to allow dirt, mud, sand, dust, water, toxic gases or salt to
enter the camera as this may damage the camera. Wipe away any
raindrops or water droplets and allow the camera to dry.
• Refer to “Precautions When Using an SD Memory Card” (p.24) regarding
the SD Memory Card.
• Please note that formatting an SD Memory Card or built-in memory will
delete all data; however it may still be possible to recover that data using
off-the-shelf data recovery software. Please manage your camera’s
memory at your own risk.
• Please do not press forcefully on the LCD monitor. This could cause
breakage or malfunction.
• Be careful not to sit down with the camera in your back pocket as this may
damage the exterior of the camera or the LCD monitor.
• When using a tripod with the camera, be careful not to overtighten the
screw in the tripod socket on the camera.

6
Using the Mode Palettes .................................................................... 45
How to Select the Modes................................................................ 45
Mode Palette List............................................................................45
Taking Pictures 48
Taking Pictures in a Selected Mode..................................................48
Taking Pictures in the Basic Mode (Green Mode)..........................48
Letting the Camera Choose the Optimal Shooting Mode
(Auto Picture Mode)........................................................................50
Letting the Camera Choose the Optimal Settings
(Program Mode) .............................................................................51
Taking Pictures of People (Portrait Mode/Kids Mode).................... 52
Taking Pictures of Your Pet (Pet Mode) .........................................54
Taking Pictures of Dark Scenes
(Night Scene Mode)........................................................................55
Reducing Camera Shake and Blurring When Taking Pictures
(Digital SR Mode) ...........................................................................56
Framing Your Pictures (Frame Composite Mode)..........................57
Taking Panoramic Pictures (Digital Panorama Mode)....................59
Taking Pictures with Customized Settings ......................................61
Selecting the Recorded Pixels........................................................61
Selecting the Quality Level .............................................................63
Using the Zoom ..............................................................................65
Selecting the Focus Mode ..............................................................67
Selecting the Auto Focus Mode (AF Mode)....................................70
Selecting the Flash Mode ...............................................................71
Setting the Sensitivity .....................................................................73
Reproducing the Natural Color of Subject (White Balance) ........... 74
Setting the Exposure (EV Compensation)......................................76
Adjusting Sharpness, Saturation, and Contrast..............................77
Doing More with Useful Functions ....................................................78
Displaying Shooting Information.....................................................78
Using the Self-timer ........................................................................80
Taking a Series of Pictures............................................................. 81
Setting the Date Imprint ..................................................................83
Setting the Instant Review Time.....................................................84
Saving Your Settings (Memory)......................................................85
Recording Movies ...............................................................................87
Recording a Movie.......................................................................... 87
Selecting the Settings for Taking Movies ....................................... 89

10
Camera Features
The Optio E40 features a variety of shooting modes to suit different
situations. Here we briefly describe how to make the most of the key
features of your camera. Together with the explanations of camera
operations, it will enable you to enjoy your camera to the full.
The Optio E40 features an easy-to-see 2.4-inch LCD monitor. In
addition, settings for capture, playback and editing functions are easy to
navigate. Simply select icons that appear on the LCD monitor.
Picture taking has never been simpler in Green Mode. With just one
press of a button, you can capture every smile, every moment, and every
memory. (p.48)
If you are unsure of which shooting mode to use, select b (Auto
Picture). The camera selects the appropriate shooting mode depending
on the scene. *(p.50)
* When you select b (Auto Picture mode), a shooting mode is selected from -
(Standard mode), A (Night Scene mode), q (Landscape mode), and I
(Portrait mode).
Easy-to-Navigate Capture and Playback Functions!
Let the camera choose the optimal settings.
Use the Green Mode to take pictures easily using
standard settings.

12
Front
Back
Names of Parts
Shutter
release button
Flash
Lens
Strap lug
Power switch
Microphone
Self-timer lamp
DC coupler
cable cover
LCD monitor
Battery/card cover
Tripod
socket
Speaker
USB/AV
terminal
Power lamp
ImageLink terminal
(Dock terminal)

13
Normal Display in Still Picture Capture Mode
The display shows information such as the shooting conditions.
Names of Operating Parts
Refer to “Understanding the Button Functions” (p.36 - p.39) for an
explanation of the function of each button.
Monitor Indications
Shutter release button
Power switch
4/W button
Four-way controller
Q button
Zoom/w x y/ / /f button
Green/i button
3 button
+ 1 . 0
+
+
+
+1
1
1
1.
.
.
.0
0
0
0
+ 1 . 0
3 8
3
3
3
38
8
8
8
3 8
1
1
1
14
4
4
4:
:
:
:2
2
2
25
5
5
5
1 4 : 2 5
0
0
0
08
8
8
8/
/
/
/0
0
0
01
1
1
1/
/
/
/2
2
2
20
0
0
00
0
0
07
7
7
7
0 8 / 0 1 / 2 0 0 7
12
1
2
6
3
8
9
10
11
7
4
5

17
1
Getting Started
Attaching the Strap
Attach the strap (O-ST62) supplied with the camera.
1Pass the narrow end of the strap through the strap lug.
2Pass the other end of the strap through the loop and
pull tight.
1
2

19
1
Getting Started
• Image Storage Capacity and Playback Time
(at 23°C with the LCD monitor on and fresh AA alkaline batteries inserted)
*1: Recording capacity shows approximate number of shots recorded during
CIPA-compliant testing (with LCD monitor on, flash used for 50% of the shots,
and 23°C). Actual performance may vary according to operating conditions.
*2: According to the result of in-house testing.
• Battery Level Indicator
You can check the battery level by the w indicator on the LCD monitor.
• Use the AC adapter kit K-AC62 (optional) if you intend to use the
camera for a long time. (p.20)
Image Storage Capacity*1 Playback Time*2
Approx. 240 pictures Approx. 400 min.
•
In general, battery performance may temporarily deteriorate as the
temperature decreases. Be sure to take spare batteries when using
the camera in a cold region and keep the batteries warm by placing
them in your pocket or inside your coat. Battery performance that
has deteriorated due to cold temperature will return to normal
performance when the batteries reach room temperature.
• Due to their characteristics, AA alkaline batteries may not allow
the camera to make full use of its capabilities, and therefore they
are not recommended except for emergency use.
•
Due to their characteristics, AA alkaline batteries and nickel manganese
batteries may not allow the camera to make full use of its capabilities
when used at cold temperatures. Use of AA lithium batteries is
recommended when the camera is used at cold temperatures.
• Be sure to take spare batteries with you when traveling abroad or
to a cold region, or if you intend to take a lot of pictures.
Screen Display Battery Status
w(green) Adequate power remains.
x(green) Batteries are running low.
y(yellow) Batteries are running very low.
z(red) Batteries are exhausted.
[Battery depleted] The camera will turn off after this message appears.
Due to the characteristics of AA nickel manganese batteries, the
battery level may not be displayed correctly when using these
batteries. w may be displayed for the battery level even if the
batteries are running low. The camera may also turn off without
warning even if w is displayed.

21
1
Getting Started
• Make sure that the camera is turned off before connecting or
disconnecting the AC adapter.
• Make sure that the AC plug cord and the power cord connecting
the AC adapter to the camera are inserted securely. The data may
become lost if either cord becomes disconnected while data is
being recorded.
• Use the AC adapter with due care to avoid fire or electric shock.
Be sure to read “USING YOUR CAMERA SAFELY” (p.1) before
using the AC adapter.
• Be sure to read the operation manual accompanying the AC
adapter kit K-AC62 before using the adapter.
22
1
Getting Started
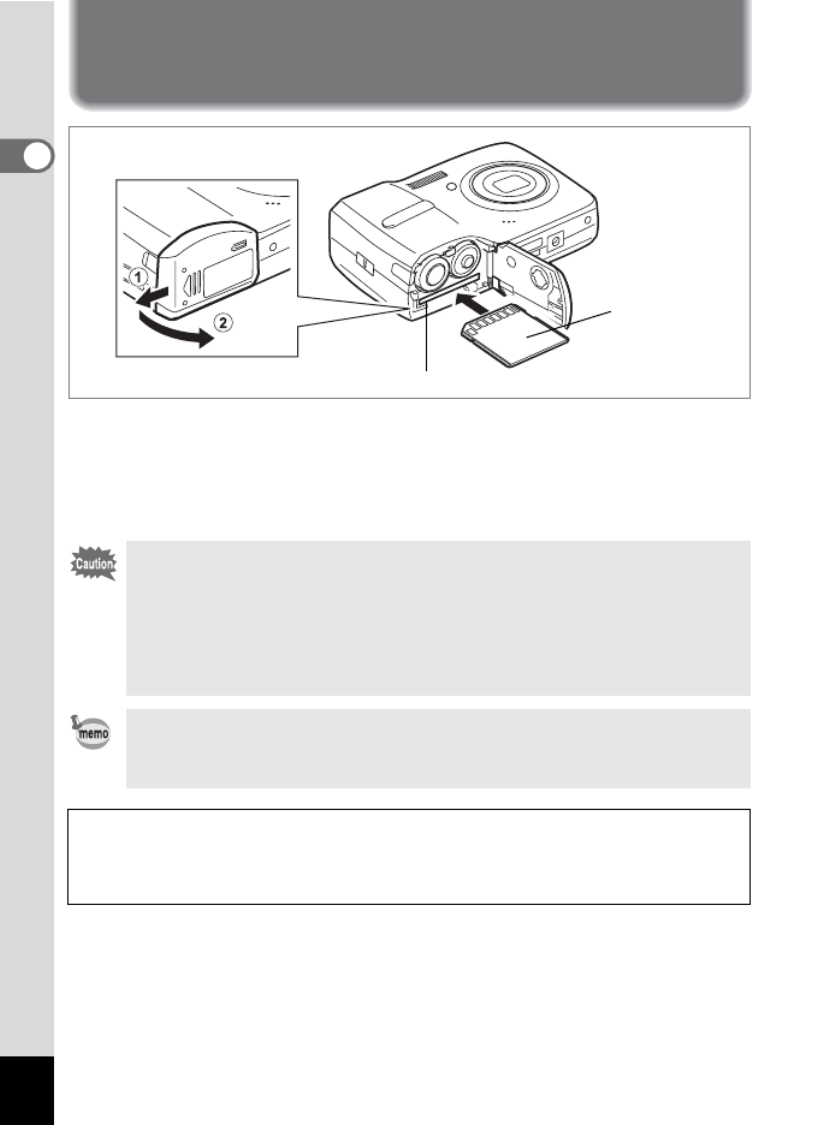
Installing the SD Memory Card
This camera uses either an SD Memory Card or an SDHC Memory Card.
(Both cards are referred to as SD Memory Cards hereafter.) Captured
images and sound files are saved on the SD Memory Card if a card is
inserted in the camera. They are saved in the built-in memory if a card is
not inserted.
• Be sure to use this camera to format an SD Memory Card that is
unused or has been used on another camera. Refer to “Formatting
an SD Memory Card or the Built-in Memory” (p.131) for
instructions on formatting.
• Make sure that the camera is turned off before inserting or
removing the SD Memory Card.
The still picture storage capacity varies depending on the capacity
of the SD Memory Card and the selected number of recorded pixels
and quality level. (p.155)
Backing Up Data
The camera may not be able to access data in the built-in memory in the case
of a malfunction. Use a computer or other device to back up important data in
another location.
SD Memory Card socket
SD Memory
Card
Termékspecifikációk
| Márka: | Pentax |
| Kategória: | kamera |
| Modell: | Optio E40 |
Szüksége van segítségre?
Ha segítségre van szüksége Pentax Optio E40, tegyen fel kérdést alább, és más felhasználók válaszolnak Önnek
Útmutatók kamera Pentax

12 Január 2025
12 Január 2025
23 Augusztus 2024
23 Augusztus 2024
23 Augusztus 2024
23 Augusztus 2024
23 Augusztus 2024
23 Augusztus 2024
23 Augusztus 2024
23 Augusztus 2024
Útmutatók kamera
- kamera Samsung
- kamera Sony
- kamera Braun
- kamera National Geographic
- kamera Acer
- kamera Nedis
- kamera Philips
- kamera Reolink
- kamera Olympus
- kamera Oregon Scientific
- kamera SilverCrest
- kamera Panasonic
- kamera Canon
- kamera JVC
- kamera Lenovo
- kamera Casio
- kamera Toshiba
- kamera Ozito
- kamera HP
- kamera BenQ
- kamera TP-Link
- kamera Medion
- kamera Vimar
- kamera Xiaomi
- kamera Fujifilm
- kamera EZVIZ
- kamera Prixton
- kamera Polaroid
- kamera Kyocera
- kamera Technaxx
- kamera GoPro
- kamera Speco Technologies
- kamera Ricoh
- kamera Hikvision
- kamera Epson
- kamera Netgear
- kamera Vtech
- kamera Rollei
- kamera Agfa
- kamera Lamax
- kamera Hitachi
- kamera Kodak
- kamera Ring
- kamera Nikon
- kamera Alpine
- kamera Optoma
- kamera Logitech
- kamera Bresser
- kamera Dahua Technology
- kamera Viewsonic
- kamera Cobra
- kamera Scosche
- kamera Denver
- kamera Minox
- kamera Trevi
- kamera Joy-It
- kamera Daewoo
- kamera Gembird
- kamera GE
- kamera SPC
- kamera Powerfix
- kamera Eufy
- kamera Avaya
- kamera Levenhuk
- kamera Konica Minolta
- kamera Mamiya
- kamera Lorex
- kamera Foscam
- kamera Kogan
- kamera SJCAM
- kamera Imou
- kamera AgfaPhoto
- kamera Sigma
- kamera Velleman
- kamera D-Link
- kamera Blaupunkt
- kamera InfiRay
- kamera Fluke
- kamera Arlo
- kamera Trust
- kamera Konig
- kamera ARRI
- kamera Pyle
- kamera Emerson
- kamera MuxLab
- kamera Lumens
- kamera Sanyo
- kamera DataVideo
- kamera Lenco
- kamera Leica
- kamera Azden
- kamera Vemer
- kamera Burris
- kamera Marshall Electronics
- kamera Getac
- kamera AViPAS
- kamera Creative
- kamera EverFocus
- kamera SereneLife
- kamera Swann
- kamera Anker
- kamera Microtek
- kamera Linksys
- kamera Elmo
- kamera UniView
- kamera Laserliner
- kamera IGET
- kamera Vivitar
- kamera PTZ Optics
- kamera BZBGear
- kamera Argus
- kamera Lexibook
- kamera Bushnell
- kamera Easypix
- kamera Maginon
- kamera AVerMedia
- kamera Celestron
- kamera Yashica
- kamera Flir
- kamera Daitsu
- kamera Nest
- kamera Ansco
- kamera Sygonix
- kamera Intel
- kamera Zenit
- kamera EVE
- kamera Fuji
- kamera Minolta
- kamera Zorki
- kamera RunCam
- kamera SeaLife
- kamera FIMI
- kamera Liiv360
- kamera Watec
- kamera Meade
- kamera Contax
- kamera Sinji
- kamera Traveler
- kamera Exakta
- kamera Digital Watchdog
- kamera ZeissIkon
- kamera Silvergear
- kamera Dorr
- kamera Spypoint
- kamera HOLGA
- kamera Praktica
- kamera Hasselblad
- kamera Moto Mods (Motorola)
- kamera Fantasea Line
- kamera Brinno
- kamera Z CAM
- kamera General
- kamera Ergoguys
- kamera Strex
- kamera General Electric
- kamera Berger & Schröter
- kamera Leitz Focomat IIc
- kamera Syrp
- kamera Cosina
- kamera Hanwha
- kamera Videology
- kamera Pelco
- kamera Videotec
- kamera Cambo
- kamera Kobian
- kamera Kyocera Yashica
- kamera Red Digital Cinema
- kamera Bauhn
- kamera Konica
- kamera Akaso
- kamera Seek Thermal
- kamera Aida
- kamera Ikegami
- kamera Ikelite
- kamera Adeunis
- kamera Hoppstar
- kamera IOptron
- kamera Moultrie
- kamera PatrolEyes
- kamera Camouflage
- kamera HuddleCamHD
- kamera Aplic
- kamera Linhof
- kamera GoXtreme
- kamera KanDao
- kamera Aquapix
Legújabb útmutatók kamera

10 Április 2025
9 Április 2025
3 Április 2025
1 Április 2025
29 Március 2025
29 Március 2025
28 Március 2025
27 Március 2025
27 Március 2025

20 Március 2025