Használati útmutató Pantech Breeze IV
Pantech
okostelefon
Breeze IV
Olvassa el alább 📖 a magyar nyelvű használati útmutatót Pantech Breeze IV (210 oldal) a okostelefon kategóriában. Ezt az útmutatót 9 ember találta hasznosnak és 2 felhasználó értékelte átlagosan 4.5 csillagra
Oldal 1/210

User Guide
Thank you for choosing the Pantech Breeze IV.
The Pantech Breeze IV has many features
designed to enhance your mobile experience.
From its EZ to read menus, to its sleek, stylish
design, we know you will enjoy the entire
Breeze IV experience.
This User Guide contains important and useful
information that will maximize your familiarity
with all that the Pantech Breeze IV has to offer.

2
Specifications
Design
Clamshell phone with internal
and external display
Displays
•WQVGALCDwith3.0”internal
display
•qqVGATFTLCDwith1.44”
external display
•9linesfortextinbasicmode
with24pointfont
•Twosoftkeysandfour-way
scroll and pressing
Melodies
MIDI,i-Melody,MP3,AMR,WAV,
AAC,AAC+,WMA
Camera
Integrated3MCMOSCamera
•
Resolutionupto2048x1536
(3MAFpixels)
•3GPVideorecording/playingup
to15f/s(QVGAsize)
•Self-timerfunction(Off/5secs/
10secs)
•Photoalbumandvideoalbum
•LEDCameraFlash(SupportOn/
Off)

3
Dimensions & Weight
Weight:102g(withstandard
battery)
Dimensions:106.5mmX53mm
X17.4mm
Power Management
(Performance)
Battery
Type Capacity Standby
Time
Talk
Time
Standard
Lithium-
Ion
(Li-ion)
Up to
1030mAh
Up to
250
hours
Up to
3
hours
Operating Frequency
•GSM/GPRS/EDGE850/900/
1800/1900MHz,UMTS/
HSDPA850/1900/2100MHz
networksinNorthAmerica,
SouthAmerica,Europe,Africa,
andAsia-Pacicwherethese
networks are supported
•Automaticbandswitching

4
Specifications ...................................2
Phone overview ................................8
Using Shortcuts ..............................10
Menu overview ................................. 11
Quick & Easy ....................................14
SIM card and battery ..................... 17
Turning the phone on/off ............ 20
Essential display indications ...... 20
Setting the phone mode ..............23
Entering text ...................................24
Quick call keys ................................ 26
PC Suite .............................................27
Memory card ...................................28
Breeze Mode
1. Calls and address book
Making,receivingandendinga
call ........................................................ 34
Optionsduringacall 36 ....................
Checking all calls ...........................40
Speeddialing 41 ....................................
Using address book ......................42
Using your headset .......................44
Fixed dialing number ................... 45
2. Messaging
Receivingmessages 48 ....................
Creating and sending text
messages .........................................49
Creating multimedia
messages .........................................50
Managing messaging memory ...56
Email ................................................... 57

Contents
5
3. Multimedia
Camera ..............................................60
Photo album ....................................66
Video album .....................................68
4. Useful Features
Magnier 72 ...........................................
Calendar ............................................ 72
Alarmclock ....................................... 74
PillReminder .................................... 75
User Guide ....................................... 76
Calculator ......................................... 77
Tip calculator .................................. 77
Stopwatch 78........................................
SayaCommand 78 .............................
ReadoutMode 80 ................................
SlowSpeech 81 .....................................
5. Connectivity
Bluetooth ..........................................84
Using the web browser................87
6. Settings
Phone status ....................................92
Sounds&alerts 92 ..............................
Displaysettings 93 ..............................
Voice command setting .............93
Advanced Mode
1. Calls and address book
Making,receivingandending
a call ..................................................... 96
Call settings ....................................101
Checking all calls ..........................101
Speeddialing 103 .................................
Using address book .................... 104
Using your headset .....................107
Fixed dialing number ................. 107
Calleridentication 108 ....................
SlowSpeech 108 ..................................

6
2. Messaging
Receivingmessages 110 ...................
Creating and sending text
messages .........................................112
Creating multimedia
messages ........................................ 113
Message templates .....................118
Message settings ......................... 118
Managing messaging
memory ........................................... 120
Email ...................................................121
3. Multimedia
Camera .............................................124
Photo album .................................. 130
Video album ....................................132
Audioalbum 134 ..................................
Music player ...................................136
Music player settings .................. 141
Media player ................................... 142
Otherles 145 .......................................
Managing memory ..................... 145
Playing games...............................145
4. Useful Features
Magnier 148 .........................................
Calendar ..........................................149
Alarmclock 150 .....................................
PillReminder 151 ...................................
User Guide ......................................152
Calculator ........................................153
Tip calculator .................................153
Stopwatch 154......................................
Notepadandvoicememo 154 ......
Worldtime 156 ......................................
Converter 156 ........................................
Timer .................................................. 157
SayaCommand ............................ 157
ReadoutMode 159 ..............................

Contents
7
5. Connectivity
Bluetooth ........................................ 162
UsingUSBMode 165 ..........................
Using the web browser.............. 165
Settingproles ............................. 167
6. Settings
Language ........................................170
Time and date ...............................170
Voice command setting ...........170
Soundsandalerts 171 ........................
Displaysettings 171 .............................
Security 173 .............................................
Updating software .......................174
Reset 175 ..................................................
TTY .....................................................176
7. Appendix
Alertmessage 180 ...............................
Troubleshooting checklist .......181
Safetyinformation 184 ......................
Safetyprecautions 185 .....................
Aboutthebatteryusage ...........187
FCCHearing-AidCompatibility
(HAC)regulationsforwireless
devices 191 ..............................................
FCCRegulatoryCompliance .... 195
Warranty 199 ..........................................
SpeakerPhone&
Noise Cancel ................................206
DynamicNoiseSuppression
fromAudience .............................207
earSmart™technology 208 ............

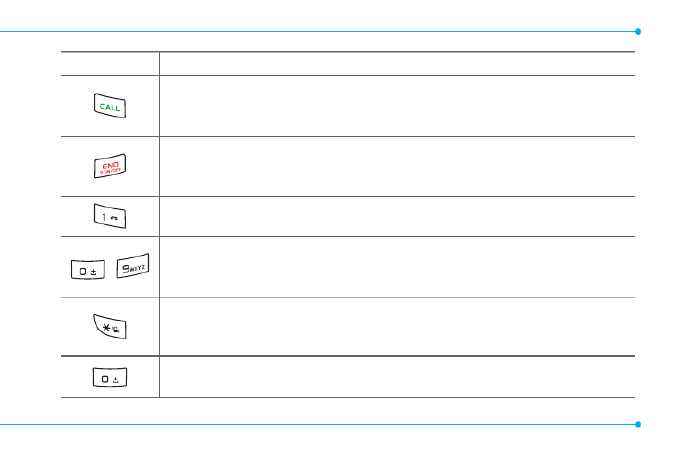
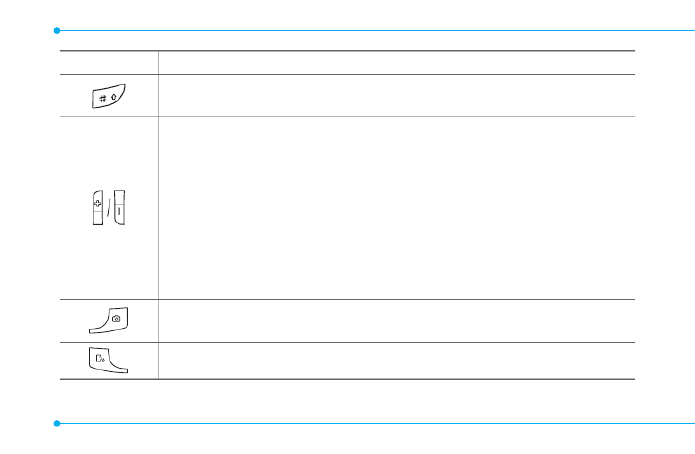
Clear key
Returntopreviousscreenordeletes
characters in text mode.
Power on & off / Menu exit / End key
Turnphoneon/off,endscalls,exit
menus
Camera key
OK key or access Browser
Press to enter menu system
Left/Right Soft key
Perform the functions shown at the
bottom line of the display
Internal display
Earpiece
Navigation key
Scrollthroughthe
menu options
Quick Call Keys
Vibrate mode
Microphone 1
Voicemail
8
Send key
Voice Command
Phone overview

External Display Camera
Flash
LED Indicators
Message, Call,
Battery
Internal antenna
area
Microphone 2
Speaker
Micro USB
(Ear Mic. &
Charger)
note:Holdingthedevicebytheinternalantennaareamightaffectthequalityofallcalls.
9
Volume up /
down

10
note: The phone has integrated
advancednoisesuppressiontechnology.
Toensurevoicequality,pleasedonot
covermicrophoneentriesasindicated.
Using Shortcuts
Numbered menu items, such as
menus,sub-menus,andoptions
canbequicklyaccessedby
using their shortcut numbers.
In Menu mode, Main Menus
can be accessed by pressing
thenumberkeys(1to#)
corresponding to their location
on the screen.
Example:AccessingthePhone
Mode menu.
1.SelectMenu.
2. Press for Settings.
3.Press for Phone Mode.
4.PresstheU/D scroll key to
select the mode.
note:Thestepsmayvarybymodeand
thismanualprovidesinstructionsfor
both and Breeze Mode Advanced Mode
respectively.

11
Address Book
Contacts
Groups
Favorites
Settings
FixedDial
Numbers
SService
Numbers
Messaging
Conversations
Options
Create Message
Delete
Delete
Conversations
Templates
Settings
Memory
Camera
Take Pictures
RecordVideos
My Pictures
My Videos
AT&T Services
SayaCommand
AT&TFamilyMap
AT&TNavigator
AT&TMusic
Games&Apps
myAT&T
MyAccount
Mobile Email
Browser
Tools
Magnier
Calendar
AlarmClock
PillReminder
User Guide
Calculator
Tip Calculator
StopWatch
Settings
PhoneStatus
Sounds&Alerts
Bluetooth
FontSize
Wallpaper
SlowSpeech
Voice Command
Settings
Phone Mode
Menu overview
Breeze mode
menu
SSIMdependent

12
Advanced mode menu
Address
Book
Contacts
Groups
Favorites
Settings
FixedDial
Numbers
S
Service
Numbers
Messaging
Conversations
Options
Create
Message
Delete
Delete
Conversations
Templates
Settings
Memory
Mobile
Email
AT&T GPS
AT&T
Navigator
AT&T
FamilyMap
Browser
Home
Bookmarks
Enter
Address
History
Manage
My Stuff
Applications
Audio
Games
Picture
Video
Tools
OtherFiles
UsedSpace
Picture
SSIMdependentNNetwork dependent

13
Video Tools
Magnier
RecentCalls
Camera
Video Camera
Media Player
AlarmClock
Calendar
PillReminder
User Guide
Notepad
Voice Memo
WorldTime
Calculator
Tip Calculator
Converter
StopWatch
Timer
SayaCommand
AT&T Music
Music Player
ShopMusic
myAT&T Settings
Phone Mode
SoundProles
Display
NCall
Phone
Network
Connections
Network
Connectivity
SSecurity
NAT&T
Software
Update
Reset
TTY
Phone
Information

14
Quick & Easy
Keys Functions
Perform the functions shown at the bottom line of the display
by using these soft keys.
ScrollthroughthemenuoptionsinMenumode.Instandby
mode,
LeftScroll:AccessMy Stuff menu
RightScroll:AccessCalendar menu
UpScroll:AccessCreate Message menu
DownScroll:AccessContacts menu
Selectamenufunctionorstoreuser-inputinformation,such
asnames.Alsousethiskeyforconrmation.
LaunchtheBrowser menu directly if pressed in standby
mode.
Deletecharactersintextmode,orreturntopreviousmenu.
15
Keys Functions
Makeorreceiveacall.Showtherecentcalllistinstandbymode.
Re-dialthelastcallnumberifpressedandheldinstandby
mode.
Completethecurrentcall.Turnon/offthephoneifpressed
and held. Cancel user input and return to standby mode while
in Menu mode.
Quicklyconnecttothevoicemailserverifpressedand
held in standby mode.
~
Enter numbers, letters or special characters. Go to the dial
screen if pressed in standby mode.
Assignthenumberasaspeeddialwhenitispressedandheld.
Enterorexitfromvibratemodeifpressedandheldinstandby
mode.Showthesymbolinputscreenifpressed in text input
mode.
Enterthe+signprexforinternationaldialingifpressedandheld.
Enter the space character in text input mode.
16
Keys Functions
Changevarioustextinputmodesif thetext-editingpressed at
screen.
Adjusttheearpiecevolumewhilemakingacall.
ControltheRingtonevolume,vibratemodeandsilentallmode
in standby.
Mutetheringtoneoftheincomingcallifthevolumeupkeyis
pressed.
Rejecttheincomingcallifthevolumedownkeyispressedand
heldwhenyoureceiveanincomingcall.
LaunchtheMultitaskingbypressingandholdingthevolume
up key.
Turn camera capture mode on.
Workasacamerashutterincapturemode.
Turn the Voice Commands on.

17
SIM card and battery
About your SIM card
Whenyousubscribetoyour
networkoperator,youreceivea
SIM(SubscriberIdentityModule)
card containing your registration
information, PIN code, etc.
Likeacreditcard,itshould
be kept secure and handled
carefully.Donotbend,scratch
orexposeittomoisture.Avoid
static electricity.
ToavoidcorruptingyourSIM
card’s memory, always switch off
yourphonebeforeremovingor
insertingyourSIMcard.
About your battery
YourphoneusesaLi-Ionbattery.
Make sure to use an authorized
battery and charger only. For
moredetails,pleaseinquireat
your nearest dealer.
note: Your phone is powered by a
LithiumIon(Li-Ion)battery.Thismeans
that, unlike other forms of battery
technology, you can recharge your
battery while some charge remains
without reducing your phone’s
autonomy due to the “battery memory
effect”inherentinthosetechnologies.

18
Installing/removing SIM card
and battery
1.Removethe
batterycover
from the unit.
Totthebattery
cover,putiton
the guide rail and
push up.
Incorrect
Correct
2.InserttheSIMcard
into the slot.
The gold contacts
oftheSIMcard
should go against
the metal contacts
of the phone.
Put the contacts
of the battery into
the hole located at
the top of the unit and then
insert and press the lower
side of the battery until you
hearthe“click”. Make sure you
align the gold contacts at the
battery end with contacts on

Getting started
19
the phone. If the contacts at
the battery not properly are
aligned, damage could occur
to the phone and the battery.
Incorrect
Correct
3.Toremovethe
battery, push the
bottom of the
battery to upwards
(1)andremove(2)
the battery.
PushtheSIMcard
in the arrow
direction as shown.
To charge your
battery
1.Tocharge,
connect the
charger adapter
as shown right.
Incorrect Correct
Incorrect
Correct

20
2.Toremove
the adapter
connecting, pull
the adapter
away as shown
right.
Turning the phone on/off
To turn on
1.Pressandhold .
To turn off
1.Pressandhold .
Essential display
indications
Signalstrength.Thegreaterthe
number of bars, the stronger
thesignal.Whennetworkisin
searching mode is displayed.
Flightmodeisactive.
Acallisbeingmade.When
youareinnoservicearea, is
displayed.
Call forwardingNSisactive.
Incoming calls set to ring only
(Normal).
Incoming calls set to Vibrate
and Ring.

Getting started
21
Incoming calls set to Vibrate
Only.
Incoming calls set to Silent.
Receivedoneormoretext
messages.
Receivedoneormore
multimedia messages.
ReceivedoneormoreWAPpush
messages.
Receivedoneormoreother
messages.
Receivedoneormorevoice
messages.
Inbox is full.
Amessageisbeingsent.
Amessageisbeingreceived.
Analarmisset.
Bluetoothisactive.
Bluetoothhands-freeheadsetis
connected.
BluetoothA2DPheadsetis
connected.
Bluetoothhands-free+A2DP
headset is connected.
DatatransferviaBluetooth.
Headsetisconnected.
USBisconnected.

22
External memory card is
inserted.
Anerroroccurredonthe
external memory card.
TTYisactive.
PillReminderisset.
AnEDGEsignalisavailable.
(Whitecolor:Deactivate,
Bluecolor:Activate)
AGPRSsignalisavailable.
(Whitecolor:Deactivate,
Bluecolor:Activate)
A3Gsignalisavailable.
(Whitecolor:Deactivate,
Bluecolor:Activate)
WAPisconnected.Whenthe
security is set is displayed.
Batterystrength.Whenthe
battery charge is low, is
displayed.
SSIMdependent
N
Network dependent

Getting started
23
Setting the phone mode
Your phone has two customized
modes,BreezeandAdvanced.
The default is set to Breeze mode
whichprovidesEZaccesstothe
functionsusedmostfrequently.
IntheBreezemode,youcanview
anabbreviatedmenu:Address
Book, Messaging, Camera, AT&T
Services, Tools Settings and . The
Advanced Mode allows access to
all menu items.
Breeze Mode Advanced
Mode
To change the phone mode
1.SelectMenu > Settings >
Phone Mode.
2.SelectBreeze Mode or
Advanced Mode.

24
Assigning the menu
You can set the most commonly
used menu item in GoTo in
standby mode.
1.SelectGoTo in standby mode
> (Unassigned).
2.SelectAdd.
3.Selectthemenuitemandsub
menu item.
4.SelectSave.
Entering text
Youcanentertextwithmulti-tap,
predictive,numericorsymbol.
Useful keys
Displaysymbols.
Addingaspace.
Press to toggle from initial caps
to all caps, to lower case, or to
numeric entries.
Press to change the text entry
functionsfromABCmodeto
predictivemode,ornumber
mode.
ABC Mode dbc (lower
case/initialcaps/allcaps)
Predictive Mode gef
(lowercase/initialcaps/all
caps)
Number Mode a

Getting started
25
Key characters by language
Each of the following keys will
scrollthroughthesesequential
options listed by language.
Key English French Spanish
.,-?!/'@:
abc ç à ä á ã ç
def é è é
ghi í
jkl
mno ö ñ ó ñ
pqrs ß
tuv ù ü ú ü
wxyz
ABC mode
Press the key labeled with the
targetletteroncefortherst
letter; press it twice for the
second letter, and so on.
1.Press to change the mode
asmulti-tap.
2. Press to to input text
repeatedly. To write the letter
“C”,press 3times.Towrite
number 2, press 4times.
Predictive mode (T9)
Thepredictivemode
automatically compares your
keystrokes with an internal
linguistic dictionary to determine

26
the correct word. It will display
the most commonly used
rst.Tosaveawordnotlisted
in phone’s dictionary, select
Options > Predictive Settings >
My Words.
1.Press to change the mode
topredictive.
2. Press to to input text.
For example, to write ‘hello’,
press .
Number mode
You can input numbers in this
mode.
1.Press to change the mode
to123.
2. Press to and to
input numbers.
Symbol mode
You can input symbols.
1.Press toviewthesymbols.
2. Press U/D/L/R to select a
symbol and select Insert.
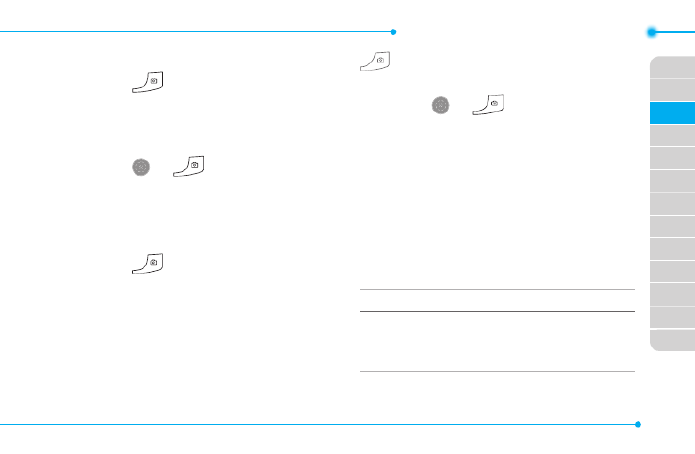
Quick call keys
Getting in touch with those you
callmostisnowasEZas1-2-3.
note: The following direction is an
example with using key. The usage
of and keys will be same as the
following.

Getting started
27
To assign a contact to Quick
Call
1.Press .
2.SelectQuick Call > Assign.
3.Selectacontact > Select.
To make a call using one
touch key
1.Press .
2.SelectCall.
To send a message using
one touch key
1.Press .
2.SelectOptions > Send
Message.
PC Suite
PCsuiteisaWindows-based
PC program that allows you
to easily manage personal
dataandmultimedialesby
connecting your Phone to a PC.
The PC suite application can be
downloaded at
http://www.pantechusa.com.
System requirements
•MicrosoftWindows2000,
WindowsXPfamily,Windows
Vista32bit,Windows7,or
Windows8
•Atleast300MBoffreedisk
space

28
•InterfacedevicessuchasUSB
or Bluetooth for the connection
with the phone
PC Suite features
•ContactManager
•MessageManager
•FileManager
Memory card
YoucanuseamicroSDcardasa
memorycard.Itgivesyoumore
spacetosavepictures,videos,
music, etc.
Inserting a memory card
1.Removethe
batterycover
and the battery
from the unit.
2. Unlock the
microSDcard
slot by carefully
sliding it up.
The metal
covershould
now be easily
lifted up.
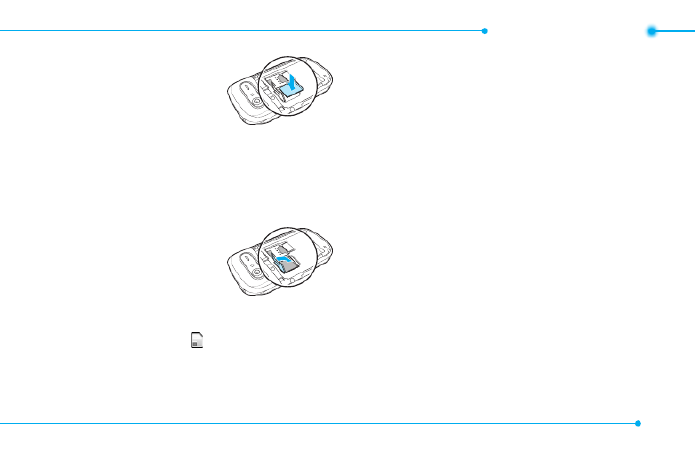
Getting started
29
3.Insertthemicro
SDcardinto
the slot. The
gold contacts
of the
microSDcardshouldgo
against the metal contacts of
the phone.
4.Closethemetal
coverand
slide down to
lock the
microSDcard
in place. The icon will be
displayed when the phone is
turned on.
Using a memory card
Youcansave,moveanddelete
thelesinyourphoneand
external memory card. You can
alsomoveandcopythelesto
computer from your phone.
To copy a le to the memory
card
1.Selectale > Options > Copy.
2.SelectMemory by pressing
L/R .Tocopythelebackto
the phone, select Phone.
3.Selectadesiredfolder>Here.

30
To move a le to the memory
card
1.Selectale > Options > Move.
2.SelectMemory by pressing
L/R .Tocopythelebackto
the phone, select Phone.
3.Selectadesiredfolder>Here.
To delete a le from the
memory card
1.Selectalefromthecard >
Options Delete > > Yes.
In Advanced Mode ,youhave
access to all of the features of
Breeze IV including the features
providedby Breeze Mode.
To move the le from the
card to the computer
1.Connectthedatacablewith
mobile and the computer.
2.SelectMenu > Settings >
Connectivity.
3.SelectSelect USB Mode.
4.SelectMusic Player, Mass
Storage Modem , , or Ask on
Connection.
5.Followtheinstructionsonyour
computer screen.

Getting started
31
note:SelectMusic Player when you
want to add music to the playlist in
yourdevice.WhenyouselectAskon
Connection Music , it will ask you to select
Player, MassStorage, or Modemevery
timeyouconnectyourdevicewithyour
computer.
Resetting a memory card
1.SelectMenu > Settings >
Reset.
2. Enter password.
3.SelectOK > External Memory
Reset Select > > Yes.
Fordetailsonreset,seepage175.
note: Master Reset Master Clear and
will reset your phone to its default
settings.Thedefaultpasswordis'1234'.

32
Memo

1
Making, receiving and ending a call
Options during a call
Checking all calls
Speed dialing
Using address book
Using your headset
Fixed dialing number
Calls and address book
33

34
Making, receiving and
ending a call
Making a call
1.Entertheareacodeand
phone number.
2. Press .
Answering a call
1.Press or select Accept.
Ending a call
1.Press .
Oncethecalliscompleted,acall
summary is displayed.
Rejecting a call
Press or select Ignore.
Making a call using the call list
Yourphonelogsupto20
dialed,receivedandmissedcall
numbers.
1.Press to display the recent
calls list.
2.SelectAll Calls, Missed Calls,
Received Calls Dialed Calls,
or Call Ranking by pressing
L/R.
3.Selectanumber.
4.Press to dial the selected
number.
note: To redial the last number, press
and hold in standby mode.

Breeze Mode - Calls a address booknd
35
03
04
05
06
01
02
03
04
05
06
07
01
02
Making a call during a call
1.Enterthephonenumber
or select Options > View
Contacts.
2. Press to dial the
secondcall.Therstcallis
automatically put on hold.
Switching between two calls
1.SelectOptions > Swap.
Making an international call
1.Pressandhold for the
internationalprexuntilthe
‘+’,characterappears.
2. Type the country code, area
code, and phone number.
3.Press .
Making an emergency call
1.Youcanmakeemergency
callsevenifyourphonedoes
nothaveaSIMcard.
2. Press Emergency Number, or
select SOS if your phone does
nothaveaSIMcard.
3.Press .
Replying to a missed call
1.Press to display the calls
list.

36
2.SelectMissed Calls by
pressing L/R.
3.Selectanumbertocallby
pressing U/D.
4.Press .
Answering a second call N
1.Press .Therstcallis
automatically put on hold.
2. Press to end the second
call. The call on hold is
automatically reconnected.
note: For answering a second call, you
shouldactivate Call Waiting inadvance.
(Select Menu Settings Call > > > Call
Waiting Options > > Activate inAdvanced
Mode.)
Options during a call
Switching your phone’s
microphone off
1.SelectOptions > Mute.
Switching your phone’s
microphone back on
1.SelectOptions > Unmute.
Talking on speaker
1.Select .
Slowing down a Voice
1.SelectOptions > Slow
Speech.

Breeze Mode - Calls a address booknd
37
03
04
05
06
01
02
03
04
05
06
07
01
02
Removing background noise
You can eliminate background
noisefromconversationsand
improvethevoicequalityof
communications by setting
NoiseSuppressiontoOn.
1.SelectOptions> Noise
Suppression.
Putting a call on hold and
returning N
Putting a call on hold
1.SelectOptions > Hold or press
.
Returning to a held call
1.SelectOptions > Unhold or
press again.
Multi-party calls N
You can talk with more than one
personorhaveaconferencecall.
Making a multi-party call
1.Calltherstparticipant.
2. Call the second participant.
Therstcallisautomatically
put on hold.
3.SelectOptions > Join.
Having a private
conversation with one
participant
1.SelectOptions > Split.
2.Selectaparticipant>Select.

38
Removing one participant
from a multi-party call
1.SelectOptions > End.
2.Selectthenumberassociated
with the call you wish to end or
End All to end all calls.
Searching for a number in
address book during a call
1.Select Options View >
Contacts.
2.Selectanumber, and then
press .
Searching for a name or
group in address book
Entertherstlettersofthename
forNameSearch.Theentriesare
displayedstartingwiththerst
entry matching your input.
Finding a name manually in
address book
1.PressU/D.
Viewing the details of
highlighted entry in address
book
1.SelectSelect.
For details on address book, see
page42.

Breeze Mode - Calls a address booknd
39
03
04
05
06
01
02
03
04
05
06
07
01
02
Reading a message during a
call
1.SelectOptions > View
Message.
2.Selectaconversation > View.
3.Selectamessage > View.
Sending a message during a
call
1.SelectOptions > Send
Message.
For details on creating a text
message,seepage49.
Mobile Web N during a call
1.SelectOptions > Browser.
Viewing the calendar during
a call
1.SelectOptions > View
Calendar.
Making a note during a call
1.SelectOptions > Notepad.

40
Checking all calls
Youcanviewinformationabout
all calls simply by pressing .
For more options for all, missed,
received,dialedcalls,andcall
ranking, select an entry and
Options.
Viewing missed calls
1.SelectGoTo in standby mode.
2.SelectRecent Calls > Missed
Calls.
Viewing received calls
1.SelectGoTo in standby mode.
2.SelectRecent Calls >
Received Calls.
Viewing dialed calls
1.SelectGoTo in standby mode.
2.SelectRecent Calls > Dialed
Calls.
Viewing call rankings
1.SelectGoTo in standby mode.
2.SelectRecent Calls > Call
Ranking.
Deleting call logs
1.SelectGoTo in standby mode.
2.SelectRecent Calls > Delete
Call Logs.
3.Select All Calls Missed Calls, ,
Received Calls, or Dialed
Calls.

Breeze Mode - Calls a address booknd
41
03
04
05
06
01
02
03
04
05
06
07
01
02
note: If no logs exist, the message “No
Call Exist ”appears.
Viewing call time
1.SelectGoTo in standby mode.
2.SelectRecent Calls > Call
Time.
3.Last Call, Received Calls,
Dialed Calls Total Calls, , and
Lifetime Calls are displayed.
Resetting all call times
1.SelectGoTo in standby mode.
2.SelectRecent Calls > Call
Time.
3.SelectReset > Yes.
note:Thedefaultpasswordis‘1234’.
Speed dialing
Youcandialquicklyusingspeed
dialing.Upto8phonenumbers
can be programmed using
numbers2to9.
:Voicemail
:Prexforinternationalcall
Setting speed dial
1.SelectMenu > Address Book >
Settings.
2.SelectSpeed Dial > an empty
entry and select Add.
3.Selectacontact>Select.

42
Changing speed dial contact
1.SelectMenu > Address Book >
Settings.
2.SelectSpeed Dial and select a
number.
3.SelectChange.
4.Selectacontact>Select > Yes.
Removing from speed dial
1.SelectMenu > Address Book >
Settings.
2.SelectSpeed Dial and select a
number.
3.SelectRemove > . Yes
Using address book
Youcansavenames,phone
numbers, and information on the
SIMorphone.Numberofentries
can depend on the capacity of
theSIMcard.
Adding a contact
1.SelectMenu > Address Book >
Contacts Options > > Add
New Contact.
2.SelectPhone or SIM.
3.Inputtheelds.
4.SelectSave.
Viewing the contact list
1.PressD or select Menu >
Address Book > Contacts.

Breeze Mode - Calls a address booknd
43
03
04
05
06
01
02
03
04
05
06
07
01
02
Searching for a phone
number
1.PressD or select Menu >
Address Book > Contacts.
2.Inputtherstletterortwoof
the person’s name and scroll
with U/D.
3.Select toviewdetailSelect
information.
4.Toupdateinformation,select
Options > Edit Contact.
Calling from contact list
1.PressD or select Menu >
Address Book > Contacts.
2.Selectacontacttocall.
3.Press .
Sending a contact
1.PressD or select Menu >
Address Book > Contacts.
2.Selectacontact > Options >
Share Contact Info All >
Contact Info Personal ,
Contact, or Business
Contact.
3.Youcansendthecontact
using via Message or via
Bluetooth.
Deleting a contact
1.PressD or select Menu >
Address Book > Contacts.
2.Selectacontact > Options >
Delete > . Yes

44
Making groups
1.PressD, R or select Menu >
Address Book Groups> .
2.SelectOptions > Add New
Group.
3.Enteragroupnameand
select Save.
Editing groups
1.PressD, R or select Menu >
Address Book Groups> .
2.Selectagroup>Options >
Add New Group, Edit Group,
or Delete Group.
Adding to favorites or
groups
1.PressD or select Menu >
Address Book Contacts > .
2.Selectacontact> Options >
Add to.
3.SelectFavorites Groups or .
Using your headset
Youcanmakeorreceiveacall
usingyourheadset.Whenyou
connect your headset to the jack,
the button on the headset works
as follows.
note: You must use the headset
designedforthisdevice.Itisanoptional
item.Notallheadsetwillhaveabutton.

Breeze Mode - Calls a address booknd
45
03
04
05
06
01
02
03
04
05
06
07
01
02
While in standby mode
1.Pressthebuttononce to list
recent calls.
2. Press the button twice to
redial the last call.
While the phone is closed
1.Pressthebuttononce to
receiveanincomingcall.
2. Press and hold the button
once to end the call.
Fixed dialing number
Viewing xed dialing number
list
Fixeddialingnumberisaservice
thatlimitsyouraccesstospecic
numbers in the address book
listrecordedontheSIM.Input
the PIN2 to set up or cancel this
service.ThedefaultPIN2is"2222".
1.SelectMenu > Address Book >
Fixed Dial Numbers.
note: PIN2 must be correctly entered
within3attempts.Ifyouinputincorrect
code three times in a row, the PIN2 code
will be blocked. If the PIN2 code is blocked,
pleasecontactyourserviceprovider.Your
PIN2codeissuppliedwiththeSIMcard.

46
Memo

47
2
Receiving messages
Creating and sending text messages
Creating multimedia messages
Managing messaging memory
Email
Messaging

48
Receiving messages
Viewing a new message
1.SelectView.
Reading a message from the
conversations
1.SelectMenu > Messaging.
2.Selectaconversation > View.
Saving the contact
information from a received
message
1.Selectareceivedmessage >
View.
2.SelectOptions > Save to
Contact.
3.Selectas New Contact or as
Existing Contact.
Saving the object in a
received multimedia
message
1.Openamultimediamessage.
2.Selectanobject.
3.SelectOptions > Use >
Save to internal Save to or
external.
Itwillbesavedinoneofthe
categories in the My Pictures or
My Videos folder.
For details on photo album and
videoalbum,seepage66,
68.

Breeze Mode - Messaging
49
01
04
05
06
01
02
03
04
05
06
07
02
03
Creating and sending
text messages
Sending a text message
1.PressU or select Menu >
Messaging Options > >
Create Message.
2. Enter a message.
3.Select>Options > Send to
and a contact to send the
message and select Select >
Done.
4.Tosavemessageasdraft,
select Options > Save the
Message.
5.SelectSend.
6.Toviewthesentmessage,
select Menu Messaging > .
7.Selectaconversation>View.
8.Selectamessage>View.
note:Allsentmessageswillbesavedin
conversations.
Replying to a message
1.SelectMenu > Messaging.
2.Selectaconversation>View
>selectquickreplyeditoron
theconversation.

50
Creating multimedia
messages
You can create and send
multimedia messages. Capacity is
100KB,300KBor600KB.Anerror
message will alert you once the
message exceeds the capacity.
Adding a saved picture to
the message
1. Press U or select Menu >
Messaging Options > >
Create Message.
2. Enter a message.
3.SelectInsert > Picture by
pressing L/R.SelectMy
Picture.
4.Scrolltothesavedpicture
and select View.Conrmthe
picture and select Select.
5.Topreviewthemessage,
press U/D to select the slide
box and select Options >
Preview Current Whole > or
Message.
6.Toeditthetextmessage,
press U/D to select the text
box and edit your message.
7.SelectOptions > Send to >
a contact > Select > Done >
Send.

Breeze Mode - Messaging
51
01
04
05
06
01
02
03
04
05
06
07
02
03
Adding a new picture to the
message
1.PressU or select Menu >
Messaging Options > >
Create Message.
2. Enter a message.
3.SelectInsert > Picture by
pressing L/R.SelectTake
Picture.
4.Focusontheobject.
5.Press or .
6.Toeditthetextmessage,
press U/D to select the text
box and edit your message.
7.SelectOptions > Send to >
a contact > Select > Done >
Send.
For details on taking a picture,
seepage63.
Adding a saved video to the
message
1.PressU or select Menu >
Messaging Options > >
Create Message.
2. Enter a message.
3.SelectInsert > Video by
pressing L/R.SelectMy
Video.

52
4.Scrolltothesavedvideoclip
and select Play.Conrmthe
videoclipandselectSelect.
5.Toeditthetextmessage,
press U/D to select the text
box and edit your message.
6.
SelectOptions > > a Send to
contact > > > Select Done Send.
Adding a new video to the
message
1.PressU or select Menu >
Messaging Options > >
Create Message.
2. Enter a message.
3.SelectInsert > Video by
pressing L/R.SelectCreate
Video.
4.Focusontheobject.
5.Press or or select ,
Options Record > .
6.Tostopandsavethe
recording, select Stop.
7.Toeditthetextmessage,
press U/D to select the text
box and edit your message.
8.SelectOptions > > a Send to
contact > > > Select Done Send.
Fordetailsonrecordingavideo,
seepage64.

Breeze Mode - Messaging
53
01
04
05
06
01
02
03
04
05
06
07
02
03
Adding a recorded voice
memo to the message
1.PressU or select Menu >
Messaging Options > >
Create Message.
2. Enter a message.
3.SelectInsert > Audio by
pressing L/R.SelectMy
Audio > My Voice.
4.Scrolltothesavedaudioclip
and select Play.Conrmthe
audio clip and select Select.
5.Toeditthetextmessage,
press U/D to select the text
box and edit your message.
6.SelectOptions > > a Send to
contact > > > Select Done Send.
Adding a new voice memo to
the message
1.PressU or select Menu >
Messaging Options > >
Create Message.
2. Enter a message.
3.SelectInsert > Audio by
pressing L/R.SelectRecord
Audio.
4.SelectRecord to record the
sound.
5.Tostopandsavethe
recording, select Stop.

54
6.Toeditthetextmessage,
press U/D to select the text
box and edit your message.
7.SelectOptions > > a Send to
contact > > > Select Done Send.
Fordetailsonrecordingavoice
memo,seepage155.
Adding other files to the
message
1.PressU or select Menu >
Messaging Options > >
Create Message.
2. Enter a message.
3.SelectInsert > Other by
pressing L/R.Andselect
Files.
4.Selectale>Select.
5.Toeditthetextmessage,
press U/D to select the text
box and edit your message.
6.SelectOptions > Send to >
a contact > > Select Done >
Send.

Breeze Mode - Messaging
55
01
04
05
06
01
02
03
04
05
06
07
02
03
Adding Contacts to the
message
1.PressU or select Menu >
Messaging Options > >
Create Message.
2. Enter a message.
3.SelectInsert > Other by
pressing L/R.
4.SelectContacts > a Contact >
Select.
5.ToSendthemessage,select
Options > Send to > a contact
> Select > Done Send > .
Adding Templates to the
message
1.PressU or select Menu >
Messaging Options > >
Create Message.
2. Enter a message.
3.SelectInsert > Other by
pressing L/R.
4.SelectTemplates > a
Template > Select.
5.ToSendthemessage,select
Options > Send to > a contact
> Select > Done Send > .

56
Managing messaging
memory
Upto300messagescanbe
stored in the phone memory,
additional messages will be
savedtotheSIMcard.When
the message box is full, the
messagesfulliconwillappear.All
messages share memory.
Icon Descriptions
Textmessageisfull(SIMand
phonemessages).
Deleting a conversation
1.Selectaconversation >
Options Delete > > Yes.
Deleting multiple
conversations
1.SelectOptions > Delete
Conversations.
2.SelectSelect or Deselect
to select or deselect the
message.
3.SelectOptions > Delete > Yes.

Breeze Mode - Messaging
57
01
04
05
06
01
02
03
04
05
06
07
02
03
Email
Youcanreceiveemailsfromyour
serviceprovider.
Receiving an email
1.SelectMenu > AT&T Services
> Mobile Email.
2.Selectanemail.
3.SelectSelect.
4.Enteryouremailaccount's
login credentials.

58
Memo

59
3
Camera
Photo album
Video album
Multimedia

60
Camera
Youcantakepicturesandrecordmoviesusingthebuilt-incamera.
Thephotosandvideoclipscanbesavedandsentviamultimedia
messages, or Bluetooth.
Zoom Zoom
Picture
remaining
Brightness Brightness
SelfTimer SelfTimer
Effect
Flash
Effect
Flash
White
Balance
White
Balance
Size Size
Camera
mode
Video
mode
note:Whenyousetthephotosizeto2048x1536,thezoomfunctionisnotavailable.

Breeze Mode - Multimedia
61
01
02
05
06
01
02
03
04
05
06
07
03
04
Setting camera settings
1.Press in standby mode or
select Menu > Camera > Take
Pictures.
2.SelectOptions > Settings to
change settings prior to taking
a picture.
Camera options
Icon Name Descriptions
Flash On( ),Off( )
White
Balance
Auto( ),DayLight
( ),Tungsten( ),
Fluorescent ( )
Effect
Normal ( ),Sepia
( ),Negative( ),
B&W( )
Icon Name Descriptions
SelfTimer Off( ),5secs
( ),10secs( )
Size
2048x1536( ),
1600x1200( ),
1280x960( ),
640x480( ),
320x240( ),
240x400( )
Advanced
PictureQuality,
SaveLocation,
ShutterSound,
TimerSound,
AutoFocus

62
Video camera options
Icon Name Descriptions
Flash On( ),Off( )
White
Balance
Auto( ),DayLight
( ),Tungsten( ),
Fluorescent ( )
Effect
Normal ( ),Sepia
( ),Negative( ),
B&W( )
SelfTimer Off( ),5secs
( ),10secs( )
Size
176x144(MMS)
( ),176x144( ),
320x240( )
Icon Name Descriptions
Advanced
VideoQuality,
SoundRecording,
SaveLocation,
TimerSound
Zoom in and out
1.PressU/D.
Itrangesfrom1xto4x.
Increasing or decreasing the
brightness
1.PressL/R.
Itrangesfrom-2to+2.
Breeze Mode - Multimedia
63
01
02
05
06
01
02
03
04
05
06
07
03
04
Taking a picture
1.Press in standby mode or
select Menu > Camera > Take
Pictures.
2. Focus on the object.
3.Press or , or select
Options Capture > .
Changing to video camera
mode
1.Press in standby mode or
select Menu > Camera > Take
Pictures.
2.SelectOptions while camera
modeisactivated.
3.SelectVideo Camera Mode.
note:Incameramode,pressandhold
tochangetovideocameramode.
4.Focusontheobject.
5.Press or , or select
Options Record > .
6.SelectStop to stop recording.
Viewing the taken picture
1.SelectMenu > Camera > My
Pictures.
2.Selectapicture > View.
After taking pictures
To Press
Sendusing
a multimedia
message
Options Send as > >
Multimedia Message
64
To Press
Sendusing
Bluetooth
Options Send via > >
Bluetooth
Setas
wallpaper
Options > Set as >
Wallpaper
SetasCallerID Options > Set as >
Caller ID
Delete Options > Delete
Rename Options > Rename
View photo
information Options Properties >
Recording a video
1.SelectMenu > Camera >
Record Videos.
2. Focus on the object.
3Press or , or select
Options Record > .
4.SelectStop to stop recording.
5.SelectOptions > Play to play
thevideoclip.
6.Press or Back to go back
topreviewmode.
Changing to camera mode
1.SelectMenu > Camera >
Record Videos.
2.Select whilevideoOptions
modeisactivated.

Breeze Mode - Multimedia
65
01
02
05
06
01
02
03
04
05
06
07
03
04
3.SelectCamera Mode.
note:Invideocameramode,pressan
hold to change to camera mode.
For details on taking a picture,
seepage63.
Viewing the recorded video
clip
1.SelectMenu > Camera > My
Videos.
2.Selectthevideoclip > Play.
After recording video clips
To Press
Sendusing
a multimedia
message
Options Send as > >
Multimedia Message
To Press
Sendusing
Bluetooth
Options Send via > >
Bluetooth
View recorded
videoclip Play
Delete Options > Delete
Rename Options > Rename
Viewvideoclip
information Options Properties >
During recording a video clip
To Press
Receive
an incoming call or
Pause Pause
Stoprecording Stop

66
Photo album
The My Pictures menu allows
youtoviewallthepicturesyou
havetaken,saveselectedimages
to your phone or an external
memory card and share the
photos with others. JPEG format
is supported, and other formats
aresavedinthePicture folder.
note: To access My Pictures, select
Menu Camera > > My Pictures.
Viewing the saved pictures
1.SelectMenu > Camera > My
Pictures.
2.Selectapicture>View.
Viewing zoom mode
1.SelectMenu > Camera > My
Pictures.
2.Selectapicture>View >
Options Zoom > .
3.Zoomanimageinoroutby
pressing + -/ .
Viewing Picture Slide Show
1.SelectMenu > Camera > My
Pictures.
2.SelectOptions > Slide Show.
Viewing Pictures by grid or
list
1.SelectMenu > Camera > My
Pictures.

Breeze Mode - Multimedia
67
01
02
05
06
01
02
03
04
05
06
07
03
04
2.SelectOptions > View by Grid
or View by List.
Setting as wallpaper in the
display
1.SelectMenu > Camera > My
Pictures.
2.Selectapicture.
3.SelectOptions > Set as >
Wallpaper.
Setting as caller identication
1.SelectMenu > Camera > My
Pictures.
2.Selectapicture.
3.SelectOptions > Set as >
Caller ID.
4.Selectacontact>Select.
Sending pictures using
multimedia message
1.SelectMenu > Camera > My
Pictures.
2.Selectapicture.
3.SelectOptions > Send > as
Multimedia Message.
For details on creating
multimedia messages, see page
50.
Deleting multiple pictures
1.SelectMenu > Camera > My
Pictures.
2.SelectOptions > Multiple
Select.

68
3.SelectSelect to select more
than one picture.
4.SelectDeselect to cancel
your selection.
5.SelectOptions > Delete.
Viewing a le information
1.SelectMenu > Camera > My
Pictures.
2.Selectapicture.
3.SelectOptions > Properties.
Video album
The My Videos menu allows
youtoplay,send,saveand
deletevideosinyourphoneor
an external memory card. The
supportedformatsareMP4,
WMA,3GPand3G2.
Playing the saved video clips
1.SelectMenu > Camera > My
Videos.
2.Selectavideoclip.
3.SelectPlay.

Breeze Mode - Multimedia
69
01
02
05
06
01
02
03
04
05
06
07
03
04
Using video player controls
To Press
Pause/Play
Rewind HoldU
Fast forward HoldD
Control
volume
Sidekeyupordown
or L/R
Stop Options > Stop
Mute Options > Mute
RepeatOn/Off Options > Repeat On
or Repeat Off
Portrait/
Landscape
Options Portrait > or
Landscape
Viewing video clips by grid or
list
1.SelectMenu > Camera > My
Videos.
2.SelectOptions > View by Grid
or View by List.
Sending a video clip using
multimedia message
1.SelectMenu > Camera > My
Videos.
2.Selectavideoclip.
3.SelectOptions > Send > as
Multimedia Message.
For details on creating multimedia
messages,seepage50.

70
Sending a video clip via
Bluetooth
1.SelectMenu > Camera > My
Videos.
2.Selectavideoclip.
3.SelectOptions > Send > via
Bluetooth.
Deleting multiple video clips
1.SelectMenu > Camera > My
Videos.
2.SelectOptions > Multiple
Select.
3.SelectSelect to select more
than one picture.
4.SelectDeselect to cancel
your selection.
5.SelectOptions > Delete > Yes.
Viewing a le information
1.SelectMenu > Camera > My
Videos.
2.Selectavideoclip.
3.SelectOptions > Properties.

71
4
Magnier
Calendar
Alarm clock
Pill Reminder
User Guide
Calculator
Tip calculator
Stop watch
Say a command
Readout Mode
Slow Speech
Useful Features

72
Magnifier
Magnierhelpsto
capture a more
detailed scene by
zooming in on the
screen.
Current Display
Capture
1.SelectMenu > Tools >
Magnier.
2. Focus on the object and press
Focus.
3.Zoominandoutbypressing
L/R.
4.Increaseordecreasethe
brightness by pressing U D/ .
5.PressCapture.
6.Togobacktopreviouspage,
select .
note:Youcanaccesscapturedimages
by pressing > > Menu Camera My
Pictures.
Calendar
Calendar helps you
manage your
schedule including
your time for calls or
special days. You can
set a reminder on
anygivendatewith
this function.

Breeze Mode - Useful features
73
01
02
03
06
01
02
03
04
05
06
07
04
05
Viewing calendar
1.SelectMenu > Tools >
Calendar.
note: View by Month is default setting
for Calendar.
In the monthly view
To Press
Moveto
another day
LforPrevious
R for Next
Moveto
another week
UforPrevious
D for Next
View other
month
Sidekeydownor
forPrevious
Sidekeyupor for
Next
Creating a new event
1.Selectadayandselect
Options > New Event.
2.SelectAppointment, Task or
Note.
3.Inputtheeventandselect
Save.
note:Youcancreateeventsfordates
from01/01/2000to12/31/2099.

74
Alarm clock
Setting an alarm
1.SelectMenu > Tools Alarm >
Clock.
2.SelectCreate New for new
alarm.
3.SettheCycle, Time Alarm ,
Sound, Alarm Alert Type,
Alarm Volume and Snooze.
4.SelectSave.
Editing existing alarms
1.SelectMenu > Tools Alarm >
Clock.
2.Selectanalarm>Edit or select
Options toaccessfollowing:
Create New, Delete and
Delete All.
Setting a simple alarm
1.SelectMenu > Tools Alarm >
Clock.
2.SelectSimple Alarm and
select Edit.
3.Setthealarmscheduleand
select Save.

Breeze Mode - Useful features
75
01
02
03
06
01
02
03
04
05
06
07
04
05
Pill Reminder
PillRemindersets
your schedule to
take pill, and alarm
pop-upwillappear
on the setting time.
You can select to
accept the reminder
orhavethereminderpop-up
againafter15minutes.
Creating a new pill reminder
1.SelectMenu > Tools Pill >
Reminder > Create New.
2.SelectTake and then, take a
picture.
For details on taking picture, see
page63.
3.InputName and Dosage.
4.SelectTime > Create.
5.Select >SetadesiredCreate
time > > OK Back.
6.SelectPeriod Begins Select > > .
7.Setthebeginningdateofthe
dosage on the calendar.
8.SelectReminders and set the
reminding period.
9.SelectDaily, Every 2 days,
or Monthly .Whenselecting
Every 2 days, you can set
desired days for period.
10. Entermoreinformation.
11.SelectSave.

76
Checking Today's Pill
Reminder
1.
SelectMenu > Tools
> Pill Reminder >
Options Today's >
Pill.
2.Scrollandselecta
pill reminder item
to check the detail.
Editing a pill reminder
1.SelectMenu > Tools > Pill
Reminder.
2.Selectapillreminder > Select
> Edit.
3.EditName, Dosage, Time,
Period or More Information.
4.SelectSave.
Deleting reminders
1.SelectMenu > Tools Pill >
Reminder.
2.Selectapillreminder>
Options Delete > or Delete All
> Yes.
User Guide
User Guide helps users to learn
how to use the phone easily in
itself.
1.SelectMenu > Tools User >
Guide.
2.Selectafunctiontocheckin
detail.

Breeze Mode - Useful features
77
01
02
03
06
01
02
03
04
05
06
07
04
05
Calculator
1.SelectMenu > Tools
> Calculator.
2. Input the numbers
with the numeric
keypad and enter
the operators with
L/R/U/D/ to
calculate.
3.Press to use the decimal
point.
4.Press to cancel your input.
5.SelectReset to reset.
Tip calculator
1.SelectMenu > Tools
> Tip Calculator.
2.Enterthevalues
forallthevariable
elds(Bill($),
Tip(%) Split, )
and then the
corresponding calculation
elds(Tip($), Total($),
You Pay )areupdated
automatically.
3.Press to use the decimal
point.
4.SelectReset to reset.

78
Stop watch
1.SelectMenu > Tools
> Stop Watch.
2.SelectStart to
start.
3.SelectStop to stop.
4.SelectContinue
to restart or select
Reset to clear.
5.Tochecksplittimes,select
Mode > Split Time Mode.
6.Tochecklaptimes,select
Mode > Lap Time Mode.
note: In Basic Mode, when you exit the
stop watch menu, or become idle, the
stop watch will continue running and
will be indicated by a clock icon. You can
accessthestopwatchbyre-entering
the stop watch menu.
Say a Command
Yourphoneisequippedwith
anAdvancedVoiceCommand
(AVC)feature.Thisfeatureallows
you to make calls or use the
phone functions by simply using
yourvoice.Allyouhavetodois
talk into the phone and then the
phonewillrecognizeyourvoice
and complete tasks by itself.
1.Instandbymode,simply
press to access Say a
Command.

Breeze Mode - Useful features
79
01
02
03
06
01
02
03
04
05
06
07
04
05
OrselectMenu > AT&T
Services > Say a Command.
2.Atthevoiceprompt,saya
command and simply follow
thevoiceprompts.
Thefollowinglistshowsavailable
voicecommands.
Call <Name or #>:Voicedials
a name or phone number in
your address book. If multiple
numbers exist, say the name and
the number type (i.e. mobile,
home,work,orother).
Send Message <Name or #>:
DisplaytheCreateMessage
screenwiththecontactyouhave
spoken.
Contact <Name> :Retrieveand
display the contact information
stored in the address book.
Go To <Menu>:Openan
application on your phone.
Check <Item> :Checkthestatus
information of your phone
(Status,Voicemail,Messages,
MissedCalls,Time,Signal
strength, Battery, My Phone
Number,andVolume).

80
Readout Mode
ReadoutModemakesyour
phone a useful companion when
youcan’tordon’thavetheability
to read the phone screen.
WhenReadoutmodeis
activated,thephonewill
announcekeyalert,navigation,
andcontentinformationverbally.
•Provideverbalalertsofthe
following:
– Missed Call
– NewMessagereceived
– LowBattery
– MessageSentandother
conrmationnotications
•Announcehighlighteditems
inMenusasusernavigatesthe
phone
•Announcenumbersastheyare
pressed on keypad
•Readouttextmessagecontent
To turn on Readout Mode
1.SelectMenu > Settings >
Voice Command Settings.
2.SelectAudio Modes >
Readout mode.

Breeze Mode - Useful features
81
01
02
03
06
01
02
03
04
05
06
07
04
05
Slow Speech
SlowSpeechmakesthecaller's
voiceslowdownandeasierto
understand.
1.SelectMenu > Settings > Slow
Speech.
2.SelectOn or Off.
3.SelectSelect.

82
Memo

83
5
Bluetooth
Using the web browser
Connectivity

84
Bluetooth
Bluetooth technology enables
free wireless connections
betweenelectronicdevices
withinamaximumrangeof33
feet(10meters).Bluetooth
connections can be used to send
images, text, business cards,
calendarevents,ortoconnect
to computers using Bluetooth
technology.
Yourmobilephonesupports:
•ConnecttoPCtoaccessinternet.
•ConnecttoHands-Free.
•Connecttoelectronicdevices.
Bluetooth Icon
Icon Descriptions
Bluetoothisactive.
Bluetoothhands-free
headset is connected.
BluetoothA2DPheadsetis
connected.
Bluetoothhands-free+
A2DPheadsetisconnected.
DatatransferviaBluetooth.
note:AdvanceAudioDistribution
Prole(A2DP)isaBluetoothprole
(mode)whichisdesignedtotransfera
uni-directional2-channelstereoaudio
stream to a headset or car audio.

Breeze Mode - Connectivity
85
01
02
03
04
01
02
03
04
05
06
07
05
06
Activating Bluetooth
1.
SelectMenu > Settings >
Bluetooth Activation > .
2.SelectOn or Off.
Adding a device
1.SelectMenu > Settings >
Bluetooth > My Devices.
2.SelectSearch for Devices >
Search.
3.Theavailabledevicewillbe
displayed.
4.Selectadeviceandselect
Select.
5.Enterpasswordandpress .
note:Thetargetdevicemustbein
discoverablemode.
Receiving les
Thereceiptshouldbeapproved
beforereceivingale(s).
Thereceivedle(s)willbesaved
in the corresponding folder.
Forexample,ifyoureceived
contacts information from the
sender,itwillbesavedinyour
phone’s memory.
1.Afterpairingwiththetarget
device,selectOptions > Take
Files.
2.Theavailableleswillbe
displayed.
3.Selectaleandselect
Options > Copy.

86
Setting the visibility
1.SelectMenu > Settings >
Bluetooth Visibility > .
2.SelectShow or Hide.
3.SelectSelect.
Naming the phone
1.SelectMenu > Settings >
Bluetooth > My Bluetooth Info.
2.SelectName > Edit.
3.Enterthenewnameand
select Save.
note:Thedevicenameiswhatidenties
your phone to Bluetooth network.
Setting the Using Memory
1.SelectMenu > Settings >
Bluetooth > Memory in Use.
2.SelectPhone Memory or
External Memory.
3.SelectSelect.

Breeze Mode - Connectivity
87
01
02
03
04
01
02
03
04
05
06
07
05
06
Using the web browser
Accessing browser
1.Press in standby mode or
select Menu > AT&T Services >
Browser.
2.SelectHome.
note: Itwillaccessyourservice
provider’shomepage.
Using bookmarks
1.Press in standby mode or
select Menu > AT&T Services >
Browser.
2.SelectBookmarks.
Adding bookmarks
1.Press in standby mode or
select Menu > AT&T Services >
Browser.
2.SelectBookmarks > Options >
Add Bookmark.
3.Enteranamefornew
bookmarkinTitleeldand
webaddressinURLeld.
4.SelectSave.

88
Entering web address
1.Press in standby mode or
select Menu > AT&T Services >
Browser.
2.SelectEnter Address.
3.EntertheURL.
4.SelectGo.
Viewing history
1.Press in standby mode or
select Menu > AT&T Services >
Browser.
2.SelectHistory.
Setting advanced options
1.Press in standby mode or
select Menu > AT&T Services >
Browser.
2.SelectManage > Options.
3.SelectRendering Mode,
Cache Cookies, , Security
Warning, Javascript Image or
Display.
4.Selectanoption>Select.

90
Memo

91
6
Phone status
Sounds & alerts
Display settings
Voice Command Setting
Settings

92
Phone status
ThismenuallowsyoutoviewMy
Phone Number Signal Strength,
and Battery Remaining.
1.SelectMenu > Settings >
Phone Status.
Sounds & alerts
The Sounds & Alerts menu
allows you to specify a ringer
type, message alert sound, key
volumeandsoon.
1.SelectMenu > Settings >
Sounds & Alerts.
2.SelectNormal, Vibrate and
Ring, Vibrate Only, Silent or
Flight Mode.
3.SelectEdit to specify a
selected option.
4.Selectanoptionforeacheld
and select . To reset to Save
factory defaults, select Reset.
note: You can specify the options only
when Normal or Vibrate and Ring
prolesarehighlighted.Othersonly
view.

93
01
02
03
04
05
03
04
05
06
07
02
06
01
Breeze Mode - Settings
Display settings
Setting the font size
1.SelectMenu > Settings > Font
Size.
2.SelectMedium, Large Very or
Large.
3.SelectSelect.
Setting the wallpaper
1.SelectMenu > Settings >
Wallpaper.
2.
Selectadesiredimage>
View.
3.SelectSelect.
Voice command setting
1.SelectMenu > Settings >
Voice Command Settings.
2.SelectConfirmation,
Adaptation, Audio Modes,
Speakerphone About or and
select Select.
3.Selectanoption>Select.
4.Toimprovetherecognition
accuracy, select Adaptation >
Adapt Voice > Start.
note: You can check the details for each
setting option by selecting on the Help
option setting screen.

94
Memo

Making, receiving and ending a call
Call settings
Checking all calls
Speed dialing
Using address book
Using your headset
Fixed dialing number
Caller identification
Slow Speech
Calls and address book
with Advanced Mode
1

96
AdvancedModeoffersadditional
features and functionality
associated with making calls and
using address book.
Making, receiving and
ending a call
Making a call
1.Entertheareacodeand
phone number.
2. Press .
Answering a call
1.Press or select Accept.
Ending a call
1.Press .
Oncethecalliscompleted,acall
summary is displayed.
Rejecting a call
Press or select Ignore.
Making a call using the call
list
Yourphonelogsupto20
dialed,receivedandmissedcall
numbers.
1.Press to display the recent
calls list.
2.SelectAll Calls, Missed Calls,
Received Calls Dialed Calls,
or Call Ranking by pressing
L/R.

Advanced Mode - Calls a address booknd
97
03
04
05
06
01
02
03
04
05
06
07
01
01
02
3.Selectanumber.
4.Press to dial the selected
number.
note: To redial the last number, press
and hold in standby mode.
Making a call during a call
1.Enterthephonenumber
or select > Options View
Contacts.
2. Press to dial the
secondcall.Therstcallis
automatically put on hold.
Switching between two calls
1.SelectOptions > Swap.
Making an international call
1.Pressandhold key for the
internationalprexuntilthe
‘+’,characterappears.
2. Type the country code, area
code, and phone number.
3.Press .
Making an emergency call
1.Youcanmakeemergency
callsevenifyourphonedoes
nothaveaSIMcard.
2. Press Emergency Number, or
select SOS if your phone does
nothaveaSIMcard.
3.Press .

98
Replying to a missed call
1.Press to display the calls
list.
2.SelectMissed Calls by
pressing L/R.
3.Selectanumbertocallby
pressing U/D.
4.Press .
Answering a second call N
1.Press .Therstcallis
automatically put on hold.
2. Press to end the second
call. The call on hold is
automatically reconnected.
note: For answering a second call, you
shouldactivateCall Waitinginadvance.
(Select Menu > Settings > Call > Call
Waiting Options Activate > > inAdvanced
mode.)
Slowing down a Voice
1.SelectOptions > Slow Speech.
Putting a call on hold and
returning N
Putting a call on hold
1.SelectOptions > Hold or press
.
Returning to a held call
1.SelectOptions > Unhold or
press again.

Advanced Mode - Calls a address booknd
99
03
04
05
06
01
02
03
04
05
06
07
01
01
02
Multi-party calls N
You can talk with more than one
personorhaveaconferencecall.
Making a multi-party call
1.Calltherstparticipant.
2. Call the second participant.
Therstcallisautomatically
put on hold.
3.SelectOptions > Join.
Having a private
conversation with one
participant
1.SelectOptions > Split.
2.Selecttheparticipant>
Select.
Removing one participant
from a multi-party call
1.SelectOptions > End.
2.Selectthenumberassociated
with the call you wish to end or
End All to end all calls.
Searching for a number in
address book during a call
1.Select Options > View Contacts.
2.Selectanumber > .
Searching for a name or
group in address book
Entertherstlettersofthename
forNameSearch.Theentriesare
displayedstartingwiththerst
entry matching your input.

100
Finding a name manually in
address book
1.PressU/D.
Viewing the details of
highlighted entry in address
book
1.SelectSelect.
For details on address book, see
page104.
Reading a message during a
call
1.SelectOptions > View
Message.
2.Selectaconversation>View.
3.Selectamessage>View.
Sending a message during a
call
1.SelectOptions > Send
Message.
For details on creating a text
message,seepage112.
Mobile WebN during a call
1.SelectOptions > Browser.
Viewing the calendar during
a call
1.SelectOptions > View
Calendar.
Making a note during a call
1.SelectOptions > Notepad.

Advanced Mode - Calls a address booknd
103
03
04
05
06
01
02
03
04
05
06
07
01
01
02
Resetting all call times
1.SelectMenu > My Stuff >
Tools.
2.SelectRecent Calls > Call
Time.
3.SelectReset > Yes.
note:Thedefaultpasswordis‘1234’.
Speed dialing
Youcandialquicklyusingspeed
dialing.Upto8phonenumbers
can be programmed using
numbers2to9.
:Voicemail
:Prexforinternationalcall
Setting speed dial
1.SelectMenu > Address Book >
Settings.
2.SelectSpeed Dial > an empty
entry and select Add.
3.Selectacontact>Select.
Changing speed dial contact
1.SelectMenu > Address Book >
Settings.
2.SelectSpeed Dial and select a
number.
3.SelectChange.
4.Selectacontact>Select > Yes.

108
1.SelectMenu > Address Book >
Fixed Dial Numbers.
note: PIN2 must be correctly entered
within3attempts.Ifyouinputincorrect
code three times in a row, the PIN2
code will be blocked. If the PIN2 code
isblocked,pleasecontactyourservice
provider.YourPIN2codeissuppliedwith
theSIMcard.
Caller identification
Caller identication N
1.SelectMenu > Settings Call >
> Display My Number.
2.SelectNetwork Default, Show
or Hide > Select.
Slow Speech
SlowSpeechmakesthecaller's
voiceslowdownandeasierto
understand.
1.SelectMenu > Settings > Slow
Speech.
2.SelectOn or Off.
3.SelectSelect.

P2000
109
Receiving messages
Creating and sending text messages
Creating multimedia messages
Message templates
Message settings
Managing messaging memory
Email
Using instant messenger
Messaging
with Advanced Mode
2

110
Whenyourphoneissetto
AdvancedMode,youcan
use additional features and
functionality associated with
messaging.
Receiving messages
Viewing a new message
1.SelectView.
2.Selectamessage>View.
Reading a message from the
conversation
1.SelectMenu > Messaging.
2.Selectaconversation > View.
3.Selectamessage>View.
Saving the contact
information from a received
message
1.Selectareceivedmessage >
View.
2.SelectOptions > Save to
Contact.
3.Selectas New Contact or as
Existing Contact.
Saving the object in a
received multimedia
message
1.Openamultimediamessage.
2.Selectanobject.
3.SelectOptions > Use > Save to
internal or Save to external.

120
Setting auto delete old
message
Whenmessagememory
capacity is full, the oldest
message will be deleted
automatically.
1.SelectMenu > Messaging >
Options Settings > .
2.SelectAuto Delete.
3.SelectOn or Off > Save.
Managing messaging
memory
Upto300messagescanbe
stored in the phone memory,
additional messages will be
savedtotheSIMcard.When
the message box is full, the
messagesfulliconwillappear.All
messages share memory.
Icon Descriptions
Textmessageisfull(SIMand
phonemessages).
Moving a message to SIM
1.SelectMenu > Messaging > a
conversation>View.
2.Selectamessage > Options >
Move to SIM.
Deleting a conversation
1.Selectaconversation >
Options Delete > > Yes.

Advanced Mode - Messaging
121
01
04
05
06
01
02
03
04
05
06
07
02
02
04
03
Deleting multiple
conversations
1.SelectMenu > Messaging
> Options Delete >
Conversations.
2.SelectSelect or Deselect
to select or deselect the
message.
3.SelectOptions > Delete > Yes.
Viewing memory space
information
1.SelectMenu > Messaging >
Option Memory > .
2. Press L/RtoviewSIM and
Phone memory.
Email
Youcanreceiveemailsfromyour
serviceprovider.
Receiving an email
1.SelectMenu > Mobile Email.
2.Selectanemail.
3SelectSelect.

122
Memo

123
Camera
Photo album
Video album
Audio album
Music player
Music player settings
Media player
Other les
Managing memory
Playing games
Multimedia
with Advanced Mode
3

124
InAdvancedMode,youcanusethefullfeaturesofmultimediathat
Breeze IV offers.
Camera
Youcantakepicturesandrecordmoviesusingthebuilt-incamera.
Thephotosandvideoclipscanbesavedandsentviamultimedia
messages or Bluetooth.
Zoom Zoom
Picture
remaining
Brightness Brightness
SelfTimer SelfTimer
Effect
Flash
Effect
Flash
White
Balance
White
Balance
Size Size
Camera
mode
Video
mode
Termékspecifikációk
| Márka: | Pantech |
| Kategória: | okostelefon |
| Modell: | Breeze IV |
Szüksége van segítségre?
Ha segítségre van szüksége Pantech Breeze IV, tegyen fel kérdést alább, és más felhasználók válaszolnak Önnek
Útmutatók okostelefon Pantech

12 Október 2024
24 Augusztus 2024
17 Augusztus 2024
8 Augusztus 2024
6 Augusztus 2024
4 Augusztus 2024
2 Augusztus 2024
31 Július 2024
30 Július 2024
30 Július 2024
Útmutatók okostelefon
- okostelefon Samsung
- okostelefon Sony
- okostelefon Acer
- okostelefon Nedis
- okostelefon LG
- okostelefon Realme
- okostelefon Philips
- okostelefon SilverCrest
- okostelefon Garmin
- okostelefon Panasonic
- okostelefon AEG
- okostelefon Sharp
- okostelefon Nokia
- okostelefon Lenovo
- okostelefon Evolveo
- okostelefon Toshiba
- okostelefon Oppo
- okostelefon Hyundai
- okostelefon Hisense
- okostelefon BenQ
- okostelefon Apple
- okostelefon TP-Link
- okostelefon Medion
- okostelefon MyPhone
- okostelefon Motorola
- okostelefon Geemarc
- okostelefon Alcatel
- okostelefon TCL
- okostelefon Xiaomi
- okostelefon CAT
- okostelefon Dell
- okostelefon Gigaset
- okostelefon Cyrus
- okostelefon Gigabyte
- okostelefon Vivax
- okostelefon Thomson
- okostelefon Intex
- okostelefon Polaroid
- okostelefon Kyocera
- okostelefon Aiwa
- okostelefon Huawei
- okostelefon Microsoft
- okostelefon Asus
- okostelefon Haier
- okostelefon Mitsubishi
- okostelefon Sencor
- okostelefon Telefunken
- okostelefon Nevir
- okostelefon Kodak
- okostelefon Doro
- okostelefon Denver
- okostelefon Bush
- okostelefon TAG Heuer
- okostelefon Trevi
- okostelefon Amazon
- okostelefon NGS
- okostelefon Tesla
- okostelefon Energy Sistem
- okostelefon OK
- okostelefon Google
- okostelefon Honor
- okostelefon SPC
- okostelefon Bea-fon
- okostelefon ZTE
- okostelefon ESTAR
- okostelefon Vodafone
- okostelefon O2
- okostelefon Hammer
- okostelefon Overmax
- okostelefon OnePlus
- okostelefon Archos
- okostelefon MaxCom
- okostelefon Kogan
- okostelefon Alecto
- okostelefon Honeywell
- okostelefon Prestigio
- okostelefon Media-Tech
- okostelefon Bury
- okostelefon Sony Ericsson
- okostelefon Manta
- okostelefon Blaupunkt
- okostelefon Mio
- okostelefon Facom
- okostelefon Oukitel
- okostelefon Sagem
- okostelefon Razer
- okostelefon Ulefone
- okostelefon Olympia
- okostelefon Tiptel
- okostelefon Sanyo
- okostelefon CRUX
- okostelefon Micromax
- okostelefon NEC
- okostelefon Audioline
- okostelefon CUSTOM
- okostelefon GoClever
- okostelefon Krüger&Matz
- okostelefon Allview
- okostelefon RCA
- okostelefon HTC
- okostelefon Bluebird
- okostelefon Majestic
- okostelefon IGET
- okostelefon Tecdesk
- okostelefon Lava
- okostelefon Cubot
- okostelefon CSL
- okostelefon I.safe Mobile
- okostelefon Fysic
- okostelefon Wiko
- okostelefon Yarvik
- okostelefon Aligator
- okostelefon Amplicomms
- okostelefon AQISTON
- okostelefon Amplicom
- okostelefon Ecom
- okostelefon Lexibook
- okostelefon Trekstor
- okostelefon Vestel
- okostelefon Sonim
- okostelefon Blu
- okostelefon Easypix
- okostelefon Konrow
- okostelefon Brigmton
- okostelefon Sunstech
- okostelefon Aspera
- okostelefon Swissvoice
- okostelefon Sunny
- okostelefon Nordmende
- okostelefon Binatone
- okostelefon Blackberry
- okostelefon KPN
- okostelefon Vivo
- okostelefon Wolder
- okostelefon NGM
- okostelefon Profoon
- okostelefon Switel
- okostelefon InFocus
- okostelefon GreatCall
- okostelefon XD
- okostelefon Alba
- okostelefon RugGear
- okostelefon Umidigi
- okostelefon Intermec
- okostelefon AT&T
- okostelefon Mpman
- okostelefon Kazam
- okostelefon Logicom
- okostelefon Karbonn
- okostelefon Palm
- okostelefon Emporia
- okostelefon Hannspree
- okostelefon Phicomm
- okostelefon Crosscall
- okostelefon Plum
- okostelefon Lumigon
- okostelefon Infinix
- okostelefon Keneksi
- okostelefon Klipad
- okostelefon T-Mobile
- okostelefon JCB
- okostelefon Casper
- okostelefon Unnecto
- okostelefon Wileyfox
- okostelefon ITT
- okostelefon Yota
- okostelefon Avus
- okostelefon Spice
- okostelefon M3 Mobile
- okostelefon Wolfgang
- okostelefon BQ
- okostelefon ORA
- okostelefon Danew
- okostelefon Echo
- okostelefon Primux
- okostelefon UTStarcom
- okostelefon Zipy
- okostelefon Mediacom
- okostelefon Beafon
- okostelefon BGH
- okostelefon Billow
- okostelefon Telstra
- okostelefon ToughGear
- okostelefon Benefon
- okostelefon Komu
- okostelefon Doogee
- okostelefon Energizer
- okostelefon Tremay
- okostelefon Kurio
- okostelefon Piranha
- okostelefon Coolpad
- okostelefon Mobistel
- okostelefon Itel
- okostelefon Garmin-Asus
- okostelefon Handheld
- okostelefon Fero
- okostelefon AT Telecom
- okostelefon General Mobile
- okostelefon Mustang
- okostelefon Syco
- okostelefon Pharos
- okostelefon Storex
- okostelefon Fairphone
- okostelefon Xtreamer
- okostelefon Freeman
- okostelefon HomTom
- okostelefon Auro
- okostelefon Maxx
- okostelefon ITTM
- okostelefon Posh Mobile
- okostelefon THL
- okostelefon NGM-Mobile
- okostelefon Nothing
- okostelefon Lark
- okostelefon NUU Mobile
- okostelefon Senifone
- okostelefon Tecno
- okostelefon Telme
- okostelefon UMi
- okostelefon Olitech
- okostelefon Mobiola
- okostelefon Meizu
- okostelefon Neffos
- okostelefon Gionee
- okostelefon TIM
- okostelefon Leotec
- okostelefon Leagoo
- okostelefon NTech
- okostelefon Nubia
- okostelefon LeEco
- okostelefon GSmart
- okostelefon Saiet
- okostelefon POCO
- okostelefon Verykool
- okostelefon Aplic
- okostelefon HMD
- okostelefon Opis
- okostelefon Volla
Legújabb útmutatók okostelefon
10 Április 2025
2 Április 2025

30 Március 2025

16 Január 2025
16 Január 2025

15 Január 2025
14 Január 2025
13 Január 2025
12 Január 2025
12 Január 2025