Használati útmutató Panasonic NV-GS33EGE
Olvassa el alább 📖 a magyar nyelvű használati útmutatót Panasonic NV-GS33EGE (47 oldal) a Kamerák kategóriában. Ezt az útmutatót 4 ember találta hasznosnak és 2 felhasználó értékelte átlagosan 4.5 csillagra
Oldal 1/47

R
Operating Instructions
Instrukcja obsługi
Digital Video Camera
Model No. NV-GS22EGE
NV-GS33EGE
Before use, please read these instructions completely.
Przed pierwszym włączeniem kamery prosimy o dokładne przeczytanie
instrukcji obsługi.
VQT0H63-1

-2-
Information for Your Safety
ª Carefully read the Operating
Instructions and use the Movie
Camera correctly.
≥Injury or material damage resulting from any
kind of use that is not in accordance with the
operating procedures explained in these
Operating Instructions are the sole
responsibility of the user.
Operating Instructions
≥These Operating Instructions apply to models
NV-GS22 and NV-GS33.
≥The illustrations used in these Operating
Instructions show model NV-GS33, however,
parts of the explanation refer to different
models.
≥Depending on the model, some functions are
not available.
Try out the Movie Camera.
Be sure to try out the Movie Camera before
recording your first important event and check
that it records properly and functions correctly.
The manufacturer is not liable for loss of
recorded contents.
The manufacturer shall in no event be liable for
the loss of recordings due to malfunction or
defect of this Movie Camera, its accessories or
cassettes.
Carefully observe copyright laws.
Recording of pre-recorded tapes or discs or other
published or broadcast material for purposes
other than your own private use may infringe
copyright laws. Even for the purpose of private
As this equipment gets hot during use,
operate it in a well-ventilated place; do
not install this equipment in a confined
space such as a bookcase or similar unit.
To reduce the risk of fire, electric shock
or product damage, do not expose this
equipment to rain, moisture, dripping or
splashing and ensure that no objects
filled with liquids, such as vases, shall be
placed on the equipment.
AC Adaptor
≥The rating plate is on the underside of
the AC Adaptor.
use, recording of certain material may be
restricted.
≥The Movie Camera uses copyright-protected
technologies and is protected by the patented
technologies and intellectual properties of
Japan and the U.S. To use these
copyright-protected technologies, authorization
of the Macrovision Company is required. It is
prohibited to disassemble or modify the Movie
Camera.
Pages for reference
Pages for reference are indicated by dashes
either side of a number, for example: -00-
ª WARNING
Do not remove the cover (or back); there are
no user serviceable parts inside.
Refer servicing to qualified service personnel.
ª EMC Electric and magnetic
compatibility
This symbol (CE) is located on the rating
plate.
Use only the recommended accessories.

-3-
Contents
ENGLISH
Information for Your Safety.............................. 2
Before Use
Standard Accessories...................................... 4
Optional Accessories....................................... 4
Controls and Components............................... 4
The Remote Controller .................................... 7
Power Supply .................................................. 8
Charging Time and Available Recording
Time .............................................................. 9
The One-touch Free Style Grip Belt ................ 9
Attaching the Lens Cap ................................. 10
Attaching the Shoulder Strap......................... 10
Inserting a Cassette....................................... 10
Turning on the Movie Camera....................... 11
Selecting Modes............................................ 11
Using the Viewfinder/LCD Monitor ................ 11
Using the Menu Screen ................................. 12
List of Menus ................................................. 13
Setting Date and Time................................... 14
Internal Lithium Battery Recharge ................. 14
LP Mode ........................................................ 14
Audio Recording Mode .................................. 15
Recording Mode
About Recording............................................ 16
Recording on a Tape ..................................... 16
Photoshot ...................................................... 17
Quick Start..................................................... 18
Self-timer Recording...................................... 18
Zoom In/Out Functions.................................. 18
Digital Zoom Function.................................... 19
Image Stabilizer Function .............................. 19
Fade In/Out Functions ................................... 20
Backlight Compensation Function ................. 20
Night View Functions..................................... 21
Soft Skin Function ......................................... 21
Wind Noise Reduction Function .................... 21
Cinema Function ........................................... 21
Recording in Special Situations..................... 22
Recording in Natural Colours ........................ 22
Adjusting White Balance Manually ................ 23
Manual Shutter Speed Adjustment ................ 24
Manual Iris Adjustment .................................. 24
Manual Focus Adjustment ............................. 24
Digital Effect Functions.................................. 25
Playback Mode
Playing Back a Tape ..................................... 28
Finding a Scene You Want to Play Back....... 28
Slow Motion Playback ................................... 29
Still Playback/Still Advance Playback............ 29
Index Search Functions................................. 29
Playback Zoom Function ............................... 30
Playback Digital Effect Functions .................. 31
Playing Back on Your TV .............................. 31
Editing Mode
Audio Dubbing............................................... 33
Copying on an S-VHS (or a VHS)
Cassette...................................................... 33
Using the DV Cable for Recording ................ 33
Using as a Web Camera or with
DV STUDIO ................................................ 34
Others
Indications ..................................................... 35
Initializing the Modes ..................................... 36
Warning/Alarm Indications ............................ 36
Notes and Hints............................................. 36
Cautions for Use............................................ 40
Before Requesting Repair
(Problems and Solutions) ........................... 43
Explanation of Terms .................................... 45
Specifications
Specifications ................................................ 47
Before Use
-4-
Before Use
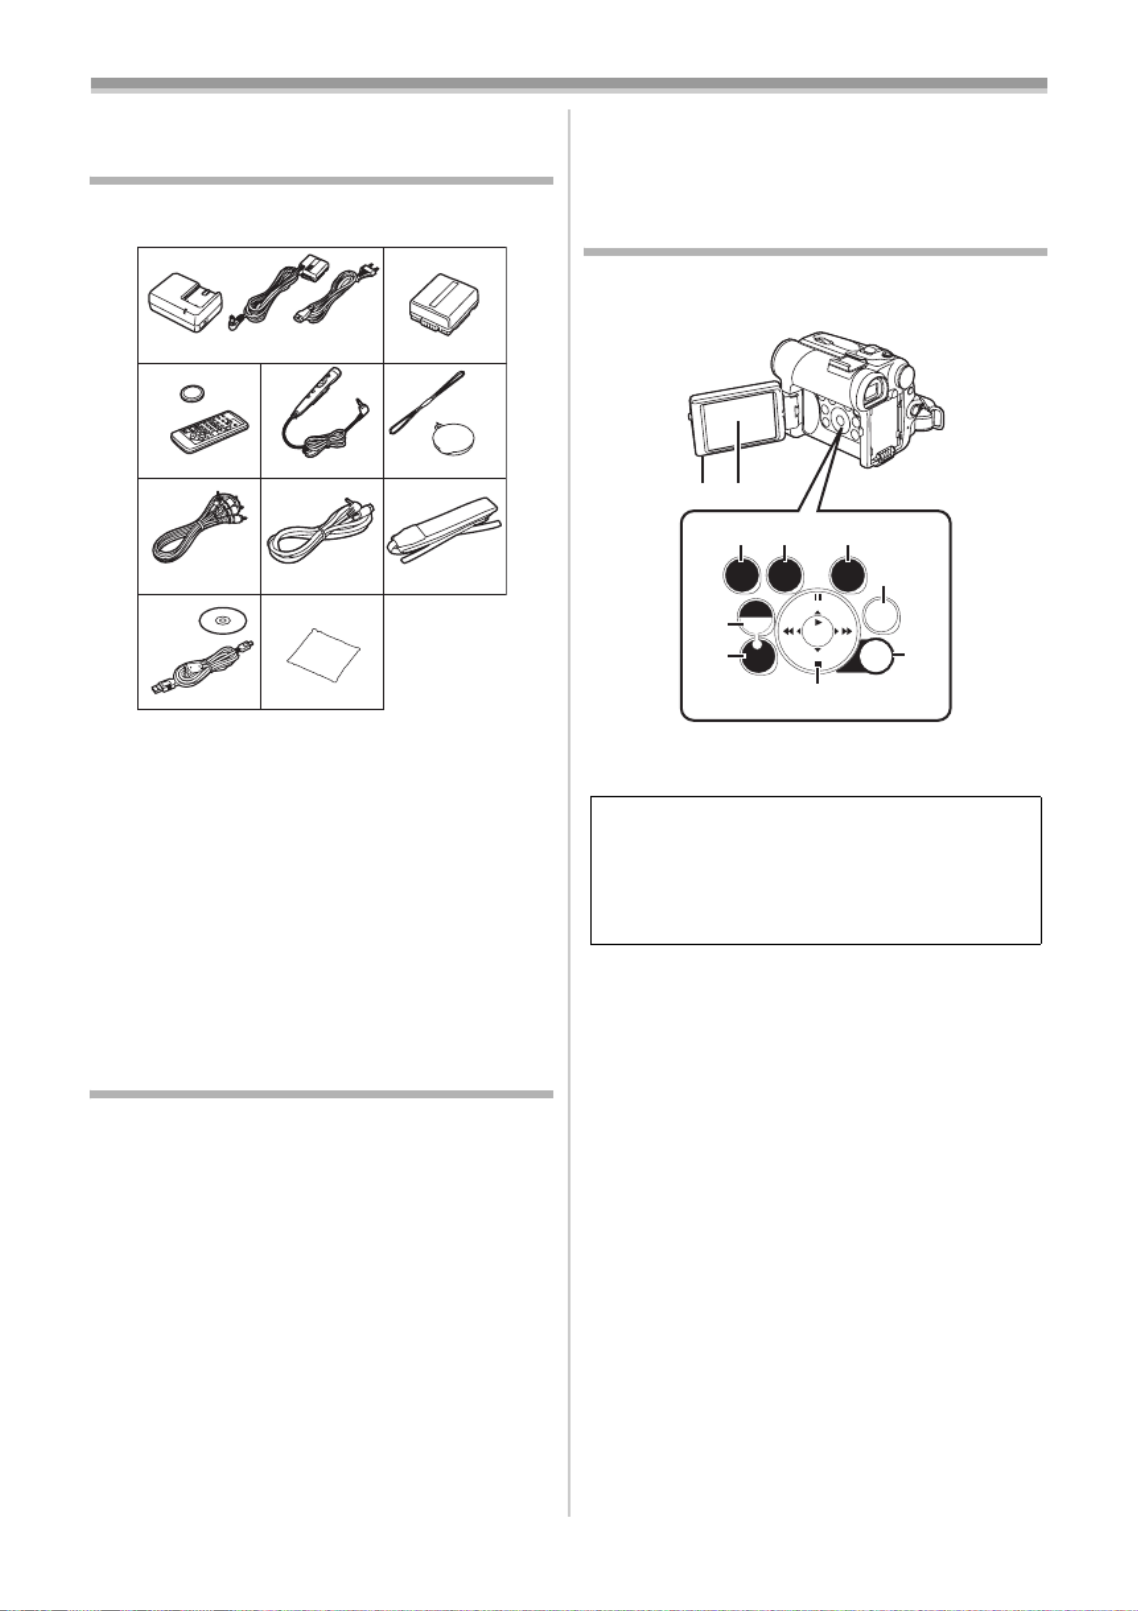
Standard Accessories
Illustrated are accessories supplied with the
Movie Camera.
1) AC Adaptor, DC Input Lead and AC Mains
Lead -8-
2) Battery Pack -8-
3) Remote Controller and Button-Type
Battery -6-
4) Free Style Remote Controller with Mic -6-
5) Lens Cap and Lens Cap Cord -10-
6) AV Cable -31-
7) S-Video Cable -31-
8) Shoulder Strap -10-
9) USB Connection Kit (USB Cable and
CD-ROM)
10) Cleaning Cloth
Optional Accessories
1) AC Adaptor (VW-AD10E)
2) Battery Pack (Lithium/CGA-DU07/680mAh)
3) Battery Pack (Lithium/CGA-DU14/1360mAh)
4) Battery Pack (Lithium/CGA-DU21/2040mAh)
5) Wide Conversion Lens (VW-LW2707N2E)
6) Tele Conversion Lens (VW-LT2714N2E)
7) ND Filter (VW-LND27E)
8) MC Protector (VW-LMC27E)
9) Stereo Microphone (VW-VMS2E)
10) Video DC Light (VW-LDC10E)
11) Light Bulb for Video DC Light (VZ-LL10E)
12) Shoe Adaptor (VW-SK11E)
13) Tripod (VW-CT45E)
14) Snow & Rain Jacket (VW-SJGS55E)
15) DV Cable (VW-CD1E)
16) DV Editing Software with DV Interface Board
(VW-DTM41E)
K2CQ2DA00003
1)
3)
7)6) 8)
VFC3506
N2QAGC000018
VGQ7304
VGQ7697
4) 5)
2)
K2GJ2DZ00017
K2KC4CB00009
N2QCBD000030
K2KC4CB00008
9) 10)
VFA0425
VSK0651
VFC3778
CGA-DU07
17) DV Editing Software (VW-DTM40E)
≥Some optional accessories may not be
available in some countries.
Controls and Components
ª Movie Camera
(1) LCD Monitor Open Knob [OPEN4] -11-
(2) LCD Monitor -11-,-43 -
(3) Colour Night View Button
[COLOUR NIGHT VIEW] -21-
(4) Soft Skin Button [SOFT SKIN] -21-
(5) Tele Macro Button [TELE MACRO] -19-
(6) Multi Button [MULTI] -26-
Picture-in-Picture Button [P-IN-P] -26-
(7) Recording Check Button [S] -16-
Recording Button [REC] (Available only
with NV-GS33) -34-
(8) Backlight Button [BACK LIGHT] -20-
(9) Pause Button [;] -29-
Still Button [STILL] -17-
(10) Fast Forward/Cue Button [5] -28-
(11) Play Button [1] -28-
Enter Button [ENTER] -12-
(12) Stop Button [∫] -28-
Fade Button [FADE] -20-
(13) Rewind/Review Button [6] -28-
(14) Menu Button [MENU] -12-
Due to limitations in LCD production
technology, there may be some tiny bright or
dark spots on the LCD Monitor screen.
However, this is not a malfunction and does
not affect the recorded picture.
STILL
ENTER
FADE MENU
BACK
LIGHT
MULTI/
P-IN-P
COLOUR
NIGHT
VIEW
SOFT
SKIN
TELE
MACRO
S
REC
is
(1)(2)
(3) (4) (5)
(9)(10)(11)(12)(13)
(7)
(6)
(8) (14)

Before Use
-5-
(15) Lens Hood -43-
(16) Recording Lamp -16-
(17) Lens
(18) Microphone (built-in, stereo) -19-,-2 1-
(19) Lock Button -9-
(20) Lock Cover -9-
(21) Accessory Shoe
≥Accessories, such as a stereo microphone
(VW-VMS2E; optional), are attached here.
(22) Eyecup
(23) Power LCD Button [POWER LCD] -12-
Power LCD Lamp -12-
(24) Cassette Holder
(25) Cassette Compartment Cover -10-
(26) Speaker -28-
(27) USB Socket [ ] -34-
(28) S-Video Output Socket [S-VIDEO OUT]
-31-
(29) White Balance Sensor -23-
Remote Control Sensor -7-
(30) Socket for Free Style Remote Controller
with Mic [REMOTE] -17-
Microphone Socket [MIC]
≥When connecting an external microphone
or audio equipment to this socket, the
built-in microphone does not operate.
≥When connecting the Free Style Remote
Controller with Mic to this socket and the
(15)
(16)
(17)
(18)
(19)
(20)
(21)
(22)
(23)
S-VIDEO
OUT
A/V OUT
PHONES
REMOTE/MIC
DV
(PLUG IN POWER)
(24)
(25)
(26)
(27) (28)
(29)
(30) (31) (32)
[TALK] Button is pressed, the built-in
microphone does not operate. -17-
≥When connecting the pin plug of the Free
Style Remote Controller with Mic to this
socket, plug it in as far as it goes.
≥A compatible plug-in powered microphone
can be used.
≥The microphone may make noises
depending on the type of it. In this case, we
recommend using the battery for the Movie
Camera.
(31) Audio-Video Output Socket [A/V OUT] -31-
Headphone Socket [PHONES]
≥Connecting an AV Cable to this socket
activates the Movie Camera’s built-in
speaker, but connecting a headphone, etc.
deactivates it.
≥When connecting the pin plug of the AV
Cable to this socket, plug it in as far as it
goes.
≥When using headphones, set [AV JACK] of
the [INITIAL] sub-menu to [OUT/PHONES].
If you set [AV JACK] to [OUT], you may
hear noises on the right.
(32) DV Terminal [DV] (Input function on
NV-GS33 Model only) -33-
≥Connect this to the digital video equipment.
(33) Viewfinder -11-,-43-
(34) Eyepiece Corrector Knob -11-
(35) Photoshot Button [PHOTO SHOT] -17-
(36) Zoom Lever [W/T] [` _VOL/JOG ] -18-
(37) Cassette Eject Lever [OPEN/EJECT] -10-
(38) Reset Button [RESET] -36-
(39) Mode Dial -11-
(40) Quick Start Recording Button
[QUICK START] -18-
Quick Start Recording Lamp -18-
(41) Recording Start/Stop Button -16-
Due to limitations in LCD production
technology, there may be some tiny bright or
dark spots on the Viewfinder screen.
However, this is not a malfunction and does
not affect the recorded picture.
START
ON
OFF
QUICK
(33)(34)(35)(36)(37)(38)
(39)
(40)
(41)
(42)
(43)

Before Use
-6-
(42) Power Switch [OFF/ON] -11- -16- -40-, ,
(43) Power Lamp -11- -16- -28-, ,
(44) Mode Selector Switch
[AUTO/MANUAL/FOCUS] -16- -22-,
(45) Shoulder Strap Holders -10-
(46) Grip Belt (One-touch Free Style Grip Belt)
-9-
(47) Battery Eject Button [PUSH BATT] -8-
(48) Battery Holder
(49) Tripod Receptacle
≥Used for mounting the Movie Camera on an
optional tripod.
ª Remote Controller
Using the wireless Remote Controller that is
supplied with the Movie Camera, most of the
Movie Camera functions can be operated from a
distance.
(50) Date/Time Button [DATE/TIME] -36-
(51) Indication Output Button [OSD] -32-
(52) Display Button [DISPLAY] -35-
(53) Reset Button [RESET] -45-
(54) Recording Button [¥REC] (Available only
with NV-GS33) -34-
(55) Audio Dubbing Button [A.DUB] -33-
(56) Cursor Buttons for Variable Speed
Search Function [π ∫, ] -29-
Direction Buttons for Playback Zoom
Function [π ∑ ∏ ∫, , , ] -31-
(44)(45)(46)
(47)(48) (49)
ZOOM
INDEX INDEX
SELECT
STORE
STOP
K L
∫
OSD
DISPLAY
V
/REW
STILL ADV
OFF/ON
P.B.DIGITAL
DATE/
TIME
RESET TITLE
T
T
T
TT
W
W
W
WW
s rVOL
¥REC
MULT I/
P-IN-P
PHOTO
SHOT
START/
STOP
A.DUB
PLAY
PAU SE
FF/W
STILL ADV
ENTER
6 1 5
;
E D
VAR.
SEARCH
MENU
P.B. ZOOM
(50)
(51)
(52)
(53)
(54)
(55)
(56)
(57) Slow Motion/Still Advance Buttons [E D, ]
(E: reverse, D: forward)
-29-
(58) Index Search Buttons [: 9, ]
(:: reverse, 9: forward) -30-
(59) Selection Button [SELECT] -31-
(60) Store Button [STORE] -31-
(61) Off/On Button [OFF/ON] -31-
(62) Zoom/Volume Button [ZOOM/VOL]
-18- -28- -30-, ,
(63) Variable Speed Search Button
[VAR. SEARCH] -29-
(64) Menu Button [MENU] -12-
(65) Photoshot Button [PHOTO SHOT] -17-
(66) Title Button [TITLE]
≥This Movie Camera cannot be operated
with this button.
(67) Multi-Picture/Picture-in-Picture Button
[MULTI/P-IN-P]
-26-
(68) Rewind/Review Button [6] -28-
(69) Pause Button [;] -29-
(70) Stop Button [∫] -28-
(71) Recording Start/Stop Button
[START/STOP] -16-
(72) Play Button [1] -28-
(73) Fast-forward/Cue Button [5] -28-
(74) Playback Zoom Button [P.B. ZOOM] -30-
(75) Enter Button [ENTER] -12-
ª Free Style Remote Controller with Mic
This controller allows the scene to be shot from
various angles, high to low, and is also
ZOOM
INDEX INDEX
SELECT
STORE
STOP
K L
∫
OSD
DISPLAY
V
/REW
STILL ADV
OFF/ON
P.B.DIGITAL
DATE/
TIME
RESET TITLE
T
T
T
TT
W
W
W
WW
s rVOL
¥REC
MULT I/
P-IN-P
PHOTO
SHOT
START/
STOP
A.DUB
PLAY
PAU SE
FF/W
STILL ADV
ENTER
6 1 5
;
E D
VAR.
SEARCH
MENU
P.B. ZOOM
(57)
(58)
(59)
(60)
(61)
(62)
(63)
(64)
ZOOM
INDEX INDEX
SELECT
STORE
STOP
K L
∫
OSD
DISPLAY
V/REW
STILL ADV
OFF/ON
P.B.DIGITAL
DA E/T
TIME
RESET TITLE
T
T
T
TT
W
W
W
WW
sVOL r
¥REC
MULT I/
P-IN-P
PHOTO
SHOT
START/
STOP
A.DUB
PLAY
PAU SE
FF/ W
STILL ADV
ENTER
6 1 5
;
E D
VAR.
SEARCH
MENU
P.B. ZOOM
(65)
(66) (71)
(74)
(75)
(72)
(73)
(67)
(68)
(69)
(70)

Before Use
-7-
convenient when the Tripod is used. When the
controller is not in use, attach the clip to the Grip
Belt for convenience.
This controller allows the Movie Camera to be for
left-handed users.
(76) Microphone [MIC] -17-
(77) Recording Start/Stop Button [REC]
(78) Zoom Lever [W/T]
≥Zoom speed changes in 2 stages.
(79) Photoshot Button [PHOTO SHOT]
(80) Microphone Switch Button [TALK] -17-
≥When the Free Style Remote Controller with
Mic is connected to [REMOTE] Socket and
the [TALK] Button is pressed, the narration
microphone is activated and the built-in
microphone on the Movie Camera is
deactivated.
(81) Clip
≥Insert the plug securely into the [REMOTE]
Socket as far as it will goes. A loose
connection will spoil normal operation.
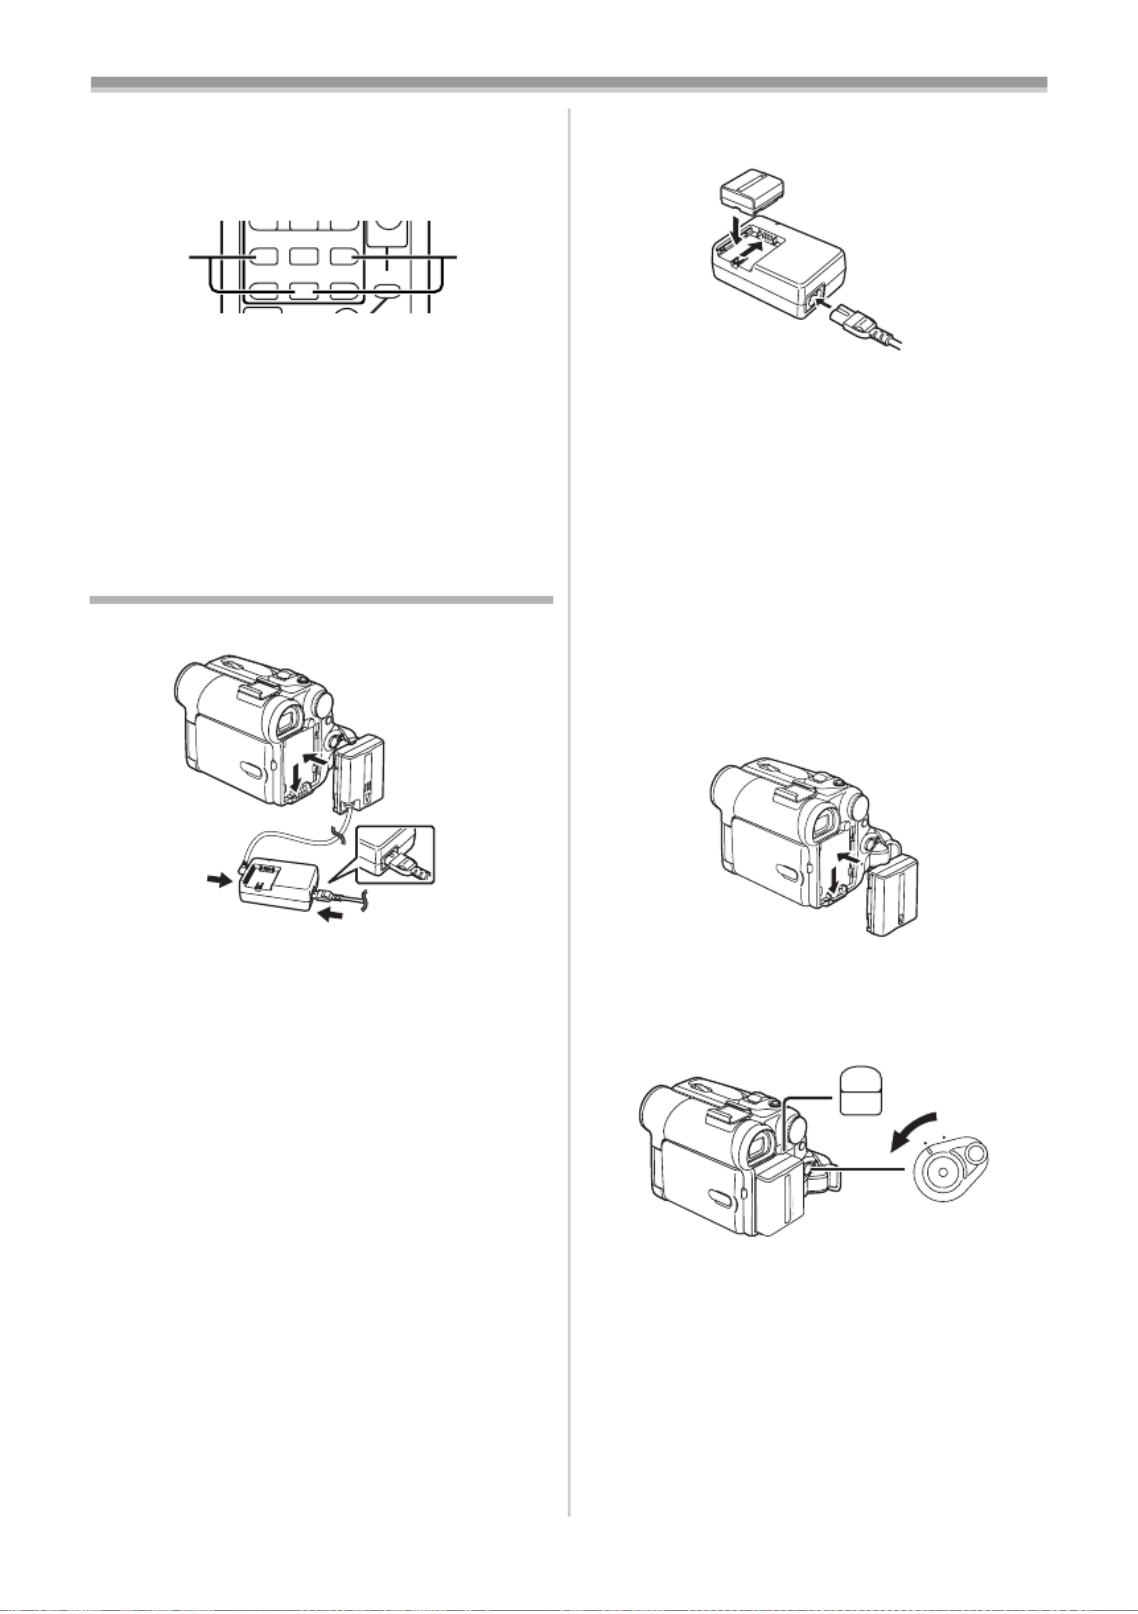
The Remote Controller
ª Inserting a Button-type Battery
Before using the Remote Controller, insert the
supplied button-type battery.
1 While pressing the Stopper 1, pull out the
Battery Holder.
2 Insert the button-type battery with the (i)
marking facing upward.
3 Insert the Battery Holder into the Remote
Controller.
≥When the button-type battery is exhausted,
replace it with a new CR2025 battery. (A battery
(76)
(77)
(78)
(79)
(80)
(81)
1
is normally expected to last about 1 year.
However, it depends on operation frequency.)
≥Make sure to match the poles correctly when
inserting the battery.
ª Using the Remote Controller
1 Direct the Remote Controller at the Remote
Control Sensor (29) of the Movie Camera
and press an appropriate button.
≥Distance from the Movie Camera: Within
approximately 5 metres
≥ oAngle: Within approximately 15 in the
vertical and horizontal directions from the
central axis
≥The above operating ranges are for indoor use.
Outdoors or under strong light, the Movie
Camera may not operate properly even within
the above ranges.
≥Within a 1-metre range, you can also use the
Remote Controller on the LCD Monitor side of
the Movie Camera.
Selecting Remote Controller Modes
When 2 Movie Cameras are used
simultaneously, they can be operated individually
by selecting different Remote Controller Modes.
≥If the Remote Controller Mode of the Movie
Camera and that of the Remote Controller do
not match, [REMOTE] Indication is displayed.
CAUTION
Danger of explosion if battery is
incorrectly replaced. Replace only
with the same or equivalent type
recommended by the equipment
manufacturer. Discard used batteries
according to manufacturer’s
instructions.
WARNING
Risk of fire, explosion and burns. Do
not recharge, disassemble, heat
above 100xC or incinerate. Keep the
Button-Type battery out of the reach
of children. Never put Button-Type
battery in mouth. If swallowed call
your doctor.
15˚
15˚
15˚
15˚
(29)
Before Use
-8-
Setup on the Movie Camera:
Set [REMOTE] on the [INITIAL] Sub-Menu to the
desired Remote Controller Mode. (-13-)
Setup on the Remote Controller:
[VCR1]:
Press the [D] Button and [∫] Button
simultaneously. 1
[VCR2]:
Press the [E] Button and [∫] Button
simultaneously. 2
≥When the battery in the Remote Controller is
replaced, the mode is automatically reset to
[VCR1] Mode.
Power Supply
ª Using the AC Adaptor
1Connect the DC Input Lead to the Movie
Camera.
2 Connect the DC Input Lead to the AC
Adaptor.
3 Connect the AC Mains Lead to the AC
Adaptor and the AC mains socket.
≥The AC Mains Lead’s outlet plug does not fit
entirely into the AC Adaptor socket. A gap will
remain as shown 1.
≥Before connecting or disconnecting the
power supply, set the [OFF/ON] Switch on
the Movie Camera to [OFF] and make sure
that Power Lamp is not lit.
ª Using the Battery
Before use, fully charge the Battery.
≥We recommend using Panasonic’s Battery.
≥We cannot guarantee the quality of this Movie
Camera when batteries of other companies are
used.
INDEX INDEX
SELECT
STOP
K L
∫
STILL ADV
PAUSE
STILL ADV
6 1 5
;
E D
P.B. ZOOM
2 1
1
1 Attach the Battery to the AC Adaptor and
charge it.
≥Since the Battery will not be charged when
the DC Input Lead is connected to the AC
Adaptor, disconnect it from the AC Adaptor.
≥The [CHARGE] Lamp lights up, and charging
starts.
≥When the [CHARGE] Lamp goes off,
charging is completed.
≥When charging the overdischarged battery,
the [CHARGE] lamp blinks at first, but the
battery is charged normally. When the
temperature of the battery is too high or low,
the [CHARGE] lamp blinks and the charging
time becomes longer than usual.
2 Attach the charged Battery to the Movie
Camera.
Disconnecting the Power Source
Set the [OFF/ON] Switch (42) to [OFF] and, while
pressing the [PUSH BATT] Button
(47), slide the
Battery or DC Input Lead upward to disconnect it.
≥For other notes concerning this item, see
-36-.
PUSH
BATT
ON
OFF
(47)
(42)
Before Use
-11-
prevention slider (by sliding it to the [REC] arrow
direction).
≥For other notes concerning this item, see
-36-.
Turning on the Movie Camera
ª How to Turn on the Power
1Set the [OFF/ON] Switch (42) to [ON] while
pressing the button 1.
≥The [POWER] Lamp (43) lights up.
ª How to Turn off the Power
1 Set the [OFF/ON] Switch (42) to [OFF] while
pressing the button 1.
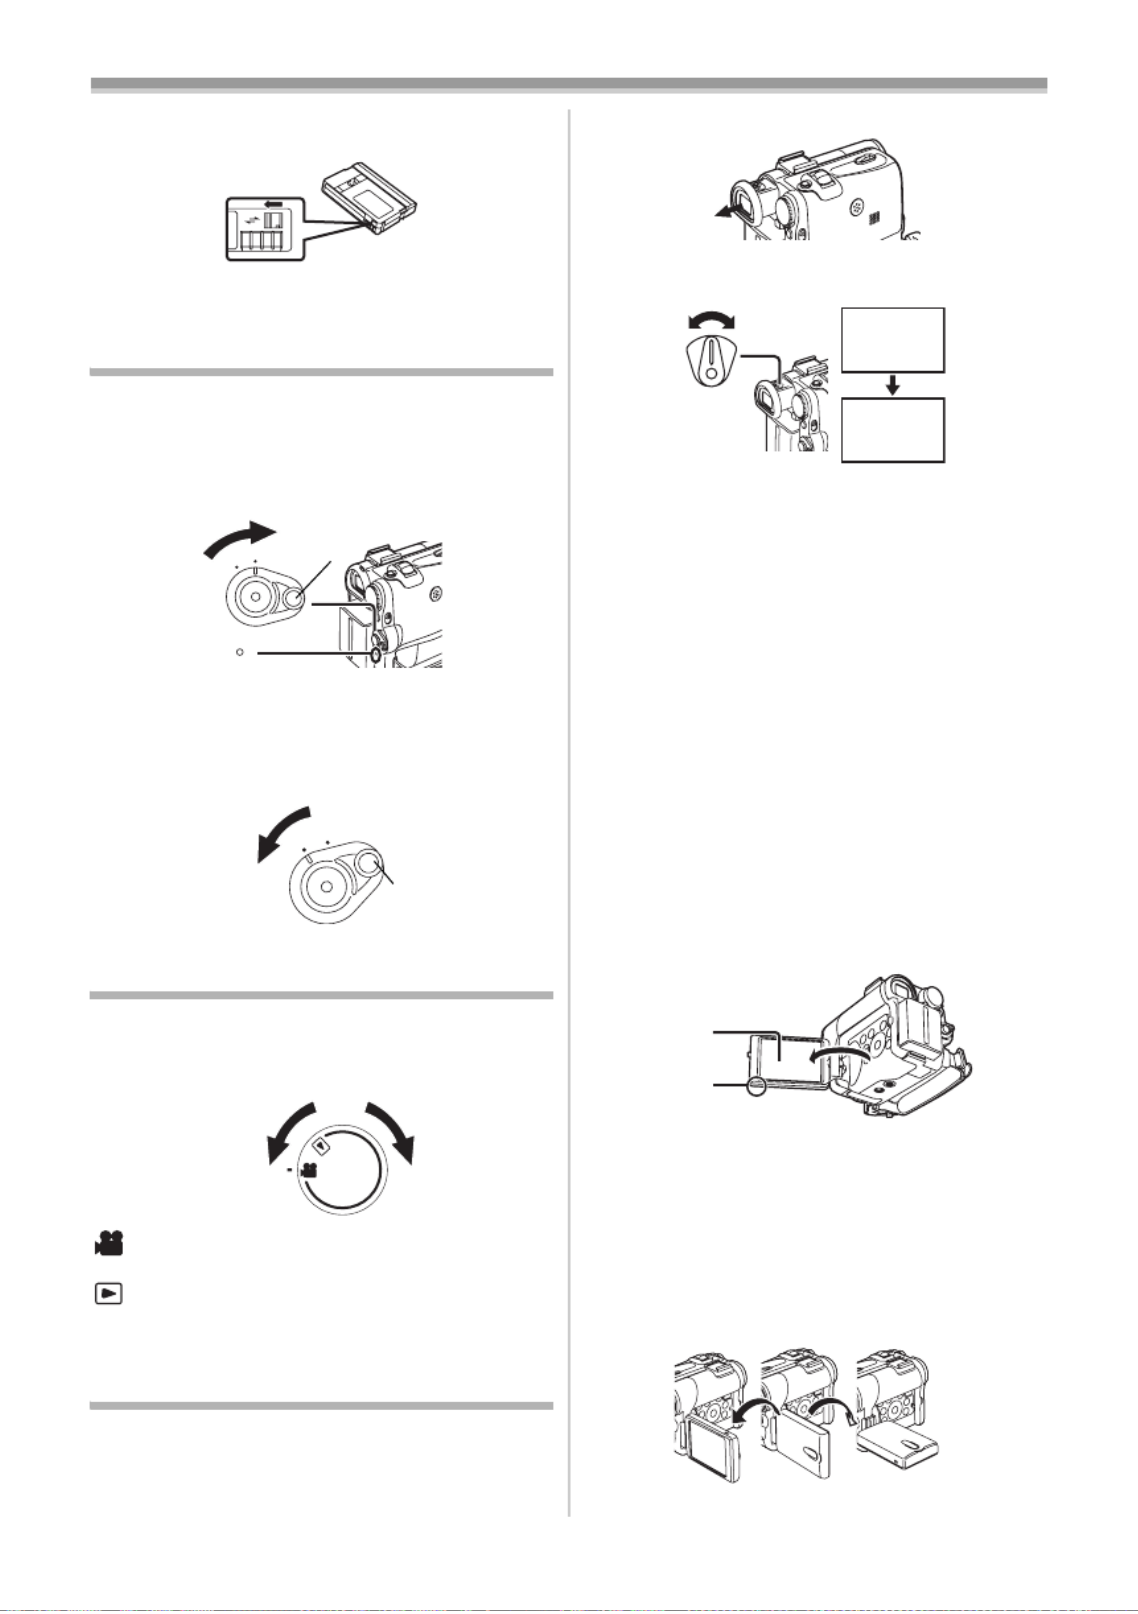
Selecting Modes
You can choose a desired mode by rotating the
Mode Dial.
1 Rotate the Mode Dial (39).
:Tape Recording Mode
Use this mode when recording pictures on a tape.
:Tape Playback Mode
Use this mode when playing back the recorded
scene on a tape.
Using the Viewfinder/LCD Monitor
ª Using the Viewfinder
Before using the Viewfinder, adjust the field of
view so that the displays inside the Viewfinder
become clear and easy to read.
R E C
SAVE
1
ON
OFF
(42)
(43)
1
ON
OFF
(42) 1
(39)
1 Pull the Viewfinder.
2 Adjust by turning the Eyepiece Corrector
Knob (34).
To Use the Viewfinder at the Same Time as the
LCD Monitor
Set [LCD/EVF] >> [EVF ON/AUTO] >> [ON].
≥The Viewfinder does not turn off even if the LCD
Monitor is opened.
≥When you turn the Movie Camera off, this
setting is cancelled.
ª Using the LCD Monitor
With the LCD Monitor open, you can also record
the picture while watching it.
1 Put a finger on the [OPEN4] Knob (1) and
pull the LCD Monitor
(2) out in the direction
of the arrow.
≥The Viewfinder is deactivated.
≥The LCD Monitor can be opened a maximum
of 120o. If you open the LCD monitor by 120o,
it becomes convenient to operate menus or to
play back pictures.
2 Adjust the LCD Monitor angle according to
the desired recording angle.
≥The LCD Monitor can rotate a maximum of
180o 1 from the vertical position upwards
and a maximum of 90o 2 to the downward
direction. Forcefully rotating the LCD Monitor
beyond these ranges will damage the Movie
Camera.
12:30:45
15.10.2004
12:30:45
15.10.2004
12:30:45
15.10.2004
12:30:45
15.10.2004
(34)
(2)
(1)
290o1180o

Before Use
-12-
Closing the LCD Monitor
Push the LCD Monitor until it is securely locked.
ª Adjusting Brightness and Colour
Level
When [LCD/EVF SET] on the [LCD/EVF]
Sub-Menu is set to [YES], the following items are
displayed.
LCD Brightness [LCD BRIGHTNESS]
Adjusts the brightness of the image on the LCD
screen.
LCD Colour Level [LCD COLOUR LEVEL]
Adjusts the colour saturation of the image on the
LCD screen.
Brightness of the Viewfinder
[EVF BRIGHTNESS]
Adjusts the brightness of the image in the
Viewfinder.
To Adjust
Press the [ / ]
;
;
;
;; ∫
∫
∫
∫∫ Button and select the item to be
adjusted, and then press the [ / ]6 5 Button to
raise or lower the number of vertical bars in the
Bar Indication.
≥A larger number of vertical bars indicates
stronger brightness or colour saturation.
To Increase the Brightness of the Entire LCD
Monitor
Press the [POWER LCD] Button.
When you press [POWER LCD] button, the LCD
monitor becomes bright about twice as much as
usual.
The [POWER LCD] Lamp (23) lights up.
≥When turning the power on with using AC
Adaptor, [POWER LCD] function is
automatically effective.
To Resume Normal Brightness
Press the [POWER LCD] Button again.
≥These adjustments do not affect the recorded
images.
≥For other notes concerning this item, see -43-.
1LCD BRIGHTNESS
[-]||||----[+]
LCD COLOUR LEVEL
[-]||||----[+]
EVF BRIGHTNESS
[-]||||----[+]
/ :SELECT / :SETUP; ∫ & %
/MENU:EXIT!
LCD/EVF SETUP
POWER
LCD
(23)
Using the Menu Screen
To facilitate the selection of a desired function or
setup, this Movie Camera displays various
function setups on Menus.
≥When operating the menu with the Viewfinder,
set [LCD/EVF] >> [EVF ON/AUTO] >> [ON] or
rotate the LCD monitor by 180o.
1 Press the [MENU] Button (14).
≥The Menu corresponding to the Mode
selected by using the Mode Dial (39) is
displayed.
2 Press the [;
;
;
;;/∫
∫
∫
∫∫] Button to select a desired
Sub-Menu.
≥ ; ∫Press the [ / ] Button to display the
highlighted item.
3 Press the [5] Button to display the
selected Sub-Menu.
4 Press the [;
;
;
;;/∫
∫
∫
∫∫] Button to select the item.
5 Press the [5] Button to display the
selected item.
6 Press the [;
;
;
;;/∫
∫
∫
∫∫] Button to select the desired
mode and press [ENTER] Button to
determine the setting.
≥While a Menu is displayed, you cannot record or
play back. Menus can be displayed during
playback but not during recording. The above
operations can be done using the [MENU]
Button, [π ∑ ∏ ∫, , , ] Buttons and [ENTER]
Button on the Remote Controller. (-6-)
To Return the Previous Screen
Press the [6] Button.
To Exit the Menu Screen
Press the [MENU] Button again.
About the Menu Mode Setting
The setting selected on the Menu will be retained
even when the Movie Camera is turned off.
However, if the Battery or AC Adaptor is
disconnected before turning off the Movie
Camera, the selected setup may not be retained.
(The setups of [EFFECT2] (-25-) are not retained.)
≥Menu operation flow is shown in this text by >>.
MENU
STILL
ENTER
FADE
is
(14)
(39)

Before Use
-13-
List of Menus
The figures of the Menus are for explanation
purposes only, and they are different from the
actual Menus.
ª[TAPE RECORDING MENU]
Tape Recording Mode
1) [CAMERA]
Camera Setup Sub-Menu
[PROG.AE]
Auto Exposure Mode -22-
[SIS]
Image Stabilizer -19-
[D.ZOOM]
Digital Zoom
-19-
[SHTR EFFECT]
Shutter Effect -17-
[SELF TIMER]
Self-timer Recording -18-
[USB FUNCTION]
USB Functions Mode -34-
≥ 6If you press [ ] Button, the menu changes
back to the previous screen.
2) [DIGITAL]
Digital Setup Sub-Menu
[EFFECT1]
Digital Effects 1
-25-
[EFFECT2]
Digital Effects 2
-25-
[MULTI MODE]
Multi-Picture Mode
-26-
3) [RECORDING]
Recording Setup Sub-Menu
[REC SPEED]
Recording Speed Mode -14-
[AUDIO REC]
Audio Recording Mode -15-
[SCENE INDEX]
Scene Index Mode -30-
[WIND CUT]
Wind Noise Reduction -21-
[ZOOM MIC]
Zoom Microphone -19-
[CINEMA]
Cinema-like Format Recording -22-
4) [DISPLAY]
Display Setup Sub-Menu
[DISPLAY]
Display Mode -36-
; ∫ %/ :SELECT :NEXT
MENU:EXIT
DIGITAL
DISPLAY
LCD/EVF
INITIAL
RECORDING
SIS
D.ZOOM
SELF TIMER
USB FUNCTION
SHTR EFFECT
PROG.AE
TAPE RECORDING MENU
CAMERA !
[DATE/TIME]
Date and Time Indication
-36-
[C.DISPLAY]
Counter Display Mode -35-
[C.RESET]
Counter Reset -45-
≥It resets the counter to zero. However, it cannot
reset the Time Code.
5) [LCD/EVF]
LCD/EVF Setup Sub-Menu
[LCD/EVF SET]
LCD and Viewfinder Adjustment
-12-
[SELF REC]
Recording Yourself -18-
[EVF ON/AUTO]
Using the Viewfinder -11-
6) [INITIAL]
Initial Setup Sub-Menu
[BLANK SEARCH]
Blank Search -17-
[DEMO MODE]
Demonstration Mode
≥If no operation takes place for approximately
10 minutes after the AC Adaptor was connected
to the Movie Camera and the [OFF/ON] Switch
was turned to [ON] without inserting a Cassette,
the Movie Camera is automatically set to
Demonstration Mode for introducing its
functions. If any button is pressed or operated,
the Demonstration Mode is cancelled. The
Demonstration Mode can be started by setting
[DEMO MODE] to [ON] and by exiting the
Menu. To terminate the Demonstration Mode,
insert a Cassette or set the [DEMO MODE] to
[OFF].
[AV JACK]
AV Socket -44-
[REMOTE]
Remote Controller Mode -8-
[REC LAMP]
Recording Lamp -16-
[BEEP SOUND]
Beep Sound -36-
[CLOCK SET]
Date and Time Setting
-14-
[INITIAL SET]
Initial Setting Mode -36-
ª[TAPE PLAYBACK MENU]
Tape Playback Mode
1) [PLAYBACK]
; ∫ %/ :SELECT :NEXT
MENU:EXIT
DIGITAL
RECORDING
DISPLAY
LCD/EVF
INITIAL
12bit AUDIO
AUDIO OUT
SEARCH
TAPE PLAYBACK MENU
PLAYBACK !

Before Use
-14-
Playback Functions Sub-Menu
[SEARCH]
Index Search Mode -30-
[12bit AUDIO]
Audio Selector -33-
[AUDIO OUT]
Audio Output Mode -39-
2) [DIGITAL]
Playback Digital Setup Sub-Menu
[EFFECT ON]
Digital Effect On/Off -31-
[EFFECT SEL]
Digital Effect Selection -31-
3) [RECORDING]
Recording Setup Sub-Menu
[REC SPEED]
Recording Speed Mode -14-
[AUDIO REC]
Audio Recording Mode -15-
4) [DISPLAY]
Display Setup Sub-Menu
≥All of the items on the [DISPLAY] Sub-Menu are
the same as those on the [DISPLAY] Sub-Menu
of the [TAPE RECORDING MENU] Main-Menu.
5) [LCD/EVF]
Adjusting Brightness and Colour Level
[LCD/EVF SET]
LCD and Viewfinder Adjustment -12-
[EVF ON/AUTO]
Using the Viewfinder -11-
6) [INITIAL]
Initial Setup Sub-Menu
[BLANK SEARCH]
Blank Search -17-
[AV JACK]
AV Socket -44-
[REMOTE]
Remote Controller Mode -8-
[REC LAMP]
Recording Lamp -16-
[BEEP SOUND]
Beep Sound -36-
Setting Date and Time
Since the internal clock of the Movie Camera has
a slight imprecision, make sure to check the time
before recording.
MENU
STILL
ENTER
FADE
is
(14)
1Set [INITIAL] >> [CLOCK SET] >> [YES].
2 Press the [;
;
;
;;/∫
∫
∫
∫∫] Button to select [YEAR],
[MONTH], [DAY], [HOUR] or [MIN.] and
press the [6 5/ ] Button to set it to the
desired value.
≥Year will cycle in the order shown below.
2000, 2001, ..., 2089, 2000, ...
3 Press the [MENU] Button (14) to finish
setting the date and time.
≥The clock operation starts from [00] second.
≥If the built-in battery is weak, the [0] Indication
flashes. In this case, charge the built-in battery.
≥The clock uses the 24-hour system.
Internal Lithium Battery Recharge
The internal lithium battery sustains the operation
of the clock. When the [0] Indication flashes,
the internal lithium battery is near exhaustion.
1 Connect the AC Adaptor to the Movie
Camera with the power turned off and then
connect to the AC Mains socket.
≥After charging for 4 hours, the built-in lithium
battery can power the clock for approximately
3 months.
LP Mode
A desired recording speed can be selected with
[REC SPEED] on the [RECORDING] Sub-Menu.
If LP Mode is selected, the recording time
becomes 1.5 times longer than that of SP
Mode.
Although the image quality does not decrease
with the LP Mode recording, mosaic-pattern noise
CLOCK SET
;/ /∫:SELECT & %:SETUP
!/MENU:EXIT
1YEAR 2004
MONTH 10
DAY 8
HOUR 14
MIN. 30

Before Use
-15-
may appear on a playback image, or some
normal functions may be restricted.
≥The contents that are recorded in LP Mode are
not completely compatible with other
equipment.
≥Audio dubbing is not possible with LP Mode.
(-33-)
Audio Recording Mode
The sound quality of the recorded sound can be
selected with [AUDIO REC] on the
[RECORDING] Sub-Menu.
High sound-quality recording is possible with
“16 bit 48 kHz 2 track” Mode. With the “12 bit
32 kHz 4 track” Mode, the original sound can be
recorded on 2 tracks in stereo, while the other
2 tracks can be used for Audio Dubbing.

Recording Mode
-16-
Recording Mode
About Recording
When recording pictures on a tape, set the Mode
Dial to Tape Recording Mode [ ].
When recording with the
[AUTO/MANUAL/FOCUS] Switch (44) set to
[AUTO], the Movie Camera automatically adjusts
the focus and white balance. In some cases, they
cannot be adjusted automatically and need to be
adjusted manually. ( -23- -24-, )
≥Before turning on the power, remove the
Lens Cap. If the Lens Cap is still attached
when the power is turned on, Automatic
White Balance Adjustment (-23-) may not
function correctly.
≥When the Recording Pause Mode continues for
more than 6 minutes, the power is turned off
automatically for tape protection and power
conservation. (If the AC Adaptor is used, the
power is turned off only when the tape is
inserted in Tape Recording Mode.) When the
tape is inserted in Tape Recording Mode and if
the Recording Pause Mode continues for more
than 6 minutes, the power is turned off
automatically.
To resume recording from this condition, turn
off, then turn on the power again.
ª Recording Lamp
The Recording Lamp (16) lights up during
recording and alerts those being recorded that
recording is in progress.
≥The Recording Lamp does not light up if the
[REC LAMP] on the [INITIAL] Sub-Menu is set
to [OFF].
Recording on a Tape
1 Set the [OFF/ON] Switch (42) to [ON].
AUTO
MANUAL
FOCUS
(44)
(16)
≥The [POWER] Lamp (43) lights up.
2 Set the Mode Dial (39) to Tape Recording
Mode.
3 Press the Recording Start/Stop Button (41).
≥Recording starts.
≥After the [RECORD] is displayed, it changes
to [REC].
4 Press the Recording Start/Stop Button (41)
again to pause the recording.
≥The [PAUSE] Indication is displayed.
ª To Check the Recording
By pressing the [S] Button (7) briefly in the
Recording Pause Mode, you can play back the
last few seconds of the recorded scene.
≥The [CHK] Indication is displayed. After
checking, the Movie Camera resumes the
Recording Pause Mode.
ª Finding the End of Recording
(Blank Search Function)
The Blank Search Function aids you to locate the
end of the recording on the Cassette quickly.
ON
OFF
(42)
(43)
(39)
RECORD
REC
(41)
PAUSE
PAUSE
S
REC
(7)
Recording Mode
-17-
1 Set [TAPE RECORDING MENU] or
[TAPE PLAYBACK MENU] >> [INITIAL] >>
[BLANK SEARCH] >> [YES].
≥The [BLANK] Indication appears during the
Blank Search.
≥Approximately 1 second before the last
recorded scene, the Movie Camera switches
to the Recording Pause Mode or the Still
Playback Mode.
≥If there is no blank left on the Cassette, the
Movie Camera stops at the end of the tape.
To Cancel Blank Search Before Completion
Press the [∫] Button.
ª To Add a Sound while Recording
With the supplied Free Style Remote Controller
with Mic connected to the [REMOTE] Socket
(30),
you can add a narration while recording is in
progress.
While the [TALK] Button (80) is pressed, the [ ]
Indication is displayed and the sound is recorded
from [MIC] (76).
≥While the [TALK] Button is pressed, the built-in
microphone does not operate.
Photoshot
Still pictures can be recorded from the Movie
Camera lens.
1Press the [PHOTO SHOT] Button (35) in the
Recording Pause Mode.
≥The Movie Camera records a still picture for
about 7 seconds and then switches back to
the Recording Pause Mode.
MENU
STILL
ENTER
FADE
is
(14)
REC
(76)
(80)
PHOTO SHOT
(35)
≥If you set [SHTR EFFECT] on the [CAMERA]
Sub-Menu to [ON], you can add an image and a
sound like releasing the shutter.
ª Progressive Photoshot
When the [æ] Indication is displayed,
Progressive Photoshot Function works.
You can record still pictures as frame still pictures
with higher quality by this function.
≥The progressive function may not be activated
depending on the function you use. (-36-)
ª Continuous Photoshot
If you set [SHTR EFFECT] on the [CAMERA]
Sub-Menu to [ON] and keep the [PHOTO SHOT]
Button pressed, the Movie Camera will
continuously record still pictures in approximately
0.7 seconds intervals until the button is released.
≥The screen blinks and, at the same time, a
shutter clicking sound is recorded.
ª Digital Still Picture
When the [STILL] Button (9) is pressed, images
become still pictures. When the button is pressed
again, the Digital Still Picture Mode is cancelled.
≥We recommend that you press the [STILL]
Button first at the position where you wish to
record the still picture so as to enter the Digital
Still Picture Mode and then press the
[PHOTO SHOT] Button.
≥For other notes concerning this item, see
-37-.
ª Recording Yourself
By opening the LCD Monitor and rotating it
frontward (to the lens side), you can let the
PHOTO
PHOTOPHOTO
PHOTO
STILL
ENTER
FADE
is
(9)

Recording Mode
-18-
subject in front of the Movie Camera monitor the
shot while recording is in progress.
≥When the LCD Monitor is opened, the
Viewfinder is disabled automatically. However,
when the LCD Monitor is rotated frontward, the
image is also shown in the Viewfinder.
≥If you prefer to have the image on the LCD
Monitor to look like an image in a mirror, set
[SELF REC] on the [LCD/EVF] Sub-Menu to
[MIRROR]. Images are recorded normally and
no left and right reversal occurs.
Quick Start
By pressing the [QUICK START] Button (40), and
the Movie Camera will be ready for recording in
approximately 1.3 seconds after the Movie
Camera is turned on.
1Press the [QUICK START] Button (40).
≥The Quick Start Recording Lamp
(40) lights
up.
2 Set the [OFF/ON] Switch (42) to [OFF].
≥The Quick Start Recording Lamp remains lit.
3 Set the [OFF/ON] Switch (42) to [ON].
≥The Movie Camera will be ready for recording
in approximately 1.3 seconds.
To Cancel the Quick Start
Keep the [QUICK START] Button pressed for
approximately 2 seconds and make sure the
Quick Start Recording Lamp is not lit.
≥For other notes concerning this item, see
-37-.
START
QUICK
(40)
(40)
ON
OFF
(42)
Self-timer Recording
When you set the self-timer, the still pictures are
automatically taken after 10 seconds, on the
Tape.
1Set [TAPE RECORDING MENU] >>
[CAMERA] >> [SELF TIMER] >> [ON].
≥The [ ] Indication appears.
2Press the [PHOTO SHOT] Button (35).
≥The Recording Lamp (16) and the [ ]
Indication flash and the recording starts after
10 seconds.
≥For other notes concerning this item, see
-37-.
Zoom In/Out Functions
It gives special effects to the picture by recording
objects close by or with wide-angle shot.
1 For wide-angle shots (zoom out):
Push the [W/T] Lever (36) towards [W].
For close-ups (zoom in):
Push the [W/T] Lever towards [T].
≥Zoom Magnification Indication is displayed for
a few seconds.
ª To Take Close-up Shots of Small
Subjects
(Macro Close-up Function)
When the zoom magnification is 1k, the Movie
Camera can focus on a subject that is as close as
approximately 40 mm from the Lens. Small
MENU
STILL
ENTER
FADE
is
(14)
(35)
PHOTO SHOT
VOL/JOG
W T
(36)
1 Wt
5 Wt
10 WtT
T
T
Recording Mode
-19-
subjects like insects can be recorded with this
function.
ª To Use the Tele-Macro Function
With the zoom magnification of 10k, the Movie
Camera can bring the subject into focus as close
as approximately 20 cm from the Lens. Focusing
only on the subject and displaying the
background out of focus makes the picture more
impressive.
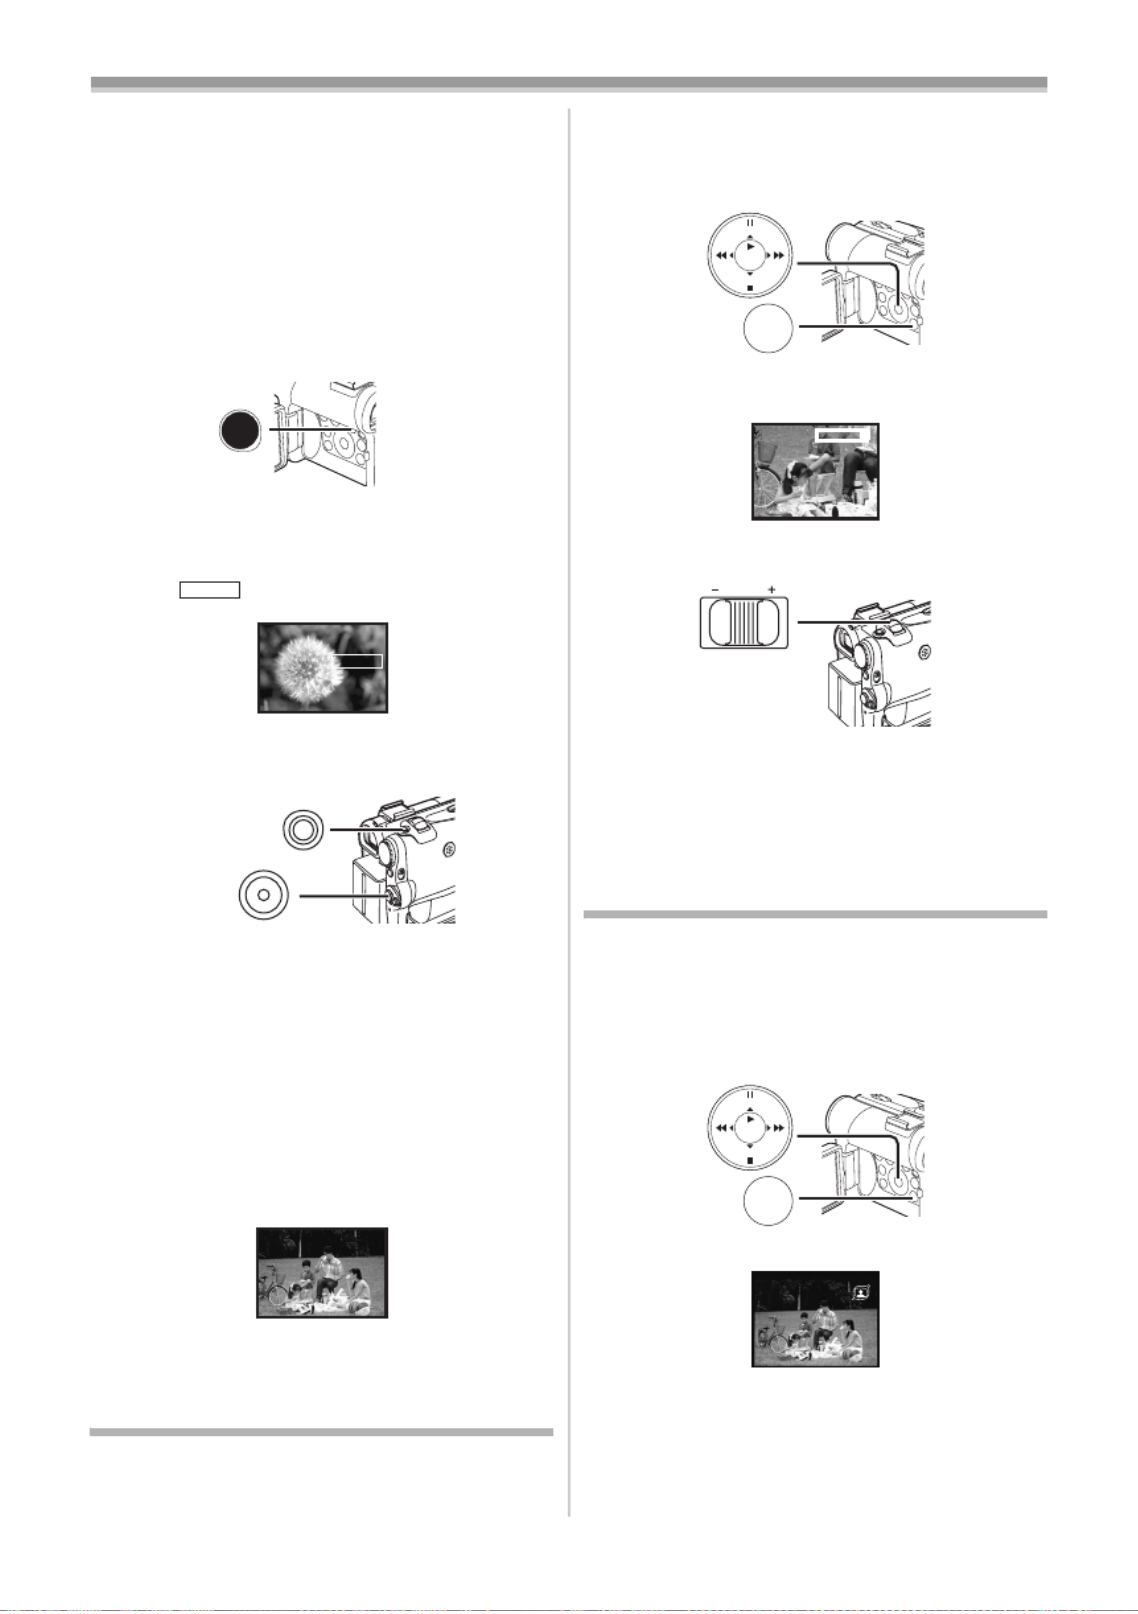
1Press the [TELE MACRO] Button (5).
≥ kThe zoom magnification is fixed at 10 and
the subject can be focused on as close as
20 cm .
≥The [ ] Indication appears.
2 Press the Recording Start/Stop Button (41)
or the [PHOTO SHOT] Button
(35).
To Cancel the Tele-Macro Function
Press the [TELE MACRO] Button.
ª To Use the Zoom Microphone
Function
Along with the zooming operation, the
microphone’s directional angle and sensitivity are
varied for recording sounds.
≥Set [TAPE RECORDING MENU]>>
[RECORDING] >> [ZOOM MIC] >> [ON]. (The
[Z.MIC] Indication is displayed.)
≥For other notes concerning this item, see
-37-.
Digital Zoom Function
This function is useful when you want to record
close-up shots of subjects located beyond a
normal zoom range of 1k to 10k magnification.
TELE
MACRO
(5)
T.MACRO
T.MACRO
T
T
T
TT.M
.M
.M
.M.M
AC
AC
AC
ACACRO
RO
RO
RORO
PHOTO SHOT
(35)
(41)
Z.MIC
Z.MIC
Z.MIC
Z.MIC
Z.MICZ.MIC
With the Digital Zoom Function, you can select a
magnification from 20k up to 500k.
1Set [TAPE RECORDING MENU] >>
[CAMERA] >> [D.ZOOM] >> [20k
k
k
kk] or [500k
k
k
kk].
≥ k20 : Digital zooming to 20k
≥ k500 : Digital zooming to 500k
2 Push the [W/T] Lever (36) towards [W] or
towards [T] to zoom in or out.
To Cancel the Digital Zoom Function
Set [TAPE RECORDING MENU] >> [CAMERA]
>> [D.ZOOM] >> [OFF].
≥For other notes concerning this item, see
-37-.
Image Stabilizer Function
If the Movie Camera is shaken while recording,
the camera shake in the image can be corrected.
≥If the Movie Camera shakes too much, the
images may not be stabilized.
1Set [TAPE RECORDING MENU] >>
[CAMERA] >> [SIS] >> [ON].
≥The [[] Indication appears.
MENU
STILL
ENTER
FADE
is
(14)
20 WtT
D.ZOOM
VOL/JOG
W T
(36)
MENU
STILL
ENTER
FADE
is
(14)

Recording Mode
-21-
Night View Functions
Colour Night View Function
This function allows you to record colour images
brightly in a dark place without using the Video
Flash.
1Press the [COLOUR NIGHT VIEW] Button
(3) until the [C.NIGHT VIEW] Indication
appears.
0 Lux Night View Function
Using the LCD Monitor light, a dark scene of
almost 0 lux can be recorded.
1Press the [COLOUR NIGHT VIEW] Button
(3) until the [0LUX NIGHT VIEW] Indication
appears.
≥The [REVERSE THE LCD MONITOR]
Indication appears.
2 Rotate the LCD Monitor frontward (to the
lens side).
≥The screen becomes white and the
Viewfinder turns on.
≥The available range of the LCD Monitor light
is within approximately 1.2 metre.
To Cancel the Night View Functions
Press the [COLOUR NIGHT VIEW] Button
repeatedly until neither the [C.NIGHT VIEW]
Indication nor the [0LUX NIGHT VIEW] Indication
appears.
≥For other notes concerning this item, see
-37-.
Soft Skin Function
This enables you to record skin colours in a softer
tone. In order to get the best result, avoid
COLOUR
NIGHT
VIEW
C.NIGHT
VIEW
(3)
0
LUX
NIGHT VIEW
C.NIGHT
VIEW
background colours similar to the skin colour of
the subject. Otherwise, this may result in a softer
background lacking in detail.
1Press the [SOFT SKIN] Button (4).
≥The [ ] Indication appears.
≥To obtain the best effect, we recommend to
take the bust shot, so that the upper part from
the breast of the subject can be framed in the
screen.
To Cancel the Soft Skin Function
Press the [SOFT SKIN] Button.
Wind Noise Reduction Function
This function reduces the sound of wind hitting
the microphone when recording.
1Set [TAPE RECORDING MENU] >>
[RECORDING] >> [WIND CUT] >> [ON].
≥The [WIND CUT] Indication appears.
To Cancel the Wind Noise Reduction Function
Set [TAPE RECORDING MENU] >>
[RECORDING] >> [WIND CUT] >> [OFF].
≥For other notes concerning this item, see
-38-.
Cinema Function
This function is for recording in a cinema-like
screen.
TELE
MACRO
SOFT
SKIN
(4)
SOFT SKIN
SOFT SKIN
MENU
STILL
ENTER
FADE
is
(14)
WIND CUT

Recording Mode
-22-
1 Set [TAPE RECORDING MENU] >>
[RECORDING] >> [CINEMA] >> [ON].
≥Black bars appear at the top and bottom of
the screen.
To Cancel the Cinema Mode
Set [TAPE RECORDING MENU] >>
[RECORDING] >> [CINEMA] >> [OFF].
≥For other notes concerning this item, see
-38-.
Recording in Special Situations
(Programme AE)
You can select optimal automatic exposure under
specific recording situations.
1 Set the [AUTO/MANUAL/FOCUS] Switch
(44) to [MANUAL].
≥The [MNL] Indication appears.
2Set [TAPE RECORDING MENU] >>
[CAMERA] >> [PROG.AE] >> a desired
mode ([5], [7], [4], [ ] or [Ω º]).
≥The Indication of the selected Mode appears.
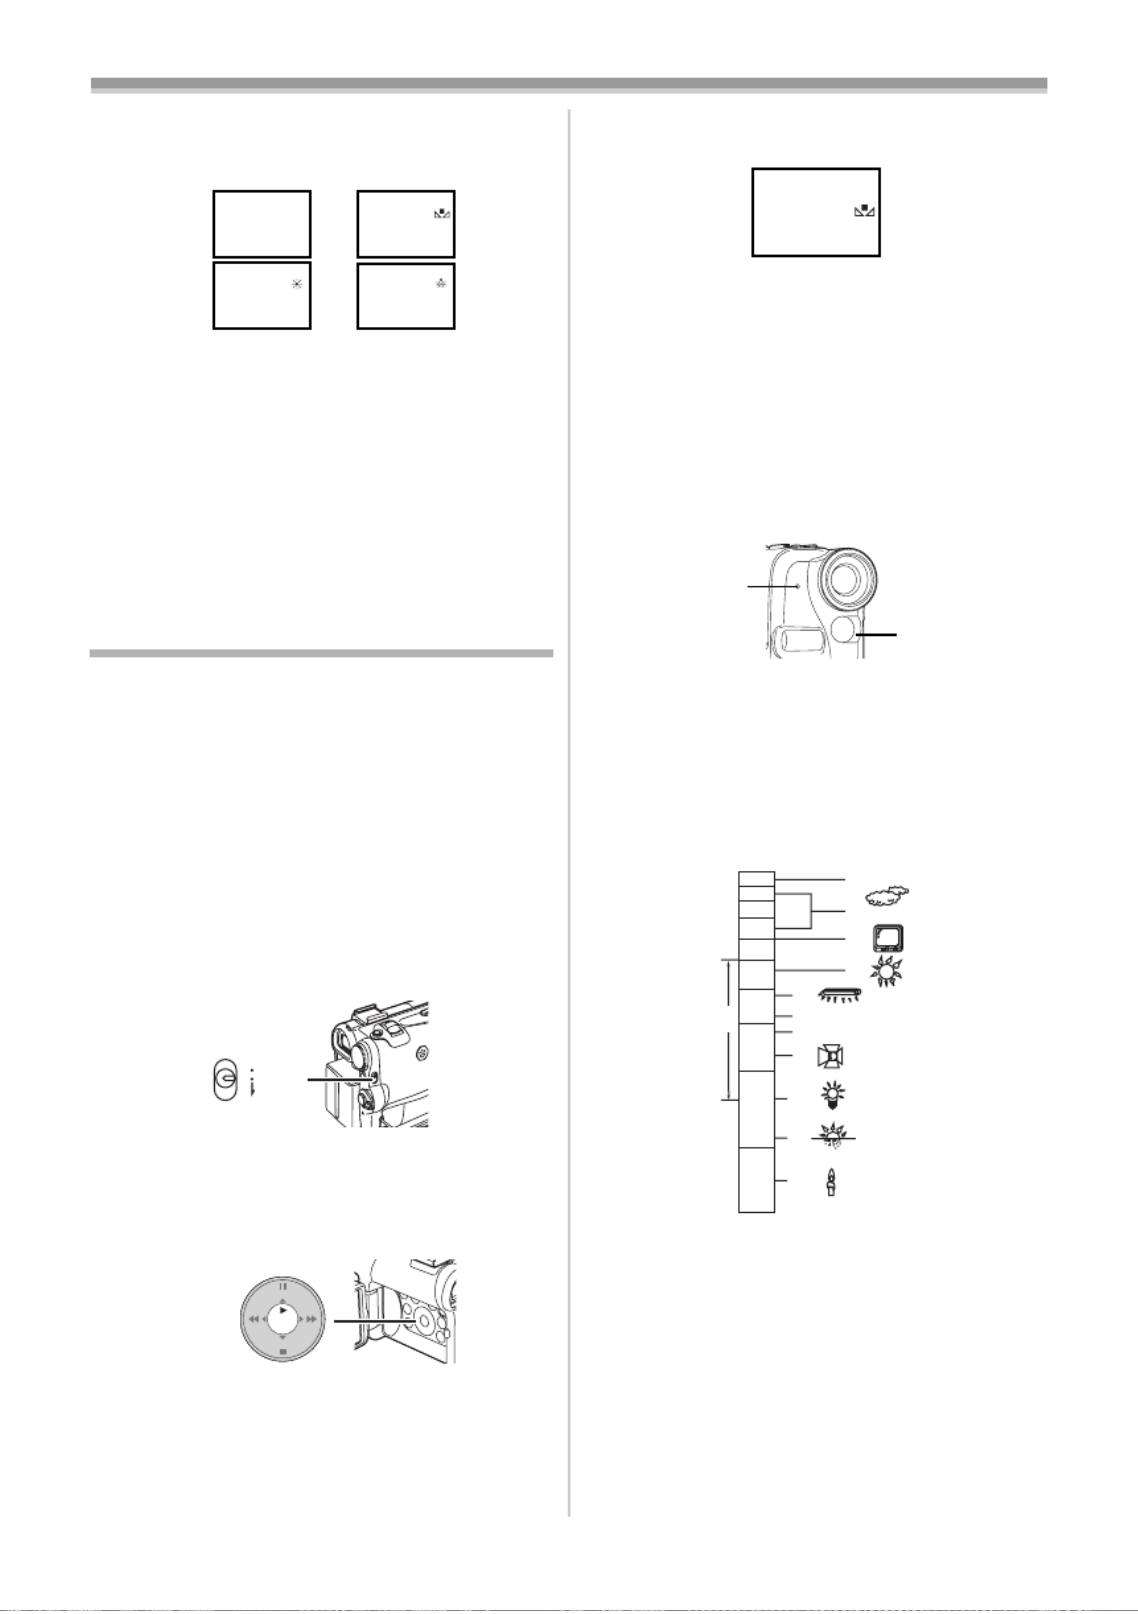
1) [5] Sports Mode
MENU
STILL
ENTER
FADE
is
(14)
CINEMA
AUTO
MANUAL
FOCUS
(44)
MENU
STILL
ENTER
FADE
is
(14)
1)
3)
2)
4)
5)
≥For recording scenes involving quick
movements, such as sports scenes.
2) [7] Portrait Mode
≥For bringing up people clearly from the
background.
3) [4] Low Light Mode
≥For recording a dark scene brighter.
4) [Ω] Spotlight Mode
≥For recording a subject under a spotlight in
a party, theatre, etc.
5) [º] Surf & Snow Mode
≥For recording in a glaring surrounding, such
as ski slopes, beaches, etc.
To Cancel the Programme AE Function
Set the [PROG.AE] on the [CAMERA] Sub-menu
to [OFF]. Or, set the [AUTO/MANUAL/FOCUS]
Switch to [AUTO].
≥For other notes concerning this item, see
-38-.
Recording in Natural Colours
(White Balance)
Depending on the scene or light condition, the
Automatic White Balance Adjustment Mode may
not be able to bring out natural colours. In this
case, the white balance can be adjusted
manually.
When the Movie Camera is turned on with the
Lens Cap on, the Automatic White Balance
Adjustment may not function properly. Please
turn on the Movie Camera after removing the
Lens Cap.
1 Set the [AUTO/MANUAL/FOCUS] Switch
(44) to [MANUAL].
≥The [MNL] Indication appears.
2 Press the [ENTER] Button .
≥The [AWB] Indication appears.
AUTO
MANUAL
FOCUS
(44)
STILL
ENTER
FADE
is
(11)
Recording Mode
-23-
3Press the [5] Button (10) or [6] Button
(13) to select a desired White Balance
Mode.
1) Automatic White Balance Adjustment [AWB]
2) The white balance setting that was previously
set manually [1]
3) Outdoor Mode [z]
4) Indoor Mode (recording under incandescent
lamp) [{]
To Resume Automatic Adjustment
Press the [5] Button (10) or [6] Button (13)
until the [AWB] Indication appears. Or, set the
[AUTO/MANUAL/FOCUS] Switch to [AUTO].
Adjusting White Balance Manually
White Balance Adjustment recognizes the colour
of light and adjust so that the white colour will
become pure white. The Movie Camera
determines the hue of light that comes through
the Lens and White Balance Sensor, thereby
judging the recording condition, and selects the
closest hue setting. This function is called
Automatic White Balance Adjustment.
For light outside the functional Auto White
Balance Adjustment range, use the Manual White
Balance Adjustment Mode.
1 Set the [AUTO/MANUAL/FOCUS] Switch
(44) to [MANUAL].
≥The [MNL] Indication appears.
2 Point the Movie Camera at a full-screen
white subject.
3 Press the [ENTER] Button (11).
≥The [AWB] Indication appears.
1
1
1
1AWB
1)
3)
2)
4)
AUTO
MANUAL
FOCUS
(44)
STILL
ENTER
FADE
is
(11)
4 Press the [5] Button (10) or [6] Button
(13) until the [1] Indication is displayed.
5 Keep pressing [ENTER] Button (11) until the
[1] Indication stops flashing.
To Resume Automatic Adjustment
Press the [5] Button (10) or [6] Button (13)
until the [AWB] Indication is displayed. Or, set the
[AUTO/MANUAL/FOCUS] Switch to [AUTO].
ª About White Balance Sensor
The White Balance Sensor (29) determines the
nature of the light source during recording.
≥Do not cover the White Balance Sensor with
your hand during recording because White
Balance will not function normally.
≥The red light from the Recording Lamp
(16) will
be reflected off your hand or object, possibly
causing the White Balance sensor to operate
incorrectly and changing the colouring.
Outside of the effective range of Automatic White
Balance Adjustment, the image will become
reddish or bluish. Even within the effective range
of Automatic White Balance Adjustment, the
Automatic White Balance Adjustment may not
function properly if there is more than one light
source. In this case, adjust the White Balance.
1) The effective range of Automatic White
Balance Adjustment on this Movie Camera
2) Blue sky
3) Cloudy sky (rain)
4) TV screen
5) Sunlight
MNL
1
(29)
(16)
2)
3)
4)
5)
6)
7)
8)
9)
10)
11)
12)
10 000K
9 000K
8 000K
7 000K
6 000K
5 000K
4 000K
3 000K
2 000K
1 000K
1)

Recording Mode
-24-
6) White fluorescent lamp
7) 2 hours after sunrise or before sunset
8) 1 hour after sunrise or before sunset
9) Halogen light bulb
10) Incandescent light bulb
11) Sunrise or sunset
12) Candlelight
≥For other notes concerning this item, see
-38-.
Manual Shutter Speed Adjustment
Useful for recording fast-moving subjects.
1 Set the [AUTO/MANUAL/FOCUS] Switch
(44) to [MANUAL].
≥The [MNL] Indication appears.
2 Press the [ENTER] Button (11) until the
Shutter Speed Indication appears.
3 Press the [5 6] Button (10) or [ ] Button
(13) to adjust the shutter speed.
Range of Shutter Speed Adjustment
1/50–1/8000 s
The standard shutter speed is 1/50 s.
Selecting a speed closer to [1/8000] causes the
shutter speed to be faster.
To Resume Automatic Adjustment
Set the [AUTO/MANUAL/FOCUS] Switch to
[AUTO].
≥For other notes concerning this item, see
-38-.
Manual Iris Adjustment
(F Number)
You can use this function when the screen is too
bright or too dark.
AUTO
MANUAL
FOCUS
(44)
STILL
ENTER
FADE
is
MNL
1/1000
(11)
1 Set the [AUTO/MANUAL/FOCUS] Switch
(44) to [MANUAL].
≥The [MNL] Indication appears.
2 Press the [ENTER] Button (11) until the Iris
Indication appears.
3 Press the [5] Button (10) or [6] Button
(13) to adjust the iris.
Range of Iris Adjustment
CLOSE (Closed), F16, ..., F2.0,
OP (Opened)i0dB, ..., OPi18dB
When a value closer to [CLOSE] is selected, the
image becomes darker.
When a value closer to [OPi18dB] is selected,
the image becomes brighter.
The value to which idB is attached indicates a
Gain-up value. If this value is too large, the quality
of the image deteriorates.
To Resume Automatic Adjustment
Set the [AUTO/MANUAL/FOCUS] Switch to
[AUTO].
≥For other notes concerning this item, see
-39-.
Manual Focus Adjustment
Focus can be adjusted manually for recording in
a situation where auto focus may not function
well.
1 Set the [AUTO/MANUAL/FOCUS] Switch
(44) to [MANUAL].
≥The [MNL] Indication appears.
AUTO
MANUAL
FOCUS
(44)
STILL
ENTER
FADE
is
MNL
1/50
F2.4
(11)
AUTO
MANUAL
FOCUS
(44)

Recording Mode
-25-
2Slide the [AUTO/MANUAL/FOCUS] Switch
(44) to [FOCUS].
≥ 1The [ MF] Indication (Manual Focus Mode)
appears.
3 Press the [5 6] Button (10) or [ ] Button
(13) to adjust the focus.
≥ 5If you keep pressing the [ ] Button or [6]
Button, the speed of adjusting becomes
faster.
To Resume Automatic Adjustment
Set the [AUTO/MANUAL/FOCUS] Switch to
[AUTO] or [FOCUS].
Digital Effect Functions
This Movie Camera is equipped with Digital Effect
Functions that add special effects to the scene.
Digital Effects 1 [EFFECT1]
1) Multi Mode [MULTI]
2) Picture-In-Picture Mode [P-IN-P]
3) Wipe Mode [WIPE]
4) Mix Mode [MIX]
5) Strobe Mode [STROBE]
AUTO
MANUAL
FOCUS
(44)
MF
MNL
STILL
ENTER
FADE
is
(13) (10)
3) WIPE
4) MIX 5) STROBE 6) TRAIL
7) MOSAIC 8) MIRROR 9) STRETCH
1) MULTI 2) P-IN-P
10) SLIM
≥It records images with a stroboscopic effect.
6) Trailing Effect Mode [TRAIL]
≥It records images with a trailing effect.
7) Mosaic Mode [MOSAIC]
≥It produces a mosaic-like image.
8) Mirror Mode [MIRROR]
≥The right half of an image becomes a mirror
image of the left half.
9) Stretch Mode [STRETCH]
≥The Picture is expanded horizontally.
10) Slim Mode [SLIM]
≥The picture is expanded vertically.
Digital Effects 2 [EFFECT2]
11) Negative Mode [NEGA]
≥The colours of the recorded image are
inverted as seen in a negative.
12) Sepia Mode [SEPIA]
≥It records a scene with a brownish tint, like
the colour of old pictures.
13) Black & White Mode [B/W]
≥It records an image in black and white.
14) Solarisation Mode [SOLARI]
≥It records an image with a painting-like
effect.
To Select a Desired Digital Effect
Set [TAPE RECORDING MENU] >> [DIGITAL]
>> [EFFECT1] or [EFFECT2] >> a desired Digital
Effect.
To Cancel the Digital Effect
Set [TAPE RECORDING MENU] >> [DIGITAL]
>> [EFFECT1] or [EFFECT2] >> [OFF].
≥If the Movie Camera is turned off, the
[EFFECT2] settings are cancelled.
≥For other notes concerning this item, see -39-.
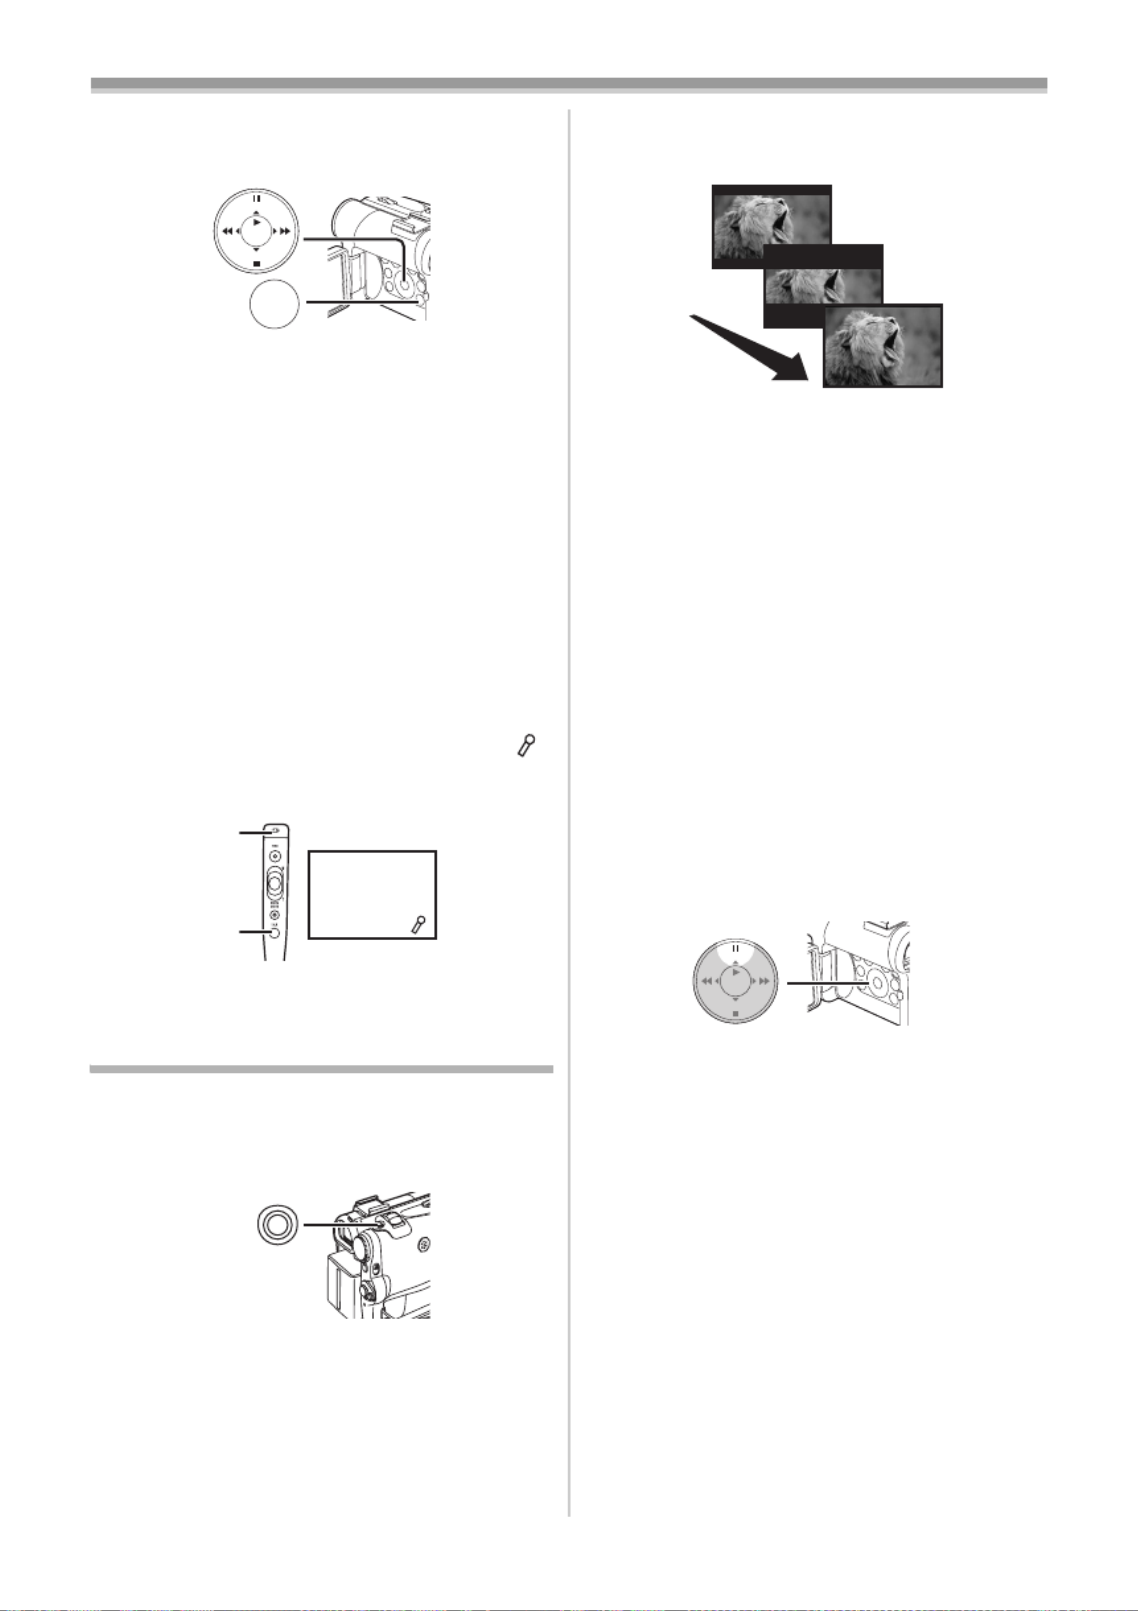
ª Multi-Picture Mode
Strobe Multi-Picture Mode:
You can capture and record 9 consecutive small
still pictures.
11) NEGA 12) SEPIA
13) B/W 14) SOLARI

Recording Mode
-27-
2Press the Recording Start/Stop Button (41)
to start recording.
3 Press the Recording Start/Stop Button (41)
to pause the recording.
≥The last scene is stored in memory. The
[WIPE] or [MIX] Indication changes to [B]
or [C].
4 Press the Recording Start/Stop Button (41)
to restart the recording.
≥The last image of the previous scene
gradually changes to the new scene.
≥For other notes concerning this item, see
-39-.
(41)

Playback Mode
-28-
Playback Mode
Playing Back a Tape
The recorded scene can be played back
immediately after the recording.
1 Set the [OFF/ON] Switch (42) to [ON].
≥The [POWER] Lamp (43) lights up.
2 Set the Mode Dial (39)to Tape Playback
Mode.
3 Press the [6] Button (13) to rewind the
tape.
≥Rewind the tape to the point where you want
to start playback.
≥When the tape reaches the beginning,
rewinding stops automatically.
4 Press the [1] Button (11) to start playback.
≥ !The [ ] Indication appears.
≥If a cassette recorded with a copyright
protection signal is played back, the picture is
distorted by mosaic-like patterns.
To Stop Playback
Press the [∫] Button (12).
ª Adjusting the Sound Volume
To adjust the volume, push the [W/T] Lever (36)to
display the [VOLUME] Indication. Push the [W/T]
ON
OFF
(42)
(43)
(39)
STILL
ENTER
FADE
is
(13)
STILL
ENTER
FADE
is
(11)
STILL
ENTER
FADE
is
(12)
Lever towards [T] to increase the volume or push
the [W/T] Lever towards [W] to decrease the
volume. The [VOLUME] Indication goes off after
the adjustment is finished.
To adjust the volume with the Remote Controller,
press the [T] or [W] Button to display the
[VOLUME] Indication. Press the [T] Button to
increase the volume or press the [W] Button to
decrease the volume. The [VOLUME] Indication
goes off after the adjustment is finished.
≥The sound volume cannot be adjusted using the
Remote Controller in Playback Zoom Mode.
(-30-)
≥For other notes concerning this item, see
-39-.
Finding a Scene You Want to Play
Back
ª Cue/Review Playback
If the [5] Button (10) or [6] Button (13) is
pressed during Playback, it turns to Cue Playback
A B or Review Playback .
≥If the Button is held continuously, it turns to Cue
Playback or Review Playback until you release
it.
ª Variable Speed Search Function
The speed of Cue Playback or Review Playback
can be varied.
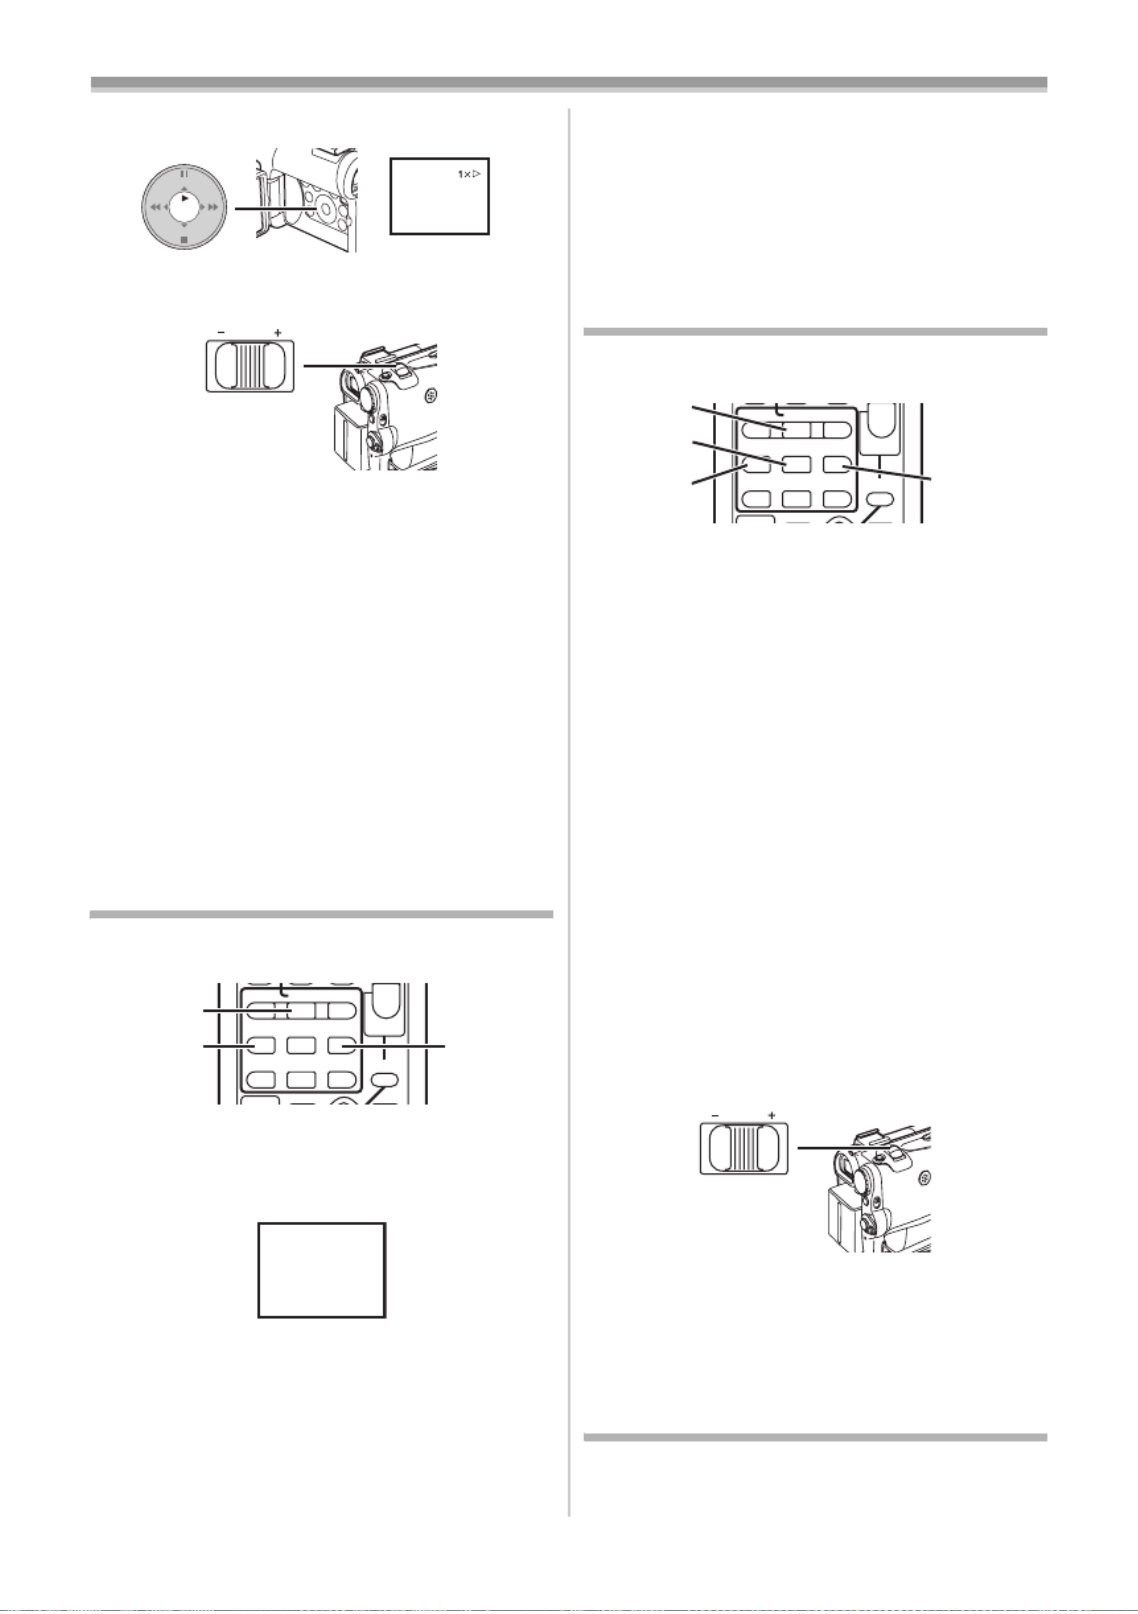
1 During playback, press the [1] Button (11).
VOL/JOG
W T
(36)
STILL
ENTER
FADE
is
(13) (10)
A B
Playback Mode
-29-
≥The [1k!] Indication appears.
2 Push the [W/T] Lever (36) to select a desired
search speed.
The following 6 playback speeds are available for
the Variable Speed Search Function in both the
fast-forward and rewind directions:
1/5k (slow playback in SP Mode only), 1/3k
(slow playback in LP Mode only), 1k, 2k, 5k,
10k and 20k.
≥This function works by pressing the
[VAR. SEARCH] and cursor buttons ([π ∫, ]) on
the Remote Controller. (-6-)
To Resume Normal Playback
Press the [1] Button (11).
≥During Cue or Review Playback, fast-moving
images may show a noise like a mosaic.
≥The sound is muted during search.
Slow Motion Playback
This Movie Camera can play back at a slow
speed.
1 Press the [1] Button (72).
2 Press the [E] Button or [D] Button (57) on
the Remote Controller.
≥The [~ }] or [ ] Indication appears.
≥ EWhen the [ ] Button is pressed, Slow Motion
Playback proceeds in the reverse direction.
When the [D] Button is pressed, Slow Motion
Playback proceeds in the forward direction.
Scenes recorded in the SP Mode are played back
at approximately 1/5th of the normal speed.
Scenes recorded in the LP Mode are played back
at approximately 1/3rd of the normal speed.
STILL
ENTER
FADE
is
(11)
VOL/JOG
W T
(36)
INDEX INDEX
SELECT
STOP
K L
∫
V/REW
STILL ADV
W
W
W
WW
s
PLAY
PAUSE
FF/W
STILL ADV
6 1 5
;
E D
P.B. ZOOM
(72)
(57) (57)
}
To Resume Normal Playback
Press the [1] Button (72).
≥If the Movie Camera is left in the Slow Playback
Mode for more than 12 minutes, the Movie
Camera switches to the Stop Mode to protect
the video heads from excessive wear and tear.
Still Playback/Still Advance
Playback
This Movie Camera is capable of still picture
playback and frame-advance playback.
1 Press the [1] Button (72).
2 Press the [;] Button (69).
≥The playback image stops in the Still
Playback Mode.
3 Press the [E D] Button or [ ] Button (57) on
the Remote Controller.
≥ EWith each press of the [ ] Button, still
pictures advance in the reverse direction.
With each press of the [D] Button, still
pictures advances in the forward direction. If
one of the buttons continues to be pressed,
still pictures advance continuously 1 frame at
a time until the button is released.
To Resume Normal Playback
Press the [1] Button (72).
ª Playback with Zoom Lever
By pushing the [W/T] Lever (36) of the Movie
Camera in the Still Playback Mode, still pictures
can be advanced one frame at a time in the
forward or backward direction.
If you keep pushing the Lever, still pictures
advances continuously.
≥If the Movie Camera is left in the Still Playback
Mode for more than 6 minutes, the Movie
Camera switches to the Stop Mode to protect
the video heads from excessive wear and tear.
Index Search Functions
To facilitate searching for desired scenes, this
Movie Camera automatically records index
signals during recording, as explained in the
following.
INDEX INDEX
SELECT
STOP
K L
∫
V/REW
STILL ADV
W
W
W
WW
s
PLAY
PAUSE
FF/W
STILL ADV
6 1 5
;
E D
P.B. ZOOM
(72)
(69)
(57) (57)
VOL/JOG
W T
(36)

Playback Mode
-30-
Photoshot Index Signal
These signals are automatically recorded
whenever still pictures are taken in Photoshot
Mode. (-17-) Photoshot Index Signals are not
recorded on still pictures recorded in Continuous
Photoshot Mode.
Scene Index Signal
Scene Index Signals are automatically recorded
when you start recording after inserting a
Cassette.
≥If [SCENE INDEX] of [RECORDING] Sub-Menu
on the [TAPE RECORDING MENU] is set to
[2HOUR], an index signal is recorded when
recording is restarted after an elapse of 2 hours
or longer. If it is set to [DAY], an index signal is
recorded when recording is restarted after the
date has changed since the last recording.
(While the index signal is being recorded, the
[INDEX] Indication flashes for a few seconds.)
≥If the Movie Camera is switched from the Tape
Playback Mode to Tape Recording Mode or if
the date and time is set before the start of
recording, the index signal is not recorded.
ª Photoshot Index Search
1 Set [TAPE PLAYBACK MENU] >>
[PLAYBACK] >> [SEARCH] >> [PHOTO].
2 Press the [9 :] Button or [ ] Button (58)
on the Remote Controller.
≥With each press of the corresponding button,
still pictures recorded in Photoshot Mode are
searched.
≥Sounds are played back for approximately
4 seconds.
ª Scene Index Search
1Set [TAPE PLAYBACK MENU] >>
[PLAYBACK] >> [SEARCH] >> [SCENE].
2 Press the [9 :] Button or [ ] Button (58)
on the Remote Controller.
≥When the corresponding button is pressed
once, the [S 1] Indication appears, and
searching for the subsequent scene marked
INDEX
MENU
STILL
ENTER
FADE
is
(14)
INDEX INDEX
SELECT
STOP
K L
∫
V/REW
STILL ADV
W
W
W
WW
s
V
PLAY
PAUSE
FF/ W
STILL ADV
6 1 5
;
E D
P.B. ZOOM
(58) (58)
with an index signal starts. Each time the button
is pressed after the start of Scene Index
Search, the indication changes, from [S 2] to
[S 9], and the beginning of the scene
corresponding to the selected number will be
searched.
≥Up to 9 scene numbers can be selected.
Continuous Index Search
If the [9] Button or the [:] Button (58) is
pressed for 2 seconds or longer, search can be
continued at several-second intervals. (To cancel,
press the [1] Button (72) or the [∫] Button (70).)
≥For other notes concerning this item, see
-39-.
Playback Zoom Function
A part of the image can be enlarged up to
10 times during playback.
1During playback, press the [P.B. ZOOM]
Button (74) on the Remote Controller.
≥The centre of the image is enlarged to
approximately 2 times.
To Change the Zoom Magnification
2 Change the magnification by pressing the
[W] Button or [T] Button
(62) on the Remote
Controller.
S 1
INDEX INDEX
SELECT
STOP
K L
∫
V/REW
STILL ADV
W
W
W
WW
s
V
PLAY
PAUSE
FF/W
STILL ADV
6 1 5
;
E D
P.B. ZOOM
(72)
(70)
INDEX INDEX
SELECT
STORE
STOP
K L
∫
OFF/ON
P B DIGITAL
ENTER
VAR.
SEARCH
MENU
P.B. ZOOM
(74)
(56) (56)
ZOOM 2t
ZOOM
OSD
DISPLAY
V/REW
DATE/
TIME
RESET TITLE
T
T
T
TT
W
W
W
WW
s rVOL
¥REC
MULTI/
P-IN-P
PHOTO
SHOT
START/
STOP
A.DUB
PLAY FF/
W
6 1 5
(62)
Playback Mode
-31-
To Change the Enlarging Area of an Image
3 Press the Arrow Button (π ∑ ∏ ∫, , , ) (56)
on the Remote Controller that points to the
area you want to enlarge.
To Cancel the Playback Zoom Function
Press the [P.B. ZOOM] Button (74) on the
Remote Controller.
≥For other notes concerning this item, see
-39-.
Playback Digital Effect Functions
During playback, special digital effects can be
added to the recorded pictures. The same effects
as those of Digital Effects 1 and 2, which are
used during recording, are obtained.
1 Press the [1] Button (72).
2 Press the [SELECT] Button (59) on the
Remote Controller to select a desired digital
effect.
≥When the [SELECT] Button is pressed
repeatedly, the digital effect selection
changes.
≥The same setting can be done using
[EFFECT SEL] Sub-Menu on the
[TAPE PLAYBACK MENU].
To suspend Playback Digital Effect
Temporarily
Press the [OFF/ON] Button (61) to suspend or
restart the digital effect. When the digital effect is
paused temporarily, the selected effect’s
indication flashes.
To Cancel the Digital Effect
Press the [SELECT] Button (59) on the Remote
Controller and clear the digital effect indication.
ª Wipe Mode and Mix Mode
1 Press the [1] Button (72).
INDEX INDEX
S C
STOP
K L
∫
V/REW
STILL ADV
W
W
W
WW
s
V
PLAY
PAUSE
FF/ W
STILL ADV
6 1 5
;
E D
P.B. Z OOM
(72)
SELECT
STORE
OFF/ON
P.B.DIGITAL
ENTER
VAR.
SEARCH
MENU
(59)
(61)
INDEX INDEX
S C
STOP
K L
∫
V/REW
STILL ADV
W
W
W
WW
s
V
PLAY
PAUSE
FF/W
STILL ADV
6 1 5
;
E D
P.B. ZOOM
(72)
2 Press the [SELECT] Button (59) on the
Remote Controller and select [WIPE] or
[MIX].
3 Press the [STORE] Button (60) at the
moment you want to save as a still picture.
≥The [B C] or [ ] Indication appears, and
the image is saved.
4 Press the [OFF/ON] Button (61) in the scene
in which you want to use the Wipe or Mix
effect.
≥The scene changes as a result of the Wipe or
Mix effect.
≥The Wipe Function and Mix Function can be
used only from the Remote Controller during
playback.
≥If the [OFF/ON] Button (61) is pressed while
Wipe or Mix is carried out, the effect will stop
temporarily at that point. Pressing the [OFF/ON]
Button (61) again will bring back the effect.
≥For other notes concerning this item, see
-39-.
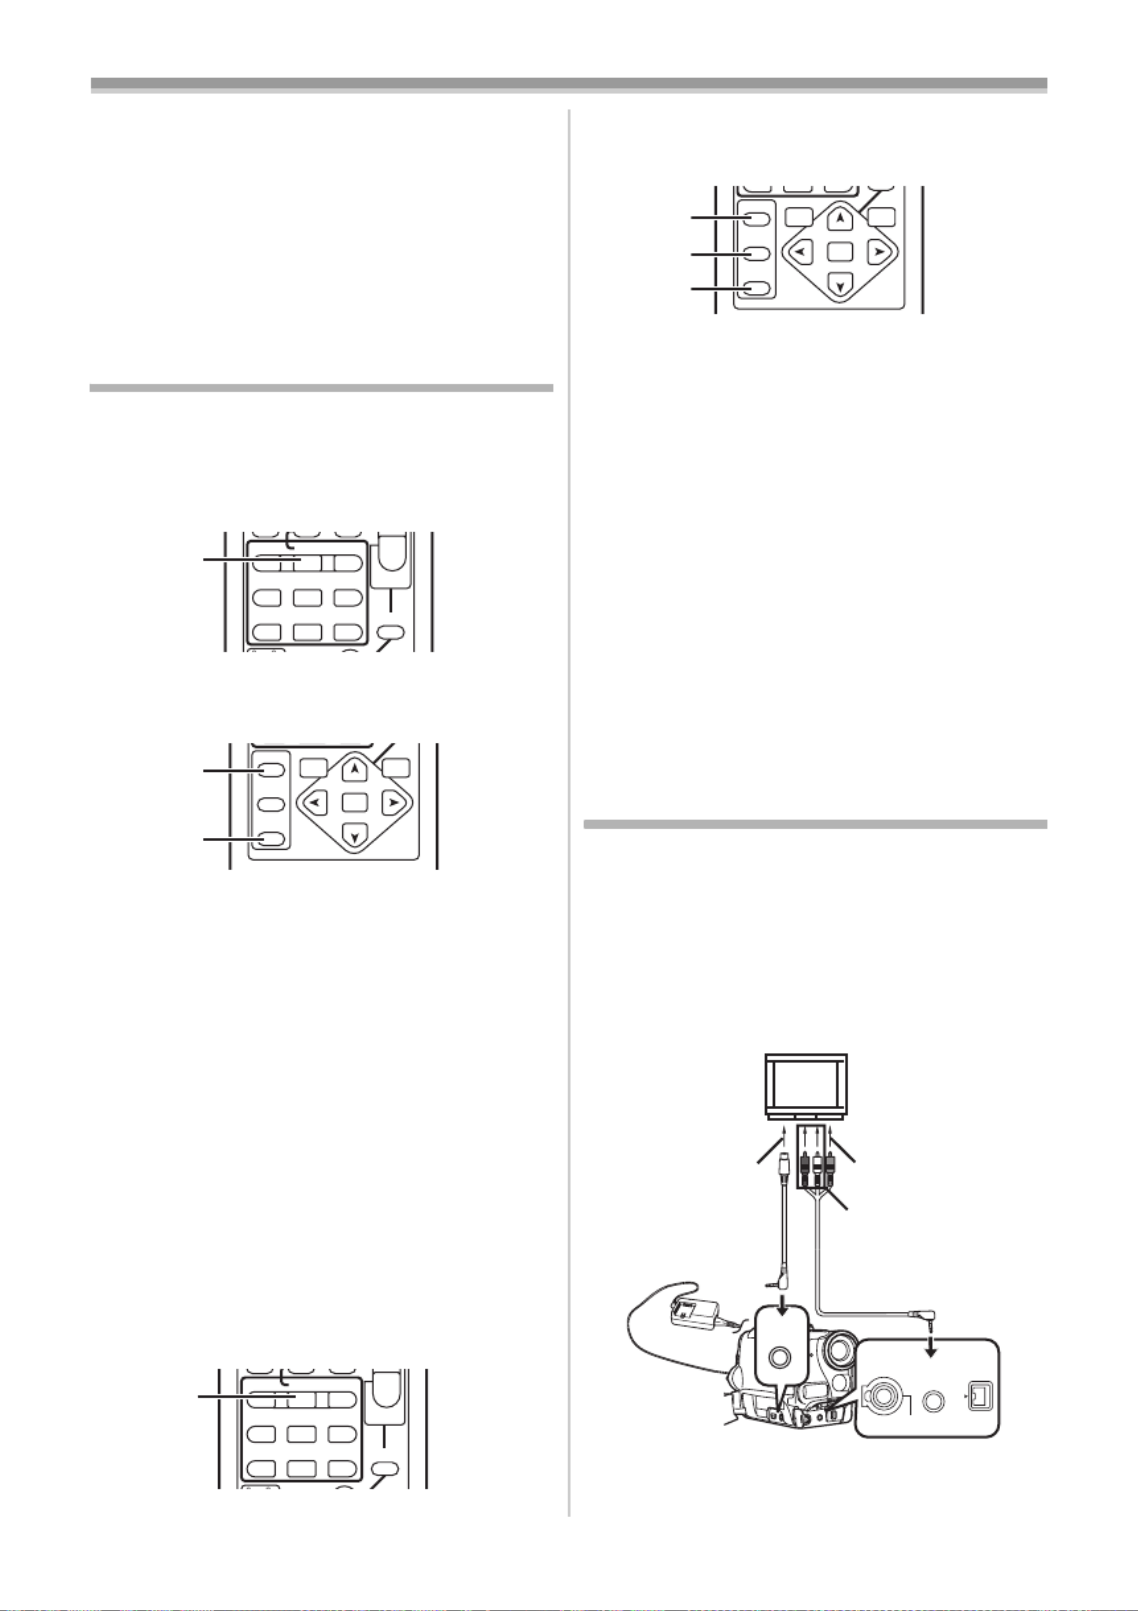
Playing Back on Your TV
By connecting your Movie Camera with your TV,
the recorded scenes can be viewed on your TV
screen.
≥Before connecting them, turn off the power of
both the Movie Camera and TV.
1Connect the [A/V OUT] Socket of the Movie
Camera and the Video and Audio Input
Sockets of the TV.
≥Connect to the TV with the AV Cable 1,
make a connection with the TV. If the TV has
an S-Video Socket, connect the S-Video
Cable 2, too.
SELECT
STORE
∫
OFF/ON
P.B.DI GIT AL
ENTER
VAR.
SEARCH
MENU
(59)
(60)
(61)
1
2
[VIDEO IN]
[AUDIO IN]
[S-VIDEO IN]
S-VIDEO
OUT
A/V OUT
PHONES
REMOTE/MIC
DV
(PLUG IN POWER)

Playback Mode
-32-
≥When plugging the pin plug of the AV cable
into the [A/V OUT] Socket, plug it in as far as
it goes.
To Make the Indications Appear on the TV
Screen
Press the [OSD] Button (51) on the Remote
Controller.
≥For other notes concerning this item, see
-39-.
OO
OSD
S
DATE/
TIME
S
PHOTO
SHOT
START/
STOP
(51)

Editing Mode
-34-
Terminal with a DV Cable VW-CD1E (optional)
1, dubbing can be done in the digital format.
≥Only the NV-GS33 can be used as a Recorder.
Player/Recorder:
1 Insert the Cassette and set to Tape
Playback Mode.
Player:
2 Press the [1] Button (72) to start playback.
Recorder:
3 While pressing the [REC] Button (54), press
the [PLAY] Button
(72).
Or while pressing the [REC] Button (7),
press the [BACK LIGHT] Button (8) on the
Movie Camera.
≥Recording starts.
To Stop Dubbing
Press the [;] Button (69) or the [∫] Button (70).
≥For other notes concerning this item, see
-40-.
Using as a Web Camera or with DV
STUDIO
If the Movie Camera is connected to your
Personal Computer, you can send video from the
Movie Camera to other parties via the network.
≥Do not connect the USB Cable until the USB
driver or Web Camera driver is installed.
1 Install the supplied USB driver or Web
Camera driver.
2 Set the Mode Dial to Tape Recording Mode
(or Tape Playback Mode when using with
DV STUDIO).
3 When using as a Web Camera:
Set [CAMERA] >> [USB FUNCTION] >>
[WEB CAMERA].
When using with DV STUDIO:
1
DV
INDEX INDEXSTOP
K L
∫
V/REW
STILL ADV
T
T
T
TT
W
W
W
WW
s rVOL
¥REC
MULTI/
P-IN-P A.DUB
PLAY
PAUSE
FF/
W
STILL ADV
6 1 5
;
E D
P.B. ZOOM
(54)
(72)
(69)
(70)
Set [CAMERA] >> [USB FUNCTION] >>
[DV STUDIO].
≥It enters WEB CAMERA Mode or DV
STUDIO Mode.
4 Connect the supplied USB Cable to Socket
(27).
5 Start the Windows Messenger or DV
STUDIO.
≥When using as a web camera, it is not possible
to record on a tape or display a title.
≥For more details on the operating environment,
installation, connections, and procedures,
please refer to USB Connection Kit’s operating
instructions.
MENU
STILL
ENTER
FADE
is
(14)
S-VIDEO
OUT
(27)

Others
-35-
Others
Indications
Various functions and the Movie Camera status
are shown on the screen.
r: Remaining Battery Power
≥When the battery power becomes low, the
Indication changes. When the battery is
discharged completely, the u v ( )
Indication flashes.
R0:45: Remaining Tape Time
≥Remaining tape time is indicated in minutes.
(When it reaches less than 3 minutes, the
indication starts flashing.)
: Tape Recording Mode -16-
: Tape Playback Mode -28-
CINEMA: Cinema Mode -21-
D.ZOOM: Digital Zoom -19-
MULTI: Multi Mode -25-
P-IN-P: P-IN-P Mode -25-
WIPE: Wipe Mode -25-
MIX: Mix Mode -25-
STROBE: Strobe Mode -25-
TRAIL: Trailing Effect Mode -25-
MOSAIC: Mosaic Mode -25-
MIRROR: Mirror Mode -25-
STRETCH: Stretch Mode -25-
SLIM: Slim Mode -25-
NEGA: Negative Mode -25-
SEPIA: Sepia Mode -25-
B/W: Black & White Mode -25-
SOLARI: Solarisation Mode -25-
(PB) ZOOM: Playback Zoom -30-
SP: Standard Play Mode (Recording
Speed Mode) -14-
LP: Long Play Mode (Recording
Speed Mode) -14-
INDEX: Index signal recording -30-
S 1: Search Number -30-
5k: Zoom Magnification Indication
-18-
AUTO: Automatic Mode -16-
MNL: Manual Mode -22-
[: Image Stabilizer -19-
12 bit, 16 bit: Audio Recording Mode -15-
MF: Manual Focus -25-
ª: Back Light Mode -20-
5: Sports Mode (Programme AE)
-22-
7: Portrait Mode (Programme AE)
-22-
4: Low Light Mode (Programme AE)
-22-
Ω: Spotlight Mode (Programme AE)
-22-
º: Surf & Snow Mode (Programme
AE) -22-
REC: Recording -16-
PAUSE: Recording Pause -16-
: Self-Timer Recording -18-
: When connecting the Free Style
Remote Controller with Mic to
[REMOTE] Socket and the
[TALK] Button is pressed, this
indication appears. -17-
!: Playback -28-
;: Still Playback -29-
%: Fast-forward/Cue Playback -28-
&: Rewind/Review Playback -28-
~ }, : Slow Motion Playback -29-
";, ;!: Still Advance Playback -29-
* ), : Index Search -29-
CHK: Recording Check -16-
A.DUB !: Audio Dubbing -33-
A.DUB ;: Audio Dubbing Pause -33-
BLANK: Blank Search -16-
R !: Repeat Playback -39-
2k%: Variable Speed Search -29-
1/500: When you adjust shutter speed
manually, this indication appears.
-24-
F2.4: When you adjust the F Number
manually, this indication appears.
-24-
1: White Balance Adjustment Mode
-23-
z: Outdoor Mode -23-
{: Indoor Mode (recording under
incandescent lamp) -23-
C.NIGHT VIEW:
Colour Night View Function -21-
0LUX NIGHT VIEW:
0 Lux Night View Function -21-
Z.MIC: Zoom Microphone -19-
WIND CUT: Wind Noise Reduction -21-
æ: Progressive Photoshot Mode -17-
: Tele Macro -19-
: Soft Skin Mode -21-
VOLUME: Volume adjustment -28-
15:30:45: Date/Time Indication -36-
ª To Change the Counter Display Mode
By changing [C.DISPLAY] on the [DISPLAY]
Sub-Menu, you can change the Counter Display
Mode to Tape Counter Indication [COUNTER]
(0:00.00), Memory Counter Indication [MEMORY]
(M0:00.00), and Time Code Indication
[TIMECODE] (0h00m00s00f). (-13-) By repeatedly
pressing the [DISPLAY] Button on the Remote
Controller, you can change the Counter Display
Mode.
T.MACRO
SOFT SKIN

Others
-36-
ª To Display Date/Time Indication
To display Date/Time Indication, set the
appropriate Date/Time in [DATE/TIME] on the
[DISPLAY] Sub-Menu. (-13-)
You can also press the [DATE/TIME] Button of
the Remote Controller repeatedly to display or
change the Date/Time Indication.
ª To Change the Display Mode
By changing [DISPLAY] on the [DISPLAY]
Sub-Menu, you can change the Display Mode to
All Function Display [ALL] and Minimum Display
[OFF]. (-13-)
ª Progressive Photoshot
You cannot use the Progressive Photoshot
Function in the following cases.
≥Digital Effect Modes in [EFFECT1]
≥Digital Zoom [D.ZOOM]
≥1/750 s or faster shutter speed
≥When brightness is insufficient
≥When the Night View Function is ON
≥When the Portrait Mode is used
Initializing the Modes
You can change the Menu settings back to the
shipping condition.
1Set [INITIAL] >> [INITIAL SET] >> [YES].
≥The initializing takes a little while.
≥After the initializing is completed, the
[COMPLETED] Indication appears with
beeps.
≥Initializing will not erase the clock setting (
-14-)
that has been adjusted.
Warning/Alarm Indications
If any one of the following indications lights up or
flashes, please check the condition of the Movie
Camera.
3DEW (DEW DETECT/EJECT TAPE):
Condensation has occurred. -41-
Y (CHECK REC TAB/TAPE NOT INSERTED):
You are attempting to record pictures on a
Tape with setting the accidental erasure
prevention slider to [SAVE].
You are attempting Audio dubbing or Digital
dubbing on a Tape with setting the
accidental erasure previntion slider to
[SAVE].
No Cassette is inserted. -10-
6 (LOW BATTERY):
The Battery is low. Recharge it.
-8-
0: The built-in battery is low. -14-
: (NEED HEAD CLEANING):
The video heads are dirty. -41-
2END (TAPE END):
The tape came to the end during recording.
REMOTE (CHECK REMOTE MODE):
Wrong Remote Controller Mode has been
selected.
-7-
UNPLAYABLE TAPE
(OTHER FORMAT):
You are attempting to play back a tape
section that has been recorded with a
different TV system.
UNABLE TO A. DUB
(LP RECORDED):
Because the original recording was done in
LP Mode, audio dubbing cannot be
performed.
INCOMPATIBLE TAPE:
This cassette is incompatible.
PUSH THE
RESET SWITCH:
An irregularity in the mechanism has been
detected. Press the [RESET] Button (-5-).
This may solve the problem.
COPY INHIBITED:
Because the medium is protected by a copy
guard, images cannot be recorded
correctly.
CASSETTE DOOR OPENED:
Close the Cassette Compartment Cover
before recording.
Notes and Hints
ª Concerning the Power Supply
≥When the Movie Camera is used for a long time,
the Camera body becomes warm, but this is not
a malfunction.
≥If the [CHARGE] Lamp does not light up
although the Battery is attached to the AC
Adaptor, detach the Battery and reattach it.
ª Inserting/Removing the Cassette
≥In the case of using a previously recorded
Cassette, you can use the Blank Search
Function to find the position where you want to
continue recording.
≥If a new Cassette is inserted, rewind to the
beginning of the tape before starting recording.
≥When inserting the cassette, make sure it faces
in the right direction and then push it in until it
stops.
≥When the Cassette Holder is in action, do not
touch anything except the [PUSH] mark.
≥When closing the Cassette Compartment
Cover, do not get anything caught in the cover,
such as a cable of an optional stereo
microphone.
ª Alarm Sounds
When [BEEP SOUND] on the [INITIAL]
Sub-Menu on the [TAPE RECORDING MENU] is

Others
-37-
set to [ON], confirmation/alarm beeps are issued
as follows.
1 Beep
≥When you start recording
≥When you switch the [OFF/ON] Switch from
[OFF] to [ON]
2 Beeps
≥When you pause recording
2 Beeps for 4 times
≥If you operate a wrong operation before or
during recording
ª Recording Check
≥For Recording Check, the recording speed
mode (SP/LP) must be the same as the mode
used for the recording. If different, playback
images will be distorted.
ª Quick Start
≥During the Quick Start Standby Mode, a minute
amount of electricity is consumed.
≥When the Movie Camera is left in the Recording
Pause Mode for 6 minutes, it will be turned into
the Quick Start Standby Mode. To turn the
Movie Camera on again, set the [OFF/ON]
Switch to [OFF] and then set it to [ON] again.
(The Quick Start Mode will be restored.)
≥This Function is not activated when a tape is not
inserted even if the Quick Start Recording Lamp
lights.
≥In the following cases, Quick Start is cancelled
during the Quick Start Standby Mode.
≥Operate the mode dial
≥The Battery is replaced
≥If the [QUICK START] Button is pressed and
held for approximately 2 seconds during the
Quick Start Standby Mode, the Lamp will go off
and the Movie Camera will completely be turned
off.
≥If the Movie Camera is not operated for
approximately 30 minutes when the Quick Start
Recording Lamp lights, the Lamp will go off and
the Movie Camera will completely be turned off.
≥In the Automatic White Balance Mode, the
colour may be recorded unnaturally at the
beginning of the recording.
≥The zoom magnification differs from when it is
in the Quick Start Standby Mode and when the
recording starts.
ª Photoshot
≥Photoshot Recording results in slightly inferior
image quality.
ª Self-timer Recording
≥When [BEEP SOUND] on the [INITIAL]
Sub-Menu is set to [ON], the beep sound will be
emitted along with the Recording Lamp flashing
in the Self-timer Standby Mode.
≥By operating the [OFF/ON] Switch, Recording
Start/Stop Button or Mode Dial, the Self-timer
Standby Mode is cancelled.
ª Zoom In/Out Functions
≥When you are zooming on a faraway subject, a
sharper focus is achieved if the recording
subject is 1.2 metres or further from the Movie
Camera.
ª Tele-Macro Function
≥The Tele-Macro Function cannot be started
during recording.
≥ k kWhen the [D.ZOOM] is set to [20 ] or [500 ],
the Tele-Macro Function with the magnification
greater than 10k is available.
≥If a sharper focus cannot be achieved, adjust
the focus manually.
In the following cases, the Tele-Macro
Function is cancelled.
≥The zoom magnification becomes lower than
10k.
≥Setting the [OFF/ON] Switch to [OFF].
ª Zoom Microphone Function
≥The Zoom Microphone Function may not work
effectively if the surrounding noise is too loud.
≥It does not work with an external microphone.
ª Digital Zoom Functions
≥As the magnification of digital zoom increases,
the quality of image may deteriorate.
≥White balance cannot be set in the digital zoom
range.
ª Image Stabilizer Function
≥The Image Stabilizer Function does not operate
in a dimly lit place. In this case, the [[]
Indication flashes.
≥Under fluorescent lighting, image brightness
may change or colours may not look natural.
≥After-images may appear.
≥When a tripod is used, it is recommended that
you turn the Image Stabilizer off.
≥Within the digital zoom range, or when
recording with a conversion lens attached, the
Image Stabilizer Function may not work
effectively.
ª Backlight Compensation Function
≥When setting the Iris manually, the Backlight
Compensation Function does not work.
≥By operating the [OFF/ON] Switch, the
Backlight Compensation Function is cancelled.
ª Night View Functions
≥In a bright place, such as outdoors, the
recorded picture may become whitish.
≥In a dark place, the recorded picture is
presented in a time-lapse-like manner.
≥Adjust the Focus manually.

Others
-38-
≥The Progressive Photoshot Function is
automatically turned off.
≥The Continuous Photoshot Function cannot be
used.
≥White Balance cannot be set.
≥The shutter speed cannot be adjusted.
≥The Image Stabilizer, Programme AE or Digital
Effect Modes in [EFFECT1] cannot be set.
≥When recording with the Night View Function, it
is recommended that you use the tripod.
≥The Night View Function makes the signal
charging time of CCD up to 25 times longer than
usual, so that the dark scenes that are invisible
to the naked eyes can be recorded brightly. For
this reason, a bright dots may be seen, but this
is not a malfunction.
≥The Image Stabilizer Function does not work. In
this case, the [[] Indication flashes.
≥The Soft Skin Function and the Backlight
Compensation Function cannot be changed.
ª Wind Noise Reduction Function
≥It does not work with the microphone on the
Free Style Remote Controller with Mic nor an
external microphone.
≥When it is set to [ON], directivity of microphone
is regulated depending on the strength of wind
to reduce wind noise.
ª Cinema Function
≥Using the Cinema Mode does not widen the
recording angle.
≥If you play back tape recorded in Cinema Mode
on a wide-screen (16:9) format TV, playback
size is automatically adjusted to fit the TV
screen format. Please refer to the TV’s
operating instructions for details.
≥When images are displayed on a TV screen, the
Date/Time Indication may be erased in some
cases.
≥Depending on the TV, the picture quality may
be deteriorated.
≥Using the Cinema Mode deactivates [MULTI]
and [P-IN-P] of [EFFECT1].
≥Depending on the software in use, the imported
Cinema picture may not be displayed correctly.
ª Programme AE
≥If any of the Programme AE Modes are
selected, you cannot adjust the shutter speed
(-24-) or iris (-24-).
≥Using the Night View Function cancels any of
the Programme AE mode.
Sports Mode
≥During normal playback, the image
movement may not look smooth.
≥Because the colour and brightness of the
playback image may change, avoid
recording under fluorescent light, mercury
light or sodium light.
≥If you record a subject illuminated with
strong light or a highly reflective subject,
vertical lines of light may appear.
≥If the light is insufficient, the [5]
Indication flashes.
Sports Mode/Portrait Mode
≥If you record a still picture in Progressive
Photoshot Mode, the brightness and hue of
the recorded still picture may become
unstable.
≥If this mode is used for indoor recording,
playback images may flicker.
Low Light Mode
≥Extremely dark scenes may not be able to
be made brighter to a satisfactory degree.
Spotlight Mode
≥With this mode, recorded images may
become extremely dark.
≥If the recording subject is extremely bright,
its recorded image may becomes whitish.
Surf & Snow Mode
≥If the recording subject is extremely bright,
its recorded image may turn out to be
whitish.
ª White Balance
In the following cases, you cannot change
White Balance:
≥When you set [EFFECT2] to [SEPIA] or to
[B/W].
≥ kWhen you set the Zoom to 10 or higher
≥During Digital Still Picture Mode
≥When you display a Menu
≥When you use the Night View Mode
In the following cases, the [1] Indication
flashes:
≥The flashing indicates that the previously
adjusted White Balance setting is still kept. This
setting will be kept until White Balance is
adjusted again.
≥You may not be able to achieve correct White
Balance Adjustment manually under weak
illumination.
ª Manual Shutter Speed Adjustment
≥You may see vertical lines of light in the
playback image of a brightly shining subject or
highly reflective subject.
≥During normal playback, movement in the
images may not look smooth.
≥Because the colour and brightness of the
playback image may become unstable, avoid
recording under fluorescent light, mercury light
or sodium light.
≥If you are using Night View Mode (
-21-) or
Programme AE Mode (-22-), you cannot adjust
the shutter speed.

Others
-39-
ª Manual Iris Adjustment
≥Depending on zoom magnification, there are iris
values that will not be displayed.
≥If you are using Night View Mode (
-21-) or
Programme AE Mode (-22-), you cannot adjust
the iris.
≥If you attempt to adjust the Shutter Speed after
setting the Iris, the value set for the Iris will be
cancelled.
ª Digital Effect Functions
≥If you have set [EFFECT2] to [B/W] or [SEPIA],
changing the selected White Balance Mode is
not possible. (-22-)
≥Setting the Cinema Mode cancels the
Picture-in-Picture Mode and the Multi-Picture
Mode.
≥During the Digital Still Picture Mode, the Digital
Effect Functions cannot be set.
In the following cases, using the [EFFECT1]
on the [DIGITAL] Sub-Menu is not possible.
≥When the Night View Mode is set (-21-)
Wipe Mode and Mix Mode
If the following operation is carried out, stored
images will be erased, and Wipe and Mix
Functions cannot be used.
≥Set other item of Digital Effect
≥Operate the [OFF/ON] switch or Mode Dial
≥Insert or eject a cassette
Picture-in-Picture Mode
≥If Mode Dial is operated, the smaller picture
disappears.
Multi-Picture Mode
≥If the [MULTI] Button is pressed while
self-recording Mirror Mode (-17-) is used, the still
picture is displayed from the upper right corner
of the screen, but, in reality, the picture is
recorded from the upper left corner as usual.
≥The quality of Multi images deteriorates slightly.
≥The top and bottom of the Multi pictures will be
cut off slightly.
ª Playing Back
Repeat Playback
If you continue to press the [1] Button for
5 seconds or longer, the Movie Camera switches
to Repeat Playback Mode, and the [R !]
Indication appears. (To cancel Repeat Playback
Mode, set the [OFF/ON] Switch to [OFF].)
Choosing Sound during Playback
You can select the sound by using the
[AUDIO OUT] setting on the [PLAYBACK]
Sub-Menu.
STEREO: Stereo Sound (main sound and
sub sound)
L: Left channel sound (main sound)
R: Right channel sound (sub sound)
≥If you dub a tape recorded at the [12bit]
selected as the [AUDIO REC] on the
[RECORDING] Sub-Menu, playback sound
becomes stereo sound regardless of the
[AUDIO OUT] setting if [12bit AUDIO] is set to
[MIX].
ª Index Search Functions
≥Index Search may not be possible at the
beginning of the tape.
≥Scene Index Search may not function properly if
the interval between 2 scene index signals is
less than 1 minute.
ª Playback Zoom Function
≥You cannot adjust the sound volume with the
Remote Controller in Playback Zoom Mode.
≥If you turn off the Movie Camera power or if you
operate the Mode Dial, Playback Zoom Mode is
automatically cancelled.
≥Even if Playback Zoom Functions are being
used, images that are output from the DV
Terminal (-5-) are not enlarged.
≥As you enlarge an image, the quality of the
image deteriorates.
≥During a Playback Zoom, the Variable Speed
Search Function cannot be changed with the
Remote Controller.
ª Playback Digital Effect Functions
≥Signals of images to which digital effects are
added during playback cannot be output from
the DV Terminal (-5-).
≥You cannot use the Wipe or Mix Function while
playing back the non-recorded portion of tape.
ª Playing Back on Your TV
≥Depending on your TV, nothing may be shown
even if you correctly connect the movie camera
with your TV. In this case, set [AV JACK] on the
[INITIAL] Sub-Menu to [OUT].
≥Picture size may be displayed differently when
playing back a Cinema picture on a wide-screen
TV with Playback Digital Effect.
ª Audio Dubbing
≥The blank section of a tape cannot be dubbed.
≥Sounds sent through the DV Terminal cannot
be dubbed.
≥If a tape has a non-recorded portion when the
tape is dubbed, images and sounds may be
disturbed when this portion of the tape is played
back.
≥If you set the tape counter back to 0 at the
position where you want to stop Audio Dubbing
so as to make it possible to use the Memory
Stop Function (-45-), Audio Dubbing is
terminated automatically when the tape reaches
this position.

Others
-40-
≥In the case of importing data recorded with
Audio Dubbing to a PC using the PC’s software,
only the original sound (ST1) may be imported,
depending on the software.
ª Using the DV Cable for Recording
(Digital Dubbing)
≥Regardless of the setting, digital dubbing is
carried out automatically in the same audio
recording mode as that of the playback
Cassette.
≥The images on the recorded monitor may be
disturbed, but it does not affect the recorded
images.
≥Even if Playback Digital Effects or Playback
Zoom have been used, these effects are not
output from the DV Terminal.
≥Even if you use device equipped with DV
Terminals (such as IEEE1394), you may not be
able to perform Digital Dubbing in some cases.
≥Date or other information to be displayed cannot
be displayed if the software of the connected
equipment does not support the display
function.
Cautions for Use
ª After Use
1 Take out the Cassette. (-10-)
2 Set the [OFF/ON] Switch to [OFF].
3 Detach the power supply and retract the
Viewfinder or the LCD Monitor. ( -8- -11-, )
4 To protect the Lens, attach the supplied
Lens Cap.
ª Cautions for Use
When you use your Movie Camera on a rainy
or snowy day or on a beach, make sure that
no water enters the Movie Camera.
≥Water may cause the Movie Camera or
Cassette to malfunction. (Irreparable failure
may occur.)
≥If sea water splashes onto the Movie Camera,
wet a soft cloth with tap water, wring it well, and
use it to wipe the camera body carefully. Then,
wipe it again thoroughly with a soft dry cloth.
Keep the Movie Camera away from
magnetized equipment (such as a microwave
oven, TV, video game equipment, etc.).
≥If you use the Movie Camera on or near a TV,
images or sounds may be disturbed due to
electromagnetic wave radiation.
≥Do not use near cell phone because doing so
may cause noise to adversely affect the picture
and sound.
≥Recordings on the tape may be damaged, or
images may be distorted, by strong magnetic
fields created by speakers or large motors.
≥Electromagnetic wave radiation generated by a
microprocessor may adversely affect the Movie
Camera, causing the disturbance of images and
sounds.
≥If the Movie Camera is affected by magnetically
charged equipment and does not function
properly, turn off the Movie Camera power and
detach the Battery or AC Adaptor and then
connect the Battery or AC Adaptor again.
Thereafter, turn on the Movie Camera power.
Do not use your Movie Camera near radio
transmitters or high-voltage cables.
≥If you record pictures near radio transmitters or
high-voltage cables, recorded images or sounds
may be adversely affected.
Do not use this Movie Camera for surveillance
purposes or other business use.
≥If you use the Movie Camera for a long period of
time, the internal temperature increases and,
consequently, this may cause malfunction.
≥This Movie Camera is not intended for business
use.
When you use your Movie Camera on a beach
or similar place, do not let sand or fine dust
get into the Movie Camera.
≥Sand or dust may damage the Movie Camera or
Cassette. (Care should be taken when inserting
and removing the Cassette.)
Do not spray insecticides or volatile
chemicals onto the Movie Camera.
≥If the Movie Camera is sprayed with such
chemicals, the camera body may be deformed
and the surface finish may peel off.
≥Do not keep rubber or plastic products in
contact with the Movie Camera for a long period
of time.
Do not use benzine, thinner or alcohol for
cleaning the Movie Camera.
≥The camera body may be deformed and the
surface finish may peel off.
≥Before cleaning, detach the Battery or pull out
the AC Mains Lead from the AC mains socket.
≥Wipe the Movie Camera with a soft dry cloth. To
remove stubborn stains, wipe with a cloth that is
soaked in a detergent diluted with water and
afterwards finish wiping with a dry cloth.
≥For storing or transporting the Movie Camera,
place it in a bag or case lined with soft pads so
as to prevent the coating on the camera body
from being worn.
After use, be sure to take the Cassette out and
detach the Battery from the Movie Camera or
pull out the AC Mains Lead from AC mains
socket.
≥If the Cassette is left in the Movie Camera, the
tape sags and deteriorates.

Others
-41-
≥If the Battery is left on the Movie Camera for a
long time, the voltage drops excessively, and
the Battery will not function even after it is
recharged.
ª About AC Adaptor
≥If the temperature of the Battery is extremely
high or extremely low, the [CHARGE] Lamp
may continue flashing, and the Battery may not
be charged. After the temperature of the Battery
has decreased or increased sufficiently,
charging starts automatically. If the [CHARGE]
Lamp continues to flash even after the Battery
temperature has decreased or increased
sufficiently, the Battery or AC Adaptor may be
faulty. In this case, please contact a dealer.
≥If the Battery is warm, charging takes a longer
time than normal.
≥If you use the AC Adaptor near a radio, radio
reception may be disturbed. Keep the AC
Adaptor 1 metre or more away from radio.
≥When using the AC Adaptor, it may generate
whirring sounds. However, this is normal.
≥After use, be sure to pull out the AC Mains Lead
from the AC mains socket. (If they are left
connected, a minute amount of current is
consumed.)
≥Keep the electrodes of the AC Adaptor and
Battery always clean.
ª Condensation
If you turn the Movie Camera on when
condensation occurs on the head or the tape,
Condensation Indication [3DEW] (yellow or red)
blinks on the Viewfinder or the LCD monitor and
the messages [DEW DETECT] or [EJECT TAPE]
(only when the tape is inserted) appear. In this
case, follow the procedure below.
Blink in yellow:
Dews are slightly adhering on the head or the
tape.
Blink in red:
Dews are adhere on the head or the tape.
1 Remove the tape if it is inserted.
≥It takes about 20 seconds to open the
Cassette Holder. This is not a malfunction.
2 Leave the Movie Camera with the Cassette
Compartment Cover closed to cool or warm
it to the ambient temperature.
When [3DEW] blinks in yellow
≥Leave the Movie Camera for about 30
minutes.
When [3DEW] blinks in red
≥The Power Indicator Lamp blinks for about 1
minute and then the Movie Camera
automatically turns off. Leave it for about 2
to 3 hours.
3 Turn the Movie Camera on again, set it to
the Tape Recording/Playback Mode and
then check if the condensation indication
disappears.
Especially in cold districts, dews may be frozen.
In this case, it may take more time before the
condensation indication disappears.
Watch for Condensation even before the
Condensation Indication is displayed.
≥The condensation indication may not appear
depending on circumstances. When
condensation occurs on the lens or the Movie
Camera, it also may occur on the head and the
tape. Do not open the Cassette Compartment
Cover.
When the Lens is Fogged:
Set the [OFF/ON] Switch to [OFF] and leave the
Movie Camera in this condition for about 1 hour.
When the lens temperature becomes close to the
ambient temperature, the fogging disappears
naturally.
ª Video Head Clogging and Care
If the heads (the parts that make contact with the
tape) are dirty, mosaic-pattern noise may appear
on the playback image, or the screen as a whole
becomes black. If the heads are extremely dirty,
recording performance deteriorates, and, in the
worst case, the Movie Camera cannot record at
all.
Causes of Dirty Heads
≥Large quantity of dust in the air
≥High-temperature and high-humidity
environment
≥Damaged tape
≥Long operating hours
Using Mini-DV Format Digital Video Head
Cleaner
1 Insert the Head Cleaner into the Movie
Camera in the same manner as a Video
Cassette.
2 Press the [1] Button, and approximately
20 seconds later, press the [∫] Button. (Do
not rewind the tape.)
3 Take out the Head Cleaner. Insert a Video
Cassette and start recording. Then, play the
tape back to check the recorded image.
4 If the image is not still clear, repeat
Steps 1 to 3. (Do not use the Head Cleaner
for 3 times or more consecutively.)
Notes:
≥Do not rewind every time you use the Head
Cleaner. Rewind only when the tape reaches
the end, and then use it again from the
beginning in the same manner as before.
≥If the heads become dirty soon after cleaning,
the tape may be damaged. In this case,
immediately stop using that Cassette.
≥Do not clean the heads excessively. (Excessive
cleaning may cause excessive wear of the

Others
-42-
heads. If the heads are worn, images cannot be
played back even after the heads are cleaned.)
≥If the dirty heads cannot be cleaned with the
Head Cleaner, the Movie Camera needs to be
cleaned at a service centre. Please consult a
dealer.
≥Video Head Cleaners can be purchased from
service centres.
≥Head cleaning due to dirty heads is not
considered a malfunction of the product. It is not
covered by the warranty.
Periodical Check-up
To maintain the highest image quality, we
recommend replacement of worn parts, such as
heads, etc., after approximately 1000 hours of
use. (This, however, depends on operating
conditions, such as temperature, humidity, dust,
etc.)
ª Optimal Use of the Battery
Battery Characteristics
This Battery is a rechargeable lithium ion battery.
Its ability to generate power is based upon the
chemical reaction that takes place inside it. This
reaction is susceptible to the surrounding
temperature and humidity, and, if the temperature
is too high or too low, the operating time of the
Battery becomes shorter. If the Battery is used in
an extremely cold environment, the Battery may
operate only for about 5 minutes. If the Battery
becomes extremely hot, a protective function may
operate, and the Battery may become unusable
for a while.
Be Sure to Detach the Battery after Use
Be sure to detach the Battery from the Movie
Camera. (If it is left attached to the Movie
Camera, a minute amount of current is consumed
even when the Movie Camera power is off.) If the
Battery is left attached to the Movie Camera for a
long time, over-discharge takes place. The
Battery may become unusable after it is charged.
Disposing of an Unusable Battery
≥The Battery has a limited life.
≥Do not throw the Battery into fire because it may
cause an explosion.
Always Keep the Terminals of the Battery
Clean
Prevent the terminals from getting clogged with
dirt, dust, or other substances.
If you drop the Battery accidentally, check to see
if the Battery body and terminals are deformed.
Attaching a deformed Battery to the Movie
Camera or AC Adaptor may damage the Movie
Camera or AC Adaptor.
ª Cautions for Storage
Before storing the Movie Camera, take the
Cassette out and detach the Battery.
Store all the components in a dry place with a
relatively stable temperature.
(Recommended Temperature: 15 to 25oC,
Recommended Humidity: 40 to 60%)
Movie Camera
≥Wrap it with a soft cloth to prevent dust from
getting into the Camera.
≥Do not leave the Movie Camera in places that
expose it to high temperature.
Battery
≥Extremely high temperatures or low
temperatures will shorten the life of the Battery.
≥If the Battery is kept in smoky or dusty places,
the terminals may rust and cause malfunctions.
≥Do not allow the Battery terminals to come
in contact with metal objects (such as
necklaces, hairpins, etc.). This can result in
a short circuit or heat generation and, if you
touch the Battery in this condition, you may
be badly burned.
≥Store the Battery in a completely discharged
state. To store the Battery for a long period of
time, we recommend you charge it once every
year and store it again after you completely use
up the charged capacity.
Cassette
≥Before storing it, rewind the tape to the
beginning. If the Cassette is left for more than
6 months with the tape stopped midway, the
tape sags (although it depends on the storage
condition). Be sure to rewind to the beginning.
≥Store the Cassette in its case. Dust, direct
sunlight (ultraviolet rays), or humidity may
damage the tape. Dust contains hard mineral
particles, and dusty Cassettes damage the
heads of the Movie Camera and other
components. Develop a habit of returning the
Cassette back to its case.
≥Once every half year, wind the tape to the end
and then rewind it to the beginning. If the
Cassette is left for 1 year or longer without
winding or rewinding, temperature and humidity
changes may cause the Cassette to deform due
to swelling, shrinking, and so forth. The wound
tape may stick to itself.
≥Do not place a Cassette near highly magnetic
substances or equipment.
≥The surface of tape is covered with extremely
minute magnetic particles, upon which signals
are recorded. Magnetic necklaces, toys, etc.,
have magnetic force that is stronger than you
may normally expect, and they may erase the
contents of a recording or may cause noise in
images and sounds.

Others
-43-
ª LCD Monitor/Viewfinder/Lens Hood
LCD Monitor
≥In a place with drastic temperature changes,
condensation may form on the LCD Monitor.
Wipe it with soft dry cloth.
≥If your Movie Camera is extremely cold when
you turn its power on, the image on the LCD
Monitor is slightly darker than usual at first.
However, as the internal temperature increases,
it goes back to the normal brightness.
Viewfinder
≥Do not direct the Viewfinder or Lens to the sun.
Internal components may be seriously
damaged.
≥When the Movie Camera is used with a large
capacity Battery (CGA-DU14, CGA-DU21;
optional) attached to it, it is not practical to look
in the Viewfinder from behind the Battery.
Lens Hood
≥Do not attach other conversion lenses in front of
the Lens Hood; there is no mount to be used for
the attachment.
≥When you wish to attach the Tele Conversion
Lens (VW-LT2714N2E; optional), Wide
Conversion Lens (VW-LW2707N2E; optional),
MC Protector (VW-LMC27E; optional), or ND
Filter (VW-LND27E; optional), first of all, turn
the Lens Hood counterclockwise. If the MC
Protector or ND Filter is used, the Lens Hood
can be mounted on the filter.
≥If you push the [W/T] Lever toward [W] during
recording with the filter and conversion lens
attached together to the Movie Camera,
4 corners of the image may become dark
(vignetting). For details, please refer to the
operating instructions of your accessories.
Extremely high precision technology is
employed to produce the LCD Monitor
screen featuring a total of approximately
123,000 pixels. The result is more than
99.99% effective pixels with a mere 0.01% of
the pixels inactive or always lit. However,
this is not a malfunction and does not affect
the recorded picture.
Extremely high precision technology is
employed to produce the Viewfinder screen
featuring a total of approximately 67,500
pixels. The result is more than 99.99%
effective pixels with a mere 0.01% of the
pixels inactive or always lit. However, this is
not a malfunction and does not affect the
recorded picture.
≥Be sure to keep the Lens Hood attached to the
Movie Camera so as to shut out unnecessary
light.
Before Requesting Repair (Problems
and Solutions)
Power
1: The Movie Camera power cannot be turned
on.
• Is the power source connected correctly? (-8-)
2: The Movie Camera power is turned off
automatically.
• When the Recording Pause Mode continues
for more than 6 minutes, the power is turned off
automatically for tape protection and power
conservation. (If the AC Adaptor is used, the
power is turned off only when the tape is
inserted in Tape Recording Mode.) When the
tape is inserted in Tape Recording Mode and if
the Recording Pause Mode continues for more
than 6 minutes, the power is turned off
automatically.
To resume recording from this condition, turn
off, then turn on the power again.
3: The Movie Camera power does not stay on
long enough.
• Is the Battery low? Charge the Battery or
attach a fully charged Battery. (-8-)
• Has condensation occurred? Wait until the
Condensation Indication disappears. (-41-)
Battery
1: Battery runs down quickly.
• Is the Battery fully charged? Charge it with the
AC Adaptor. (-8-)
• Are you using the Battery in an extremely cold
place? In cold places, the operating time of the
Battery becomes shorter. (-42-)
• Has the Battery worn out? If the operating time
is still too short even after the Battery is fully
charged, the Battery has worn out.
2: The Battery cannot be charged.
• If the DC Input Lead is connected to the AC
Adaptor, charging cannot be performed.
Disconnect the DC Input Lead.
Normal Recording
1: Recording does not start although power is
supplied to the Movie Camera and the
Cassette is correctly inserted.
• Is the accidental erasure prevention slider on
the Cassette open? If it is open (set to [SAVE]),
recording cannot be performed. (-10-)
• Is the tape wound to the end? Insert a new
Cassette. (-10-)
• Is the Movie Camera power turned on? (-16-)
• Has condensation occurred? Wait until the
Condensation Indication disappears. (-41-)
Termékspecifikációk
| Márka: | Panasonic |
| Kategória: | Kamerák |
| Modell: | NV-GS33EGE |
Szüksége van segítségre?
Ha segítségre van szüksége Panasonic NV-GS33EGE, tegyen fel kérdést alább, és más felhasználók válaszolnak Önnek
Útmutatók Kamerák Panasonic

10 Július 2024
4 Július 2024
3 Július 2024
3 Július 2024
2 Július 2024
Útmutatók Kamerák
- Kamerák Samsung
- Kamerák Sony
- Kamerák Canon
- Kamerák JVC
- Kamerák Hitachi
- Kamerák Sanyo
- Kamerák Manfrotto
- Kamerák Yashica
- Kamerák Think Tank
- Kamerák Kata
- Kamerák Peak Design
- Kamerák HPRC
Legújabb útmutatók Kamerák

14 Január 2025

11 December 2024
11 Október 2024
10 Október 2024
1 Szeptember 2024
1 Szeptember 2024
1 Szeptember 2024
1 Szeptember 2024
27 Augusztus 2024
27 Augusztus 2024