Használati útmutató Newline TT-6519RS
Olvassa el alább 📖 a magyar nyelvű használati útmutatót Newline TT-6519RS (86 oldal) a Monitor kategóriában. Ezt az útmutatót 6 ember találta hasznosnak és 2 felhasználó értékelte átlagosan 4.5 csillagra
Oldal 1/86

User Manual
V2.0

i
Contents
About This Document ..................................................................................................................... 5
Safety Instruction ............................................................................................................................. 6
1 Overview ......................................................................................................................................... 9
1.1 Introduction .................................................................................................................................................................. 9
1.2 Parts .............................................................................................................................................................................. 9
1.3 Ports ............................................................................................................................................................................ 12
1.4 Remote Control ........................................................................................................................................................... 16
2 Installation Guide ....................................................................................................................... 18
2.1 Safety Precautions ...................................................................................................................................................... 18
2.2 Installation Precautions ............................................................................................................................................... 19
2.3 Installation .................................................................................................................................................................. 20
2.4 Installing the Internal PC (Optional) ........................................................................................................................... 21
2.5 Installing Newline Assistant ....................................................................................................................................... 23
3 Getting Started............................................................................................................................. 24
3.1 Power On .................................................................................................................................................................... 24
3.2 Power Off.................................................................................................................................................................... 25
3.3 Calibration .................................................................................................................................................................. 25
4 Operating the Touch Screen ..................................................................................................... 28
4.1 Start Screen ................................................................................................................................................................. 28
4.2 Home .......................................................................................................................................................................... 29
4.3 System Settings ........................................................................................................................................................... 33
4.3.1 Network Settings ..................................................................................................................................................... 33
4.3.2 Language and Input Settings .................................................................................................................................... 34
4.3.3 Storage ..................................................................................................................................................................... 36
4.3.4 Applications ............................................................................................................................................................. 37
4.3.5 Whiteboard .............................................................................................................................................................. 37
4.3.6 Smart Eye Protection ............................................................................................................................................... 37
4.3.7 Date and Time Settings ............................................................................................................................................ 38
4.3.8 Power Settings ......................................................................................................................................................... 40
4.3.9 Tool Bar Settings ..................................................................................................................................................... 41

ii
4.3.10 Input/Output Settings ............................................................................................................................................. 42
4.3.11 Display & Theme Settings ..................................................................................................................................... 43
4.3.12 Security Settings .................................................................................................................................................... 43
4.3.13 System ................................................................................................................................................................... 44
4.4 Windows ..................................................................................................................................................................... 44
4.5 Screen Sharing ............................................................................................................................................................ 45
4.6 Whiteborad . ................................................................................................................................................................ 45
4.6.1 Whiteboard Functions .............................................................................................................................................. 48
4.6.2 Page Management .................................................................................................................................................... 57
4.6.3 Object Detection ...................................................................................................................................................... 59
4.7 Browser ....................................................................................................................................................................... 61
4.8 File Management ........................................................................................................................................................ 61
4.8.1 File Viewer Page ...................................................................................................................................................... 61
4.8.2 File Preview ............................................................................................................................................................. 62
4.8.3 File Search ............................................................................................................................................................... 62
4.8.4 File Filtering ............................................................................................................................................................ 63
4.8.5 New Folder .............................................................................................................................................................. 64
4.8.6 File Operation .......................................................................................................................................................... 64
4.8.7 File Name ................................................................................................................................................................ 64
4.9 Gadget ......................................................................................................................................................................... 65
4.10 Add Shortcut ............................................................................................................................................................. 66
4.10.1 Add Shortcuts to Home Page ................................................................................................................................. 66
4.10.2 Add Quick Start Windows Programs in Smart System .......................................................................................... 68
4.11 Preview window ....................................................................................................................................................... 71
4.12 Automatically Power Off .......................................................................................................................................... 71
5 Quick Setting Menu ................................................................................................................... 72
6 Serial Port Control ...................................................................................................................... 74
7 FAQs & Troubleshooting .......................................................................................................... 79
8 Specifications ............................................................................................................................... 82
9 More Information ........................................................................................................................ 85

5
About This Document
This document describes multiple functions, instructions, and notes about the product.
Symbols are used in this document to indicate operations that need particular attention. The
symbols are defined as follows:
Provides additional information to supplement
operation in the main text.
Provides tips for operation.
Indicates a potentially hazardous situation that, if not
avoided, could result in equipment damage, data loss,
performance deterioration, or unanticipated results.
Indicates a hazard with risk that, if not avoided, could
result in death or injury.
WARNING

6
Safety Instruction
For your safety, please read the following instruction before you use the product. Serious injury or property
damage may be caused by improper operations. Do not try to repair the product on your own.
Disconnect the product from the power supply immediately if major failures occur.
Major failures include the following:
⚫ If smoke, peculiar smell or abnormal sound is discharged from the product. a an
⚫ No image or sound is displayed, or the image error occurs.
In the preceding scenarios, do not continue to use the product. Disconnect power supply
immediately and contact professional sta for troubleshooting.
Do not drop any liquids, metal, or anything combustible onto the product.
⚫ If any liquids or metal are dropped onto or into the product, power off the product and
disconnect the power supply. Then contact professional sta for solutions.
⚫ Pay attention to children when they are close to the product.
Put the product on a stable surface.
An unstable surface includes, is not limited to, an inclined plane, a shaky stand, desk or and
platform, that might cause the product to turnover and be damaged.
Do not open the panel or change the product on your own.
High voltage components are installed in the product. When you open the panel, high voltage,
electric shock, or other dangerous situations may occur.
If inspection, adjustment, or maintenance is required, contact the local distributor for help.
Use the provided power supply.
⚫ To prevent the product from being damaged, do not use any types of power cables other than
the one provided with the product.
⚫ Use a three-wire socket and ensure that it is properly grounded.
⚫ Pull out the power plug from the socket if the product is not used for a long period.
Clean the power plug regularly.
⚫ Fire or electric shock may be caused if the product is powered on while you are cleaning.
⚫ Pull out the power plug before cleaning it with a dried cloth.
Power output port is 5V/2A.
The voltage/current of the rear power output port is 5V/2A (maximum). Purchase the power
code/AC adapter according to customer needs. The port can be used for the Newline X10D
Android box. Please do not connect any products with different power requirement. Otherwise,
it may cause damage to products or fire.
WARNING

7
Do not put items on the top of the product.
⚫ Do not put items, such as a container for liquid (a vase, owerpot, cosmetics, or liquid
medicine) on the top of the product.
⚫ If any water or liquid is spilled on the product, the product may short circuit and cause re or
electric shock.
⚫ Do not walk on or hang any items on the product.
Do not install the product in an improper place.
⚫ Do not install the product in humid places, such as the bathroom, the shower room, near
windows, or outdoor environments that experience rain, snow, or other harsh weather. Avoid
installation near hot spring vapor. The preceding environments may cause faults in the product
or electric shock under extreme conditions.
⚫ Do not put exposed re source, such as a lit candle, on the product. an
Pull out the power supply during thunderstorms.
⚫ Do not touch the product during a lighting storm, you may experience an electric shock.
⚫ Install or place components that supply high enough voltage to cause personal injury out of the
reach of children.
Do not touch the power cable with wet hands.
Do not install the product in high temperature environments.
⚫ Do not install the product near a heat source, such as a radiator, a heat reservoir, a stove, or
other heating products.
⚫ Do not expose the product to direct sunlight, which may cause high temperatures and
subsequent faults in the product.
When transporting the product:
⚫ Pack the product for transport or maintenance by using the cartons and cushioning material
provided with the product.
⚫ Move the product vertically during transport. The screen or other components are easily
broken if the product is moved in an improper way.
⚫ Before you move the product, disconnect all external connections and separate all topple
preventing products. Move the product carefully to prevent it from being hit or squeezed,
especially the screen, which may cause injury if broken.
Do not cover or block up any vents on the product.
⚫ Any overheated components may cause re, damage the product, and shorten the service life.
⚫ Do not lay the product down in a way where the venting surface will be covered.
WARNING
CAUTION

8
⚫ Do not install the product on carpet or cloth.
⚫ Do not use a cloth, such as table cloth, to cover the product.
Keep the product away from the radio.
The product complies with the international EMI standard to pervent radio interference.
However, interference may still exists and causes noise in the radio. If noise occurs in the radio,
try the following solutions.
⚫ Adjust the direction of the radio antenna to avoid the interference from the product.
⚫ Keep the radio away from the product.
If the screen glass is broken or falls o:
⚫ Keep all personnel 10 feet away from the screen to ensure safety.
⚫ Do not perform any installation or disassembly while the screen glass is broken or has fallen
o.
Use the battery correctly.
⚫ Galvanic corrosion, electric leakage, and even re may be caused by improper battery usage.
⚫ It is recommended to use the designated type of battery and install the battery by the correct
electrodes (positive and negative).
⚫ Do not install and use a new battery with a used one.
⚫ Take out the battery if the remote control is not used for a long period.
⚫ Do not expose the battery to overheated environments, such as sunlight or heat sources.
⚫ Dispose of the used battery based on your local regulations.
Do not damage the power cable.
⚫ Do not damage, change, twist, bend, or forcibly drag the power cable.
⚫ Do not put weights (such as the product itself) on the power cable.
⚫ Do not forcibly drag the cable when you pull out the power plug. If the power cable is
damaged, please contact the local distributor to repair or replace it.
⚫ The power cable the accessory box for this product only. Do not use on other products. in is it
Additional advice:
⚫ Use the product in an environment with comfortable lighting. It is harmful to your eyes to
watch in a too bright or too dark environment.
⚫ Relax your eyes watching for a period of time.
⚫ Keep sucient distance from the product to protect your eyes and prevent eyestrain.
⚫ Adjust the volume to an appropriate level, especially at night.
⚫ Use amplier equipment as the audio input source with caution. If you must use amplier
equipment, the input power should not exceed the maximum of speaker power. Otherwise, the
speaker can become overpowered and damaged.
About USB port.
Front USB ports and rear USB 3.0/USB 2.0 ports switch connections based on signal sources. If
the current signal source is reading the data from an external product connecting to the port,
please switch the signal source after the data reading is complete. Otherwise, the data or product
may be damaged.
CAUTION

10
⚫ Rear View
65 inch:
75 inch 86 inch:/

1
Remote Control Receiver
7
Speakers
2
Power On/Off
8
Power Supply Plug
3
Light Sensor
9
Power Switch
4
Front Plate Cover
10
Internal PC Port (OPS)
5
Front Ports
11
Rear Ports
6
Front Buttons

12
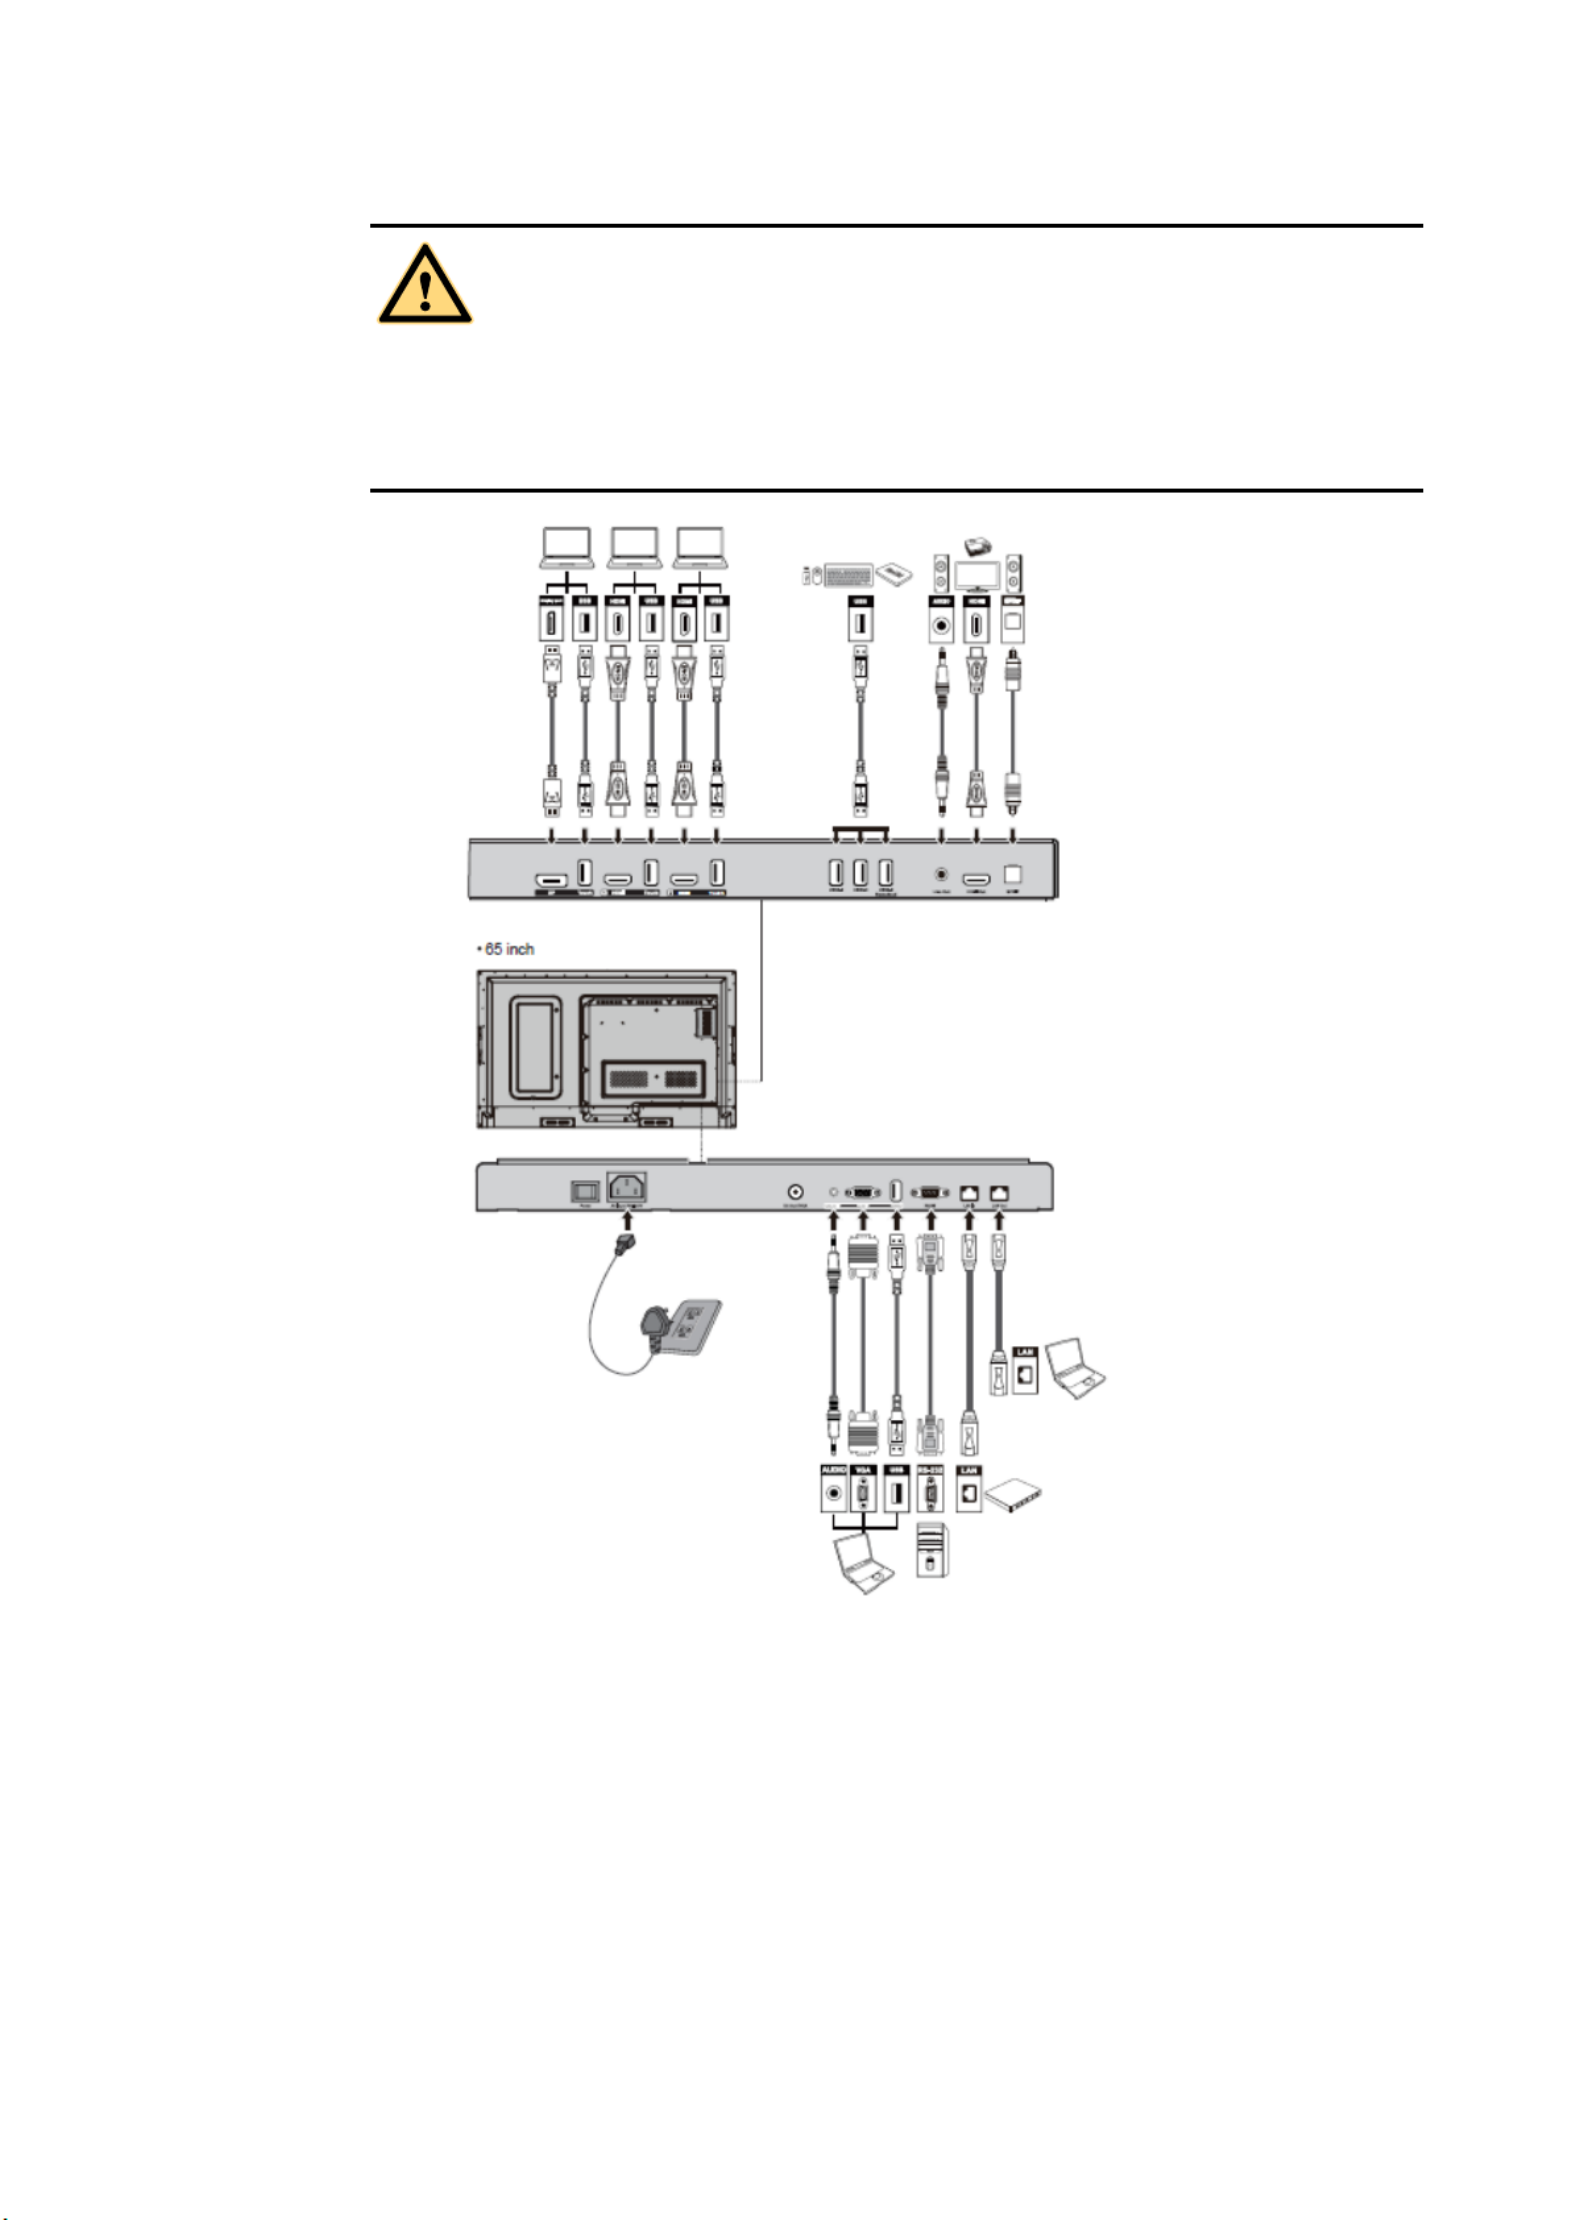
1.3 Ports
Front Ports
Front USB ports and rear USB 3.0/USB 2.0 ports switch connections based on signal sources.
If the current signal source is reading the data from an external product connecting to the
port, please switch the signal source after the data reading is complete. Otherwise, the data
or product may be damaged.
For USB consumption, USB 2.0 provides up to 500ma whereas USB 3.0 provides up to
900ma. Kindly please make sure your USB flash drive which inserts to the display port is
FAT32 format .
Rear Ports
CAUTION
13
The voltage/current of the rear power output port is 5V/2A (maximum). Purchase the power
code/AC adapter according to customer needs. The port can be used for the Newline X10D
Android box. Please do not connect any products with different power requirement. Otherwise
it may cause the damage to products or fire.
WARNING

14

15
Front Buttons
Buttons
Operations
Functions
Short press
Power on/o
⚫ Steady r color Display is in shut down mode ed :
⚫ Steady white color Display is on and working :
Home
Short press
Go to the home page
Return
Short press
Return to the last menu/Exit
Menu
Short press
Open the ttings menu Se
Long Press for
More than 2
Seconds
Lock the screen
Vol-
Short press
Decrease the sound volume
Long press for more
than 1 second
Continously decrease the sound volume
Vol+
Short press
Increase the sound volume
Long press for more
than 1 second
Continuously increase the sound volume

16
1.4 Remote Control
Carefully read the following instructions before using the remote control to avoid possible
faults:
⚫ Do not drop or damage the remote control.
⚫ Do not spill water or other liquids on the remote control.
⚫ Do not place the remote control on a wet object.
⚫ Do not place the remote control directly under sunlight or near a heat source.
Buttons
Operations
Power On/O
Mute/Unmute Audio
0-9
Enter number
Go to the Home Page
Return to Previous/Exit
Up/Down/Left/Right
Conrm/OK
Enter Whiteboard Mode
Take Screenshot a
Enable Sound Only Mode
Freeze the Current Screen, Click Again to
Exit Freeze Function
Adjust the Sound Volume
Adjust the Brightness
Enter the Source Selection Page
View Currently Running Applications
Open the File Manager

17
Buttons
Operations
View all Pre-installed Applications
Switch Source to Internal PC
Switch Source to Display Port
HDMI
FRONT
Switch Source to HDMI Front
HDMI 1
Switch Source to HDMI 1
HDMI 2
Switch Source to HDMI 2
VGA
Switch Source to VGA
Autocorrection Screen Display (For VGA
Signal Source)
Open the Browser Application
Toggle Display Backlight Mode
Start/Exit the Screen Lock Function
⚫ Open the Menu (Short Press)
⚫ Screen Lock (Long Press for More than 2
Second)
Open the System Settings

18
2 Installation Guide
2.1 Safety Precautions
Installation Environment
Installation Direction

20
Ventilation
Ensure adequate ventilation and/or air conditioned environment. We recommend keeping an
certain distances from the side of the product to the wall or panels. Ventilation requirements are
shown in following figure:
2.3 Installation
The dimensions of the four bracket mounting holes on the back panel are VESA MIS-F
compliant (86 inch or 75 inch 800 x 400 mm/31.50 x 15.75 in 65 inch 600 x 400 mm/23.62 : ; :
x 15.75 in). Use metric M8 screws with a length of 10 mm to 15 mm (0.40 to 0.59 in) to
secure the touchscreen to the mounting system. Dimensions of the mounting holes on the
back panel are shown on the following figure:
C
onsult a professional installer to install the display product.
This apparatus intended supported a Listed wall-mount bracket. is to be by GS

21
86 inch/75 inch:
65 inch:
2.4 Installing the Internal PC (Optional)
The internal PC does not support hot plugging. Therefore, you must insert or remove the
internal PC when the display is powered off. Otherwise, the display or internal PC may be
damaged.
22
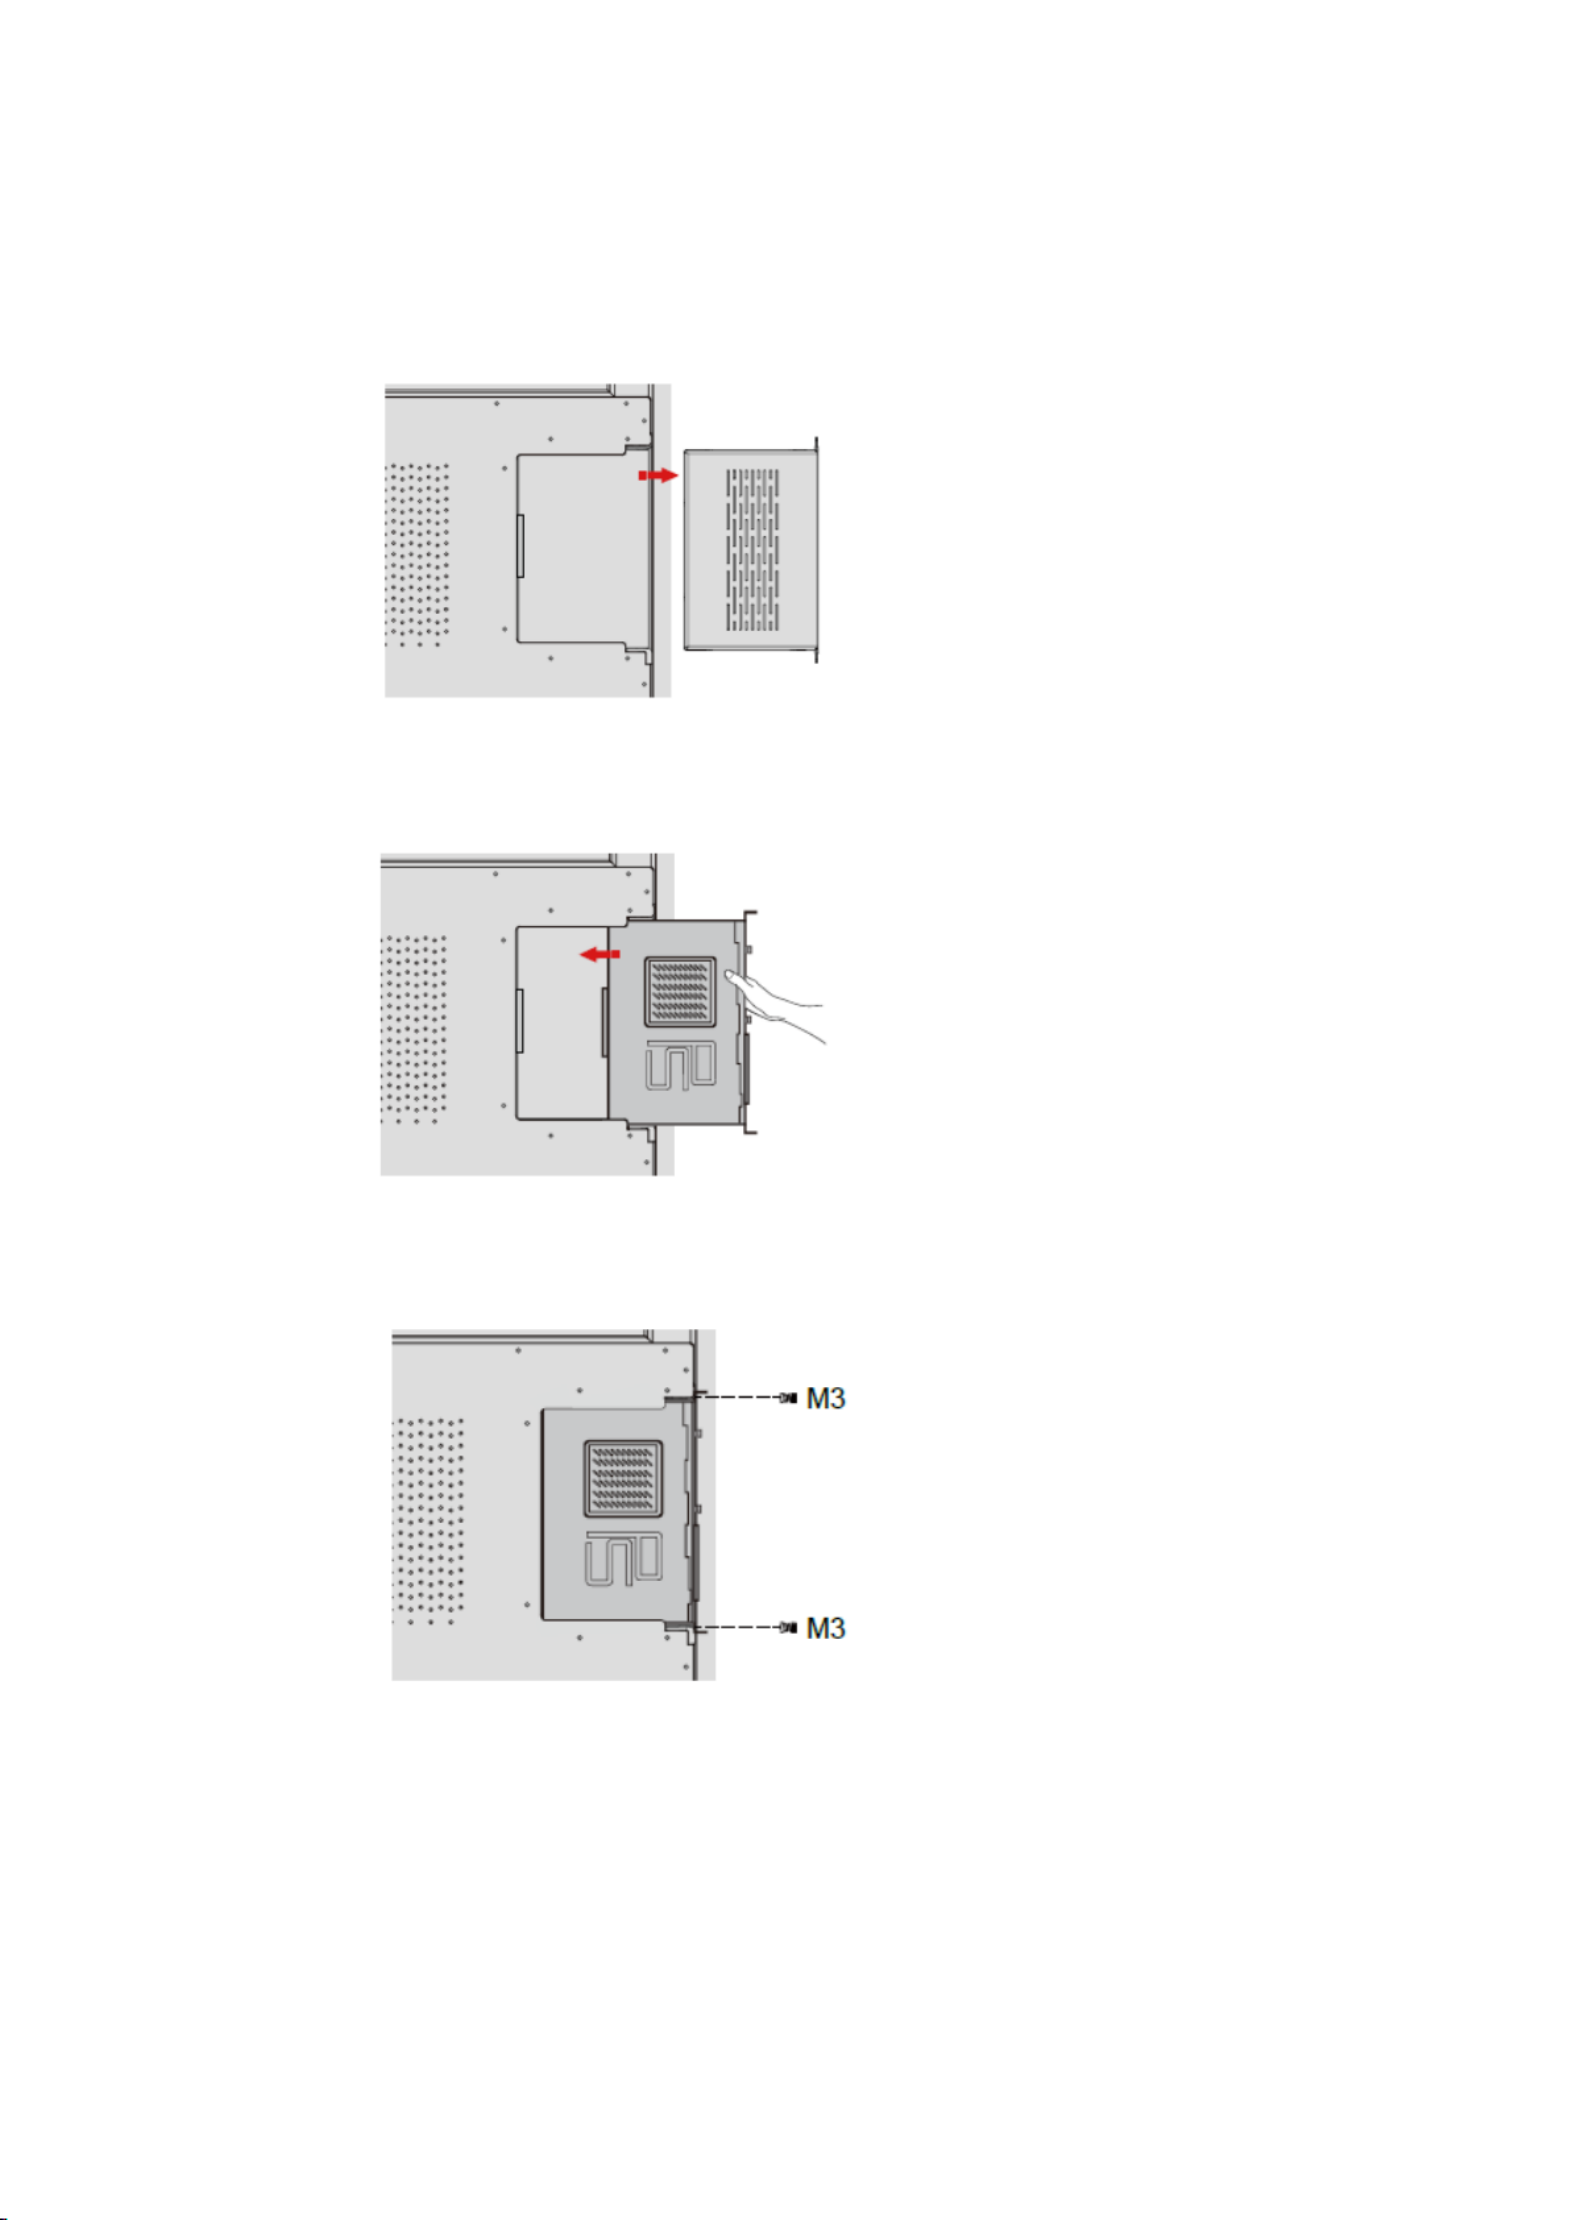
You will need to purchase the internal PC separately. Perform the following steps to install the
internal PC:
Step 1 Unscrew the M3 screws by hand to remove the internal PC shielding cover.
Step 2 Push the internal into the port at the rear of the screen from right to left. PC
Step 3 Secure the internal PC to the display by using the M3 screws.
Step 4 Ensure the installation is correct before turning the power on again.

23
2.5 Installing Newline Assistant
Introduction
The Newline Assistant is the tool used as a bridge between the embedded operating system
and the Internal PC (OPS). It helps add Windows software shortcuts to the Home Page, as
well as to protect USB data when switching between sources.
Therefore we strongly recommend users install the Newline Assistant after installing the
internal PC.
Installation
Step 1 Install the Internal PC correctly.
Step 2 On the Home Page, click Windows. It will switch the signal source to the Internal Windows
system.
Step 3 Visit our website www.newline-interactive.com and choose at Products > seriesRS >
Download to download the Newline Assistant installation package.
Step 4 Install the Newline Assistant as instructed.

24
3 Getting Started
3.1 Power On
Step 1 Plug the power supply into the power outlet fully and plug the power connector into the side
of the product. Ensure the power supply is in the range of 100V to 240V with frequency at 50
Hz/60 Hz ± 5%. The power current must be grounded.
The power outlet should be installed near the equipment and should be easily accessible.
Step 2 Flip the power switch located on the side of the product to “On”.

25
Step 3 Press the power button on the front control panel or on the remote control.
3.2 Power Off
Step 1 Press the power button on the front panel or the power button on the remote
control.
Step 2 Press the power button on the front panel or the power button on the remote control
again, the power indicator will turn to red.
Step 3 If you are not going to use the product for an extended period of time, we recommend you
switch the power switch to “O . ”
⚫ If an internal PC is equipped, the internal PC and the screen are powered off simultaneously when
you power off the display.
⚫ Do not forcibly disconnect the power supply of the screen when the internal PC is .on
3.3 Calibration
If the cursor position has a big deviation from the actual touch point, calibration is used to
eliminate the deviation. Calibration is required in the following scenarios:
⚫ The internal PC is used.
⚫ A computer is connected through the HDMI or Display Port interface.
Interface operation on the embedded operating system does not need positioning. External products with
Microsoft Windows 7 or later versions will require positioning.
If the positioning is not correct, perform the following operations to calibrate again. The
following takes Windows 10 as an example:
Step 1 Ensure that the HDMI or DP interface and external products are connected properly.
Step 2 Select the corresponding Windows signal from the signal source menu. The Windows page
will be displayed.
Step 3 Select Tablet PC Settings on the Control Panel page.

26
Step 4 Select in the Tablet PC Settings window.
27
Step 5 Select Touch input from the option and start calibration.
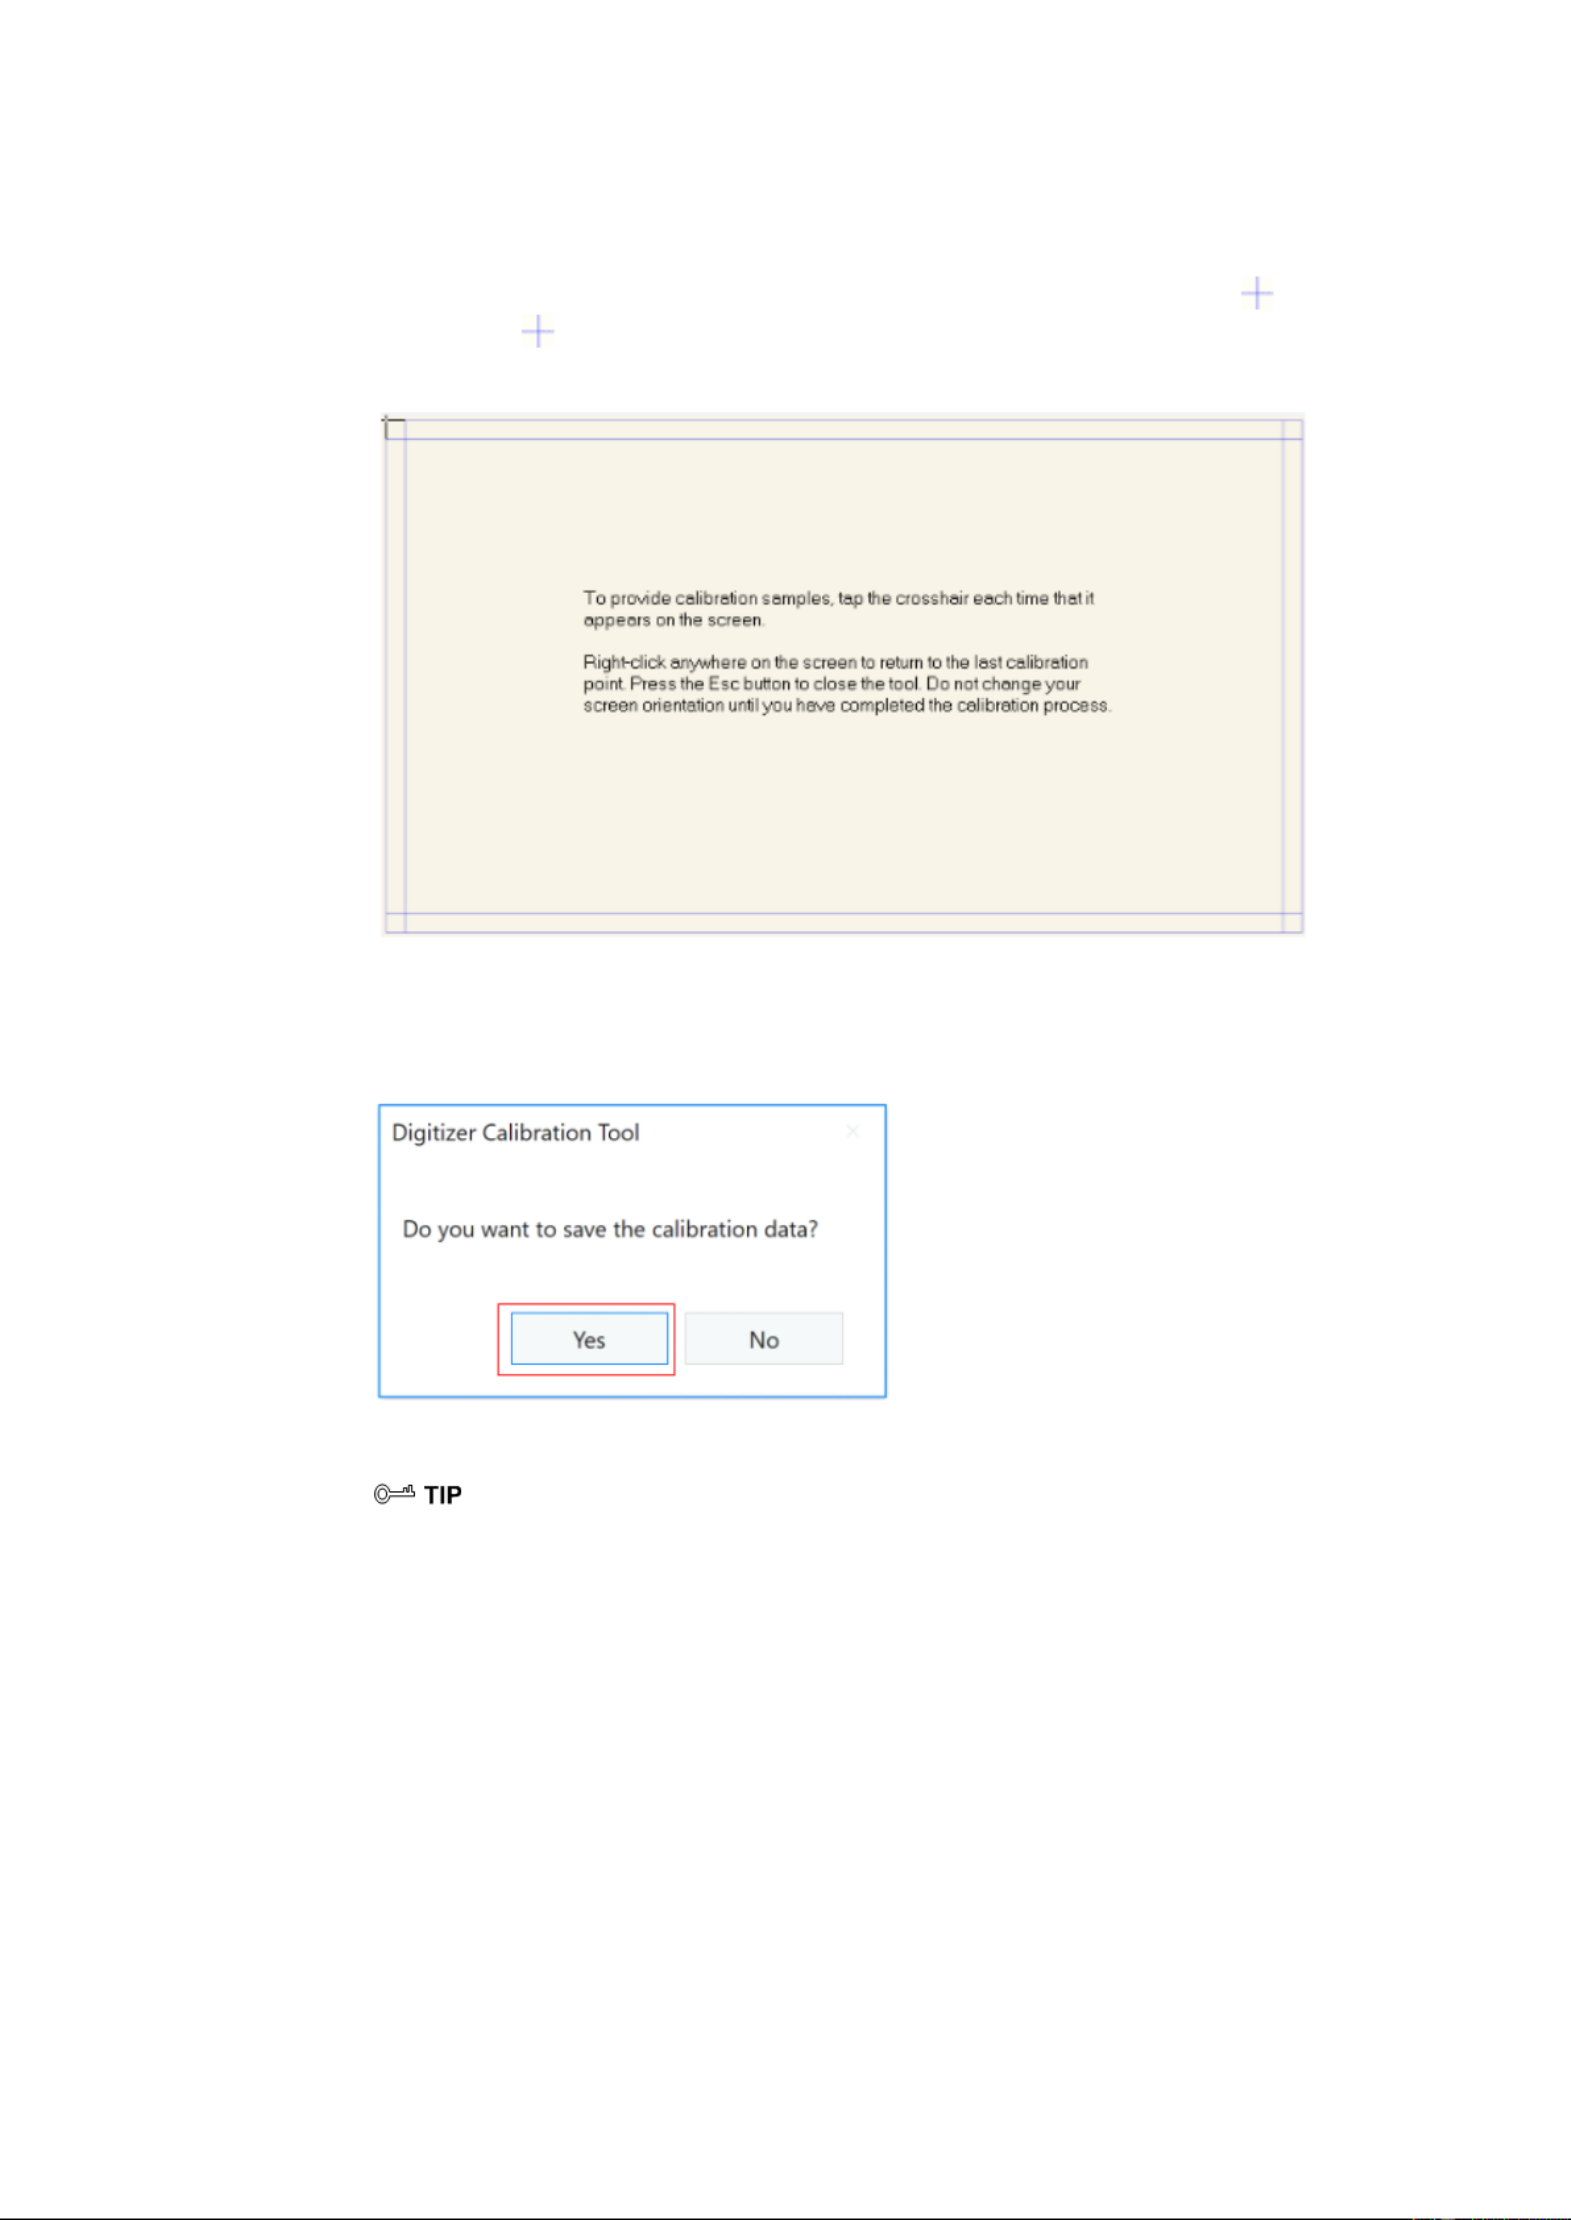
Step 6 Use your nger or pencil to click and hold the center of the ickering cross . Do not a
release until moves to the next positioning point. Complete the calibration process as
instructed.
Step 7 After the calibration is complete, the Digitizer Calibration Tool dialog box will be
displayed. Click to save calibration data. Yes
⚫ To ensure writing accuracy, use the pencil or stylus included with the product for proper positioning.
⚫ Positioning errors may cause failure of touch functions of the display. In that case, please perform
calibration again.
Step 8 The Tablet PC Settings dialog box will be displayed again. Click . The calibration will OK
be complete.

28
4 Operating the Touch Screen
4.1 Start Screen
When the product is turned on, the product will show the Start Screen page, as shown in the
following figure:

29
4.2 Home
Touch anywhere on the Start Screen to start a meeting, and the product will go to the Home page,
as shown in the following figure:
Shortcut for Display Settings & Theme
Click the icon on the Home Page to enter the Display & Theme setting page to set
the logo image and wallpaper. The logo and wallpaper can be obtained locally or from a device
connected via the USB port, as shown in the following figure:
30
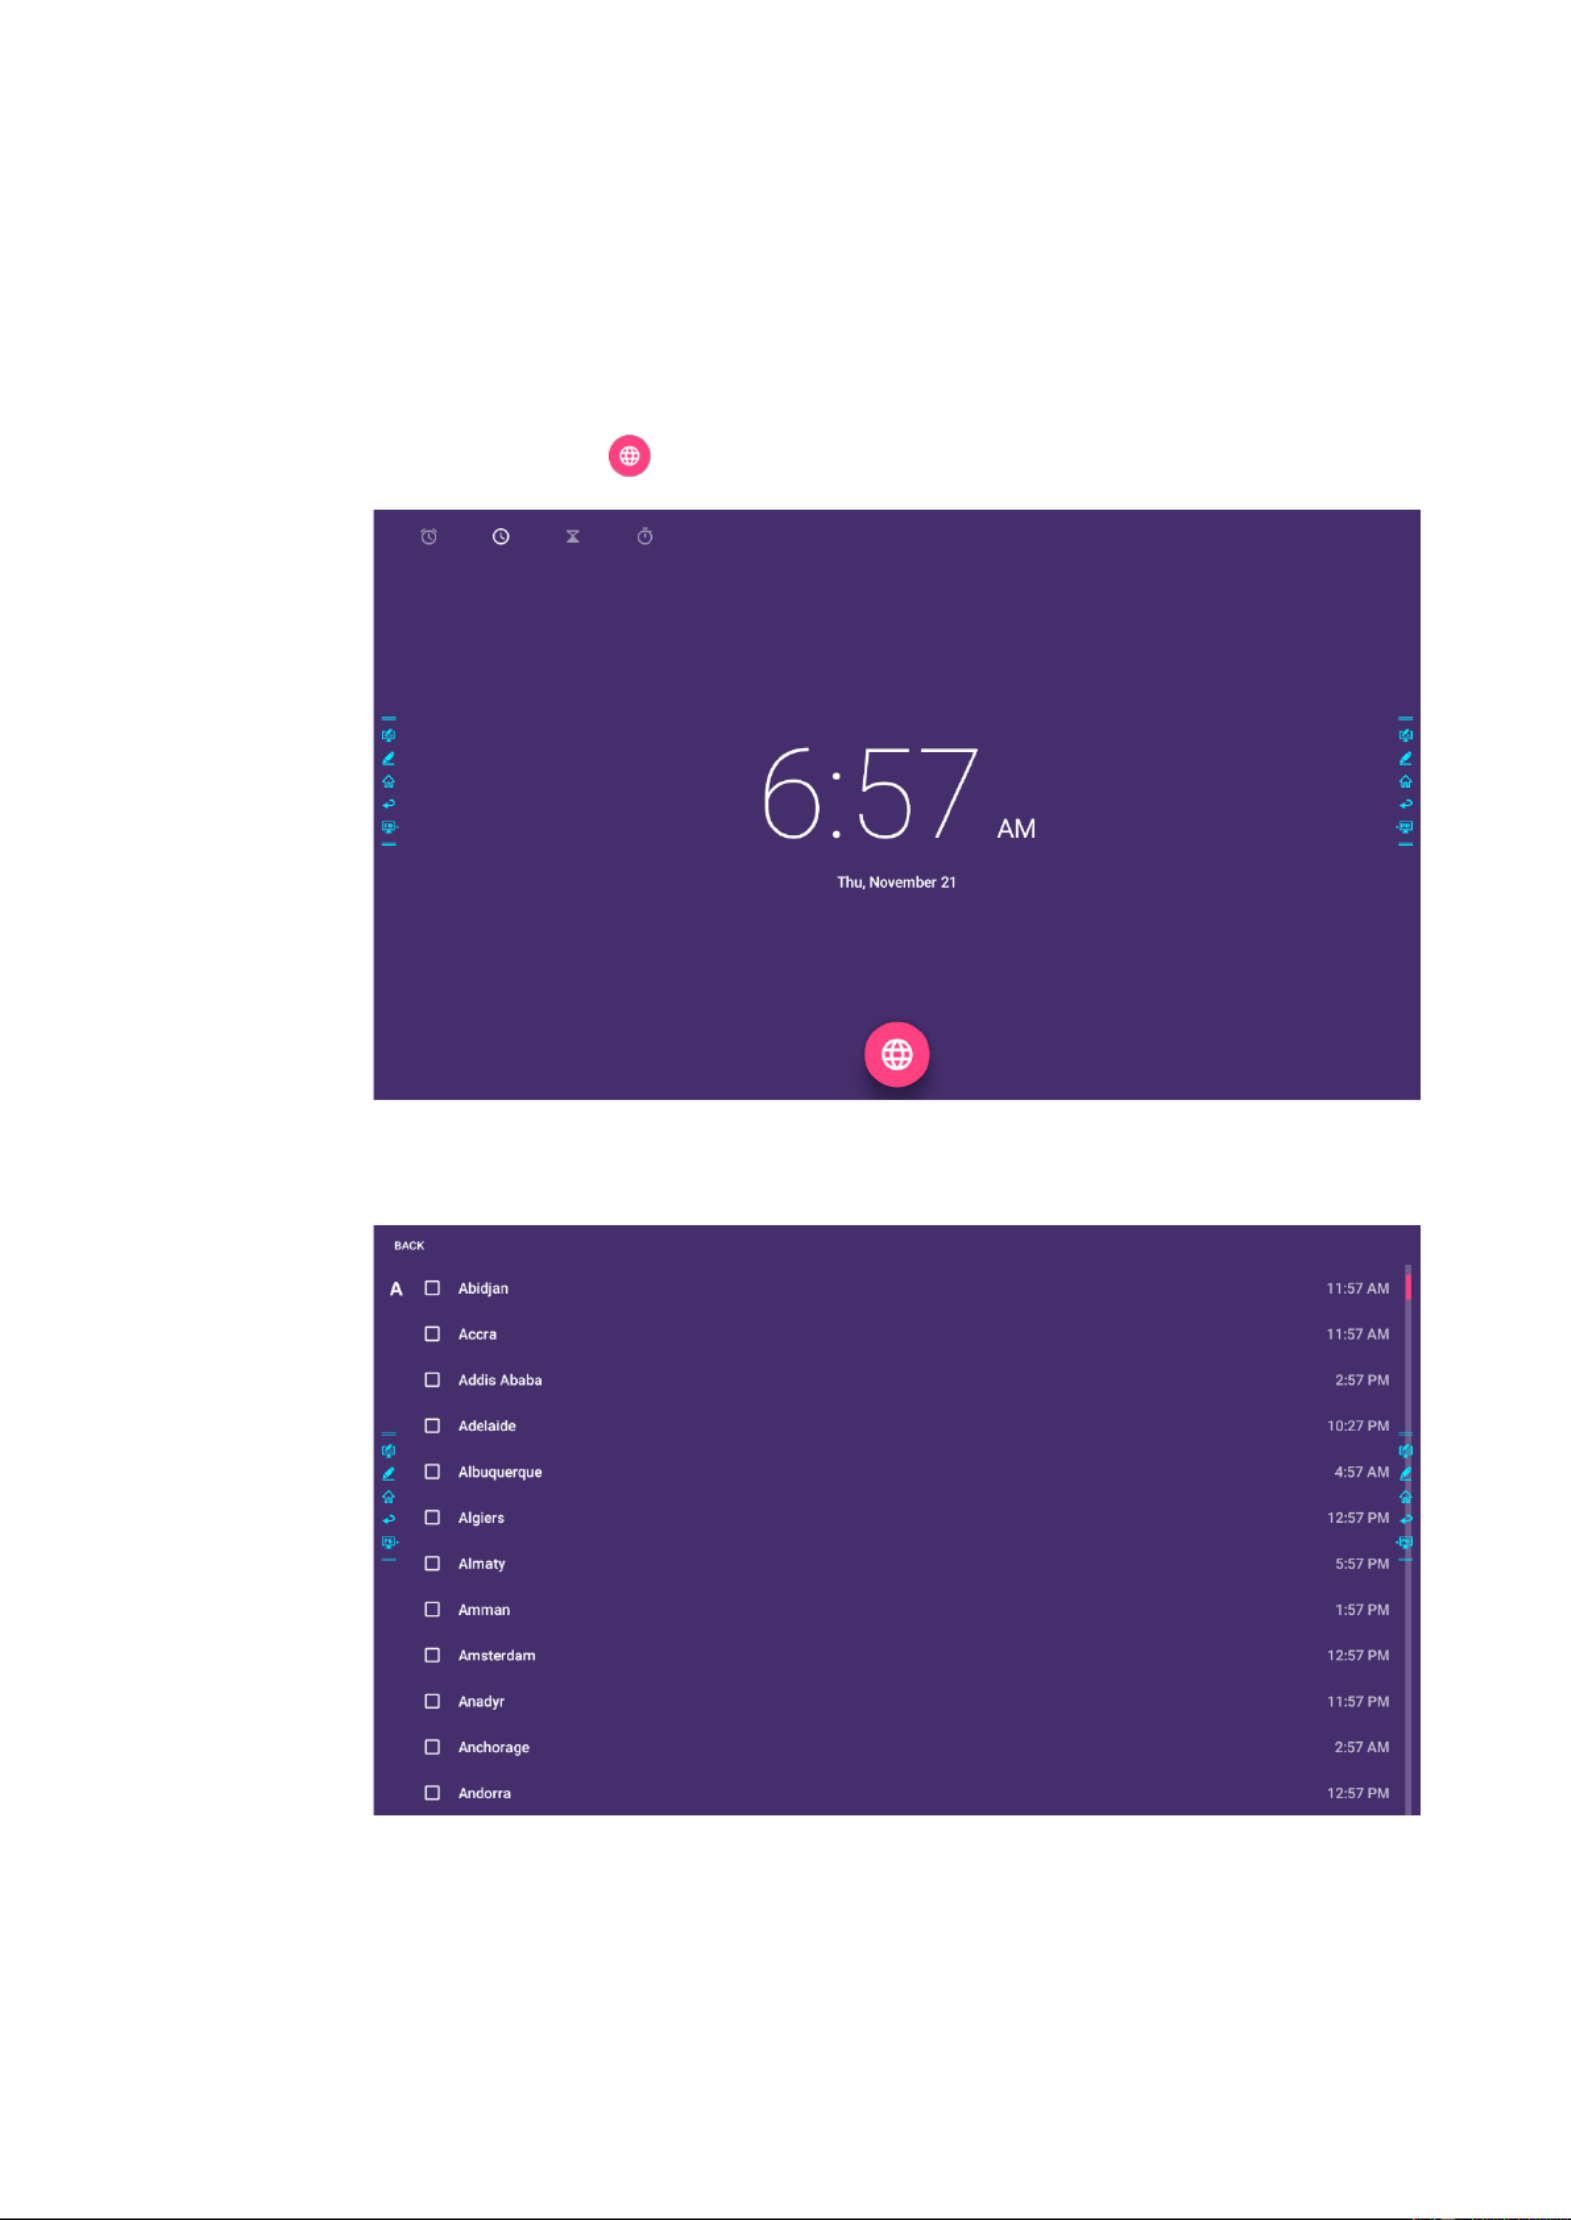
S Clock hortcut for
Click the time icon on the age to start the clock application. Using the icons on the top left, Home
you may switch from clock mode to alarm mode or to timer and stopwatch mode. In the clock ,
mode, you may click add other time zones as shown in the following figure:to

31
Side Toolbar
The Annotation Mode, Whiteboard, Home, Return, and Windows icons are displayed by default in
the toolbar on both sides of the screen. You may hide one or both side toolbars in the Settings or
move it up and down on the screen, shrink or expand by using touch gestures. You may double-tap
the “=” to expand or shrink the toolbar. Long press the customized icon to unfold level-2 icons.
The functions of the side toolbar are as follows:
Icon
Functions
Enter annotation mode, and click again to stop annotation and take screenshot. a
Access discussion mode.
Go to Home page.
Return to the previous menu/Exit an app
Go to the internal PC source.
Manage currently running applications.
Slide up/down the currently running application or click “×” at the upper right
corner to close the application.

32
Icon
Functions
Go to your favorite source. You can set favorite source in the “Tool bar”
submenu in the system settings.
Status Bar and Settings
The upper right corner of the home page displays three working status icons (including USB
drive(s), Ethernet, and Wi-Fi, system setting shortcut return to the start screen page).and
Icon
Functions
If a USB ash drive is connected to the USB port, this icon will . appear
If the product is connected to Ethernet, th icon will appear. is
If the product is connected to a wireless network, th icon will . is appear
Access the system setting page.
Return to the Start Screen page.
Main Ic on
Icon
Functions
Switch to the internal PC source.
Click “Screen ”Sharing to enable the wireless screen sharing function.
Note: By default, the “Screen sharing” icon is displayed after startup. When
you click “Add Gadget Screen sharing” “ or ” “ icon, ” switches to the
“ ”Connection icon.
Click Connection to switch to the connected sources including in the internal ,
PC, HDMI 1, HDMI 2, Display Port, HDMI Front and VGA.
Discussion takes you to the whiteboard function and screen annotation
functions.
33
Icon
Functions
Click to enter a quick-access browser.
Open the File Manager explore internal and external files on the display. to
Gadget displays all pre-installed applications, including Gallery, Browser,
Music, Calculator, E-mail, File Viewer, Keyboard, Oice Viewer and
Newline Cast etc. Click the icon of an application to run the application.
Click to customize the Home page. You can add up to 5 shortcuts to your Add
favorite software, gadgets, or connections. (See more detail in Add Shortcuts “
to Home Page )”
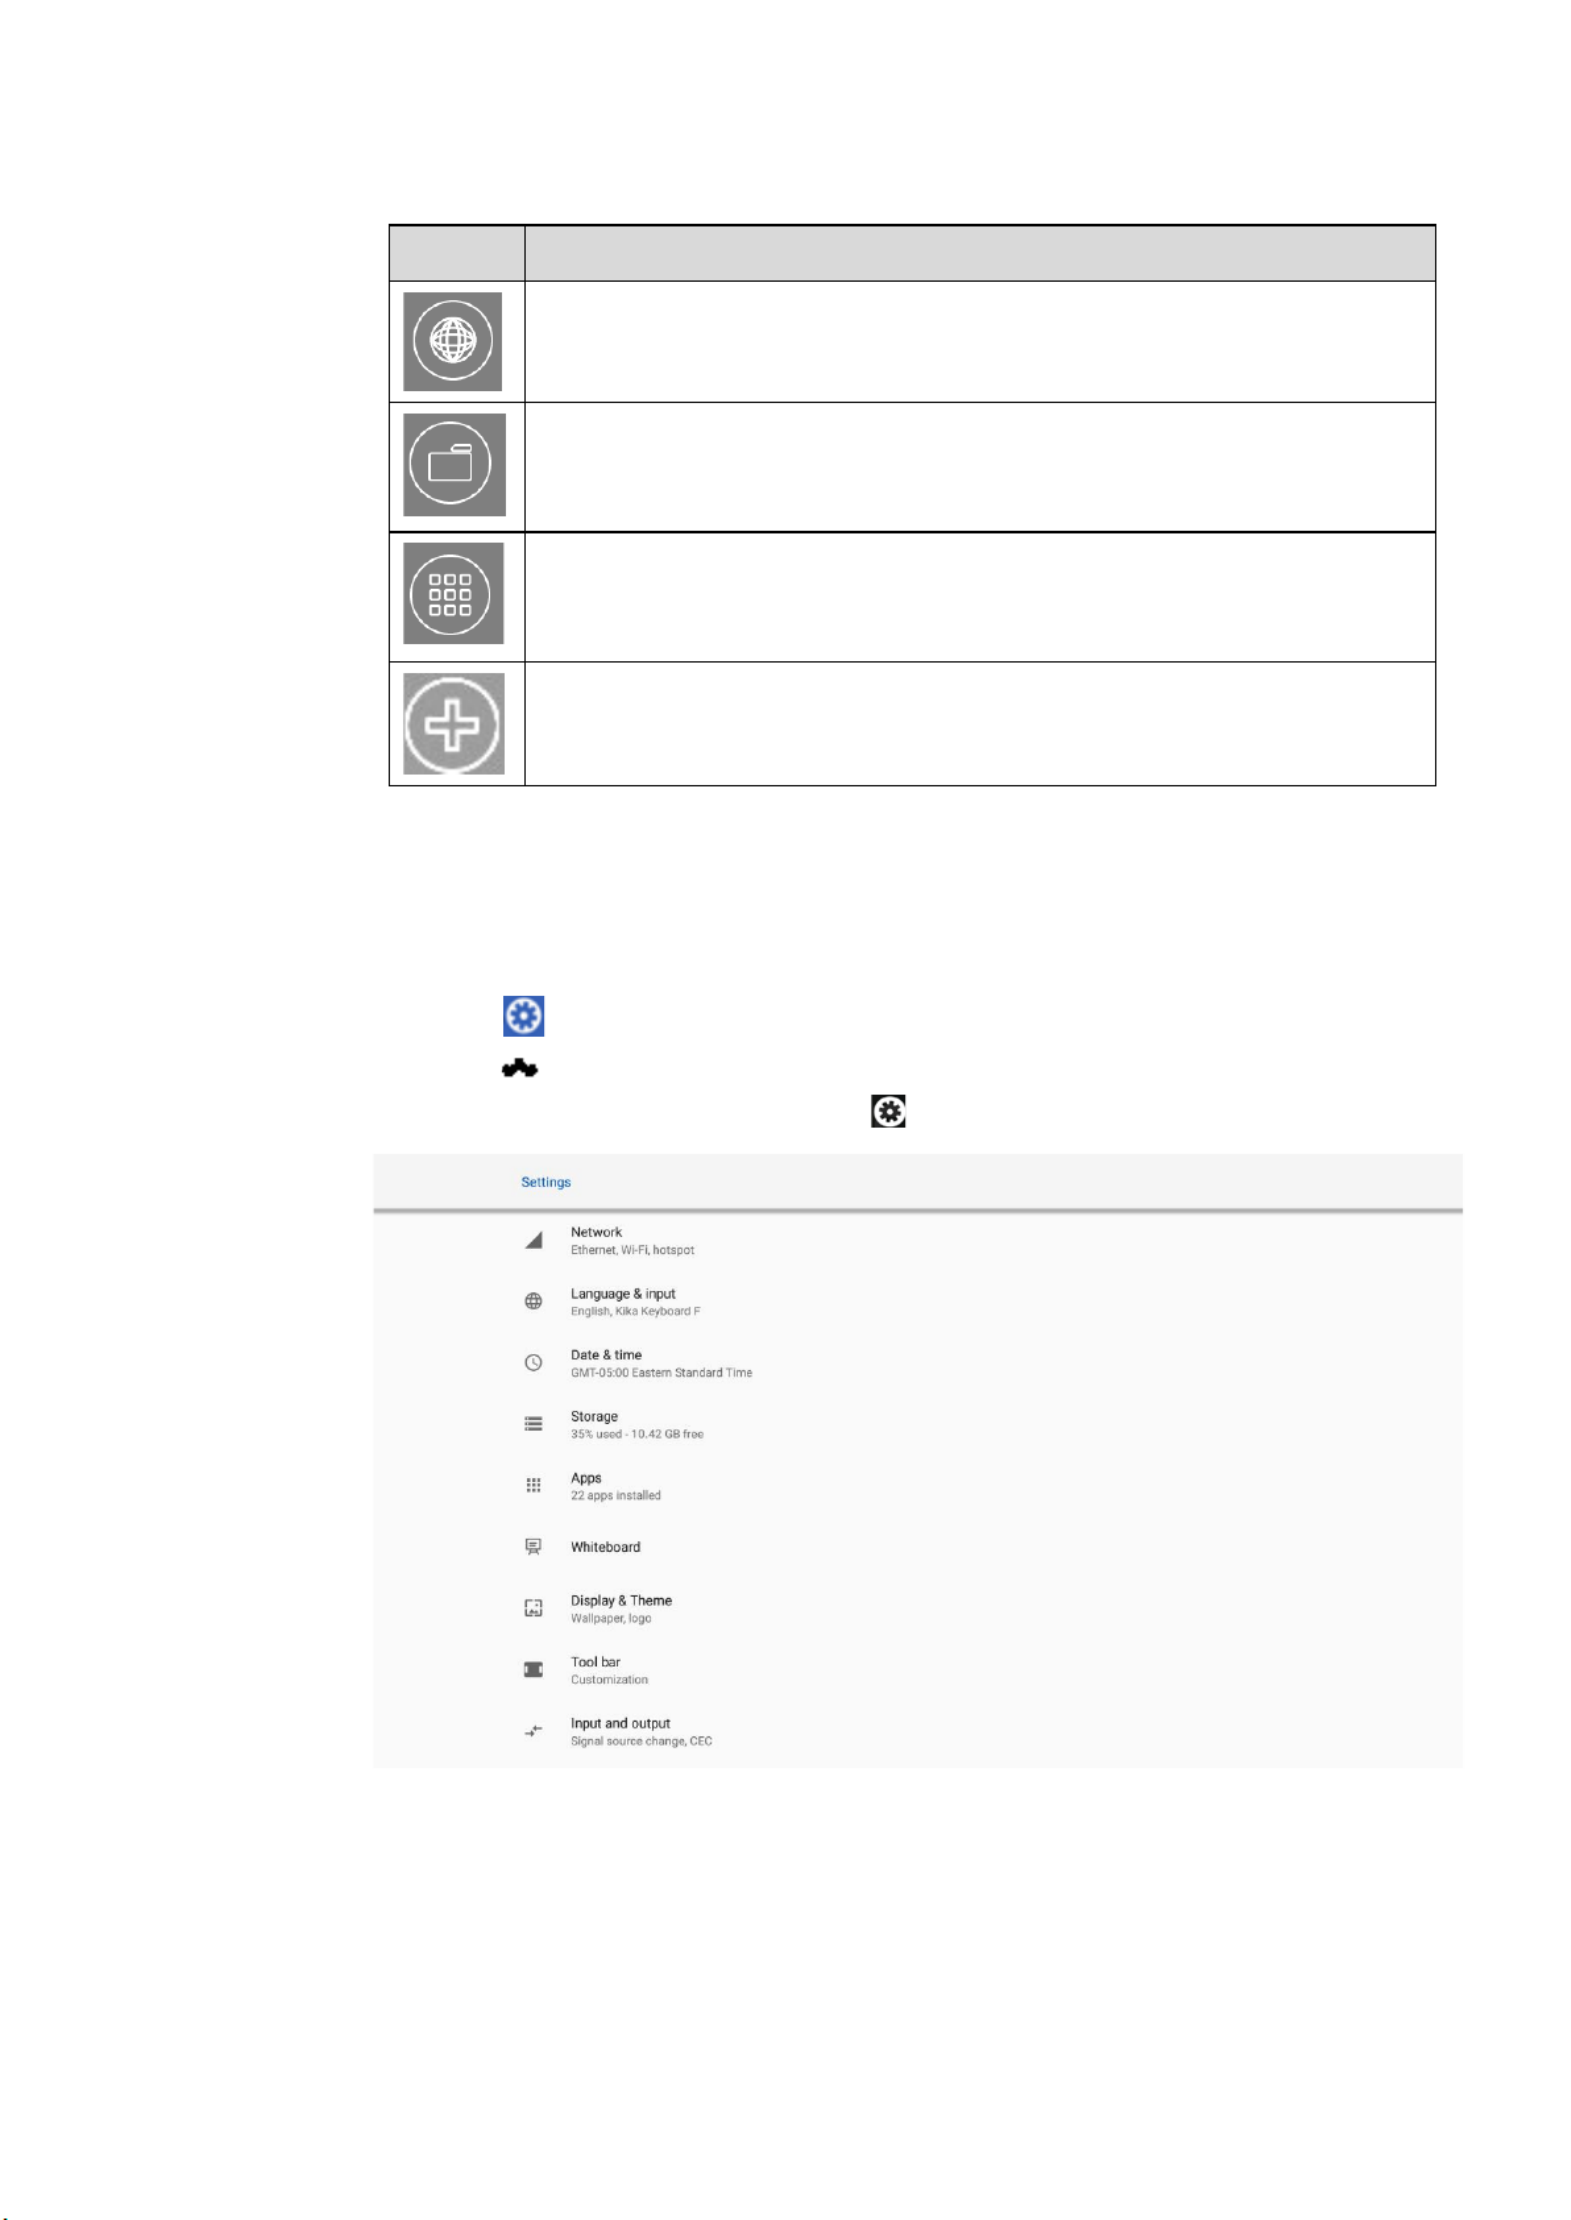
4.3 System Settings
Enter the System Settings page using one of the following methods:
⚫ Click on the page.Home
⚫ Press on the remote control.
⚫ In the Quick Settings Menu, click the icon.
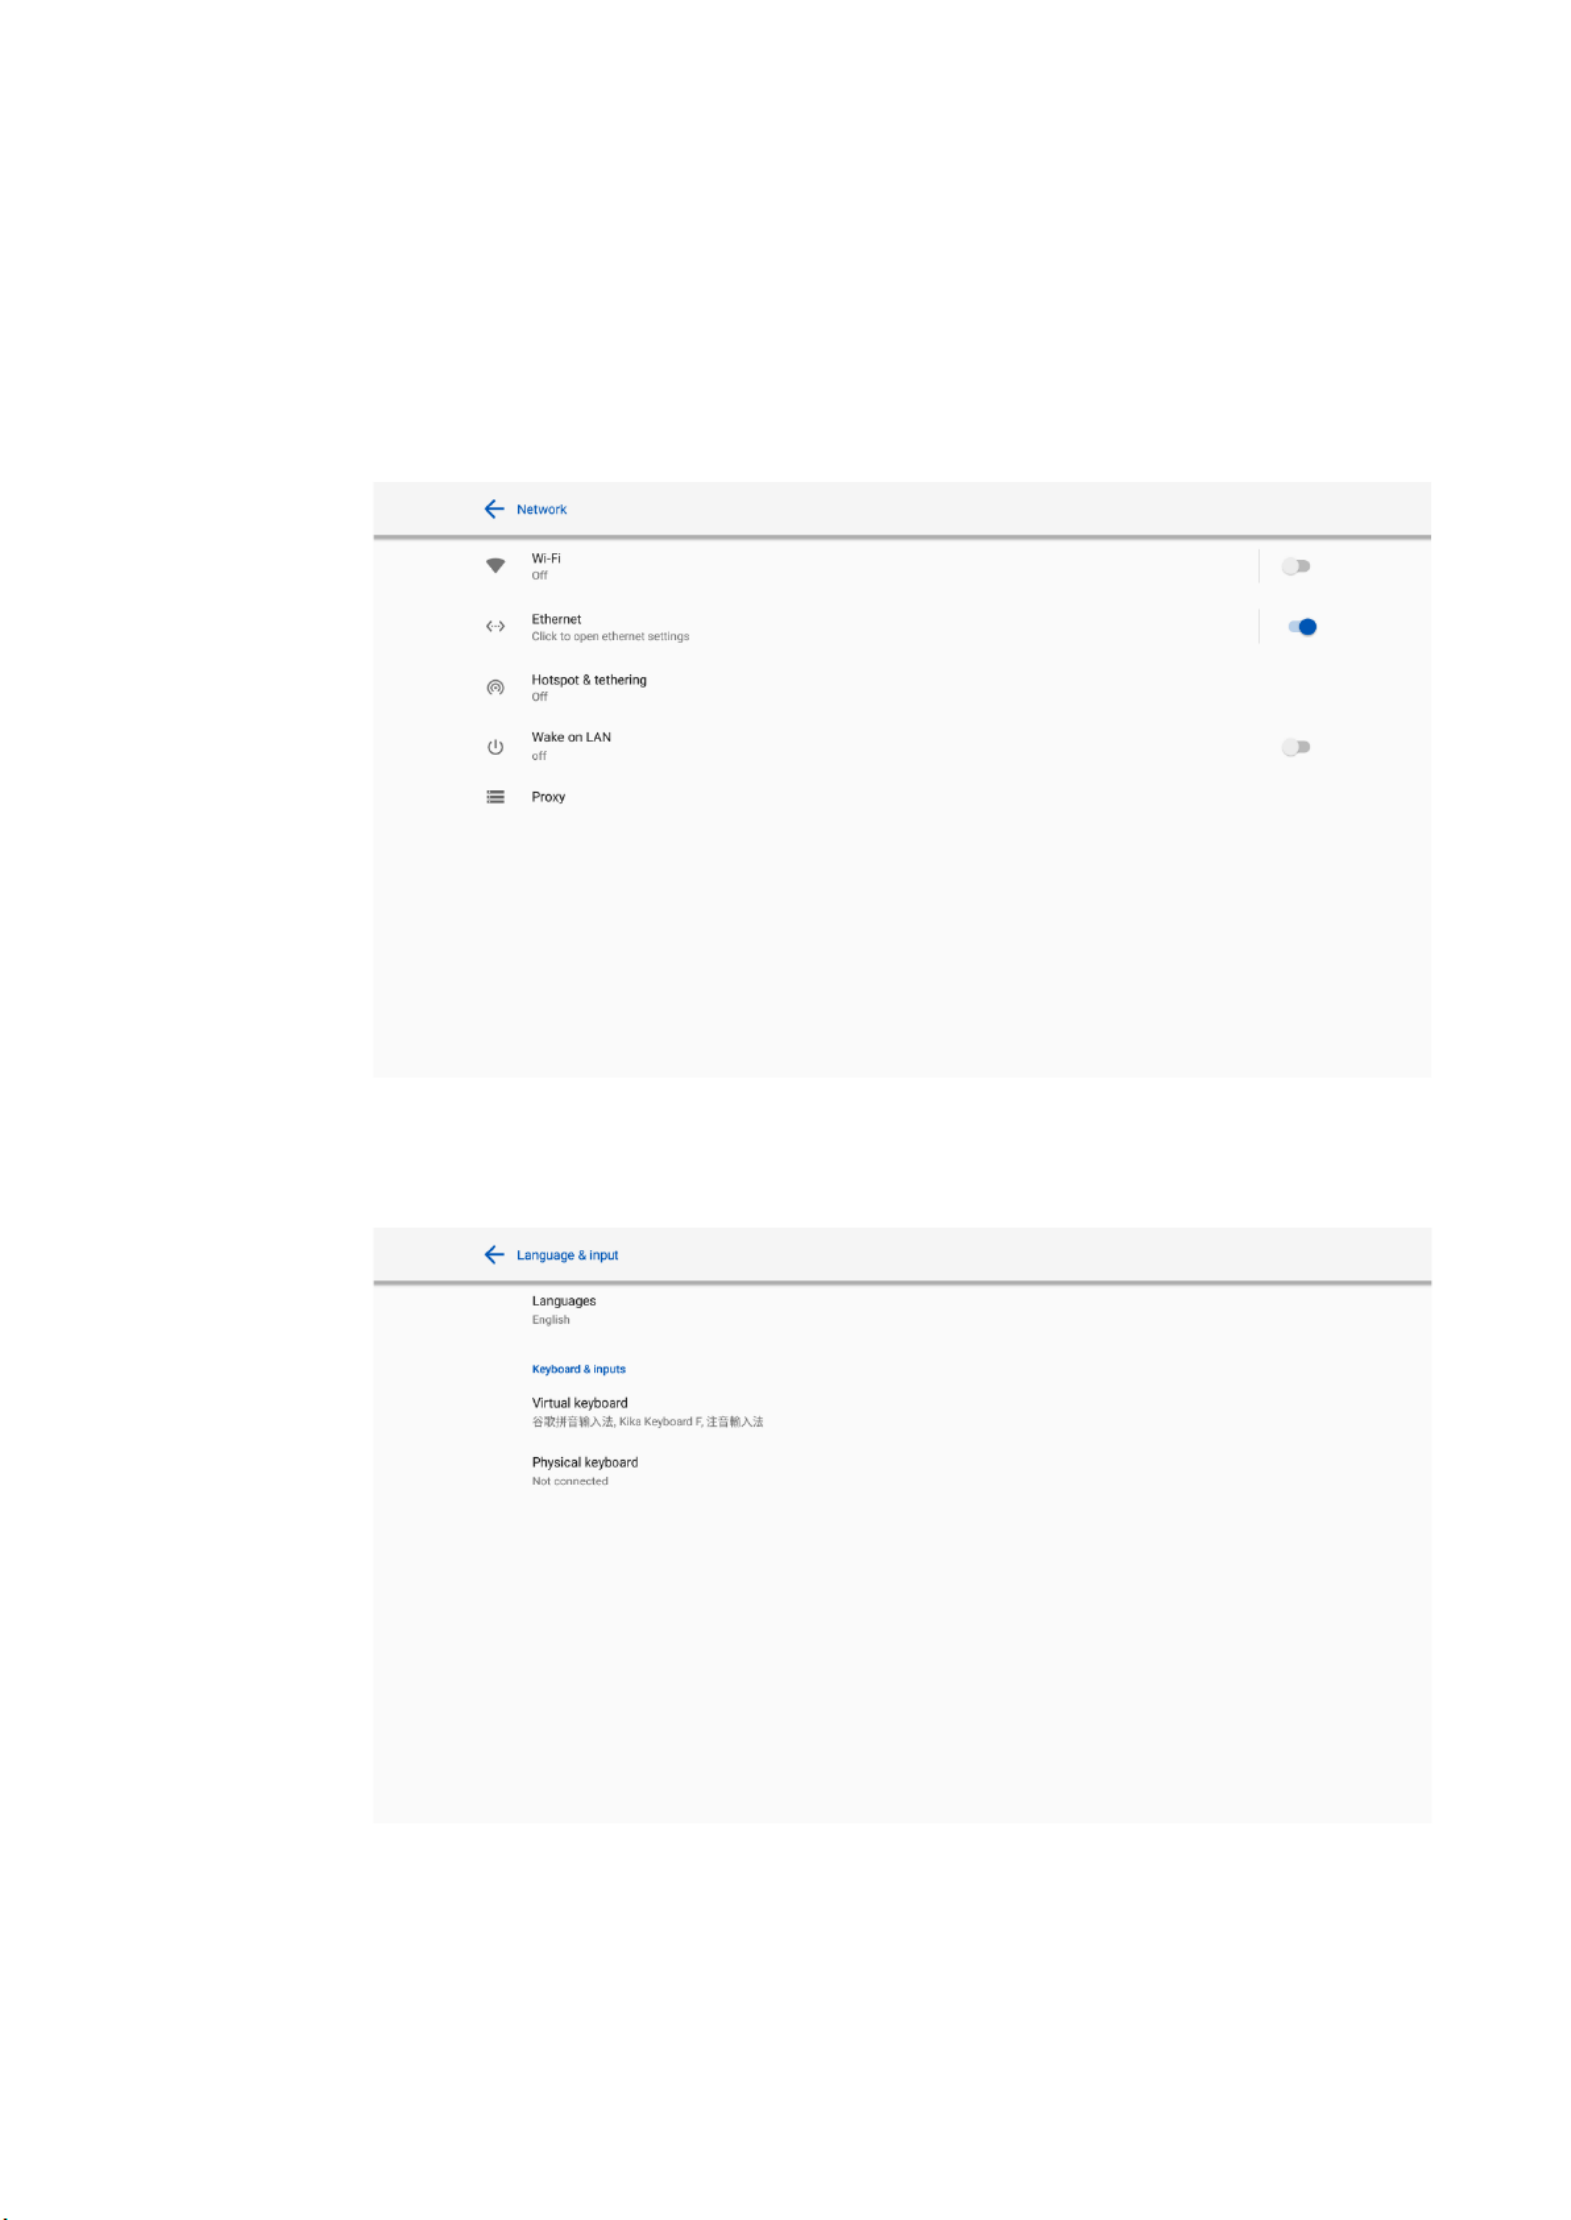
4.3.1 Network Settings
Enter the Network submenu to set a LAN, Ethernet, Hotspot&tethering, Proxy, enable Wi-Fi
function.
34
⚫ Wi-Fi: Click the corresponding button to enable the Wi-Fi function. ress again to see the P
available Wi-Fi list.
⚫ Ethernet: Click to open ethernet settings.
⚫ Hotspot&tethering: Click to set up Wi-Fi hotspot.
⚫ Wake on LAN turn on/off LAN.:
⚫ Proxy The settings of the proxy server.:
4.3.2 Language and Input Settings
Enter the Language & Input submenu to set the language and keyboard settings.

35
Settings
The default input method of the system is Kika Keyboard F, and the Physical keyboard must be
enabled. If you want to switch to another language, switch the keyboard input method via Manage
keyboards methods, in addition to switching the language.
00
Setting a Language
Click Languages Language & Input theon interface. In the Languages dialog box that is
displayed, select your preferred language.

36
Adding an Input Method
Click Manage keyboards on the Virtual Keyboard interface. On the Manage keyboards page,
select the input methods you would like to use (multiple choices can be selected).
4.3.3 Storage
Enter the Storage submenu to view space distribution of the internal storage.
37
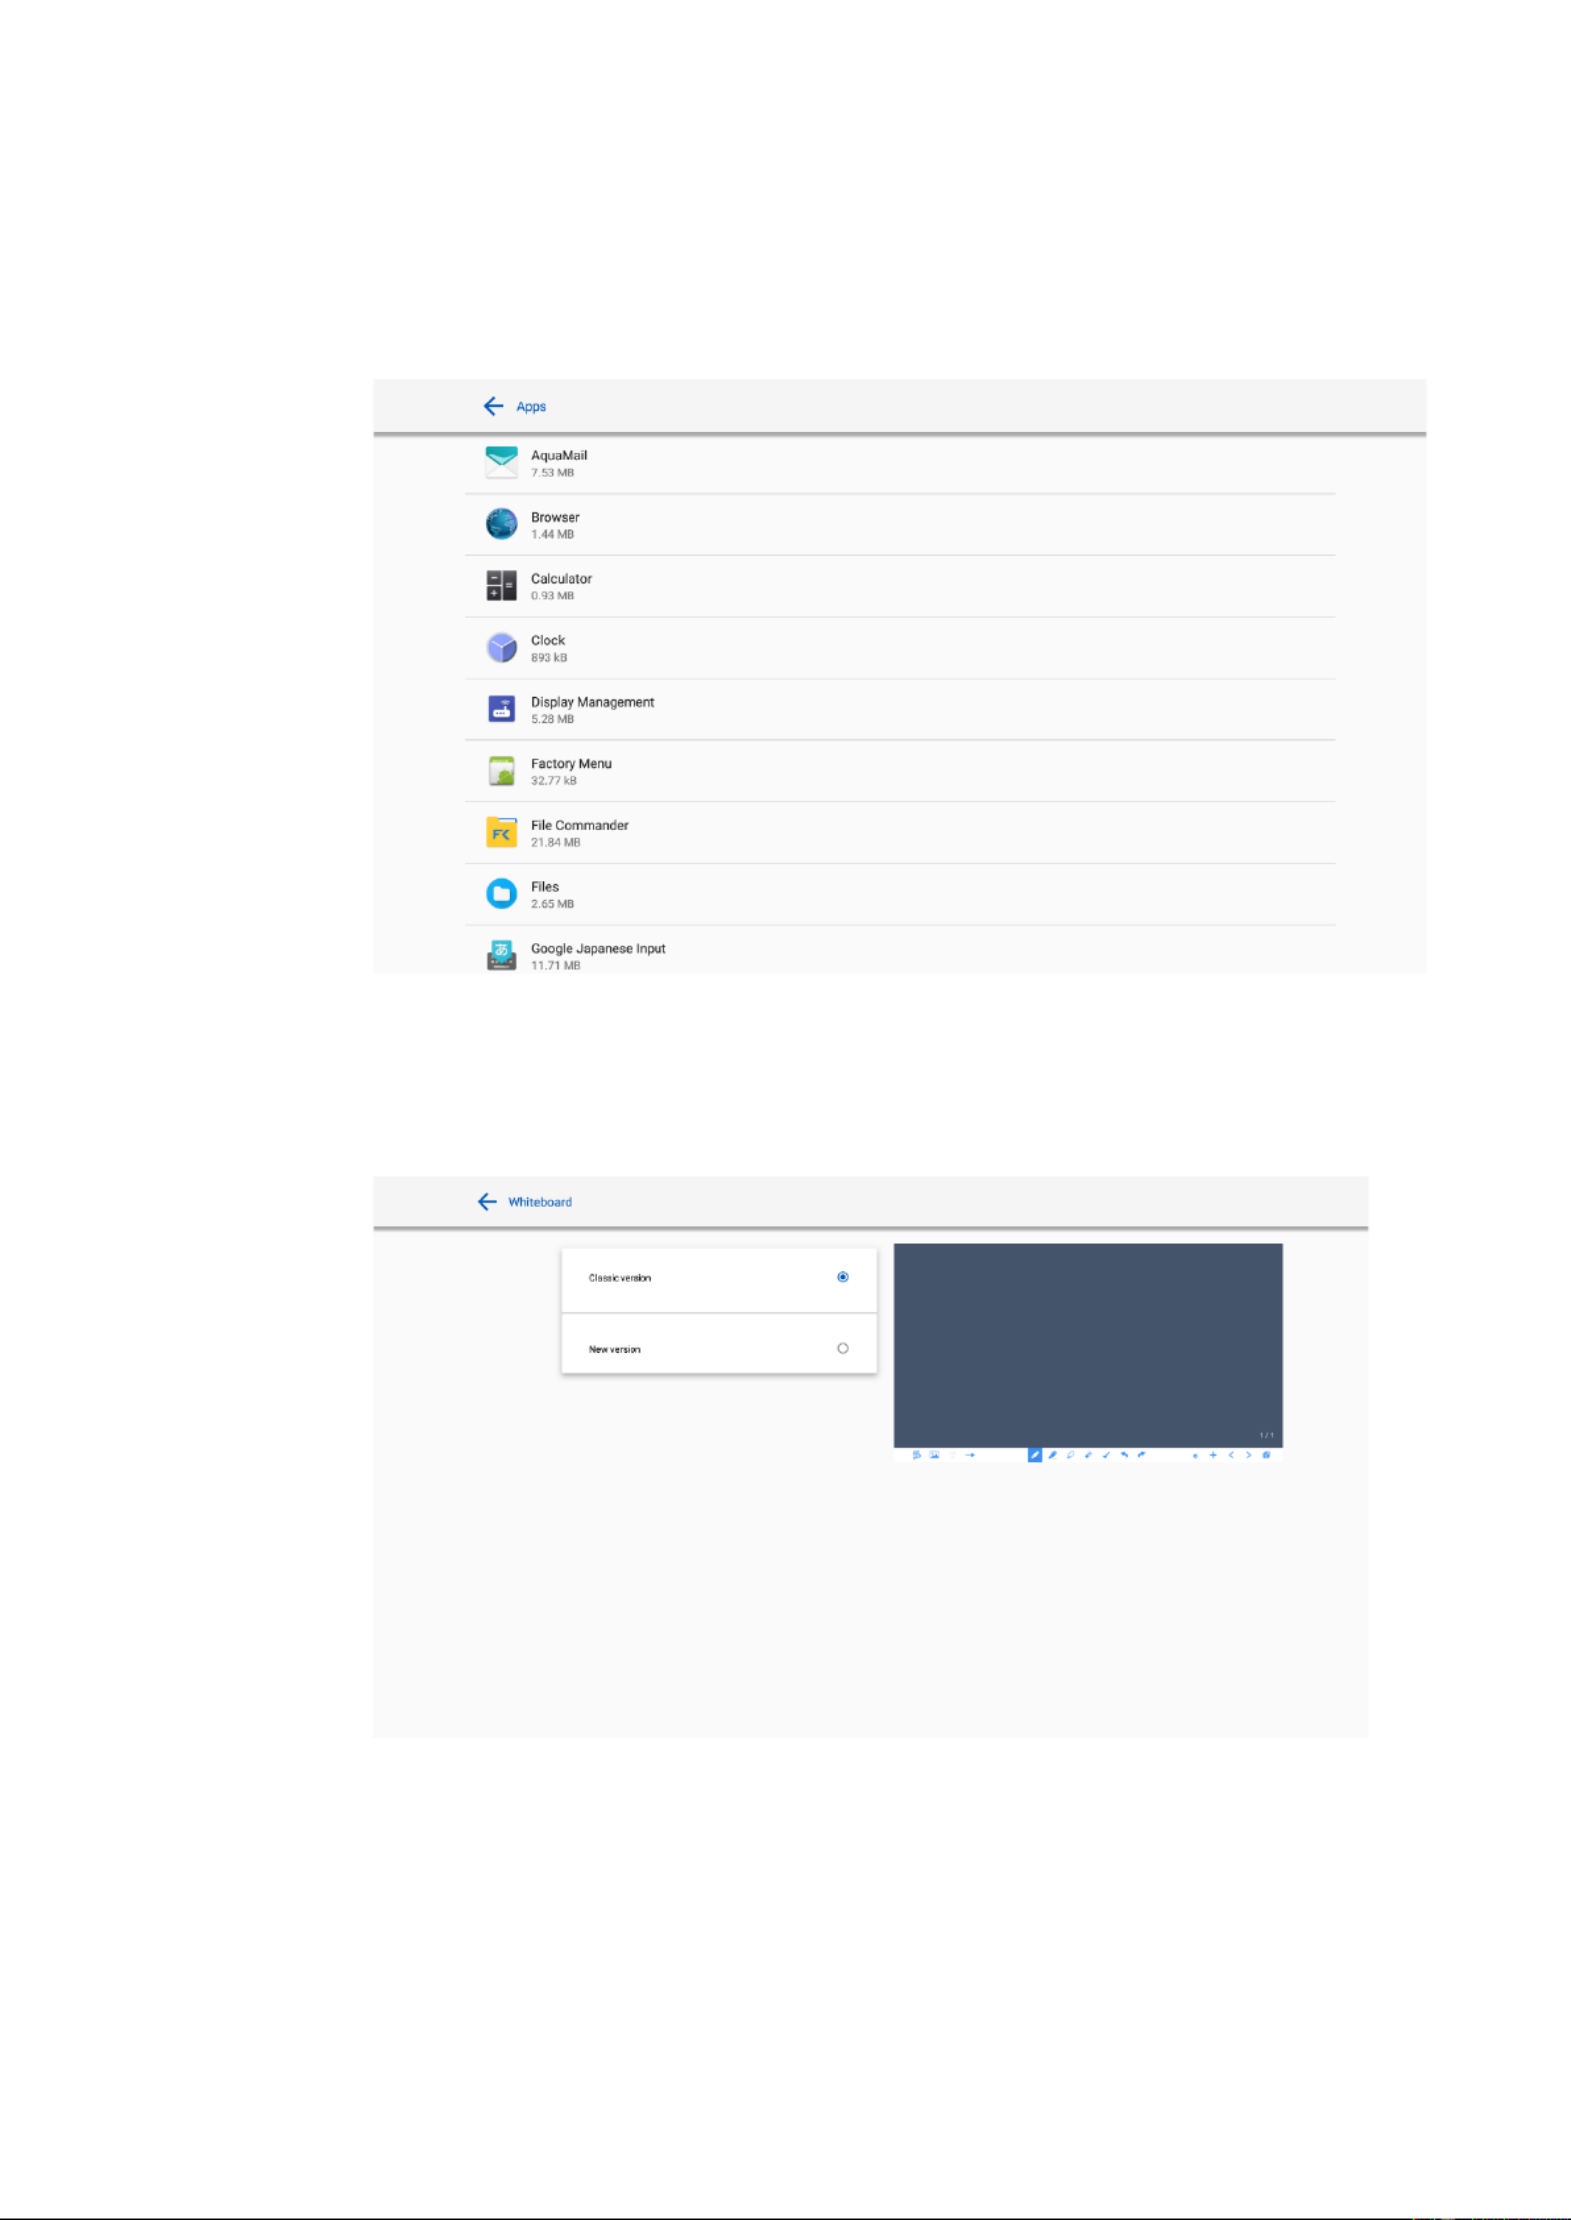
4.3.4 Applications
Enter the Apps submenu to view all downloaded applications by type, running applications, and a
summary of all applications.
4.3.5 Whiteboard
Enter the Whiteboard submenu to set the version of whiteboard.
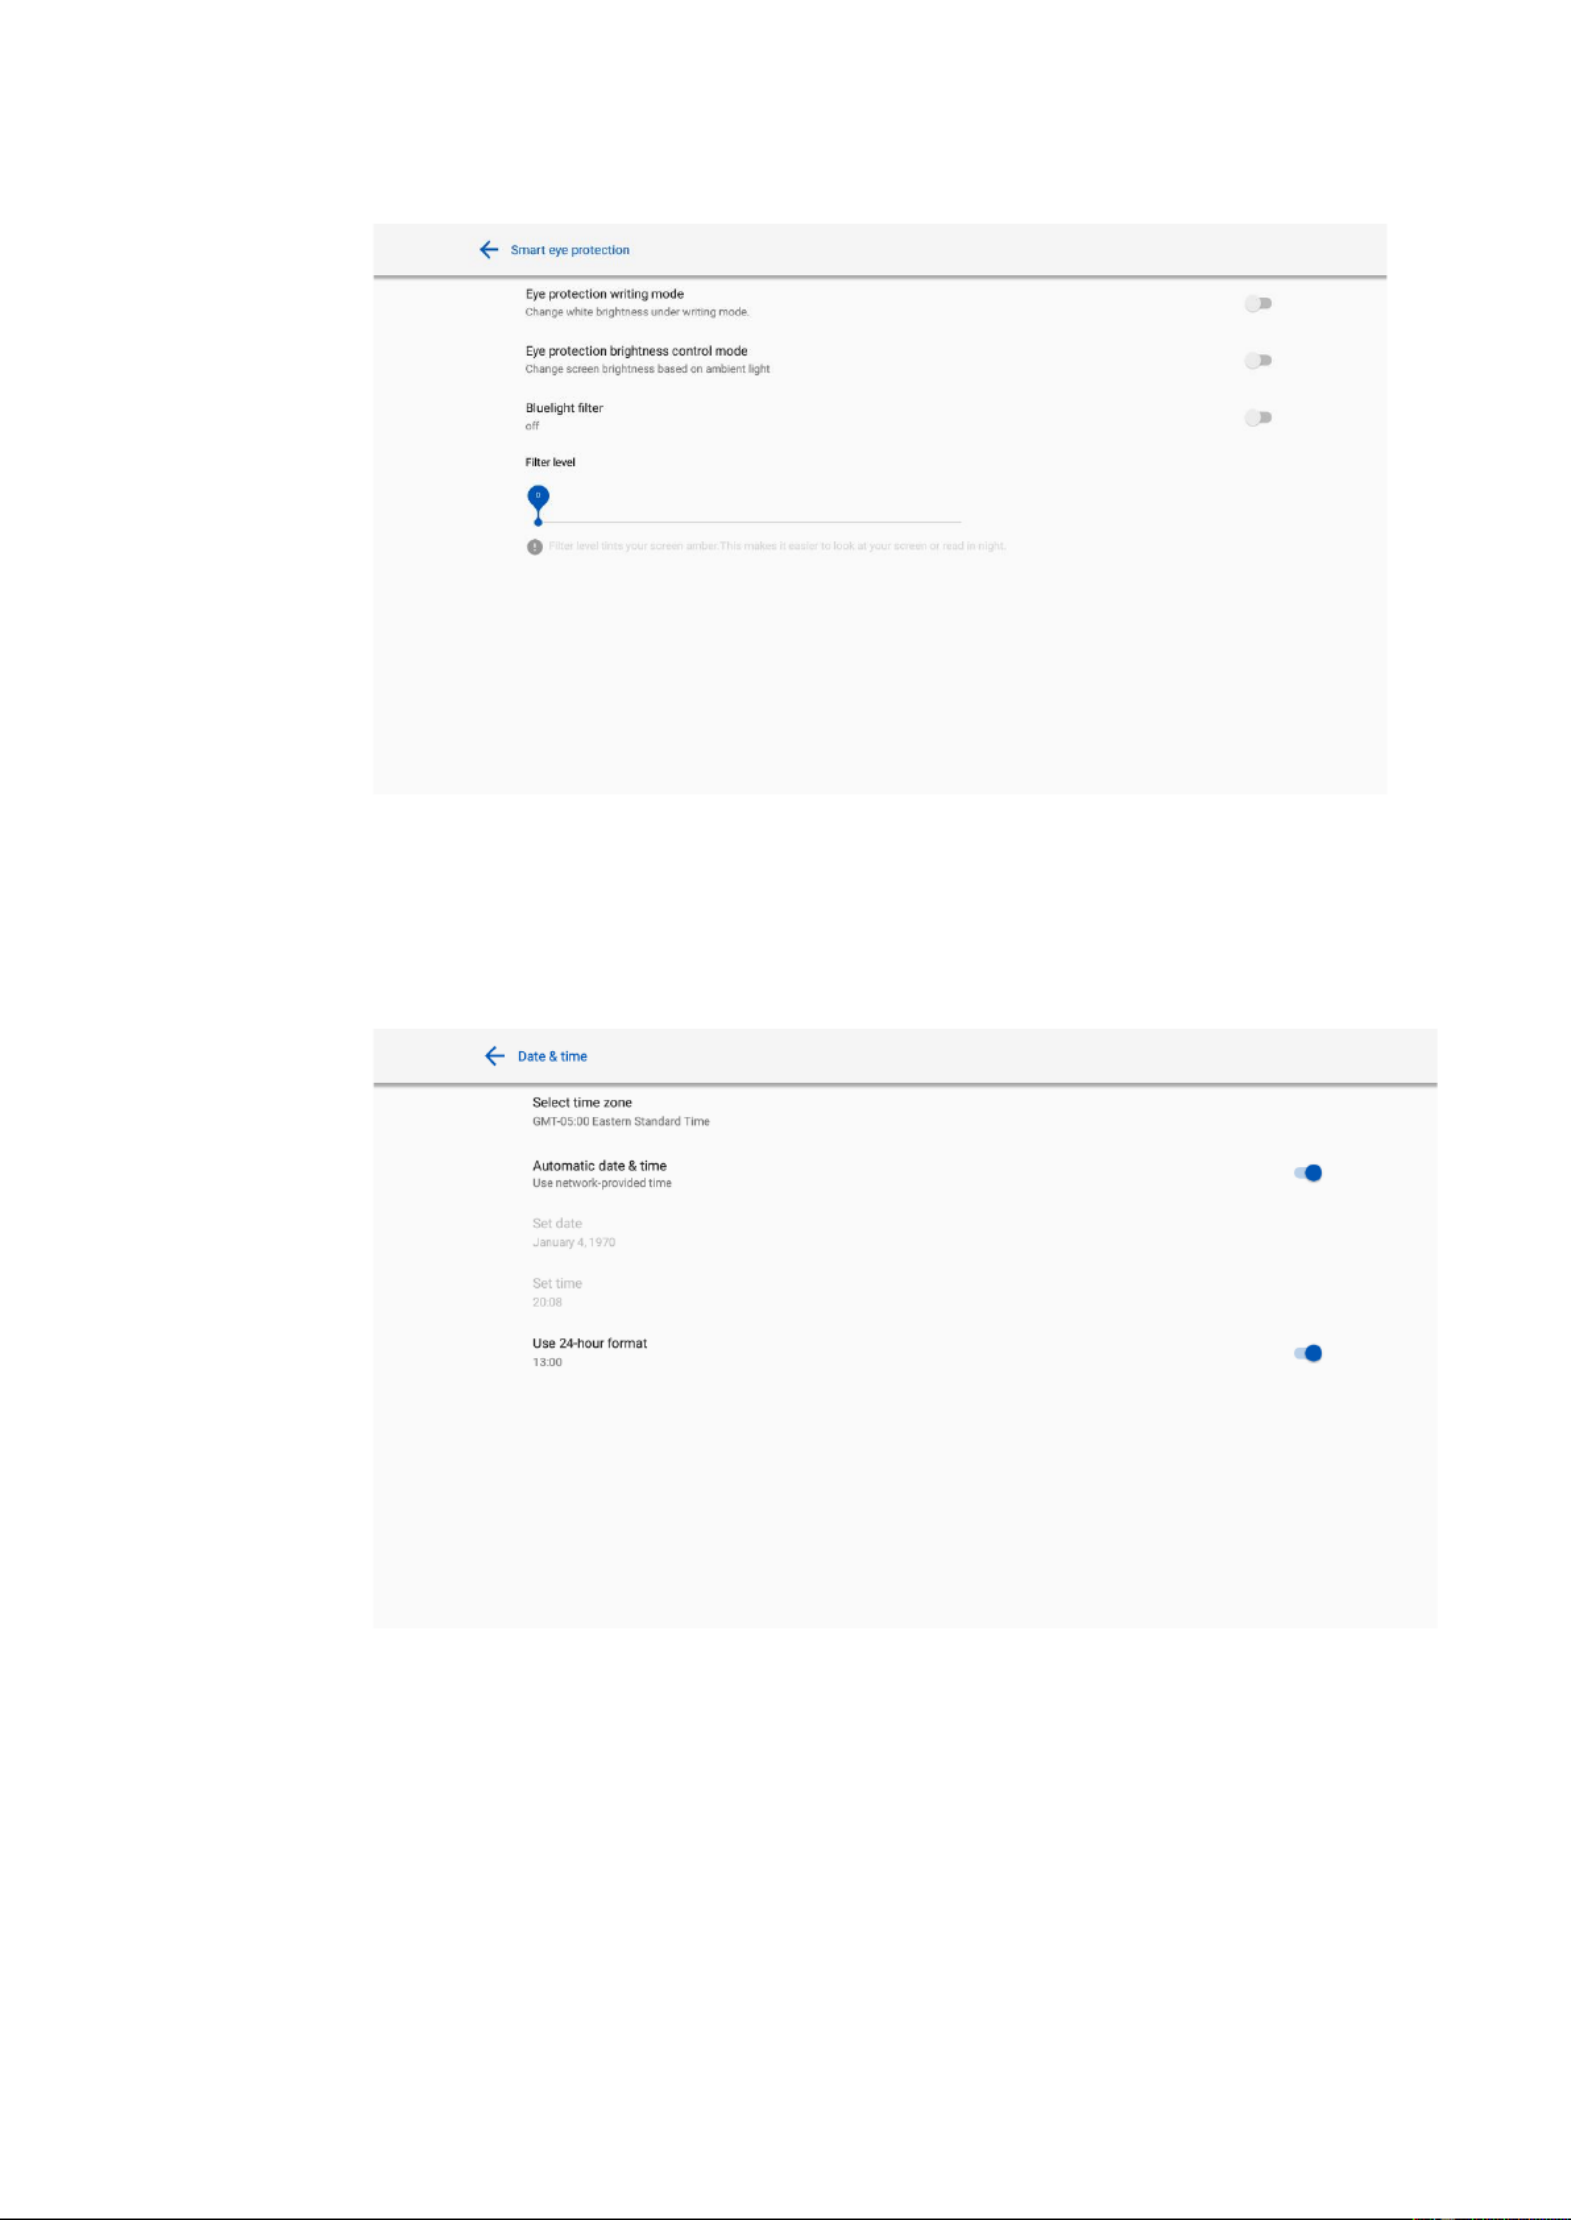
4.3.6 Smart E Protection ye
Enter the Smart eye protection submenu to set Eye protection writing mode Eye protection ,
brightness control mode and the Bluelight lter. If only the Bluelight lter setting is on, the lter
level can be set.
38
4.3.7 Date and Time Settings
Enter the Date & Time setting submenu to set the date and time. Before setting the date and time,
users should click Select time zone to set everything to the local time zone.
Date Settings
You can automatically obtain the date .
⚫ To automatically obtain the date, select Automatic date & time.

40
4.3.8 Power Settings
Enter the Power setting submenu to set an automatic power on/o time and the time for the system
to enter energy saving mode .
⚫ To set the automatic power on time, select Auto power on, and the time you want the display
to turn on in Power on time, as shown in the following gure:
⚫ To set the automatic power o time, select Auto power o, and set the time you would like
the display to turn o in Power o time, as shown in the following gure:

41
⚫ To set the energy saving time, click Energy saving. In the dialog box that is displayed, set a
duration after which the screen enters the lock mode if the screen is left un-operated. After the
screen is locked, if the user does not operate the screen within 120s, the screen enters the shut
down mode. The duration can be set to 30 mins 60 mins 90 mins, , , or Never. You can also
customize this duration and the range is 3 minutes to 480 minutes.
NEVER indicates that the automatic shut down mode function is not enabled.
4.3.9 Tool Bar Settings
Enter the Tool bar submenu to set whether to display the side tool bar and icons.
⚫ Left: Click to turn on/off the left tool bar.
⚫ Right: Click to turn on/off the right tool bar.
⚫ Customized icon: Click the icon under Customized icon to display the last shortcut key on
both toolbars. If you define the shortcut key as Connection, you can set a signal source to
enter after this shortcut key is clicked in Favorite Connection.

42
⚫ Quick settings: Click to turn on/off the quick settings function.
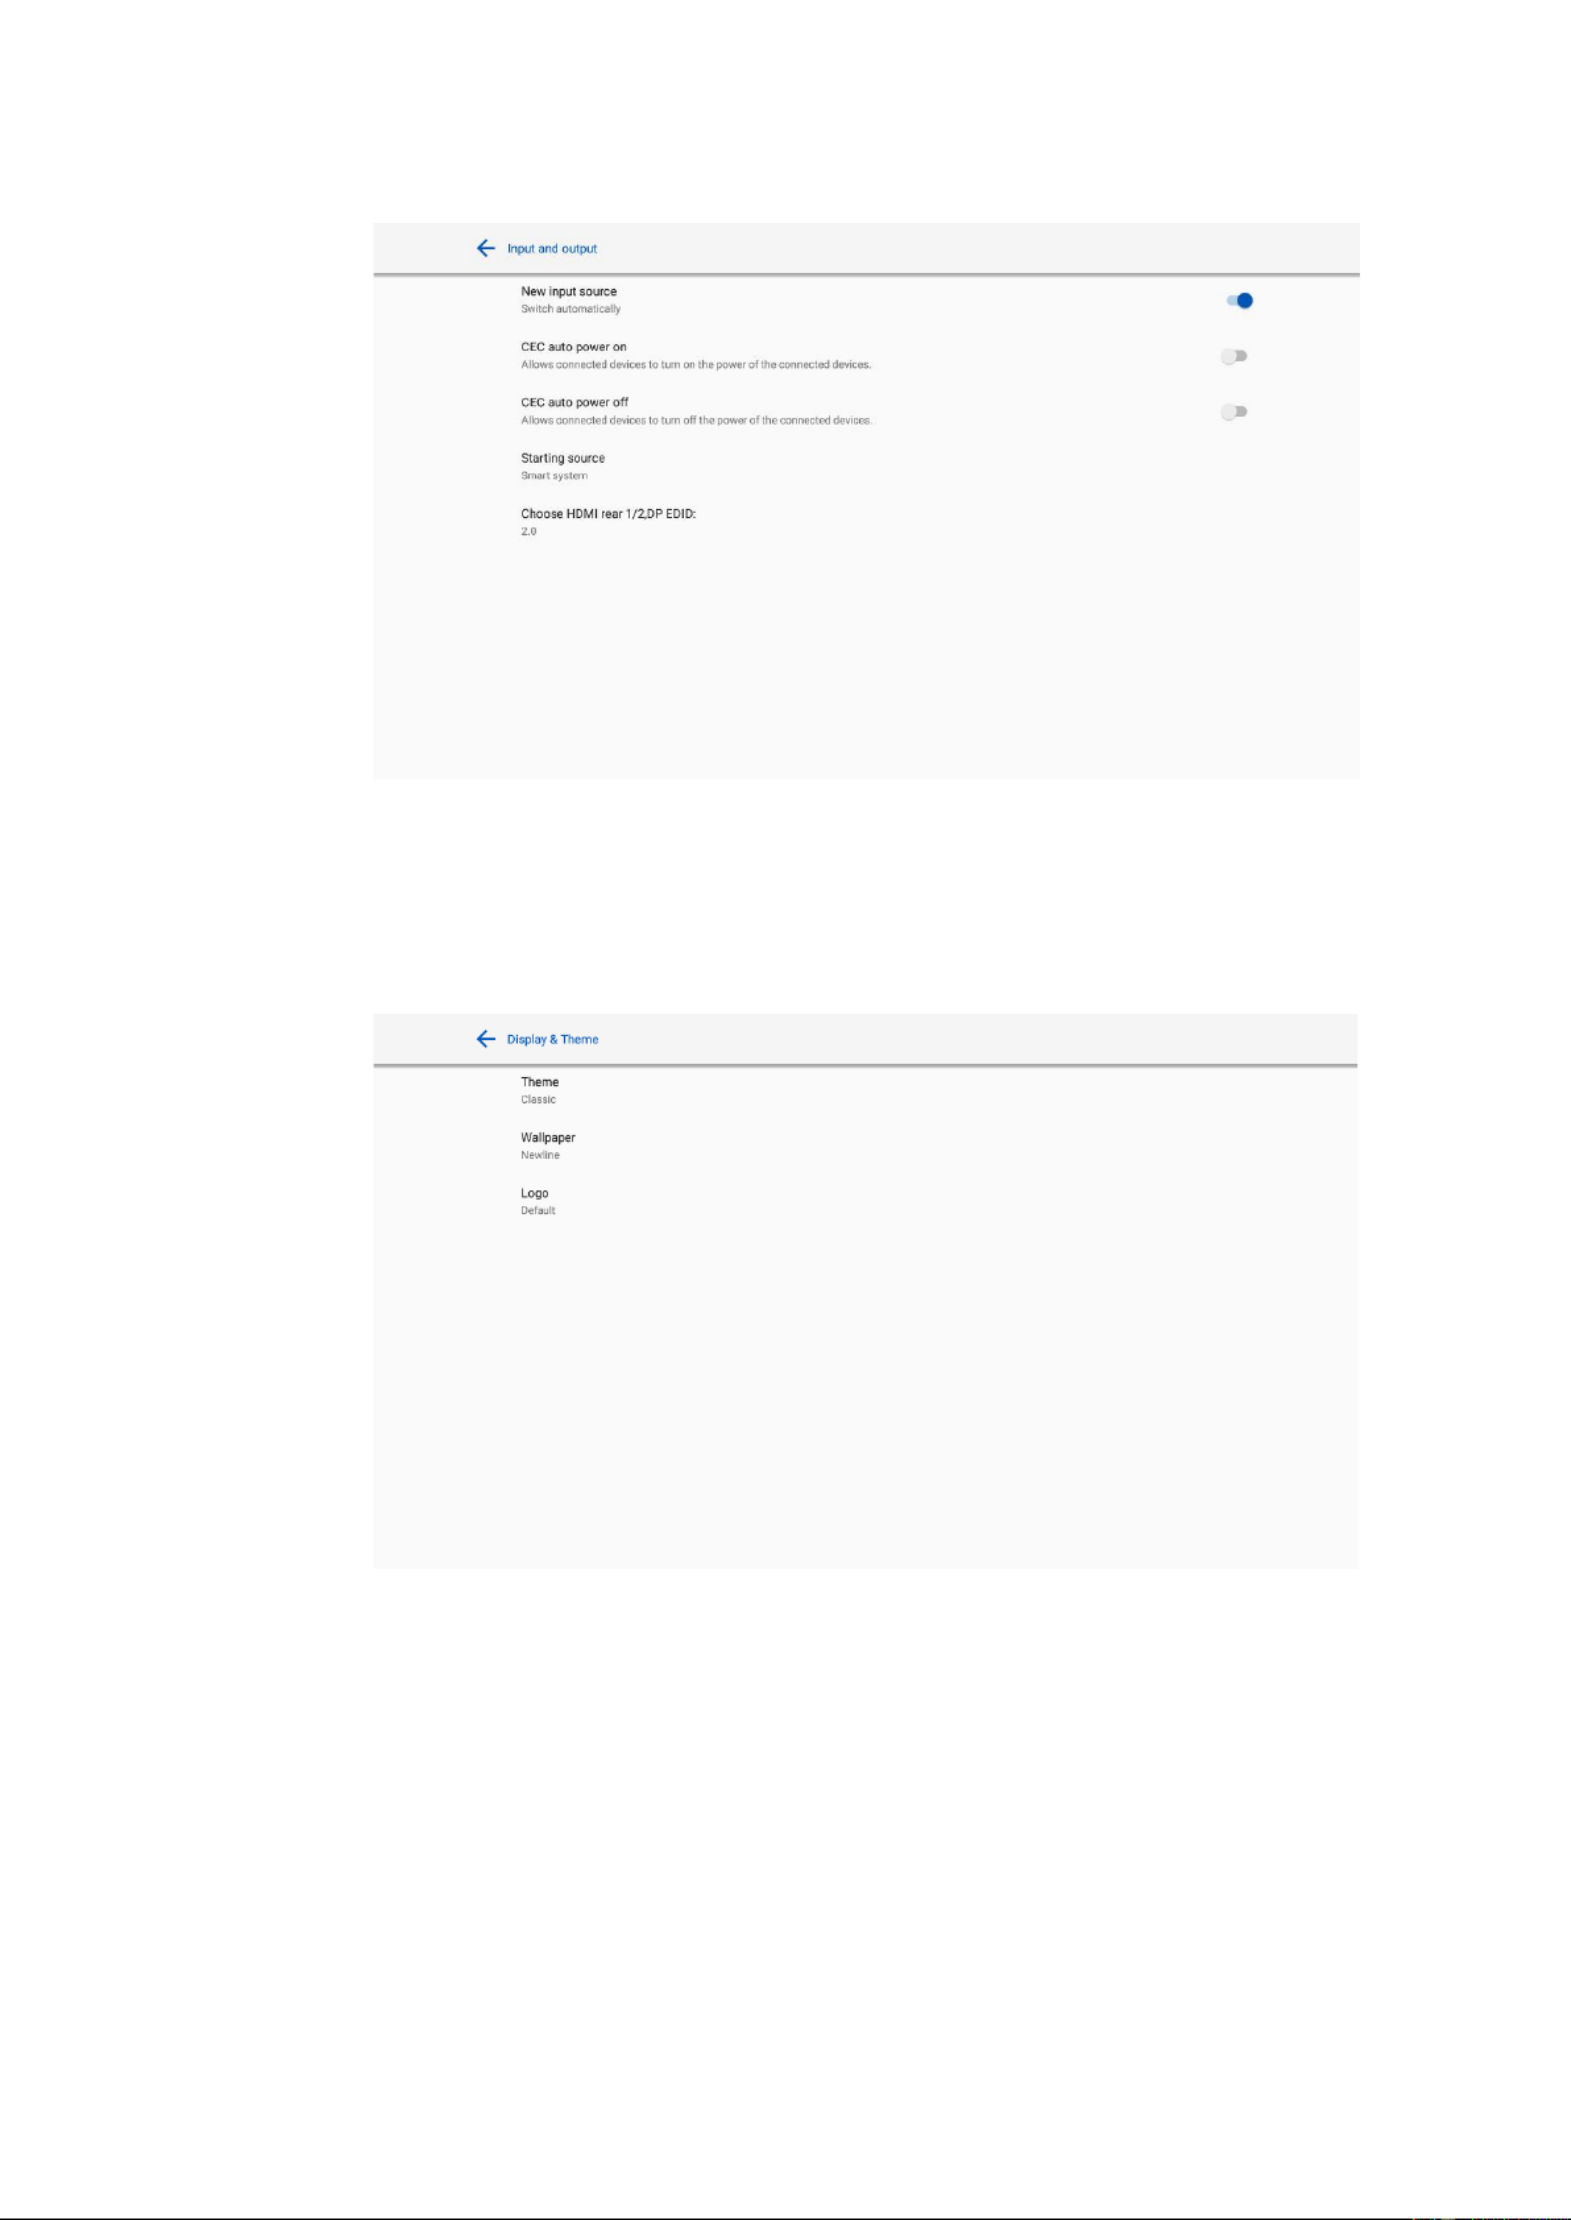
4.3.10 Input/Output Settings
Enter the Input and output setting submenu to set the starting source, new input source, and
resolution of image output through the HDMI port etc..
⚫ New input source: After the New input source function is enabled, the system can
automatically switch to the screen of the newly connected signal source.
⚫ CEC auto power on:
When this function is enabled: When the HDMI port of the machine is connected to a CEC
device (such as a DVD), and both the CEC device and the machine are turned off, if the CEC
device is turned on, the machine automatically turns on after receiving command from the
CEC.
⚫ CEC auto power off:
When this function is enabled: When the HDMI port of the machine is connected to a CEC
device, and both the CEC device and the machine are turned on, if the machine is turned off,
the CEC device automatically turns off after receiving the command; if the CEC device is
turned off, the machine automatically turns off after receiving the command.
⚫ Starting source: Set the signal source entered after power on.
⚫ Choose HDMI rear 1/2, DP EDID: Set the EDID version (1.4/2.0) for HDMI rear 1/2, DP
port.
43
4.3.11 Display & Theme Settings
Enter the Display & Theme setting submenu to set the system theme, wallpaper, Home logo and
lock screen logo.
4.3.12 Security Settings
Enter the Security setting submenu to set Passkey lock, Whiteboard/Screenshot data clearance,
Encryption & credentials, USB lock functions.
Passkey lock: Click to set whether you need enter the password or modified password when going
from the Start page to the Home page. The password must be at least 4 digit numbers. English
letters are not allowed.
Whiteboard/Screenshot data clearance: Click to set the regular clearance of discussion data.
Encryption & credentials: Click to view the information about encryption & credentials.

44
USB lock: Click to turn on/off the USB lock function.
4.3.13 System
Enter the System submenu to upgrade the system, perform a factory data reset, network settings
reset, app preferences reset, view firmware information, embedded operating system version
information or the display’s serial number.
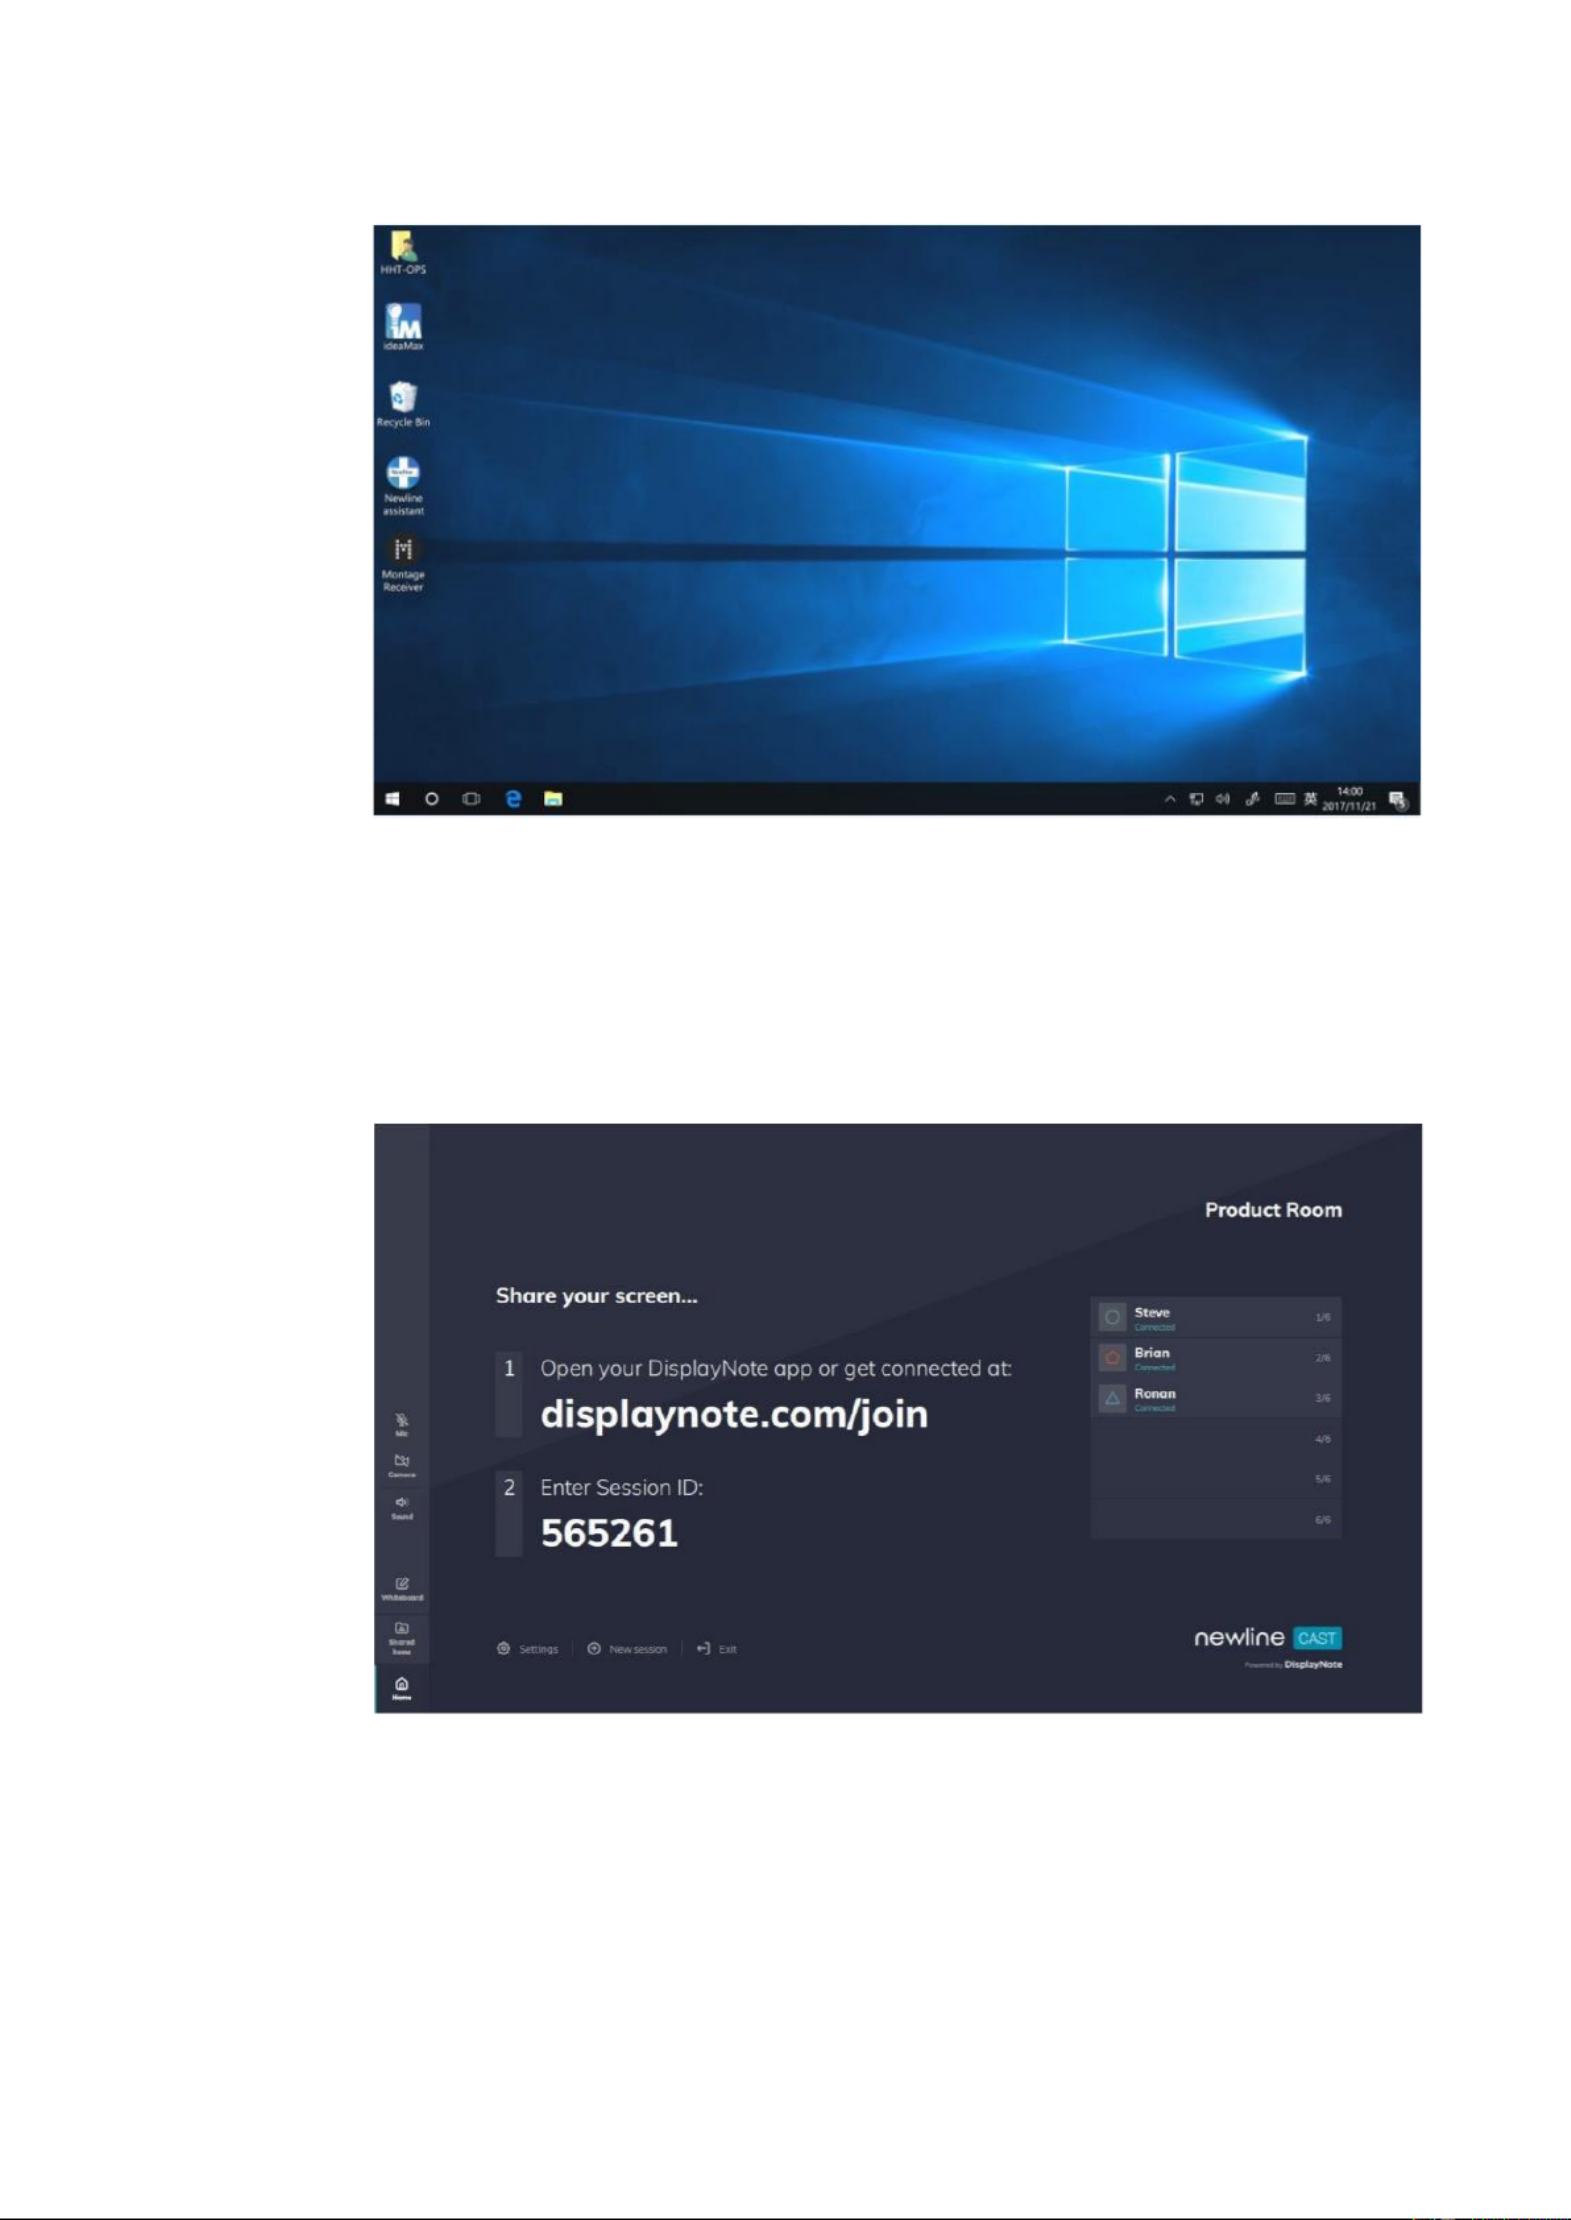
4.4 Windows
On the Home Page, click Windows to enter the Internal PC source, as shown in the following
figure. If the display is not equipped with an Internal PC, "No Signal" is displayed.
45
4.5 Screen Sharing
Multiple devices can be cast wirelessly to the display through several casting modes (Airplay,
Google Cast…). To cast: click Screen Sharing on the Home Page to enter Newline Cast. On screen
directions will appear for you to follow in order to wirelessly cast to the display, as shown in the
following figure:
4.6 Whiteborad
The whiteboard has the following functions:

46
⚫ Discussion and screen annotation
On the whiteboard page, you can select pen type, width, and color to write or annotate on the
screen. You can also erase selected content or clear all content on the screen.
⚫ Page navigation
Preview or delete pages.
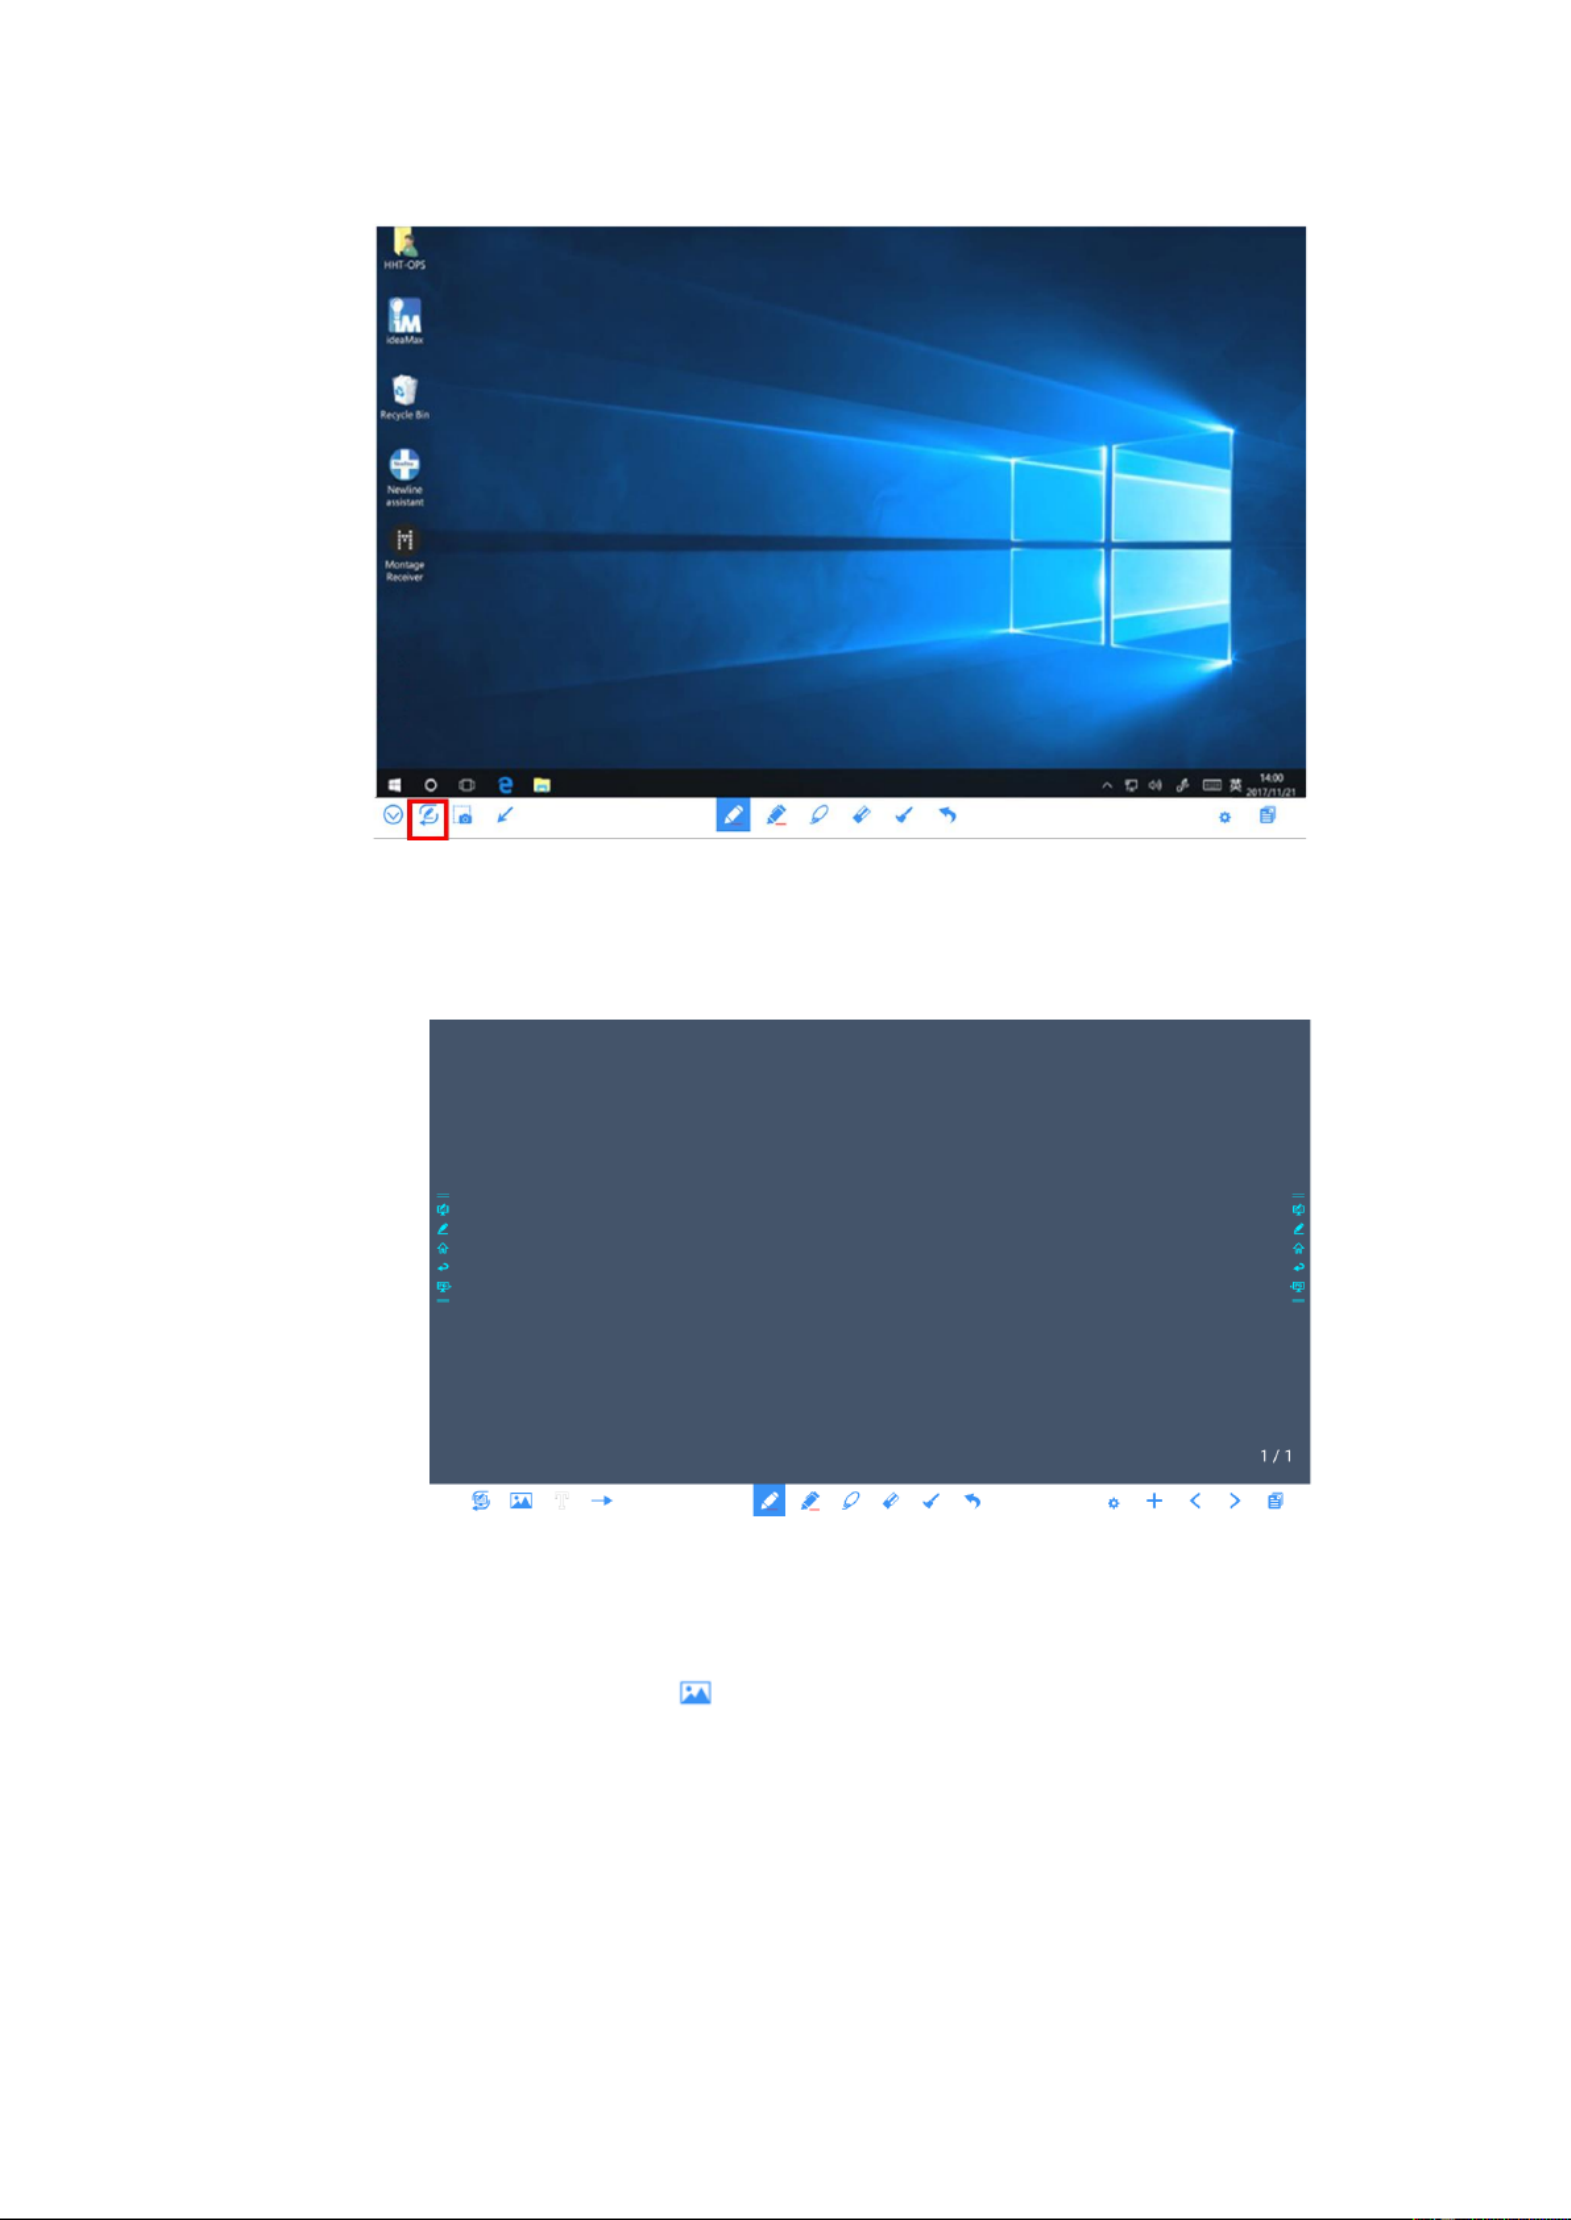
Whiteboard Mode
⚫ Click Discussion in the main toolbar or click on either side toolbar to enter the
embedded whiteboard mode, as shown in the following figure:
⚫ Click on the side toolbar or click in discussion mode to enter annotation mode. In
annotation mode, a transparent layer lays over the screen, letting you write over whatever is
on the screen until you exit annotation mode.

47
SN
Icon Name
Icon Function
1
Mode Switch
Click the icon to enter annotation mode. (See more detail in
whiteboard mode section)
2
Import
Click the icon to insert picture.
3
Insert Text
Click and show the text window(Color/ Size) and the keyboard,
then type in the text. Click and hold the icon for two seconds to set
the default text setting.
4
Insert Auto
Sharp
Click the icon to insert shape.
5
Pen
Click to use the pen function, and the icon turns into blue. Click and
hold the icon for two seconds to set the size and color.
6
Highlighter
Click to use the highlighter function, and the icon will turn blue.
Click and hold the icon for two seconds to set the highlighter size or
color.
7
Select
Click it and user could choose the data on the page to move/ zoom
in/ zoom out, and the icon turns into blue.
8
Eraser
Click to select the eraser function and the icon will turn blue. Click
and hold the icon for two seconds to set the size of eraser.
9
Clear
Clear all data on this page.
10
Undo
Back to the previous step.

48
SN
Icon Name
Icon Function
11
Object
recognition
switch
Slide the turn on or off the object recognition function.
12
New Page
Click to add a new page. Click and hold for two seconds to set the
color and the pattern of the new page.
13
Previous Page
Click to back to the previous page.
14
Next Page
Click to go to the next page.
15
Navigation
Click to show the page thumbnails.
16
Hide Smart Bar
Click to hide or show the smart bar.
17
Mode Switch
Click the icon to enter discussion mode.
18
Screenshot
Click to take a screenshot, and save the data in the display’s internal
storage.
4.6.1 Whiteboard Functions
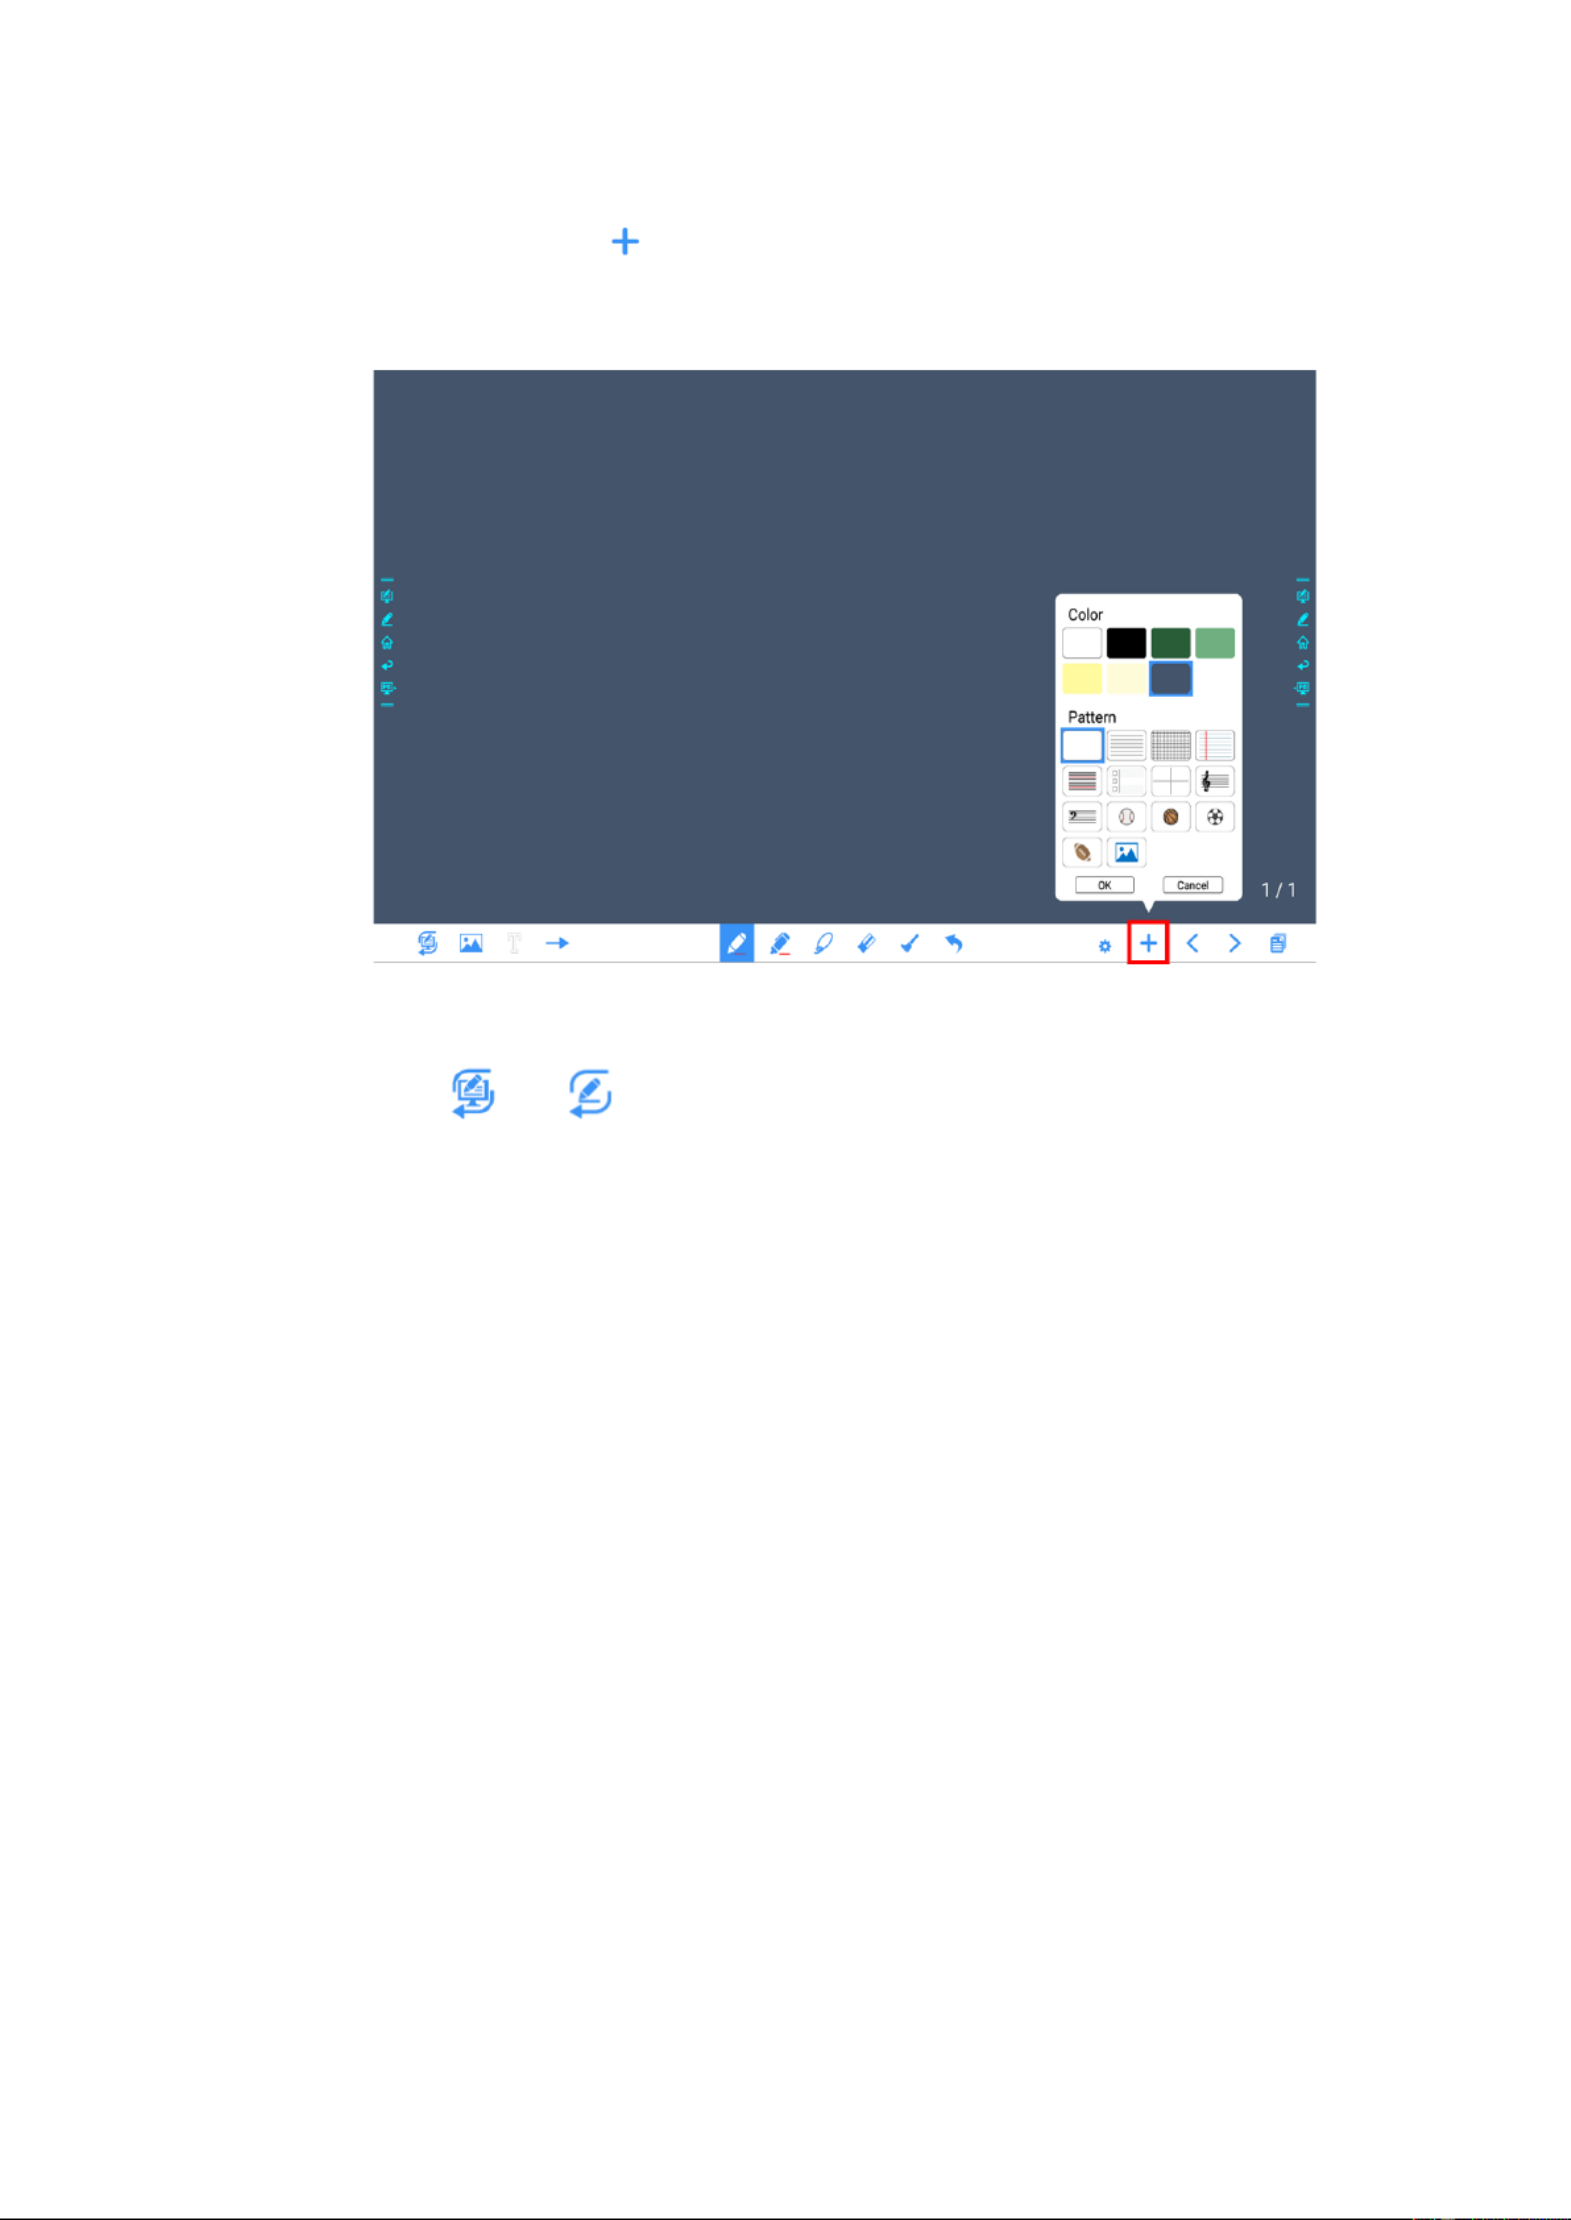
New Page and Settings
⚫ Create a new page
In discussion mode, click to create a new page. Up to 20 pages can be created. See the
following figure:
⚫ Page settings
49
Click and hold for two seconds to set the color and the pattern of the new page, as shown
in the figure below.
Mode Switch
Click in the lower left corner of the discussion mode to switch between and
whiteboard modes.
⚫ Annotation mode
The background is transparent and the real-time image of the current signal source will be
displayed. You can comment on presentation content such as Office documents and pictures
as shown in the following figure:
50
⚫ Discussion mode
The background is a single color, as shown in the following figure. You can write content on
the page as you wanted.
Import
On the Whiteboard, Click to import data from file management, you can import the pictures/
whiteboard data (PNG)/ screenshots (PNG) from system files, USB, network.

51
Insert Text
On the Whiteboard, Click to insert text, and show the keyboard. Click and hold the icon for
two seconds to set the default text setting.
Insert Auto Shape
On the Whiteboard, Click to insert the anto shape. Click and hold the icon for two seconds to
set the shapes and color.

53
Select
On the Whiteboard, Click and user could choose the data on the page to move/ zoom in/
zoom out/ rotate by two ngers, and the icon turns into white.
Click to expand the toolbar,users can copy or delete or cut the data or change the data
color, such as the following figure:
Icon
Functions
Click this icon to Crop the image.
Long press this icon to Rotate the selected items

54
Click this icon to Post the selected items.
Click this icon to Change color for the selected items.
Paste (long press the screen around two seconds and the icon will appear
only after one item copied or cut)
Click this icon to Push to bottom layer.
Click this icon to Delete the items.
Click this icon to cut the items.
Click this icon to copy the items.
Eraser
Two methods are available to erase written errors or content as follows:
⚫ Fist/hand back erasing: corresponding erase shape is a round with diameter 100pt.
⚫ Spot erasing: Click to clear errors or unnecessary content.
Clear All
On the Whiteboard page, click to show the pop-up windows to clear all content on the
current page, as shown in the following figure:

55
Object recognition switch
Press the setting icon, it will pop up a switch and let user to change the object recognition
setting, slide to left to open the object recognition function, slide to right to turn it off.
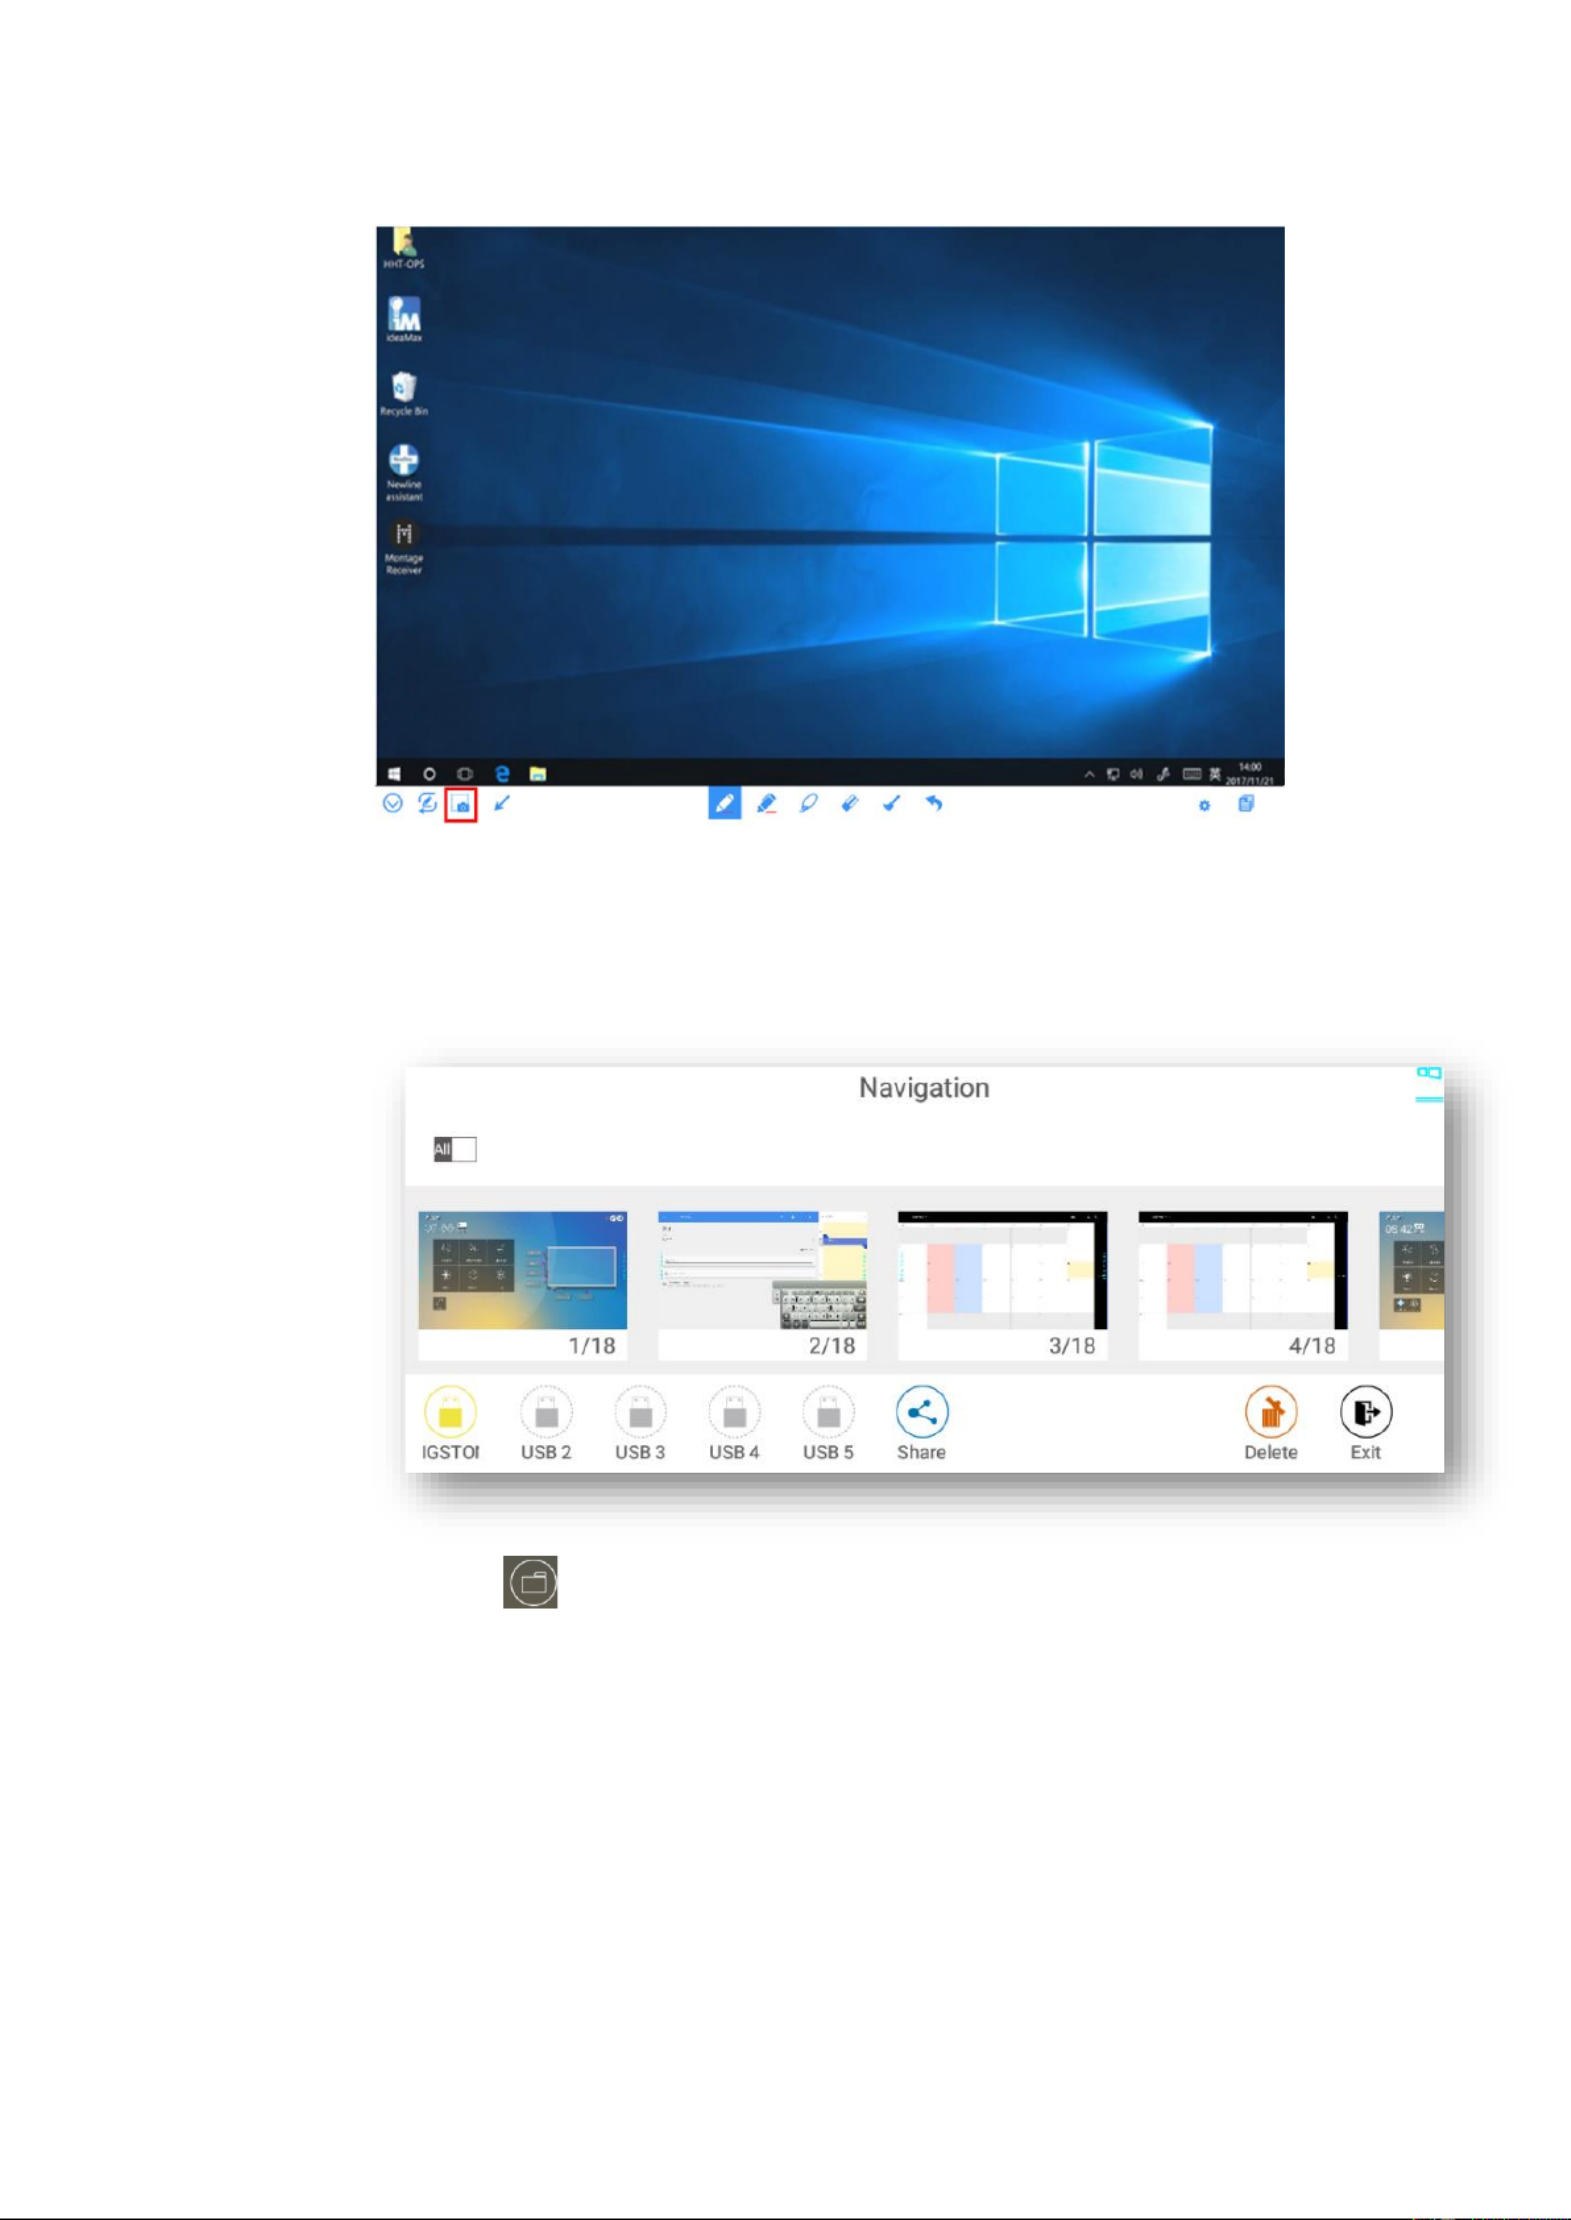
Screenshot
In annotation mode, click to save the current slide as a picture. Up to 50 screenshots can be
created. as shown in following figure:
56
Pictures saved through screenshots can be viewed and obtained using the following methods:
⚫ Screenshots are saved on the Navigation page, as shown in the following figure:
⚫ Click on the home page and choose Internal storage > Pictures > Screenshots >
image to view or share screenshots.

57
4.6.2 Page Management
You can preview, select, share, save, and delete any created writing page.
Page Preview
Click on the lower right corner in the discussion mode. All pages will be displayed. Click
one page to switch to that page for more operations, as shown in the following figure:
Only 8 pages are displayed at once. You can slide right or left using one finger to see more.

58
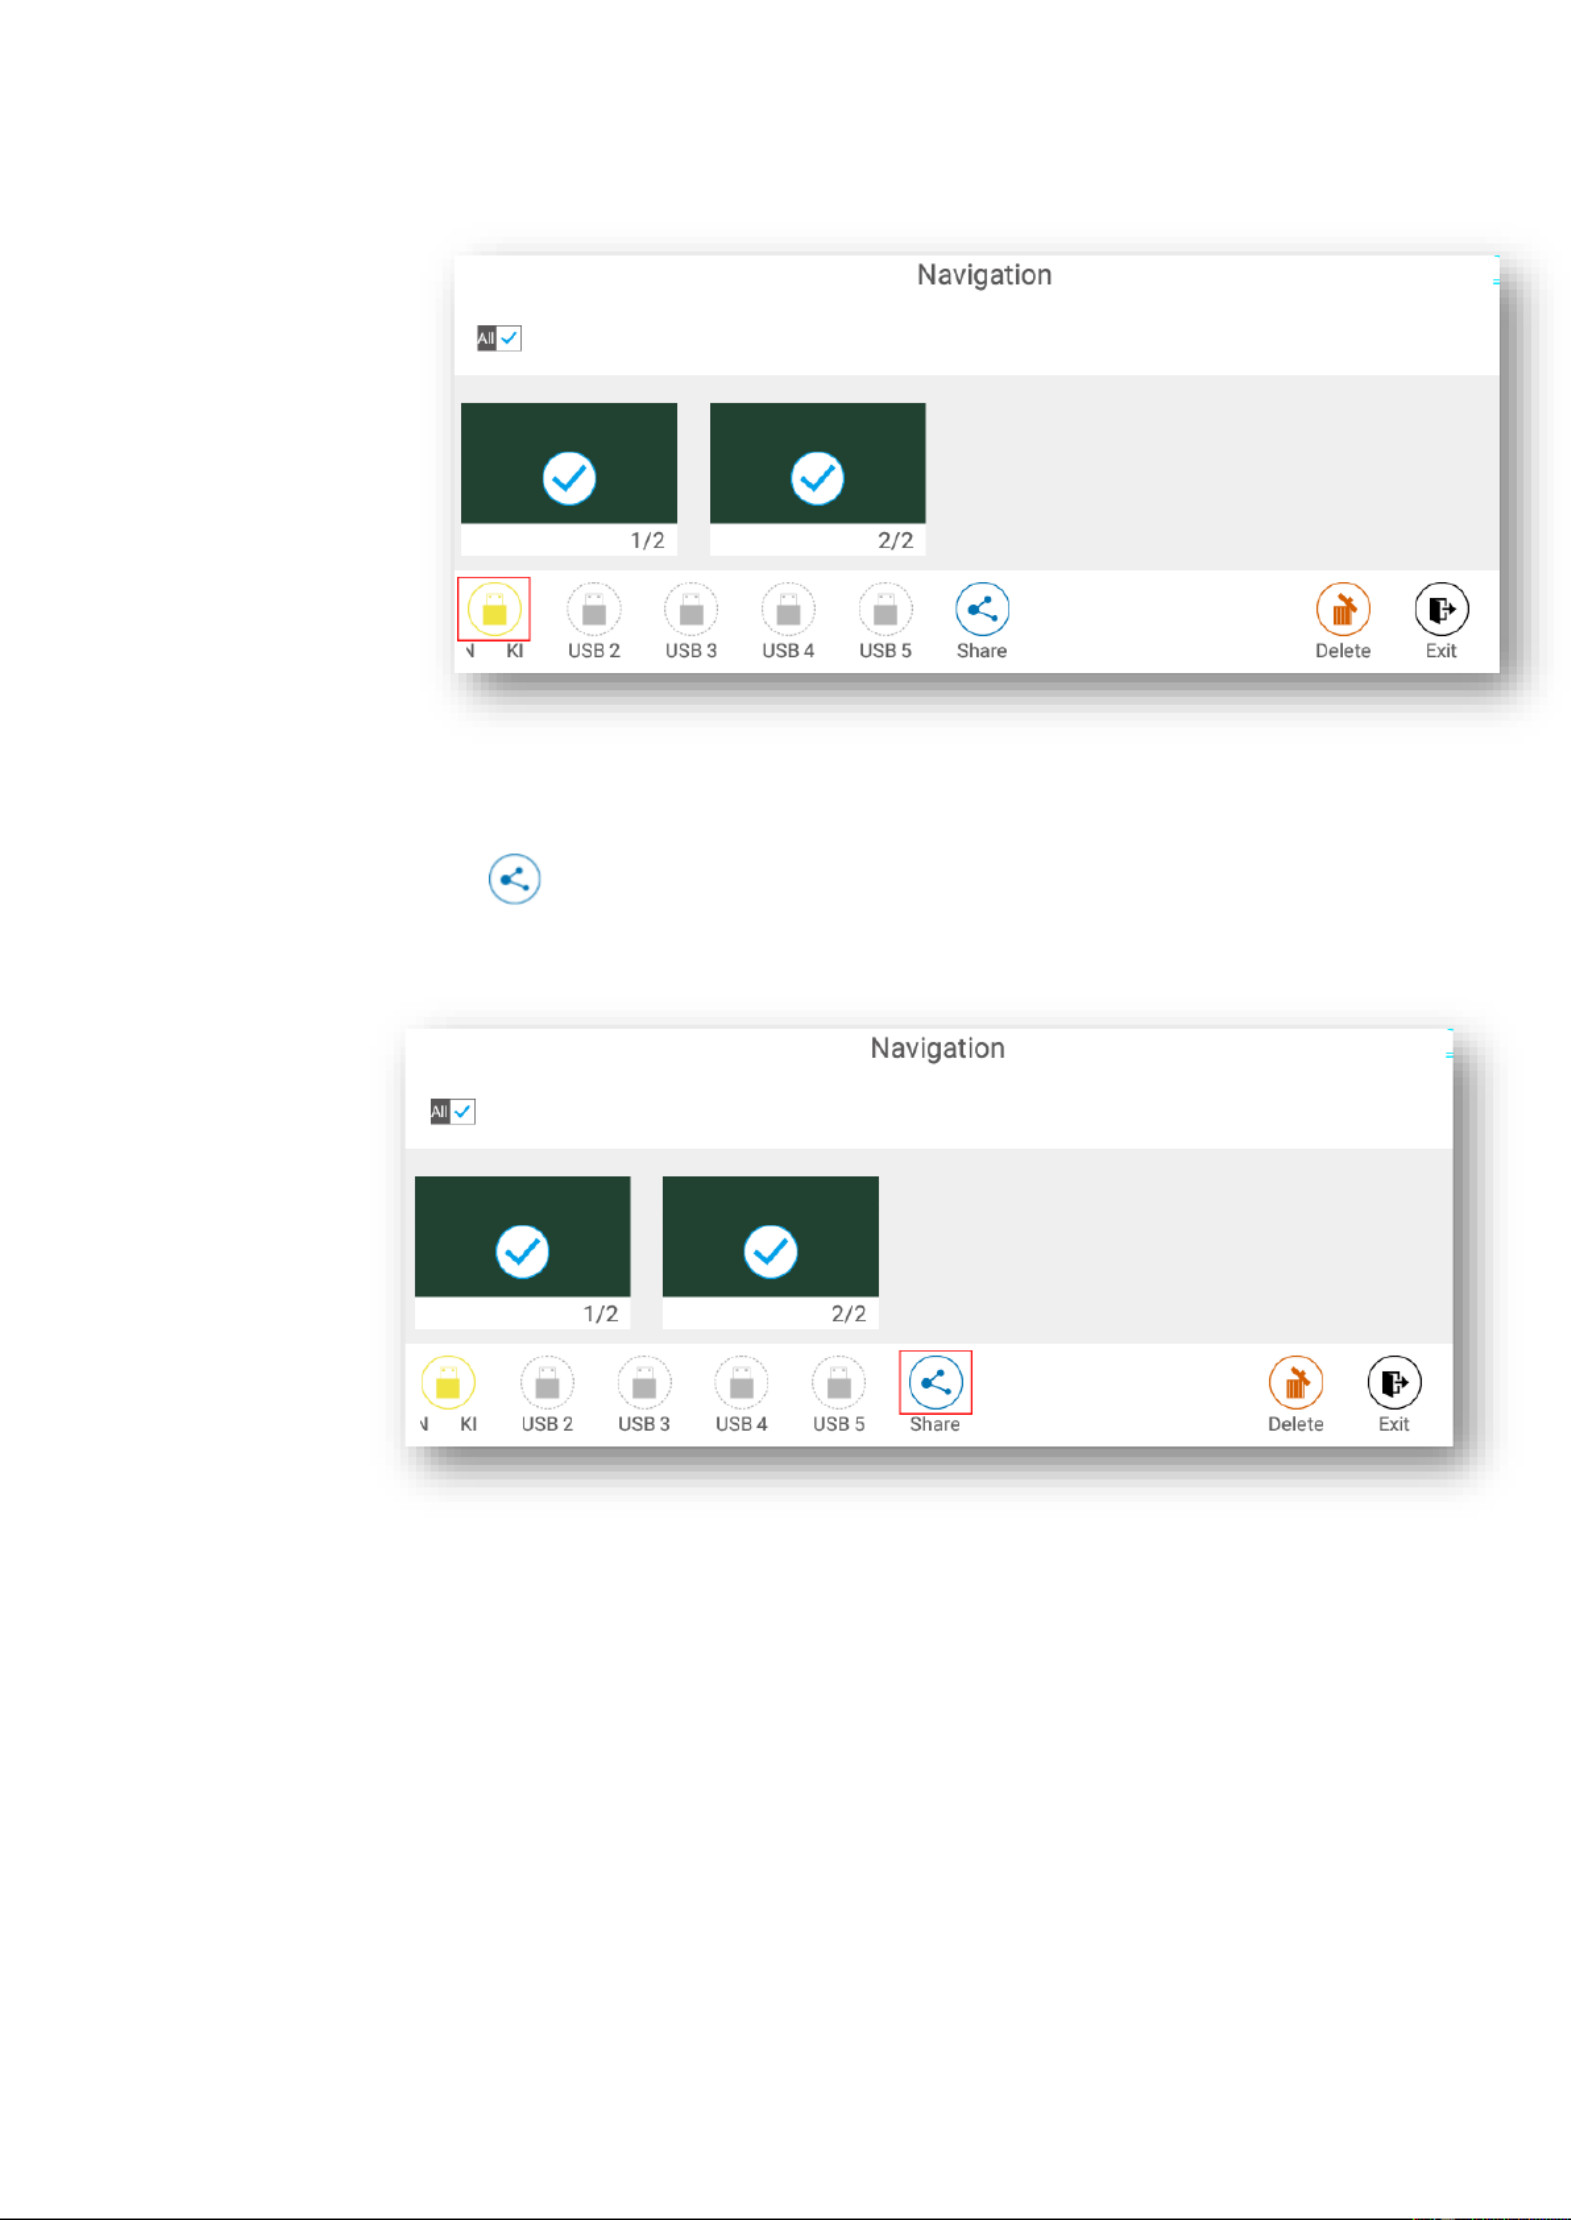
Page Select Or Delete Page
On the Navigation page, you can select or delete writing pages according to requirements, as
shown in the following figure.
⚫ Click to select all pages.
⚫ Click to share selected pages.
⚫ Click to delete selected pages.
⚫ Click to exit Navigation.
Save Page
On the Navigation page, when no external USB drives are connected, the USB icons will be gray.
When an external USB drive is connected, the USB icons will turn yellow. Click the yellow USB
icons and the selected whiteboard file can be saved in the folder of "Meeting + year month day
hour minute second" under the root directory of the storage device.
⚫ Do not eject USB flash drive before completing the saving process.
⚫ If the USB flash drive is larger than 16GB or the file format is not FAT32, the data will not be saved
properly.
⚫ If the screen is showing external source, USB port may be used by the source and USB drive may not
appear in the list. In that case, please use the Android USB port on the back of the unit or change the
source to the embedded operating system.
59
Page share
Click the button on the Navigation page, click File Commander to save to local storage or to
the cloud, or click AquaMail to share current the meeting files by email. Before sending by email,
confirm that an email account is successfully set up in Settings .
4.6.3 Object Detection
This product supports object recognition and produces different effects according to the diameter
and size of the input objects.
⚫ Fist/palm: identified as an eraser (100 pt).
⚫ Fine Pen (3mm): suggested to use while writing.
⚫ Thick Pen ( ≥ 8 mm)/ finger: suggested to use when you want to highlight.

60
If the diameter or size of the input object is larger than 3mm or smaller than 8mm, there is a risk of
identification failure. Keep the object vertical while writing.
Object recognition: The system automatically remembers the settings selected for a fine pen and a
thick pen. Users can use a fine pen (stylus or thick pen (finger) to utilize select functions (including
pen color and thickness). After that, the system remembers this information until users change
them manually.
⚫ Fist/palm: keep the eraser (100 pt) function.
⚫ Fine pen (3mm): before users manually change, the system remembers the previous selected
attributes (including pen color and thickness).
⚫ Thick pen ( 8 ≥ mm): before users manually change, the system remembers the previous
selected attributes (including pen color and thickness).

61
4.7 Browser
On the page, click Home Browser to view web page, as shown in the following figure:
4.8 File Management
The product supports connection to USB flash memory. In File Viewer application, you can
preview all files in the internal storage and storage devices connected via USB ports and select,
copy, paste, delete and search for files.
4.8.1 File Viewer Page
On the page, click Home File Viewer, as shown in the following figure:

62
4.8.2 File Preview
Using the File Viewer application, you can click the submenu on the left side to preview what files
are on internal storage, external storage devices connected via the USB ports, cloud stored files,
FTP uploaded files, and local network files, as shown in the following figure.
4.8.3 File Search
Enter the File Viewer application and click . In the dialog box that pops up, enter the keywords
in the search box. The system will display a list of files that match the searched for keywords.

63
4.8.4 File Filtering
You can click the menu on the left side to display files by type, for example, ether the files is a wh
document, a picture, music, a video, archived or was downloaded.
⚫ The system supports two view modes: list and thumbnail. You can click on the top right
corner to switch or view modes
⚫ Click to display files based on name, type, size, and modification. You can also click
to filter files by whether they are pictures, music or video files.
64
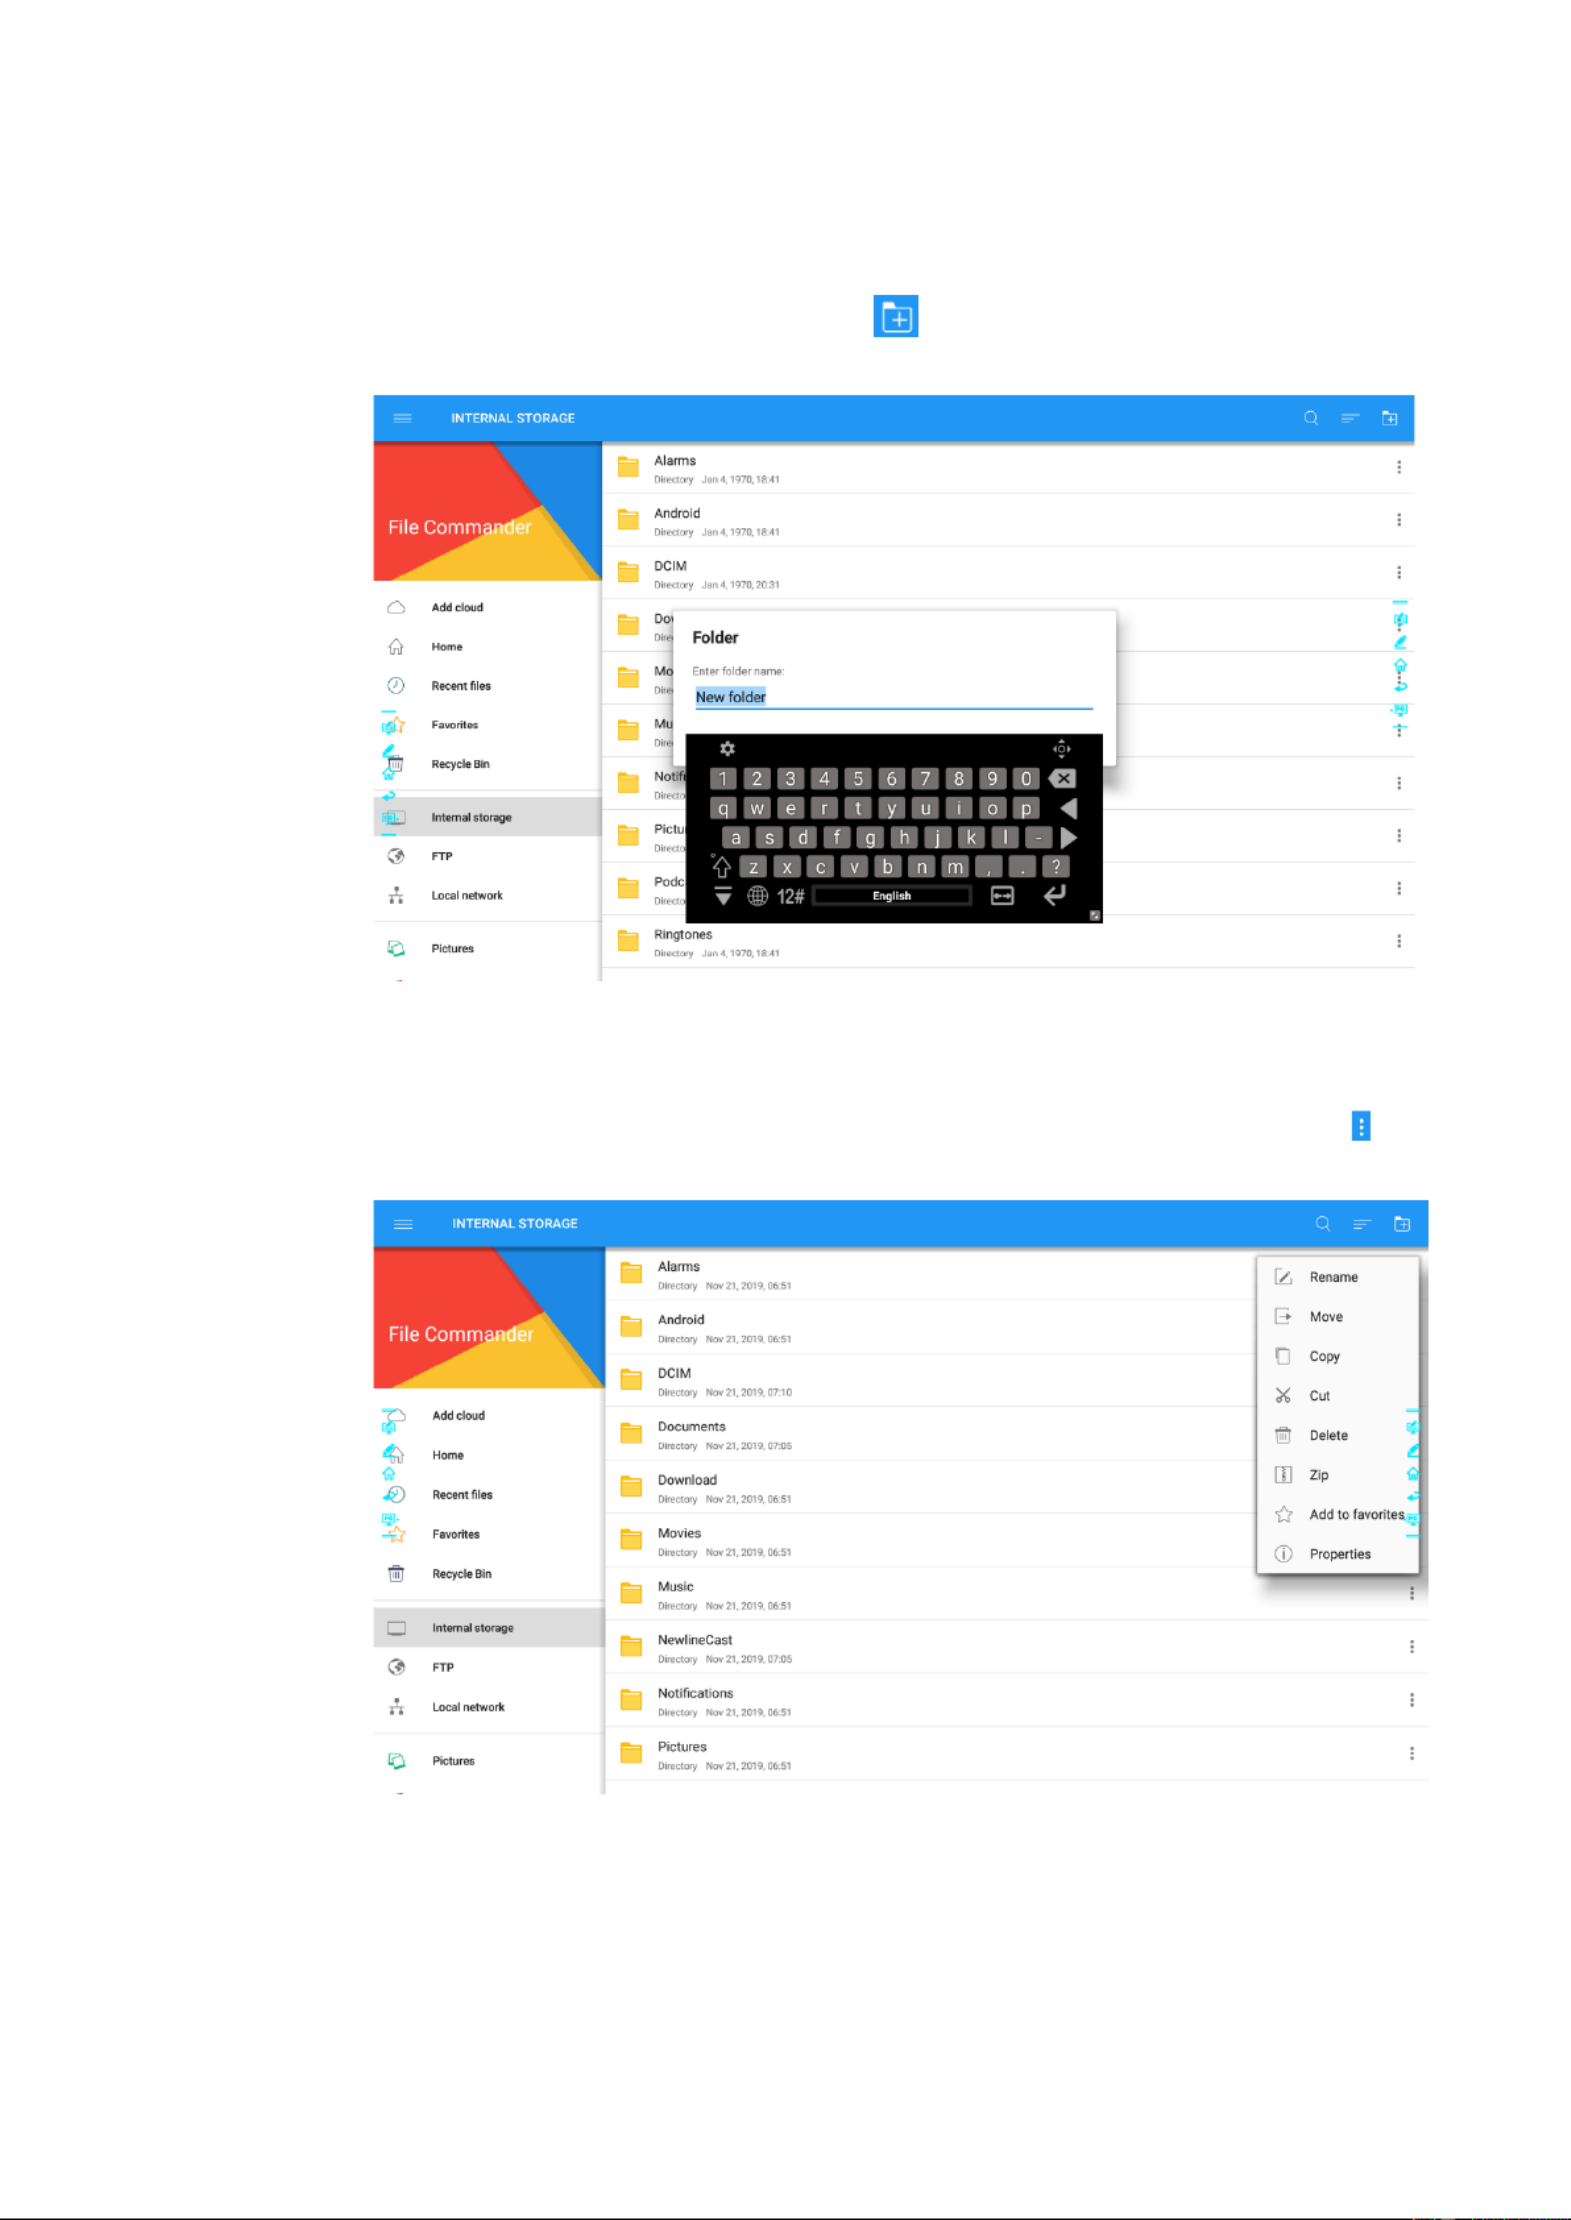
4.8.5 New ld Fo er
Enter the File Viewer application, and click create folder. as shown in the following to
figure.
4.8.6 File Operation
Enter the File Viewer application. You can create folders according to requirements, select files by
long pressing, and set wallpaper/copy/paste/delete. For details on other operation, click in the
upper right corner for more operation.
4.8.7 File Name
Under the "Internal storage > Pictures > Screenshots > image" folder in the File Manager, all
pictures of this meeting are saved. Screenshots include annotation page screenshots, remote control

65
screenshots and pages in the discussion mode. Depending on the screenshots mode, picture naming
is different. Picture files are named in the following of prefix + creation file.
Prefix name rule: WB (discussion mode page), AN (annotation page screenshot), and SS (remote
control screenshot).
4.9 Gadget
On the Home page, click Gadget. On the page that is displayed, all applications can be viewed. The
following figure shows applications that the system is delivered with.
Name
Icon
Functions
Browser
Click this icon to enter the browser application.

66
Name
Icon
Functions
Music
Click this icon to enter the music application.
Calendar
Click this icon to enter the calculator application.
Display
management
Click this icon to enter the Display management application.
File view er
Click this icon to open the File M and you can explore anager
all internal and external files on the screen.
Office viewer
Click this icon to enter the Office viewer application. In this
application, you can view office files, including excel, word,
power point, and PDF files.
Newline
Broadcast
Click this icon to enter the Newline Broadcast application.
E-mail
Click this icon to enter the email application and send files.
Before sending files, you need to add an email account.
Newline Cast
Click this icon to enter the Newline Cast application.
4.10 Add Shortcut
4.10.1 Add Shortcuts to Home Page
Step 1 On page, click the icon in the lower right corner. The interface for adding shortcuts Home
will be displayed.

67
Step 2 Click the icons on top to switch the list between external signal sources, Windows software
shortcuts and pre-installed gadgets.
⚫ Click to view signal sources in .Connection
⚫ Click to view the Windows software shortcuts that the Newline Assistant uploads to the
embedded operating system. For details, see “Add Quick Start Windows Programs in Smart
System”.
⚫ Click to view all Gadget applications.

68
Step 3 Add or delete applications on the tab.
⚫ In the list, click the icon to add it as a shortcut on the Home page. A check icon will appear at
the upper right corner of the shortcut icons. Up to 5 shortcuts can be added.
⚫ Tap the icon with the check mark again. The check icon will disappear and the shortcut will
be removed from the page.Home
Step 4 At the page, click the shortcut icon and you can start the program/application or change to Home
the external signal source.
4.10.2 Add Quick Start Windows Programs in Smart System
Step 1 In Windows, run the Newline Assistant program and drag the software icons or folder shortcut
icons that you want to add from desktop or menu to the the Newline Assistant window. The
applications added or deleted through the Windows system will be automatically updated to the
embedded operating system until the upload progress reaches 100%. If there is an application not
updated, click in the upper right corner to manually update all icons in the Newline assistant
window to the smart system.
Only folders and .exe files are supported.

70
By default, the Newline Assistant application is added on the tab.
Step 4 Tap the icon and add the shortcut at the Home page. Tap again and remove it.
Step 5 Return to Home page. Click the icon of an added Windows application to start the software.
72
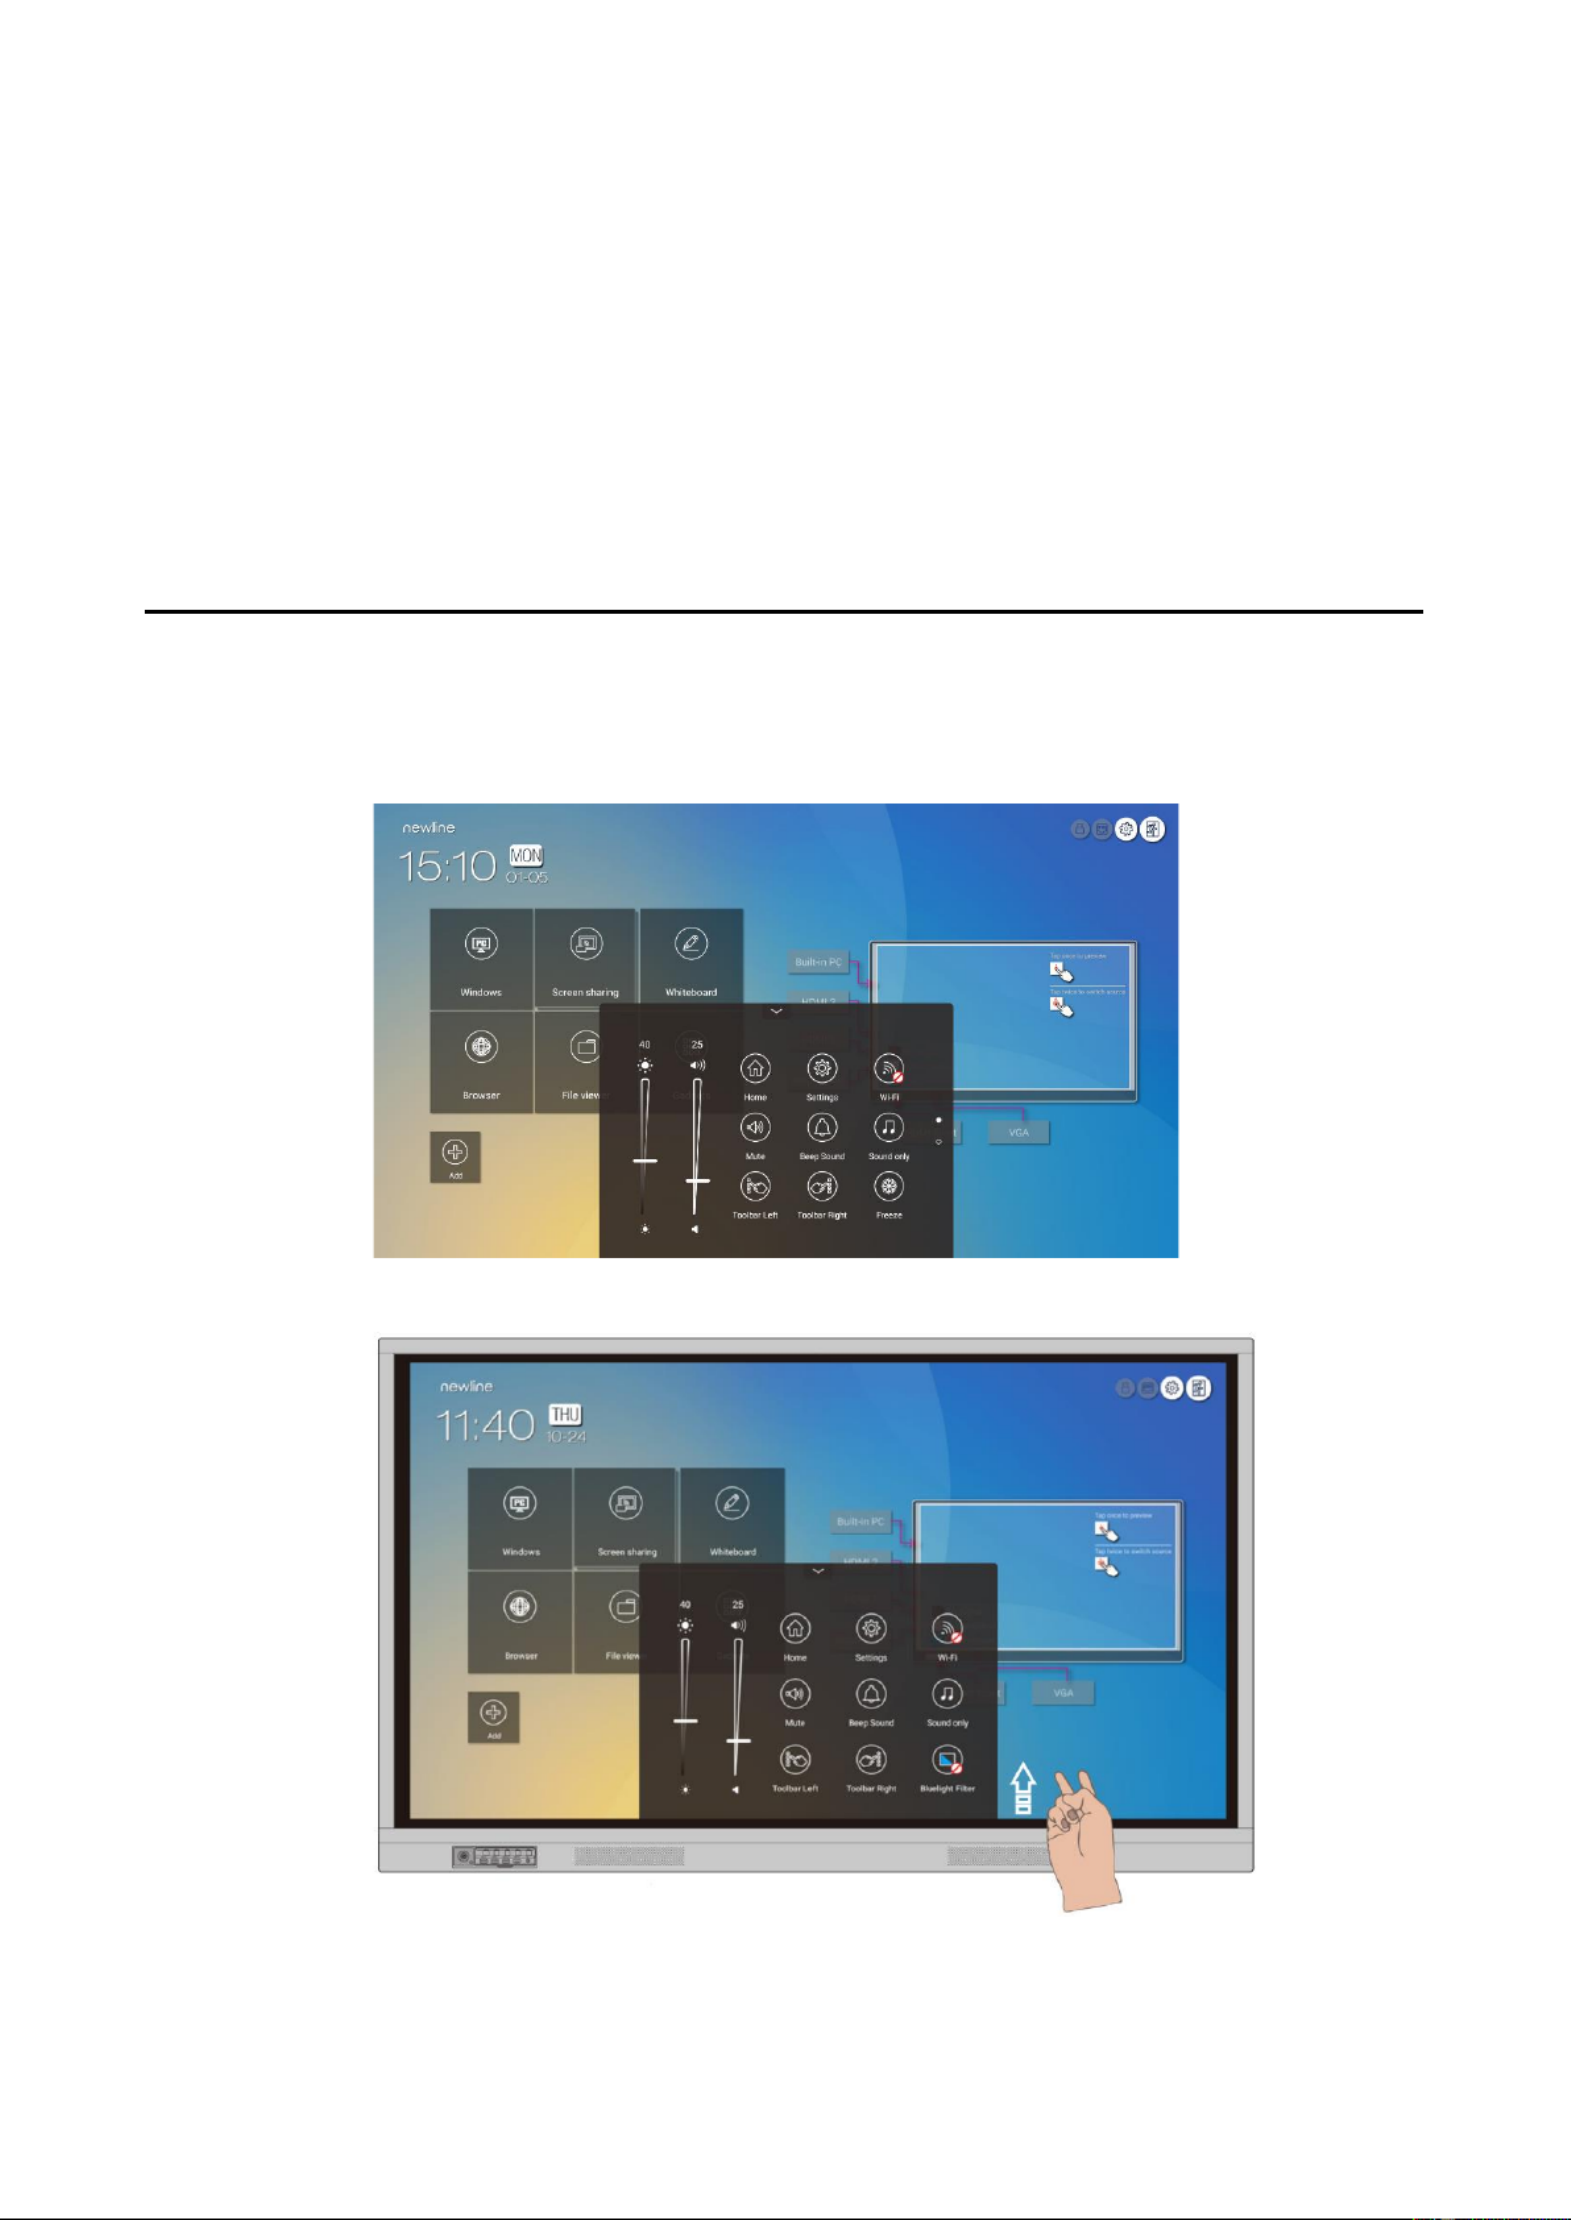
5 Quick Setting Menu
Using two fingers to swipe up from the bottom of the screen, the Quick Settings menu will
appear, as shown in the following figure.

73
Icon
Functions
Drag the slider to adjust the brightness.
Drag the slider to adjust the volume.
Click the icon to return to Home page.
Click the icon to enter the settings page.
Click the icon to turn on/off the Smart system Wi-Fi.
Click the icon to mute/unmute.
Click the icon to turn on/off the beep sound.
Click the icon to enable sound only mode.
In sound only mode, the screen LCD displays and LED backlight turns off,
other functions are in normal operating condition.
Click the icon to turn on/off the left toolbar.
Click the icon to turn on/off the right toolbar.
Click the icon to turn on/off the screen freeze function.

75
Function
Controlling codes
Return codes
VGA
7F 08 99 A2 B3 C4 02 FF 01 54
CF
7F 09 99 A2 B3 C4 02 FF 01 54 01
CF
Internal PC
7F 08 99 A2 B3 C4 02 FF 01 38
CF
7F 09 99 A2 B3 C4 02 FF 01 38 01
CF
DP
7F 08 99 A2 B3 C4 02 FF 01 56
CF
7F 09 99 A2 B3 C4 02 FF 01 56 01
CF
Page up
7F 08 99 A2 B3 C4 02 FF 01 13
CF
7F 09 99 A2 B3 C4 02 FF 01 13 01
CF
Page down
7F 08 99 A2 B3 C4 02 FF 01 14
CF
7F 09 99 A2 B3 C4 02 FF 01 14 01
CF
VOL -
7F 08 99 A2 B3 C4 02 FF 01 17
CF
7F 09 99 A2 B3 C4 02 FF 01 17 01
CF
VOL +
7F 08 99 A2 B3 C4 02 FF 01 18
CF
7F 09 99 A2 B3 C4 02 FF 01 18 01
CF
Menu
7F 08 99 A2 B3 C4 02 FF 01
1B CF
7F 09 99 A2 B3 C4 02 FF 01 1B 01
CF
Home page
7F 08 99 A2 B3 C4 02 FF 01
1C CF
7F 09 99 A2 B3 C4 02 FF 01 1C 01
CF
Return (exit)
7F 08 99 A2 B3 C4 02 FF 01
1D CF
7F 09 99 A2 B3 C4 02 FF 01 1D 01
CF
OK
7F 08 99 A2 B3 C4 02 FF 01
2B CF
7F 09 99 A2 B3 C4 02 FF 01 2B 01
CF
←
7F 08 99 A2 B3 C4 02 FF 01
2C CF
7F 09 99 A2 B3 C4 02 FF 01 2C 01
CF
→
7F 08 99 A2 B3 C4 02 FF 01
2D CF
7F 09 99 A2 B3 C4 02 FF 01 2D 01
CF
↑
7F 08 99 A2 B3 C4 02 FF 01 2E
CF
7F 09 99 A2 B3 C4 02 FF 01 2E 01
CF
↓
7F 08 99 A2 B3 C4 02 FF 01 2F
CF
7F 09 99 A2 B3 C4 02 FF 01 2F 01
CF
Set volume
7F 08 99 A2 B3 C4 02 FF 05
XX CF
XX indicates the volume value
(0 to 100), corresponding to
hexadecimals 00 to 64.
7F 09 99 A2 B3 C4 02 FF 05 XX
01 CF
Query the
firmware version
number
7F 08 99 A2 B3 C4 02 FF 01
3D CF
7F 09 99 A2 B3 C4 02 FF 01 3D 01
CF
Termékspecifikációk
| Márka: | Newline |
| Kategória: | Monitor |
| Modell: | TT-6519RS |
Szüksége van segítségre?
Ha segítségre van szüksége Newline TT-6519RS, tegyen fel kérdést alább, és más felhasználók válaszolnak Önnek
Útmutatók Monitor Newline

20 Augusztus 2024
10 Augusztus 2024
2 Augusztus 2024
31 Július 2024
29 Július 2024
20 Július 2024
20 Július 2024
20 Július 2024
17 Július 2024
16 Július 2024
Útmutatók Monitor
- Monitor Samsung
- Monitor PeakTech
- Monitor Sony
- Monitor Yamaha
- Monitor Fujitsu
- Monitor Acer
- Monitor LG
- Monitor Philips
- Monitor Pioneer
- Monitor Olympus
- Monitor SilverCrest
- Monitor Garmin
- Monitor RCF
- Monitor Bosch
- Monitor Panasonic
- Monitor Canon
- Monitor JVC
- Monitor Sharp
- Monitor Lenovo
- Monitor HyperX
- Monitor Toshiba
- Monitor Neumann
- Monitor Omron
- Monitor HP
- Monitor Hyundai
- Monitor Hisense
- Monitor BenQ
- Monitor Apple
- Monitor Emos
- Monitor Medion
- Monitor Vimar
- Monitor JBL
- Monitor TCL
- Monitor OSEE
- Monitor Viessmann
- Monitor Insignia
- Monitor LC-Power
- Monitor Dell
- Monitor Boss
- Monitor Crestron
- Monitor Gigabyte
- Monitor Tripp Lite
- Monitor Xerox
- Monitor Thomson
- Monitor Speco Technologies
- Monitor Hikvision
- Monitor Eurolite
- Monitor Epson
- Monitor V7
- Monitor Huawei
- Monitor Asus
- Monitor PEAQ
- Monitor Renkforce
- Monitor Haier
- Monitor Mitsubishi
- Monitor M-Audio
- Monitor AOC
- Monitor Citizen
- Monitor Westinghouse
- Monitor Hitachi
- Monitor Continental Edison
- Monitor Asrock
- Monitor Ring
- Monitor Alpine
- Monitor Optoma
- Monitor SPL
- Monitor Smart
- Monitor Dahua Technology
- Monitor Viewsonic
- Monitor Denver
- Monitor Dynaudio
- Monitor Ernitec
- Monitor Qian
- Monitor Joy-It
- Monitor MSI
- Monitor Daewoo
- Monitor Tesla
- Monitor Kali Audio
- Monitor Godox
- Monitor Cisco
- Monitor Behringer
- Monitor APC
- Monitor KRK
- Monitor Cooler Master
- Monitor Chauvet
- Monitor Shure
- Monitor PreSonus
- Monitor Archos
- Monitor Deltaco
- Monitor Tannoy
- Monitor Plantronics
- Monitor Kogan
- Monitor Honeywell
- Monitor SMART Technologies
- Monitor Marshall
- Monitor Kindermann
- Monitor Alesis
- Monitor Velleman
- Monitor Prestigio
- Monitor Monacor
- Monitor IK Multimedia
- Monitor Blaupunkt
- Monitor NZXT
- Monitor Yealink
- Monitor Razer
- Monitor Samson
- Monitor Jay-Tech
- Monitor Mackie
- Monitor Posiflex
- Monitor Peerless-AV
- Monitor Abus
- Monitor AG Neovo
- Monitor Iiyama
- Monitor Konig
- Monitor Seiki
- Monitor 3M
- Monitor ARRI
- Monitor GlobalTronics
- Monitor Jensen
- Monitor Pyle
- Monitor AVer
- Monitor Sanyo
- Monitor Salora
- Monitor IFM
- Monitor DataVideo
- Monitor Maxell
- Monitor Atlona
- Monitor Schneider
- Monitor AJA
- Monitor Brandson
- Monitor Danfoss
- Monitor Vorago
- Monitor Barco
- Monitor NEC
- Monitor Element
- Monitor Marshall Electronics
- Monitor Yorkville
- Monitor Elo
- Monitor IStarUSA
- Monitor Provision-ISR
- Monitor Postium
- Monitor Orion
- Monitor Palmer
- Monitor EverFocus
- Monitor Elvid
- Monitor Gamber-Johnson
- Monitor Focal
- Monitor Adj
- Monitor Legamaster
- Monitor Wohler
- Monitor Packard Bell
- Monitor Vitek
- Monitor Planar
- Monitor Mobile Pixels
- Monitor CSL
- Monitor Newstar
- Monitor SWIT
- Monitor RGBlink
- Monitor Kramer
- Monitor ART
- Monitor AMX
- Monitor Alienware
- Monitor Emachines
- Monitor Caliber
- Monitor Maxdata
- Monitor Sunstech
- Monitor Sunny
- Monitor BlueBuilt
- Monitor Marquant
- Monitor Da-Lite
- Monitor ProXtend
- Monitor Kubo
- Monitor GeoVision
- Monitor LaCie
- Monitor InFocus
- Monitor Midas
- Monitor Festo
- Monitor Swissonic
- Monitor Waeco
- Monitor Ikan
- Monitor IHealth
- Monitor QSC
- Monitor Hannspree
- Monitor ESI
- Monitor Avocor
- Monitor Simrad
- Monitor Jung
- Monitor Genelec
- Monitor Interlogix
- Monitor Eizo
- Monitor POSline
- Monitor Peerless
- Monitor Atomos
- Monitor Mad Catz
- Monitor Krom
- Monitor Monoprice
- Monitor Promethean
- Monitor Odys
- Monitor Fostex
- Monitor Prowise
- Monitor Terra
- Monitor Neets
- Monitor Stairville
- Monitor Soundstream
- Monitor Xoro
- Monitor HKC
- Monitor I3-Technologies
- Monitor CTOUCH
- Monitor Ozone
- Monitor HoverCam
- Monitor Ibm
- Monitor BOOX
- Monitor Aputure
- Monitor Drawmer
- Monitor Blue Sky
- Monitor Zalman
- Monitor Iadea
- Monitor Advantech
- Monitor Hercules
- Monitor Sonifex
- Monitor Avantone Pro
- Monitor Ganz
- Monitor Extron
- Monitor Belinea
- Monitor Adam
- Monitor Triton
- Monitor ITek
- Monitor Akuvox
- Monitor Antelope Audio
- Monitor MicroTouch
- Monitor X-Rite
- Monitor EKO
- Monitor ONYX
- Monitor IBoardTouch
- Monitor Mirai
- Monitor Elite Screens
- Monitor Mitsai
- Monitor Skytronic
- Monitor TV One
- Monitor Christie
- Monitor Hanwha
- Monitor COMMBOX
- Monitor Yiynova
- Monitor Pelco
- Monitor Lilliput
- Monitor LightZone
- Monitor AOpen
- Monitor Planet Audio
- Monitor EC Line
- Monitor Datacolor
- Monitor Fluid
- Monitor HELGI
- Monitor Desview
- Monitor Syscom
- Monitor Allsee
- Monitor Alogic
- Monitor Night Owl
- Monitor ProDVX
- Monitor Varad
- Monitor PureTools
- Monitor DoubleSight
- Monitor CTL
- Monitor Game Factor
- Monitor Nixeus
- Monitor Chimei
- Monitor Blue Sea
- Monitor AMCV
- Monitor Faytech
- Monitor Hamlet
- Monitor Wyse - Dell
- Monitor Approx
- Monitor Bauhn
- Monitor TVLogic
- Monitor Feelworld
- Monitor GeChic
- Monitor Oecolux
- Monitor ADS-TEC
- Monitor Satco
- Monitor Casalux
- Monitor Positivo
- Monitor Jupiter
- Monitor Transvideo
- Monitor Innocn
- Monitor KeepOut
- Monitor Shimbol
- Monitor Raysgem
- Monitor Motrona
- Monitor Ikegami
- Monitor AORUS
- Monitor Portkeys
- Monitor Mimo Monitors
- Monitor Enttec
- Monitor American Dynamics
- Monitor AIS
- Monitor Eve Audio
- Monitor Wortmann AG
- Monitor Viotek
- Monitor Vidi-Touch
- Monitor KTC
- Monitor CoolerMaster
- Monitor Atlantis Land
- Monitor HEDD
- Monitor Colormetrics
- Monitor Monkey Banana
- Monitor SmallHD
- Monitor UPERFECT
- Monitor GVision
- Monitor Voxicon
- Monitor Mybeo
- Monitor Bearware
- Monitor IOIO
- Monitor DTEN
- Monitor Cocopar
- Monitor Titan Army
- Monitor Xenarc
- Monitor Delvcam
- Monitor Wimaxit
- Monitor BookIT
Legújabb útmutatók Monitor

9 Április 2025

9 Április 2025

9 Április 2025

8 Április 2025
8 Április 2025

5 Április 2025

5 Április 2025

4 Április 2025
2 Április 2025
2 Április 2025