Használati útmutató Netgear RN524X
Olvassa el alább 📖 a magyar nyelvű használati útmutatót Netgear RN524X (213 oldal) a szerver kategóriában. Ezt az útmutatót 4 ember találta hasznosnak és 2 felhasználó értékelte átlagosan 4.5 csillagra
Oldal 1/213

ReadyNAS OS 6 Desktop
Storage Systems
Hardware Manual
Model
ReadyNAS 102, 104
ReadyNAS 202, 204, 212, 214
ReadyNAS 312, 314, 316
ReadyNAS 422, 424, 426, 428
ReadyNAS 516, 524X, 526X, 528X
ReadyNAS 626X, 628X
ReadyNAS 716X
EDA 500
April 2017
202-11206-10
350 E. Plumeria Drive
San Jose, CA 95134
USA

Support
Thank you for purchasing this NETGEAR product. You can visit www.netgear.com/support to register your
product, get help, access the latest downloads and user manuals, and join our community. We recommend that
you use only ocial NETGEAR support resources.
Conformity
For the current EU Declaration of Conformity, visit http://kb.netgear.com/app/answers/detail/a_id/11621.
Compliance
For regulatory compliance information, visit http://www.netgear.com/about/regulatory.
See the regulatory compliance document before connecting the power supply.
Trademarks
© NETGEAR, Inc., NETGEAR, and the NETGEAR Logo are trademarks of NETGEAR, Inc. Any non-NETGEAR
trademarks are used for reference purposes only.
2
ReadyNAS OS 6 Desktop Storage Systems

Contents
Chapter 1 Getting Started
Additional Documentation 13....................................................................................
Setup Locationsetup location 13...............................................................................
Supported Operating Systems 13.............................................................................
Supported Browsers 14............................................................................................
Diskless Storage Systems 14...................................................................................
Chapter 2 NETGEAR ReadyNAS 102
Front and Side Panels 16..........................................................................................
Drive Bays 16............................................................................................................
Rear Panel 17...........................................................................................................
Status Information 18................................................................................................
Power On and Shut Down 19....................................................................................
Power On 20.........................................................................................................
Preferred Shutdown 20........................................................................................
Forced Shutdown 20............................................................................................
Boot Menu 20............................................................................................................
Chapter 3 NETGEAR ReadyNAS 104
Front and Side Panels 24..........................................................................................
Drive Bays 24............................................................................................................
Rear Panel 25...........................................................................................................
Status Information 26................................................................................................
Power On and Shut Down 27....................................................................................
Power On 28.........................................................................................................
Preferred Shutdown 28........................................................................................
Forced Shutdown 28............................................................................................
Boot Menu 28............................................................................................................
Chapter 4 NETGEAR ReadyNAS 202
Front and Side Panels 31..........................................................................................
Drive Bays 31............................................................................................................
Rear Panel 32...........................................................................................................
Status Information 33................................................................................................
Power On and Shut Down 34....................................................................................
Power On 35.........................................................................................................
Preferred Shutdown 35........................................................................................
Forced Shutdown 35............................................................................................
Boot Menu 35............................................................................................................
Chapter 5 NETGEAR ReadyNAS 204
Front and Side Panels 39..........................................................................................
3

Drive Bays 39............................................................................................................
Rear Panel 40...........................................................................................................
Status Information 41................................................................................................
Power On and Shut Down 42....................................................................................
Power On 43.........................................................................................................
Preferred Shutdown 43........................................................................................
Forced Shutdown 43............................................................................................
Boot Menu 43............................................................................................................
Chapter 6 NETGEAR ReadyNAS 212
Front and Side Panels 46..........................................................................................
Drive Bays 46............................................................................................................
Rear Panel 47...........................................................................................................
Status Information 48................................................................................................
Power On and Shut Down 49....................................................................................
Power On 50.........................................................................................................
Preferred Shutdown 50........................................................................................
Forced Shutdown 50............................................................................................
Boot Menu 50............................................................................................................
Chapter 7 NETGEAR ReadyNAS 214
Front and Side Panels 54..........................................................................................
Drive Bays 54............................................................................................................
Rear Panel 55...........................................................................................................
Status Information 56................................................................................................
Power On and Shut Down 57....................................................................................
Power On 58.........................................................................................................
Preferred Shutdown 58........................................................................................
Forced Shutdown 58............................................................................................
Boot Menu 58............................................................................................................
Chapter 8 NETGEAR ReadyNAS 312
Front and Side Panels 61..........................................................................................
Drive Bays 61............................................................................................................
Rear Panel 62...........................................................................................................
Status Information 63................................................................................................
Power On and Shut Down 64....................................................................................
Power On 64.........................................................................................................
Preferred Shutdown 65........................................................................................
Forced Shutdown 65............................................................................................
Boot Menu 65............................................................................................................
Chapter 9 NETGEAR ReadyNAS 314
Front and Side Panels 69..........................................................................................
Drive Bays 69............................................................................................................
Rear Panel 70...........................................................................................................
Status Information 71................................................................................................
Power On and Shut Down 72....................................................................................
4
ReadyNAS OS 6 Desktop Storage Systems

Power On 73.........................................................................................................
Preferred Shutdown 73........................................................................................
Forced Shutdown 73............................................................................................
Boot Menu 74............................................................................................................
Chapter 10 NETGEAR ReadyNAS 316
Front and Side Panels 77..........................................................................................
Drive Bays 77............................................................................................................
Rear Panel 78...........................................................................................................
Status Information 79................................................................................................
Power On and Shut Down 80....................................................................................
Power On 80.........................................................................................................
Preferred Shutdown 81........................................................................................
Forced Shutdown 81............................................................................................
Boot Menu 81............................................................................................................
Chapter 11 NETGEAR ReadyNAS 422
Front and Side Panels 84..........................................................................................
Drive Bays 85............................................................................................................
Rear Panel 86...........................................................................................................
Status Information 87................................................................................................
Power On and Shut Down 87....................................................................................
Power On 88.........................................................................................................
Preferred Shutdown 88........................................................................................
Forced Shutdown 88............................................................................................
Boot Menu 89............................................................................................................
Chapter 12 NETGEAR ReadyNAS 424
Front and Side Panels 92..........................................................................................
Drive Bays 93............................................................................................................
Rear Panel 94...........................................................................................................
Status Information 95................................................................................................
Power On and Shut Down 95....................................................................................
Power On 96.........................................................................................................
Preferred Shutdown 96........................................................................................
Forced Shutdown 96............................................................................................
Boot Menu 97............................................................................................................
Chapter 13 NETGEAR ReadyNAS 426
Front and Side Panels 100........................................................................................
Drive Bays 101..........................................................................................................
Rear Panel 102.........................................................................................................
Status Information 103..............................................................................................
Power On and Shut Down 103..................................................................................
Power On 104.......................................................................................................
Preferred Shutdown 104......................................................................................
Forced Shutdown 105..........................................................................................
Boot Menu 105..........................................................................................................
5
ReadyNAS OS 6 Desktop Storage Systems

Chapter 14 NETGEAR ReadyNAS 428
Front and Side Panels 108........................................................................................
Drive Bays 109..........................................................................................................
Rear Panel 110.........................................................................................................
Status Information 111..............................................................................................
Power On and Shut Down 111..................................................................................
Power On 112.......................................................................................................
Preferred Shutdown 112......................................................................................
Forced Shutdown 112..........................................................................................
Boot Menu 113..........................................................................................................
Chapter 15 NETGEAR ReadyNAS 516
Front and Side Panels 116........................................................................................
Drive Bays 116..........................................................................................................
Rear Panel 117.........................................................................................................
Status Information 118..............................................................................................
Power On and Shut Down 119..................................................................................
Power On 119.......................................................................................................
Preferred Shutdown 120......................................................................................
Forced Shutdown 120..........................................................................................
Boot Menu 120..........................................................................................................
Chapter 16 NETGEAR ReadyNAS 524X
Front and Side Panels 123........................................................................................
Drive Bays 124..........................................................................................................
Rear Panel 125.........................................................................................................
Status Information 126..............................................................................................
Power On and Shut Down 127..................................................................................
Power On 127.......................................................................................................
Preferred Shutdown 128......................................................................................
Forced Shutdown 128..........................................................................................
Boot Menu 128..........................................................................................................
Chapter 17 NETGEAR ReadyNAS 526X and 626X
Front and Side Panels 131........................................................................................
Drive Bays 132..........................................................................................................
Rear Panel ReadyNAS 526X 133.............................................................................
Rear Panel ReadyNAS 626X 134.............................................................................
Status Information 135..............................................................................................
Power On and Shut Down 136..................................................................................
Power On 136.......................................................................................................
Preferred Shutdown 137......................................................................................
Forced Shutdown 137..........................................................................................
Boot Menu 137..........................................................................................................
Chapter 18 NETGEAR ReadyNAS 528X and 628X
Front and Side Panels 140........................................................................................
6
ReadyNAS OS 6 Desktop Storage Systems

Drive Bays 141..........................................................................................................
Rear Panel ReadyNAS 528X 142.............................................................................
Rear Panel ReadyNAS 628X 143.............................................................................
Status Information 144..............................................................................................
Power On and Shut Down 145..................................................................................
Power On 145.......................................................................................................
Preferred Shutdown 146......................................................................................
Forced Shutdown 146..........................................................................................
Boot Menu 146..........................................................................................................
Chapter 19 NETGEAR ReadyNAS 716X
Front and Side Panels 149........................................................................................
Drive Bays 149..........................................................................................................
Rear Panel 150.........................................................................................................
Status Information 151..............................................................................................
Power On and Shut Down 153..................................................................................
Power On 153.......................................................................................................
Preferred Shutdown 154......................................................................................
Forced Shutdown 154..........................................................................................
Boot Menu 154..........................................................................................................
Chapter 20 NETGEAR EDA 500
Front and Side Panels 157........................................................................................
Drive Bays 157..........................................................................................................
Rear Panel 158.........................................................................................................
Status Information 159..............................................................................................
Power On and Shut Down 160..................................................................................
Power On 160.......................................................................................................
Preferred Shutdown 161......................................................................................
Forced Shutdown 161..........................................................................................
Chapter 21 Disks
Disk Trays 163...........................................................................................................
Standard Disk Traydisk trays standard 163..........................................................
EDA 500 Disk Tray 164.........................................................................................
Supported Disks 164................................................................................................
Previously Formatted Disks 165...............................................................................
Reformat Previously Formatted Disks 165...........................................................
Migrate a Volume 166...........................................................................................
Add a Disk 166..........................................................................................................
Add a 3.5-Inch Disk 166.......................................................................................
Add a 2.5-Inch Disk 171.......................................................................................
Replace a Disk 175...................................................................................................
Replace a 3.5-Inch Disk 175................................................................................
Replace a 2.5-Inch Disk 180................................................................................
Appendix A Defaults and Technical Specications
Factory Default Settings 184.....................................................................................
7
ReadyNAS OS 6 Desktop Storage Systems

ReadyNAS 102 Technical Specications 184...........................................................
General: 184.........................................................................................................
Physical dimensions (h x w x d): 185...................................................................
Physical weight: 185.............................................................................................
Power consumption: 185......................................................................................
Electrical: 185.......................................................................................................
Environmental requirements: 185........................................................................
Certifications: 185................................................................................................
ReadyNAS 104 Technical Specications 186...........................................................
General: 186.........................................................................................................
Physical dimensions (h x w x d): 186...................................................................
Physical weight: 186.............................................................................................
Power consumption: 186......................................................................................
Electrical: 186.......................................................................................................
Environmental requirements: 187........................................................................
Certifications: 187................................................................................................
ReadyNAS 202 Technical Specications 187...........................................................
General: 187.........................................................................................................
Physical dimensions (h x w x d): 187...................................................................
Physical weight: 187.............................................................................................
Power consumption: 188......................................................................................
Electrical: 188.......................................................................................................
Environmental requirements: 188........................................................................
Certifications: 188................................................................................................
ReadyNAS 212 Technical Specications 188...........................................................
General: 188.........................................................................................................
Physical dimensions (h x w x d): 189...................................................................
Physical weight: 189.............................................................................................
Power consumption: 189......................................................................................
Electrical: 189.......................................................................................................
Environmental requirements: 189........................................................................
Certifications: 189................................................................................................
ReadyNAS 204 Technical Specications 189...........................................................
General: 189.........................................................................................................
Physical dimensions (h x w x d): 190...................................................................
Physical weight: 190.............................................................................................
Power consumption: 190......................................................................................
Electrical: 190.......................................................................................................
Environmental requirements: 190........................................................................
Certifications: 190................................................................................................
ReadyNAS 214 Technical Specications 191...........................................................
General: 191.........................................................................................................
Physical dimensions (h x w x d): 191...................................................................
Physical weight: 191.............................................................................................
Power consumption: 191......................................................................................
Electrical: 191.......................................................................................................
Environmental requirements: 191........................................................................
Certifications: 192................................................................................................
ReadyNAS 312 Technical Specications 192...........................................................
8
ReadyNAS OS 6 Desktop Storage Systems

General: 192.........................................................................................................
Physical dimensions (h x w x d): 192...................................................................
Physical weight: 192.............................................................................................
Power consumption: 192......................................................................................
Electrical: 193.......................................................................................................
Environmental requirements: 193........................................................................
Certifications: 193................................................................................................
ReadyNAS 314 Technical Specications 193...........................................................
General: 193.........................................................................................................
Physical dimensions (h x w x d): 193...................................................................
Physical weight: 194.............................................................................................
Power consumption: 194......................................................................................
Electrical: 194.......................................................................................................
Environmental requirements: 194........................................................................
Certifications: 194................................................................................................
ReadyNAS 316 Technical Specications 194...........................................................
General: 194.........................................................................................................
Physical dimensions (h x w x d): 195...................................................................
Physical weight: 195.............................................................................................
Power consumption: 195......................................................................................
Electrical: 195.......................................................................................................
Environmental requirements: 195........................................................................
Certifications: 196................................................................................................
ReadyNAS 422 Technical Specications 196...........................................................
General: 196.........................................................................................................
Physical dimensions (h x w x d): 196...................................................................
Physical weight: 196.............................................................................................
Power consumption: 196......................................................................................
Electrical: 196.......................................................................................................
Environmental requirements: 197........................................................................
Certifications: 197................................................................................................
ReadyNAS 424 Technical Specications 197...........................................................
General: 197.........................................................................................................
Physical dimensions (h x w x d): 197...................................................................
Physical weight: 197.............................................................................................
Power consumption: 198......................................................................................
Electrical: 198.......................................................................................................
Environmental requirements: 198........................................................................
Certifications: 198................................................................................................
ReadyNAS 426 Technical Specications 198...........................................................
General: 198.........................................................................................................
Physical dimensions (h x w x d): 199...................................................................
Physical weight: 199.............................................................................................
Power consumption: 199......................................................................................
Electrical: 199.......................................................................................................
Environmental requirements: 199........................................................................
Certifications: 199................................................................................................
ReadyNAS 428 Technical Specications 200...........................................................
General: 200.........................................................................................................
9
ReadyNAS OS 6 Desktop Storage Systems

Physical dimensions (h x w x d): 200...................................................................
Physical weight: 200.............................................................................................
Power consumption: 200......................................................................................
Electrical: 200.......................................................................................................
Environmental requirements: 201........................................................................
Certifications: 201................................................................................................
ReadyNAS 516 Technical Specications 201...........................................................
General: 201.........................................................................................................
Physical dimensions (h x w x d): 201...................................................................
Physical weight: 201.............................................................................................
Power consumption: 202......................................................................................
Electrical: 202.......................................................................................................
Environmental requirements: 202........................................................................
Certifications: 202................................................................................................
ReadyNAS 524X Technical Specications 202.........................................................
General: 202.........................................................................................................
Physical dimensions (h x w x d): 203...................................................................
Physical weight: 203.............................................................................................
Power consumption: 203......................................................................................
Electrical: 203.......................................................................................................
Environmental requirements: 203........................................................................
Certifications: 203................................................................................................
ReadyNAS 526X Technical Specications 204.........................................................
General: 204.........................................................................................................
Physical dimensions (h x w x d): 204...................................................................
Physical weight: 204.............................................................................................
Power consumption: 204......................................................................................
Electrical: 204.......................................................................................................
Environmental requirements: 205........................................................................
Certifications: 205................................................................................................
ReadyNAS 528X Technical Specications 205.........................................................
General: 205.........................................................................................................
Physical dimensions (h x w x d): 205...................................................................
Physical weight: 205.............................................................................................
Power consumption: 206......................................................................................
Electrical: 206.......................................................................................................
Environmental requirements: 206........................................................................
Certifications: 206................................................................................................
ReadyNAS 626X Technical Specications 206.........................................................
General: 206.........................................................................................................
Physical dimensions (h x w x d): 207...................................................................
Physical weight: 207.............................................................................................
Power consumption: 207......................................................................................
Electrical: 207.......................................................................................................
Environmental requirements: 207........................................................................
Certifications: 207................................................................................................
ReadyNAS 628X Technical Specications 208.........................................................
General: 208.........................................................................................................
Physical dimensions (h x w x d): 208...................................................................
10
ReadyNAS OS 6 Desktop Storage Systems

Physical weight: 208.............................................................................................
Power consumption: 208......................................................................................
Electrical: 208.......................................................................................................
Environmental requirements: 209........................................................................
Certifications: 209................................................................................................
ReadyNAS 716X Technical Specications 209.........................................................
General: 209.........................................................................................................
Physical dimensions (h x w x d): 209...................................................................
Physical weight: 209.............................................................................................
Power consumption: 210......................................................................................
Electrical: 210.......................................................................................................
Environmental requirements: 210........................................................................
Certifications: 210................................................................................................
EDA 500 Technical Specications 210......................................................................
General: 210.........................................................................................................
Physical dimensions (h x w x d): 210...................................................................
Physical weight: 211.............................................................................................
Power consumption: 211......................................................................................
Electrical: 211.......................................................................................................
Environmental requirements: 211........................................................................
Certifications: 211................................................................................................
Safety Warnings 211.................................................................................................
Electrical Safety Precautions 212.........................................................................
General Safety Precautions 212..........................................................................
Electrostatic Discharge Precautions 212..............................................................
11
ReadyNAS OS 6 Desktop Storage Systems

1
Getting Started
Congratulations on your purchase of a NETGEAR ReadyNAS storage system. This manual describes the®
physical features of the ReadyNAS OS 6 desktop storage systems.
This chapter contains the following sections:
•Additional Documentation on page 13
•Setup Location on page 13
•Supported Operating Systems on page 13
•Supported Browsers on page 14
•Diskless Storage Systems on page 14
12

Additional Documentation
For detailed information about conguring, managing, and using your ReadyNAS storage system, see the
ReadyNAS OS 6 Software Manual, which is available at netgear.com/support/product/ReadyNAS_OS_6.
NETGEAR maintains a community website that supports ReadyNAS products. Visit
www.netgear.com/readynas for reviews, tutorials, a comparison chart, software updates, documentation,
an active user forum, and much more.
Setup Location
Your ReadyNAS storage system is suitable for use in a home or small oce environment where it can be
freestanding. The small, compact size makes it suitable for sitting on a desk or on a closet shelf.
Choose a location for your storage system that meets these criteria:
•Cables can be connected easily.
•Water or moisture cannot enter the case.
•Airow around the storage system and through the vents in the side of the case is not restricted.
•The air is as free of dust as possible.
•Temperature operating limits are not likely to be exceeded.
•If you are using an uninterruptable power supply (UPS) for protection, the power cable can be securely
and safely connected to the UPS.
Supported Operating Systems
The ReadyNAS storage system is supported on the following systems:
•Microsoft Windows 10 (32 bit and 64 bit)
•Microsoft Windows 8.1 (32 bit and 64 bit)
•Microsoft Windows 8 (32 bit and 64 bit)
•Microsoft Windows 7 (32 bit and 64 bit)
•Windows Server 2016 (64 bit)
•Windows Server 2012 R2 (64 bit)
•Microsoft Server 2012 (64 bit)
•Microsoft Server 2008 R2 (64 bit)
•Apple OS X 10.7 or later
•Linux, UNIX, Solaris
•Apple iOS
•Google Android
Getting Started
13
ReadyNAS OS 6 Desktop Storage Systems

Supported Browsers
The ReadyNAS local admin page supports the following browsers:
•Microsoft Edge
•Microsoft Internet Explorer 9.0 and later
•Apple Safari, 5.0 and later
•Google Chrome 20 and later
•Mozilla Firefox 14 and later
If you experience diculty accessing the local admin page or if you notice unexpected behavior, try using
another browser. For more information about the ReadyNAS local admin page, see the ReadyNAS OS 6
Software Manual, which is available at netgear.com/support/product/ReadyNAS_OS_6.
Diskless Storage Systems
If you purchased a ReadyNAS storage system without a preinstalled disk drive or drives, you must add at
least one disk your system before you use the system. You can add a 3.5-inch hard disk drive, a 2.5-inch
hard disk drive, or a 2.5-inch solid state drive to an empty drive bay. For information about how to install a
disk, see on page 166.Add a Disk
Use only supported SATA hard disk drives (HDD) or solid state drives (SSD) in your ReadyNAS storage
system. If you use disks that are not supported, NETGEAR technical support will not provide assistance.
For a list of supported disks, see the NETGEAR Hardware Compatibility List at netgear.com/readynas-hcl.
If you are adding a previously formatted disk to your storage system, see the instructions in Previously
Formatted Disks on page 165.
Getting Started
14
ReadyNAS OS 6 Desktop Storage Systems

2
NETGEAR ReadyNAS 102
This chapter provides an overview of the physical features of the ReadyNAS 102 and includes the following
sections:
•Front and Side Panels on page 16
•Drive Bays on page 16
•Rear Panel on page 17
•Status Information on page 18
•Power On and Shut Down on page 19
•Boot Menu on page 20
15

Front and Side Panels
The following gure shows the front and side panels of the ReadyNAS 102.
Figure 1. ReadyNAS 102 front and side panels
1. Power button and LED
2. Disk activity LED
3. Exhaust vent
4. USB 2.0 port
5. Backup button
6. USB and Backup status LED
7. Disk 1 and Disk 2 LEDs
8. Drive bay door
Drive Bays
The following gure shows the drive bays of the ReadyNAS 102.
NETGEAR ReadyNAS 102
16
ReadyNAS OS 6 Desktop Storage Systems

Figure 2. ReadyNAS 102 drive bays
1. Drive bay door
2. Disk tray handle
3. Recessed disk tray handle lock
4. Disk tray release latch
5. Drive bays
Rear Panel
The following gure shows the rear panel of the ReadyNAS 102.
NETGEAR ReadyNAS 102
17
ReadyNAS OS 6 Desktop Storage Systems

Figure 3. ReadyNAS 102 rear panel
1. Exhaust fan
2. Kensington lock
3. GbE ports with LED status indicators
4. USB 3.0 ports
5. eSATA port
6. Reset button
7. Power adapter socket
Status Information
You can obtain information about the status of your storage system by reviewing the indicators listed in the
following table.
NETGEAR ReadyNAS 102
18
ReadyNAS OS 6 Desktop Storage Systems

Table 1. ReadyNAS 102 indicator descriptions
DescriptionIndicator
Press this button to turn on the ReadyNAS. The LED indicates these states:
•On. Powered on.
•Blinking. Booting or shutting down.
•O. Powered o.
Power button and LED
An LED on the front panel of the storage system is associated with each drive bay.
The disk LEDs have these states:
•On. Power is on and the disk is operating normally.
•Blinking. The disk was removed, failed, or is resynchronizing.
•O. The drive bay is empty.
Disk LEDs (1, 2)
The disk activity LED has these states:
•On. At least one disk is present.
•Blinking. A disk is active.
•O. All disks are idle.
Disk activity LED
Two LED status indicators are built into this port, one green and one amber. They
indicate port speed and activity as follows:
•Green on, amber o. 1000 Mbps connection speed, no activity.
•Green blinking, amber o. 1000 Mbps connection speed, activity.
•Green o, amber on. 10 Mbps or 100 Mbps connection speed, no activity.
•Green o, amber blinking. 10 Mbps or 100 Mbps connection speed, activity.
•Green o, amber o. No connection.
Rear panel Ethernet port
LEDs
Power On and Shut Down
This section describes how to power on and shut down your system. If you must shut down the system, use
one of the preferred shutdown methods whenever possible.
NETGEAR ReadyNAS 102
19
ReadyNAS OS 6 Desktop Storage Systems

Power On
When you connect the system to a power supply or the system recovers from a power outage, the system
returns to its last state:
•If the system was powered on, the system automatically powers on again when the power supply is
connected or power is restored.
•If the system was powered off, the system remains off when the power supply is connected or power
is restored.
In this situation, press the Power button on the front panel of the system to power on the system.
Preferred Shutdown
You can gracefully shut down your system by using the Power button or the ReadyNAS local admin page.
For information about how to gracefully shut down your system using the ReadyNAS local admin page, see
the ReadyNAS OS 6 Software Manual, which is available at netgear.com/support/product/ReadyNAS_OS_6.
To gracefully shut down your system using the Power button:
1. Press the Power button.
The Power LED blinks, prompting you to confirm the shutdown.
2. Press the Power button again.
The system shuts down gracefully.
Forced Shutdown
Perform a forced shutdown only if the storage system is not responding.
To perform a forced shutdown:
•Unplug the system from the power supply.
Boot Menu
Use the boot menu to restart or troubleshoot your ReadyNAS storage system.Your storage system has the
following boot modes:
•Normal. Initiates a normal boot process, just like booting using the Power button.
•Factory default. Initiates a short disk test that takes approximately 5 minutes. After the disk test, a
10-minute time-out period begins, during which all LEDs blink simultaneously.
WARNING:
The factory default reboot process resets the storage system to factory
settings, erases all data, resets all defaults, and reformats the disk to X-RAID.
NETGEAR ReadyNAS 102
20
ReadyNAS OS 6 Desktop Storage Systems

-If you want to cancel the factory default process, power off the storage system before the 10-minute
time-out ends. The system powers down safely without causing any data loss.
-If you want to reset the system to factory default settings, do not power off your system. After the
10-minute time-out period, the factory default process begins.
To start the factory default process immediately, press the button during theBackup
10-minute time-out period.
Tip
•OS reinstall. Reinstalls the firmware from the internal flash to the disks. Use the OS reinstall boot mode
when the system crashes and corrupts some configuration files. OS reinstall boot mode also resets
some settings on your storage system, such as Internet protocol settings and the administrator password,
to defaults.
•Tech support. Boots into a low-level diagnostic mode. Use the tech support boot mode only when a
NETGEAR technical support representative instructs you to do so.
•Volume read only. Mounts a volume as read-only. Use this option when you are attempting to rescue
data off a disk during a disaster recovery.
•Memory test. Performs a memory test. The pass or fail result is reported using the storage system's
LEDs. Contact a NETGEAR technical support representative to interpret memory test results.
•Test disk. Performs an offline full disk test. This process can take four hours or more, depending on
the size of your disks. Any problems are reported in the system logs. For more information about viewing
the system logs, see the ReadyNAS OS 6 Software Manual, which is available at
netgear.com/support/product/ReadyNAS_OS_6.
To access the boot menu:
1. Power off your storage system.
2. Using a straightened paper clip, press and hold the button.Reset
3. Press the Power button.
The system powers on.
4. Continue to press the button until the Power button LED, USB and backup status LED, disk 1Reset
LED, and disk 2 LED light.
5. Press the button to scroll through boot mode options.Backup
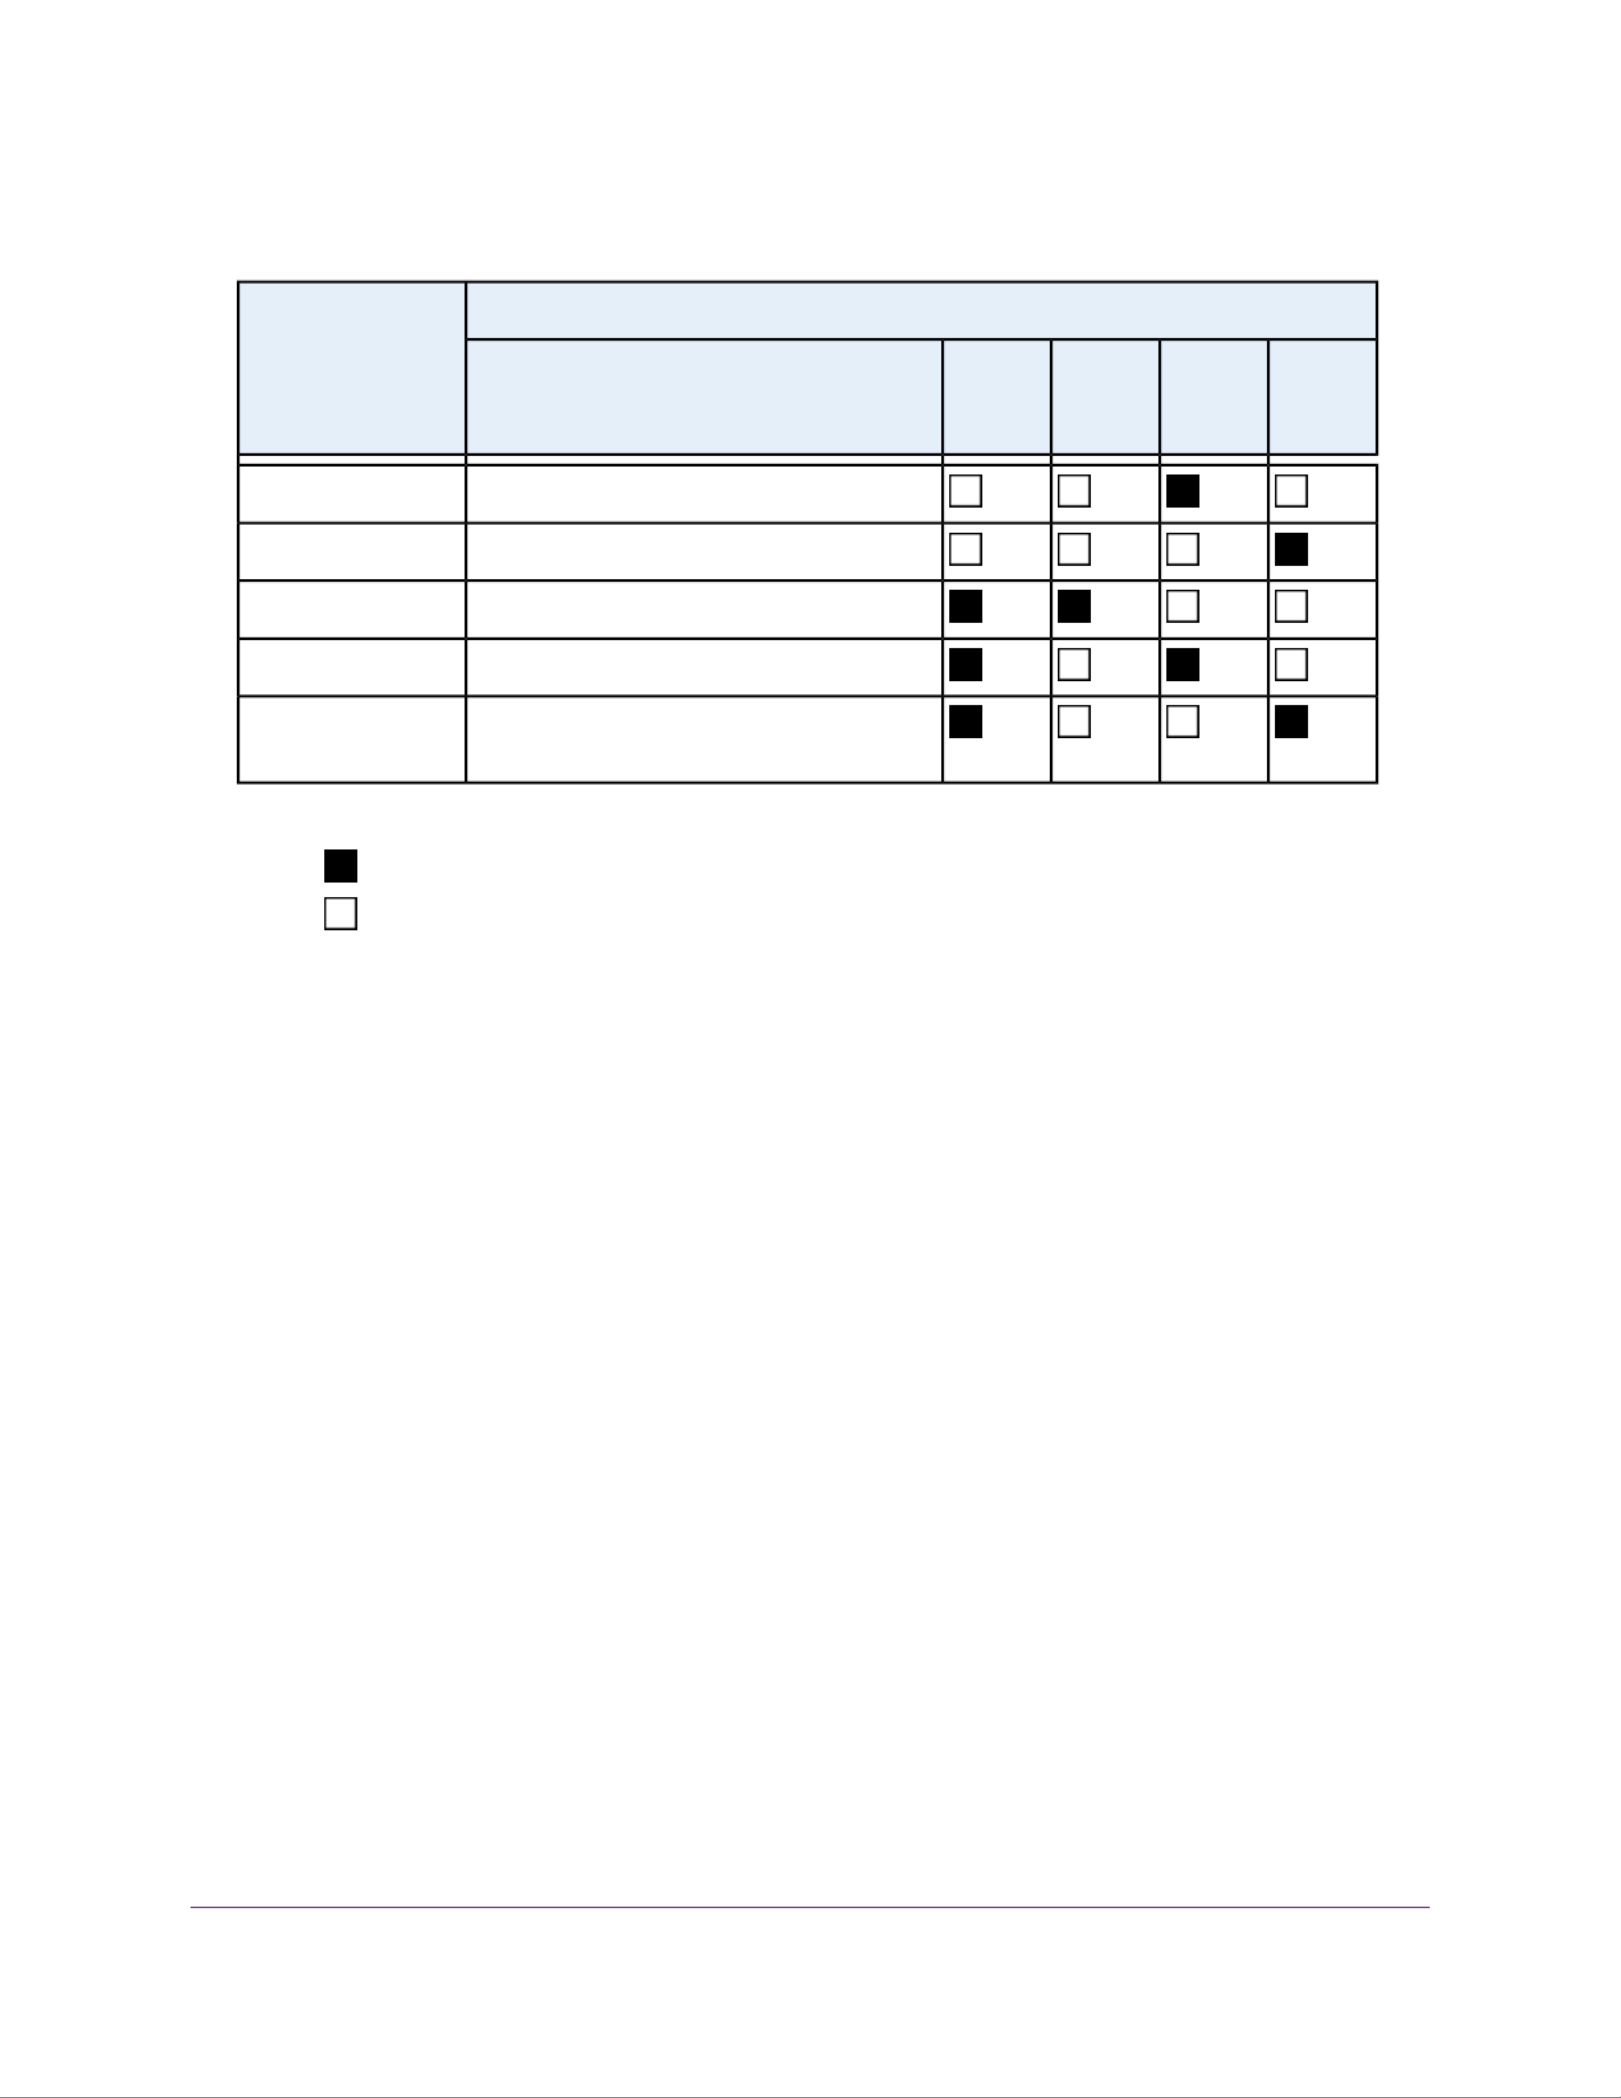
The storage system shows the boot mode options using the LEDs, as described in the following table:
Status IndicatorBoot Mode
USB and
Backup
LED
Disk 2
LED
Disk 1
LED
Power
LED
Description
All four LEDs light.Boot menu
Power LED lights.Normal
Disk 1 LED lights.Factory default
NETGEAR ReadyNAS 102
21
ReadyNAS OS 6 Desktop Storage Systems
(Continued)
Status IndicatorBoot Mode
USB and
Backup
LED
Disk 2
LED
Disk 1
LED
Power
LED
Description
Disk 2 LED lights.OS reinstall
USB and backup status LED lights.Tech support
Power LED and disk 1 LED light.Volume read only
Power LED and disk 2 LED light.Memory test
Power LED and USB and backup status LED
light.
Test disk
Legend:
•On:
•Off:
6. Press and release the button to confirm your boot menu selection.Reset
The system boots in the selected boot mode.
NETGEAR ReadyNAS 102
22
ReadyNAS OS 6 Desktop Storage Systems

3
NETGEAR ReadyNAS 104
This chapter provides an overview of the physical features of the ReadyNAS 104 and includes the following
sections:
• Front and Side Panels on page 24
• Drive Bays on page 24
• Rear Panel on page 25
• Status Information on page 26
• Power On and Shut Down on page 27
• Boot Menu on page 28
23

Front and Side Panels
The following figure shows the front and side panels of the ReadyNAS 104.
Figure 4. ReadyNAS 104 front and side panels
1. Exhaust vents
2. USB 2.0 port
3. Backup button and LED
4. Disk LEDs
5. Disk activity LED
6. Power button and LED
7. Drive bay door
8. Status display screen
Drive Bays
The following figure shows the drive bays of the ReadyNAS 104.
NETGEAR ReadyNAS 104
24
ReadyNAS OS 6 Desktop Storage Systems

Figure 5. ReadyNAS 104 drive bays
1. Drive bay door
2. Disk tray handle
3. Recessed disk tray handle lock
4. Disk tray release latch
5. Drive bays
Rear Panel
The following figure shows the rear panel of the ReadyNAS 104.
NETGEAR ReadyNAS 104
25
ReadyNAS OS 6 Desktop Storage Systems

Figure 6. ReadyNAS 104 rear panel
1. eSATA port
2. Reset button
3. USB 3.0 ports
4. GbE ports with LED status indicators
The two GbE ports are equivalent. They can be used as two separate Ethernet
connections, or can be configured as a single, bonded port with a 2 Gbps potential
speed. For information about how to configure a bonded port, and the network
configuration requirements needed to support 2 Gbps, see the ReadyNAS OS 6
Software Manual, which is available at netgear.com/support/product/ReadyNAS_OS_6.
Note
5. Power cable socket
6. Exhaust fan
7. Kensington lock
Status Information
You can obtain information about the status of your storage system by reviewing the indicators listed in the
following table.
NETGEAR ReadyNAS 104
26
ReadyNAS OS 6 Desktop Storage Systems

Table 2. ReadyNAS 104 indicator descriptions
DescriptionIndicator
Press this button to turn on the ReadyNAS. The LED indicates these states:
•On. Powered on.
•Blinking. Booting or shutting down.
•Off. Powered off.
Power button and LED
An LED on the top of the front panel is associated with each drive bay. LEDs are in
numerical order from left to right. The disk LEDs indicate these states:
•On. Power is on and the disk is operating normally.
•Blinking. The disk was removed, failed, or is resynchronizing. See the display
screen for details.
•Off. The drive bay is empty.
Disk LEDs (1, 2, 3, 4)
The disk activity LED indicates these states:
•On. At least one disk is present.
•Blinking. A disk is active.
•Off. All disks are idle.
Disk activity LED
Two LED status indicators are built into this port, one green and one amber. They
indicate port speed and activity as follows:
•Green on, amber off. 1000 Mbps connection speed, no activity.
•Green blinking, amber off. 1000 Mbps connection speed, activity.
•Green off, amber on. 10 Mbps or 100 Mbps connection speed, no activity.
•Green off, amber blinking. 10 Mbps or 100 Mbps connection speed, activity.
•Green off, amber off. No connection.
Rear panel Ethernet port
LEDs
Displays messages about the status of your storage system. Note that the status
display screen goes to sleep to prevent burn-in. To wake it, press the Power button
once. If the storage system reports an abnormal operation or error, the status display
screen stays on.
Status display screen
Power On and Shut Down
This section describes how to power on and shut down your system. If you need to shut down the system,
use one of the preferred shutdown methods whenever possible.
NETGEAR ReadyNAS 104
27
ReadyNAS OS 6 Desktop Storage Systems

Power On
When you connect the system to a power supply or the system recovers from a power outage, the system
returns to its last state:
•If the system was powered on, the system automatically powers on again when the power supply is
connected or power is restored.
•If the system was powered off, the system remains off when the power supply is connected or power
is restored.
In this situation, press the Power button on the front panel of the system to power on the system.
Preferred Shutdown
You can gracefully shut down your system by using the Power button or the ReadyNAS local admin page.
For information about how to gracefully shut down your system using the ReadyNAS local admin page, see
the ReadyNAS OS 6 Software Manual, which is available at netgear.com/support/product/ReadyNAS_OS_6.
To gracefully shut down your system using the Power button:
1. If the status display screen is not lit, do the following:
a. Press the Power button.
The status display screen wakes.
b. Press the Power button a second time.
Instructions for graceful shutdown display on the status display screen.
c. Press the Power button a third time.
The system shuts down gracefully.
2. If the status display screen is lit, do the following:
a. Press the Power button.
Instructions for graceful shutdown display on the status display screen.
b. Press the Power button again.
The system shuts down gracefully.
Forced Shutdown
Perform a forced shutdown only if the storage system is not responding.
To perform a forced shutdown:
•Unplug the system from the power supply.
Boot Menu
Use the boot menu to restart or troubleshoot your ReadyNAS storage system.Your storage system has the
following boot modes:
NETGEAR ReadyNAS 104
28
ReadyNAS OS 6 Desktop Storage Systems

•Normal. Initiates a normal boot process, just like booting using the Power button.
•Factory default. Initiates a short disk test that takes approximately 5 minutes. After the disk test, a
10-minute time-out period begins, during which all LEDs blink simultaneously.
WARNING:
The factory default reboot process resets the storage system to factory
settings, erases all data, resets all defaults, and reformats the disk to X-RAID.
-If you want to cancel the factory default process, power off the storage system before the 10-minute
time-out ends. The system powers down safely without causing any data loss.
-If you want to reset the system to factory default settings, do not power off your system. After the
10-minute time-out period, the factory default process begins.
To start the factory default process immediately, press the Backup button during the
10-minute time-out period.
Tip
•OS reinstall. Reinstalls the firmware from the internal flash to the disks. Use the OS reinstall boot mode
when the system crashes and corrupts some configuration files. OS reinstall boot mode also resets
some settings on your storage system, such as Internet protocol settings and the administrator password,
to defaults.
•Tech support. Boots into a low-level diagnostic mode. Use the tech support boot mode only when a
NETGEAR technical support representative instructs you to do so.
•Volume read only. Mounts a volume as read-only. Use this option when you are attempting to rescue
data off a disk during a disaster recovery.
•Memory test. Performs a memory test. The pass or fail result is reported on the status display screen.
•Test disk. Performs an offline full disk test. This process can take four hours or more, depending on
the size of your disks. Any problems are reported in the system logs. For more information about viewing
the system logs, see the ReadyNAS OS 6 Software Manual, which is available at
netgear.com/support/product/ReadyNAS_OS_6.
To access the boot menu:
1. Power off your storage system.
2. Using a straightened paper clip, press and hold the button.Reset
3. Press the Power button.
The system powers on.
4. Continue to press the button until the status display screen shows a boot menu message.Reset
5. Press the button to scroll through boot mode options.Backup
The status display screen shows the current boot mode option.
6. When the status display screen shows the boot mode that you need, press and release the buttonReset
to confirm your boot menu selection.
The system boots in the selected boot mode.
NETGEAR ReadyNAS 104
29
ReadyNAS OS 6 Desktop Storage Systems

4
NETGEAR ReadyNAS 202
This chapter provides an overview of the physical features of the ReadyNAS 202 and includes the following
sections:
•Front and Side Panels on page 31
•Drive Bays on page 31
•Rear Panel on page 32
•Status Information on page 33
•Power On and Shut Down on page 34
•Boot Menu on page 35
30

Front and Side Panels
The following gure shows the front and side panels of the ReadyNAS 202.
Figure 7. ReadyNAS 202 front and side panels
1. Power button and LED
2. Disk activity LED
3. Exhaust vent
4. USB 3.0 port
5. Backup button
6. USB and backup status LED
7. Disk 1 and Disk 2 LEDs
8. Drive bay door
Drive Bays
The following gure shows the drive bays of the ReadyNAS 202.
NETGEAR ReadyNAS 202
31
ReadyNAS OS 6 Desktop Storage Systems
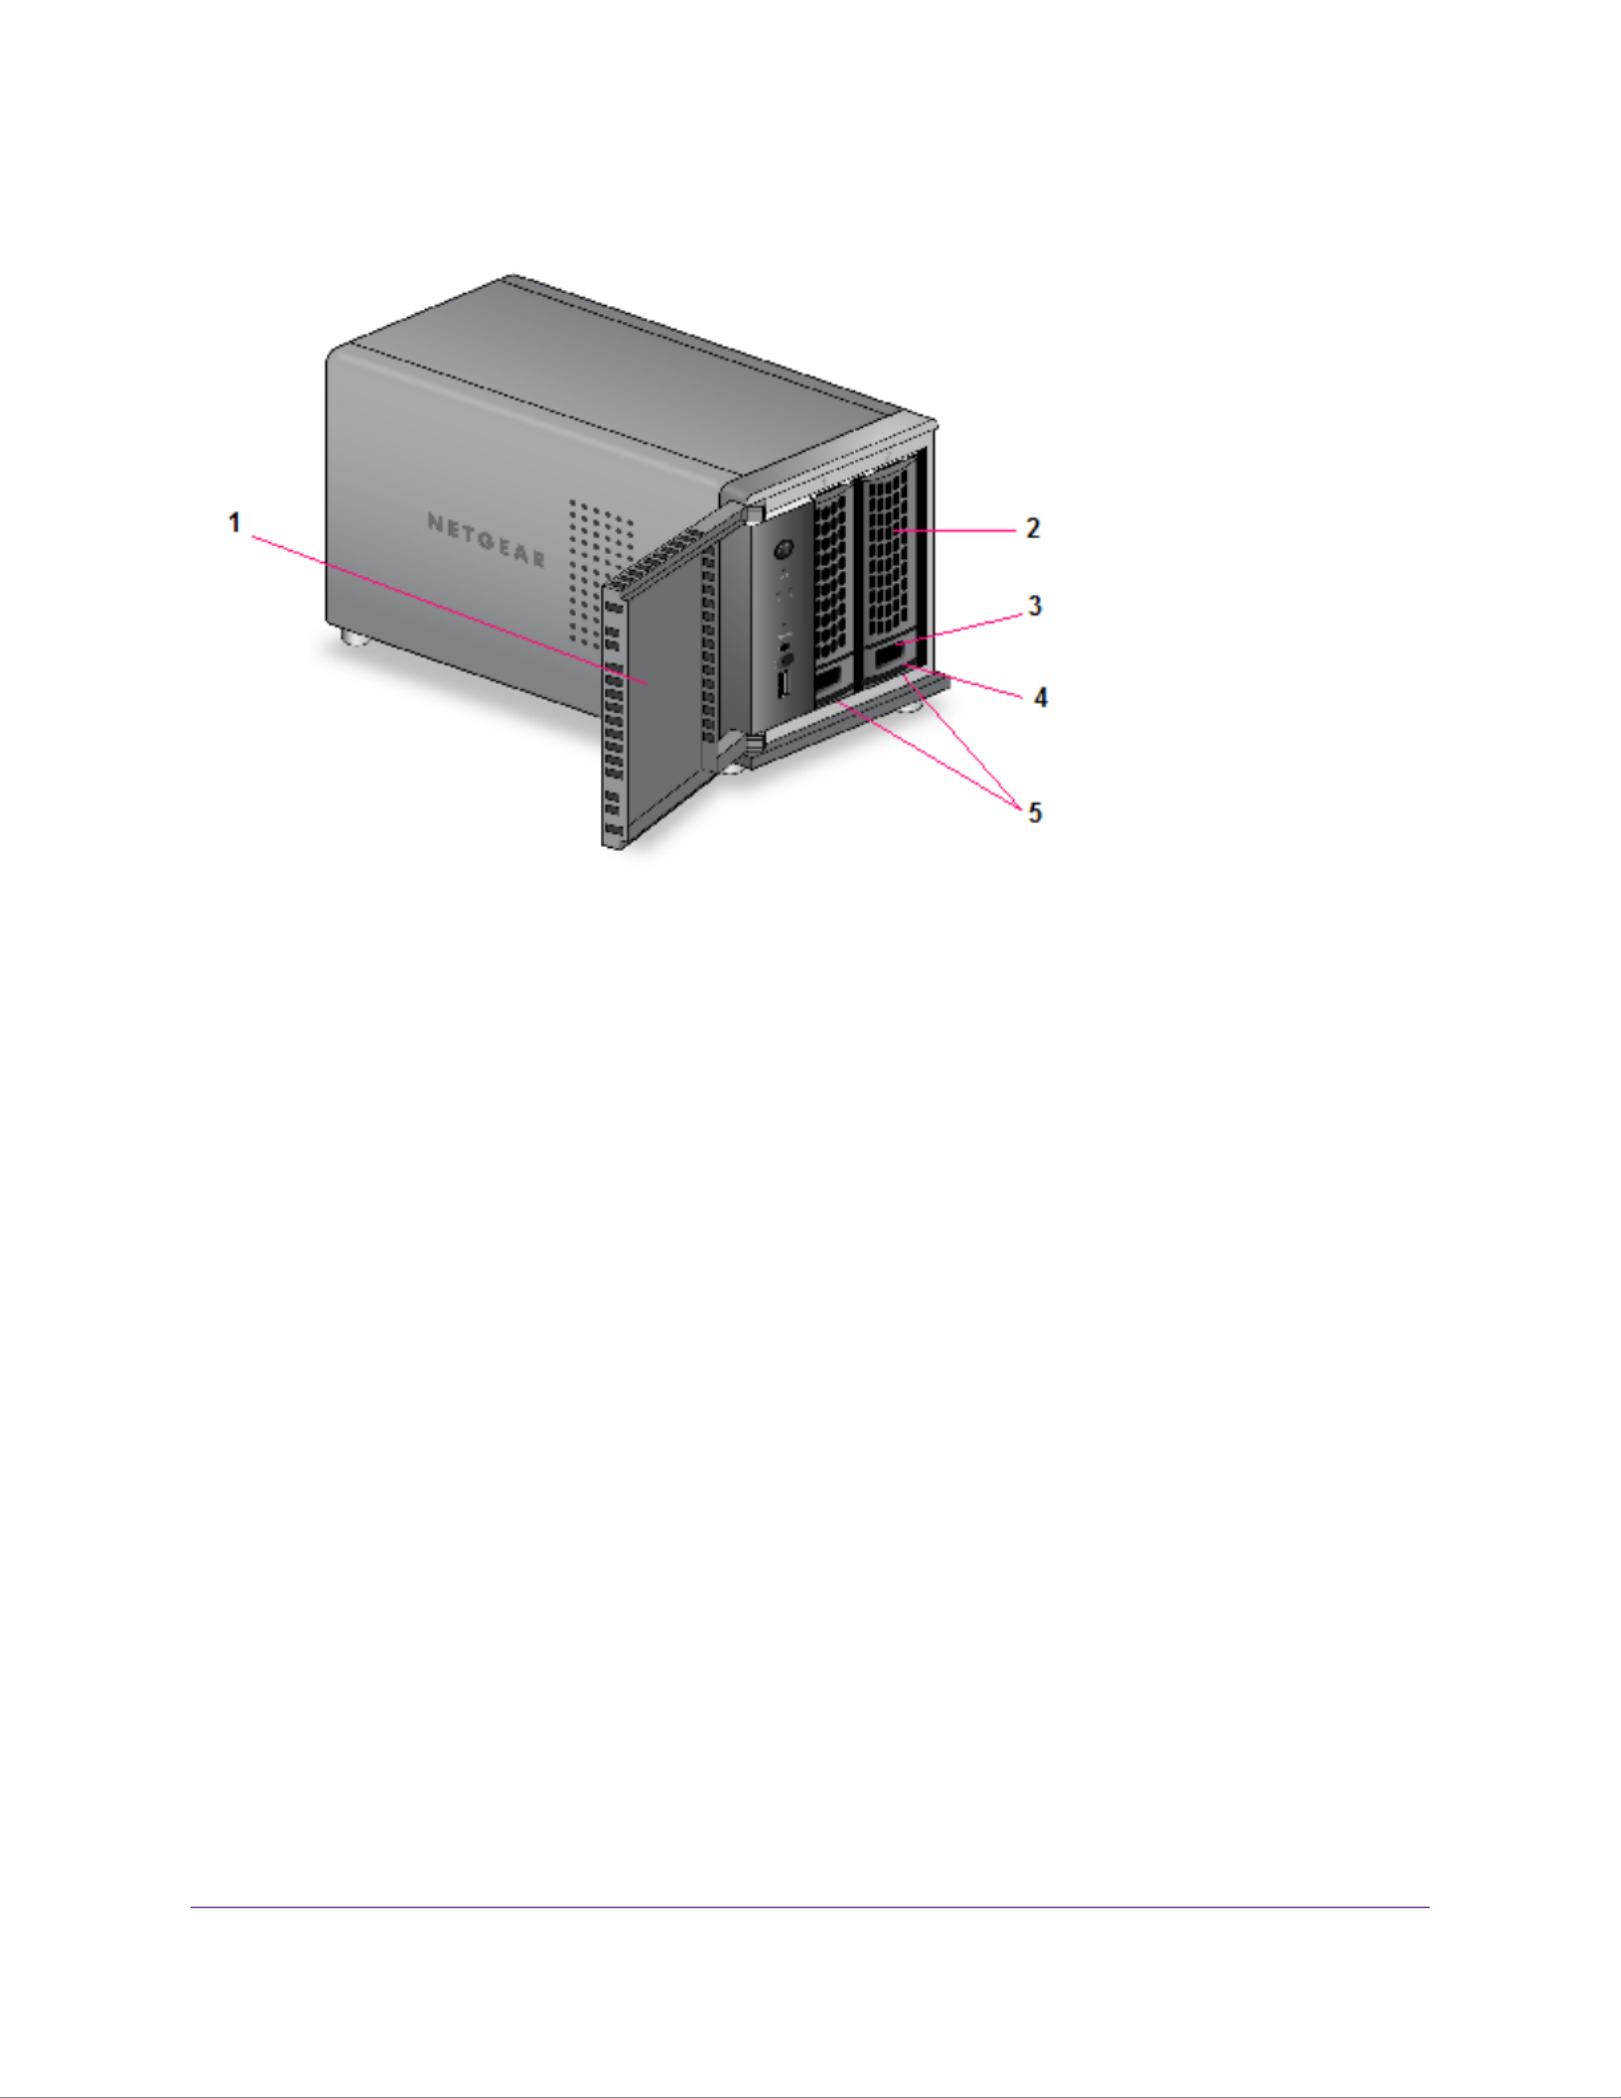
Figure 8. ReadyNAS 202 drive bays
1. Drive bay door
2. Disk tray handle
3. Recessed disk tray handle lock
4. Disk tray release latch
5. Drive bays
Rear Panel
The following gure shows the rear panel of the ReadyNAS 202.
NETGEAR ReadyNAS 202
32
ReadyNAS OS 6 Desktop Storage Systems

Figure 9. ReadyNAS 202 rear panel
1. Exhaust fan
2. Kensington lock
3. USB 3.0 ports
4. eSATA port
5. GbE ports with LED status indicators
The two GbE ports are equivalent. They can be used as two separate Ethernet
connections, or can be congured as a single, bonded port with a 2 Gbps potential
speed. For information on how to congure a bonded port, and the network
conguration requirements needed to support 2 Gbps, see the ReadyNAS OS 6
Software Manual, which is available at netgear.com/support/product/ReadyNAS_OS_6.
Note
6. Reset button
7. Power adapter socket
Status Information
You can obtain information about the status of your storage system by reviewing the indicators listed in the
following table.
NETGEAR ReadyNAS 202
33
ReadyNAS OS 6 Desktop Storage Systems

Table 3. ReadyNAS 202 indicator descriptions
DescriptionIndicator
Press this button to turn on the ReadyNAS. The LED has these states:
•On. Powered on.
•Blinking. Booting or shutting down.
•O. Powered o.
Power button and LED
Each drive bay has an LED associated with it on the front panel of the storage
system. The disk LEDs have these states:
•On. Power is on and the disk is operating normally.
•Blinking. The disk was removed, failed, or is resynchronizing. See the display
screen for details.
•O. The drive bay is empty.
Disk LEDs (1, 2)
The disk activity LED has these states:
•Blinking. A disk is active.
•O. Disk is idling.
Disk activity LED
Two LED status indicators are built into each port, one o or green and one showing
three states: o, amber, or green. They indicate port speed and activity as follows:
•Green, green. 1000 Mbps connection speed, no activity.
•Green blinking, green. 1000 Mbps connection speed, activity.
•Green, amber. 100 Mbps connection speed, no activity.
•Green blinking, amber. 100 Mbps connection speed, activity.
•Green on, o. 10 Mbps connection speed, no activity.
•Green blinking, o. 10 Mbps connection speed, activity.
•O, o. No connection.
Rear panel Ethernet port
LEDs
Power On and Shut Down
This section describes how to power on and shut down your system. If you must shut down the system, use
one of the preferred shutdown methods whenever possible.
NETGEAR ReadyNAS 202
34
ReadyNAS OS 6 Desktop Storage Systems

Power On
When you connect the system to a power supply or the system recovers from a power outage, the system
returns to its last state:
•If the system was powered on, the system automatically powers on again when the power supply is
connected or power is restored.
•If the system was powered o, the system remains o when the power supply is connected or power
is restored.
In this situation, press the Power button on the front panel of the system to power on the system.
Preferred Shutdown
You can gracefully shut down your system by using the Power button or the ReadyNAS local admin page.
For information about how to gracefully shut down your system using the ReadyNAS local admin page, see
the ReadyNAS OS 6 Software Manual, which is available at netgear.com/support/product/ReadyNAS_OS_6.
To gracefully shut down your system using the Power button:
1. Press the Power button.
The Power LED blinks, prompting you to conrm the shutdown.
2. Press the Power button again.
The system shuts down gracefully.
Forced Shutdown
Perform a forced shutdown only if the storage system is not responding.
To perform a forced shutdown:
•Unplug the system from the power supply.
Boot Menu
Use the boot menu to restart or troubleshoot your ReadyNAS storage system.Your storage system has the
following boot modes:
•Normal. Initiates a normal boot process, just like booting using the Power button.
•Factory default. Initiates a short disk test that takes approximately 5 minutes. After the disk test, a
10-minute time-out period begins, during which all LEDs blink simultaneously.
WARNING:
The factory default reboot process resets the storage system to factory
settings, erases all data, resets all defaults, and reformats the disk to X-RAID.
NETGEAR ReadyNAS 202
35
ReadyNAS OS 6 Desktop Storage Systems
To access the boot menu:
1. Power off your storage system.
2. Using a straightened paper clip, press and hold the button.Reset
3. Press the Power button.
The system powers on.
4. Continue to press the button until the Power LED, USB and backup status LED, disk 1 LED, andReset
disk 2 LED light.
5. Press the button to scroll through boot mode options.Backup
The storage system shows the boot mode options using the LEDs, as described in the following table:
Status IndicatorBoot Mode
USB and
Backup
LED
Disk 2
LED
Disk 1
LED
Power
LED
Description
All four LEDs light.Boot menu
Power LED lights.Normal
Disk 1 LED lights.Factory default
Disk 2 LED lights.OS reinstall
USB and backup status LED lights.Tech support
Power LED and disk 1 LED light.Volume read only
Power LED and disk 2 LED light.Memory test
Power LED and USB and backup status LED
light.
Test disk
Legend:
•On:
•Off:
6. Press and release the button to confirm your boot menu selection.Reset
The system boots in the selected boot mode.
NETGEAR ReadyNAS 202
37
ReadyNAS OS 6 Desktop Storage Systems

5
NETGEAR ReadyNAS 204
This chapter provides an overview of the physical features of the ReadyNAS 204 and includes the following
sections:
• Front and Side Panels on page 39
• Drive Bays on page 39
• Rear Panel on page 40
• Status Information on page 41
• Power On and Shut Down on page 42
• Boot Menu on page 43
38
Front and Side Panels
The following figure shows the front and side panels of the ReadyNAS 204.
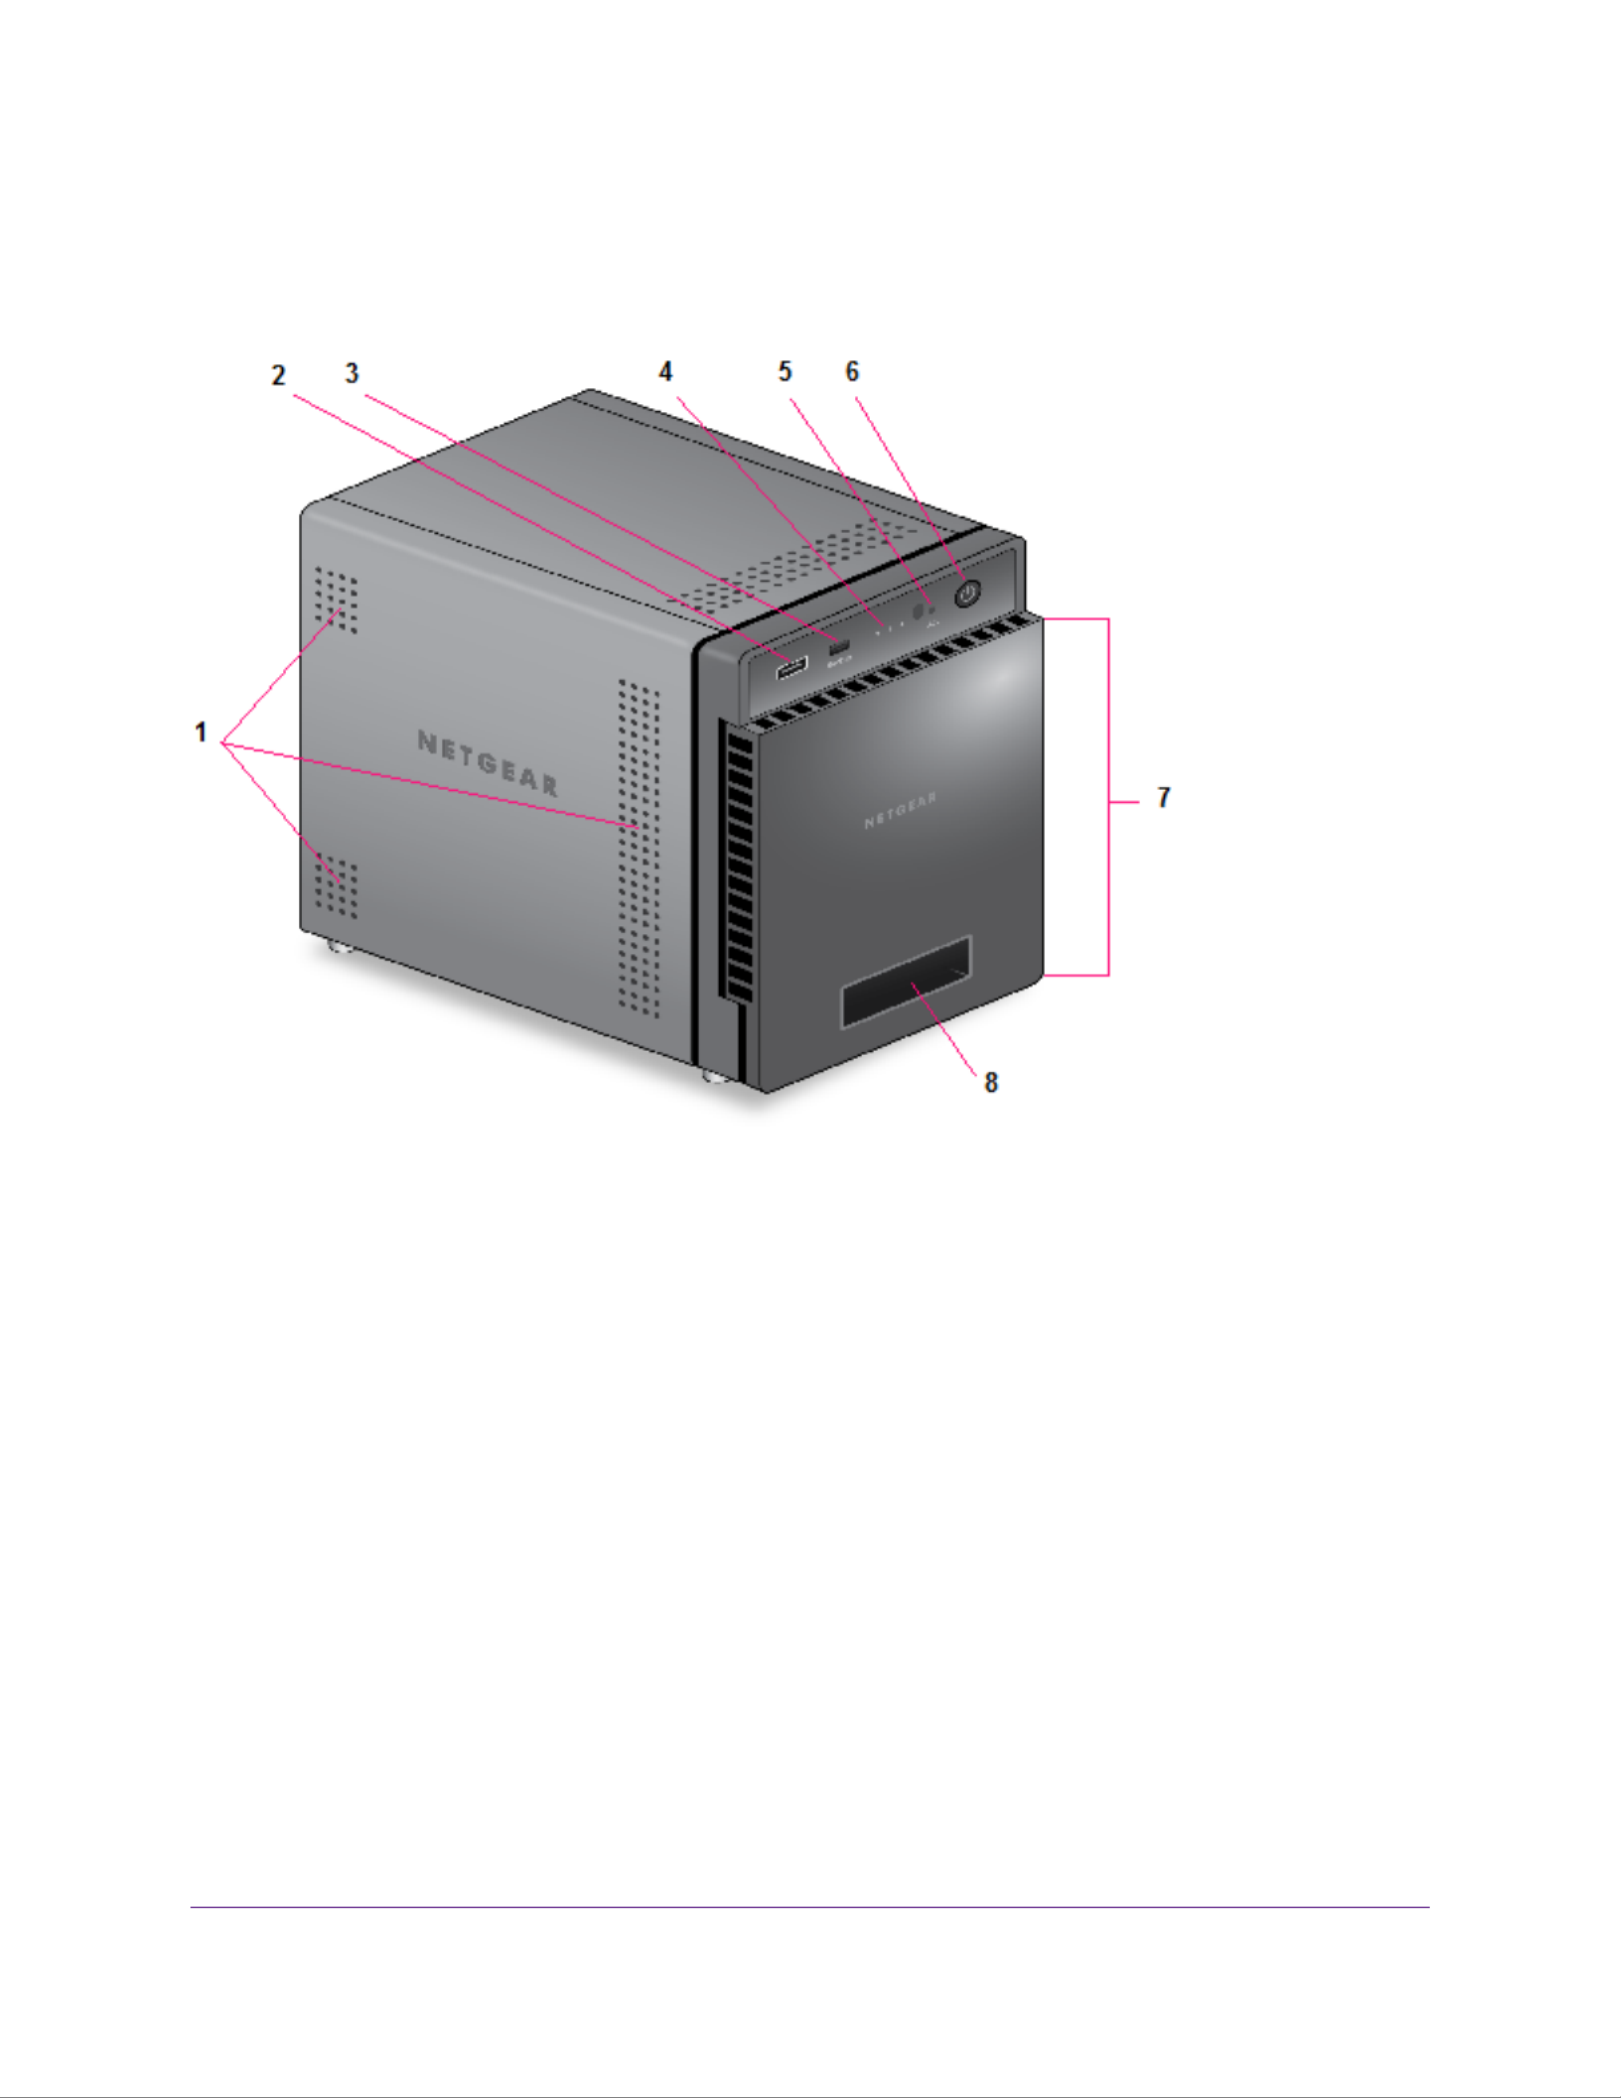
Figure 11. ReadyNAS 204 front and side panels
1. Exhaust vents
2. USB 2.0 port
3. Backup button and LED
4. Disk LEDs
5. Disk activity LED
6. Power button and LED
7. Drive bay door
8. Status display screen
Drive Bays
The following figure shows the drive bays of the ReadyNAS 204.
NETGEAR ReadyNAS 204
39
ReadyNAS OS 6 Desktop Storage Systems

Figure 12. ReadyNAS 204 drive bays
1. Drive bay door
2. Disk tray handle
3. Recessed disk tray handle lock
4. Disk tray release latch
5. Drive bays
Rear Panel
The following figure shows the rear panel of the ReadyNAS 204.
NETGEAR ReadyNAS 204
40
ReadyNAS OS 6 Desktop Storage Systems

Figure 13. ReadyNAS 204 rear panel
1. eSATA port
2. Reset button
3. USB 3.0 ports
4. LAN ports with LED status indicators
The two LAN ports are equivalent. They can be used as two separate Ethernet
connections, or can be configured as a single, bonded port with a 2 Gbps potential
speed. For information about how to configure a bonded port, and the network
configuration requirements needed to support 2 Gbps, see the ReadyNAS OS 6
Software Manual, which is available at netgear.com/support/product/ReadyNAS_OS_6.
Note
5. Power cable socket
6. Exhaust fan
7. Kensington lock
Status Information
You can obtain information about the status of your storage system by reviewing the indicators listed in the
following table.
NETGEAR ReadyNAS 204
41
ReadyNAS OS 6 Desktop Storage Systems

Table 4. ReadyNAS 204 indicator descriptions
DescriptionIndicator
Press this button to turn on the ReadyNAS. The LED indicates these states:
•On. Powered on.
•Blinking. Booting or shutting down.
•O. Powered off.
Power button and LED
An LED on the top of the front panel is associated with each drive bay. LEDs are in
numerical order from left to right. The disk LEDs indicate these states:
•On. Power is on and the disk is operating normally.
•Blinking. The disk was removed, failed, or is resynchronizing. See the display
screen for details.
•O. The drive bay is empty.
Disk LEDs (1, 2, 3, 4)
The disk activity LED indicates these states:
•Blinking. A disk is being accessed.
•O. All disks are idle.
Disk activity LED
Two LED status indicators are built into each port, one off or green and one showing
three states: off, amber, or green. They indicate port speed and activity as follows:
•Green, green. 1000 Mbps connection speed, no activity.
•Green blinking, green. 1000 Mbps connection speed, activity.
•Green, amber. 100 Mbps connection speed, no activity.
•Green blinking, amber. 100 Mbps connection speed, activity.
•Green on, o. 10 Mbps connection speed, no activity.
•Green blinking, o. 10 Mbps connection speed, activity.
•O, o. No connection.
Rear panel Ethernet port
LEDs
Displays messages about the status of your storage system. Note that the status
display screen goes to sleep to prevent burn-in. To wake it, press the Power button
once. If the storage system reports an abnormal operation or error, the status display
screen stays on.
Status display screen
Power On and Shut Down
This section describes how to power on and shut down your system. If you must shut down the system, use
one of the preferred shutdown methods whenever possible.
NETGEAR ReadyNAS 204
42
ReadyNAS OS 6 Desktop Storage Systems

Power On
When you connect the system to a power supply or the system recovers from a power outage, the system
returns to its last state:
•If the system was powered on, the system automatically powers on again when the power supply is
connected or power is restored.
•If the system was powered off, the system remains off when the power supply is connected or power
is restored.
In this situation, press the Power button on the front panel of the system to power on the system.
Preferred Shutdown
You can gracefully shut down your system by using the Power button or the ReadyNAS local admin page.
For information about how to gracefully shut down your system using the ReadyNAS local admin page, see
the ReadyNAS OS 6 Software Manual, which is available at netgear.com/support/product/ReadyNAS_OS_6.
To gracefully shut down your system using the Power button:
1. If the status display screen is not lit, do the following:
a. Press the Power button.
The status display screen wakes.
b. Press the Power button a second time.
Instructions for graceful shutdown display on the status display screen.
c. Press the Power button a third time.
The system shuts down gracefully.
2. If the status display screen is lit, do the following:
a. Press the Power button.
Instructions for graceful shutdown display on the status display screen.
b. Press the Power button again.
The system shuts down gracefully.
Forced Shutdown
Perform a forced shutdown only if the storage system is not responding.
To perform a forced shutdown:
•Unplug the system from the power supply.
Boot Menu
Use the boot menu to restart or troubleshoot your ReadyNAS storage system.Your storage system has the
following boot modes:
NETGEAR ReadyNAS 204
43
ReadyNAS OS 6 Desktop Storage Systems

6
NETGEAR ReadyNAS 212
This chapter provides an overview of the physical features of the ReadyNAS 212 and includes the following
sections:
• Front and Side Panels on page 46
• Drive Bays on page 46
• Rear Panel on page 47
• Status Information on page 48
• Power On and Shut Down on page 49
• Boot Menu on page 50
45

Front and Side Panels
The following figure shows the front and side panels of the ReadyNAS 212.
Figure 14. ReadyNAS 212 front and side panels
1. Power button and LED
2. Disk activity LED
3. Exhaust vent
4. USB 3.0 port
5. Backup button
6. USB and backup status LED
7. Disk 1 and Disk 2 LEDs
8. Drive bay door
Drive Bays
The following figure shows the drive bays of the ReadyNAS 212.
NETGEAR ReadyNAS 212
46
ReadyNAS OS 6 Desktop Storage Systems

Figure 15. ReadyNAS 212 drive bays
1. Drive bay door
2. Disk tray handle
3. Recessed disk tray handle lock
4. Disk tray release latch
5. Drive bays
Rear Panel
The following figure shows the rear panel of the ReadyNAS 212.
NETGEAR ReadyNAS 212
47
ReadyNAS OS 6 Desktop Storage Systems

Table 5. ReadyNAS 212 indicator descriptions
DescriptionIndicator
Press this button to turn on the ReadyNAS. The LED indicates these states:
•On. Powered on.
•Blinking. Booting or shutting down.
•Off. Powered off.
Power button and LED
An LED on the front panel of the storage system is associated with each drive bay
The disk LEDs indicate these states:
•On. Power is on and the disk is operating normally.
•Blinking. The disk was removed, failed, or is resynchronizing. See the display
screen for details.
•Off. The drive bay is empty.
Disk LEDs (1, 2)
The disk activity LED indicates these states:
•Blinking. A disk is active.
•Off. disk is idling.
Disk activity LED
Two LED status indicators are built into each port, one off or green and one showing
three states: off, amber, or green. They indicate port speed and activity as follows:
•Green, green. 1000 Mbps connection speed, no activity.
•Green blinking, green. 1000 Mbps connection speed, activity.
•Green, amber. 100 Mbps connection speed, no activity.
•Green blinking, amber. 100 Mbps connection speed, activity.
•Green on, off. 10 Mbps connection speed, no activity.
•Green blinking, off. 10 Mbps connection speed, activity.
•Off, off. No connection.
Rear panel Ethernet port
LEDs
Power On and Shut Down
This section describes how to power on and shut down your system. If you must shut down the system, use
one of the preferred shutdown methods whenever possible.
NETGEAR ReadyNAS 212
49
ReadyNAS OS 6 Desktop Storage Systems

Power On
When you connect the system to a power supply or the system recovers from a power outage, the system
returns to its last state:
•If the system was powered on, the system automatically powers on again when the power supply is
connected or power is restored.
•If the system was powered off, the system remains off when the power supply is connected or power
is restored.
In this situation, press the Power button on the front panel of the system to power on the system.
Preferred Shutdown
You can gracefully shut down your system by using the Power button or the ReadyNAS local admin page.
For information about how to gracefully shut down your system using the ReadyNAS local admin page, see
the ReadyNAS OS 6 Software Manual, which is available at netgear.com/support/product/ReadyNAS_OS_6.
To gracefully shut down your system using the Power button:
1. Press the Power button.
The Power LED blinks, prompting you to confirm the shutdown.
2. Press the Power button again.
The system shuts down gracefully.
Forced Shutdown
Perform a forced shutdown only if the storage system is not responding.
To perform a forced shutdown:
•Unplug the system from the power supply.
Boot Menu
Use the boot menu to restart or troubleshoot your ReadyNAS storage system.Your storage system has the
following boot modes:
•Normal. Initiates a normal boot process, just like booting using the Power button.
•Factory default. Initiates a short disk test that takes approximately 5 minutes. After the disk test, a
10-minute time-out period begins, during which all LEDs blink simultaneously.
WARNING:
The factory default reboot process resets the storage system to factory
settings, erases all data, resets all defaults, and reformats the disk to X-RAID.
NETGEAR ReadyNAS 212
50
ReadyNAS OS 6 Desktop Storage Systems

-If you want to cancel the factory default process, power off the storage system before the 10-minute
time-out ends. The system powers down safely without causing any data loss.
-If you want to reset the system to factory default settings, do not power off your system. After the
10-minute time-out period, the factory default process begins.
To start the factory default process immediately, press the button during theBackup
10-minute time-out period.
Tip
•OS reinstall. Reinstalls the firmware from the internal flash to the disks. Use the OS reinstall boot mode
when the system crashes and corrupts some configuration files. OS reinstall boot mode also resets
some settings on your storage system, such as Internet protocol settings and the administrator password,
to defaults.
•Tech support. Boots into a low-level diagnostic mode. Use the tech support boot mode only when a
NETGEAR technical support representative instructs you to do so.
•Volume read only. Mounts a volume as read-only. Use this option when you are attempting to rescue
data off a disk during a disaster recovery.
•Memory test. Performs a memory test. The memory test runs for eight hours. The current status and
the pass or fail result is reported using the storage system LEDs, as described in the following table:
Figure 17. Memory Test Status
Backup LEDDisk 2 LEDDisk 1 LEDPower LEDMemory Test State
BlinkingOffOffOffFirst hour
OffBlinkingOffOffSecond hour
OffOffBlinkingOffThird hour
BlinkingBlinkingBlinkingOffForth hour
BlinkingOffOffOnFifth hour
OffBlinkingOffOnSixth hour
OffOffBlinkingOnSeventh hour
BlinkingBlinkingBlinkingOnEigth hour
BlinkingBlinkingBlinkingBlinkingResult: fail
OnOnOnOnResult: pass
•Test disk. Performs an offline full disk test. This process can take four hours or more, depending on
the size of your disks. Any problems are reported in the system logs. For more information about viewing
the system logs, see the ReadyNAS OS 6 Software Manual, which is available at
netgear.com/support/product/ReadyNAS_OS_6.
NETGEAR ReadyNAS 212
51
ReadyNAS OS 6 Desktop Storage Systems

To access the boot menu:
1. Power off your storage system.
2. Using a straightened paper clip, press and hold the button.Reset
3. Press the Power button.
The system powers on.
4. Continue to press the button until the Reset Power button LED, USB and backup status LED, disk 1
LED, and disk 2 LED light.
5. Press the button to scroll through boot mode options.Backup
The storage system shows the boot mode options using the LEDs, as described in the following table:
Status IndicatorBoot Mode
USB and
Backup
LED
Disk 2
LED
Disk 1
LED
Power
LED
Description
All four LEDs light.Boot menu
Power LED lights.Normal
Disk 1 LED lights.Factory default
Disk 2 LED lights.OS reinstall
USB and backup status LED lights.Tech support
Power LED and disk 1 LED light.Volume read only
Power LED and disk 2 LED light.Memory test
Power LED and USB and backup status LED
light.
Test disk
Legend:
•On:
•Off:
6. Press and release the button to confirm your boot menu selection.Reset
The system boots in the selected boot mode.
NETGEAR ReadyNAS 212
52
ReadyNAS OS 6 Desktop Storage Systems

7
NETGEAR ReadyNAS 214
This chapter provides an overview of the physical features of the ReadyNAS 214 and includes the following
sections:
• Front and Side Panels on page 54
• Drive Bays on page 54
• Rear Panel on page 55
• Status Information on page 56
• Power On and Shut Down on page 57
• Boot Menu on page 58
53

Front and Side Panels
The following figure shows the front and side panels of the ReadyNAS 214.
Figure 18. ReadyNAS 214 front and side panels
1. Exhaust vents
2. USB 2.0 port
3. Backup button and LED
4. Disk LEDs
5. Disk activity LED
6. Power button and LED
7. Drive bay door
8. Status display screen
Drive Bays
The following figure shows the drive bays of the ReadyNAS 214.
NETGEAR ReadyNAS 214
54
ReadyNAS OS 6 Desktop Storage Systems

Figure 20. ReadyNAS 214 rear panel
1. eSATA port
2. Reset button
3. USB 3.0 ports
4. LAN ports with LED status indicators
The two LAN ports are equivalent. They can be used as two separate Ethernet
connections, or can be configured as a single, bonded port with a 2 Gbps potential
speed. For information about how to configure a bonded port, and the network
configuration requirements needed to support 2 Gbps, see the ReadyNAS OS 6
Software Manual, which is available at netgear.com/support/product/ReadyNAS_OS_6.
Note
5. Power cable socket
6. Exhaust fan
7. Kensington lock
Status Information
You can obtain information about the status of your storage system by reviewing the indicators listed in the
following table.
NETGEAR ReadyNAS 214
56
ReadyNAS OS 6 Desktop Storage Systems

Table 6. ReadyNAS 214 indicator descriptions
DescriptionIndicator
Press this button to turn on the ReadyNAS. The LED indicates these states:
•On. Powered on.
•Blinking. Booting or shutting down.
•Off. Powered off.
Power button and LED
An LED on the top of the front panel is associated with each drive bay. LEDs are in
numerical order from left to right. The disk LEDs indicate these states:
•On. Power is on and the disk is operating normally.
•Blinking. The disk was removed, failed, or is resynchronizing. See the display
screen for details.
•Off. The drive bay is empty.
Disk LEDs (1, 2, 3, 4)
The disk activity LED indicate these states:
•Blinking. A disk is being accessed.
•Off. All disks are idle.
Disk activity LED
Two LED status indicators are built into each port, one off or green and one showing
three states: off, amber, or green. They indicate port speed and activity as follows:
•Green, green. 1000 Mbps connection speed, no activity.
•Green blinking, green. 1000 Mbps connection speed, activity.
•Green, amber. 100 Mbps connection speed, no activity.
•Green blinking, amber. 100 Mbps connection speed, activity.
•Green on, off. 10 Mbps connection speed, no activity.
•Green blinking, off. 10 Mbps connection speed, activity.
•Off, off. No connection.
Rear panel Ethernet port
LEDs
Displays messages about the status of your storage system. Note that the status
display screen goes to sleep to prevent burn-in. To wake it, press the Power button
once. If the storage system reports an abnormal operation or error, the status display
screen stays on.
Status display screen
Power On and Shut Down
This section describes how to power on and shut down your system. If you must shut down the system, use
one of the preferred shutdown methods whenever possible.
NETGEAR ReadyNAS 214
57
ReadyNAS OS 6 Desktop Storage Systems

Power On
When you connect the system to a power supply or the system recovers from a power outage, the system
returns to its last state:
•If the system was powered on, the system automatically powers on again when the power supply is
connected or power is restored.
•If the system was powered off, the system remains off when the power supply is connected or power
is restored.
In this situation, press the Power button on the front panel of the system to power on the system.
Preferred Shutdown
You can gracefully shut down your system by using the Power button or the ReadyNAS local admin page.
For information about how to gracefully shut down your system using the ReadyNAS local admin page, see
the ReadyNAS OS 6 Software Manual, which is available at netgear.com/support/product/ReadyNAS_OS_6.
To gracefully shut down your system using the Power button:
1. If the status display screen is not lit, do the following:
a. Press the Power button.
The status display screen wakes.
b. Press the Power button a second time.
Instructions for graceful shutdown display on the status display screen.
c. Press the Power button a third time.
The system shuts down gracefully.
2. If the status display screen is lit, do the following:
a. Press the Power button.
Instructions for graceful shutdown display on the status display screen.
b. Press the Power button again.
The system shuts down gracefully.
Forced Shutdown
Perform a forced shutdown only if the storage system is not responding.
To perform a forced shutdown:
•Unplug the system from the power supply.
Boot Menu
Use the boot menu to restart or troubleshoot your ReadyNAS storage system.Your storage system has the
following boot modes:
NETGEAR ReadyNAS 214
58
ReadyNAS OS 6 Desktop Storage Systems

•Normal. Initiates a normal boot process, just like booting using the Power button.
•Factory default. Initiates a short disk test that takes approximately 5 minutes. After the disk test, a
10-minute time-out period begins, during which all LEDs blink simultaneously.
WARNING:
The factory default reboot process resets the storage system to factory
settings, erases all data, resets all defaults, and reformats the disk to X-RAID.
-If you want to cancel the factory default process, power off the storage system before the 10-minute
time-out ends. The system powers down safely without causing any data loss.
-If you want to reset the system to factory default settings, do not power off your system. After the
10-minute time-out period, the factory default process begins.
To start the factory default process immediately, press the Backup button during the
10-minute time-out period.
Tip
•OS reinstall. Reinstalls the firmware from the internal flash to the disks. Use the OS reinstall boot mode
when the system crashes and corrupts some configuration files. OS reinstall boot mode also resets
some settings on your storage system, such as Internet protocol settings and the administrator password,
to defaults.
•Tech support. Boots into a low-level diagnostic mode. Use the tech support boot mode only when a
NETGEAR technical support representative instructs you to do so.
•Volume read only. Mounts a volume as read-only. Use this option when you are attempting to rescue
data off a disk during a disaster recovery.
•Memory test. Performs a memory test. The pass or fail result is reported on the status display screen.
•Test disk. Performs an offline full disk test. This process can take four hours or more, depending on
the size of your disks. Any problems are reported in the system logs. For more information about viewing
the system logs, see the ReadyNAS OS 6 Software Manual, which is available at
netgear.com/support/product/ReadyNAS_OS_6.
To access the boot menu:
1. Power off your storage system.
2. Using a straightened paper clip, press and hold the button.Reset
3. Press the Power button.
The system powers on.
4. Continue to press the button until the status display screen shows a boot menu message.Reset
5. Press the button to scroll through boot mode options.Backup
The status display screen shows the current boot mode option.
6. When the status display screen shows the boot mode that you need, press and release the buttonReset
to confirm your boot menu selection.
The system boots in the selected boot mode.
NETGEAR ReadyNAS 214
59
ReadyNAS OS 6 Desktop Storage Systems

Front and Side Panels
The following figure shows the front and side panels of the ReadyNAS 312.
Figure 21. ReadyNAS 312 front and side panels
1. Power button and LED
2. Disk activity LED
3. Exhaust vent
4. USB 2.0 port
5. Infrared remote receiver
6. Backup button
7. USB and Backup status LED
8. Disk 1 and Disk 2 LEDs
9. Drive bay door
Drive Bays
The following figure shows the drive bays of the ReadyNAS 312.
NETGEAR ReadyNAS 312
61
ReadyNAS OS 6 Desktop Storage Systems

Figure 23. ReadyNAS 312 rear panel
1. Exhaust fan
2. Kensington lock
3. USB 3.0 ports
4. eSATA port
5. LAN ports with LED status indicators
6. Reset button
7. HDMI port (currently not supported)
8. Power adapter socket
Status Information
You can obtain information about the status of your storage system by reviewing the indicators listed in the
following table.
NETGEAR ReadyNAS 312
63
ReadyNAS OS 6 Desktop Storage Systems

Table 7. ReadyNAS 312 indicator descriptions
DescriptionIndicator
Press this button to turn on the ReadyNAS. The LED has these states:
•On. Powered on.
•Blinking. Booting or shutting down.
•O. Powered o.
Power button and LED
An LED on the front panel of the storage system is associated with each drive bay
The disk LEDs have these states:
•On. Power is on and the disk is operating normally.
•Blinking. The disk was removed, failed, or is resynchronizing.
•O. The drive bay is empty.
Disk LEDs (1, 2)
The disk activity LED has these states:
•On. At least one disk is present.
•Blinking. A disk is active.
•O. All disks are idle.
Disk activity LED
Two LED status indicators are built into this port, one green and one amber. They
indicate port speed and activity as follows:
•Green on, amber o. 1000 Mbps connection speed, no activity.
•Green blinking, amber o. 1000 Mbps connection speed, activity.
•Green o, amber on. 10 Mbps or 100 Mbps connection speed, no activity.
•Green o, amber blinking. 10 Mbps or 100 Mbps connection speed, activity.
•Green o, amber o. No connection.
Rear panel Ethernet port
LEDs
Power On and Shut Down
This section describes how to power on and shut down your system. If you need to shut down the system,
use one of the preferred shutdown methods whenever possible.
Power On
When you connect the system to a power supply or the system recovers from a power outage, the following
occurs:
NETGEAR ReadyNAS 312
64
ReadyNAS OS 6 Desktop Storage Systems

•The system automatically powers on if you enabled the Wake on LAN (WoL) feature or scheduled the
system to automatically power on or o.
•The system returns to its last state if the Wake on LAN (WoL) feature is disabled and you did not schedule
the system to automatically power on or o:
-If the system was powered on, the system automatically powers on again when the power supply
is connected or power is restored.
-If the system was powered o, the system remains o when the power supply is connected or power
is restored.
In this situation, press the Power button on the front panel of the system to power on the system.
Preferred Shutdown
You can gracefully shut down your system by using the Power button or the ReadyNAS local admin page.
For information about how to gracefully shut down your system using the ReadyNAS local admin page, see
the ReadyNAS OS 6 Software Manual, which is available at netgear.com/support/product/ReadyNAS_OS_6.
To gracefully shut down your system using the Power button:
1. Press the Power button.
The Power LED blinks, prompting you to conrm the shutdown.
2. Press the Power button again.
The system shuts down gracefully.
Forced Shutdown
Perform a forced shutdown only if the storage system is not responding.
To perform a forced shutdown:
•Press and hold the Power button for ve seconds.
The LEDs blink quickly and simultaneously to warn that power will be cut o forcibly.
The system shuts down.
Boot Menu
Use the boot menu to restart or troubleshoot your ReadyNAS storage system. Your storage system has the
following boot modes:
•Normal. Initiates a normal boot process, just like booting using the Power button.
•Factory default. Initiates a short disk test that takes approximately 5 minutes. After the disk test, a
10-minute time-out period begins, during which all LEDs blink simultaneously.
NETGEAR ReadyNAS 312
65
ReadyNAS OS 6 Desktop Storage Systems

WARNING:
The factory default reboot process resets the storage system to factory
settings, erases all data, resets all defaults, and reformats the disk to X-RAID.
-If you want to cancel the factory default process, power o the storage system before the 10-minute
time-out ends. The system powers down safely without causing any data loss.
-If you want to reset the system to factory default settings, do not power o your system. After the
10-minute time-out period, the factory default process begins.
To start the factory default process immediately, press the button during theBackup
10-minute time-out period.
Tip
•OS reinstall. Reinstalls the rmware from the internal ash to the disks. Use the OS reinstall boot mode
when the system crashes and corrupts some conguration les. OS reinstall boot mode also resets
some settings on your storage system, such as Internet protocol settings and the administrator password,
to defaults.
•Tech support. Boots into a low-level diagnostic mode. Use the tech support boot mode only when a
NETGEAR technical support representative instructs you to do so.
•Volume read only. Mounts a volume as read-only. Use this option when you are attempting to rescue
data o a disk during a disaster recovery.
•Memory test. Performs a memory test. The pass or fail result is reported using the storage system's
LEDs. Contact a NETGEAR technical support representative to interpret memory test results.
•Test disk. Performs an oine full disk test. This process can take four hours or more, depending on
the size of your disks. Any problems are reported in the system logs. For more information about viewing
the system logs, see the ReadyNAS OS 6 Software Manual, which is available at
netgear.com/support/product/ReadyNAS_OS_6.
To access the boot menu:
1. Power o your storage system.
2. Using a straightened paper clip, press and hold the button.Reset
3. Press the Power button.
The system powers on.
4. Continue to press the button until the Power button LED, USB and backup status LED, disk 1Reset
LED, and disk 2 LED light.
5. Press the button to scroll through boot mode options.Backup
The storage system shows the boot mode options using the LEDs, as described in the following table:
NETGEAR ReadyNAS 312
66
ReadyNAS OS 6 Desktop Storage Systems

Status IndicatorBoot Mode
USB and
Backup
LED
Disk 2
LED
Disk 1
LED
Power
LED
Description
All four LEDs light.Boot menu
Power LED lights.Normal
Disk 1 LED lights.Factory default
Disk 2 LED lights.OS reinstall
USB and backup status LED lights.Tech support
Power LED and disk 1 LED light.Volume read only
Power LED and disk 2 LED light.Memory test
Power LED and USB and backup status LED
light.
Test disk
Legend:
•On:
•O:
6. Press and release the button to conrm your boot menu selection.Reset
The system boots in the selected boot mode.
NETGEAR ReadyNAS 312
67
ReadyNAS OS 6 Desktop Storage Systems

Figure 26. ReadyNAS 314 rear panel
1. Reset button
2. LAN ports with LED status indicators
3. eSATA port
4. USB 3.0 ports
5. HDMI port (currently not supported)
6. Power cable socket
7. Exhaust fan
8. Kensington lock
Status Information
You can obtain information about the status of your storage system by reviewing the indicators listed in the
following table.
NETGEAR ReadyNAS 314
71
ReadyNAS OS 6 Desktop Storage Systems

Table 8. ReadyNAS 314 indicator descriptions
DescriptionIndicator
Press this button to turn on the ReadyNAS. The LED indicates these states:
•On. Powered on.
•Blinking. Booting or shutting down.
•O. Powered o.
Power button and LED
An LED on the top of the front panel is associated with each drive bay. LEDs are in
numerical order from left to right. The disk LEDs indicate these states:
•On. Power is on and the disk is operating normally.
•Blinking. The disk was removed, failed, or is resynchronizing. See the display
screen for details.
•O. The drive bay is empty.
Disk LEDs (1, 2, 3, 4)
The disk activity LED has these states:
•On. At least one disk is present.
•Blinking. A disk is active.
•O. All disks are idle.
Disk activity LED
Two LED status indicators are built into this port, one green and one amber. They
indicate port speed and activity as follows:
•Green on, amber o. 1000 Mbps connection speed, no activity.
•Green blinking, amber o. 1000 Mbps connection speed, activity.
•Green o, amber on. 10 Mbps or 100 Mbps connection speed, no activity.
•Green o, amber blinking. 10 Mbps or 100 Mbps connection speed, activity.
•Green o, amber o. No connection.
Rear panel Ethernet port
LEDs
Displays messages about the status of your storage system. Note that the status
display screen goes to sleep to prevent burn-in. To wake it, press the Power button
once. If the storage system reports an abnormal operation or error, the status display
screen stays on.
Status display screen
Power On and Shut Down
This section describes how to power on and shut down your system. If you must shut down the system, use
one of the preferred shutdown methods whenever possible.
NETGEAR ReadyNAS 314
72
ReadyNAS OS 6 Desktop Storage Systems
The system shuts down.
Boot Menu
Use the boot menu to restart or troubleshoot your ReadyNAS storage system.Your storage system has the
following boot modes:
•Normal. Initiates a normal boot process, just like booting using the Power button.
•Factory default. Initiates a short disk test that takes approximately 5 minutes. After the disk test, a
10-minute time-out period begins, during which all LEDs blink simultaneously.
WARNING:
The factory default reboot process resets the storage system to factory
settings, erases all data, resets all defaults, and reformats the disk to X-RAID.
-If you want to cancel the factory default process, power o the storage system before the 10-minute
time-out ends. The system powers down safely without causing any data loss.
-If you want to reset the system to factory default settings, do not power o your system. After the
10-minute time-out period, the factory default process begins.
To start the factory default process immediately, press the button during theBackup
10-minute time-out period.
Tip
•OS reinstall. Reinstalls the rmware from the internal ash to the disks. Use the OS reinstall boot mode
when the system crashes and corrupts some conguration les. OS reinstall boot mode also resets
some settings on your storage system, such as Internet protocol settings and the administrator password,
to defaults.
•Tech support. Boots into a low-level diagnostic mode. Use the tech support boot mode only when a
NETGEAR technical support representative instructs you to do so.
•Volume read only. Mounts a volume as read-only. Use this option when you are attempting to rescue
data o a disk during a disaster recovery.
•Memory test. Performs a memory test. The pass or fail result is reported on the status display screen.
•Test disk. Performs an oine full disk test. This process can take four hours or more, depending on
the size of your disks. Any problems are reported in the system logs. For more information about viewing
the system logs, see the ReadyNAS OS 6 Software Manual, which is available at
netgear.com/support/product/ReadyNAS_OS_6.
To access the boot menu:
1. Power o your storage system.
2. Using a straightened paper clip, press and hold the button.Reset
3. Press the Power button.
The systems powers on.
NETGEAR ReadyNAS 314
74
ReadyNAS OS 6 Desktop Storage Systems

4. Continue to press the button until the status display screen shows a boot menu message.Reset
5. Press the button to scroll through boot mode options.Backup
The status display screen shows the current boot mode option.
6. When the status display screen shows the boot mode that you need, press and release the buttonReset
to conrm your boot menu selection.
The system boots in the selected boot mode.
NETGEAR ReadyNAS 314
75
ReadyNAS OS 6 Desktop Storage Systems

Front and Side Panels
The following gure shows the front and side panels of the ReadyNAS 316.
Figure 27. ReadyNAS 316 front and side panels
1. Status and menu display screen
2. Infrared remote receiver
3. Drive bay door
4. Touch pad and backlight
5. OK button
Drive Bays
The following gure shows the drive bays of the ReadyNAS 316.
NETGEAR ReadyNAS 316
77
ReadyNAS OS 6 Desktop Storage Systems

Figure 28. ReadyNAS 316 drive bays
1. Drive bay door
2. Disk tray release latch
3. Recessed disk tray handle lock
4. USB 2.0 port
5. Disk tray handle
6. Power button
7. Disk LED
8. Drive bays
Rear Panel
The following gure shows the rear panel of the ReadyNAS 316.
NETGEAR ReadyNAS 316
78
ReadyNAS OS 6 Desktop Storage Systems

Figure 29. ReadyNAS 316 rear panel
1. Exhaust fan
2. Power cable socket
3. Power switch
4. Kensington lock
5. eSATA ports
6. LAN ports with LED status indicators
7. HDMI port (currently not supported)
8. USB 3.0 ports
9. Reset button
Status Information
You can obtain information about the status of your storage system by reviewing the indicators listed in the
following table.
NETGEAR ReadyNAS 316
79
ReadyNAS OS 6 Desktop Storage Systems

-If the system was powered on, the system automatically powers on again when the power supply
is connected or power is restored.
-If the system was powered o, the system remains o when the power supply is connected or power
is restored.
In this situation, press the Power button on the front panel of the system to power on the system.
Preferred Shutdown
You can gracefully shut down your system by using the Power button or the ReadyNAS local admin page.
For information about how to gracefully shut down your system using the ReadyNAS local admin page, see
the ReadyNAS OS 6 Software Manual, which is available at netgear.com/support/product/ReadyNAS_OS_6.
To gracefully shut down your system using the Power button:
1. If the status display screen is not lit, do the following:
a. Press the Power button on the front panel of the system.
The status display screen wakes.
b. Press the Power button a second time.
Instructions for graceful shutdown display on the status display screen.
c. Press the Power button a third time.
The system shuts down gracefully.
2. If the status display screen is lit, do the following:
a. Press the Power button on the front panel of the system.
Instructions for graceful shutdown display on the status display screen.
b. Press the Power button again.
The system shuts down gracefully.
Forced Shutdown
Perform a forced shutdown only if the storage system is not responding.
To perform a forced shutdown:
•Press and hold the Power button on the front panel of the system for ve seconds.
The LEDs blink quickly and simultaneously to warn that power will be cut o forcibly.
The system shuts down.
Boot Menu
Use the boot menu to restart or troubleshoot your ReadyNAS storage system.Your storage system has the
following boot modes:
NETGEAR ReadyNAS 316
81
ReadyNAS OS 6 Desktop Storage Systems

Drive Bays
The following gure shows the drive bays of ReadyNAS 422.
Figure 31. ReadyNAS 422 drive bays
1. Drive bay door
2. Disk tray handle
3. Disk tray release latch
4. USB 3.0 port
5. Recessed disk tray handle lock
6. Power button
7. Disk LED
8. Drive bays
NETGEAR ReadyNAS 422
85
ReadyNAS OS 6 Desktop Storage Systems

Rear Panel
The following gure shows the rear panel of the ReadyNAS 422.
Figure 32. Rear panel ReadyNAS 422
1. Exhaust fan
2. Kensington lock
3. eSATA port
4. USB 3.0 port
5. Micro USB console connector (marked as UART)
6. Reset button
7. 1 GbE LAN ports with LED status indicators
8. Power cable socket
NETGEAR ReadyNAS 422
86
ReadyNAS OS 6 Desktop Storage Systems

Drive Bays
The following gure shows the drive bays of ReadyNAS 424.
Figure 34. ReadyNAS 424 drive bays
1. Drive bay door
2. Disk tray handle
3. Disk tray release latch
4. Recessed disk tray handle lock
5. USB 3.0 port
6. Disk LED
7. Power button
8. Drive bays
NETGEAR ReadyNAS 424
93
ReadyNAS OS 6 Desktop Storage Systems
Termékspecifikációk
| Márka: | Netgear |
| Kategória: | szerver |
| Modell: | RN524X |
Szüksége van segítségre?
Ha segítségre van szüksége Netgear RN524X, tegyen fel kérdést alább, és más felhasználók válaszolnak Önnek
Útmutatók szerver Netgear

24 Augusztus 2024
28 Július 2024
23 Július 2024
12 Július 2024
Útmutatók szerver
- szerver Sony
- szerver Fujitsu
- szerver Acer
- szerver StarTech.com
- szerver Lenovo
- szerver Toshiba
- szerver HP
- szerver Medion
- szerver Vimar
- szerver Technics
- szerver Rocstor
- szerver Digitus
- szerver TRENDnet
- szerver Dell
- szerver Gigabyte
- szerver Tripp Lite
- szerver Conceptronic
- szerver Blackmagic Design
- szerver Hikvision
- szerver Asus
- szerver ELAC
- szerver Synology
- szerver Supermicro
- szerver ZyXEL
- szerver Smart-AVI
- szerver Planet
- szerver Ernitec
- szerver Black Box
- szerver MSI
- szerver Cisco
- szerver ATen
- szerver APC
- szerver SEH
- szerver Western Digital
- szerver HGST
- szerver D-Link
- szerver Monacor
- szerver Moxa
- szerver Abus
- szerver Veritas
- szerver Atlona
- szerver Lindy
- szerver Areca
- szerver QNAP
- szerver NEC
- szerver Siig
- szerver Eaton
- szerver Gefen
- szerver Kathrein
- szerver IStarUSA
- szerver Lantronix
- szerver Provision-ISR
- szerver Axis
- szerver NETSCOUT
- szerver Sitecom
- szerver ACTi
- szerver Megasat
- szerver KanexPro
- szerver Kramer
- szerver Allnet
- szerver SilverStone
- szerver Maxdata
- szerver AVerMedia
- szerver Matrox
- szerver Flir
- szerver Buffalo
- szerver GeoVision
- szerver LevelOne
- szerver LaCie
- szerver Valcom
- szerver Asustor
- szerver Intel
- szerver Fantec
- szerver Freecom
- szerver Seagate
- szerver Iomega
- szerver Digi
- szerver Revox
- szerver Luxman
- szerver Ibm
- szerver Sonnet
- szerver TAIDEN
- szerver Advantech
- szerver Extron
- szerver Avocent
- szerver Intellinet
- szerver Teradek
- szerver Silex
- szerver Hanwha
- szerver In Win
- szerver Sun
- szerver MvixUSA
- szerver Dual Bay
- szerver Raidsonic
- szerver EMC
- szerver Infortrend
- szerver Opengear
- szerver G-Technology
- szerver EXSYS
- szerver Chenbro Micom
- szerver Middle Atlantic
- szerver Mr. Signal
- szerver Atlantis Land
- szerver C2G
- szerver Promise Technology
- szerver Mobotix
- szerver Origin Storage
Legújabb útmutatók szerver

9 Április 2025
3 Április 2025

2 Április 2025
29 Március 2025
29 Március 2025
29 Március 2025
24 Március 2025
24 Március 2025

15 Január 2025
15 Január 2025