Használati útmutató Netgear Orbi Pro SRR60
Olvassa el alább 📖 a magyar nyelvű használati útmutatót Netgear Orbi Pro SRR60 (164 oldal) a router kategóriában. Ezt az útmutatót 13 ember találta hasznosnak és 2 felhasználó értékelte átlagosan 4.5 csillagra
Oldal 1/164

User Manual
Orbi Pro
Models
SRR60
SRS60
NETGEAR, Inc.
350 E. Plumeria DriveMarch 2020
San Jose, CA 95134, USA202-11824-07

Support and Community
Visit netgear.com/support to get your questions answered and access the latest
downloads.
You can also check out our NETGEAR Community for helpful advice at
community.netgear.com.
Regulatory and Legal
Si ce produit est vendu au Canada, vous pouvez accéder à ce document en français
canadien à https://www.netgear.com/support/download/.
(If this product is sold in Canada, you can access this document in Canadian French at
https://www.netgear.com/support/download/.)
For regulatory compliance information including the EU Declaration of Conformity, visit
https://www.netgear.com/about/regulatory/.
See the regulatory compliance document before connecting the power supply.
For NETGEAR’s Privacy Policy, visit https://www.netgear.com/about/privacy-policy.
By using this device, you are agreeing to NETGEAR’s Terms and Conditions at
https://www.netgear.com/about/terms-and-conditions. If you do not agree, return the
device to your place of purchase within your return period.
Trademarks
© NETGEAR, Inc., NETGEAR, and the NETGEAR Logo are trademarks of NETGEAR, Inc.
Any non-NETGEAR trademarks are used for reference purposes only.
2
Orbi Pro Router SRR60 and Orbi Pro Satellite SRS60

Revision History
CommentsPublish DatePublication Part
Number
We added the following sections:
•Enable the network access control list and specify the access rule on page
54 and subsections
•Manage the IoT WiFi network settings on page 87 and subsections
•Set up a guest WiFi network and captive portal on page 90 and Set up a
guest WiFi network with open access or password authentication on page
90
•Enable or disable Protected Management Frames on page 102
•Manage the automatic backup options on page 123
We made major changes to the following sections:
•Manage MAC access control lists for WiFi networks and the LAN on page
48 and subsections
•Change the admin WiFi password or security level on page 81
•Change the employee WiFi password or security level on page 85
•Manage the download bandwidth per SSID on page 95
•View satellites, WiFi devices, and wired devices connected to the Orbi
network on page 117
•View and manage logs of router activity on page 119
•Set up a syslog server on page 120
We made minor changes and adjustments to other sections.
March 2020202-11824-07
We added the following new sections:
•Manage MAC access control lists for WiFi networks and the LAN on page
48
•Manage the download bandwidth per SSID on page 95
•Set up a syslog server on page 120
November 2019202-11824-06
3
Orbi Pro Router SRR60 and Orbi Pro Satellite SRS60

Contents
Chapter 1 Overview
Supported Orbi Pro models..............................................................10
Orbi Pro router and satellite hardware overviews..........................10
Orbi Pro router model SRR60 hardware overview....................10
Orbi Pro satellite model SRS60 hardware overview..................11
LED behavior.......................................................................................11
Orbi Pro WiFi system LEDs...........................................................12
Add-on Orbi Pro satellite LEDs....................................................12
Wall mount or ceiling mount your Orbi Pro router........................13
Wall-mount your Orbi Pro.............................................................13
Ceiling-mount your Orbi Pro........................................................14
Orbi Pro router label and Orbi Pro satellite label..........................16
Connect your Orbi Pro router...........................................................17
Place your satellite..............................................................................18
Sync your Orbi Pro satellite...............................................................18
Sync a satellite from an Orbi Pro WiFi system............................18
Sync an add-on Orbi Pro satellite................................................19
Add satellites to your network using the router web interface.20
Set up your Orbi network with the NETGEAR Insight app............21
Chapter 2 Connect to the Orbi Pro Network and Access the Router
Connect to the network.....................................................................23
Wired connection..........................................................................23
WiFi connection.............................................................................23
WiFi connection using WPS..........................................................24
Types of logins....................................................................................24
Use a web browser to access the router..........................................24
Use the automatic Internet setup option....................................25
Log in to the Orbi router web interface......................................26
Change the language........................................................................27
Chapter 3 Specify Your Internet Settings
Use the Internet Setup Wizard..........................................................29
Manually set up the Internet connection.........................................29
Specify an Internet connection without a login..........................29
Specify an Internet connection that uses a login.......................31
4

Manage an IPv6 Internet connection...............................................33
Requirements for entering IPv6 addresses.................................33
Specify IPv6 Internet connections................................................33
Use auto detection for an IPv6 Internet connection..................34
Use auto conguration for an IPv6 Internet connection...........35
Set up an IPv6 6rd tunnel Internet connection...........................36
Set up an IPv6 6to4 tunnel Internet connection.........................38
Set up an IPv6 pass-through Internet connection......................40
Set up an IPv6 xed Internet connection....................................40
Set up an IPv6 DHCP Internet connection..................................41
Set up an IPv6 PPPoE Internet connection..................................43
Change the MTU size.........................................................................45
Chapter 4 Control Access to the Internet
Manage MAC access control lists for WiFi networks and the LAN.48
Enable a MAC ACL for a specic network..................................49
Add automatically detected devices to a MAC ACL.................50
Manually add, remove, or change the information for a device
on a MAC ACL................................................................................51
Disable a MAC ACL for a specic network.................................52
Manage the Orbi network access control list..................................53
Enable the network access control list and specify the access
rule 54...................................................................................................
Manage the allowed devices on the network access control
list 55.....................................................................................................
Manage the blocked devices on the network access control
list 57.....................................................................................................
Use keywords to block Internet sites...............................................58
Delete keywords that are used to block Internet sites...................59
Avoid blocking on a trusted computer............................................60
Block services from the Internet.......................................................60
Schedule when to block Internet sites and services......................62
Set up security event email notications.........................................63
Chapter 5 Specify Network Settings
View or change WAN settings..........................................................66
Manage Dynamic DNS.......................................................................67
Set up a new Dynamic DNS account...........................................67
Specify a DNS account that you already created.......................68
Change the Dynamic DNS settings.............................................69
Set up a default DMZ server..............................................................69
Change the router’s device name....................................................70
Change the LAN TCP/IP settings......................................................71
Use the router as a DHCP server......................................................73
5
Orbi Pro Router SRR60 and Orbi Pro Satellite SRS60

Disable the DHCP server feature in the router...............................74
Manage reserved LAN IP addresses................................................75
Reserve an IP address....................................................................75
Edit a reserved IP address............................................................76
Delete a reserved IP address entry..............................................76
Manage custom static routes............................................................77
Set up a static route.......................................................................77
Edit a static route...........................................................................78
Delete a static route.......................................................................79
Change the admin WiFi network settings.......................................80
Change the admin WiFi network name and channel................80
Change the admin WiFi password or security level..................81
Manage the employee WiFi network settings................................83
Enable the employee WiFi network and change the settings..83
Change the employee WiFi password or security level............85
Manage the IoT WiFi network settings............................................87
Enable the IoT WiFi network and change the settings..............87
Change the IoT WiFi password or security level........................88
Set up a guest WiFi network and captive portal.............................90
Set up a guest WiFi network with open access or password
authentication 90.................................................................................
Set up a guest network with a captive portal.............................92
Set up Facebook Wi-Fi..................................................................93
Manage the download bandwidth per SSID...................................95
View or change advanced WiFi settings..........................................97
Use the router as a WiFi access point..............................................98
Set up router mode............................................................................99
Generate a new backhaul password................................................99
Enable or disable implicit beamforming.......................................100
Enable or disable MU-MIMO..........................................................101
Enable or disable Protected Management Frames.....................102
Check your Internet bandwidth......................................................103
Set up a bridge for a port group or VLAN tag group..................103
Set up a bridge for a port group...............................................104
Set up a bridge for a VLAN tag group......................................104
Improve network connections with Universal Plug and Play......106
Chapter 6 Manage Your Network
Update the router and satellite rmware......................................109
Enable the automatic rmware update feature.......................109
Check for rmware updates.......................................................109
Manually update rmware..........................................................110
Manually update satellite rmware...........................................111
Manually update router rmware..............................................111
6
Orbi Pro Router SRR60 and Orbi Pro Satellite SRS60

Change the admin password..........................................................112
Enable admin password reset........................................................113
Reset the admin password..............................................................114
View router status and usage information....................................114
Display Internet port statistics.........................................................115
Check the Internet connection status............................................116
View satellites, WiFi devices, and wired devices connected to the
Orbi network.....................................................................................117
View satellite status..........................................................................118
View and manage logs of router activity.......................................119
Set up a syslog server......................................................................120
Monitor Internet trafc.....................................................................121
Manage the router conguration le.............................................122
Back up settings...........................................................................122
Manage the automatic backup options....................................123
Erase the current conguration settings...................................123
Restore conguration settings...................................................124
Set up remote management...........................................................125
Use remote access...........................................................................126
Chapter 7 Customize Internet Trafc Rules for Ports
Manage port forwarding to a local server.....................................128
Set up port forwarding to a local server...................................128
Add a custom port forwarding service.....................................129
Edit a port forwarding service....................................................130
Delete a port forwarding entry..................................................131
Application example: Make a local web server public...........131
How the router implements the port forwarding rule.............132
Manage port triggering...................................................................132
Add a port triggering service.....................................................133
Enable port triggering................................................................134
Application example: Port triggering for Internet Relay Chat.134
Chapter 8 Use VPN to Access Your Network
Set up a VPN connection.................................................................137
Specify VPN service in the router...................................................137
Install OpenVPN software...............................................................138
Install OpenVPN software on your Windows-based computer 138.
Install OpenVPN software on your Mac computer..................141
Install OpenVPN software on an iOS device............................142
Install OpenVPN software on an Android device....................142
Use a VPN tunnel on your Windows-based computer................143
Use VPN to access your Internet service at home........................145
Set up VPN client Internet access in the router........................145
7
Orbi Pro Router SRR60 and Orbi Pro Satellite SRS60

Block VPN client Internet access in the router.........................146
Use a VPN tunnel to access your Internet service at home....147
Chapter 9 Troubleshooting
Quick tips...........................................................................................149
Sequence to restart your network.............................................149
WiFi settings.................................................................................149
Network settings..........................................................................149
The router and satellite do not sync..............................................149
You cannot log in to the router.......................................................151
You cannot access the Internet.......................................................151
Troubleshoot Internet browsing.....................................................152
Troubleshoot PPPoE........................................................................153
Troubleshoot WiFi connectivity......................................................154
Troubleshoot your network using the ping utility........................154
Test the LAN path to your router...............................................154
Test the path from your computer to a remote device...........155
Appendix A Supplemental Information
Factory settings.................................................................................158
Factory settings for Orbi Pro router model SRR60..................158
Factory settings for Orbi Pro satellite model SRS60...............160
Technical specications...................................................................162
Technical specications for Orbi Pro router model SRR60....162
Technical specications for Orbi Pro satellite model SRS60..163
8
Orbi Pro Router SRR60 and Orbi Pro Satellite SRS60

1
Overview
The Orbi Pro creates dedicated high-speed WiFi connections to your Internet service.
The Orbi Pro router connects to your modem or gateway. The Orbi Pro satellite extends
the WiFi signal throughout your home.
This chapter contains the following sections:
• Supported Orbi Pro models
• Orbi Pro router and satellite hardware overviews
• LED behavior
• Wall mount or ceiling mount your Orbi Pro router
• Orbi Pro router label and Orbi Pro satellite label
• Connect your Orbi Pro router
• Place your satellite
• Sync your Orbi Pro satellite
• Set up your Orbi network with the NETGEAR Insight app
For more information about the topics covered in this manual, visit the support website
at support.netgear.com.
Note: This manual refers to the Orb Pro router as the and refers to the Orbi Prorouter
satellite as the .satellite
9

Supported Orbi Pro models
This user manual describes the following Orbi Pro models:
•Orbi Pro Router (Model SRR60)
•Orbi Pro Satellite (Model SRS60)
This user manual does not describe the following Orbi Pro satellites:
•Orbi Outdoor Satellite (Model RBS50Y)
•Orbi Pro Ceiling Satellite (Model SRC60)
For more information about these Orbi Pro satellites, see their user manuals, which are
available at https://www.netgear.com/support/.
Note: To manage your Orbi Pro router and any Orbi Pro satellites that are connected
to your Orbi Pro network, you must manage them from your Orbi Pro router web
interface.
Orbi Pro router and satellite hardware
overviews
The following sections display the hardware features available for the Orbi Pro router
(model SRR60) and Orbi Pro satellite (model SRS60).
Orbi Pro router model SRR60 hardware overview
Figure 1. Orbi Pro router model SRR60, front and back views
User Manual10Overview
Orbi Pro Router SRR60 and Orbi Pro Satellite SRS60

1. Ring LED (not shown in image)
2. button (also used for WPS connection)Sync
3. Internet port
4. Ethernet ports
5. button and Power LEDPower On/Off
6. DC Power connector
7. buttonReset
Orbi Pro satellite model SRS60 hardware overview
Figure 2. Orbi Pro satellite model SRS60, front and back views
1. Ring LED (not shown in image)
2. button (also used for WPS connection)Sync
3. Ethernet ports
4. button and Power LEDPower On/Off
5. DC Power connector
6. buttonReset
LED behavior
When you sync an Orbi Pro satellite to the Orbi Pro router, the LED behavior for a satellite
that comes in an Orbi Pro WiFi system is different from the LED behavior for add-on
Orbi Pro satellites.
User Manual11Overview
Orbi Pro Router SRR60 and Orbi Pro Satellite SRS60

Orbi Pro WiFi system LEDs
The following table describes the LED behavior for an Orbi Pro router (model SRR60)
and Orbi Pro satellite (model SRS60) that are purchased together and come in the same
package.
Table 1. Orbi ProWiFi System router and satellite LED descriptions
LED BehaviorLED
The Power LED is located above the button on the rear panel.Power On/Off
•Solid green. Power is on.
•Solid amber. The router or satellite is booting.
•Blinking amber. The router or satellite is resetting to factory default settings.
•Blinking red. The rmware is corrupted.
•Off. Power is not supplied.
Power LED
The ring LED is located on the top.
•Pulsing white Sync. The router is booting or someone pressed the button.
•Off. The router nished booting and is working normally.
•Solid white. The router is resetting to factory default settings.
•Solid magenta. The router cannot connect to the Internet. See You cannot access the
Internet on page 151.
Router ring LED
This satellite is included when you buy an Orbi router. The ring LED is located on the
top.
•Pulsing white. The satellite is booting.
•Blue for three minutes. The connection between the satellite and the router is good.
•Amber for three minutes. The connection between the satellite and the router is fair.
•Magenta. The satellite failed to sync to the router. See The router and satellite do not
sync on page 149.
•Off. The satellite synced to the router and is working normally.
Satellite ring
LED
Add-on Orbi Pro satellite LEDs
The following table describes the LED behavior for an add-on Orbi Pro satellite (model
SRS60) that was purchased separately from the Orbi Pro kit.
User Manual12Overview
Orbi Pro Router SRR60 and Orbi Pro Satellite SRS60

Table 2. Orbi Pro add-on satellite (model SRS60) LED description
LED BehaviorLED
The Power LED is located above the button on the rear panel.Power On/Off
•Solid green. Power is on.
•Solid amber. The satellite is rebooting.
•Blinking amber. The satellite is resetting to factory default settings.
•Blinking red. The rmware is corrupted.
•Off. Power is not supplied.
Power LED
Optional add-on satellites are sold separately and can be added to your Orbi network. The
ring LED is located on the top.
•Pulsing white. The satellite is booting.
•Solid white Sync. The satellite is ready to sync to the router (press the button).
•Blue for three minutes. The connection between the satellite and the router is good.
•Amber for three minutes. The connection between the satellite and the router is fair.
•Magenta. The satellite is not connected to the router or is not getting an IP address.
•Off. The satellite synced to the router and is working normally.
Add-on satellite
ring LED
Wall mount or ceiling mount your Orbi Pro
router
Your package contains wall-mounting and ceiling-mounting items. Before you can wall
mount or ceiling mount your Orbi Pro router (model SRR60) or Orbi Pro satellite (model
SRS60), you must attach the mount base and cover to your router or satellite.
Wall-mount your Orbi Pro
After you attach the mount base and cover to your router or satellite, you can mount
your router or satellite to the wall.
User Manual13Overview
Orbi Pro Router SRR60 and Orbi Pro Satellite SRS60
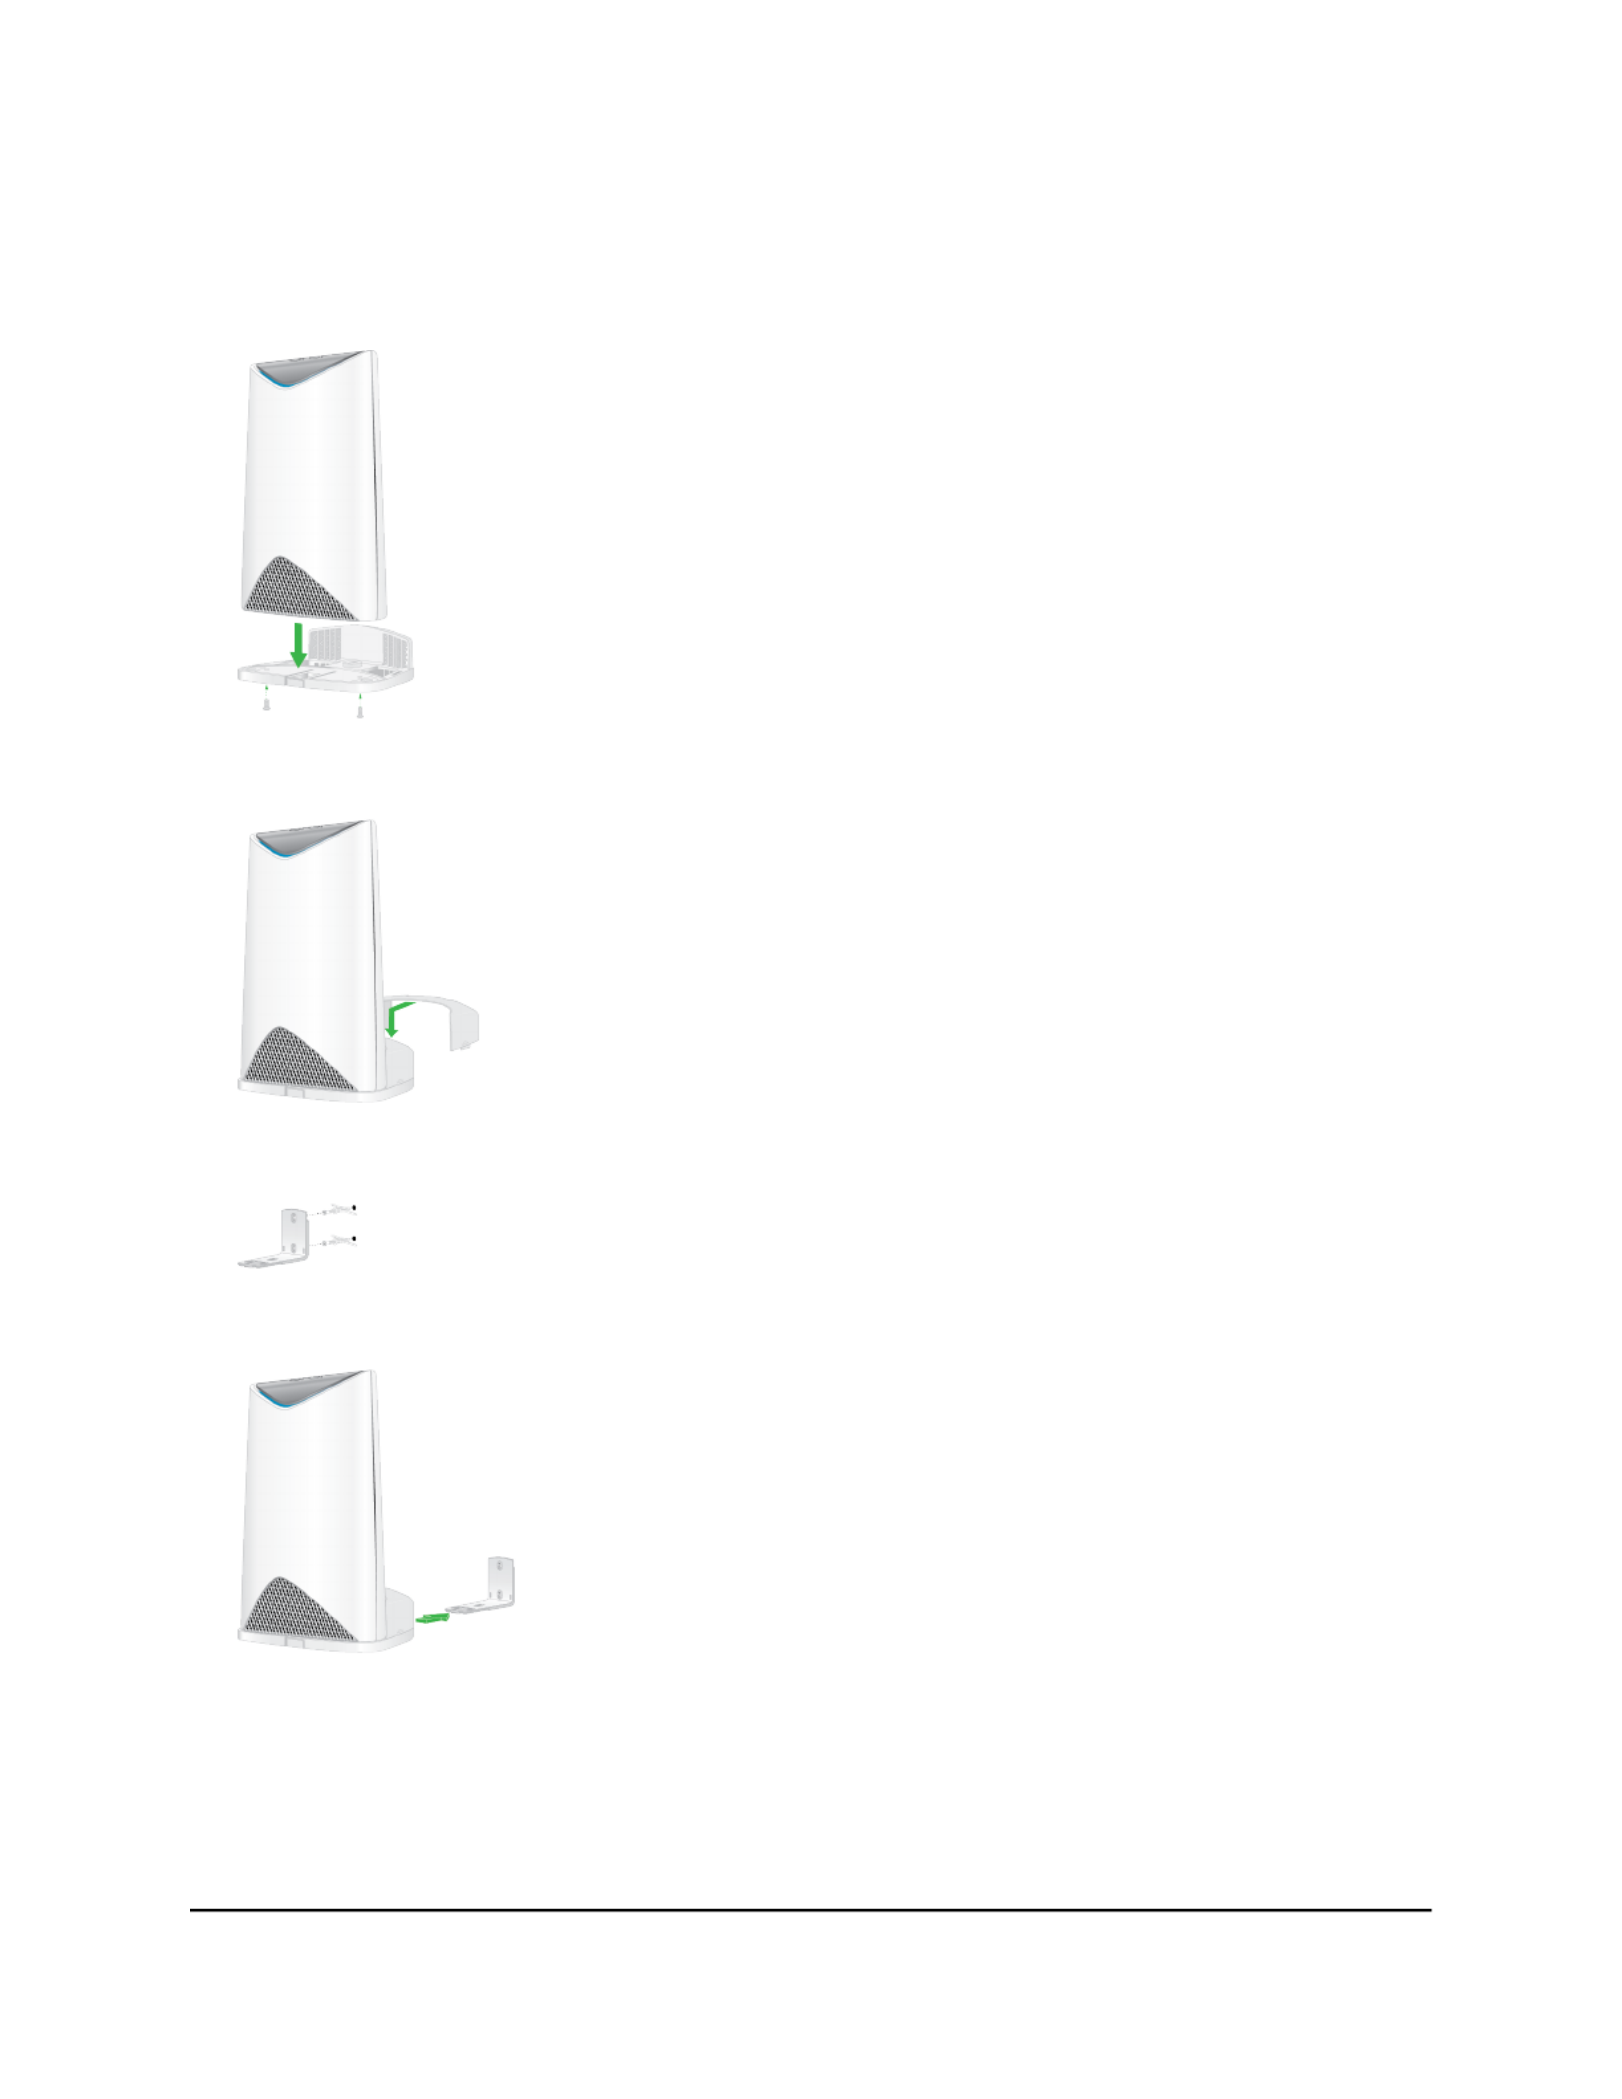
To wall mount your router or satellite:
1. Place your Orbi router or satellite on the mount base and attach the router or satellite
to the base with the provided screws.
2. Attach the mount cover to the mount base.
3. Use the wall anchors with screws to attach the wall bracket to the wall.
4. Slide the mount base onto the wall bracket.
Ceiling-mount your Orbi Pro
The following instructions require a drop ceiling.
User Manual14Overview
Orbi Pro Router SRR60 and Orbi Pro Satellite SRS60

To ceiling mount your router or satellite:
1. Place your Orbi router or satellite on the mount base and attach the router or satellite
to the base with the provided screws.
2. Attach the mount cover to the mount base.
3. Attach the T-bracket to the ceiling bracket with the T-bracket screws.
4. Loosen the screw so that the locking plate can slide.
5. Secure the T-bracket to the T-bar and tighten the screw.
User Manual15Overview
Orbi Pro Router SRR60 and Orbi Pro Satellite SRS60

6. Slide the mount base into the ceiling bracket.
Orbi Pro router label and Orbi Pro satellite
label
The Orbi Pro router label shows the login information, the WiFi network name and
password, the router’s MAC address, and the router’s serial number. The following is
an example of what the router label might look like:
Figure 3. Orbi Pro router label
The Orbi Pro satellite label shows the WiFi network name and password, the satellite’s
MAC address, and the satellite’s serial number. The following is an example of what the
satellite label might look like:
User Manual16Overview
Orbi Pro Router SRR60 and Orbi Pro Satellite SRS60

Figure 4. Orbi Pro satellite label
Connect your Orbi Pro router
If you want to connect your Orbi Pro router to an existing gateway, we recommend that
you turn off your existing gateway’s WiFi.
To cable your router:
1. Unplug your modem’s power, leaving the modem connected to the wall jack for
your Internet service.
If your modem uses a battery backup, remove the battery, and then put the battery
back in.
2. Plug in and turn on your modem.
3. Connect your modem to the Internet port of your router with the Ethernet cable that
came with your router.
4. Connect the power adapter to your and plug the power adapter into anrouter
outlet.
5. If the Power LED does not light, press the button on the rear panelPower On/Off
of the router.
User Manual17Overview
Orbi Pro Router SRR60 and Orbi Pro Satellite SRS60

Place your satellite
Your satellites must be within range of your router’s WiFi signal in order for it to sync
with the router. Use the satellite’s ring LED to help you determine where to place your
satellite.
Sync your Orbi Pro satellite
The sync process for your Orbi Pro satellite depends on whether your satellite came
with your Orbi Pro WiFi system, or if your satellite is an add-on satellite.
Sync a satellite from an Orbi Pro WiFi system
The Orbi Pro WiFi System includes an Orbi Pro router and a Orbi Pro satellite. The Orbi
pro satellite in the WiFi system is preset to automatically nd and sync to the WiFi signal
from the Orbi Pro router in the same WiFi system.
To sync your Orbi Pro satellite:
1. Place your satellite.
For more information, see Place your satellite on page 18.
2. Connect the satellite to a power source.
3. If the Power LED on the back of the satellite does not light, press the Power On/Off
button.
The satellite ring LED pulses white. The satellite automatically nds the Orbi router’s
WiFi signal and attempts to sync to the Orbi router.
The satellite ring LED lights one of the following colors for about three minutes and
then turns off:
•Blue. The Orbi router and satellite successfully synced, and the connection
between the router and satellite is good.
•Amber. The Orbi router and satellite successfully synced, and the connection
between the router and satellite is fair. Consider moving the Orbi satellite closer
to the Orbi router.
•Magenta. The Orbi router and satellite failed to sync.
User Manual18Overview
Orbi Pro Router SRR60 and Orbi Pro Satellite SRS60

Set up your Orbi network with the NETGEAR
Insight app
You can use the NETGEAR Insight app to set up your Orbi network.
To nd the app, search for NETGEAR Insight in the Apple App Store or Google Play
Store. Then launch the NETGEAR Insight app on your mobile device and follow the
prompts. For more information about the NETGEAR Insight app, visit
https://www.netgear.com/insight/.
User Manual21Overview
Orbi Pro Router SRR60 and Orbi Pro Satellite SRS60

2
Connect to the Orbi Pro Network
and Access the Router
To manage your Orbi Pro router and any Orbi Pro satellites that are connected to your
Orbi Pro network, you must manage them from your Orbi Pro router web interface.
This chapter contains the following sections:
• Connect to the network
• Types of logins
• Use a web browser to access the router
• Change the language
22

Connect to the network
You can connect to the Orbi network through a wired or WiFi connection. If you set up
your computer to use a static IP address, change the settings so that it uses Dynamic
Host Conguration Protocol (DHCP).
Wired connection
You can connect your computer to the router using an Ethernet cable and join the
router’s local area network (LAN).
To connect your computer to the router with an Ethernet cable:
1. Make sure that the router is receiving power (its Power LED is lit).
2. Connect an Ethernet cable to an Ethernet port on your computer.
3. Connect the other end of the Ethernet cable to one of the router’s Ethernet ports.
Your computer connects to the local area network (LAN). A message might display
on your computer screen to notify you that an Ethernet cable is connected.
WiFi connection
If you're installing your Orbi router for the rst time, you can connect to the router's
WiFi network by scanning the QR code on your router with the camera app on your
mobile device. To scan the QR code with your camera app, your mobile device must
have iOS version 11 or later or Android version 10 or later.
You can also manually nd and select the Orbi router's WiFi network from your
WiFi-enabled computer or mobile device.
To nd and select the WiFi network:
1. Make sure that the router or satellite is receiving power (its Power LED is lit).
2. On your WiFi-enabled computer or mobile device, nd and select the WiFi network.
The WiFi network name is on the router label. The WiFi network name is the same
for the router and the satellite in the Orbi WiFi System.
Note: If you bought the router and the satellite separately, their default WiFi network
names are different.
3. Join the WiFi network and enter the WiFi password.
The password is on the router label.
Your WiFi-enabled computer or mobile device connects to the WiFi network.
User Manual23Connect to the Orbi Pro Network
and Access the Router
Orbi Pro Router SRR60 and Orbi Pro Satellite SRS60

12. Click the button to test your Internet connection.Test
Specify an Internet connection that uses a login
To view or change the basic Internet setup:
1. Launch a web browser from a computer or mobile device that is connected to your
Orbi network.
2. Enter .orbilogin.com
A login window opens.
3. Enter the admin user name and password.
The user name is . The password is the one that you specied the rst timeadmin
that you logged in. The user name and password are case-sensitive.
The BASIC Home page displays.
4. Select .Internet
The Internet Setup page displays.
5. Select the Does your Internet connection require a login radio button.Yes
The page adjusts.
6. From the menu, select the encapsulation method:Internet Service Provider
The selections are , , or .PPPoE PPTP L2TP
7. In the eld, enter the login name your ISP gave you.Login
This login name is often an email address.
8. In the eld, type the password that you use to log in to your InternetPassword
service.
9. If your ISP requires a service name, type it in the eld.Service Name (if Required)
10. From the menu, select , , orConnection Mode Always On Dial on Demand Manually
Connect.
11. To change the number of minutes until the Internet login time out, in the Idle Timeout
(In minutes) eld, type the number of minutes.
This is how long the router keeps the Internet connection active when no one on the
network is using the Internet connection. A value of 0 (zero) means never log out.
User Manual31Specify Your Internet Settings
Orbi Pro Router SRR60 and Orbi Pro Satellite SRS60
Termékspecifikációk
| Márka: | Netgear |
| Kategória: | router |
| Modell: | Orbi Pro SRR60 |
Szüksége van segítségre?
Ha segítségre van szüksége Netgear Orbi Pro SRR60, tegyen fel kérdést alább, és más felhasználók válaszolnak Önnek
Útmutatók router Netgear

11 Október 2024
8 Október 2024
28 Szeptember 2024
18 Szeptember 2024
18 Szeptember 2024
18 Szeptember 2024
11 Szeptember 2024
11 Szeptember 2024
11 Szeptember 2024
8 Szeptember 2024
Útmutatók router
- router Samsung
- router Acer
- router Milwaukee
- router Bosch
- router AEG
- router StarTech.com
- router Einhell
- router Nokia
- router HP
- router Makita
- router BenQ
- router Apple
- router Ubiquiti Networks
- router Siemens
- router TP-Link
- router Medion
- router Motorola
- router Vimar
- router LogiLink
- router Alcatel
- router Roland
- router TCL
- router Digitus
- router Zebra
- router Xiaomi
- router TRENDnet
- router Mercusys
- router AVM
- router EZVIZ
- router Dell
- router Lancom
- router Strong
- router Gigabyte
- router Conceptronic
- router Thomson
- router Juniper
- router Kyocera
- router Hikvision
- router Keewifi
- router Vivanco
- router Huawei
- router Asus
- router Vtech
- router Hama
- router Zoom
- router Renkforce
- router Synology
- router Draytek
- router Iogear
- router Güde
- router Hitachi
- router Mikrotik
- router Toolcraft
- router ZyXEL
- router SPL
- router Dahua Technology
- router Smart-AVI
- router Black & Decker
- router Devolo
- router Planet
- router Tenda
- router BT
- router Black Box
- router MSI
- router Gembird
- router Cisco
- router PowerPlus
- router ATen
- router Google
- router Metabo
- router Bea-fon
- router ZTE
- router Edimax
- router Vodafone
- router ModeCom
- router HiKOKI
- router Foscam
- router Milan
- router Manhattan
- router Kogan
- router Festool
- router EnGenius
- router Sigma
- router Western Digital
- router D-Link
- router Media-Tech
- router Blustream
- router Milesight
- router Moxa
- router Sagem
- router Razer
- router Trust
- router Porter-Cable
- router Konig
- router Alfa
- router MuxLab
- router DeWalt
- router AVMATRIX
- router IFM
- router A-NeuVideo
- router Atlona
- router Schneider
- router AJA
- router Lindy
- router Cudy
- router Barco
- router QNAP
- router NEC
- router Silverline
- router Cotech
- router Siig
- router Gefen
- router Kathrein
- router Avenview
- router Lantronix
- router Technicolor
- router FSR
- router Topcom
- router Holzmann
- router Arris
- router Anker
- router I-TEC
- router Keenetic
- router Linksys
- router Teltonika
- router Sitecom
- router Intelix
- router Comprehensive
- router Ocean Matrix
- router Digitalinx
- router Alfatron
- router Belkin
- router RGBlink
- router Kopul
- router KanexPro
- router Key Digital
- router Kramer
- router BZBGear
- router UPC
- router Allnet
- router Allied Telesis
- router Airlive
- router Actiontec
- router Proximus
- router Skil
- router Eminent
- router Nilox
- router Sonos
- router Patton
- router Techly
- router Totolink
- router KPN
- router Netis
- router Envivo
- router Buffalo
- router Nest
- router LevelOne
- router ICIDU
- router Clas Ohlson
- router AT&T
- router Sweex
- router Aruba
- router Phicomm
- router Kasda
- router Jung
- router Digi
- router Verizon
- router Billion
- router T-Mobile
- router RAVPower
- router Hawking Technologies
- router Nexxt
- router Beafon
- router Kraun
- router LTS
- router Zolid
- router Sagemcom
- router Telstra
- router Eero
- router Advantech
- router Mercku
- router Hercules
- router Xantech
- router Intellinet
- router Arcadyan
- router Digiconnect
- router Ubee
- router SMC
- router Tele 2
- router Peak
- router CradlePoint
- router Davolink
- router Sixnet
- router 7inova
- router AVPro Edge
- router F-Secure
- router Rosewill
- router Digicom
- router Sabrent
- router On Networks
- router PENTAGRAM
- router Leoxsys
- router Readynet
- router OneAccess
- router Accelerated
- router Nexaira
- router Hamlet
- router Approx
- router T-com
- router Amped Wireless
- router Cambium Networks
- router 3Com
- router WyreStorm
- router Ruckus Wireless
- router Dovado
- router Mach Power
- router EXSYS
- router NetComm
- router Comtrend
- router Premiertek
- router GL.iNet
- router Shinybow
- router Edgewater
- router Atlantis Land
- router Lumantek
- router Starlink
- router PulseAudio
- router Predator
- router Evolution
- router Luxul
- router StarIink
- router Silentwind
- router Keezel
- router United Telecom
- router Wisetiger
Legújabb útmutatók router

9 Április 2025

9 Április 2025
9 Április 2025

31 Március 2025
30 Március 2025
30 Március 2025
30 Március 2025
30 Március 2025
30 Március 2025
23 Március 2025