Használati útmutató Netgear Nighthawk AX6
Olvassa el alább 📖 a magyar nyelvű használati útmutatót Netgear Nighthawk AX6 (162 oldal) a router kategóriában. Ezt az útmutatót 3 ember találta hasznosnak és 2 felhasználó értékelte átlagosan 4.5 csillagra
Oldal 1/162

User Manual
Nighthawk AX6
6-Stream AX4300 WiFi Router
Model RAX50
NETGEAR, Inc.
350 E. Plumeria DriveJune 2020
San Jose, CA 95134, USA202-12030-02

Support and Community
Visit netgear.com/support to get your questions answered and access the latest
downloads.
You can also check out our NETGEAR Community for helpful advice at
community.netgear.com.
Regulatory and Legal
Si ce produit est vendu au Canada, vous pouvez accéder à ce document en français
canadien à https://www.netgear.com/support/download/.
(If this product is sold in Canada, you can access this document in Canadian French at
https://www.netgear.com/support/download/.)
For regulatory compliance information including the EU Declaration of Conformity, visit
https://www.netgear.com/about/regulatory/.
See the regulatory compliance document before connecting the power supply.
For NETGEAR’s Privacy Policy, visit https://www.netgear.com/about/privacy-policy.
By using this device, you are agreeing to NETGEAR’s Terms and Conditions at
https://www.netgear.com/about/terms-and-conditions. If you do not agree, return the
device to your place of purchase within your return period.
Trademarks
©NETGEAR, Inc. NETGEAR and the NETGEAR Logo are trademarks of NETGEAR, Inc.
Any non-NETGEAR trademarks are used for reference purposes only.
2
Nighthawk AX6 6-Stream AX5400 WiFi Router

Contents
Chapter 1 Hardware Setup
Unpack your router...............................................................................9
Top panel LEDs and buttons.............................................................10
Rear panel............................................................................................12
Router label.........................................................................................13
Attach and position the antennas.....................................................13
Position your router............................................................................14
Wall-Mount Your Router....................................................................15
Cable your router...............................................................................16
Chapter 2 Connect to the Network and Access the Router
Connect to the network.....................................................................18
Connect to the network using a wired connection....................18
Find and connect to the WiFi network........................................18
WiFi connection using WPS..........................................................18
Types of logins....................................................................................19
Use a web browser to access the router..........................................19
Automatic Internet Setup..............................................................19
Log in to the router........................................................................21
Install and manage your router with the Nighthawk app..............21
Change the language........................................................................22
Chapter 3 Specify Your Internet Settings
Use the Internet Setup Wizard..........................................................24
Manually set up the Internet connection.........................................24
Specify an Internet connection without a login..........................24
Specify an Internet connection that uses a login.......................26
Specify IPv6 Internet connections....................................................27
Requirements for entering IPv6 addresses.................................28
Use auto detect for an IPv6 Internet connection........................28
Set up an IPv6 6to4 tunnel Internet connection.........................29
Set up an IPv6 pass-through Internet connection......................31
Set up an IPv6 xed Internet connection....................................31
Set up an IPv6 DHCP Internet connection..................................33
Set up an IPv6 PPPoE Internet connection..................................34
Use auto cong for an IPv6 Internet connection........................36
3

Top panel LEDs and buttons
The status LEDs and two buttons are located on the top panel of the router.
Figure 2. Top view
Table 1. LED descriptions
DescriptionLED and Button
•Solid white. The router is ready.
•Blinking white Reset. The router is not ready, rmware is upgrading, or the
button was pressed.
•Off. Power is not supplied to the router.
Power LED
•Solid white. The Internet connection is ready.
•Blinking white. The port is sending or receiving trafc.
•Off. No Ethernet cable is connected between the router and the modem.
Internet LED
User Manual10Hardware Setup
Nighthawk AX6 6-Stream AX5400 WiFi Router

Table 1. LED descriptions (Continued)
DescriptionLED and Button
The LED color indicates the speed: white for Gigabit Ethernet connections and
amber for 100 Mbps or 10 Mbps Ethernet connections.
•Solid white. The router detected a 1 Gbps link with a powered-on device.
•Blinking white. The port is sending or receiving trafc at 1 Gbps.
•Solid amber. The router detected a 100 Mbps or 10 Mbps link with a
powered-on device.
•Blinking amber. The port is sending or receiving trafc at 100 Mbps or 10
Mbps.
•Off. No device is connected to this Ethernet port.
Ethernet LEDs for ports 1–4
•Solid white. A USB device is connected and is ready.
•Blinking white. A USB device is plugged in and is trying to connect.
•Off Safely Remove. No USB device is connected, or someone clicked the
Hardware button and it is now safe to remove the attached USB device.
USB 3.0 port LED
Pressing the WiFi button for two seconds turns WiFi LED and WiFi radios on and
off.
If this LED is lit, the WiFi radios are on. If this LED is off, the WiFi radios are turned
off and you cannot use WiFi to connect to the router.
WiFi LED
Pressing the WPS button lets your WPS-enabled device join your router's WiFi
network without typing the WiFi password. The WPS LED blinks white during
the WPS process and then lights solid white when the WPS-enabled device
connects to your router's WiFi network.
WPS LED
User Manual11Hardware Setup
Nighthawk AX6 6-Stream AX5400 WiFi Router

Rear panel
The following gure shows the rear panel connectors and buttons.
1 2 4 5 63
Figure 3. Rear panel
The rear panel contains the following components:
1. . Pressing the button resets the router.Reset button Reset
If the button is pressed for at least 10 seconds and the Power LED blinks, theReset
router returns to its factory settings.
2. . Use the USB 3.0 port to connect USB storage device.USB 3.0 port
3. . Four Gigabit Ethernet RJ-45 LAN ports. Use these ports to connectEthernet ports
LAN devices to the router.
4. . One Gigabit Ethernet RJ-45 WAN port to connect the router to anInternet port
Internet modem such as a cable modem or DSL modem.
5. DC power connector. Connect the power adapter that came in the product package
to the DC power connector.
6. . Press the button to provide power to thePower On/Off button Power On/Off
router.
User Manual12Hardware Setup
Nighthawk AX6 6-Stream AX5400 WiFi Router

Router label
The router label shows the login information, WiFi network name (SSID), password,
serial number, and MAC address.
Figure 4. Router label
Attach and position the antennas
Before you install your router, attach the antennas to the router.
Note: Make sure to match the labels on the antennas with the labels on the router. The
antennas must be attached to the correct antenna post on the router.
After you are done attaching the antennas, position the antennas as shown.
Figure 5. Attach and position the antennas
User Manual13Hardware Setup
Nighthawk AX6 6-Stream AX5400 WiFi Router

Position your router
The router lets you access your network anywhere within the operating range of your
WiFi network. However, the operating distance or range of your WiFi connection can
vary signicantly depending on the physical placement of your router.
In addition, position your router according to the following guidelines:
•Place your router near the center of the area where your computers and other devices
operate, and within line of sight to your WiFi devices.
•Make sure that the router is within reach of an AC power outlet and near Ethernet
cables for wired computers.
•Place the router in an elevated location, minimizing the number walls and ceilings
between the router and your other devices.
•Place the router away from electrical devices such as these:
- Ceiling fans
- Home security systems
- Microwaves
- Computers
- Base of a cordless phone
- 2.4 GHz or 5 GHz cordless phones
•Place the router away from large metal surfaces, large glass surfaces, insulated walls,
and items such as these:
- Solid metal door
- Aluminum studs
- Fish tanks
- Mirrors
- Brick
- Concrete
The following factors might limit the range of your WiFi:
•The thickness and number of walls the WiFi signal passes through can limit the range.
•Other WiFi access points in and around your home might affect your router’s signal.
WiFi access points are routers, repeaters, WiFi range extenders, and any other
devices that emit a WiFi signal for network access.
User Manual14Hardware Setup
Nighthawk AX6 6-Stream AX5400 WiFi Router

Wall-Mount Your Router
You can wall-mount your router using the wall-mounting holes on the bottom of your
router.
Note: We recommend using M3 x 20 mm screws.
Figure 6. Bottom of the router
To wall-mount your router:
1. Drill holes in the wall where you want to wall-mount your router.
2. Insert wall anchors in the holes.
3. Insert screws into the wall anchors, leaving 3/16 inch (0.5 cm) of each screw exposed.
4. Align the router’s wall-mounting holes with the screws and mount your router.
User Manual15Hardware Setup
Nighthawk AX6 6-Stream AX5400 WiFi Router
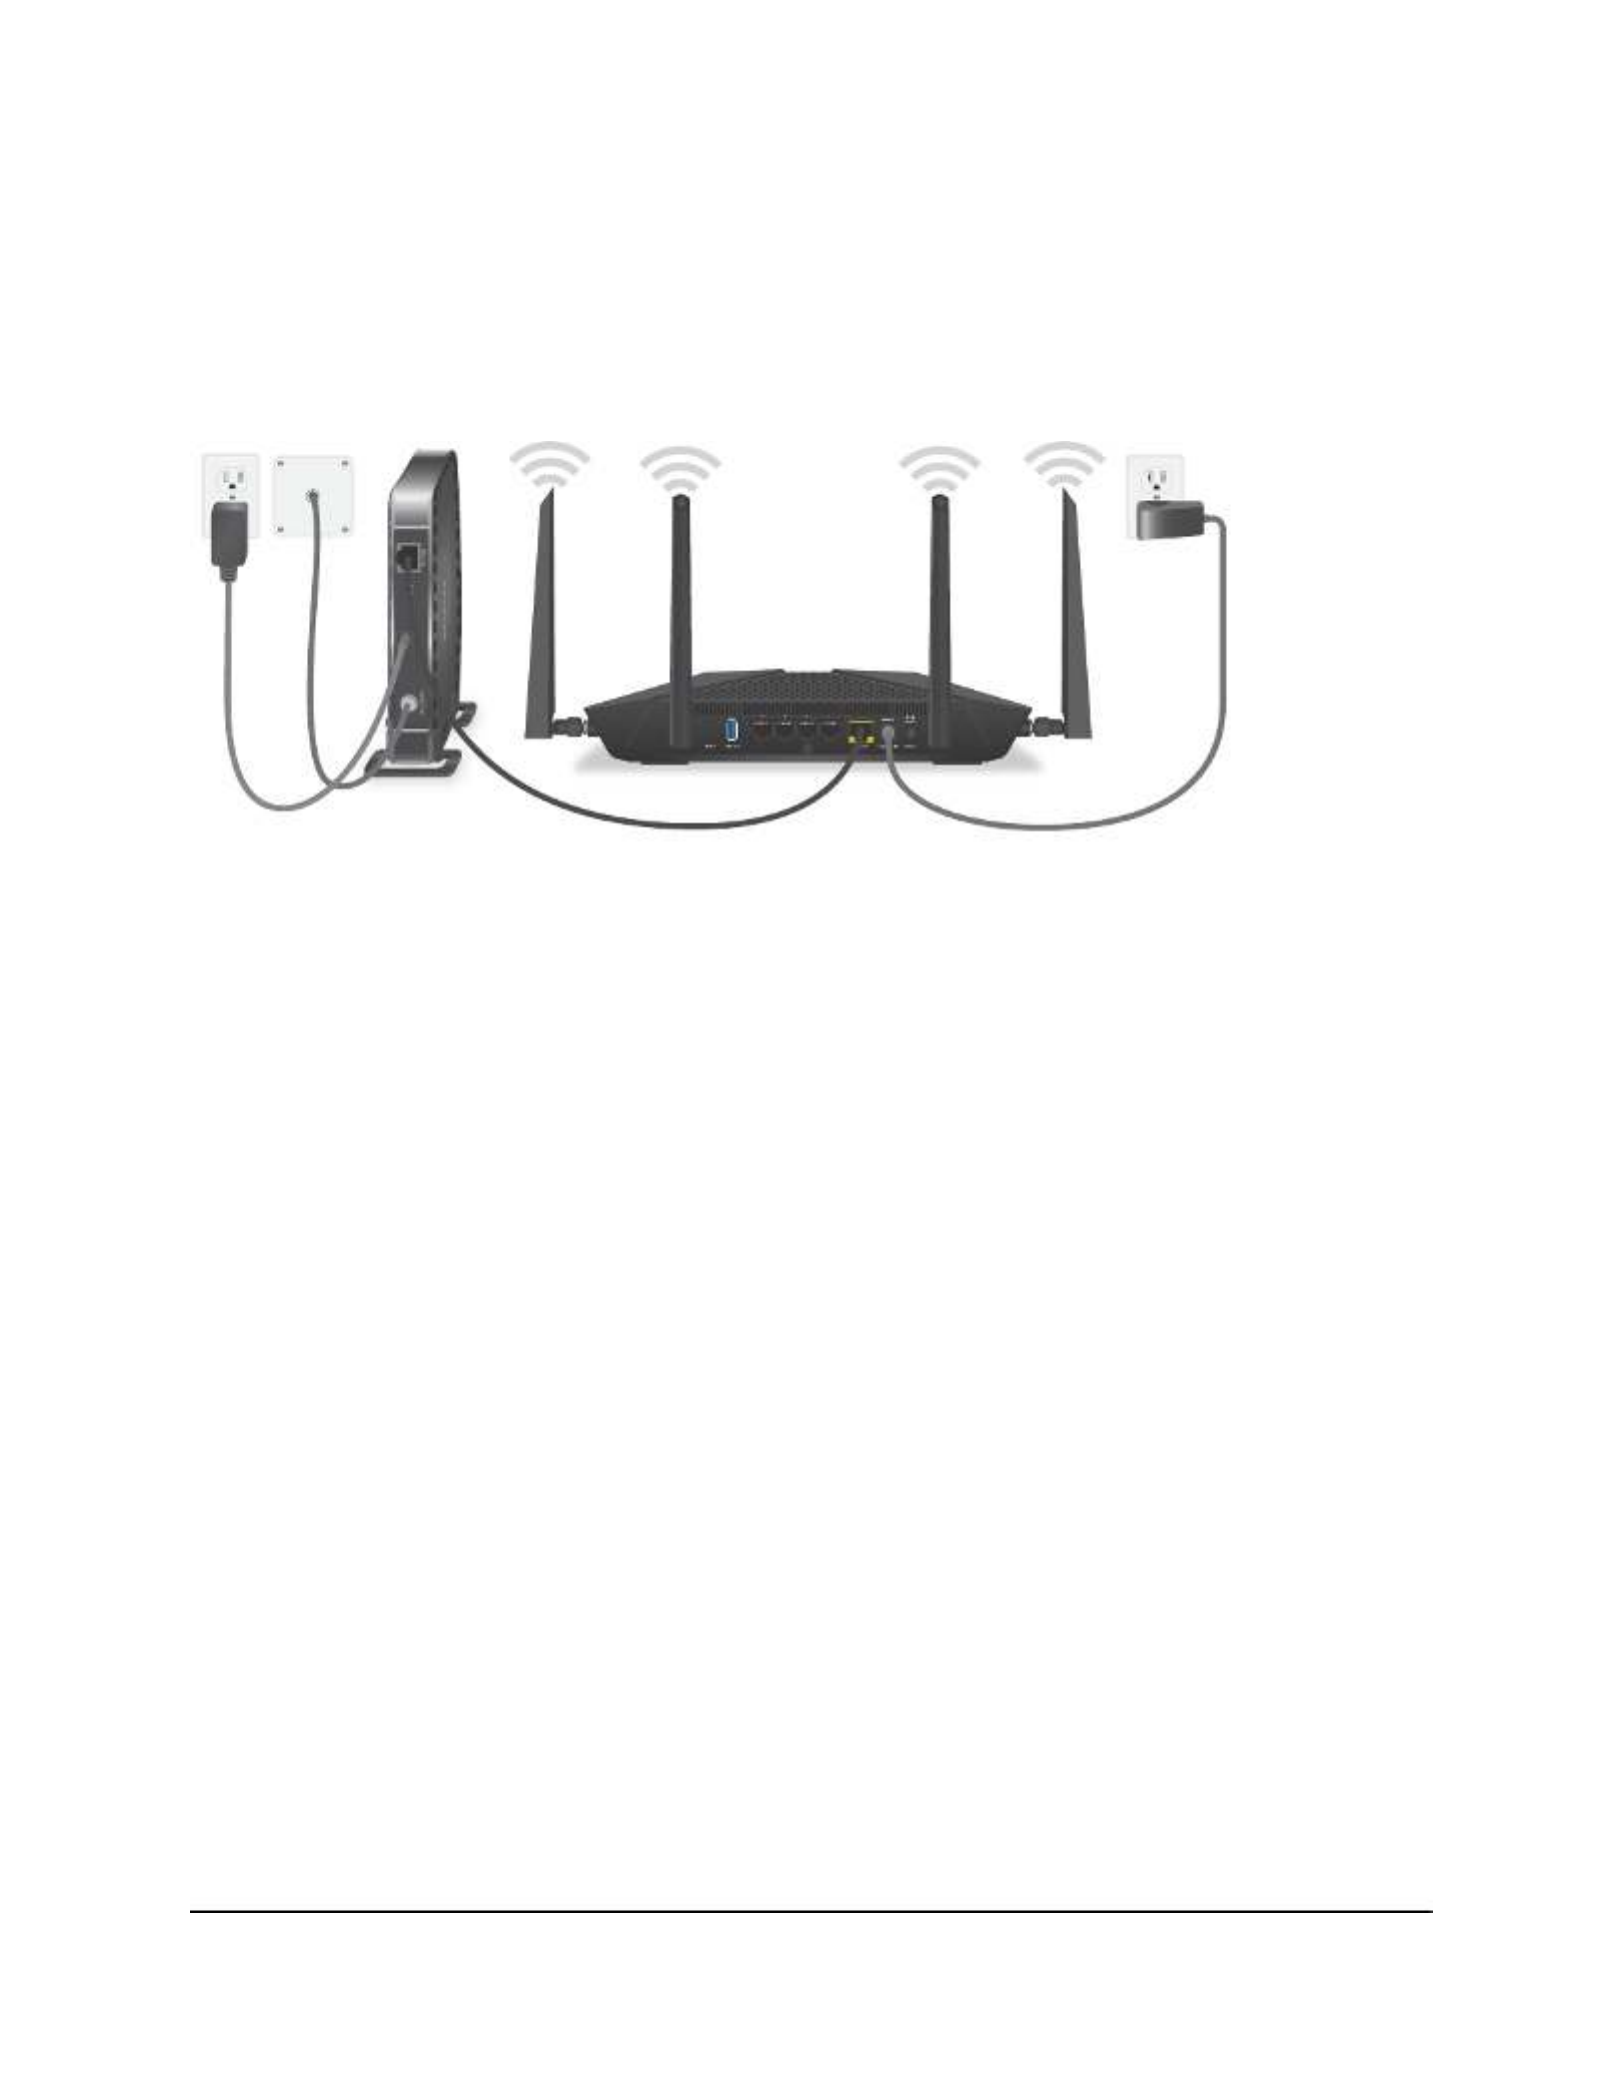
Cable your router
Power on your router and connect it to a modem.
Figure 7. Cable your router
To cable your router:
1. Unplug your modem, remove and reinsert the backup battery if it uses one, and
then plug the modem back in.
2. Use the Ethernet cable to connect the modem to the yellow Internet port on the
router.
Note: If your Internet connection does not require a modem, connect your main
Ethernet cable to the yellow Internet port on the router.
3. Connect the power adapter to your router and plug the power adapter into an outlet.
4. Press the button on the rear panel of the router.Power On/Off
The router’s Power LED lights solid white when the router is ready.
User Manual16Hardware Setup
Nighthawk AX6 6-Stream AX5400 WiFi Router

2
Connect to the Network and Access
the Router
You can connect to the router’s WiFi networks or use a wired Ethernet connection. This
chapter explains the ways you can connect and how to access the router and log in.
The chapter contains the following sections:
• Connect to the network
• Types of logins
• Use a web browser to access the router
• Install and manage your router with the Nighthawk app
• Change the language
17

Connect to the network
You can connect to the router’s network through a wired or WiFi connection. If you set
up your computer to use a static IP address, change the settings so that it uses Dynamic
Host Conguration Protocol (DHCP).
Connect to the network using a wired connection
You can connect your computer to the router using an Ethernet cable and join the
router’s local area network (LAN).
To connect your computer to the router with an Ethernet cable:
1. Make sure that the router is receiving power (its Power LED is lit).
2. Connect an Ethernet cable to an Ethernet port on your computer.
3. Connect the other end of the Ethernet cable a LAN port on the router.
Your computer connects to the local area network (LAN).
Find and connect to the WiFi network
To nd and select the WiFi network:
1. Make sure that the router is receiving power (its Power LED is lit).
2. On your computer or WiFi device, nd and select the WiFi network.
The WiFi network name is on the router label.
3. Join the WiFi network and enter the WiFi password.
The password is on the router label.
Your device connects to the WiFi network.
WiFi connection using WPS
You can connect your WPS-enabled device to the router’s WiFi network with Wi-Fi
Protected Setup (WPS) or you can nd and select the WiFi network.
To use WPS to connect to the WiFi network:
1. Make sure that the router is receiving power (its Power LED is lit).
2. Check the WPS instructions for your WPS-enabled device.
3. Press the button on the router.WPS
User Manual18Connect to the Network and
Access the Router
Nighthawk AX6 6-Stream AX5400 WiFi Router

When your Internet service starts, your Internet service provider (ISP) typically gives you
all the information needed to connect to the Internet. For DSL service, you might need
the following information to set up your router:
•The ISP conguration information for your DSL account
•ISP login name and password
•Fixed or static IP address setting (special deployment by ISP; this setting is rare)
If you cannot locate this information, ask your ISP to provide it. When your Internet
connection is working, you no longer need to launch the ISP login program on your
computer to access the Internet. When you start an Internet application, your router
automatically logs you in.
The NETGEAR installation assistant runs on any device with a web browser. Installation
and basic setup takes about 15 minutes to complete.
To automatically set up your router:
1. Make sure that the router is powered on.
2. Make sure that your computer or mobile device is connected to the router with an
Ethernet cable (wired) or over WiFi with the preset security settings listed on the
label.
Note: If you want to change the router’s WiFi settings, use a wired connection to
avoid being disconnected when the new WiFi settings take effect.
3. Launch a web browser.
The page that displays depends on whether you accessed the router before:
•The rst time you set up the Internet connection for your router, the browser goes
to and the Conguring the Internet Connectionhttp://www.routerlogin.net
page displays.
•If you already set up the Internet connection, enter http://www.routerlogin.net
in the address eld for your browser to start the installation process.
4. Follow the onscreen instructions.
The router connects to the Internet.
5. If the browser does not display the NETGEAR installation assistant, do the following:
•Make sure that the computer is connected to one of the LAN Ethernet ports or
over WiFi to the router.
•Make sure that the router is receiving power and that its Power LED is lit.
•Close and reopen the browser or clear the browser cache.
•Browse to .http://www.routerlogin.net
User Manual20Connect to the Network and
Access the Router
Nighthawk AX6 6-Stream AX5400 WiFi Router

•If the computer is set to a static or xed IP address (this setting is uncommon),
change it to obtain an IP address automatically from the router.
6. If the router does not connect to the Internet, do the following:
a. Review your settings. Make sure that you selected the correct options and typed
everything correctly.
b. Contact your ISP to verify that you are using the correct configuration information.
c. Read You cannot access the Internet on page 154. If problems persist, register
your NETGEAR product and contact NETGEAR Technical Support.
Log in to the router
When you rst connect to your router and launch a web browser, the browser
automatically displays the router web interface. If you want to view or change settings
for the router later, you can use a browser to log in to the router web interface.
To log in to the router:
1. Launch a web browser from a computer or mobile device that is connected to the
router network.
2. Enter .http://www.routerlogin.net
Note: http://www.routerlogin.com http://192.168.1.1You can also enter or .
The procedures in this manual use .http://www.routerlogin.net
A login window opens.
3. Enter the router admin user name and password.
The user name is . The password is the one that you specied the rst timeadmin
that you logged in. The user name and password are case-sensitive.
The BASIC Home page displays.
Install and manage your router with the
Nighthawk app
With the Nighthawk app, you can easily install and manage your router. The app
automatically updates the router to the latest rmware, allows you to personalize your
WiFi network, and even helps register your router with NETGEAR.
The Nighthawk app is available for iOS and Android mobile devices.
User Manual21Connect to the Network and
Access the Router
Nighthawk AX6 6-Stream AX5400 WiFi Router

To install your router using the Nighthawk app:
1. To download the app, visit Nighthawk-app.com.
2. On your mobile device, tap and nd and connect to your router’sSettings > Wi-Fi
WiFi network.
Your router’s WiFi network name (SSID) and network key (WiFi password) are on the
router label.
If the label includes a QR code, you can scan the QR code to join the router’s WiFi
network.
3. Launch the Nighthawk app on your mobile device.
4. Follow the prompts on the app to install your router and connect to the Internet.
Change the language
By default, the language that displays when you log in to the router web interface is set
to Auto.
To change the language:
1. Launch a web browser from a computer or mobile device that is connected to the
router network.
2. Enter .http://www.routerlogin.net
A login window opens.
3. Enter the router admin user name and password.
The user name is . The password is the one that you specied the rst timeadmin
that you logged in. The user name and password are case-sensitive.
The BASIC Home page displays.
4. In the upper right corner, select a language from the menu.
5. When prompted, click the button to conrm this change.OK
The page refreshes with the language that you selected.
User Manual22Connect to the Network and
Access the Router
Nighthawk AX6 6-Stream AX5400 WiFi Router

3
Specify Your Internet Settings
Usually, the quickest way to set up the router to use your Internet connection is to allow
your router to detect the Internet connection automatically when you rst access the
router web interface. You can also customize and manually specify your Internet settings.
This chapter contains the following sections:
• Use the Internet Setup Wizard
• Manually set up the Internet connection
• Specify IPv6 Internet connections
• Manage the MTU size
23

Use the Internet Setup Wizard
You can use the Setup Wizard to detect your Internet settings and automatically set up
your router. The Setup Wizard is not the same as the pages that display the rst time
you connect to your router to set it up.
To use the Setup Wizard:
1. Launch a web browser from a computer or mobile device that is connected to the
router network.
2. Enter .http://www.routerlogin.net
A login window opens.
3. Enter the router admin user name and password.
The user name is . The password is the one that you specied the rst timeadmin
that you logged in. The user name and password are case-sensitive.
The BASIC Home page displays.
4. Select .ADVANCED > Setup Wizard
The Setup Wizard page displays.
5. Select the radio button.Yes
If you select the radio button, you are taken to the Internet Setup page (seeNo
Manually set up the Internet connection on page 24).
6. Click the button.Next
The Setup Wizard searches your Internet connection for servers and protocols to
determine your Internet conguration.
Manually set up the Internet connection
You can view or change the router’s Internet connection settings.
Specify an Internet connection without a login
To specify the Internet connection settings:
1. Launch a web browser from a computer or mobile device that is connected to
therouter network.
2. Enter .http://www.routerlogin.net
A login window opens.
User Manual24Specify Your Internet Settings
Nighthawk AX6 6-Stream AX5400 WiFi Router

3. Enter the router admin user name and password.
The user name is . The password is the one that you specied the rst timeadmin
that you logged in. The user name and password are case-sensitive.
The BASIC Home page displays.
4. Select .Internet
The Internet Setup page displays.
5. In the Does your Internet connection require a login? section, leave the radioNo
button selected.
6. If your Internet connection requires an account name or host name, click the Edit
button in the Account Name section and enter the account name.
7. If your Internet connection requires a domain name, type it in the Domain Name (If
Required) eld.
For the other sections on this page, the default settings usually work, but you can
change them.
8. Select an Internet IP Address radio button:
• Get Dynamically from ISP. Your ISP uses DHCP to assign your IP address. Your
ISP automatically assigns these addresses.
• Use Static IP Address. Enter the IP address, IP subnet mask, and the gateway IP
address that your ISP assigned. The gateway is the ISP router to which your router
connects.
9. Select a Domain Name Server (DNS) Address radio button:
•Get Automatically from ISP. Your ISP uses DHCP to assign your DNS servers.
Your ISP automatically assigns this address.
• Use These DNS Servers. If you know that your ISP requires specic servers, select
this option. Enter the IP address of your ISP’s primary DNS server. If a secondary
DNS server address is available, enter it also.
10. Select a Router MAC Address radio button:
• Use Default Address. Use the default MAC address.
• Use Computer MAC Address. The router captures and uses the MAC address
of the computer that you are now using. You must use the one computer that the
ISP allows.
• Use This MAC Address. Enter the MAC address that you want to use.
11. Click the button.Apply
Your settings are saved.
User Manual25Specify Your Internet Settings
Nighthawk AX6 6-Stream AX5400 WiFi Router

12. Click the button to test your Internet connection.Test
If the NETGEAR website does not display within one minute, see You cannot access
the Internet on page 154.
Specify an Internet connection that uses a login
To view or change the basic Internet setup:
1. Launch a web browser from a computer or mobile device that is connected to the
router network.
2. Enter .http://www.routerlogin.net
A login window opens.
3. Enter the router admin user name and password.
The user name is . The password is the one that you specied the rst timeadmin
that you logged in. The user name and password are case-sensitive.
The BASIC Home page displays.
4. Select .Internet
The Internet Setup page displays.
5. In the Does your Internet connection require a login? section, select the radioYes
button.
6. From the menu, select the encapsulation method: ,Internet Service Provider PPPoE
L2TP PPTP, or .
7. In the eld, enter the login name that your ISP gave you.Login
This login name is often an email address.
8. In the eld, type the password that you use to log in to your InternetPassword
service.
9. If your ISP requires a service name, type it in the eld.Service Name (if Required)
10. From the menu, select , , orConnection Mode Always On Dial on Demand Manually
Connect.
11. To change the number of minutes until the Internet login times out, in the Idle
Timeout (In minutes) eld, type the number of minutes.
This is how long the router keeps the Internet connection active when no one on the
network is using the Internet connection. A value of 0 (zero) means never log out.
12. Select an Internet IP Address radio button:
User Manual26Specify Your Internet Settings
Nighthawk AX6 6-Stream AX5400 WiFi Router

•Get Dynamically from ISP. Your ISP uses DHCP to assign your IP address. Your
ISP automatically assigns these addresses.
• Use Static IP Address. Enter the IP address, IP subnet mask, and the gateway IP
address that your ISP assigned. The gateway is the ISP router to which your router
connects.
13. Select a Domain Name Server (DNS) Address radio button:
• Get Automatically from ISP. Your ISP uses DHCP to assign your DNS servers.
Your ISP automatically assigns this address.
•Use These DNS Servers. If you know that your ISP requires specic servers, select
this option. Enter the IP address of your ISP’s primary DNS server. If a secondary
DNS server address is available, enter it also.
14. Select a Router MAC Address radio button:
•Use Default Address. Use the default MAC address.
• Use Computer MAC Address. The router captures and uses the MAC address
of the computer that you are now using. You must use the one computer that the
ISP allows.
• Use This MAC Address. Enter the MAC address that you want to use.
15. Click the button.Apply
Your settings are saved.
16. Click the button to test your Internet connection.Test
If the NETGEAR website does not display within one minute, see You cannot access
the Internet on page 154.
Specify IPv6 Internet connections
You can set up an IPv6 Internet connection if the router does not detect it automatically.
To set up an IPv6 Internet connection:
1. Launch a web browser from a computer or mobile device that is connected to the
router network.
2. Enter .http://www.routerlogin.net
A login window opens.
3. Enter the router admin user name and password.
The user name is . The password is the one that you specied the rst timeadmin
that you logged in. The user name and password are case-sensitive.
The BASIC Home page displays.
User Manual27Specify Your Internet Settings
Nighthawk AX6 6-Stream AX5400 WiFi Router

4. Select .ADVANCED > Advanced Setup > IPv6
The IPv6 page displays.
5. From the menu, select the IPv6 connection type:Internet Connection Type
•If you are not sure, select so that the router detects the IPv6 typeAuto Detect
that is in use.
•If your Internet connection does not use PPPoe or DHCP, or is not xed, but is
IPv6, select .Auto Cong
Your Internet service provider (ISP) can provide this information.
6. Click the button.Apply
Your settings are saved.
Requirements for entering IPv6 addresses
IPv6 addresses are denoted by eight groups of hexadecimal quartets that are separated
by colons. You can reduce any four-digit group of zeros within an IPv6 address to a
single zero or omit it. The following errors invalidate an IPv6 address:
•More than eight groups of hexadecimal quartets
•More than four hexadecimal characters in a quartet
•More than two colons in a row
Use auto detect for an IPv6 Internet connection
To set up an IPv6 Internet connection through autodetection:
1. Launch a web browser from a computer or mobile device that is connected to the
router network.
2. Enter .http://www.routerlogin.net
A login window opens.
3. Enter the router admin user name and password.
The user name is . The password is the one that you specied the rst timeadmin
that you logged in. The user name and password are case-sensitive.
The BASIC Home page displays.
4. Select .ADVANCED > Advanced Setup > IPv6
The IPv6 page displays.
5. From the menu, select .Internet Connection Type Auto Detect
The page adjusts.
User Manual28Specify Your Internet Settings
Nighthawk AX6 6-Stream AX5400 WiFi Router

The router automatically detects the information in the following elds:
•Connection Type. This eld indicates the connection type that is detected.
•Router’s IPv6 Address on WAN. This field shows the IPv6 address that is acquired
for the router’s WAN (or Internet) interface. The number after the slash (/) is the
length of the prex, which is also indicated by the underline (_) under the IPv6
address. If no address is acquired, the eld displays Not Available.
•Router’s IPv6 Address on LAN. This field shows the IPv6 address that is acquired
for the router’s LAN interface. The number after the slash (/) is the length of the
prex, which is also indicated by the underline (_) under the IPv6 address. If no
address is acquired, the eld displays Not Available.
6. Select an IP Address Assignment radio button:
• Use DHCP Server. This method passes more information to LAN devices but
some IPv6 systems might not support the DHCv6 client function.
• Auto Cong. This is the default setting.
This setting species how the router assigns IPv6 addresses to the devices on your
home network (the LAN).
7. (Optional) Select the check box and specify the interface IDUse This Interface ID
to be used for the IPv6 address of the router’s LAN interface.
If you do not specify an ID here, the router generates one automatically from its MAC
address.
8. Select an IPv6 Filtering radio button:
•Secured. In secured mode, which is the default mode, the router inspects both
TCP and UDP packets.
• Open. In open mode, the router inspects UDP packets only.
9. Click the button.Apply
Your settings are saved.
Set up an IPv6 6to4 tunnel Internet connection
The remote relay router is the router to which your router creates a 6to4 tunnel. Make
sure that the IPv4 Internet connection is working before you apply the 6to4 tunnel
settings for the IPv6 connection.
User Manual29Specify Your Internet Settings
Nighthawk AX6 6-Stream AX5400 WiFi Router

To set up an IPv6 Internet connection by using a 6to4 tunnel:
1. Launch a web browser from a computer or mobile device that is connected to the
router network.
2. Enter .http://www.routerlogin.net
A login window opens.
3. Enter the router admin user name and password.
The user name is . The password is the one that you specied the rst timeadmin
that you logged in. The user name and password are case-sensitive.
The BASIC Home page displays.
4. Select .ADVANCED > Advanced Setup > IPv6
The IPv6 page displays.
5. From the menu, select .Internet Connection Type 6to4 Tunnel
The page adjusts.
The router automatically detects the information in the Router’s IPv6 Address on
LAN eld. This eld shows the IPv6 address that is acquired for the router’s LAN
interface. The number after the slash (/) is the length of the prex, which is also
indicated by the underline (_) under the IPv6 address. If no address is acquired, the
eld displays Not Available.
6. Select a Remote 6to4 Relay Router radio button:
• Auto. Your router uses any remote relay router that is available on the Internet.
This is the default setting.
•Static IP Address. Enter the static IPv4 address of the remote relay router. Your
IPv6 ISP usually provides this address.
7. Select an IP Address Assignment radio button:
• Use DHCP Server. This method passes more information to LAN devices but
some IPv6 systems might not support the DHCPv6 client function.
• Auto Cong. This is the default setting.
This setting species how the router assigns IPv6 addresses to the devices on your
home network (the LAN).
8. (Optional) Select the check box and specify the interface IDUse This Interface ID
to be used for the IPv6 address of the router’s LAN interface.
If you do not specify an ID here, the router generates one automatically from its MAC
address.
9. Select an IPv6 Filtering radio button:
User Manual30Specify Your Internet Settings
Nighthawk AX6 6-Stream AX5400 WiFi Router

3. Enter the router admin user name and password.
The user name is . The password is the one that you specied the rst timeadmin
that you logged in. The user name and password are case-sensitive.
The BASIC Home page displays.
4. Select .ADVANCED > Advanced Setup > IPv6
The IPv6 page displays.
5. From the menu, select .Internet Connection Type Fixed
The page adjusts.
6. Congure the xed IPv6 addresses for the WAN connection:
•IPv6 Address/Prex Length. The IPv6 address and prex length of the router
WAN interface.
•Default IPv6 Gateway. The IPv6 address of the default IPv6 gateway for the
router’s WAN interface.
•Primary DNS Server. The primary DNS server that resolves IPv6 domain name
records for the router.
•Secondary DNS Server. The secondary DNS server that resolves IPv6 domain
name records for the router.
Note: If you do not specify the DNS servers, the router uses the DNS servers that
are congured for the IPv4 Internet connection on the Internet Setup page. (See
Manually set up the Internet connection on page 24.)
7. Select an IP Address Assignment radio button:
• Use DHCP Server. This method passes more information to LAN devices but
some IPv6 systems might not support the DHCPv6 client function.
•Auto Cong. This is the default setting.
This setting species how the router assigns IPv6 addresses to the devices on your
home network (the LAN).
8. In the elds, specify the static IPv6 address and prexIPv6 Address/Prex Length
length of the router’s LAN interface.
If you do not specify an ID here, the router generates one automatically from its MAC
address.
9. Select an IPv6 Filtering radio button:
• Secured. In secured mode, which is the default mode, the router inspects both
TCP and UDP packets.
User Manual32Specify Your Internet Settings
Nighthawk AX6 6-Stream AX5400 WiFi Router

• Open. In open mode, the router inspects UDP packets only.
10. Click the button.Apply
Your settings are saved.
Set up an IPv6 DHCP Internet connection
To set up an IPv6 Internet connection with a DHCP server:
1. Launch a web browser from a computer or mobile device that is connected to the
router network.
2. Enter .http://www.routerlogin.net
A login window opens.
3. Enter the router admin user name and password.
The user name is . The password is the one that you specied the rst timeadmin
that you logged in. The user name and password are case-sensitive.
The BASIC Home page displays.
4. Select .ADVANCED > Advanced Setup > IPv6
The IPv6 page displays.
5. From the menu, select .Internet Connection Type DHCP
The page adjusts.
The router automatically detects the information in the following elds:
•Router’s IPv6 Address on WAN. This field shows the IPv6 address that is acquired
for the router’s WAN (or Internet) interface. The number after the slash (/) is the
length of the prex, which is also indicated by the underline (_) under the IPv6
address. If no address is acquired, the eld displays Not Available.
•Router’s IPv6 Address on LAN. This field shows the IPv6 address that is acquired
for the router’s LAN interface. The number after the slash (/) is the length of the
prex, which is also indicated by the underline (_) under the IPv6 address. If no
address is acquired, the eld displays Not Available.
6. (Optional) In the eld, enter a host name.User Class (If Required)
Most people can leave this eld blank, but if your ISP gave you a specic host name,
enter it here.
7. (Optional) In the eld, enter a domain name.Domain Name (If Required)
You can type the domain name of your IPv6 ISP. Do not enter the domain name for
the IPv4 ISP here. For example, if your ISP’s mail server is mail.xxx.yyy.zzz, type
User Manual33Specify Your Internet Settings
Nighthawk AX6 6-Stream AX5400 WiFi Router

xxx.yyy.zzz as the domain name. If your ISP provided a domain name, type it in this
field. For example, Earthlink Cable might require a host name of home, and Comcast
sometimes supplies a domain name.
8. Select an IP Address Assignment radio button:
• Use DHCP Server. This method passes more information to LAN devices but
some IPv6 systems might not support the DHCv6 client function.
•Auto Cong. This is the default setting.
This setting species how the router assigns IPv6 addresses to the devices on your
home network (the LAN).
9. (Optional) Select the check box and specify the interface IDUse This Interface ID
to be used for the IPv6 address of the router’s LAN interface.
If you do not specify an ID here, the router generates one automatically from its MAC
address.
10. Select an IPv6 Filtering radio button:
• Secured. In secured mode, which is the default mode, the router inspects both
TCP and UDP packets.
• Open. In open mode, the router inspects UDP packets only.
11. Click the button.Apply
Your settings are saved.
Set up an IPv6 PPPoE Internet connection
To set up a PPPoE IPv6 Internet connection:
1. Launch a web browser from a computer or mobile device that is connected to the
router network.
2. Enter .http://www.routerlogin.net
A login window opens.
3. Enter the router admin user name and password.
The user name is . The password is the one that you specied the rst timeadmin
that you logged in. The user name and password are case-sensitive.
The BASIC Home page displays.
4. Select .ADVANCED > Advanced Setup > IPv6
The IPv6 page displays.
User Manual34Specify Your Internet Settings
Nighthawk AX6 6-Stream AX5400 WiFi Router

5. From the menu, select .Internet Connection Type PPPoE
The page adjusts.
The router automatically detects the information in the following elds:
•Router’s IPv6 Address on WAN. This field shows the IPv6 address that is acquired
for the router’s WAN (or Internet) interface. The number after the slash (/) is the
length of the prex, which is also indicated by the underline (_) under the IPv6
address. If no address is acquired, the eld displays Not Available.
•Router’s IPv6 Address on LAN. This field shows the IPv6 address that is acquired
for the router’s LAN interface. The number after the slash (/) is the length of the
prex, which is also indicated by the underline (_) under the IPv6 address. If no
address is acquired, the eld displays Not Available.
6. In the eld, enter the login information for the ISP connection.Login
This is usually the name that you use in your email address. For example, if your main
mail account is JerAB@ISP.com, you would type JerAB in this eld. Some ISPs (like
Mindspring, Earthlink, and T-DSL) require that you use your full email address when
you log in. If your ISP requires your full email address, type it in this eld.
7. In the eld, enter the password for the ISP connection.Password
8. In the eld, enter a service name.Service Name
If your ISP did not provide a service name, leave this eld blank.
Note: Connection ModeThe default setting of the menu is Always On to provide
a steady IPv6 connection. The router never terminates the connection. If the
connection is terminated, for example, when the modem is turned off, the router
attempts to reestablish the connection immediately after the PPPoE connection
becomes available again.
9. Select an IP Address Assignment radio button:
• Use DHCP Server. This method passes more information to LAN devices but
some IPv6 systems might not support the DHCv6 client function.
•Auto Cong. This is the default setting.
This setting species how the router assigns IPv6 addresses to the devices on your
home network (the LAN).
10. (Optional) Select the check box and specify the interface IDUse This Interface ID
to be used for the IPv6 address of the router’s LAN interface.
If you do not specify an ID here, the router generates one automatically from its MAC
address.
User Manual35Specify Your Internet Settings
Nighthawk AX6 6-Stream AX5400 WiFi Router
Termékspecifikációk
| Márka: | Netgear |
| Kategória: | router |
| Modell: | Nighthawk AX6 |
Szüksége van segítségre?
Ha segítségre van szüksége Netgear Nighthawk AX6, tegyen fel kérdést alább, és más felhasználók válaszolnak Önnek
Útmutatók router Netgear

11 Október 2024
8 Október 2024
28 Szeptember 2024
18 Szeptember 2024
18 Szeptember 2024
18 Szeptember 2024
11 Szeptember 2024
11 Szeptember 2024
11 Szeptember 2024
8 Szeptember 2024
Útmutatók router
- router Samsung
- router Acer
- router Milwaukee
- router Bosch
- router AEG
- router StarTech.com
- router Einhell
- router Nokia
- router HP
- router Makita
- router BenQ
- router Apple
- router Ubiquiti Networks
- router Siemens
- router TP-Link
- router Medion
- router Motorola
- router Vimar
- router LogiLink
- router Alcatel
- router Roland
- router TCL
- router Digitus
- router Zebra
- router Xiaomi
- router TRENDnet
- router Mercusys
- router AVM
- router EZVIZ
- router Dell
- router Lancom
- router Strong
- router Gigabyte
- router Conceptronic
- router Thomson
- router Juniper
- router Kyocera
- router Hikvision
- router Keewifi
- router Vivanco
- router Huawei
- router Asus
- router Vtech
- router Hama
- router Zoom
- router Renkforce
- router Synology
- router Draytek
- router Iogear
- router Güde
- router Hitachi
- router Mikrotik
- router Toolcraft
- router ZyXEL
- router SPL
- router Dahua Technology
- router Smart-AVI
- router Black & Decker
- router Devolo
- router Planet
- router Tenda
- router BT
- router Black Box
- router MSI
- router Gembird
- router Cisco
- router PowerPlus
- router ATen
- router Google
- router Metabo
- router Bea-fon
- router ZTE
- router Edimax
- router Vodafone
- router ModeCom
- router HiKOKI
- router Foscam
- router Milan
- router Manhattan
- router Kogan
- router Festool
- router EnGenius
- router Sigma
- router Western Digital
- router D-Link
- router Media-Tech
- router Blustream
- router Milesight
- router Moxa
- router Sagem
- router Razer
- router Trust
- router Porter-Cable
- router Konig
- router Alfa
- router MuxLab
- router DeWalt
- router AVMATRIX
- router IFM
- router A-NeuVideo
- router Atlona
- router Schneider
- router AJA
- router Lindy
- router Cudy
- router Barco
- router QNAP
- router NEC
- router Silverline
- router Cotech
- router Siig
- router Gefen
- router Kathrein
- router Avenview
- router Lantronix
- router Technicolor
- router FSR
- router Topcom
- router Holzmann
- router Arris
- router Anker
- router I-TEC
- router Keenetic
- router Linksys
- router Teltonika
- router Sitecom
- router Intelix
- router Comprehensive
- router Ocean Matrix
- router Digitalinx
- router Alfatron
- router Belkin
- router RGBlink
- router Kopul
- router KanexPro
- router Key Digital
- router Kramer
- router BZBGear
- router UPC
- router Allnet
- router Allied Telesis
- router Airlive
- router Proximus
- router Skil
- router Eminent
- router Nilox
- router Sonos
- router Patton
- router Techly
- router Totolink
- router KPN
- router Netis
- router Envivo
- router Buffalo
- router Nest
- router LevelOne
- router ICIDU
- router Clas Ohlson
- router AT&T
- router Sweex
- router Aruba
- router Phicomm
- router Kasda
- router Jung
- router Digi
- router Verizon
- router Billion
- router T-Mobile
- router RAVPower
- router Hawking Technologies
- router Nexxt
- router Beafon
- router Kraun
- router LTS
- router Zolid
- router Sagemcom
- router Telstra
- router Eero
- router Advantech
- router Mercku
- router Hercules
- router Xantech
- router Intellinet
- router Arcadyan
- router Digiconnect
- router Ubee
- router SMC
- router Tele 2
- router Peak
- router CradlePoint
- router Davolink
- router Sixnet
- router 7inova
- router AVPro Edge
- router F-Secure
- router Rosewill
- router Digicom
- router Sabrent
- router On Networks
- router PENTAGRAM
- router Leoxsys
- router Readynet
- router OneAccess
- router Accelerated
- router Nexaira
- router Hamlet
- router Approx
- router T-com
- router Amped Wireless
- router Cambium Networks
- router 3Com
- router WyreStorm
- router Ruckus Wireless
- router Dovado
- router Mach Power
- router EXSYS
- router NetComm
- router Comtrend
- router Premiertek
- router GL.iNet
- router Shinybow
- router Edgewater
- router Atlantis Land
- router Lumantek
- router Starlink
- router PulseAudio
- router Predator
- router Evolution
- router Luxul
- router StarIink
- router Silentwind
- router Keezel
- router United Telecom
- router Wisetiger
Legújabb útmutatók router

9 Április 2025

9 Április 2025
9 Április 2025

31 Március 2025
30 Március 2025
30 Március 2025
30 Március 2025
30 Március 2025
30 Március 2025
23 Március 2025