Használati útmutató Netgear DST6501
Netgear
Powerline adapter
DST6501
Olvassa el alább 📖 a magyar nyelvű használati útmutatót Netgear DST6501 (51 oldal) a Powerline adapter kategóriában. Ezt az útmutatót 12 ember találta hasznosnak és 2 felhasználó értékelte átlagosan 4.5 csillagra
Oldal 1/51

350 East Plumeria Drive
San Jose, CA 95134
USA
October 2015
202-11568-01
Add-on DST Adapter
Requires Nighthawk R7300 DST Router
Model DST6501
User Manual

2
Nighthawk DST AC1900 DST Router and DST Adpater Model R7300DST
Support
Thank you for purchasing this NETGEAR product. You can visit www.netgear.com/support to register your product, get help,
access the latest downloads and user manuals, and join our community. We recommend that you use only official NETGEAR
support resources.
For additional support, visit www.geeksquad.com to chat online or call 1-800-GeekSquad. Setup and support are included
for one year from your Nighthawk R7300 DST router purchase date.
Your Geek Squad support coupon code is GS1337EXB.
Compliance
For regulatory compliance information, visit http://www.netgear.com/about/regulatory.
See the regulatory compliance document before connecting the power supply.
Trademarks
NETGEAR, Inc., NETGEAR and the NETGEAR Logo are trademarks of NETGEAR, Inc. GEEK SQUAD, the GEEK SQUAD logo,
Dead Spot Terminator and the DST logo are trademarks of Best Buy and its affiliated companies. Any non.NETGEAR
trademarks are used for reference purposes only.

3
Contents
Chapter 1 Hardware Setup
Unpack Your DST Adapter . . . . . . . . . . . . . . . . . . . . . . . . . . . . . . . . . . . . . . . . . . . . . 6
DST Adapter Hardware Features. . . . . . . . . . . . . . . . . . . . . . . . . . . . . . . . . . . . . . . . 7
DST Adapter LEDs. . . . . . . . . . . . . . . . . . . . . . . . . . . . . . . . . . . . . . . . . . . . . . . . . . 8
DST Adapter Side Panel Hardware Features . . . . . . . . . . . . . . . . . . . . . . . . . . . . 8
Connect Add-On DST Adapters to the DST Router . . . . . . . . . . . . . . . . . . . . . . . . 9
Chapter 2 Connect to the DST Adapter Network and Access the DST
Adapter
Connect Devices to the DST Adapter Network . . . . . . . . . . . . . . . . . . . . . . . . . . 12
Connect to the DST Adapter Network With an Ethernet Cable. . . . . . . . . . . 12
Connect to the DST Adapter Network With a WiFi Connection . . . . . . . . . . 12
Log In to the DST Adapter After Initial Setup . . . . . . . . . . . . . . . . . . . . . . . . . . . . 14
Chapter 3 Manage DST Adapter’s Encryption Key
Create a New Encryption Key for the DST Adapter . . . . . . . . . . . . . . . . . . . . . . . 16
Use the DST Adapter’s Default Encryption Key . . . . . . . . . . . . . . . . . . . . . . . . . . 17
Chapter 4 Specify Network Settings for the DST Adapter
Specify Basic WiFi Settings for the DST Adapter . . . . . . . . . . . . . . . . . . . . . . . . . 20
Change the DST Adapter WiFi Password or Security Level. . . . . . . . . . . . . . . . . 21
Chapter 5 Manage the DST Adapter Network and Settings
Update the DST Adapter’s Firmware . . . . . . . . . . . . . . . . . . . . . . . . . . . . . . . . . . . 24
Update the DST Adapter’s Firmware From the DST Router . . . . . . . . . . . . . . 24
Update the DST Adapter’s Firmware From the DST Adapter . . . . . . . . . . . . . 24
Return the DST Adapter to Its Factory Settings. . . . . . . . . . . . . . . . . . . . . . . . . . 25
Use the Factory Reset Button to Restore Factory Settings . . . . . . . . . . . . . . 26
Erase the DST Adapter Settings . . . . . . . . . . . . . . . . . . . . . . . . . . . . . . . . . . . . . 26
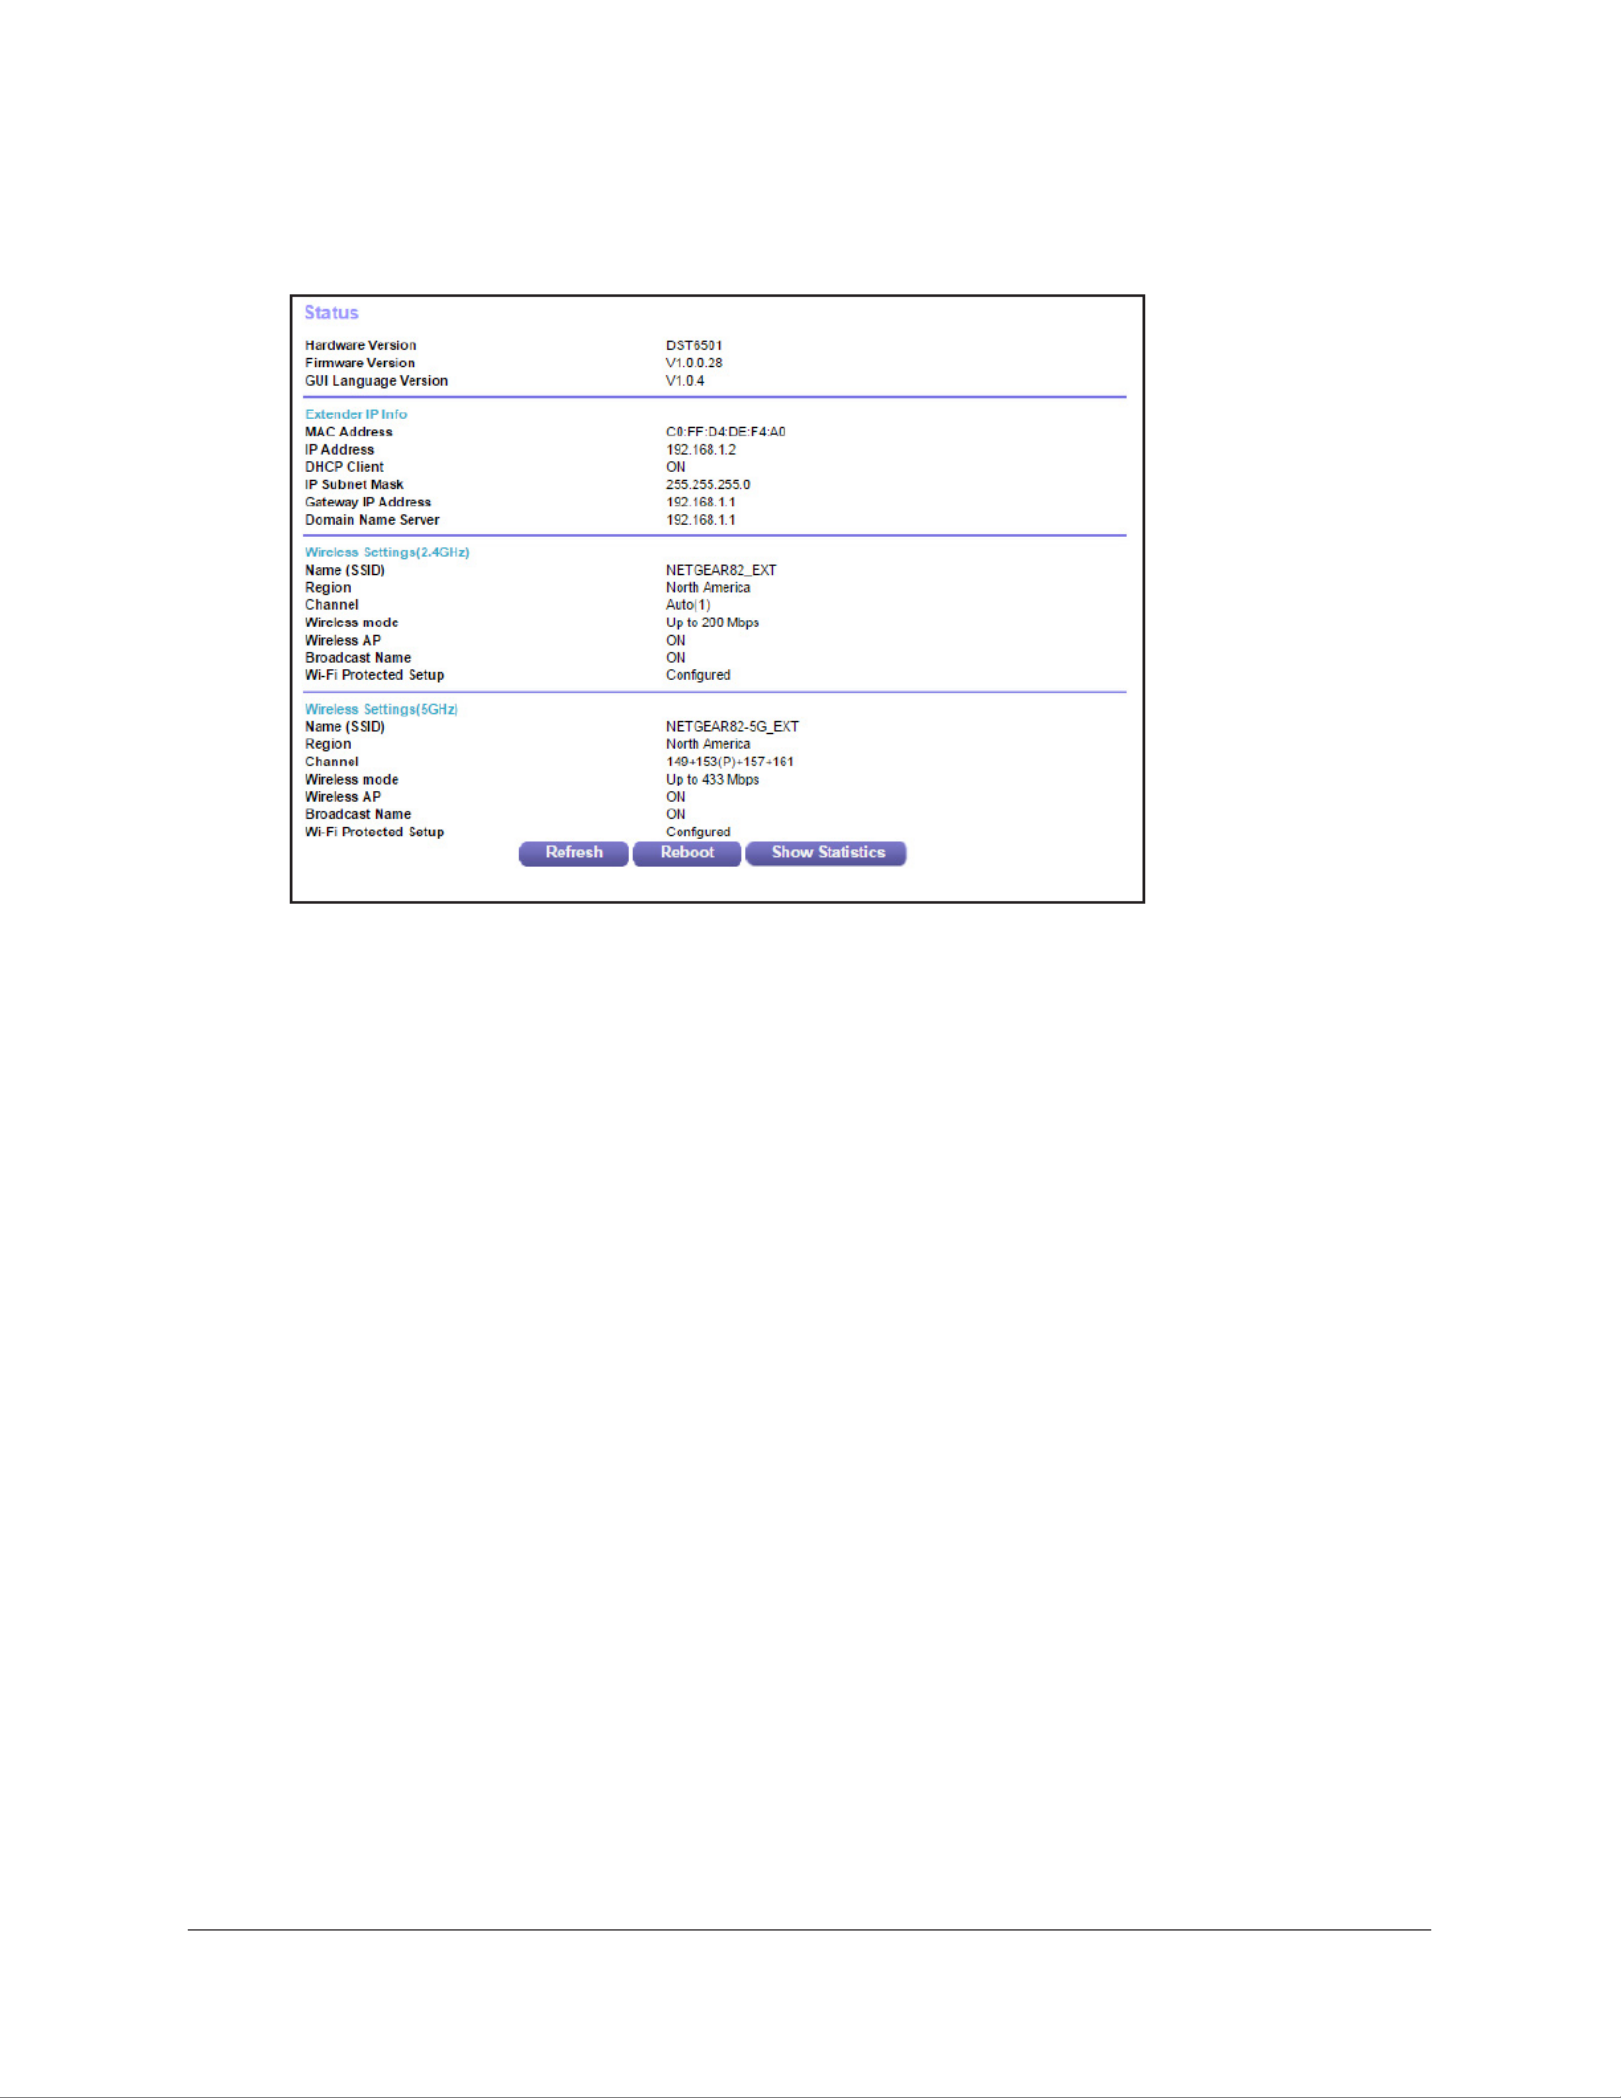
View the DST Adapter Status . . . . . . . . . . . . . . . . . . . . . . . . . . . . . . . . . . . . . . . . . 27
View the DST Adapter ‘s Statistics . . . . . . . . . . . . . . . . . . . . . . . . . . . . . . . . . . . . . 28
Back Up the DST Adapter Configuration . . . . . . . . . . . . . . . . . . . . . . . . . . . . . . . . 29
Restore Saved Configuration Settings for the DST Adapter. . . . . . . . . . . . . . . . 30
Update the DST Adapter’s WiFi Settings From the DST Router . . . . . . . . . . . . . 31
View the DST Adapter’s WiFi Settings From the DST Router . . . . . . . . . . . . . . . 32
Change the DST Adapter’s Device Name. . . . . . . . . . . . . . . . . . . . . . . . . . . . . . . . 33
Change the DST Adapter’s Device Name From the DST Adapter . . . . . . . . . 33

4
Nighthawk DST AC1900 DST Router and DST Adpater Model R7300DST
Change the DST Adapter’s Device Name From the DST Router . . . . . . . . . . 34
Change the DST Adapter’s admin Password . . . . . . . . . . . . . . . . . . . . . . . . . . . . . 35
Turn the LEDs on the DST Adapter On or Off . . . . . . . . . . . . . . . . . . . . . . . . . . . . 36
Use WPS to Add a Device to the DST Adapter’s WiFi Network . . . . . . . . . . . . . 36
Use WPS With the Push Button Method . . . . . . . . . . . . . . . . . . . . . . . . . . . . . . 37
Use WPS With the PIN Method. . . . . . . . . . . . . . . . . . . . . . . . . . . . . . . . . . . . . . 38
View or Change the DST Adapter’s WPS Settings . . . . . . . . . . . . . . . . . . . . . . . . 39
View or Change DST Adapter Advanced WiFi Settings . . . . . . . . . . . . . . . . . . . . 40
Set Up a WiFi Access List for the DST Adapter . . . . . . . . . . . . . . . . . . . . . . . . . . . 41
View Wired and WiFi Network Devices Connected to the DST Adapter. . . . . . 43
Set Up the DST Adapter to Use a Static IP Address . . . . . . . . . . . . . . . . . . . . . . . 43
Chapter 6 DST Adapter Troubleshooting
LEDs Are Off When the DST Adapter Is Plugged In . . . . . . . . . . . . . . . . . . . . . . . 46
Power LED Is Off . . . . . . . . . . . . . . . . . . . . . . . . . . . . . . . . . . . . . . . . . . . . . . . . . . . . 46
DST LED Is Off, Amber, or Red . . . . . . . . . . . . . . . . . . . . . . . . . . . . . . . . . . . . . . . . 46
Ethernet LED Is Off . . . . . . . . . . . . . . . . . . . . . . . . . . . . . . . . . . . . . . . . . . . . . . . . . . 46
Contact Geek Squad . . . . . . . . . . . . . . . . . . . . . . . . . . . . . . . . . . . . . . . . . . . . . . . . . 47
Appendix A DST Adapter Supplemental Information
Technical Specifications . . . . . . . . . . . . . . . . . . . . . . . . . . . . . . . . . . . . . . . . . . . . . . 50
Safety Information . . . . . . . . . . . . . . . . . . . . . . . . . . . . . . . . . . . . . . . . . . . . . . . . . . 51

5
1
1. Hardware Setup
You must install a Nighthawk R7300 DST router and the DST adapter that came with the DST
router and set up a DST network before you can set up the add-on DST adapter. For more
information, see the Nighthawk DST AC1900 DST Router and DST Adapter Model R7300DST
User Manual, which is available online at downloadcenter.netgear.com or through a link in the
product’s user interface.
This chapter contains the following sections:
•Unpack Your DST Adapter
•DST Adapter Hardware Features
•Connect Add-On DST Adapters to the DST Router
For more information about the topics covered in this manual, visit the support website at
support.netgear.com.

Hardware Setup
6
Nighthawk DST AC1900 DST Router and DST Adpater Model R7300DST
Unpack Your DST Adapter
Your package contains the following items.
DST adapter Ethernet cable
Figure 1. Package contents
Hardware Setup
7
Nighthawk DST AC1900 DST Router and DST Adpater Model R7300DST
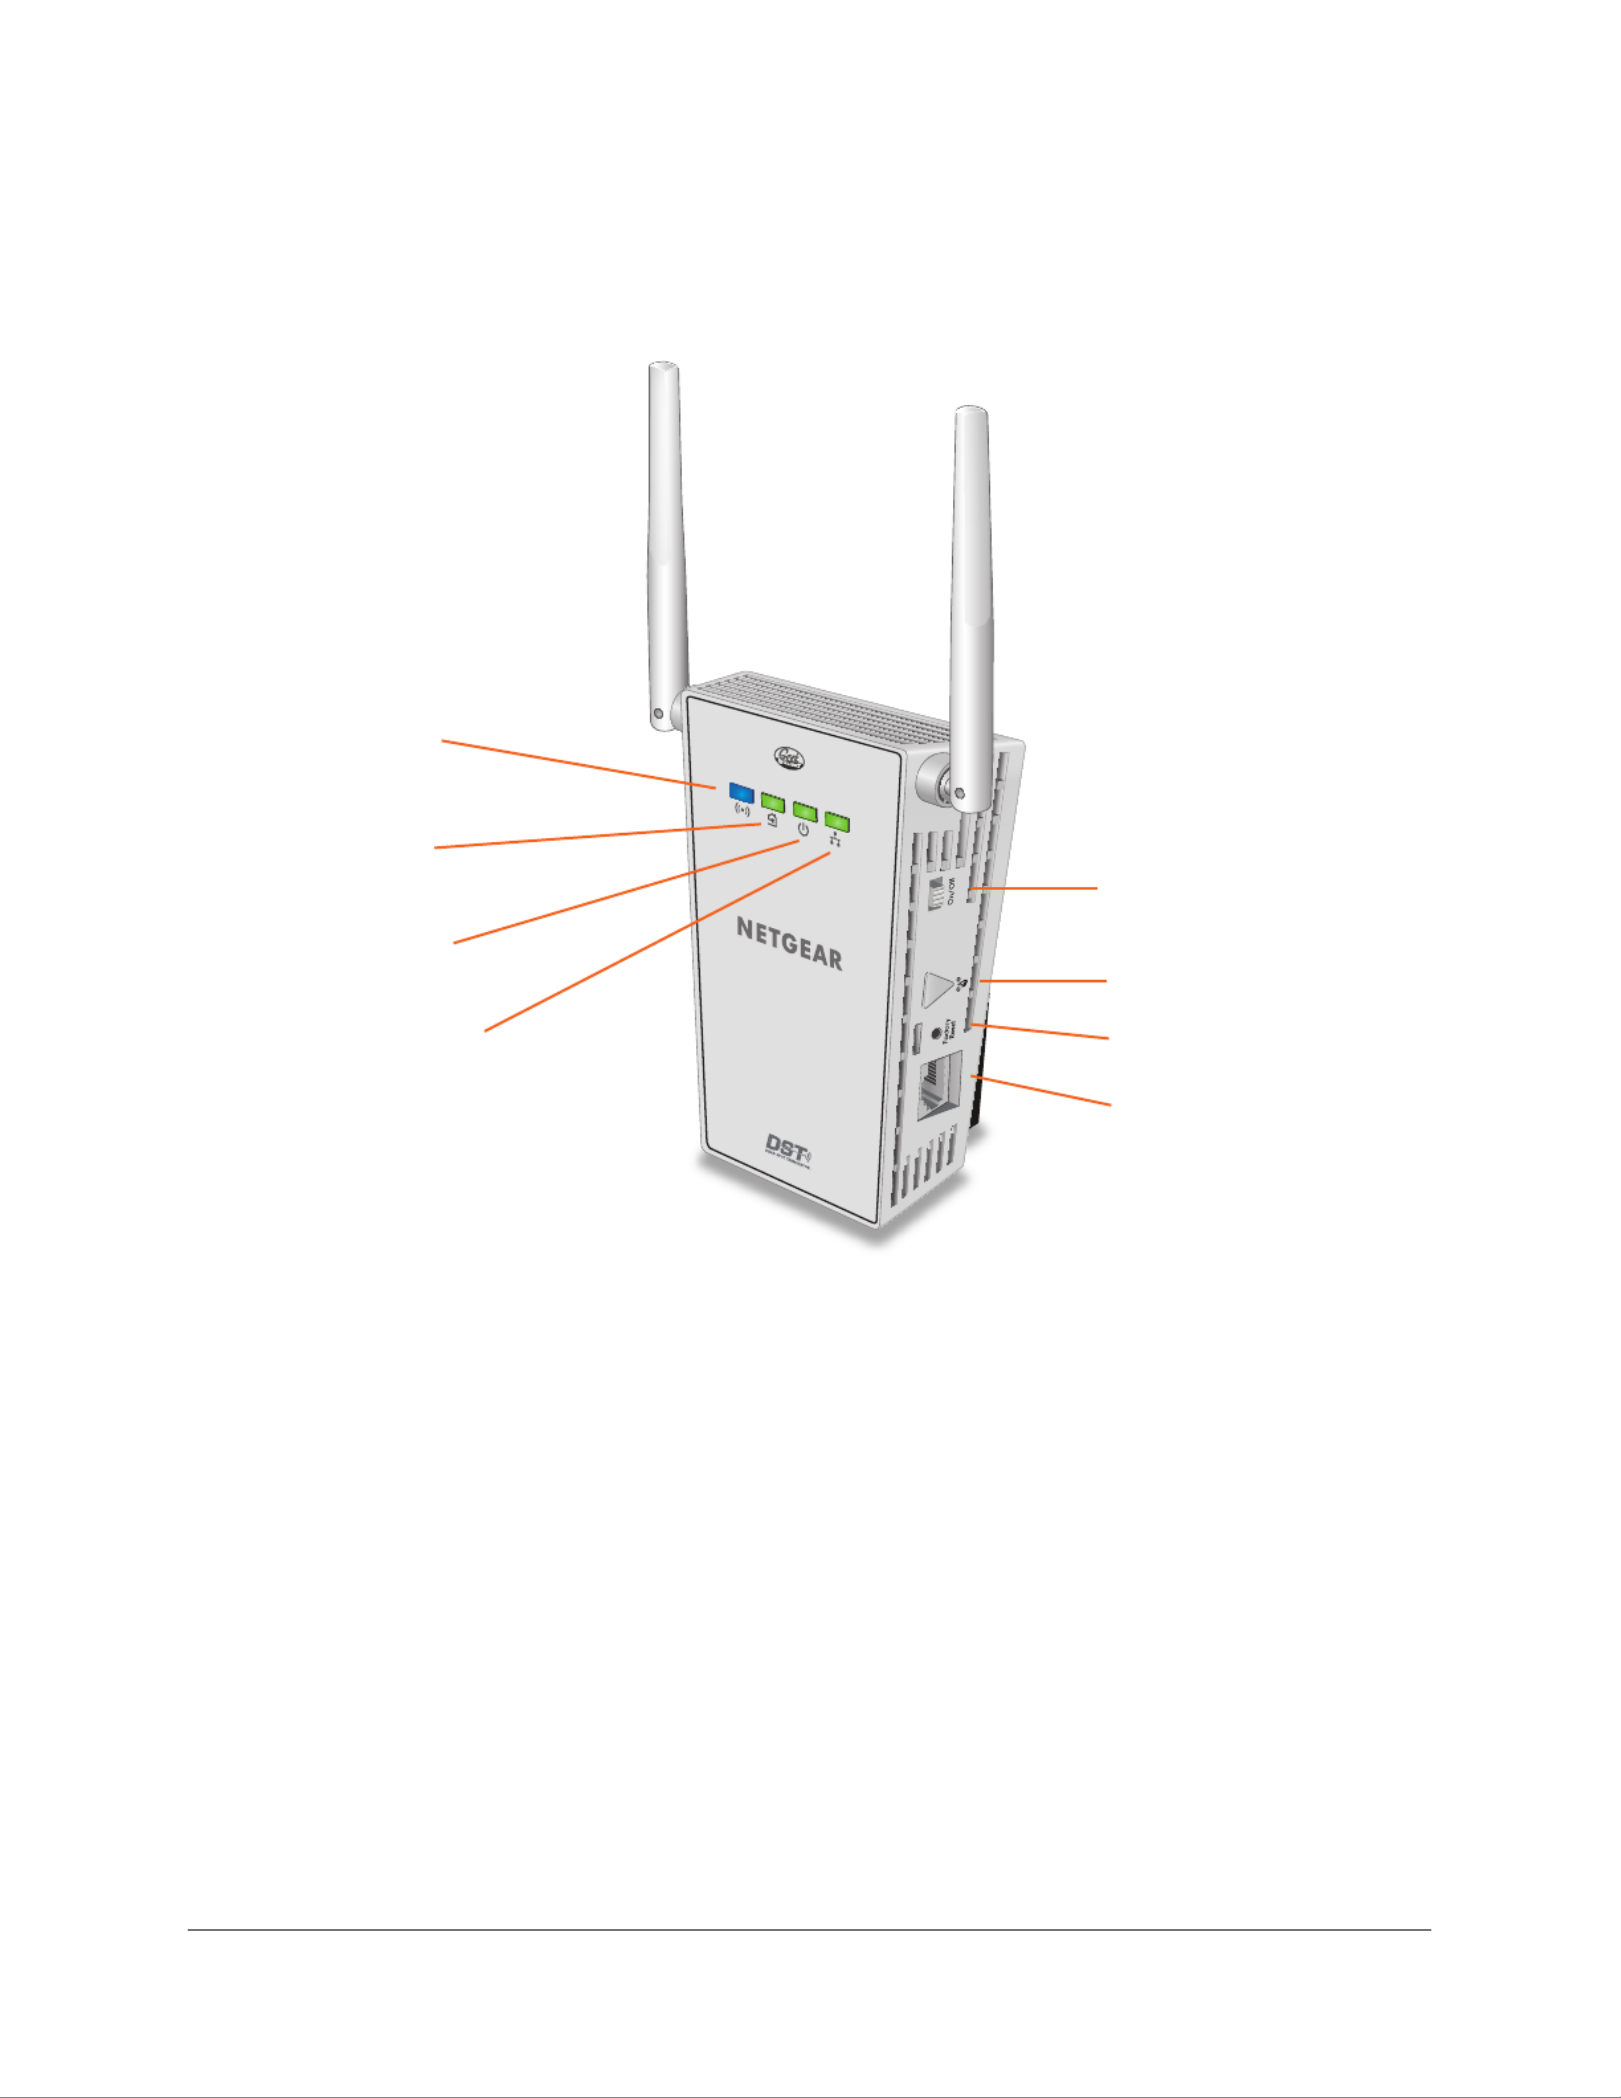
DST Adapter Hardware Features
The LEDs, buttons, and Ethernet port are shown in the following figure.
WiFi LED
DST LED
Factory Reset button
Ethernet port
Power LED
Ethernet LED
WPS and DST Router
Sync button
Power On/Off switch
Figure 2. DST adapter hardware features

Hardware Setup
8
Nighthawk DST AC1900 DST Router and DST Adpater Model R7300DST
DST Adapter LEDs
The LEDs on the DST adapter light to indicate DST adapter activity:
Table 1. DST adapter LED descriptions
LED Description
WiFi LED • Solid blue. The DST adapter is securely paired with a WiFi device.
• Blinking blue. The DST adapter is pairing with a WiFi device.
• Off. WiFi is disabled.
DST LED This LED indicates when the DST adapter is connected to the electrical outlet with the
strongest link performance, indicated by the color displayed by the LED:
• Red. Link rate < 50 Mbps (good).
• Amber. Link rate > 50 and < 80 Mbps (better).
• Green. Link rate > 80 Mbps (best).
• Off. The DST adapter did not find any other compatible DST devices using the same
encryption key.
Power LED • Solid green. The DST adapter is powered on.
• Blinking green. The DST adapter is pairing with another DST device.
• Off. The DST adapter is powered off.
Ethernet LED
• Solid green. A powered-on device is connected to the Ethernet port.
• Off. No device is connected to this Ethernet port.
DST Adapter Side Panel Hardware Features
The side panel of the DST adapter contains the following:
• Power On/Off switch. Slide the switch to the On position to provide power to the
DST adapter.
• WPS and DST Router Sync button. Press this button to connect a computer or WiFi
device to the DST adapter’s network using WPS, or to or to connect to DST router.
• Factory Reset button Factory Reset. Pressing the button restores the factory
default settings.
• Ethernet port. The DST adapter uses the Ethernet port to convert a standard
electrical wall outlet into a high-speed wired network connection.You can use the
wired network connection to bring Internet connectivity to any device with an Ethernet
port, such as a computer, game console, Blu-ray player, smart TV, HD set-top box, or
network DVR.
Hardware Setup
9
Nighthawk DST AC1900 DST Router and DST Adpater Model R7300DST
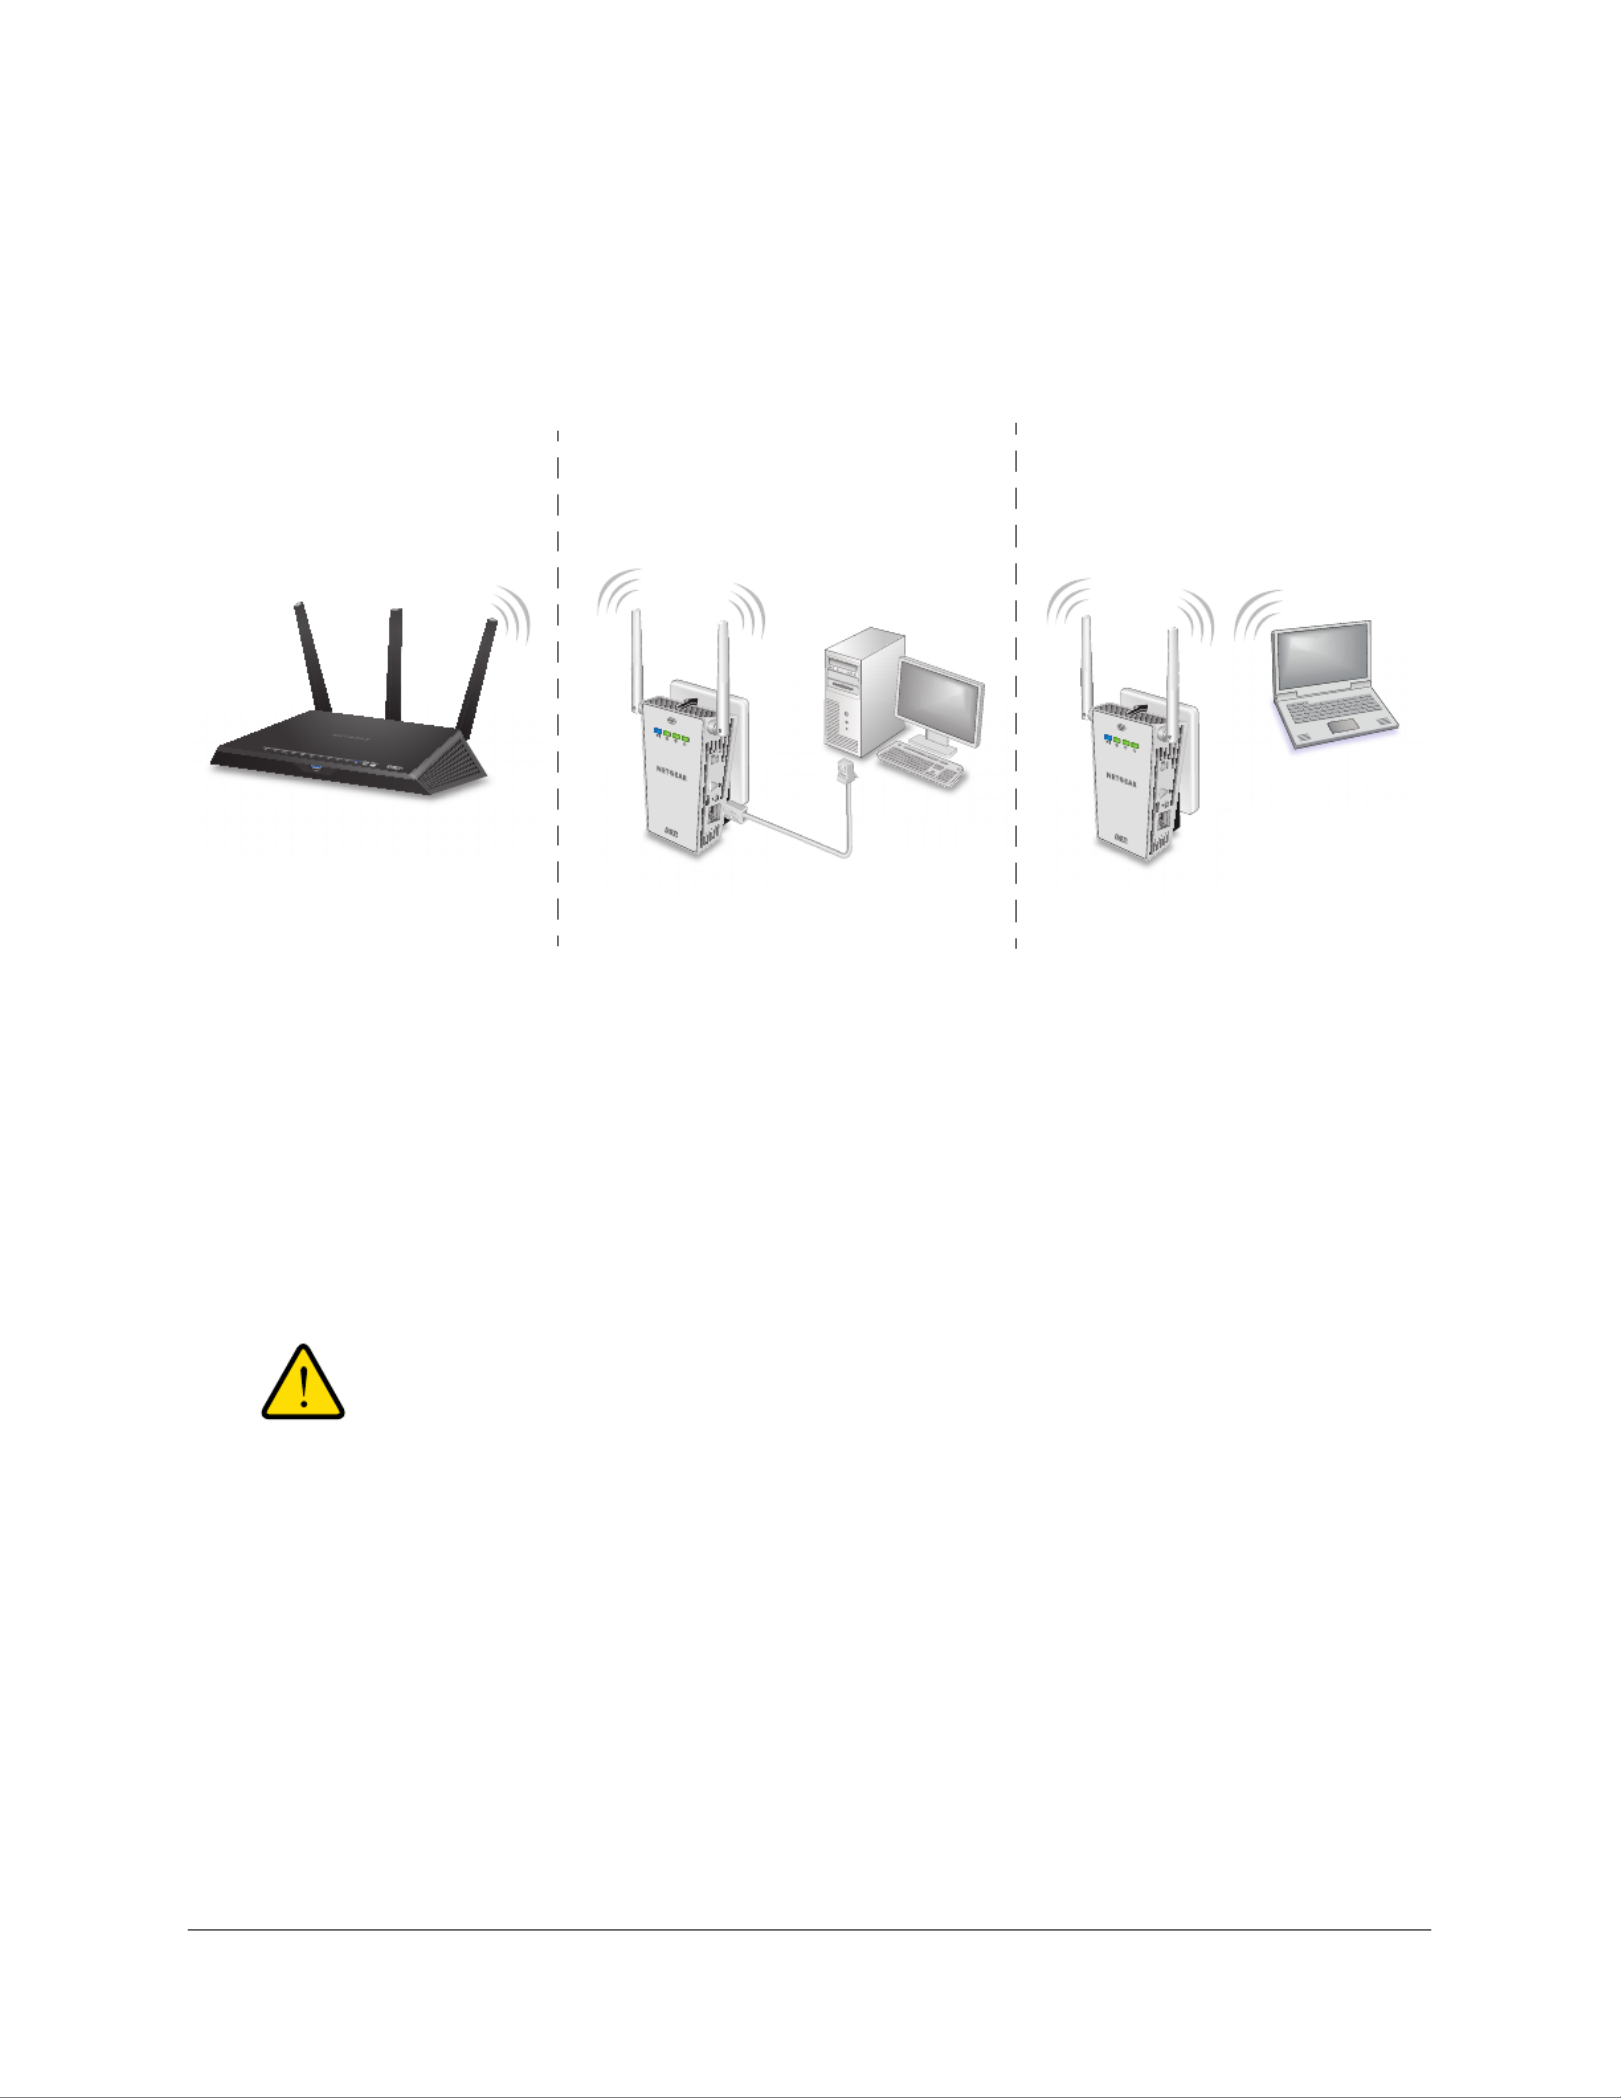
Connect Add-On DST Adapters to the DST Router
After you set up your DST network, you can add up to eight DST adapters to extend your
DST network to eight more locations.
DST router
DST adapter
Room 1 Room 2 Room 3
DST adapter
The following instructions assume that you already set up your DST network. If you did not set up
your DST router yet, follow the instructions in the Nighthawk DST AC1900 DST Router and DST
Adapter Model R7300DST User Manual, which is available online at
downloadcenter.netgear.com or through a link in the product’s user interface.
To connect additional DST adapters to the DST router:
1. In the room where you want to improve WiFi coverage or add Ethernet, plug your DST
adapter into an electrical outlet and wait for the Power LED to light solid green.
WARNING:
Do not plug the DST adapter into extension cords, power strips, or
surge protectors.
2. If the Power LED does not light, slide the Power On/Off switch to the On position.
3. Wait for the DST adapter to connect to the DST router.
4. Update the encryption key to secure the connection between the DST adapter and the DST
router:
a. WPS and DST Press the Adapter Sync button on the DST router.
b. Within two minutes, press the WPS and DST Router Sync button on the DST
adapter for two seconds.

Hardware Setup
10
Nighthawk DST AC1900 DST Router and DST Adpater Model R7300DST
The Power LED on the DST adapter blinks and the DST LED on the DST router
blinks.
Once the connection is made, the following LEDs light:
•The DST LED on the DST adapter lights solid green or amber .
•The DST LED on the DST router lights solid blue.
This process takes between 5 and 80 seconds.
If the DST LED on the DST adapter is red, the link performance is weak. You might
want to move the DST adapter to another electrical outlet with a faster connection.
5. Log in to the DST router to update the DST adapter’s firmware and WiFi settings:
a. Connect a computer or WiFi device to the DST router’s network.
b. Launch a web browser from a computer or WiFi device that is connected to the
network.
c. http://wwwEnter .routerlogin.net.
A login window displays.
d. Enter the DST router user name and password.
The user name is . admin The default password is . The user name and password
password are case-sensitive.
The BASIC Home page displays.
e. Select Remote DST Management.
f. In the Update DST Adapter Firmware and Update DST Adapter WiFi Settings
columns, click the Update All buttons.
You can only click the buttons only if new firmware or WiFi settings are Update All
available.

11
2
2. Connect to the DST Adapter
Network and Access the DST
Adapter
You can connect to the DST router’s network using a WiFi or wired Ethernet connection.
This chapter contains the following sections:
•Connect Devices to the DST Adapter Network
•Log In to the DST Adapter After Initial Setup

Connect to the DST Adapter Network and Access the DST Adapter
12
Nighthawk DST AC1900 DST Router and DST Adpater Model R7300DST
Connect Devices to the DST Adapter Network
You can connect your computer or WiFi devices to the DST adapter using a wired Ethernet
connection, a WPS connection, or a WiFi connection. For the best WiFi performance, make
sure that your computer or WiFi device is in the same room as the DST adapter.
Connect to the DST Adapter Network With an Ethernet Cable
You can connect your computer to the DST adapter using an Ethernet cable.
To connect your computer to the DST adapter with an Ethernet cable:
1. Make sure that the DST adapter is receiving power (its Power LED is lit).
2. Connect an Ethernet cable to an Ethernet port on your computer .
3. Connect the other end of the Ethernet cable to the Ethernet port on the DST adapter.
Your computer connects to the local area network (LAN). A message might display on
your computer page to notify you that an Ethernet cable is connected.
Connect to the DST Adapter Network With a WiFi Connection
If you updated the DST adapter’s WiFi settings using the DST router’s installation assistant,
the DST adapter’s WiFi settings are based on the DST router’s WiFi settings. If you did not
update the DST adapter’s WiFi settings yet, launch a web brower to display the DST router’s
and DST adapter’s WiFi settings.
If you want to manually update the DST adapter’s WiFi settings, log in to the DST router. For
more information, see Update the DST Adapter’s WiFi Settings From the DST Router on
page 31.
The following table shows examples of what multiple DST adapters’ SSIDs and passwords
are, based on the DST router’s SSID and password.
Table 2. DST adapter WiFi network name and password examples
Product 2.4 GHz WiFi Settings 5 GHz WiFi Settings
DST router • SSID. NETGEAR4
• Password. Coconut234
• SSID. NETGEAR4-5G
• Password. Coconut234
DST adapter 1 • SSID. NETGEAR4_EXT
• Password. Coconut234
• SSID. NETGEAR4-5G_EXT
• Password. Coconut234
DST adapter 2 • SSID. NETGEAR41_EXT
• Password. Coconut234
• SSID. NETGEAR4-5G1_EXT
• Password. Coconut234
DST adapter 3 • SSID. NETGEAR42_EXT
• Password. Coconut234
• SSID. NETGEAR4-5G2_EXT
• Password. Coconut234

Connect to the DST Adapter Network and Access the DST Adapter
13
Nighthawk DST AC1900 DST Router and DST Adpater Model R7300DST
To manually find and select the DST adapter WiFi network:
1. Make sure that the DST adapter is receiving power (its Power LED is lit).
2. On the WiFi device that you want to connect to your DST adapter, open the software
application that manages your WiFi connections.
This software scans for all WiFi networks in your area.
3. Look for the DST adapter’s WiFi network name (SSID) and select it.
The DST adapter’s WiFi network name is based on the DST router’s SSID with _EXT
added at the end of the name. If more than one DST adapter is connected to the DST
router, for every additional DST adapter after the first, a number is added before _EXT.
4. Enter the DST adapter’s WiFi password.
The DST adapter’s WiFi password is the same as the DST router’s WiFi password.
Your WiFi device connects to the WiFi network.
Connect to the DST Adapter Network With a WPS Connection
Wi-Fi Protected Setup (WPS) is a standard for easily adding computers and other devices to
a home network while maintaining security. To use WPS (Push 'N' Connect), make sure that
all WiFi devices to be connected to the network are Wi-Fi certified and support WPS. During
the connection process, the client gets the security settings from the DST router so that every
device in the network supports the same security settings.
To use WPS to connect to the DST adapter’s WiFi network:
1. Make sure that the DST router is receiving power (its Power LED is lit).
2. Check the WPS instructions for your computer or WiFi device.
3. Press and hold the WPS and DST Router Sync button on the DST adapter for two
seconds.
The WiFi LED on the DST adapter blinks.
4. WPSWithin two minutes, press the button on your WiFi device (such as a computer, tablet,
or smartphone).
When the WiFi LED stops blinking, your computer or WiFi device is automatically
connected to the DST adapter and you can access the Internet from your computer or
WiFi device.
Note: Make sure that your WiFi device is in the same room as the DST
adapter that you are connecting to.

Connect to the DST Adapter Network and Access the DST Adapter
14
Nighthawk DST AC1900 DST Router and DST Adpater Model R7300DST
Log In to the DST Adapter After Initial Setup
After you connect the DST adapter to the DST router’s network, you can log in to the DST
adapter to view or change its settings.
To log in to the DST adapter after the initial setup:
1. With an Ethernet cable, temporarily connect your computer to the Ethernet port on the
DST adapter.
2. Launch a web browser from the computer.
3. http://www.mywifiext.netEnter .
A login window displays.
4. Enter the DST adapter user name and password.
The user name is . The default password is . The user name and admin password
password are case-sensitive.
The Status page displays.

15
3
3. Manage DST Adapter’s Encryption
Key
This chapter contains the following sections:
•Create a New Encryption Key for the DST Adapter
•Use the DST Adapter’s Default Encryption Key

Manage DST Adapter’s Encryption Key
16
Nighthawk DST AC1900 DST Router and DST Adpater Model R7300DST
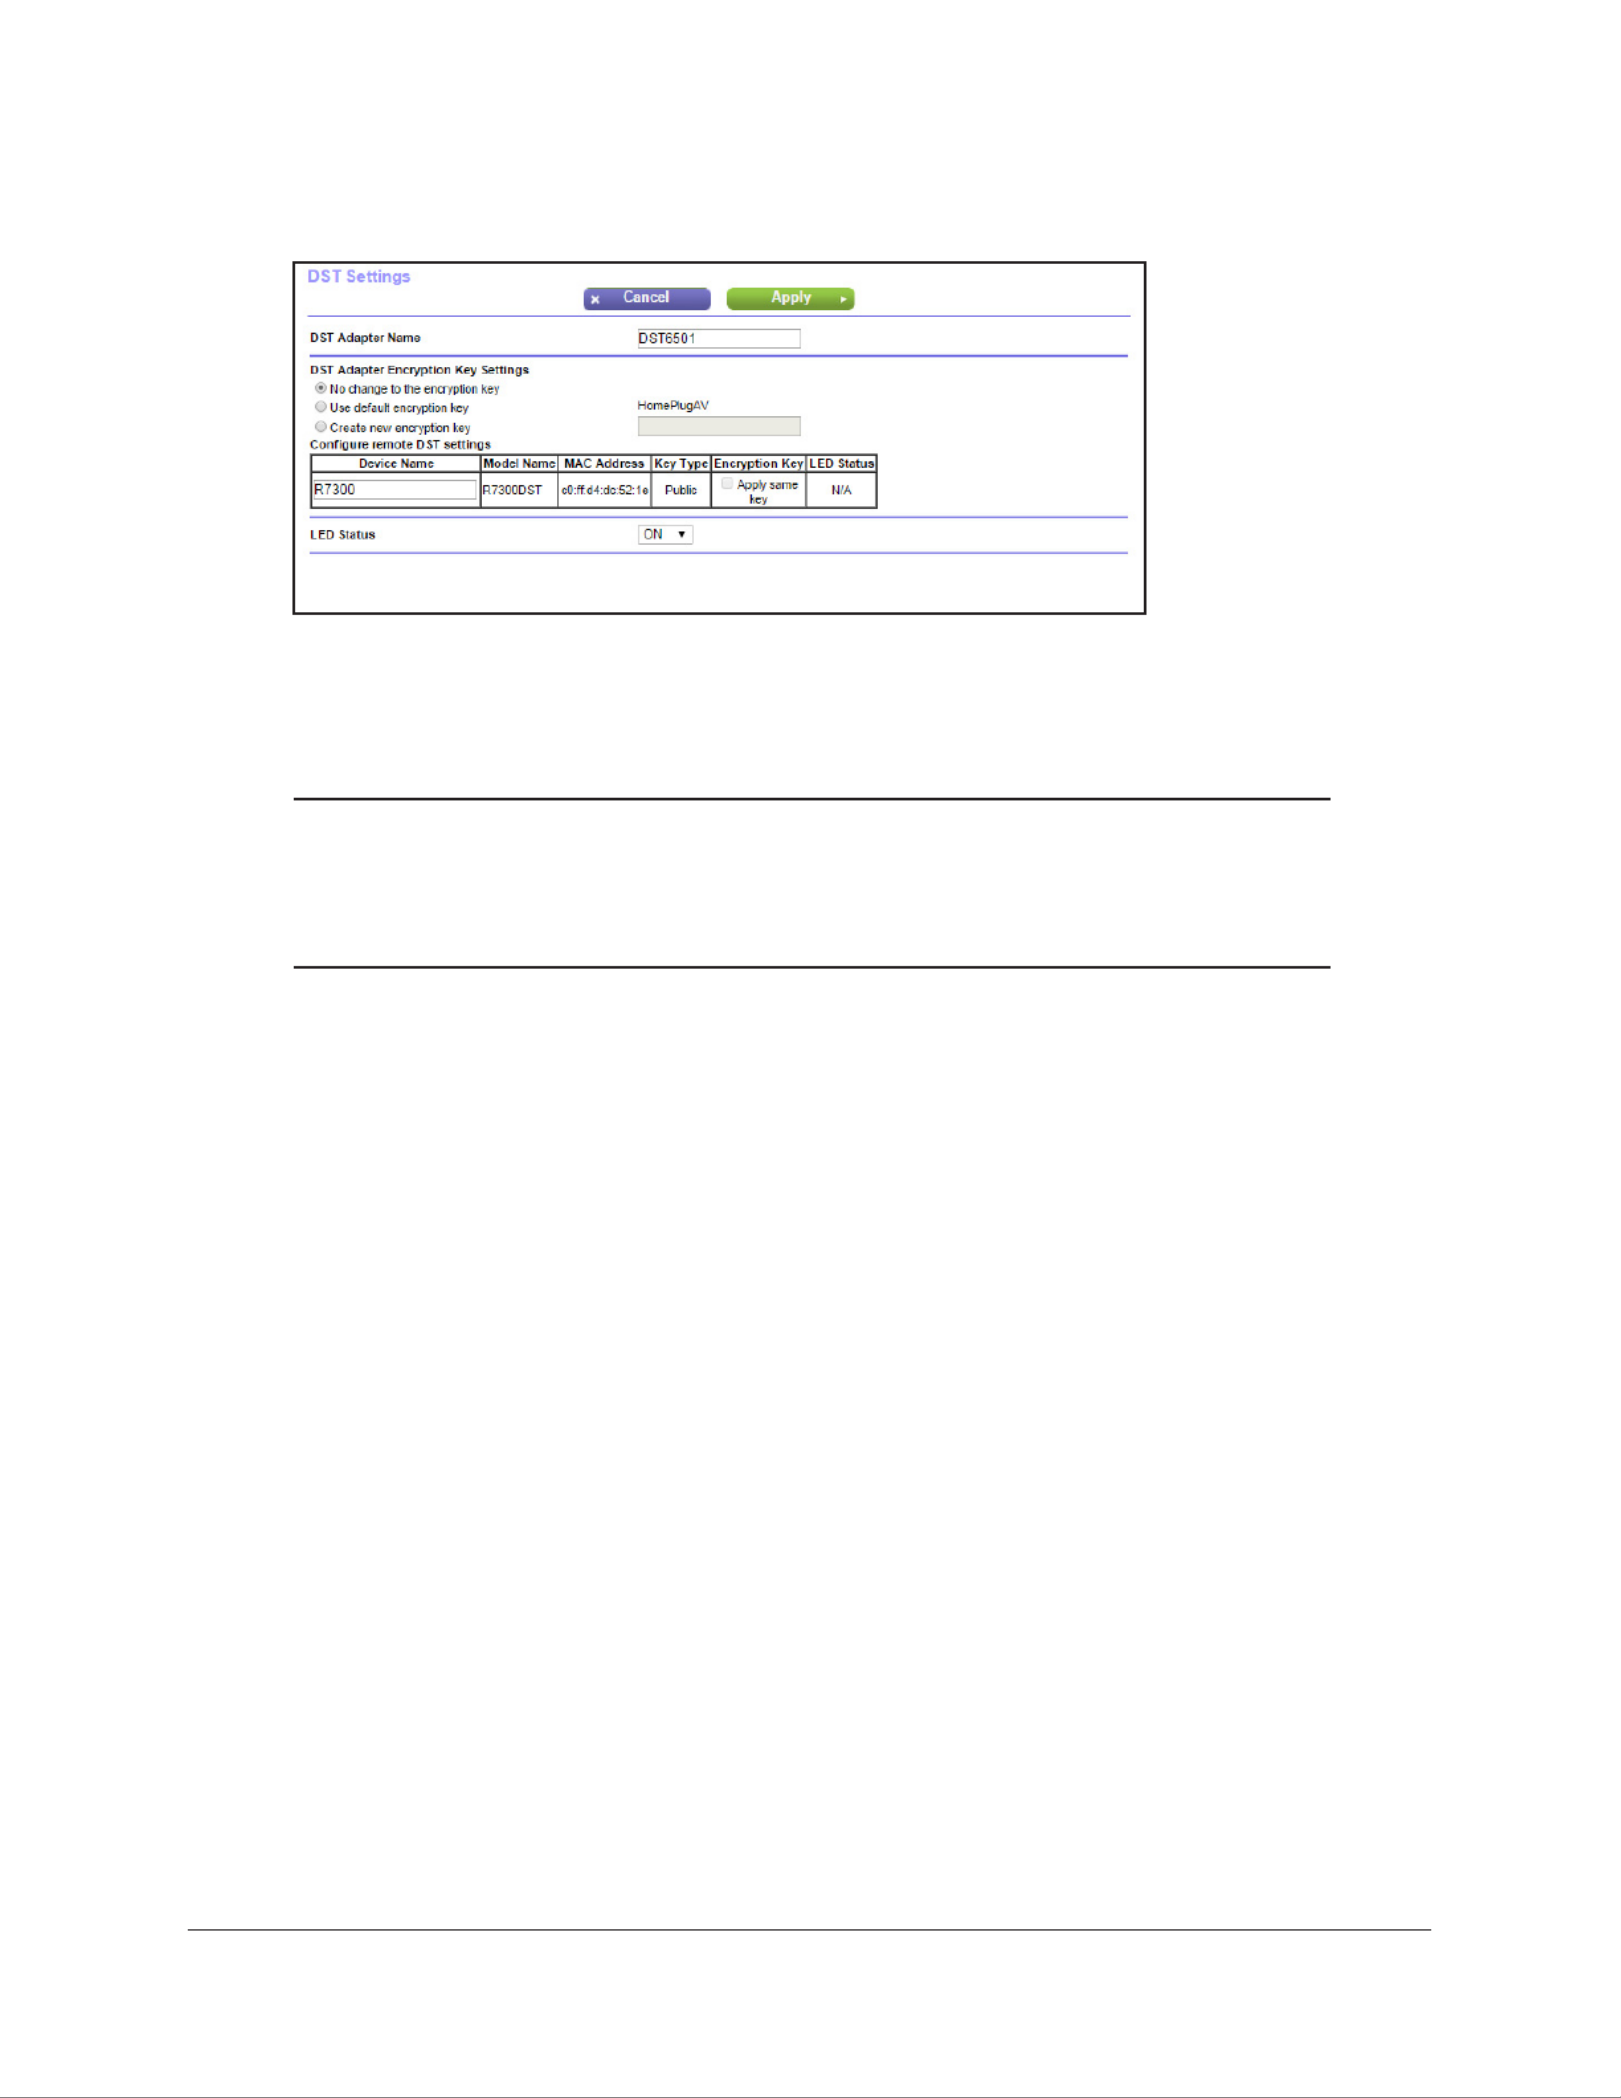
Create a New Encryption Key for the DST Adapter
After you connect your add-on DST adapter to the DST network, the DST adapter’s uses the
same encryption key as the DST network. If you did not change the DST network’s
encryption key, the DST network uses the default encryption key, which is HomePlugAV
If you change the DST adapter’s encryption key, the DST router and DST adapters on your
DST network you must use the same encryption key. If the DST adapter uses a different
encryption key than the DST router, it will no longer be connected to your network.
To create a new encryption key for the DST adapter:
1. With an Ethernet cable, temporarily connect your computer to the Ethernet port on the
DST adapter.
2. Launch a web browser from the computer.
3. http://wwwEnter .mywifiext.net.
A login window displays.
4. Enter the DST adapter user name and password.
The user name is . admin The default password is . The user name and password
password are case-sensitive.
The Status page displays.
5. Select ADVANCED > DST Settings.
6. Select the Create new encryption key radio button.
The encryption key must be a value of 8 to 63 ACSCII characters.
7. Enter a new encryption key in the field.
8. Make sure that the Apply same key check box next to your DST router and next to each
DST adapter and that your own is selected.

Manage DST Adapter’s Encryption Key
17
Nighthawk DST AC1900 DST Router and DST Adpater Model R7300DST
Note: The DST router and DST adapters on your network must use the
same encryption key. If the DST adapters on your network use a
different encryption key than the DST router, they will no longer be
connected to your network.
9. Click the Apply button.
Your settings are saved.
Use the DST Adapter’s Default Encryption Key
The DST adapter’s default encryption key is HomePlugAV. If you do not change the default
encryption key, after you connect your DST adapter to the DST network, the DST adapter
use the same default encryption key.
Note: The radio button is automatically No change to the encryption key
selected when you visit the DST Settings page. This is the default
option. If you select this option and click the Apply button, the
encryption key does not change the DST network encryption key and
the DST network is not disconnected.
To change the DST adapter’s encryption key back to the default encryption key:
1. With an Ethernet cable, temporarily connect your computer to the Ethernet port on the
DST adapter.
2. Launch a web browser from the computer.
3. http://www.mywifiext.netEnter .
A login window displays.
4. Enter the DST adapter user name and password.
The user name is . The default password is . The user name and admin password
password are case-sensitive.
The Status page displays.
Manage DST Adapter’s Encryption Key
18
Nighthawk DST AC1900 DST Router and DST Adpater Model R7300DST
5. Select ADVANCED > DST Settings.
6. Select the Use default encryption key radio button.
7. Make sure that the Apply same key check box next to your DST router and next to each
DST adapter and that your own is selected.
Note: The DST router and DST adapters on your network must use the
same encryption key. If the DST adapters on your network use a
different encryption key than the DST router, they will no longer be
connected to your network.
8. Click the Apply button.
Your settings are saved.

Specify Network Settings for the DST Adapter
20
Nighthawk DST AC1900 DST Router and DST Adpater Model R7300DST
Specify Basic WiFi Settings for the DST Adapter
To specify basic WiFi settings for the DST adapter:
1. With an Ethernet cable, temporarily connect your computer to the Ethernet port on the
DST adapter.
2. Launch a web browser from the computer.
3. http://wwwEnter .mywifiext.net.
A login window displays.
4. Enter the DST adapter user name and password.
The user name is . admin The default password is . The user name and password
password are case-sensitive.
The Status page displays.
5. Select Setup > Wireless Settings.
6. To change the network name (SSID), type a new name in the Name (SSID) field.
7. The name can be up to 32 characters long and it is case-sensitive.If you change the name,
make sure to write down the new name and keep it in a safe place.
8. To change the WiFi channel, select a number in the Channel menu.
In some regions, not all channels are available. Do not change the channel unless you
experience interference (shown by lost connections or slow data transfers). If this
happens, experiment with different channels to see which is the best.
When you use multiple access points, it is better if adjacent access points use different
channels to reduce interference. The recommended channel spacing between adjacent
access points is four channels (for example, use Channels 1 and 5, or 6 and 10).
9. To change the mode, select it from the Mode menu.

Specify Network Settings for the DST Adapter
22
Nighthawk DST AC1900 DST Router and DST Adpater Model R7300DST
5. Select Setup > Wireless Settings.
6. Under Security Options, select a WPA options.
The WPA2 options use the newest standard for the strongest security, but some older
computers and WiFi devices cannot use WPA2. By default, the WPA2-PSK [AES] radio
button is selected.
The field displays.Password
7. PasswordIn the field, enter the network key (password) that you want to use.
It is a text string from 8 to 63 characters.
8. Write down the new password and keep it in a secure place for future reference.
9. Click the Apply button.
Your settings are saved.

23
5
5. Manage the DST Adapter Network
and Settings
This chapter covers the following topics:
•Update the DST Adapter’s Firmware
•Return the DST Adapter to Its Factory Settings
•View the DST Adapter Status
•View the DST Adapter ‘s Statistics
•Back Up the DST Adapter Configuration
•Restore Saved Configuration Settings for the DST Adapter
•Update the DST Adapter’s WiFi Settings From the DST Router
•View the DST Adapter’s WiFi Settings From the DST Router
•Change the DST Adapter’s Device Name
•Change the DST Adapter’s admin Password
•Turn the LEDs on the DST Adapter On or Off
•Use WPS to Add a Device to the DST Adapter’s WiFi Network
•View or Change the DST Adapter’s WPS Settings
•View or Change DST Adapter Advanced WiFi Settings
•Set Up a WiFi Access List for the DST Adapter
•View Wired and WiFi Network Devices Connected to the DST Adapter
•Set Up the DST Adapter to Use a Static IP Address

Manage the DST Adapter Network and Settings
24
Nighthawk DST AC1900 DST Router and DST Adpater Model R7300DST
Update the DST Adapter’s Firmware
You can update the DST adapter’s firmware by from the DST router or the DST adapter.
Update the DST Adapter’s Firmware From the DST Router
To update the DST adapter’s firmware by logging in to the DST router:
1. Launch a web browser from a computer or WiFi device that is connected to the network.
2. http://wwwEnter .routerlogin.net.
A login window displays.
3. Enter the DST router user name and password.
The user name is . admin The default password is . The user name and password
password are case-sensitive.
The BASIC Home page displays.
4. Select Remote DST Management.
5. In the Update DST Adapter Firmware column, click the Update All button.
You can only click on the button only if new firmware is available.Update All
The firmware is updated.
WARNING:
To avoid the risk of corrupting the firmware, do not interrupt the
upgrade. For example, do not close the browser, click a link, or load
a new page. Do not turn off the DST adapter and the DST router.
Update the DST Adapter’s Firmware From the DST Adapter
Unless you changed the settings on the Firmware Update page previously, the DST adapter
is set up to check for new firmware automatically when you log in. You can also check for
new firmware.

Manage the DST Adapter Network and Settings
25
Nighthawk DST AC1900 DST Router and DST Adpater Model R7300DST
To log in to the DST adapter and check to see if new firmware is available and update
the DST adapter’s firmware:
1. With an Ethernet cable, temporarily connect your computer to the Ethernet port on the
DST adapter.
2. Launch a web browser from the computer.
3. http://wwwEnter .mywifiext.net.
A login window displays.
4. Enter the DST adapter user name and password.
The user name is . admin The default password is . The user name and password
password are case-sensitive.
The Status page displays.
5. Select Maintenance > Firmware Update.
6. CheckClick the button.
The DST adapter finds new firmware information if any is available and displays a
message asking if you want to download and install it.
7. Click the Yes button.
The DST adapter locates and downloads the firmware and begins the update.
8. BrowseClick the button.
9. Locate and select the new firmware file.
WARNING:
To avoid the risk of corrupting the firmware, do not interrupt the
upgrade. For example, do not close the browser, click a link, or load
a new page. Do not turn off the DST adapter.
Return the DST Adapter to Its Factory Settings
To reset the DST adapter to its factory settings, you can use the button or the Factory Reset
Erase feature.

Manage the DST Adapter Network and Settings
26
Nighthawk DST AC1900 DST Router and DST Adpater Model R7300DST
Use the Factory Reset Button to Restore Factory Settings
CAUTION:
This process erases any settings that you have configured in the DST
adapter.
To restore factory settings:
Factory Reset
hole and
button
1. Insert a paper clip into the Factory Reset
hole and hold it for two seconds, and then
release the button.
The Power LED blinks green.
All the LEDs turn off after 3 seconds, and then
the Power LED lights solid green for about 30
seconds.
2. Check the DST adapter status.
The other LEDs show the DST adapter’s
status:
• WiFi LED. The WiFi LED lights sold blue if
WiFi is enabled.
• DST LED. The DST LED lights if a compatible DST device is connected to the DST
adapter.
• Ethernet LED. The Ethernet LED lights if a powered-on device is connected to the
DST adapter’s Ethernet port.
Erase the DST Adapter Settings
You can erase the current configuration and restore the factory default settings.
CAUTION:
This process erases any settings that you configured in the DST adapter.
To erase the DST adapter’s current settings:
1. With an Ethernet cable, temporarily connect your computer to the Ethernet port on the
DST adapter.
2. Launch a web browser from the computer.
3. http://wwwEnter .mywifiext.net.
A login window displays.
4. Enter the DST adapter user name and password.
Manage the DST Adapter Network and Settings
28
Nighthawk DST AC1900 DST Router and DST Adpater Model R7300DST
The user name is . The default password is . The user name and admin password
password are case-sensitive.
View the DST Adapter ‘s Statistics
To view the DST adapter’s statistics:
1. With an Ethernet cable, temporarily connect your computer to the Ethernet port on the
DST adapter.
2. Launch a web browser from the computer.
3. http://wwwEnter .mywifiext.net.
A login window displays.
4. Enter the DST adapter user name and password.

Manage the DST Adapter Network and Settings
29
Nighthawk DST AC1900 DST Router and DST Adpater Model R7300DST
The user name is . The default password is . The user name and admin password
password are case-sensitive.
5. Click the Show Statistics button.
6. To change the polling frequency, enter a time in seconds in the field and click Poll Interval
the Set Interval button.
To stop the polling entirely, click the button.Stop
Back Up the DST Adapter Configuration
When the DST adapter works correctly after initial setup, we recommend that you back up
the DST adapter configuration settings. After you back up the settings, if you change the DST
adapter settings but are not content with the new settings, you can restore the backed-up
DST adapter configuration settings.
To back up the DST adapter configuration settings:
1. With an Ethernet cable, temporarily connect your computer to the Ethernet port on the
DST adapter.

Manage the DST Adapter Network and Settings
30
Nighthawk DST AC1900 DST Router and DST Adpater Model R7300DST
2. Launch a web browser from the computer.
3. http://wwwEnter .mywifiext.net.
A login window displays.
4. Enter the DST adapter user name and password.
The user name is . admin The default password is . The user name and password
password are case-sensitive.
The Status page displays.
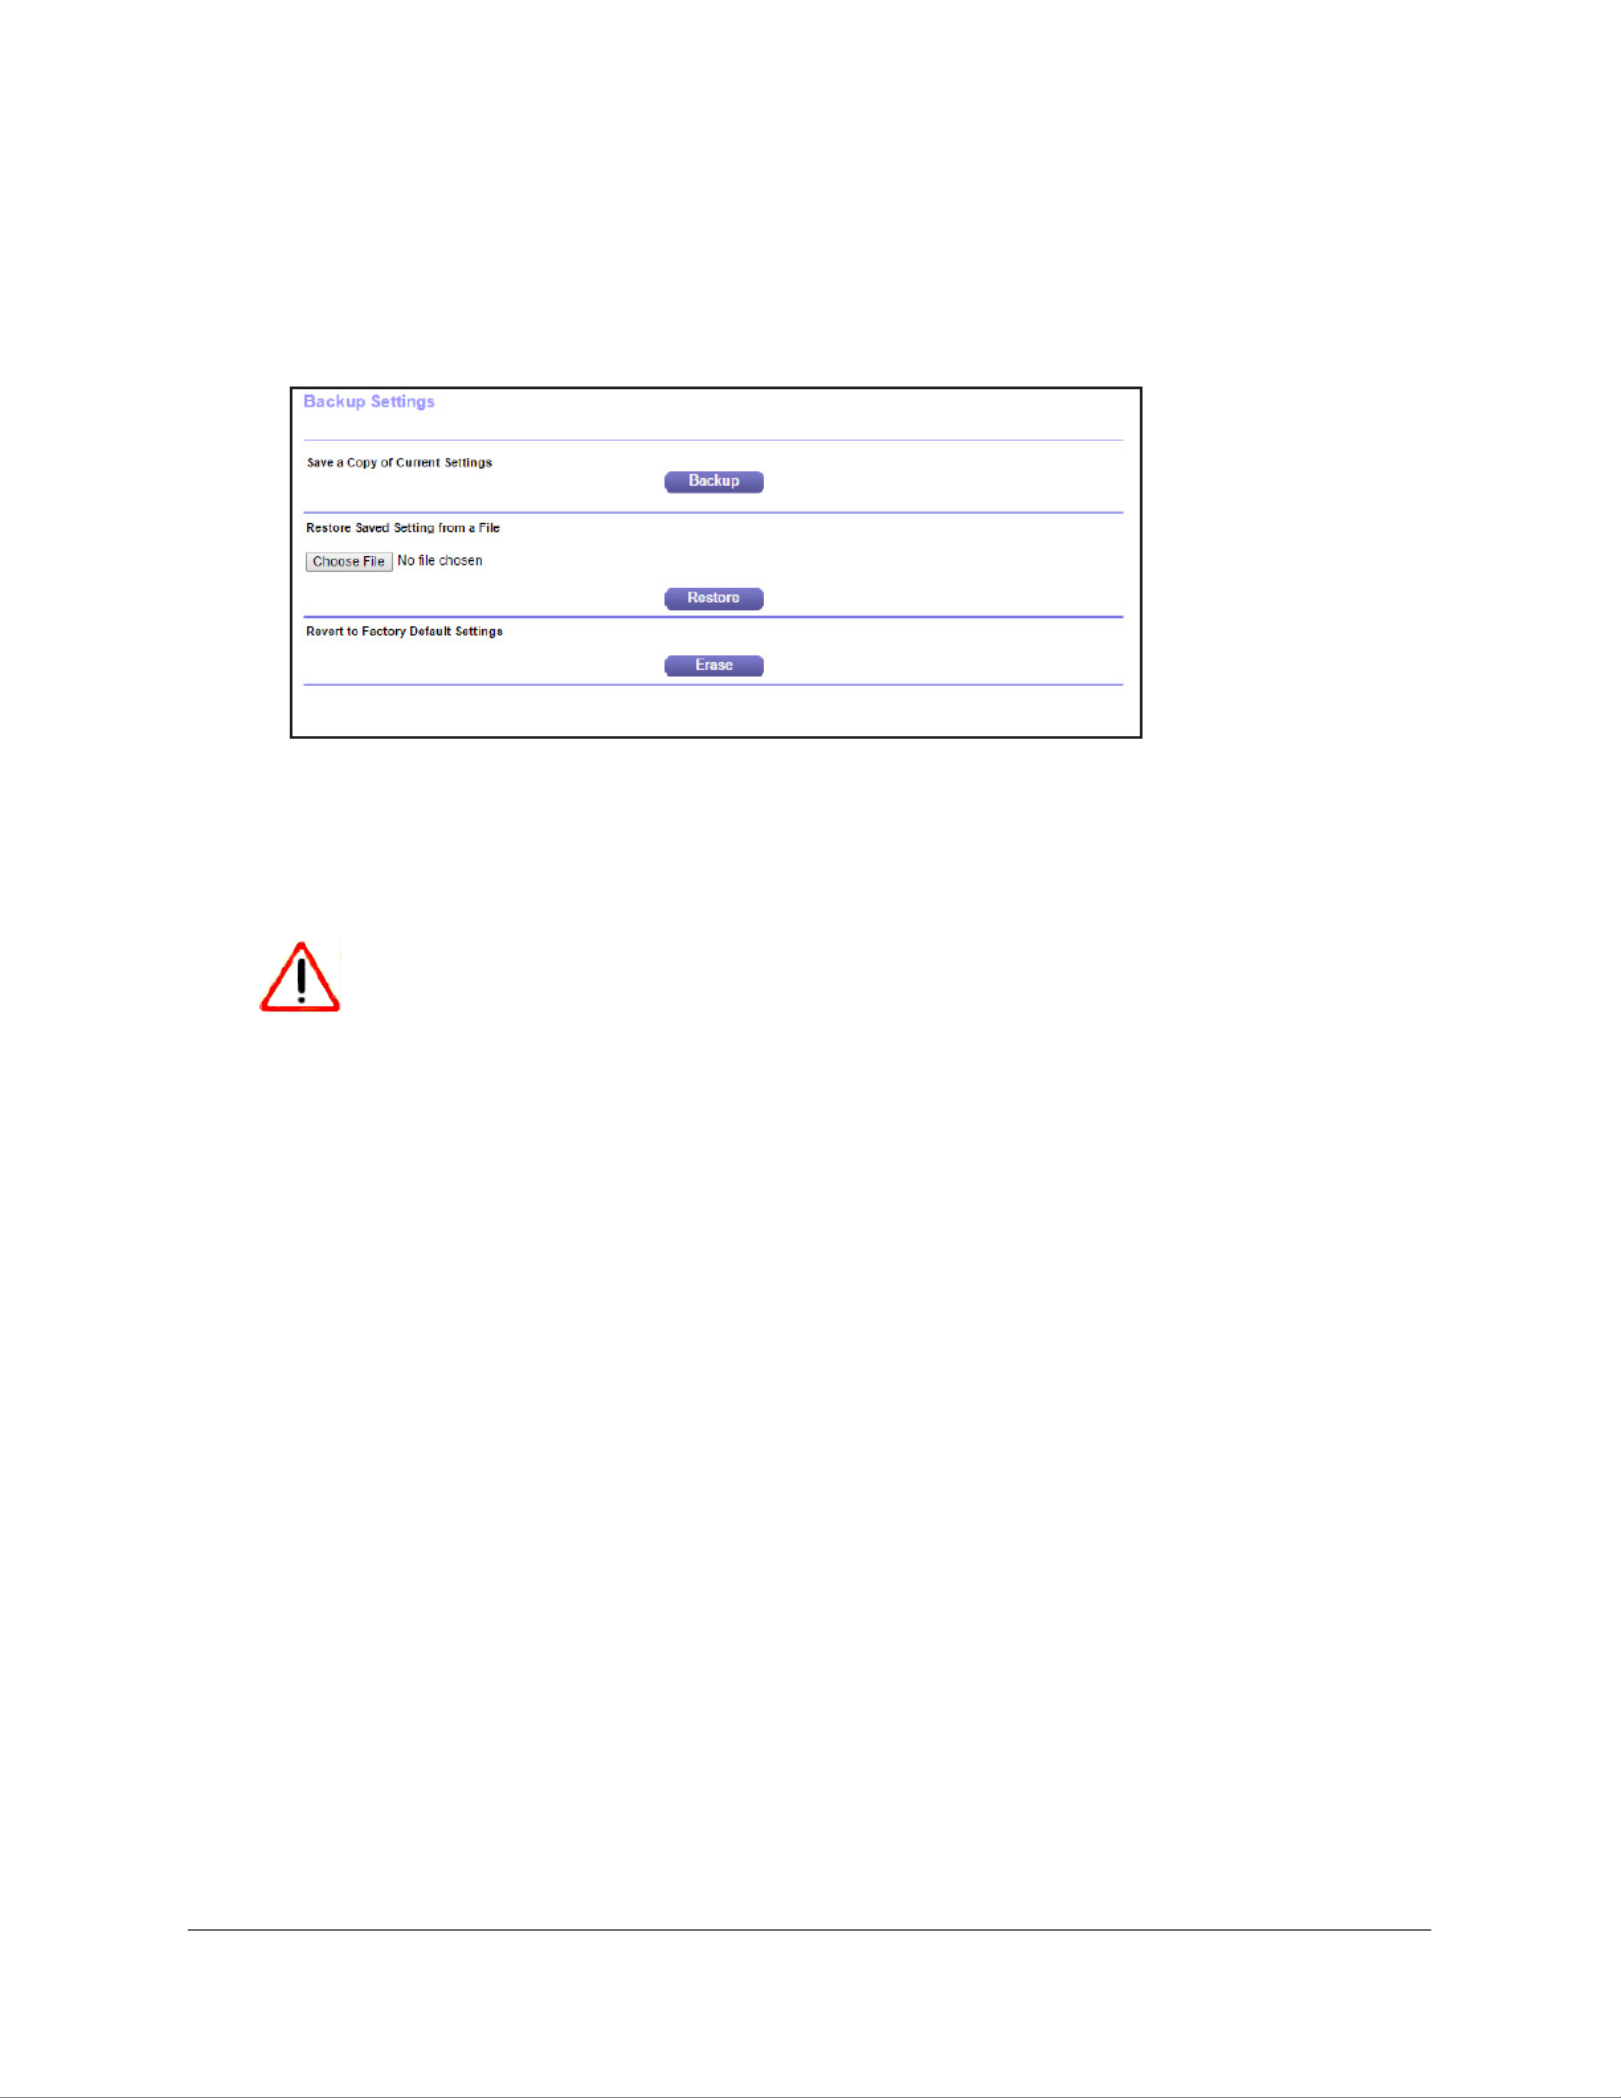
5. Select Maintenance > Backup Settings.
6. BackupClick the button.
7. If your web browser is not set up to save downloaded files automatically, locate where you
want to save the file.
The configuration settings file downloads to your computer.
The name of the file is .NETGEAR_DST6501.cfg
Restore Saved Configuration Settings for the DST
Adapter
You can restore the configuration settings file of the DST adapter to a previously saved
configuration settings file.
To restore the DST adapter configuration settings:
1. With an Ethernet cable, temporarily connect your computer to the Ethernet port on the
DST adapter.
2. Launch a web browser from the computer.
3. http://wwwEnter .mywifiext.net.
A login window displays.
4. Enter the DST adapter user name and password.
Manage the DST Adapter Network and Settings
31
Nighthawk DST AC1900 DST Router and DST Adpater Model R7300DST
The user name is . The default password is . The user name and admin password
password are case-sensitive.
The Status page displays.
5. Select Maintenance > Backup Settings.
6. Click the Choose File button.
7. Locate and select the previously saved configuration settings file.
The name of the file is .NETGEAR_DST6501.cfg
CAUTION:
After you click the Restore button, do not try to go online, turn off the DST
adapter, shut down the computer, or do anything else to the DST adapter
until it finishes restarting.
8. RestoreClick the button.
A confirmation pop-up window displays.
9. Confirm your decision.
The DST adapter restarts. This process takes about one minute.
Update the DST Adapter’s WiFi Settings From the DST
Router
The DST adapter’s WiFi settings are based on the DST router’s WiFi settings. If you changed
the DST router’s WiFi settings, log in to the DST router to update the DST adapter’s WiFi
settings.
When you update the DST adapter’s WiFi settings, the DST adapter’s SSID is set to the DST
router’s SSID with _EXT added at the end. The DST adapter’s WiFi password is the same as
the DST router’s WiFi password. If you change the DST router’s WiFi settings, you must
update the DST adapter’s WiFi settings again.

Manage the DST Adapter Network and Settings
32
Nighthawk DST AC1900 DST Router and DST Adpater Model R7300DST
To update the DST adapter’s WiFi settings by logging in to the DST router:
1. Launch a web browser from a computer or WiFi device that is connected to the network.
2. http://wwwEnter .routerlogin.net.
A login window displays.
3. Enter the DST router user name and password.
The user name is . admin The default password is . The user name and password
password are case-sensitive.
The BASIC Home page displays.
4. Select Remote DST Management.
5. In the Update DST Adapter WiFi Settings column, click the Update All button.
You can click on the Update All button only if the WiFi settings must be updated.
The DST adapter’s WiFi settings are updated.
View the DST Adapter’s WiFi Settings From the DST
Router
You can view the IP address, model name, and MAC address for each DST adapter in your
network.
To view the DST adapter settings:
1. Launch a web browser from a computer or WiFi device that is connected to the network.
2. http://wwwEnter .routerlogin.net.
A login window displays.
3. Enter the DST router user name and password.
The user name is . admin The default password is . The user name and password
password are case-sensitive.
The BASIC Home page displays.

Manage the DST Adapter Network and Settings
33
Nighthawk DST AC1900 DST Router and DST Adpater Model R7300DST
4. Select Remote DST Management.
The following information about your DST adapters display:
• Device name.The DST adapter’s name. You can change the DST adapter’s name on
the DST settings page. For more information, see Change the DST Adapter’s Device
Name on page 33.
• IP address. The IP address of the DST adapter.
• Model name. The model number of the DST adapter.
• MAC address. The MAC address for the DST adapter. This is also on the product
label, which might not be visible when the device is plugged in.
Change the DST Adapter’s Device Name
You can change the DST adapter’s device name that displays on the DST router’s and DST
adapter’s DST Settings pages by logging in to the DST adapter or DST router.
Change the DST Adapter’s Device Name From the DST Adapter
To change the DST adapter’s device name by logging into the DST adapter:
1. With an Ethernet cable, temporarily connect your computer to the Ethernet port on the
DST adapter.
2. Launch a web browser from the computer.
3. http://wwwEnter .mywifiext.net.
A login window displays.
4. Enter the DST adapter user name and password.
The user name is . admin The default password is . The user name and password
password are case-sensitive.
The Status page displays.

Manage the DST Adapter Network and Settings
35
Nighthawk DST AC1900 DST Router and DST Adpater Model R7300DST
Change the DST Adapter’s admin Password
The user name to access the DST adapter is admin, and its default password is password.
We strongly recommend that you set a more secure password.
To change the password for the DST adapter:
1. With an Ethernet cable, temporarily connect your computer to the Ethernet port on the
DST adapter.
2. Launch a web browser from the computer.
3. http://wwwEnter .mywifiext.net.
A login window displays.
4. Enter the DST adapter user name and password.
The user name is . admin The default password is . The user name and password
password are case-sensitive.
The Status page displays.
5. Select Maintenance > Set Password.
6. Type the old password.
7. Type the new password twice.
8. Click the Apply button.
Your changes are saved.
Note: If you forget your new admin password, use the Factory Reset button
to factory reset the DST adapter. The password resets to the default
password, which is . The user name remains as . password admin
The user name and password are case-sensitive. For more
information about how to factory reset your DST adapter, see Use the
Factory Reset Button to Restore Factory Settings on page 26.

Manage the DST Adapter Network and Settings
36
Nighthawk DST AC1900 DST Router and DST Adpater Model R7300DST
Turn the LEDs on the DST Adapter On or Off
You can turn the WiFi LED, DST LED, and Ethernet LED on or off. The default value is ON.
Note that the Power LED remains on if you turn the LEDs off.
To turn the LEDs on the DST adapter on or off:
1. With an Ethernet cable, temporarily connect your computer to the Ethernet port on the
DST adapter.
2. Launch a web browser from the computer.
3. http://wwwEnter .mywifiext.net.
A login window displays.
4. Enter the DST adapter user name and password.
The user name is . admin The default password is . The user name and password
password are case-sensitive.
The Status page displays.
5. Select Advanced > DST Settings.
6. From the LED Status menu, select an option:
• ON. Turns on the WiFi LED, DST LED, and Ethernet LED.
• OFF. Turns off the WiFi LED, DST LED, and Ethernet LED.
7. Click the Apply button.
Your settings are saved.
Use WPS to Add a Device to the DST Adapter’s WiFi
Network
WPS (Wi-Fi Protected Setup) lets you connect a computer or WiFi device to the DST
adapter’s network without entering the WiFi network passphrase or key. Instead, you use a
WPS button or enter a PIN to connect.
Manage the DST Adapter Network and Settings
38
Nighthawk DST AC1900 DST Router and DST Adpater Model R7300DST
The WPS process automatically sets up your WiFi device with the network password
when it connects. The DST adapter WPS page displays a confirmation message.
Use WPS With the PIN Method
To use the PIN method to connect a WiFi device to the DST adapter’s WiFi network, you
must know the PIN of the WiFi device that you are trying to connect.
To using WPS with the PIN method to join the DST adapter’s WiFi network:
1. With an Ethernet cable, temporarily connect your computer to the Ethernet port on the
DST adapter.
2. Launch a web browser from the computer.
3. http://wwwEnter .mywifiext.net.
A login window displays.
4. Enter the DST adapter user name and password.
The user name is . admin The default password is . The user name and password
password are case-sensitive.
The Status page displays.
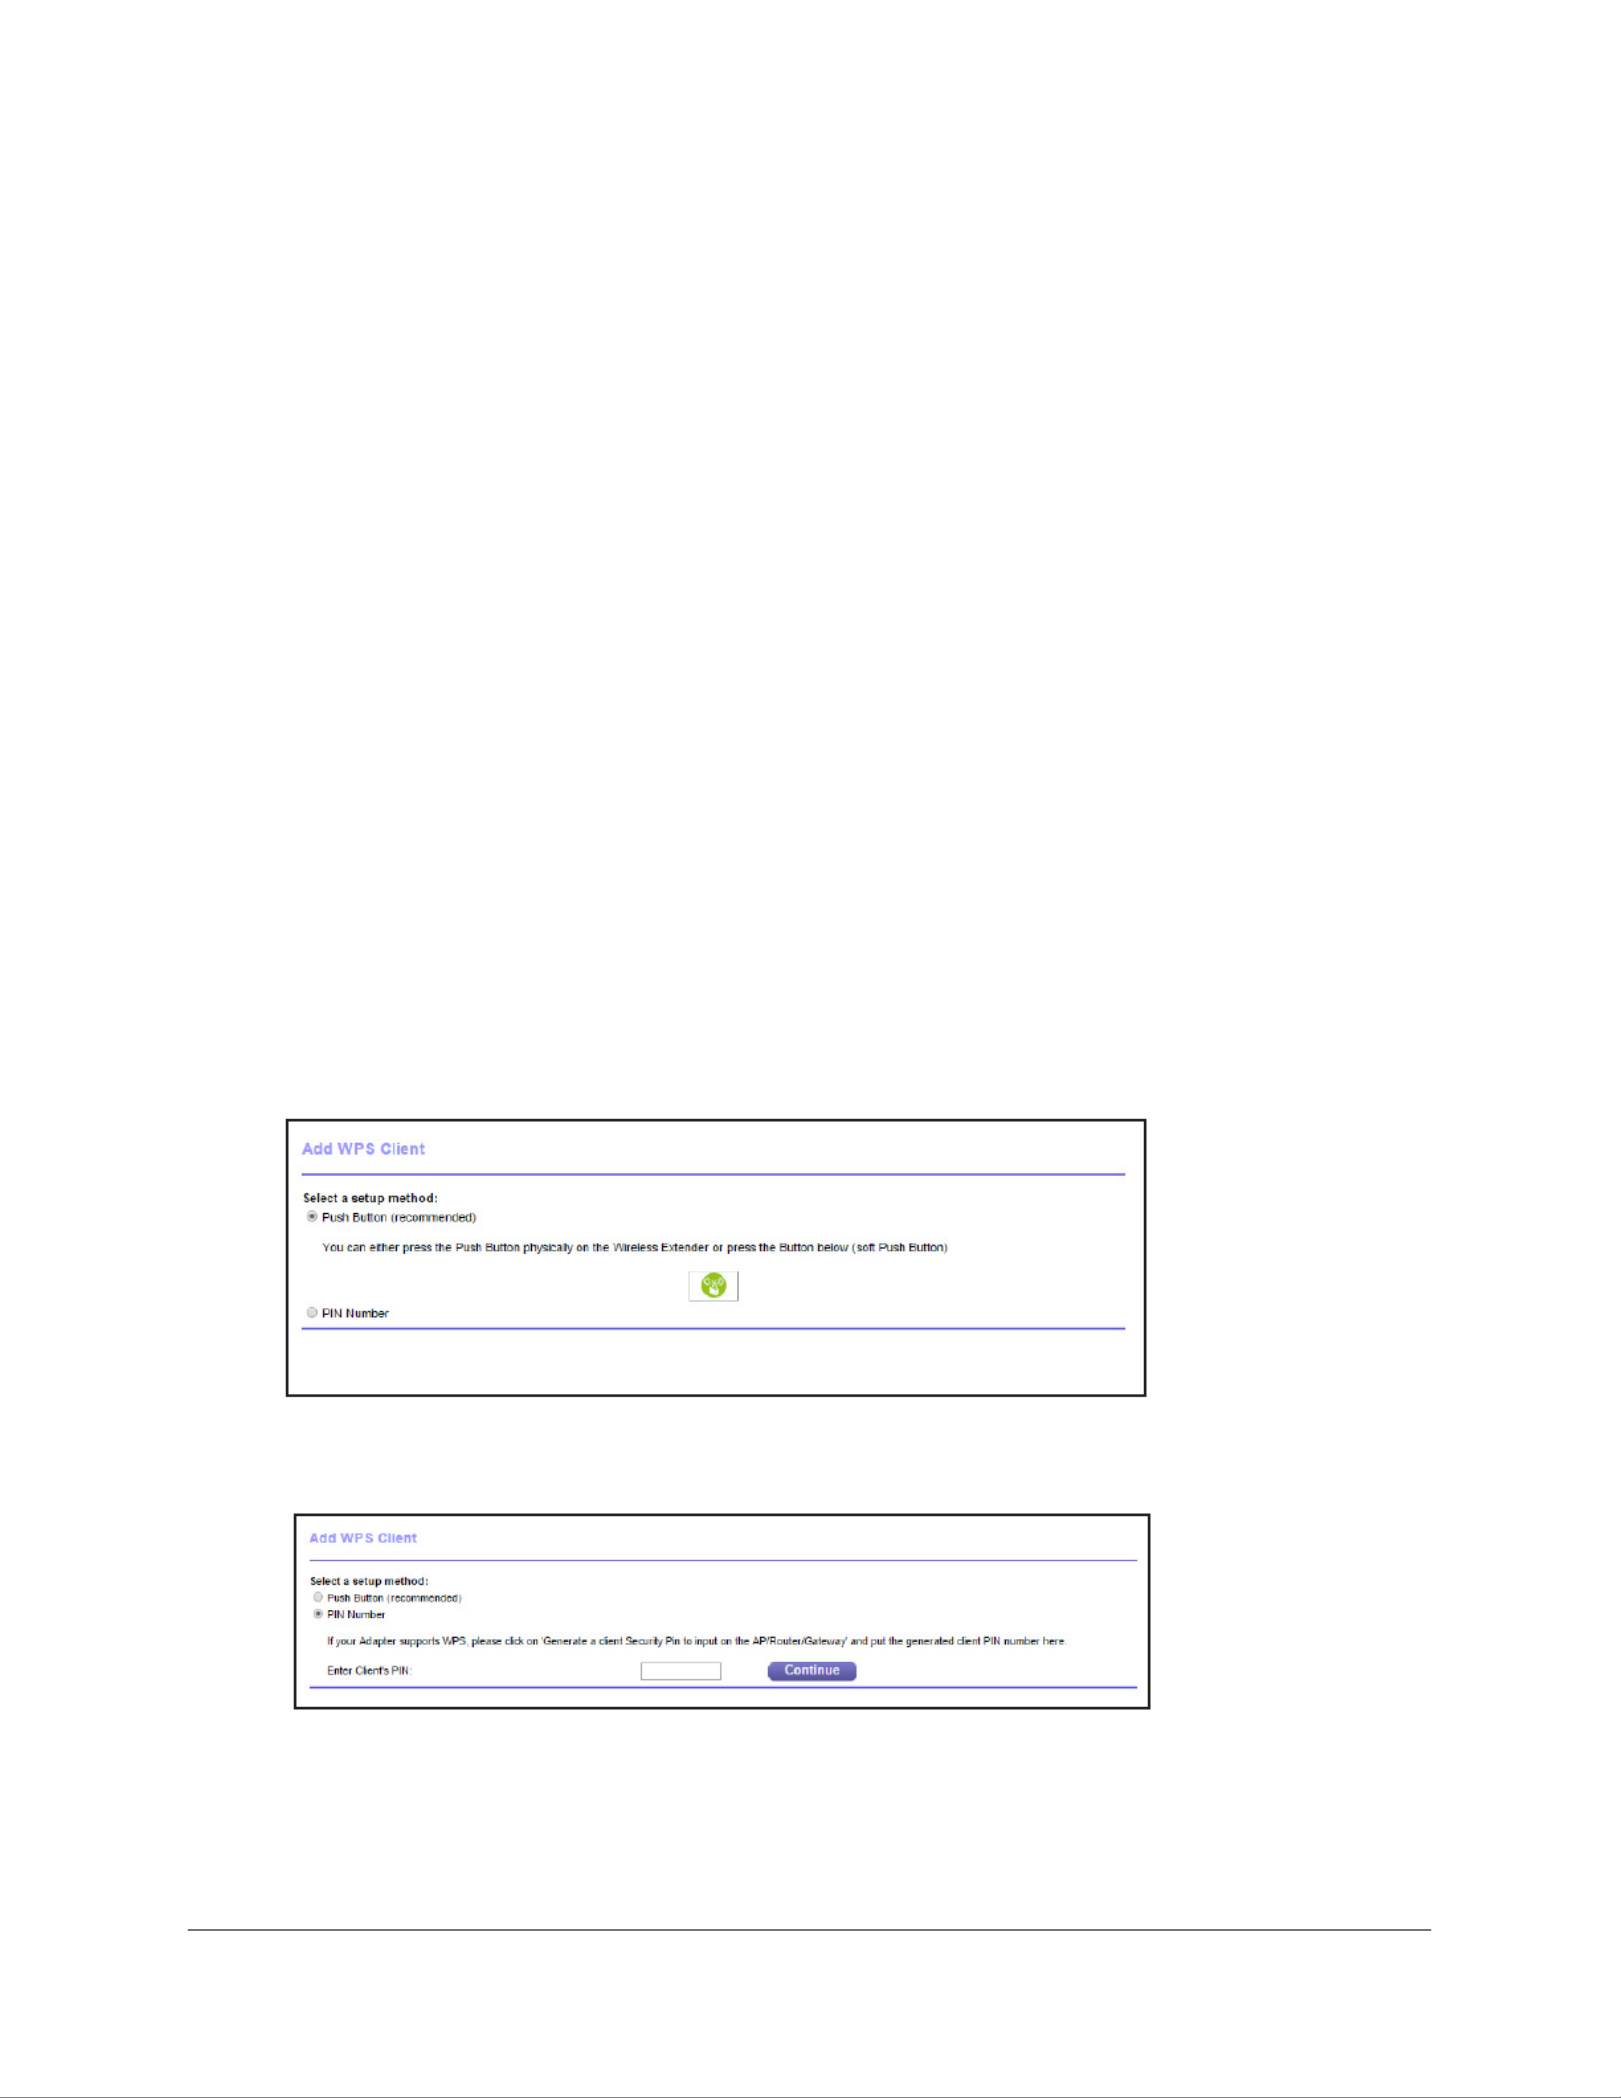
5. Select Add WPS Client.
The Add WPS Client page displays.
6. NextClick the button.
By default, the radio button is selected.Push Button (recommended)
7. Select the PIN Number radio button.
8. In the Enter Clients’ PIN field, enter the PIN number of the WiFi device.
9. ContinueClick the button.

Manage the DST Adapter Network and Settings
39
Nighthawk DST AC1900 DST Router and DST Adpater Model R7300DST
The DST adapter attempts to find the WiFi device (that is, the client) that you want to join
the DST adapter’s WiFi network.
10. Within two minutes, go to the WiFi device and use its WPS software to join the network
without entering a password
The WPS process automatically sets up your WiFi device with the network password
when it connects. The DST adapter WPS page displays a confirmation message.
View or Change the DST Adapter’s WPS Settings
To view or change the DST adapter’s WPS settings:
1. With an Ethernet cable, temporarily connect your computer to the Ethernet port on the
DST adapter.
2. Launch a web browser from the computer.
3. http://wwwEnter .mywifiext.net.
A login window displays.
4. Enter the DST adapter user name and password.
The user name is . admin The default password is . The user name and password
password are case-sensitive.
The Status page displays.
5. Select Advanced > Wireless Settings.
In the WPS Settings section displays the DST adapter’s PIN. You cannot change this
number.
6. In the WPS Settings section, change the settings as needed:
• Enable Device’s PIN. By default, this check box is selected so that it is possible to
use the WPS PIN method to connect to the DST adapter’s network.

Manage the DST Adapter Network and Settings
40
Nighthawk DST AC1900 DST Router and DST Adpater Model R7300DST
• To prevent PIN compromise... By default, this check box is selected. This feature
lets you specify the maximum number of times someone can try to enter the DST
adapter’s PIN to connect with WPS before the DST adapter disables its PIN.
• Keep Existing Wireless Settings (2.4 GHz b/g/n). By default, this check box is
selected so that the SSID and passphrase stay the same when you use WPS to
connect to the 2.4 GHz band. We recommend that you leave this check box selected.
• Keep Existing Wireless Settings (5 GHz a/n/ac). By default, this check box is
selected so that the SSID and passphrase stay the same when you use WPS to
connect to the 5 GHz band. We recommend that you leave this check box selected.
7. Click the Apply button.
Your settings are saved.
View or Change DST Adapter Advanced WiFi Settings
Use care when changing the WiFi settings. Incorrect settings might disable the DST
adapter’s WiFi networks unexpectedly.
To view or change the advanced WiFi settings:
1. With an Ethernet cable, temporarily connect your computer to the Ethernet port on the
DST adapter.
2. Launch a web browser from the computer.
3. http://wwwEnter .mywifiext.net.
A login window displays.
4. Enter the DST adapter user name and password.
The user name is . admin The default password is . The user name and password
password are case-sensitive.
The Status page displays.
5. Select Advanced > Wireless Settings.

Manage the DST Adapter Network and Settings
41
Nighthawk DST AC1900 DST Router and DST Adpater Model R7300DST
All the check boxes are selected by default.
6. Select or clear the check boxes:
• Enable Wireless Access Point (2.4 GHz). When this check box is selected, the DST
adapter allows WiFi connections in the 2.4 GHz band. Clearing this check box
prevents WiFi devices from connecting to the DST adapter in the 2.4 GHz band. LAN
devices can still connect to the DST adapter over an Ethernet cable.
• Enable SSID Broadcast (2.4 GHz). When this check box is selected, the DST
adapter broadcasts its WiFi network name (SSID) for the 2.4 GHz band. Clearing this
check box hides the DST adapter’s 2.4 GHz network name. In such a situation, this
network name does not display in a WiFi network manager. A user who wants to join
this hidden network must know its network name.
• Enable 20/40 MHz Coexistence (2.4 GHz). The DST adapter 2.4 GHz WiFi network
can run in either 40 MHz mode or 20 MHz mode. When this check box is selected, the
DST adapter uses 40 MHz mode unless a nearby WiFi network is using 20 MHz
mode. If that happens, the DST adapter uses 20 MHz mode to coexist with that
network.
• Enable Wireless Access Point (5 GHz). When this check box is selected, the DST
adapter allows WiFi connections in the 5 GHz band. Clearing this check box prevents
WiFi devices from connecting to the DST adapter in the 5 GHz band. LAN devices
can still connect to the DST adapter over an Ethernet cable.
• Enable SSID Broadcast (5 GHz). When this check box is selected, the DST adapter
broadcasts its WiFi network name (SSID) for the 5 GHz band. Clearing this check box
hides the DST adapter’s 5 GHz network name. In such a situation, this network name
does not display in a WiFi network manager. A user who wants to join this hidden
network must know its network name.
7. Click the Apply button.
Your changes are saved.
Set Up a WiFi Access List for the DST Adapter
By default, any WiFi device that is configured with the correct network name (SSID) can
access the DST adapter’s WiFi networks. For increased security, you can restrict access to
the DST adapter’s WiFi networks so that only WiFi devices with the MAC addresses that you
add to an access list can connect.
Each network device owns a MAC address, which is a unique 12-character physical address,
containing the hexadecimal characters 0–9, a–f, or A–F only, separated by colons (for
example, 00:09:AB:CD:EF:01). Typically, the MAC address is on the label of the WiFi device.
If you cannot access the label, you can display the MAC address using the network
configuration utilities of the computer. You might also find the MAC addresses on the
Attached Devices page (see View Wired and WiFi Network Devices Connected to the DST
Adapter on page 43).

Manage the DST Adapter Network and Settings
44
Nighthawk DST AC1900 DST Router and DST Adpater Model R7300DST
To set up the DST adapter’s IP address:
1. With an Ethernet cable, temporarily connect your computer to the Ethernet port on the
DST adapter.
2. Launch a web browser from the computer.
3. http://wwwEnter .mywifiext.net.
A login window displays.
4. Enter the DST adapter user name and password.
The user name is . admin The default password is . The user name and password
password are case-sensitive.
The Status page displays.
5. Select Setup > IP Address Setup.
6. By default, the Get an IP address dynamically from the router radio button is selected.
7. Select the Use Static IP Address radio button.
8. Complete the fields to specify the IP network IP addresses.
9. Click the Apply button.
Your settings are saved.

45
6
6. DST Adapter Troubleshooting
You can take various steps to diagnose and solve problems that you might encounter.
The first step in troubleshooting your DST adapter is to check the LEDs. After you plug in the
DST adapter, the following sequence of events occurs:
1. The Power LED lights.
2. After approximately 10 seconds, verify the following:
•The Power LED is solid green. The device is powered on.
•If the device is connected to a Powerline network, the Pick A Plug LED is lit.
•If the Powerline device is connected through the Ethernet port to a powered-on
Ethernet device, the Ethernet LED is lit.
If no LEDs are lit, see LEDs Are Off When the DST Adapter Is Plugged In .
If the Power LED is not lit, see .Power LED Is Off
If the Pick A Plug LED is not lit, see DST LED Is Off, Amber, or Red .
If the Ethernet LED is not lit, see .Ethernet LED Is Off
If you do not find the solution here, visit the NETGEAR support site at support.netgear.com for
product and contact information, or contact Geek Squad. For more information, see Contact
Geek Squad .

DST Adapter Troubleshooting
46
Nighthawk DST AC1900 DST Router and DST Adpater Model R7300DST
LEDs Are Off When the DST Adapter Is Plugged In
A common reason the LEDs are off is that power is not being provided to the DST adapter.
Make sure that power is supplied to the electrical outlet, and that the DST adapter is not
plugged into an extension cord, power strip, or surge protector.
Power LED Is Off
If the Power LED is off, the adapter is not receiving electrical power. You can try various
troubleshooting tips:
•Make sure that power is supplied to the electrical outlet.
•Press the Factory Reset button on the DST adapter for two seconds to return the device
to its factory default settings.
DST LED Is Off, Amber, or Red
If the DST LED is off, you can try various troubleshooting tips.
If the DST LED is off, the DST adapters cannot find the DST router or other DST adapters.
Try these troubleshooting tips:
•Make sure that the DST adapters and DST router are plugged into wall outlets with power
and that they use the same network encryption key.
•Move a DST adapter to an outlet that is closer to the computer or other devices.
•If you set a private encryption key, make sure that all DST adapters and the DST router
are using the same encryption key.
•If the problem occurred after you set the encryption key, reset each device to its factory
default settings.
Then try setting the encryption key again.
•If the LED is amber or red, move the DST adapter to another electrical outlet with a faster
connection.
Ethernet LED Is Off
If the Ethernet LED is off, the Ethernet port on the DST adapter is not linked. You can try
various troubleshooting tips.
If your DST adapter is connected to a computer, game console, Blu-ray player, or other
peripheral device, check the following:
•The peripheral device is turned on.
•The DST adapter is securely connected to the peripheral device using an Ethernet cable.
Termékspecifikációk
| Márka: | Netgear |
| Kategória: | Powerline adapter |
| Modell: | DST6501 |
Szüksége van segítségre?
Ha segítségre van szüksége Netgear DST6501, tegyen fel kérdést alább, és más felhasználók válaszolnak Önnek
Útmutatók Powerline adapter Netgear

13 Január 2025
12 Szeptember 2024
24 Augusztus 2024
12 Augusztus 2024
5 Augusztus 2024
3 Augusztus 2024
3 Augusztus 2024
3 Augusztus 2024
3 Augusztus 2024
3 Augusztus 2024
Útmutatók Powerline adapter
- Powerline adapter Nedis
- Powerline adapter SilverCrest
- Powerline adapter StarTech.com
- Powerline adapter TP-Link
- Powerline adapter Medion
- Powerline adapter TRENDnet
- Powerline adapter Mercusys
- Powerline adapter AVM
- Powerline adapter Strong
- Powerline adapter Asus
- Powerline adapter Hama
- Powerline adapter Renkforce
- Powerline adapter Mikrotik
- Powerline adapter ZyXEL
- Powerline adapter Devolo
- Powerline adapter Planet
- Powerline adapter Cisco
- Powerline adapter Edimax
- Powerline adapter Manhattan
- Powerline adapter Western Digital
- Powerline adapter D-Link
- Powerline adapter Tiptel
- Powerline adapter Konig
- Powerline adapter I-TEC
- Powerline adapter Sitecom
- Powerline adapter Allnet
- Powerline adapter Hirschmann
- Powerline adapter Eminent
- Powerline adapter DeLock
- Powerline adapter Maginon
- Powerline adapter Totolink
- Powerline adapter LevelOne
- Powerline adapter ICIDU
- Powerline adapter NPG
- Powerline adapter Eero
- Powerline adapter Sabrent
- Powerline adapter Readynet
- Powerline adapter Hamlet
- Powerline adapter TELE System
- Powerline adapter GBS Elettronica
- Powerline adapter NetComm
- Powerline adapter Comtrend
Legújabb útmutatók Powerline adapter

14 Január 2025
13 Január 2025
1 Január 2025
1 Január 2025
1 Január 2025

29 December 2024
24 December 2024
24 December 2024
20 December 2024
20 December 2024