Használati útmutató Lorex U222AA
Olvassa el alább 📖 a magyar nyelvű használati útmutatót Lorex U222AA (2 oldal) a kamera kategóriában. Ezt az útmutatót 7 ember találta hasznosnak és 2 felhasználó értékelte átlagosan 4.5 csillagra
Oldal 1/2
HD Wire-Free Add-On Camera
U222A_QSG_EN_R2
Quick Start Guide
English Version 2.0
• HD Wire-Free Security Camera(s)
• Camera Mounting Kit*
• Rechargeable Power Pack*
• Camera Antenna*
• Allen Key
• Power Pack Adapter
* Per camera in multi-camera packs
Package Contents
• Read this guide carefully and keep it for future reference.
• Follow all instructions for safe use of the product and handle with care.
• Use the camera within given temperature, humidity and voltage levels
noted in the camera’s specications.
• Do not disassemble the camera.
• Do not point the camera directly towards the sun or a source of intense
light.
• Use only the supplied regulated power supply provided with the product
or compatible accessories. Use of a non-regulated, non-conforming
power supply can damage the product and void the warranty.
• Periodic cleaning may be required. Use a damp cloth only. Do not use any
harsh, chemical-based cleaners.
Safety Precautions
lorex.com
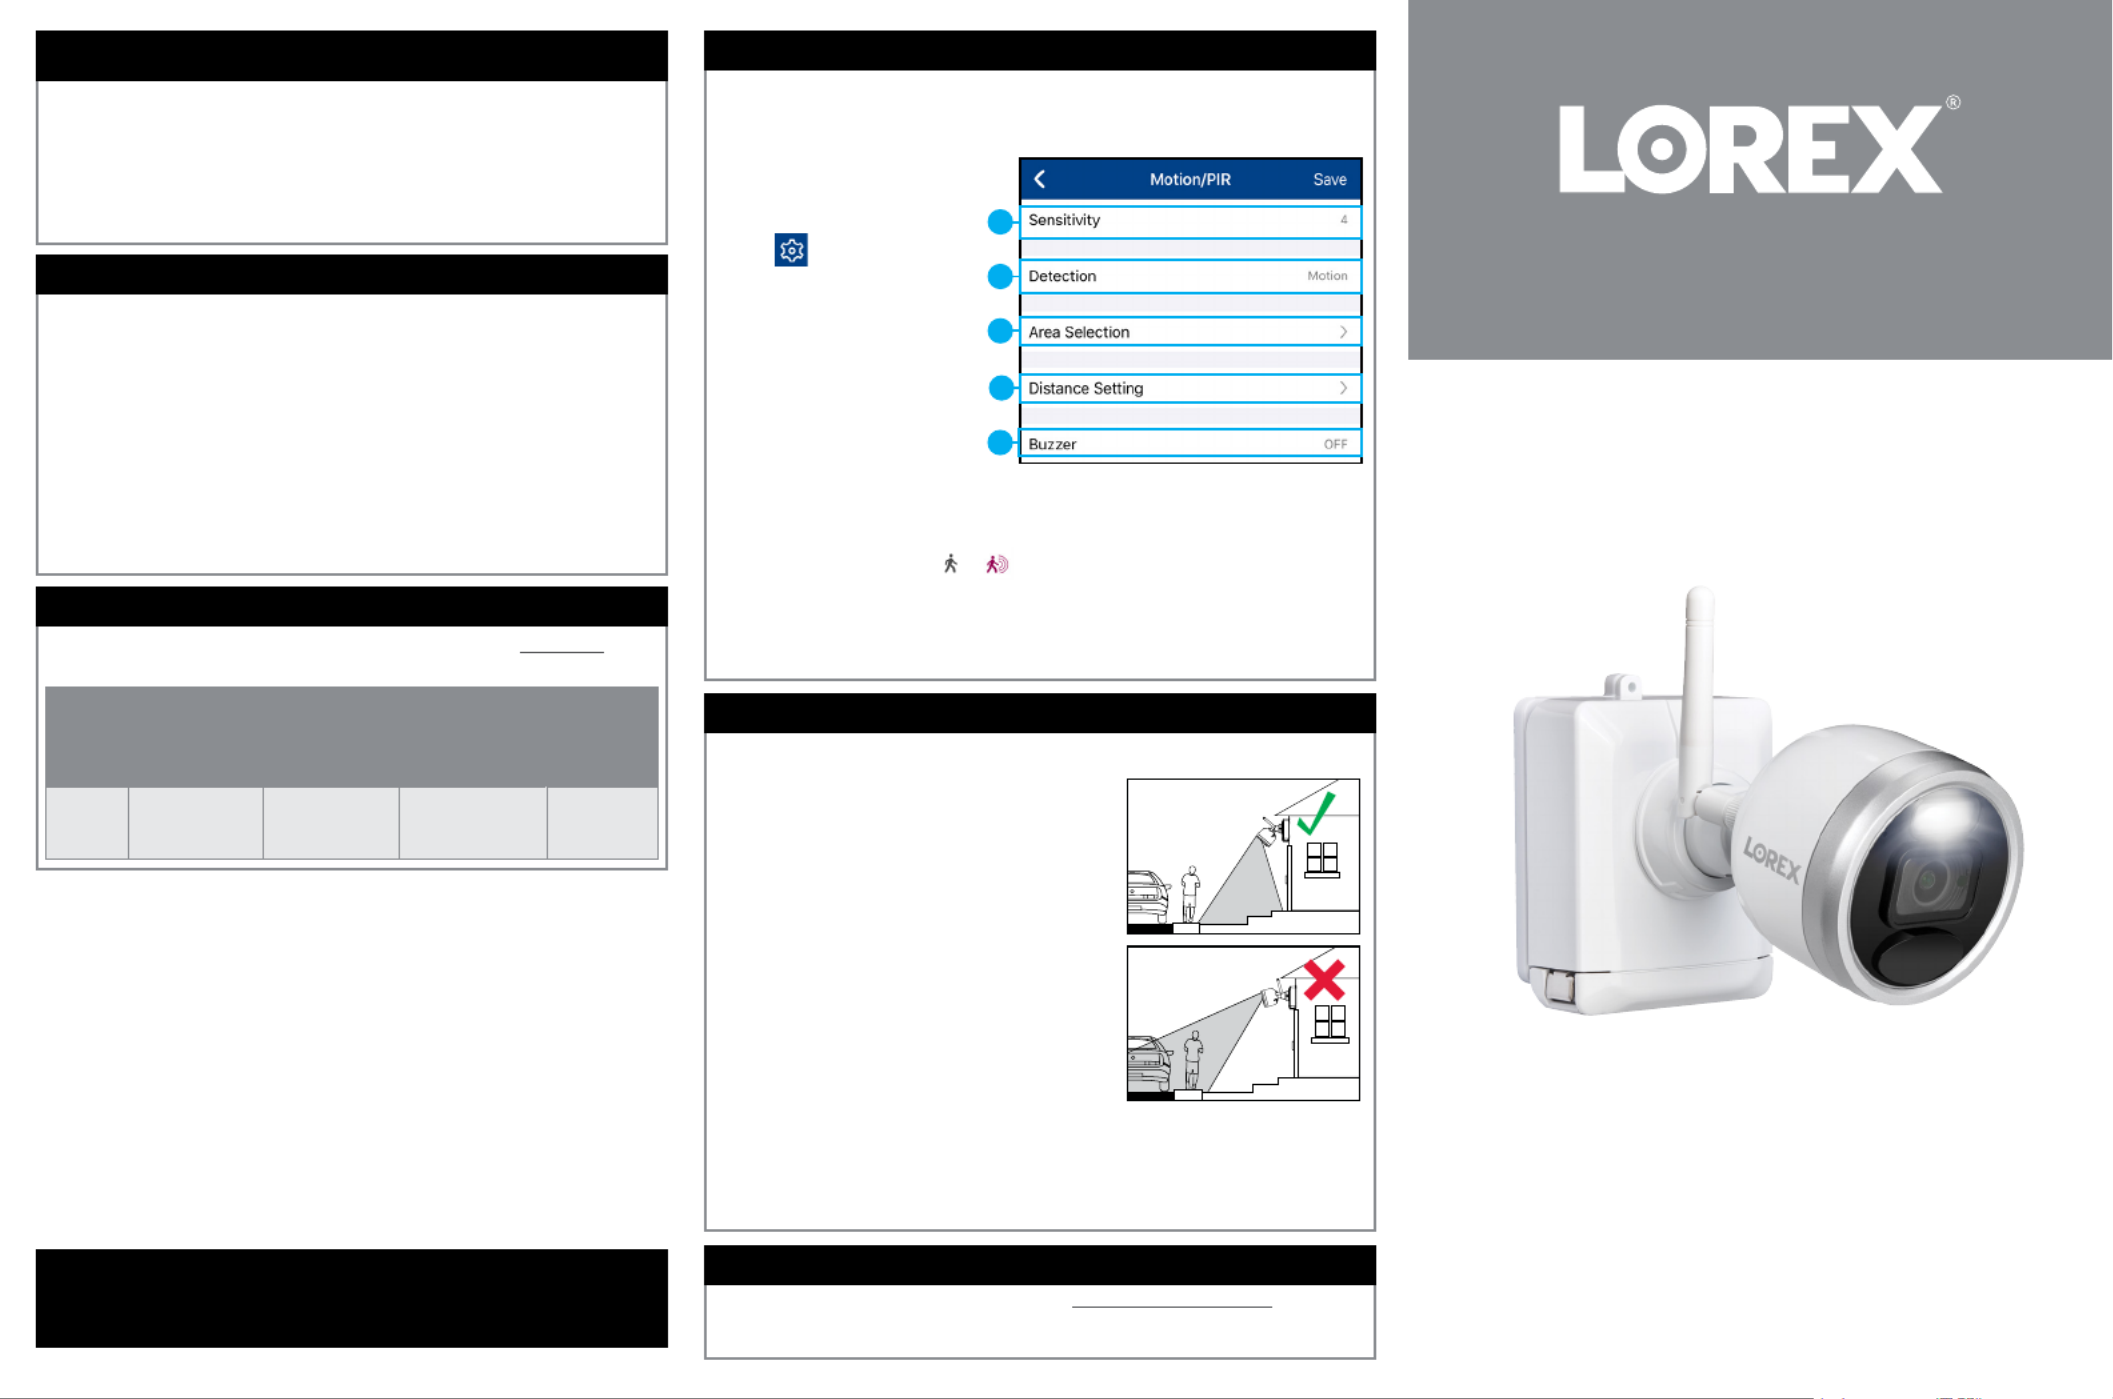
Optimizing Motion Detection
Customize motion detection settings to ensure motion events are being
recorded and reduce false alarms.
To optimize motion detection:
1. Launch the app.Lorex Cirrus
2. Tap a channel in Live View
to select it.
3. Tap , then tap .Motion
4. Congure the following as
needed:
a. Sensitivity: The amount of
motion needed to trigger
recording (e.g., higher
sensitivity requires less motion
to trigger recording).
b. Detection: Enable/disable
motion detection or person
detection per channel.
5. Tap . Repeat for other cameras on the system.Save
Installation Tips
• See images to the right for ideal setup. It is
recommended to place your camera at least 7ft (2.1m)
above the ground and angle it slightly downward toward
the monitoring area, excluding any busy areas (e.g.,
sidewalks or roadways).
• Ensure the camera image is free of obstructions (e.g.,
tree branches).
• Position the camera no more than 20ft (6.1m) away
from the area you wish to monitor.
• See the “Optimizing Motion Detection” section to
customize motion settings for each camera on your
system.
• For best performance, position the camera so that
objects of interest will move from side-to-side across
the camera image, rather than moving towards or away
from the camera.
• Install the camera within range of the recorder (noted in
Follow the tips below for more accurate motion detection and to optimize
battery life:
the camera’s specications).
• Test your camera's connection to the recorder prior to selecting a permanent mounting
location.
• This camera is weather resistant for outdoor use (IP66 rated). Installation in a sheltered
location is recommended.
• Battery life will vary based on temperature, settings and number of events.
U222A SERIES
Copyright © 2020 Lorex Corporation
As our products are subject to continuous improvement, Lorex reserves the right to
modify product design, specications and prices, without notice and without incurring
any obligation. E&OE. All rights reserved.
• For a full list of compatible recorders, visit .lorex.com/compatibility
• Not intended for submersion in water. Installation in a sheltered location
recommended.
Disclaimers
The following accessories are available for purchase. Visit lorex.com and
search for the model numbers below for details:
COLOR
Extra Power
Pack Power
Adapters
2-cell
Accessory
Power Pack
3-cell
Accessory
Power Pack
PLUS
Solar
Panel
WHITE ACPWF1 ACBATTR2 ACBATTR3 ACSOL1B
Available Accessories
a
b
c
d
e
c. Area Selection: Congure the active area for motion detection so that only areas of
interest are selected and detected.
d. Distance Setting: Congure distance setting for motion detection. While watching the
camera’s video on your mobile device, recreate a motion event in front of your camera.
The icon will change from to when motion is detected by the camera. Change
the distance setting if motion detection is being triggered by unwanted events.
NOTE: Distance will be affected by temperature.
e. Buzzer: Set the recorder to sound an alarm when motion is detected.

STEP 1: Initial Setup
To prepare the cameras:
Before you begin, you will need to prepare the Wire-Free cameras and Power Packs.
2. Peel off the label covering the contacts PLEASE REMOVE
on each Power Pack. Insert the charged Power Packs
into each camera base. Push up until the Power Pack
‘clicks’ into place.
1. Twist the adjustment ring counterclockwise to reposition
each camera as shown to the right. Connect one of the white
antennas to each camera.Twist clockwise to tighten when
nished.
STEP 2: Pairing with Lorex Cirrus
To pair the camera with Lorex Cirrus:
Next, you must pair your add-on camera to your recorder using the Lorex Cirrus app for
smartphones and tablets (iOS and Android).
NOTE: Make sure the camera is within 3ft (1m) of the recorder.
NOTE: The camera will when the Power Pack is 'beep'
properly inserted. If you do hear this alert, remove the
Power Pack by pushing on the release tabs then re-insert.
U222A_QSG_EN_R2
1. From Live view, tap any
free channel you would
like to pair a camera to
(marked with a icon).
2. Tap PAIR.
A timer for 30
seconds appears.
3. Press and hold the
pair button on the
back of the camera for
3 seconds.
NOTE: A “pairing successful” message should appear on screen. If you do not see this message,
repeat the steps above.
To install your cameras:
1. Set the mounting bracket in
the desired mounting position.
Mark holes through the
mounting bracket (shown as
blue X’s on the right).
2. Drill holes where marked for
the mounting screws using
the included drill bit (item C
provided in the toolkit with your
wire-free system).
3. Secure the bracket to the
mounting surface with the
included mounting screws
(×4). Make sure all screws
are fastened tightly using the
included screwdriver (item
A+B provided in the toolkit
with your wire-free system).
NOTES:
• Insert the included drywall anchors if you
are mounting the camera onto drywall.
• The hole at the top of the mounting
bracket will be used in step 5, once the
camera is attached to the mounting plate.
STEP 3: Installing the Cameras
Follow the instructions below to mount the cameras. It is recommended that you refer to the “Installation Tips” section to
help you select good mounting locations.
4. Lower the camera base
onto the mounting
bracket so the 2 tabs in
the mounting bracket
lock into the 2 slots in the
camera base.
6. OPTIONAL: To prevent
the pre-installed
locking screw from
being easily removed,
tighten it on the base
of the Power Pack
using the included
screwdriver (item A+B
in toolkit).
7. Adjust the angle of
the camera. Twist
the adjustment ring
counterclockwise to
reposition the camera.
Tighten the adjustment
ring when nished.
8. Use the included cable clips to complete the installation. Remove OPTIONAL:
the protective strip to uncover the adhesive on the cable clip to attach to the
mounting surface.
NOTE: You will need to
loosen the locking screw
to remove the Power Pack
in the future.
5. Insert the security screw
through the fasteners on
the top of the camera base
and mounting bracket
to secure the camera to
the mounting bracket.
Tighten using the included
screwdriver (item A+B
provided in the toolkit with
your wire-free system).
Adjustment ring
Power cable
Mounting surface
NOTE: Power Packs come fully charged.
Adjustment ring
*
*
Termékspecifikációk
| Márka: | Lorex |
| Kategória: | kamera |
| Modell: | U222AA |
Szüksége van segítségre?
Ha segítségre van szüksége Lorex U222AA, tegyen fel kérdést alább, és más felhasználók válaszolnak Önnek
Útmutatók kamera Lorex

5 Október 2024
26 Augusztus 2024
26 Augusztus 2024
25 Július 2024
17 Július 2024
12 Július 2024
Útmutatók kamera
- kamera Samsung
- kamera Sony
- kamera Braun
- kamera National Geographic
- kamera Acer
- kamera Nedis
- kamera Philips
- kamera Reolink
- kamera Olympus
- kamera Oregon Scientific
- kamera SilverCrest
- kamera Panasonic
- kamera Canon
- kamera JVC
- kamera Lenovo
- kamera Casio
- kamera Toshiba
- kamera Ozito
- kamera HP
- kamera BenQ
- kamera TP-Link
- kamera Medion
- kamera Vimar
- kamera Xiaomi
- kamera Fujifilm
- kamera EZVIZ
- kamera Prixton
- kamera Polaroid
- kamera Kyocera
- kamera Technaxx
- kamera GoPro
- kamera Speco Technologies
- kamera Ricoh
- kamera Hikvision
- kamera Epson
- kamera Netgear
- kamera Vtech
- kamera Rollei
- kamera Agfa
- kamera Lamax
- kamera Hitachi
- kamera Kodak
- kamera Ring
- kamera Nikon
- kamera Alpine
- kamera Logitech
- kamera Bresser
- kamera Dahua Technology
- kamera Viewsonic
- kamera Cobra
- kamera Scosche
- kamera Denver
- kamera Minox
- kamera Trevi
- kamera Joy-It
- kamera Daewoo
- kamera Gembird
- kamera GE
- kamera SPC
- kamera Powerfix
- kamera Eufy
- kamera Avaya
- kamera Levenhuk
- kamera Konica Minolta
- kamera Mamiya
- kamera Foscam
- kamera Kogan
- kamera SJCAM
- kamera Imou
- kamera AgfaPhoto
- kamera Sigma
- kamera Pentax
- kamera Velleman
- kamera D-Link
- kamera Blaupunkt
- kamera InfiRay
- kamera Fluke
- kamera Arlo
- kamera Trust
- kamera Konig
- kamera ARRI
- kamera Pyle
- kamera Emerson
- kamera MuxLab
- kamera Lumens
- kamera Sanyo
- kamera DataVideo
- kamera Lenco
- kamera Leica
- kamera Azden
- kamera Burris
- kamera Marshall Electronics
- kamera Getac
- kamera AViPAS
- kamera Creative
- kamera EverFocus
- kamera SereneLife
- kamera Swann
- kamera Anker
- kamera Microtek
- kamera Linksys
- kamera Elmo
- kamera UniView
- kamera Laserliner
- kamera IGET
- kamera Vivitar
- kamera PTZ Optics
- kamera BZBGear
- kamera Argus
- kamera Lexibook
- kamera Bushnell
- kamera Easypix
- kamera Maginon
- kamera AVerMedia
- kamera Celestron
- kamera Yashica
- kamera Flir
- kamera Daitsu
- kamera Nest
- kamera Ansco
- kamera Sygonix
- kamera Intel
- kamera Zenit
- kamera EVE
- kamera Fuji
- kamera Minolta
- kamera Zorki
- kamera RunCam
- kamera SeaLife
- kamera FIMI
- kamera Liiv360
- kamera Watec
- kamera Meade
- kamera Contax
- kamera Sinji
- kamera Traveler
- kamera Exakta
- kamera Digital Watchdog
- kamera ZeissIkon
- kamera Silvergear
- kamera Dorr
- kamera Spypoint
- kamera HOLGA
- kamera Praktica
- kamera Hasselblad
- kamera Moto Mods (Motorola)
- kamera Fantasea Line
- kamera Brinno
- kamera Z CAM
- kamera General
- kamera Ergoguys
- kamera Strex
- kamera General Electric
- kamera Berger & Schröter
- kamera Leitz Focomat IIc
- kamera Syrp
- kamera Cosina
- kamera Hanwha
- kamera Videology
- kamera Pelco
- kamera Videotec
- kamera Cambo
- kamera Kobian
- kamera Kyocera Yashica
- kamera Red Digital Cinema
- kamera Bauhn
- kamera Konica
- kamera Akaso
- kamera Seek Thermal
- kamera Aida
- kamera Ikegami
- kamera Ikelite
- kamera Adeunis
- kamera Hoppstar
- kamera IOptron
- kamera Moultrie
- kamera PatrolEyes
- kamera Camouflage
- kamera HuddleCamHD
- kamera Aplic
- kamera Linhof
- kamera GoXtreme
- kamera KanDao
- kamera Aquapix
Legújabb útmutatók kamera
29 Március 2025
29 Március 2025
28 Március 2025
27 Március 2025
27 Március 2025

20 Március 2025

14 Január 2025

14 Január 2025
12 Január 2025
12 Január 2025