Használati útmutató Linksys Hydra 6
Olvassa el alább 📖 a magyar nyelvű használati útmutatót Linksys Hydra 6 (49 oldal) a router kategóriában. Ezt az útmutatót 13 ember találta hasznosnak és 2 felhasználó értékelte átlagosan 4.5 csillagra
Oldal 1/49

1
z
USER GUIDE
Linksys Hydra 6
AX3000 BandDual-
WiFi 6 Router
MR2000 Series

2
Table of Contents
Table of Contents
Table of Contents
Table of ContentsTable of Contents
Product Overview
Product Overview
Product Overview
Product OverviewProduct Overview
3
3
3
33
____________________________________________________________________________________
____________________________________________________________________________________
____________________________________________________________________________________
________________________________________________________________________________________________________________________________________________________________________
Help
Help
Help
HelpHelp
__________________________________________________________________________________________________
__________________________________________________________________________________________________
__________________________________________________________________________________________________
____________________________________________________________________________________________________________________________________________________________________________________________________
5
5
5
55
Where to find
Where to find
Where to find
Where to findWhere to find more help
more help
more help
more help more help
5
5
5
55
____________________________________________________________________________________
____________________________________________________________________________________
____________________________________________________________________________________
________________________________________________________________________________________________________________________________________________________________________
Set Up
Set Up
Set Up
Set UpSet Up
________________________________________________________________________________________________
________________________________________________________________________________________________
________________________________________________________________________________________________
________________________________________________________________________________________________________________________________________________________________________________________________
6
6
6
66
What you’ll need
What you’ll need
What you’ll need
What you’ll needWhat you’ll need
6
6
6
6 6
____________________________________________________________________________________________
____________________________________________________________________________________________
____________________________________________________________________________________________
________________________________________________________________________________________________________________________________________________________________________________________
Linksys Whole Home Wi
Linksys Whole Home Wi
Linksys Whole Home Wi
Linksys Whole Home WiLinksys Whole Home Wi-
-
-
--
Fi S
Fi S
Fi S
Fi SFi System Settin
ystem Settin
ystem Settin
ystem Settinystem Settings
gs
gs
gsgs__________________________________________________________
__________________________________________________________
__________________________________________________________
____________________________________________________________________________________________________________________
8
8
8
88
Log in to the Linksys app
Log in to the Linksys app
Log in to the Linksys app
Log in to the Linksys appLog in to the Linksys app
___________________________________________________________________________________
___________________________________________________________________________________
___________________________________________________________________________________
______________________________________________________________________________________________________________________________________________________________________ 8
8
8
8 8
Navigation Me
Navigation Me
Navigation Me
Navigation MeNavigation Menu
nu
nu
nunu
____________________________________________________________________________________________
____________________________________________________________________________________________
____________________________________________________________________________________________
________________________________________________________________________________________________________________________________________________________________________________________ 9
9
9
9 9
Dashboard
Dashboard
Dashboard
DashboardDashboard
________________________________________________________________________________________________
________________________________________________________________________________________________
________________________________________________________________________________________________
________________________________________________________________________________________________________________________________________________________________________________________________ 10
10
10
1010
_
_
_
__
Devices
Devices
Devices
DevicesDevices
_____________________________________________________________________________________________________
_____________________________________________________________________________________________________
_____________________________________________________________________________________________________
__________________________________________________________________________________________________________________________________________________________________________________________________________11
11
11
1111
To view or change device details 12__________________________________________________________________________________________
Parental Controls
Parental Controls
Parental Controls
Parental ControlsParental Controls
__________________________________________________________________________________________
__________________________________________________________________________________________
__________________________________________________________________________________________
____________________________________________________________________________________________________________________________________________________________________________________ 13
13
13
1313
Wi
Wi
Wi
WiWi-
-
-
--
Fi Settings
Fi Settings
Fi Settings
Fi SettingsFi Settings______________________________________________________________________________________________
______________________________________________________________________________________________
______________________________________________________________________________________________
____________________________________________________________________________________________________________________________________________________________________________________________ 14
14
14
1414
Advanced Wi- Fi Settings___________________________________________________________________________________________________ 15
Connect a Device with WPS ________________________________________________________________________________________________ 16
Guest Network Access
Guest Network Access
Guest Network Access
Guest Network AccessGuest Network Access
_____________________________________________________________________________________
_____________________________________________________________________________________
_____________________________________________________________________________________
__________________________________________________________________________________________________________________________________________________________________________ 17
17
17
1717
Priority
Priority
Priority
PriorityPriority ____________________________________________________________________________________________________
____________________________________________________________________________________________________
____________________________________________________________________________________________________
________________________________________________________________________________________________________________________________________________________________________________________________________ 18
18
18
1818
Notifications
Notifications
Notifications
NotificationsNotifications
_______________________________________________________________________________________________
_______________________________________________________________________________________________
_______________________________________________________________________________________________
______________________________________________________________________________________________________________________________________________________________________________________________ 19
19
19
1919
Network Administration
Network Administration
Network Administration
Network AdministrationNetwork Administration
___________________________________________________________________________________
___________________________________________________________________________________
___________________________________________________________________________________
______________________________________________________________________________________________________________________________________________________________________
20
20
20
2020
Advanced Settings
Advanced Settings
Advanced Settings
Advanced SettingsAdvanced Settings
_________________________________________________________________________________________
_________________________________________________________________________________________
_________________________________________________________________________________________
__________________________________________________________________________________________________________________________________________________________________________________ 21
21
21
2121
Internet Settings ___________________________________________________________________________________________________________ 21
Port Settings ______________________________________________________________________________________________________________ 22
Wi- Fi MAC Filters _________________________________________________________________________________________________________ 23
External Storage
External Storage
External Storage
External StorageExternal Storage
___________________________________________________________________________________________
___________________________________________________________________________________________
___________________________________________________________________________________________
______________________________________________________________________________________________________________________________________________________________________________________
24
24
24
2424
Speed Check
Speed Check
Speed Check
Speed CheckSpeed Check
_______________________________________________________________________________________________
_______________________________________________________________________________________________
_______________________________________________________________________________________________
______________________________________________________________________________________________________________________________________________________________________________________________ 25
25
25
2525
My Account
My Account
My Account
My AccountMy Account
________________________________________________________________________________________________
________________________________________________________________________________________________
________________________________________________________________________________________________
________________________________________________________________________________________________________________________________________________________________________________________________
26
26
26
2626
Feedback
Feedback
Feedback
FeedbackFeedback
__________________________________________________________________________________________________
__________________________________________________________________________________________________
__________________________________________________________________________________________________
____________________________________________________________________________________________________________________________________________________________________________________________________ 27
27
27
2727
Help
Help
Help
HelpHelp _______________________________________________________________________________________________________
_______________________________________________________________________________________________________
_______________________________________________________________________________________________________
______________________________________________________________________________________________________________________________________________________________________________________________________________
28
28
28
2828
Connect Directly To Your Router
Connect Directly To Your Router
Connect Directly To Your Router
Connect Directly To Your RouterConnect Directly To Your Router
____________________________________________________________________
____________________________________________________________________
____________________________________________________________________
________________________________________________________________________________________________________________________________________
29
29
29
2929
Router password __________________________________________________________________________________________________________ 30
How to factory r
How to factory r
How to factory r
How to factory rHow to factory reset your router
eset your router
eset your router
eset your routereset your router
____________________________________________________________________
____________________________________________________________________
____________________________________________________________________
________________________________________________________________________________________________________________________________________ 31
31
31
3131
How to mount y
How to mount y
How to mount y
How to mount yHow to mount your router on the wall
our router on the wall
our router on the wall
our router on the wallour router on the wall
_______________________________________________________________
_______________________________________________________________
_______________________________________________________________
______________________________________________________________________________________________________________________________ 31
31
31
3131
Specifications
Specifications
Specifications
SpecificationsSpecifications
_______________________________________________________________________________________
_______________________________________________________________________________________
_______________________________________________________________________________________
______________________________________________________________________________________________________________________________________________________________________________32
32
32
3232
Linksys Hydra 6
Linksys Hydra 6
Linksys Hydra 6
Linksys Hydra 6Linksys Hydra 6
___________________________________________________________________________________________
___________________________________________________________________________________________
___________________________________________________________________________________________
______________________________________________________________________________________________________________________________________________________________________________________ 32
32
32
3232
Environmental
Environmental
Environmental
EnvironmentalEnvironmental
_____________________________________________________________________________________________
_____________________________________________________________________________________________
_____________________________________________________________________________________________
__________________________________________________________________________________________________________________________________________________________________________________________ 32
32
32
3232

3
Product Overview
Light description Status
Blue (blinking) Starting up/WPS pairing started
Wait for the router to finish starting up or WPS paring to complete.
Purple Ready for setup
Open the Linksys app to complete setup.
Purple (blinking) Setup in progress
Follow instructions in the app.
Blue Connected to internet/WPS pairing successful
Router is online, everything is good.
Red No internet
Not online, check with your ISP for service interruptions.
Red (blinking) Disconnected
• Child node: too far from a working node
• Parent node: un from theplugged modem
Yellow Weak signal (child nodes only)
Yellow (blinking) WPS pairing unsuccessful

4
Ethernet ports (1)—Connect ethernet cables to these blue gigabit (10/100/1000) ports, and to wired devices on your network.
Note—For best performance, use CAT5e or higher rated cables on the Ethernet ports.
Internet port (2)—Connect an ethernet cable to the yellow gigabit (10/100/1000) port, and to a broadband internet cable/DSL
or fiber modem. If you are using this router as a child node in a mesh Wi-Fi system, you can use this port to create a wired
connection to another node.
Note—For best performance, use CAT5e or higher rated cable on the Internet port.
Wi- 3)—Fi Protected Setup™ button ( Press to connect to WPS-enabled network devices.
Reset button (4)—To factory reset your router, press and hold while the light on top of the router blinks red. Do not release
the button until the light goes out and then turns bright red.
Power port (5)—Connect the included AC power adapter.
Ethernet activity lights (6)—Lights indicate data transfer over ethernet cable.
USB 3.0 port —(7) Connect and share USB drives on your network or on the internet.
USB (8)—activity light Light indicate data transfer over s USB c . onnection
Power switch (9)—Press |
|
|
| | (on) to turn on the router.
Note — FCC regulations restrict the operation of this device to indoor use only.

5
H elp
Where to find more help
• Linksys.com/support/MR200 0
• Linksys app help (launch the app and click Help in the main navigation menu)
iPhone
Android
Note—Licenses and notices for third party software used in this product may be viewed on http://support.linksys.com/en-
us/license http://support.linksys.com/en s/gplcodecenter. Please contact -u for questions or GPL source code requests.

6
Set Up
IMPORTANT—Your MR2000 Series router can be set up as a node or a child in a whole home mesh Wiparent -Fi system. A
parent node must be connected with an ethernet cable to your modem or modem- Child router. nodes can be connected wirelessly
or with ethernet cables.
If you are adding the router as the parent node for Linksys an existing whole home mesh Wi-Fi system, factory reset all nodes and
add them to the system after your MR2000 Series router is setup and working.
Download the Linksys app. You need this app to . set up your router
Go to the app store for your device and search for Linksys. Look for this icon:
What you’ll need
Install the app, open it and follow the instructions.
Note—The app works with iOS 1 1 4. and later, and Android 6.0 .and later
During setup you will create a Linksys Smart Wi- Fi account so you can use the app to view or change your router system
settings from anywhere you have an internet connection.
Among the many things you can do with Linksys Smart Wi-Fi and the Linksys app:
• Change your Wi-Fi name and password
• Set up guest access
• Connect devices to Wi-Fi with WPS
• Block internet with parental controls
• Test your i nternet connection speed
Note—
—
—
——W d e’ll sen you a verification email. While connected to your home network, click the link in the email to link your router with
your account.
Other than plugging in the power and the ethernet cable, the app-based setup process does the work for you. Once connected,
use the app to personalize your Wi-Fi by giving it a name and password. You also can give your router and any child nodes
names based on where they are so you can identify them in the rare case where things need attention.
If you want to add child nodes to create a whole home mesh Wi- Fi system, set them up within range of a working node. Only
the parent node has to be wired to the modem or modem-router. Don’t worry, the app will help you place your nodes.

7
Print this page, then record your Wi-Fi and account settings in the table as a reference. Store your notes in a safe place.
Wi- Fi Name
Wi- Fi Password
Router Password
Guest NameNetwork
Guest Network Password
Linksys App Login Email Address
Linksys App Password
Your login email address and password can also be used to log in at LinksysSmartWiFi.com on a computer. You can view or
manage your Wi-Fi in an internet browser.

8
Linksys Whole Home Wi-Fi System Settings
Using your Linksys app, you can change system view or Wi-Fi settings including security and parental controls. You can access
settings from anywhere in the world if you have an internet connection. You can also access your system directly from your
home network, even if you don’t have an internet connection.
Log in to the Linksys app
1. Open the Linksys app, tap
Log in
Log in
Log in
Log inLog in.
iPhone
Android
2. Enter the email address you used when creating your account.
3. Enter your account password.
4. Tap Log in.

9
Navigation Menu
Tap the menu icon to navigate around the app.
iPhone
Android

10
Dashboard
Dashboard is a snapshot of your Wi- Fi. See how many devices are connected to your system. From Dashboard you can share
your Wi- Fi password and turn on guest access. Dashboard also shows you if any devices have parental controls on them or
have been prioritized for Wi-Fi access.
iPhone
Android
11
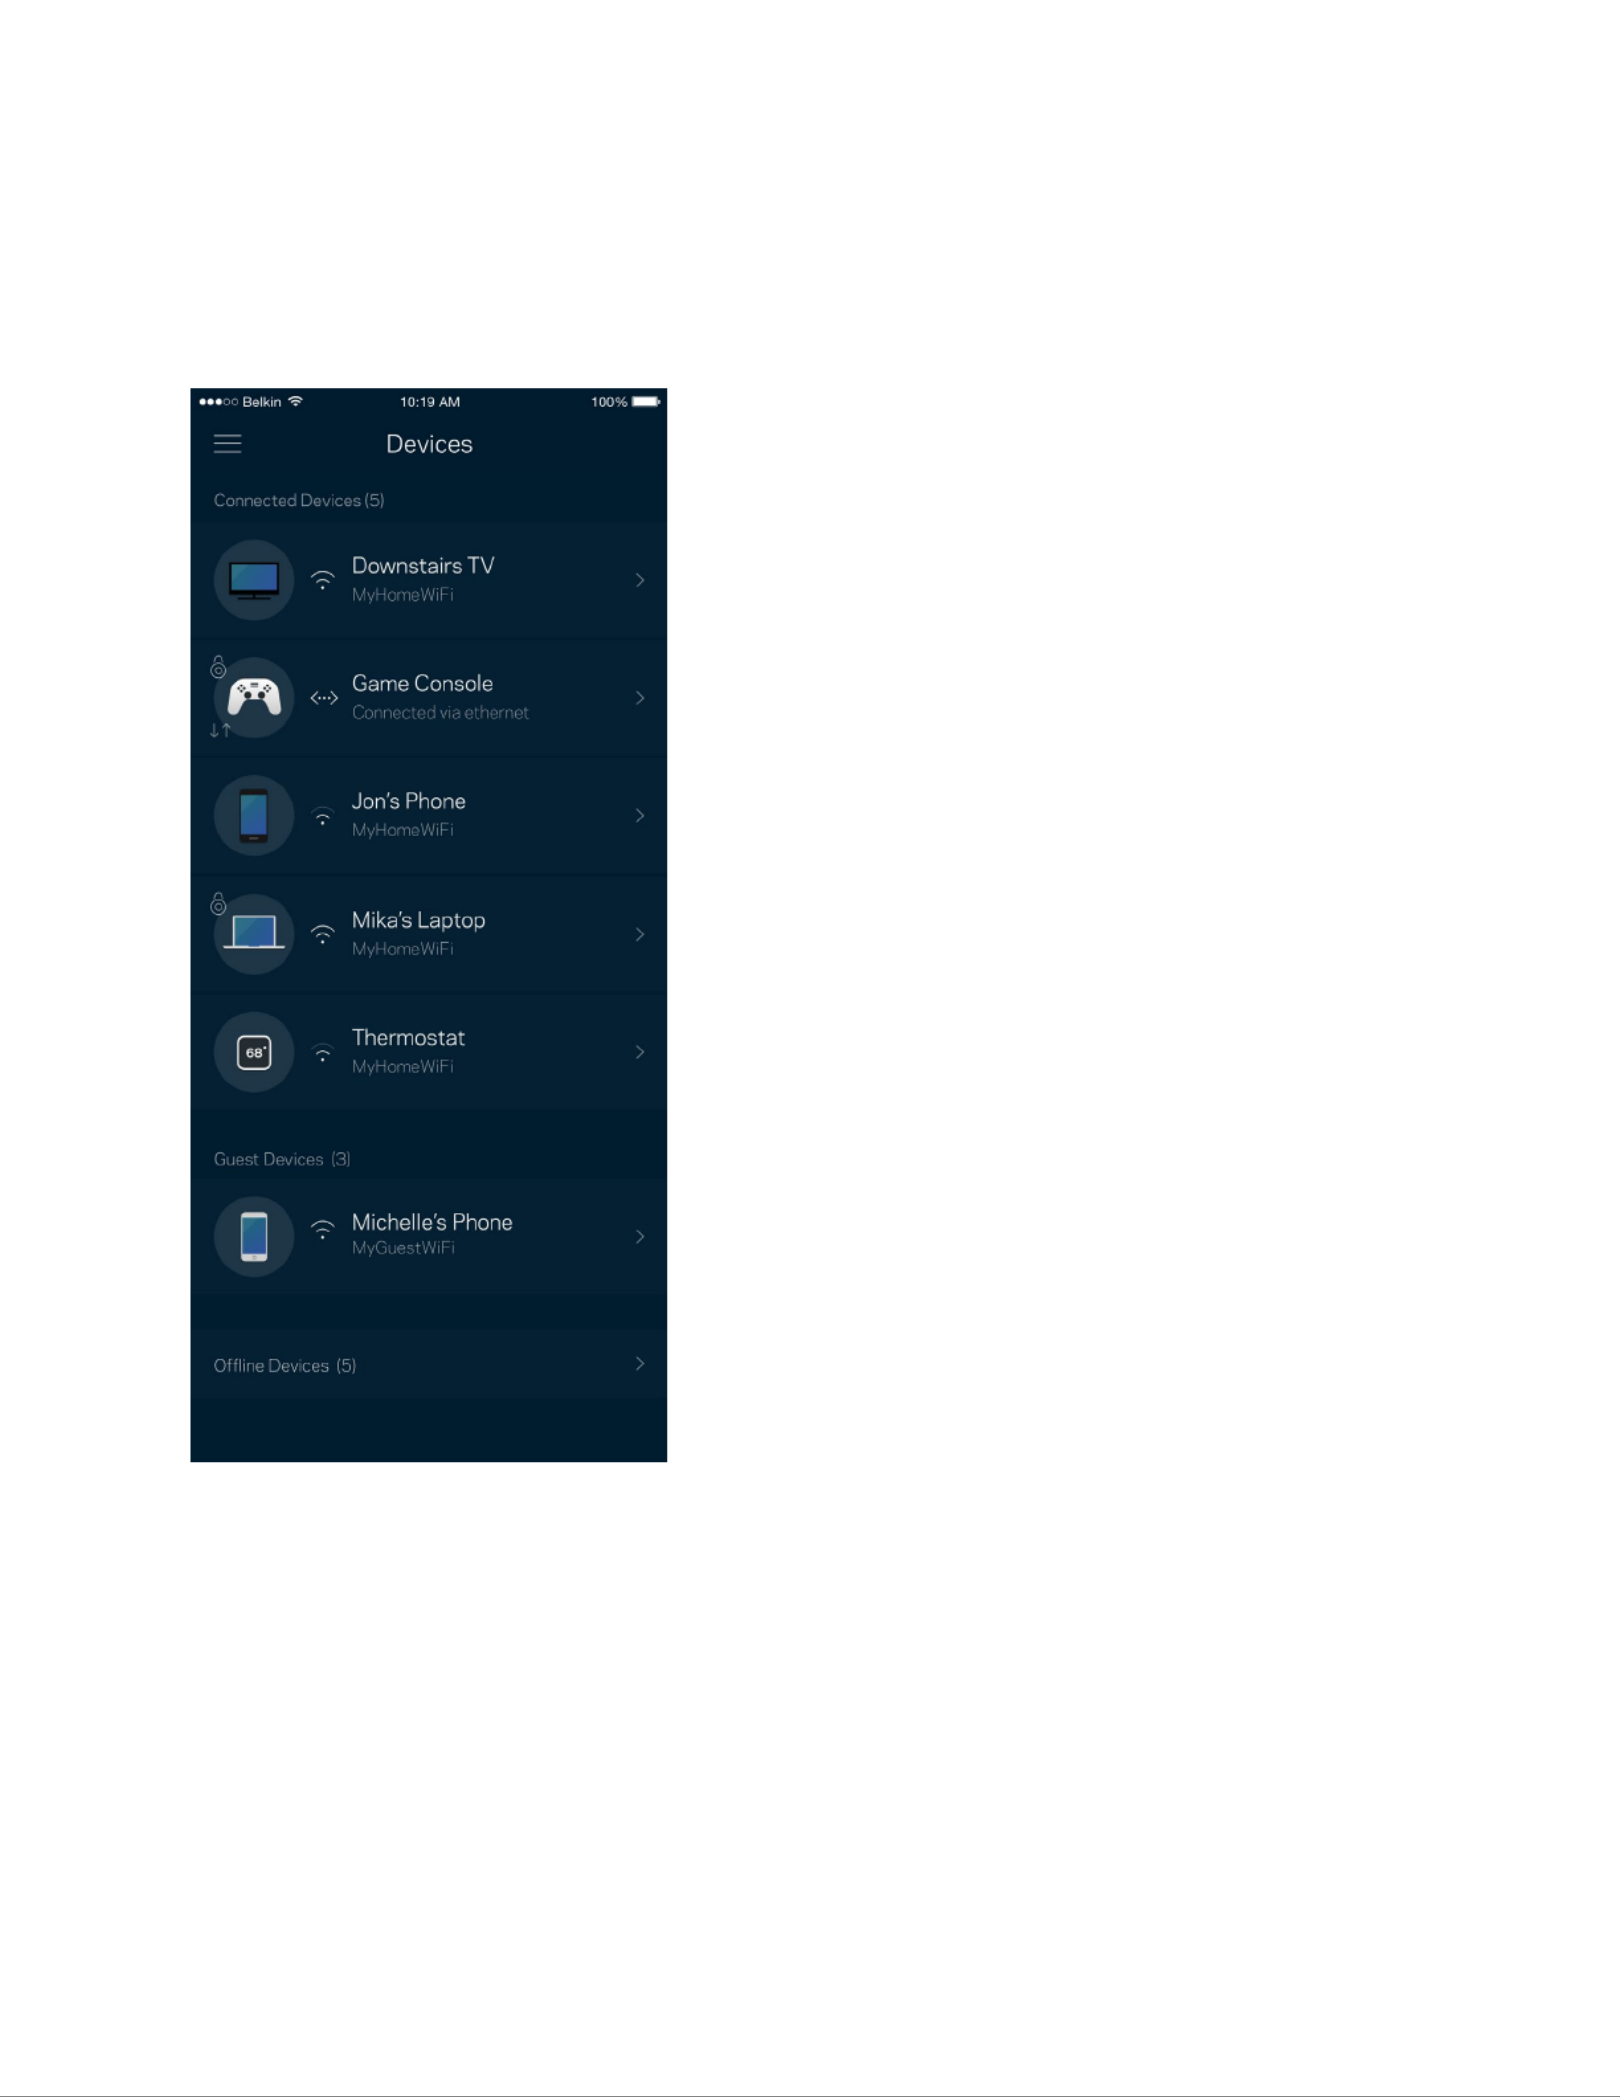
Devices
View and change details for all devices connected to your Wi-Fi. You can view devices on your main network and your guest
network, or display information about each device.

12
To view or change device details
From the Devices screen you can edit device names and change the device icons. You also can prioritize devices, set parental
controls, and see Wi-Fi details. Tap on any device to see details.
14
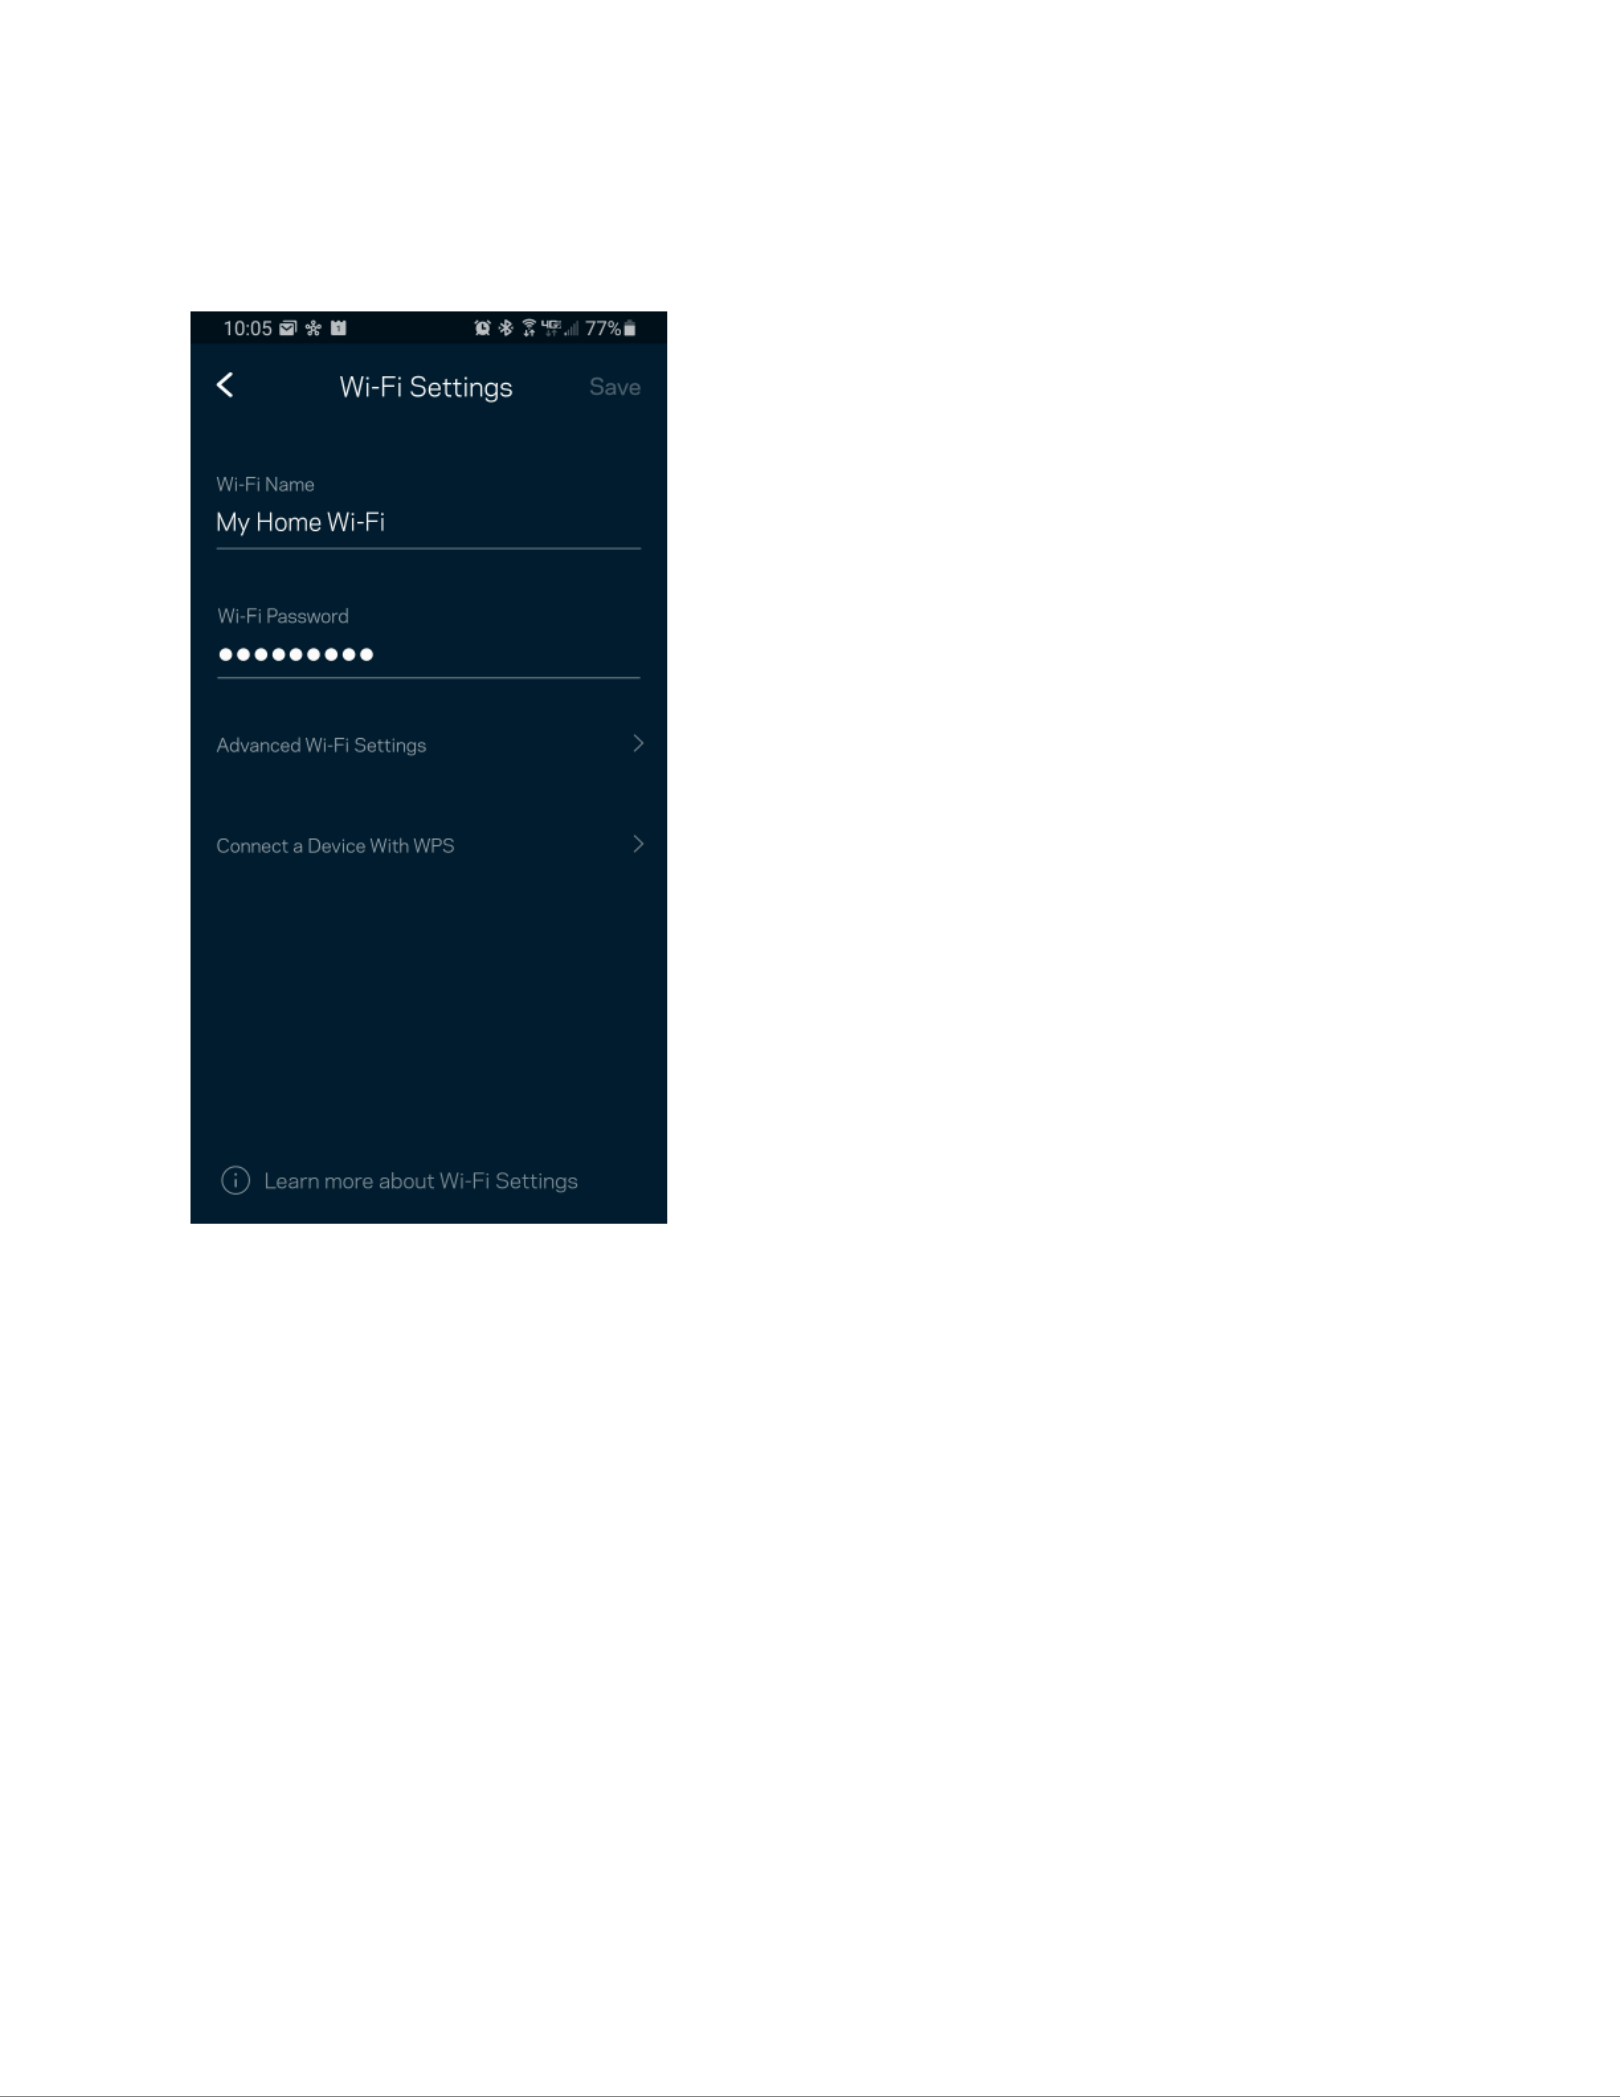
Wi-Fi Settings
View or change your Wi-Fi name and password and connect devices using Wi- Fi Protected Setup™.
15
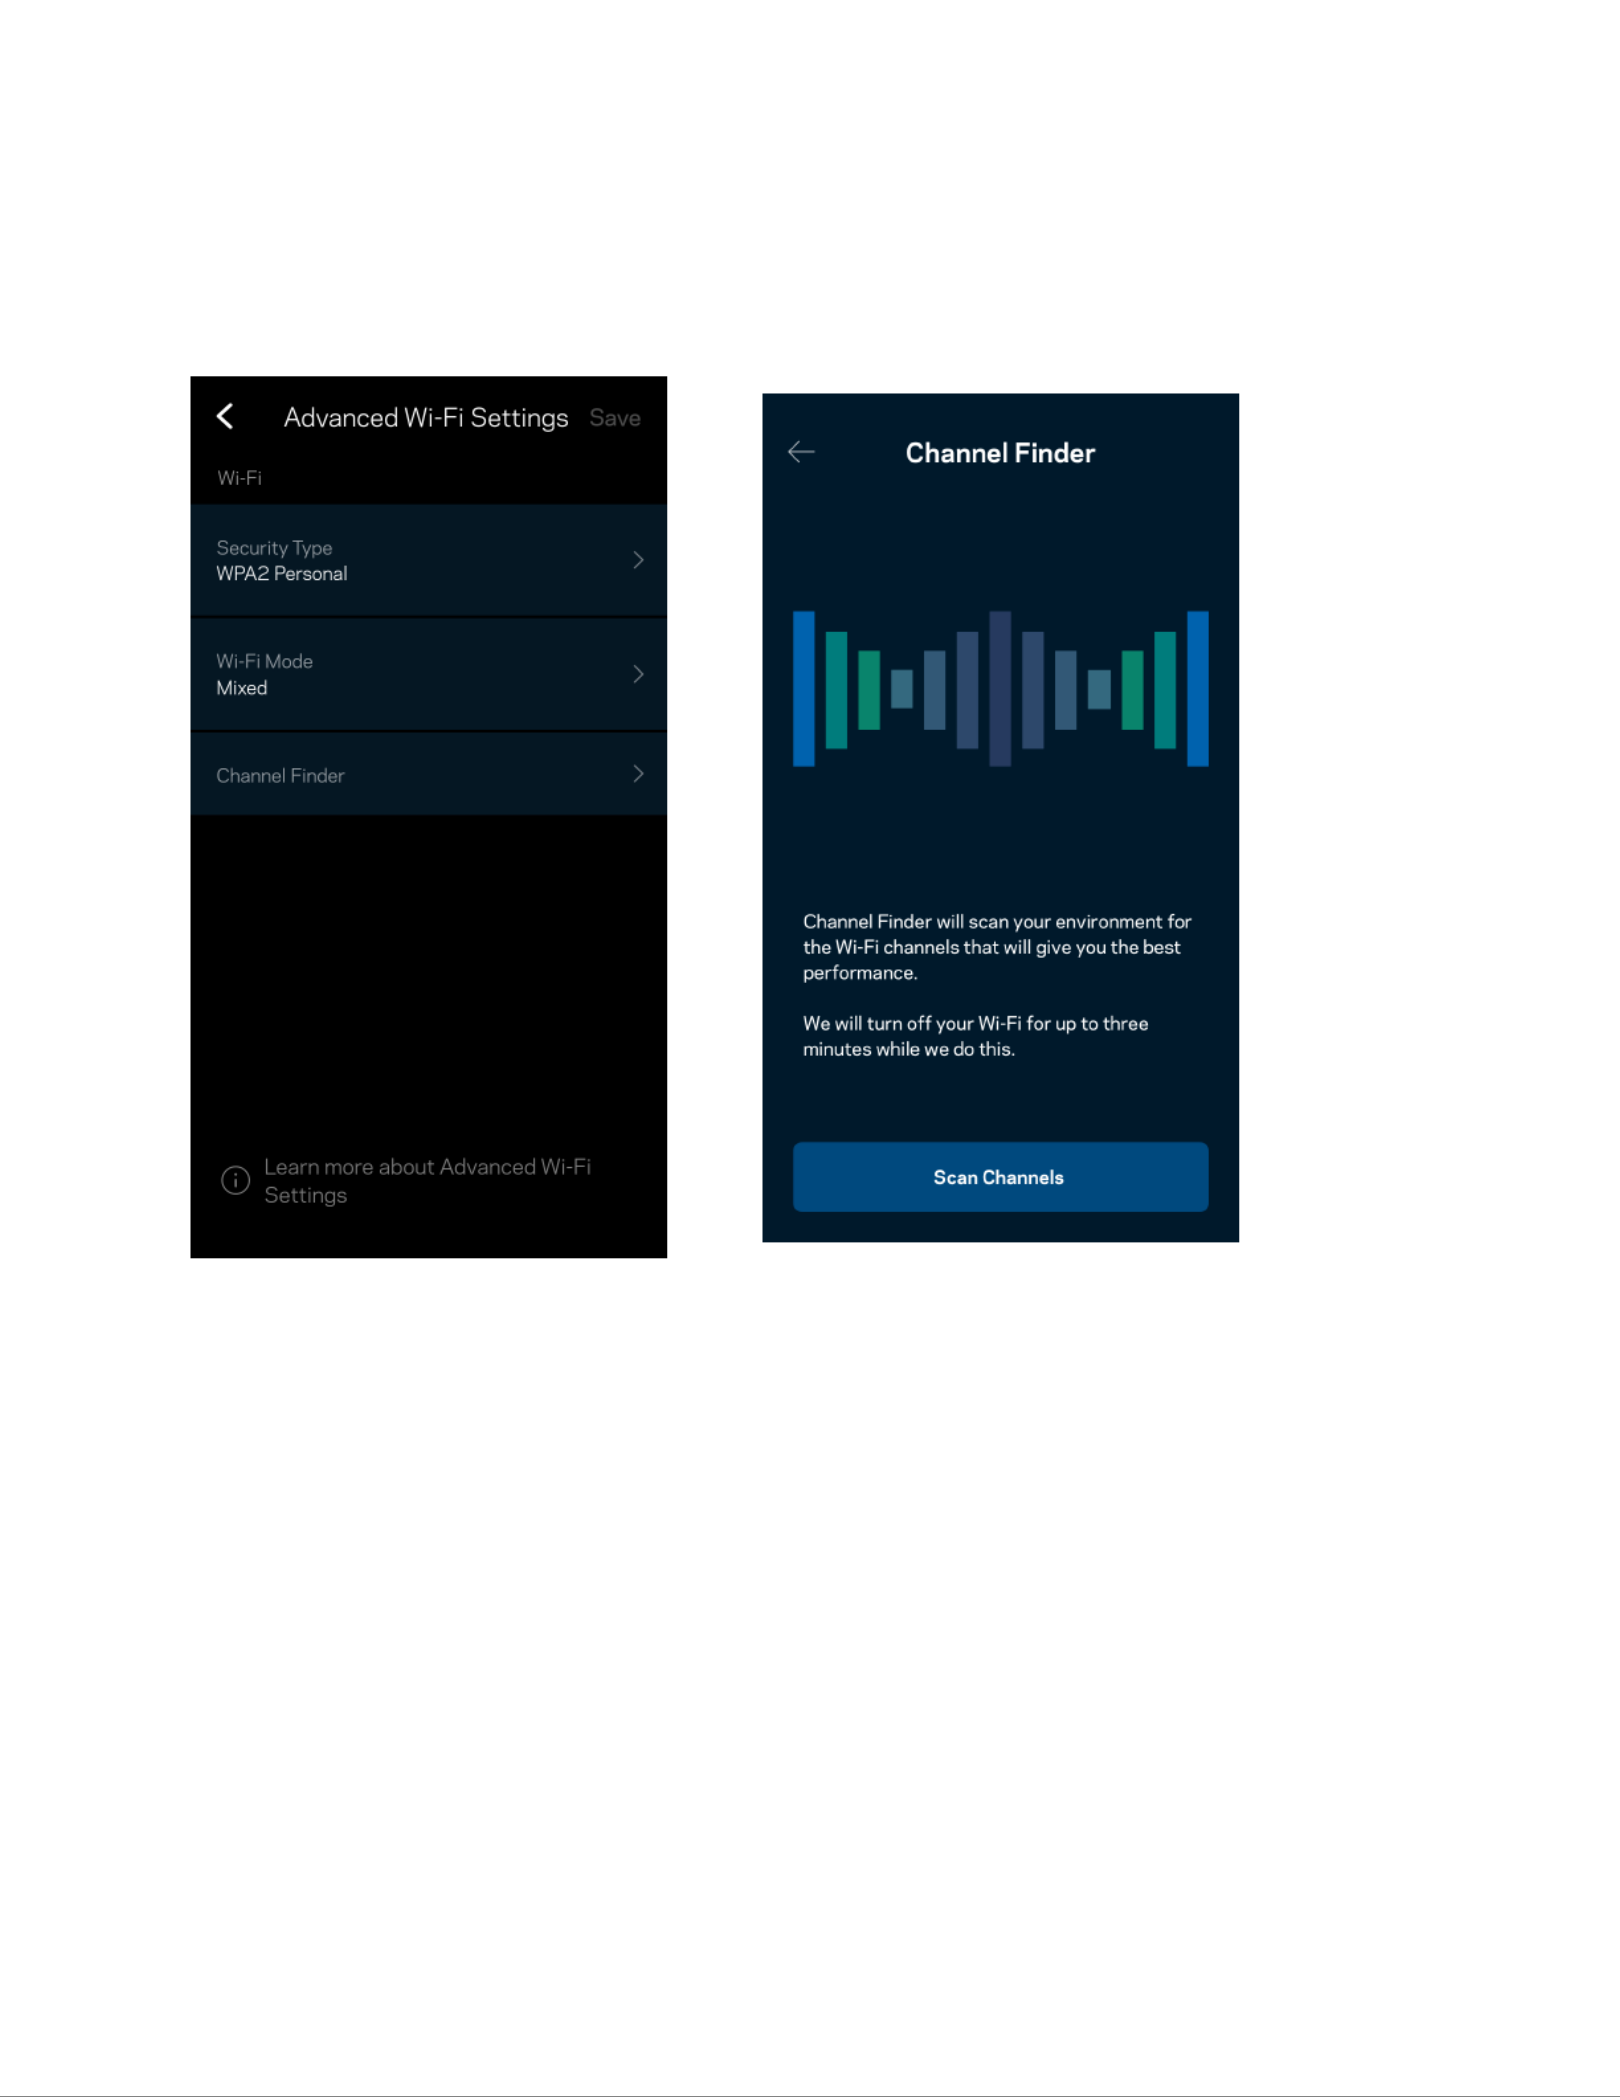
Advanced -Fi Wi Settings
Advanced users can change the default security type and Wi-Fi mode. Do not change these unless you have a lot of experience
with Wi-Fi networks. Channel Finder will search for the least populated -Wi Fi channels in your area to ensure you get the best
performance from your system. If you have more than one node in your system, Channel er will find the best channel for Find
each node.

16
Connect a Device with WPS
Wi-Fi Protected Setup allow you to s easily connect wireless devices to your Wi Fi without manually entering security settings. -
17
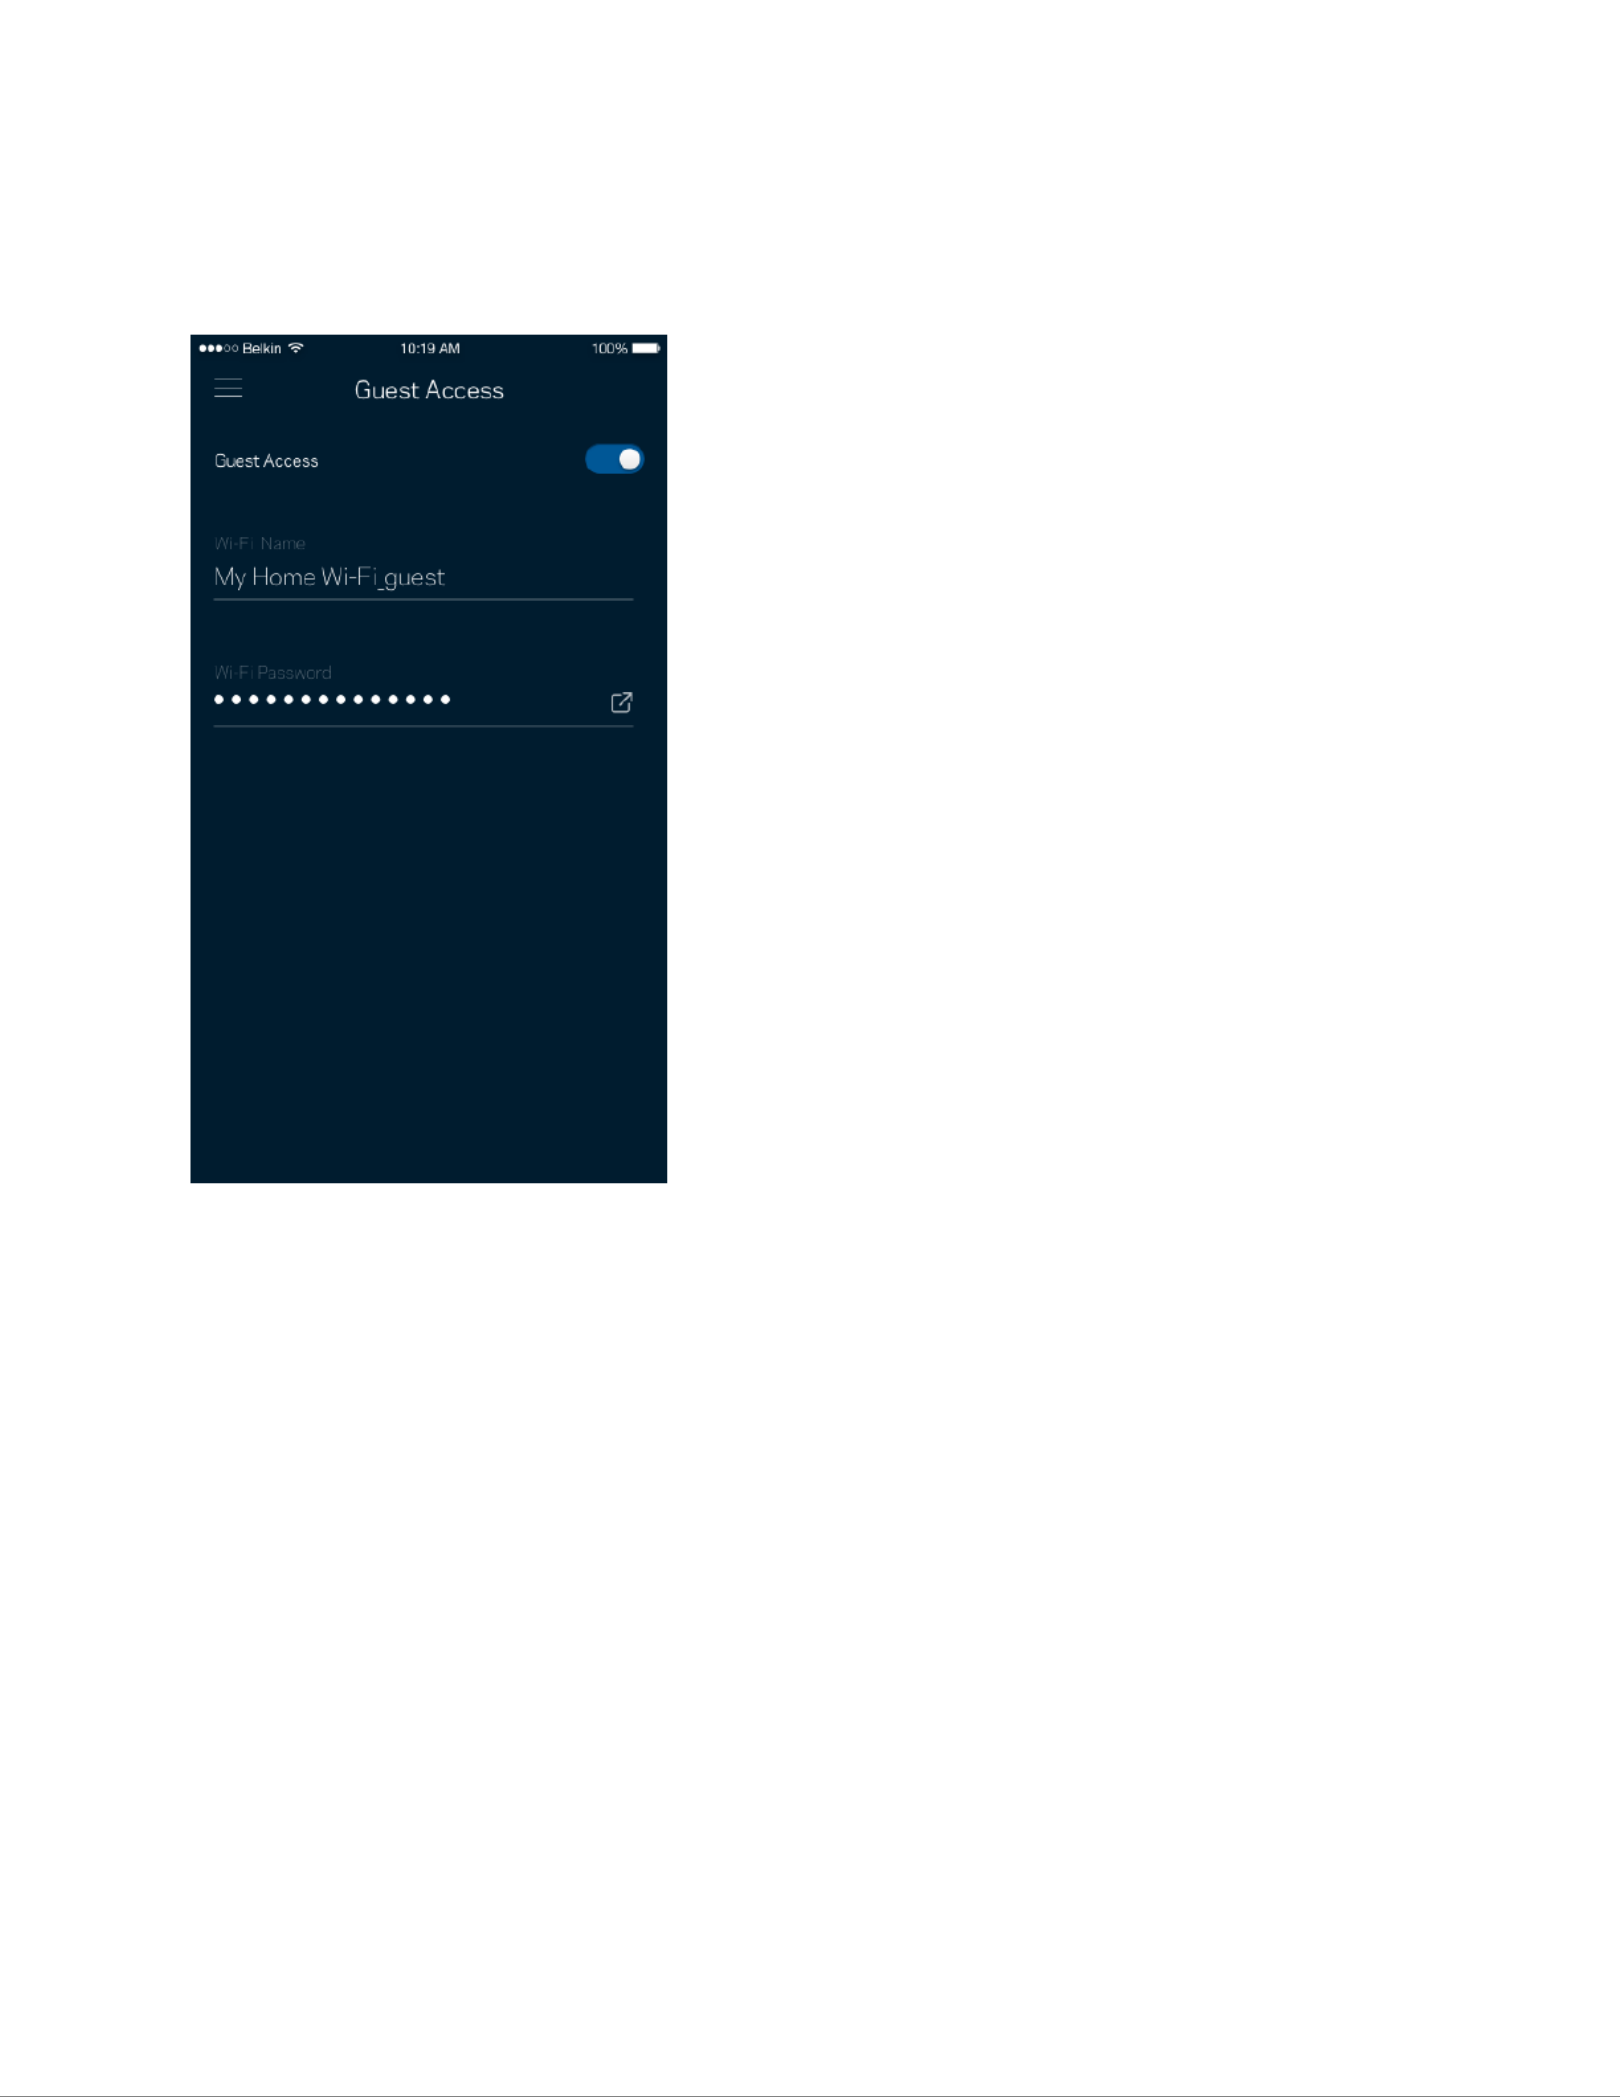
Guest Network Access
Use your Guest Access screen to allow guests to get online while restricting their access to other resources connected to your
Wi-Fi. Send the password by text message or email.

18
Priority
Choose up to three devices for priority usage of your internet connection. Those devices – wired and/or wireless always will –
have the best access when connected. Your router -runs a speed check to determine how to best distribute Wi Fi to prioritized
devices. Other devices will share the leftover capacity.

19
Notifications
If you have more than one node, the app can notify you when child nodes in your system go offline. Child nodes are any that
are not wired to your modem. You have to turn on notifications in your mobile device settings to allow the app to notify you.

20
Network Administration
Use the Network Administration screen to change the router password and hint, and check various identifiers (model number,
serial number, and IP details) for your router.
Opt in to automatically report crashes to Linksys and contribute to improving the Wi- . Fi experience You also can manually
report specific issues to Linksys.
The following information will be sent with your description of the issue:
• App version • Login Type (cloud: show email address associated, local:
display “ ”Router admin )
• Device model • WAN Connection type (display Wi- eFi or thernet)
•
Device OS version •
Time: date (mo/day/year, time, time zone)
Termékspecifikációk
| Márka: | Linksys |
| Kategória: | router |
| Modell: | Hydra 6 |
Szüksége van segítségre?
Ha segítségre van szüksége Linksys Hydra 6, tegyen fel kérdést alább, és más felhasználók válaszolnak Önnek
Útmutatók router Linksys

9 Szeptember 2024
25 Augusztus 2024
22 Augusztus 2024
16 Augusztus 2024
16 Augusztus 2024
16 Augusztus 2024
14 Augusztus 2024
12 Augusztus 2024
8 Augusztus 2024
8 Augusztus 2024
Útmutatók router
- router Samsung
- router Acer
- router Milwaukee
- router Bosch
- router AEG
- router StarTech.com
- router Einhell
- router Nokia
- router HP
- router Makita
- router BenQ
- router Apple
- router Ubiquiti Networks
- router Siemens
- router TP-Link
- router Medion
- router Motorola
- router Vimar
- router LogiLink
- router Alcatel
- router Roland
- router TCL
- router Digitus
- router Zebra
- router Xiaomi
- router TRENDnet
- router Mercusys
- router AVM
- router EZVIZ
- router Dell
- router Lancom
- router Strong
- router Gigabyte
- router Conceptronic
- router Thomson
- router Juniper
- router Kyocera
- router Hikvision
- router Keewifi
- router Vivanco
- router Netgear
- router Huawei
- router Asus
- router Vtech
- router Hama
- router Zoom
- router Renkforce
- router Synology
- router Draytek
- router Iogear
- router Güde
- router Hitachi
- router Mikrotik
- router Toolcraft
- router ZyXEL
- router SPL
- router Dahua Technology
- router Smart-AVI
- router Black & Decker
- router Devolo
- router Planet
- router Tenda
- router BT
- router Black Box
- router MSI
- router Gembird
- router Cisco
- router PowerPlus
- router ATen
- router Google
- router Metabo
- router Bea-fon
- router ZTE
- router Edimax
- router Vodafone
- router ModeCom
- router HiKOKI
- router Foscam
- router Milan
- router Manhattan
- router Kogan
- router Festool
- router EnGenius
- router Sigma
- router Western Digital
- router D-Link
- router Media-Tech
- router Blustream
- router Milesight
- router Moxa
- router Sagem
- router Razer
- router Trust
- router Porter-Cable
- router Konig
- router Alfa
- router MuxLab
- router DeWalt
- router AVMATRIX
- router IFM
- router A-NeuVideo
- router Atlona
- router Schneider
- router AJA
- router Lindy
- router Cudy
- router Barco
- router QNAP
- router NEC
- router Silverline
- router Cotech
- router Siig
- router Gefen
- router Kathrein
- router Avenview
- router Lantronix
- router Technicolor
- router FSR
- router Topcom
- router Holzmann
- router Arris
- router Anker
- router I-TEC
- router Keenetic
- router Teltonika
- router Sitecom
- router Intelix
- router Comprehensive
- router Ocean Matrix
- router Digitalinx
- router Alfatron
- router Belkin
- router RGBlink
- router Kopul
- router KanexPro
- router Key Digital
- router Kramer
- router BZBGear
- router UPC
- router Allnet
- router Allied Telesis
- router Airlive
- router Actiontec
- router Proximus
- router Skil
- router Eminent
- router Nilox
- router Sonos
- router Patton
- router Techly
- router Totolink
- router KPN
- router Netis
- router Envivo
- router Buffalo
- router Nest
- router LevelOne
- router ICIDU
- router Clas Ohlson
- router AT&T
- router Sweex
- router Aruba
- router Phicomm
- router Kasda
- router Jung
- router Digi
- router Verizon
- router Billion
- router T-Mobile
- router RAVPower
- router Hawking Technologies
- router Nexxt
- router Beafon
- router Kraun
- router LTS
- router Zolid
- router Sagemcom
- router Telstra
- router Eero
- router Advantech
- router Mercku
- router Hercules
- router Xantech
- router Intellinet
- router Arcadyan
- router Digiconnect
- router Ubee
- router SMC
- router Tele 2
- router Peak
- router CradlePoint
- router Davolink
- router Sixnet
- router 7inova
- router AVPro Edge
- router F-Secure
- router Rosewill
- router Digicom
- router Sabrent
- router On Networks
- router PENTAGRAM
- router Leoxsys
- router Readynet
- router OneAccess
- router Accelerated
- router Nexaira
- router Hamlet
- router Approx
- router T-com
- router Amped Wireless
- router Cambium Networks
- router 3Com
- router WyreStorm
- router Ruckus Wireless
- router Dovado
- router Mach Power
- router EXSYS
- router NetComm
- router Comtrend
- router Premiertek
- router GL.iNet
- router Shinybow
- router Edgewater
- router Atlantis Land
- router Lumantek
- router Starlink
- router PulseAudio
- router Predator
- router Evolution
- router Luxul
- router StarIink
- router Silentwind
- router Keezel
- router United Telecom
- router Wisetiger
Legújabb útmutatók router

9 Április 2025
9 Április 2025
9 Április 2025

31 Március 2025
30 Március 2025
30 Március 2025
30 Március 2025
30 Március 2025
30 Március 2025
23 Március 2025