Használati útmutató Lenco DIR-170
Olvassa el alább 📖 a magyar nyelvű használati útmutatót Lenco DIR-170 (128 oldal) a rádió kategóriában. Ezt az útmutatót 11 ember találta hasznosnak és 2 felhasználó értékelte átlagosan 4.5 csillagra
Oldal 1/128

1
Model: DIR-170WA
User manual – Internet Radio with DAB+, FM and Bluetooth
Gebruikshandleiding – Internetradio met DAB+, FM en Bluetooth
Bedienungsanleitung – Internetradio mit DAB+, FM und Bluetooth
Mode d’emploi – Radio Internet avec DAB+, FM et Bluetooth
Manual de usuario – Radio Internet con DAB+, FM y Bluetooth

2
Index
English .....................................................................................................................................................3
Nederlands............................................................................................................................................27
Deutsch .................................................................................................................................................53
Français .................................................................................................................................................80
Español................................................................................................................................................107
Version 5.0

3
English
DIR-170WA
CAUTION:
Usage of controls or adjustments or performance of procedures other than those specified herein
may result in hazardous radiation exposure.
PRECAUTIONS BEFORE USE
KEEP THESE INSTRUCTIONS IN MIND:
1. Do not cover or block any ventilation openings. When placing the device on a shelf, leave
5 cm (2”) free space around the whole device.
2. Install in accordance with the supplied user manual.
3. Keep the device away from heat sources such as radiators, heaters, stoves, candles and other
heat-generating products or naked flame. The device can only be used in moderate climates.
Extremely cold or warm environments should be avoided. Working temperature between 0°
and 35°C.
4. Avoid using the device near strong magnetic fields.
5. Electrostatic discharge can disturb normal usage of this device. If so, simply reset and restart
the device following the instruction manual. During file transmission, please handle with care
and operate in a static-free environment.
6. Warning! Never insert an object into the product through the vents or openings. High voltage
flows through the product and inserting an object can cause electric shock and/or short circuit
internal parts. For the same reason, do not spill water or liquid on the product.
7. Do not use in wet or moist areas such as bathrooms, steamy kitchens or near swimming pools.
8. The device shall not be exposed to dripping or splashing and make sure that no objects filled
with liquids, such as vases, are placed on or near the apparatus.
9. Do not use this device when condensation may occur. When the unit is used in a warm wet
room with damp, water droplets or condensation may occur inside the unit and the unit may
not function properly; let the unit stand in power OFF for 1 or 2 hours before turning on the
power: the unit should be dry before getting any power.
10. Although this device is manufactured with the utmost care and checked several times before
leaving the factory, it is still possible that problems may occur, as with all electrical appliances.
If you notice smoke, an excessive build-up of heat or any other unexpected phenomena, you
should disconnect the plug from the main power socket immediately.
11. This device must operate on a power source as specified on the specification label. If you are
not sure of the type of power supply used in your home, consult your dealer or local power
company.
12. Keep away from animals. Some animals enjoy biting on power cords.
13. To clean the device, use a soft dry cloth. Do not use solvents or petrol based fluids.
To remove severe stains, you may use a damp cloth with dilute detergent.
14. The supplier is not responsible for damage or lost data caused by malfunction, misuse,
modification of the device or battery replacement.
15. Do not interrupt the connection when the device is formatting or transferring files. Otherwise,
data may be corrupted or lost.
16. If the unit has USB playback function, the USB memory stick should be plugged into the unit
directly. Don’t use an USB extension cable because it can cause interference resulting in failing
of data.
17. The rating label has been marked on the bottom or back panel of the device.
18. This device is not intended for use by people (including children) with physical, sensory or
mental disabilities, or a lack of experience and knowledge, unless they’re under supervision or
have received instructions about the correct use of the device by the person who is responsible
for their safety.
19. This product is intended for non professional use only and not for commercial or industrial use.
20. Make sure the unit is adjusted to a stable position. Damage caused by using this product in an
unstable position vibrations or shocks or by failure to follow any other warning or precaution
contained within this user manual will not be covered by warranty.
21. Never remove the casing of this device.

4
22. Never place this device on other electrical equipment.
23. Do not allow children access to plastic bags.
24. Only use attachments/accessories specified by the manufacturer.
25. Refer all servicing to qualified service personnel. Servicing is required when the device has
been damaged in any way, such as the power supply cord or the plug, when liquid has been
spilled or objects have fallen into the device, when the device has been exposed to rain or
moisture, does not operate normally, or has been dropped.
26. Long exposure to loud sounds from personal music players may lead to temporary or
permanent hearing loss.
27. If the product is delivered with power cable or AC power adaptor:
If any trouble occur, disconnect the AC power cord and refer servicing to qualified
personnel.
Don’t step on or pinch the power adaptor. Be very careful, particularly near the plugs and
the cable’s exit point. Do not place heavy items on the power adaptor, which may
damage it. Keep the entire device out of children’s reach! When playing with the power
cable, they can seriously injure themselves.
Unplug this device during lightning storms or when unused for a long period.
The socket outlet must be installed near the equipment and must be easily accessible.
Do not overload ac outlets or extension cords. Overloading can cause fire or electric shock.
Devices with class 1 construction should be connected to a main socket outlet with a
protective earthed connection.
Devices with class 2 construction do not require a earthed connection.
Always hold the plug when pulling it out of the main supply socket. Do not pull the power
cord. This can cause a short circuit.
Do not use a damaged power cord or plug or a loose outlet. Doing so may result in fire or
electric shock.
28. If the product contains or is delivered with a remote control containing coin/cell batteries:
Warning:
“Do not ingest battery, Chemical Burn Hazard” or equivalent working.
[The remote control supplied with] This product contains a coin/button cell battery. If the
battery is swallowed, it can cause severe internal burns in just
2 hours and can lead to death.
Keep new and used batteries away from children.
If the battery compartment does not close securely, stop using the product and keep it
away from children.
If you think batteries might have been swallowed or placed inside any part of the body,
seek immediate medical attention.
29. Caution about the use of Batteries:
Danger of explosion if battery is incorrectly replaced. Replace only with the same or
equivalent type.
Battery cannot be subjected to high or low extreme temperatures, low air pressure at
high altitude during use, storage or transportation.
Replacement of a battery with an incorrect type that can result in an explosion or the
leakage of flammable liquid or gas.
Disposal of a battery into fire or a hot oven, or mechanically crushing or cutting of a
battery, that can result in an explosion.
Leaving a battery in an extremely high temperature surrounding environment that can
result in an explosion or that leakage of flammable liquid or gas.
A battery subjected to extremely low air pressure that may result in an explosion or the
leakage of flammable liquid or gas.
Attention should be drawn to the environmental aspects of battery disposal.
INSTALLATION
• Unpack all parts and remove protective material.
• Do not connect the unit to the mains before checking the mains voltage and before all other
connections have been made.
5
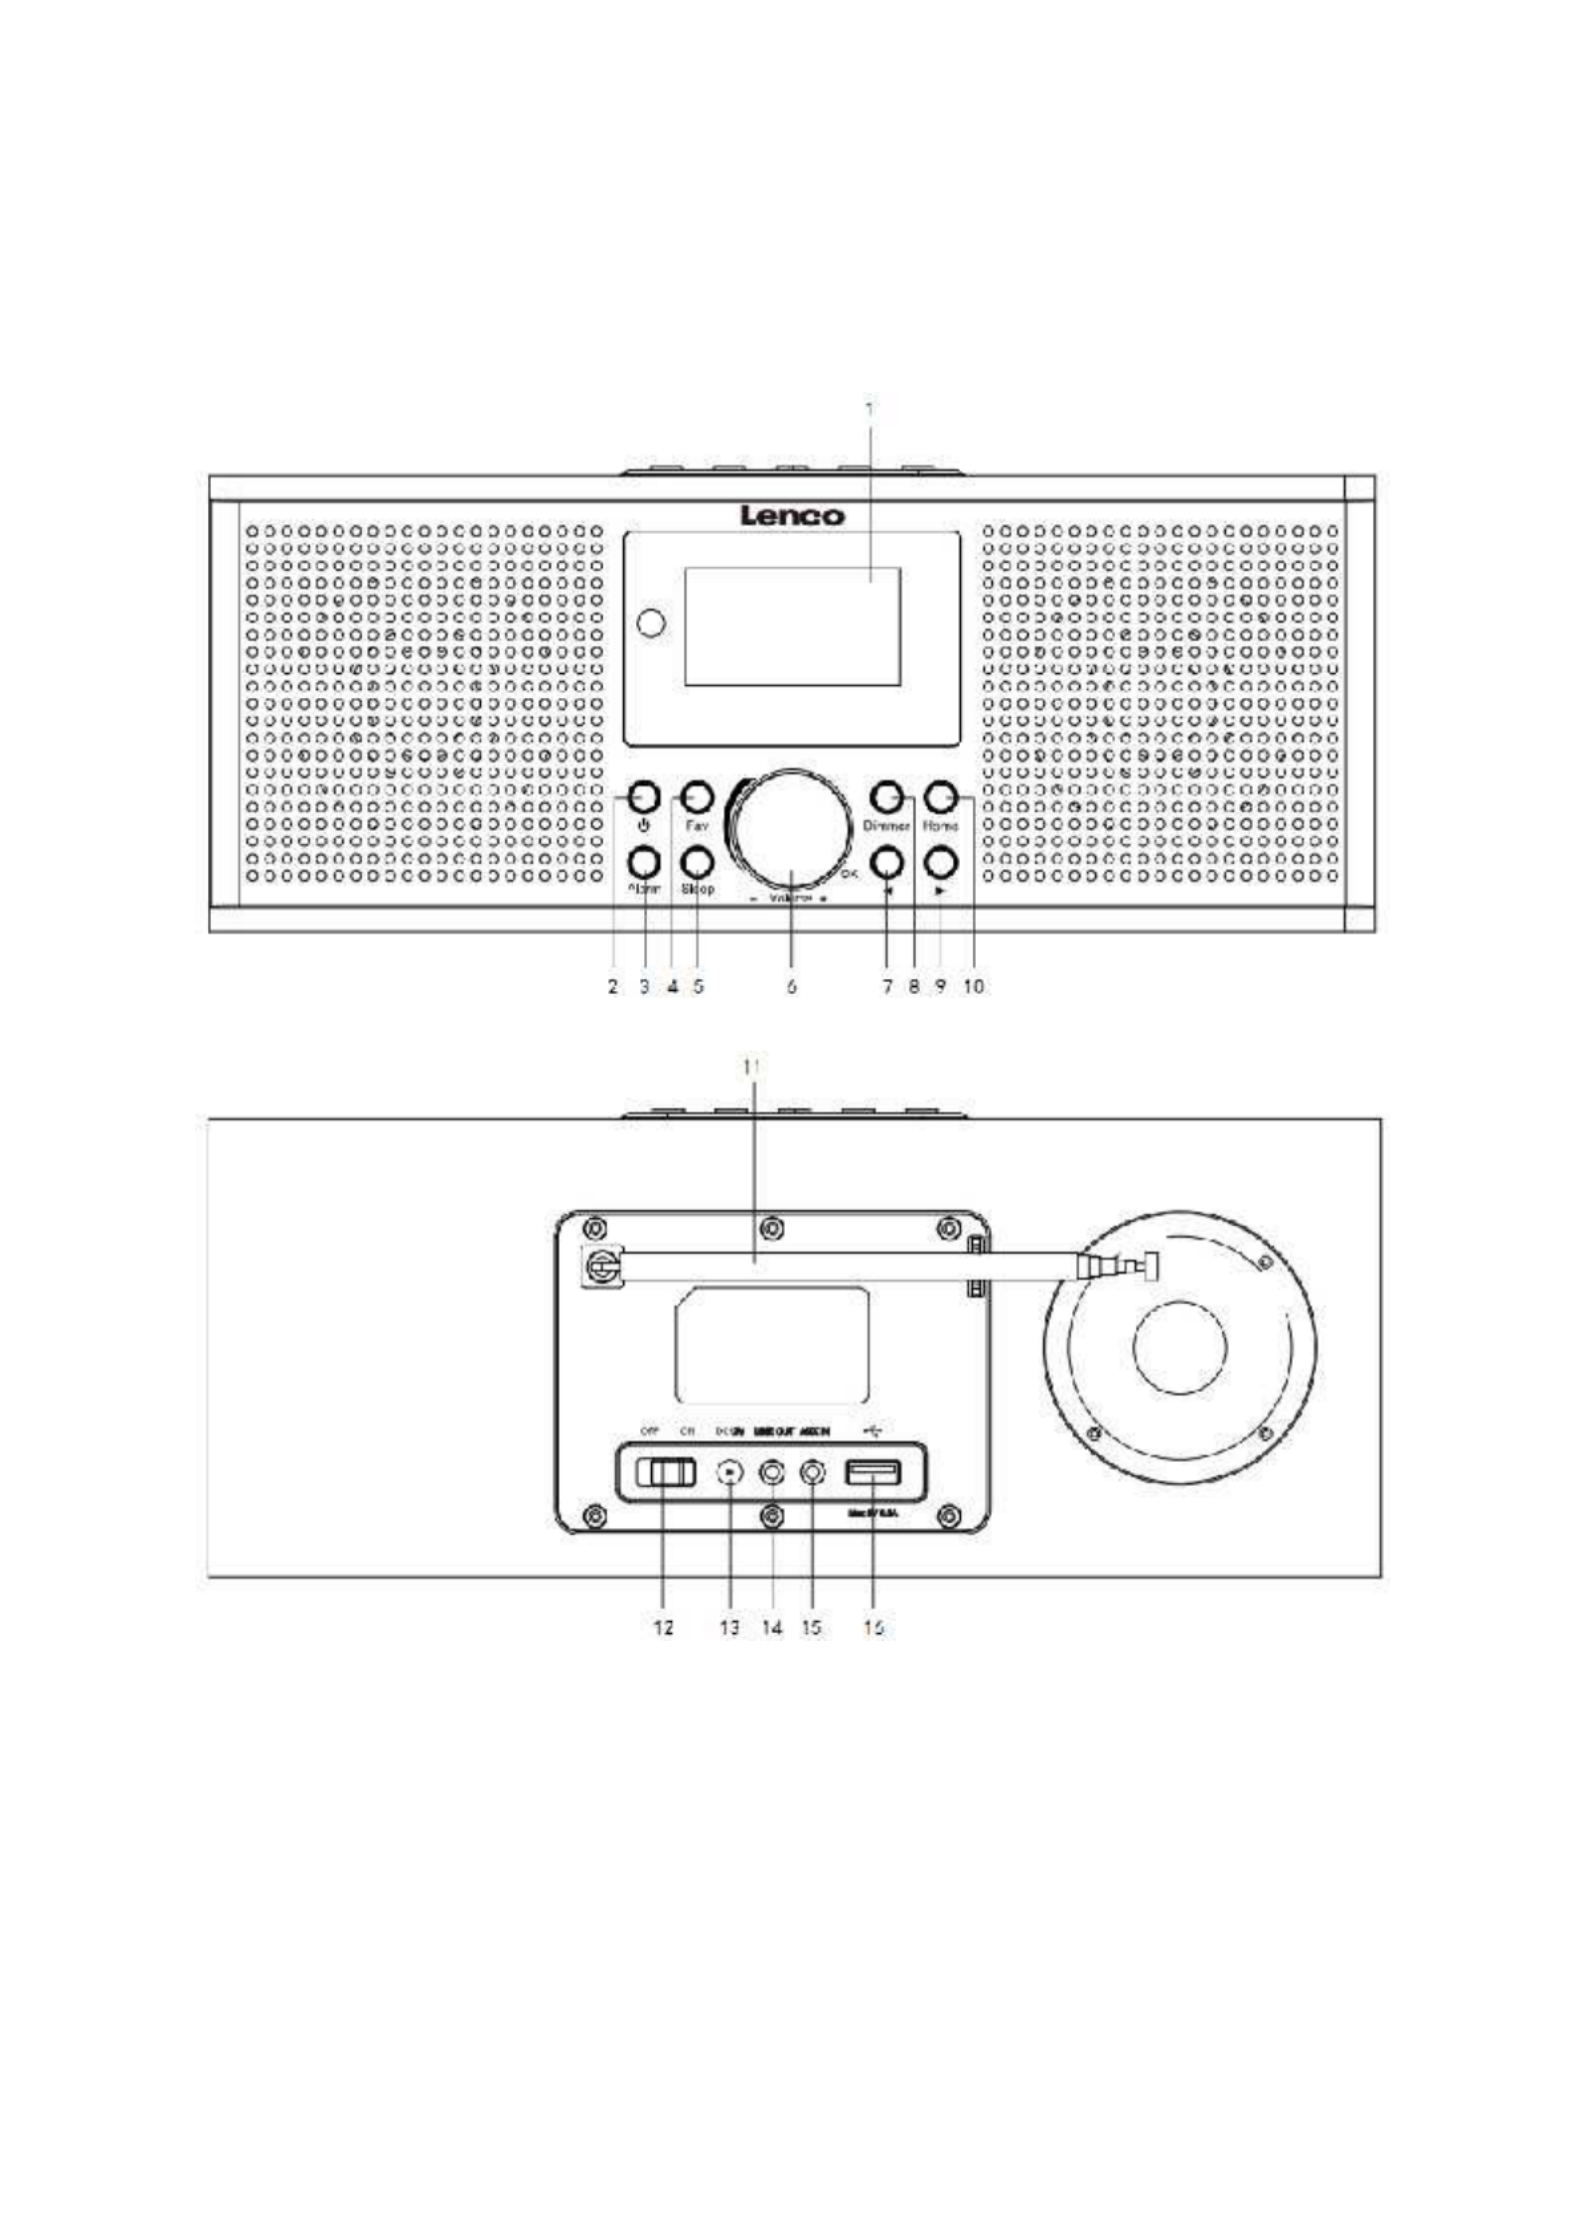
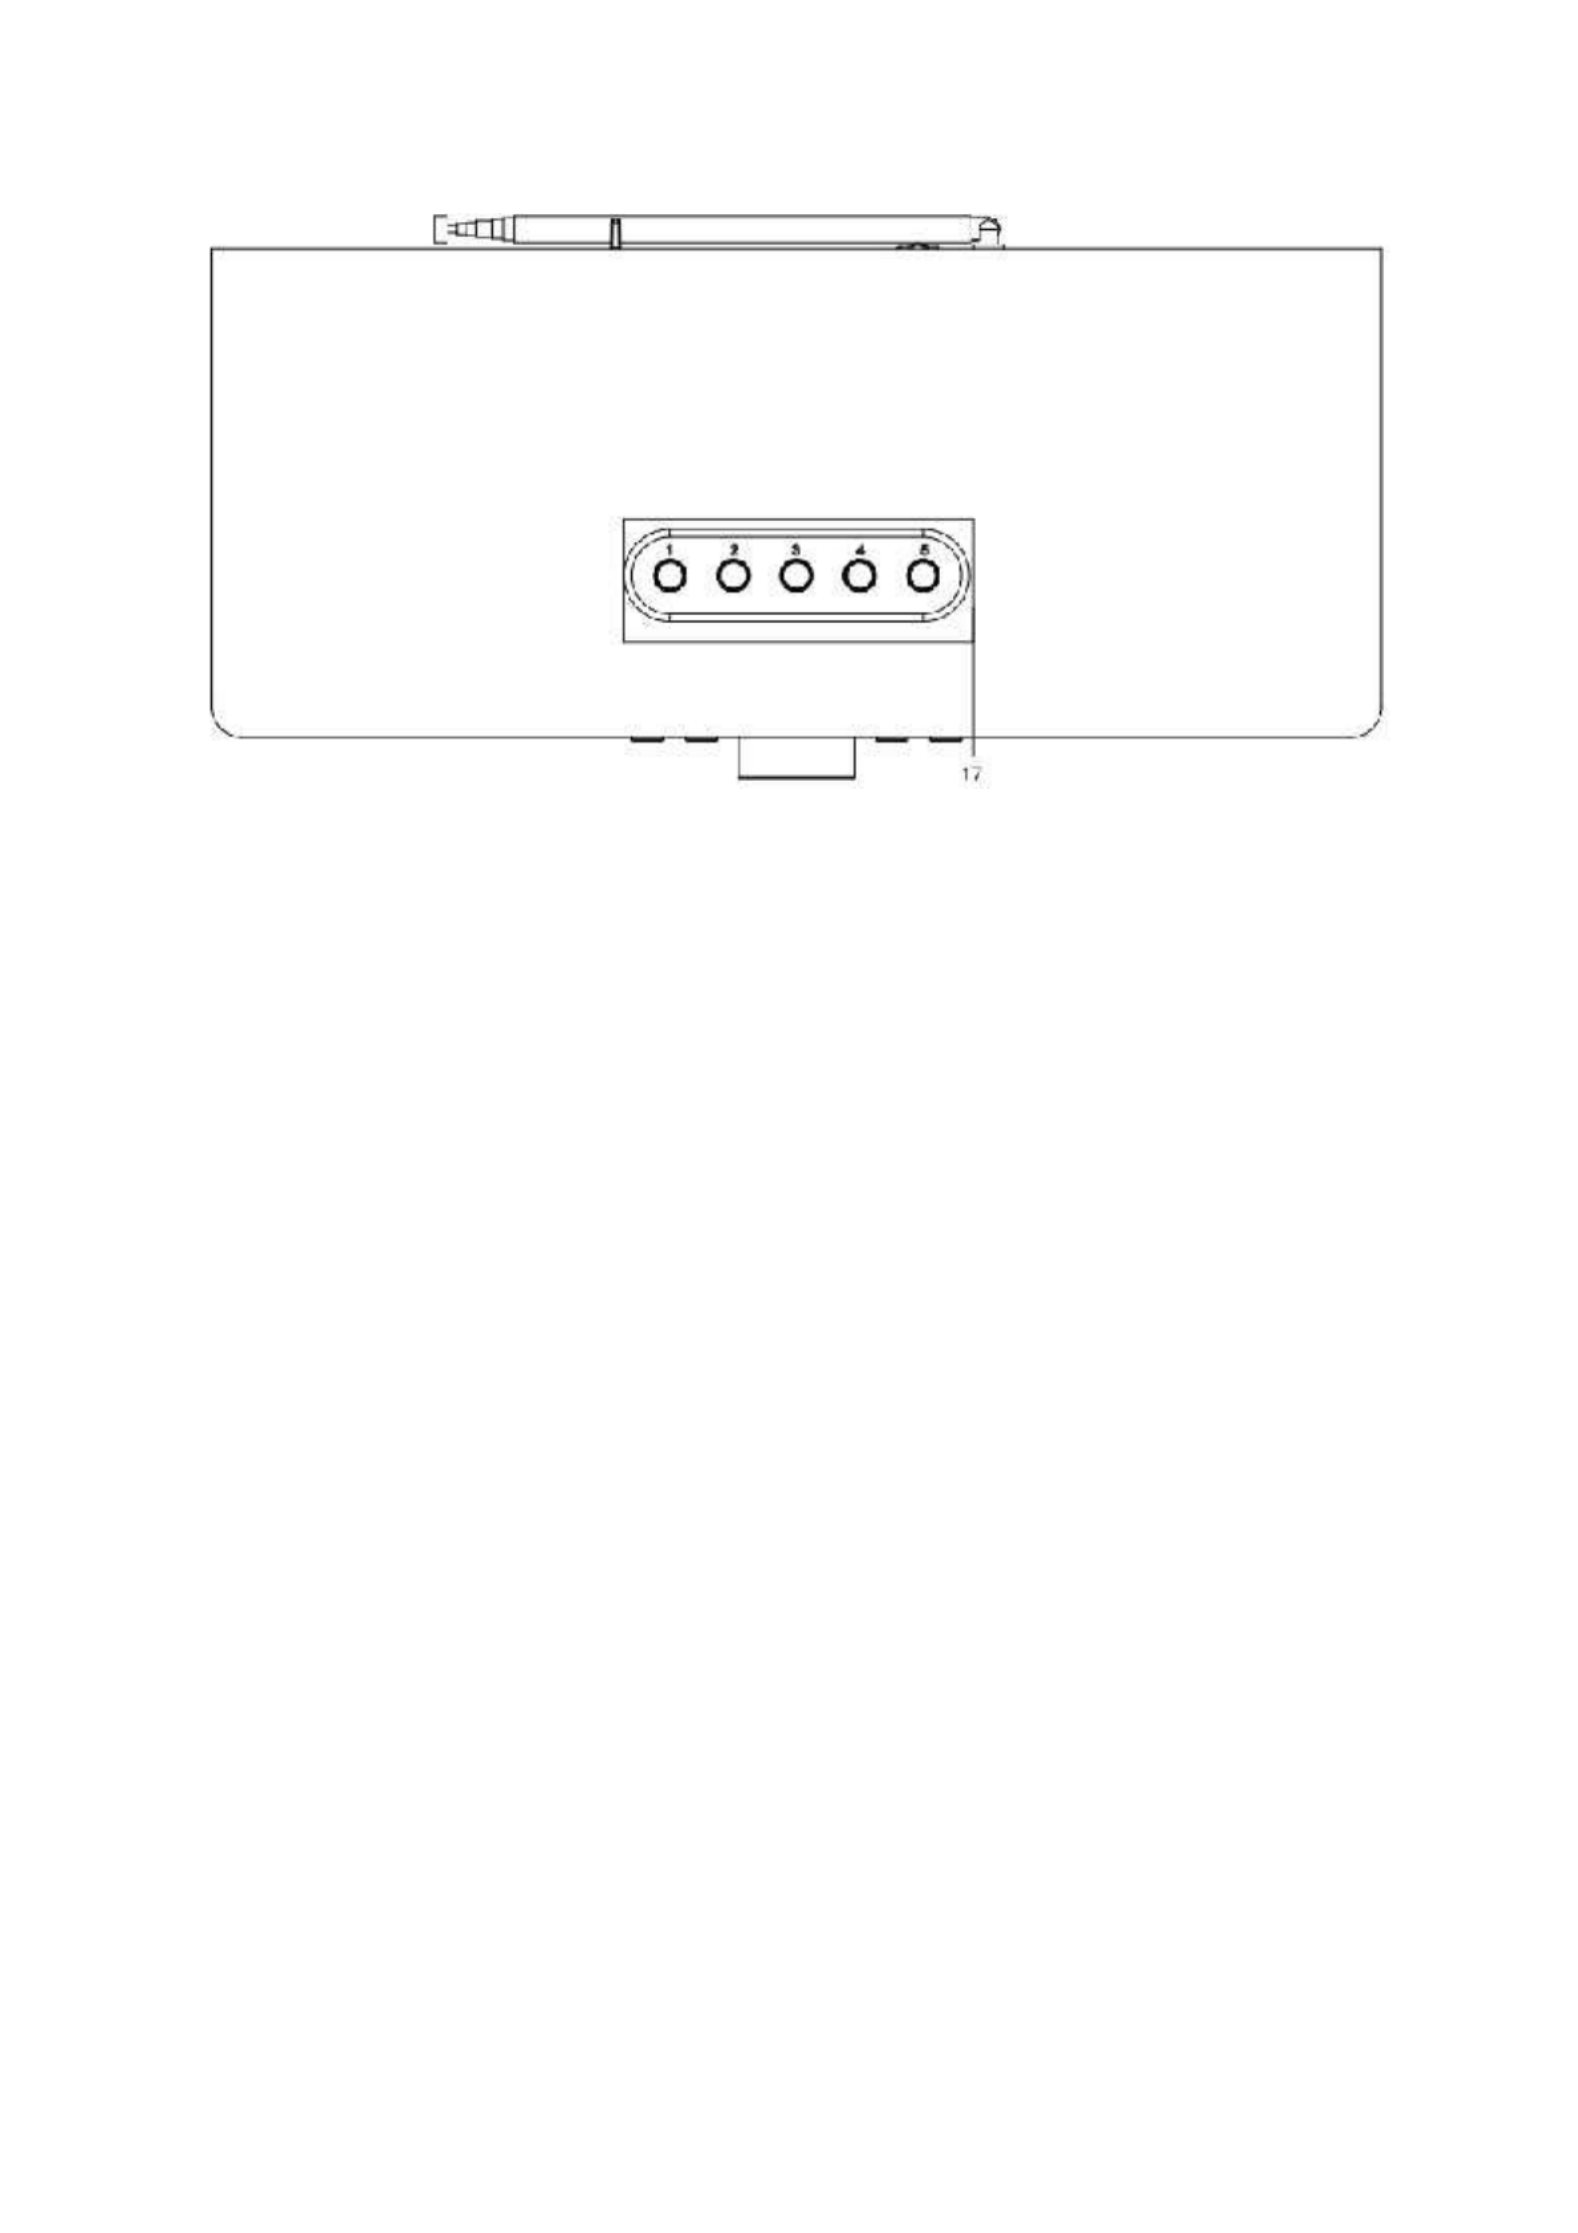
Product Overview

6
1. Display
2. Standby button
3. Alarmbutton
4. Fav button
5. Sleep button
6. Vol+/Vol-/OK wheel
7. Previous button
8. Dimmerbutton
9. Nextbutton
10. Home button
11. Telescopic Antenna
12. ON/OFF switch button
13. DC IN socket
14. Line out socket(3.5mm)
15. AUX IN socket(3.5mm)
16. USB port
17. Preset buttons

7
Remote Control
1. Standby button
2. Input letters and numbers
3. Navigate Up button
4. Navigate Left button
5. Navigate Right button
6. Navigate Down button
7. OK button
8. Play/pausebutton
9. Stop button
10. Go back/forwardbutton
11. Vol+/Vol- button
8
12. Home button
13. Mode button
14. Alarm button
15. Dimmer button
16. Sleep button
17. Mute button
18. Fav. button
19. Fav.+ button
20. EQ set tone
21. Language selectionbutton
Note: the cursor buttons (3,4,5,6) on the remote control can also be used to
navigate through the system menus.
INITIAL SETUP
Before operation, please make sure that the voltage mentioned on the power supply is the same as
the voltage of your local area.
Use the supplied mains adaptor to connect the device to your household mains socket.
Use the power switch (12) on the back to power up.
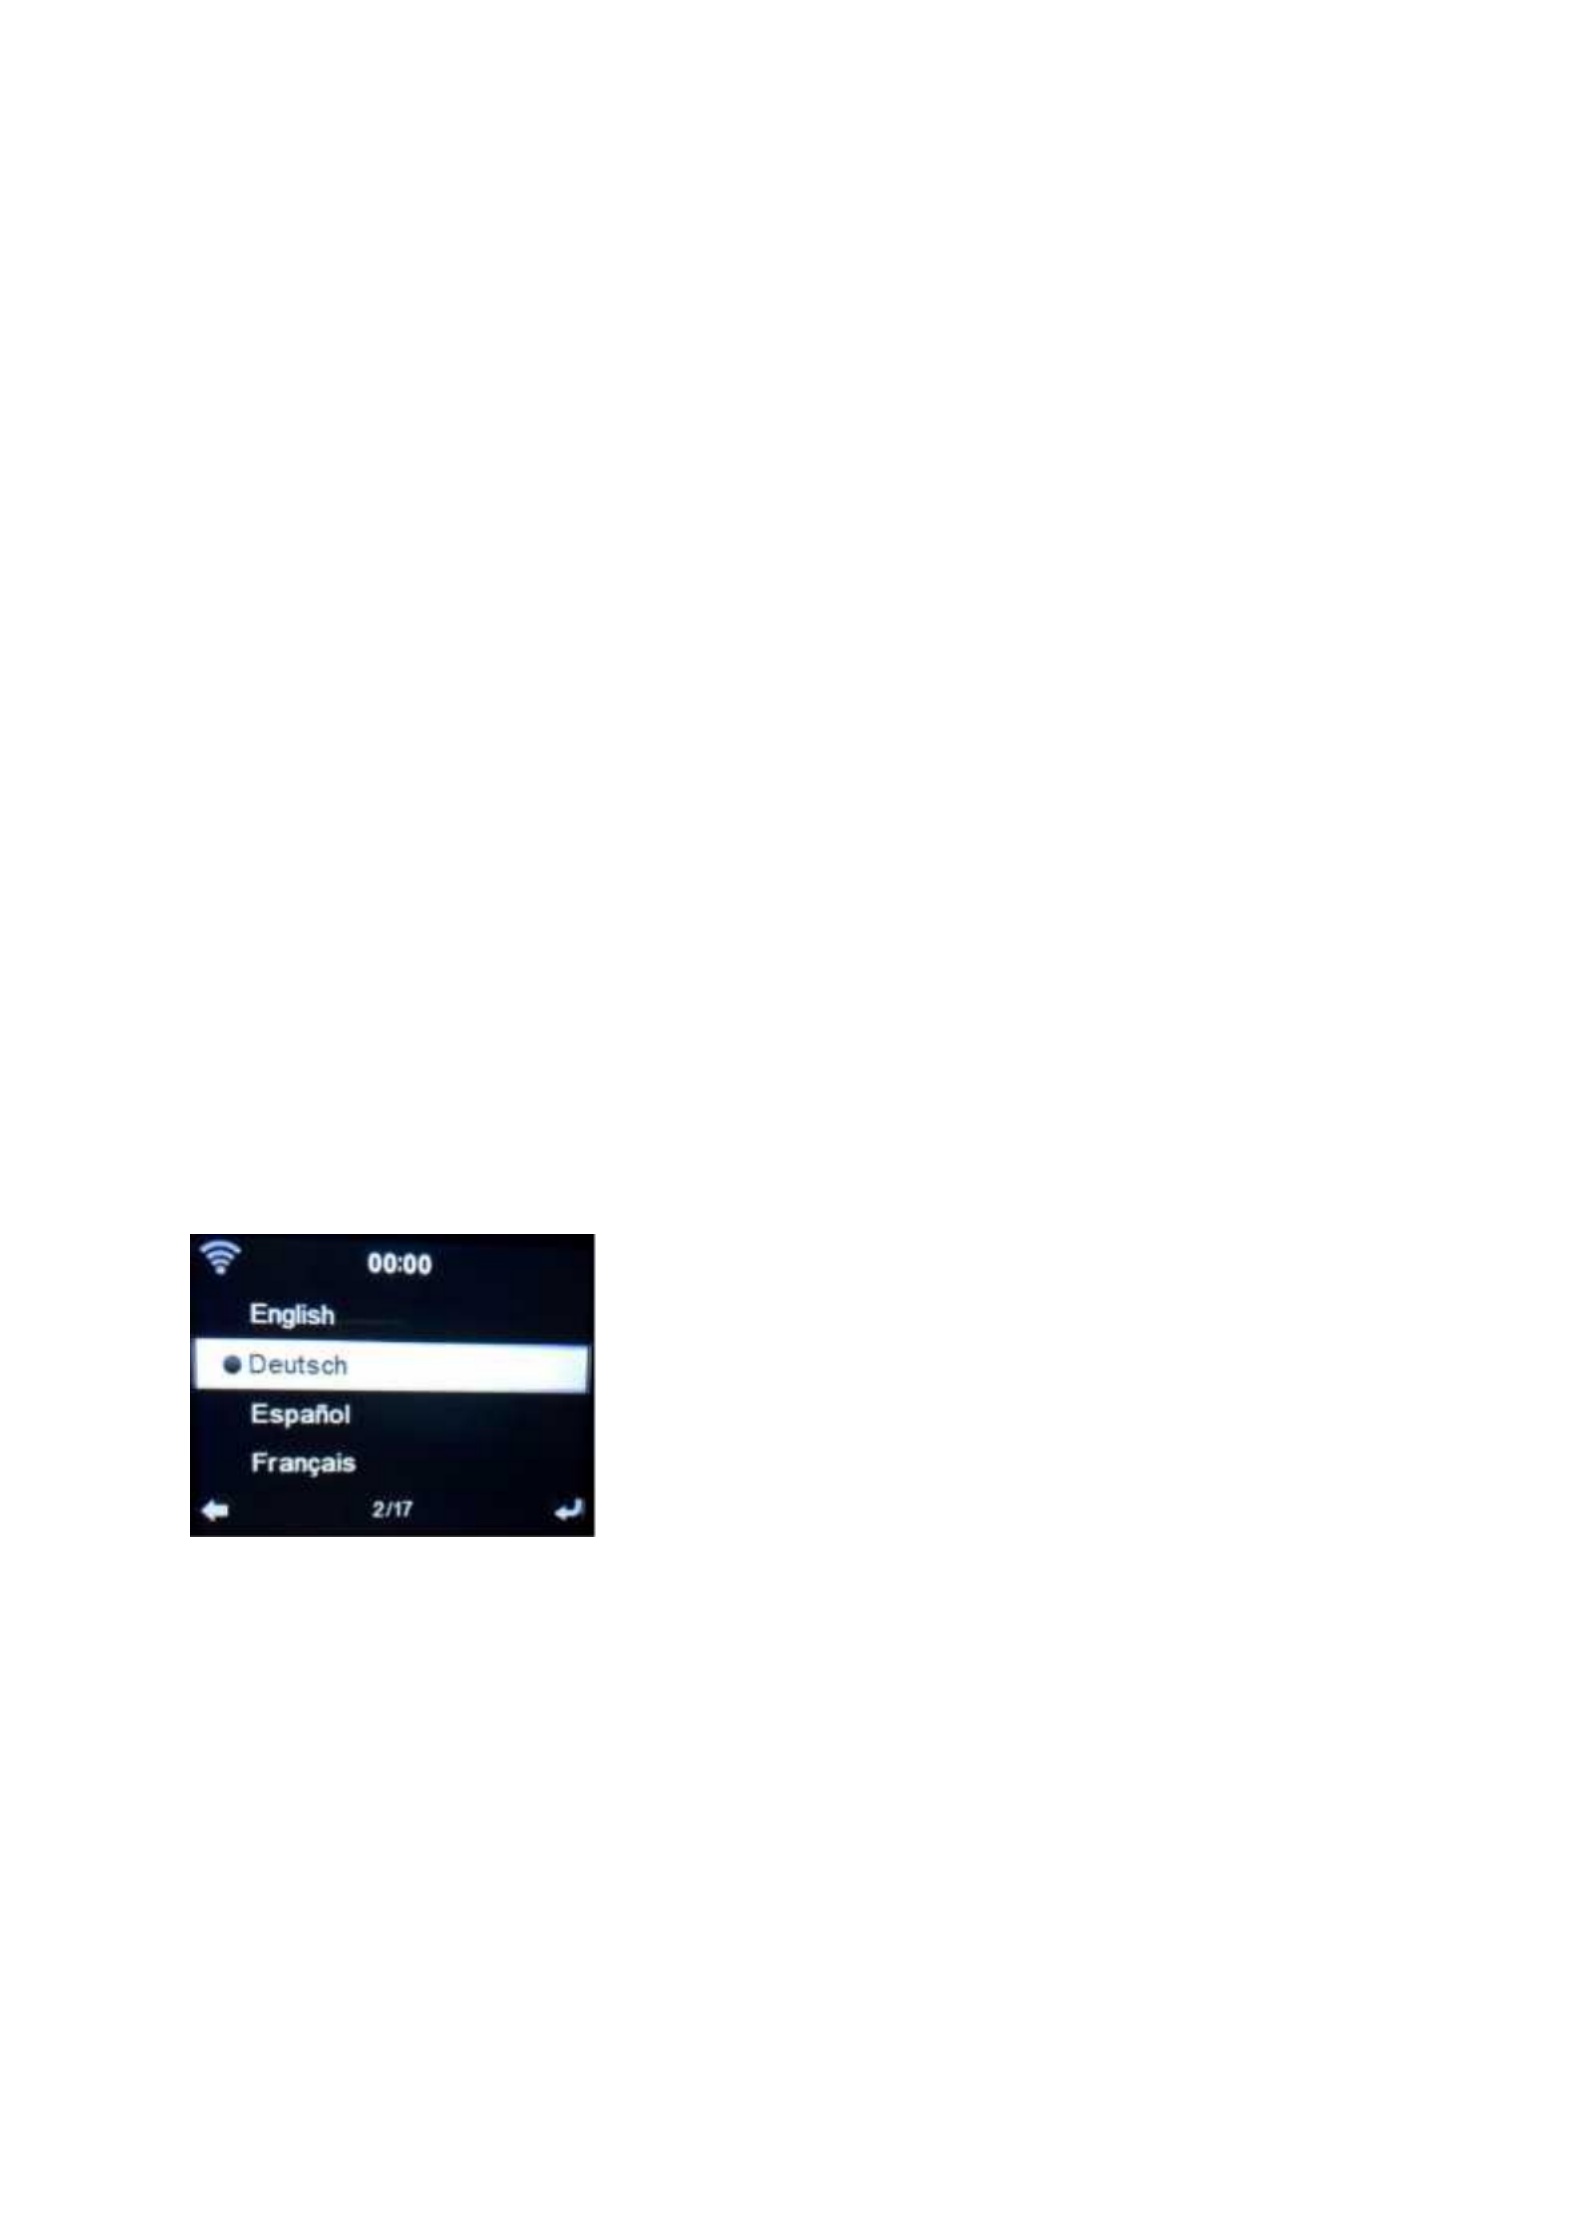
The system will ask you to set the units Language.
Use the Navigation (6) wheelto select the desired language, then press the Navigation (6) wheelto
confirm.

9
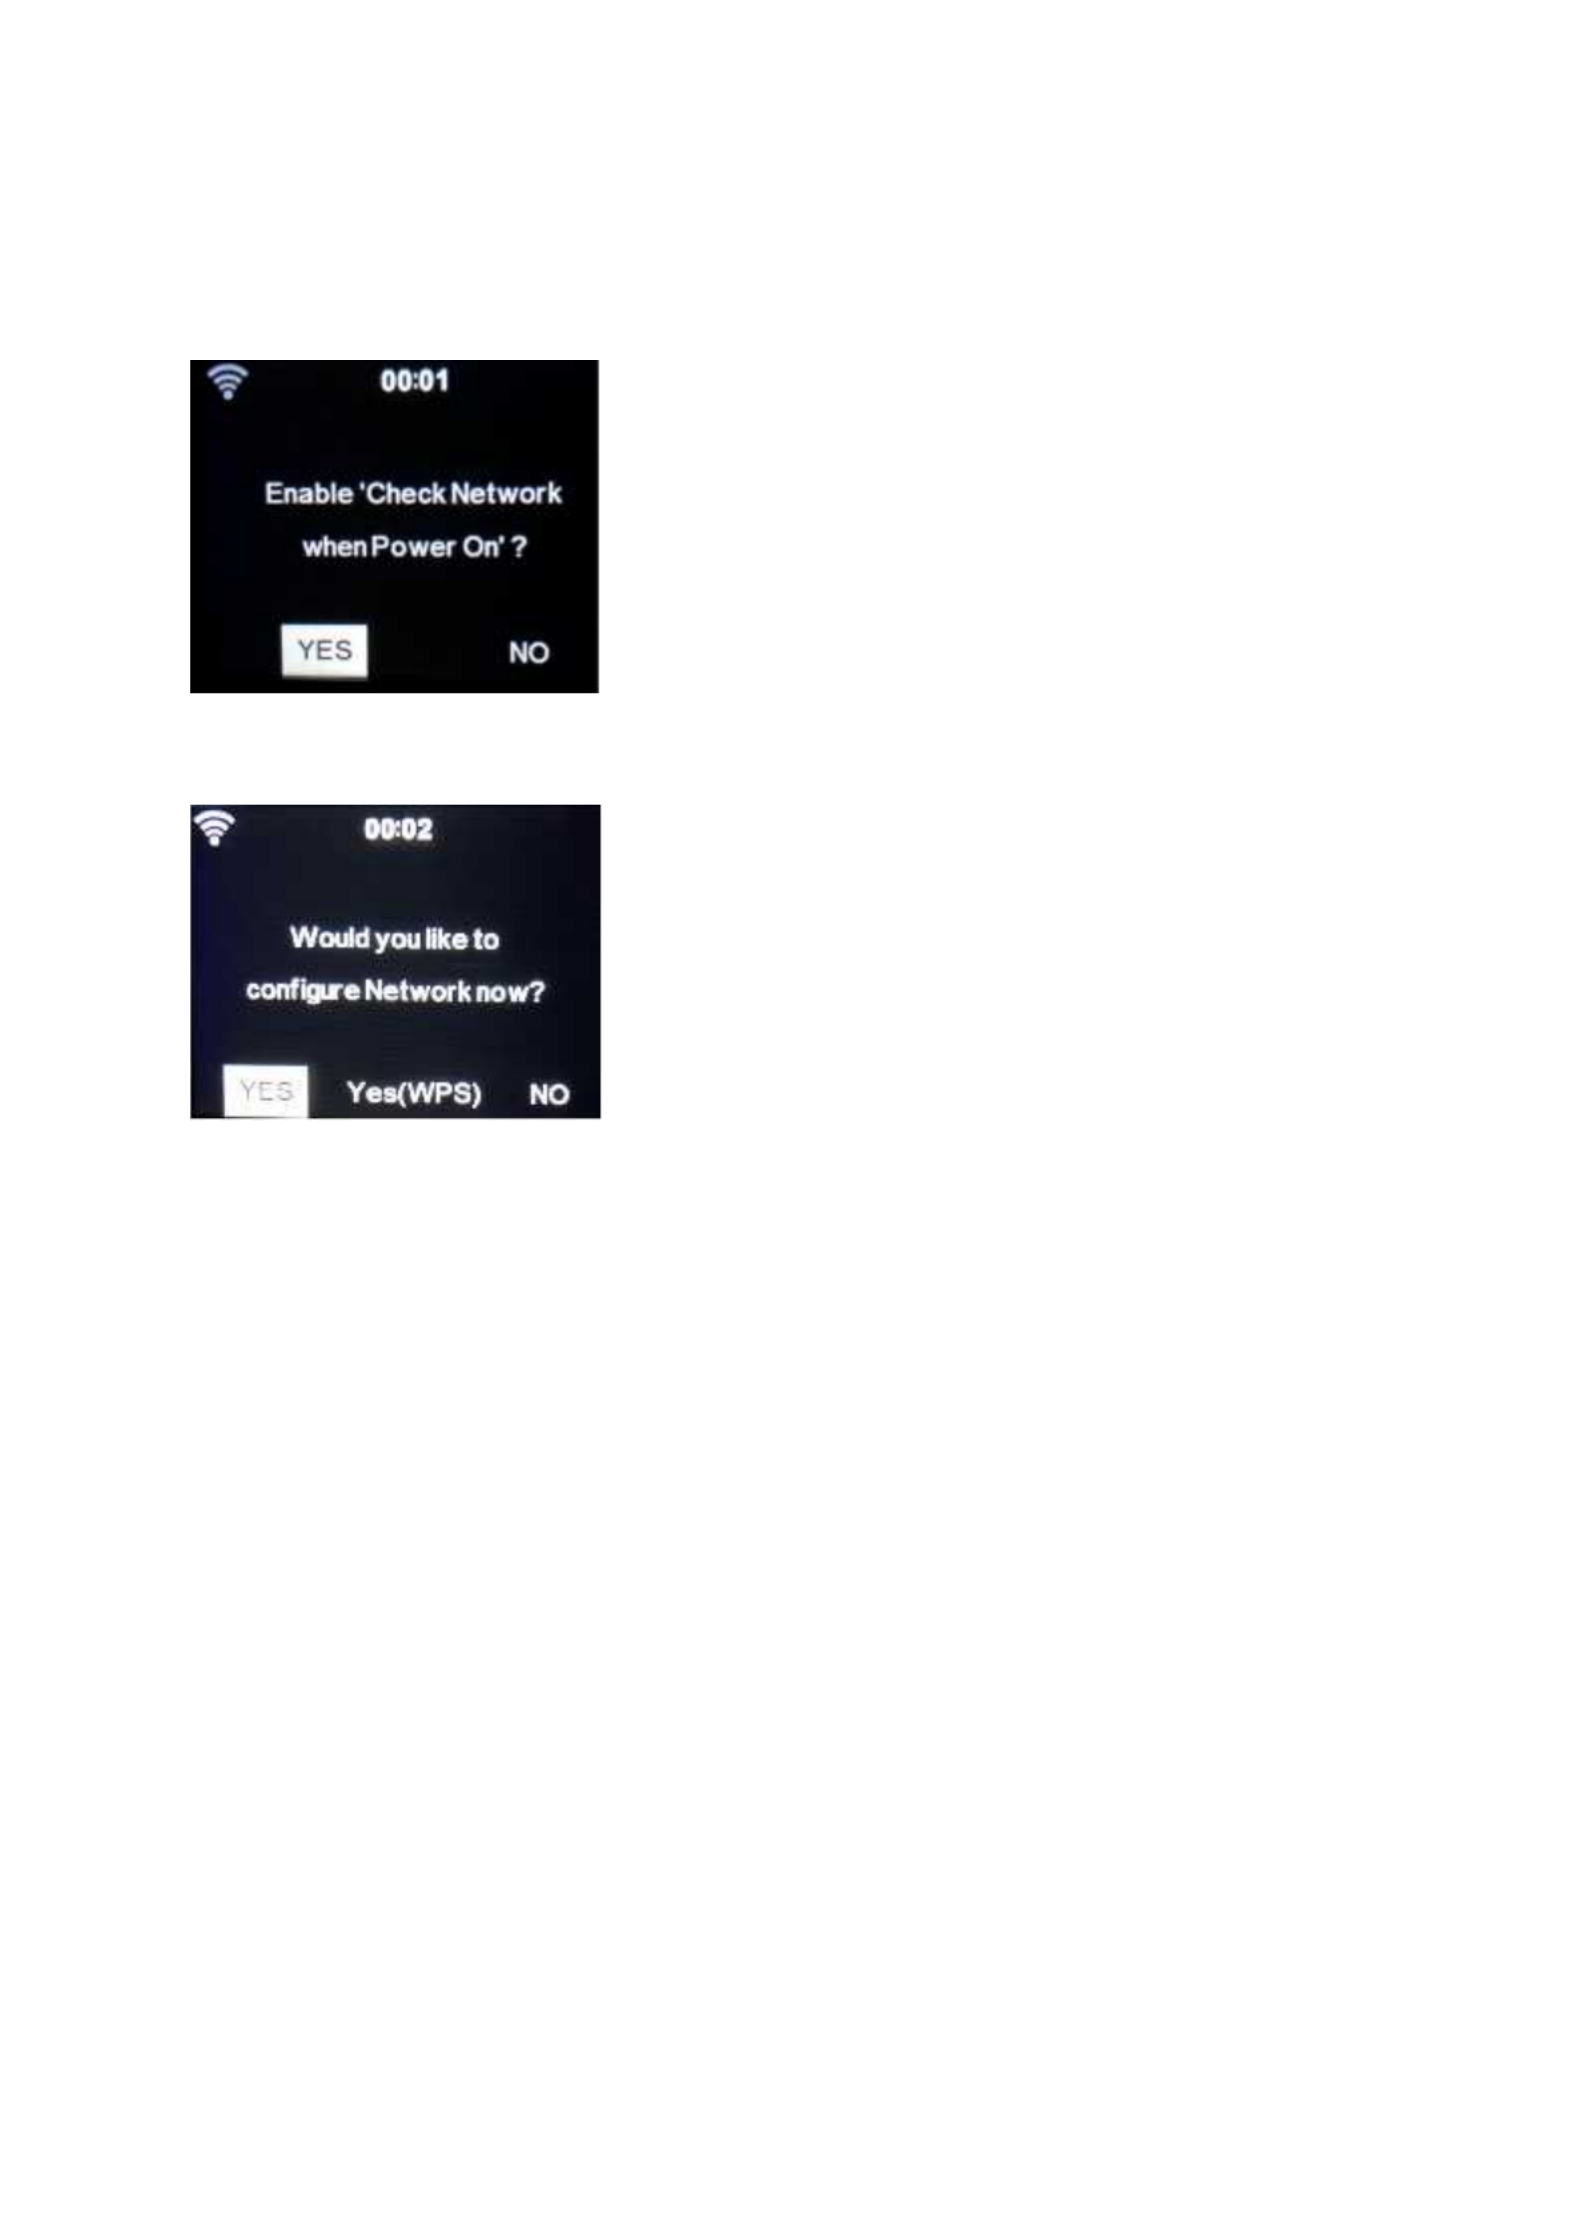
Do you want to check the WIFI network availability when powering on the device? Use the
Navigation (6) wheelto select the desired option and press the Navigation (6) wheelto confirm.
Now you can configure the wireless network.
1. Select YES if you want to continue and connect to your WIFI network using the standard
method. Press the Navigation (6) wheelto confirm. Continue reading ‘network configuration’
option 1.
2. Select YES(WPS) if you would like to set up with the WPS (WIFI PROTECTED SETUP) function
of your router (please verify with your router’s manual if it’s available). Press the
Navigation (6) wheelto confirm. Continue reading ‘network configuration’ option 2.
3. Select NO and Press the Navigation (6) wheelto confirmif you want to skip the Wireless
network setup. You can configure it later in the setup menu.

10
Network configuration
1. Standard network configuration
After selecting this option the DIR-170 will scan for available WIFI networks.
The display will show the networks it found.
Select your WIFI network by turning the Navigation/OK (6) wheeland confirm by pressing the
Navigation/OK (6) wheel.
If your selected WIFI network requires a password, you can enter it in the next screen.
Enter your password by pressing the numeric keys(2) on the remote control, followed by the
Navigation right(5) button (NOTE: you have to press the navigation right(5) after every
character).
To make a correction, press the NavigationLeft(4) to go backwards and delete the last character
at the same time. When the password is completed, press the OK(7) button to confirm.

11
If you want to enter the password directly on the DIR-170 front panel, you can turn the
Navigation(6) wheelto select the first character and then press the button(9) to move
forward to the next character. To make a correction, press the button (7)to go back and
delete the lastcharacter at the same time.
When the password is completed, press the Navigation (6) button to confirm
Note: following characters can be used:
Numbers(from 0-9)
English letters(from A to Z and from a to z)
Characters(DEL,@,Blank,!,”,#,$,%,&,*,’,+ and (,)
2. WPS PBC network configuration
You can easily connect by pressing the WPS button on your router and then selecting YES(WPS) on
your DIR-170 within 120 seconds. The connection between the router and the DIR-170 will be
configured automatically.
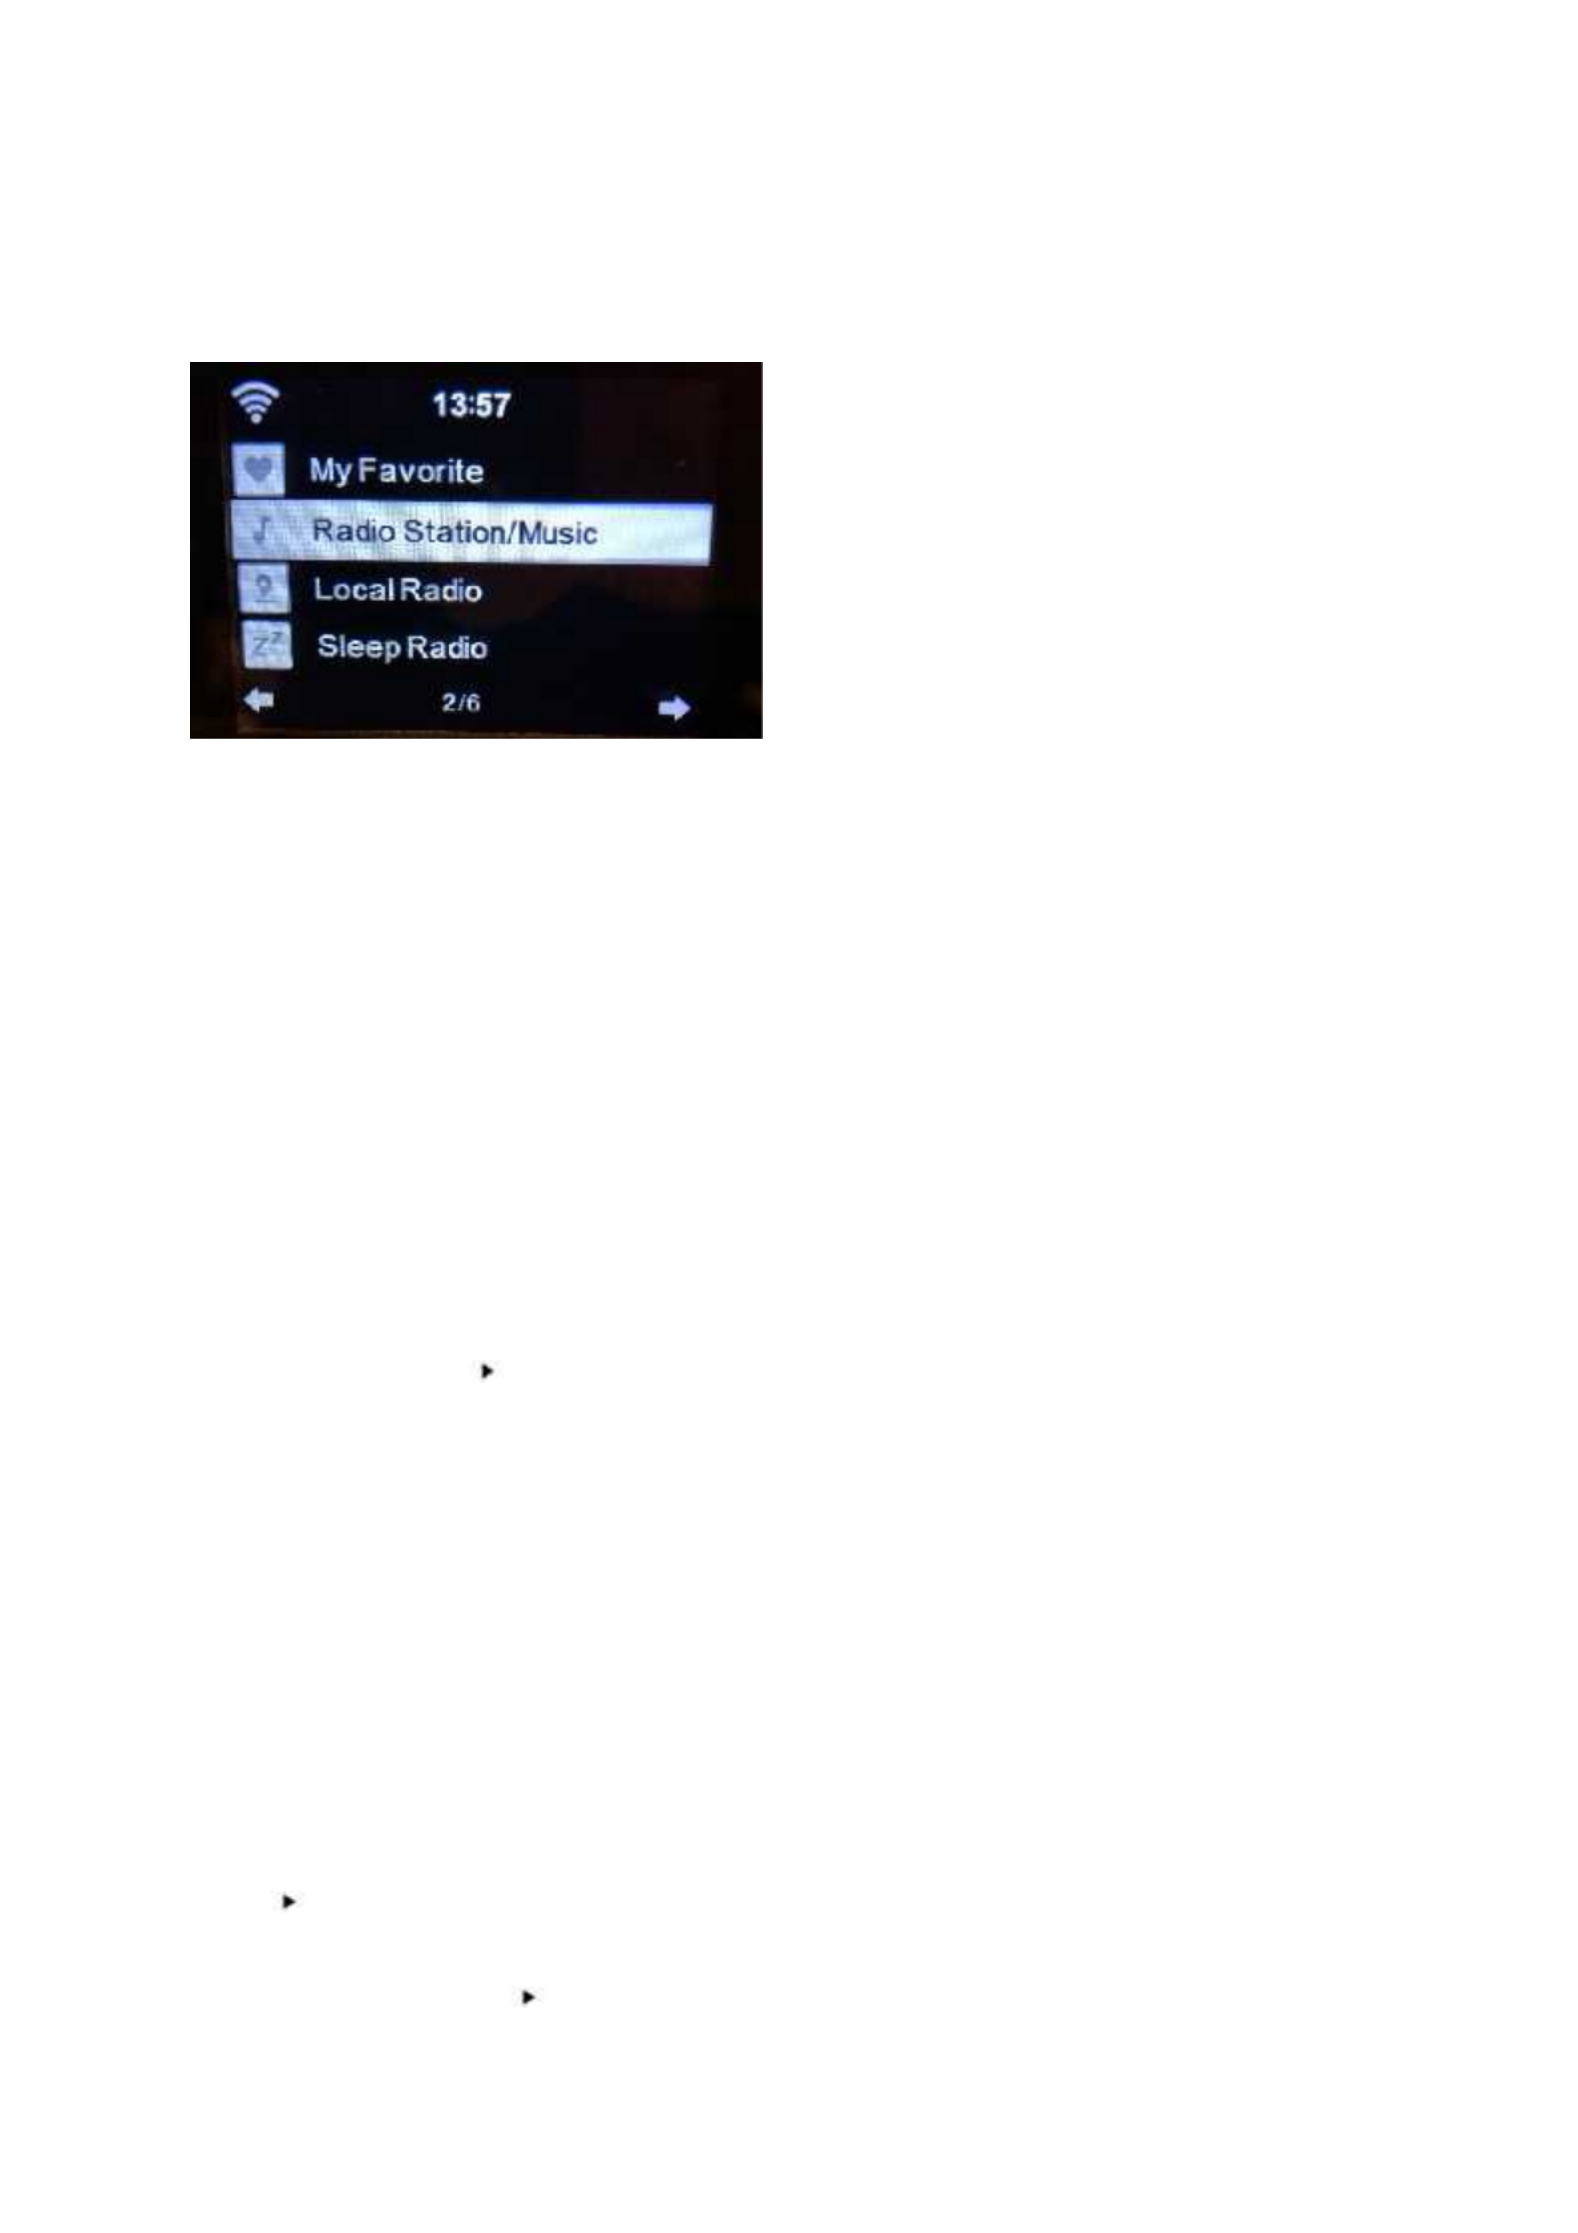
INTERNET RADIO
From the main menu use the Navigation wheel(6) to select INTERNET RADIO and press the
Navigation wheel(6) to start.
Now you can use the Navigation wheel(6) again to scroll through the different menu options and
select the desired option by pressing the Navigation wheel(6)
Press to return to the previous menu.
After successfully connecting to a radio station, the station information will be shown. This
information can be changed by pressing the or button.
Below you find the explanation of the various Internet Radio menu options:
My Favorite
These are your favorite preset stations. It can hold up to 250 entries.
To add a favorite internet radio station, press and hold “Fav” on the device or”Fav+“on the remote
control to save the station as a favorite.
12
You can add favorites when playing the station you want to add as favorite or add them directlyfrom
the ‘Radio Station/Music’ list. Select with the navigation wheel(6) and press/hold “Fav” on the
device or Navigation buttons on the Remote and then press the “Fav+” button.
You can replace already saved favorites with a new favorite station.
Favorite radio stations cannot be stored twice The saved stations are showed by selecting this
menu.You may also press Fav to enter the saved station list.You may enter the number key on the
remote control to recall the saved station.
Selecting a radio station from the favorites list.
Press the “Fav” button on the front panel or press “Fav” on the remote control to show the favorites
list. Rotate the navigation wheel(6) or press the navigation keys on the remote control to move
through the favorites list. Press the navigation wheel(6) or press “OK” on the remote control to listen
to the selected favorite.
Enter a submenu with button, Delete, Shift Up/Down along the list, Rename, Play, or Use as
Alarm (if you chose internet as alarm sound in the alarm configuration).
Radio Station/Music
Radio Stations are categorized into subcatagories Global Top 20, Genre, Country/Location (Africa,
Asia, Europe, Middle East, North America, Oceania/Pacific and South America) and Highlight. Press
the navigation wheel(6) or ‘OK’ on the remote, to select the subcategories and choose a station to
listen to. For each station,press the navigation wheel(6) on the unit or ‘OK’ on the remote control to
play directly.
Press to enter its submenu.When you choose Auto Scan, it plays each station in this
subcategory for 30 seconds until all stations have been played. You can cancel the auto scan function
by pressing“OK”.Pressthe button to view information about the active radio station.

13
Local Radio:
The Stations are categorized to the country/location in which the unit is operated.
Sleep Radio:
You can chooseBirds, Piano, Rain, Spa, Space, and Waveas sleep radio.
History:
List of the ten recently listened stations.
Service:
Search radio station: Enter a stationsname/keyword to search through the list of all radio
stations.
Add new radio station:by using an IP address/web address, the added station will be stored
in the ‘My Favorite’ list.
Note that the maximum character of the station name is 250.
MEDIA CENTER
With Media center you can play music from USB or UPnP.
Use the Navigation wheel(6) or the navigation buttons on the remote control to select one
of the following functions:
USB:
Insert an USB memory stick into the USB socket(16) then select USB from the MEDIA CENTER.
The DIR-170 will read the contents of the USB memory stick.
Browse folders/files with the Navigation wheel(6) or direction keys on the remote control.
The display shows folder and file names (not necessarily track names).
Once you have found a track you want to play, press the navigationwheelon the device or press OK
on the remote control.
Note: The USB port does not support charging or data transfer with a computer.

14
UPnP
If you have set up shared media in your network, thanyou should see it by choosing UPnP. If you
have more than one computer sharing media, these will also be shown.
Select the shared media you want to play.
Use Play/Pause, Next/Prev andStop.Press Right navigationbuttonto view the display information of
the current track.
Note: The DIR-170can only read tracks with filenames less than 40characters.Thecharacters should
be in European Language. If a track generates an error while opening,you can try to rename the
track.However, if it still can’t play, you can try to convert the track to a different format.
My Playlist:
You can create a playlist of your favoriteUPnP music.You can add the active music to the playlist. To
do this,press and hold the navigation wheel(6)/OK on the unit or press and hold the “OK”button on
the remote control to save it into ‘My Playlist’.
Clear My Playlist
Please select this option to clear the playlist.Please confirm the questions.
My mediaU
Display and playback your own mediaU station list on the mediaU server. Set your account first.To
activate your own station list, follow the steps below:
Access http://www.mediayou.net/. Join my mediaU membership. Login to the website;
Enter the wireless MAC addresss of Radio to the mediaU website. This information can be obtained
in themenu ->information Center>System information>Wireless Info;
When successfully configured, you are able to save and view your own mediaU station
playlist(s).Username and password is not required to enter to the Radio.
If there are different devices stored in your MediaU account, you can choose the one you currently
use under Configuration menu. On the website, you may save stations to Favorite Station, set
Favorite Location/Genre and My Local City, or add stations manually. The stations can be viewed
from My Media mode on the Radio.

15
INFORMATION CENTER
Weather Information
There are weather information and forecasts for 2000 cities.
Select the country and then the city for the weather details.
Press / to see the weather forecasts.
The device is able to display the weather information in the standby mode. On the weather
information page, press OK to set the city to show in the standby mode.Then turn on the weather
display.
Financial Information
View the stock index
System Information
Here you can view the details of your DIR-170 unit, find the software version and the WIFI
information. The information includes the unique MAC address which is required to fill in when
registeringyour “my mediaU” membership.

16
CONFIGURATION
Time Display
Analog/digital
My MediaU
When it is enabled, my mediaU will show on the main menu. If various
mediaU accounts exist in the Radio, Select the default login account in here.
Network
Wireless Network Configuration: Enable/disable WiFi network.When you
enable the WiFi network, the system will automatically select the required
AP.Enter WEP or WPA code to connect the WiFi.
Wireless Network (WPS PBC): If you are using a router with WPS/QSS
button, you can set up the network connection easily via WPS function.Enter
it and go to press the WPS/QSS button on your router within 120
seconds.The connection between the router and device will then be
configured automatically.
Manual Configuration: You can choose DHCP (which assignes the ip address
automatically) or manually input the IP address for wireless network
connection.The following information has to be entered: SSID (nameof
access point),IP Address,subnet mask,default gateway,preferred DNS
server,alternate DNS server.
Check Network When Power On: Enable/disable WiFi network.When you
enable the WiFi network, the system will automatically search for available
AP.Select the required AP.
Date & Time
Set the date and time
Set time format display as 12 Hour or 24 Hour
Set date format (YYYY/MM/DD-DD/MM/YYYY-MM/DD/YYYY)
Daylight Saving Time (DST)
○ ON
Tips: When “ON” is selected, the time will be one hourlater than the current
time.
○ OFF
Tips: When “OFF” is selected, the time will be same as the current time. If it
was already in “Daylight Saving Time(DST)” and you choose”OFF”,the time
will be deducted by one hour,that’s to say,the time will be same as the actual
time.

17
Alarm
There are 3 independent Alarms which can be set. 2 different Alarms (Alarm 1,
Alarm 2) and one NAP alarm which is a countdown alarm which can be used
when doing a quick sleep.
Press the Alarm button on the remote control to enter the alarm settings
menu directly and follow the following steps.
Setting the alarm
- Press ‘Alarm’ button on the unit or remote.
- Select Alarm 1
- Select Turn On
- Press the ‘ok’ button on the remote or press the navigation wheel on the
unit.
- Press the ‘ok’ on the “Repeat:” option and select the how the alarm
should work.
(Everyday, once or select the required days)
- Press the left arrow key on the remote or unit to return to the previous
alarm menu
then select “Time:” and press ‘ok’
- You now can use the up down buttons to change the highlighted Hours
then press the right arrow button once to switch to the Minutes and use
the up/down buttons to change the minutes. press the ‘ok’ button to
confirm.
- Select the “Sound:” and press the ‘ok’ button. Now you can choose
between Beep Melody Internet radio and USB (when inserted)
When internet radio is selected as wake up sound, you can use one of
your favorite radio stations (which have to be stored as favorite on the
DIR-170).
Note: when no internet connection is available within 1 minute after
the alarm is activated
the DIR-170 will automatically switch to Melody.
When selecting USB as wake up sound, you can select one of the music
files stored on the inserted usb memory device.
Repeat the above steps to setup the alarm 2
Setting the NAP alarm
- Press ‘Alarm’ button on the unit or remote.
- Select NAP alarm
- Use the up/down buttons to choose the desired minutes.
You can choose 5/10/20/30/60/90 or 120 minutes and then press the
‘ok’ button to select
- Press the left arrow button to return to the main screen.
When the NAP alarm is activated you see a clock icon on the lower right corner
with the remaining time.

18
Timer
Countdown timer (max. 100min)
Language
English/Deutsch/Espanol/Francais/Portugese/Nederlands/Italiano/Pyccknn/
Svenska/Norske/Dansk/Magyar/Cesky/Slovensky/Polski/Turkce/Suomi
Dimmer
Power Saving/Turn On
Display
Color/Monochrome
Power Management
This option configures when the DIR-170 should go into standby mode. You
can select Turn off/5 minutes/15 minutes/30 minutes.
When configured, the DIR-170 will switch to standby when no music is played
for the configured time.
Use the Turn off setting to ignore the standby function.
Sleep Timer
Turn off or set the sleep timer of 15/30/60/90/120/150/180 minutes.Once
the time is set,there will be a bed icon with the remaining minutes at the top
right corner of the display and the device will turn to standby after the
configured time.
(You also can use the Sleep button on the remote control to use this function)
Buffer
Configure the buffer time of the music playback,2/4/8 seconds.
Weather
Activate/deactivate the weather forecast on the standby display. Choose
your preferred temperature unit (°F or °C) and then proceed by entering your
location. When activated, the weather forecast is shown in turns with the
clock display on the standby screen (it changes every 10 secs).
FM Setup
Mode: you can set to forced Mono or Stereo reception.
Treshold: Choose the seek- and Stereo threshold.
Local Radio Setup
There is a shortcut Local Radio from the Internet Radio menu so that you can
easily go to the station list of your location.You can setup your location
manually or let the system detect your current location. If you choose to
automatically detect your location,the system will detect the location
according to the IP address of your connected network. Press Local Station to
enter the local radio station list directly.
Playback Setup
Select the play mode of the media center. You can select: Off (no repeat or
shuffle),Repeat all, Repeat one,or Shuffle.
Device
The DIR-170 default device name for DLNA is “AirMusic”.You may rename it
for DLNA setupon the PCor mobile. Use the QR code for download and install
the “AirMusic” control App.
Equalizer
The default equalizer setting is ‘normal’, but you may change it to ‘Flat, Jazz,
Rock, Soundtracks, Classical, Pop, News or my EQ’.Press the EQ button on the
remote control to quickly change the equalizer mode.

19
Resume When Power On
The system default setting is to resume the internet radio playback if you
were listening to internet radio or media center before switching off the
unit.If you turn this option off, the system will return to the main menu when
switching on the unit again.
Software Update
If there is a software update on the server, the system will notify you. Before
starting a software upgrade, ensure that the unit is plugged into a stable
mains power connection. Disconnecting the power during a software
update may permanently damage the unit.
Reset to Default
Restore to default settings. After the device is reset, the system will show the
language menu. Choose the desired language and press the navigate wheel(6)
DLNA/UPnP
You may change the default DLNA name as you like.The information below is the introductionof how
to setup media streaming from PC or other media server.Study the own instructions of the software
or apps you are using for music streaming.Make sure the music files are in the format of MP3,WMA
or AAC.

20
UPnP
Connect your PC to the network.
Ensure the Radio is powered on and connected to the same network.
Open the UPnP platform Windows Media Player (11 or later), other platforms orservers such as
Windows Media Connection may be used.
Allow to share your media to the DIR-170.
Add the audio files and folders you want to share with the DIR-170 to the media library.
You may also enjoy the streaming music from another music server, such as a smart phone (Android
platform)
Connect the mobile to the network
Search and install media sharing apps from Google Play.
Add the audio files from your mobile you want to share.
After setting up the shared server, choose the music and control the playback on the DIR-170
DLNA
Besides UPnP, the DIR-170 supports DLNA functionality; you share the music files from PC or Android
mobile.
You canuse your PC,Android mobile or iPhone/iPad to control the music playback of the DIR-170
The PC system requirement for using DLNA is Windows 7 and Windows Media Player version 12.
Setup as below:
First, share the media on your PC to the DIR-170.
Control Panel > Network and Internet >Network and Sharing Center >Change Advanced
Sharing>Media streaming options
Open Windows Media Player to enable Allow remote control of my Player.
Right click any music in the library and choose Play to Radio.
There will be a window for controlling music playback on Radio.

21
You may search and install any free or commercial DLNA apps from Google Play or Apple Store if you
are using Android mobile,tablet or iPhone/iPad. It is suggested to use bubble UPnP, Twonky Beam on
Android mobile, tablet or Twonky Beam on iPhone/iPad.Some apps may not support streaming music
from iPhone/iPod but iPhone/iPod could still be used to control streaming music from other servers.
Procedure for playing shared music on the app are as follow:
Select the DIR-170 as the player. Some apps may allow playing the music to multi players at the
same time.
Select music server and choose the music.Some apps can create a playlist if you choose several music.
Please note: When using DLNA music streaming function on theInternet Radio, you can only control
the volume and standby via the unit.It is restricted to control the other functions.Stop DLNA on PC,
mobile or tablet before you resume the DIR-170’s own control.
AUX (Line input)
Aux in mode plays audio from an external source such as an MP3 player or other audio device with
line out.
To play audio with Aux in mode:
Turn the volume low on both the Radio and if adjustable, the audio source device.
Connect the external audio source to the AUX IN 3.5mm stereo socket.Either press MODE until the
display shows AUX IN or select AUX in from the Main menu.
Adjust the volume of the DIR-170and, if necessary, the audio source device as required.
BLUETOOTH
Press MODE until the display shows Bluetooth or selectBluetoothfrom the Main menu.You will hear
a sound which means the the pairing mode is active. Activate the Bluetooth pairing mode of your
phone/tablet and search the for the name Lenco DIR-170on your phone/tablet. Then click it to
pair.When successfully connected It will make a connected sound. You now can play music via
Bluetooth and adjust volume at the DIR-170 or the connected device.

22
FM (RADIO)
Select ‘FM mode’ from the main menu by using the navigation wheel(6) or with the navigation
buttons on the remote. Press the navigation wheel(6) to enter the FM radio mode. The FM mode
will start on 87.5MHz.
To save all stations with strong signal, press the navigationwheel(6), it will show “auto scan?”choose
YES. Then it will start auto scan. Once the auto-scan is complete, stations will be saved in your
favorites.
You will then be able to browse through these saved stations by holding down the ‘<’ or ‘>’ buttons
to skip between saved stations.
To manually scroll through FM frequency, simply press the ‘<’ or ‘>’ buttons to go backwards or
forwards through the frequency wave.
Pre-setting your favourite FM stations
To save presets manually, select and listen to the station frequency number for the station you wish
to save.
Follow by holding down the ‘Fav’ button for 1-2 secs and the number ‘01’ will display on the screen.
Use the navigation knob to browse through preset numbers(up to 99) and select the chosen preset
number you wish to save it as by pressing the navigation wheel(6).
Recalling preset FM stations
View your favourite FM stations when you are on FM mode by simply selecting the ‘Fav’ button and
begin scrolling through saved stations.

23
DAB+ (DIGITAL RADIO)
Select ‘DAB/DAB+’ on the main display screen by turning the knob and pressing the navigation knob
or with the remote navigation buttons.
On first use of the DAB on your radio, your radio will begin scanning for DAB stations and will show’
Scanning’ on the display screen. It will display how many stations have been found as the search
continues.
Once all of the available stations have been found, the screen will display the choice of available
stations. Scroll through using the navigation knob or navigation buttons to select the station you
wish to listen to.
When you have selected a station, the screen will display the station and press navigation knob to
play. To choose previous or next station, use the navigation knob to scroll accordingly.
To go back to the list to scroll through manually, select the ‘<’ button to go back. To rescan your
stations, go on the main list page for the DAB stations and there will be reminder ‘Delete station
list?’.Choose ‘YES’ to do rescan.
When on your chosen station, select the ‘>’ button to show information on the station. The screen
will automatically scroll through information and display genre,MHz, song playing, KHz and Kbps.
Pre-setting your favorite DAB/DAB+ stations
When you have found your desired station, hold down ‘Fav’ for a few seconds to go to the ‘Add to
my Favorites’ screen. Turn the navigationwheel(6) to choose the preset number(up to 99) and select
your option by pressing the navigation wheel(6)
Alternatively, when you are on the list screen of DAB stations you are able to highlight the chosen
station and hold down ‘Fav’to go to the ‘Add to my Favorites’ screen.
Recalling preset DAB/DAB+ stations
View your favorite DAB/DAB+ stations when you are on DAB mode by selecting the ‘Fav’ button and
begin scrolling through the saved stations.

24
Technical Specifications
Network
802.11b/g/n (WLAN) Encryption: WEP, WPA, WPA 2(PSK), WPS
Streaming
UPnP, DLNA
Supported filetypes
WMA, MP3,FLAC,AAC
Connections
DC, USB, 3.5mm AUX-IN, 3.5mm Line-Out
Input
100-240V~50/60 Hz, 0.8A
Output
12.0V/2.0A
Power output
Bluetooth version
FM Frequency band
DAB Frequency band
2 x 10W RMS
V2.1 + EDR
87.5 – 108MHz
170 – 240MHz
Operating conditions
Temperature: 0-35
Humidity 5% to 90%
Operating position
Horizontal
Power consumption
(standby)
<1W
Network stand-by power
consumption
<2 W
Power supply adaptor:
Use only original AC adaptor
Use only the power supply listed in these user instructions.
Information
Value and and precision
Manufacturers name or trade mark, commercial
registration and address
Shenzhen Adition Audio
Science & Technology
Co.,Ltd
Model Identifier
AD2401202000EU
Input voltage
100-240V
Input AC frequency
50/60Hz
Output voltage
12,0V
Output current
2,0A

25
Output Power
24,0W
Average active efficiency
88,39%
Efficiency at low load (10%)
84,64%
No load Power consumption
0,06W
GUARANTEE
Lenco offers service and warranty in accordance with the European law, which means that in case of
repairs (both during and after the warranty period) you should contact your local dealer.
Important note: It is not possible to send products that need repairs to Lenco directly.
Important note: If this unit is opened or accessed by a non-official service center in any way, the
warranty expires.
This device is not suitable for professional use. In case of professional use, all warranty obligations of
the manufacturer will be voided.

26
DISCLAIMER
Updates to Firmware and/or hardware components are made regularly.Therefore some of the
instruction, specifications and pictures in this documentation may differ slightly from your particular
situation.All items described in this guide for illustration purposes only and may not apply to a
particular situation.No legal right or entitlements may be obtained from the description made in this
manual.
DISPOSAL OF THE OLD DEVICE
This symbol indicates that the relevant electrical product or battery should not be
disposed of as general household waste in Europe. To ensure the correct waste
treatment of the product and battery, please dispose them in accordance to any
applicable local laws of requirement for disposal of electrical equipment or
batteries.In so doing, you will help to conserve natural resources and improve
standards of environmental protection in treatment and disposal of electrical waste
(Waste Electrical and Electronic Equipment Directive).
CE Marking
Hereby, Lenco Benelux B.V., Thermiekstraat 1a, 6361 HB Nuth, The Netherlands, declares
that this product is in compliance with the essential EU directive requirements.
The declaration of conformity may be consulted via techdoc@commaxxgroup.com
SERVICE
For more information and helpdesk support, please visit www.lenco.com
Lenco Benelux BV, Thermiekstraat 1a, 6361 HB Nuth, The Netherlands.

27
Nederlands
DIR-170WA
LET OP:
Het gebruik van afstandsbedieningen of aanpassingen of de uitvoering van procedures die niet in dit
document zijn gespecificeerd, kan leiden tot gevaarlijke blootstelling aan straling.
VOORZORGSMAATREGELEN VOOR GEBRUIK
ONTHOUD DE VOLGENDE INSTRUCTIES:
30. Bedek of blokkeer de ventilatieopeningen niet. Wanneer u het apparaat op een schap plaatst,
dient u 5 cm (2”) vrije ruimte rondom het gehele apparaat te behouden.
31. Installeer het product volgens de meegeleverde gebruikershandleiding.
32. Houd het apparaat uit de buurt van hittebronnen, zoals radiatoren, verwarmingen, kachels,
kaarsen en andere hittegenererende producten of open vuur. Het apparaat kan alleen worden
gebruikt in een gematigd klimaat. Extreem koude of warme omgevingen dienen te worden
vermeden. Het bedrijfstemperatuurbereik ligt tussen 0 °C en 35 °C.
33. Gebruik dit apparaat niet in de buurt van krachtige magnetische velden.
34. Elektrostatische ontlading kan normaal gebruik van dit apparaat verstoren. U hoeft het
apparaat in dit geval slechts te resetten en opnieuw op te starten volgens de
gebruikershandleiding. Wees voorzichtig tijdens bestandsoverdracht en gebruik het product in
een omgeving zonder statische interferentie.
35. Waarschuwing! Steek nooit een voorwerp via de ventilatie- of andere openingen in het product.
Er is hoogspanning in het product aanwezig en als u er een object insteekt, kan dat een
elektrische schok veroorzaken en/of kortsluiting in de interne onderdelen. Mors om dezelfde
reden geen water of vloeistof op het product.
36. Gebruik het toestel niet in vochtige ruimtes, zoals badkamers, stomende keukens of in de buurt
van zwembaden.
37. Het apparaat mag niet worden blootgesteld aan druppels en spetters en zorg ervoor dat er
geen met vloeistof gevulde voorwerpen, zoals vazen, op of in de buurt van het apparaat
worden geplaatst.
38. Gebruik dit apparaat niet wanneer condensatie kan optreden. Wanneer het apparaat in een
warme, natte ruimte wordt gebruikt, kunnen zich waterdruppels of condens vormen in het
apparaat en kan het apparaat niet goed functioneren. Laat het apparaat 1 of 2 uur uit staan
voordat u het inschakelt: het apparaat dient droog te zijn voordat deze stroom ontvangt.
39. Alhoewel dit apparaat met grote zorg gefabriceerd en verschillende keren geïnspecteerd is
voordat het de fabriek verlaat, is het nog steeds mogelijk dat er problemen optreden, zoals met
alle elektrische apparaten. Als u rook, een overmatige hitteontwikkeling of enig ander
onverwacht verschijnsel opmerkt, moet u onmiddellijk de stekker van het netsnoer uit het
stopcontact halen.
40. Dit apparaat moet worden gebruikt met een voedingsbron zoals gespecificeerd op het
specificatielabel. Als u twijfelt over het type voeding dat gebruikt wordt in uw huis, raadpleeg
dan uw dealer of plaatselijk energiebedrijf.
41. Buiten bereik van dieren houden. Sommige dieren kauwen graag op voedingskabels.
42. Gebruik een zacht, droog doekje om het apparaat te reinigen. Gebruik geen oplosmiddelen of
op benzine gebaseerde vloeistoffen. U kunt een vochtig doekje met verdund
schoonmaakmiddel gebruiken om hardnekkige vlekken te verwijderen.
43. De leverancier is niet verantwoordelijk voor schade of verloren gegevens veroorzaakt door
storing, misbruik, modificatie van het apparaat of batterijvervanging.
44. Onderbreek nooit de verbinding wanneer het apparaat formatteert of bestanden overdraagt.
De gegevens kunnen anders corrupt of verloren raken.
45. Indien het apparaat een USB-afspeelfunctie heeft, moet de USB-geheugenstick rechtstreeks op
het apparaat worden aangesloten. Gebruik geen USB-verlengkabel, omdat die kan leiden tot
storingen met foutieve gegevens als gevolg.
46. Het classificatielabel bevindt zich op de onderkant of het achterpaneel van het apparaat.
47. Dit hulpmiddel is niet bedoeld voor gebruik door mensen (inclusief kinderen) met een fysieke,
zintuiglijke of mentale handicap, of een gebrek aan ervaring en kennis, tenzij zij toezicht of

28
instructies hebben gekregen over het juiste gebruik van het hulpmiddel door een persoon die
verantwoordelijk is voor hun veiligheid.
48. Dit product is alleen voor niet-professioneel gebruik bedoeld en niet voor commercieel of
industrieel gebruik.
49. Verzeker u ervan dat het apparaat in een stabiele positie staat opgesteld. Schade die wordt
veroorzaakt door het gebruik van dit product in een onstabiele positie, trillingen of schokken of
het niet opvolgen van de waarschuwingen of voorzorgsmaatregelen in deze
gebruikershandleiding wordt niet gedekt door de garantie.
50. Verwijder nooit de behuizing van dit apparaat.
51. Plaats dit apparaat nooit op andere elektrische apparatuur.
52. Geef kinderen geen gelegenheid in aanraking met plastic zakken te komen.
53. Gebruik uitsluitend uitbreidingen/accessoires gespecificeerd door de fabrikant.
54. Laat alle reparaties over aan gekwalificeerd onderhoudspersoneel. Onderhoud is nodig als het
apparaat is beschadigd, bijvoorbeeld als de voedingskabel of de stekker is beschadigd, als er
vloeistof op het apparaat is gemorst, als er voorwerpen in het apparaat zijn gevallen, als het
apparaat is blootgesteld aan regen of vocht, als het apparaat niet normaal werkt of als het is
gevallen.
55. Langdurige blootstelling aan harde geluiden van persoonlijke muziekspelers kan leiden tot
tijdelijk of permanent gehoorverlies.
56. Als het product wordt geleverd met voedingskabel of wisselstroomvoedingsadapter:
Als er zich problemen voordoen, moet u de voedingskabel loskoppelen en het ter
onderhoud aanbieden aan gekwalificeerd personeel.
Nooit op de voedingsadapter stappen of deze indrukken. Wees zeer voorzichtig, vooral in
het gebied rond de stekkers en de kabelaansluitingen. Plaats geen zware voorwerpen op
de voedingsadapter, om beschadiging ervan te voorkomen. Houd het gehele apparaat
buiten bereik van kinderen! Wanneer kinderen met de voedingskabel spelen, kunnen zij
ernstig letsel oplopen.
Haal de stekker uit het stopcontact tijdens onweer of wanneer u deze langere tijd niet
gebruikt.
Het stopcontact moet in de buurt van de apparatuur zijn geïnstalleerd en eenvoudig te
bereiken zijn.
Laat AC-stopcontacten of verlengsnoeren nooit overbelast raken. Overbelasting kan
brand of een elektrische schok veroorzaken.
Apparaten met een Klasse 1 structuur dienen te worden aangesloten op een stopcontact
met een beschermende aardverbinding.
Apparaten met een Klasse 2 structuur vereisen geen aardverbinding.
Houd altijd de stekker vast wanneer u deze uit het stopcontact trekt. Trek nooit aan de
voedingskabel. Dit kan tot een kortsluiting leiden.
Gebruik nooit een beschadigde voedingskabel of stekker of een los stopcontact. Dit vormt
namelijk een risico op brand of elektrische schokken.
57. Indien het product knoopcelbatterijen bevat of wordt geleverd met een afstandsbediening die
knoopcelbatterijen bevat:
Waarschuwing:
“Batterij niet inslikken, chemisch brandgevaar” of gelijkwaardige werking.
De meegeleverde afstandsbediening bevat een knoopcelbatterij. Als de batterij wordt
ingeslikt, kan deze in slechts 2 uur ernstige interne brandwonden veroorzaken en tot de
dood leiden.
Houd nieuwe en gebruikte batterijen buiten bereik van kinderen.
Als de batterijhouder niet goed kan worden gesloten, dient u het product niet meer te
gebruiken en buiten bereik van kinderen te houden.
Als u denkt dat batterijen zijn ingeslikt of binnenin een willekeurig lichaamsdeel terecht
zijn gekomen, dient u onmiddellijk medische hulp te zoeken.
58. Waarschuwing m.b.t. het gebruik van batterijen:
Als de batterij onjuist wordt geplaatst, bestaat er explosiegevaar. Vervang de batterij
alleen door een zelfde of vergelijkbare soort batterij.
Stel de batterij niet bloot aan extreem hoge of lage temperaturen of een lage luchtdruk
op grote hoogte tijdens gebruik, opslag of transport.

29
Vervanging van een batterij door een incorrect type kan leiden tot een ontploffing of de
lekkage van ontvlambare vloeistoffen of gas.
Het weggooien van een batterij in het vuur of een hete oven, of het mechanisch
verpletteren of insnijden van een batterij, kan leiden tot een explosie.
Het achterlaten van een batterij in een omgeving met extreem hoge temperaturen kan
leiden tot een explosie of het lekken van brandbare vloeistof of gas.
Een batterij die aan een extreem lage luchtdruk wordt blootgesteld, kan leiden tot een
explosie of het lekken van brandbare vloeistof of gas.
Aandacht voor het milieu is nodig bij het verwijderen van de batterijen.
INSTALLATIE
• Pak alle onderdelen uit en verwijder de beschermende materialen.
• Sluit het apparaat niet aan op het stopcontact, voordat u de netspanning hebt gecontroleerd en
voordat alle andere aansluitingen zijn gemaakt.

30
Productoverzicht
31
1. Scherm
2. Stand-by-toets
3. Alarmtoets
4. Favorietentoets
5. Slaap-toets
6. Vol+/Vol-/OK-Knop
7. Vorige-toets
8. Dimmertoets
9. Volgende-toets
10. Home-toets
11. Uitschuifbare antenne
12. AAN-/UIT-schakelaartoets
13. DC-ingang
14. Lijnuitgang (3,5mm)
15. AUX-ingang (3,5mm)
16. USB-poort
17. Voorkeuzetoetsen

32
Afstandsbediening
1. Stand-by-toets
2. Letters en cijfers invoeren
3. Navigatietoets Omhoog
4. Navigatietoets Links
5. Navigatietoets Rechts
6. Navigatietoets Omlaag
7. OK-toets
8. Afspelen/Pauzeren-toets
9. Stop-toets
10. Terug-/Vooruittoets
11. Toets Vol+/Vol-

33
12. Home-toets
13. Modus-toets
14. Alarmtoets
15. Dimmertoets
16. Slaap-toets
17. Demptoets
18. Favorietentoets
19. Fav+ toets
20. EQ Voor het instellen van de toon
21. Toets voor taalselectie
Opmerking: de cursortoetsen (3, 4, 5, 6) op de afstandsbediening kunnen ook
worden gebruikt om de systeemmenu's te navigeren.
EERSTE SETUP
Controleer vóór gebruik a.u.b. of de spanning aangegeven op het apparaat overeenkomt met uw
netspanning.
Gebruik de meegeleverde netadapter om het apparaat aan te sluiten op het stopcontact.
Gebruik de aan-/uitschakelaar (12) op de achterzijde om in te schakelen.
Het systeem zal u vragen de Taal voor het apparaat in te stellen.
Gebruik het Navigatiewieltje (6) om de gewenste taal te selecteren en druk vervolgens ter
bevestiging op het Navigatiewieltje (6).
34
Wilt u de beschikbaarheid van WiFi-netwerken controleren wanneer het apparaat wordt
ingeschakeld? Gebruik het Navigatiewieltje (6) om de gewenste optie te selecteren en druk
vervolgens ter bevestiging op het Navigatiewieltje (6).
U kunt nu het draadloze netwerk configureren.
1. Selecteer YES (Ja) als u verder wilt gaan en verbinding wilt maken met uw WiFi-netwerk op
de gebruikelijke wijze. Druk ter bevestiging op het Navigatiewieltje (6). Lees
‘netwerkconfiguratie’ optie 1.
2. Selecteer YES (WPS) (Ja (WPS)) als u de instelling wilt uitvoeren met de WPS-functie
(BEVEILIGDE WIFI-INSTELLING) van uw router (controleer a.u.b. in de handleiding van uw
router indien beschikbaar). Druk ter bevestiging op het Navigatiewieltje (6). Lees
‘netwerkconfiguratie’ optie 2.
3. Selecteer NO (Nee) en druk ter bevestiging op het Navigatiewieltje (6) als u de draadloze
netwerkinstelling wilt overslaan. U kunt dit later configureren in het instellingsmenu.

35
Netwerkconfiguratie
1. Standaard netwerkconfiguratie
De DIR-170 zal naar beschikbare WiFi-netwerken zoeken nadat u deze optie selecteert.
De display zal de gevonden netwerken weergeven.
Selecteer uw WiFi-netwerk door het Navigatiewieltje/OK (6) te draaien en ter bevestiging op het
Navigatieknop/OK (6) te drukken.
Als uw geselecteerde WiFi-netwerk een wachtwoord vereist, dan kunt u deze op het volgende
scherm invoeren.
Voer uw wachtwoord in door op de cijfertoetsen (2) op de afstandsbediening te drukken,
gevolgd door navigatietoets Rechts (5) (OPMERKING: u dient na elk karakter op navigatietoets
Rechts (5) te drukken).
U kunt iets corrigeren door op navigatietoets Links (4) te drukken om terug te gaan en
tegelijkertijd het laatste karakter te wissen. Druk ter bevestiging op de toets OK (7) wanneer het
volledige wachtwoord is ingevoerd.

36
Als u het wachtwoord direct op het voorpaneel van de DIR-170 wilt invoeren, dan kunt u het
Navigatiewieltje (6) draaien om het eerste karakter te selecteren en vervolgens op de toets
(9) drukken om verder te gaan naar het volgende karakter. U kunt iets corrigeren door op
de toets (7) te drukken om terug te gaan en tegelijkertijd het laatste karakter te wissen.
Druk ter bevestiging op de Navigatietoets (6) wanneer het volledige wachtwoord is ingevoerd.
Opmerking: de volgende karakters kunnen worden gebruikt:
Cijfers (van 0-9)
Engelse letters (van A tot Z en van a tot z)
Karakters (DEL,@,blanco,!,”,#,$,%,&,*,’,+ en (,)
2. WPS PBC netwerkconfiguratie
U kunt eenvoudig verbinding maken door op de WPS-toets op uw router te drukken en vervolgens
binnen 120 seconden YES (WPS) (Ja (WPS)) op uw DIR-170 te selecteren. De verbinding tussen de
router en DIR-170 zal automatisch worden geconfigureerd.
INTERNETRADIO
Gebruik in het hoofdmenu het Navigatiewieltje (6) om INTERNET RADIO te selecteren en druk op het
Navigatiewieltje (6) om te starten.
U kunt het Navigatiewieltje (6) nogmaals gebruiken om de verschillende menu-opties te doorlopen
en de gewenste optie selecteren door op het Navigatiewieltje (6) te drukken.
Druk op om terug te keren naar het vorige menu.
Na een geslaagde verbinding met een radiostation, zal de informatie over het station worden
weergegeven. Deze informatie kan worden veranderd door op de toets of te drukken.
Hieronder volgt de uitleg van de verschillende opties in het menu Internet Radio:
Mijn favorieten
Dit zijn uw favoriete voorkeuzestations. Er kunnen tot 250 stations worden opgeslagen
U kunt een favoriet internetradiostation toevoegen door “Fav” op het apparaat of ”Fav+“ op de
afstandsbediening ingedrukt te houden en het station als een favoriet op te slaan.

37
U kunt favorieten toevoegen terwijl het station dat u als favoriet wilt opslaan wordt afgespeeld of u
kunt favorieten direct toevoegen uit de lijst ‘Radio Station/Music’ (Radiostation/Muziek). Selecteer
met het Navigatiewieltje (6), houd “Fav” op het apparaat of de Navigatietoetsen op de
afstandsbediening ingedrukt en druk vervolgens op de toets “Fav+”.
U kunt favorieten die al zijn opgeslagen vervangen door een nieuw favoriet station.
Favoriete radiostations kunnen niet tweemaal worden opgeslagen. De opgeslagen stations worden
weergegeven door dit menu te selecteren. U kunt ook op Fav drukken om de lijst met opgeslagen
stations te openen. U kunt de cijfertoetsen op de afstandsbediening gebruiken om een opgeslagen
station te herroepen.
Een radiostation selecteren uit de favorietenlijst.
Druk op de toets “Fav” op het voorpaneel of druk op “Fav” op de afstandsbediening om de
favorietenlijst te openen. Draai het Navigatiewieltje (6) of druk op de navigatietoetsen op de
afstandsbediening om de favorietenlijst te scrollen. Druk op het Navigatiewieltje (6) of druk op “OK”
op de afstandsbediening om naar het geselecteerde favoriete station te luisteren.
Open een submenu met de toets , Wissen, de lijst Omhoog/Omlaag scrollen, Hernoemen,
Afspelen, of Als Alarm Gebruiken (als u internet als alarmgeluid hebt gekozen in de
alarmconfiguratie).
Radiostation/Muziek
Radiostations kunnen worden ingedeeld in de subcategorieën Globale Top 20, Genre, Land/Locatie
(Afrika, Azië, Europa, Midden-Oosten, Noord-Amerika, Oceanië/Pacifisch Gebied en Zuid-Amerika) en
Highlight. Druk op het Navigatiewieltje (6) of op ‘OK’ op de afstandsbediening om een subcategorie te
selecteren en het station te kiezen waar u naar wilt luisteren. Druk voor elk station op het
Navigatiewieltje (6) op het apparaat of op ‘OK’ op de afstandsbediening om direct af te spelen.

38
Druk op om het submenu ervan te openen. Wanneer u Auto Scan kiest, dan zal elk station in
deze subcategorie 30 seconden lang worden afgespeeld totdat alle stations zijn afgespeeld. U kunt
de automatische scanfunctie annuleren door op “OK” te drukken. Druk op de toets om
informatie te bekijken over het actieve radiostation.
Lokale radio:
De stations zijn ingedeeld op het land/de locatie waar het apparaat wordt gebruikt.
Slaapradio:
U kunt Birds (Vogels), Piano, Rain (Regen), Spa, Space (Ruimte) en Wave (Golf) kiezen als slaapradio.
Geschiedenis:
Lijst van de tien laatst beluisterde stations.
Service:
Naar een radiostation zoeken: Voer een stationsnaam/trefwoord in om de lijst met alle
radiostations te doorzoeken.
Een nieuw radiostation toevoegen: het toegevoegde station zal worden opgeslagen in de
lijst ‘My Favorite’ (Mijn Favoriet) door een IP-adres/webadres te gebruiken.
Merk op dat 250 tekens het maximale aantal tekens van de naam van het station is.
MEDIACENTRUM
U kunt het Mediacentrum gebruiken om muziek af te spelen van USB of UPnP.
Gebruik het Navigatiewieltje (6) of de navigatietoetsen op de afstandsbediening om een van
de volgende functies te selecteren:
USB:
Steek een USB-geheugenstick-in de USB-poort (16) en selecteer vervolgens USB in het
MEDIACENTRUM.

40
Ga naar http://www.mediayou.net/. Word lidt van “mediaU”. Meld aan op de website;
Voer het draadloze MAC-adres van de radio in op de mediaU website. Deze informatie is te vinden in
het menu -> information Center>System information>Wireless Info
(informatiecentrum>Systeeminformatie>Draadloze Info;
Wanneer succesvol geconfigureerd, dan kunt u uw eigen MediaU-station afspeellijst(en) opslaan. Er
is geen gebruikersnaam of wachtwoord vereist om de Radio te openen.
Als er verschillende apparaten zijn opgeslagen in uw MediaU-account, dan kunt u het apparaat
kiezen dat u momenteel gebruikt in het menu Configuration (Configuratie). U kunt op de website
stations opslaan in “Favorite Station” (Favoriete station), Favorite Location/Genre (Favoriete
locatie/genre) en My Local City (Mijn lokale stad) instellen of stations handmatig toevoegen. De
stations kunnen worden bekeken via de modus “My Media” (Mijn media) op de radio.
INFORMATIECENTRUM
Weersinformatie
Er zijn weersinformatie en -prognoses voor 2000 steden.
Selecteer het land en daarna de stad voor de weerdetails.
Druk op / om de weersvoorspelling te zien.
Het apparaat kan de weersinformatie weergeven wanneer op stand-by geschakeld. Druk op de
pagina met weersinformatie op OK om de stad in te stellen die in stand-by-modus moet worden
weergegeven. Schakel vervolgens de weergave in van de weersvoorspelling.
Financiële informatie
De koersindex bekijken

41
Systeeminformatie
U kunt hier de details bekijken van uw DIR-170 apparaat en de softwareversie en WiFi-informatie
vinden. De informatie bevat het unieke MAC-adres dat u nodig hebt wanneer u uw “My MediaU”
(Mijn MediaU) lidmaatschap registreert.
CONFIGURATIE
Tijdweergave
Analoog/digitaal
MY mediaU
beheren
Wanneer ingeschakeld, dan zal Mijn MediaU in het hoofdmenu worden
weergegeven. Als meerdere MediaU accounts bestaan in de radio, selecteer
dan hier het standaard aanmeldaccount.
Netwerk
Configuratie draadloos netwerk: In-/uitschakelen wifi-netwerk. Wanneer u
het WiFi-netwerk inschakelt, dan zal het systeem automatisch het vereiste
toegangspunt selecteren. Voer de WEP- of WPA-code in om met wifi te
verbinden.
Draadloos netwerk (WPS PBC): Als u een router gebruikt met een WPS-/QSS-
-toets, dan kunt u de netwerkverbinding eenvoudig instellen via de WPS-
functie. Stel het in door binnen 120 seconden op de WPS-knop te drukken.
De verbinding tussen de router en het apparaat zal automatisch worden
geconfigureerd.
Handmatige configuratie: U kunt DHCP kiezen (waardoor het IP-adres
automatisch wordt toegewezen) of het IP-adres voor de draadloze
netwerkverbinding handmatig invoeren. U dient de volgende informatie in te
voeren: SSID (naam van het toegangspunt), IP-adres, subnetmasker,
standaard gateway, gewenste DNS-server, alternatieve DNS-server.
Netwerk controleren bij inschakelen:In-/uitschakelen wifi-netwerk.
Wanneer u het WiFi-netwerk inschakelt, dan zal het systeem automatisch
naar een beschikbaar toegangspunt zoeken. Selecteer het vereiste
toegangspunt.
Datum & Tijd
Datum en tijd instellen
Tijdnotatie instellen Stel de tijdweergave in per 12 Hour (12 uur) of 24 Hour
(24 uur)
Datumnotatie instellen stel het datumformaat in (JJJJ/MM/DD-DD/MM/JJJJ-
MM/DD/JJJJ)
Zomertijd (DST)

44
Energiebeheer
Deze optie configureert wanneer de DIR-170 op stand-by-modus moet
worden geschakeld. U kunt Turn off (Uitschakelen)/5 minuten/15 minuten/
30 minuten selecteren.
Wanneer geconfigureerd, dan zal de DIR-170 op stand-by schakelen nadat er
voor de ingestelde tijd geen muziek wordt afgespeeld.
Kies de instelling Turn off (Uitschakelen) om de stand-by-functie te
annuleren.
Slaaptimer
Schakel deze optie uit of stel de slaaptimer in op 15/30/60/90/120/150/180
minuten. Nadat de tijd eenmaal is ingesteld, dan zal er een bedicoontje met
de resterende minuten rechtsboven in de hoek van de display worden
weergegeven en het apparaat zal op stand-by schakelen nadat de ingestelde
tijd is verlopen.
(U kunt ook op de toets Sleep op de afstandsbediening drukken om deze
functie te gebruiken)
Buffer
Configureer de buffertijd van het afspelen van muziek in 2/4/8 seconden.
Weer
De weersverwachting op de display in stand-by-modus
activeren/deactiveren. Selecteer de gewenste temperatuureenheid (°F or °C)
en voer vervolgens uw Locatiein. Wanneer geactiveerd, dan zal de
weersverwachting afwisselend met de klokweergave worden weergegeven
op het stand-by-scherm (dit verandert elke 10 sec.).
FM instellen
Modus: u kunt de geforceerd Mono of Stereo ontvangst instellen.
Drempelwaarde: Kies de zoek- en Stereo drempelwaarde.
Lokale radio
instellen
U kunt de snelkoppeling Local Radio (Lokale Radio) gebruiken in het menu
Internet Radio om eenvoudig de stationslijst te openen van uw locatie. U
kunt de locatie handmatig instellen of het systeem naar uw huidige locatie
laten zoeken. Als u de automatische locatiedetectie selecteert, dan zal het
systeem de locatie bepalen volgens het IP-adres van uw verbonden netwerk.
Druk op Local Station om de lijst met lokale radiostations direct te openen.
Afspelen instellen
Selecteer de afspeelmodus van het mediacentrum. U kunt kiezen uit: Off
(Uit) (geen herhaling of willekeurige afspeelvolgorde), Repeat all (Herhaal
alles), Repeat one (Herhaal één) en Shuffle (Willekeurig).
Apparaat
De standaard apparaatnaam van de DIR-170 voor DLNA is “AirMusic”. U kunt
het hernoemen bij de DLNA-instelling op de pc of mobiel. Gebruik de QR-
code om de app “AirMusic” te downloaden en installeren.
Equalizer
De standaard equalizerinstelling is ‘normaal’, maar u kunt dit veranderen in
‘Vlak, Jazz, Rock, Soundtracks, Klassiek, Pop, Nieuws of Mijn EQ’. Druk op de
EQ-toets op de afstandsbediening om de equalizermodus snel te veranderen.

46
Zoek en installeer apps in Google Play, die media delen.
Voeg de audiobestanden van uw mobiel die u wilt delen toe.
Nadat de gedeelde server is ingesteld, kies de muziek en regel het afspelen op de DIR-170
DLNA
De DIR-170 ondersteunt naast UPnP ook de DLNA-functie; u deelt de muziekbestanden direct via pc
of mobiele Android-telefoon.
U kunt bovendien uw pc, mobiele Android-telefoon of iPhone/iPad gebruiken om de
muziekweergave van de DIR-170 te bedienen
De pc-systeemvereiste voor het gebruik van DLNA is Windows 7 en Windows Mediaspeler versie 12.
Stel het in, zoals hieronder beschreven:
Deel eerst de media op uw pc met de DIR-170.
Control Panel (controlepanel) > Network and Internet (netwerk en internet) > Network and Sharing
Center (netwerk en deelcentrum) > Change advanced sharing settings (Geavanceerde
deelinstellingen wijzigen) > Media streaming options (opties mediastreaming)
Open Windows Media Player om Allow remote control of my Player (Sta afstandsbediening vanaf
mijn speler toe) in te schakelen.
Rechtsklik op het gewenste muziekbestand in de bibliotheek en selecteer “Play to Radio” (Afspelen
op radio).
Er zal een venster verschijnen om het afspelen van de muziek op de radio te regelen.
U kunt elke gratis of commerciële DLNA-app van Google Play of de Apple Store zoeken en installeren
als u gebruik maakt van Android mobiel, tablet of iPhone/iPad. Wij raden u aan bubble UPnP,
Twonky Beam op een Android telefoon of tablet te gebruiken en Twonky Beam op een iPhone/iPad.
Sommige apps geven geen ondersteuning voor het streamen van muziek vanaf de iPhone/iPod,
maar de iPhone/iPod kan nog wel worden gebruikt voor de bediening van het streamen van muziek
vanaf andere servers.
De procedure voor het afspelen van gedeelde muziek in de app is als volgt:
Selecteer de DIR-170 als de speler. U kunt met sommige apps de muziek ook gelijkertijd afspelen via
meerdere spelers.

47
Selecteer de (music server) muziek-server en kies de muziek. Sommige apps kunnen een afspeellijst
maken als u voor meerdere muziektracks kiest.
Opmerking: Wanneer u de DLNA muziek streaming functie gebruikt op de internetradio, dan kunt u
alleen het volume en stand-by regelen via het apparaat. De bediening van andere functies is beperkt.
Stop DLNA op de pc, mobiele telefoon of tablet voordat u de eigen bediening van de
DIR-170 hervat.
AUX (Lijningang)
De AUX-ingangsmodus speelt audio af van een externe bron zoals een MP3-speler of andere
audiobron met lijnuitgang.
Om audio af te spelen in de Aux-in-modus:
Stel het volume laag in op zowel de radio als de audiobron, indien instelbaar.
Sluit de externe audiobron aan op de Aux in 3,5 mm stereo-aansluiting. Druk of op MODE totdat de
display AUX IN weergeeft of selecteer AUX in het hoofdmenu.
Pas naar wens het volume aan van de DIR-170 enindien nodig, de audiobron.
BLUETOOTH
Druk op MODE totdat de display Bluetooth weergeeft of selecteer Bluetooth in het hoofdmenu. Er
zal een geluid klinken om aan te geven dat de paringmodus actief is. Activeer de Bluetooth-
paringmodus van uw telefoon/tablet en zoek op uw telefoon/tablet naar de naam Lenco DIR-170.
Klik vervolgens op deze naam om te paren. Er zal na een geslaagde verbinding een verbindingsgeluid
klinken. U kunt nu muziek afspelen via Bluetooth en het volume aanpassen op de DIR-170 of op het
verbonden apparaat.

48
FM-radio
Selecteer ‘FM mode’ (FM-modus) in het hoofdmenu met het Navigatiewieltje (6) of met de
navigatietoetsen op de afstandsbediening. Druk op het Navigatiewieltje (6) om de FM-radiomodus te
openen. De FM-modus zal starten op 87,5MHz.
Druk op het Navigatiewieltje (6) en kies YES (Ja) wanneer “auto scan?” verschijnt om alle stations
met een krachtig signaal op te slaan. Het apparaat zal vervolgens een automatische scan starten.
Nadat de automatische scan eenmaal is gestart, dan zullen de stations worden opgeslagen in uw
favorieten.
U kunt deze opgeslagen stations vervolgens doorlopen door de toets ‘<’ of ‘>’ ingedrukt te houden
en tussen opgeslagen stations te wisselen.
U kunt de FM-frequentie ook handmatig doorlopen door gewoon op de toets ‘<’ of ‘>’ te drukken en
de frequentieband in oplopende of aflopende frequentie te scannen.
Uw favoriete FM-stations als voorkeuze instellen
U kunt voorkeuzestations handmatig opslaan door de stationsfrequentie te selecteren van het
station dat u wilt opslaan.
Houd vervolgens de toets ‘Fav’ 1-2 seconden ingedrukt en het nummer ‘01’ zal op de display
verschijnen. Gebruik de navigatieknop om de voorkeuzenummers (tot 99) te doorlopen en selecteer
het voorkeuzenummer waar u het station wilt opslaan door op het Navigatiewieltje (6) te drukken.
FM-voorkeuzestations herroepen
Bekijk uw favoriete FM-stations in de FM-modus door gewoon op de toets ‘Fav’ te drukken en de
opgeslagen stations te doorlopen.

49
DAB+ (DIGITALE RADIO)
Selecteer ‘DAB/DAB+’ op het hoofdscherm door de knop te draaien en op de navigatieknop of
navigatietoetsen op de afstandsbediening te drukken.
Wanneer u de DAB-functie op uw radio voor het eerst gebruikt, dan zal de radio beginnen naar DAB-
stations te zoeken terwijl ’Scanning’ (Scannen) op de display verschijnt. De radio zal het aantal
gevonden stations weergeven naargelang de scan wordt uitgevoerd.
Nadat alle beschikbare stations zijn gevonden, dan zal de display de keuze van beschikbare stations
weergeven. Scroll met de navigatieknop of navigatietoetsen om het station te luisteren waar u naar
wilt luisteren.
Wanneer u een station hebt geselecteerd, dan zal de display het station weergeven en kunt u op de
navigatieknop drukken om het afspelen te starten. U kunt de navigatieknop drukken om het vorige
of volgende station te selecteren.
Druk op de toets ‘<’ om terug te keren naar de lijst om de stations handmatig te doorlopen. U kunt
stations opnieuw scannen door naar de hoofdlijstpagina voor de DAB-stations te gaan waar de
herinnering ‘Delete station list?’ (Stationslijst wissen?) zal staan. Selecteer ‘YES’ (Ja) om opnieuw te
scannen.
Wanneer uw gekozen station wordt weergegeven, druk dan op de toets ‘>’ om informatie over het
station te bekijken. De informatie zal automatisch op het scherm worden doorlopen waarbij het
genre, MHz, de afspelende track, KHz en Kbps worden weergegeven.
Uw favoriete DAB/DAB+ stations als voorkeuze instellen
Wanneer u het gewenste station hebt gevonden, houd dan ‘Fav’ enkele seconden ingedrukt om naar
het scherm ‘Add to my Favorites’ (Toevoegen aan Mijn Favorieten) te gaan. Draai het
Navigatiewieltje (6) om het voorkeuzenummer (tot 99) te kiezen en selecteer uw optie door op het
Navigatiewieltje (6) te drukken
Wanneer de lijst met DAB-stations wordt weergegeven, dan kunt u het gekozen station ook
markeren en ‘Fav’ ingedrukt houden om naar het scherm ‘Add to my Favorites’ (Toevoegen aan Mijn
Favorieten) te gaan.

50
DAB/DAB+ voorkeuzestations herroepen
Bekijk uw favoriete DAB/DAB+ stations in de DAB-modus door op de toets ‘Fav’ te drukken en de
opgeslagen stations te doorlopen.
Technische specificaties
Network (Netwerk)
802.11b/g/n (WLAN) encryptie: WEP, WPA, WPA 2(PSK), WPS
Streaming
UPnP, DLNA
Ondersteunde
bestandtypes
WMA, MP3, FLAC, AAC
Aansluitingen
DC, USB, 3,5mm AUX-IN, 3,5mm Lijnuitgang
Ingang
100-240V~50/60 Hz, 0,8A
Uitgang
12.0V/2.0A
Muziek vermogen
Bluetooth versie
FM Frequentieband
DAB Frequentieband
2 x 10W RMS
V2.1 + EDR
87.5 – 108MHz
170 – 240MHz
Werkingscondities
Temperatuur: 0-35
Vochtigheid 5% tot 90%
Werkingspositie
Horizontaal
Stroomverbruik (in
stand-by)
< 1 W
Netwerk stand-by
stroom verbruik
< 2 W
Voedingsadapter:
Gebruik alleen de originele wisselstroomadapter
Gebruik uitsluitend de voeding gespecificeerd in deze gebruikersaanwijzingen.
Informatie
Waarde en precisie
Naam of handelsmerk van de fabrikant,
handelsregistratie en adres
Shenzhen Adition Audio
Science & Technology
Co.,Ltd
Modelaanduiding
AD2401202000EU
Ingangsspanning
100-240V
Termékspecifikációk
| Márka: | Lenco |
| Kategória: | rádió |
| Modell: | DIR-170 |
Szüksége van segítségre?
Ha segítségre van szüksége Lenco DIR-170, tegyen fel kérdést alább, és más felhasználók válaszolnak Önnek
Útmutatók rádió Lenco

6 Október 2024
29 Szeptember 2024
25 Szeptember 2024
16 Szeptember 2024
16 Szeptember 2024
26 Augusztus 2024
26 Augusztus 2024
21 Augusztus 2024
18 Augusztus 2024
17 Augusztus 2024
Útmutatók rádió
- rádió Sony
- rádió August
- rádió Yamaha
- rádió Moulinex
- rádió Nedis
- rádió Milwaukee
- rádió Grundig
- rádió Philips
- rádió Pioneer
- rádió Kärcher
- rádió Adler
- rádió Oregon Scientific
- rádió SilverCrest
- rádió Garmin
- rádió Bosch
- rádió Panasonic
- rádió JVC
- rádió AEG
- rádió Sharp
- rádió Einhell
- rádió Harman Kardon
- rádió Toshiba
- rádió Sven
- rádió Ozito
- rádió Makita
- rádió Hyundai
- rádió HQ
- rádió Emos
- rádió Medion
- rádió Onkyo
- rádió Motorola
- rádió Vimar
- rádió Technics
- rádió JBL
- rádió Camry
- rádió DAP-Audio
- rádió Zebra
- rádió Xiaomi
- rádió GoGen
- rádió Futaba
- rádió Boss
- rádió Be Cool
- rádió Thomson
- rádió Technaxx
- rádió Aiwa
- rádió Kenwood
- rádió Tesco
- rádió Duronic
- rádió Clatronic
- rádió Hama
- rádió PEAQ
- rádió Renkforce
- rádió Midland
- rádió Sencor
- rádió GPX
- rádió Bose
- rádió Lowrance
- rádió Hitachi
- rádió BLUEPALM
- rádió Telefunken
- rádió Nevir
- rádió Sennheiser
- rádió Tangent
- rádió Cambridge
- rádió Alpine
- rádió Acoustic Solutions
- rádió Roadstar
- rádió Logitech
- rádió Klein Tools
- rádió Parrot
- rádió Cobra
- rádió Hilti
- rádió Sonoro
- rádió Denver
- rádió Bush
- rádió Power Dynamics
- rádió Black & Decker
- rádió Trevi
- rádió Memphis Audio
- rádió Elta
- rádió Albrecht
- rádió Aluratek
- rádió Audio-Technica
- rádió NGS
- rádió Daewoo
- rádió Lenoxx
- rádió PowerPlus
- rádió Denon
- rádió Muse
- rádió OK
- rádió JL Audio
- rádió Metabo
- rádió SPC
- rádió Auna
- rádió Hitec
- rádió Mac Audio
- rádió TriStar
- rádió BaseTech
- rádió Bogen
- rádió RYOBI
- rádió Terratec
- rádió DreamGEAR
- rádió HiKOKI
- rádió Intertechno
- rádió Manhattan
- rádió Alecto
- rádió Festool
- rádió Furrion
- rádió Velleman
- rádió Teac
- rádió Clarion
- rádió Scott
- rádió Monacor
- rádió ION
- rádió Manta
- rádió Blaupunkt
- rádió Oricom
- rádió Viper
- rádió Easy Home
- rádió Sagem
- rádió Delta
- rádió Busch-Jaeger
- rádió Olympia
- rádió Logik
- rádió Tronic
- rádió Timex
- rádió La Crosse Technology
- rádió Infinity
- rádió AKAI
- rádió Porter-Cable
- rádió Konig
- rádió Stabo
- rádió TechniSat
- rádió GlobalTronics
- rádió Jensen
- rádió Pyle
- rádió Emerson
- rádió DeWalt
- rádió Sanyo
- rádió Salora
- rádió Telestar
- rádió CRUX
- rádió Schneider
- rádió Roberts
- rádió Audizio
- rádió ECG
- rádió Stanley
- rádió Uniden
- rádió Victrola
- rádió Majority
- rádió Hertz
- rádió Vonroc
- rádió Soundmaster
- rádió Monitor Audio
- rádió Cotech
- rádió Audac
- rádió Rockford Fosgate
- rádió Krüger&Matz
- rádió Dual
- rádió ICOM
- rádió Kathrein
- rádió Yaesu
- rádió RCA
- rádió Imperial
- rádió Kicker
- rádió Sangean
- rádió Topcom
- rádió Sirius
- rádió MB Quart
- rádió H-Tronic
- rádió OneConcept
- rádió ILive
- rádió Schwaiger
- rádió EasyMaxx
- rádió Orava
- rádió Lexon
- rádió Vitek
- rádió Geneva
- rádió Craftsman
- rádió Majestic
- rádió Graphite
- rádió Reflexion
- rádió Smartwares
- rádió Teufel
- rádió Sogo
- rádió Crosley
- rádió REVO
- rádió Artsound
- rádió Matsui
- rádió Quigg
- rádió Acoustic Energy
- rádió Argon
- rádió Icy Box
- rádió Brennenstuhl
- rádió Lexibook
- rádió Tevion
- rádió GPO
- rádió Caliber
- rádió Swan
- rádió Exibel
- rádió Brigmton
- rádió Sunstech
- rádió Maginon
- rádió Marquant
- rádió Nordmende
- rádió AudioAffairs
- rádió Binatone
- rádió Steren
- rádió Audiosonic
- rádió Proline
- rádió Coby
- rádió Envivo
- rádió Bigben Interactive
- rádió Technoline
- rádió Pure
- rádió Audiovox
- rádió Terris
- rádió Switel
- rádió Hager
- rádió Bigben
- rádió Sunwind
- rádió Laser
- rádió Alba
- rádió Clas Ohlson
- rádió Naxa
- rádió Ricatech
- rádió Boston Acoustics
- rádió Mpman
- rádió Sweex
- rádió Ices
- rádió Nikkei
- rádió PerfectPro
- rádió Freecom
- rádió Navman
- rádió Gira
- rádió Jung
- rádió Dnt
- rádió Balance
- rádió MT Logic
- rádió Audio Pro
- rádió Kunft
- rádió Difrnce
- rádió Noveen
- rádió Karcher Audio
- rádió Fusion
- rádió PAC
- rádió IHome
- rádió AIC
- rádió Ruarkaudio
- rádió Tivoli Audio
- rádió Go Green
- rádió Wolfgang
- rádió Linn
- rádió Numan
- rádió Iluv
- rádió TELEX
- rádió Multiplex
- rádió Clint
- rádió Soundstream
- rádió Xoro
- rádió Zolid
- rádió Sagemcom
- rádió Block
- rádió Berker
- rádió Woxter
- rádió Xhdata
- rádió View Quest
- rádió Harley Davidson
- rádió Noxon
- rádió Brionvega
- rádió Ferguson
- rádió Wet Sounds
- rádió Eissound
- rádió Dcybel
- rádió Tecsun
- rádió JGC
- rádió Scansonic
- rádió TFA Dostmann
- rádió Audisse
- rádió ETON
- rádió Kruger Matz
- rádió Equity
- rádió EKO
- rádió Pinell
- rádió Videologic
- rádió Tivoli
- rádió Mtx Audio
- rádió Aquatic AV
- rádió Roswell
- rádió Intek
- rádió Digitalbox
- rádió Whistler
- rádió Xact
- rádió Ruark Audio
- rádió Magnavox
- rádió Digitech
- rádió GME
- rádió NUVO
- rádió Narex
- rádió Tiny Audio
- rádió R-MUSIC
- rádió E-bench
- rádió Konig Electronic
- rádió Peha
- rádió SiriusXM
- rádió Sanwa
- rádió SW-Stahl
- rádió Sailor
- rádió SSV Works
- rádió Microlab
- rádió QFX
- rádió Voxx
- rádió SACK It
- rádió BasicXL
- rádió Roth
- rádió Ices Electronics
- rádió AmpliVox
- rádió Elbe
- rádió GBS Elettronica
- rádió Sang
- rádió Gewiss
- rádió Lutron
- rádió Axxess
- rádió Retekess
- rádió Wintal
- rádió Atlantis Land
- rádió Ranger
- rádió MAAS
- rádió Weather X
- rádió Aconatic
- rádió Mebby
- rádió Yamazen
- rádió Blonder Tongue
- rádió RoadKing
Legújabb útmutatók rádió

10 Április 2025
2 Április 2025
1 Április 2025
1 Április 2025
31 Március 2025
30 Március 2025
29 Március 2025
26 Március 2025

25 Március 2025
16 Január 2025