Használati útmutató Lamax X7 Mira ActionCam
Lamax
Digitális fényképezőgép
X7 Mira ActionCam
Olvassa el alább 📖 a magyar nyelvű használati útmutatót Lamax X7 Mira ActionCam (141 oldal) a Digitális fényképezőgép kategóriában. Ezt az útmutatót 6 ember találta hasznosnak és 2 felhasználó értékelte átlagosan 4.5 csillagra
Oldal 1/141
- 1 -
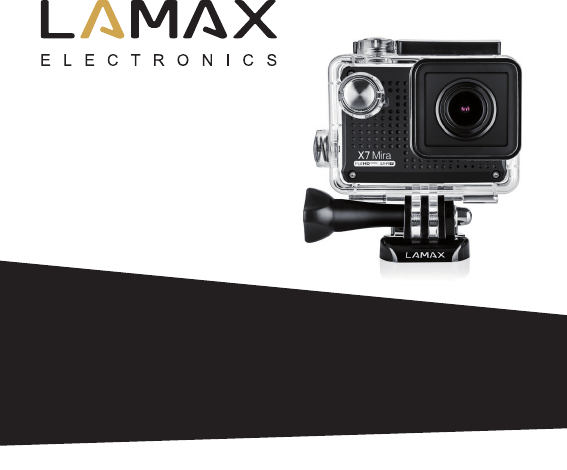
LAMAX X7 Mira Action Camera
Waterproof up to 30 m
Full HD video 1920 x 1080
12 MP camera
WiFi
- 2 -
Safety Precautions
1. Do not drop the camera or subject it to any powerful physical shock that may cause
mechanical damage.
2. Do not place the camera near objects that generate magnetic elds, such as magnets
or electric motors or near objects that emit strong radio waves, such as antenna.
Powerful magnetic elds or radio waves may cause damage to the camera or corrupt
the captured video and audio recordings.
3. Do not expose the unit to high temperatures or direct sunlight.
4. Use only a high-quality micro SD card. Cards produced by unveried manufacturers are
not guaranteed to function properly.
5. Do not place the micro SD card near a magnetic eld or in a place with static electricity
as this may cause the loss of data.
6. If the device overheats, emits smoke or a suspicious odour, immediately disconnect the
device from the power supply.
7. Whilst charging the camera, keep it out of reach of children as the power cable may
cause electric shock or asphyxiation.
8. Store camera in a cool, dry and dust-free environment.
Introduction
Congratulations on purchasing the LAMAX X7 Mira camera. This highly-durable camera
is ideal for use in extreme conditions leaving you free to shoot when diving, ying,
doing winter sports, riding a bike or motorbike and whenever you require high-quality
recording under harsh weather conditions. The LAMAX X7 Mira action camera allows you
to shoot video in FULL HD, take photos at a resolution of 12 MP and view this on the
integrated 1.5” LCD display.
- 3 -
The LAMAX X7 Mira Action Camera has the following features:
- Compact design.
- Comes supplied with a protective waterproof housing able to withstand depths of up to
30 m enabling you to capture stunning underwater shots or your favourite water sports.
- Includes an integrated LCD display for immediate playback of your recordings.
- Can shoot video or take photographs whilst charging.
- Shoots Full HD video 1920 x 1080.
- Up to 12 MP photos.
- Wide-angle lens with a range up to 170°.
- Wide choice of video and photo resolutions.
- Multiple photography modes.
- Option to manually set photo and video exposure.
- Wide range of supplied accessories allows you to shoot video any time and anywhere.
- Can be used as a dashcam.
- Can be used as a webcam.
- Supports Micro SDHC cards up to 32 GB.
- USB and HDMI connectivity.
- Integrated WiFi allows connection to wireless devices.
- Intuitive to use and easy to connect to a PC or smartphone.
- User-friendly software.
- 2 baterries

- 4 -
Camera from the front right
Camera Parts:
1 Shutter / Conrm
2 Power / Mode
3 Operating Indicator
4 Charging Indicator
5 Micro USB Slot
6 Micro SDHC Card Slot
7 HDMI Port
8 Speaker
9 Lens
Camera from the back right
Camera Parts:
1 Up
2 Down
3 Back / Cancel
4 Menu
5 Microphone
6 WiFi Indicator
7 WiFi button
6
7
9
8
2
3
5
4
1
3
5
6
1 2
4
7

- 5 -
Camera from below
Camera parts:
1 Battery cover
2 Battery cover lock
Camera in waterproof housing
from front left
Case parts:
1 WiFi button
2 Shutter / Conrm
3 Power / Mode
4 Waterproof case door lock
5 Lens
12
5
3
2
1
4

- 6 -
Waterproof case
Pole mount
Frame for use without waterproof case
J mount
Charger
Fast plug-in
Quick clip mount
Self-adhesive mount, straight (2 pcs)
3-axis connector (3 parts)
Tripod adapter
Accessories
Tripod screw adapter
Universal straps with hook and loop fastener
3M replacement pads
USB cable
Li-ion battery (2 pcs)
Replacement door
Cable ties
Wire rope sling
Microbre cloth
User manual

- 7 -
Camera assembly
- 9 -
6. Switching modes
Pressing the “MODE” button allows you to switch between modes: Video / Photo /
Gallery. The mode icon appears at the top of the screen.
7. Video recording: modes and settings
a. Capturing video
Put the camera in “Video” mode by pressing the “MODE” button and to record press
the shutter button. An animation is now displayed in the upper right-hand corner
of the display. To stop recording press the shutter button again and the recording
animation disappears. Whilst lming, the audio recording can be enabled or disabled
by pressing the “UP” button and also, recorded le can be locked by pressing the
“DOWN” button. This changes the corresponding icon in the upper left-hand corner
of the display.
b. “Video” settings (video camera icon)
• Video resolution – select the video resolution and frame rate.
1080p at 30 fps
720p at 60 fps
720p at 30 fps
• Loop recording – this function is important when using the camera as a car camera.
When enabled, the camera continuously records and if it runs out of space on the SD
card it will automatically overwrite the oldest, unlocked recordings.
O
1 min
3 min
5 min
• G-Sensor – this additional function is also useful when using the camera in a car. When
enabled, if there is a collision the recordings will be automatically locked against
deletion. In this settings menu, you can adjust the sensitivity of the G-Sensor.
- 11 -
shutter, the camera takes a photo, a series of photos or begins the timer, depending
on the settings.
b. “Camera” settings (camera icon)
• Photo resolution – these settings change the photo resolution, the nal quality and size.
4000 x 3000 (12 MP)
3648 x 2736 (10 MP)
3264 x 2448 (8 MP)
2816 x 2112 (6 MP)
• Quality – change the overall quality of the shots and their size.
Super ne
Fine
Normal
• ISO – determines the sensitivity of the image chip. The darker the subject, the higher
the ISO can be set. Higher ISO settings lead to more image noise.
Automatic
50
100
200
400
800
1600
• Self-timer – allows you to set the delay time after pressing the shutter. This minimizes
motion blur caused by camera shake when taking a photo in the classic way.
O
3s
5s
10s
- 12 -
• Photo Burst
Photo burst allows you to take multiple shots by pressing the shutter.
O
3 photos
5 photos
10 photos
• Sharpness
This setting aects the hardness or softness of the image contours.
Hard
Normal
Soft
• Date Stamp
Inserts the current date and/or time onto the image.
O
Date
Date & Time
9. Other settings
For additional settings not included in the “Video” and “Camera” tabs there is a
“Settings” tab (gear icon).
• Image Orientation – this function allows you to adjust the orientation of the image
when lming or taking photos. The options allow you to use the standard orientation,
to rotate the image by 180° or to automatically rotate the image to the standard
orientation depending on the position of the camera.
Normal
Auto Rotate
Rotate 180°
- 13 -
• White Balance – allows you to adjust the white balance when recording.
Auto
Daylight
Overcast
Tungsten
Fluorescent
• Image Filters – sets the colour eect of the image.
Normal
B&W
Sepia
Negative
Miniature
Red
Green
Blue
Saturation
• Exposure – allows you to adjust exposure as needed. The exposure settings range from
-2 to +2 in increments of 1/3.
• Language – select the language of the device.
• LCD O – display automatically turns o after the set about of time when idle.
1 min
3 min
5 min
O
• Auto Power O – camera automatically powers o after a set amount of time when
idle.
O
1 min
- 14 -
3 min
5 min
• Sound – allows you to enable or disable the audio in video recording, the welcome
tune, and the shutter and button sounds.
• Date & Time – the date and time settings of the device. Set the format of the displayed
data.
• Network Frequency – allows you to select the frequency in accordance with the grid
frequency (on the European continent it is 50 Hz and in the Americas and parts of Asia
it is 60 Hz).
System
• Factory Reset – this restores factory setting on the device. Conrmation of this action
can not be undone.
• System Info – displays information about the camera software version.
• Card Info – displays information about the inserted micro SDHC card.
• Format – allows you to format the micro SD card.
• WiFi Password – set the password to connect to WiFi.
• WiFi Name – set the WiFi name of your device.
10. Connecting WiFi
The camera can be connected via WiFi to your mobile device running Android or iOS
by following these instructions:
a. Install the LAMAX CamApp 2.0 onto your mobile device (the app can be found on
Google Play for Android devices or in the App Store for iOS devices).
b. Turn on the camera and activate WiFi by pressing the “WiFi” button.
c. Activate WiFi on your mobile device. The camera WiFi connection is listed under
“ACTION X7”. The password for the connection is 1234567890.
d. Once connected, you can use the application to control the camera or browse the
recorded data.
- 16 -
d. Unlock a single entry – can be done in the photo or video gallery. Press the “MENU”
button, select “File lock”, select “Unlock le” and conrm by selecting “Yes”.
e. Unlock all entries – can be done in the photo or video gallery. Press the “MENU”
button, select “Lock data”, select “Unlock all” and conrm by selecting “Yes”.
14. The LAMAX X7 Mira camera connects to a computer in multiple modes.
a. External disk – connect to your computer using the USB cable, select “USB STORAGE”
using the “UP” and “DOWN” arrows and conrm by pressing the shutter.
b. Webcam – connect to your computer using the USB cable, select “WEBCAM” using
the “UP” and “DOWN” arrows and conrm by pressing the shutter.
c. Charging via USB while maintaining full camera functionality – connect to your
computer using the USB cable, select “CHARGING” using the “UP” and “DOWN”
arrows and conrm by pressing the shutter.
Termékspecifikációk
| Márka: | Lamax |
| Kategória: | Digitális fényképezőgép |
| Modell: | X7 Mira ActionCam |
Szüksége van segítségre?
Ha segítségre van szüksége Lamax X7 Mira ActionCam, tegyen fel kérdést alább, és más felhasználók válaszolnak Önnek
Útmutatók Digitális fényképezőgép Lamax

15 Augusztus 2024
12 Augusztus 2024
7 Augusztus 2024
Útmutatók Digitális fényképezőgép
- Digitális fényképezőgép Samsung
- Digitális fényképezőgép Sony
- Digitális fényképezőgép Olympus
- Digitális fényképezőgép Oregon Scientific
- Digitális fényképezőgép SilverCrest
- Digitális fényképezőgép Panasonic
- Digitális fényképezőgép Canon
- Digitális fényképezőgép JVC
- Digitális fényképezőgép Casio
- Digitális fényképezőgép Toshiba
- Digitális fényképezőgép HP
- Digitális fényképezőgép BenQ
- Digitális fényképezőgép Medion
- Digitális fényképezőgép Fujifilm
- Digitális fényképezőgép Polaroid
- Digitális fényképezőgép Kyocera
- Digitális fényképezőgép Technaxx
- Digitális fényképezőgép GoPro
- Digitális fényképezőgép Ricoh
- Digitális fényképezőgép Epson
- Digitális fényképezőgép Rollei
- Digitális fényképezőgép Renkforce
- Digitális fényképezőgép Kodak
- Digitális fényképezőgép Nikon
- Digitális fényképezőgép Denver
- Digitális fényképezőgép Minox
- Digitális fényképezőgép Beha-Amprobe
- Digitális fényképezőgép Albrecht
- Digitális fényképezőgép Fisher Price
- Digitális fényképezőgép Gembird
- Digitális fényképezőgép GE
- Digitális fényképezőgép Powerfix
- Digitális fényképezőgép Pulsar
- Digitális fényképezőgép AgfaPhoto
- Digitális fényképezőgép Sigma
- Digitális fényképezőgép Pentax
- Digitális fényképezőgép ION
- Digitális fényképezőgép TomTom
- Digitális fényképezőgép Trust
- Digitális fényképezőgép Leica
- Digitális fényképezőgép GoClever
- Digitális fényképezőgép Insta360
- Digitális fényképezőgép HTC
- Digitális fényképezőgép Genius
- Digitális fényképezőgép Vivitar
- Digitális fényképezőgép Aiptek
- Digitális fényképezőgép AEE
- Digitális fényképezőgép Apeman
- Digitális fényképezőgép Argus
- Digitális fényképezőgép Lexibook
- Digitális fényképezőgép Tevion
- Digitális fényképezőgép Bushnell
- Digitális fényképezőgép Easypix
- Digitális fényképezőgép Maginon
- Digitális fényképezőgép Flir
- Digitális fényképezőgép Envivo
- Digitális fényképezőgép Targa
- Digitális fényképezőgép Fuji
- Digitális fényképezőgép Ematic
- Digitális fényképezőgép Minolta
- Digitális fényképezőgép Ingo
- Digitális fényképezőgép Veho
- Digitális fényképezőgép Dnt
- Digitális fényképezőgép Wanscam
- Digitális fényképezőgép Drift
- Digitális fényképezőgép SeaLife
- Digitális fényképezőgép Sakar
- Digitális fényképezőgép Qware
- Digitális fényképezőgép Jobo
- Digitális fényképezőgép Odys
- Digitális fényképezőgép Geonaute
- Digitális fényképezőgép Guardo
- Digitális fényképezőgép Red
- Digitális fényképezőgép Digital Blue
- Digitális fényképezőgép Traveler
- Digitális fényképezőgép Mustek
- Digitális fényképezőgép Plawa
- Digitális fényképezőgép BML
- Digitális fényképezőgép RadioShack
- Digitális fényképezőgép Spypoint
- Digitális fényképezőgép Liquid Image
- Digitális fényképezőgép Praktica
- Digitális fényképezőgép Somikon
- Digitális fényképezőgép Brinno
- Digitális fényképezőgép BlackVue
- Digitális fényképezőgép Storex
- Digitális fényképezőgép Bolyguard
- Digitális fényképezőgép Voigtlaender
- Digitális fényképezőgép General Electric
- Digitális fényképezőgép WASPcam
- Digitális fényképezőgép Revue
- Digitális fényképezőgép Kompernass - Lidl
- Digitális fényképezőgép Guide
- Digitális fényképezőgép Umax
- Digitális fényképezőgép Magpix
- Digitális fényképezőgép Konig Electronic
- Digitális fényképezőgép Sipix
- Digitális fényképezőgép Nytech
- Digitális fényképezőgép Yakumo
- Digitális fényképezőgép Konica
- Digitális fényképezőgép Duramaxx
Legújabb útmutatók Digitális fényképezőgép
30 Március 2025
19 Március 2025
18 Március 2025

16 Január 2025
16 Január 2025
16 Január 2025

16 Január 2025
15 Január 2025
15 Január 2025
12 Január 2025