Használati útmutató Konig KN-WLHDMI10
Konig
AV hosszabbító
KN-WLHDMI10
Olvassa el alább 📖 a magyar nyelvű használati útmutatót Konig KN-WLHDMI10 (36 oldal) a AV hosszabbító kategóriában. Ezt az útmutatót 5 ember találta hasznosnak és 2 felhasználó értékelte átlagosan 4.5 csillagra
Oldal 1/36

Wireless HDTV Solution
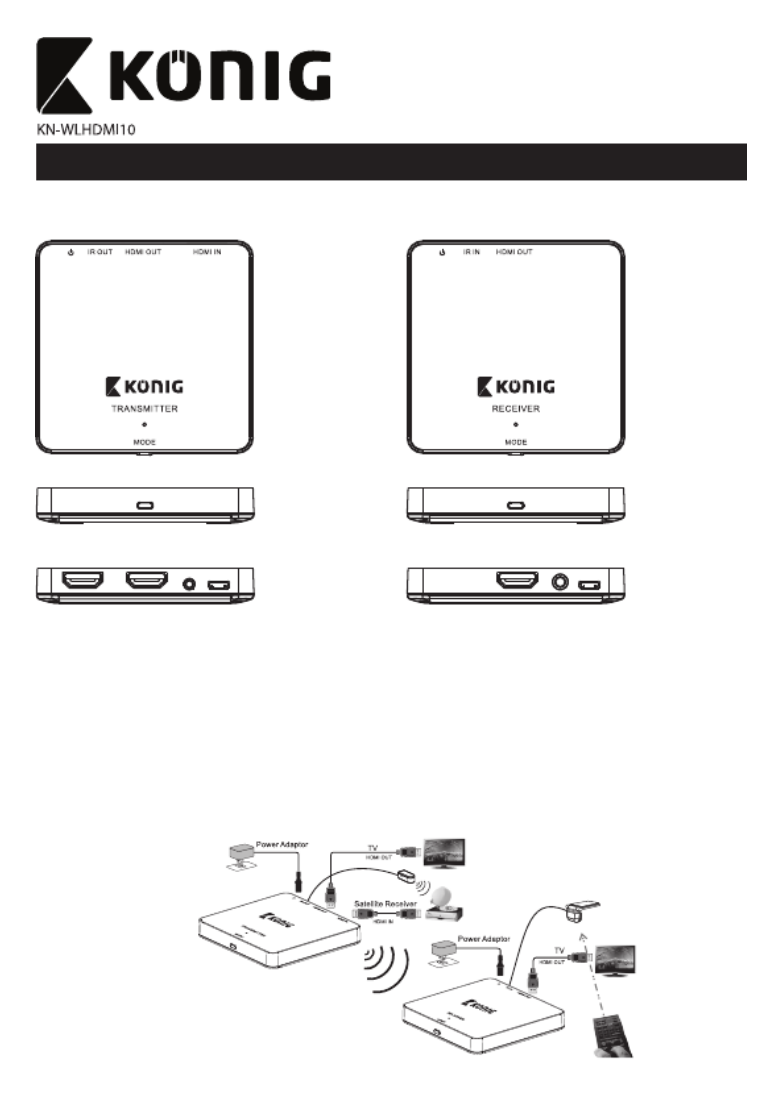
CONNECTION & OPERATION
Tr nsmitta er b )ox (TX
TOP
Recei r b )ve ox (RX
TOP
Front
B kac
Front
B kac
C onnection
Step 1: Use an HDMI™ Cable to connect the HDMI IN transmitter port to a source device, e.g. a satellite receiver, CATV STB, Blu-ray player
or game console. To view the same TV programme on two TVs, also connect an HDMI™ Cable to the HDMI OUT transmitter port
and to the second (HDTV) screen.
St e an DMep 2: Us H I™ Cable to conne ctthe DMH I OUT recei rve port n D eto scree a (H TV roj, p ctor etc.).
St onn ct the IR mitteep 3: C e e r tto he trans ittem r. Place th mitte e er probe in ront f of receithe IR ver of the sour ic onnecce dev e. C t Ithe R
receiver o recei r. recei r t the ve Place the ve probe in fro o it.nt f
St onn ctep 4: C e a V er adapter DC 5 /1 A pow t to h Se Micro U B port of the tran mitts er.
St onn ct anoep 5: C e ther V DC 5 /1 A wer pter ro S po ada to th ice M U B port of the recei r eve . Conn ction should b ed. now ta be es lish
Step 6: If the screen does not show any images, rst pair the transmitter box (TX) and receiver box (RX) (press the MODE key of the RX
and then press the MODE key of the TX).
1

1. Make sure your input AC voltage is compatible with the adapter specications.
Opera tion
A In on. stallati
2. Only use th ow e p er adapter icwh h is pro ided withv t WLH Ihe KN- DM 10. I se f you u your own adapter, make sure the power p out ut s i
DC 5 , 1 V A, centr ti .e posi ve
3. With a direct line of sight, the maximum range of the A/V signal transmission can reach up to 100 feet. This distance, however, is limited
by obstacles or walls placed between the transmitter box and receiver box (the optimum indoor range is less than 30 metres).
4. To ensure a good infrared remote control operation, aim your remote control at the IR probe of the KN-WLHDMI10 and press
the buttons rmly (with some remote controls it may be necessary to press and hold each button for approx. 1 second).
The working angle o Rf the I probe is + º./- 15
5. The distance between the remote control and the receiver should be between 0.3 metres and 5 metres (working angle +/- 15º).
B pa ng m. TX RX & iri ode
Pr sse th DE e MO key on the RX.
1. “Connection” is dis layed p on n.scree
2. Pr sse th DE e MO key on e TX th .
3. Wait or f auto connection .
C t. IR ex ending f onuncti
1. Connect the IR itt em er o pr be o t t .he TX
2. Connect the IR rec reive probe to the RX.
3. You can now o ratpe e th ourc ice wie s e dev th a re ol. mote contr
Warning I: n order to id ve avo o rheati g,n do not cove the trar nsmitt r e or the recei r.ve
NO ETIC
• Manufacturer reserves the right to make changes in the hardware, packaging and any accompanying documentation without prior
written notice.
• The terms HDMI ang HDMI High-Denition Multimedia Interface, and the HDMI Logo are trademarks or registered trademarks of
HDMI Licensing LLC in the United States and other countries.
• WLH I KN- DM 10 incorporates H IDM ™ technology.
TR UBLE HOO S O GTIN
1. I hf t e sc remreen ains blank:
• Make ure thas t th de direct connection from the source evice to the sink device works roperly p .
• Check if all connectors a e pr roperly conne tec d h; c eck f all cablei s su hpport t e transmission speed. High lSpeed HDMI™ Cab es are
recommended.
• Disco t the pnnec ower cable to restart KN-WLHDMI10.
2. I hf t ere s i n u :o so nd
• ry t adjT o ust the volume of your TV.
• Check the cable connection to see if it is properly connected.
• Check the cable to see if it only supports video transmission (D if it VI) or is damaged.
• HDCP may not pair successfully at the rst attempt; please disconnect the power cable to restart the KN-WLHDMI10.
3. I hf t ere s i n :o 3D eect
• Make sure the 3D function on the 3D TV (or DLP projector) is activated (set to AUTO or 3D ON).
• Make sure the 3D function on the 3D source device is activated (set to AUTO or 3D ON).
• Make sure the power of the shutter glasses is switched on.
• Check if the power cable of the KN-WLHDMI10 is connected properly.
• If the 3D HDTV requires active shutter glasses for 3D viewing, make sure the pair of active shutter glasses you use are compatible with
the 3D TV.
• If the 3D HDTV requires passive shutter glasses for 3D viewing, make sure the pair of passive shutter glasses you use are compatible
with the 3D TV.
4. I hf t e im ge is u stable, or a snowy noise pa n atte n showr s onscreen:
• Keep he KN-WLHDMI10 away from any pt ossible ources s o rf inte fere chnce, su as - Wi Firout rs mie , crowaves, air conditioner tc.s e
• he wT ireless rat nsmission distance may be to fa or blo ed by o r ck a wa otll or her objects. Place the aKN-WLHDMI10 at location which
allows for a l c ear ignal s r t n.ecep io
• Change the di n of rectio the T nX a d RX to enable a better reception.
5. I hf t e wi eless c nnection failsr o :
• lease m ke sP a ure the power of the source device is switc ed onh .
• Discon c one t the p wer cable to restart t Whe KN- LHDMI10.
6. I hf t e IR ex g function is not workingtendin :
• Check if the R emitter iI s connected t ho t e KN-WL DMI10 tH ransmitter and lace p the emitter probe in fr o hnt of t e IR receiver of the
sour dce evice.
• The IR extending function of KN-WLHDMI10 works with 30 ~ 60 kHz IR remote control systems. If the IR remote control system works
with dierent frequencies or the IR signal pulse is too short the IR extending function is not compatible.
2
An schluss
Schritt 1: Verwenden Sie ein HDMI™-Kabel, um den HDMI-Eingang des Übertragungsgeräts mit einem Quellgerät zu verbinden,
beispielsweise einen Satelliten-Receiver, CATV STB, Blu-ray-Player oder eine Spielekonsole. Schließen Sie ein HDMI™-Kabel
an den HDMI-Ausgangsanschluss des Übertragungsgeräts und an einen zweiten (HDTV-) Bildschirm an, um das gleiche
Bild auf zwei Bildschirmen zu sehen.
Schritt 2: Verwenden Sie ein HDMI™-Kabel, um den HDMI-Ausgangsanschluss des Empfängers an einen Bildschirm anzuschließen
(HDTV, Beamer usw.).
Schritt 3: Schließen Sie den Infrarot-Sender an das Übertragungsgerät an. Platzieren Sie die Sendersonde vor dem Infrarot-Empfänger
des Quellgeräts. Schließen Sie den Infrarot-Empfänger an den Empfänger an. Platzieren Sie die Empfängersonde davor.
Schritt Sch 4: ließen Sie ei 5-n V-( )DC -/1- -NetztA eil an den Micro-USB-Anschluss des raÜbert gungs gerätsan.
Schritt 5: Schließen Sie ein weiteres 5-V-(DC)-/1-A-Netzteil an den Micro-USB-Anschluss des Empfängers an. Die Verbindung sollte nun
hergestellt sein.
Schritt 6: Falls kein Bild zu sehen ist, erst die Übertragungs-Box (TX) und die Empfänger-Box (RX) koppeln (drücken Sie auf die MODE-Taste
des RX und anschließend auf die MODE-Taste des TX).
Drahtlose HDTV-Lösung
Empfä eng r-B RXox ( )
O T BERSEI E
e ag oxÜb rtr ungs-B (TX)
O T BERSEI E
Vord rs ite e e
Rücks ite e
Vord rs ite e e
Rücks ite e
ANSCHLUSS UND BETRIEB
3
Termékspecifikációk
| Márka: | Konig |
| Kategória: | AV hosszabbító |
| Modell: | KN-WLHDMI10 |
Szüksége van segítségre?
Ha segítségre van szüksége Konig KN-WLHDMI10, tegyen fel kérdést alább, és más felhasználók válaszolnak Önnek
Útmutatók AV hosszabbító Konig

17 Augusztus 2024
11 Augusztus 2024
1 Augusztus 2024
31 Július 2024
29 Július 2024
29 Július 2024
25 Július 2024
24 Július 2024
24 Július 2024
23 Július 2024
Útmutatók AV hosszabbító
- AV hosszabbító Nedis
- AV hosszabbító Philips
- AV hosszabbító StarTech.com
- AV hosszabbító LogiLink
- AV hosszabbító Roland
- AV hosszabbító Rocstor
- AV hosszabbító Digitus
- AV hosszabbító Crestron
- AV hosszabbító Gigabyte
- AV hosszabbító Tripp Lite
- AV hosszabbító Renkforce
- AV hosszabbító Iogear
- AV hosszabbító Smart-AVI
- AV hosszabbító Trevi
- AV hosszabbító Planet
- AV hosszabbító Black Box
- AV hosszabbító ATen
- AV hosszabbító Edimax
- AV hosszabbító Bogen
- AV hosszabbító Manhattan
- AV hosszabbító Adder
- AV hosszabbító Kindermann
- AV hosszabbító D-Link
- AV hosszabbító Blustream
- AV hosszabbító Monacor
- AV hosszabbító One For All
- AV hosszabbító Peerless-AV
- AV hosszabbító Abus
- AV hosszabbító Vivotek
- AV hosszabbító AG Neovo
- AV hosszabbító Marmitek
- AV hosszabbító Pyle
- AV hosszabbító MuxLab
- AV hosszabbító AVMATRIX
- AV hosszabbító DataVideo
- AV hosszabbító Atlona
- AV hosszabbító AJA
- AV hosszabbító Lindy
- AV hosszabbító Marshall Electronics
- AV hosszabbító Siig
- AV hosszabbító Gefen
- AV hosszabbító Vivolink
- AV hosszabbító Schwaiger
- AV hosszabbító Comprehensive
- AV hosszabbító Alfatron
- AV hosszabbító Teufel
- AV hosszabbító SWIT
- AV hosszabbító Belkin
- AV hosszabbító Kopul
- AV hosszabbító Sescom
- AV hosszabbító KanexPro
- AV hosszabbító Kramer
- AV hosszabbító Analog Way
- AV hosszabbító AMX
- AV hosszabbító Allnet
- AV hosszabbító Eminent
- AV hosszabbító Vision
- AV hosszabbító Techly
- AV hosszabbító Matrox
- AV hosszabbító Steren
- AV hosszabbító LevelOne
- AV hosszabbító InFocus
- AV hosszabbító Genexis
- AV hosszabbító Audio Pro
- AV hosszabbító Wentronic
- AV hosszabbító Peerless
- AV hosszabbító Monoprice
- AV hosszabbító MIPRO
- AV hosszabbító I3-Technologies
- AV hosszabbító UTEPO
- AV hosszabbító Aitech
- AV hosszabbító Polycom
- AV hosszabbító Advantech
- AV hosszabbító Micro Connect
- AV hosszabbító Extron
- AV hosszabbító ASSMANN Electronic
- AV hosszabbító Avocent
- AV hosszabbító Rose
- AV hosszabbító Intellinet
- AV hosszabbító Ebode
- AV hosszabbító Accell
- AV hosszabbító Ecler
- AV hosszabbító Rose Electronics
- AV hosszabbító Epcom
- AV hosszabbító CYP
- AV hosszabbító TV One
- AV hosszabbító SmartAVI
- AV hosszabbító IMG Stage Line
- AV hosszabbító Oehlbach
- AV hosszabbító HELGI
- AV hosszabbító Liberty
- AV hosszabbító PureTools
- AV hosszabbító Enson
- AV hosszabbító Lightware
- AV hosszabbító Approx
- AV hosszabbító Hall Research
- AV hosszabbító WyreStorm
- AV hosszabbító Seco-Larm
- AV hosszabbító ConnectPro
- AV hosszabbító Kanex
- AV hosszabbító TechLogix Networx
- AV hosszabbító C2G
- AV hosszabbító SEADA
- AV hosszabbító PureLink
- AV hosszabbító Camplex
Legújabb útmutatók AV hosszabbító
2 Április 2025
2 Április 2025
2 Április 2025
2 Április 2025
1 Április 2025
16 Január 2025
14 Január 2025
14 Január 2025
14 Január 2025
14 Január 2025