Használati útmutató JVC LT-22C540
Olvassa el alább 📖 a magyar nyelvű használati útmutatót JVC LT-22C540 (68 oldal) a televízió kategóriában. Ezt az útmutatót 11 ember találta hasznosnak és 2 felhasználó értékelte átlagosan 4.5 csillagra
Oldal 1/68

Instruction Manual
22” LED TV WITH
DVD PLAYER
LT-22C540


Contents
1 Safety Warnings ...........................................................................................................................................................................5
2 Preparation ................................................................................................................................................................................... 7
Unpacking the TV 7 ...............................................................................................................................................................................................................
Installing / Removing the Base Stand 8 .........................................................................................................................................................................
− Installing the Base Stand 8 ......................................................................................................................................................................................
− Mounting the TV to a Wall 8 ...................................................................................................................................................................................
Front View and Rear View Controls .............................................................................................................................................................................. 9
Rear View and Sockets ....................................................................................................................................................................................................10
Installing Batteries in the Remote Control ..............................................................................................................................................................11
Remote Control Operation Range .............................................................................................................................................................................. 11
Remote Control .................................................................................................................................................................................................................12
3 Connections ................................................................................................................................................................................ 14
Making Video and Audio Connections .....................................................................................................................................................................14
Connecting an AV Device Using an HDMI Cable...................................................................................................................................................14
Connecting a Computer Using a VGA Cable ..........................................................................................................................................................15
Connecting an AV Device Using a Component (YPbPr) Cable ........................................................................................................................15
Connecting an AV Device Using a SCART Cable ...................................................................................................................................................16
Connecting an AV Device Using Composite Cable ..............................................................................................................................................16
Connecting a Coaxial Audio Receiver .......................................................................................................................................................................17
Connecting Headphones ...............................................................................................................................................................................................17
4 Initial Setup ................................................................................................................................................................................18
Turning the TV On for the First Time .........................................................................................................................................................................18
− Target Region Setting .........................................................................................................................................................................................19
− Selecting the Input Source................................................................................................................................................................................19
− Channel Selection .............................................................................................................................................................................................. 20
− Listening to the Radio (Radio Mode) ............................................................................................................................................................ 20
− Display Channel Information .......................................................................................................................................................................... 20
− Volume Adjustment ............................................................................................................................................................................................ 20
5 Customising TV Settings ...........................................................................................................................................................21
Channel Setting (TV, DTV or Radio Mode) ...............................................................................................................................................................21
− Auto Tuning ............................................................................................................................................................................................................21
− DTV Manual Tuning............................................................................................................................................................................................. 22
− ATV Manual Tuning 22 .............................................................................................................................................................................................
− Channel Edit (ATV / DTV Mode) ...................................................................................................................................................................... 23
− Signal Information (DTV Mode) ...................................................................................................................................................................... 24
− CI (Common Interface) (DTV Mode) .............................................................................................................................................................. 25
− Software Update .................................................................................................................................................................................................. 26
Picture Setting .................................................................................................................................................................................................................. 27
Sound Setting ................................................................................................................................................................................................................... 29
− Stereo / Dual Sound Reception (ATV Mode) .............................................................................................................................................. 30
− Speaker Sound Output Selection (DTV Mode) ..........................................................................................................................................31
Time Settings......................................................................................................................................................................................................................31
Option Setting .................................................................................................................................................................................................................. 32
− OSD Language ...................................................................................................................................................................................................... 32
− Audio Language (DTV Mode) .......................................................................................................................................................................... 33
− Subtitle Language (DTV Mode) ...................................................................................................................................................................... 33
− Hearing Impaired ................................................................................................................................................................................................. 34
− Country .................................................................................................................................................................................................................... 34
− PVR File System (DTV Mode) ............................................................................................................................................................................ 35
− Restore Factory Default ..................................................................................................................................................................................... 36
− HDMI CEC (Consumer Electronics Control) ................................................................................................................................................ 36
− HDMI ARC (Audio Return Channel) ............................................................................................................................................................... 37
Lock Setting ....................................................................................................................................................................................................................... 38
− Lock System ........................................................................................................................................................................................................... 38
− Set Password ......................................................................................................................................................................................................... 39
− Block Channel ....................................................................................................................................................................................................... 40
− Parental Guidance ................................................................................................................................................................................................41

6 Using the Features .....................................................................................................................................................................42
EPG (Electronic Programme Guide) (DTV or Radio Mode) ............................................................................................................................... 42
− Switch On / O EPG ............................................................................................................................................................................................. 42
− Select a Programme ........................................................................................................................................................................................... 42
Digital Teletext (DTV Mode) ......................................................................................................................................................................................... 43
− Teletext within Digital Service ........................................................................................................................................................................ 43
7 Entertainment ............................................................................................................................................................................44
Connecting a USB Storage Device .............................................................................................................................................................................44
Viewing Photos .................................................................................................................................................................................................................44
Listening to Music ............................................................................................................................................................................................................ 45
Viewing Movies ................................................................................................................................................................................................................46
My Text................................................................................................................................................................................................................................. 47
8 PVR (Personal Video Recorder) .................................................................................................................................................48
Time Shift Function .........................................................................................................................................................................................................48
Recording DTV Programme onto a USB Storage Device .................................................................................................................................. 49
Timer Programming ....................................................................................................................................................................................................... 50
Playing Recorded Programme ....................................................................................................................................................................................51
9 Using the DVD Features.............................................................................................................................................................52
Using the Built-in DVD Player ...................................................................................................................................................................................... 52
Compatible Disc Types .................................................................................................................................................................................................. 52
− Supported Formats ............................................................................................................................................................................................. 52
− Region Code .......................................................................................................................................................................................................... 52
Basic DVD Playback Functions .................................................................................................................................................................................... 53
− Playing the DVD ................................................................................................................................................................................................... 53
− Menu Playback (for DVD) .................................................................................................................................................................................. 53
− Stopping Playback ............................................................................................................................................................................................... 53
− Previous / Next (for DVD / CD / Multimedia discs) .................................................................................................................................. 53
− Forward / Backward (for DVD / CD / Multimedia discs) ......................................................................................................................... 53
− Pause (for DVD / CD / Multimedia discs) ..................................................................................................................................................... 53
− Repeat (for DVD / CD / Multimedia discs) ................................................................................................................................................... 54
− Display (for DVD / Multimedia discs) ............................................................................................................................................................ 54
− Goto (for DVD / CD / Multimedia discs) ....................................................................................................................................................... 54
− Audio (for DVD / CD) ...........................................................................................................................................................................................54
− Repeat A-B (for DVD / CD)................................................................................................................................................................................. 54
Program (for DVD) ........................................................................................................................................................................................................... 54
Playing Multimedia Discs .............................................................................................................................................................................................. 55
Using the DVD Language Setup Page...................................................................................................................................................................... 57
Using the DVD Video Setup Page .............................................................................................................................................................................. 57
Using the DVD Rating Setup Page ............................................................................................................................................................................. 58
Using the DVD Misc Setup Page ................................................................................................................................................................................. 58
9 Others Information ....................................................................................................................................................................59
Maintenance ...................................................................................................................................................................................................................... 59
Hints and Tips .................................................................................................................................................................................................................... 60
Display Modes ................................................................................................................................................................................................................... 62
− YPbPr Mode ........................................................................................................................................................................................................... 62
− PC Mode .................................................................................................................................................................................................................. 62
− HDMI Mode ........................................................................................................................................................................................................... 62
Specications .................................................................................................................................................................................................................... 63

5
1 Safety Warnings
• Read all the instructions carefully before using the unit
and keep them for future reference.
• Retain the manual. If you pass the unit onto a third
party make sure to include this manual.
• Check that the voltage marked on the rating label
matches your mains voltage.
Damage
• Please inspect the unit for damage after unpacking.
• Do not continue to operate the unit if you are in any
doubt about it working normally, or if it is damaged
in any way - switch off, withdraw the mains plug and
consult your dealer.
Location of Unit
• The unit must be placed on a flat stable surface and
should not be subjected to vibrations.
• Do not place the unit on sloped or unstable surfaces as
the unit may fall off or tip over.
• The mains socket must be located near the unit and
should be easily accessible.
• This unit is designed for indoor, domestic use only.
Temperature
• Avoid extreme degrees of temperature, either hot or
cold. Place the unit well away from heat sources such
as radiators or gas / electric fires.
• Avoid exposure to direct sunlight and other sources of
heat.
Naked Flames
• Never place any type of candle or naked flame on the
top of or near the unit.
Moisture
• To reduce the risk of fire, electric shock or product
damage, do not expose this unit to rain, moisture,
dripping or splashing. No objects filled with liquids,
such as vases, should be placed on the unit.
• If you spill any liquid into the unit, it can cause serious
damage. Switch it off at the mains immediately.
Withdraw the mains plug and consult your dealer.
Ventilation
• To prevent the risk of electric shock or fire hazard
due to overheating, ensure that curtains and other
materials do not obstruct the ventilation vents.
• Do not install or place this unit in a bookcase, built-in
cabinet or in another confined space. Ensure the unit is
well ventilated.
• Make sure that there is a gap of at least 10 cm on both
sides and a gap of 20 cm at the top.
• Unplug the unit from the mains socket during a
lightning storm.
Mains Cable
• Make sure the unit or unit stand is not resting on top of
the mains cable, as the weight of the unit may damage
the mains cable and create a safety hazard.
• If the mains cable is damaged it must be replaced
by the manufacturer, its service agent, or similarly
qualified persons in order to avoid a hazard.
Interference
• Do not place the unit on or near appliances which may
cause electromagnetic interference. If you do, it may
adversely affect the operating performance of the unit,
and cause a distorted picture or sound.
Optimum viewing
• View the unit in moderate light to prevent eye strain. It
is recommended to watch the unit from a distance
3-7 times that of the screen height.
LCD screen
• The LCD screen is manufactured using high-precision
technology. However, some tiny black points and /
or bright points (red, blue or green in colour) may
constantly appear on the LCD screen. These points
are generated in the manufacturing process and are
normal.
Screen Burn
• A characteristic of Plasma and TV Panels is that
displaying the same image for a long time may cause
a permanent after-image to remain on the screen. This
is called screen burn. Most pictures shown on the unit
will be constantly moving and fill the screen.
• Examples of images that you need to watch out for are
as follows (this is not an all-inclusive list):
1. Black Bars: If black bars appear at the left / right or
top / bottom of the screen, it is recommended to
change the format so that the picture fills the entire
screen.
2. TV Channel Logos: e.g. Shopping channel logos
and pricing displays - especially if they are bright
and stationary. Moving or low-contrast graphics are
less likely to cause ageing of the screen.
3. Time Displays
4. Teletext: Do not view a stationary page for long
periods of time.
5. TV Menus
6. Pause Mode: Do not leave the screen in pause
mode for long periods of time, e.g. when watching
videos.
• To prevent screen burn if viewing any of the above for
long periods of time, reduce contrast and brightness
when viewing. Once burn-in occurs it will never
disappear completely.
Earphones
• Listening to loud sounds for prolonged periods of time
may permanently damage your hearing.
• Before putting on earphones, turn the volume down
then put the earphones on and slowly increase the
volume until you reach a comfortable listening level.
10 cm 10 cm
20 cm
10 cm
Chapter
1
Safety
• Always disconnect the unit from the mains supply
before connecting / disconnecting other devices or
moving the unit.

6
1Safety Warnings
Standby
• The button on the remote control does not switch
off the unit completely. The unit will continue to draw
electricity from the mains supply while in standby. In
the interests of safety and to avoid unnecessary energy
consumption, never leave the unit in standby while
unattended for long periods of time, e.g. overnight,
while on holiday or while out of the house. Disconnect
the mains plug from the mains socket.
Batteries
• Batteries used in the remote control for this unit
are easily swallowed by young children and this is
dangerous.
• Keep loose batteries away from young children and
make sure that the battery holder tray is secure in the
remote control. Seek medical advice if you believe a
cell has been swallowed.
• Please dispose of batteries correctly by following the
guidance in this manual.
• The batteries shall not be exposed to excessive heat
such as sunshine, fire or the like.
Supervision
• Children should be supervised to ensure that they do
not play with the unit and the remote control.
• Never let anyone especially children push anything
into the holes, slots or any other openings in the case -
this could result in a fatal electric shock.
CAUTION
RISK OF ELECTRIC SHOCK
DO NOT OPEN
The lightning flash with arrowhead symbol,
within an equilateral triangle, is intended to
alert the user to the presence of uninsulated
“dangerous voltage” within the unit’s
enclosure that may be of sufficient
magnitude to constitute a risk of electric
shock.
The exclamation point within an equilateral
triangle is intended to alert the user to the
presence of important operating and
maintenance (servicing) instructions in the
manual accompanying the unit.
Service
• To reduce the risk of electric shock, do not remove
screws. The unit does not contain any user-serviceable
parts. Please leave all maintenance work to qualified
personnel.
• Do not open any fixed covers as this may expose
dangerous voltages.
Maintenance
• Ensure to unplug the unit from the mains socket before
cleaning.
• Do not use any type of abrasive pad or abrasive
cleaning solutions as these may damage the unit’s
surface.
• Do not use liquids to clean the unit.
• The wall socket plug is used as a disconnect device, the
disconnect device should be readily accessible.
• This equipment is a Class II or double insulated
electrical appliance. It has been designed in such
a way that it does not require a safety connection
to electrical earth.
To prevent the spread of
fire, keep candles or other
open flames away from this
product at all times.

7
2 Preparation
Unpacking the TV
Remove all packaging from the TV. Retain the packaging. If you dispose of it please do so according to local regulations.
The following items are included:
Instruction Manual Quick Start Guide
TV Base
TV Stand Support
Remote Control / AAA Batteries x 2
SETUP
ANGLE
ZOOM STEP
MENU
TEXT
CANCEL
AD
MIX
OK
SIZE
ASPECT S.MO DE P.MO DE GUIDE
LIST
PROG
MEN U IN PU T
BACK E XIT
OK
S
TITLE
TV.RD
FAV
HOLD REVE AL SUB PAGE INDEX
GOTO S LOW REP EAT A-B
TV
Screw A x 1 Screw B x 4
Thank you for purchasing your new JVC TV.
Your new TV has many features and incorporates the latest technology to enhance your viewing
experience. We recommend that you spend some time reading this instruction manual so that you fully
understand these features. You will also find some hints and tips to help you resolve any issues.
Read all the safety instructions carefully before use and keep this instruction manual for future reference.
Chapter
2
• If items are missing, or damaged please contact Partmaster (UK only). Tel: 0844 800 3456 for assistance.
• If you require additional assistance please call our UK Call Centre on 0344 561 1234.
Rear Spacers x 4

2
8
Preparation
2. To install the base stand, align the screw
holes, then secure with a screw driver (not
included) using the 4 screw B provided.
1. Disconnect all cables connected to the TV.
2. Lay the TV down on a flat surface with the back side facing up, and ideally at the edge of a table so that the base of the TV
slightly overhangs on it. Please make sure a soft cushioned material (such as a pillow or thick piece of foam) is placed beneath
the screen.
Installing the Base Stand
1. To install the TV stand, first attach the stand support to the TV by
using screw A. Align with the screw hole then use screws to fix
the stand support to the TV.
1. To remove the stand assembly, untighten the screw holding the
stand assembly to the rear of the TV. Slide the stand assembly
out.
2. Mounting on the wall. This TV is designed to be wall-mounted
with a standard 100 mm x 100 mm mounting kit (sold
separately) designed for flat-panel TVs. Mount this TV according
to the instructions included in the mounting kit. Due to space
restrictions, we recommend that you make all connections (refer
to page 14-17 and page 44 for details) before mounting on to the
wall.
Installing / Removing the Base Stand
The LCD display is very fragile, and must be protected at all times when installing and removing the base stand. Be sure that
no hard or sharp object, or anything that could scratch or damage the LCD display, comes into contact with it. DO NOT exert
pressure on the front of the TV at any time because the screen could crack.
Remove the stand assembly before mounting the TV onto the wall.
Keep all the spare screws should you want to use
the stand assembly option.
The screw holes will only align if the
front of the base stand is at the front
of the TV.
Please read this instruction manual carefully while setting up your TV.
100 mm
100 mm
Four mounting holes
(size M4x5 screw)
Screw B x 4
TV Front Base Stand
Front
screw in
Screw A x 1
screw in
unscrew
Screw A
Mounting the TV to a Wall
Use the supplied 4 rear spacers to mount TV’s with curved/recessed backs,
recessed mounting holes, or to allow access to A/V inputs.
rear spacer
2
Preparation
9
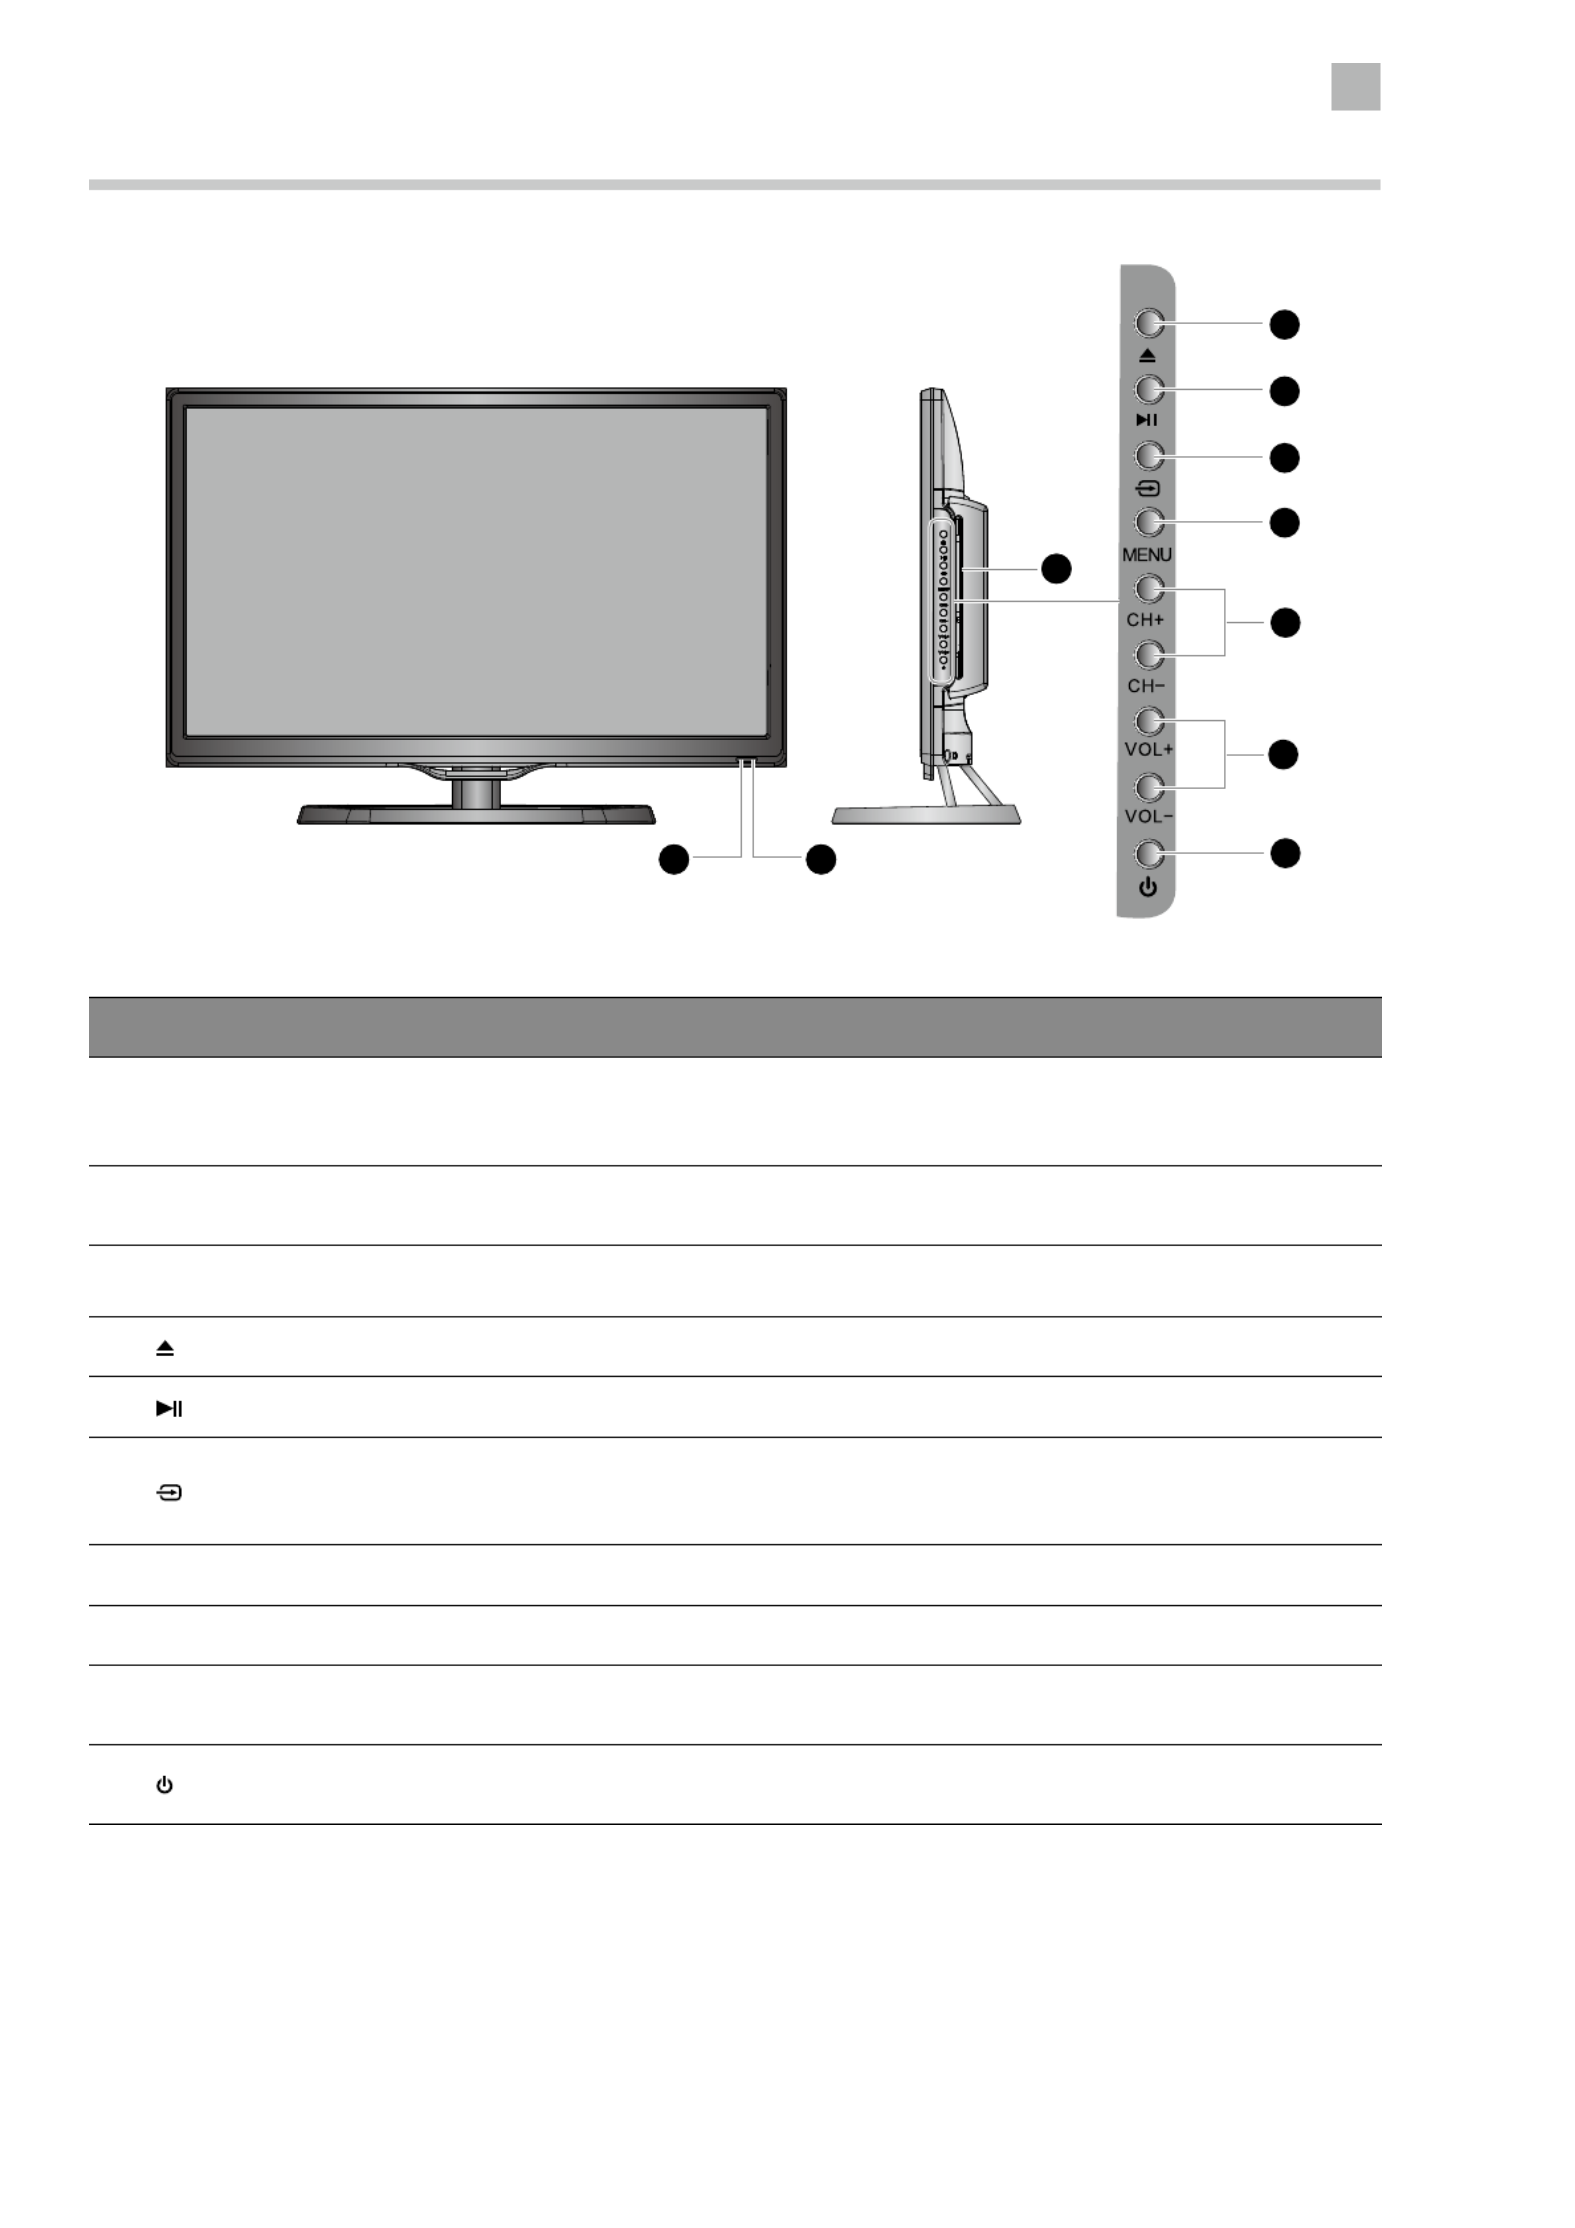
Front View and Rear View Controls
Item Description
1 POWER LED
Illuminates blue when the TV is turned on. Illuminates red when the TV is in standby
mode. The LED will illuminate in blue and then blink in red and blue, confirming that a
timer recording programme has started in standby mode.
2 IR (Infrared Receiver) Receives IR signals from the remote control.
Do not put anything near the sensor, as its function may be affected.
3 Disc Slot Insert a disc with the label side facing towards the front of the TV. (12 cm discs only.
Don't insert 8 cm discs.)
4 Press to eject disc. (DVD mode)
5 Press to start playback or pause. (DVD mode)
6
Press to select among different input signal sources:
DTV / ATV / DVD / AV / SCART / YPbPr / HDMI1 / HDMI2 / PC / USB
Confirmed selection on the OSD menu.
7 MENU Displays the OSD (on screen display) menu.
8 CH + / – Press to select a channel or select a sub-menu from the OSD menu.
9 VOL + / – Adjusts the volume.
Press to select and adjust a setting in the OSD menu.
10 Switches the TV on from standby mode.
Switches the TV back to standby mode.
3
1 2
6
4
5
7
9
10
8
3
1 2
2
10
Preparation
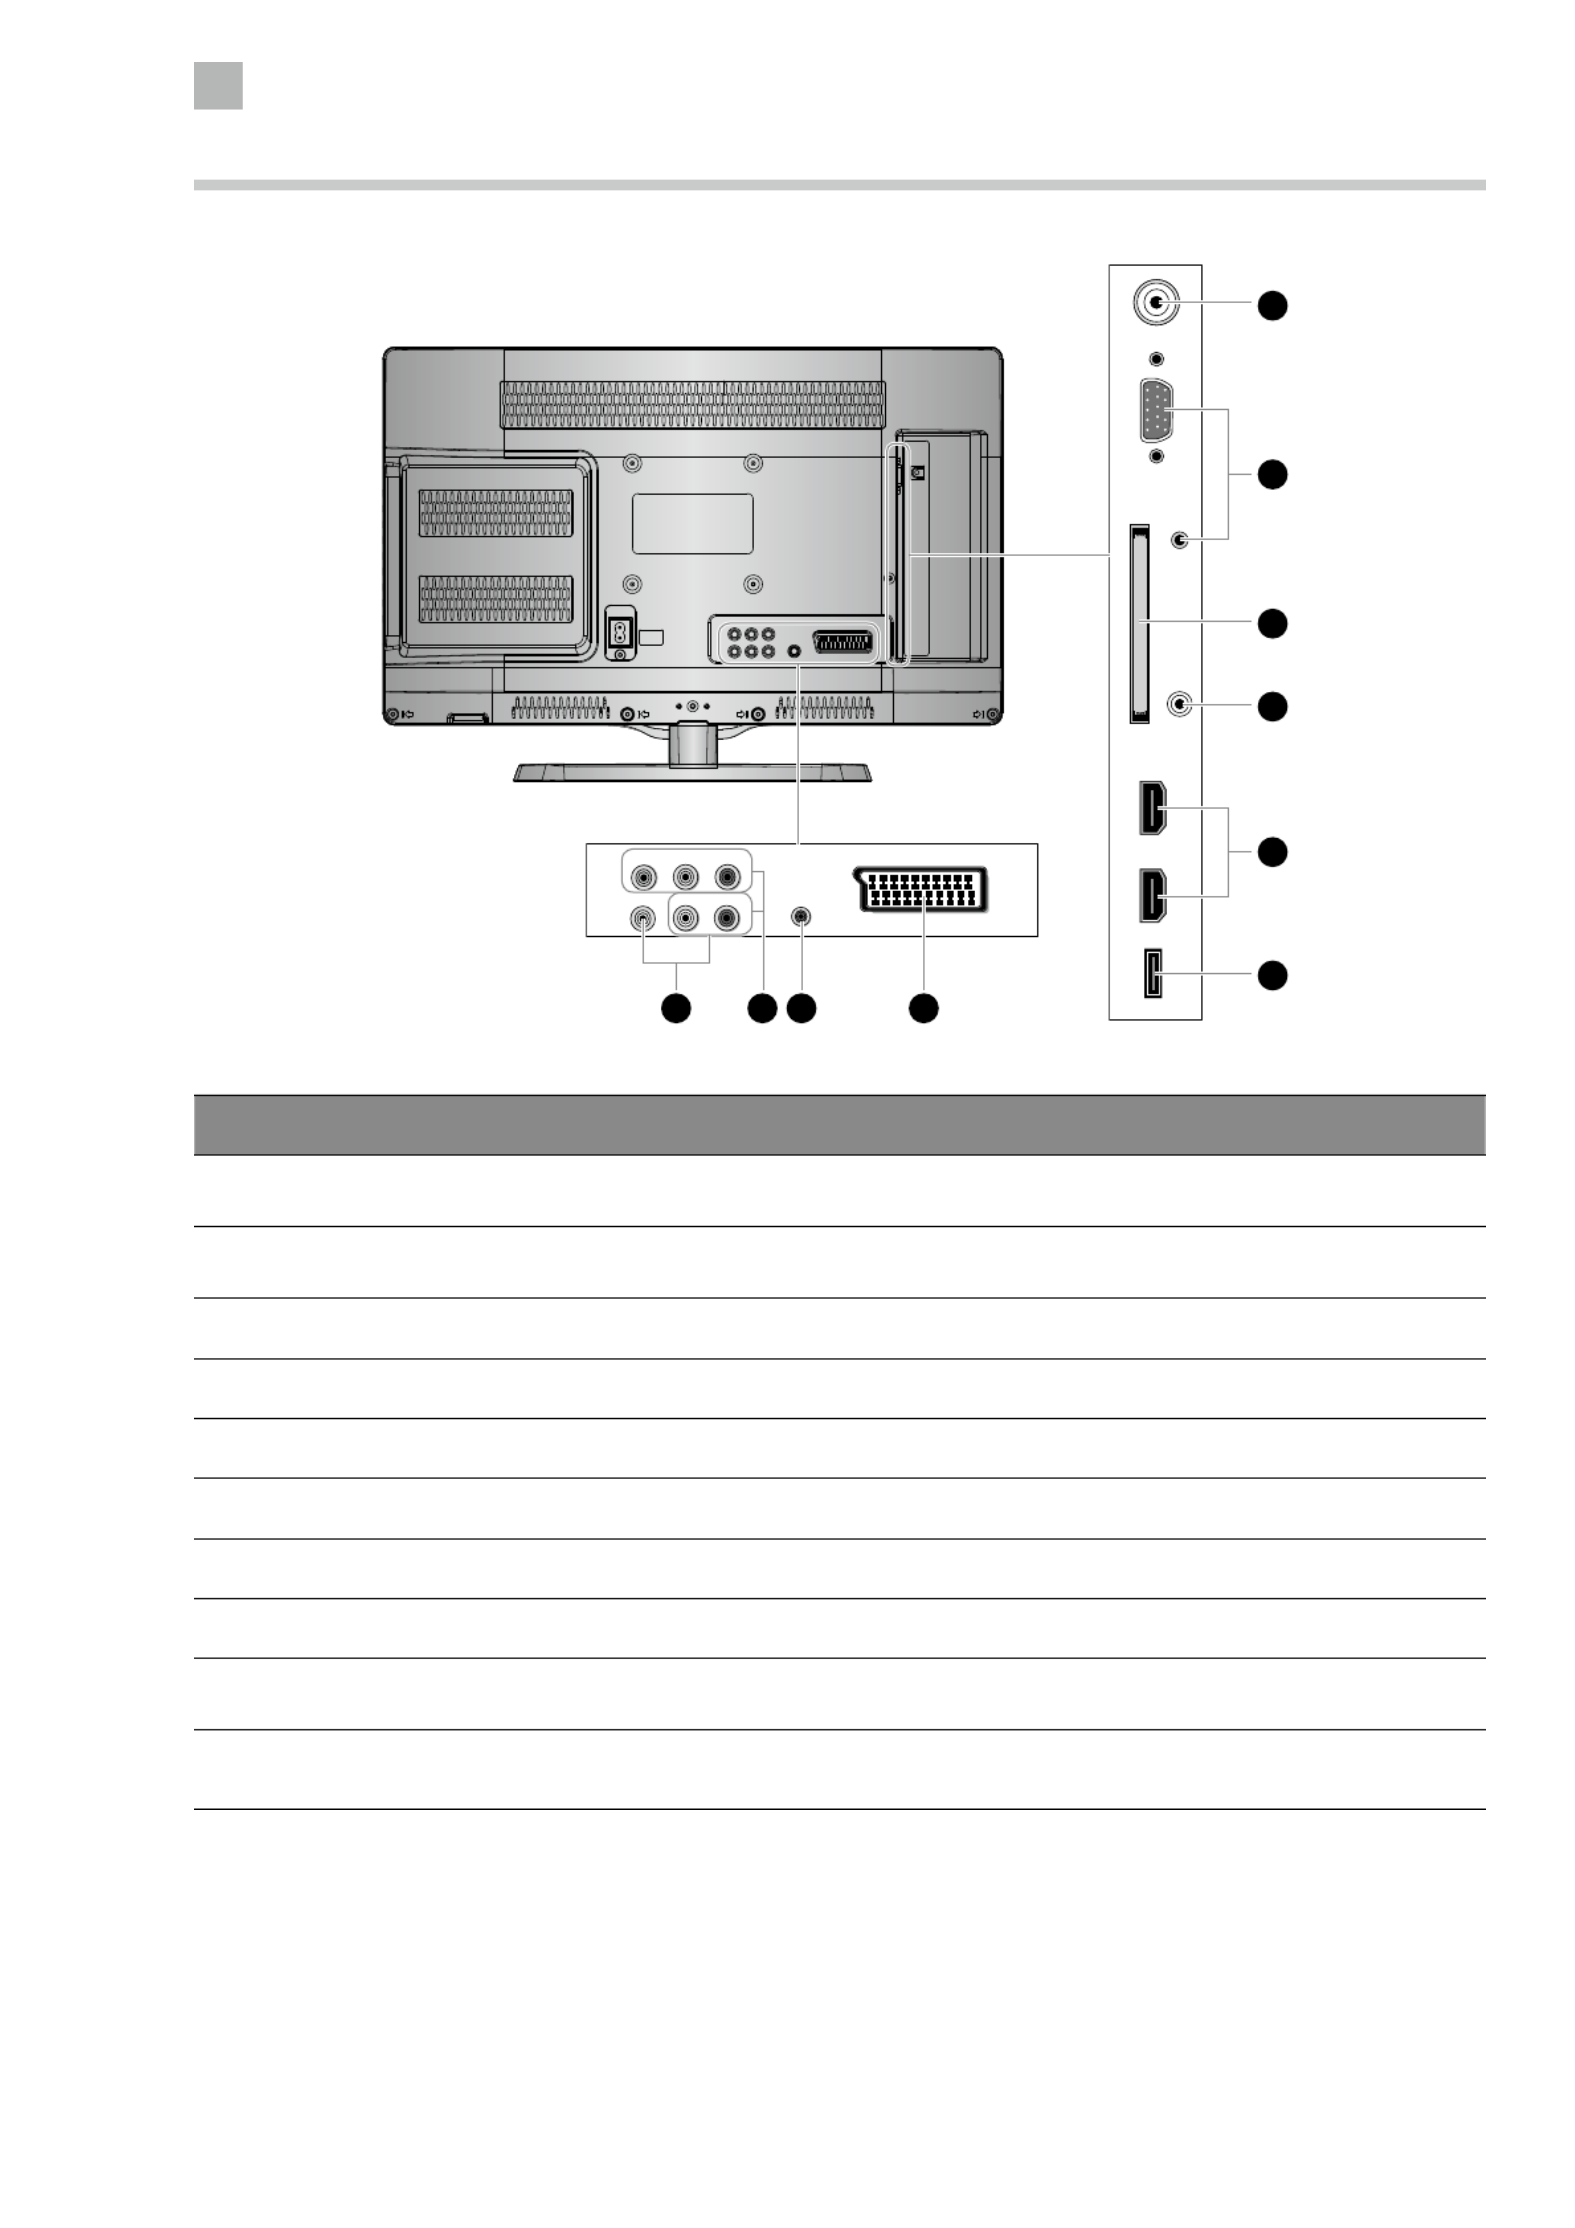
Rear View and Sockets
Item Description
1 VIDEO / AUDIO (L/R) Connects to the Composite VIDEO and AUDIO (L/R) output sockets on external video
devices.
2 Y, PB, PR / AUDIO (L/R) Connects to a DVD player, Digital Set-Top-Box, or other AV devices with component
(YPbPr) video and audio output sockets.
3 SPDIF OUTPUT Connects to the audio socket on the digital/standard 5.1 audio system.
4 SCART Connects to a VCR, DVD Player, or other AV device with a SCART output socket.
5 RF Aerial Connects to the aerial socket on the wall with the RF coaxial cable.
6 PC IN / PC AUDIO Connects to a computer or other devices with a VGA interface.
7 COMMON INTERFACE Allows the insertion of a Common Access Module.
8 HEADPHONE Connects to the headphones.
9 HDMI1(ARC) / HDMI2 Connects to a High-Definition (HD) signal output device, such as a set-top box, blu-ray
disc player or AV receiver.
10 USB Allows the insertion of a USB storage device to play video, audio, photo and text files
(USB mode) and record DTV programmes on to a USB storage device.
USB HDMI2 HDMI1(ARC) PC IN RF
COMMON INTERFACE (CI)
HEADPHONE PC AUDIO
5
6
7
8
10
9
21
Y Pb Pr
RLVIDEO
SCART
SPDIF OUTPUT
43
2
Preparation
11
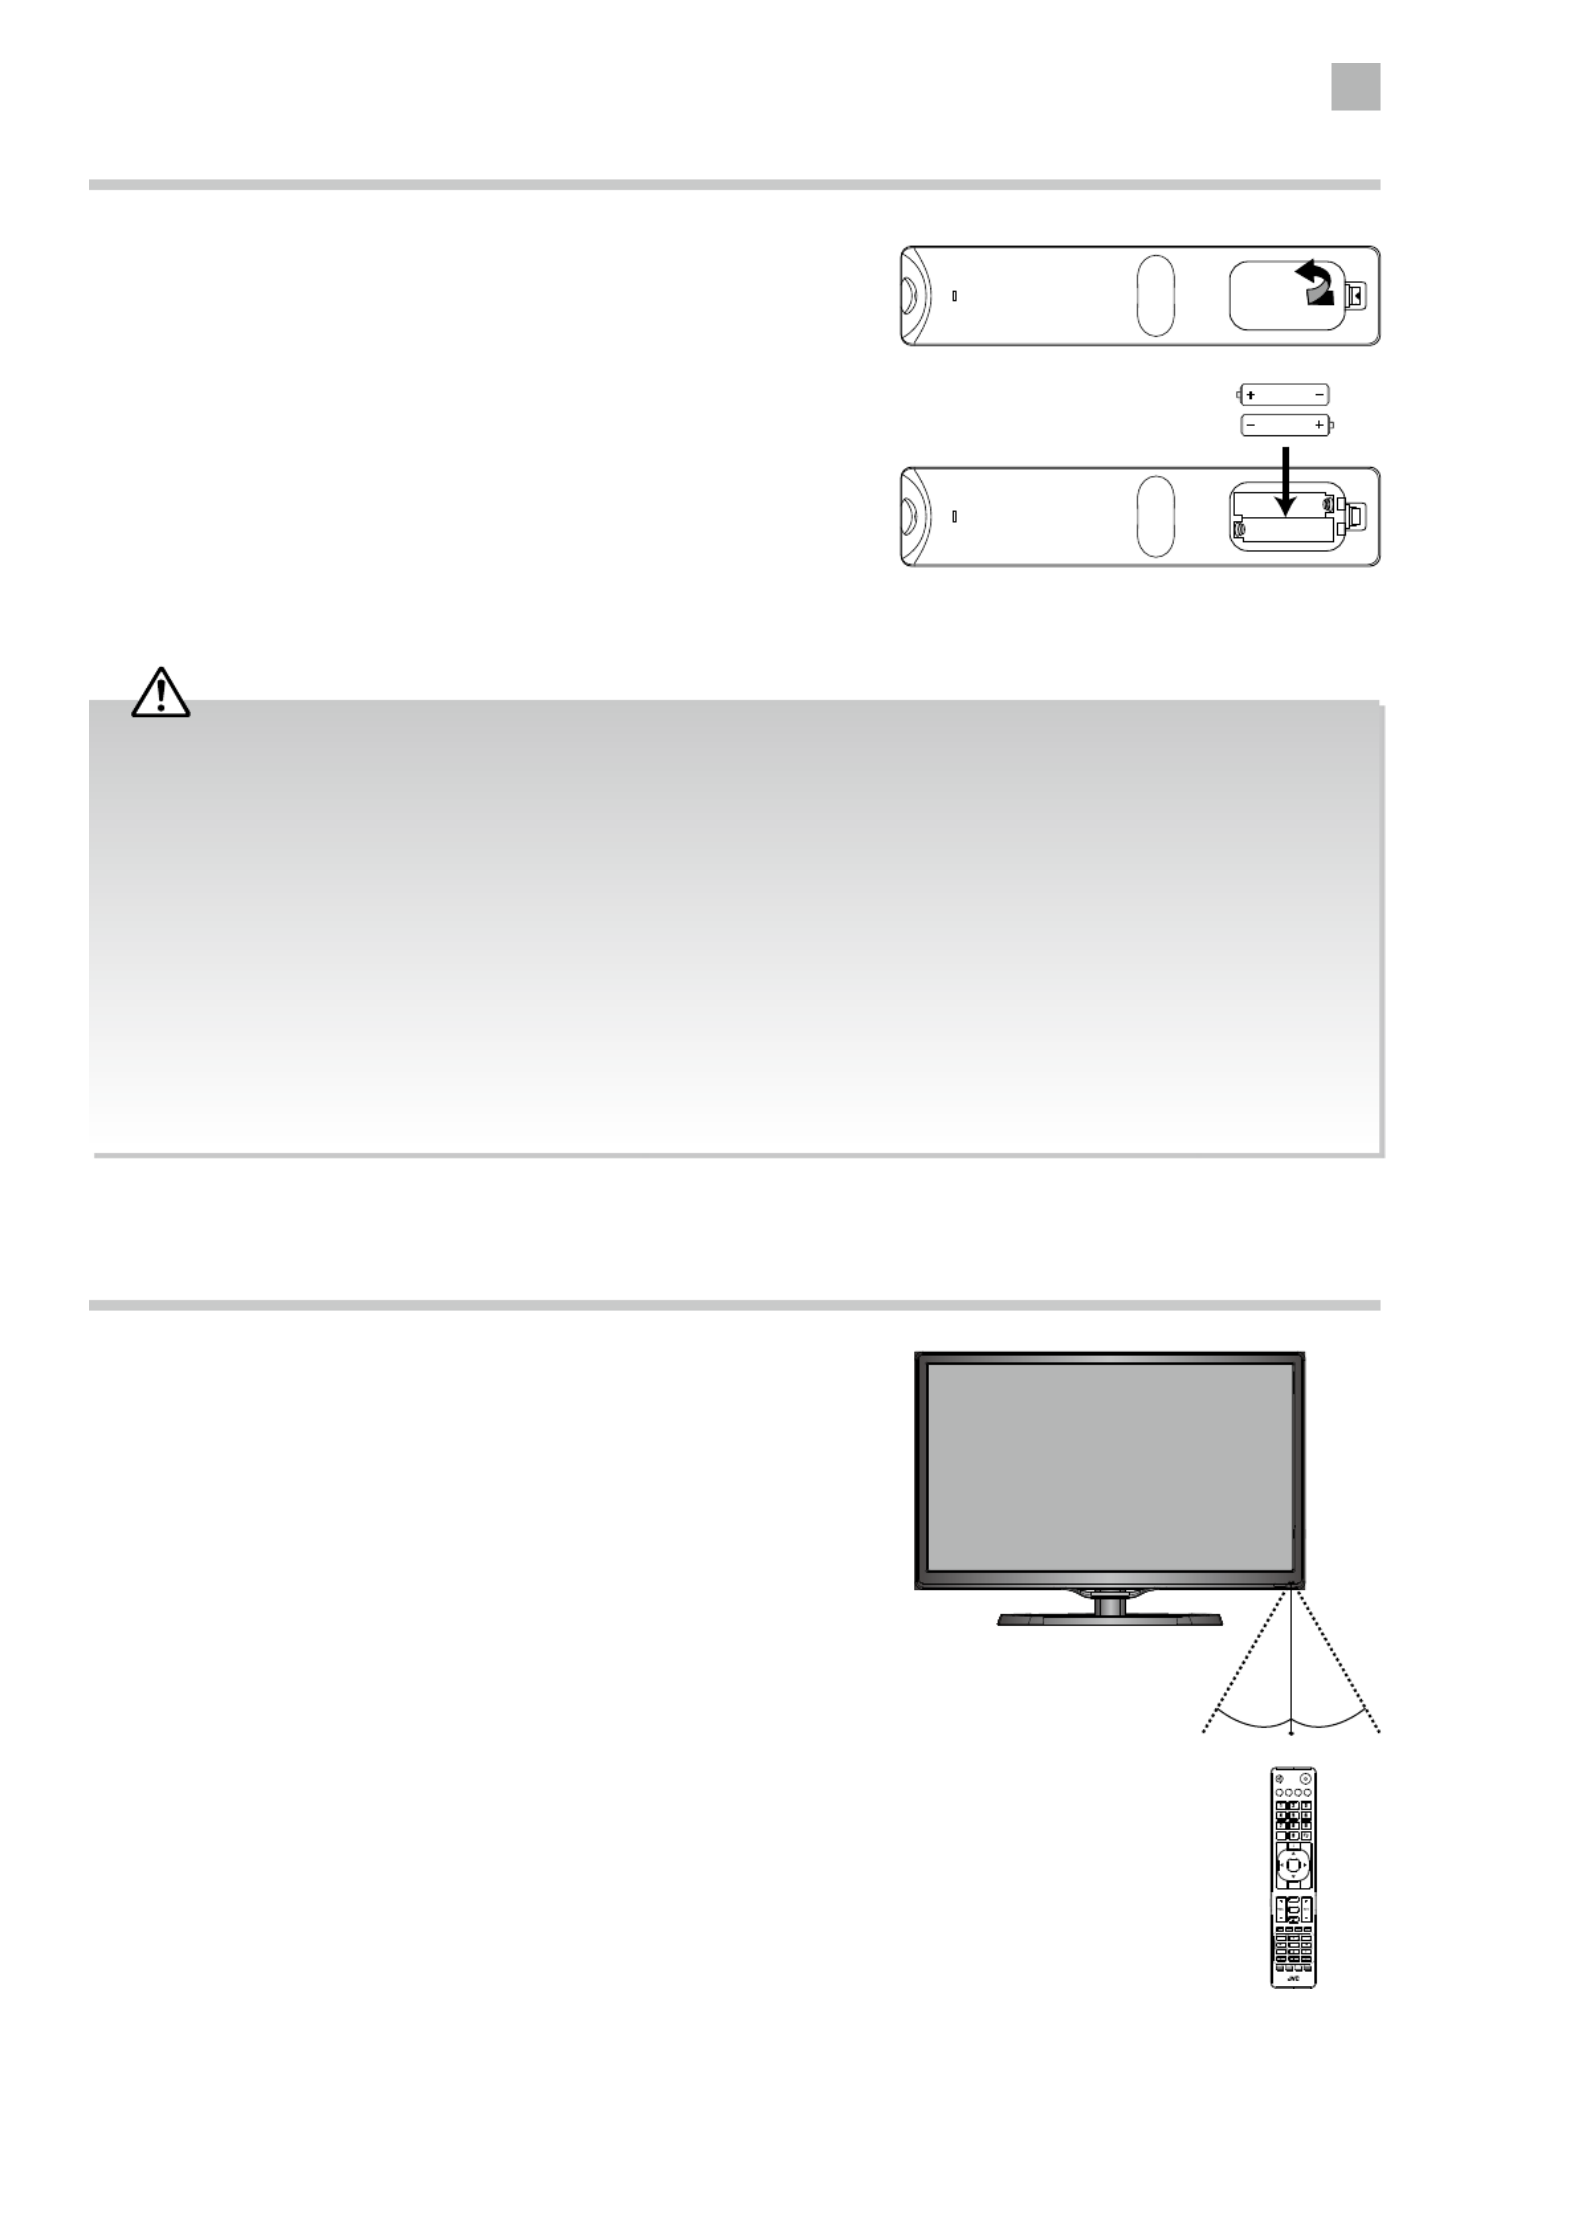
Remote Control Operation Range
Point the remote control at the TV no more than 5 metres from the
remote control sensor on the TV and within 60° in front of the TV.
The operating distance may vary depending on the brightness of the
room.
Installing Batteries in the Remote Control
1. Press and lift the back cover to open the battery compartment of the
remote control.
2. Insert two AAA size batteries. Make sure the (+) and ( - ) ends of
the batteries match the (+) and ( - ) ends indicated in the battery
compartment.
3. Close the battery compartment cover.
SETUP
ANGLE
ZOOM STEP
MENU
TEXT
CANCEL
AD
MIX
OK
SIZE
ASPE CT S.MODE P.MODE GUIDE
LIST
PROG
MENU INPUT
BACK EXIT
OK
S
TITLE
TV.RD
FAV
HOLD REVEAL SUBPAGE INDEX
GOTO SLOW REPEAT A-B
30° 30°
5M
Handling the Batteries
• Improper or incorrect use of batteries may cause
corrosion or battery leakage, which could cause fire,
personal injury or damage to property.
• Only use the battery type indicated in this manual.
• When the batteries are exhausted, the remote will
not function. Replace both batteries at the same time
with new ones.
• Do not install new batteries with used ones and do
not mix different types of batteries.
• Do not dispose of used batteries as domestic waste.
Dispose of them in accordance with local regulations.
Handling the Remote Control
• Take care of your fingernails when you press and hold
the battery release tab.
• Do not drop or cause impact to the remote control.
• Do not spill water or any liquid on the remote control.
• Do not place the remote control on a wet object.
• Do not place the remote control under direct sunlight
or near sources of excessive heat.
• Remove the battery from the remote control when
not in use for a long period of time, as it could
cause corrosion or battery leakage and may result
in physical injury and/or property damage including
fire.
2
12
Preparation
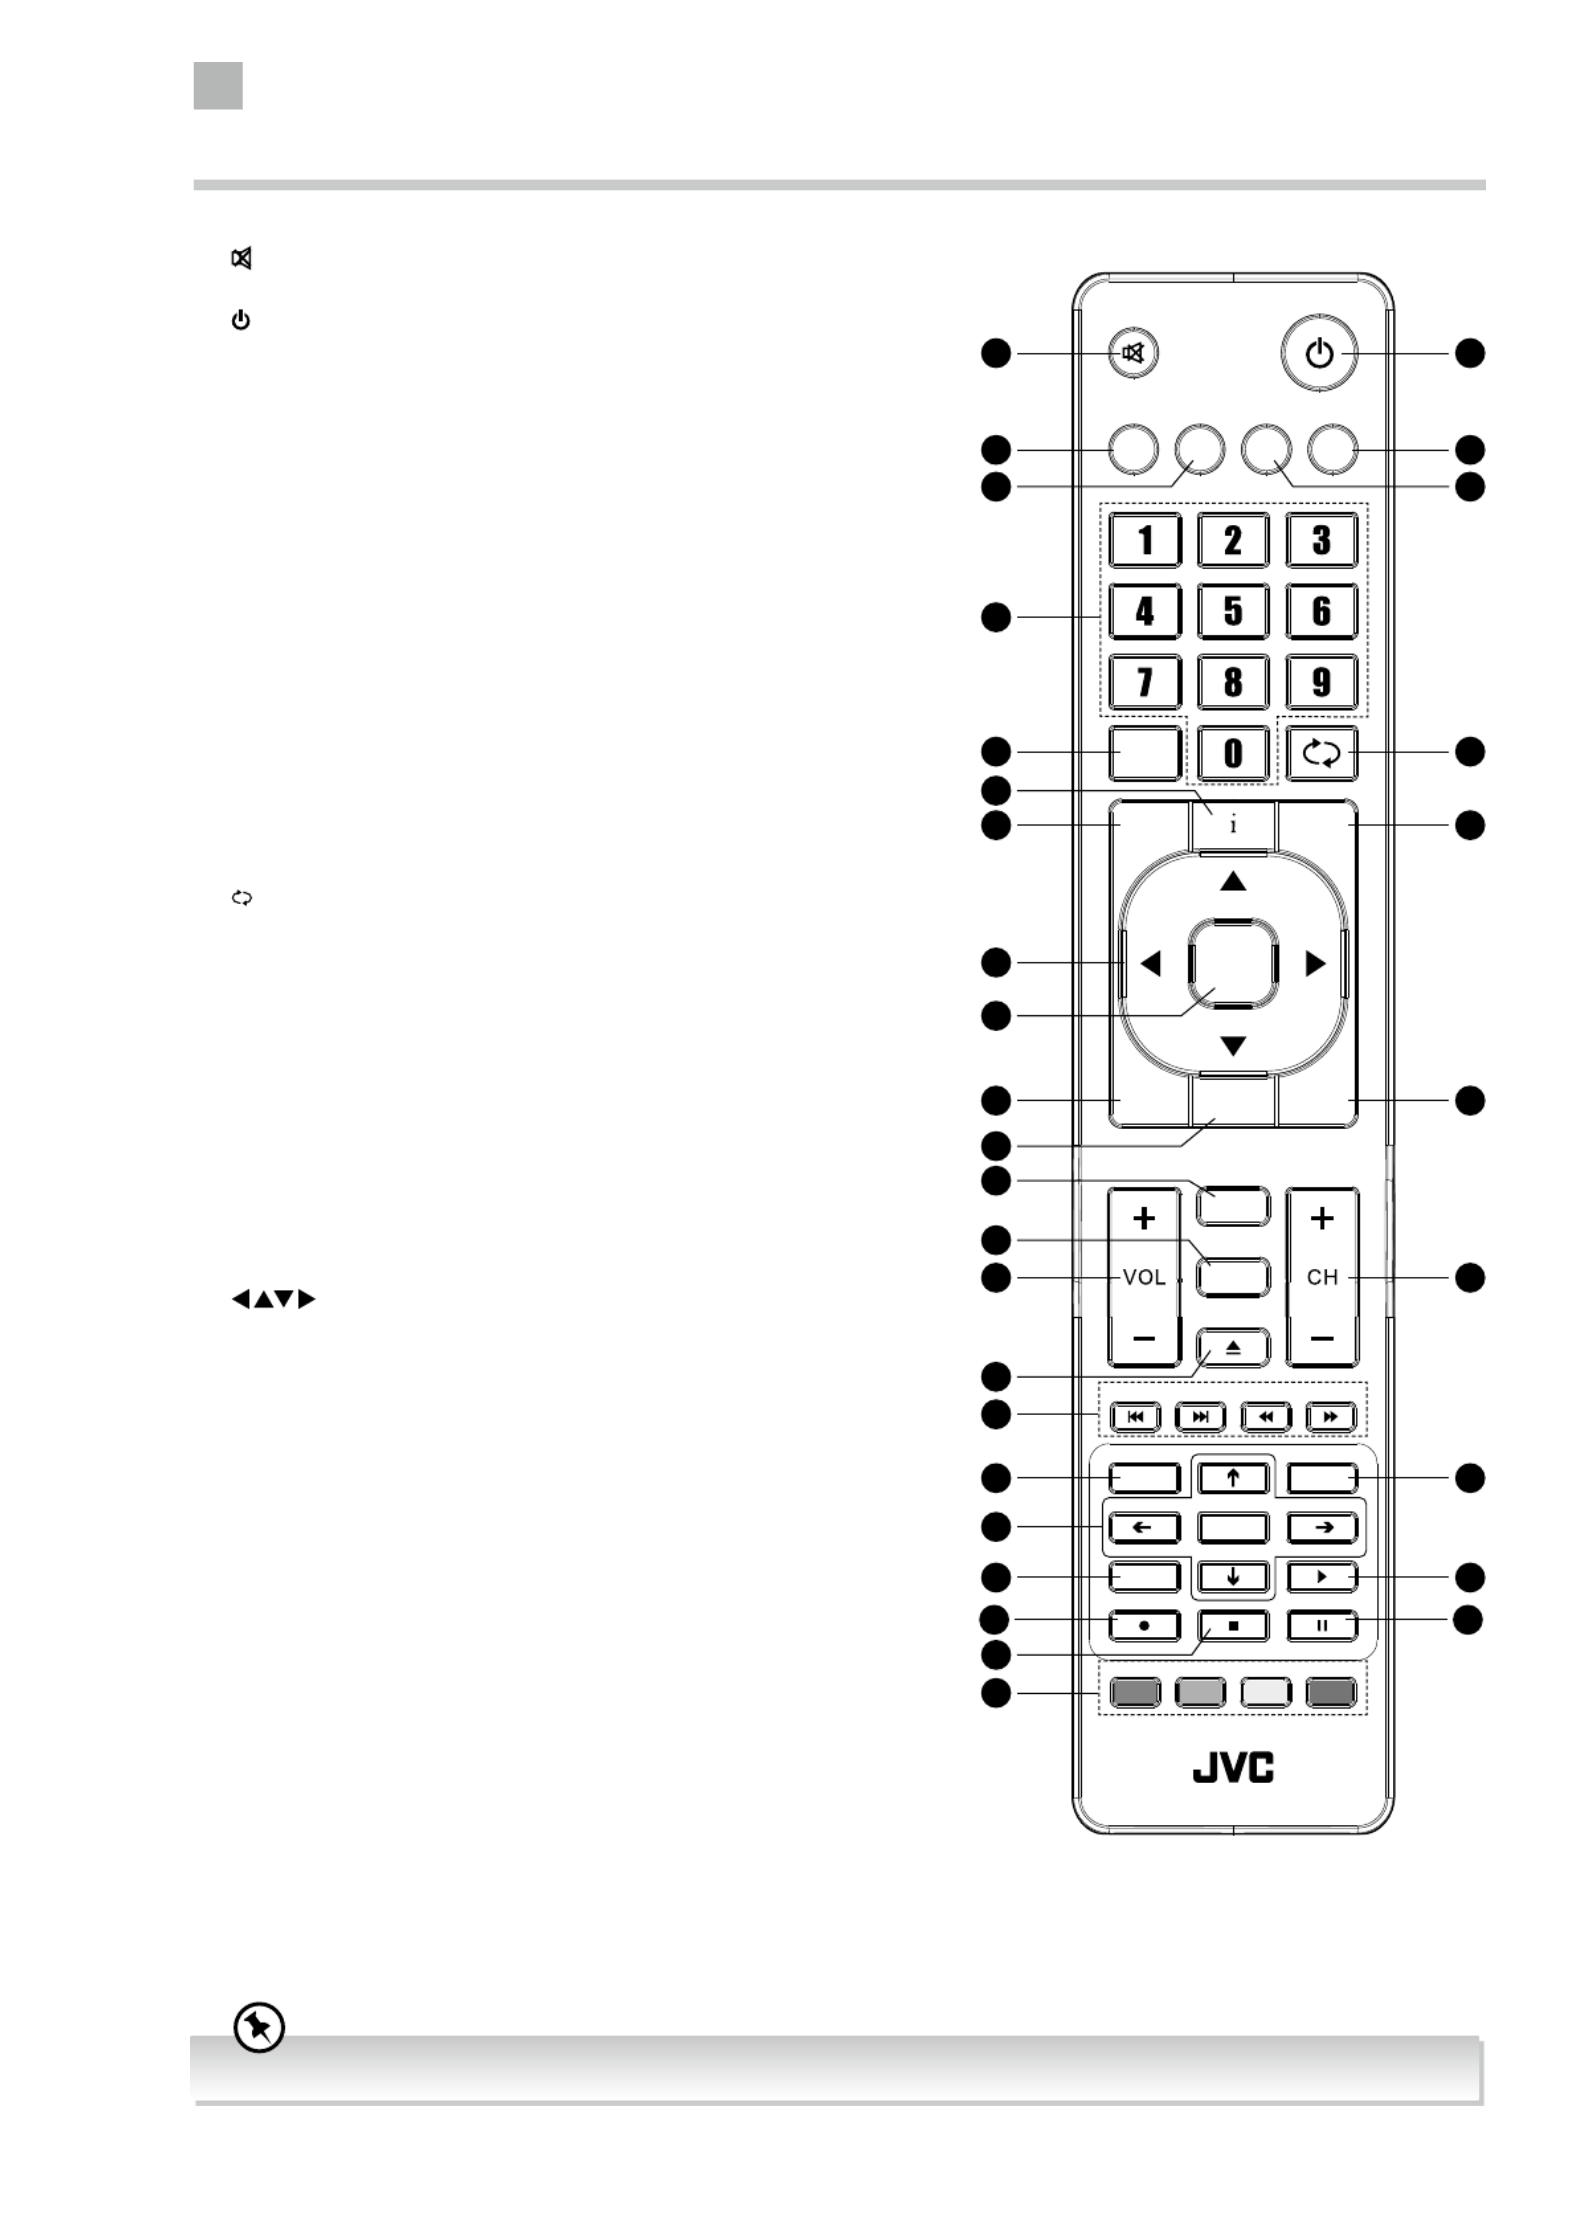
1.
Mute and restore your TV sound.
2.
Switch the TV between on and standby mode.
3. ASPECT
Watch the screen in various formats: Auto / 4:3 / 16:9 / Full /
Zoom / Subtitle / Smart Zoom.
4. S.MODE
Select sound mode: Standard / Music / Movie / Sports / User.
5. GUIDE
Displays the EPG Electronic Programme Guide. (DTV mode)
TITLE
Display the DVD title content. (DVD mode)
6. P.MODE
Select picture mode: Standard / Mild / User / Dynamic.
7. 0-9 Number Button
• Press to select a programme.
• Select numbered items in a menu. (DVD mode)
8. LIST
Display the channel list. (ATV / DTV mode)
9. (RECALL)
• Return to the previous viewing channel. (ATV / DTV mode)
• Return to menu (DVD mode)
10. i
• Display the present channel information such as the current
time and channel name. (ATV / DTV mode)
• Display the present disc information. (DVD mode)
11. MENU
Display the OSD (On Screen Display) menu.
12. INPUT
Select among the di erent input signal sources:
DTV / ATV / DVD / AV / SCART / YPbPr / HDMI1 / HDMI2 / PC /
USB.
13.
Allows you to navigate the OSD menus and adjust the system
settings to your preference.
14. OK
Con rm the selection in the OSD menus.
15. BACK
Return to the previous menu in the OSD menus.
16. PROG
• Display the channel edit menu. (ATV / DTV mode)
• Programme the DVD. (DVD mode)
17. Exit
Exit the OSD menu.
18. TV.RD
A short-cut to switch input source to TV / Digital radio channels.
ANGLE
Select di erent angles for the video. (DVD mode)
19. FAV
Display the favourite channel list. (ATV / DTV mode)
SETUP
Display and exit the DVD setup menu. (DVD mode)
20. VOL + / –
Adjust the volume.
Remote Control
Please note that there are DVD mode functions on the remote control only operate on TV models with a built-in DVD player.
SETUP
ANGLE
ZOOM STEP
MENU
TEXT
CANCEL
AD
MIX
OK
SIZE
ASPECT S.MODE P.MODE GUIDE
LIST
PROG
MENU INPUT
BACK EXIT
OK
S
TITLE
TV.RD
FAV
HOLD REVEAL SUBPAGE INDEX
GOTO SLOW REPEAT A-B
1
3
8
11
15
20
24
27
29
26
23
32
22
31
13
14
16
18
19
10
7
4
2
5
9
12
17
21
25
28
30
6

2
Preparation
13
21. CH + / –
Select a channel.
22.
Eject a disc. (DVD mode)
23.
To skip to the beginning of the previous chapter / track /
photo. (DVD / USB mode)
Skip to the beginning of the next chapter / track / photo.
(DVD / USB mode)
Reverse playback rapidly. (DVD / USB mode)
Advance playback rapidly. (DVD / USB mode)
24. TEXT
Turn on and o the teletext function. (DTV mode)
MENU
Display the DVD menu. (DVD mode)
25. S (Subtitle)
• Display subtitles which are broadcast with the
programme. (DTV mode)
• Display subtitles on the DVD. (DVD mode)
26.
Navigate the DVD menu and adjust the system settings to
your preference. (DVD mode)
OK
Con rm the selection in the DVD menus. (DVD mode)
27. AD (Audio Description)
• Turn on / o the Audio Description (AD) function (only
applicable when the TV programme has this feature).
(DTV mode)
• Select di erent Audio mode on DVD mode. (DVD mode)
• Select Stereo / Dual Sound Reception. (ATV mode)
28. PLAY
Start playback. (DVD / USB mode)
29. REC
Record the current programme. (DTV mode).
ZOOM
Zoom in on the displayed frame. (DVD mode)
30. Stop
Stop the playback or recording. (DVD / USB / DTV mode)
31. Pause
• Pause playback. (DVD / USB mode)
• Start the time-shift function (DTV mode)
STEP
Play the playback forward frame by frame. (DVD mode)
32. Coloured buttons
• Access the TELETEXT items. (DTV mode)
• Access menu options.
GOTO (RED)
Skip to a speci c location on a DVD / CD. (DVD mode)
SLOW (GREEN)
Play video slowly. (DVD mode)
REPEAT (YELLOW)
Select between di erent repeat modes. (DVD mode)
A–B (BLUE)
Repeat a segment between A and B. (DVD mode)
Please note that there are DVD mode functions on the remote control only operate on TV models with a built-in DVD player.
SETUP
ANGLE
ZOOM STEP
MENU
TEXT
CANCEL
AD
MIX
OK
SIZE
ASPECT S.MODE P.MODE GUIDE
LIST
PROG
MENU INPUT
BACK EXIT
OK
S
TITLE
TV.RD
FAV
HOLD REVEAL SUBPAGE INDEX
GOTO SLOW REPEAT A-B
1
3
8
11
15
20
24
27
29
26
23
32
22
31
13
14
16
18
19
10
7
4
2
5
9
12
17
21
25
28
30
6

14
Connecting an AV Device Using an HDMI Cable
• This TV can accept High-Definition Multimedia Interface (HDMI) supports HDCP (High-Bandwidth Digital Content Protection)
Protocol.
• This TV has a total of 2 HDMI input sockets, please make sure the correct input source is selected and corresponds to your
connected HDMI input socket.
• When you connect to the output of an HD ready player (blu-ray disc player, game console, set-top box or computer) switch to
the HDMI function and the TV will automatically detect the resolution used by the HDMI source.
• To get the best picture quality, adjust the blu-ray disc player, game console or set-top box output resolution up to 1920 x
1080p.
1. Use an HDMI cable to connect the TV’s HDMI input
socket to the external AV device’s HDMI output socket.
2. Plug the connected devices into the mains socket
before switching on the TV.
3. Press the button on the right side panel of the TV
or on the remote control to turn on your TV.
4. Press the button on the right side panel of the TV
or the button on the remote control to display INPUT
the Source List. Use the buttons to select HDMI1
/ HDMI2 and then press the OK button to confirm.
Making Video and Audio Connections
Not all AV devices have the ability to connect to a TV, please refer to the owner’s manual of your AV device for compatibility and
connection procedures.
When connecting any external AV device, do not connect the mains cable to the mains socket until all other connections are
complete.
Signal Type Separate Audio
Connection Required
HDMI1
HDMI
(480i/480p/576i/576p/720p/1080i/1080p) No
PC IN
PC
Yes
Y PB PR
Component Video
(480i/480p/576i/576p/720p/1080i/1080p)
Yes
R L
SCART
SCART (RGB Input) No
VIDEO
Composite Video
Yes
R L
Best Video
Performance
3 Connections
Chapter
3
Although this TV is able to connect to an HDMI
device, it is possible that some devices may not
operate correctly.
USB HDMI2 HDMI1(ARC) PC IN RF
COMMON INTERFACE (CI)
HEADPHONE PC AUDIO
Rear Right Side View of TV
HDMI Cable
(not included)
Blu-ray Player / DVD Player /
Recorder
Set-top BoxGame Console
Termékspecifikációk
| Márka: | JVC |
| Kategória: | televízió |
| Modell: | LT-22C540 |
Szüksége van segítségre?
Ha segítségre van szüksége JVC LT-22C540, tegyen fel kérdést alább, és más felhasználók válaszolnak Önnek
Útmutatók televízió JVC

12 Január 2025
4 Október 2024
2 Október 2024
30 Szeptember 2024
23 Szeptember 2024
22 Szeptember 2024
18 Szeptember 2024
11 Szeptember 2024
1 Szeptember 2024
24 Augusztus 2024
Útmutatók televízió
- televízió Samsung
- televízió Sony
- televízió Yamaha
- televízió Beko
- televízió Fujitsu
- televízió Electrolux
- televízió Acer
- televízió Nedis
- televízió LG
- televízió Grundig
- televízió Marantz
- televízió Philips
- televízió Pioneer
- televízió SilverCrest
- televízió Panasonic
- televízió AEG
- televízió Sharp
- televízió Nokia
- televízió Lenovo
- televízió Casio
- televízió Toshiba
- televízió Oppo
- televízió Hyundai
- televízió Hisense
- televízió BenQ
- televízió SunBriteTV
- televízió Siemens
- televízió Medion
- televízió TCL
- televízió Xiaomi
- televízió GoGen
- televízió Insignia
- televízió Infiniton
- televízió Dell
- televízió Strong
- televízió VOX
- televízió Vivax
- televízió Thomson
- televízió Polaroid
- televízió Aiwa
- televízió Orima
- televízió V7
- televízió Clatronic
- televízió PEAQ
- televízió Qilive
- televízió Haier
- televízió Mitsubishi
- televízió Cecotec
- televízió Sencor
- televízió GPX
- televízió Küppersbusch
- televízió Innoliving
- televízió AOC
- televízió Citizen
- televízió Westinghouse
- televízió Hitachi
- televízió Continental Edison
- televízió Telefunken
- televízió Nevir
- televízió Monster
- televízió Roadstar
- televízió Optoma
- televízió CHiQ
- televízió Viewsonic
- televízió Nextbase
- televízió Denver
- televízió Bush
- televízió Trevi
- televízió Albrecht
- televízió Daewoo
- televízió Funai
- televízió Tesla
- televízió Smart Tech
- televízió Muse
- televízió Energy Sistem
- televízió OK
- televízió SVAN
- televízió Loewe
- televízió RevolutionHD
- televízió Polar
- televízió Manhattan
- televízió Kogan
- televízió Horizon
- televízió Intenso
- televízió Furrion
- televízió Teac
- televízió Aspes
- televízió Digihome
- televízió Manta
- televízió Blaupunkt
- televízió Sagem
- televízió Jay-Tech
- televízió Logik
- televízió Finlux
- televízió Peerless-AV
- televízió Abus
- televízió AG Neovo
- televízió Bang & Olufsen
- televízió Iiyama
- televízió AKAI
- televízió TechniSat
- televízió Seiki
- televízió Jensen
- televízió Pyle
- televízió Emerson
- televízió Sanyo
- televízió Kemo
- televízió Salora
- televízió Lenco
- televízió Schneider
- televízió Philco
- televízió ECG
- televízió Uniden
- televízió Technika
- televízió NEC
- televízió Element
- televízió Soundmaster
- televízió Alphatronics
- televízió AYA
- televízió MBM
- televízió Krüger&Matz
- televízió Dual
- televízió Brandt
- televízió Wharfedale
- televízió Allview
- televízió RCA
- televízió OKI
- televízió Orion
- televízió SereneLife
- televízió Schaub Lorenz
- televízió Luxor
- televízió Metz
- televízió ILive
- televízió Graetz
- televízió Tatung
- televízió Packard Bell
- televízió EasyMaxx
- televízió Orava
- televízió Arçelik
- televízió Planar
- televízió Zenith
- televízió Doffler
- televízió QBell Technology
- televízió SYLVOX
- televízió Majestic
- televízió Reflexion
- televízió FFalcon
- televízió Megasat
- televízió Sogo
- televízió United
- televízió Techwood
- televízió Newstar
- televízió Matsui
- televízió Alden
- televízió Aldi
- televízió Airis
- televízió Aristona
- televízió Apex
- televízió Ziggo
- televízió Icy Box
- televízió Lexibook
- televízió Palsonic
- televízió Walker
- televízió Saba
- televízió Antarion
- televízió Kernau
- televízió Tevion
- televízió Proscan
- televízió Vestel
- televízió Tucson
- televízió Sunstech
- televízió Nabo
- televízió Sylvania
- televízió Sunny
- televízió Marquant
- televízió Nordmende
- televízió AudioAffairs
- televízió Magnum
- televízió Audiosonic
- televízió Kubo
- televízió Proline
- televízió Coby
- televízió Seg
- televízió Vivo
- televízió Daitsu
- televízió Terris
- televízió Changhong
- televízió Alba
- televízió Naxa
- televízió Star-Light
- televízió Fantec
- televízió Mpman
- televízió Sweex
- televízió Vizio
- televízió Cello
- televízió Mx Onda
- televízió Nikkei
- televízió Hannspree
- televízió DGM
- televízió Yasin
- televízió Humax
- televízió XD Enjoy
- televízió MT Logic
- televízió Superior
- televízió Kunft
- televízió Difrnce
- televízió ITT
- televízió Grunkel
- televízió Avtex
- televízió Inovia
- televízió Odys
- televízió NPG
- televízió Bluesky
- televízió Videocon
- televízió Xoro
- televízió Durabase
- televízió HKC
- televízió Edenwood
- televízió Woxter
- televízió Premier
- televízió Onn
- televízió Teleco
- televízió Opera
- televízió LTC
- televízió JTC
- televízió Zalman
- televízió Ferguson
- televízió Viewpia
- televízió XS4ALL
- televízió JGC
- televízió Online
- televízió Dyon
- televízió DirecTV
- televízió Tele 2
- televízió Telesystem
- televízió EKO
- televízió E-motion
- televízió Mitsai
- televízió Selfsat
- televízió High One
- televízió Tve
- televízió ISymphony
- televízió Pantel
- televízió Magnavox
- televízió ATYME
- televízió HCI
- televízió Inno-Hit
- televízió Lin
- televízió Engel
- televízió Bang Olufsen
- televízió TechLine
- televízió Elements
- televízió Englaon
- televízió Time
- televízió Reflex
- televízió Astar
- televízió Visco
- televízió Tivax
- televízió H&B
- televízió Norcent
- televízió TELE System
- televízió TIM
- televízió Oyster
- televízió Belson
- televízió Vision Plus
- televízió Sbr
- televízió Bauhn
- televízió Voxx
- televízió Rm 2000
- televízió Hoher
- televízió Felson
- televízió Mach Power
- televízió Elbe
- televízió Axing
- televízió CGV
- televízió Séura
- televízió Mitzu
- televízió Caratec
- televízió JTC24
- televízió Coocaa
- televízió Kivi
- televízió Smart Brand
- televízió Voxicon
- televízió Aconatic
- televízió Mitchell & Brown
- televízió FOX Electronics
- televízió Mystery
Legújabb útmutatók televízió

10 Április 2025

10 Április 2025

10 Április 2025

9 Április 2025
9 Április 2025
9 Április 2025
9 Április 2025

9 Április 2025
9 Április 2025
9 Április 2025