Használati útmutató JGC DVD250
JGC
DVD-lejátszó
DVD250
Olvassa el alább 📖 a magyar nyelvű használati útmutatót JGC DVD250 (32 oldal) a DVD-lejátszó kategóriában. Ezt az útmutatót 10 ember találta hasznosnak és 2 felhasználó értékelte átlagosan 4.5 csillagra
Oldal 1/32

DVD Player
Bedienungsanleitung

2
3
5
6
7
8
9
10
22
26
28
30
11
1
29
27
Inhalt
Einleitung
Sicherheitshinweise
Wichtige Sicherheitsanweisungen
Anweisungen
Eigenschaften
Gerät Bedienteil / Anschlüsse
Fernbedienung
Anschluß
Anschluß an ein TV Gerät
Anschluß an eine digitale Surroundanlage
Grundeinstellungen
Modus und Einstellungen
Einstellungen per Fernbedienung
MP3 Wiedergabe
Kodak Picture CD Wiedergabe
Algemeines
Problembehebung
Inbetriebnahme der Fernbedienung
Technische Daten
2
Das Blitzsymbol im Dreieck soll
den Benutzer vor nicht isolierter,
gefährlicher Spannung warnen,
die sich innerhalb des Geräte-
gehäuses befindet und elektrische
Schläge hervorrufen kann.
Das Ausrufezeichen im Dreieck weist
auf wichtige Hinweise in der Bedienungs-
anleitung in Bezug auf Bedienungs- und
Wartungshinweise hin.
WARNUNG:
Sicherheitshinweise Einleitung
ACHTUNG:
ACHTUNG:
ACHTUNG:
Um das Risiko eines elektrischen Schlages oder
Feuer zu vermeiden, das Gerät niemals Regen oder
Feuchtigkeit aussetzen.
Es können gefährlich hohe Spannungen im Gerät
vorhanden sein, das Gerät daher niemals öffnen.
Reparaturen dürfen nur von Qualifizierten Fach-
personal durchgeführt werden.
Keine mit Flüssigkeit gefüllten Gefäße , z.B. Vasen,
auf das Gerät stellen.
Dieses Gerät verwendet ein Lasersystem.
Lesen Sie die Bedienunsanleitung sorgfältig durch
und bewahren diese auf.
Falls ein Fehler auftritt, befolgen Sie bitte die
Anweisungen im Abschnitt 'Problembehebung'
oder wenden sich bitte an die dort angegebene
Servicehotline.
Bei geöffnetem Gerät oder entfernten
Sicherungsvorrichtungen kann unsichtbare
Laserstrahlung austreten.
Niemals direkt in den Strahl blicken.
Dieser DVD Player ist ein CLASS 1 LASER
Produkt. Veränderungen oder Einstellungen
welche hier nicht beschrieben sind, können
zum Austreten von gefährlicher Laserstrahlung
führen.
Um eine Schädgung der Augen durch Laser-
strahlung zu vermeiden, darf das Gehäuse nicht
geöffnet werden.
Reparaturen dürfen nur von Qualifizierten
Fachpersonal durchgeführt werden.

3
Wichtige Sicherheitshinweise
1. Aufstellen
Benutzen Sie ausschließlich stabile Stellflächen. Bei der
Aufstellung des Gerätes muß genau nach den Anweisungen
des Herstellers vorgegangen werden und das vom Hersteller
empfohlene Montagematerial verwendet werden.
Sollte das Gerät auf einem Rollwagen plaziert werden, darf dieser
nur vorsichtig hin- und herbewegt werden. Plötzliches Anhalten,
kräftiges Schieben sowie unebene Stellflächen können dazu
führen, daß die Geräte-Rollwagen-Kombination umkippt.
2. Zusatzgeräte
Benutzen Sie keine Zusatzgeräte, die nicht ausdrücklich
genehmigt wurden, da dies Gefahren mit sich bringen kann.
3. Reinigung
Vor der Reinigung muß der Netzstecker aus der Steckdose
gezogen werden. Benutzen Sie zur Reinigung keine flüssigen
Reinigungsmittel oder Sprühreiniger, sondern ein
angefeuchtetes Tuch.
4. Gewitter
Als zusätzliche Schutzmaßnahme sollten Sie den Netzstecker
des Gerätes während eines Gewitters, oder wenn das Gerät
längere Zeit nicht benutzt wird, aus der Steckdose Ziehen.
Ebenfalls sollten bei Gewitter alle anderen angeschlosenen
Kabel vom Gerät abgezogen werden. So kann ein Schaden
durch Blitzschlag oder Überspannung bei Gewitter verhindert
werden.
5. Gegenstände und Flüssigkeiten
Es dürfen keine Gegenstände durch die Öffnungen
des Gerätes geschoben werden, da dadurch
gefährliche Spannungspunkte oder Überbrückungsteile
berührt werden könnten und so ein Kurzschluss oder
Brand verursacht werden kann. Verschütten Sie keine
Flüssigkeiten über das Gerät, da dadurch ein Kurzschluss
oder Brand verursacht werden kann oder gefährliche
Berührungsspannungen verursacht werden können.
In diesem Fall sofort das Gerät vom Netz trennen.
6. Überlastung
Wandsteckdosen, Verlängerungskabel oder zusätzliche
Steckdosen dürfen nicht Überlastet werden, da sonst
die Gefahr eines Brandes oder eines elektrischen
Schlages besteht.
7. Stromkabel
Die Stromkabel müssen so verlegt werden, daß sie nicht
im Wege sind, bzw. nicht durch Gegenstände
eingeklemmt werden. Besondere Beachtung müssen
die Kabel im Bereich von Stecker, Steckdose und
Geräteausgang finden.
8. Stromversorgung
Das Gerät darf nur mit der auf dem Typenschild
angegebenen Stromquelle betrieben werden.
Sollten Sie sich nicht sicher sein, welche
Stromquelle Sie zu hause haben, können Sie sich
an den Händler oder Ihre Stromversorgungs-
gesellschaft wenden. Für Geräte, die mit Batterien
oder einer anderen Energiequelle betrieben werden,
finden Sie Hinweise dazu in der Bedienungsanleitung.
Dieser DVD Player wird mit 230V Wechselspannung
bei 50Hz betrieben.

4
Wichtige Sicherheitshinweise
9. Wartung
Versuchen Sie nicht, das Gerät selber zu Warten, da
das öffnen oder entfernen der Abdeckung Sie
gefährlichen Stromspannungen oder anderen Gefahren
aussetzen kann. Überlassen Sie jegliche Wartung
qualifizierten Fachpersonal.
10. TV System
Dieses Gerät ist mit Fernsehgeräten kompatibel, die
das PAL- und/oder das NTSC-System unterstützen.
11. Belüftung
Schlitze und Öffnungen im Gehäuse sind für die Belüftung
und zur Sicherstellung eines ordnungsgemäßen Betriebs
des Gerätes sowie zum Schutz vor Überhitzung vorgesehen.
Diese Öffnungen dürfen keinesfalls versperrt oder abgedeckt
werden. Stellen Sie das Gerät nicht auf weiche Stellflächen
wie z.B. Bett, Sofa, Teppich usw., da so keine ausreichende
Belüftung gewährleistet werden kann.Das Gerät darf nur in
eine Einbaukostruktion (Einbauschrank, Regal usw.) gestellt
werden, wenn eine ausreichende Belüftung gewährleistet
werden kann.Darüberhinaus sollte das Gerät nicht in der
Nähe von Wärmequellen wie z.B. Heizkörper, Wärmespeicher,
Öfen oder anderen Hitzequellen platziert werden.
12. Nässe und Feuchtigkeit
Benutzen Sie das Gerät nicht in der Nähe von Wasser, z.B.
Badewanne, Waschbecken, Spülbecken, Schwimmbecken,
feuchten Kelern oder ähnlichem. Sollte sich dennoch
Kondeswasser bilden, muss die Disk aus dem Gerät
herausgenommen, das Netzkabel eingesteckt werden und
das Gerät für 2-3 Stunden eingeschaltet bleiben. Durch die
Erwärmung verdunstet die Feuchtigkeit.

5
5
HINWEIS Einleitung
Bitte die Verpackung aufbewahren, um im Servicefall das
Gerät geschützt verpackt an den Service zu schicken.
Nach längeren Betrieb kann das Gerät sehr warm werden.
Dies ist normal und stellt keinen Fehler dar.
Das Gerät während der Wiedergabe nicht bewegen oder
anstoßen, dies kann die Disk und/oder den Laser beschädigen.
Verwenden Sie immer die OPEN/CLOSE Taste auf der
Fernbedienung oder am Gerät, um die Schublade zu öffnen
oder zu schließen. Niemals die Schublade zudrücken oder
ziehen, dadurch kann die Mechanik beschädigt werden.

Features Einleitung
Kompatibel zu DVD, CD, MP3, Kodak PictureCD, CD-R
und CD-RW (abgeschlossen).
Bildschirmschoner
Vom Player unterstützte Diskformate:
Dolby DigitalDolby Digital
KODAK picture CDsKODAK picture CDs
MP3 Dateien auf CD-R/CD-RW
DVD videoDVD video
R
RESTRICTED
Kindersicherung
9Wählbare Blickwinkel
32
8
16:9
LB Wählbares Seitenverhältnis
This product incorporates copyright protection technology that is protected by method claims of
certain U.S.patents and other intellectual property rights owned by Macrovision Corporation and other
rights owners. Use of this copyright protection technology must be authorized by Macrovision
Corporation, and is intended for home and other limited viewing uses only unless otherwise authorized
by Macrovision Corporation. Reverse engineering or disassembly is prohibited.
The product complies with the KODAK Picture CD format and will display KODAK Picture CDs. The "KODAK
Picture CD Compatible" logo is a trademark of Eastman Kodak Company and is used with permission.
Manufactured under license from Dolby Laboratories. "Dolby" and the double-D symbol are trademarks of
Dolby Laboratories. Confidential Unpublished Works. c
1992-1997 Dolby Laboratories, Inc. All rights reserved.
6
Wiedergabemöglichkeiten: Programmierte Reihenfolge, Bildsuchlauf usw.
Digitaler Audioausgang (Koaxial)
Videoausgabe: S-Video, Composite,
Komponenten (Y Cb Cr, Y Pb Pr) und RGB
Untertitel
Audiotracks
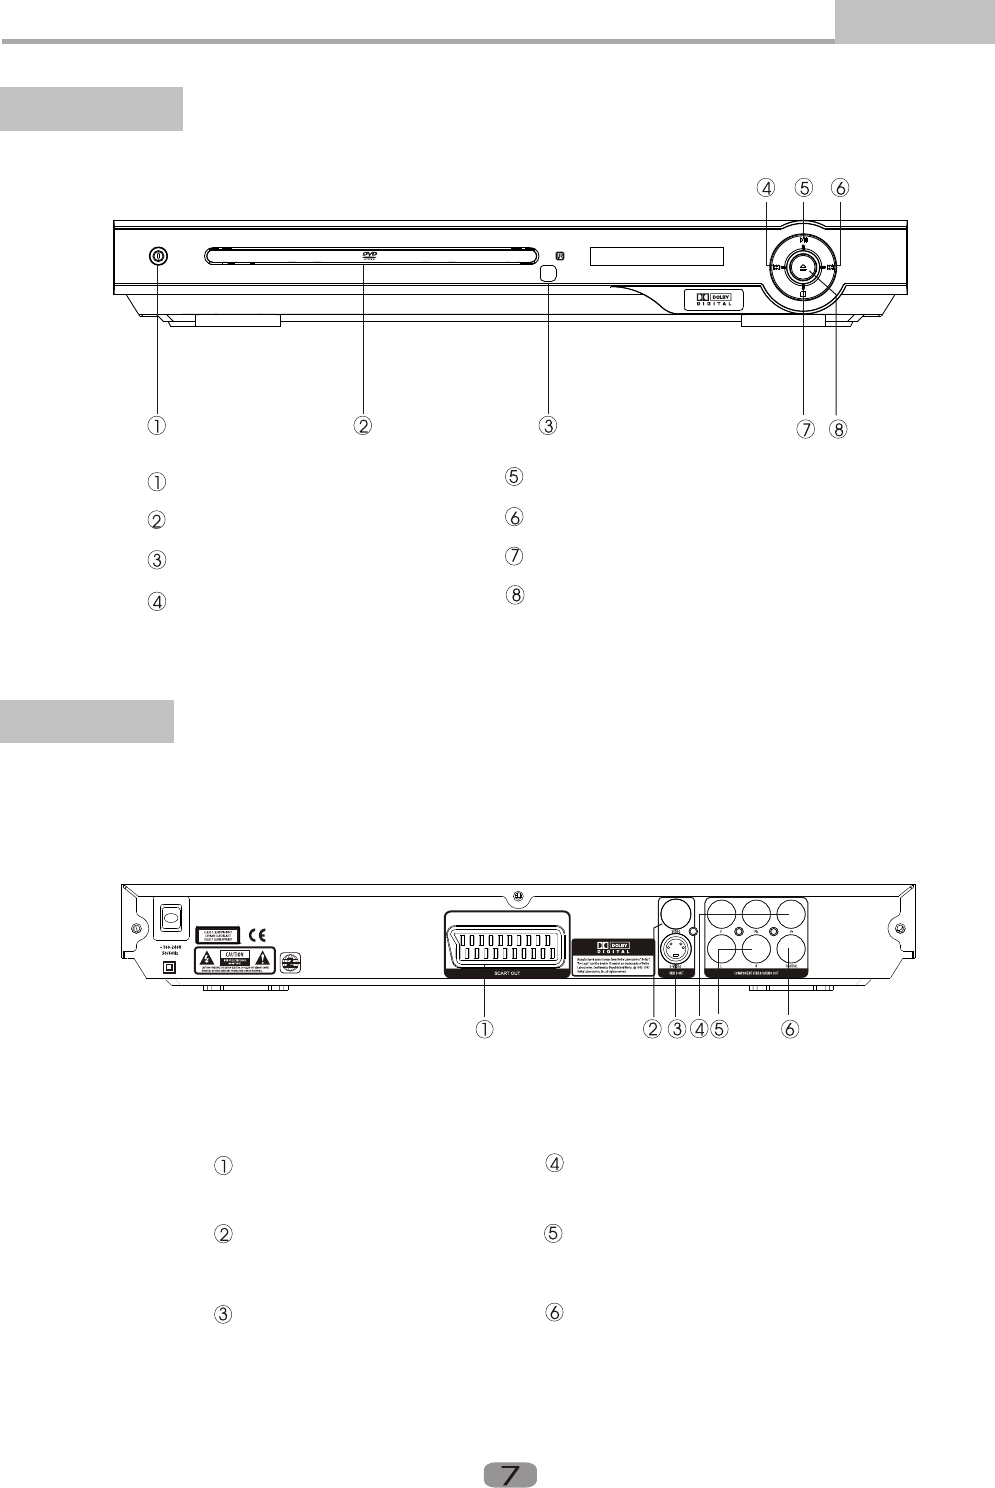
Bedienteil und Anschlüsse Einleitung
POWER Taste
Disk Schublade
IR Empfänger
PREV Taste
PLAY/PAUSE Taste
NEXT Taste
STOP Taste
OPEN/CLOSE Taste
1. Bedienteil
2. Anschlüsse
SCART Buchse
COMPOSITE VIDEO
Buchse
S-VIDEO Buchse
KOMPONENTEN VIDEO Ausgang
(Y Pb Pr)
STEREO AUDIO Ausgang
DIGITAL AUDIO Ausgang (Koaxial)
ENTER
MUTE SUBTITLE LANGUAGE OPEN/
CLOSE
ANGLE VOL+
VOL-
PROG
TITLE
MENU
SETUP PLAY/
PAUSE
L/R STOP
10+
123
456
7890
REV PREV NEXT
PBC DISPLAY ZOOM SLOW
STEP A-B REPEAT VIDEO/
MODE
GOTO
FWD
Einleitung
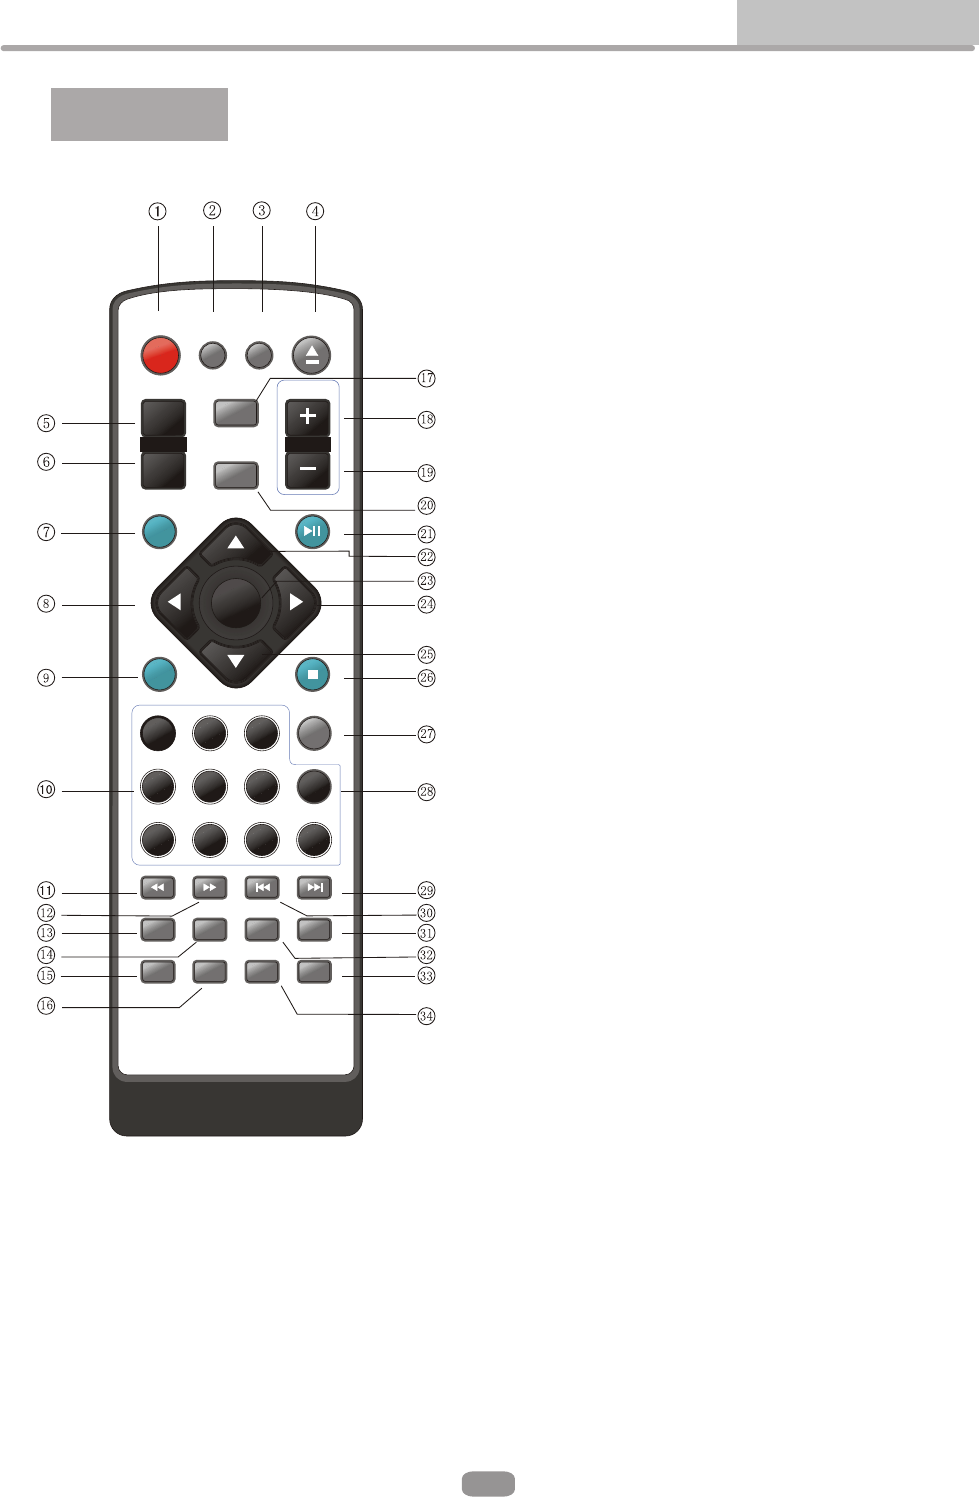
Fernbedienung
Fernbedienung
8
1. MUTE
2. SUBTITLE
3. LANGUAGE
4. OPEN/CLOSE
5. ANGLE
6. PROG
7. SETUP
8. LEFT
9. L/R
10. ZIFFERNTASTEN
11. REV
12. FWD
13. PBC
14. DISPLAY
15. STEP
16. A-B
17. TITLE
18. VOL +
19. VOL -
20. MENU
21. PLAY/PAUSE
22. UP
23. ENTER
24. RIGHT
25. DOWN
26. STOP
27. GOTO
28. 10+
29. NEXT
30. PREV
31. SLOW
32. ZOOM
33. VIDEO MODE
34. REPEAT

ROT
WEISS
HINWEIS:
Es stehen 4 verschiedene Anschlußmöglichkeiten zu Verfügung:
1. S-Video Kabel und Stereo Ton
2. COMPOSITE (gelber Stecker / Buchse) und Stereo Ton
3. Komponent Video und Stereo Ton
4. SCART Verbindung (Bild und Ton)
GELB

HINWEIS:
Die Einstellungen des Audioausgangs müssen auf
„SPDIF/PCM“ oder „SPDIF/RAW“ eingestellt werden
(Siehe Seite 11).
Nach dem Anschluß des Videosignals an Ihr TV Gerät muß der
richtige Kanal eingestellt werden. Bei Verwendung des
AV-Eingangs muß dieser gewählt werden.
Einzelheiten dazu entnehmen Sie bitte der Bedienungsanleitung
Ihres TV-Gerätes.
Die Einstellung des Verstärkers erfolgt auf ähnliche Weise.
11
SYSTEM SETUPSYSTEM SETUP
TV SYSTEM
SCREEN SAVER
VIDEO
TV TYPE
PASSWORD
RATING
DEFAULT
EXIT SETUP
VIDEO SETUPVIDEO SETUP
BRIGHTNESS
CONTRAST
HUE
SATURATION
SHARPNESS
EXIT SETUP
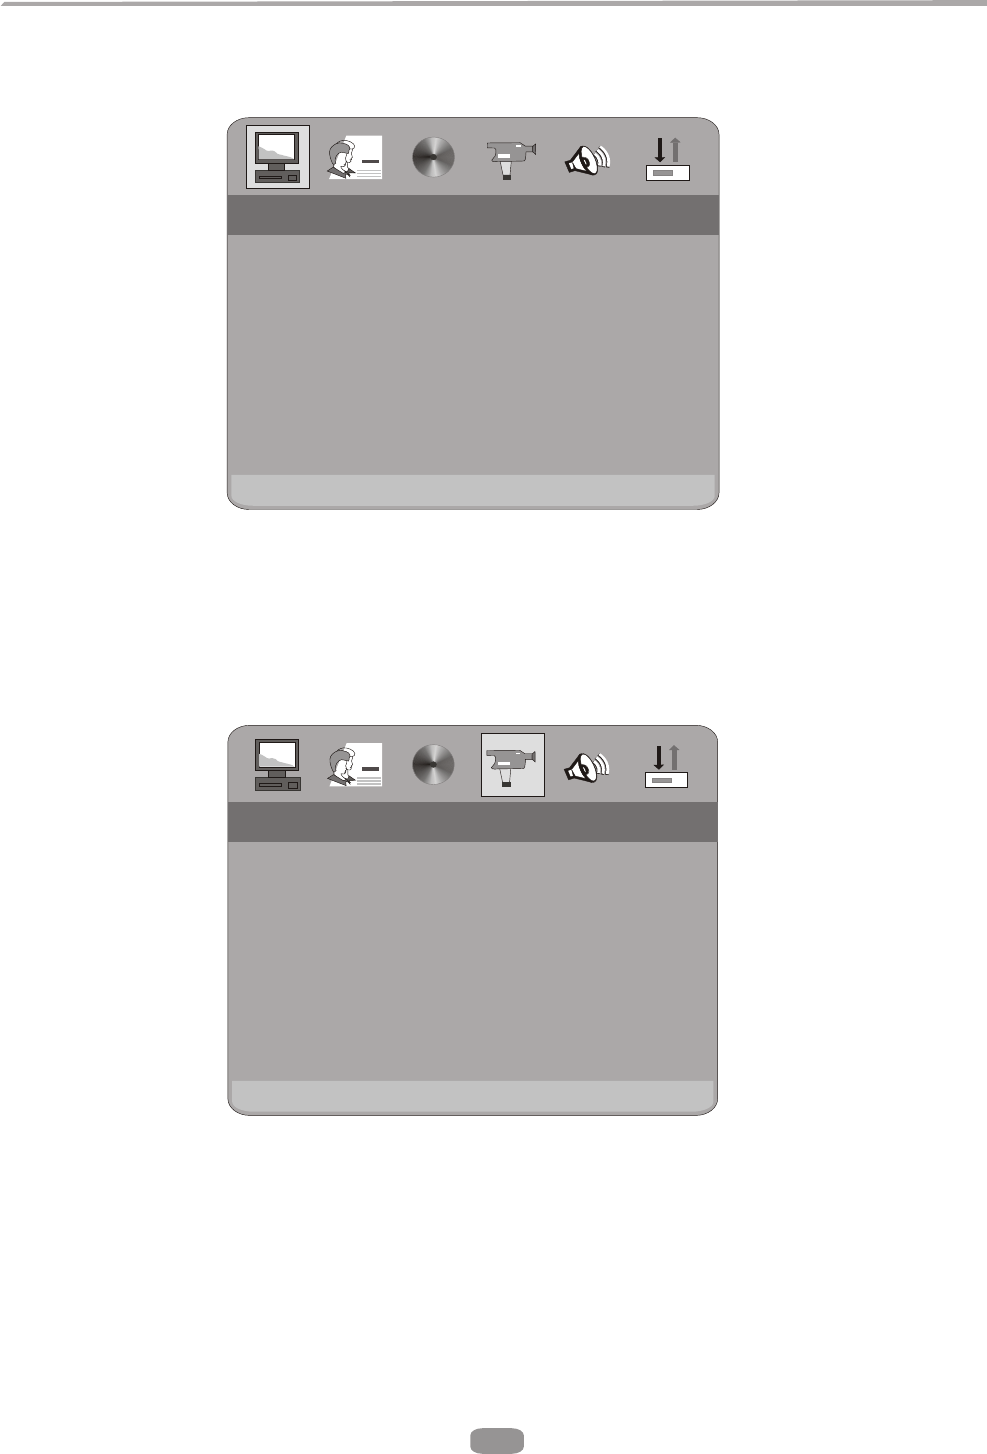
Das Einstellungsmenü
Allgemeine Schritte des Einstellungsmenüs
A) Drücken Sie die Setup Taste, das Einstellungsmenü erscheint
B) Drücken Sie die Pfeiltasten Links/Rechts um zu dem gewünschten Symbol
zu erreichen.Drücken Sie Die Pfeiltaste Runter/Links jeweilige Seite zu
aktivieren.
Beispiel:um den Punkt Video zu erreichen nutzen Sie dei Pfeiltaste Rechts
die Seite Video erscheint.
C) Drüchen Sie die Pfeiltaste Runter um den gewünschten Punkt zu erreichen.
Zur Auswahl drücken Sie die Taste Enter oder Pfeil rechts. Die Unterpunkte
erscheinen rechts.
Beispiel : Taste runter bis Punkt Brightness, Enter oder rechts zum Bestätigen,
die einstellungsmöglichkeiten erscheinen rechts.

12
Grundeinstellungen
VIDEO SETUPVIDEO SETUP
BRIGHTNESS
CONTRAST
HUE
SATURATION
SHARPNESS
EXIT SETUP
SYSTEM SETUPSYSTEM SETUP
TV SYSTEM
SCREEN SAVER
VIDEO
TV TYPE
PASSWORD
RATING
DEFAULT
EXIT SETUP
NTSC
PAL
AUTO
NTSC
PAL
AUTO
A) Drücken Sie Pfeiltaste links/rechts um das gewünschte Symbol auszuwähen
dann Enter oder Setup um das Menü zu verlassen.
2. Erläuterung der Einstellungen
2.1. System Einstellungen
Die Systemeinstellungen werden wie folgt dargestellt :
2.1.2. TV System
Je nach TV System, kann die Einstellung vorgenommen werden.
Einstellungen

13
2.1.2. Bildschirmschoner
INTERLACE-YUV
P-SCAN YPBPR
TV RGB
S-VIDEO
INTERLACE-YUV
P-SCAN YPBPR
TV RGB
S-VIDEO
SYSTEM SETUPSYSTEM SETUP
TV SYSTEM
SCREEN SAVER
VIDEO
TV TYPE
PASSWORD
RATING
DEFAULT
EXIT SETUP
SYSTEM SETUPSYSTEM SETUP
TV SYSTEM
SCREEN SAVER
VIDEO
TV TYPE
PASSWORD
RATING
DEFAULT
EXIT SETUP
ON
OFF
ON
OFF
Einstellungen Grundeinstellungen
dauerhaft angezeigt solang keine DVD eingelegt wurde.
2.1.3. Video
Je nach Tv Gerät und Anschluß könne Sie zwischen einzelnen Punkten
wählen.
Hinweis :
Nutzen Sie PSCAN nur wenn der DVD Spieler an ein PSCAN TV angeschlossen
wurde.

14
Grundeinstellungen
Je nach TV Gerät könne Sie 16.9, 4.3LB oder 4:3PS wählen.
2.1.5 Kennwort
--------
SYSTEM SETUPSYSTEM SETUP
TV SYSTEM
SCREEN SAVER
VIDEO
TV TYPE
PASSWORD
RATING
DEFAULT
EXIT SETUP
SYSTEM SETUPSYSTEM SETUP
TV SYSTEM
SCREEN SAVER
VIDEO
TV TYPE
PASSWORD
RATING
DEFAULT
EXIT SETUP
4:3 PS
4:3 LB
16:9
4:3 PS
4:3 LB
16:9
Dieser Menüpunkt ist per voreinstellung belegt. Es könne keine
Einstellungen
2.1.4 TV Typ
Einstellungen im Rating vorgenommen werden. Zur Einstellung muss die
Passwort Funktion mit dem Werkskennwort 6666 freigegeben werden.
Um ein persönliches Kennwort zu vergeben, werden Sie aufgefordert
ihr altes einzugeben (6666) um es im Anschluß durch ihr persönliches,
auch aus 4 Ziffern, zu ersetzen.

15
Grundeinstellungen
2.1.6 Altersbeschränkungen
1 KID SAFE
2 G
3 PG
4 PG13
5 PG-R
6 R
7 NC-17
8 ADULT
1 KID SAFE
2 G
3 PG
4 PG13
5 PG-R
6 R
7 NC-17
8 ADULT
SYSTEM SETUPSYSTEM SETUP
TV SYSTEM
SCREEN SAVER
VIDEO
TV TYPE
PASSWORD
RATING
DEFAULT
EXIT SETUP
RESTORERESTORE
SYSTEM SETUPSYSTEM SETUP
TV SYSTEM
SCREEN SAVER
VIDEO
TV TYPE
PASSWORD
RATING
DEFAULT
EXIT SETUP
Einstellungen
Diese Funktion ist eine Kontrollfunktion, änlich der bei Filnem bekannten.
Sie ermöglicht ihnen ein Kontrolle über Filme die gesehen werden können,
Voraussetzung ist, das der betreffende Film mit dieser Funktion ausgestattet ist.
2.1.7 Rückstellung
Hier kann der Auslieferungs Zustand des Gerätes wieder hergestellt werden.
Hinweis :
Sollte das Gerät nicht richtig arbeiten, kann das von falschen Einstellungen
verursacht werden. Stellen Sie in diesem Fall die Werkseinstellungen wieder her.
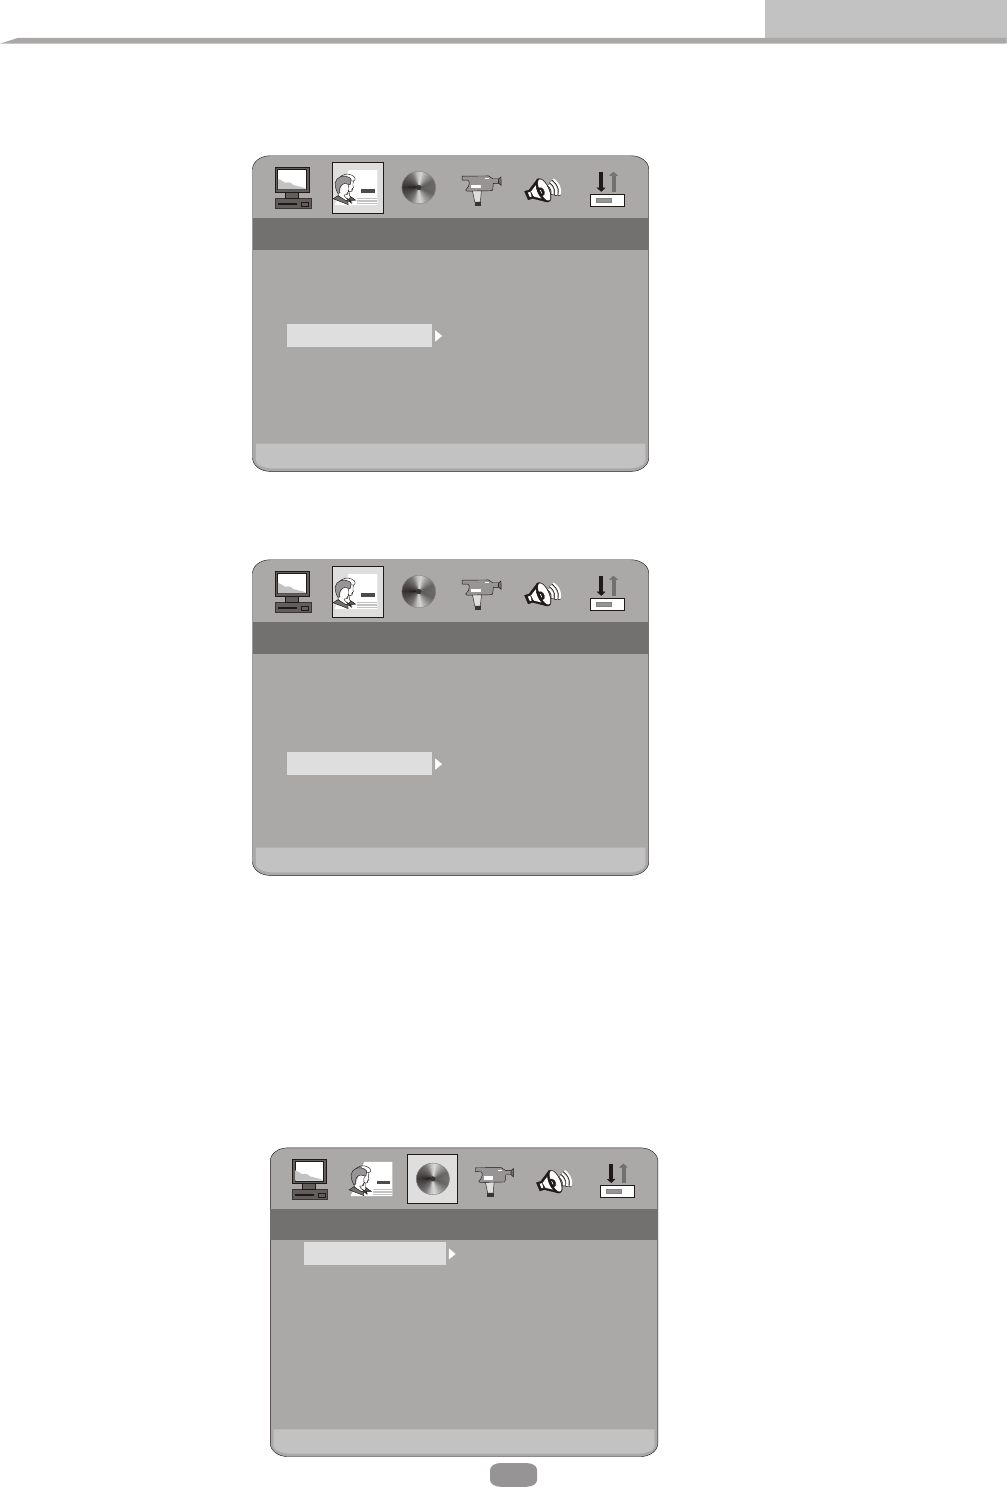
2.2 Sprachauswahl
Die Sprach Optionen werden wie folgt dargestellt :
2.2.1 OSD Sprach Optionen
In diesem Menüpunkt kann die OSD Sprache gewählt werden. Nutzen Sie
die Pfeiltasten um ihre Sprache zu erreichen, bestätigen Sie mit ENTER.

16
LANGUAGE SETUPLANGUAGE SETUP
OSD LANGUAGE
AUDIO LANG
SUBTITLE LANG
MENU LANG
DIVA[R] VOD
EXIT SETUP
ENGLISH
GERMAN
SPANTISH
FRENCH
PORTUGUESE
ITALIAN
DUTCH
LATCH
ENGLISH
GERMAN
SPANTISH
FRENCH
PORTUGUESE
ITALIAN
DUTCH
LATCH
LANGUAGE SETUPLANGUAGE SETUP
OSD LANGUAGE
AUDIO LANG
SUBTITLE LANG
MENU LANG
DIVX[R] VOD
EXIT SETUP
ENGLISH
GERMAN
SPANISH
FRENCH
ENGLISH
GERMAN
SPANISH
FRENCH
LANGUAGE SETUPLANGUAGE SETUP
OSD LANGUAGE
AUDIO LANG
SUBTITLE LANG
MENU LANG
DIVX[R] VOD
EXIT SETUP
ENGLISH
GERMAN
SPANTISH
FRENCH
PORTUGUESE
ITALIAN
DUTCH
OFF
ENGLISH
GERMAN
SPANTISH
FRENCH
PORTUGUESE
ITALIAN
DUTCH
OFF
GrundeinstellungenEinstellungen
2.2.2 Audio Sprachfunktion
Im Menüpunkt Audio Sprache wird die gewünschte Wiedergabe Sprache
eingestellt werden. Wählen Sie mit den Pfeiltasten ihre Sprache aus
und bestätigen Sie mit ENTER. Wenn diese auf der gespielten Disc vorhanden ist,
erfolgt die Wiedergabe automatisch.
2.2.3 Untertitel Sprache
Hier kann die Sprache des dargestellten Untertitels eingestellt werden.
Wählen Sie mit den Pfeiltasten die gewünschte Sprache, bestätigen Sie mit ENTER.
2.2.4 Menü Sprache
Hier wird die Menü Sprache gewählt. Auswahl erfolgt über die Pfeiltasten,
bestätigen Sie mit ENTER. Vorausgesetzt die gespielte Disc verfügt über diese
Sprache, wird das Menü in dieser angezeigt.
17
SPDIP/OFF
SPDIF/RAW
SPDIF/PCM
SPDIP/OFF
SPDIF/RAW
SPDIF/PCM
AUDIO OUTAUDIO OUT
AUDIO OUT
EXIT SETUP
LANGUAGE SETUPLANGUAGE SETUP
OSD LANGUAGE
AUDIO LANG
SUBTITLE LANG
MENU LANG
DIVX[R] VOD
EXIT SETUP
Hinweis :
LANGUAGE SETUPLANGUAGE SETUP
OSD LANGUAGE
AUDIO LANG
SUBTITLE LANG
MENU LANG
EXIT SETUP
ENGLISH
GERMAN
SPANTISH
FRENCH
PORTUGUESE
ITALIAN
DUTCH
LATCH
ENGLISH
GERMAN
SPANTISH
FRENCH
PORTUGUESE
ITALIAN
DUTCH
LATCH
Grundeinstellungen
Einstellungen
Wenn die gewünschten Sprachen nicht auf der Disc vorhanden sind, wird
die Werkseinstellung wiedergegeben.
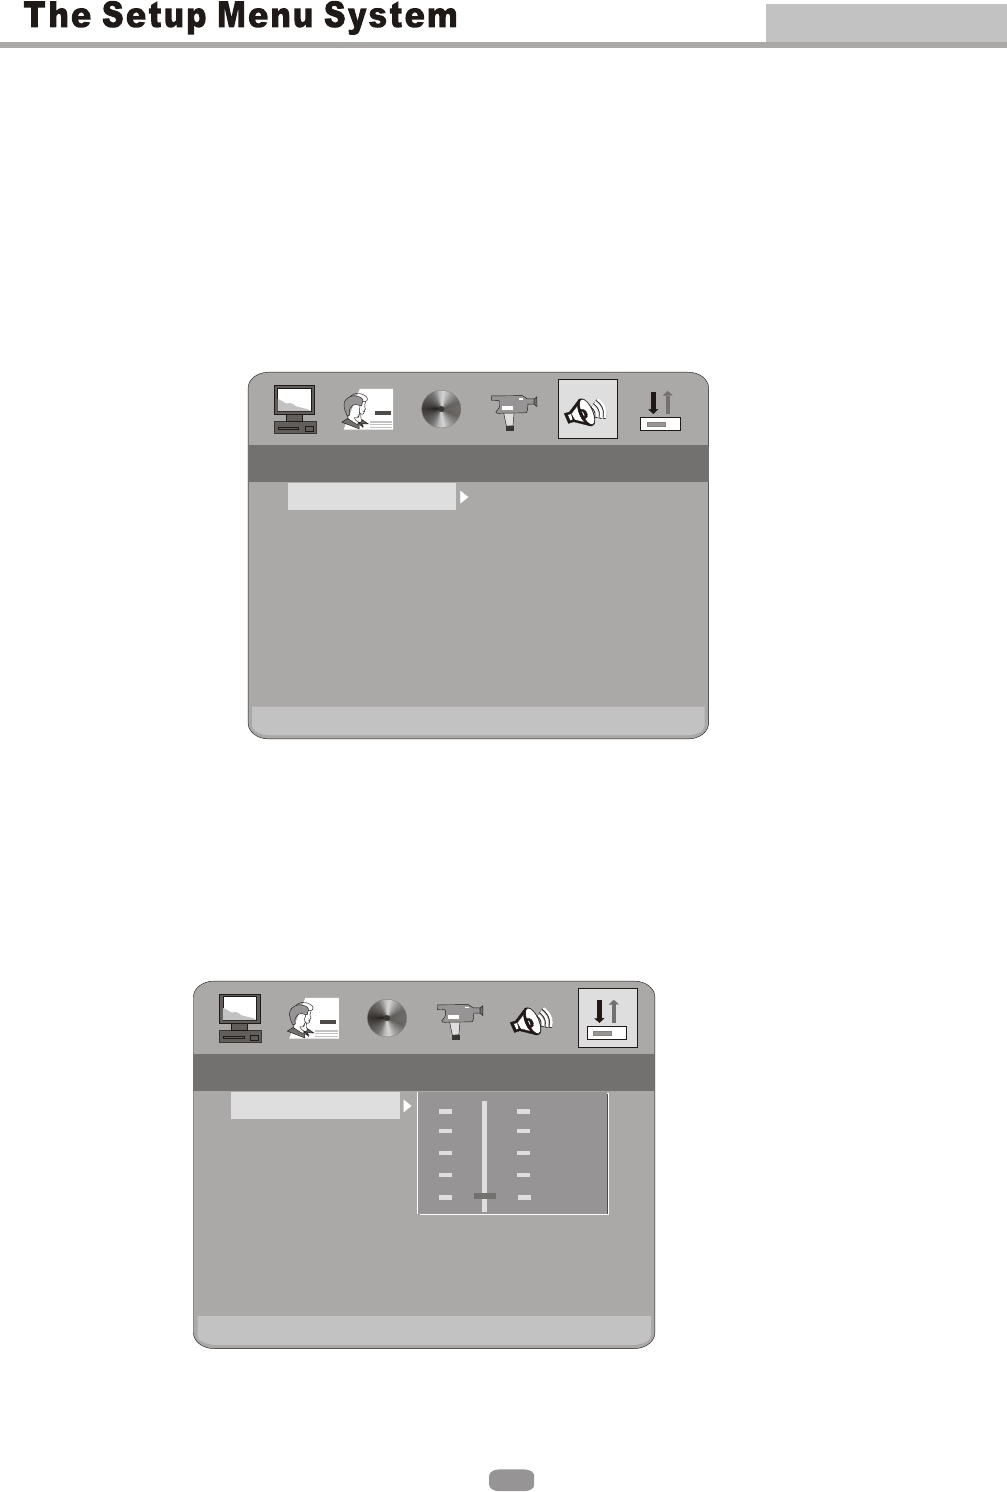
2.3 Audio Einstellungen
Die Audio Einstellungen werden wie folgt Dargestellt.
2.3.1 Audio Ausgang
Wählen Sie mit den Pfeiltasten das gewünschte Tonvormat,
bestätigen Sie mit Enter.

18
VIDEO SETUPVIDEO SETUP
BRIGHTNESS
CONTRAST
HUE
SATURATION
SHARPNESS
EXIT SETUP
VIDEO SETUPVIDEO SETUP
BRIGHTNESS
CONTRAST
HUE
SATURATION
SHARPNESS
EXIT SETUP
VIDEO SETUPVIDEO SETUP
BRIGHTNESS
CONTRAST
HUE
SATURATION
SHARPNESS
EXIT SETUP
Einstellungen
2.4 Video Einstellungen
Die Video Einstellungen werden wie folgt dargestellt.
2.4.1 Helligkeit
Nutzen Sie die Pfeiltasten zur Einstellung der gewünschten Helligkeit.
2.4.2 Kontrast
Nutzen Sie die Pfeiltasten zur Einstellung des gewünschten Kontastes

19
Advanced Features
Use the Up and Down arrow buttons to move the scroll and adjust the HUE.Use the Up and Down arrow buttons to move the scroll and adjust the HUE.
2.4.3 HUE2.4.3 HUE
VIDEO SETUPVIDEO SETUP
BRIGHTNESS
CONTRAST
HUE
SATURATION
SHARPNESS
EXIT SETUP
2.4.4 SATURATION2.4.4 SATURATION
Use the Up and Down arrow buttons to move the scroll and adjust the
saturation.
Use the Up and Down arrow buttons to move the scroll and adjust the
saturation.
VIDEO SETUPVIDEO SETUP
BRIGHTNESS
CONTRAST
HUE
SATURATION
SHARPNESS
EXIT SETUP
2.4.5 SHARPNESS2.4.5 SHARPNESS
Use the Up and Down arrow buttons to move the scroll and adjust the
Sharpness.
Use the Up and Down arrow buttons to move the scroll and adjust the
Sharpness.
VIDEO SETUPVIDEO SETUP
BRIGHTNESS
CONTRAST
HUE
SATURATION
SHARPNESS
EXIT SETUP
Advanced Features
20
2.5 SPEAKER SETUP2.5 SPEAKER SETUP
The speaker setup options are illustrated below:The speaker setup options are illustrated below:
2.5.1 DOWNMIX2.5.1 DOWNMIX
A) LT / RT Choose this setting when you are connected to a
2 Channel Analog Audio Input.
A) LT / RT Choose this setting when you are connected to a
2 Channel Analog Audio Input.
B) STEREO Choose this setting when the DVD player is
connected to a TV or therefore modulator.
B) STEREO Choose this setting when the DVD player is
connected to a TV or therefore modulator.
LT/RT
STEREO
LT/RT
STEREO
SPEAKER SETUPSPEAKER SETUP
DOWNMIX
EXIT SETUP
2.6 DIGITAL SETUP2.6 DIGITAL SETUP
The DIGITAL SETUP options are illustrated below:The DIGITAL SETUP options are illustrated below:
2.6.1 DYNAMIC RANGE:
When LINE OUT is selected,choose this setting to adjust the line out ratio for
different effects.
2.6.1 DYNAMIC RANGE:
When LINE OUT is selected,choose this setting to adjust the line out ratio for
different effects.
6/8 6/8
4/8 4/8
2/8 2/8
OFF OFF
FULL FULL
DIGITAL SETUPDIGITAL SETUP
DYNAMIC RANGE
DUAL MONO
EXIT SETUP

Advanced Features
21
2.6.2 DUAL MONO (LEFT + RIGHT)2.6.2 DUAL MONO (LEFT + RIGHT)
Choose to setup the L and R mono output mode. There are four
modes in this option:
Choose to setup the L and R mono output mode. There are four
modes in this option:
STEREO, MONO L, MONOR,and MIX MONO. STEREO, MONO L, MONOR,and MIX MONO.
1. To protect your DVD player, the interval between turning the unit on and off,
via the Main Power button, should be more than 30 seconds.
2. If the unit will not be used for an extended period of time, please disconnect
the power plug from the outlet.
3. The player should only be operated with the correct power supply that
corresponds to the marking label. The incorrect power supply could damage
the unit.
5. If the player stops during playback, eject the disc and power off the unit. Wait
10 minutes and power the unit back on.
4. The player may not be compatible with some encrypted discs.
STEREO
MONO L
MONO R
MIX MONO
STEREO
MONO L
MONO R
MIX MONO
DYNAMIC RANGE
DUAL MONO
EXIT SETUP
DIGITAL SETUPDIGITAL SETUP
REFERENCE:REFERENCE:

22
Advanced Features
Total title Total Chapter
Language
Audio type Subtitle
Angle
Press DISPLAY to show the Audio and Subtitle message menu.
During playback,press DISPLAY to show the current time counter position.
Play time of the current titlePlay time of the current title
DISPLAYDISPLAY
Current title
Disc type
Current Chapter
GOTOGOTO
During playback,press GOTO show the current time counter position.During playback,press GOTO show the current time counter position.
Enter number to
choose the title
Enter number to
choose the title
Enter number to choose
the Play time.
Enter number to choose
the Play time.
Total ChapterTotal Chapter
Enter number to choose
the Chapter.
Enter number to choose
the Chapter.
Advanced Features
23
These keys are used to input the time, as well as title, chapter and track
numbers.
These keys are used to input the time, as well as title, chapter and track
numbers.
When a numeric item is displayed on the screen, press the 0-10+ keys to
select the desired entry, and press ENTER to confirm.
When a numeric item is displayed on the screen, press the 0-10+ keys to
select the desired entry, and press ENTER to confirm.
To open the disc tray, press OPEN/CLOSE.To open the disc tray, press OPEN/CLOSE.
To close the disc tray, press OPEN/CLOSE again.To close the disc tray, press OPEN/CLOSE again.
OPEN/
CLOSE
OPEN/
CLOSE
0-10+ keys0-10+ keys
A-BA-B
PREVPREV
NEXTNEXT
STOPSTOP
During playback, press A-B to select point A.During playback, press A-B to select point A.
Press it again to select point B. The player will repeat the section from A to
B automatically.
Press it again to select point B. The player will repeat the section from A to
B automatically.
Press A-B third time to cancel A-B repeat and clear points A and B.Press A-B third time to cancel A-B repeat and clear points A and B.
Note: 1. During CD playback, points A and B must be within the same track.
During DVD playback, points A and B can be selected from different chapters.
2. This function is subject to the disc.
Note: 1. During CD playback, points A and B must be within the same track.
During DVD playback, points A and B can be selected from different chapters.
2. This function is subject to the disc.
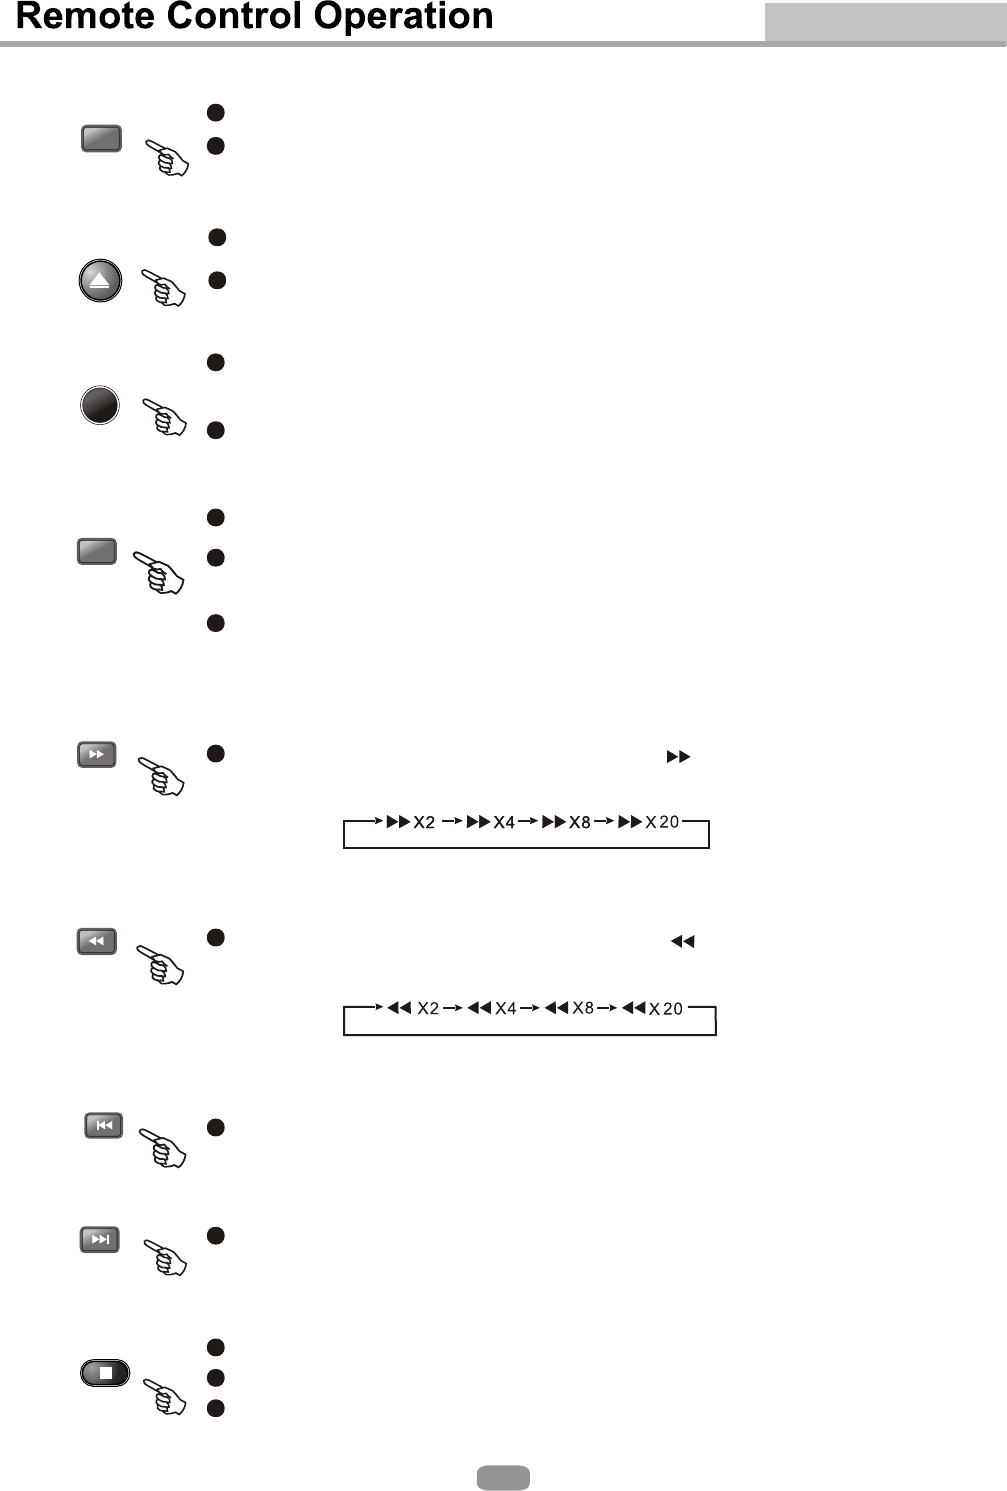
During DVD or CD playback, press and holp to scan forward. The player
will review the disc at 2, 4, 8 and 20 times normal speed as follows:
During DVD or CD playback, press and holp to scan forward. The player
will review the disc at 2, 4, 8 and 20 times normal speed as follows:
Press PLAY to resume normal playback.Press PLAY to resume normal playback.
During DVD or CD playback, press and holp to scan in reverse. The
player will review the disc at 2, 4, 8 and 16 times normal speed as follows:
During DVD or CD playback, press and holp to scan in reverse. The
player will review the disc at 2, 4, 8 and 16 times normal speed as follows:
Press PLAY to resume normal playback.Press PLAY to resume normal playback.
Press PREV to skip to previous chapter or track.Press PREV to skip to previous chapter or track.
Press NEXT to skip to the next chapter or track.Press NEXT to skip to the next chapter or track.
Press STOP once during playback to stop and hold playback.Press STOP once during playback to stop and hold playback.
Press PLAY to resume playback from the point you pressed STOP.Press PLAY to resume playback from the point you pressed STOP.
Press STOP twice to stop playback completely.Press STOP twice to stop playback completely.
Press MUTE to mute the Audio output.Press MUTE to mute the Audio output.
Press MUTE again to resume normal Audio output.Press MUTE again to resume normal Audio output.
MUTEMUTE

PLAY/
PAUSE
PLAY/
PAUSE
VODEO/
MODE
VODEO/
MODE
Advanced Features
24
Press the VODEO/MODE button to change the Video Output .There are 4
different outputs INTERLACE-YUV,P-SCAN,YPBPR,TV-RGB,S-VODEO.
When you have selected the incorrect output your screen will go
blank. Continue to hit the VODEO/MODE button to retrieve the correct
connection.
Press the VODEO/MODE button to change the Video Output .There are 4
different outputs INTERLACE-YUV,P-SCAN,YPBPR,TV- , -
When you have selected the incorrect output your screen will go
blank. Continue to hit the VODEO/MODE button to retrieve the correct
connection.
RGB S VODEO.
Press PLAY/PAUSE during playback to pause playback.Press PLAY/PAUSE during playback to pause playback.
Press PLAY/PAUSE to resume normal playback.Press PLAY/PAUSE to resume normal playback.
During DVD, playback, press MENU to return to the program menu.During DVD, playback, press MENU to return to the program menu.
Note: This function is subject to the disc.Note: This function is subject to the disc.
During DVD, playback, press TITLE to display the DVD title menu or play the
first title.
During DVD, playback, press TITLE to display the DVD title menu or play the
first title.
Note: This function is subject to the disc.Note: This function is subject to the disc.
Select to press REPEAT to select Repeat Title, Repeat chapter, Repeat off
During DVD playback.
Select to press REPEAT to select Repeat Title, Repeat chapter, Repeat off
During DVD playback.
Press REPEAT to select Repeat Single, Repaet all and Repeat off (CD or
Other).
Press REPEAT to select Repeat Single, Repaet all and Repeat off (CD or
Other).
Press PLAY/PAUSE from stop mode to start lpay.Press PLAY/PAUSE from stop mode to start lpay.
Q2Q2 Q3Q3 Q4Q4 Q1/2Q1/2 Q1/3Q1/3 Q1/4Q1/4
QOFFQOFF
Press Volume < VOL+> button to increase Volume.Press Volume < VOL+> button to increase Volume.
Press < VOL-> button to reduce Volume till to no volume output.Press < VOL-> button to reduce Volume till to no volume output.
During DVD playback, press ZOOM to magnify the image as follows:During DVD playback, press ZOOM to magnify the image as follows:
Press ANGLE to view scenes from different camera angles.Press ANGLE to view scenes from different camera angles.
During DVD playbackDuring DVD playback
Press ANGLE repeatedly to change from one camera angle to another.Press ANGLE repeatedly to change from one camera angle to another.
Note: This function is disc specific.Note: This function is disc specific.
MENUMENU
TITLETITLE
REPEATREPEAT
VOL+ VOL-VOL+ VOL-
ZOOMZOOM
ANGLEANGLE
STEPSTEP Press STEP to step a single frame/ picture forward during playback. Press
STEP several times to step several frames/ pictures forward. Press PLAY
to resume playback.
Press STEP to step a single frame/ picture forward during playback. Press
STEP several times to step several frames/ pictures forward. Press PLAY
to resume playback.

25
Advanced Features
PROGPROG
White [PROGRAM] is on, press ENTER to display the [Program] submenu:White [PROGRAM] is on, press ENTER to display the [Program] submenu:
CD Others
Program Input
1__ 4__ 7__ 10__
2__ 5__ 8__ 11__
3__ 6__ 9__ 12__
Play Program Clear All
DVD
Program Input Title / chapter
1__:__ 4__:__ 7__:__ 10__:__
Play Program Clear All
2__:__ 5__:__ 8__:__ 11__:__
3__:__ 6__:__ 9__:__ 12__:__
Input the track numbers in the order you would like
them to play. When finished, select[Play Program]
and then press ENTER to play the tracks in the new
programmed order.Select [Clear All] and press ENTER
to clear all the numbers you have input.
Input the track numbers in the order you would like
them to play. When finished, select[Play Program]
and then press ENTER to play the tracks in the new
programmed order.Select [Clear All] and press ENTER
to clear all the numbers you have input.
Input the title number and the chapter number in the
desired order. Then select[Play Program] and press
ENTER to play the chapters in the order you have set..
Select [Clear All] and press ENTER to clear all the
numbers you have input.
Input the title number and the chapter number in the
desired order. Then select[Play Program] and press
ENTER to play the chapters in the order you have set..
Select [Clear All] and press ENTER to clear all the
numbers you have input.
SLOWSLOW
L/RL/R
Press slow repeatedly to slow motion playback at variable speeds.Press slow repeatedly to slow motion playback at variable speeds.
When a DVD is played, the active dubbing languang will be shown. When
a SVCD or VCD is played the left track, right track or stereo will be displayed
accordingly.
When a DVD is played, the active dubbing languang will be shown. When
a SVCD or VCD is played the left track, right track or stereo will be displayed
accordingly.
When a bilingual story VCD is played, you may press the button to select
the language desired.
When a bilingual story VCD is played, you may press the button to select
the language desired.
During DVD playbackDuring DVD playback
Press LANGUAGE repeatedly to select from up to 8 Audio language/formats.Press LANGUAGE repeatedly to select from up to 8 Audio language/formats.
Note: This function is disc specific.Note: This function is disc specific.
During DVD playbackDuring DVD playback
Press SUBTITLE repeatedly to select from up to 32 subtitle languages.Press SUBTITLE repeatedly to select from up to 32 subtitle languages.
Note: This function is disc specific (languages will vary)..Note: This function is disc specific (languages will vary)..
LANGUAGELANGUAGE
SUBTITLESUBTITLE
Termékspecifikációk
| Márka: | JGC |
| Kategória: | DVD-lejátszó |
| Modell: | DVD250 |
Szüksége van segítségre?
Ha segítségre van szüksége JGC DVD250, tegyen fel kérdést alább, és más felhasználók válaszolnak Önnek
Útmutatók DVD-lejátszó JGC

20 Augusztus 2024
18 Augusztus 2024
Útmutatók DVD-lejátszó
- DVD-lejátszó Samsung
- DVD-lejátszó Sony
- DVD-lejátszó Yamaha
- DVD-lejátszó LG
- DVD-lejátszó Grundig
- DVD-lejátszó Marantz
- DVD-lejátszó Philips
- DVD-lejátszó Pioneer
- DVD-lejátszó SilverCrest
- DVD-lejátszó Panasonic
- DVD-lejátszó JVC
- DVD-lejátszó AEG
- DVD-lejátszó Sharp
- DVD-lejátszó Harman Kardon
- DVD-lejátszó BMW
- DVD-lejátszó Toshiba
- DVD-lejátszó Oppo
- DVD-lejátszó Hyundai
- DVD-lejátszó Apple
- DVD-lejátszó Medion
- DVD-lejátszó Onkyo
- DVD-lejátszó Technics
- DVD-lejátszó JBL
- DVD-lejátszó Boss
- DVD-lejátszó Thomson
- DVD-lejátszó Aiwa
- DVD-lejátszó Kenwood
- DVD-lejátszó Asus
- DVD-lejátszó Mitsubishi
- DVD-lejátszó Sencor
- DVD-lejátszó GPX
- DVD-lejátszó Supermicro
- DVD-lejátszó Hitachi
- DVD-lejátszó Nevir
- DVD-lejátszó Cambridge
- DVD-lejátszó Alpine
- DVD-lejátszó Nextbase
- DVD-lejátszó Denver
- DVD-lejátszó Bush
- DVD-lejátszó Trevi
- DVD-lejátszó Elta
- DVD-lejátszó Daewoo
- DVD-lejátszó Lenoxx
- DVD-lejátszó Funai
- DVD-lejátszó Gembird
- DVD-lejátszó Denon
- DVD-lejátszó Muse
- DVD-lejátszó Energy Sistem
- DVD-lejátszó OK
- DVD-lejátszó TriStar
- DVD-lejátszó Loewe
- DVD-lejátszó Scott
- DVD-lejátszó Manta
- DVD-lejátszó Blaupunkt
- DVD-lejátszó NAD
- DVD-lejátszó Logik
- DVD-lejátszó AKAI
- DVD-lejátszó Jensen
- DVD-lejátszó Sanyo
- DVD-lejátszó Salora
- DVD-lejátszó DataVideo
- DVD-lejátszó Lenco
- DVD-lejátszó Philco
- DVD-lejátszó Best Buy
- DVD-lejátszó Rotel
- DVD-lejátszó Zenec
- DVD-lejátszó Soundmaster
- DVD-lejátszó Dual
- DVD-lejátszó RCA
- DVD-lejátszó Schaub Lorenz
- DVD-lejátszó Arcam
- DVD-lejátszó Linksys
- DVD-lejátszó Majestic
- DVD-lejátszó Reflexion
- DVD-lejátszó Sogo
- DVD-lejátszó Aiptek
- DVD-lejátszó Airis
- DVD-lejátszó Apex
- DVD-lejátszó Lexibook
- DVD-lejátszó Eminent
- DVD-lejátszó Vestel
- DVD-lejátszó Sunstech
- DVD-lejátszó Sylvania
- DVD-lejátszó Marquant
- DVD-lejátszó Magnum
- DVD-lejátszó Audiosonic
- DVD-lejátszó Proline
- DVD-lejátszó Coby
- DVD-lejátszó Vieta
- DVD-lejátszó Audiovox
- DVD-lejátszó Transcend
- DVD-lejátszó Terris
- DVD-lejátszó Aitro
- DVD-lejátszó Laser
- DVD-lejátszó Alba
- DVD-lejátszó Naxa
- DVD-lejátszó Sherwood
- DVD-lejátszó Mpman
- DVD-lejátszó Targa
- DVD-lejátszó Mx Onda
- DVD-lejátszó Nikkei
- DVD-lejátszó Autovision
- DVD-lejátszó Qmedia
- DVD-lejátszó Difrnce
- DVD-lejátszó Emtec
- DVD-lejátszó Odys
- DVD-lejátszó Soundstream
- DVD-lejátszó Xoro
- DVD-lejátszó Durabase
- DVD-lejátszó Micromaxx
- DVD-lejátszó Woxter
- DVD-lejátszó Opera
- DVD-lejátszó Tesco-Technika
- DVD-lejátszó Hiteker
- DVD-lejátszó Ferguson
- DVD-lejátszó Mustek
- DVD-lejátszó Bluetech
- DVD-lejátszó Audica
- DVD-lejátszó Eltax
- DVD-lejátszó Sevic
- DVD-lejátszó EKO
- DVD-lejátszó Magnavox
- DVD-lejátszó AC Ryan
- DVD-lejátszó Planet Audio
- DVD-lejátszó Koda
- DVD-lejátszó Belson
- DVD-lejátszó Yakumo
- DVD-lejátszó Voxx
- DVD-lejátszó Aconatic
Legújabb útmutatók DVD-lejátszó

24 Március 2025

21 Március 2025

14 Január 2025
14 Január 2025

11 Január 2025
11 Január 2025
11 Január 2025

11 Január 2025
11 Január 2025
11 Január 2025