Használati útmutató ION Tough Sounds
ION
fejhallgató
Tough Sounds
Olvassa el alább 📖 a magyar nyelvű használati útmutatót ION Tough Sounds (2 oldal) a fejhallgató kategóriában. Ezt az útmutatót 6 ember találta hasznosnak és 2 felhasználó értékelte átlagosan 4.5 csillagra
Oldal 1/2
Tough Sounds
Quickstart Guide
Box Contents: Tough Sounds, Mini USB Charging Cable, 3.5 mm (1/8”) Stereo Aux
Cable, Quickstart Guide.
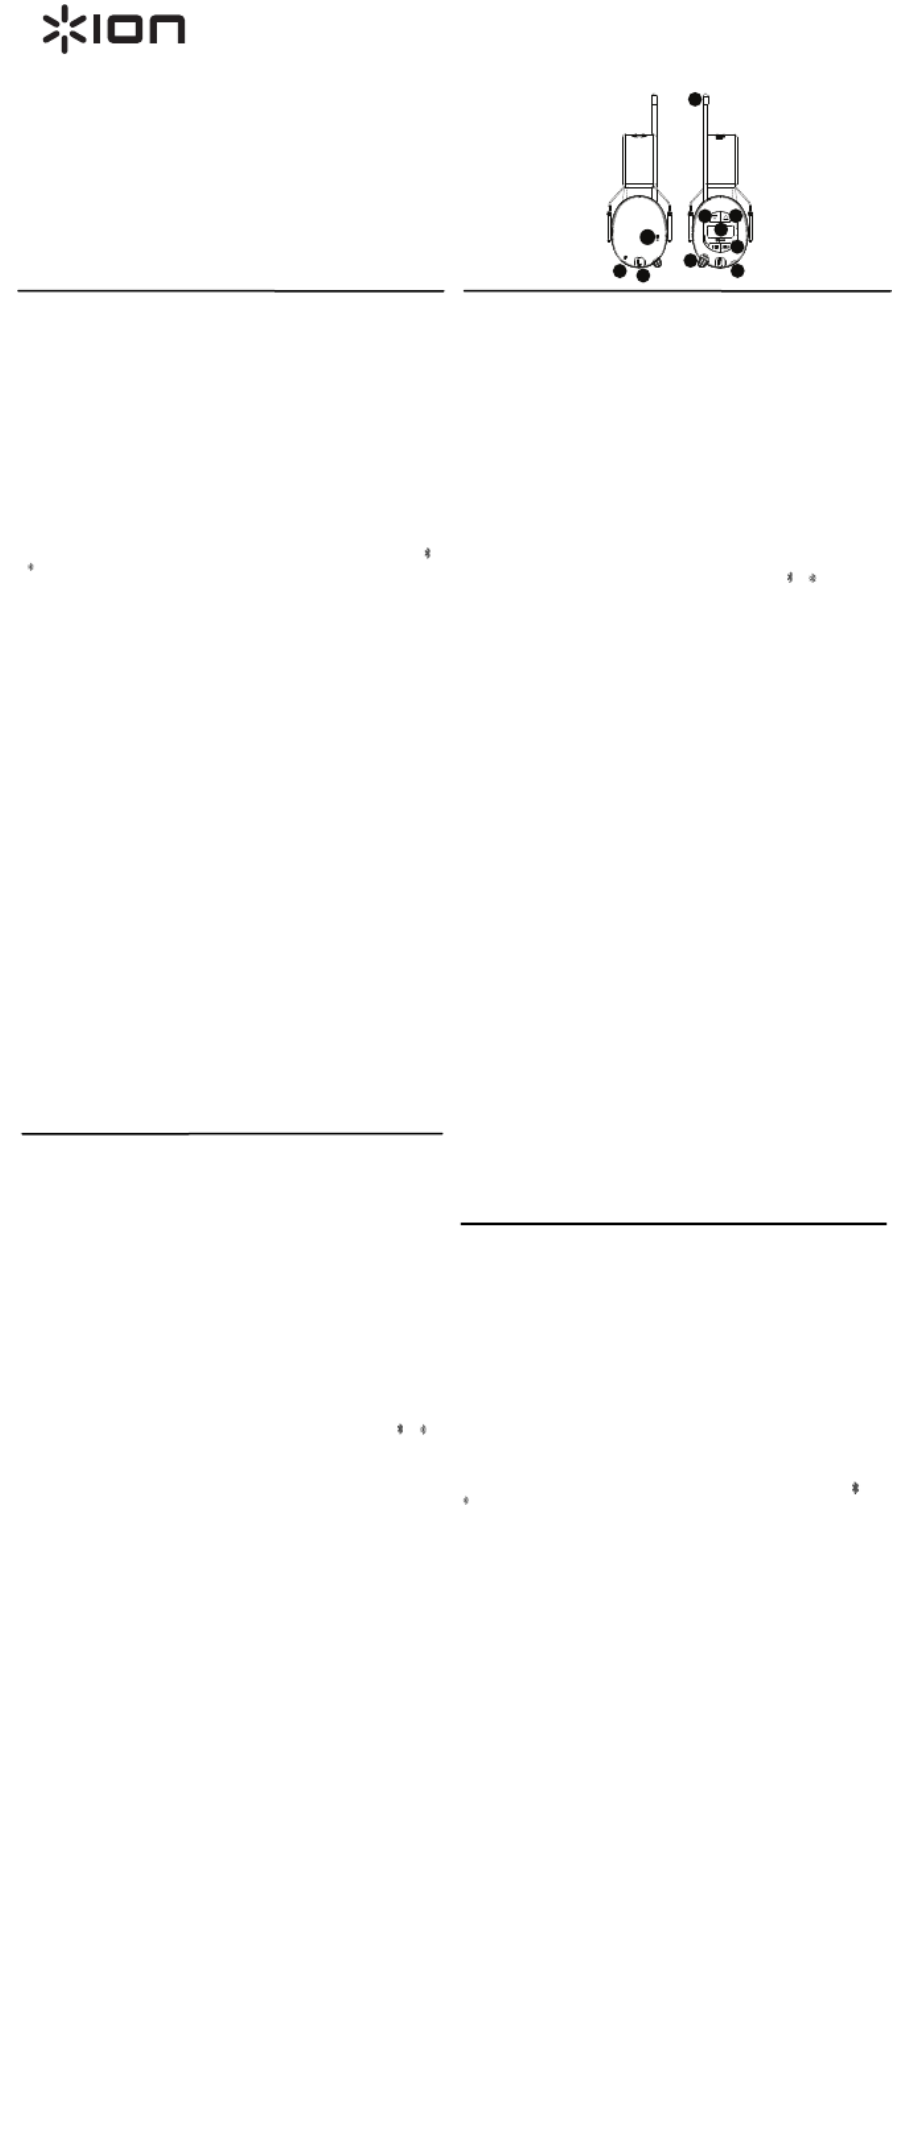
Controls: (1) Antenna, (2) Select Down Button, (3) Select Up Button, (4) LCD, (5)
Source Button, (6) Auxiliary Jack, (7) Volume/On-Off Knob, (8) Microphone, (9) Mini USB
Charge Port, (10) Charge LED.
Charging Tough Sounds: Use the included mini-USB charging cable to connect Tough
Sounds to (A) a USB power adapter connected t o a power outlet or your computer (B)
(powered on) for approximately 2 hours. The charge LED is illuminated when Tough
Sounds is currently charging. You will know Tough Sounds is fully charged when this
LED has gone out.
Getting Started:
(1) Turn the Volume/On-Off knob clockwise to power on Tough Sounds. (2) Adjust the
volume as needed on Tough Sounds. button (3) Select the source by tapping the SRC
between FM/ AM/ BT modes. (4) Turn the Volume/On-Off knob counter-clockwise until it
clicks to power off Tough Sounds.
Bluetooth Mode:
(1) Tap the SRC button to toggle between AM/FM/BT modes. (2) Select ---- (blinking) to
activate Bluetooth mode and begin pairing. (3) In your Bluetooth device settings, find
Tough Sounds and connect. (4) Once paired, the Bluetooth logo will change from to
(5) Tap Play/Pause to play or pause the music. (6) If you're having trouble with your
Bluetooth connection, press and hold the button for 2 seconds to reset the current SRC
Bluetooth connection (this is disabled during a phone call).
Aux-In Mode:
(1) Turn the Volume/On-Off knob clockwise to power on Tough Sounds. (2) To use the
Aux input, plug a 3.5mm (1/8") cable into the Aux-In port on Tough Sounds. (3) Adjust
the volume using the Volume/On-Off knob.
Radio Mode:
(1) Tap the SRC button to toggle AM//FM/BT and set to AM or FM to listen to the radio.
(2) Tap ▲ or ▼ until you reach your desired station. To seek through stations, press (3)
and hold ▲ or ▼ for 2 seconds, then release the button when seeking starts. Seek will
stop on clear radio stations. (4) To save a preset station, hold the Play/Pause button.
Release Play/Pause when “M” and the preset station number are flashing. (5) Tap ▲ or
▼ to save the station t o your desired position. (6) Tap the Play/Pause button to confirm
your preset number setting.
Note: The FM ant enna works best when set at a 90 degree angle and not put under the
headband.
To select between 9 kHz (Europe) and 10 kHz (US) AM reception setting:
(1) Keep Tough Sounds in the OFF position. (2) Press the SRC button for 2 seconds. 9
kHz will be shown on the display. (3) Press ▲ or ▼ to select 10 kHz. (4) Press the SRC
button again to save the setting.
Receiving phone calls:
When Bluetooth-paired with a smartphone, answer an incoming call by tapping
Play/Pause. Tap Play/Pause to end the current call. To reject an incoming call, tap the
SRC button.
Note: If you are paired to a Bluetooth source, you can still receive and answer calls while
using FM/AM and Aux modes.
Setting the Time:
(1) Turn the Volume/On-Off knob counter-clockwise to power off Tough Sounds. (2) Tap
the Play/Pause button once to set the hours or tap Play/Pause again to set the minutes.
(3) When the selected t ime is flashing, tap to adjust the time, then tap ▲ or ▼
Play/Pause to confirm the setting. To change your unit to display military time (24 hour
time), press the Tune Up or Down button when the power is off. If AM or PM is
displayed, then you are in 12 Hour time. If AM or PM is not displayed, then you are in 24
Hour time.
Troubleshooting:
Windows 7 and Windows 8 Users: When Tough Sounds is connected to your computer
through USB, select as the playback device for Headphones – Tough Sounds Stereo
best sound quality.
For the Safety and Warranty manual, visit ionaudio.com/warranty.
ionaudio.com/support
For technical support
Para soporte técnico
Pour obtenir de l’assistance technique
Per assistenza tecnica
Für technischen Support
Voor technische ondersteuning
ionaudio.com/warranty
For complete warranty information
Para información completa sobre la garantía
Pour obtenir toutes les informations relatives à la garantie
Per informazioni complete in merito alla garanzia
Für komplette Garantieinformationen
Voor volledige informatie over de garantie
Manual Version 1.1
Controls
Controles
Commandes
Comandi
Kontrollknappar
Ohjaukset
2
1
3
4
5
6
7
89
10
Contenido de la caja: Tough Sounds, Cable de carga mini USB, Cable auxiliar estéreo
de 3,5 mm (1/8 pulg.), Guía de inicio rápido.
Controles: (1) Antena, (2) Botón de selección hacia abajo, (3) Botón de selección hacia
arriba, (4) LCD, (5) Botón de fuente, (6) Conector auxiliar, (7) Perilla de volumen y
encendido-apagado, (8) Micrófono, (9) Puerto de carga Mini USB, (10) LED de carga.
Carga del Tough Sounds: Utilice el cable mini USB incluido para conectar el Tough
Sounds a (A) un adaptador de corriente USB conectado a una toma de corriente o (B)
su ordenador (encendido) durante aproximadamente 2 horas. El LED de carga se
ilumina cuando Tough Sounds se está cargando. Sabrá cuando el Tough Sounds esté
totalmente cargado cuando se apague este LED.
Para comenzar:
(1) Gire la perilla de volumen y encendido-apagado en sentido horario para encender el
Tough Sounds. (2) Ajuste el volumen del Tough Sounds como sea necesario. (3)
Seleccione la fuente pulsando levemente el botón SRC entre los modos FM/ AM/ BT. (4)
Gire la perilla de volumen y encendido-apagado en sentido antihorario hasta que haga
clic para apagar el Tough Sounds.
Modo Bluetooth:
(1) Pulse levemente el botón SRC para alternar entre los modos AM/FM/BT. (2)
Seleccione ---- (parpadeando) para activar el modo Bluetooth y comenzar el
apareamiento. (3) En la configuración de dispositivo Bluetooth, busque Tough Sounds y
establezca la conexión. (4) Una vez apareado, el logo Bluetooth cambiará de
a (5)
Pulse ligeramente Play/Pause (Reproducir/Pausa) para reproducir la música o hacer
una pausa. Si está teniendo problemas con su conexión Bluetooth, mantenga (6)
pulsado el botón SRC durante 2 segundos para reiniciar la conexión Bluetooth actual (la
cual se deshabilita durante una llamada telefónica).
Modo de entrada auxiliar:
(1) Gire la perilla de volumen y encendido-apagado para encender el Tough
Sounds. (2) Para utilizar la entrada auxiliar, conecte un cable de 3,5 mm (1/8 pulg.) en el
puerto de entrada auxiliar del Tough Sounds. (3) Aj uste el volumen utilizando la perilla
de volumen y encendido-apagado.
Modo radio:
(1) Pulse ligeramente el botón SRC para alternar entre AM//FM/BT y ajústelo en AM o
FM para escuchar radio. (2) Pulse ligeramente ▲ o ▼ hasta encontrar la estación
deseada. (3) Para buscar estaciones, mantenga pulsado ▲ o ▼ durante 2 segundos,
luego suelte el botón cuando comienza la búsqueda. La búsqueda se detendrá en
estaciones de radio con señal clara. (4) Para guardar una estación preseleccionada,
mantenga pulsado el botón Play/Pause. Suelte Play/Pause cuando parpadeen la "M" y
el número de estación preseleccionada. (5) Toque ligeramente ▲ o ▼ para guardar la
estación en la posición deseada. para (6) Toque ligeramente el botón Play/Pause
confirmar el número de estación preseleccionada. Para que su unidad muestre la hora
en formato de 24 horas, pulse el botón Tune Up (Sintonizar hacia arriba) o Down
(Sintonizar hacia abajo) cuando la alimentación esté apagada. Si se muestra AM o PM,
la hora está en formato de 12 horas. Si no se muestra AM o PM, la hora está en formato
de 24 horas.
Nota: La antena de FM funciona mejor cuando se ajusta en un ángulo de 90 grados y
se coloca por fuera de la banda de sujeción.
Para seleccionar el ajuste de recepción AM entre 9 kHz (Europa) y 10 kHz
(EE.UU.):
(1) Mantenga el Tough Sounds en la posición OFF (apagado). (2) Pulse el botón SRC
durante 2 segundos. Se mostrará 9 kHz en la pantalla. (3) Pulse ▲ o ▼ para
seleccionar 10 kHz. (4) Pulse el botón SRC para guardar el ajuste.
Recepción de llamadas telefónicas:
Una vez apareado mediante Bluetooth con un smartphone (teléfono inteligente),
responda las llamadas pulsando ligeramente Play/Pause. Pulse ligeramente
Play/Pause para terminar la llamada en curso. Para rechazar las llamadas entrantes,
pulse ligeramente el botón SRC.
Nota: Si está apareado con una fuente Bluetooth, aún puede recibir y contestar
llamadas estando en modo FM/AM o Aux.
Ajuste de la hora:
(1) Gire la perilla de volumen y encendido-apagado en sentido antihorario para
apagar el Tough Sounds. (2) Pulse ligeramente el botón Play/Pause una vez para
ajustar la hora o dos veces para ajustar los minutos. (3) Cuando parpadea el tiempo
seleccionado, pulse ligeramente ▲ o ▼ para ajustar el tiempo, luego pulse ligerament e
Play/Pause para confirmar el ajuste.
Solución de problemas: Usuarios de Windows 7 y Windows 8:
Cuando Tough Sounds está conectado a su ordenador mediante USB, seleccione
Headphones – Tough Sounds Stereo (Auriculares - Tough Sounds estéreo) como el
dispositivo de reproducción para una mejor calidad de sonido.
Para obtener el manual sobre la seguridad y garantía visite ionaudio.com/warranty
.
The Bluetooth word mark and logo are owned by the Bluetooth SIG, Inc. and any
use of such marks by ION Audio is under license.
Contenuti della confezione: Tough Sounds, cavo di ricarica Mini USB, cavo stereo
aux da 3,5 mm (1/8”), Guida rapida.
Comandi: (1) Antenna, (2) Tast o Select Down, (3) Tasto Select Up, (4) LCD, (5) Tasto
Source, (6) Jack Aux, (7) Manopola volume/On-Off , (8) Microphone, (9) Porta di
ricarica mini USB, (10) LED di ricarica.
Ricarica del Tough Sounds: Servirsi del cavo mini-USB in dotazione per collegare il
Tough Sounds a (A) un adattatore di aliment azione USB collegato a una presa elettrica
o (B) al computer (acceso) per circa 2 ore. Durante la ricarica del Tough Sounds il LED
di ricarica è illuminato. Quando il LED si spegne, la ricarica del Tough Sounds è
completa.
Primi passi:
(1) Girare la manopola Volume/On-Off knob in senso orario per accendere il Tough
Sounds. (2) Regolare il volume come necessario sul Tough Sounds. (3) Selezionare la
fonte toccando il puls ante SRC tra le modalità FM/ AM/ BT. (4) Girare la manopola
Volume/On-Off knob in senso antiorario fino a quando non scatta per spegnere il
Tough Sounds.
Modalità Bluetooth:
(1) Toccare il pulsante SRC per commutare tra le modalità AM/FM/BT. (2) Selezionare
---- (lampeggiante) per attivare la modalità Bluetooth e iniziare il collegamento. (3)
Sotto le impostazioni del proprio dis positivo Bluetooth, trovare il Tough Sounds e
collegarlo. (4) Una volta collegato, il logo Bluetooth cambierà da a (5) Toccare
Play/Pause per far riprodurre o mettere in pausa la musica. (6) In caso di problemi con
il collegamento Bluetooth, tenere premuto il tasto SRC per 2 secondi per azzerare
l’attuale collegamento Bluetooth (disabilitat o durante una telefonata).
Modalità Aux-in (ingresso ausiliario):
(1) Girare la manopola Volume/On-Off knob in senso orario per accendere il Tough
Sounds. (2) Per utilizzare l'ingresso Aux, collegare un cavo da 3,5mm (1/8") alla porta
Aux-In del Tough Sounds. (3) Regolare il volume utilizzando la manopola Volume/On-
Off.
Modalità radio:
(1) Toccare il tasto SRC per commutare tra AM//FM/BT e impostare AM o FM per
ascoltare la radio. (2) Toccare ▲ o ▼ fino a quando non si raggiunge la stazione
desiderata. (3) Per cercare tra le stazioni, tenere premuto ▲ o ▼ per 2 secondi, quindi
rilasciare il tasto quando la ricerca viene avviata. La ricerca si fermerà sulle stazioni dal
segnale limpido. (4) Per salvare una stazione pres et, tenere premuto il tasto
Play/Pause. Lasciare Play/Pause quando “M” e il numero di stazione preset
lampeggiano. (5) Toccare ▲ o ▼ per salvare la stazione alla posizione desiderata. (6)
Toccare il tasto per confermare l'impostazione del numero di preset.Play/Pause Per
modificare l’apparcchio in modo che mostri l’ora milit are (24 ore), premere il tasto Tune
Up o Down ad alimentazione spenta. Se AM o PM compaiono a display, ci si trova in
un orario a 12 ore. Se AM o PM non compaiono a display, l’orario sarà a 24 ore.
Nota bene: l'antenna FM funziona al meglio quando posizionata a un angolo di 90
gradi e non inserita sotto l'archetto.
Per selezionare tra le impostazioni di ricezione AM da 9 kHz (Europa) e 10 kHz
(US):
(1) Mantenere il Tough Sounds in posizione OFF. (2) Premere il tasto SRC per 2
secondi. A display comparirà la scritta "9 kHz". (3) Premere ▲ o ▼ per selezionare 10
kHz. (4) Premere nuovamente il tasto SRC per salvare l'impostazione.
Ricezione di telefonate:
Quando si è collegati in Bluetooth con uno smartphone, è possibile rispondere a una
chiamata in arrivo toccando Play/Pause. Toccare Play/Pause per concludere la
chiamata corrente. Per respingere una chiamata in arrivo, toccare il tasto SRC.
Nota bene: se si è collegati a una fonte Bluetooth è comunque possibile ricevere
telefonate e rispondere alle chiamate utilizzando le modalità FM/AM e Aux.
Impostazione dell'ora:
(1) Girare la manopola Volume/On-Off knob in senso antiorario per spegnere il Tough
Sounds. (2) Toccare il tasto una volta per impost are le ore o toccare Play/Pause
nuovamente Play/Pause per impost are i minuti. (3) Quando l'ora selezionata
lampeggia, toccare ▲ o per ▼ per regolare l'ora, quindi toccare Play/Pause
confermare l'impostazione.
Risoluzione di problemi:
Utenti Windows 7 e Windows 8: Quando il Tough Sounds è collegato al computer
tramite USB, selezionare Headphones – Tough Sounds Stereo come dispositivo di
riproduzione predefinito per ottenere la migliore qualità sonora.
Per ottenere il manuale di si curezza e garanzia, recarsi alla pagina
ionaudio.com/warranty
.
Lieferumfa ng: Tough Sounds, Mi ni-USB-Ladekabel, 3,5mm (1/8") Stereo-Aux-Kabel, Schnellstart-
Anleitung.
Bedienelemente: (1) Antenne, (2) Wahltaste Abwärt s, (3) Wahltaste Aufwä rts, (4) LCD, (5)
Quellentaste, (6) Aux-Buchse, (7 ) Regler Lautstärke/Ein/Aus, (8) Mikrofo n, (9) Mini-USB-
Ladebuchse, (10) Lade-LED.
Aufladen des Tough Sounds: Verwenden Sie das mitgelief erte Mini-USB-Ladekabel, um Tough
Sounds mit (A) einem USB-Netzt eil zu verbinden, das in einer Steckdose steckt oder (B) mit Ihrem
(eingeschaltet en) Compute r zu verbinden und etwa 2 Stunden lang aufzuladen. Die Lade-LED
leuchtet, wenn Tough Sounds gerade aufgeladen wi rd. Wenn die LED erloschen ist, zeigt dies an,
dass Tough Sounds vollstän dig geladen ist .
Erste Schrit te:
(1) Drehen Sie den Regler Lautstärke/Ei n/Aus im Uhrzeiger sinn, um Tough Sounds einzuschalten.
(2) Stellen Sie di e Lautstärke am Tough Sounds n ach Wunsch ein. (3) Wählen Sie die Quelle, indem
Sie auf die Drehen Sie den SRC-Taste tippen, um zwischen FM/AM/BT-Modi auszuwählen. (4)
Regler Lautstärke/Ein/Aus bis er einrastet gegen den Uh rzeigersinn, um Tough Sounds
abzuschalten.
Bluetooth-Modus:
(1) Tippen Sie auf die SRC-Taste, um zwischen den AM/FM/BT-Modi umzuschalten.
(2) Auswählen ---- (blinkt), um den Bluetoot h-Modus zu aktivieren und mit dem Koppeln zu
beginnen. (3) In den Einstellungen Ihres Bluetooth-Geräts wählen Sie T ough Sounds und stellen
eine Verbindung her. (4) Sind die Geräte einmal gekoppelt, wechselt da s Bluetooth-Logo von auf
(5) Tippen Sie auf Wieder gabe/Pau se, um die Musik abzuspielen oder zu pausieren. (6) Als u
problemen met uw Bluetooth-verbinding ondervindt, houd de SRC-knop voor 2 seconden ingedrukt
om de huidige Bluetooth-verbinding te resetten (dit wordt tijdens een telefoong esprek
uitgeschakeld).
Aux-In-Modus:
(1) Drehen Sie den Regler Lau tstärke/Ein/Aus im Uhrzeiger sinn, um Tough Sounds einzuschalten.
(2) Um den Aux-Eingang zu verwenden, stecken Sie ein 3,5mm (1/8") Kabel in den Aux-In-
Anschluss am Toug h Sounds. (3) Passen Sie die Lautstärk e mit dem Regler Lautstärke /Ein/Aus an.
Radio-Modus:
(1) Tippen Sie auf die SRC-Taste, um zwischen AM/FM und BT zu wechseln und um AM oder FM
einzustellen, um Radio zu hören. (2) Tippen Sie auf ▲ oder ▼ bis Sie den gewü nschten Sender
erreichen. (3) Um durch die Sender zu suchen, halten Sie ▲ oder ▼ 2 Sekunden lang gedrückt und
lassen die Taste los sobald die Suche beginnt. Die Suche wird bei Radiostationen, die gut
empfangen werden können, stoppen. (4) Um einen voreingestellten Sende r zu speichern, h alten Sie
die Taste Wiedergabe/Pause gedrückt. Lassen Sie die Taste W iede rgabe /Pause los, wenn "M"
und die Sendernummer blinken. (5) Tippen Sie auf ▲ oder ▼, um den Sender auf die gewünschte
Position zu speicher n. (6) Tippen Sie auf die Taste Wie de rgabe/P ause , um Ihre eingestellte Preset-
Nummer zu bestätigen. Um die Zeitanzeige am Gerät auf Militärzeit (24-Stunden) zu ändern,
drücken Sie auf di e Taste Tune-Up oder Down, wenn das Gerät ausgeschaltet ist. Wenn AM oder
PM angezeigt wird, dann befi nden Sie sich im 12-Stun den-Modus. Wenn AM oder PM nicht
angezeigt wird, dann befinden Sie sich im 24-Stunden-Modus.
Hinweis: Die FM-Antenne funktioniert am besten, wenn sie in einem 90-Grad-Winkel positionier t ist
und sich nicht unter dem Kopfbügel befindet.
So wechseln S ie zwische n 9 kHz (Eur opa) und 10 kHz (US) AM-Empfang:
(1) Halten Sie Tough Sounds in der Position AUS. (2) Halten Sie die SRC-Taste 2 Sekunden lang
gedrückt. Am Display wird 9 kHz angezeigt. (3) Drücken Sie ▲ oder ▼, um 10 kHz auszuwählen. (4)
Drücken Sie die SRC-Taste erne ut, um die Einstellung zu speichern.
Annahme von Telef onanrufen:
Wenn ein Smar tphone via Bluetooth verbunden ist, können Sie ei nen eingehenden Anruf annehmen,
indem Sie auf die Taste W iedergab e /Pause tippen. Tippen Sie auf Wiedergabe/P ause, um das
aktuelle Gespräch zu beenden. Um einen eingehend en Anruf abzuweisen, tippen Sie auf die SRC-
Taste.
Hinweis: Wenn Sie mit einer Bluetooth-Quelle verbunden sind, können Sie immer noch Anrufe
empfangen und annehmen, auch wenn Sie sich in den FM/AM und Aux-Modi befinden.
Uhrzeit einstellen:
(1) Drehen Sie den Regl er Lautstärke/Ein/Aus gegen den Uhrzeigersinn , bis er einrastet, um
Tough Sounds abzuschalten. (2) Tippen Sie einmal auf die Taste Wiedergabe/Pause, um die
Stunden einzust ellen oder tippen Sie erneut auf Wiedergabe/Pause, um die Minuten einz ustellen. (3)
Wenn die gewählte Zeit blinkt, tippen Sie auf ▲ oder ▼, um die Zeit einzust ellen. Tippen Sie dann
auf Wiedergabe/Pause, um die Einstellung zu bestätigen .
Fehlerbe hebung:
Windows 7 und Windows 8 Benutzer:
Wenn Tough Sounds über USB mit Ihrem Computer verbunden ist, wählen Sie Headphones -
Tough Sounds Stere o als Wiede rgabegerät, um die beste Klangqualität zu erreichen.
Für die Sicherh eits- und Garantieinform ationen besuchen Sie ionaudio.com/warranty.

Notice Concerning FCC Regulations: You are cautioned that changes or modifications not
expressly approved by the part responsible for compliance coul d void the user's authorit y to
operate the equipment. This e quipment has been tested and found to comply with the limits for a
Class B digital device, pursuant to part 15 of the FCC rules. These limits are designed to provide
reasonable protection against harmful inter ference in a residential installation. This equipment
generates uses and can radiate radio frequency energy and, if not installed and used in
accordance with the instructions, may cause harmful inte rference to radio communications.
However, there is no guarantee that interference will not occur in a particular installation. If this
equipment does cause harmful interference to radio or television reception, which can be
determined by turning the equipment off and on, the user is encour aged to try to correct the
interference by one or more of the following measures: (a) reorient or relocate the receiving
antenna; (b) move this unit; (c) increase the separation between the equipment and receiver; (d)
connect the equipment into an outlet on a circuit different from that to which the receiver is
connected; (e) be sure that all cables are properly shielded, using a choke or ferrite where
appropriate; (f) consult the dealer or an experience d radio/television technician for help.
ESD / EFT Warning: This unit may contai n a microcomputer for signal processing
and control functions. In very rare situations, severe interference, noise from an
external source, or static electricity may cause it to lock up. In the unlikely event that
this should happen, turn off the unit, wait at least five seconds, and then turn i t back
on again.
In an environment with radio frequency interference, the unit may malfunction and resume normal
operation after removal of the interference. For best audio quality, avoid using this device in a
high RF-radi ated environment. This unit does not exceed the Class B limits for radio noise
emission from digital apparatus set out in the radio interference regulations of the Canadian
Department of Communicatio ns.
The Bluetoot h word mark and logo are owned by the Bluetooth SIG, Inc. and any use of such
marks by ION Audio is under license.
This device complies with part 15 of the FCC rules. Operation is subject to the
following two conditions: (1) this device m ay not cause harmful interference, and
(2) this device must accept any interference received, includi ng interfere nce that
ma
y
cause undesired o
p
eration.
FCC RF Radiation Exposure Statement: This equipment complies with FCC radiation exposure
limits set forth for an uncontrolled environment. End users must follow the specific operating
instructions for satisfying RF exposure compliance. This transmitter must not be co-located or
operating in c onjunction with any other antenna or transmit ter.
Allgemeinhin weis zur Konformitäts erklärung: Hiermit erklären wir, daß sich
das Gerät Tough Sounds in Übereinstimmung mit den grundlegenden
Anforderungen der europäischen Richtlinie 1999/5/EG befindet . Die vollständige
EG Konformitätserklärung kann unter folgender Adresse angef ordert werden:
inMusic GmbH
Halskestrasse 16-18
D – 47877 Willich
GERMANY
Contenu de la boîte : Tough Sounds, câble de rechargement mini USB, câble stéréo
auxiliaire 3,5 mm (1/8 po), guide d’utilisation simplifié.
Commandes : (1) antenne, (2) touche de sélection du haut, (3) touche de sélection du
bas, (4) écran ACL, (5) touche source, (6) prise auxiliaire, (7) bouton volume/marche-
arrêt, (8) microphone, (9) port de rechargement mini USB, (10) DEL de rechargement.
Rechargement du Tough Sounds : Utilisez le câble mini USB inclus afin de brancher
le Tough Sounds à (A) un adaptateur d’alimentation USB branché à une prise secteur,
ou (B) à un ordinateur (sous tension) pendant environ 2 heures. La DEL de
rechargement s’allume lorsque la batterie du Tough Sounds se recharge. La batterie
du Tough Sounds est entièrement rechargée lorsque la DEL s’éteint.
Mise en route :
(1) Tournez le bouton volume/marche-arrêt dans le sens horaire afin de mettre le
Tough Sounds sous tension. (2) Réglez le volume du Tough Sounds au besoin. (3)
Tapez la touche SRC afin de sélectionner la source entre les modes FM/AM/BT. (4)
Tournez le bouton volume/marche-arrêt dans le sens antihoraire jusqu’à ce qu’un clic
se fasse entendre afin de mettre le Tough Sounds hors tension.
Mode Bluetooth :
(1) (2) Tapez la touche SRC afin de basculer entre les modes FM/AM/BT. Sélectionnez
---- (clignotement) afin d’activer le mode de Bluetooth et lancer le jumelage. (3) Dans
les paramètres Bluetooth de votre appareil, sélectionnez Tough Sounds et lancez la
connexion. (4) Une fois le jumelage réussi, le logo Bluetooth passe de à . (5)
Tapez sur la touche de lecture afin de lancer ou d'interrompre la musique. (6) Si la
connexion Bluetooth ne réussie pas, maintenez la touche SRC enfoncée pendant 2
secondes afin de supprimer la connexion Bluetooth (cette fonction est désactivée lors
d’un appel téléphonique).
Mode entrée auxiliaire :
(1) Tournez le bouton volume/marche-arrêt dans le sens horaire afin de mettre le
Tough Sounds sous tension. (2) Pour utiliser l'entrée auxiliaire, branchez un câble de
3,5 mm (1/8 po) au port d’entrée auxiliaire du Tough Sounds. (3) Utilisez le bouton
volume/marche-arrêt afin de régler le volume.
Mode Radio :
(1) Tapez la touche SRC afin de basculer entre les modes AM//FM/BT pour écouter la
radio AM ou FM. (2) Tapez ▲ ou ▼jusqu'à ce que vous atteigniez la station désirée.
(3) Pour rechercher parmi les stations, maintenez la touche ▲ ou ▼ enfoncée pendant
2 secondes, puis relâchez la touche lorsque la recherche est lancée. La recherche
s'arrête sur les st ations radio avec un signal clair. (4) Pour mémoriser une station,
maintenez la enfoncéetouche de lecture . Relâchez la touche de lecture lorsque
« M » et le poste de la station clignotent. (5) Tapez ▲ ou ▼ afin de mémoriser la
station sur la position désirée. (6) Tapez la touche de lecture afin de confirmer le
numéro de préréglage. Pour modifier le format d’affichage de l’heure (24 heures),
appuyez sur la touche Tune Up ou Down lorsque l'appareil est hors tension. Si AM ou
PM est affiché, l’appareil affiche le format sur 12 heures. Si AM ou PM n’est pas
affiché, l’appareil affiche le format sur 24 heures.
Remarque : L'antenne FM fonctionne mieux lorsque réglée à un angle de 90 degrés et
non placée sous le bandeau.
Pour sélectionner entre la réception AM 9 kHz (Europe) et 10 kHz (Amérique du
Nord) :
(1) Gardez le Tough Sounds hors tension. (2) Appuyez sur la touche SRC pendant 2
secondes. 9 kHz devrait s’afficher. Appuyez sur ou (3) ▲ ▼ pour sélectionner 10 kHz.
(4) Appuyez à nouveau sur la touche SRC afin de sauvegarder le réglage.
Répondre à un appel :
Afin de répondre à un appel entrant lorsqu’un téléphone Bluetooth est jumelé, tapez
sur la touche de lecture.Tapez la touche de lecture afin de mettre fin à l’appel. Pour
rejeter un appel entrant, tapez la touche SRC.
Remarque : Lorsqu’une source Bluetooth est jumelée, vous pouvez toujours recevoir
et répondre à des appels en utilisant les modes FM/AM et auxiliaire.
Réglage de l’heure :
(1) Tournez le bouton volume/marche-arrêt dans le sens antihoraire afin de mettre le
Tough Sounds hors tension. (2) Tapez la touche de lecture une fois pour régler
l’heure et une autre fois pour régler les minutes. Lorsque l’heure clignote, tapez (3) ▲
ou ▼ pour régler l’heure, puis tapez la touche de lecture afin de confirmer le réglage.
Dépannage :
Utilisateurs Windows 7 et Windows 8 : Lorsque le Tough Sounds est connecté à votre
ordinateur par connexion USB, sélectionnez Headphones – Tough Sounds Stereo
comme appareil de lecture afin d’obtenir une qualité audio optimale.
Pour consulter les Consignes de sécurité et informations concernant la garantie,
veuillez visiter ionaudio.com/warranty.
Inhoud van de doos: Tough Sounds, mini USB-oplaadkabel, stereo Aux-kabel van
3,5 mm (1/8”), snelstartgids.
Bediening: (1) antenne, (2) selectieknop omlaag, (3) selectieknop omhoog, (4) LCD,
(5) bronknop, (6) Aux-ingang, (7) volume-/aan- en uitknop, (8) microfoon, (9) mini
USB-oplaadpoort, (10) oplaad-LED.
Tough Sounds opladen: Gebruik de meegeleverde mini USB-kabel om Tough
Sounds gedurende ongeveer 2 uur te verbinden met (A) een USB-stroomadapter,
aangesloten op een stopcontact, of (B) uw pc (ingeschakeld). De oplaad-LED gaat
branden wanneer Tough Sounds aan het opladen is. Wanneer de LED uitgaat, weet u
dat Tough Sounds volledig is opgeladen.
Aan de slag:
(1) Draai de volume-/aan- en uit knop rechtsom om Tough Sounds aan te zetten. (2)
Zet het volume op Tough Sounds op de nodige stand. (3) Selecteer de bron door te
tikken op de SRC-knop en te kiezen tussen de modi FM/AM/BT. (4) Om Tough
Sounds uit te zetten: draai de volume-/aan- en uitknop linksom tot deze klikt.
Bluetooth-modus:
(1) Tik op de SRC-knop om de modi AM/FM/BT te doorbladeren.
(2) Selecteer ---- (knippert ) om de Bluetooth-modus te activeren en te beginnen
koppelen. (3) Zoek in de instellingen van uw Bluetooth-apparaat Tough Sounds en
maak verbinding. (4) Eens de verbinding is gemaakt, verandert het Bluetooth-logo van
in (5) Tik op Afspelen/Pauzeren om de muziek af te spelen of te pauzeren. (6)
Houd de SRC-knop gedurende 2 seconden ingedrukt om de huidige Bluetooth-
verbinding te verbreken (tijdens een telefoongesprek is deze mogelijkheid
gedeactiveerd).
Aux-modus:
(1) Draai de volume/aan- en uitknop rechtsom om Tough Sounds aan te zetten.
(2) Sluit een kabel van 3,5 mm (1/8”) aan op de Aux-ingang van Tough Sounds om de
Aux-ingang te gebruiken. (3) Regel het volume met behulp van de volume/aan- en
uitknop.
Radiomodus:
(1) Tik op de SRC-knop om AM/FM/BT te selecteren en selecteer AM of FM om naar
de radio te luisteren. (2) Tik ▲ of ▼ tot u de gewenste zender bereikt. (3) Om zenders
te zoeken: houd of ▲ ▼ 2 seconden lang ingedrukt en laat vervolgens, wanneer het
zoeken start, de knop los. Bij heldere ontvangst van een radiostation wordt het zoeken
stopgezet. (4) Om een zender te programmeren: de knop Afspelen/Pauzeren
ingedrukt houden. Laat de knop Afspelen/Pauzeren los wanneer “M” en het
programmanummer beginnen knipperen. om de zender in de (5) Tik op ▲ of ▼
gewenste positie op te slaan. (6) Tik op de knop Afspelen/Pauzeren om de instelling
van het programmanummer te bevestigen.
Opmerking: De FM-antenne werkt het beste wanneer geplaatst onder een hoek van
90 graden, niet onder de hoofdband.
Kiezen tussen 9 kHz (Europa) en 10 kHz (VS) voor AM-ontvangst:
(1) Zet Tough Sounds in UIT-positie. (2) Druk gedurende 2 seconden op de SRC-
knop. Op het scherm verschijnt 9 kHz. om 10 kHz te selecteren. (3) Druk ▲ of ▼(4)
Druk nogmaals op de SRC-knop om de instelling op te slaan.
Telefoongesprekken beantwoorden:
Beantwoord een inkomende oproep door op Afspelen/Pauzeren t e drukken wanneer
via Bluetooth een smartphone is aangesloten. Tik op Afspelen/Pauzeren om het
lopende gesprek te beëindigen. Tik op de SRC-knop om een binnenkomende oproep
te weigeren.
Opmerking: Als u gekoppeld bent aan een Bluetooth-bron kunt u ook tijdens het
gebruik van de de FM/AM- en de Aux-modi oproepen ontvangen en beantwoorden.
De tijd instellen:
(1) Draai de volume-/aan- en uitknop linksom om de Tough Sounds uit te zetten. (2)
Tik eerst op de knop Afspelen/Pauzeren om de uren in te stellen en vervolgens op
Afspelen/Pauzeren om de minuten in te stellen. (3) Wanneer de geselecteerde tijd
begint te knipperen, tikt u op ▲ of ▼ om de tijd in te stellen, en vervolgens op
Afspelen/Pauzeren om de instellingen te bevestigen. Als u uw tijdseenheid wilt
wijzigen om militaire tijd (24-uursnotatie) weer te geven, druk op de Tune Up of Down
toets wanneer de stroom uitgeschakeld is. Als AM of PM wordt weergegeven, dan
bent u in 12-uursnotatie. Als AM of PM niet weergegeven wordt, dan bent u in 24-
uursnotatie.
Problemen oplossen:
Gebruikers van Windows 7 en Windows 8:
Wanneer Tough Sounds verbonden is met uw pc via USB, selecteer dan Koptelefoon
- Tough Sounds Stereo als het afspeelapparaat voor een optimale geluidskwaliteit.
Bezoek voor de Veiligheids- en Garantiehandleiding ionaudio.com/warranty.
Termékspecifikációk
| Márka: | ION |
| Kategória: | fejhallgató |
| Modell: | Tough Sounds |
Szüksége van segítségre?
Ha segítségre van szüksége ION Tough Sounds, tegyen fel kérdést alább, és más felhasználók válaszolnak Önnek
Útmutatók fejhallgató ION

13 Szeptember 2024
28 Július 2024
26 Július 2024
Útmutatók fejhallgató
- fejhallgató Samsung
- fejhallgató Sony
- fejhallgató August
- fejhallgató Yamaha
- fejhallgató Acer
- fejhallgató Sharkoon
- fejhallgató Nedis
- fejhallgató LG
- fejhallgató Marantz
- fejhallgató Philips
- fejhallgató Pioneer
- fejhallgató SilverCrest
- fejhallgató Garmin
- fejhallgató Bosch
- fejhallgató Panasonic
- fejhallgató JVC
- fejhallgató AEG
- fejhallgató Sharp
- fejhallgató Harman Kardon
- fejhallgató Nokia
- fejhallgató Lenovo
- fejhallgató Evolveo
- fejhallgató HyperX
- fejhallgató Sven
- fejhallgató Neumann
- fejhallgató Oppo
- fejhallgató Omron
- fejhallgató Gamdias
- fejhallgató Apple
- fejhallgató Saramonic
- fejhallgató Siemens
- fejhallgató Medion
- fejhallgató Onkyo
- fejhallgató Motorola
- fejhallgató Geemarc
- fejhallgató LogiLink
- fejhallgató Sena
- fejhallgató Alcatel
- fejhallgató SBS
- fejhallgató Technics
- fejhallgató Roland
- fejhallgató JBL
- fejhallgató Camry
- fejhallgató TCL
- fejhallgató DAP-Audio
- fejhallgató Digitus
- fejhallgató Zebra
- fejhallgató Xiaomi
- fejhallgató GoGen
- fejhallgató Crivit
- fejhallgató LC-Power
- fejhallgató CAT
- fejhallgató Dell
- fejhallgató Boss
- fejhallgató Gigaset
- fejhallgató Cyrus
- fejhallgató VOX
- fejhallgató MEE Audio
- fejhallgató Prixton
- fejhallgató Conceptronic
- fejhallgató Thomson
- fejhallgató Klipsch
- fejhallgató Aiwa
- fejhallgató Interphone
- fejhallgató Kenwood
- fejhallgató Vivanco
- fejhallgató V7
- fejhallgató Huawei
- fejhallgató Microsoft
- fejhallgató Asus
- fejhallgató Jabra
- fejhallgató Vtech
- fejhallgató Hama
- fejhallgató PEAQ
- fejhallgató Dyson
- fejhallgató Renkforce
- fejhallgató Midland
- fejhallgató Lamax
- fejhallgató Blue Element
- fejhallgató Hori
- fejhallgató Focusrite
- fejhallgató Polsen
- fejhallgató Genesis
- fejhallgató Bose
- fejhallgató M-Audio
- fejhallgató AOC
- fejhallgató Thrustmaster
- fejhallgató Iogear
- fejhallgató Xblitz
- fejhallgató Nevir
- fejhallgató Sennheiser
- fejhallgató Tangent
- fejhallgató V-TAC
- fejhallgató Cambridge
- fejhallgató Doro
- fejhallgató Monster
- fejhallgató Alpine
- fejhallgató Optoma
- fejhallgató Omnitronic
- fejhallgató Logitech
- fejhallgató Pro-Ject
- fejhallgató Klein Tools
- fejhallgató Parrot
- fejhallgató Withings
- fejhallgató Cobra
- fejhallgató Scosche
- fejhallgató Denver
- fejhallgató Trevi
- fejhallgató Ewent
- fejhallgató Aluratek
- fejhallgató Audio-Technica
- fejhallgató Amazon
- fejhallgató NGS
- fejhallgató MSI
- fejhallgató Daewoo
- fejhallgató Dali
- fejhallgató Livoo
- fejhallgató Antec
- fejhallgató Gembird
- fejhallgató Cisco
- fejhallgató Denon
- fejhallgató Muse
- fejhallgató Energy Sistem
- fejhallgató Google
- fejhallgató Honor
- fejhallgató Soundcore
- fejhallgató Niceboy
- fejhallgató SPC
- fejhallgató BOYA
- fejhallgató Speed-Link
- fejhallgató Kingston
- fejhallgató Steelplay
- fejhallgató Auna
- fejhallgató Klip Xtreme
- fejhallgató Edifier
- fejhallgató Behringer
- fejhallgató Suunto
- fejhallgató Chord
- fejhallgató CyberPower
- fejhallgató BlueAnt
- fejhallgató RYOBI
- fejhallgató KRK
- fejhallgató ModeCom
- fejhallgató Avaya
- fejhallgató ADATA
- fejhallgató Cooler Master
- fejhallgató DreamGEAR
- fejhallgató Nodor
- fejhallgató Electro Harmonix
- fejhallgató Shure
- fejhallgató PreSonus
- fejhallgató SuperTooth
- fejhallgató OnePlus
- fejhallgató Steelseries
- fejhallgató Manhattan
- fejhallgató Tannoy
- fejhallgató Plantronics
- fejhallgató Kogan
- fejhallgató Alecto
- fejhallgató EnGenius
- fejhallgató Marshall
- fejhallgató Acme
- fejhallgató Grandstream
- fejhallgató Media-Tech
- fejhallgató Røde
- fejhallgató Monacor
- fejhallgató S.M.S.L
- fejhallgató One For All
- fejhallgató Sony Ericsson
- fejhallgató LD Systems
- fejhallgató Manta
- fejhallgató Jamo
- fejhallgató Blaupunkt
- fejhallgató NZXT
- fejhallgató NAD
- fejhallgató Mio
- fejhallgató Yealink
- fejhallgató Razer
- fejhallgató Samson
- fejhallgató Cayin
- fejhallgató Logik
- fejhallgató Mackie
- fejhallgató Xtrfy
- fejhallgató SureFire
- fejhallgató Infinity
- fejhallgató Magnat
- fejhallgató Bang & Olufsen
- fejhallgató Trust
- fejhallgató AKAI
- fejhallgató Konig
- fejhallgató Marmitek
- fejhallgató TechniSat
- fejhallgató 3M
- fejhallgató Meliconi
- fejhallgató Pyle
- fejhallgató Rolls
- fejhallgató Musical Fidelity
- fejhallgató Telestar
- fejhallgató Lenco
- fejhallgató Roccat
- fejhallgató Maxell
- fejhallgató Corsair
- fejhallgató Lindy
- fejhallgató Audizio
- fejhallgató NACON
- fejhallgató Uniden
- fejhallgató JLab
- fejhallgató Best Buy
- fejhallgató Vorago
- fejhallgató Arctic Cooling
- fejhallgató Majority
- fejhallgató Bowers & Wilkins
- fejhallgató KEF
- fejhallgató AKG
- fejhallgató Trebs
- fejhallgató Fanvil
- fejhallgató Audeeo
- fejhallgató Audioline
- fejhallgató Fresh 'n Rebel
- fejhallgató Krüger&Matz
- fejhallgató Dual
- fejhallgató Cardo
- fejhallgató RCA
- fejhallgató Vocopro
- fejhallgató Ultimate Ears
- fejhallgató HTC
- fejhallgató Thermaltake
- fejhallgató Imperial
- fejhallgató Kicker
- fejhallgató Creative
- fejhallgató Sangean
- fejhallgató Schuberth
- fejhallgató JAYS
- fejhallgató Equip
- fejhallgató Deltaco Gaming
- fejhallgató Genius
- fejhallgató Sudio
- fejhallgató Definitive Technology
- fejhallgató Focal
- fejhallgató Anker
- fejhallgató Numark
- fejhallgató Primus
- fejhallgató IFi Audio
- fejhallgató ILive
- fejhallgató Audix
- fejhallgató Rapoo
- fejhallgató Ausdom
- fejhallgató Clarity
- fejhallgató Tascam
- fejhallgató Happy Plugs
- fejhallgató Beats
- fejhallgató Schwaiger
- fejhallgató FiiO
- fejhallgató Cougar
- fejhallgató Enhance
- fejhallgató House Of Marley
- fejhallgató Astro
- fejhallgató SoundMagic
- fejhallgató Savio
- fejhallgató Teufel
- fejhallgató Sogo
- fejhallgató Vincent
- fejhallgató NuPrime
- fejhallgató InLine
- fejhallgató CSL
- fejhallgató Artsound
- fejhallgató Wiko
- fejhallgató Aftershokz
- fejhallgató Alienware
- fejhallgató Amplicomms
- fejhallgató Altec Lansing
- fejhallgató Amplicom
- fejhallgató Argon
- fejhallgató American Audio
- fejhallgató Aiaiai
- fejhallgató Lexibook
- fejhallgató BeeWi
- fejhallgató Caliber
- fejhallgató SilverStone
- fejhallgató Exibel
- fejhallgató Valore
- fejhallgató Aukey
- fejhallgató Gemini
- fejhallgató Easypix
- fejhallgató Kensington
- fejhallgató Brigmton
- fejhallgató Sunstech
- fejhallgató Maginon
- fejhallgató Sylvania
- fejhallgató Punktal
- fejhallgató Techly
- fejhallgató Swissvoice
- fejhallgató Marquant
- fejhallgató Ednet
- fejhallgató Magnum
- fejhallgató Connect IT
- fejhallgató Blackberry
- fejhallgató Steren
- fejhallgató KitSound
- fejhallgató Polk
- fejhallgató ProXtend
- fejhallgató Audiosonic
- fejhallgató Coby
- fejhallgató Speedlink
- fejhallgató Envivo
- fejhallgató Sandberg
- fejhallgató Bigben Interactive
- fejhallgató Jam
- fejhallgató Vivo
- fejhallgató AV:link
- fejhallgató Champion
- fejhallgató Buffalo
- fejhallgató Audiovox
- fejhallgató Listo
- fejhallgató Goji
- fejhallgató Terris
- fejhallgató LucidSound
- fejhallgató Bigben
- fejhallgató Blue Microphones
- fejhallgató IDance
- fejhallgató MyKronoz
- fejhallgató Rocketfish
- fejhallgató Clas Ohlson
- fejhallgató Naxa
- fejhallgató JAZ Audio
- fejhallgató Umidigi
- fejhallgató Fantec
- fejhallgató AT&T
- fejhallgató Mpman
- fejhallgató Sweex
- fejhallgató Vizio
- fejhallgató Austrian Audio
- fejhallgató Vakoss
- fejhallgató Metronic
- fejhallgató Natec
- fejhallgató Pure Acoustics
- fejhallgató Master & Dynamic
- fejhallgató T'nB
- fejhallgató Emporia
- fejhallgató Tracer
- fejhallgató Defunc
- fejhallgató Zagg
- fejhallgató ESI
- fejhallgató Veho
- fejhallgató Cellular Line
- fejhallgató Maxxter
- fejhallgató Anchor Audio
- fejhallgató Mr Handsfree
- fejhallgató Saitek
- fejhallgató Turtle Beach
- fejhallgató Mitel
- fejhallgató Celly
- fejhallgató Adesso
- fejhallgató Paradigm
- fejhallgató Cleer
- fejhallgató ITT
- fejhallgató Wentronic
- fejhallgató Urban Revolt
- fejhallgató IHome
- fejhallgató Stereoboomm
- fejhallgató Tivoli Audio
- fejhallgató Senal
- fejhallgató Qware
- fejhallgató Jawbone
- fejhallgató Satechi
- fejhallgató Skullcandy
- fejhallgató Mad Catz
- fejhallgató Dymond
- fejhallgató 4smarts
- fejhallgató Beyerdynamic
- fejhallgató Krom
- fejhallgató Motörheadphönes
- fejhallgató Iluv
- fejhallgató Monoprice
- fejhallgató Avanca
- fejhallgató TELEX
- fejhallgató Fostex
- fejhallgató ASTRO Gaming
- fejhallgató DEXP
- fejhallgató AQL
- fejhallgató VXi
- fejhallgató AudioQuest
- fejhallgató Grado
- fejhallgató Mark Levinson
- fejhallgató Kraun
- fejhallgató 180s
- fejhallgató Iqua
- fejhallgató Ozone
- fejhallgató PSB
- fejhallgató Native Union
- fejhallgató Empire
- fejhallgató JPL
- fejhallgató SoundBot
- fejhallgató Woxter
- fejhallgató Snom
- fejhallgató Shokz
- fejhallgató Yurbuds
- fejhallgató Boompods
- fejhallgató Macrom
- fejhallgató Tritton
- fejhallgató DeTeWe
- fejhallgató Miiego
- fejhallgató OTL Technologies
- fejhallgató Audeze
- fejhallgató Bowers Wilkins
- fejhallgató One2track
- fejhallgató Verbatim
- fejhallgató Zalman
- fejhallgató HMDX
- fejhallgató Nocs
- fejhallgató RHA
- fejhallgató Polycom
- fejhallgató Hercules
- fejhallgató Ausounds
- fejhallgató Frends
- fejhallgató Dcybel
- fejhallgató Koss
- fejhallgató Konix
- fejhallgató GetTech
- fejhallgató Etymotic
- fejhallgató Ebode
- fejhallgató BML
- fejhallgató Novero
- fejhallgató Phonocar
- fejhallgató I-onik
- fejhallgató In-akustik
- fejhallgató Soul
- fejhallgató FreeVoice
- fejhallgató Adam
- fejhallgató QCY
- fejhallgató Supra
- fejhallgató Buddyphones
- fejhallgató GOgroove
- fejhallgató Forever
- fejhallgató Ifrogz
- fejhallgató ONU
- fejhallgató Swingson
- fejhallgató Avantree
- fejhallgató Venom
- fejhallgató Addasound
- fejhallgató Urbanista
- fejhallgató PDP
- fejhallgató GamesterGear
- fejhallgató POGS
- fejhallgató Nura
- fejhallgató Gioteck
- fejhallgató Fairphone
- fejhallgató VT
- fejhallgató GMB Audio
- fejhallgató V-Moda
- fejhallgató DMV
- fejhallgató OneOdio
- fejhallgató Peltor
- fejhallgató Strex
- fejhallgató Mtx Audio
- fejhallgató Cabstone
- fejhallgató Promate
- fejhallgató PowerLocus
- fejhallgató Naztech
- fejhallgató SleepPhones
- fejhallgató B-Speech
- fejhallgató Velodyne
- fejhallgató Hollyland
- fejhallgató ISY
- fejhallgató PowerA
- fejhallgató Whistler
- fejhallgató Master Dynamic
- fejhallgató Astell&Kern
- fejhallgató HiFiMAN
- fejhallgató Fun Generation
- fejhallgató Karma
- fejhallgató X-Zero
- fejhallgató Jaybird
- fejhallgató ShotTime
- fejhallgató FURY
- fejhallgató Magnavox
- fejhallgató IMG Stage Line
- fejhallgató BlueParrott
- fejhallgató Eikon
- fejhallgató EarFun
- fejhallgató Oehlbach
- fejhallgató Perfect Choice
- fejhallgató White Shark
- fejhallgató Olive
- fejhallgató Canyon
- fejhallgató 1More
- fejhallgató X Rocker
- fejhallgató Munitio
- fejhallgató Audictus
- fejhallgató Hi-Fun
- fejhallgató Sabrent
- fejhallgató Teenage Engineering
- fejhallgató EKids
- fejhallgató Bluedio
- fejhallgató Bang Olufsen
- fejhallgató JTS
- fejhallgató LEDWOOD
- fejhallgató Goodis
- fejhallgató Sharper Image
- fejhallgató PENTAGRAM
- fejhallgató Krux
- fejhallgató Dr. Dre Beats
- fejhallgató TooQ
- fejhallgató Sol Republic
- fejhallgató Soundlogic
- fejhallgató Konig Electronic
- fejhallgató Tek Republic
- fejhallgató KRK Systems
- fejhallgató Able Planet
- fejhallgató Kinyo
- fejhallgató GMB Gaming
- fejhallgató Tellur
- fejhallgató 2GO
- fejhallgató Hamlet
- fejhallgató DAP
- fejhallgató MiTone
- fejhallgató NuForce
- fejhallgató Approx
- fejhallgató Leotec
- fejhallgató CAD Audio
- fejhallgató SoundPEATS
- fejhallgató SACK It
- fejhallgató Beoplay
- fejhallgató R Products
- fejhallgató MTX
- fejhallgató Luxa2
- fejhallgató Vultech
- fejhallgató Williams Sound
- fejhallgató 3MK
- fejhallgató Mad Dog
- fejhallgató Nutz
- fejhallgató KeepOut
- fejhallgató Elbe
- fejhallgató Acefast
- fejhallgató KLH Audio
- fejhallgató Onanoff
- fejhallgató Bluefox
- fejhallgató Liquid Ears
- fejhallgató Homido
- fejhallgató Solight
- fejhallgató CGV
- fejhallgató Kanex
- fejhallgató Ryght
- fejhallgató Audibax
- fejhallgató EarMen
- fejhallgató Eversolo
- fejhallgató Axagon
- fejhallgató Quad
- fejhallgató Nuheara
- fejhallgató Moki
- fejhallgató Fosi Audio
- fejhallgató Final
- fejhallgató CoolerMaster
- fejhallgató DOCKIN
- fejhallgató Shanling
- fejhallgató Trainer
- fejhallgató Ailihen
- fejhallgató Lasmex
- fejhallgató Topping
- fejhallgató Stax
- fejhallgató Acezone
- fejhallgató ESTUFF
- fejhallgató Westone
- fejhallgató Ultrasone
- fejhallgató Phonix
- fejhallgató Twiins
- fejhallgató Wearhaus
- fejhallgató Voxicon
- fejhallgató Defender
- fejhallgató Hecate
- fejhallgató Mixx
- fejhallgató Xmusic
- fejhallgató Ooma
- fejhallgató Lucid Audio
- fejhallgató Sprout
- fejhallgató FoneStar
- fejhallgató Greenmouse
- fejhallgató Meze Audio
- fejhallgató Moman
- fejhallgató Califone
- fejhallgató Ejeas
- fejhallgató Haylou
- fejhallgató Oglo
Legújabb útmutatók fejhallgató

10 Április 2025
9 Április 2025
9 Április 2025

8 Április 2025
6 Április 2025
3 Április 2025
3 Április 2025
2 Április 2025
2 Április 2025

1 Április 2025