Használati útmutató Humax HDR-FOX T2
Olvassa el alább 📖 a magyar nyelvű használati útmutatót Humax HDR-FOX T2 (81 oldal) a Vevő kategóriában. Ezt az útmutatót 9 ember találta hasznosnak és 2 felhasználó értékelte átlagosan 4.5 csillagra
Oldal 1/81

The default password is 0000.
User’s Manual
HDR-FOX T2
HD Digital Recorder

English
1
Notice
Thank you for purchasing a Humax HDR-FOX T2 Freeview+ HD
product.
Freeview+ HD explained:
• Accurate recording
The start and end times of scheduled recordings will track the signal meaning the recording will start and stop at
the times sent by the broadcasters. If a programme starts early or runs late the record time will automatically be
adjusted to record the whole programme.
• Series Recording
If a programme you wish to record is in a series, you can now record the whole series. If the programme changes to
a different day or time the product will track these changes and still record the programme.
• Alternate Instances
If a scheduled recording(s) overlap with other programmes set to record you will be given the option to record one
of the programmes later that day or week, on the same channel or a different channel.
• Split Recordings
If a programme has two parts split by another entry in the Guide (e.g. a film divided in to two parts by a News
programme) you will be given the option to set both parts to record.
Note: The above Freeview+ HD features are available on channels where the correct and accurate data is being
broadcast. Some channels may not support all of the Freeview+ HD services.
For more information on Freeview+ HD please visit http://www.freeview.co.uk/HD.

2
Notice
Thank you for purchasing a HUMAX product. Please read this user’s manual carefully to be able to safely install, use and
maintain the product at maximum performance. Keep this user’s manual next to your product for future reference. The
information in this user’s manual is subject to change without notice.
Copyright (Copyright © 2010 HUMAX Corporation)
Not to be copied, used or translated in part or whole without HUMAX’s prior consent in writing except approval of
ownership of copyright and copyright law.
Warranty
The warranty does not cover parts which may become defective due to misuse of the information contained in this
manual.
Meaning of Symbols
To reduce the risk of electric shock, do not remove cover (or back). No user serviceable parts inside.
Refer servicing to qualified service personnel.
This symbol indicates dangerous voltage inside the product that presents a risk of electric shock or
personal injury.
This symbol indicates important instructions accompanying the product.
Warnings, Cautions and Notes
Throughout the whole manual, pay special attention to the following marks that indicate hazardous situations.
Warning
Indicates a hazardous situation which could result in serious injury.
Caution
Indicates a situation which could damage the equipment or other apparatus.
Note
Indicates additional information to make the user aware of possible problems and information of any importance to
help understand, use and maintain the installation.

English
3
Notice
‘WEEE’ Instructions
This product should not be disposed with other household wastes at the end of its working life. Please
separate this from other types of wastes and recycle it responsibly to promote the sustainable reuse of
material resources. This will prevent possible harm to the environment or human health from uncontrolled
waste disposal.
Domestic users:
Please contact either the retailer where you purchased this product or their local government office for details of where
and how they can take this item for environmentally safe recycling.
Business users:
Contact your supplier and check the terms and conditions of the purchase contract. This product should not be mixed
with other commercial wastes for disposal.
Trademarks
• Manufactured under license from Dolby Laboratories.
Dolby and the double-D symbol are trademarks of Dolby Laboratories.
• HDMI, the HDMI Logo, and High-Definition Multimedia Interface are trademarks of registered trademarks of HDMI
Licensing LLC.

4
Contents
Notice 1
Thank you for purchasing a Humax HDR-FOX T2
Freeview+ HD product. 1
Quick Start Guide 5
1. Checking Accessories 5
2. Product Overview 5
3. Connections 9
4. Powering On 11
5. Installation Wizard 12
6. Menu Overview 14
Basic Operation 15
Changing Channels 15
Volume / Mute / Audio 15
Display Format / Resolution 16
Programme Information (i-plate) 17
Sleep Timer 18
Subtitle 18
Option 18
Text and Interactive Services 19
Channel List 20
Changing Channels 20
Editing Channels in Channel List 21
Managing Channels 22
Editing Channels 22
Editing Favourite Channels 24
TV Guide 26
Watching Programmes 26
Setting Reminders 27
Finding Programmes 28
Scheduling Reminders and Recordings 29
Recording and Playback 30
Recording 30
Playback 34
Playback Controls 35
Pausing and Rewinding Live TV (TSR) 36
Media List 37
Using Video List 39
Using Music List 42
Using Photo List 44
HUMAX TV Portal 46
Preferences 47
Parental Control 47
Language Setting 48
Setting Power On/Off Timer 48
Video Setting 49
Audio Setting 50
Screen Display 51
Installation 52
Automatic Search 52
Manual Search 53
Software Update (OTA) 53
Antenna Power 55
Factory Default 55
System 56
System Information 56
Signal Detection 56
Power Management 57
Common Interface 57
Data Storage 58
Internet Setting 58
Appendix 59
Specification 59
Service and Support 60
Safety Warning 61
Trouble Shooting 63
Error Message 65
Glossary 66
Remote Control Code List 68

English
5
1. Checking Accessories
Note: The accessories may vary according to area.
2. Product Overview
Front Panel
Note: The image shown may differ from the actual product.
Quick Start Guide
Quick Start Guide
User’s Manual
Manual &
Quick Start Guide
Remote Control
& Batteries
SCART Cable
HDMI Cable
VOL-/VOL+ P-/P+Status Display
USB port
Connect a USB storage device.
STANDBY
Switches between operation
and standby modes.

6
Quick Start Guide
Rear Panel
Note: The image shown may differ from the actual product.
Conditional Access
Although most TV and radio services are free to air, others are
available on a subscription basis and can only be enjoyed via a
Conditional Access Module (CAM) and smartcard.
Insert the CAM into the Common Interface slot.
Note: The CAM and smartcard are not provided with the product
and are available from the Pay TV provider.
ANTENNA IN
Connect your main aerial.
ANTENNA OUT
Connect to the TV or VCR using
an RF cable.
VIDEO
Connect to the TV or VCR
using an RCA cable.
AUDIO
Connect to the TV or VCR
using an RCA cable.
ETHERNET
Connect a LAN cable.
USB Port
Connect a USB storage
device.
SPDIF
Connect to the audio
system using an S/PDIF
cable. (digital audio).
Common Interface
Insert a CI-module.
HDMI
Connect to the TV using
an HDMI cable.
TV SCART
Connect to the TV using a TV
SCART cable.
ON/OFF
Powers on/off.
CAM

English
7
Quick Start Guide
Remote Control
To control the product please make sure that the PVR mode is selected on the remote control.
MUTE Mutes audio
STANDBY Switches between operation and standby modes.
ݢMODE Changes the mode of remote.
NUMERIC (0-9)
TV Portal Access to Humax TV Portal.
MENU Displays the main menu.
ݣPlayback
Control
Buttons
X Play, II Pause, Stop, z Record
WW
Rewind,
XX
Fast Forward, I
WW
Previous,
XX
I
Next, Instant Replay, Skip
ݤCOLOUR
Buttons
Colour keys for interactive applications.
MEDIA Displays the media list.
GUIDE Displays the programme guide.
ARROW
Buttons
Moves the cursor up, down, left or right.
OK Selects a menu or confirms.
EXIT Exits all On-Screen Display (OSD) screens.
BACK Returns to the previous screen.
Note:
• The image shown may differ from the actual product.
• Some playback control buttons may not function depending on the content/media files you are
viewing.
1
2
3

8
Quick Start Guide
VOLUME Adjusts the audio volume.
PS T/P Changes the channel or page.
LIST Displays the channel list.
i (Information) Displays the channel and programme information.
OPT+ Displays the channels attributes.
AUDIO Displays the audio list.
SUB Displays the subtitle language list.
TV/RADIO Switches between TV and radio modes.
TEXT Enters the digital text service.
SOURCE Controls the output of TV SCART.
SLEEP Sets the sleep timer.
V-FORMAT Sets the resolution of video.
WIDE Sets the display format.
Add Bookmark/Show Bookmark List.
Slow Play
Inserting Batteries
1. Press the hook upward and lift the
battery cover off.
2. Insert the batteries (supplied)
matching the plus(+) and minus(-)
at each end.
3. Close the cover.
4. Press the PVR button at the top of
the remote control.
i

English
9
Quick Start Guide
3. Connections
This section describes how to connect your product to match your particular devices setup and to gain
optimum signal quality. The product provides various interfaces to connect to the TV, VCR or other
devices. Select the most appropriate procedure depending on the device you have.
Note: If you encounter any problems setting up your product, please contact your local retailer or Humax
Customer Helpline.
HDMI T V SCART
LAN
Router
S PDIF Cable/
RCA Cable
SCART Cable
HDMI Cable
DVI Connecter
Ethernet Cable
4
HDMI Cable
1
2
3

10
Quick Start Guide
Connecting the Antenna
Connect the aerial to the ANTENNA IN.
Connecting the TV
You can select one of the following connections depending on the device you have.
ݎTV with the HDMI connector;
For the best picture quality, connect the product and TV using a HDMI cable.
When using a HDMI cable it is not necessary to also use a scart cable.
ݏTV with the DVI connector;
For very good picture quality, connect the product and TV using a HDMI cable and a HDMI-to-DVI
converter for video.
You will also require a RCA cable(Audio L/R) connected to the necessary connection(s) on your TV/Display
for Audio.
Please refer to your TV/Display user manual for further information on the connections required for Audio.
ݐTV with the SCART connector;
For good picture quality, connect the product and TV using a SCART cable.
For additional audio connections you can either
1. Connect the product and TV using an RCA cable (Audio L/R).
2. When using the digital audio system, connect the product and the digital audio system using a S/PDIF
cable.
Connecting the Network
ݑConnecting to the LAN;
Connect one end of the Ethernet cable to the receiver and the other end to the LAN router.

English
11
Quick Start Guide
4. Powering On
1. Connect the power cord of the product to a wall outlet.
2. Ensure the power switch at the rear of the product is switched to ON.
3. Power on by pressing the STANDBY button on the remote control or touching the STANDBY button
at the front of the product.
Note: To control the product please make sure that the PVR mode is selected on the remote
control.
12
Quick Start Guide
5. Installation Wizard
When powering on your product for the rst time after purchase or performing the factory default in
menu, the Installation Wizard will appear on your TV screen.
If you do not see the Installation Wizard please check:
1. Your TV is switched on.
2. The cables between the product and your TV are connected correctly.
3. Your TV is on the correct input (AV channel) for the connection you are using. (Please refer to your
TV/Display user manual for further information to select the correct Input/channel.)
Note: If you exit the installation wizard without fully completing the channel searching procedure, you
may not have all of the channels available. In this case, you can use the Settings > Installation
menu to search for more channels.
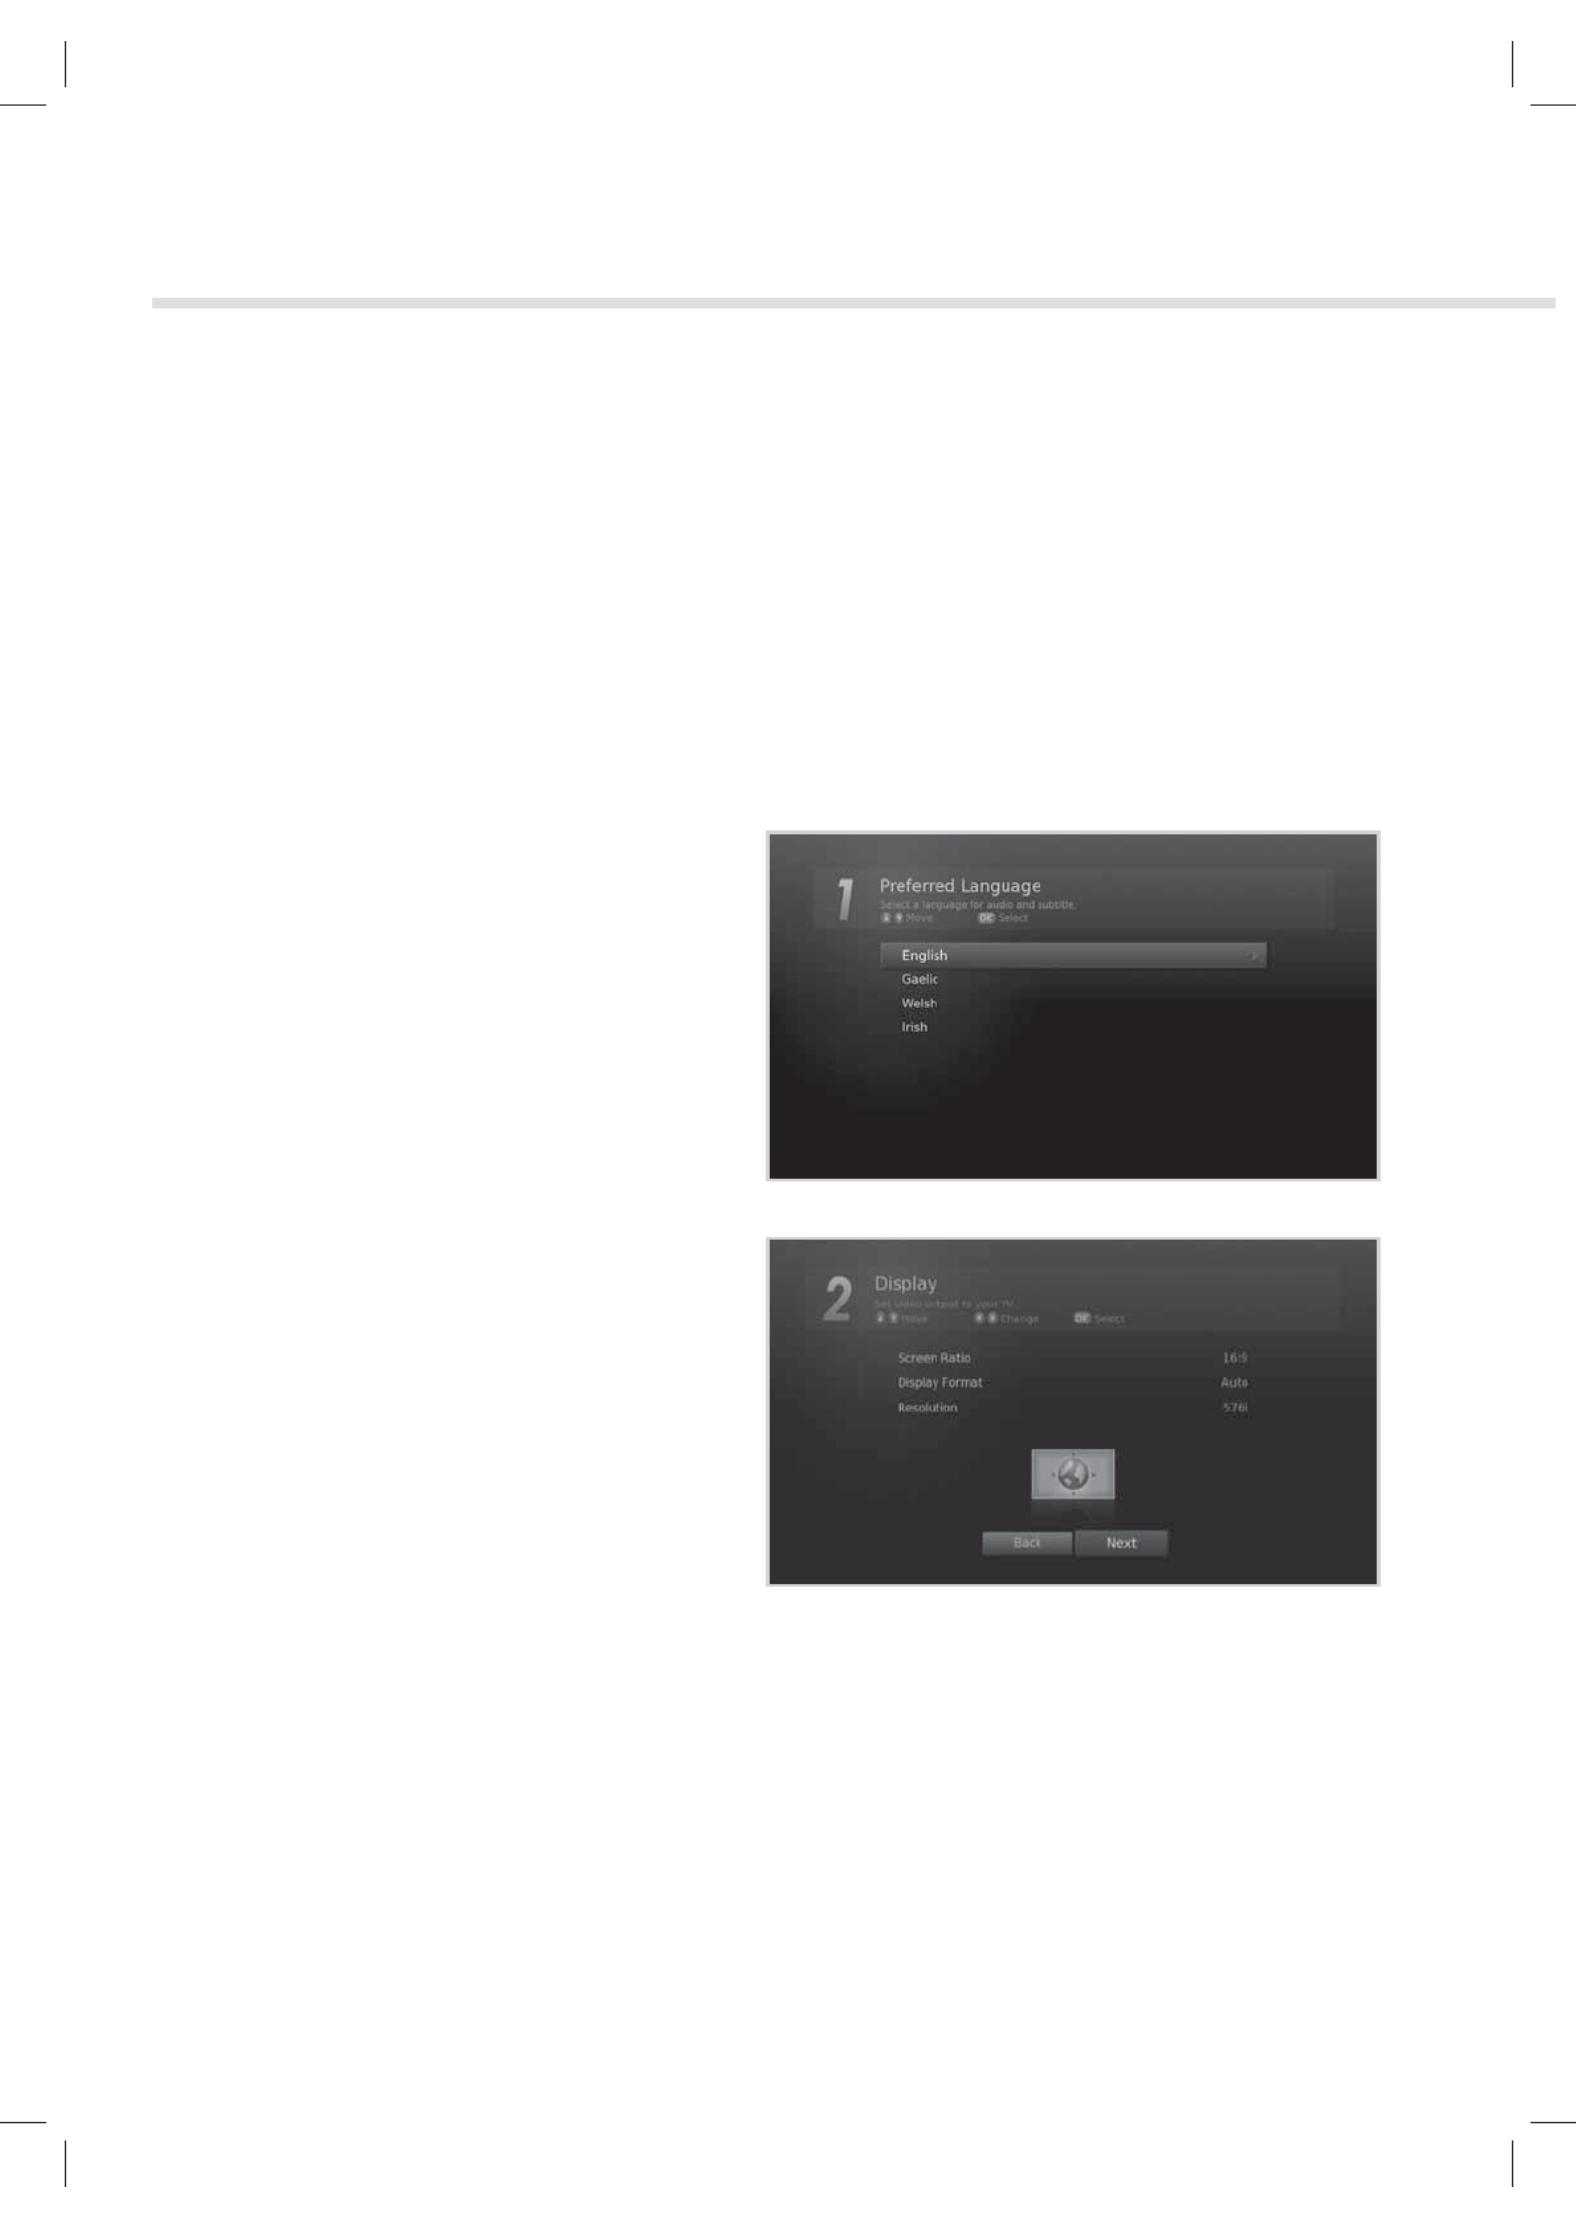
1. Preferred Language
Select a language for audio and subtitles and
press the button.OK
2. Display
Set the video output settings you require.
To continue to the next step select Next and
press the button.OK
Screen Ratio:
16:9 - Widescreen TV
4:3: Traditional TV
Display Format:
Select your Required Display Format, the
image at the bottom of the screen will indicate
how the picture will appear on your TV.
Resolution:
Select your Required Video Resolution (576i, 576p, 720p, 1080i, 1080p)
Note: Some TVs/Displays may not support all Video Resolutions, to change this in the future please use
the V-FORMAT button on your remote contol.

English
13
Quick Start Guide
3. Automatic Search
Channel search will begin automatically.
When the search has completed press the OK
button to save the channels found during the
search.
4. Result
The results of the Installation Wizard are
displayed on screen.
Select Finish and press the button to OK
complete the Installation Wizard.

14
Quick Start Guide
6. Menu Overview
Channel List
TV Guide
Video
Music
Photo
HUMAX TV Portal
Settings
Preferences
• Parental Control
• Language
• Time
• Video
• Audio
• Recording
• Screen Display
Edit Channels
• Edit Favourite List
• Edit Channel List
Installation
• Automatic Search
• Manual Search
• Software Update
• Antenna Power
• Factory Default
System
• System Information
• Signal Detection
• Power Management
• Common Interface
• Data Storage
• Internet Setting
How to Navigate
Displays the Menu OSD Moves among menus or options
Selects (Enters) a menu or conrms a selection Changes or adjusts the option
Goes back to the previous screen Enters the number (0~9)
Exit all On-Screen
or
English
15
Changing Channels
You can change the channels in several ways.
Press the P /PS T button.
Enter the channel number directly. (0-9)
Go to the channel list or TV guide and select a channel.
Note: Press the TV/RADIO button to switch between TV and radio channels.
Volume / Mute / Audio
To adjust the audio volume, press the button.\+/ -\
To mute the audio temporarily, press the button.MUTE
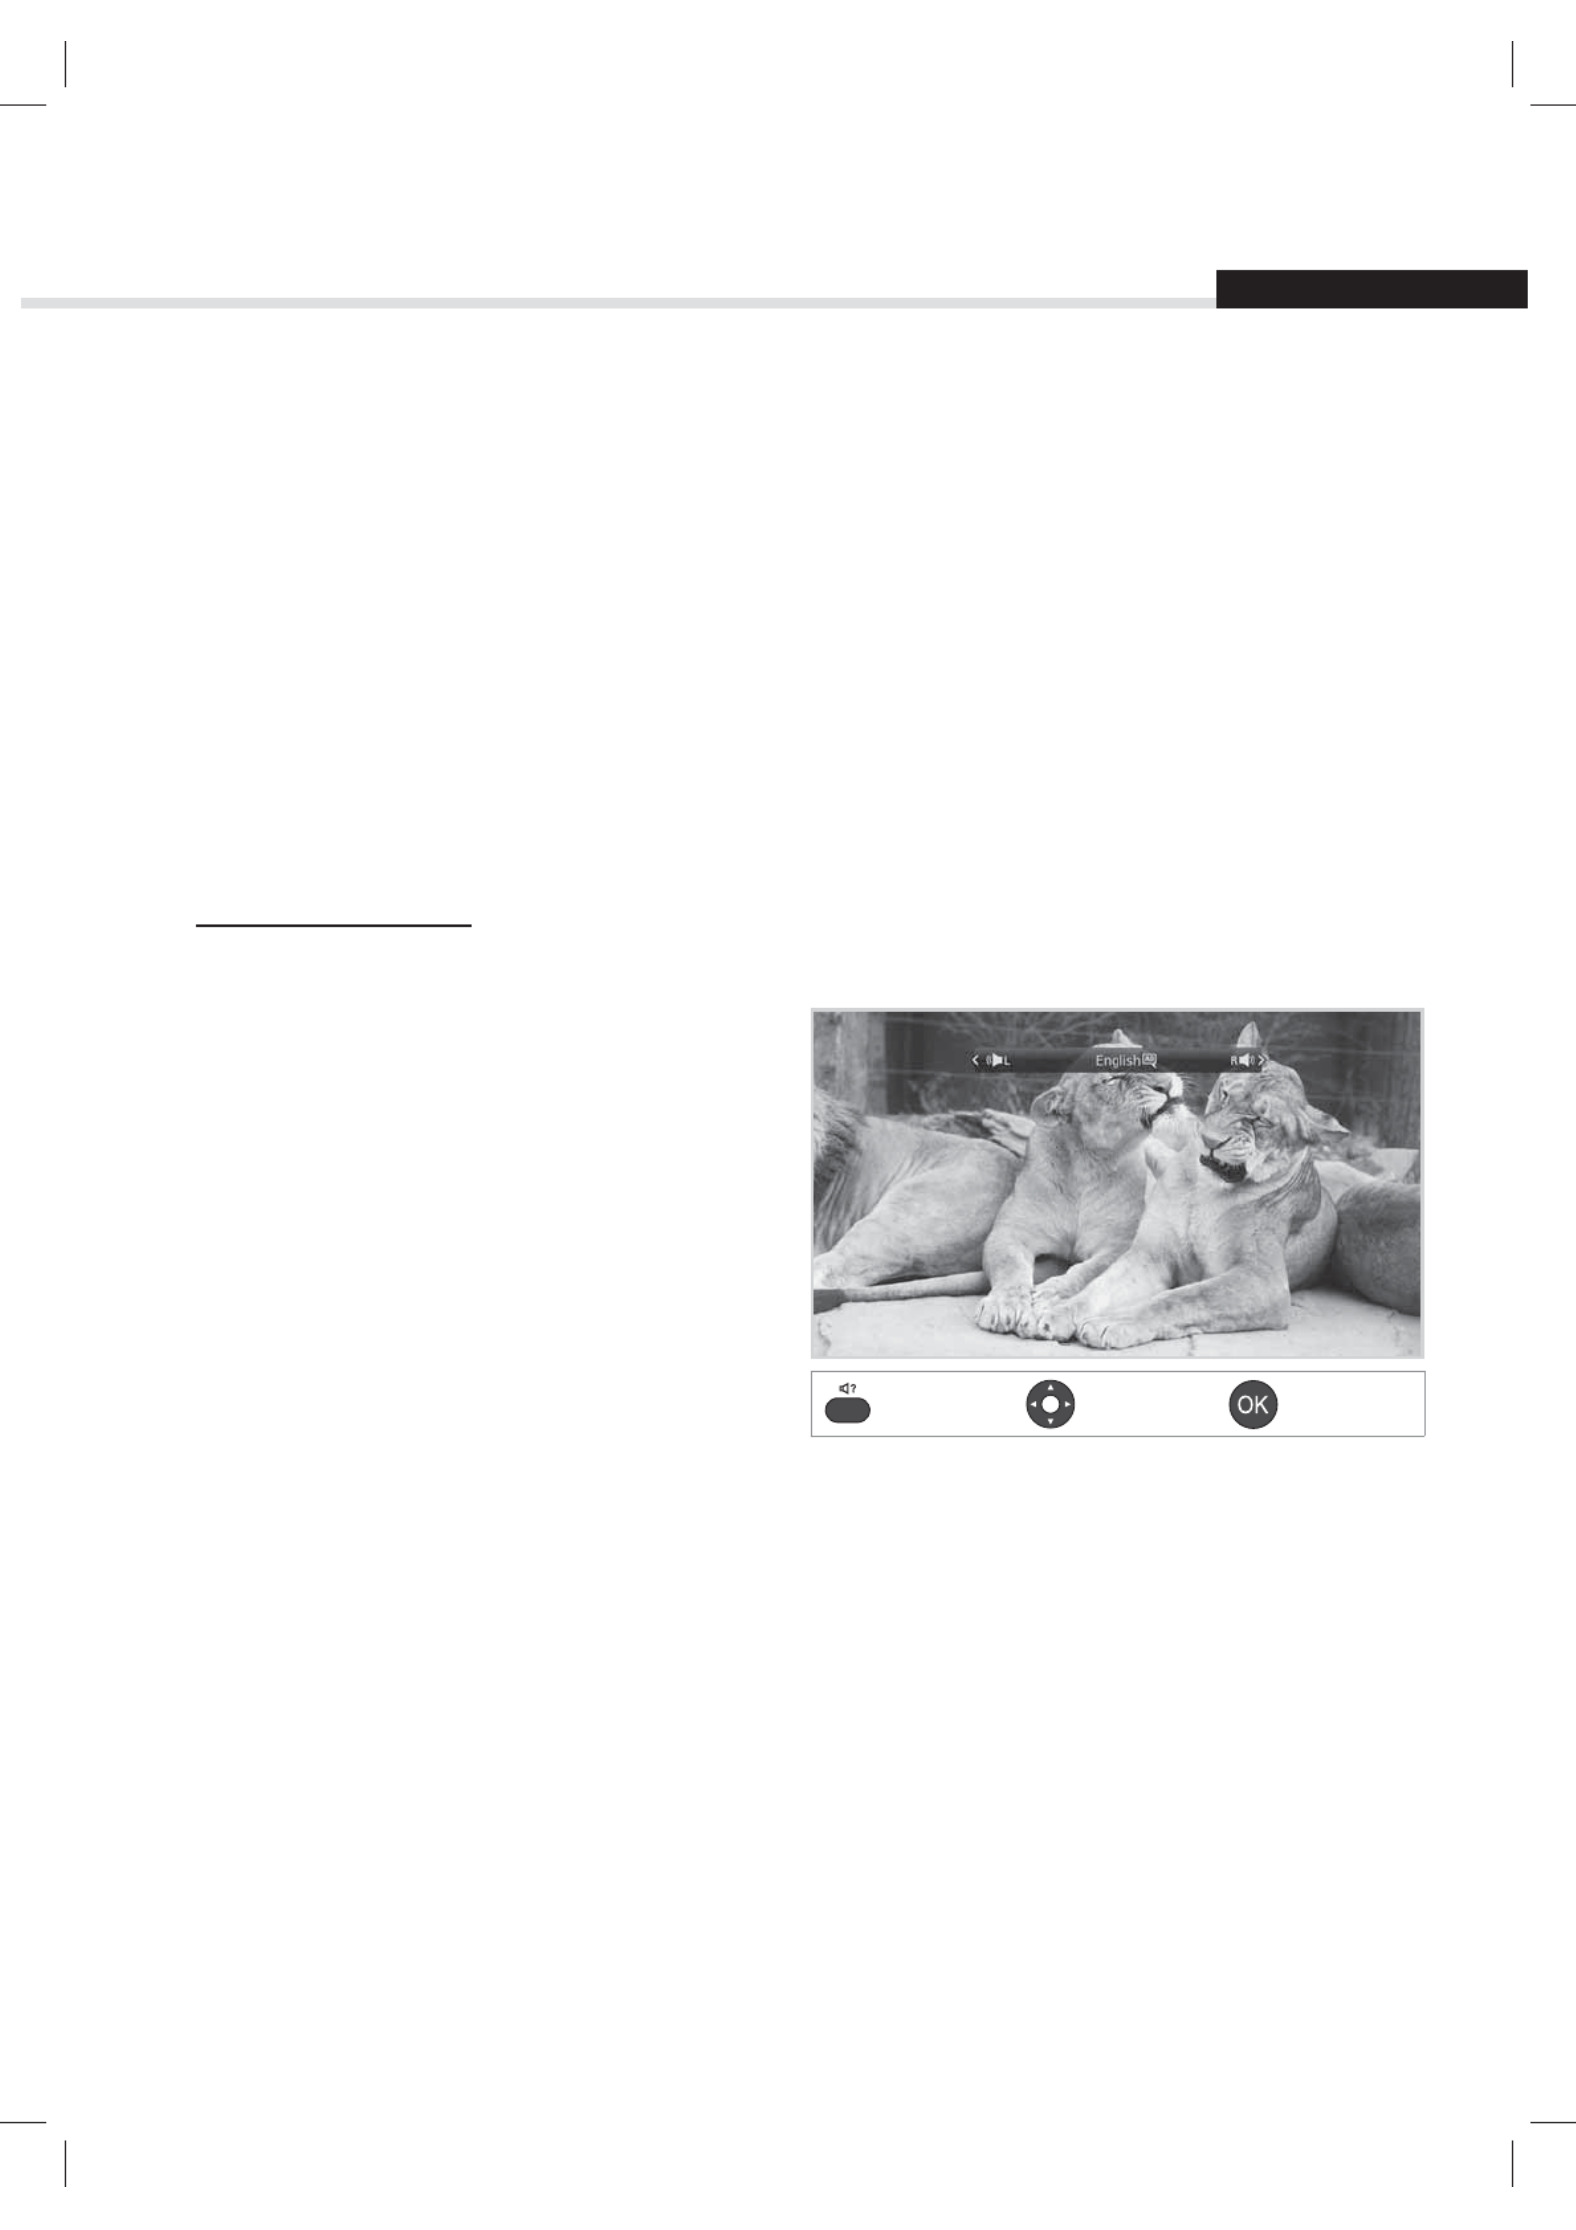
Setting Audio Options
Audio options are available only when the programme supports multiple audio languages.
1. Press the AUDIO button.
Each time you press this button, the audio
language changes or the Audio Description
soundtrack will be selected.
2. Select the audio direction (if available) using
the W X/ arrows.
Note:
• The mute function remains set while you
change channels.
• You cannot set the audio direction when the
programme is broadcast in Dolby Digital.
Basic Operation
Display Select Conrm

16
Basic Operation
Display Format / Resolution
Setting Display Format
Press the button to set the display format WIDE
according to the screen ratio.
Each time you press this button, the value
changes.
h Screen ratio 4:3: Auto - Letterbox 16:9 -
Letterbox 14:9 - Centre
h Screen ratio 16:9: Auto – Pillar Box – Zoom
Note: Refer to Display Format for details.
Setting Resolution
Press the V-FORMAT button to set the resolution
of the screen.
Each time you press this button, the value
changes.
h 576i - 576p - 720p - 1080i - 1080p
Note: When connected with an HDMI cable
you may only be able to change to the
resolutions that the TV supports.
Display
Display
English
17
Basic Operation
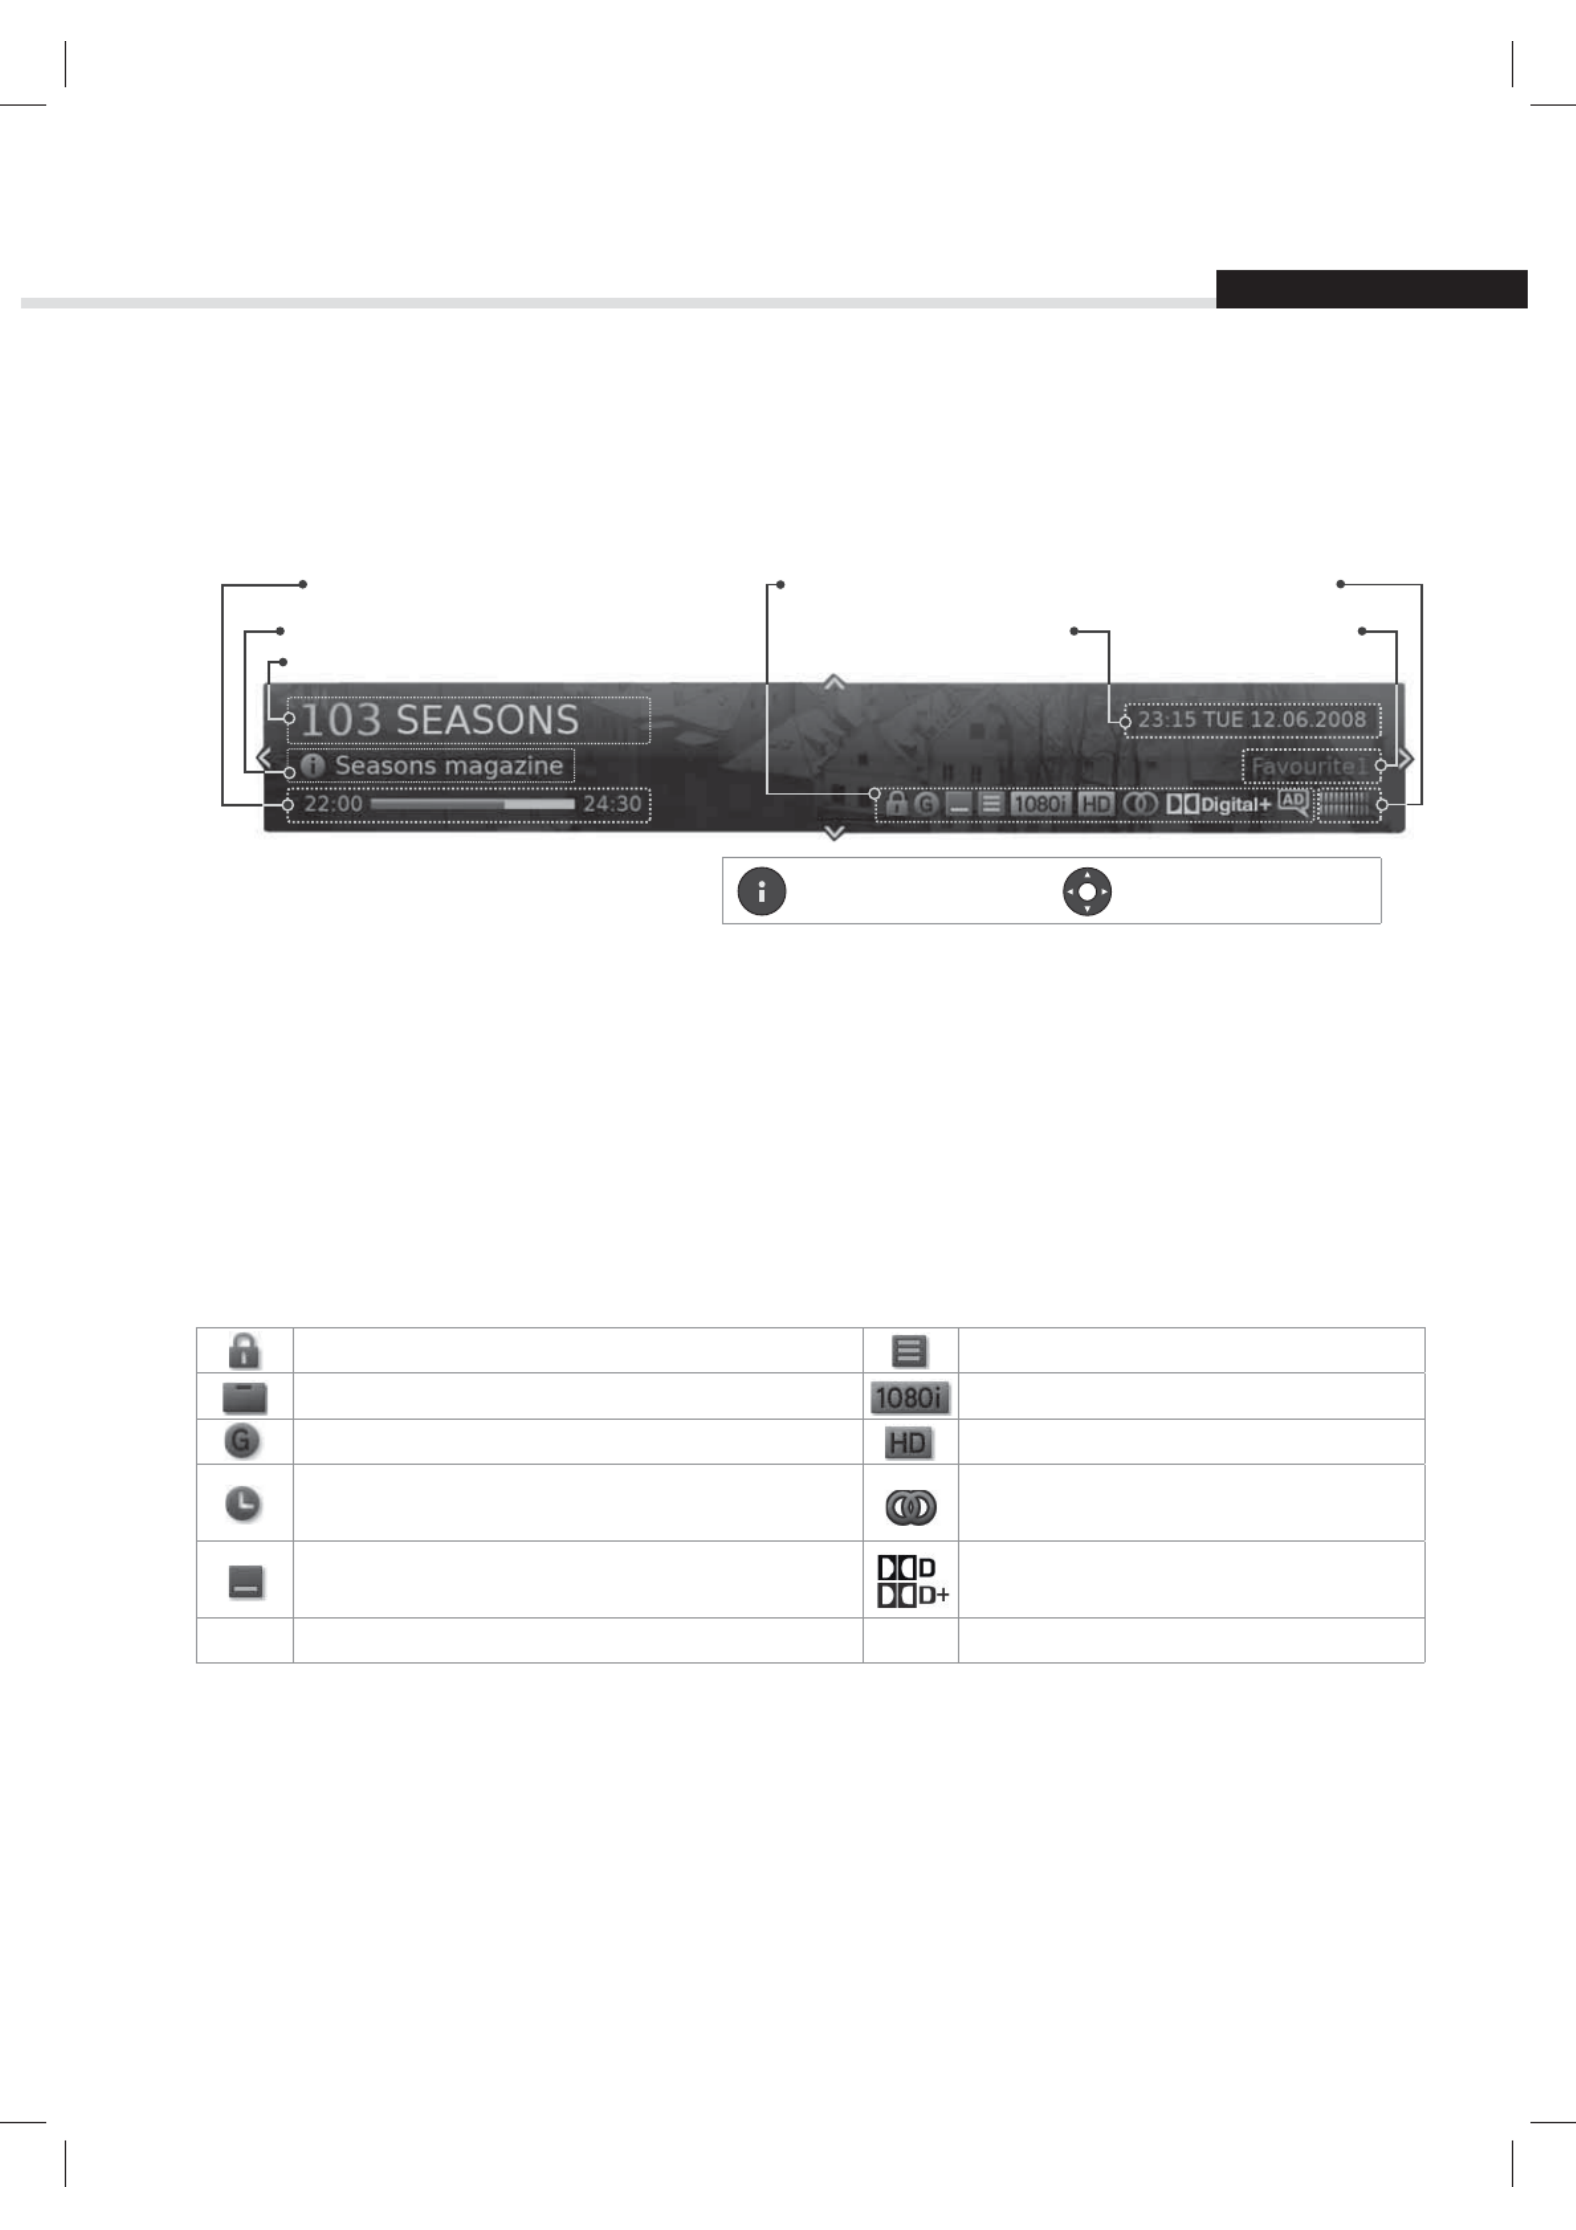
Programme Information (i-plate)
The i-plate is an information banner that is displayed for a certain period of time whenever you change
channels. Press the i button while watching a progamme to display the i-plate. Press the EXIT button to
hide.
Display Navigation mode
h Viewing detailed programme information
Press the i button again while the i-plate is displayed.
hViewing previous/next programme information
Press the W X/ button while the i-plate is displayed. Press the OK button to set reminders for future
programmes.
hViewing programme information of other channels
Press the S T/ button while the i-plate is displayed. Press the OK button to change to the selected channel.
Icons
The icons represent the information and services provided.
Locked programme Series Programme
Pay TV / encrypted programmes (CAS icons) Resolution
Parental guidance programme HD programme
Scheduled programme
(Red: Record, Blue: Reminder) Multiaudio
Subtitle Dolby Digital audio
Dolby Digital Plus audio
Audio Description
Note: Programme information is not displayed when there is no programme information.
Channel number and name
Icons Signal strength and quality
Group name Current time and date
Playing time
Programme name

18
Basic Operation
Sleep Timer
Press the button to set the automatic turn SLEEP
off time.
Each time you press this button, the value
changes.
h Sleep Off - 10 - 20 - 30 - 60 - 90 - 120 minutes
Subtitle
You can select the subtitle language when subtitle
information is provided.
Press the button.SUB
Each time you press this button, the subtitle
language changes.
Note:
• You can choose to always display the subtitle
when available.
• The icon appears when the DVB subtitle is
supported.
Option
You can set the options for the watching channel.
1. Press the OPT+ button.
2. Select an option.
h Favourite : Select the favourite group to add the
channel
h : Select or .Lock On Off
h : Press the button.Delete OK
2. Select to save and exit.OK
Display
Display
Display

English
19
Basic Operation
Text and Interactive Services
If your chosen channel has digital text features, you can access them. Digital text services often load
automatically shortly after the digital text window is displayed. In which case, simply follow the on screen
instructions. (Press colour buttons)
1. Press the TEXT button to access digital text.
2. Press the TEXT button again to return to normal viewing.
3. Press the PS T/P button to exit this service.

20
The channel list will help you find the channel you want to watch quickly and easily.
You can access the channel list in several ways.
Press the LIST button.
Press the button and select .MENU Channel List
Changing Channels
Select the channel you want to watch and press the OK button. The displayed channel will change.
Note:
• : Locked channel, : Pay TV / encrypted programmes (CAS icons)
• Press the i button to view the detailed programme information.
• Press the LIST EXIT or button to exit.
Advanced Options
Changing Group
You can display the list of the selected channel
group.
h TV, HDTV, Radio, Favourite 1~5, Recent
1. Press the X arrow.
2. Select a channel group.
3. Press the OK button.
Note: Press the button to switch TV/RADIO
between TV and Radio groups.
Sorting Channels
Press the RED button to sort the list in numerical
or alphabetical order.
Channel List
Display/Change
Select Confirm
English
21
Channel List
Editing Channels in Channel List
You can lock or delete each channel in the channel list, as well as in menu. To edit the multiple channels,
go to .MENU >Settings > Edit Channels
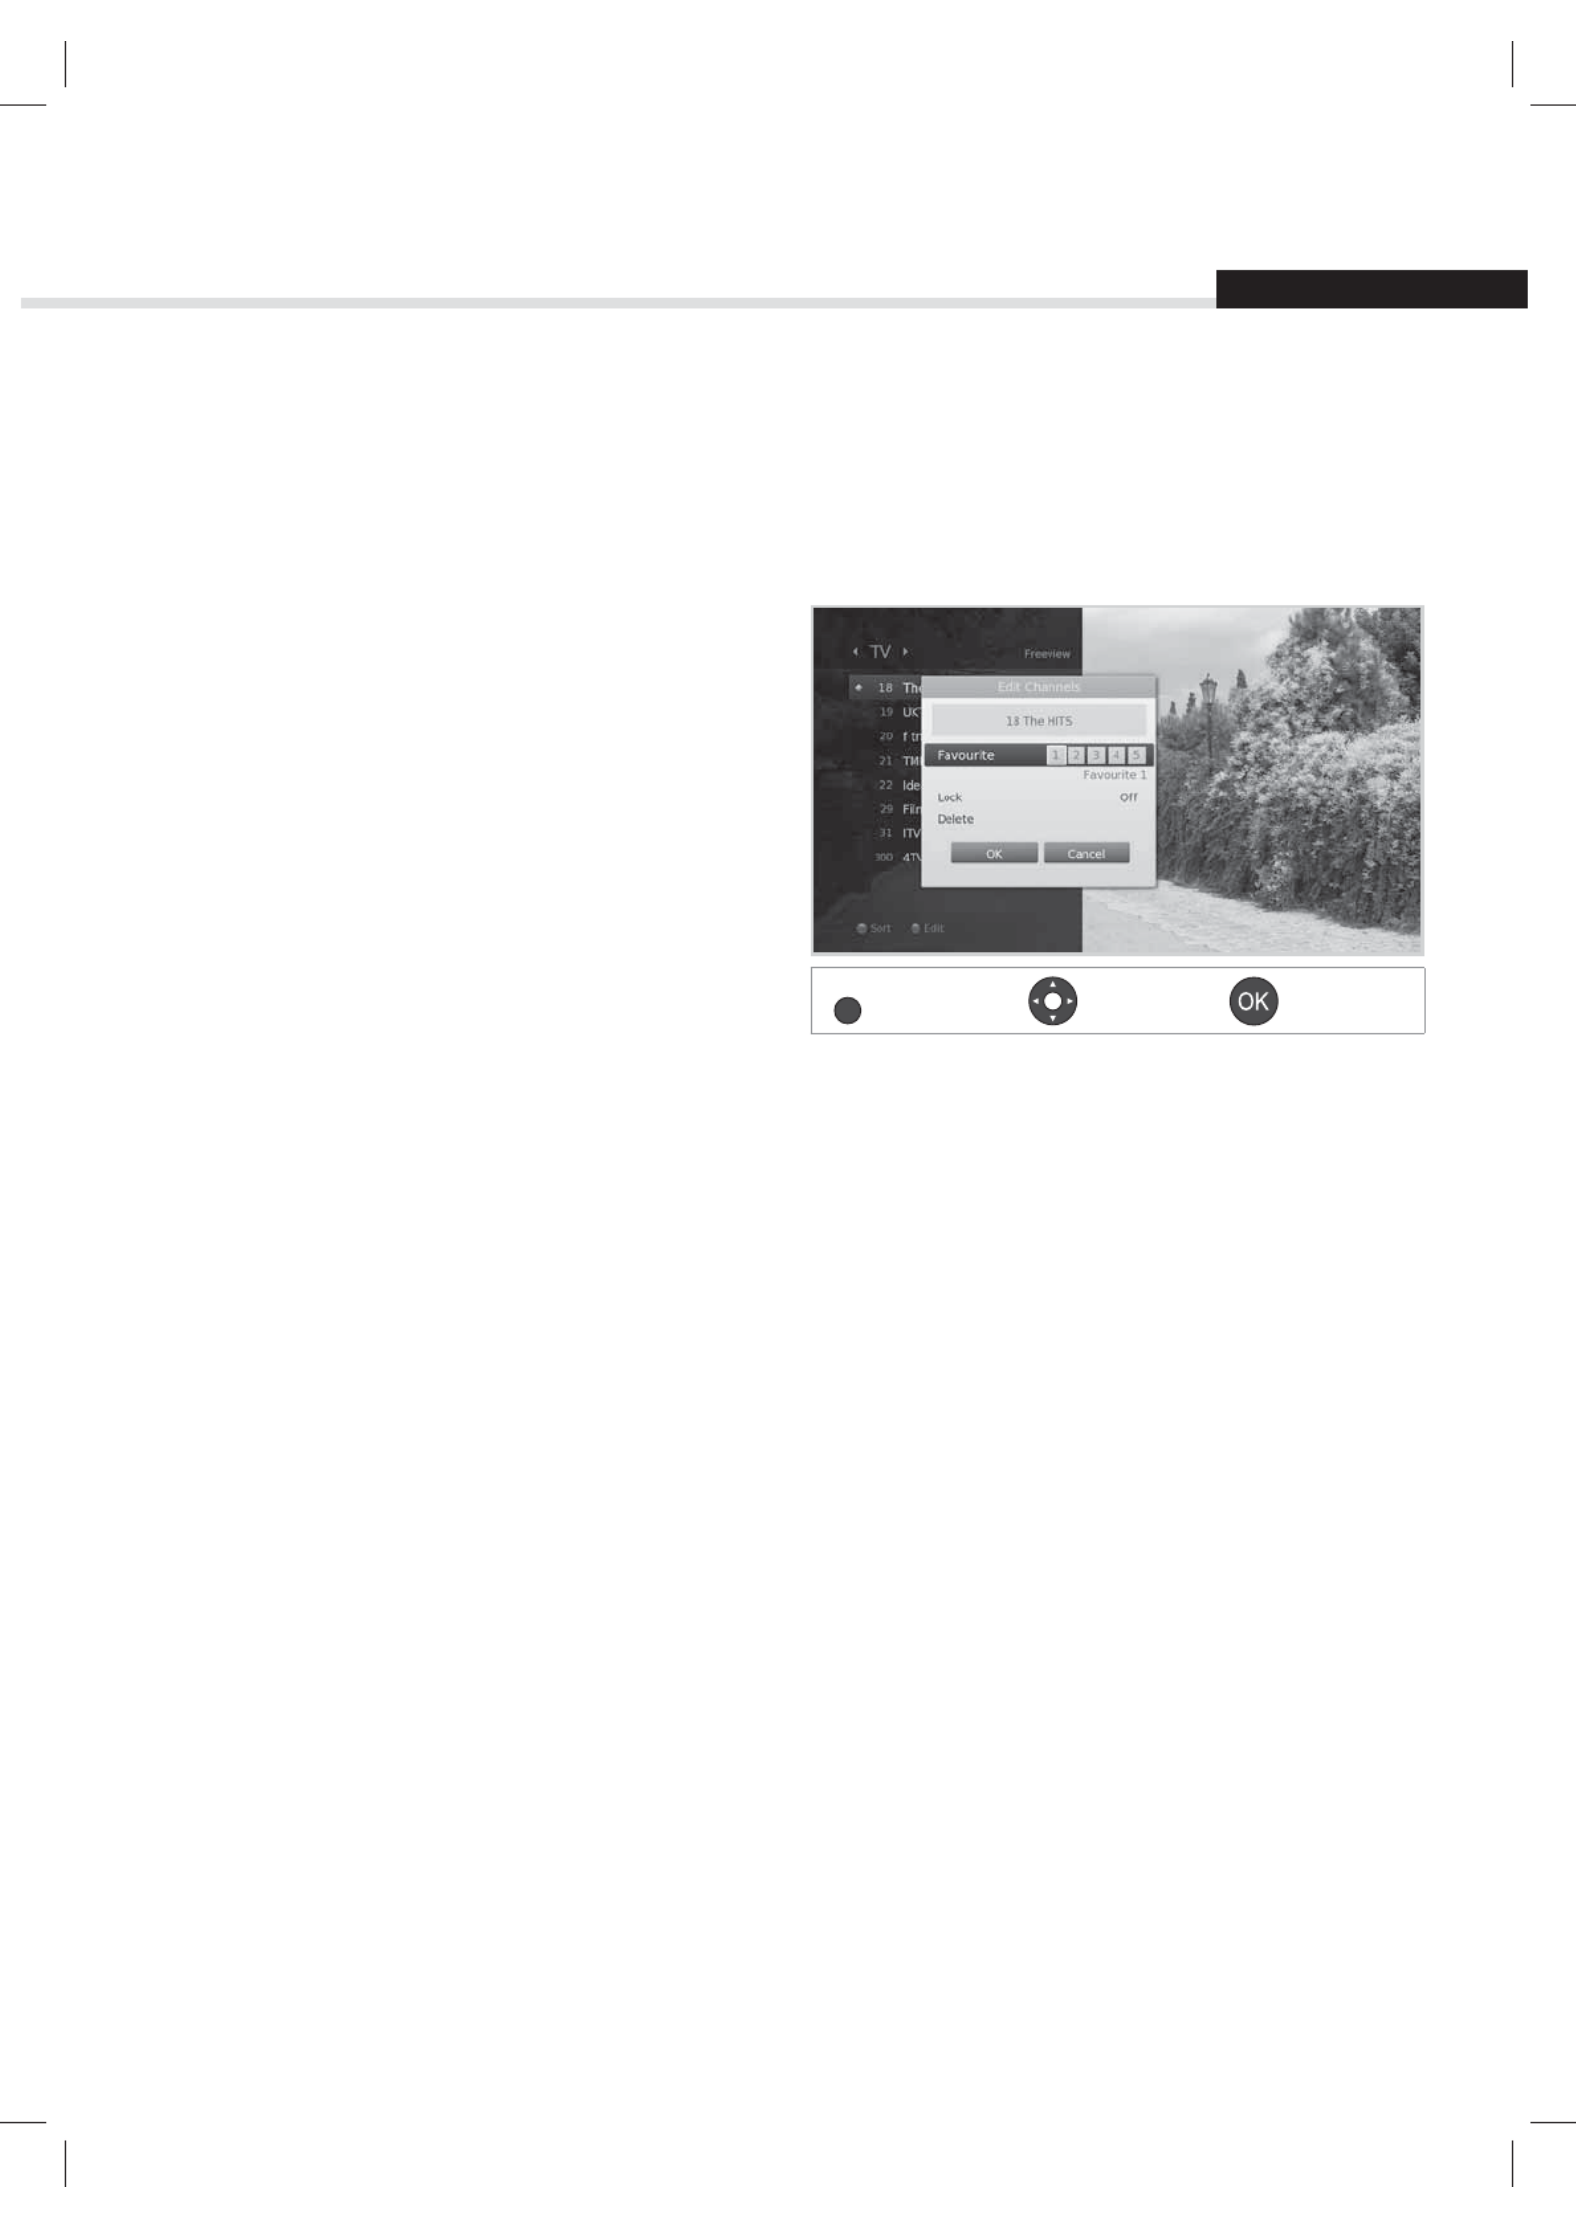
Locking / Deleting Channels
1. Select a channel you want to edit and press
the button.GREEN
2. Select an option.
h : Select or .Lock On Off
h : Press the button.Delete OK
3. Select OK to save and exit.
Note: The default password is 0000. If you have
forgotten your password, please contact
Humax Customer Support.
Setting Favourite Channels
You can select your favourite channels and include them in the five favourite groups.
1. Select a channel and press the GREEN button.
2. Select Favourite.
3. Select a favourite group you want to include the channel in and press the OK button.
To remove a channel from a favourite group, select the group and press the OK button again.
4. Select OK to save and exit.
Display
Select Confirm
GREEN

22
Editing Channels
The menu will help you delete or lock multiple channels. Edit Channel List
MENU Settings J J Edit Channels J Edit Channel List
Select
Mark/Confirm Page up/down
Note:
• : Locked channel, : Pay TV / encrypted programmes (CAS icons)
• Press the MENU EXIT or button to exit. Press the BACK button to return to the previous screen.
Deleting Channels
1. Select the channels using the / and S T OK button.
2. Press the RED button.
Locking / Unlocking Channels
1. Select the channels using the / and S T OK button.
2. Press the BLUE button.
3. Select Lock. To unlock, select .Unlock
Managing Channels
Group name
Marked / Total channels
Function buttons
: Coloured button

English
23
Managing Channels
Advanced Options
Changing Group
To list the channels of other groups, press the GREEN button and select a group you want.
Note: Press the button to switch between TV and Radio groups.TV/RADIO
Changing Background
You can change the channel displayed in the background while editing.
1. Select the channel you want to watch.
2. Press the YELLOW button. The displayed channel will change.
Selecting / Releasing All Channels
1. Press the BLUE button.
2. Select Select All.
3. To release all, select .Release All

24
Managing Channels
Editing Favourite Channels
The Edit Favourite List menu will help you add or remove channels from the favourite groups.
MENU Settings J J Edit Channels J Edit Favourite List
Select
Mark/Confirm Page up/down
Note: Press the button to exit. Press the MENU or EXIT BACK button to return to the previous screen.
Adding / Removing Favourite Channels
1. Press the YELLOW button and select the favourite group you want to edit.
2. To add channels to the favourite list, select the channels you want to add using the S T/ and OK
button in the left column and then press the button. The added channels will appear in the right RED
column.
3. To remove channels from the favourite list, select the channels you want to remove in the right
column and then press the button.RED
Moving Channels
1. Select the channels using the / and S T OK button.
2. Press the RED button.
3. Move the selected channels to the location you want using the S T/ and button.OK
Note: You can move the channels in the right column only.
Renaming Favourite Groups
1. Press the YELLOW button and select the favourite group you want to edit.
2. Press the OPT+ button
3. Select Rename.
4. Enter the name in the keyboard.
Group name
Marked / Total channels
Favourite group name
Function buttons
: Coloured or buttonOPT+

English
25
Managing Channels
Advanced Options
Changing Group
To list the channels of other groups in the left column, press the button and select a group you GREEN
want.
Note: Press the button to switch between TV and Radio groups.TV/RADIO
Changing Background
To list the channels of other groups in the left column, press the BLUE button and select a group you want.
Selecting / Releasing All Channels
1. Press the OPT+ button.
2. Select Select All.
3. To release all, select .Release All
Termékspecifikációk
| Márka: | Humax |
| Kategória: | Vevő |
| Modell: | HDR-FOX T2 |
Szüksége van segítségre?
Ha segítségre van szüksége Humax HDR-FOX T2, tegyen fel kérdést alább, és más felhasználók válaszolnak Önnek
Útmutatók Vevő Humax

7 Augusztus 2024
24 Július 2024
9 Július 2024
Útmutatók Vevő
- Vevő Phoenix Gold
- Vevő Grace Design
- Vevő Sony
- Vevő August
- Vevő Yamaha
- Vevő Nedis
- Vevő Marantz
- Vevő Philips
- Vevő Pioneer
- Vevő SilverCrest
- Vevő Garmin
- Vevő RCF
- Vevő Bosch
- Vevő Panasonic
- Vevő JVC
- Vevő StarTech.com
- Vevő Sharp
- Vevő Harman Kardon
- Vevő Nokia
- Vevő HQ
- Vevő Saramonic
- Vevő Emos
- Vevő Hifonics
- Vevő Onkyo
- Vevő Motorola
- Vevő Geemarc
- Vevő Vimar
- Vevő LogiLink
- Vevő Technics
- Vevő Roland
- Vevő JBL
- Vevő DAP-Audio
- Vevő GoGen
- Vevő AVM
- Vevő Futaba
- Vevő Insignia
- Vevő Martin Logan
- Vevő Boss
- Vevő Crestron
- Vevő Strong
- Vevő Cyrus
- Vevő VOX
- Vevő Tripp Lite
- Vevő MEE Audio
- Vevő Thomson
- Vevő Klipsch
- Vevő Hegel
- Vevő Reely
- Vevő Aiwa
- Vevő Speco Technologies
- Vevő Kenwood
- Vevő Rega
- Vevő Vivanco
- Vevő Asus
- Vevő Jabra
- Vevő Hama
- Vevő ELAC
- Vevő Zoom
- Vevő Renkforce
- Vevő Sencor
- Vevő Focusrite
- Vevő Polsen
- Vevő Bose
- Vevő Raymarine
- Vevő Mercury
- Vevő Blackstar
- Vevő Telefunken
- Vevő Sennheiser
- Vevő Tangent
- Vevő Cambridge
- Vevő Kanto
- Vevő Alpine
- Vevő Optoma
- Vevő Ibanez
- Vevő Omnitronic
- Vevő Logitech
- Vevő Amiko
- Vevő SPL
- Vevő Bresser
- Vevő Pro-Ject
- Vevő Smart
- Vevő TOA
- Vevő Dahua Technology
- Vevő SVS
- Vevő Scosche
- Vevő Hilti
- Vevő Crunch
- Vevő Denver
- Vevő Smart-AVI
- Vevő Naim
- Vevő Bush
- Vevő Power Dynamics
- Vevő Dynacord
- Vevő Trevi
- Vevő Devolo
- Vevő Memphis Audio
- Vevő DiO
- Vevő The T.amp
- Vevő DJI
- Vevő Ground Zero
- Vevő Audio-Technica
- Vevő Amazon
- Vevő Konig & Meyer
- Vevő Godox
- Vevő Cisco
- Vevő Denon
- Vevő ATen
- Vevő Electro-Voice
- Vevő JL Audio
- Vevő BOYA
- Vevő Hartke
- Vevő Auna
- Vevő Mac Audio
- Vevő Behringer
- Vevő Nexa
- Vevő Mooer
- Vevő REL Acoustics
- Vevő Chamberlain
- Vevő Chord
- Vevő Lotronic
- Vevő Bogen
- Vevő Terratec
- Vevő Shure
- Vevő Renegade
- Vevő PreSonus
- Vevő Revel
- Vevő Manhattan
- Vevő Plantronics
- Vevő Peavey
- Vevő Kogan
- Vevő Alecto
- Vevő Fontastic
- Vevő Marshall
- Vevő Velleman
- Vevő Universal Audio
- Vevő AEA
- Vevő Morel
- Vevő Russound
- Vevő Teac
- Vevő Clarion
- Vevő Blustream
- Vevő Metra
- Vevő Monacor
- Vevő MXL
- Vevő S.M.S.L
- Vevő Anthem
- Vevő McIntosh
- Vevő LD Systems
- Vevő Proel
- Vevő Jamo
- Vevő Blaupunkt
- Vevő Deaf Bonce
- Vevő NAD
- Vevő Conrad
- Vevő Thomann
- Vevő Datapath
- Vevő Sagem
- Vevő IRiver
- Vevő Samson
- Vevő Cayin
- Vevő Mackie
- Vevő Vonyx
- Vevő Alto
- Vevő Delta Dore
- Vevő Vivotek
- Vevő Infinity
- Vevő Magnat
- Vevő Bang & Olufsen
- Vevő Trust
- Vevő AKAI
- Vevő Konig
- Vevő Marmitek
- Vevő TechniSat
- Vevő Fenton
- Vevő Line 6
- Vevő Jensen
- Vevő Meliconi
- Vevő Pyle
- Vevő MuxLab
- Vevő Audioengine
- Vevő AVMATRIX
- Vevő Kemo
- Vevő Rolls
- Vevő Salora
- Vevő IFM
- Vevő Musical Fidelity
- Vevő DataVideo
- Vevő Telestar
- Vevő A-NeuVideo
- Vevő Stinger
- Vevő Atlona
- Vevő Lindy
- Vevő Audizio
- Vevő Audiotec Fischer
- Vevő Fender
- Vevő Rotel
- Vevő Hertz
- Vevő Bowers & Wilkins
- Vevő FBT
- Vevő Audiolab
- Vevő Atlas Sound
- Vevő AKG
- Vevő Marshall Electronics
- Vevő Ashly
- Vevő AudioControl
- Vevő Monitor Audio
- Vevő Audac
- Vevő Technical Pro
- Vevő Siig
- Vevő Yorkville
- Vevő Rockford Fosgate
- Vevő Krüger&Matz
- Vevő Salus
- Vevő Dual
- Vevő ICOM
- Vevő Gefen
- Vevő Inateck
- Vevő Warm Audio
- Vevő Wharfedale
- Vevő Kathrein
- Vevő Homematic IP
- Vevő Canton
- Vevő Yaesu
- Vevő Panduit
- Vevő HQ Power
- Vevő Vocopro
- Vevő Axis
- Vevő Optex
- Vevő Medeli
- Vevő Palmer
- Vevő Imperial
- Vevő Kicker
- Vevő FSR
- Vevő DBX
- Vevő Sangean
- Vevő Camille Bauer
- Vevő Valueline
- Vevő SureCall
- Vevő Definitive Technology
- Vevő Focal
- Vevő MB Quart
- Vevő Genie
- Vevő Legamaster
- Vevő Lectrosonics
- Vevő Hughes & Kettner
- Vevő IFi Audio
- Vevő Audix
- Vevő Vivolink
- Vevő Arcam
- Vevő FiiO
- Vevő Intelix
- Vevő Comprehensive
- Vevő Orava
- Vevő Alfatron
- Vevő Astro
- Vevő Match
- Vevő Thorens
- Vevő Majestic
- Vevő Smartwares
- Vevő Teufel
- Vevő Sogo
- Vevő Classé
- Vevő Vincent
- Vevő NuPrime
- Vevő Reloop
- Vevő CSL
- Vevő Artsound
- Vevő KanexPro
- Vevő Rupert Neve Designs
- Vevő Kramer
- Vevő Ram Audio
- Vevő ART
- Vevő BZBGear
- Vevő Ampeg
- Vevő Amplicom
- Vevő American Audio
- Vevő Hirschmann
- Vevő Audison
- Vevő Palsonic
- Vevő Caliber
- Vevő Exibel
- Vevő Vision
- Vevő Summit Audio
- Vevő Musway
- Vevő Brigmton
- Vevő Sunstech
- Vevő Elektrobock
- Vevő Avalon
- Vevő Sonance
- Vevő Oculus VR
- Vevő Redline
- Vevő Marquant
- Vevő Matrox
- Vevő Steren
- Vevő Polk
- Vevő Sandberg
- Vevő Galaxy Audio
- Vevő Denson
- Vevő Pyle Pro
- Vevő Roksan
- Vevő Valcom
- Vevő Goobay
- Vevő Hager
- Vevő Maxview
- Vevő Rocketfish
- Vevő Naxa
- Vevő Sherwood
- Vevő QTX
- Vevő Zgemma
- Vevő RDL
- Vevő Zehnder
- Vevő Mx Onda
- Vevő Fredenstein
- Vevő Metronic
- Vevő Harper
- Vevő TV STAR
- Vevő QSC
- Vevő Lanzar
- Vevő Simrad
- Vevő Vaddio
- Vevő Gira
- Vevő Jung
- Vevő Golden Age Project
- Vevő Apart
- Vevő Pinnacle
- Vevő Eventide
- Vevő Audio Pro
- Vevő Radial Engineering
- Vevő Homecast
- Vevő Graupner
- Vevő Bluesound
- Vevő Integra
- Vevő Revox
- Vevő Engel Axil
- Vevő Comica
- Vevő Fusion
- Vevő Audient
- Vevő PAC
- Vevő Skytec
- Vevő Luxman
- Vevő JETI
- Vevő Linn
- Vevő Monoprice
- Vevő Ibiza Sound
- Vevő Exposure
- Vevő Axton
- Vevő Fostex
- Vevő MIPRO
- Vevő Solid State Logic
- Vevő Edision
- Vevő Neets
- Vevő NAV-TV
- Vevő HiFi ROSE
- Vevő OSD Audio
- Vevő Mark Levinson
- Vevő RME
- Vevő Black Lion Audio
- Vevő Soundstream
- Vevő Xoro
- Vevő DLS
- Vevő Adastra
- Vevő Block
- Vevő PSB
- Vevő Aeon Labs
- Vevő Citronic
- Vevő Formuler
- Vevő Lindell Audio
- Vevő LTC
- Vevő JB Systems
- Vevő Dreambox
- Vevő Zalman
- Vevő James
- Vevő HUMANTECHNIK
- Vevő PSSO
- Vevő Crest Audio
- Vevő Primare
- Vevő Sonifex
- Vevő Xantech
- Vevő Ferguson
- Vevő Wet Sounds
- Vevő Televés
- Vevő Manley
- Vevő Extron
- Vevő HEOS
- Vevő Madison
- Vevő Ebode
- Vevő Phonocar
- Vevő Xtrend
- Vevő Scansonic
- Vevő Helix
- Vevő Winegard
- Vevő Laney
- Vevő Devialet
- Vevő ETON
- Vevő Xsarius
- Vevő EA
- Vevő DirecTV
- Vevő Octagon
- Vevő GOgroove
- Vevő Crown
- Vevő SRS
- Vevő Avantree
- Vevő LYYT
- Vevő Antelope Audio
- Vevő CE Labs
- Vevő Pharos
- Vevő Accell
- Vevő Jolida
- Vevő Inovonics
- Vevő Ecler
- Vevő Viscount
- Vevő Ashdown Engineering
- Vevő Triax
- Vevő Synq
- Vevő Mtx Audio
- Vevő Aquatic AV
- Vevő Parasound
- Vevő DB Technologies
- Vevő Roswell
- Vevő Velodyne
- Vevő Epcom
- Vevő Sunfire
- Vevő Selfsat
- Vevő Skytronic
- Vevő CYP
- Vevő Topp Pro
- Vevő Whistler
- Vevő Astell&Kern
- Vevő Karma
- Vevő TV One
- Vevő Dimavery
- Vevő AMS Neve
- Vevő Powersoft
- Vevő LinksPoint
- Vevő Esoteric
- Vevő Markbass
- Vevő IMG Stage Line
- Vevő Wireless Solution
- Vevő Leviton
- Vevő Aurel
- Vevő ESX
- Vevő NUVO
- Vevő Phoenix Audio
- Vevő AVPro Edge
- Vevő Comtek
- Vevő Fishman
- Vevő RetroSound
- Vevő Pyramid
- Vevő LEA
- Vevő Sound Ordnance
- Vevő Canyon
- Vevő FiveO
- Vevő Planet Audio
- Vevő Phonic
- Vevő Koda
- Vevő Hotone
- Vevő Trace Elliot
- Vevő Bang Olufsen
- Vevő JTS
- Vevő AER
- Vevő Dynavox
- Vevő Modelcraft
- Vevő Klark Teknik
- Vevő Simaudio
- Vevő TIC
- Vevő Niles
- Vevő Knoll
- Vevő Creek
- Vevő Mobile Crossing
- Vevő DAP
- Vevő Krell
- Vevő GigaBlue
- Vevő ANKARO
- Vevő Bugera
- Vevő CAD Audio
- Vevő Cabasse
- Vevő Triangle
- Vevő Lab Gruppen
- Vevő Wavtech
- Vevő AmpliVox
- Vevő Audiofrog
- Vevő CyberData Systems
- Vevő WyreStorm
- Vevő Williams Sound
- Vevő Lyngdorf
- Vevő SoundTube
- Vevő WesAudio
- Vevő AudioSource
- Vevő Stewart
- Vevő Leema
- Vevő Apantac
- Vevő Axing
- Vevő Seco-Larm
- Vevő Mosconi
- Vevő Crest
- Vevő TechLogix Networx
- Vevő Audibax
- Vevő Meridian
- Vevő Quad
- Vevő BC Acoustique
- Vevő Gold Note
- Vevő IOTAVX
- Vevő Fosi Audio
- Vevő Shinybow
- Vevő Rexing
- Vevő Shanling
- Vevő Inter-M
- Vevő Sinus Live
- Vevő Soundtrack
- Vevő Canor
- Vevő C2G
- Vevő Unison Research
- Vevő Cerwin-Vega
- Vevő Universal Remote Control
- Vevő BMB
- Vevő Advance
- Vevő Cloud
- Vevő Lumantek
- Vevő Taga Harmony
- Vevő PTN-electronics
- Vevő VMV
- Vevő Black Hydra
- Vevő Bellari
- Vevő GlobalSat
- Vevő Aplic
- Vevő PureLink
- Vevő FoneStar
- Vevő Henry Engineering
- Vevő Glemm
- Vevő ButtKicker
- Vevő Atoll
- Vevő Benchmark
- Vevő Streacom
Legújabb útmutatók Vevő

9 Április 2025
9 Április 2025
5 Április 2025
5 Április 2025
2 Április 2025
2 Április 2025
2 Április 2025

31 Március 2025
31 Március 2025
30 Március 2025