Használati útmutató Getac F110 G3
Olvassa el alább 📖 a magyar nyelvű használati útmutatót Getac F110 G3 (101 oldal) a tabletta kategóriában. Ezt az útmutatót 11 ember találta hasznosnak és 2 felhasználó értékelte átlagosan 4.5 csillagra
Oldal 1/101

Rugged Mobile Computing Solutions
F110
USER MANUAL

January 19 20
TRADEMARKS
All brand and product names are trademarks or registered trademarks of
their respective companies.
NOTE
The information in this manual is subject to change without notice.
For at the latest version of the manual, please visit the Getac website
www.getac.com.

i
Table of Contents
Chapter 1 Getting Started ................................................................. 1
Getting the Tablet PC Running ................................................. 2
Unpacking .............................................................................. 2
Installing the SIM Card (Optional) and Battery Packs ......... 3
Connecting to AC Power ....................................................... 5
Using the Tether .................................................................... 6
Turning On and Off the Tablet PC ....................................... 7
Taking a Look at the Tablet PC ................................................. 8
Front Components ................................................................. 8
Rear Components ................................................................ 11
Left- Side Components......................................................... 12
Top Components.................................................................. 13
Bottom Components ........................................................... 14
Chapter 2 Operating Your Tablet PC .............................................. 15
Navigating on the Screen ........................................................ 16
Using the Touchscreen ........................................................ 16
Using the Dual Mode Display (Optional) ........................... 19
Using the Network Features .................................................... 20
Using the LAN (Optional) .................................................... 20
Using the WLAN................................................................... 20
Using the BT Feature ............................................................... 22
Turning On/Off the BT Radio .............................................. 22
Connecting to another BT Device ....................................... 23
Using the WWAN Feature (Optional) ..................................... 24
Turning On/Off the WWAN Radio ...................................... 24
Setting up a WWAN Connection ........................................ 25
Using the Fingerprint Scanner (Optional) .............................. 27
Chapter 3 Managing Power ............................................................ 29
AC Adapter ............................................................................... 30
Battery Pack .............................................................................. 31
Charging the Battery Pack .................................................. 31

ii
Initializing the Battery Pack ................................................ 32
Checking the Battery Level ................................................. 32
Ba ttery Low Signals and Actions ........................................ 33
Replacing the Battery Pack ................................................. 33
Power- Saving Tips .................................................................... 36
Chapter 4 Expanding Your Tablet PC ............................................. 37
Connecting a USB Device ......................................................... 38
Connecting an Audio Device ................................................... 39
Connecting an HDMI Display Monitor ................................... 40
Connecting a Serial Device (Optional) .................................... 41
Using Smart Cards (Optional) .................................................. 42
Using HDMI- in Function (Optional) ........................................ 43
Using the NFC/RFID Reader (Optional) ................................... 44
Using MicroSD Cards (Optional) ............................................. 45
Chapter 5 Using BIOS Setup ............................................................ 46
When and How to Use ............................................................. 47
Menu Descriptions ................................................................... 48
Information Menu ............................................................... 48
Main Menu ........................................................................... 48
Advanced Menu ................................................................... 49
Security Menu ...................................................................... 50
Boot Menu ........................................................................... 51
Exit Menu ............................................................................. 51
Chapter 6 Using Getac Software .................................................... 52
OSD Control Panel ................................................................... 53
G- Manager ............................................................................... 54
Camera (Optional) ................................................................... 55
G- Camera (for Windows 10) ............................................... 55
Getac Camera (for Windows 7) ........................................... 56
Using the Barcode Reader (Optional) ..................................... 57
Chapter 7 Care and Maintenance ................................................... 59
Protecting the Tablet PC .......................................................... 60
Using an Anti Virus Strategy- ............................................... 60
Using the Cable Lock ........................................................... 60
Taking Care of the Tablet PC .................................................. 61
Location Guidelines ............................................................. 61
General Guidelines .............................................................. 61
Cleaning Guidelines ............................................................. 62
Battery Pack Guidelines ....................................................... 62
Touchscreen Guidelines ....................................................... 63

iii
When Traveling ........................................................................ 65
Chapter 8 Troubleshooting ............................................................. 66
Preliminary Checklist ................................................................ 67
Solving Common Problems ...................................................... 68
Batt ery Problems ................................................................. 68
BT Wireless Transmission Problems .................................... 68
Display Problems .................................................................. 69
Hardware Device Problems ................................................. 69
Power Management Problems ........................................... 70
Sensor Problems (for Windows 10 Models Only) .............. 70
Software Problems .............................................................. 71
Sound Problems ................................................................... 71
Startup Problems ................................................................. 72
WLAN Problems ................................................................... 72
Other Problems .................................................................... 74
Resetting the Tablet PC ........................................................... 75
System Recovery ....................................................................... 76
Windows 10 Models ............................................................ 76
Windows 7 Models .............................................................. 78
Using the Driver Disc (Optional) ............................................. 80
Appendix A Specifications ................................................................. 81
Appendix B Regulatory Information ................................................. 83
On the Use of the System ........................................................ 84
Class B Regulations .............................................................. 84
ANSI Warning ....................................................................... 85
Safety Notices ....................................................................... 86
On the Use of the RF Device.................................................... 89
USA and Canada Safety Requirements and Notices .......... 89
European Union CE Marking and Compliance Notices ..... 91
User Notification of Take-back Service ................................... 93
ENERGY STAR 7.0 ..................................................................... 94
Battery Recycling ...................................................................... 96

1
Chapter 1
Getting Started
This chapter first tells you step by step how to get the Tablet PC up and
running. Then, you will find a section briefly introducing the external
components of the Tablet PC.
2
Getting the RunningTablet PC
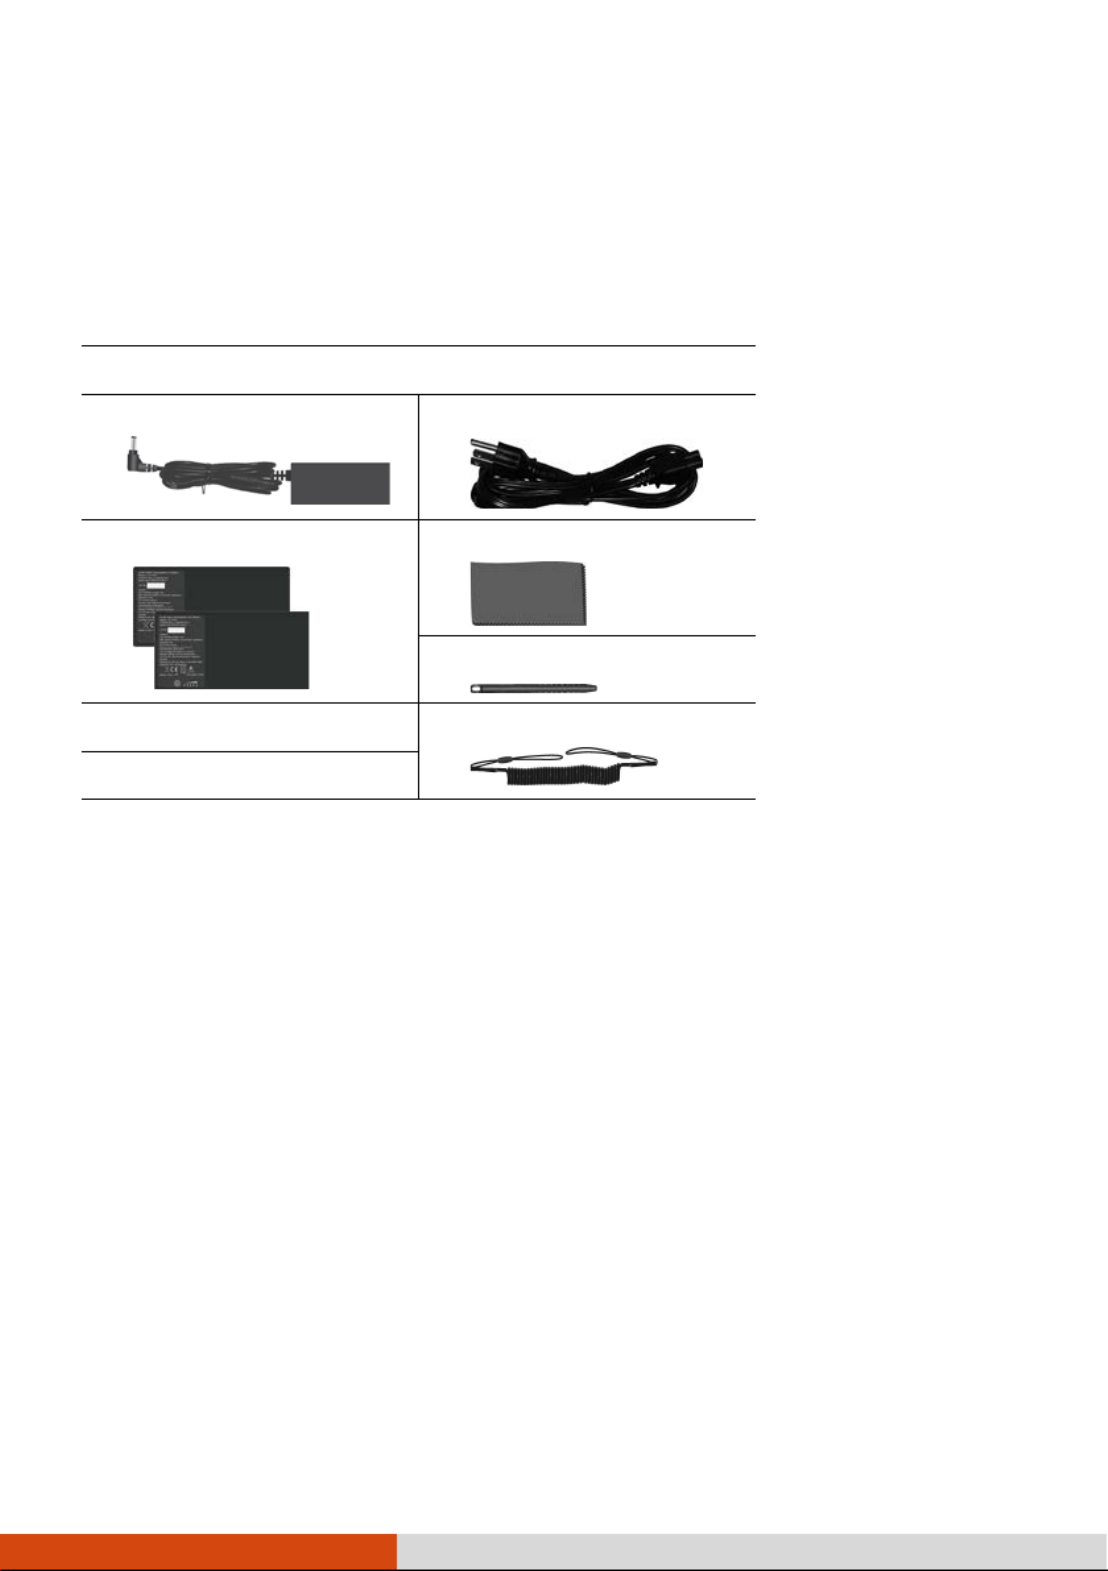
Unpacking
After unpacking the shipping carton, you should find these standard items:
F110 Tablet PC
AC adapter
AC power cord
Battery pack x 2
Screen cleaning cloth
Stylus
Document(s) Tether
Driver disc (optional)
Inspect all the items. If any item is dam or missing, notify your dealer age
immediately.

3
Installing the (Optional) and SIM Card
Battery Packs
1. Locate the battery cover. Slide the two small locks outward to the
unlocked position ( ) () and then release the latch ( () ) to open
the battery cover.
2. Select models only:
With the SIM card s chip side facing up and the corner pointing ’ beveled
to the slot, insert the card all the way into the slot.
NOTE: To remove the SIM card, just push in the SIM card to pop out and -
remove the card.

4
3. Note the orientation of the battery pack. Hold the battery pack at an
angle and insert its small tabs to the corresponding notches in the
battery compartment. Then, lift the yellow protection sheet in the
battery compartment and plug the battery connector.
4. Proceed with the other battery pack.
5. Hold the battery cover at an angle and insert the cover s small tabs to the ’
corresponding notches on the Tablet PC; then close the cover. Press the
four small dots () so that the cover clicks into place. Engage the cover
latch ( ) () and slide the two small locks inward to the locked position
( ) ().
Battery 1
Battery 2
5
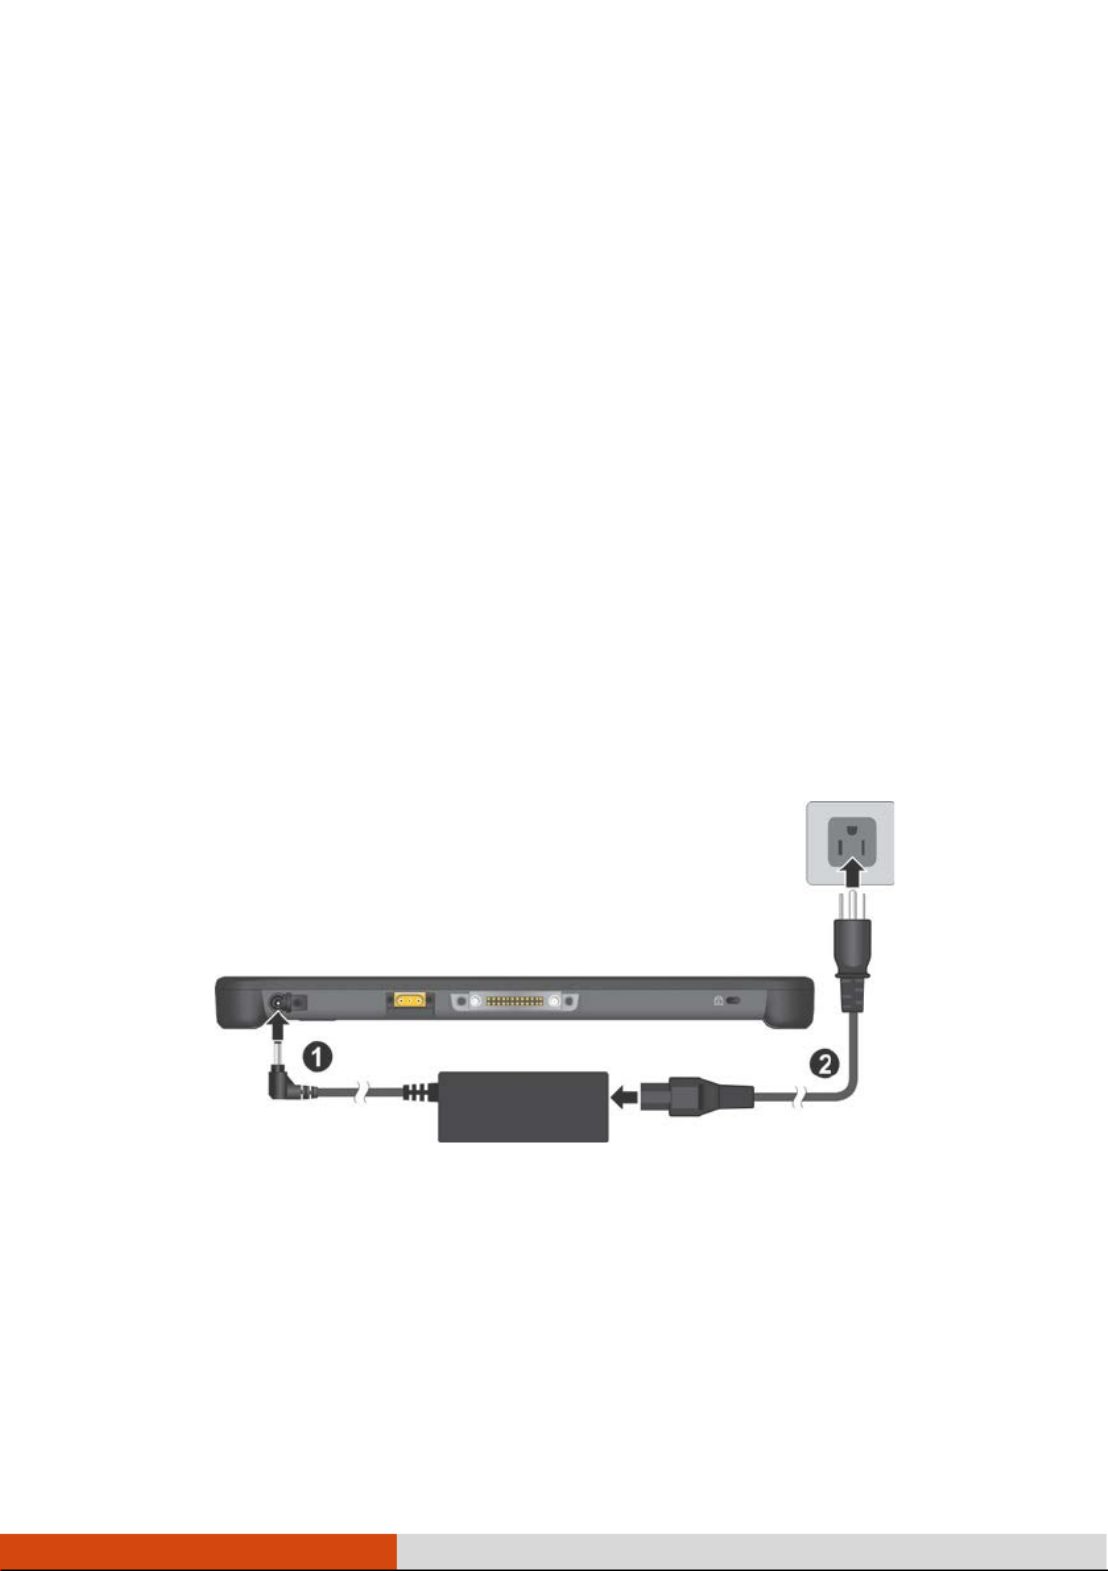
Connecting to AC Power
CAUTION: Use only the AC adapter included with your . Using Tablet PC
other AC adapters may damage the Tablet PC.
NOTE:
The battery pack is shipped to you in power saving mode that protects it
from charging/discharging. It will get out of the mode to be ready for
use when you install the battery pack and connect AC power to the
Tablet PC for the very first time.
When the AC adapter is connected, it also charges the battery pack. For
information on using battery power, see Chapter 3.
You must use AC power when start up the for the very first ing Tablet PC
time.
1. Plug the DC cord of the AC adapter to the power connector of the Tablet
PC ().
2. Plug the female end of the AC power cord to the AC adapter and the
male end to an electrical outlet ().
3. Power is being supplied from the electrical outlet to the AC adapter and
onto your . Now, you are ready to turn on the Tablet PC Tablet PC.

6
Using the Tether
A tether is provided for attaching the stylus to your Tablet PC.
1. Insert one of the tether s loop ends through the hole of the stylus (as ’
indicated by below). Then, insert the other end through the first loop
(as indicated by below) and pull it tight.
2. Insert the other loop end to the tether hole on the T blet PC (as a
indicated by below). Then, insert the stylus end through the loop (as
indicated by be low) and pull it tight.

7
Turning On and Off the Tablet PC
Turning On
Press the power button ( ). T he Windows operating system should start.
NOTE: T apping the screen during startup may invoke a pre-boot menu
(unless the default settings have been changed). If the menu appears, simply
select . Continue
Turning Off
When you finish a working session, you can stop the system by turning off
the power or leaving in Sleep or Hibernation mode:it
To... Do this...
Windows 10 Windows 7
Power off
(Shutdown)
Tap Power Shut
down.
Use the Windows Start menu
in the lower left and follow
the shutdown procedure.
Sleep Press the power button.*
-or-
Tap Power Sleep.
Press the power button.*
-or-
U Start menu se the Windows
to put the Tablet PC in Sleep
mode.
Hibernate By default, this option is not
shown in the Start menu. If you
want to use the feature, set up
accordingly in Windows
settings.
Use the Windows Start menu
to put the Tablet PC in
H ibernation mode.
* “ ” Sleep is the default setting of the power button. You may change what
the power button does in Windows settings.

8
Taking a Look at the Tablet PC
NOTE: Depending on the model you purchased, the appearance of your
Tablet PC may not be exactly the same as those shown in this manual.
CAUTION: You need to open the protective covers to access the connectors.
When not using a connector, make sure to close the cover completely for
water- and dust-proof integrity. Engage the locking mechanism if existing. ( )
Front Components
Ref
Component Description
Touchscreen D s s or . isplay and receive information f the Tablet PC
Camera Lens
(option )al
Allows you to use the camera function. When the
camera lens is in use, the indicator beside it lights up.
Light Sensor Se nses the ambient light for automatic adjustments
of the display backlight.
Indicators
Power Lights blue the power is onwhen .
Blinks blue when the system is in Sleep mode.

9
Ref
Component Description
Battery
Charge
Lights amber when the battery is being charged.
Lights green when battery charging is completed.
Blinks green to indicate in high -the battery’s built
temperature protection mechanism is activated.
CAUTION: Do not remove the battery during this
period.
Blinks red (once per second) when the battery’s
capacity is below 10%.
Blinks red rapidly (once per 0.5 second) when there is
a thermal protection problem Ask for repair service .
in case this happens.
Blinks amber when the battery charging is in an
abnormal state. Replace the battery in case this
happens.
RF (Radio
Frequency)
Lights blue when the RF radio of any RF feature
(WLAN/BT/WWAN) is on.
Power Button Turns the power on or off. (The default “off” state is
“ ”) Sleep mode.
Extra Button The default function is Camera Trigger or depending
on your model.
Camera For Window s 10:
Starts the G Camera application.-
For Window s 7:
Starts the Camera program and Getac
serves as the shutter release button.
Trigger Serves as the trigger button for the barcode
reader if your model has the module.
When Function Lock is on:
Enables o disables the touchscreen feature.r
Can be changed to another set of predefined
functions using G-Manager.
Provides a keyboard key function for specific
occasions.

10
Ref
Component Description
P1 Button Switches on or off Function Lock (FL), which changes
the alternative Extra, Up, and Down buttons to an
function . When FL is on, the icon appears on
Windows taskbar.
When pressed longer:
Serves as the keyboard keys.Ctrl+Alt+Del
Provides a keyboard key function for specific
occasions.
Up/Down
Button increases the sound volume.
decreases the sound volume.
When Function Lock is on:
increases the LCD brightness.
decreases the LCD brightness.
Provides a keyboard key function for specific
occasions.
Microphone Receives sound and voice to record voice.
Windows Logo
Button
For Window : s 10
Opens or closes the Start menu.
For Window s 7:
Opens or closes the OSD Control Panel.
Provides a keyboard key function for specific
occasions.

11
Rear Components
Ref
Component Description
Tether Hole Stylus can be tethered to this hole.
Stylus/
Digitizer pen
Serves as the input device by t on the apping
touchscreen to make selections and enter
information.
Battery Pack
Cover
Inside are two battery packs.
Inside is the SIM card slot (optional).

12
Ref
Component Description
Camera Indicator
(optional)
Lights up when the camera lens beside it is in use.
Flash (optional) Provides extra light when taking pictures.
Camera Lens
(optional)
Allows you to use the camera function.
Speaker Sends out sound and voice from your Tablet PC.
Select models have one of the below components.
HDMI-in and
Smart Card
Reader Module
Connects an A/V device for audio and video inputs
through the HDMI interface.
Accepts a smart card for additional security feature.
Smart Card
Re ader
Accepts a smart card for additional security feature.
NFC/RFID
Reader
Reads data from NFC/ tags. RFID
Fingerprint
Scanner
Serves as the fingerprint verification, preventing
unauthorized access to your Tablet PC.
Left- Side Components
Ref
Component Description
Combo Audio
Connector
Connects a set of headphones or external speakers
with amplifier
Supports a headset microphone with 4-pole TRRS
3.5mm jack.
HDMI Connector
Connects a HDMI monitor or TV set.

13
Ref
Component Description
USB 3.0 Port
Connects flash a USB device, such as a USB disk,
printer, digital camera, joystick, and more.
Top Components
Ref
Component Description
None
Or can be one of the below components depending on your model:
Serial Port Connects a serial device.
MicroSD Card Slot
(inside the cover)
Accepts a microSD card for removable storage
media.
RJ- Connector 45
(inside the cover)
Connects the LAN cable.
USB 2.0 Port
(inside the cover)
Connects flash a USB device, such as a USB disk,
printer, digital camera, joystick, and more.
Barcode Reader
Lens
Scans and reads barcodes.

14
Bottom Components
Ref
Component Description
Power Connector
Connects the AC adapter.
Antenna P - ass
through
(optional)
Connects to the docking station for using external
GPS /WW antenna. AN/WLAN
Docking
Connector
C docking sonnects to the tation (available as an
option).
Kensington Lock Locks the to a station ry object for Tablet PC a
security.
WLAN
WWAN
GPS

15
Chapter 2
Operating Your
Tablet PC
This chapter provides information about the use of the Tablet PC.
If you are new to , reading this chapter will help you learn the computers
operating basics. If you are already a computer user, you may choose to read
only the parts containing information unique to your Tablet PC.
CAUTION:
Do not expose your skin to the when operating it in a very hot Tablet PC
or cold environment.
The Tablet PC can get uncomfortably warm when you use it in high
temperatures. circumstanceAs a safety precaution in such a , do not
place the Tablet PC on your lap or touch it with your bare hands for
extended periods of time. Prolonged body contact can cause discomfort
and potentially a burn.

16
Navigating on the Screen
The screen of your Tablet PC is touch . You can control the location -sensitive
of the pointer on the screen using the included stylus orcursor/ your finger to
communicate with the Tablet PC.
CAUTION: Do not use a sharp object such as a ballpoint pen or pencil on the
touchscreen. Doing so may damage the touchscreen surface. Use the included
stylus or your finger.
NOTE: An optical film has been attached to the screen before shipment. The
film is a consumable, which will be worn out by possible scratches. You can
purchase a new one when replacement is required.
Using the Touchscreen
Your Tablet PC has a c touchscreen. This type of touchscreen apacitive
responds to objects that have conductive properties, such as fingertips and a
capacitive- . tipped stylus
You can change the touchscreen sensitivity settings to suit your scenario.
Double-tap shortcut the Touch Screen Mode on Windows desktop to open
the settings menu and select one of the options (as shown below).
NOTE:
In high temperatures (above 60 oC / 140 °F), set the mode to Touch instead
of or mode. Glove Pen
If liquid is spilled on the touchscreen causing a wet area, the area will stop
responding to any inputs. For the area to function again, you must dry it.
Select this if you are using the
s
tylus. (You must use the one
supplied with your model.)
Select this if you are wearing gloves
(
referring to warm gloves or work gloves,
not
referring to touchscreen capable gloves).-
Select this if you prefer using
fingertips.
Also, select this
when raindrops are falling
on the screen and should be
rejected as input.
17
The following table shows how you use the touchscreen to obtain equiv alent
mouse functions.
Term/Action E quivalent
Mouse Function
Tap: T . ouch the screen once Click/Point
Double-tap: Touch the screen twice rapidly. Double- click
Tap and hold: Tap and hold until a popup menu
appears.
Right- click
Drag: Hold the stylus (or finger) on the screen and drag
across the screen your destination until reaching .
Drag
Using Multi-touch Gestures
You can interact with your Tablet PC by placing two fingers on the screen.
The movement of the fingers across the screen creates “gestures,” which
send commands to the Tablet PC.
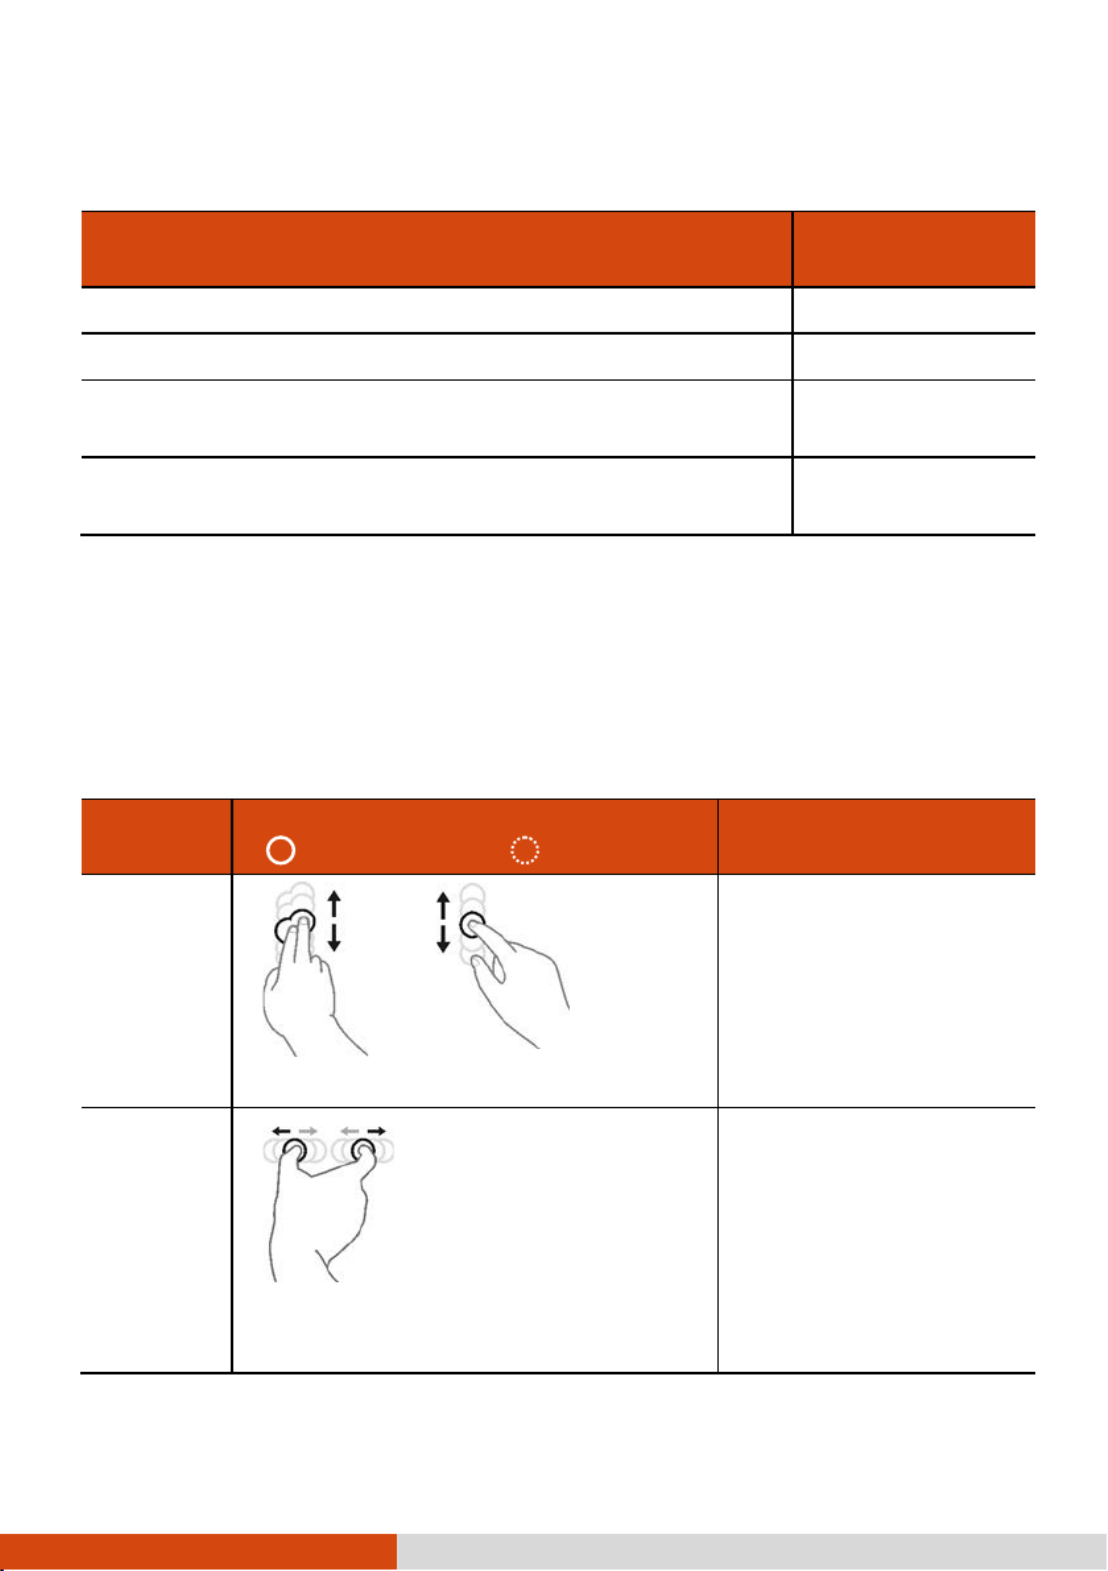
Here are the - multi touch gestures that you can use:
Gestures Actions
( = finger down; = finger up) Descriptions
Pan
(Scroll)
or
Drag 1 or 2 fingers up or down.
Use panning to see
another part of a page
that has scroll bars.
Zoom
(Pinch)
Move two fingers apart/toward each
other.
Use zooming to make
an item (a photo for
example) on the screen
larger or smaller. The
gesture works in
applications that
support mouse wheel
zooming.
18
Gestures Actions
( = finger down; = finger up) Descriptions
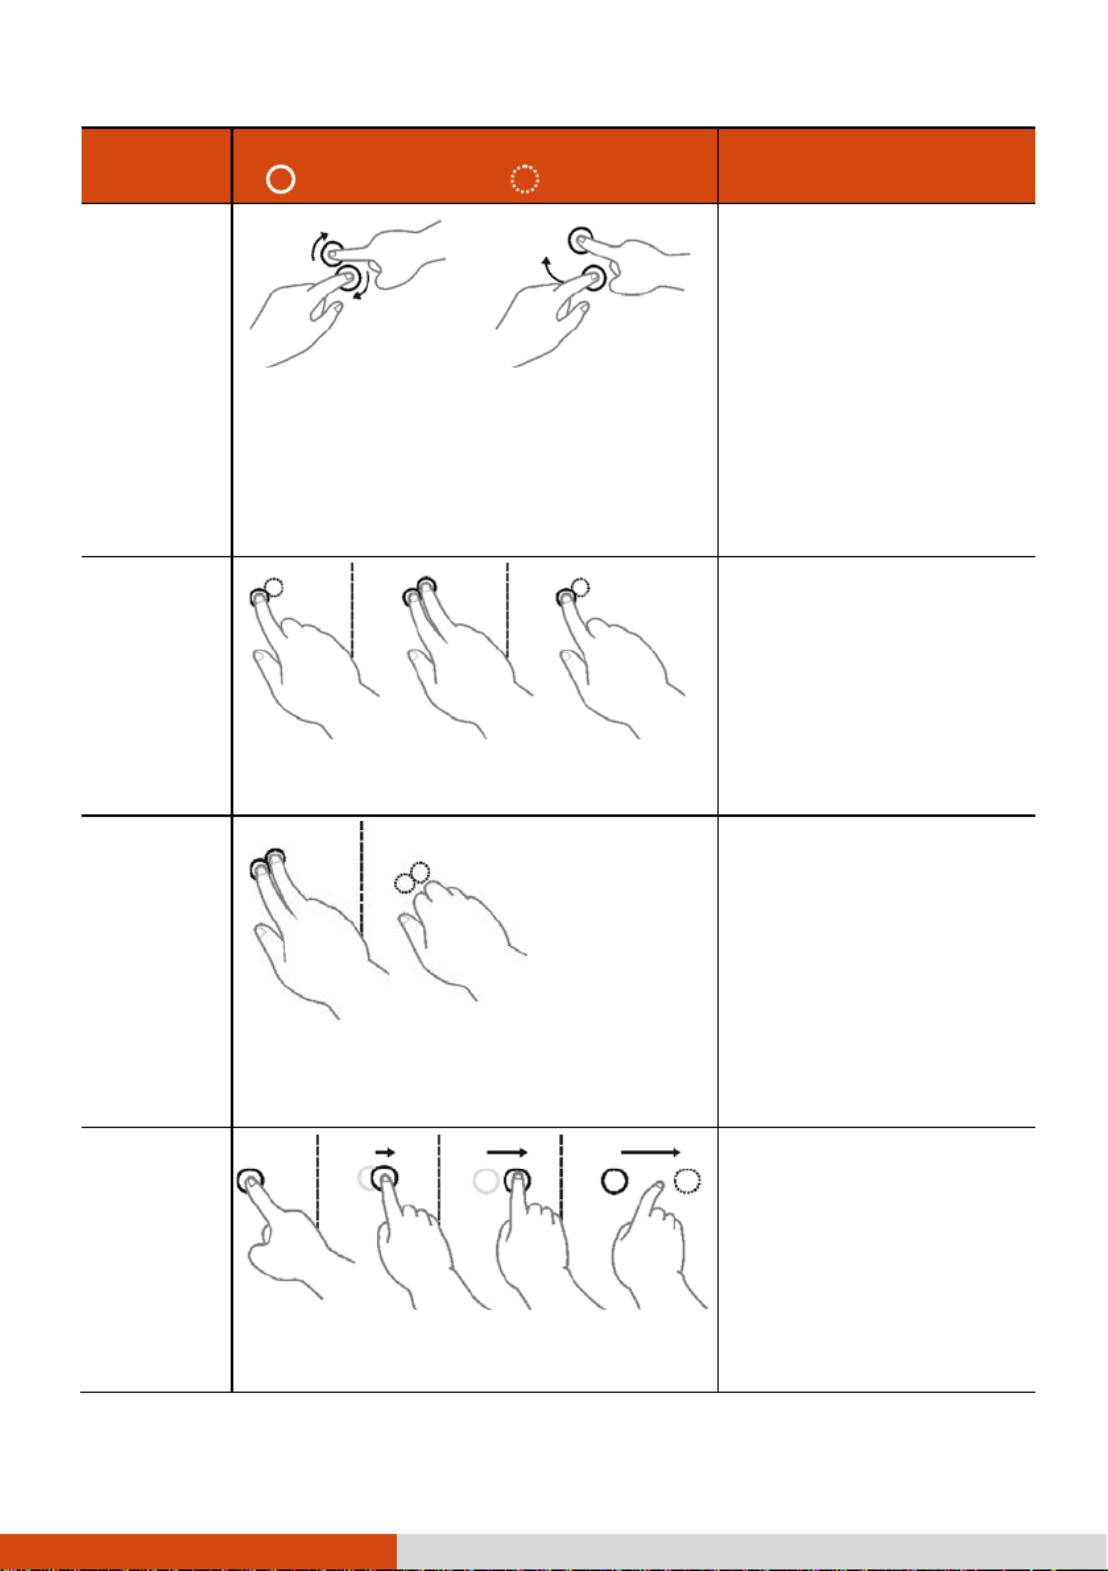
Rotate
or
Move two fingers in opposing
directions.
-or-
Use one finger to pivot around
another.
Use rotating to move a
picture or other item
on the screen in a
circular direction
(clockwise or counter-
clockwise). The gesture
works in applications
that support the
specific gesture.
Press and
T ap
Press on target and tap using a
second finger.
Use press and tap to
access the shortcut
menu.
Two-
finger
Tap
Tap two fingers at the same time
(where the target is in the midpoint
between the fingers).
The function is defined
by applications that
support the specific
gesture.
Flicks
Make quick drag gestures in the
desired direction.
Flick left or right to
navigate back and
forward in a browser
and other applications.
The gesture works in
most applications that
support back and
forward.

19
Using the Dual Mode Display (Optional)
Dual mode (if your model has the feature) incorporate display s both
touchscreen and digitizer functions.
The display set to n mode by default. Touchscreen mode is Touchscree
provides all the functionalities that an ordinary touchscreen has. When the
Tablet PC irece ves signals from the digitizer pen, the display automatically
switches to D igitizer mode.
You can move the cursor by bringing the digitizer pen close to the screen,
without actually touching the screen’s surface.
20
Using the Network Features
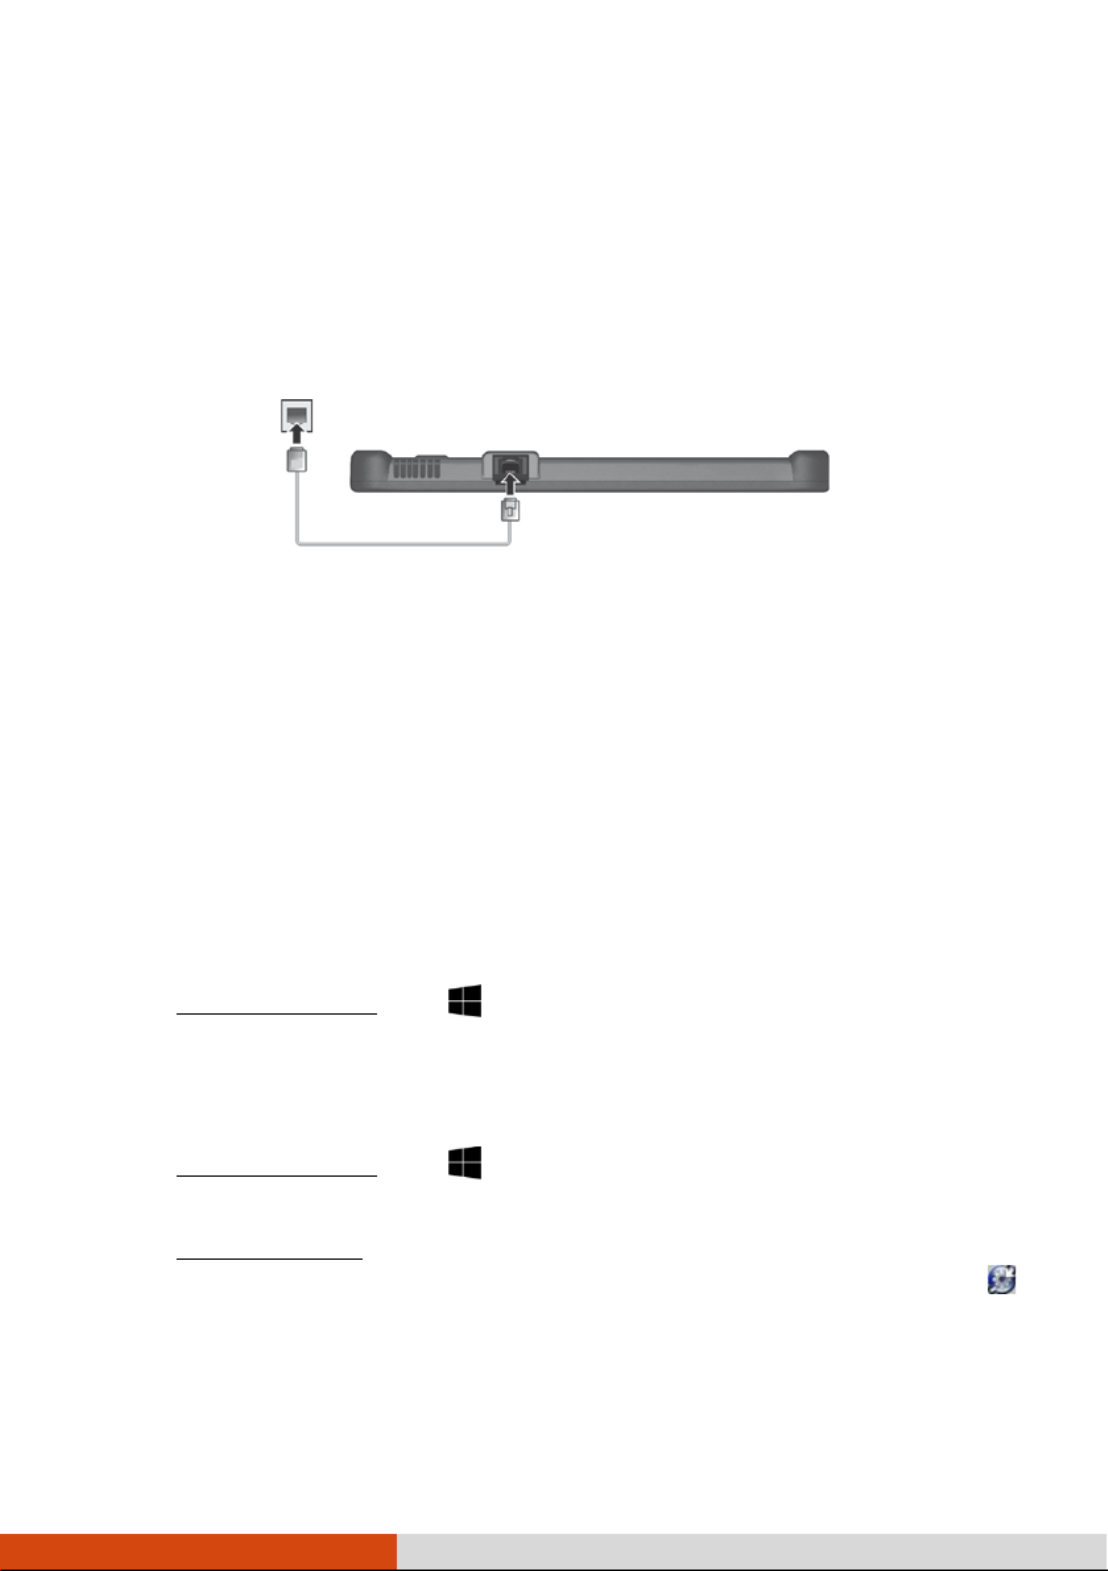
Using the LAN (Optional)
To connect the network cable to the LAN module (if your model has the
feature), connect one end of the LAN cable to the RJ on the - connector 45
Tablet PC and the other end to the network hub.
Using the WLAN
The WLAN (Wireless Local Area Network) module supports IEEE 802.11ac,
compatible with 802.11a/b/g /n.
Turning On /Off the WLAN Radio
To turn on the WLAN radio:
1. Make sure that the Airplane mode is switched off. You can control the
Airplane mode using one of the below methods.
• Use the button in the Airplane Mode OSD Control Panel.
• For Windows 10: Tap Settings Network & Internet
Airplane mode Airplane mode. Slide the switch to the Off position.
2. If you have previously turned off the WLAN radio, use one of the below
methods to turn it on.
• For Wi Network & Internet ndow Settingss 10: Tap .Wi-Fi
Slide the switch to the Wi-Fi On position.
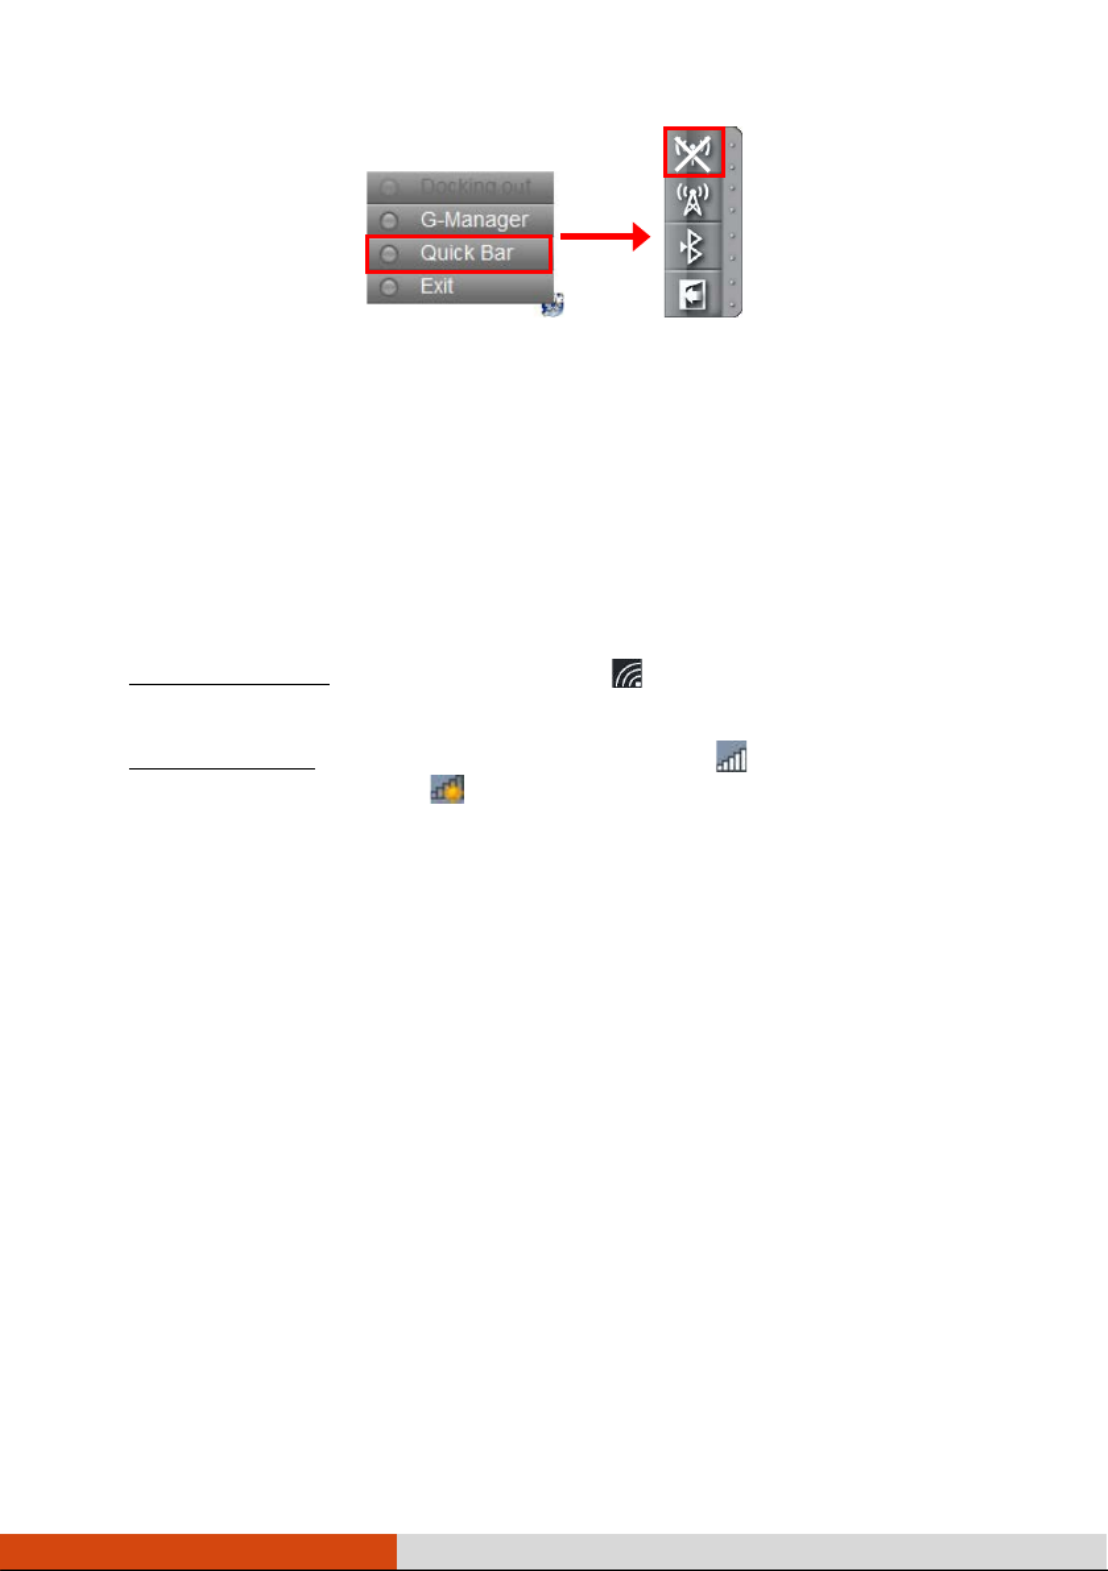
• For Windows 7: Use either Windows Mobility Center or Getac Quick
Bar. To open Getac Quick Bar, tap and hold the Getac Utility icon
on Windows taskbar and select Quick Bar. Tap the WLAN button in
the Quick Bar (an X over the button means the radio is currently off).
21
To turn off the WLAN radio:
You can turn off the WLAN radio the same way you turn it on.
If you want to quickly turn off all wireless radio, simply switch on Airplane
mode.
Connecting to a WLAN Network
1. Make sure that the WLAN function is enabled (as described above).
2. Tap For Windows 10: the network icon in the lower right of the task
bar.
For Windows 7: Tap the Wireless Network ico on the taskbar. (An n
orange light in the ico indicates connections are available.)n
3. In the list of available wireless networks, a network, and then tap tap
Connect.
4. Some networks require a network security key or passphrase. To connect
to one of those networks, ask your network administrator or Internet
service provider (ISP) for the security key or passphrase.
For more information on setting a wireless network , refer to connection
Windows online help.
NOTE: You can use Intel PROSet Wireless to take full advantage of the ®
Wi- . Fi capabilities of your blet PCTa See the Help of the utility for
instructions.

22
Using the BT Feature
T short-range between he BT technology allows wireless communications
devices without requiring a cable connection. Data can be transmitted through
walls, pockets and briefcases as long as two devices are within range.
Turning On/Off the BT Radio
To turn on the BT radio:
1. Make sure that the Airplane mode is switched off. You can control the
Airplane mode using one of the below methods.
• Use the button in the Airplane Mode OSD Control Panel.
• For Windows 10: Tap Settings Network & Internet
Airplane mode Airplane mode. Slide the switch to the Off position.
2. If you have previously turned off the BT radio, use one of the below
methods to turn it on.
• For Window Settingss 10: Tap Devices . BT Slide the BT
switch to the On position.
• For Windows 7: Use Getac Quick Bar. To open Getac Quick Bar, tap
and hold the Getac Utility icon on Windows taskbar and select
Quick Bar. Tap the BT button in the Quick Bar (an X over the button
means the radio is currently off).
To turn off the BT radio:
You can turn off the BT radio the same way you turn it on.
If you want to quickly turn off all wireless radio, simply switch on Airplane
mode.

23
Connecting to another BT Device
1. Make sure that the function is enabled (as described above).BT
2. Make sure that the target device is turned on, discoverable and BT
within close range. (See the documentation that came with the BT
device.)
3. For Windows 10: Settings Tap Devices . BT
For Windows 7: Tap and hold the BT icon on Windows taskbar . Tap Add
a Device.
4. Select the device you want to connect from the search results.
5. Depending on the type of BT device that you want to connect to, you
will need to enter the pertinent information.
For detailed information on using the BT feature, see Windows’ online Help.

24
Using the WWAN Feature
(Optional)
A ireless W A NWWAN (W ide rea etwork) uses mobile telecommunication
cellular network technologies to transfer data. The WWAN module of your
Tablet PC supports 3G and 4G LTE.
NOTE:
Your model only supports data transmission. Voice transmission is not
supported.
For instructions on installing the SIM card, see Installing the “ SIM Card
(Optional) and Battery Pack in Chapter 1.s”
Turning On/Off the WWAN Radio
To turn on the WWAN radio:
1. Make sure that the Airplane mode is switched off. You can control the
Airplane mode using one of the below methods.
• Use the button in the Airplane Mode OSD Control Panel.
• For Windows 10: Tap Settings Network & Internet
Airplane mode Airplane mode. Slide the switch to the Off position.
2. If you have previously turned off the WWAN radio, use one of the below
methods to turn it on.
• For Windows 10: Tap Settings Network & Internet
Airplane mode. Slide the Cellular switch to the On position.
• For Windows 7: Use the WWAN utility software or Getac Quick Bar.
To open Getac Quick Bar, tap and hold the Getac Utility icon on
Windows taskbar and select . Tap the button in the Quick Bar WWAN
Quick Bar (an X over the button means the radio is currently off).

25
To turn off the WWAN radio:
You can turn off the WWAN radio the same way you turn it on.
If you want to quickly turn off all wireless radio, simply switch on Airplane
mode.
Se tting up a WWAN Connection
1. Make sure that the SIM card is inserted and the WWAN function is
enabled (as described above).
2. S ). tart the WWAN utility software (Skylight
3. You need to configure the software to match your mobile network
operator.
Tap the button to open the User Options window.

26
4. elect S Firmware and pull down the list of mobile network operators.
5. From the list, s lect the name that matches your operator and firmware.e
• For the US region: EM/MC7355 firmware is required. The supported
operators include ATT, Bell, Roger, Sprint, Telus, . If your and Verizon
operator is not one of them, select Generic_US_7355 in the list.
• For the EMEA (Europe, the Middle East, and Africa) and APAC (Asia
Pacific) regions: EM/MC7305 firmware is required. The supported
operators include Orange, Swisscom, Telefonica, Telstra, and
Vodafone. If your operator is not one of them, select
Generic_EMEA_APAC_7305 in the list.
6. Se lect OK to start configuring mobile broadband device. A message bar
appears on the screen to show the progress. Wait till the configuration is
completed.
CAUTION: Do not perform other tasks or shut down the Tablet PC during
the configuration process.
7. After the , you WWAN connections. configuration can use For more
information, see the online help of the software.

27
Using the Fingerprint Scanner
(Optional)
WARNING:
We shall not be liable for any loss or damage whatsoever resulting from
your use of the fingerprint sca or neglect of fingerprint scannernner use,
or any data loss resulting from such developments as fingerprint
authentication malfunctioning.
It is not recommended that you use the fingerprint scanner in a below -
freezing temperature. The moisture on your finger can freeze to the
scanner’s metal surface when you touch it, resulting in a failed operation.
Besides, touching freezing metal with your finger can cause frostbite.
T he fingerprint scanner (if your model has the feature) provides a strong
authentication mechanism based on fingerprint recognition.
NOTE:
You can a fingerprint only after creating a password for the enroll
Windows user account.
The fingerprint logon process can take a while. This is because the
system has to check hardware devices and security configuration before
initiating the fingerprint scanner.

28
To enroll your fingerprint:
For Windows 10
1. Tap . Settings Accounts -Sign in options
2. On the right side under Fingerprint, tap Set up.
3. Follow the onscreen instructions to complete.
For Windows 7
1. Start BioExcess. Follow the wizard to enroll your fingerprints.
2. You can then use the fingerprint software to set up how the fingerprint
authentication works. detailed information, For click the Help button of
the software.
Help

29
Chapter 3
Managing Power
Your Tablet PC operates either on external AC power or on internal battery
power.
This chapter tells you how you can effectively manage power. To maintain
optimal battery performance, it is important that you use the battery in the
proper way.

30
AC Adapter
CAUTION:
The AC adapter is designed for use with your Tablet PC only. Connecting
the AC adapter to another device can damage the adapter.
The AC power cord supplied with your Tablet PC is for use in the country
where you purchased your Tablet PC. If you plan to go overseas with the
Tablet PC, consult your dealer for the appropriate power cord.
When you disconnect the AC adapter, disconnect from the electrical outlet
first and then from the Tablet PC. A reverse procedure may damage the
AC adapter or Tablet PC.
When unplugging the connector, always hold the plug head. Never pull
on the cord.
The AC adapter serves as a converter from (Alternating Current) to DCAC
(Direct Current) power because your Tablet PC runs on DC power, but an
electrical outlet usually provides AC power. It also charges the battery pack
when connected to AC power.
The adapter operates on any voltage in the range of 100~240 V AC.

31
Battery Pack
Your Tablet PC has two battery packs. The battery pack is the internal power
source for the Tablet PC. It is rechargeable using the AC adapter.
NOTE: Care and maintenance information for the battery is provided in the
“ Battery Pack Guidelines” section in Chapter 7.
Charging the Battery Pack
NOTE:
Charging will not start if the battery’s temperature is outside the
allowed range, which is between 0 °C ( C ( . Once 32 °F) and 50 °122 °F)
the battery s temperature meets the requirements, charging ’
automatically resumes.
During charging, do not disconnect the AC adapter before the battery
has been fully charged; otherwise you will get a prematurely charged
battery.
The battery has a high temperature protection mechanism which limits
the maximum charge of the battery to 80% of its total capacity n the i
event of temperature condition In such s, the battery high s. condition
will be regarded as fully charged at 80% capacity.
The battery level may automatically lessen due to the self-discharge
process (0.21% per day), even when the battery pack is fully charged
(100%). This happens no matter if the battery pack is installed in the
Tablet PC.
To charge the battery pack, connect the AC adapter to the and an Tablet PC
electrical outlet. The Battery Charge Indicator ( ) on the Tablet PC glows
amber to indicate that charging is in progress. You are advised to keep the
Tablet PC power off while the battery is being charged. When the battery is
fully charged, the Battery Charge Indicator glows green.
The two battery packs are charged in parallel. It takes approximately 5 hours
to fully charge the battery packtwo s when the power is off and approximately
6 power hours when the is on (may need a longer charging time at lower
temperatures).
CAUTION: After the Tablet PC has been fully recharged, do not immediately
disconnect and reconnect the AC adapter to charge it again. Doing so may
damage the battery.

32
Initializing the Battery Pack
You need to initialize a new battery pack before using it for the first time or
when the actual operating time of a battery pack is much less than expected.
Initializing is the process of fully charging, discharging, and then charging. It
can take several hours.
A software “ ” tool called Gauge Reset is provided for the purpose. Use the
G- Manager program and select the Battery tab to find the tool.
Checking the Battery Level
NOTE: Any battery level indication is an estimated result. The actual
operating time can be different from the estimated time, depending on
how you are using the Tablet PC.
The operating time of a fully charged battery pack depends on how you are
using the Tablet PC. When your applications often access peripherals, you
will experience a shorter operating time.
The two battery packs are discharged in parallel.
By Operating System
You can check the approximate battery level using the battery meter
function of the operating system. To read the battery level in Windows, tap
the battery icon on the taskbar.
By Gas Gauge
On the exterior side of the battery pack is a gas gauge for displaying the
estimated battery charg When the battery pack is not installed in the e.
Tablet PC and you want to know the battery charge, you can press the
push-button to see the number of LEDs that light up. Each LED represents
20% charge.
Push-button

33
Battery Low Signals and Actions
The battery icon changes appearance to display the current state of the
battery.
Battery Battery Icon
Level Description
Windows 10
Windows 7
Discharging The icon shows the charge remaining in
10-percent increments until the charge
reaches the low-battery level.
Low The battery charge has reached the low-
battery level.
Critically
low
The battery charge has reached the critical
battery level. By default, Windows will
display a notification and put your Tablet
PC into Hibernation.
When the battery is low, t ’s Battery Charge Indicator (he Tablet PC ) also
blinks red to alert you to take actions.
Always respond to by connecting the AC adapter,low-battery placing your
Tablet PC or in Hibernation mode, turning off the Tablet PC.
Replacing the Battery Pack
CAUTION:
There is danger of explosion if the battery is incorrectly replaced.
Replace the battery only with the Tablet PC manufacturer’s battery
packs. Discard used batteries according to the dealer’s instructions.
Do not attempt to disassemble the battery pack.
NOTE: You can hot swap one battery pack while the other one is supplying
the power.
To replace the battery pack, follow these steps:
1. Locate the battery cover. Slide the two small locks outward to the
unlocked position ( ) () and then release the latch ( () ) to open
the battery cover.

34
2. Pull the ribbon strip to lift the battery pack off the compartment.
3. Fit another battery pack into place. Note the orientation of the battery
pack. Hold the battery pack at an angle and insert its small tabs to the
corresponding notches in the battery compartment. Then, lift the yellow
protection sheet in the battery compartment and plug the battery
connector.
4. Hold the battery cover at an angle and insert the s small tabs to the cover’
corresponding notches on the Tablet PC; then close the cover. Press the
four small dots () so that the cover clicks into place. Engage the cover
latch ) (( ) and slide the two small locks inward to the locked
position ) (( ).

35

36
Power-Saving Tips
Aside from your Tablet PC’s power enabling saving mode, you can do your
part to maximize the battery’s operating time by following these
suggestions.
Do not disable Power Management.
Decrease the LCD brightness to the lowest comfortable level.
Shorten the length of time before Windows turn off the display.
When not using a connected device, disconnect it.
Turn off the wireless radio if you are not using the wireless module (such
as WLAN, BT WWAN). , or
Turn off the when you are not using it.Tablet PC

37
Chapter 4
Expanding Your
Tablet PC
You can expand the capabilities of your Tablet PC by connecting other
peripheral devices.
When using a device, be sure to read the instructions accompanying the
device together with the relevant section in this chapter.

38
Connecting a USB Device
Your has a port Tablet PC USB 3.0 for connecting USB devices, such as a
digital camera, scanner, printer, modem, and mouse. s a supportUSB 3.0
transfer rate up to 5 Gbit/s.
Select models have a second USB port, which supports USB 2.0 (transfer rate
is 480 MB/s).
To unlock the left side cover:-

40
Connecting an HDMI Display
Monitor
If you want the benefits of a larger display screen with higher resolution,
you can connect an external to your display monitor Tablet PC.
Your Tablet PC has an -HDMI connector. HDMI (High Definition Multimedia
Interface) is an audio/video interface that transmits uncompressed digital
data and therefore delivers true HD quality.
To switch the display output, use Windows Control Panel or OSD Control
Panel.
To unlock the left side cover:-

42
Using Smart Cards (Optional)
If your model has the smart card reader, you can use smart cards.
With an embedded microcontroller, smart cards have the unique ability to
store large amounts of data, carry out their own on card functions (e.g., -
encryption and mutual authentication), and interact intelligently with a
smart card reader.
To insert a smart : card
1. Locate the pen the cover.smart card reader. O
2. With facing the embedded computer chip front and near the slot, slide
the smart into card the slot.
3. Close the cover.
To remove a smart : card
1. Make sure that the is not accessing the smart cardsoftware .
2. O pen the cover.
3. Pull the card out of the slot.
4. Close the cover.
Chip on the other
side of the card.

44
Using the NFC/RFID Reader
(Optional)
If your model has the module, you can read data from NFC/RFID r eader NFC
(Near Field Communication) RFID (Radio Frequency Identification) and tags.
NOTE:
For enhanced applications and customization of the module, contact
your authorized Getac dealer.
The r requires NFC reade specialized applications. For further
information, ask system administrator.your
NFC/RFID
r
eader
Termékspecifikációk
| Márka: | Getac |
| Kategória: | tabletta |
| Modell: | F110 G3 |
Szüksége van segítségre?
Ha segítségre van szüksége Getac F110 G3, tegyen fel kérdést alább, és más felhasználók válaszolnak Önnek
Útmutatók tabletta Getac

23 Augusztus 2024
23 Augusztus 2024
23 Augusztus 2024
23 Augusztus 2024
23 Augusztus 2024
23 Augusztus 2024
23 Augusztus 2024
23 Augusztus 2024
23 Augusztus 2024
23 Augusztus 2024
Útmutatók tabletta
- tabletta Samsung
- tabletta Sony
- tabletta Fujitsu
- tabletta Acer
- tabletta LG
- tabletta Grundig
- tabletta Realme
- tabletta Philips
- tabletta Oregon Scientific
- tabletta Panasonic
- tabletta Nokia
- tabletta Lenovo
- tabletta Evolveo
- tabletta Toshiba
- tabletta HP
- tabletta Hyundai
- tabletta Hisense
- tabletta Apple
- tabletta Medion
- tabletta Motorola
- tabletta Alcatel
- tabletta TCL
- tabletta Zebra
- tabletta Xiaomi
- tabletta GoGen
- tabletta CAT
- tabletta Dell
- tabletta Cyrus
- tabletta Gigabyte
- tabletta Thomson
- tabletta Polaroid
- tabletta Aiwa
- tabletta Tesco
- tabletta Huawei
- tabletta Microsoft
- tabletta Asus
- tabletta Vtech
- tabletta PocketBook
- tabletta Haier
- tabletta Navitel
- tabletta Sencor
- tabletta AOC
- tabletta Telefunken
- tabletta Nevir
- tabletta Kobo
- tabletta Doro
- tabletta Logitech
- tabletta Viewsonic
- tabletta Denver
- tabletta Bush
- tabletta Trevi
- tabletta Aluratek
- tabletta Amazon
- tabletta MSI
- tabletta Tesla
- tabletta Energy Sistem
- tabletta Google
- tabletta Honor
- tabletta SPC
- tabletta Control4
- tabletta ZTE
- tabletta ESTAR
- tabletta Vodafone
- tabletta ModeCom
- tabletta Terratec
- tabletta Overmax
- tabletta OnePlus
- tabletta Archos
- tabletta Kogan
- tabletta Honeywell
- tabletta Intenso
- tabletta Prestigio
- tabletta Media-Tech
- tabletta Digiland
- tabletta Manta
- tabletta Blaupunkt
- tabletta IRiver
- tabletta Razer
- tabletta AKAI
- tabletta TechniSat
- tabletta Pyle
- tabletta Salora
- tabletta Lenco
- tabletta Maxell
- tabletta ECG
- tabletta Micromax
- tabletta Best Buy
- tabletta Vorago
- tabletta Newland
- tabletta GoClever
- tabletta Krüger&Matz
- tabletta Allview
- tabletta RCA
- tabletta Orion
- tabletta Creative
- tabletta ECS
- tabletta Adj
- tabletta Wacom
- tabletta Bluebird
- tabletta Packard Bell
- tabletta TechBite
- tabletta Majestic
- tabletta IGET
- tabletta Lava
- tabletta I.safe Mobile
- tabletta Vivitar
- tabletta Xiron
- tabletta Yarvik
- tabletta Lexibook
- tabletta Proscan
- tabletta Trekstor
- tabletta Sonim
- tabletta Gemini
- tabletta Easypix
- tabletta Konrow
- tabletta Cresta
- tabletta Brigmton
- tabletta Sunstech
- tabletta Sylvania
- tabletta Binatone
- tabletta Blackberry
- tabletta Audiosonic
- tabletta Exagerate
- tabletta Coby
- tabletta Bigben Interactive
- tabletta Wolder
- tabletta Audiovox
- tabletta Disgo
- tabletta Olivetti
- tabletta Pantech
- tabletta Laser
- tabletta Naxa
- tabletta RugGear
- tabletta Ricatech
- tabletta Hema
- tabletta Arnova
- tabletta Mpman
- tabletta Vizio
- tabletta Cello
- tabletta Logicom
- tabletta Ematic
- tabletta Hannspree
- tabletta Zagg
- tabletta Ingo
- tabletta Plum
- tabletta Difrnce
- tabletta Nextbook
- tabletta Memup
- tabletta Engel Axil
- tabletta BQ
- tabletta Butler
- tabletta Rand McNally
- tabletta Odys
- tabletta Dragon Touch
- tabletta Primux
- tabletta DEXP
- tabletta Eken
- tabletta Tom-tec
- tabletta Mediacom
- tabletta Xoro
- tabletta Billow
- tabletta Empire
- tabletta Woxter
- tabletta Storage Options
- tabletta Advantech
- tabletta Kurio
- tabletta Linx
- tabletta Ferguson
- tabletta Leap Frog
- tabletta I-onik
- tabletta Microtech
- tabletta Empire Electronix
- tabletta Vulcan
- tabletta Storex
- tabletta Skytex
- tabletta Electrovaya
- tabletta Durabook
- tabletta Mymaga
- tabletta Vinci
- tabletta Vizmo
- tabletta General Dynamics Itronix
- tabletta Xplore
- tabletta Lark
- tabletta Bookeen
- tabletta Elements
- tabletta I-Joy
- tabletta Hamlet
- tabletta Approx
- tabletta Leotec
- tabletta Bauhn
- tabletta ADS-TEC
- tabletta Nabi
- tabletta Barnes And Noble
- tabletta Sungale
- tabletta Aqprox
- tabletta Fossibot
- tabletta Hip Street
Legújabb útmutatók tabletta

9 Április 2025
3 Április 2025
1 Április 2025
1 Április 2025
1 Április 2025
1 Április 2025
1 Április 2025
31 Március 2025

30 Március 2025

30 Március 2025