Használati útmutató GE Profile CustomStyle PSI23NGRCV
GE
hűtőszekrény
Profile CustomStyle PSI23NGRCV
Olvassa el alább 📖 a magyar nyelvű használati útmutatót GE Profile CustomStyle PSI23NGRCV (132 oldal) a hűtőszekrény kategóriában. Ezt az útmutatót 2 ember találta hasznosnak és 2 felhasználó értékelte átlagosan 4.5 csillagra
Oldal 1/132

ge.com
Refrigerators
Profile Side by Side
200D8074P006 49-60414 11-05 JR
La section française commence à la page 46
La sección en español empieza en la página 88
Safety Instructions . . . . . . . . . . .2–4
Operating Instructions
Automatic Icemaker . . . . . . . . . . .14
Care and Cleaning . . . . . . . . . .16, 17
Crispers and Pans . . . . . . . . . . . . .13
CustomCool™ . . . . . . . . . . . . . . . .7, 8
Ice and Water Dispenser . . . . . . . .15
Refrigerator Doors . . . . . . . . . . . .12
Replacing the Light Bulbs . . . . . . .18
Shelves and Bins . . . . . . . . . . .10, 11
Temperature Controls . . . . . . . . . . .5
TurboCool™ . . . . . . . . . . . . . . . . . . .6
Water Filter . . . . . . . . . . . . . . . . . . .9
Installation Instructions
Installing the Refrigerator . . . .28–31
Moving the Refrigerator . . . . .24–27
Preparing to Install
the Refrigerator . . . . . . . . . . . . . . .23
Trim Kits and Panels . . . . . . . .19–22
Water Line Installation . . . . . .32–34
Troubleshooting Tips . . . . . . .36–38
Normal Operating Sounds . . . . . .35
Consumer Support
Consumer Support . . . . .Back Cover
Performance Data Sheet . . . . . . . .41
Product Registration . . . . . . . .43, 44
State of California Water
Treatment Device Certificate . . . . .42
Warranty (Canadian) . . . . . . . . . . .39
Warranty (U.S.) . . . . . . . . . . . . . . .40
Réfrigérateurs
Profile Côte à Côte
Refrigeradores
Profile Lado a Lado
Models 23, 25, 26, 27 and 29
Write the model and serial numbers here:
Model # __________________________
Serial # __________________________
Find these numbers on a label inside
the refrigerator compartment at the
top on the right side.
Owner’s Manual
and Installation
Manuel d’utilisation
et d’installation
Manual del propietario
e instalación

Consumer Support Troubleshooting Tips Operating Instructions Safety InstructionsInstallation Instructions
2
IMPORTANT SAFETY INFORMATION.
READ ALL INSTRUCTIONS BEFORE USING.
WARNING!
Use this appliance only for its intended purpose as described in this Owner’s Manual.
SAFETY PRECAUTIONS
When using electrical appliances, basic safety precautions should be followed, including the following:
■
■This refrigerator must be properly installed
and located in accordance with the Installation
Instructions before it is used.
■
■Do not allow children to climb, stand or hang
on the shelves in the refrigerator. They could
damage the refrigerator and seriously injure
themselves.
■
■Do not touch the cold surfaces in the freezer
compartment when hands are damp or wet. Skin
may stick to these extremely cold surfaces.
■
■Do not store or use gasoline or other flammable
vapors and liquids in the vicinity of this or any
other appliance.
■
■In refrigerators with automatic icemakers,
avoid contact with the moving parts of the
ejector mechanism, or with the heating element
located on the bottom of the icemaker. Do not
place fingers or hands on the automatic
icemaking mechanism while the refrigerator
is plugged in.
■
■Keep fingers out of the “pinch point” areas;
clearances between the doors and between
the doors and cabinet are necessarily small.
Be careful closing doors when children are
in the area.
■
■Unplug the refrigerator before cleaning and
making repairs.
NOTE: We strongly recommend that any servicing be
performed by a qualified individual.
■
■Setting either or both controls to 0 (off) does not
remove power to the light circuit.
■
■Do not refreeze frozen foods which have
thawed completely.
■
■Always clean the CustomCool™Tray after thawing
food.

Consumer SupportTroubleshooting TipsOperating Instructions
Safety Instructions Installation Instructions
ge.com
PROPER DISPOSAL OF THE REFRIGERATOR
Child entrapment and suffocation are not problems
of the past. Junked or abandoned refrigerators are
still dangerous…even if they will sit for “just a few
days.” If you are getting rid of your old refrigerator,
please follow the instructions below to help prevent
accidents.
Before You Throw Away Your Old Refrigerator
or Freezer:
■Take off the doors.
■Leave the shelves in place so that children may
not easily climb inside.
Refrigerants
All refrigeration products contain refrigerants,
which under federal law must be removed prior
to product disposal. If you are getting rid of an
old refrigeration product, check with the
company handling the disposal about what
to do.
USE OF EXTENSION CORDS
Because of potential safety hazards under certain conditions, we strongly recommend against the use
of an extension cord.
However, if you must use an extension cord, it is absolutely necessary that it be a UL-listed (in the United
States) or a CSA-listed (in Canada), 3-wire grounding type appliance extension cord having a grounding
type plug and outlet and that the electrical rating of the cord be 15 amperes (minimum) and 120 volts.
DANGER! RISK OF CHILD ENTRAPMENT
3
Consumer SupportTroubleshooting TipsOperating InstructionsSafety Instructions Installation Instructions
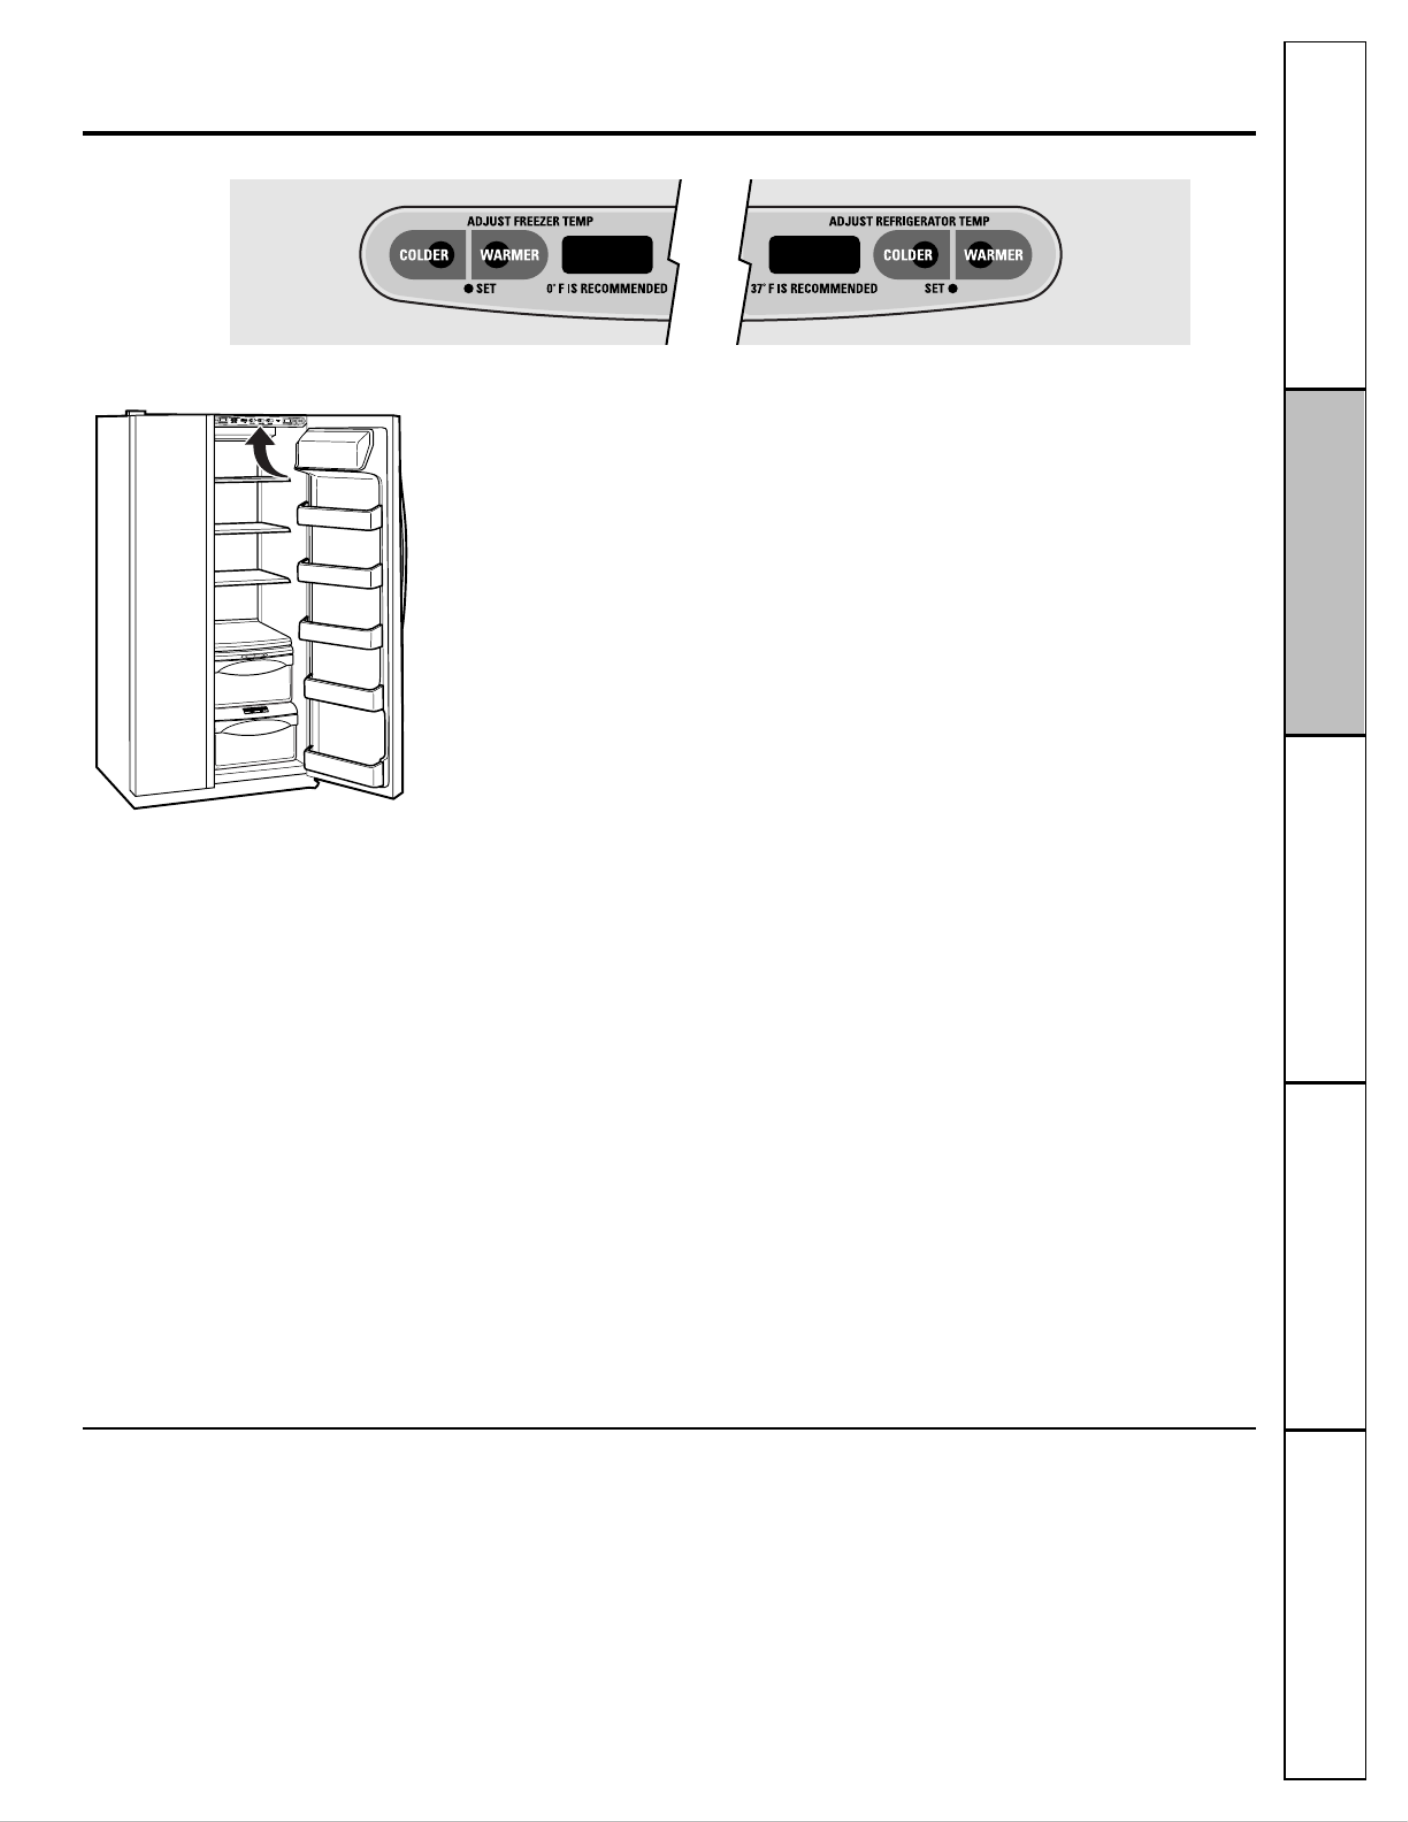
About the temperature controls. ge.com
The temperature controls are preset in the factory at for the37°F
refrigerator compartment and for the freezer compartment. Allow0°F
24 hours for the temperature to stabilize to the preset recommended
settings.
The temperature controls can display both the SET temperature
as well as the actual temperature in the refrigerator and freezer.
The actual temperature may vary slightly from the SET temperature
based on usage and operating environment.
Setting either or both controls to OFF stops cooling in both the freezer
and refrigerator compartments, but does not shut off electrical power
to the refrigerator.
NOTE: The refrigerator is shipped with protective film covering the
temperature controls. If this film was not removed during installation,
remove it now.
The Performance Air-Flow System is designed to
maximize temperature control in the refrigerator
and freezer compartments. This unique special
feature consists of the Air Tower along the back
wall of the refrigerator and the Air Tunnel on the
bottom portion of the freezer rear wall. Placing food
in front of the louvers on these components will not
affect performance. Although the Air Tower and
the Air Tunnel can be removed, doing so will affect
temperature performance. (For removal
instructions, on-line, 24 hours a day, contact us at
ge.com or call 800.GE.CARES. In Canada, contact
us at geappliances.ca or call 1.800.361.3400.)
Performance Air Flow System
To change the temperature, press and release the
WARMER COLDERor pad. The SET light will come
on and the display will show the set temperature.
To change the temperature, tap either the
WARMER COLDERor pad until the desired
temperature is displayed. Refrigerator temperatures
can be adjusted between 34°F and 44°F and the
freezer temperatures can be adjusted between
–6°F and +6°F.
Once the desired temperature has been set,
the temperature display will return to the actual
refrigerator and freezer temperatures after 5
seconds. Several adjustments may be required.
Each time you adjust controls, allow 24 hours for the
refrigerator to reach the temperature you have set.
To turn the cooling system off, tap the WARMER pad
for either the refrigerator or the freezer until the
display shows OFF. To turn the unit back on, press the
COLDER pad for either the refrigerator or freezer.
The SET light will illuminate on the side you
selected. Then press the COLDER pad again (on the
side where the SET light is illuminated) and it will
go to the preset points of 0°F for the freezer and
37°F for the refrigerator. Setting either or both
controls to stops cooling in both the freezerOFF
and refrigerator compartments, but does not shut
off electrical power to the refrigerator.
5

6
About TurboCool.
™
How it Works
TurboCool™rapidly cools the refrigerator
compartment in order to more quickly
cool foods. Use TurboCool when adding a
large amount of food to the refrigerator
compartment, putting away foods after they
have been sitting out at room temperature
or when putting away warm leftovers. It can
also be used if the refrigerator has been
without power for an extended period.
Once activated, the compressor will turn on
immediately and the fans will cycle on and
off at high speed as needed for eight hours.
The compressor will continue to run until
the refrigerator compartment cools to
approximately 34°F (1°C), then it will cycle
on and off to maintain this setting. After
8 hours, or if TurboCool is pressed again,
the refrigerator compartment will return
to the original setting.
How to Use
Press TurboCool. The refrigerator
temperature display will show TC.
After TurboCool is complete, the refrigerator
compartment will return to the original
setting.
NOTES:
The refrigerator temperature cannot be changed
during TurboCool.
The freezer temperature is not affected during
TurboCool.
When opening the refrigerator door during
TurboCool, the fans will continue to run if they
have cycled on.
Consumer Support Troubleshooting Tips Operating Instructions Safety InstructionsInstallation Instructions
About ClimateKeeper2.™
How it Works
The new ClimateKeeper2™is the industry’s
most advanced refrigeration system,
delivering optimum temperature and
humidity performance to keep food garden
fresh longer and reduce freezer burn, while
maintaining E star-level efficiency.
The new ClimateKeeper2 system features
two evaporators—one for the refrigerator
and one for the freezer.
This provides two separate cooling systems
for the entire unit, and separates the
airflow between the fresh food and freezer
sections during normal cooling operations.*
This ensures that the humidity levels in the
fresh food section are significantly higher
than in a conventional system,** allowing
fresh produce and other unsealed foods to
retain their moisture content and freshness
longer. Moisture sensitive foods such as
fresh fruit, salads, rice, etc., can now be
stored on open shelves without excessive
moisture loss. Due to the higher humidity
in the refrigerator, you may on occasion
experience fog or small amounts of
moisture in the refrigerator compartment.
This is normal and may come and go as
different food loads and environmental
conditions change. Wipe dry with a paper
towel if desired.
The separate airflow system minimizes
the mixing of air between the two
compartments, which reduces odor
transfer to improve the taste of ice.
The ClimateKeeper2 system also reduces
the number of defrosting cycles in the
freezer evaporator, thereby reducing
freezer burn.
*Freezer air is used in the CustomCool feature.
**Testing shows a higher level of humidity in
the Fresh Food section in ClimateKeeper2
refrigerators versus conventional units.

7
Empty the pan. Place the Chill/Thaw
tray in the pan. Place the items on the
tray and close the pan completely.
Select the ExpressThaw,
™ExpressChill™
or SelectTemp™pad. The display and
SET light will come on. Tap the pad
until the light appears next to the
desired setting. Use the chart to
determine the best setting to use.
■To stop a feature before it is
finished, tap that feature’s pad
until no options are selected and
the display is off.
■During ExpressThaw and
ExpressChill,the display on the
controls will count down the time
in the cycle.
■After the cycle isExpressThaw
complete, the pan will reset to the
MEAT setting (32°F) to help preserve
thawed items until they are used.
■The displayed actual temperature of
the CustomCool pan may vary slightly
from the temperature based onSET
usage and operating environment.
NOTE: For food safety reasons, it is recommended
that foods be wrapped in plastic wrap when using
ExpressThaw. This will help contain meat juices
and improve thawing performance.
About CustomCool
™
.ge.com
The CustomCool™feature is a system of
dampers, a fan, a temperature thermistor
and a heater. Depending on the function
selected, a combination of these will be
used to quickly chill items, thaw items or
hold the pan at a specific temperature.
The pan is tightly sealed to prevent the pan’s
temperature from causing temperature
fluctuations in the rest of the refrigerator.
Some CustomCool models feature a beverage
center. It is designed to store beverages at
colder temperatures. Select the Beverage
Center pad if you like to keep extra-chilled
refreshments on hand.
The controls for this pan are located at the
top of the refrigerator with the temperature
controls.
How to Use
How it Works
ExpressThaw™
To remove:
Pull the drawer out to the stop position.
Rotate all four swing locks to the unlock
position.
Lift the front of the drawer up and out.
To replace:
Make sure all four swing locks are in the
unlock position.
Place the sides of the drawer into the
drawer supports, making sure the swing
locks fit on the drawer slots.
Lock all four swing locks by rotating
them to the lock position.
How to Remove and Replace the Drawer
ExpressChill™
Consumer SupportTroubleshooting TipsOperating InstructionsSafety Instructions Installation Instructions

8
About CustomCool
™
.
CustomCool™Chart
NOTE: Results may vary depending on packaging, starting temperature and other food traits.
0.5 Lb. (4 hours)
■Hamburger Patties (0.5 lb)
■Individually Wrapped
Filet Mignon (0.5 lb)
1.0 Lb. (6 hours)
■Chicken Breasts (1.0 lb)
■Ground Beef (1.0 lb)
■Steak (1.0 lb)
2.0 Lbs. (10 hours)
■Chicken Breasts (2.0 lbs)
■Ground Beef (2.0 lbs)
■Steak (2.0 lbs)
3.0 Lbs. (12 hours)
■Chicken Breasts (3.0 lbs)
■Ground Beef (3.0 lbs)
■Steak (3.0 lbs)
15 Minutes
■1 Beverage Can (12 oz)
■2 Small Juice Boxes (6–8 oz each)
30 Minutes
■2 to 6 Beverage Cans (12 oz each)
■2 Plastic 20 oz Bottles of Beverage
■4 to 6 Small Juice Boxes
(6–8 oz each)
■3 Foil Juice Packets
■Wine (750 ml bottle)
45 Minutes
■2 Liter of Beverage
■1/2 Gallon of Juice
■Gelatin–1 package
Citrus Setting (43°F)
■Oranges, Lemons, Limes,
Pineapple, Cantaloupe
■Beans, Cucumbers, Tomatoes,
Peppers, Eggplant, Squash
Produce Setting (35°F)
■Strawberries, Raspberries, Kiwifruit,
Pears, Cherries, Blackberries,
Grapes, Plums, Nectarines, Apples
■Asparagus, Broccoli, Corn,
Mushrooms, Spinach, Cauliflower,
Kale, Green Onion, Beets, Onions
Meat Setting (32°F)
■Raw Meat, Fish and Poultry
Consumer Support Troubleshooting Tips Operating Instructions Safety InstructionsInstallation Instructions
Select the pad. The setBeverage Center
light will come on and the feature will
operate as required.
To turn off the feature, press Beverage
Center pad and set light will turn off.
NOTE: Unless turned off as above, feature will
remain active for six months. Press the Beverage
Center pad to restart.
How to Use
To remove:
Remove dairy bin first. Holding the
bottom of the dairy bin, lift the front
straight up, then lift up and out.
Holding left and right side of beverage
center, lift straight up and out.
Leave adapter in place.
To replace:
Engage backside of beverage center in
molded supports on adapter. Then
push down on the sides of the beverage
center. The beverage center will lock
into place.
Replace dairy bin.
How to Remove and Replace the Beverage Center
Dairy Bin
Adapter
Beverage
Center

About the water filter. (on some models) ge.com
9
Water Filter Cartridge
The water filter cartridge is located in the
back upper right corner of the refrigerator
compartment.
When to Replace the Filter
There is a replacement indicator light for
the water filter cartridge on the dispenser.
This light will turn orange to tell you that
you need to replace the filter soon.
The filter cartridge should be replaced
when the replacement indicator light turns
red or if the flow of water to the dispenser
or icemaker decreases.
Installing the Filter Cartridge
If you are replacing the cartridge, first
remove the old one by slowly turning
it to the left. Do not pull down on the
cartridge. A small amount of water may
drip down.
Fill the replacement cartridge with
water from the tap to allow for better
flow from the dispenser immediately
after installation.
Lining up the arrow on the cartridge
and the cartridge holder, place the
top of the new cartridge up inside
the holder. push it up into Do not
the holder.
Slowly turn it to the right until the filter
cartridge stops. DO NOT OVERTIGHTEN.
As you turn the cartridge, it will
automatically raise itself into position.
Cartridge will rotate about 1/4 turn.
Run water from the dispenser for
3 minutes (about 11⁄2gallons) to clear
the system and prevent sputtering.
Press and hold the RESET WATER FILTER
pad on the dispenser for 3 seconds.
NOTE: A newly-installed water filter cartridge may
cause water to spurt from the dispenser.
Filter Bypass Plug
You must use the filter bypass plug
when a replacement filter cartridge is not
available. The dispenser and the icemaker
will not operate without the filter or filter
bypass plug.
Replacement Filters:
To order additional filter cartridges
in the United States, visit our Website,
ge.com, or call GE Parts and Accessories,
800.626.2002.
GWF
Suggested Retail $34.95 USD
Customers in Canada should consult
the yellow pages for the nearest Camco
Service Center.
Place the top of the cartridge up
inside the cartridge holder and
slowly turn it to the right.
Filter Bypass Plug
Cartridge
Holder
Consumer SupportTroubleshooting TipsOperating InstructionsSafety Instructions Installation Instructions

Consumer Support Troubleshooting Tips Operating Instructions Safety InstructionsInstallation Instructions
10
About the shelves and bins.
Refrigerator Door Bins and Freezer Door Tilt-Out Bins
Large Bins
The larger refrigerator door bins and
freezer tilt-out door bins are adjustable.
To remove: Lift the front of the bin straight
up, then lift up and out.
To replace or relocate: Engage the back side
of the bin in the molded supports on the
door. Then push down on the front of the
bin. Bin will lock in place.
Small Bins
To remove: Lift the front of the bin straight
up then out.
To replace: Position the bin above the
rectangular molded supports on the door.
Then slide the bin down onto the support
to lock it in place.
The snugger helps prevent tipping, spilling
or sliding of small items stored on the door
shelf. Place a finger on either side of the
snugger near the rear and move it back
and forth to fit your needs.
Not all features are on all models.
Refrigerator bin
Freezer tilt-out bin
Snugger
QuickSpace™Shelf
This shelf splits in half and slides under
itself for storage of tall items on the shelf
below.
This shelf can be removed and replaced
or relocated just like Slide-Out Spillproof
Shelves.
On some models, this shelf cannot be used
in the lowest position.
Slide-Out Spillproof Shelf
The slide-out spillproof shelf allows you
to reach items stored behind others. The
special edges are designed to help prevent
spills from dripping to lower shelves.
To remove:
Slide the shelf out until it reaches the stop,
then press down on the tab and slide the
shelf straight out.
To replace or relocate:
Line the shelf up with the supports and
slide it into place. The shelf can be
repositioned when the door is at 90° or
more. To reposition the shelf, slide the shelf
past the stops and angle downward. Slide
shelf down to the desired position, line up
with the supports and slide into place.
Make sure you push the shelves all the way back
in before you close the door.
Press tab and pull shelf forward
to remove
Top freezer bin
Do not block CAUTION:
Be careful when
placing items in the
top bin. Make sure
that items do not
block or fall into
the ice chute.
Top freezer bin (on some models)
Do not block
CAUTION:
Part must be in
place as shown
for proper ice
dispensing. Food
cannot be stored
in this location.

Consumer Support Troubleshooting Tips Operating Instructions Safety InstructionsInstallation Instructions
12
About the refrigerator doors.
Refrigerator Doors
The refrigerator doors may feel different
than the ones you are used to. The special
door opening/closing feature makes sure
the doors close all the way and are securely
sealed.
When opening and closing the door you
will notice a stop position. If the door is
opened past this point, the door willstop
remain open to allow you to load and
unload food more easily. When the door
is only partially open, it will automatically
close.
The resistance you feel at the stop
position will be reduced as the door
is loaded with food.
When the door is only partially open,
it will automatically close.
Beyond this the door will stay open.stop
Door Alignment
If doors are uneven, adjust the refrigerator
door.
Using a 7/16″wrench, turn the door
adjusting screw to the right to raise the
door, to the left to lower it. (A nylon
plug, imbedded in the threads of the
pin, prevents the pin from turning
unless a wrench is used.)
After one or two turns of the wrench,
open and close the refrigerator door
and check the alignment at the top of
the doors.
7/16 Wrench″
Raise

About the crispers and pans. ge.com
13
About crisper removal.
Not all features are on all models.
Crisper Removal
Crispers can easily be removed by pulling
the drawer straight out and lifting the
drawer up and over the stop location.
If the door prevents you from taking out
the drawers, first try to remove the door
bins. If this does not offer enough
clearance, the refrigerator will need to
be rolled forward until the door opens
enough to slide the drawers out. In some
cases, when you roll the refrigerator out,
you will need to move the refrigerator
to the left or right as you roll it out.
Not all features are on all models.
Fruit and Vegetable Crispers
Excess water that may accumulate in the
bottom of the drawers should be wiped dry.
On some models, the bottom drawer has
full extension slides that allow full access
to the drawer.
Adjustable Humidity Crispers
Slide the control all the way to the HI setting
to provide high humidity recommended for
most vegetables.
Slide the control all the way to the LO
setting to provide lower humidity levels
recommended for most fruits.
H I L O
Convertible Deli Pan
The convertible deli pan has its own cold
air duct to allow a stream of cold air from
the freezer compartment or fresh food
compartment to flow to the pan.
The variable temperature control regulates
the air flow from the Climate Keeper.
Set the control to the coldest setting to
store fresh meats.
Set the control to cold to convert the pan
to normal refrigerator temperature and
provide extra vegetable storage space. The
cold air duct is turned off. Variable settings
between these extremes can be selected.
C
O
L
D
C
O
L
D
E
S
T
Consumer SupportTroubleshooting TipsOperating Instructions
Safety Instructions Installation Instructions

About the automatic icemaker.
Consumer Support Troubleshooting Tips Operating Instructions Safety InstructionsInstallation Instructions
14
Automatic Icemaker
The icemaker will produce seven cubes
per cycle—approximately 100–130 cubes
in a 24-hour period, depending on freezer
compartment temperature, room
temperature, number of door openings
and other use conditions.
If the refrigerator is operated before the
water connection is made to the icemaker,
set the power switch in the O (off) position.
When the refrigerator has been connected
to the water supply, set the power switch to
the position.l (on)
The icemaker will fill with water when it
cools to 15°F (–10°C). A newly installed
refrigerator may take 12 to 24 hours to begin
making ice cubes.
You will hear a buzzing sound each time
the icemaker fills with water.
Throw away the first few batches of ice to
allow the water line to clear.
Be sure nothing interferes with the sweep
of the feeler arm.
When the bin fills to the level of the feeler
arm, the icemaker will stop producing
ice. It is normal for several cubes to be
joined together.
If ice is not used frequently, old ice cubes
will become cloudy, taste stale and shrink.
Special note about dispenser models:
■Dispenser models have a tilt-out ice bin.
The bin can be tilted out as shown in the
illustrations, and it will hold itself up
while you take ice out or turn the
icemaker power switch on and off. Be
sure to put the bin back in place before
closing the door.
■To restore your ice level from an empty
bucket stage, the following steps are
recommended:
12 hours after the first batch of ice
has fallen into the bin, dispense
3 to 4 cubes.
After an additional 6 hours, dispense
3 to 4 cubes again.
These steps will restore your ice level
in the shortest amount of time.
NOTE: In homes with lower-than-average water
pressure, you may hear the icemaker cycle multiple
times when making one batch of ice.
A newly installed refrigerator may take 12 to 24 hours to begin making ice.
Lift the bin, then pull it
forward until the bin stops.
Removing Ice Bin (dispenser models)
CAUTION: The ice bin is heavy when full.
Set the power switch to the O (off) position
before removing the bin.
When replacing the bin, be sure to press it
firmly into place. If it does not go all the
way back, remove it and rotate the drive
mechanism 1/4 turn. Then push the bin
back again.
Icemaker
Feeler Arm
Power
Switch
Green
Power Light
Lower the bin to access ice
or reach the power switch.
NOTE: In order to take full advantage
of the tilt-out ice bin, only store items
on the shelf below the ice bin that
are no taller than the lowest point
on the bin.
On dispenser models,
to access ice or reach
the power switch:
Lift the bin, then pull it
forward until the bin stops.
Lift and pull forward again
to remove the bin.
Rotate
Drive
Mechanism
Dispenser Models only

Consumer Support Troubleshooting Tips Operating Instructions Safety InstructionsInstallation Instructions
16
Cleaning the Outside
The dispenser drip area, beneath the grille,
should be wiped dry. Water left in this area
may leave deposits. Remove the deposits by
adding undiluted vinegar to the well. Soak
until the deposits disappear or become
loose enough to rinse away.
The dispenser cradle. Before cleaning, lock
the dispenser by pressing and holding the
LOCK CONTROL pad for 3 seconds. Clean
with warm water and baking soda
solution—about a tablespoon (15 ml) of
baking soda to a quart (1 liter) of water.
Rinse thoroughly and wipe dry.
The door handles and trim. Clean with
a cloth dampened with soapy water.
Dry with a soft cloth.
The stainless steel panels and door handles
(on some models) can be cleaned with
a commercially available stainless steel
cleaner. A spray-on stainless steel cleaner
works best.
Do not use appliance wax or polish
on the stainless steel.
Keep the outside clean. Wipe with a clean
cloth lightly dampened with kitchen
appliance wax or mild liquid dish detergent.
Dry and polish with a clean, soft cloth.
Do not wipe the refrigerator with a soiled dish
cloth or wet towel. These may leave a residue
that can erode the paint. Do not use scouring
pads, powdered cleaners, bleach or cleaners
containing bleach because these products can
scratch and weaken the paint finish.
Cleaning the Inside
To help prevent odors, leave an open box of
baking soda in the fresh food and freezer
compartments.
Unplug the refrigerator before cleaning. If this
is not practical, wring excess moisture out
of sponge or cloth when cleaning around
switches, lights or controls.
Use warm water and baking soda solution—
about a tablespoon (15 ml) of baking soda
to a quart (1 liter) of water. This both
cleans and neutralizes odors. Rinse and
wipe dry.
Use of any cleaning solution other than that
which is recommended, especially those that
contain petroleum distillates, can crack or
damage the interior of the refrigerator.
Avoid cleaning cold glass shelves with hot water
because the extreme temperature difference
may cause them to break. Handle glass shelves
carefully. Bumping tempered glass can cause
it to shatter.
Do not wash any plastic refrigerator parts
in the dishwasher.
The chill/thaw tray is dishwasher safe.
Dispenser drip area.
Care and cleaning of the refrigerator.

17
For long vacations or absences, remove
food and unplug the refrigerator. Clean the
interior with a baking soda solution of one
tablespoon (15 ml) of baking soda to one
quart (1 liter) of water. Leave the doors
open.
Set the icemaker power switch to the O (off)
position and shut off the water supply to
the refrigerator.
If the temperature can drop below freezing,
have a qualified servicer drain the water
supply system to prevent serious property
damage due to flooding.
ge.com
Behind the Refrigerator
Be careful when moving the refrigerator
away from the wall. All types of floor
coverings can be damaged, particularly
cushioned coverings and those with
embossed surfaces.
Pull the refrigerator straight out and return
it to position by pushing it straight in.
Moving the refrigerator in a side direction
may result in damage to the floor covering
or refrigerator.
When pushing the refrigerator back, make sure
you don’t roll over the power cord or icemaker
supply line.
Preparing for Vacation
Preparing to Move
Secure all loose items such as shelves and
drawers by taping them securely in place
to prevent damage.
When using a hand truck to move the
refrigerator, do not rest the front or back
of the refrigerator against the hand truck.
This could damage the refrigerator. Handle
only from the sides of the refrigerator.
Be sure the refrigerator stays in an upright
position during moving.
Consumer SupportTroubleshooting TipsOperating Instructions
Safety Instructions Installation Instructions

Consumer Support Troubleshooting Tips Operating Instructions Safety InstructionsInstallation Instructions
18
Replacing the light bulbs.
Setting the controls to does not remove power to the light circuit.OFF
Reveal®appliance bulbs are used on some models. They can be identified by their blue color when they
are not illuminated.
Not all features are on all models.
Refrigerator Compartment—Upper Light
Unplug the refrigerator.
The bulbs are located at the top of the
compartment, inside the light shield.
On some models, a screw at the front of
the light shield will have to be removed.
On other models, the screw is located
in the pocket located at the back of the
light shield.
To remove the light shield, on some
models, press in on the tabs on the
sides of the shield and slide forward
and out. On other models, just slide
the shield forward and out.
After replacing the bulb with an
appliance bulb of the same or lower
wattage, replace the light shield and
screws (on some models). When
replacing the light shield, make sure
that the tabs at the back of the shield
fit into the slots at the back of the light
shield housing.
Plug the refrigerator back in.
Refrigerator Compartment—Lower Light
This light is located above the top drawer.
Unplug the refrigerator.
Remove the convertible meat drawer
control knob by pulling straight out.
Lift the light shield up and pull it out.
After replacing the bulb with an
appliance bulb of the same or lower
wattage, replace the shield and
the knob.
Plug the refrigerator back in.
Freezer Compartment
Unplug the refrigerator.
Remove the shelf just above the light
shield. (The shelf will be easier to
remove if it is emptied first.) On some
models, a screw at the top of the light
shield will need to be removed.
To remove the light shield, press in
on the sides, and lift up and out.
Replace the bulb with an appliance
bulb of the same or lower wattage,
and reinstall the light shield. When
reinstalling the light shield, make
sure the top tabs snap securely
into place. Replace the screw
(on some models).
Reinstall the shelf and plug the
refrigerator back in.
C
O
L
D
C
O
L
D
E
S
T
Dispenser (on some models)
Unplug the refrigerator.
The bulb is located on the dispenser
under the control panel.
Remove the light bulb by turning
it counterclockwise.
Replace the bulb with a bulb of the
same size and wattage.
Plug the refrigerator back in.
Tabs
Pocket
OR
Your light shield will look like
one of the following:

Consumer Support Troubleshooting Tips Operating Instructions Safety InstructionsInstallation Instructions
20
Trim kits and decorator panels.
Freezer Panel
Without Dispenser
Freezer Panel
With Dispenser Fresh Food Panel
Cutout
5/16″
(8 mm)
1415
⁄32″
(36.8 cm)
67
9⁄32″
(170.9 cm)
1/8″ (3 mm)
FRONT
177⁄8″
(45.4 cm)
1415⁄32″
(36.8 cm)
335⁄
8″
(85.4 cm)
FRONT
679⁄32″
(170.9 cm)
1915
⁄32″
(49.5 cm)
FRONT
23‘ Dimensions for Custom Wood Panels
The areas at the top of the panels need to be cut out of the panels.
25‘
CustomStyle
™
Dimensions for Custom Wood Panels
The areas at the top of the panels need to be cut out of the panels.
Cutout 1/8″ (3 mm) Cutout
1/8″ (3 mm)
5/16″
(8 mm)
5/16″
(8 mm)
Freezer Panel
Without Dispenser
Freezer Panel
With Dispenser Fresh Food Panel
Cutout
5/16″
(8 mm)
1415⁄32″
(36.8 cm)
69″
(175.3 cm)
1/8″ (3 mm)
FRONT
17″
(43.2 cm)
1415
⁄32″
(36.8 cm)
361⁄4″
(92.0 cm)
FRONT
69″
(175.3 cm)
19
15⁄32″
(49.5 cm)
FRONT
Cutout 1/8″ (3 mm) Cutout
1/8″ (3 mm)
5/16″
(8 mm)
5/16″
(8 mm)

21
Inserting the door panels.
Attach the Top Trim on the Freezer and Fresh Food Doors.
The Top Trim can be found inside the refrigerator
compartment.
With a T-20 Torxdriver, attach the Top Trim, using
two screws on each Top Trim piece, to the top of
each door. Hand tighten only. Make sure that the
top of each panel fits snugly behind the lip of the
Top Trim.
Insert the Freezer Panel and Fresh Food Panel.
Carefully push the freezer panel in until it slides
into the slot behind the door handle. Push the filler
panel (required with some door panels) in behind
the decorator panel. Repeat for fresh food panel.
If your model has a dispenser, this step only applies
to the fresh food panel and top freezer panel.
Insert the Bottom Freezer Panel (on dispenser models).
Carefully push the panel in until it slides into the
slot behind the door handle. Push the filler panel
(required with some door panels) in behind the
decorator panel.
Cut-Out
Cut-Out
Top Trim Screws
Top
Freezer
Panel
Bottom
Freezer
Panel
Side Trim
Side Trim
Fresh
Food
Panel
Read these instructions completely and carefully.
Consumer SupportTroubleshooting TipsOperating Instructions
Safety Instructions Installation Instructions
Top Trim Screws

22
Install the Side Trim.
These pieces are tucked inside the refrigerator
door handle.
Do not remove the protective film on the outside of
the Side Trim until the Side Trim is installed.
Fit the bottom of the Side Trim under the
Bottom Trim as illustrated.
Hold the Side Trim against the front face of the
decorator panels and fit the Side Trim under
the Top Trim. Make sure the magnetically attached
Side Trim is fitted correctly and that you are
satisfied with the appearance of all the parts.
Side
Trim
Side
Trim
Bottom Trim
Top Trim
Inserting the door panels.
Consumer Support Troubleshooting Tips Operating Instructions Safety InstructionsInstallation Instructions

24
Installation Instructions
LOADING THE RERIGERATOR
ONTO A HAND TRUCK
Leave all tape and door pads on doors
until the refrigerator is in its final location.
To move the refrigerator, use a padded
hand truck. Center the refrigerator on the
hand truck and secure the strap around
the refrigerator. DO NOT OVERTIGHTEN
THE STRAP.
1
REMOVE THE BASE GRILLE
Remove the grille by removing the two
Phillips head screws.
2
If the refrigerator must go through
any entrance that is less than 38″
wide, the doors must be removed.
Proceed to Step 3.
DO NOT remove the handles.
If all entrances are more than
38″ wide, skip to Installing
the Refrigerator.
DISCONNECT THE WATER
COUPLING (on some models)
If the refrigerator has a water dispenser,
there is a water line from the cabinet into
the bottom hinge on the freezer door that
must be disconnected.
To disconnect, push in on the white collar
of the coupling and pull out the tubing.
3
White collar
Bottom
freezer
hinge
MOVING THE REFRIGERATOR

25
Installation Instructions
DISCONNECT THE POWER
COUPLING (on some models)
If the refrigerator has a water dispenser,
there is a power line (harness) from the
cabinet into the bottom hinge on the
freezer door that must be disconnected.
To disconnect, pull apart at the coupling.
4
Bottom
freezer
hinge
DISCONNECT THE ELECTRICAL
CONNECTORS (on some models)
If the refrigerator has a refreshment
center, there are electrical connectors
(harnesses) from the cabinet into the
bottom hinge on the refrigerator door
that must be disconnected.
To disconnect, pull apart each connector.
5
Bottom
refrigerator
hinge
CLOSE THE FREEZER AND
REFRIGERATOR DOORS
6
REMOVE THE FREEZER DOOR
Remove the freezer door top hinge cover
(if equipped) by either squeezing it and
pulling it up or by prying it off with a
plastic putty knife.
Remove the two 5/16 hex head″or 1/8″
screws, then lift the hinge straight up to
free the hinge pin.
Open the freezer door to 90.°
7
A
C
B
5/16″or 1/8″hex head
90°
Termékspecifikációk
| Márka: | GE |
| Kategória: | hűtőszekrény |
| Modell: | Profile CustomStyle PSI23NGRCV |
Szüksége van segítségre?
Ha segítségre van szüksége GE Profile CustomStyle PSI23NGRCV, tegyen fel kérdést alább, és más felhasználók válaszolnak Önnek
Útmutatók hűtőszekrény GE

13 Január 2025
12 Január 2025
12 Január 2025
17 December 2024
17 December 2024
8 December 2024
8 December 2024
8 December 2024
8 December 2024
8 December 2024
Útmutatók hűtőszekrény
- hűtőszekrény Mestic
- hűtőszekrény Ikea
- hűtőszekrény Samsung
- hűtőszekrény Yamaha
- hűtőszekrény Beko
- hűtőszekrény Hoshizaki
- hűtőszekrény Dometic
- hűtőszekrény Electrolux
- hűtőszekrény Moulinex
- hűtőszekrény Whirlpool
- hűtőszekrény Nedis
- hűtőszekrény LG
- hűtőszekrény Grundig
- hűtőszekrény Ariston Thermo
- hűtőszekrény Husqvarna
- hűtőszekrény Candy
- hűtőszekrény Lamona
- hűtőszekrény Worx
- hűtőszekrény Philips
- hűtőszekrény Gorenje
- hűtőszekrény Euro Appliances
- hűtőszekrény Adler
- hűtőszekrény Princess
- hűtőszekrény SilverCrest
- hűtőszekrény Garmin
- hűtőszekrény Bosch
- hűtőszekrény Indesit
- hűtőszekrény NewAir
- hűtőszekrény Panasonic
- hűtőszekrény Zanussi
- hűtőszekrény MPM
- hűtőszekrény AEG
- hűtőszekrény Emerio
- hűtőszekrény Sharp
- hűtőszekrény Teka
- hűtőszekrény Hoover
- hűtőszekrény Neff
- hűtőszekrény Toshiba
- hűtőszekrény Ardo
- hűtőszekrény Bartscher
- hűtőszekrény Hyundai
- hűtőszekrény Hisense
- hűtőszekrény Cookology
- hűtőszekrény Siemens
- hűtőszekrény Medion
- hűtőszekrény Exquisit
- hűtőszekrény Corbero
- hűtőszekrény Miele
- hűtőszekrény Camry
- hűtőszekrény TCL
- hűtőszekrény V-Zug
- hűtőszekrény Danby
- hűtőszekrény DeLonghi
- hűtőszekrény Insignia
- hűtőszekrény Liebherr
- hűtőszekrény Heinner
- hűtőszekrény Infiniton
- hűtőszekrény Klarstein
- hűtőszekrény Amica
- hűtőszekrény VOX
- hűtőszekrény Gourmetmaxx
- hűtőszekrény Vivax
- hűtőszekrény Omega
- hűtőszekrény Thomson
- hűtőszekrény Smeg
- hűtőszekrény Fagor
- hűtőszekrény Unold
- hűtőszekrény Bifinett
- hűtőszekrény Ardes
- hűtőszekrény Cuisinart
- hűtőszekrény Baumatic
- hűtőszekrény Orima
- hűtőszekrény Kenwood
- hűtőszekrény AEG-Electrolux
- hűtőszekrény Jocel
- hűtőszekrény Etna
- hűtőszekrény Café
- hűtőszekrény Dunavox
- hűtőszekrény Bomann
- hűtőszekrény Bauknecht
- hűtőszekrény Amana
- hűtőszekrény Hotpoint
- hűtőszekrény Haier
- hűtőszekrény Frigidaire
- hűtőszekrény Mitsubishi
- hűtőszekrény Cecotec
- hűtőszekrény Dacor
- hűtőszekrény Pelgrim
- hűtőszekrény Privileg
- hűtőszekrény Benavent
- hűtőszekrény Küppersbusch
- hűtőszekrény CATA
- hűtőszekrény Summit
- hűtőszekrény Westinghouse
- hűtőszekrény Hitachi
- hűtőszekrény Inventum
- hűtőszekrény Mercury
- hűtőszekrény FrigeluX
- hűtőszekrény Continental Edison
- hűtőszekrény Eta
- hűtőszekrény Atag
- hűtőszekrény Telefunken
- hűtőszekrény Nevir
- hűtőszekrény Wellington
- hűtőszekrény Hiberg
- hűtőszekrény Domo
- hűtőszekrény Russell Hobbs
- hűtőszekrény Helkama
- hűtőszekrény Thor
- hűtőszekrény Caso
- hűtőszekrény Culinair
- hűtőszekrény JennAir
- hűtőszekrény Coyote
- hűtőszekrény CHiQ
- hűtőszekrény Create
- hűtőszekrény Edesa
- hűtőszekrény Mora
- hűtőszekrény Denver
- hűtőszekrény Bush
- hűtőszekrény Cooluli
- hűtőszekrény G3 Ferrari
- hűtőszekrény Severin
- hűtőszekrény BeefEater
- hűtőszekrény Orbegozo
- hűtőszekrény Wisberg
- hűtőszekrény Respekta
- hűtőszekrény Hanseatic
- hűtőszekrény Daewoo
- hűtőszekrény GYS
- hűtőszekrény Livoo
- hűtőszekrény Viking
- hűtőszekrény Gram
- hűtőszekrény Elica
- hűtőszekrény Balay
- hűtőszekrény Hotpoint Ariston
- hűtőszekrény OK
- hűtőszekrény Guzzanti
- hűtőszekrény Concept
- hűtőszekrény Whynter
- hűtőszekrény DCS
- hűtőszekrény SVAN
- hűtőszekrény Turbo Air
- hűtőszekrény Bellini
- hűtőszekrény Caple
- hűtőszekrény CDA
- hűtőszekrény KitchenAid
- hűtőszekrény Asko
- hűtőszekrény Rosieres
- hűtőszekrény Consul
- hűtőszekrény TriStar
- hűtőszekrény Rocktrail
- hűtőszekrény ELIN
- hűtőszekrény Novy
- hűtőszekrény Rommer
- hűtőszekrény Ignis
- hűtőszekrény Wolkenstein
- hűtőszekrény Koenic
- hűtőszekrény Nodor
- hűtőszekrény Daikin
- hűtőszekrény Fridgemaster
- hűtőszekrény Artusi
- hűtőszekrény Midea
- hűtőszekrény Trisa
- hűtőszekrény Electroline
- hűtőszekrény Polar
- hűtőszekrény Heller
- hűtőszekrény Blomberg
- hűtőszekrény Progress
- hűtőszekrény Kogan
- hűtőszekrény Profilo
- hűtőszekrény Honeywell
- hűtőszekrény PKM
- hűtőszekrény Stirling
- hűtőszekrény Marshall
- hűtőszekrény Furrion
- hűtőszekrény Gardenline
- hűtőszekrény Dimplex
- hűtőszekrény Aspes
- hűtőszekrény Avanti
- hűtőszekrény ProfiCook
- hűtőszekrény Fisher & Paykel
- hűtőszekrény Kenmore
- hűtőszekrény Cylinda
- hűtőszekrény DCG
- hűtőszekrény Hestan
- hűtőszekrény Melissa
- hűtőszekrény Zephyr
- hűtőszekrény Manta
- hűtőszekrény Blaupunkt
- hűtőszekrény U-Line
- hűtőszekrény Chefman
- hűtőszekrény SIBIR
- hűtőszekrény Veripart
- hűtőszekrény Ilve
- hűtőszekrény Bertazzoni
- hűtőszekrény Mobicool
- hűtőszekrény Foster
- hűtőszekrény Hansa
- hűtőszekrény Thetford
- hűtőszekrény Elektra Bregenz
- hűtőszekrény Comfee
- hűtőszekrény Signature
- hűtőszekrény Airflo
- hűtőszekrény Logik
- hűtőszekrény NEO Tools
- hűtőszekrény Junker
- hűtőszekrény Finlux
- hűtőszekrény Maytag
- hűtőszekrény LeCavist
- hűtőszekrény Fulgor Milano
- hűtőszekrény AKAI
- hűtőszekrény H.Koenig
- hűtőszekrény Seiki
- hűtőszekrény Pyle
- hűtőszekrény Sôlt
- hűtőszekrény Kalorik
- hűtőszekrény Sanyo
- hűtőszekrény Constructa
- hűtőszekrény Frilec
- hűtőszekrény Salora
- hűtőszekrény Rangemaster
- hűtőszekrény Vedette
- hűtőszekrény Schneider
- hűtőszekrény Arktic
- hűtőszekrény Linarie
- hűtőszekrény Philco
- hűtőszekrény ECG
- hűtőszekrény Gaggenau
- hűtőszekrény Romo
- hűtőszekrény Kaiser
- hűtőszekrény Esatto
- hűtőszekrény Franke
- hűtőszekrény Element
- hűtőszekrény Meireles
- hűtőszekrény Silverline
- hűtőszekrény BlueStar
- hűtőszekrény Galanz
- hűtőszekrény Scandomestic
- hűtőszekrény New Pol
- hűtőszekrény AYA
- hűtőszekrény MBM
- hűtőszekrény Brandt
- hűtőszekrény RCA
- hűtőszekrény Icecool
- hűtőszekrény Electra
- hűtőszekrény Marvel
- hűtőszekrény Rhino
- hűtőszekrény Ravanson
- hűtőszekrény Rex
- hűtőszekrény Schaub Lorenz
- hűtőszekrény Lavorwash
- hűtőszekrény Vintec
- hűtőszekrény Luxor
- hűtőszekrény Flavel
- hűtőszekrény Scancool
- hűtőszekrény Becken
- hűtőszekrény Sub-Zero
- hűtőszekrény Haeger
- hűtőszekrény Premium Levella
- hűtőszekrény Zerowatt
- hűtőszekrény De Dietrich
- hűtőszekrény SanGiorgio
- hűtőszekrény Belling
- hűtőszekrény Orava
- hűtőszekrény Arçelik
- hűtőszekrény Zenith
- hűtőszekrény Magic Chef
- hűtőszekrény Climadiff
- hűtőszekrény Sauber
- hűtőszekrény IFB
- hűtőszekrény Thorens
- hűtőszekrény Sogo
- hűtőszekrény Crosley
- hűtőszekrény United
- hűtőszekrény Techwood
- hűtőszekrény Glem Gas
- hűtőszekrény Euromaid
- hűtőszekrény Fhiaba
- hűtőszekrény Lemair
- hűtőszekrény Matsui
- hűtőszekrény Quigg
- hűtőszekrény Zanker
- hűtőszekrény Airlux
- hűtőszekrény Aldi
- hűtőszekrény Ariston
- hűtőszekrény Salton
- hűtőszekrény Tricity Bendix
- hűtőszekrény Palsonic
- hűtőszekrény Arthur Martin
- hűtőszekrény Nordland
- hűtőszekrény Tomado
- hűtőszekrény Kernau
- hűtőszekrény Thermador
- hűtőszekrény Vestel
- hűtőszekrény Swan
- hűtőszekrény John Lewis
- hűtőszekrény Mabe
- hűtőszekrény Monogram
- hűtőszekrény Iberna
- hűtőszekrény Valberg
- hűtőszekrény Accucold
- hűtőszekrény Scholtes
- hűtőszekrény Berg
- hűtőszekrény Castor
- hűtőszekrény Eldom
- hűtőszekrény Jocca
- hűtőszekrény Juno
- hűtőszekrény Nabo
- hűtőszekrény Defy
- hűtőszekrény Igloo
- hűtőszekrény Premium
- hűtőszekrény White Knight
- hűtőszekrény Sunny
- hűtőszekrény Nordmende
- hűtőszekrény CaterCool
- hűtőszekrény Friac
- hűtőszekrény Boretti
- hűtőszekrény Perel
- hűtőszekrény GOTIE
- hűtőszekrény Kubo
- hűtőszekrény Costway
- hűtőszekrény Elba
- hűtőszekrény Proline
- hűtőszekrény WLA
- hűtőszekrény True
- hűtőszekrény Kelvinator
- hűtőszekrény Everglades
- hűtőszekrény Steel Cucine
- hűtőszekrény Jenn-Air
- hűtőszekrény Limit
- hűtőszekrény Freggia
- hűtőszekrény Carpigiani
- hűtőszekrény Listo
- hűtőszekrény Milectric
- hűtőszekrény Leonard
- hűtőszekrény Osprey
- hűtőszekrény New World
- hűtőszekrény Leisure
- hűtőszekrény WhiteLine
- hűtőszekrény Bompani
- hűtőszekrény Blaze
- hűtőszekrény Viva
- hűtőszekrény M-System
- hűtőszekrény Changhong
- hűtőszekrény Primo
- hűtőszekrény Goddess
- hűtőszekrény Saro
- hűtőszekrény Godrej
- hűtőszekrény Matrix
- hűtőszekrény Juno-electrolux
- hűtőszekrény Napoleon
- hűtőszekrény Waeco
- hűtőszekrény Essentiel B
- hűtőszekrény Stoves
- hűtőszekrény Edy
- hűtőszekrény Edgestar
- hűtőszekrény Parmco
- hűtőszekrény Eurotech
- hűtőszekrény Avintage
- hűtőszekrény Carrefour Home
- hűtőszekrény Equator
- hűtőszekrény Vestfrost
- hűtőszekrény Kunft
- hűtőszekrény Electrolux-Rex
- hűtőszekrény Upo
- hűtőszekrény Brandy Best
- hűtőszekrény Lynx
- hűtőszekrény AVEA
- hűtőszekrény Optimum
- hűtőszekrény Bluesky
- hűtőszekrény Tecnolux
- hűtőszekrény Cobal
- hűtőszekrény Marynen
- hűtőszekrény La Germania
- hűtőszekrény Lec
- hűtőszekrény Oranier
- hűtőszekrény CombiSteel
- hűtőszekrény Husky
- hűtőszekrény Unic Line
- hűtőszekrény Gastro-Cool
- hűtőszekrény Tisira
- hűtőszekrény Maxx Cold
- hűtőszekrény Wells
- hűtőszekrény Paulmann
- hűtőszekrény Kucht
- hűtőszekrény Avantco
- hűtőszekrény Norlake
- hűtőszekrény Arctic Air
- hűtőszekrény Snaigė
- hűtőszekrény Merax
- hűtőszekrény Sam Cook
- hűtőszekrény Blucher
- hűtőszekrény Silhouette
- hűtőszekrény ColdTech
- hűtőszekrény ONYX
- hűtőszekrény Magic Cool
- hűtőszekrény Khind
- hűtőszekrény LERAN
- hűtőszekrény Le Chai
- hűtőszekrény Gamko
- hűtőszekrény IOMABE
- hűtőszekrény APW Wyott
- hűtőszekrény General Electric
- hűtőszekrény SPT
- hűtőszekrény Kolpak
- hűtőszekrény Hatco
- hűtőszekrény High One
- hűtőszekrény Les Petits Champs
- hűtőszekrény Moa
- hűtőszekrény Master-Bilt
- hűtőszekrény Hydra Kool
- hűtőszekrény XO
- hűtőszekrény Curtiss
- hűtőszekrény Nemco
- hűtőszekrény Beverage-Air
- hűtőszekrény Winia
- hűtőszekrény Delfield
- hűtőszekrény Traulsen
- hűtőszekrény Alto-Shaam
- hűtőszekrény Simfer
- hűtőszekrény Federal
- hűtőszekrény Structural Concepts
- hűtőszekrény Vinata
- hűtőszekrény Avallon
- hűtőszekrény Emperor's Select
- hűtőszekrény Fisher Paykel
- hűtőszekrény Wine Klima
- hűtőszekrény Marbor
- hűtőszekrény Engel
- hűtőszekrény Americana
- hűtőszekrény Koolatron
- hűtőszekrény Cosmo
- hűtőszekrény Adventure Kings
- hűtőszekrény EvaKool
- hűtőszekrény FAURE
- hűtőszekrény Coldtainer
- hűtőszekrény Orien
- hűtőszekrény Enofrigo
- hűtőszekrény BSK
- hűtőszekrény Techfrost
- hűtőszekrény Irinox
- hűtőszekrény Azure
- hűtőszekrény Gecko
- hűtőszekrény Bromic
- hűtőszekrény Kuhla
- hűtőszekrény Adora
- hűtőszekrény Newpol
- hűtőszekrény Brastemp
- hűtőszekrény Royal Catering
- hűtőszekrény Haden
- hűtőszekrény Perlick
- hűtőszekrény Sedona
- hűtőszekrény Atosa
- hűtőszekrény Cool Head
- hűtőszekrény Gladiator
- hűtőszekrény Vinotemp
- hűtőszekrény Norpole
- hűtőszekrény Gasmate
- hűtőszekrény Arthur Martin-Electrolux
- hűtőszekrény Triomph
- hűtőszekrény Schmick
- hűtőszekrény Dellware
- hűtőszekrény InAlto
- hűtőszekrény HABAU
- hűtőszekrény Tuscany
- hűtőszekrény TESLA Electronics
- hűtőszekrény Pando
- hűtőszekrény Smart Brand
- hűtőszekrény Brass Monkey
- hűtőszekrény Waltham
- hűtőszekrény DAYA
- hűtőszekrény Lec Medical
- hűtőszekrény Kalamazoo
- hűtőszekrény Yolco
- hűtőszekrény Aconatic
- hűtőszekrény Kluge
- hűtőszekrény Hoover-Grepa
- hűtőszekrény Coca-Cola
- hűtőszekrény Acros
- hűtőszekrény HomeCraft
- hűtőszekrény Koldfront
- hűtőszekrény Eqtemp
- hűtőszekrény Uniprodo
- hűtőszekrény Corona
- hűtőszekrény Coors Light
- hűtőszekrény Miller Lite
- hűtőszekrény Lanbo
- hűtőszekrény Pitsos
- hűtőszekrény Landmark
- hűtőszekrény Momcube
- hűtőszekrény Richome
- hűtőszekrény Sevenstars
Legújabb útmutatók hűtőszekrény

2 Április 2025

2 Április 2025
2 Április 2025
2 Április 2025
2 Április 2025
2 Április 2025
2 Április 2025
2 Április 2025
2 Április 2025

2 Április 2025