Használati útmutató Fujitsu ScanPartner fi-4120C
Olvassa el alább 📖 a magyar nyelvű használati útmutatót Fujitsu ScanPartner fi-4120C (180 oldal) a Scanner kategóriában. Ezt az útmutatót 4 ember találta hasznosnak és 2 felhasználó értékelte átlagosan 4.5 csillagra
Oldal 1/180
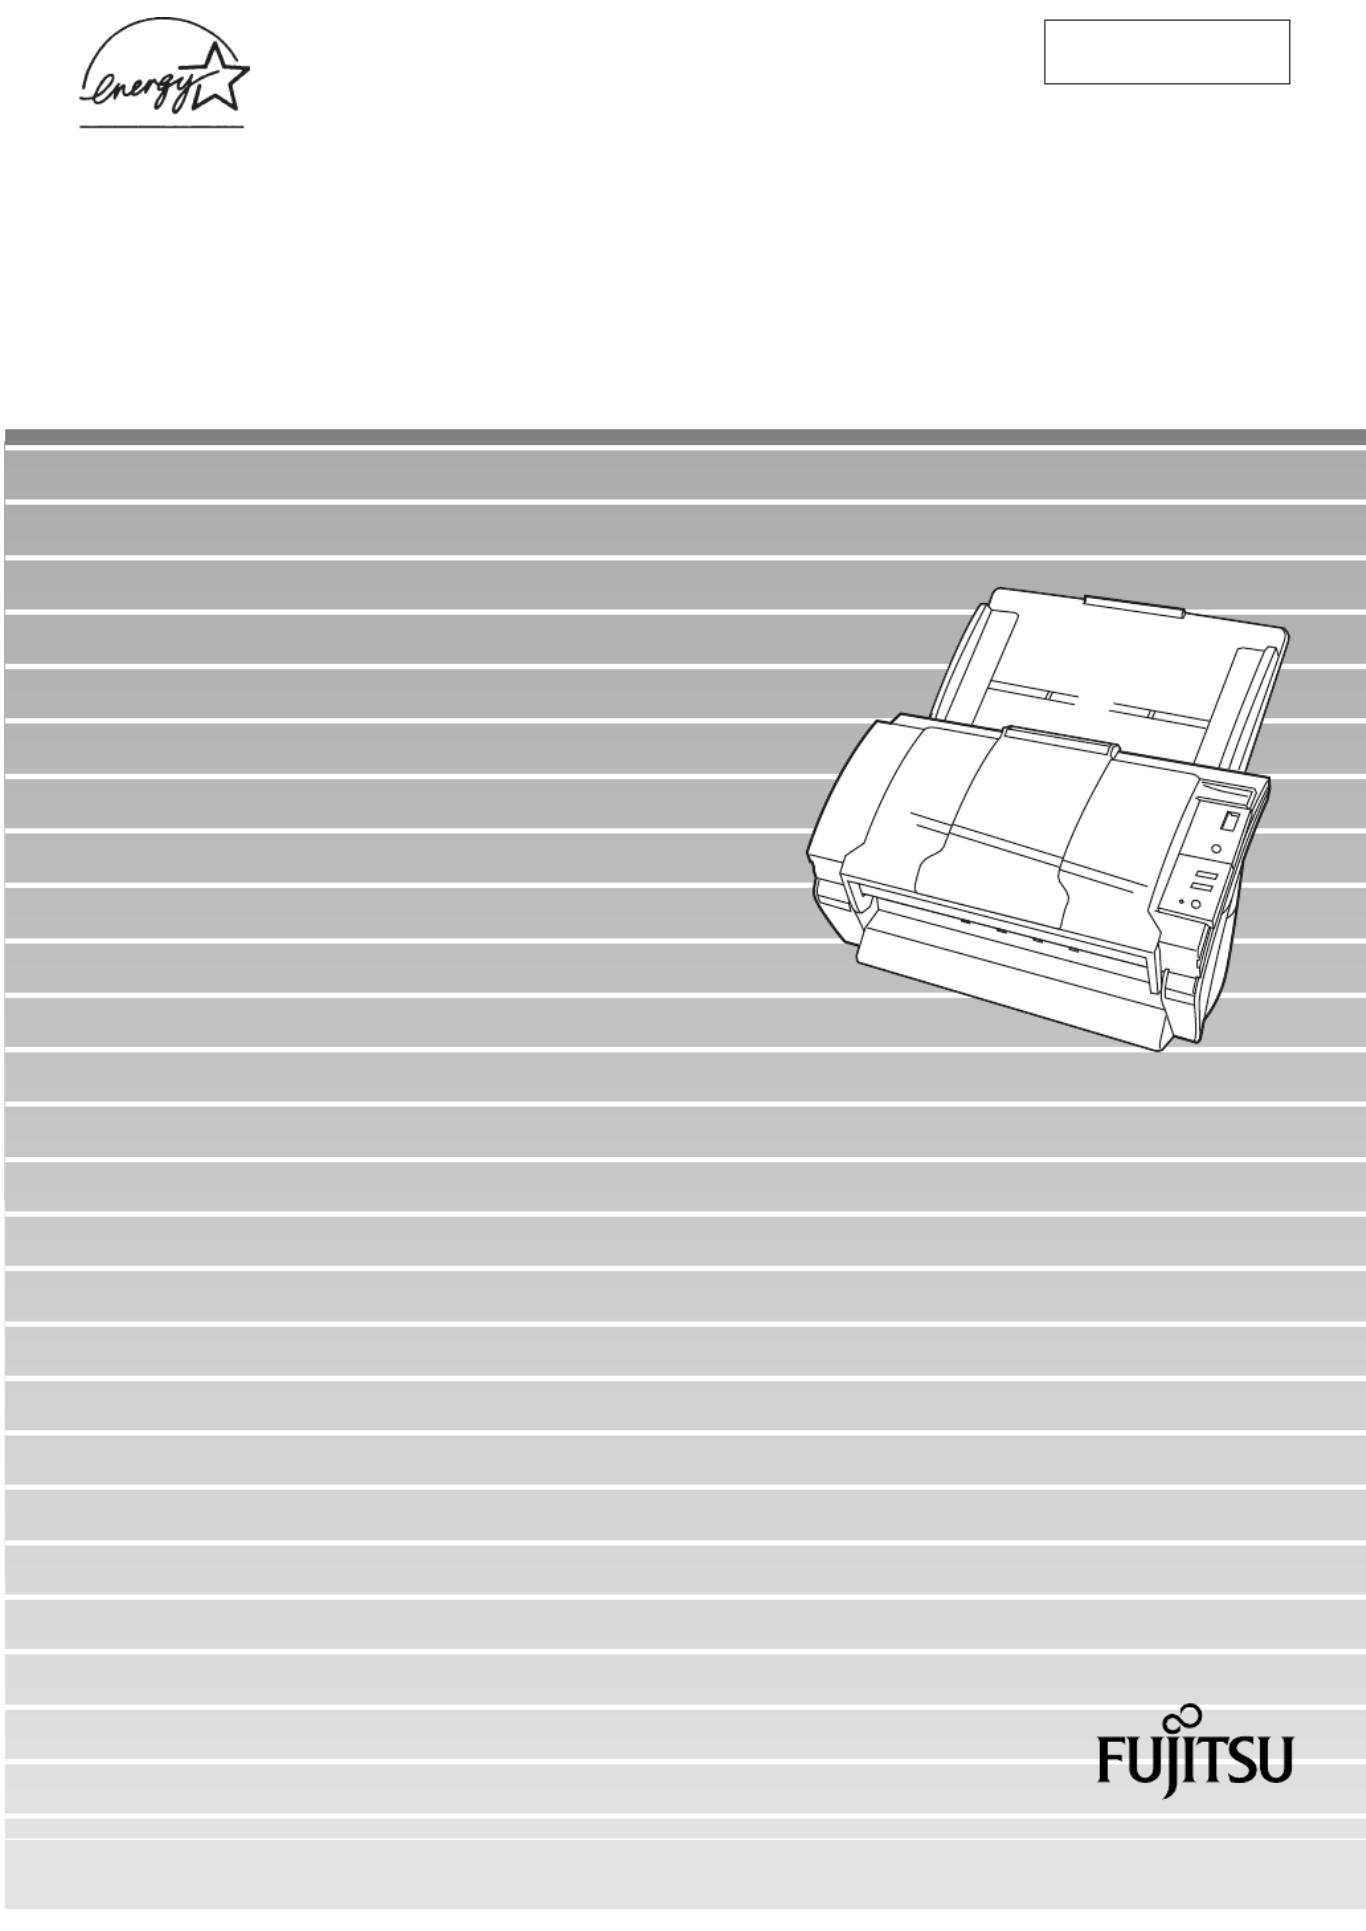
Operator's Guide
fi-4120C Image Scanner
P3PC-E007-01EN

i
INTRODUCTION
Thank you for buying the fi-4120C Duplex Color Scanner.
The fi-4120C scanner is capable of scanning color images on both
sides, and has the following features.
■
■ ■
■ Easy Scanning and Display
The ADF (Automatic Document Feeder) allows you to scan
A4-size duplex color documents at a high speed of 25 pages
per minute.
■
■ ■
■ Easily Installable
The scanner's size smaller than A4, it can always place on a
desk.

ii
About this manual
How This Manual Is Organized
This manual is organized as follows. An index is provided at the
end of this manual.
1 PREPARING THE SCANNER
This chapter describes how to prepare the scanner for
use.
2 INSTALLATION OF A SCANNER
This chapter describes how to install and connect the
scanner, and how to install the scanner application.
3 BASIC SCANNER OPERATIONS
This chapter describes basic scanner operations.
4 SCANNING VARIOUS TYPES OF DOCUMENTS
This chapter describes how to scan various types of
documents.
5 DAILY CARE
This chapter describes how to clean the scanner.
6 REPLACING CONSUMABLES
This chapter describes how to replace scanner
consumables.
7 TROUBLESHOOTING
This chapter describes how to remedy document jams,
other trouble, items to check before contacting the agent
where you bought the scanner, and how to check device
labels.

iv
Revisions
FCC declaration
This equipment has been tested and found to comply with the limits
for a Class B digital device, pursuant to Part 15 of the FCC Rules.
These limits are designed to provide reasonable protection against
harmful interference in a residential installation. This equipment
generates, uses, and can radiate radio frequency energy and, if not
installed and used in accordance with the instruction manual, may
cause harmful interference to radio communications. However,
there is no guarantee that interference will not occur in a particular
installation. If this equipment does cause harmful interference to
radio or television reception, which can be determined by turning
the equipment off and on, the user is encouraged to try to correct
the interference by one or more of the following measures:
•Reorient or relocate the receiving antenna.
•Increase the separation between the equipment and receiver.
•Connect the equipment into an outlet on a circuit different from
that to which the receiver is connected.
•Consult the dealer or an experienced radio/TV technician for
help.

v
This Class B digital apparatus complies with Canadian ICES-003.
Cet appareil numérique de la classe B est conformme à la norme
NMB-003 du Canada.
Changes or modifications not expressly
approved by the party responsible for
compliance could void the user’s authority to
operate the equipment.
NOTICE •The use of a non-shielded interface cable
with the referenced device is prohibited.
The length of the parallel interface cable
must be 3 meters (10 feet) or less. The
length of the serial interface cable must be
15 meters (50 feet) or less.
•The length of the AC cable must be 3
meters (10 feet) or less.

vi
Bescheimigung des Herstellers / Importeurs
Hiermit wird bescheinigt, daß der/dieldas
•fi-4120C in Übereinsstimmung mit den Bestimmungen der
•AmtsblVfg 243/1991 funkentstört ist. Der Deutschen
Bundesport wurde das Inverkehrbringen dieses Gerätes
angezeigt und die Berechtigung zur Überprüfung der Serie auf
Einhaltung der Bestimmungen eingeräumt.
•Maschinenlärminformationsverordnung 3. GS GV,
18.01.1991:Der höchste Schalldruckpegel beträgt 70 dB (A)
order weniger gemäß ISO/7779.

vii
International Energy Star Program
As a participating operator of the International Energy
Star Program, PFU LIMITED. certifies that this product
satisfies the requirements of the International Energy
Star Program.
The International Energy Star Program is an international program
for promoting energy conservation in computers and other office
equipment. The purpose of this program is to promote the
development and propagation of products provided with functions
for efficiently limiting energy consumption. Operators opt to
participate in this program on a voluntary basis. Equipment
covered by this program are computers, displays, printers,
facsimiles, copiers, and other office equipment. The standards for
each of these equipment Energy Star mark ( ) are unified by
each participating country.
Use in High-safety Applications
This product has been designed and manufactured on the
assumption that it will be used in office, personal, domestic, regular
industrial, and general-purpose applications. It has not been
designed and manufactured for use in applications (simply called
"high-safety applications" from here on) that directly involve serious
danger to life and health when an extremely high degree of safety
is required, for example, in the control of nuclear reactions at
nuclear power facilities, automatic flight control of aircraft, air traffic
control, operation control in mass-transport systems, medical
equipment for sustaining life, and missile firing control in weapons
systems, and when provisionally the safety in question is not
ensured. The user should use this product without adopting
measures for ensuring safety in such high-safety applications. FPU
Co., Ltd. assumes no liability whatsoever for damages arising from
use of this product by the user in high-safety applications, and for
any claims or compensation for damages by the user or a third
party.

ix
Trademarks
Microsoft®, Windows® and Windows NT® are registered
trademarks of Microsoft Corporation of the USA and other
respective countries.
ISIS® is a registered trademark of Pixel Translations, A Division of
Actionpoint Inc.
Adobe and the Adobe logo as well as Acrobat and the Acrobat
Logo are trademarks of Adobe Systems Incorporated.
Other product names referred to in this manual are registered
trademarks or trademarks of respective companies.
How Trademarks Are Indicated In This Manual
References to operating systems (OS) are indicated as follows:
Windows® 95: Refers to Microsoft® Windows® 98 operating
system.
Windows® 98: Refers to Microsoft® Windows® 98 operating
system.
Windows® Me: Refers to Refers to Microsoft® Windows®
Millennium Edition operating system.
Windows® 2000: Refers to Microsoft® Windows® 2000
Professional operating system.
Windows® XP: Refers to Microsoft® Windows
® XP Professional
operating system, and Microsoft® Windows® XP
Home Edition operating system
Windows NT®: Refers to Microsoft® Windows NT® operating
system Version4.0.
Where there is no distinction between the different versions of the
above operating system, the general term "Windows® " is used.
All Rights Reserved, Copyright© PFU LIMITED 2002.

x
Preface
Safety Precautions
This manual describes important details for ensuring the safe and
correct use of this product. Thoroughly read this manual before you
start to use this product. In particular, be sure to read and fully
understand the Safety Precautions described in this manual before
you use this product.
Also, store this manual in a safe place so that it can be easily
referred to during use of this product.
Warning Indications Used In This Manual
This manual uses the following indications to ensure safe and
correct use of this product, and to prevent possible danger and
injury to the operator and other persons.
This indication alerts operators to an
operation that, if not strictly observed, may
result in severe injury or death.
This indication alerts operators to an
operation that, if not strictly observed, may
result in safety hazards to personnel or
damage to equipment.

xi
Symbols Used In This Manual
This manual uses the following symbols in explanations in addition
to warning indications.
This symbol alerts operators to particularly
important information. Be sure to read this
information.
This symbol alerts operators to helpful advice
regarding operation.
A TRIANGLE symbol indicates that special care
and attention is required.
The drawing inside the triangle shows the specific
caution.
A CIRCLE with a diagonal line inside shows
action which users are not
allowed to do.The drawing inside or under the
circle shows the specific
action that is not allowed.
Outline characters on a colored background
shows instructions users
should follow. It may include the drawing which
shows the sepecific
instruction.

xiii
Safety Precautions
The following describes important warnings described in this
manual.
Do not damage the AC cable.
Use only specified AC cables and connector cables
A damaged AC cable might cause fire or electric
shock.
Do not place heavy objects on AC cables, or pull,
bend, twist, heat, damage or modify AC cables.
Also, do not use damaged AC cables or power
plugs, and AC cables or power plugs when the
power outlet fitting is loose.
Use only specified AC cables and connector cables.
Failure to use the included so might cause electric
shock and equipment failure.

xiv
Use this scanner only at the indicated power voltage.
Do not connect to multiple-power strips.
Wipe any dust from the power plug.
Do not install in locations subject to oil smoke,
steam, humidity, and dust.
Use this scanner only at the indicated power voltage.
Improper power voltage so might cause fire or
electric shock.
Also, do not connect to multiple-power strips.
Wipe off any dust from metal parts on the power
plug or metal fittings with a soft, dry cloth.
Accumulated dust might cause fire or electric shock.
Do not install the scanner in locations subject to oil
smoke, steam, humidity, and dust. Doing so might
cause fire or electric shock.

xv
Do not use the scanner if you smell strange odor.
Turn the scanner OFF if it is damaged.
If you sense heat coming from devices or detect
other malfunctions such as smoke, strange smells or
strange noises, immediately press down the power
button to turn off the scanner and then disconnect its
power plug.
Make sure that the smoke has disappeared, and
then contact the agent where you bought the
scanner.
If the scanner is damaged for any reason, press
down the power button the scanner and unplug the
power cable before contacting the authorized agent.

xvi
Do not allow liquids to get inside the scanner.
Do not insert or drop foreign metal objects in to the
scanner.
Do not scan wet document or document with paper
clips.
Do not splash or allow the scanner to get wet.
If foreign objects (water, small metal objects, liquids,
etc.) get inside the scanner, immediately press down
the power button to turn off the scanner and
disconnect the power plug from the power outlet.
Then contact the agent where you bought the
scanner or Maintenance Service Center.
Pay particular attention to this warning in
households where there are small children.

xvii
Do not touch the inside of the scanner unless
necessary.
Do not disassemble or modify the scanner. The
inside of the scanner contains high-voltage
components. Touching these components might
cause fire or electric shock.

xviii
The following describes important cautions described in this
manual.
Do not touch the AC cable with wet hands.
Do not install the scanner on unstable surfaces.
Firmly insert the power plug.
Do not insert or disconnect the power plug with wet
hands. Doing so might cause electric shock.
Install the scanner on a desk so that none of its parts
protrude outside of the desktop. Also, make sure that
the scanner is installed on a flat, level surface.
Do not install the scanner on unstable surfaces.
Install the scanner on a level surface that is free of
vibration to prevent it from tilting.
Firmly insert the power plug into the power outlet as
far it can go.

xix
Do not block the ventilation ports.
Do not place heavy objects or climb on top of the
scanner.
Before moving the scanner, disconnect the power
plug from the power outlet.
Do not block the ventilation ports. Blocking the
ventilation ports generates heat inside of scanner,
resulting in fire or scanner failure.
Do not place heavy objects on the scanner or use
the scanner's top surface for performing other work.
Improper installation might cause injuries.
Do not move the scanner with the power and
interface cables connected as this might damage the
cables, causing fire, electric shock or injuries.
Before moving the scanner, be sure to disconnect
the power plug from the power outlet, and
disconnect connector cables. Also, make sure that
the floor is free of obstructions.
xx
Protect the scanner from static electricity.
Do not use aerosol sprays near the scanner.
Avoid any contact when scanner is in use.
Install the scanner away from strong magnetic fields
and other sources of noise. Also, protect the scanner
from static electricity as this might cause the
scanner to malfunction.
Do not use aerosol sprays, for example, to clean the
scanner. Air sprayed from aerosol sprays causes dirt
and dust to enter the scanner, resulting scanner
failure and malfunction.
Avoid any contact when scanner is operating as this
may cause injuries.

xxi
Disconnect the power plug from the power outlet
when the scanner is not used for a long period of
time.
Disconnect the power plug from the power outlet as
soon as you hear thunder.
Do not install the scanner in the direct sunlight.
When the scanner is not used for a long period of
time, be sure to disconnect the power plug from the
power outlet for safety's sake.
If lightning strikes nearby, immediately disconnect
the AC cable from the power outlet. Leaving the
scanner turned ON might result in damage to the
scanner.
Do not install the scanner in the direct sunlight or
near heating apparatus. Doing so might cause heat
to build up inside the scanner, causing fire or
scanner trouble. Install the scanner in a well-
ventilated location.

xxiii
FUJITSU ITALIA S.p.A.
Via Nazario Sauro, 38
20099 Sesto San Giovanni
(Milan), Italy
Phone: (39-02)26294-1
Fax: (39-02)26294-201
Website:
http://www.fujitsu-europe.com/
FUJITSU ICL ESPAÑA, S.A.
Camino Cerro de los Gamos, 1
28224,
Pozuelo de Alarcon, Madrid,
Spain
Phone: (34-91)784-9000
Fax: (34-91)784-9379
Website:
http://www.fujitsu-europe.com/
E-mail:
imagemaster@mail.fujitsu.es
FUJITSU AUSTRALIA LTD.
Fujitsu House 2 Julius Avenue
North Ryde, N.S.W 2113
Australia
Phone: (61-2)9776-4555
Fax: (61-2)9776-4019
Website: http://au.fujitsu.com/
FUJITSU ASIA PTE.LTD.
20 Science Park Road, #03-01,
Tele Teck Park Singapore
Science Park II, Singapore
117674
Phone: (65)777-6577
Fax: (65)771-5499
Website: http://sg.fujitsu.com/
E-mail:
inquiry@fcsl.fujitsu.com.sg
FUJITSU TAIWAN LTD.
19th Fl., No39, Sec.1,Chung-
hwa Rd., Taipei, Taiwan R.O.C.
Phone: (886-2)2311-2255
Fax: (886-2)2311-2277
Website: http://fw.fujitsu.com/
FUJITSU HONG KONG LTD.
10/F., Lincoln House, 979 King's
Road, Taikoo Place, Island East,
Hong Kong
Phone: (852)2827-5780
Fax: (852)2827-4724
Website: http://hk.fujitsu.com/
E-mail: scanner@fujitsu.com.hk

xxiv
FUJITSU SYSTEMS BUSINESS
(THAILAND) LTD.
12th Fl., Olympia Thai Tower,
444 Rachadapisek Road,
Samsennok,
Huay kwang, Bangkok 10320,
Thailand
Phone: (662)512-6066
Fax: (662)512-6068
Website: http://th.fujitsu.com/
FUJITSU KOREA LTD.
5-11 Fl., Coryo Finance Center
Building, Youido-Dong 23-6,
Young DungPo-gu, Seoul, Korea,
150-010
Phone: (82-2)3787-6159
Fax: (82-2)3787-6164
Website: http://kr.fujitsu.com/
E-mail:
webmaster@fkl.fujitsu.co.kr
FUJITSU MALAYSIA
SDN.BHD.
7th FL., Wisma Damansara,
Jalan Semantan 50490 Kuala
Lumpur, MALAYSIA
Phone: (60-3)254-3644
Fax: (60-3)253-3940
Website: http://my.fujitsu.com/
FUJITSU PHILIPPINES, INC
2nd Fl., United Life Building,
Pasay Road, Legaspi Village
Makati,
Metro Manila, Philippines
Phone: (63-2)812-4002
Fax: (63-2)817-7576
Computer Products Business
Group
658-1 Tsuruma Machida-shi,
To kyo
194-8510, Japan
Phone: (81-42)796-5211
Fax: (81-42)788-7651
Website:
http://www.pfu.fujitsu.com/
E-mail:
scanners@pfu.fujitsu.com
Corporate headquarters
Nu 98-2 Unoke, Unoke-machi,
kahoku-gun, Ishikawa 929-1192,
Japan
Phone: (81-76)283-1212
Fax: (81-76)283-4689

xxv
CONTENTS
1 PREPARING THE SCANNER ...............1
1.1 Checking the Contents of the Scanner Package ...... 2
1.2 Names and Functions of Parts .................................. 4
1.3 Operator panel .......................................................... 9
2 INSTALLATION OF A SCANNER.......15
2.1 Installing the Scanner .............................................. 16
2.2 Connecting the Scanner to a PC ............................. 19
2.3 Installing the Scanner Application ........................... 26
3 BASIC SCANNER OPERATIONS .......27
3.1 Turning the Scanner ON ......................................... 28
3.2 Loading Documents on the ADF for Scanning ........ 30
3.3 Scanning Documents .............................................. 36
4 SCANNING VARIOUS TYPES OF
DOCUMENTS ......................................41
4.1 Scanning Different-width Documents ...................... 42
4.2 Saving Scanned Images in PDF Format ................. 43
4.3 Excluding a Color in the Image(dropout color) ........ 48
4.4 Detecting Double-feeds ........................................... 51
5 DAILY CARE........................................55
5.1 Cleaning Materials and Locations and
Cleaning Cycle ........................................................ 56
5.2 Cleaning the ADF .................................................... 58

xxvi
6 REPLACING CONSUMABLES ...........65
6.1 Consumable and Replacement Cycle ..................... 66
6.2 Replacing the Pad ASY ........................................... 74
6.3 Replacing the Pick Roller ........................................ 80
7 TROUBLESHOOTING .........................91
7.1 Removing Jammed Documents .............................. 92
7.2 Remedying Typical Troubles ................................... 95
7.3 Items to check before contacting the agent
where you bought the scanner .............................. 114
7.4 Checking Labels on the Scanner .......................... 118
8 ADF AND PAPER SPECIFICATION .121
8.1 Document Size ...................................................... 122
8.2 Document Quality .................................................. 123
8.3 Maximum Document Loading Capacity ................ 127
8.4 Hole-punching Prohibited Areas ........................... 128
8.5 Double-feed Detection Conditions ........................ 129
9 SCANNER SPECIFICATION .............133
9.1 Basic Specifications .............................................. 134
9.2 Installation Specifications ...................................... 136
9.3 External Dimensions ............................................. 138
GLOSSARY OF TERMS .....................GL-1
INDEX ................................................... IN-1

1
PREPARING THE SCANNER
1
1PREPARING THE
SCANNER
This chapter describes how to prepare the scanner for use.
1.1 Checking the Contents of the Scanner Package ....... 2
1.2 Names and Functions of Parts .................................... 4
1.3 Operator panel .............................................................. 9

1.1 Checking the Contents of the Scanner Package 3
1
PREPARING THE SCANNER
Scanner and Accessories
•Scanner •ADF paper chute •AC adapter
•AC cable
•USB interface
cable
•Scanner driver
CD-ROM
•Adobe® Acrobat®
5.0 CD-ROM
•Manual CD-ROM •Operator's Guide
(this manual)
•Quick Installation
Guide
fi-XXXX X XXX X
XX XX

41.2 Names and Functions of Parts
1.2 Names and Functions of Parts
This section describes the names of parts and their functions.
■■■■ Front
(1) Automatic document
feeder (ADF)
(2) ADF paper chute
(3) Side guide
(4) ADF button
(5) Operator panel
(6) Stacker

1.2 Names and Functions of Parts 5
1
PREPARING THE SCANNER
No. Name Function
1 ADF(Automatic
document
feeder)
Automatically feeds documents into
the scanner.
2 ADF paper
chute
Used when scanning documents on
the ADF.
3 Side guide Adjust the side guides to match the
width of the document to avoid image
skew.
4 ADF button Press this button to open the ADF
cover, for example, to remove
jammed documents in the ADF.
5 Operator panel Used for operating the scanner. The
scanner status is shown on the
Function No. display.
6 Stacker Documents are stacked here after
they are scanned.

1.2 Names and Functions of Parts 7
1
PREPARING THE SCANNER
No. Name Function
7 SCSI ID switch Sets the SCSI ID. (Set to "5" before
the scanner is shipped from the
factory.)
8 SCSI interface
connector
Connect the SCSI interface cable
from the host PC or Computer
here.
9 USB interface
connector
Connect the USB interface cable
from the host PC or Computer
here.
10 DC inlet Connect the AC adapter here.

81.2 Names and Functions of Parts
■■■■ Removable Parts
The following shows the parts that can be removed from the
scanner.
PAD ASY
ADF paper chute
Pick roller
Sheet guide
Removal is
possible.

10 1.3 Operator panel
*) For information on detailed settings for the launcher, refer to the
Scanner Utility for Microsoft
® Windows® User’s Guide on the
scanner driver CD-ROM.
Name Function
Function No. display Indicates the function No., Scan
mode, and error status. For details,
see "■ Indications on the Function
No. display" in this section.
button Function Select the Function No. set in the
launcher (*).
Send to Start and read the application
software according to the details set
in the launcher (*).
Scan
Power button Turns the scanner ON and OFF.
LED - Lights when the scanner is turned
ON.

14 1.3 Operator panel
The following table shows the details of alarms.
Indication Meaning
E2 An trouble occurred on the optical system
(front).
E3 An trouble occurred on the optical system
(back).
E4 The motor fuse has blown.
E6 An trouble occurred on the operator panel.
E7 An trouble occurred in the EEPROM.
E8 The SCSI interface fuse has blown.
E9 An trouble occurred in image memory.
Ec An trouble occurred in memory.
Ed An trouble occurred in the SCSI interface
controller.

2
INSTALLATION OF A SCANNER
15
2INSTALLATION OF
A SCANNER
This chapter describes how to install and connect the scanner, and
how to install the scanner application.
Windows® 95 Refers to Microsoft® Windows® 95 operating
system.
Windows® 98 Refers to Microsoft® Windows® 98 operating
system.
Windows® Me Refers to Microsoft® Windows® Millennium Edition
operating system.
Windows® 2000Refers to Microsoft® Windows® 2000 Professional
operating system.
Windows® XP Refers to Microsoft® Windows® XP Professional
operating system.
Refers to Microsoft® Windows® XP Home Edition
operating system.
Windows NT® Refers to Microsoft® Windows NT® operating
system Version4.0.
2.1 Installing the Scanner ................................................ 16
2.2 Connecting the Scanner to a PC............................... 19
2.3 Installing the Scanner Application............................ 26

2.1 Installing the Scanner 17
2
INSTALLATION OF A SCANNER
■■■■ Attaching the ADF paper chute
The following shows the procedure for attaching the ADF paper
chute.
1. Hold the ADF paper chute and insert its tabs into
the counterpart holes on the scanner as shown
in the figure below.
The Side guide of the ADF paper chute has to face up.
ADF paper chute
tab
Side guide
18 2.1 Installing the Scanner
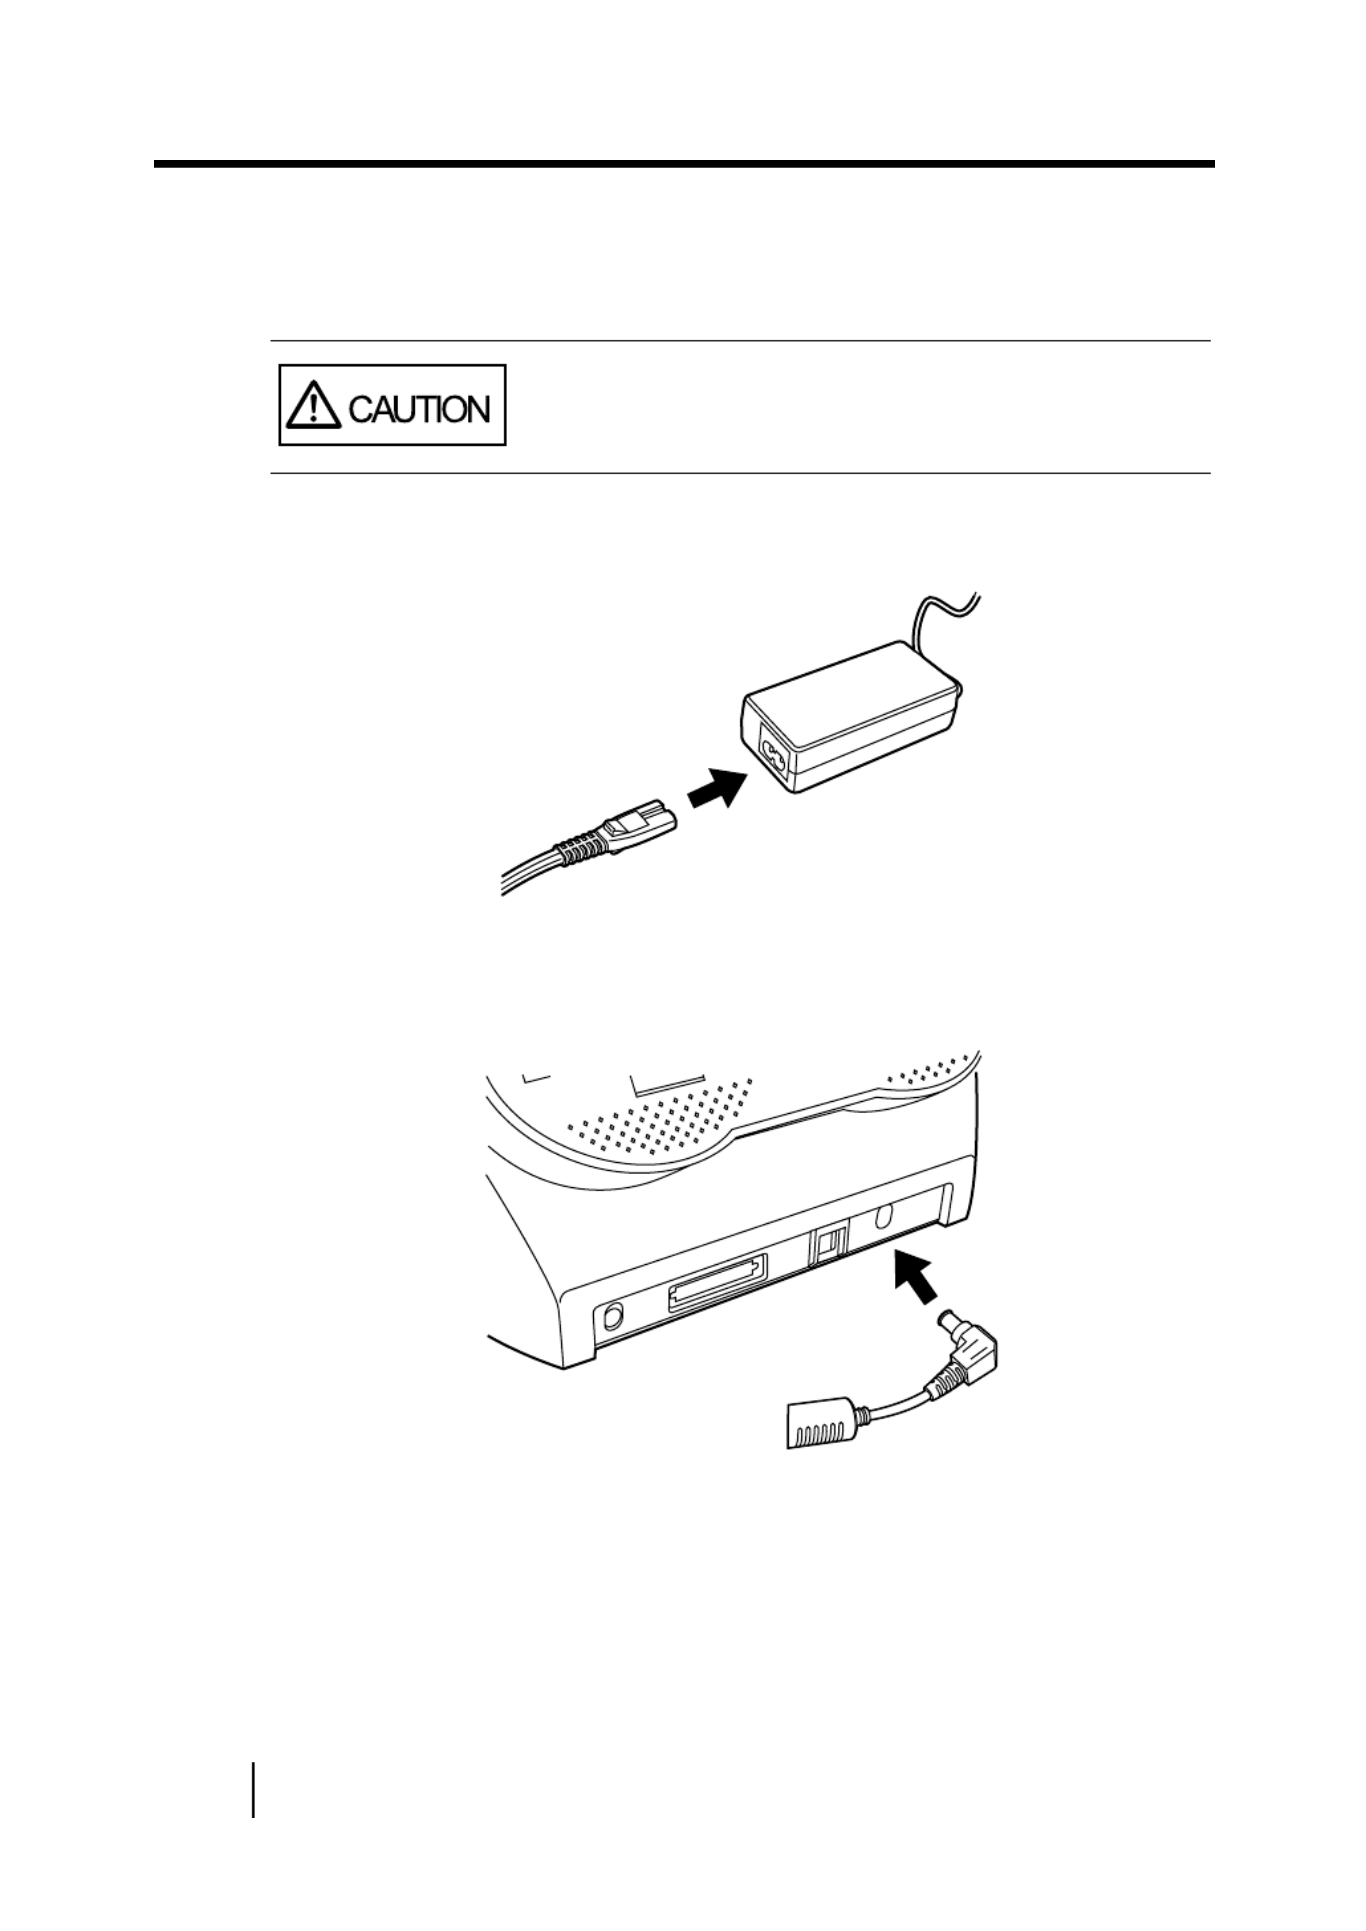
■■■■ Connecting the AC Adapter
The following shows the procedure for connecting the AC adapter.
1. Connect the AC cable to the AC adapter.
2. Connect the connector of AC adapter to the DC
inlet of the scanner.
3. Insert the AC cable into the outlet.
Use only whth AC adapter provided by the
manufacturer.

22 2.2 Connecting the Scanner to a PC
■■■■ Connecting the SCSI Interface Cable
When using the scanner with SCSI interface, a third-party SCSI
interface cable and SCSI card must be present.
•SCSI interface cable
The physical specifications of connector is complied with
SCSI-2.The 50 Pin Contact Shielded High-Density SCSI
Device Connector is used.
•SCSI card
The recommended SCSI card is noted on the following home
page.
http://imagescanner.fujitsu.com/
•When connecting the SCSI interface cable,
be sure to first connect the SCSI interface
cable then turn on the power of the scanner
and the personal computer.
•Connect the scanner so that it is the terminal
device on the SCSI daisy chain.
•The SCSI card and SCSI interface cable has
to be purchased separately.

26 2.3 Installing the Scanner Application
2.3 Installing the Scanner
Application
To enable scanning of documents on the scanner, the Scanner
driver (FUJITSU TWAIN32 scanner driver) and Image Capturing
Software Utilities “ScandAll 21” for Microsoft® Windows®
(ScandAll 21) must be installed on your PC.
For details on installing the FUJITSU TWAIN32 scanner driver and
Image Capturing Software Utilities “ScandAll 21” for Microsoft®
Windows® (ScandAll 21) , refer to the fi-4220C Quick Installation
Guide.
For further details on installing the FUJITSU TWAIN32 scanner
driver, refer to the Scanner Utility for Microsoft
® Windows® User’s
Guide on the scanner driver CD-ROM.
•The scanner driver needs to be installed prior
to scanner application.
•You must install the scanner driver and all
software components in order to use the
Function No. display of the image scanner.

3.3 Scanning Documents 37
3
BASIC SCANNER OPERATIONS
The [Select Source] dialog box appears.
Select "FUJITSU fi-4120Cdj" (Windows® 95 and
WindowsNT® 4.0, select “FUJITSU TWAIN 32”) and click the
[Select] button.
4. Click the "display in scan preview screen" on the
tool bar.
The [TWAIN Driver] dialog box (screen for setting the scan
conditions) appears.
5. Set the scan resolution, paper size and other
scan conditions, and click the [Scan] button.
For details on settings in the [TWAIN Driver] dialog box, refer
to the Scanner Utility for Microsoft
® Windows® User’s Guide
on the scanner driver CD-ROM.
Termékspecifikációk
| Márka: | Fujitsu |
| Kategória: | Scanner |
| Modell: | ScanPartner fi-4120C |
Szüksége van segítségre?
Ha segítségre van szüksége Fujitsu ScanPartner fi-4120C, tegyen fel kérdést alább, és más felhasználók válaszolnak Önnek
Útmutatók Scanner Fujitsu

11 Október 2024
12 Augusztus 2024
4 Augusztus 2024
3 Augusztus 2024
3 Augusztus 2024
2 Augusztus 2024
29 Július 2024
28 Július 2024
27 Július 2024
26 Július 2024
Útmutatók Scanner
- Scanner Braun
- Scanner Nedis
- Scanner SilverCrest
- Scanner Panasonic
- Scanner Canon
- Scanner HP
- Scanner Voltcraft
- Scanner Medion
- Scanner Zebra
- Scanner Xerox
- Scanner Technaxx
- Scanner Ricoh
- Scanner Eurolite
- Scanner Epson
- Scanner Rollei
- Scanner Renkforce
- Scanner Brother
- Scanner Kodak
- Scanner Nikon
- Scanner Cobra
- Scanner Albrecht
- Scanner Antec
- Scanner ICarsoft
- Scanner Dymo
- Scanner Konica Minolta
- Scanner Kogan
- Scanner Honeywell
- Scanner AgfaPhoto
- Scanner ION
- Scanner Sagem
- Scanner Jay-Tech
- Scanner Trust
- Scanner Konig
- Scanner GlobalTronics
- Scanner Visioneer
- Scanner Lenco
- Scanner Uniden
- Scanner Newland
- Scanner Martin
- Scanner Panduit
- Scanner Genius
- Scanner Ipevo
- Scanner Microtek
- Scanner Neat
- Scanner Elmo
- Scanner Avision
- Scanner Reflecta
- Scanner Tevion
- Scanner Targus
- Scanner Easypix
- Scanner Kensington
- Scanner Maginon
- Scanner AVerMedia
- Scanner Steren
- Scanner Lexmark
- Scanner Minolta
- Scanner Veho
- Scanner Dnt
- Scanner Hella
- Scanner Rittz
- Scanner Jobo
- Scanner Plustek
- Scanner Zolid
- Scanner Traveler
- Scanner Mustek
- Scanner RadioShack
- Scanner Kenko
- Scanner Yupiteru
- Scanner Vupoint Solutions
- Scanner DTRONIC
- Scanner Ross-Tech
- Scanner DENSO
- Scanner Perfect Choice
- Scanner IRIS
- Scanner CDVI
- Scanner Scan Dimension
- Scanner Dyka
- Scanner Matter And Form
- Scanner Pacific Image
- Scanner Doxie
- Scanner CZUR
- Scanner Cartrend
- Scanner 3DMAKERPRO
- Scanner Ambir
Legújabb útmutatók Scanner

30 Március 2025
13 Január 2025
12 Január 2025
12 Január 2025
11 Január 2025
31 December 2025
30 December 2025
23 December 2024

15 December 2024

15 December 2024