Használati útmutató Ernitec Wolf Pro
Ernitec
Térfigyelő kamera
Wolf Pro
Olvassa el alább 📖 a magyar nyelvű használati útmutatót Ernitec Wolf Pro (4 oldal) a Térfigyelő kamera kategóriában. Ezt az útmutatót 4 ember találta hasznosnak és 2 felhasználó értékelte átlagosan 4.5 csillagra
Oldal 1/4

Special Announcement
, For more information please refer to website.
Fully understand this document before using this device, and
strictly o bserve ru les in this document w hen using t his devic e. If
you install this dev ice in public places, provide the tip "You have
entered the area of el ectroni c surveil lance" in a n eye-catching
place. Fa ilure to correctly use electrical products may cause fire
and severe injurie s.
It alerts you to moderate dangers which, if not
avoided , may cause minor or moderate injuries.
It alerts you to risks. Neglect of these risks may
cause devic e damage, data loss, device
perform ance dete rioration, or unpredictable result s.
It provides additi onal information.
ŸStrictly o bserve i nstallation requi rements when installing the
device. The manufacturer shall n ot be held responsib le for
device damage caus ed by users ' non-con formanc e to these
require ments.
ŸStrictl y conform to local electrical sa fety standards and u se
power adapters that are marked with the LPS standard when
install ing and usi ng this dev ice. Otherwise, this device m ay be
damaged.
ŸUse accessories delivered w ith this device. The volt age must
meet inpu t voltage requirements for this device.
ŸIf this devi ce is insta lled in pl aces with un steady voltage, ground
this device to disch arge high energy suc h as electrical surg es in
order to prevent the p ower supp ly from burning out.
ŸWhen this d evice is in u se, ensure t hat no wate r or any liquid
flows int o the devic e. If water or liquid unexpecte dly flows into
the devic e, immediately pow er off the devic e and disconnect all
cables (such as powe r cables and network cables) from this
device.
ŸDo not focu s strong li ght (such as lighted bu lbs or sunl ight) on
ŸAv oid heavy loads, intensive shakes, and s oaking to prevent
damages during transporta tion and s torage. The warranty does
not cover a ny device d amage that is caused d uring sec ondary
packagi ng and transportation after the original packaging is
taken apart.
ŸProtect this device f rom fall-down and i ntensiv e strikes, k eep the
device away from mag netic field interference, and do not ins tall
the devic e in places w ith shaki ng surfac es or under s hocks.
ŸClean the d evice wit h a soft dry cl oth. For stubborn di rt, dip the
cloth int o slight ne utral cleanser, g ently wipe the dirt with the
cloth, an d then dry the device.
ŸDo not jam the ventilation open ing. Foll ow the installatio n
instruc tions provided in th is documen t when installing the device.
ŸKeep the device away from heat sou rces such a s radiato rs,
electric heaters , or other heat equipme nt.
ŸKeep the device away from moist , dusty, extremely hot or cold
places, or places with strong e lectric radiation.
ŸIf the devi ce is installed outdoors, take i nsect- an d moisture-
proof measures to av oid circu it board corrosion that can affect
monitoring.
ŸRemove th e power plug if the devi ce is idle fo r a long time .
ŸBefore unpacking , check whe ther the fragile sti cker is dam aged.
If the fragile sticker is damaged, contac t custome r services or
sales personnel. The manufacturer shall n ot be held responsible
for any artificial damage of the fragile sticker.
ŸAll compl ete produ cts sold by t he manufa cturer are delivered
along with nameplates, quic k setup gui de and acce ssories a fter
strict inspection. The manufacturer shall not be held respons ible
for counterfeit products.
ŸThe manufacturer will update this manual accordi ng to product
functio n enhancement or cha nges and re gularly update the
software and hardw are described in this manual. Update
information will be added to new version s of this man ual without
prior notice.
ŸThis manual may contain mispr ints, tech nology information that
is not accurate enou gh, or prod uct functi on and ope ration
descrip tion that is slightl y inconsistent with the actual product,
the final i nterpretation of c ompany is as a standard.
ŸThis manual is only for reference and does n ot ensure that the
information is totally consistent with the actual product. For
consiste ncy, see the actual product.
Precautions
Open the package, check the appearance of product f or no
obvious damage, and confirm the item list for table 1-1 is
consistent.
Table 1 1- Pack ing list
2.1 Device Ports
Component
Quantity
Remark
Eyeball Network Camera
1
Quick Set up Guide
1
Accesso ry package 1
Locatio n sticker 1
Different devices may have different ports, multi-head cables, and
fill lights; Please refer to the actual product.
Figure 2 1- Hardware ports
Long press the reset button for 5s to restore
the original setti ngs.
1
ID Port Name
Table 2-1 Hard ware ports descrip tion
CVBS video
out
Output an analog vid eo signal . Yo u can
connect the camera to a TV mo nitor through
this port t o view the an alog video.
Descrip tion
NOTE
NOTE
NOTE
this device. Otherwise, the s ervice li fe of the ima ge sensor may
be shortened.
ŸIf this dev ice is insta lled in pl aces wher e thunder a nd lightn ing
frequen tly occur, ground the device nearby to disc harge high
energy such as thunder strikes in order to prevent device
damage.
Reset button
2
3
SD card slot Install a SD card.
NOTE
ŸBefore installing a SD card, make sure the
card not in write protection state.
ŸBefore removing the SD card. make su re
the card not in write protection state.
Otherwise, the data may be lost ,or the SD
card may be damaged.
CAUT ION
WARNING
WARNING
CAUT ION
Open Package Examination
1
Device Structure
2
Reset b utton
SD card slot
CVBS video out
Fill light s ettings
Camera’s fil l light has four modes , they are intellige nt dual light (
current fill light w ill switc h to warm lig ht after an a larm is triggered,
and will switch back t o the original fill light for 30s a fter the al ert is
released.), warm l ight, infrared lam p and none (Close the fill light
and the col or of image w ill stay in p revious mode).
The different cameras c an be set different fill li ght modes , please
set fill li ght modes accordin g to the actual scene.
Day mode: I t can be used in the scene with sufficient ambien t light
fo r 24 hours, d o not turn on the fill lig ht, and the image is in color.
Night mode: it can be used in the scen e where the re is insuffic ient
ambient l ight for 24 hours, turn on the fill l ight (it can be selected
accordi ng to the fou r modes of the fill light).
Auto mode: Automatic ally switch the fill l ight mode according to
the lumin ance of the environment.
Timing mode: S et the start and end tim e of the day, this time
period is d ay mode for c amera.
2 2 Camer a Dimensions.
Figure 2-4 Dimensions Unit: m m
Different devices may have different dimensions; Please refer to
the actual product.
NOTE
φ128
3xφ4.5
120°
120°
φ140
119.24
φ100
1
2
3(Some models
may not have)
Reset
Power
Figure2 2- Multi- head cable 1
Figure 2 3- Multi-head cable 2
Reset
P ro t
2
3
4
5
6
IN
OUT
GG
(Some models may not have)
Table 2-2 Multi-head cable 1 description
1
Table 2-3 Multi-head cable 2 description
ID
Core
Descrip tion
Remark
1
Network
access
interfa ce
Connect to a standard Ethernet
cable or PoE. The green light is on,
the network connection is normal;
The yellow light flashes when the
data is transmitted. Some models
maybe not have the lights; Please
refer to the actual product.
Support PoE
supply.
2
Audio output
Connect t o an external audio
device such as a speak er.
Applied for
camera with
audio
function
3
Audio inp ut
port
Receive an analog audio signa l
from devices such as a sound
pickup device.
4
Power sup ply
(DC 12V)
Connect t o a 12V direct current
(DC) powe r supply.
5
Reset button
Long press the reset button for 5s
to restore the original setti ngs.
Applied for
some models
6
G
Alarm output COM
Applied for
alarm
function
OUT
Alarm output
G
Alarm inp ut COM
IN
Alarm inp ut
2
1Network
access
interfa ce
Connects to a standard Ethernet cabl e or
PoE. The g reen light is on, the network
connection is normal; The yellow light
flashes when the data is transmitted.
Some models maybe not have the lights;
Please refer to the actual product.
Support
PoE
supply.
Connects to a 12V dire ct curren t (DC
)
power supply.
ID Core Descrip tion Remark
3Reset button
Power sup ply
(DC 12V)
Long press the reset button for 5s to
restore the origin al settings.
Wolf Pro Network Camera
5MP Vari-Focal Lens with IR
Quick Setup Guide
Item no.: 0070-08113

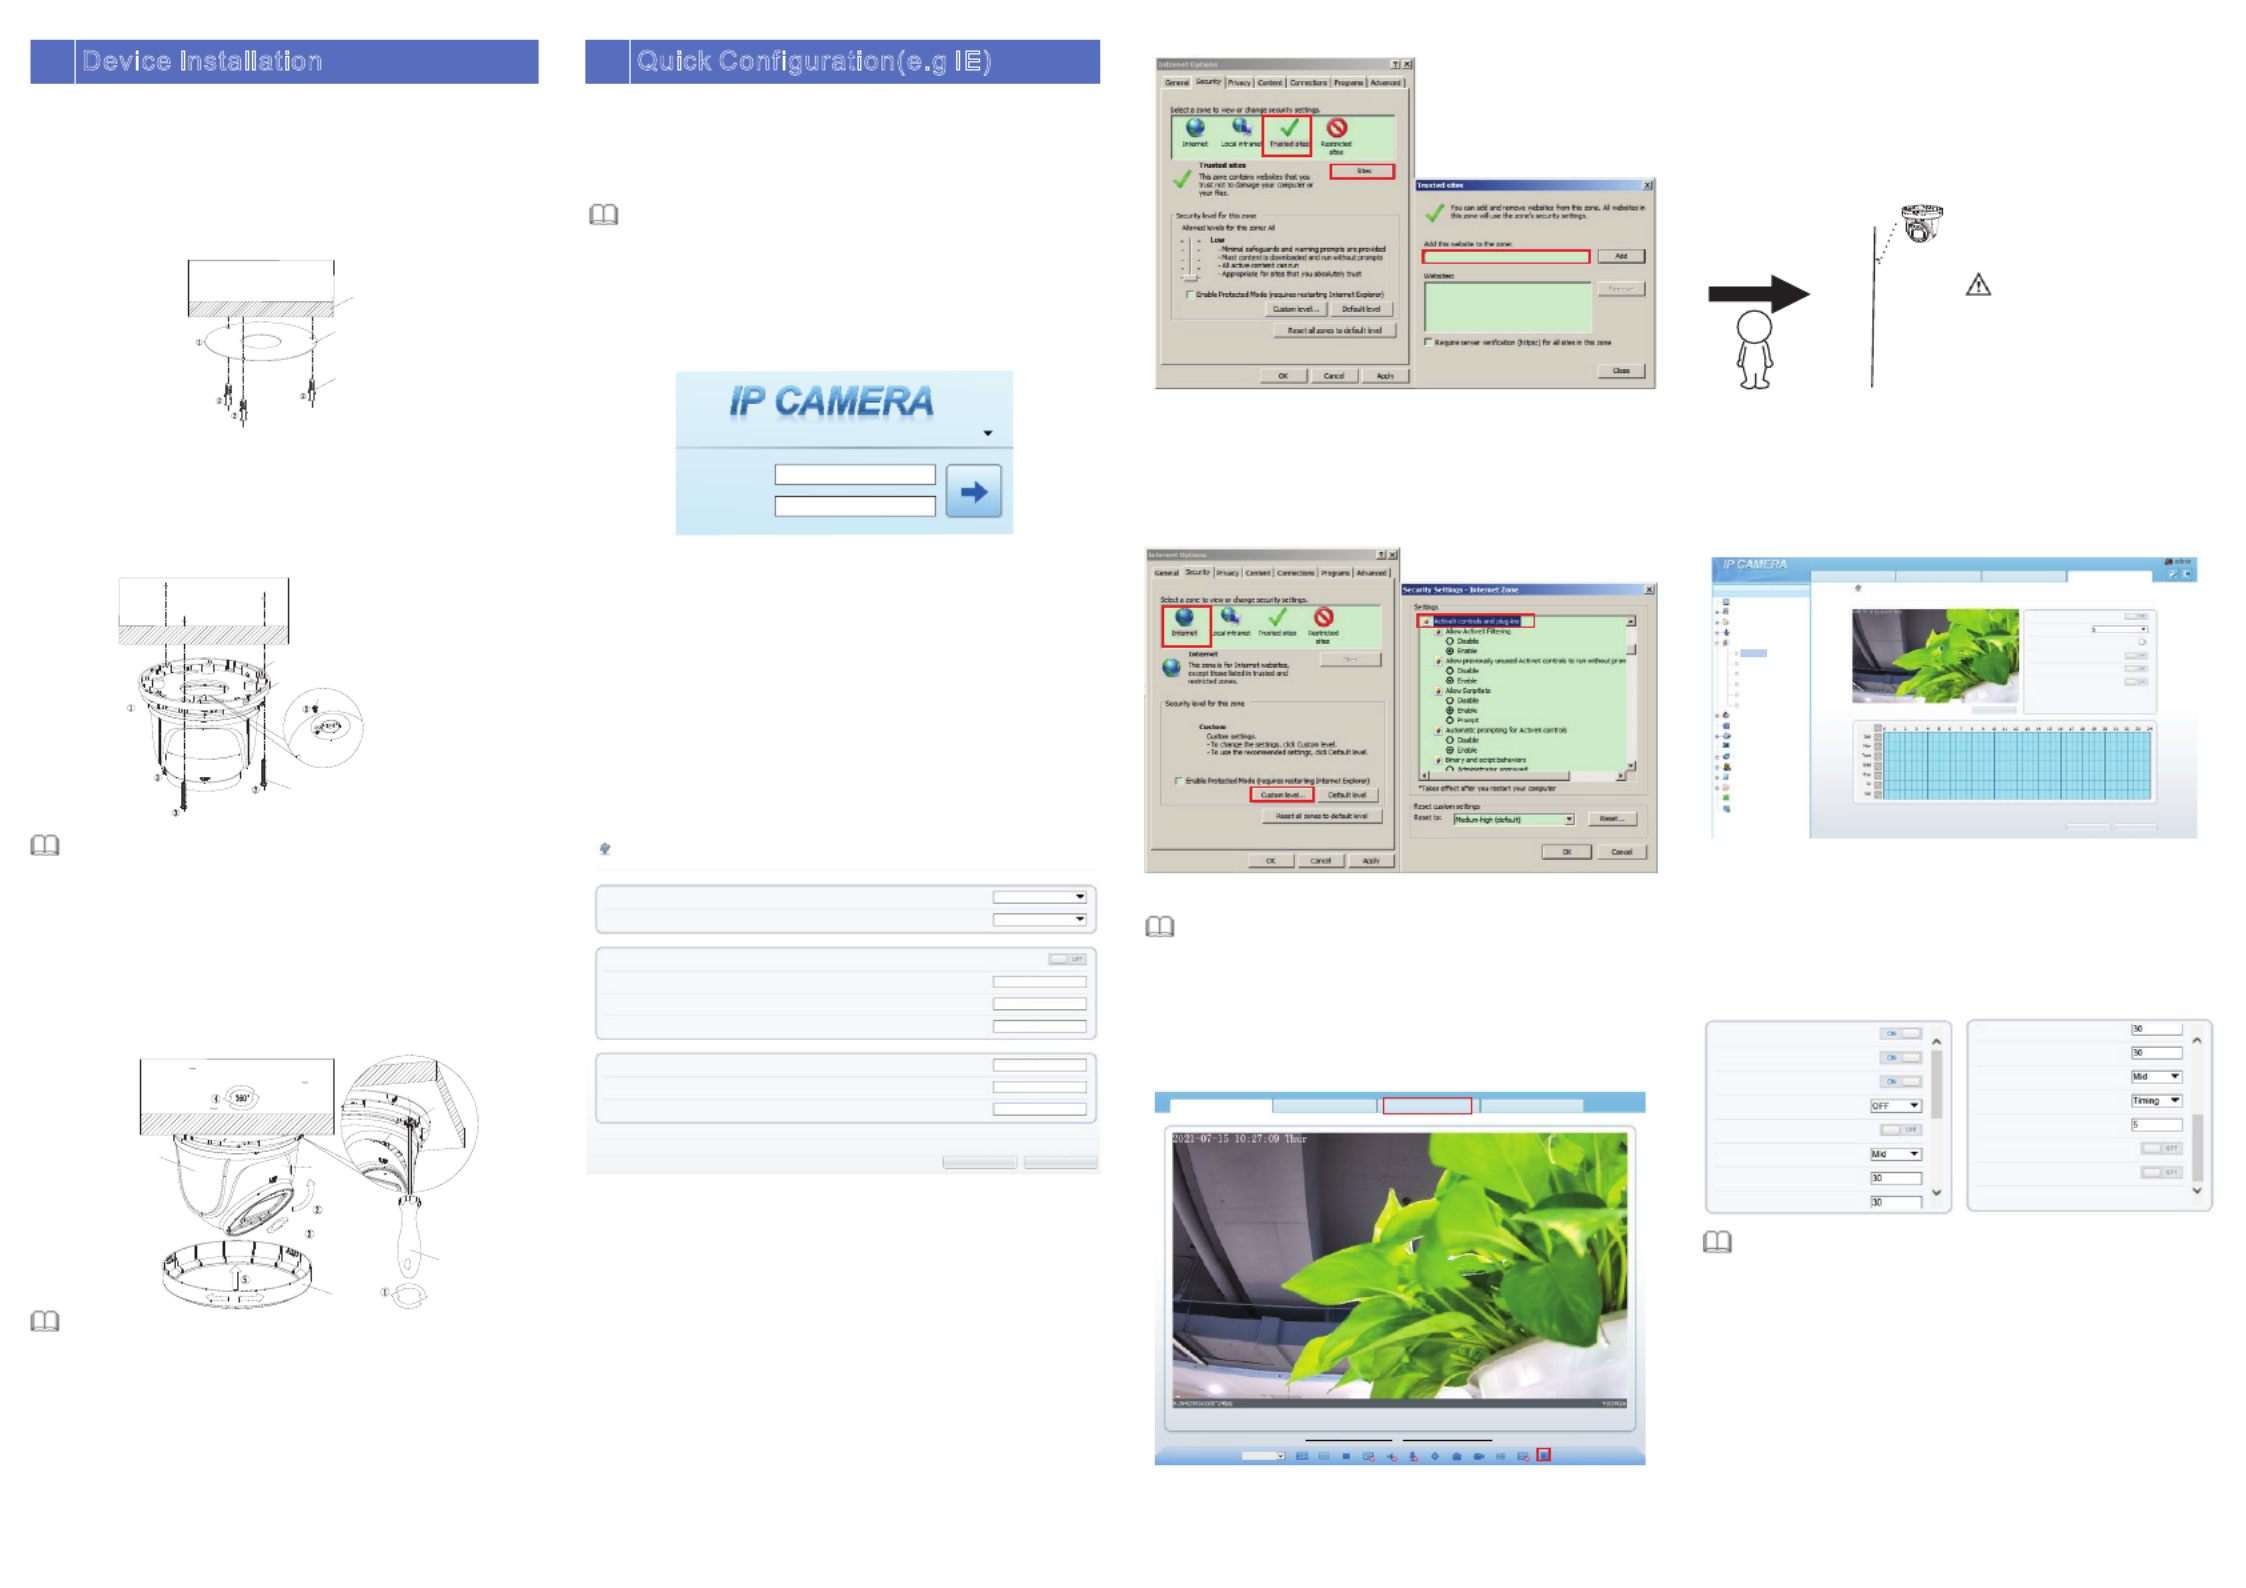
4.3 Browsing Video
To ensure the real-time video can be played properly, you must
perform the following operation when you log in the web for the first
time:
If user can access the web immediately please ignore the of , steps
adding sites trusted .
Figure 4 3 - Adding a trusted site
Step 2 In the Internet Explorer, choose Tool Internet Options > >
Security > Customer level, and set Download unsigned
ActiveX control and initialize and script ActiveX controls not
marked as safe for scripting under ActiveX controls and
plug-ins to Enable, as shown in figure 4-4.
Step 3 Download and install the player control as prompted.
If the repair tips displayed when installing the control, please
ignore the prompt, and continue the installation, the login page is
displayed when the control is loaded.
Step 1 the Internet Explorer. Choose Tools Internet options > >
Security T > rusted sites > , in the display dialog box, click Sites
Add, as shown in figure 4-3.
To browse a real-time video, click Live Video. The Live Vide o
page is displayed, as shown in figure 4-5.
Figure 4 5 - Live Video
Figure 4 4- Configuring ActiveX control and plug-in
NOTE
4.1 Login
Step 1 Open the Internet Explorer, enter the IP address of IP camera
(default value: 192.168.0.120) in the address box, and press
Enter. The login page is displayed as shown in figure 4-1.
Step Input the user name and password.2
Ÿ The default user name is admin. The default password is admin. Modify
the password when user logs into the system for first time to ensure
system security.
Ÿ It is advised to restart the device three minutes later after modifying
password to ensure modified successfully
Ÿ You can change the system display language on the login page.
NOTE
Step3 Click Login, the main page is displayed.
4.2 Modify IP address
Choose , the Configuration > Device > Local Network Local
Network page is displayed.
Enter the IP address in the IP Address box and click as shown Apply
in figure 4-2.
After the IP address is sett successfully, please use the new IP
address to log in the Web interface.
Figure 4 2 - Local Network
User Name
Password
English
Figure 4 1 - Login
Figure 3-1 Drill holes
Figure 3-2 Camera installation
Figure 3 3 - camera installation
Quick Configuration(e.g IE)
4
Installation Steps:
Step 1 Open the package, take out the camera, and disassemble
camera’s base.
Step 2 Stick the installation location sticker on the ceiling or wall,
drill three holes following the marks on the sticker. Push
the plastic anchors into the holes, as shown in figure 3-1.
3Device Installation
L c N w rko al et o
Netwo rk Card ID
IP Protocol
DHCP
IP Add res s
Subnet Mask
Default Gatew ay
Preferr ed D NS Serv er
Alternate DNS Ser v er
MTU(12 0- 1500)8
Re esfr h Appl y
1
IP v4
19 2. 1 6 . 0. 12 08
25 5. 2 5 5. 25 5 . 0
19 2. 1 6 . 0. 18
19 2. 1 6 . 0. 18
19 2. 1 6 . 0. 28
15 00
ht tp :/ /1 92 .1 6 .0 .1 208
Li ve V id eo Pl ay ba ck Pe rs on ne l Co unt Co nf ig ur at io n
Not e: Activ eX is being used t o play liv e video n ow
Swi tch to VL C, then p lay the v ideo
Swi tch to Pl ugin, t hen pla y the vid eo
St ream
str eam 1
1
2
4.4 Intelligent Analysis
At Intelligent Analysis interface user can set the " > Configuration " ,
parameters of Perimeter Single Virtual Fence Double Virtual Fence , , ,
Multi Loiter Converse and Personnel Count as shown in 4 7 , , figure - .
Figure 4 7 - Intelligent Analysis
Li ve Vi deo Pl ayback Personnel Count Confi gu rat ion
Dev ice Inf o
Str eam
Dev ice
Ext ernal D evice
Int ellig ent Anal ysis
Per imete r
Sin gle Vir tua l Fence
Dou ble Virtua l Fence s
Mul ti Loit er
Con verse
Per sonne l Count
Ala rm
AI Mu ltiob ject
Dev ice Rec ord
Pri vacy Ma sking
Net work Se rvice
Pri vileg e Manag er
Pro tocol
Dev ice Log
Loc al Conf ig
Mai ntena nce
Pe rim eter
Ena ble
Sen sitiv ity
Out put Cha nnel
Ala rm Reco rd
SMT P
FTP U plo ad
Cle ar
Ref resh
App ly
Sun
4.5 AI Multi object
At “Configuration > AI Multi object” interface, user can enable face
detection, full body detection, vehicle detection, set the other
parameters of detection, as shown in figure 4- .8
Fac e De t ec tio n
Ful lbo dy Detectio n
Veh icl e D et ection
Display Trace In f o
Sh o w De tectio n Area
Con fi den ce Coe ff icient
Fa ce Pixel Min( 30-300)
Bo dy Pixel Min(30-300)
Bo dy Pixel Min(30-300)
Veh icl e P ixe l Min (3 0 -30 0)
Ima ge Ma tti ng Qu ali ty
Sn apsh ot Mode
Uploa d I ma ge In terval (1-1 0s)
FTP Upload Ima ge Mat tin g
FTP Upload Who le Image
Alg orith ms Libra ry Vers ion
Figure 4 8 - AI Multi-object
1 Personnel Count: User can query the data of personnel count,
through year, month, day. The statistics can be downloaded. The
data can be shown by line chart, histogram, list.
2 AI Live video: Click the icon to view the snapshots of human face
or license plate (click “Face” or “Plate” to switch ).
The bottom page will show the captured images of vehicle and
human .
A
B
Pedestrian direction
15°
If user requires higher accuracy
of personnel count, we
recommend the user to install
camera and draw the line
following a gure 4-6. s fi
Figure 4 6 - Installation of personnel count
CAUTION
Plastic a o snch r 3pc
Locat ion sticke r
Ce li ing
PM4 0 30 self tappin g screw 3pcs. * - *
GND scre w PM3 6MM *
Out line hole
Baseme nt
Step 3 Fix the camera mounting base to the ceiling (or wall) by
using self-tapping screws.
Step 4 Connected the multi-connector cable. If user want the
device be connect to GND, plug ground wire to the GND
screw and tighten it, the location of GND as show in figure.
Step 5 Fix the eyeball to base , as shown in figure 3-2.
You can route cables from the top or from side. If you use the top
routing method, drill a hole in the installation surface first. If you
use the side routing method, please cut the compression ring outlet
as shown in figure 3-2, and route the multi-head cable out from the
side gap at the bottom of the camera.
NOTE
Step 6 Rotate the main body, adjust the position so that the
camera faces the monitored area, then tighten the lock
steel panel with screws and fix the camera, as shown in
figure 3-3.
NOTE
The camera's monitoring angle can be adjusted by three-axis
rotation: Horizontal rotation, up and down rotation, axial rotation of
the lens, adjust the direction of the camera and aim the lens at the
target.
1 Use a Phillips screwdriver to loosen the screw which locks the
steel panel;
2 The hemisphere can rotate up and down range of 0 t 0°; o 8
3 the hemisphere can rotate left and right range of 0 to 360° ;
4 The ball lining can rotate 360° left and right;
5 After adjusting the angle, tighten the screws on the steel panel,
then install the decorative cover to the base along the direction as
shown in Figure 3-3.
80°
360°
Eyeba ll
Decorative
cover
Screw driver
Sc re w
Lo ck ste el pan el
Ball linin g
Ti ghte n
Loosen
NOTE
For better capture performance, it is recommended to use 6mm
focus length lens or above.
Termékspecifikációk
| Márka: | Ernitec |
| Kategória: | Térfigyelő kamera |
| Modell: | Wolf Pro |
Szüksége van segítségre?
Ha segítségre van szüksége Ernitec Wolf Pro, tegyen fel kérdést alább, és más felhasználók válaszolnak Önnek
Útmutatók Térfigyelő kamera Ernitec

1 Szeptember 2024
29 Augusztus 2024
20 Augusztus 2024
20 Augusztus 2024
20 Augusztus 2024
20 Augusztus 2024
19 Augusztus 2024
19 Augusztus 2024
18 Augusztus 2024
17 Augusztus 2024
Útmutatók Térfigyelő kamera
- Térfigyelő kamera Samsung
- Térfigyelő kamera Sony
- Térfigyelő kamera August
- Térfigyelő kamera Nedis
- Térfigyelő kamera Grundig
- Térfigyelő kamera Philips
- Térfigyelő kamera Pioneer
- Térfigyelő kamera Reolink
- Térfigyelő kamera Garmin
- Térfigyelő kamera Bosch
- Térfigyelő kamera Panasonic
- Térfigyelő kamera Canon
- Térfigyelő kamera JVC
- Térfigyelő kamera Evolveo
- Térfigyelő kamera Toshiba
- Térfigyelő kamera Ubiquiti Networks
- Térfigyelő kamera TP-Link
- Térfigyelő kamera Emos
- Térfigyelő kamera Motorola
- Térfigyelő kamera LogiLink
- Térfigyelő kamera Digitus
- Térfigyelő kamera Zebra
- Térfigyelő kamera Xiaomi
- Térfigyelő kamera TRENDnet
- Térfigyelő kamera EZVIZ
- Térfigyelő kamera Boss
- Térfigyelő kamera Crestron
- Térfigyelő kamera ORNO
- Térfigyelő kamera Strong
- Térfigyelő kamera Gigaset
- Térfigyelő kamera MEE Audio
- Térfigyelő kamera Conceptronic
- Térfigyelő kamera Thomson
- Térfigyelő kamera Technaxx
- Térfigyelő kamera Speco Technologies
- Térfigyelő kamera Ricoh
- Térfigyelő kamera Hikvision
- Térfigyelő kamera Netgear
- Térfigyelő kamera Asus
- Térfigyelő kamera Vtech
- Térfigyelő kamera Rollei
- Térfigyelő kamera Hama
- Térfigyelő kamera Mitsubishi
- Térfigyelő kamera Synology
- Térfigyelő kamera Avidsen
- Térfigyelő kamera Raymarine
- Térfigyelő kamera DSC
- Térfigyelő kamera Kodak
- Térfigyelő kamera Ring
- Térfigyelő kamera V-TAC
- Térfigyelő kamera ZyXEL
- Térfigyelő kamera Logitech
- Térfigyelő kamera Dahua Technology
- Térfigyelő kamera Withings
- Térfigyelő kamera Denver
- Térfigyelő kamera First Alert
- Térfigyelő kamera Minox
- Térfigyelő kamera Trevi
- Térfigyelő kamera DiO
- Térfigyelő kamera Planet
- Térfigyelő kamera Burg Wächter
- Térfigyelő kamera Tenda
- Térfigyelő kamera Qian
- Térfigyelő kamera Aluratek
- Térfigyelő kamera Extech
- Térfigyelő kamera Gembird
- Térfigyelő kamera Cisco
- Térfigyelő kamera Niceboy
- Térfigyelő kamera SPC
- Térfigyelő kamera Bea-fon
- Térfigyelő kamera Powerfix
- Térfigyelő kamera Edimax
- Térfigyelő kamera Eufy
- Térfigyelő kamera APC
- Térfigyelő kamera Overmax
- Térfigyelő kamera Lorex
- Térfigyelő kamera Foscam
- Térfigyelő kamera Manhattan
- Térfigyelő kamera Kogan
- Térfigyelő kamera Alecto
- Térfigyelő kamera Honeywell
- Térfigyelő kamera EnGenius
- Térfigyelő kamera Imou
- Térfigyelő kamera Marshall
- Térfigyelő kamera Acme
- Térfigyelő kamera Furrion
- Térfigyelő kamera Velleman
- Térfigyelő kamera Western Digital
- Térfigyelő kamera Grandstream
- Térfigyelő kamera D-Link
- Térfigyelő kamera Avanti
- Térfigyelő kamera Milesight
- Térfigyelő kamera Monacor
- Térfigyelő kamera IDIS
- Térfigyelő kamera Epiphan
- Térfigyelő kamera ION
- Térfigyelő kamera Blaupunkt
- Térfigyelő kamera Chacon
- Térfigyelő kamera Elro
- Térfigyelő kamera GVI Security
- Térfigyelő kamera Moxa
- Térfigyelő kamera Olympia
- Térfigyelő kamera Delta Dore
- Térfigyelő kamera ZKTeco
- Térfigyelő kamera Abus
- Térfigyelő kamera Vivotek
- Térfigyelő kamera AG Neovo
- Térfigyelő kamera Arlo
- Térfigyelő kamera Trust
- Térfigyelő kamera Konig
- Térfigyelő kamera Marmitek
- Térfigyelő kamera Stabo
- Térfigyelő kamera Pyle
- Térfigyelő kamera Lumens
- Térfigyelő kamera AVer
- Térfigyelő kamera AVMATRIX
- Térfigyelő kamera Sanyo
- Térfigyelő kamera DataVideo
- Térfigyelő kamera CRUX
- Térfigyelő kamera Atlona
- Térfigyelő kamera Schneider
- Térfigyelő kamera Lindy
- Térfigyelő kamera Uniden
- Térfigyelő kamera Quantum
- Térfigyelő kamera Marshall Electronics
- Térfigyelő kamera Trebs
- Térfigyelő kamera M-e
- Térfigyelő kamera Provision-ISR
- Térfigyelő kamera Somfy
- Térfigyelő kamera AViPAS
- Térfigyelő kamera Axis
- Térfigyelő kamera Brilliant
- Térfigyelő kamera Orion
- Térfigyelő kamera EverFocus
- Térfigyelő kamera SereneLife
- Térfigyelő kamera I3International
- Térfigyelő kamera Equip
- Térfigyelő kamera Genius
- Térfigyelő kamera Valueline
- Térfigyelő kamera Swann
- Térfigyelő kamera Adj
- Térfigyelő kamera Anker
- Térfigyelő kamera Genie
- Térfigyelő kamera Petcube
- Térfigyelő kamera ClearView
- Térfigyelő kamera Sitecom
- Térfigyelő kamera ACTi
- Térfigyelő kamera Schwaiger
- Térfigyelő kamera Elmo
- Térfigyelő kamera Vitek
- Térfigyelő kamera Alfatron
- Térfigyelő kamera Laserliner
- Térfigyelő kamera Smartwares
- Térfigyelő kamera REVO
- Térfigyelő kamera Belkin
- Térfigyelő kamera KJB Security Products
- Térfigyelő kamera Kramer
- Térfigyelő kamera BZBGear
- Térfigyelő kamera BirdDog
- Térfigyelő kamera Allnet
- Térfigyelő kamera Aldi
- Térfigyelő kamera Airlive
- Térfigyelő kamera Aritech
- Térfigyelő kamera Flamingo
- Térfigyelő kamera Yale
- Térfigyelő kamera Caliber
- Térfigyelő kamera Eminent
- Térfigyelő kamera Exibel
- Térfigyelő kamera Fortinet
- Térfigyelő kamera KlikaanKlikuit
- Térfigyelő kamera Maginon
- Térfigyelő kamera Profile
- Térfigyelő kamera Marquant
- Térfigyelő kamera Ednet
- Térfigyelő kamera AVerMedia
- Térfigyelő kamera Steren
- Térfigyelő kamera Perel
- Térfigyelő kamera Flir
- Térfigyelő kamera Netis
- Térfigyelő kamera Buffalo
- Térfigyelő kamera GeoVision
- Térfigyelő kamera Nest
- Térfigyelő kamera LevelOne
- Térfigyelő kamera Siedle
- Térfigyelő kamera Hive
- Térfigyelő kamera Netatmo
- Térfigyelő kamera Switel
- Térfigyelő kamera InFocus
- Térfigyelő kamera Hombli
- Térfigyelő kamera Clas Ohlson
- Térfigyelő kamera Naxa
- Térfigyelő kamera BRK
- Térfigyelő kamera EVE
- Térfigyelő kamera Waeco
- Térfigyelő kamera QSC
- Térfigyelő kamera Xavax
- Térfigyelő kamera Vaddio
- Térfigyelő kamera Gira
- Térfigyelő kamera Jung
- Térfigyelő kamera Interlogix
- Térfigyelő kamera Boyo
- Térfigyelő kamera IC Intracom
- Térfigyelő kamera Adesso
- Térfigyelő kamera Satel
- Térfigyelő kamera POSline
- Térfigyelő kamera Notifier
- Térfigyelő kamera Hawking Technologies
- Térfigyelő kamera Lanberg
- Térfigyelő kamera Friedland
- Térfigyelő kamera Nexxt
- Térfigyelő kamera Monoprice
- Térfigyelő kamera Watec
- Térfigyelő kamera Beafon
- Térfigyelő kamera Chuango
- Térfigyelő kamera ETiger
- Térfigyelő kamera Videcon
- Térfigyelő kamera INSTAR
- Térfigyelő kamera Advantech
- Térfigyelő kamera Digital Watchdog
- Térfigyelő kamera Ferguson
- Térfigyelő kamera Ganz
- Térfigyelő kamera Kwikset
- Térfigyelő kamera Intellinet
- Térfigyelő kamera ClearOne
- Térfigyelő kamera Ebode
- Térfigyelő kamera Oplink
- Térfigyelő kamera Kerbl
- Térfigyelő kamera Dorr
- Térfigyelő kamera Sonic Alert
- Térfigyelő kamera Linear PRO Access
- Térfigyelő kamera Summer Infant
- Térfigyelő kamera SMC
- Térfigyelő kamera Topica
- Térfigyelő kamera Iiquu
- Térfigyelő kamera Verint
- Térfigyelő kamera Brinno
- Térfigyelő kamera Rostra
- Térfigyelő kamera Caddx
- Térfigyelő kamera Spyclops
- Térfigyelő kamera EKO
- Térfigyelő kamera Inovonics
- Térfigyelő kamera Kguard
- Térfigyelő kamera Woonveilig
- Térfigyelő kamera Mobi
- Térfigyelő kamera Surveon
- Térfigyelő kamera Hollyland
- Térfigyelő kamera Epcom
- Térfigyelő kamera Indexa
- Térfigyelő kamera Lutec
- Térfigyelő kamera Whistler
- Térfigyelő kamera Hanwha
- Térfigyelő kamera VideoComm
- Térfigyelő kamera IMILAB
- Térfigyelő kamera 3xLOGIC
- Térfigyelő kamera Pelco
- Térfigyelő kamera Leviton
- Térfigyelő kamera EtiamPro
- Térfigyelő kamera Inkovideo
- Térfigyelő kamera Pentatech
- Térfigyelő kamera Weldex
- Térfigyelő kamera SecurityMan
- Térfigyelő kamera Canyon
- Térfigyelő kamera CNB Technology
- Térfigyelő kamera Tapo
- Térfigyelő kamera Aigis
- Térfigyelő kamera Exacq
- Térfigyelő kamera Brickcom
- Térfigyelő kamera Laxihub
- Térfigyelő kamera Securetech
- Térfigyelő kamera EFB Elektronik
- Térfigyelő kamera NetMedia
- Térfigyelő kamera Videotec
- Térfigyelő kamera Illustra
- Térfigyelő kamera Nivian
- Térfigyelő kamera Arenti
- Térfigyelő kamera E-bench
- Térfigyelő kamera Blow
- Térfigyelő kamera Syscom
- Térfigyelő kamera Tecno
- Térfigyelő kamera Night Owl
- Térfigyelő kamera Guardzilla
- Térfigyelő kamera Astak
- Térfigyelő kamera Blink
- Térfigyelő kamera Milestone Systems
- Térfigyelő kamera Zavio
- Térfigyelő kamera Campark
- Térfigyelő kamera IPX
- Térfigyelő kamera Dedicated Micros
- Térfigyelő kamera Hamlet
- Térfigyelő kamera Annke
- Térfigyelő kamera AVTech
- Térfigyelő kamera Qoltec
- Térfigyelő kamera Approx
- Térfigyelő kamera Digimerge
- Térfigyelő kamera Y-cam
- Térfigyelő kamera Feelworld
- Térfigyelő kamera Wisenet
- Térfigyelő kamera WyreStorm
- Térfigyelő kamera Infortrend
- Térfigyelő kamera HiLook
- Térfigyelő kamera Mach Power
- Térfigyelő kamera Compro
- Térfigyelő kamera Aida
- Térfigyelő kamera Ikegami
- Térfigyelő kamera Accsoon
- Térfigyelő kamera Vimtag
- Térfigyelő kamera Sonoff
- Térfigyelő kamera Gewiss
- Térfigyelő kamera Alula
- Térfigyelő kamera Insteon
- Térfigyelő kamera Costar
- Térfigyelő kamera ALC
- Térfigyelő kamera Security Labs
- Térfigyelő kamera Comtrend
- Térfigyelő kamera Seneca
- Térfigyelő kamera Avigilon
- Térfigyelő kamera American Dynamics
- Térfigyelő kamera Vosker
- Térfigyelő kamera Sentry360
- Térfigyelő kamera Owltron
- Térfigyelő kamera Enabot
- Térfigyelő kamera Luis Energy
- Térfigyelő kamera Sir Gawain
- Térfigyelő kamera VisorTech
- Térfigyelő kamera Atlantis Land
- Térfigyelő kamera B & S Technology
- Térfigyelő kamera Promise Technology
- Térfigyelő kamera Ecobee
- Térfigyelő kamera Turing
- Térfigyelő kamera Wasserstein
- Térfigyelő kamera Qolsys
- Térfigyelő kamera HuddleCamHD
- Térfigyelő kamera Setti+
- Térfigyelő kamera Defender
- Térfigyelő kamera Mobotix
- Térfigyelő kamera IOIO
- Térfigyelő kamera BIRDFY
- Térfigyelő kamera I-PRO
- Térfigyelő kamera DVDO
- Térfigyelő kamera TCP
- Térfigyelő kamera Bolin Technology
- Térfigyelő kamera Nextech
Legújabb útmutatók Térfigyelő kamera

6 Április 2025
5 Április 2025
5 Április 2025
15 Január 2025

14 Január 2025
13 Január 2025
13 Január 2025
13 Január 2025
13 Január 2025
13 Január 2025